
Chapter 2. Security
Hacks 11-21
This chapter describes how to change the default security arrangements in Firefox. Security is a big subject, and it has plenty of baggage all of its own. One person’s safety is another’s prison. One person’s privacy is another person’s isolation. Changing security options amounts to changing who you are or aren’t willing to deal with. It also amounts to deciding how much you’re willing to let third parties know when you’re browsing the Web.
When you install Firefox, the default security settings give you a safe web browser. It is quite hard to create large holes by accidentally changing options. Firefox has also been closely inspected for internal problems. As a result, the browser and its underlying Mozilla technology have an excellent security track record. Rarely is a new security problem uncovered. When that happens, it is usually fixed within a day. The Firefox Update Manager informs you of new security patches, if any are made available.
If you don’t care about security at all, you can simply remove many of the hurdles that Firefox puts in your way. Security is a complex matter, though. Sometimes, doing away with security means just that: leaving the browser’s resources open to any exploitation. Some security regimes, however, don’t give you that option. In such cases, the best you can do is reply “I don’t care” every time you’re engaged over security. There are even rare cases in which there’s nothing at all that you can do to escape security limitations. It’s a case-by-case environment.
Security concerns and installation processes are two related but different things. This chapter discusses security only. Chapter 3 describes gritty modifications to the Firefox install process. Chapter 7 and Chapter 8 describe a form of programming that’s also a blend of installation and security. See those chapters to go further with the chrome.
Drop Miscellaneous Security Blocks
If your computing environment is secure, then Firefox’s own security is of limited use.
To systematically address every single security restriction, you’ll have to read all the hacks in this chapter; it’s just too complex for one hack. This hack describes many common quick fixes. You might also want to read [Hack #7] .
Supply Passwords Automatically
You don’t need to constantly reassert your login credentials; you can get Firefox to do it for you. NTLM and dial-up passwords are described in [Hack #14] and [Hack #26] respectively; here, we cover web form passwords and cookies.
The Password Manager is turned on automatically when Firefox starts; all you get is a first-time warning when you use it. Setting a master password serves no purpose if you’re trying to defeat security, so the Password Manager saves you that hassle by default. You can stop the remembered passwords from ever expiring by setting this preference:
security.password_lifetime /* set to 0 (days), default is 30 (days) */
Session IDs are like passwords: they’re sent by web sites that want to keep track of you as you move between web pages. Usually they’re stored as cookies : the correct jargon for web-based session IDs. Cookies are sent between Firefox and the web server as a simple string of plain text in a special HTTP header line. If you have an extension installed that’s an HTTP header diagnostic [Hack #51] , you can see cookies go to and fro. Firefox has cookie support turned on by default. If you want to configure cookie processing explicitly, use these preferences:
network.cookie.alwaysAcceptSessionCookies /* set to true */
network.cookie.cookieBehavior             /* set to 0 = Accept All */
network.cookie.lifetimePolicy             /* set to 0 = until expiry */
The following preferences are bits of rubbish left over from attempts to migrate from an old Mozilla or Netscape version to Firefox and should be ignored:
network.cookie.lifetime.enabled
network.cookie.lifetime.behavior
Allow Foreign Code to Run
One of the great challenges of the Web is the existence of untrusted downloadable code. With the exception of sandboxed Java applets and properly authenticated code bundles, such things are almost certainly insecure. Firefox won’t accept them by default, but you can turn support back on.
Turn on ActiveX
One way to do so is to reignite the native ActiveX support inside the Microsoft Windows port of Mozilla (and therefore Firefox). To turn absolutely everything on and make everything scriptable—even those ActiveX controls flagged as “do not script me”—set these preferences:
security.class.allowByDefault                   /* true (default)     */
security.xpconnect.activex.global.hosting_flags /* 31 = bits 00011111 */
These affect the behavior of a bit of Mozilla that implements
the interface called nsIActiveXSecurityPolicy. For more on that
interface, look for a file named
nsIActiveXSecurityPolicy.idl at http://lxr.mozilla.org. If
the first of these preferences is set to false, ActiveX objects must be allowed or
disallowed on a case-by-case basis with preferences like
this:
capability.policy.default.ClassID.CIDclassid" /* set to "AllAccess" */In this example, classid must be a
UUID identifier for the ActiveX object, written in this
format:
6BF52A52-394A-11D3-B153-00C04F79FAA6
If objects marked “don’t script me” aren’t wanted, set the same preference this way:
security.xpconnect.activex.global.hosting_flags /* 15 = bits 00001111 */
Whatever hijinks Windows goes through to decide whether a COM object should be scriptable or not, Mozilla also goes through. That includes observing operating-system-maintained blacklists and so on.
To run such a control, use the HTML <OBJECT> or legacy <EMBED> tag that specifies the
control’s URL and class identifier. That’s the same as in Internet
Explorer.
Turn on more plug-in and helper support
Plug-ins are another form of foreign code. The following two security preferences make plug-in access a bit easier to deal with (the first is set by default):
security.xpconnect.plugin.unrestricted     /* true by default */
plugin.expose_full_path                    /* set to true */
Having Firefox pass control of a URL directly to the operating
system is a dangerous arrangement. For example, URLs prefixed with
the shell: scheme can be passed
to Windows (which has a poor track record of handling them
securely). To turn on that behavior, set this preference:
network.protocols.useSystemDefaults /* set to true */
For selective enablement of URL schemes, change the matching preference. All such preferences have this format:
network.protocol-handler.external.schemewhere scheme stands for the
particular scheme. So, for the shell: scheme, this is the right
setting:
network.protocol-handler.external.shell /* set to true */Of course, another way to activate code in a downloaded object is to associate its file type with a suitable application. That’s done at the operating-system level, though, not in Firefox. An example is associating Microsoft Excel files containing Visual Basic macros with the Excel program. Firefox will notice such configuration changes the next time it starts up.
Drop Browser Security Hobbles
When a web page displays, Firefox wraps it up inside some security restrictions. These are designed to prevent the page from taking over the user’s computer, which is most commonly attempted with pages that contain JavaScript scripts. Preferences allow you to drop some, but not all, of these restrictions. All of the preferences that begin with the following prefix control access to scriptable features of the DOM 0 web page object model:
dom.anythingType dom into the Filter box
in the about:config window to see them all. Set
most of them to true to re-enable
the matching feature. These preferences match checkbox features in the
Firefox Options dialog box in the Web Features panel.
A few of these preferences rate special mention. This one stops scripts from ever being aborted by Firefox:
dom.max_script_run_time /* set to 0 (seconds) or a big number */
Set to 0 (zero), no script
will ever be aborted. An infinitely running script can tie up the CPU,
which can in turn cause a denial-of-service attack, preventing the
user from controlling the browser. Better to choose a very big number,
just in case.
This next preference turns off limits on pop-up-window generation:
dom.popup_maximum /* set to 0 popups or a big number */
Finally, this preference makes all JavaScript events available in modal pop-up windows:
user_pref("dom.popup_allowed_events", "mousedown mouseup click dblclick mouseover
mouseout mousemove contextmenu keydown keyup keypress focus blur load beforeunload
unload abort error submit reset change select input paint text popupshowing
popupshown popuphiding popuphidden close command croadcast commandupdate
dragenter dragover dragexit dragdrop draggesture resize scroll overflow
underflow overflowchanged DOMSubtreeModified DOMNodeInserted
DOMNodeRemoved DOMNodeRemovedFromDocument DOMNodeInsertedIntoDocument
DOMAttrModified DOMCharacterDataModified popupBlocked DOMActivate DOMFocusIn
DOMFocusOut");
Tip
The example string shown here is excessive—just pick the events you’re interested in—but it serves to illustrate all DOM-like events that Firefox knows about.
Of all the security hobbles that Firefox enforces on web pages, there’s one that’s nearly impossible to remove: the creation of windows smaller than 100 100 pixels in size. The only way to do so is to use a fully trusted script, either one signed with a digital certificate or one installed in the chrome.
Remove Profile Salting
Firefox user profiles are salted: the names
of profile directories include randomly generated directory
names, such as f8p09nj2.slt. This is a security
measure designed to prevent hostile web sites from guessing the name
of your profile and then feeding Firefox data that might have security
cracks in it. It also makes administering and moving profiles harder
than it might otherwise be. You can remove these salted names by using
the -CreateProfile command-line
option and this dirty hack. Follow these steps, which create a dummy
profile located in C: mp est:
               mkdir C:	mp
               mkdir C:	mp	est
               echo "garbage" > c:	mp	estprefs.js
               firefox -CreateProfile "test c:	mp"
The echo command just creates
a file that Firefox will sense at startup time. That’s enough to fool
it into using the C: mp est directory as an
existing profile for the new profile named test.
Update Firefox Automatically
Set these preferences to ensure that Firefox, extensions, and themes are all updated without the user having to do anything:
extensions.update.autoUpdate            /* set to true */
extensions.update.severity.threshold    /* set to 0 (lowest severity) */
app.update.autoUpdateEnabled            /* set to true */
app.update.enabled                      /* set to true */
It’s also possible to automatically download configuration data [Hack #29] , proxy information [Hack #15] and certificate revocation lists [Hack #17] . None of those things require user intervention.
Raise Security to Protect Dummies
Set up Firefox for nontechnical people.
First of all, the Firefox product is designed with nontechnical people in mind. Most of its fancy features are hidden behind unusual key presses or buried in menus. From the beginning, it’s pretty safe and secure. For the dazed and disoriented, though, safety doesn’t just mean safe from web villains and privacy attacks; it also means being safe from confusion. Struggling users can easily harm themselves accidentally when confused, so that’s something to avoid. Here are some of the configuration changes that you can apply to make life safer for struggling users:
Turn on automated patch updating.
Turn off password and form auto-complete features.
Leave on standard caching options, so that pages are always fresh.
Change the default download directory to the desktop if the operating system is Linux.
Download language packs and plug-ins when you install, and turn off subsequent plug-in detection.
Configure the Popup Manager to accept pop-ups from web sites the user trusts, such as banks and finance companies, and then turn off the pop-up blocker alert bar so that it never appears.
To turn on automated patch updates, see [Hack #13] . Auto-complete features can be turned off in the Options panel. To change the default download directory on Linux, change the directory preference from something like this:
browser.download.defaultFolder /* was /home/nrm */
to this:
browser.download.defaultFolder /* to /home/nrm/Desktop */
which is the location of the desktop under GNOME 2.x.
If your mother is Italian or Chinese, you might need support for non-English web sites. To prepare any required language packs and plug-ins, the hard way to proceed is to rebundle Firefox with the needed packs included in the install bundle. That’s not recommended unless you plan on doing hundreds of installs. It’s massive extra preparation for a marginally faster install result.
The easy way is to prepare a set of bookmarks using your own installation of Firefox (or any browser). Surf to a sample web page written in each required language and bookmark it. Do the same thing with demo pages for each required plug-in. Once the bookmark set is collected, export the bookmarks or locate the file that holds them.
Usually, the bookmarks file looks like an HTML file. For Mozilla-based products, it’s in the user profile area. Take that file with you to the computer on which you’re installing Firefox. Install Firefox normally, and then choose Bookmarks→Bookmarks Manager. In the new window that appears, choose File→Import→From File, and then import your special bookmarks. Now they’re part of the bookmark set in Firefox. Surf to each bookmarked page, and you’ll be offered the extra files you need as each page appears, or else the yellow information bar will invite you to download missing pieces. Once you’ve accepted them all (this could be a slow process on a dial-up connection), your install is complete. Afterward, decommission the plug-in manager with these preferences:
application.use_ns_plugin_finder   /* false = default */
plugins.scan.4xPluginFolder        /* Set to false. Default = true */
plugins.scan.plid.all              /* Set to false. Default = true */
The first preference says, “Don’t use an old, backward-compatible plug-in system from the days of Netscape Communicator 4.x.” It would be a rare occasion when you would ever want to do that. The second preference says, “Don’t check old installations of Netscape Communicator for plug-ins.” Normally, Firefox will do that, just in case some old plug-ins are hanging around. The last preference says, “Don’t consult the Windows registry for suitable plug-ins.”
You can avoid a slow install process if you just note the language packs and plug-ins that are present in the user profile area in your own Firefox install. You can hand-copy them across to the new computer if you want. Just restart Firefox to see the plug-ins recognized.
Firefox knows about four common plug-ins: Adobe Acrobat Reader, Sun’s Java Runtime Environment (JRE), Apple QuickTime, and Windows Media Player. You can’t stop Firefox from being aware of these things, but by setting the following preferences, you can tell it that your current plug-in versions are so recent that it should never try to upgrade them:
plugin.scan.SunJRE                  /* Set to 99.0 */
plugin.scan.Acrobat                 /* Set to 99.0 */
plugin.scan.Quicktime               /* Set to 99.0 */
plugin.scan.WindowsMediaPlayer      /* Set to 99.0 */
The value for these preferences is a version string. If necessary,
it can be stated in four parts—e.g., 2.1.3.4, which is a specific build of Version
2.1. None of the well-known plug-ins are ever likely to reach Version
99, so 99 is a safe value to use.
Each value in the set of four numbers can go up to 255.
Stop All Secret Network Activity
Send packets across the Internet only when they come from user actions.
Firefox has a mind of its own. It sometimes connects to other computers across the Internet without asking you first. Not only is this a privacy issue, but it can also be awkward. For example, the browser might be installed on test equipment that is network-enabled only intermittently. If you are performing network diagnostics, that’s another time when you don’t want any unexpected chatter on the line. Finally, if you configuration-control all of your installed software, then you probably prefer that Firefox not upgrade itself automatically either. Here’s how to stop all of that stuff.
Stop Secret Updates
Firefox periodically (daily) checks the Mozilla Update web site (http://update.mozilla.org) to see what’s new. If there are critical patches, the home page displayed at startup is replaced with a warning page. If there are any patches at all, an icon appears on the menu bar. To turn off that functionality, set these preferences:
app.update.enabled             /* default is false */
app.update.autoUpdateEnabled   /* set to false. default = true */
The second preference stops Firefox from polling the web server to see if there’s anything new to report to the user.
These two additional preferences do the same job as the previous preferences, but they control update checks for extensions, plug-ins, and themes rather than checks for the core Firefox product:
extensions.update.enabled             /* default is false */
extensions.update.autoUpdateEnabled   /* set to false. default = true */
Firefox also performs trivial updates of site icons, the small icons that appear next to URLs. Generally, they provide brand marks for web sites. Figure 2-1 shows a browser window with three site icons marked out.
The Google site icon (the rightmost one) is retrieved from a local copy. The other two are drawn from their original web sites. That’s fine for the URL that the user typed into the Location bar, but if the Bookmarks toolbar contains a lot of bookmarks that have site icons, Firefox will download them from all over the place in order to make the toolbar look pretty. Site icons can also be downloaded if the sidebar is displayed. To turn off icon retrieval, set these preferences:
browser.chrome.site_icons /* set to false. default = true */
browser.chrome.favicons   /* set to false. default = true */
Configuration updates are another class of updates that Firefox might perform, if the browser is run under the following conditions. None of these occur in the standard install, but they’re all configurable options:
If web proxies are in place [Hack #15]
If there are custom configuration files [Hack #29]
If Certificate Revocation Lists (CRLs) or Online Certificate Status Protocol (OSCP) is configured [Hack #17]
There are also update issues that are separate from the main Firefox installation. You can never be sure what update behavior an extension or plug-in might introduce of its own accord. Extensions are free to contact any web site. If the extension comes from a trusted source, then a consumer review of the extension’s intent should suffice. If that’s not enough, the extension source code itself must be reviewed for use of any Mozilla XPCOM objects that are network-oriented.
Be particularly careful if an extension adds compiled libraries to the Firefox install. Such code can’t be trusted as is; you need to inspect its original source as well. If the compiled source is supplied with the extension, that is still not enough for trust, because the compiled files could have originated from other source. Trust only the provider, not the files.
Finally, the following preference has nothing to do with Firefox. It is used only by the Mozilla Application Suite’s Smart Browsing feature. If you see it, ignore it:
browser.related.autoload /* 0 = always, 1 = after first use, 2 = never */
Stop Secret Submissions
In all quality web browsers, an unsigned web page cannot submit an HTML form to a web site without the user being involved. There are many special cases that need to be avoided if this rule is to be enforced, and there’s no way to toggle checking for these cases on or off for an unsigned page.
Firefox, however, also supports submission to web sites using
SOAP, WSDL, and XML-RPC. A rule called the Same Origin
policy allows web pages to “phone home” to their server of
origin without asking the user. The only way to stop this activity is
to disable JavaScript access to the web page objects that provide
these services, and the only way to do that is to use capability-based
permissions [Hack #20] . Here’s an example that
disables the invoke() and asyncInvoke() methods of the SOAPCall object:
capability.policy.default.SOAPCall.invoke      /* set to "NoAccess" */
capability.policy.default.SOAPCall.invokeAsync /* set to "NoAccess" */
Such capability settings are required for each object that
offers a network-enabled call interface. So, as another example,
WebServiceProxyFactory.createProxy() and its
equivalents also require capability preferences.
A further, trivial example of secret submission is the use of cookies by a web site. If being tracked by a cookie bothers you, you can turn cookie support off this way:
network.cookie.cookieBehaviour /* set to 2 (none), default = 0 (all) */
Finally, there is the case of Java applets. Applets can “phone home” just as web services can. There’s no way to stop this, short of disabling Java entirely. You can disable specific ports [Hack #16] if you want.
As for the update case, you can never be sure what submission behavior an extension or plug-in might introduce.
Stop Not-So-Secret Background Downloads
If you’ve become addicted to tabbed browsing, you might spend a lot of time looking at one web page, while lots of other web pages are loaded into the tabs that are behind the current tab. The most convenient arrangement is to have those tabs load their pages while they’re still hidden. When you change tabs, it’s likely that the web page in the tab will be ready to view. This convenience is the default arrangement.
The convenience comes at a cost, though. If you maintain, say, five tabs, your demand for web page data is up to five times the demand of a single browser page. If all of those tabs are busy loading, then the front page will get only one-fifth of the share of the connection. So you might have to wait longer to view it. Furthermore, just by opening tabs, you demand more web page data from your ISP—the same amount as if you were opening five separate windows. In the case of tabs, though, people often open tabs just in case. That means extra download activity for content that’s not actually a high priority for the user. Some call that waste.
There are two preferences that will reduce the tab download burden on your Internet connection at the cost of convenience:
browser.tabs.loadInBackground            /* Set to false, default = true */
browser.tabs.loadBookmarksInBackground   /* false = default */
The first preference turns off URL loading for tabs that aren’t in front. If you change tabs, so that the current one is no longer displayed, the matching page for the new front tab will then start to load. The second preference has to do with bookmark groups. If you store a set of tabs as a bookmark group, you can recall all of those tabs with a single click. By default, those tabs won’t start to download, which is what you probably prefer.
There is currently no way to make the Download Manager back off and use only a smaller chunk of your Internet connection. So far, it will always grab all the bandwidth it can get. That means downloads are reasonably fast, but it also means that viewing web pages is always slowed down if downloading is going on.
Work with Single Sign-On Servers
If your web content is hidden behind a security regime, here’s how to get through.
This hack explains how to stop Firefox from prompting the user for already supplied login details. In other words, Firefox can be part of a single sign-on environment, where several servers, applications, and/or services share login details. Firefox understands several kinds of server requests for user credentials.
Single sign-on servers are usually found in an Intranet environment. They provide a method of controlling who can access remote servers and the services that they provide, and they can reduce user frustration. Such arrangements are not the same as Secure Socket Layer (SSL). Although SSL and Secure HTTP swap credentials with SSL-enabled servers, those kinds of credentials (digital certificates and digital signatures) are mostly organization-based, not user-based.
The good news is that single sign-on is a no-brainer in Firefox for the simple case. The simple case isn’t that much fun, though, so let’s explore the subject a bit before we come back to it. Note that special server-oriented configuration files [Hack #29] can also be set up to perform server login actions. In that case, the server is an LDAP server.
The Single Sign-On Technology Jungle
In conceptual terms, single sign-on is a constraint enforced by servers. The server demands special information from the client (for example, a web browser) and refuses to process any request until that information is forthcoming. If a weak security regime (system of identification) is in place, the client might just send operating system login details as plain text to the server. If a strong security regime is in place, the client and server play complicated information games with each other that keep login details secret from everyone.
Warning
To understand single sign-on technology in detail requires a great deal of study. This section provides a brief overview only.
Locating standards
The first part of sign-on technology involves standards. One technique for sign-on message exchange is to formulate them as HTTP requests and responses. This is the technique that Firefox requires to access secure web servers. Many, many Internet Engineering Task Force Requests For Comment (IETF RFCs) standards cover this subject. They’re all available at http://www.ietf.org/rfc/. Here are a few of the critical ones:
- RFC 822: Standard for the format of ARPA Internet text messages
This is the granddaddy of all messaging standards, and it’s a good place to start if you’re not familiar with Internet messaging.
- RFC 2616: Hypertext Transfer protocol — HTTP/1.1
This standard shows how the core messaging standard is specialized for web messages. It includes the important
401and407return codes, which are returned by a web server that requires a login but hasn’t yet received any login information.- RFC 2617: HTTP Authentication: Basic and Digest Access Authentication
This standard adds header fields to the ordinary HTTP standard so that comparisons of user login data between client and server can occur over HTTP. It adds the critical
WWW-Authenticateheader item, along with a primitive security regime that can use it.- RFC 2743: Generic Security Service Application Programming Interface, Version 2
This standard specifies GSS-API. It’s a programming library that wraps around whatever security regimes are available, providing portability. On a given computer, it might provide access to several separate security regimes, such as operating-system login, database login, and smart-card validation. A client like Firefox can use GSS-API to decide what security regimes are supported.
- RFC 2478: The Simple and Protected GSS-API Negotiation Mechanism
This standard describes the forward-looking SPNEGO standard. It describes how a client and server can compare via HTTP the security mechanisms that they have available via a GSS-API implementation. It describes how they can agree on which security regime to use.
- IETF draft-brezak-spnego-http-04.txt: SPNEGO over HTTP
This standard offers Microsoft’s ideas on how SPNEGO and GSS-API should work together.
Brand names and standards
The second part of sign-on mixes brand names with standards names:
- Kerberos
A high-quality security regime that GSS-API can take advantage of. It’s a better quality regime than the ones documented in the previous RFCs, and it requires its own server. Although it’s available on Microsoft Windows 2000 and later, it’s used mostly on Unix/Linux.
- LAN Manager
An ancient Microsoft technology from the days of Windows 95 that provided barely secure LAN access in a way that competed in part with Novell’s Netware products.
- NTLM
Microsoft’s upgrade of LAN Manager for New Technology (NT) versions of Windows (i.e., Windows NT 4, 2000, and XP). It was also back-ported to Windows 95 and 98. NTLM is also the name of NTLM’s security regime.
- NTLMSSP
NTLM with Security Support Provider (SSP) provides enhancements that removed the need to prompt users every time it’s used. It was also back-ported to Windows 95 and 98. NTLMSSP has the same purpose as SPNEGO.
- Samba
An open source file and print server for Linux that implements several Windows protocols.
- Apache
An open source web server.
- Squid
An open source caching web proxy.
Single Sign-On: The Easy Way
Single sign-on is most commonly used on Windows desktops. Support for this is enabled by default. Using this default setting, Firefox will attempt to silently authenticate the user’s Windows domain login against a proxy server. The proxy server used is the default NTLM server for authentication; it can either be a Windows server or Samba, and so on. Firefox’s default NLTM behavior is turned on with this preference:
network.automatic-ntlm-auth.allow-proxies /* true = default */
Provided the current proxy server is set up for authentication, there is automatic support for the NTLM security regime in the local network. That regime has weak security, so it is not automatically supported for connecting to servers over public networks. If that kind of connectivity is required, then all such servers must be explicitly identified as trusted. You can create such a whitelist with this preference:
network.automatic-ntlm-auth.trusted-uris /* default is a null string */
The value for this preference is a comma-separated list of URI fragments. This sample string shows the three legal kinds of fragments:
"https://, http://www.example.com, test.com"
The first fragment says, “Trust all URLs with an https scheme.” The second fragment (a full
URL) says, “Trust this particular web site.” The third fragment is
interpreted to mean http://
anything. test.com, so any web site that is a
subdomain of test.com, including
test.com itself, will also be
trusted.
There are several potholes to avoid when you use single sign-on with NTLM:
On older Windows boxes running Windows 98 or thereabouts, a Windows patch is required to make everything work. See this Microsoft MSDN knowledge base article for details: “Q266772” (http://kb.microsoft.com). This problem is also discussed in Mozilla’s Bugzilla (http://bugzilla.mozilla.org) bug 212336.
Depending on the network setup, users must sometimes remember to quote their username as
domainuser. This occurs when domains (workgroups) are not defaulted or matched correctly between client and server. Doing so is somewhat nonintuitive for users. Stick to matching, default domains if you can.Firefox does not generate Version 2 NTLM responses. It is an implementation that provides just enough support. It does not generate LAN Manager 2 (LM2) or NTLMv2 or NTLM2 responses either. The net effect is that the extra information supplied with those later protocols is ignored.
Single Sign-On: The Hard Way
Very briefly, the hard way to use single sign-on is to guarantee a quality security regime for all sign-on activities. That means using Kerberos. Kerberos is available on all Windows versions from Windows 2000 and later, and on Linux and Macintosh.
Support for SPNEGO is required for Kerberos-based single sign-on. In Firefox, this is turned off by default for two reasons. First, a hostile server could negotiate the browser client into using the NTLM security regime, which is too weak for general Internet use. Second, SPNEGO is open to obscure security attacks when the actual security regime also runs over HTTP. It’s possible for a hostile web server to pretend that it serves someone else’s domain, in which case it can take over negotiations.
Firefox has two preferences that allow SPNEGO to be turned on. They are whitelists of URIs, in the same format as the NTLM whitelist:
network.negotiate-auth.trusted-uris     /* defaults to empty string */
network.negotiate-auth.delegation-uris  /* defaults to empty string */
The first preference identifies web sites whose SPNEGO messages will be accepted by Firefox. This opens the door to obscure security attacks, so this preference can’t be used alone. There are two ways to mitigate that problem. The first is for the browser to ignore requests for HTTP-enabled security regimes, such as NTLM, Basic, and Digest. Currently, that is not implemented, because single sign-on usually occurs in a secure Intranet and those regimes are good enough in that environment. The second mitigation strategy is to use the second preference as well and to carefully control what the web servers send out.
The second preference identifies web sites whose HTTP SPNEGO messages should result in Firefox and the web server delegating the authentication process away from HTTP. This is done using a Kerberos server that acts as a third party. Once SPNEGO starts, Firefox connects, via SSPI or GSS-API, to that Kerberos server. Using the complicated Kerberos protocol, the Kerberos server is told by the Firefox client who the user is. The SPNEGO protocol, which does run over HTTP, then carries some Kerberos information from web client to web server . That is the only time SPNEGO is used. The web server finishes up by checking with the Kerberos server whether authentication was successful. It accepts the reported answer as validation or rejection of the user’s identity.
To do all this, set the two whitelists to allow the required web
server. That server is then a trusted URI, allowing SPNEGO to go
ahead, and it is also identified as Kerberos-enabled. The web server
must therefore be a version able to consult a Kerberos server. Then,
ensure when configuring the web server that it sends out WWW-Authenticate headers that offer only
Kerberos as a security regime. That tells Firefox that Kerberos is the
only choice.
Finally, ensure that the Kerberos server is set up correctly for the user population. That means configuring it to be aware of the users that require authentication, as well as ensuring it is exposed to enough of the network to cover all users and all white-listed web servers. Note that some web servers may have an integrated Kerberos server, or they might use operating-system-supplied Kerberos service APIs. In these cases, the Kerberos server might be a virtual server with no separate existence.
Work with Web Proxies
Make Firefox automatically discover the settings it should use for accessing the Web.
The Web is full of proxy and cache servers. Firefox only has to reach the one nearest to you in order to provide connectivity. If your environment includes web servers hidden behind complex security arrangements, this hack will help you point Firefox at the right proxies.
Overview of Proxy Options
There are four strategies for proxy access: none, static, PAC, and WPAD. Setting up proxies is not the same thing as implementing full server control of Firefox configuration items [Hack #29] . However, it does have some features that are similar to remote configuration.
The Firefox Options dialog box is the starting point for proxy configuration. The General panel holds the Connection configuration item. Depending on your desktop arrangements, such as if your window is slightly too small, you might not see that item. To fix that and expose the Connection Settings... button, just enlarge the window by dragging its bottom right corner outward.
Figure 2-2 shows the Connection Settings subdialog.
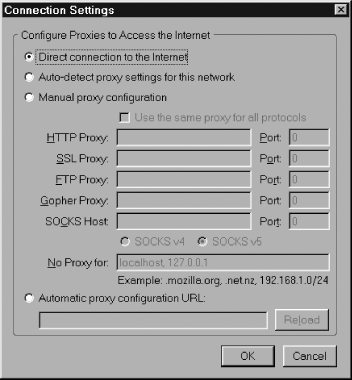
The four radio buttons in Figure 2-2 are alternative values for a single preference:
network.proxy.type /* an integer, default = 0 */
Table 2-1 shows the relationship between the dialog options, preference values, and their associated standards.
The other items in Figure
2-2 also map directly to preferences. Type the URL
about:config into Firefox and filter on the word
proxy to find them.
Setting Up Direct Connects and Static Proxies
Direct connection and static proxies rely only on the underlying TCP/IP network and access to the Domain Name System (DNS). If you avoid domain names and use only TCP/IP v4 addresses, such as 192.168.1.2, then you don’t even need DNS.
If you choose direct connection in the Connection Settings dialog box, you have immediate access to the Internet and the Web. All that is required is optional access to DNS and a default TCP/IP route. Everything you do is passed through the default route, which presumably has the Internet at the other end. Dial-up connections provide both DNS and routes automatically; corporate PCs usually acquire both at boot time, courtesy of the local network administrator (see him for details). Direct-connected Firefox uses the standard port numbers for all necessary protocols (i.e., 80 for HTTP, 20 for FTP and 110 for POP3; on Linux/Unix, see the /etc/services file for details). These can be overridden for specific URLs, such as http://www.example.com:8080.
If you choose manual proxy configuration and fill in some proxy hosts, the situation is the same as a direct connection, except that Firefox will connect to the hosts specified on a per-protocol basis, rather than blindly going through the default route. For many network topologies, this is no different from a direct connection, but it does allow for load sharing if the number of desktops is large. Desktops can alternate in their use of HTTP servers, for example. Any nontrivial LAN switch can be configured to perform per-protocol and per-port redirections, so manual proxy configuration is not widely useful in a fixed setting. Simple-minded, shrink-wrapped, low-end hubs, repeaters, and switches generally aren’t powerful enough for this, though. If you access work remotely via a virtual private network (VPN) or a WiFi hotspot, then manual configuration might suit the access requirements dictated by your organization. Make a second Firefox profile with manual proxies and use that for phoning home.
One further use of manual configuration is to reduce load on the web gateway of an organization with a slow link. By blacklisting local networks, requests to hosts on those local networks go direct. That means the local intranet can be served fast and transparently, leaving the web gateway server to be used only for external requests.
Setting Up Scripted PAC Proxies
proxy.pac files were an initiative of the Netscape Navigator 2.0 browser and have been supported by Netscape and Mozilla ever since. Such a file resides at a URL and is downloaded when Firefox starts. This preferences indicates where the file should be accessed:
network.proxy.autoconfig_url /* set to a full URL */
Once it is downloaded, the script in the file tells Firefox which proxies to use for which URLs. It is therefore a more powerful mechanism than manual configuration, which knows nothing about specific URLs requested. Since the file resides on the server, it can be configuration-controlled by the server administrator. That’s useful if services provided by the server change at short notice. Firefox regularly checks to see if a required proxy.pac file has changed. If so, it is downloaded again and rerun.
There is no standard for the file’s format, except that it should contain JavaScript. (Internet Explorer supports a similar but not identical format that has the same purpose.) The file should be delivered over the Web with this MIME type:
application/x-javascript-config
Don’t use this other content type, which is old and not supported:
application/x-ns-proxy-autoconfig
What do you put in the proxy.pac file? Implement this JavaScript function:
function FindProxyForURL(url, host) { ... }Firefox calls this function each time it attempts to retrieve a URL. The URL argument is the full URL supplied; the host argument is the domain name or TCP/IP address subpart of the URL. The function returns a list of proxy options to the browser as a single, semicolon-separated string. Firefox then goes through the list, trying each option in turn. Here’s a simple example of this function:
function FindProxyForURL (url, host) {
  if ( url.match("https:")  ) {
    return "SOCKS secure:99";
  }
  else if ( host.match("google") ) {
    return "PROXY gateway:80";
  }
  else {
    return "DIRECT; PROXY gateway:8080";
  }
}
In this example, the regular expression methods that are part
and parcel of the JavaScript String
object are used to analyze the URL. If it’s a Secure HTTP URL, a host
named secure and port 99 are used.
If it happens to be a Google web page, then the proxy host named
gateway is used. If it’s anything
else, Firefox first tries DIRECT
(i.e., no proxy), and if that fails, it tries the gateway host, but on a different port. The
preceding example illustrates all syntax options for the return
string. Note that return values are semi-colon separated when more
than one option is returned.
Because the proxy.pac file is a JavaScript script, you can make the content as complicated as you like. The script runs inside a special, secure sandbox, however, so there is a limited range of features to exploit.
Of the features available, a few are available only within the proxy.pac scripting environment. Three special functions are provided; there are also some trivial utility functions that do string processing. Here are the three main function signatures:
String tcpip_v4 address myIpAddress(  )
String tcpip_v4_address dnsResolve(String domain)
void                    proxyAlert(String message)
The proxy system is written as an XPCOM component defined in
JavaScript. This means you can look at it; see the
nsProxyAutoConfig.js file in the Firefox install
area, in the components directory. This file
makes advanced use of JavaScript, and it’s easy to be confused when
reading it: refresh yourself on JavaScript first. To spot the utility
functions available in the proxy.pac runtime
environment, find the variable in that file named pacUtils. It is transformed a bit like this
just before the proxy.pac file is read:
eval(pacUtils)
The set of utility functions defined in the big pacUtils string are then available to proxy
scripts. No other facilities are, however. Use the proxyAlert() function for debugging.
Setting Up WPAD Proxies
WPAD is an extension to the proxy.pac system. Instead of the proxy script being retrieved from a user-specified URL, it’s retrieved from a known URL that requires no user data. All the work is done by the server administrator. The user merely chooses “automatic proxy configuration” ( WPAD) when Firefox is first installed, or picks that option at a later time. Firefox expects the proxy script to be located at this URL:
| http://wpad/wpad.dat |
Since this string is fixed, the setup game consists of making sure that this URL points to a real host. You must set up a web server, copy the proxy script to the top of the web site, and then make the right domain name point to the whole thing. The last bit is the only hard part. Here’s how to do it for Linux/Unix.
First, you can hack the required configuration files by hand. You need root access.
Warning
Beware that some tools, such as RedHat’s bindconf, manage important files for you
and might overwrite your changes. If you use bindconf, go via the GUI; don’t follow
these instructions.
If you don’t have DNS configured, then your /etc/resolv.conf probably doesn’t exist, and you must be relying on the /etc/hosts file or a Network Information Services (NIS) equivalent. In that case, all you need to do is add a line for the new web server:
192.168.1.99 wpad
Add wpad as a new alternate
name if the web server already has a name.
If you do have DNS configured, then it’s trickier. In your DNS
host’s /etc/named.conf file, you should already
have a record for the current domain. It should look something like
this (if your domain is called
example.com):
zone "example.com" {
  type master;
  file "named.example.com";
};
The file called named.example.com probably resides at:
| /var/named/named.example.com |
You need to edit this file. Add a line at the end like this:
wpad IN A 192.168.1.99
Save the file and restart named. You’ve just added the fully
qualified domain name (FQDN) wpad.example.com. You should be able to ping
it and download the WPAD URL normally afterwards.
Firefox has Class 0 (minimally compliant) WPAD support. That means DNS support only, with no DHCP support. There is one exceptional feature. A security hobble prevents failed requests from being passed to higher level (more generic) domains if the first attempt at fetching the proxy script fails. You don’t want to accidentally download http://wpad.com/wpad.dat instead of http://wpad.example.com/wpad.dat.
Ignore this preference if you see it, since it is left over from older Mozilla versions:
network.enablePad /* default = false, Pad = Proxy auto-detect */
Fine-Tune Ports and Sockets
You can configure Firefox network access down to the last detail if you want.
This hack explains how to chop off pieces of network access at the backend of the Firefox browser. This is done with preferences. Doing so provides strong protection against malicious web attacks, but it offers only weak security against user tampering. That’s because, in the normal case, users can undo network-access changes via the about:config system. There is a way to serve these preferences up more securely using a server [Hack #29] . You can also configure proxy arrangements [Hack #15] .
Disallow Ports
Firefox ports are allowed or disallowed using a multi-tiered system. In highest to lowest priority, these are the rules:
Always allow any port that Firefox absolutely must have to get its job done. The primary example is access to DNS via port 53.
Always allow some ports for their standard uses. Here’s the current list:
389, 636 (LDAP), 70 (gopher), 21, 22 (FTP), 79 (finger), 13 (datetime)
Allow all ports specified in Firefox’s override list (a whitelist). You can indicate these ports by setting the following preference to a string containing a comma-separated list of port numbers that should be allowed (do not use spaces):
network.security.ports.banned.override /* unset by default */
Disallow all ports specified in Firefox’s blacklist. You can indicate these ports by setting the following preference to a string containing a comma-separated list of port numbers that should not be allowed (do not use spaces):
network.security.ports.banned /* unset by default */
Allow any port not covered by the other rules.
Set Socket Limits
You can fine-tune the performance and use of sockets, but only for specific protocols. There are many configuration options for HTTP, just one option for FTP, and none for other protocols. For FTP, tweak the following preference for a slow connection, for a heavily loaded server, or for ancient-style point-to-point UUX networks running over serial connections:
network.ftp.idleConnectionTimeout /* 300 (secs) = default */
For HTTP, you can control the type, number, and aging behavior of the underlying sockets. You can also control which kind of sockets are used by default.
Here’s the preference for secure sockets:
network.http.default-socket-type /* "socks", "socks4", "ssl", "starttls" */
The default of nothing specifies ordinary, insecure PF_INET, SOCK_STREAM sockets. That’s the sensible
value; use socks only if you’re on
a VPN and don’t want your HTTP requests to be visible. The checkboxes
in the Advanced panel of the Option dialog box just enable or disable
these protocol alternatives; they don’t change the default.
Here’s the preference for specifying the number of sockets. You can set several hard maximums. To set the limit for the Firefox client, use this preference:
network.http.max-connections /* 24 = default */
To set the limit for each server the client connects to, use this preference:
network.http.max-connections-per-server /* 8 = default */
That prevents the browser from flooding any particular server with connection requests.
A difficulty for web browsers and other programs that use short-lived TCP/IP connections is that TCP/IP v4 (the common version) is optimized to perform best for connections requiring high data volumes. That’s not typical behavior for an HTTP request. The TCP/IP v4 startup phase for a connection, during which the data volume requirements are unknown, is always slow. It’s best, therefore, to keep a socket connection open and reuse it to avoid this overhead. These preferences ensure sockets hang around for a while after the browser has finished its first use of them:
network.http.keep-alive                   /* true = default */
network.http.keep-alive.timeout           /* 300 (secs) = default */
network.http.proxy.keepalive              /* true = default */
If sockets can be kept open, then a browser can take up many socket end-points that a web server has to offer and keep them. That’s a denial-of-service attack on a web server, something that no friendly web browser should do. These preferences set high-water limits on how many reusable sockets are allowed, per server:
network.http.max-persistent-connections-per-proxy  /* 2 = default */
network.http.max-persistent-connections-per-server /* 4 = default */
Finally, this preference does nothing, so ignore it:
network.http.connect.timeout /* socket startup time */
Manage Digital Certificates
Who gives Firefox trustworthy advice? You can change that set of advisors.
All content from a web site that advertises itself as secure has to be checked. Secure content must be accompanied by a digital signature and by a certificate that says whom the digital signature belongs to. The certificate must originate from a Certificate Authority (an organization) that Firefox knows. This hack explains how to change the certificates and Certificate Authorities (CAs) that Firefox knows about.
Examining Existing Certificates and Authorities
The Firefox Options dialog box lets you manage digital certificates. Click the Advanced icon to display that panel, expand the Certificates item, and click the Manage Certificates... button. Figure 2-3 shows that window, with the fourth tab in front.

If you click on any of the rows labeled Builtin Object Token, you can then examine the certificate by pressing the View button or limit its use via the Edit button. All of the certificates listed are bundled with the standard Firefox install. There’s little reason to delete them, but you can if you want. If you do so, that will restrict the number of secure web sites that Firefox can successfully visit.
You can also list these certificates from outside Firefox. Copy these files from the current Firefox profile to a temporary directory:
cert8.db key3.db secmod.db
All three files (cert8.db, key2.db, and secmod.db) are required. To see their contents, use signtool [Hack #18] , like this:
signtool -L -d"."These three files contain, respectively, certificates, public-key encryption keys, and a list of security modules that provide enabling regimes for browser security. An enabling regime is just a starting point for security. The alphabet soup that describes such regimes includes PKCS #11 and PSM standards. Implementations of those standards make up the default (built-in) security regime for Firefox. Other regimes that could be added (via additional software libraries) include systems that support smart cards and dongles.
The other tabs in this dialog box contain these details:
- Your certificates
Certificates you might use to sign email or other outward-bound information. Firefox does not use these certificates, but it might share its profile with another application, such as Thunderbird. They are sourced locally or from a smart card.
- Other people’s certificates
Certificates received from inbound information, such as signed email. Firefox does not use these certificates, but it might share its profile with another application, such as Thunderbird.
- Web site certificates
Certificates stored by user action. If a web site presents a certificate to the user, and the user both accepts it and tells Firefox to allow that site in future, then the certificate will be copied here.
Adding More CA Certificates
Certificates are defined by a range of standards, collectively called X.509. You can add authoritative CA certificates to Firefox at any time. The first step is to establish the credibility of the CA you’re going to add. Don’t assume that all CAs are credible. Free software exists that lets anyone set themselves up as a CA. Once the CA has delivered (for free) its root certificate, import it.
To import via the GUI, click the Import button in Figure 2-3 and supply the certificate file. Firefox thinks files with the following extensions are certificates, but you can identify the file by hand (the extension isn’t important):
.crt .cert .cer .pem .der
The file should be in either in DER or (old Netscape) Base-64 encoding. Firefox can handle chained certificates stored together in one file, but it might not display all of them before final import.
To import direct from the Web, make sure the CA certificate is served up with this content type:
application/x-x509-ca-cert
Use this alternate type for web server certificates:
application/x-x509-server-cert
To import certificates using the command line, work on copies of
the cert8.db, key3.db, and
secmod.db security files with the certutil tool that is bundled with signtool. Here’s a suitable command-line
argument:
certutil -A -n "nickname" -t c -d "." [ -a ] -i new_ca.cert
Use the -a option for
Base-64-encoded certificates only. Note that the -d option requires a space before its
argument. Copy the files back to Firefox afterward.
Rejecting Certificates with CRLs and OSCP
If a certificate owner loses his credibility, he shouldn’t be allowed to use his certificate anymore. Somehow, the browser user needs to find this out. The browser displays a warning if it detects a trust request that uses a bad certificate. But how does the browser know?
Certificate Rejection Lists (CRLs) are one solution. CRLs are files with formats defined in RFC 2459. Each list is a set of certificates that a particular CA wishes they could revoke. Firefox checks all installed CRLs when signed content requests user trust. None are installed by default. If you have all the CRLs from all of the CAs Firefox knows about, then the number of bad folks you’ll accidentally trust is much reduced.
One problem with CRLs is that they get out of date. Every CRL should be brought up to date frequently. Firefox can do that either at set expiry times in the future or at a fixed regular frequency. The default frequency if any CRLs are installed is 30 seconds. Some update information is also stored in the preferences system, but the details are too gory for this hack.
To collect all the CRLs you need, visit the web sites of all CAs known by Firefox. Click on all the links to CRLs at those sites. CRLs are then downloaded and installed. They’re detected using this content type:
application/x-x509-crl
You can also import a CRL from a file if the CA delivers it to you as an email attachment.
A second solution to bad certificates is Online Certificate Status Protocol (OCSP). If it’s enabled, Firefox won’t check CRLs each time trust is requested by signed content. Instead, Firefox will send a request to the URL specified when OCSP was turned on. The server at the other end (or a proxy server) will report if the trust request includes a safe certificate or not. If it is, the original content will be trusted. That’s a lot of extra network overhead for a dial-up connection, though.
Digitally Sign Content
Content delivered to Firefox can request special privileges from the user.
Normal Firefox content, whether it’s HTML, XHTML or XUL, runs inside a sandbox that stops it from doing anything risky, such as modifying files stored on the local disk. This hack explains how to ask the user for permission to escape the sandbox. If permission is given, the content (usually scripts) can do whatever it likes. You can also arrange matters so that the user is never asked for permission [Hack #19] .
Get Oriented on Security Concepts
The design ideas behind granting permission are trust and identity. If the web page content is to have full control over the browser, there must be trust between the browser user and the content creator—two real, live people. Access to technical features is secondary to this human principle. In the conservative world of security, trust can be assured only if identity can be properly determined. Here are the identity constraints built into Firefox:
The browser user always knows whom a content maker requesting trust is.
The browser user can always physically track down a content maker that requested trust.
The browser user is always free to reject a request for trust.
The Firefox user can drop these constraints if they so choose. When presented with information about a content maker, the user can tell Firefox to trust that content maker in the future. That puts identity information about the content maker in files in the user profile area. Firefox will always validate signed content, but it can do so silently if the user directs it to do so.
Validating signed content is done automatically by Firefox. Making signed content is a task for a web site content creator.
These identity constraints are supported by technology—digital certificates and digital signing—and by a special sandbox-breaking API that only works when trust is in place. They also demand some old-fashioned paperwork. A real, live person called a Certificate Authority (CA) is required. Little of that infrastructure is obvious or meaningful to an end user confronted by a permission request, though.
Get Signing Tools
Netscape Security Services (NSS) is a technology that is
part of the Mozilla source code used to make Firefox. NSS includes a
small, separately downloadable program called signtool. Get it here:
| http://ftp.mozilla.org/pub/mozilla.org/security/nss/releases/ |
signtool can combine content
(HTML, JavaScript, XUL, CSS, images, anything) with digital signatures
by using certificates. signtool is
incompatible with similar systems used in Netscape 4.x, Internet
Explorer, and Java. It is good only for Mozilla-based browsers and
other software systems that support it. signtool has some compatibility with Java,
but a second tool called certtool
(http://ftp.mozilla.org/pub/mozilla.org/security/nss/releases/)
is also needed.
Signing content is called object signing , which is different than signing a certificate. The result of object signing is a JAR file [Hack #86] , which contains both content files and digital signature files.
Signing content is a nuisance for technologists that just want to build something. Mozilla allows signing to occur in two separate ways. You can sign in a test environment, where it is easier to use, or you can sign in a published environment, where it is fully secure.
Sign Content for Test Purposes
In a test environment, two of the three identity requirements can be dropped. The browser user can be kept ignorant of the content maker. The browser user is thus unable to track down that person. That leaves only the requirement that the browser user explicitly grant permission to the content maker. To enable this weaker security arrangement:
The content maker uses a special certificate instead of a normal one from a CA.
The browser user ensures it’s OK for Firefox to accept content signed with that special certificate.
In a test environment, both of these roles are likely to be taken by one developer. To create the special certificate, first create a certificate database. Then, make the special object-signing certificate and put it into the database:
               mkdir certs
               cd certs
               certutil -N -d .
signtool -G '
special
' -p '
password
' -d .
special is the name chosen for the
new certificate. The password string should
be whatever you typed in when certutil ran. Use single quotes on
Linux/Unix to prevent shell reinterpretation.
To tell Firefox it’s OK to work with this certificate, use the following preference:
signed.applets.codebase_principle_support /* set to true. Default = false */
Tip
Note the security hole: this setting indicates that content signed with any special certificate (from any web site) will be accepted. The name of this preference is an historical artifact from Netscape 4.x. There is no Java or Java applets at work.
You are now ready to sign your content. Suppose it’s in the directory content, which is a sibling of the certs directory:
               cd ..
signtool -d certs -k '
special
' -p '
password
' -Z result.jar content
The file result.jar is all the signed content. Put it behind the web server and retrieve it with a URL, or with a jar: URL. jar: URLs are normally used for chrome packages [Hack #75] , but you can put ordinary web site content in them, too.
Sign Content for Publication
In a production environment, you must have a genuine digital certificate before you start. Suppose your organization’s name is Acme, and the certificate comes from the CA Verisign, who gave it this short name: Acme Cert (Verisign). Once that certificate is in a handy certificate database [Hack #17] , make your object-signing certificate based on it as follows:
               cd certs
               signtool -G 'objcert' -k 'Acme Cert (Verisign)' -p 'password
' -d .
Next, sign your content with it. This is the same as in the test environment, except this time we have a real certificate:
               cd ..
signtool -d certs -k 'objcert' -p '
password
' -Z result.jar content
Put the result.jar file on the web server as before. You’re ready to go and don’t need the special preference.
Do Something with Trusted Content
If you’ve asked the browser user for trust, you must need it for some reason. There are two things you can do: you can sign an XPI file, and you can write scripts that break normal web scripting rules.
If you sign an XPI file, that file can be installed into Firefox from any web site, provided that the user gives permission. Since an XPI file and JAR file have the same format, the signing procedure is also the same. The web site that delivers the XPI file does not need to be listed as an authoritative source of extensions or patches in this case.
This sample JavaScript script requests all possible permissions and then runs some code that wouldn’t work in a normal web page:
function run(  ) {
  // normal permissions to start with
  critical_section(  )
  // normal permissions again
}

// Might be a trusted function, depending on who calls it.
function do_stuff( )
{
  var list = window.Components.classes; // try to access XPCOM
}

function critical_section( ) {
  // ask the user for permissions; should check return value as well

  netscape.security.PrivilegeManager.enablePrivilege(
    "UniversalBrowserRead"        + " " +
    "UniversalXPConnect"          + " " +
    "UniversalPreferencesRead"    + " " +
    "UniversalPreferencesWrite"   + " " +
    "CapabilityPreferencesAccess" + " " +
    "UniversalFileRead"           + " " +
    "myCapability");

  window.resizeTo(20,20);   // make current window tiny - requires trust.
  do_stuff( )                // called with trust in place

} // permissions will end when this function returns

run( ) // do it
The myCapability
option is a custom capability class [Hack
#20] . See http://www.mozilla.org/projects/security/components/signed-scripts.html
for details on the meaning of all the options.
Grant Trust with Master Certificates
Control secure uses of Firefox completely with an overriding master certificate.
Web site content can request trusted access to Firefox by presenting content that is digitally signed [Hack #18] . Trusted access lets the content break out of the web page sandbox. The user must manually confirm that they trust the signed content presented before this can happen. This hack explains how to avoid that manual confirmation.
Master Certificate Concepts
Firefox supports the use of a master certificate . Such a certificate is different than the master password that can be set in the Options dialog box in the following ways:
- Master password
Stored in the Firefox user profile area: one piece of data per user profile. Provides an overall security check per profile and privacy for each user.
- Master certificate
Stored in the Firefox install area: one JAR file only. Provides an overall security check for one or more remote websites and secure access to the browser for those web sites.
In other words, a master password keeps other users out; a master certificate lets web sites in. Since all this information is stored on the same computer as Firefox, both are subject to change from anyone who can log in to the computer.
A typical use of a master certificate is for a vendor, distributor, or deployer to bundle it with a Mozilla-based product. This gives a distributor a back door through which they can control the browser’s security status. This back door can be exploited for different reasons, depending on the web environment:
- In a conservative environment
It allows the distributor to create a community of trusted web sites that all have secure access to the user’s browser. Such a community can aggregate value-added services in the user’s browser.
- In a liberal environment
It allows a distributor to insist that security restrictions must be dropped by those that read either the vendor’s web site or the vendor’s friends’ web sites. Such an environment ensures that no user can hold back from engaging with the rest of the community.
Master certificates are, therefore, a management tool similar to Firefox’s Update Manager, with the following differences:
The Update Manager requires both dialog boxes and user interaction. Master certificates work automatically.
The Update Manager provides search, version, download, and install tools. Master certificates must be deployed by hand.
The master certificate uses fine-grained security. Update Manager is all-or-nothing.
Scripts trusted via the master-certificate system must still request the secure access they need. Scripts in updated extensions and patches are automatically secure.
In both cases, the user must download a URL before any security checks happen. You can arrange matters so that such checks are automatic. For example, you can set the home page to a URL that points to suitably signed content.
Deploying Master Certificates
A master certificate is deployed as a signature on a JAR file. No other contents are required in the JAR, so it can contain either nothing (an empty directory) or some dummy content. Just store the certificate [Hack #17] and sign the nonexistent content normally [Hack #18] . The JAR file must be named systemSignature.jar (the filename is case-sensitive).
Do not keep the master certificate inside any of Firefox’s user
profiles. That can become very confusing at runtime. Maintain separate
copies of the three .db files signtool requires, and keep them in a secure
place. At worst, maintain a separate, dedicated Firefox install or a
separate Firefox user profile. Use that separate configuration for
nothing other than maintaining the master certificate.
Next, place the JAR file in the Firefox install area. It should go in the same directory as firefox.exe (Windows), firefox-bin (Linux/Unix), or in the Essential Files directory on Mac OS X. Restart Firefox.
To test whether the certificate is working, sign a piece of content with the master certificate. The content should also use the netscape.security.PrivilegeManager.enablePrivilege( ) method [Hack #18] . Put the resulting JAR file behind a URL. Download it and confirm that the privileges are automatically granted.
Master certificates can also be wrapped up inside an Extension and deployed that way.
Delegating Trust to Others
The trust that the master certificate provides can be passed on (inherited, adopted, or added) to other certificates. This means that content signed with those other certificates can gain full access to the browser. To do this, content signed by the master certificate must tell the browser who else should be trusted, using a special web page JavaScript script.
The netscape.security.PrivilegeManager API
includes two methods that are available only to scripts signed with
the master certificate. These JavaScript methods spread trust to other
certificates. They look like this:
netscape.security.PrivilegeManager.setCanEnablePrivilege(fprint, privs)
netscape.security.PrivilegeManager.invalidate(fprint)
fprint is the SHA1
fingerprint of the other certificate that is to be trusted—normally, a
web site certificate. That other certificate may or may not be
installed in the Firefox certificate database. Any certificate can be
specified, though. privs is a set
of space-separated capability privileges [Hack
#20] . MD5 fingerprints are not supported.
To find out the fingerprint of a certificate, either view its details in the Firefox Certificate Manager, if it happens to be recorded there, or run these commands, downloaded as part of the Mozilla NSS package:
               signtool -L -d "."
            # list all known certificates
certutil -L -d "." -n"name"
   # display details for cert. "name"
Scripts delegating trust can also be wrapped up inside an Extension and deployed that way.
Alternatives to Master Certificates
You don’t have to use a master certificate. There are several alternatives:
Provide a page of links to all content to be trusted and ask users to spend Friday afternoon clicking on all of them. Get them to save their choices so that they are never asked again.
Follow the preceding approach for a single user. When finished, copy the user’s updated certificate database to all other Firefox users’ profiles.
Extensions can do anything, and security arrangements are stored in the Firefox preferences file. You can build a custom security system as an Extension that sets up whatever security arrangements are required for normally secure web pages.
Restrict Script Behavior with Policies
Internet Explorer has security zones. Firefox has capability classes instead.
When web pages load into Firefox, they stay inside a sandbox where they can’t compromise the user’s security. All unsigned web pages are displayed securely. Such pages still have a lot of latitude, though. Scripts in web pages can do all sorts of things. This hack explains how to change what scripts are allowed to do. Use of policies is extreme fine-tuning of Firefox.
Capabilities and Policies
You can control script access to features
of Firefox by defining access rules and collecting those rules together into a named
policy. You can define more than one policy. If a
Firefox feature such as window.open() is put together with a
particular kind of access, the combination is called a
capability . Each access rule allows or denies one or more
capabilities. Each policy therefore represents a set of
capabilities.
Every method and property of every browser or document object exposed to JavaScript by a DOM standard can be controlled with a capability.
Ordinary policies automatically apply to ordinary web pages.
Before a script can use a built-in feature of Firefox, it has to get
through all the existing policies unscathed. Firefox provides two
policies automatically: one default policy, named default, and one wildcard policy, named
*. The existing default policy
applies everywhere and is the normal state of affairs. The wildcard
policy does nothing, but it is a convenient place to override default
policies, if that is required. Policies are typically used
differently, depending on the kind of web page to which they are
applied:
- For ordinary web pages
Policies usually lessen rather than expand capabilities. Such pages don’t need to request anything.
- For signed web pages
Policies usually grant extra access. Such pages need to explicitly request the policies that will provide that access [Hack #17] .
Firefox policies are stored in the preference system as simple preferences. You can add more default policies, enhance the wildcard policy, or make your own policy.
Make a Policy
First, register the new policy or policies. Set this preference to whatever policy names sound meaningful:
capability.policy.policynames /* eg "nohistory lax imageswap" */
Set this preference instead if you want the policies to be default policies:
capability.policy.default_policynames /* eg "nohistory lax imageswap" */
Once the policies are registered, assign them to web sites or to
whole URI schemes. The default
policy applies to all web sites. Assign the sample nohistory policy like this:
capability.policy.nohistory.origins /* eg "https: http://www.x.org" */
In this example, every https:
URL and every URL on the X-Consortium’s web site will have the
nohistory policy applied to scripts
run inside its web pages.
Finally, add the access rules to the policy. In this example, we
prevent scripts from calling window.history.back() and from looking at or
setting the document.location.href
property. The following example is incomplete, because there are many
features that need to be blocked if scripting of history is to be
completely prevented:
capability.policy.nohistory.History.back       /* set to "NoAccess" */
capability.policy.nohistory.Location.href.get  /* set to "NoAccess" */
capability.policy.nohistory.Location.href.set  /* set to "NoAccess" */
NoAccess is the only
practical value for policies aimed at ordinary web pages. The first
preference is suitable for a JavaScript host object method. The second
and third preferences are for a JavaScript host object property. The
object names used in these preferences are Mozilla XPIDL interface
names with the prefix nsIDOM ripped
away. So, History is really
nsIDOMHistory.
To see if this works, just load any web page with a piece of JavaScript like this:
alert(window.location.href);
Using a Policy from a Signed Script
Capabilities for signed scripts can be set to NoAccess, SameOrigin, or AllAccess. These are combined with an access
type, such as the presupplied access type UniversalXPConnect [Hack
#18] . Instead of using these standard access
types, use the custom policy name.
Make Yourself Anonymous
Don’t let anyone know that you’re on the Web.
Here are some ways to reduce the amount of information that web sites and other onlookers find out about you.
Basic Web Surfing Strategies
If you want maximum privacy, follow all of these rules:
Never fill in web forms that request names, addresses, credit card information, or any geographic or demographic information. Never fill in online questionnaires. Never join a singles site. Never buy anything.
Never download any programs, demos, or novelty animations from the Internet.
Never provide your email address. Never use your email address in bulletin boards, newsgroups, message boards, IRC, or anywhere else.
Don’t use Windows or Linux/Unix with automatic operating system updates turned on.
Never use an Internet Service Provider (ISP) that supplies you with a fixed IP address; it should be a DHCP address that’s different each time you use it.
If having a known IP address or a known IP subnet bothers you, consider using services such as Anonymizer (http://www.anonymizer.com) for maximum anonymity. Before using such services, you must first persuade yourself that they are an organization that will credibly protect your privacy. You are using them as a portal for all your activities, after all.
Firefox Changes to Support Anonymity
In addition to careful web surfing, here are some concrete changes you can make to Firefox:
Turn off all cookie support by checking the box in the Privacy panel of the Options dialog box.
Carefully examine the installation for each plug-in you use. Don’t let the plug-in send personal information back to those who deliver plug-in content. Ideally, delete all plug-ins, except the default plug-in file, from the Firefox profile and the install areas. The default plug-in file is named npnul32.dll (Windows) or libnullplugin.so (Linux).
Examine your configuration of Adobe Acrobat carefully. Don’t let it connect to servers or send form data.
Review the extensions you’ve chosen to install; uninstall any that might have server connectivity.
Stop all secret network activity [Hack #13] .
Finally, you can fool web sites into thinking you’re using another browser. If you do so, the content set by the sites might change and the page display might not be exactly what you expected. This preference changes the User Agent that identifies Firefox:
general.useragent.override /* set to string */
A typical string for a Windows version of Firefox reads:
Mozilla/5.0 (Windows; U; WinXP; rv:1.7.3) Gecko/20040913 Firefox/0.10.1
For best results, leave the words Mozilla and Gecko intact. Here’s the string for Internet
Explorer 6.0 on Windows XP (you can masquerade as that browser if you
have nothing better to do):
Mozilla/4.0 (compatible; MSIE 6.0; Windows NT 5.1)