
Recipes in this chapter help you set up your local development environment to get ready for building Flutter apps. Depending on the operating system of your machine, the steps to set up may be different. You only need to use the recipes for your own requirement. After using recipes in this chapter, you should be able to get the first Flutter app running on emulators or physical devices.
1.1 Installing Flutter SDK on Windows
Problem
You have a Windows machine, and you want to start Flutter development on this machine.
Solution
Install Flutter SDK and set up Android platform on the Windows machine.
Discussion
Flutter SDK supports Windows platform. Installing Flutter on Windows is not a hard task as you may think. First of all, you need to make sure that your local development environment meets the minimum requirements. You’ll need to have 64-bit Windows 7 SP1 or later and at least 400MB free disk space for Flutter SDK to use. Flutter SDK also requires Windows PowerShell 5.0 or newer and Git for Windows to be available on the machine.
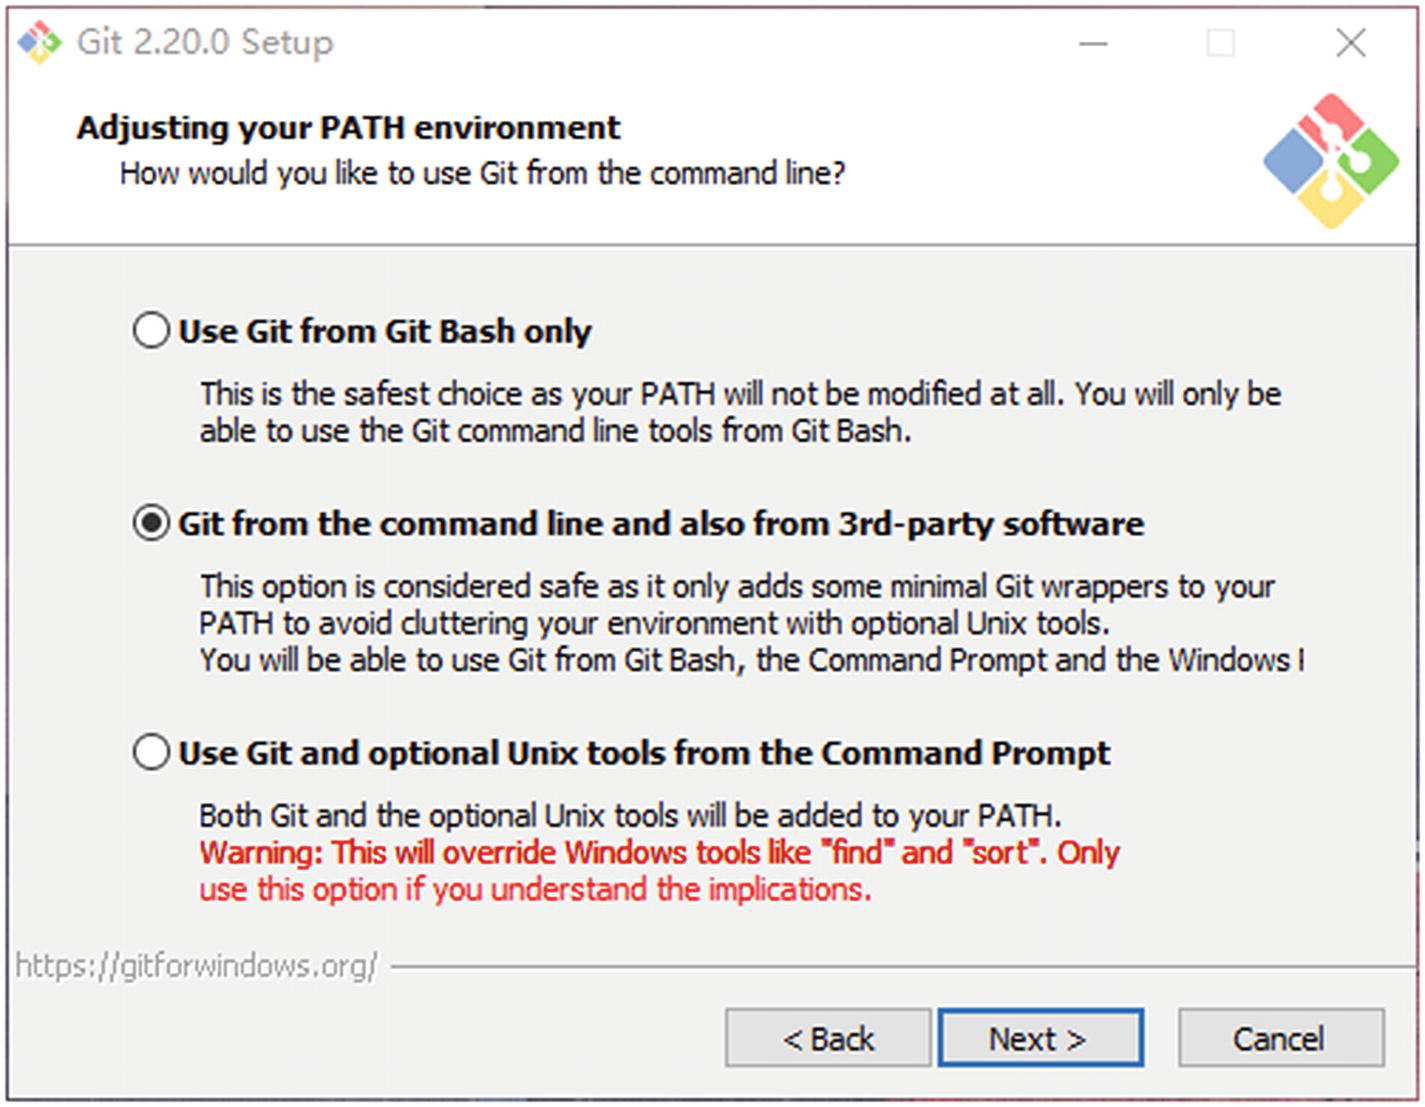
Git for Windows setup
After these minimum requirements have been satisfied, you can download the Flutter SDK zip bundles from the official web site ( https://flutter.dev/docs/get-started/install/windows ). Extract the downloaded zip file to the desired location on the local machine. It’s recommended to avoid using the system driver where Windows is installed. In the extracted directory, double-click the file flutter_console.bat to start Flutter Console and run Flutter SDK commands.
- 1.
Open the Start Search and type “env” and select “Edit the system environment variables”.
- 2.
Click the “Environment Variables…” button and find the row with “Path” in the first column under the “System Variables” section.
- 3.
In the “Edit environment variable” dialog, click “New” and input the path of the bin directory of installed Flutter SDK.
- 4.
Close all dialogs by clicking “OK”.
Success installation of Flutter SDK on Windows
Only Android platform is supported on Windows. Continue the setup following Recipe 1-7.
1.2 Installing Flutter SDK on Linux
Problem
You have a Linux machine, and you want to start Flutter development on this machine.
Solution
Install Flutter SDK and set up Android platform on the Linux machine.
Discussion
Flutter SDK supports Linux platform. However, given that there are many different Linux distributions available, the actual steps to get Flutter SDK installed may be slightly different. This recipe is based on installing Flutter SDK on Ubuntu 18.04 LTS.
After the installation finishes successfully, you can type commands curl and git to verify.
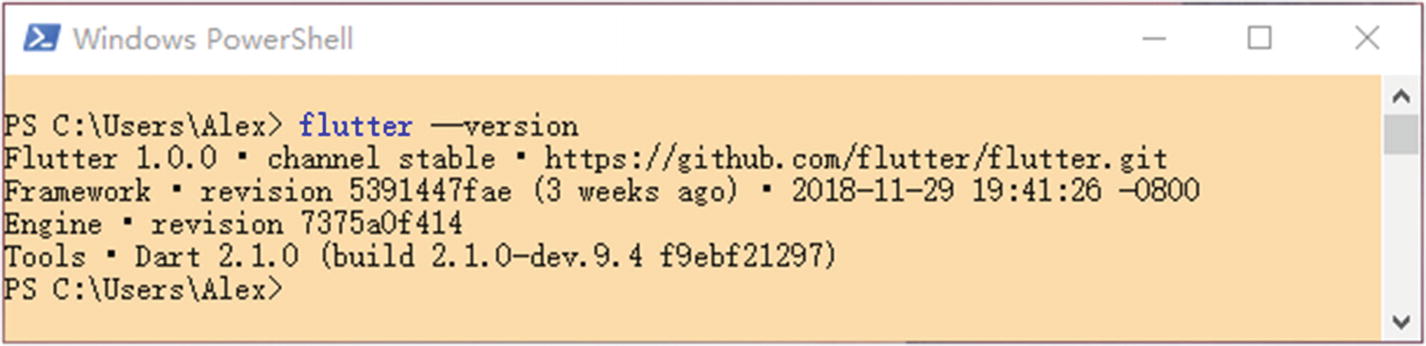
In the current terminal window, you need to run source ~/.profile for the change to take effect. Or you can simply create a new terminal window. Type flutter --version in any terminal window to verify. You’ll see the same output as Figure 1-2.
Only Android platform is supported on Linux. Continue the setup following Recipe 1-7.
1.3 Installing Flutter SDK on macOS
Problem
You have a macOS machine, and you want to start Flutter development on this machine.
Solution
Install Flutter SDK and set up Android and iOS platforms on the macOS machine.
Discussion
For macOS, Flutter SDK requires several command-line tools to be available in the local environment. These tools are bash, mkdir, rm, git, curl, unzip, and which. macOS should already have these tools as part of the system. You can simply type these commands in the terminal to verify. The easiest way to install missing tools is to use Homebrew ( https://brew.sh/ ). Homebrew is also important when setting up the iOS development environment. Use brew install to install tools, for example, brew install git to install Git.
After installing required tools, we can download the Flutter SDK zip bundle from the official web site ( https://flutter.dev/docs/get-started/install/macos ). Extract the downloaded zip file to the desired location on the local machine. The flutter command is located under the bin directory of the extracted location.
To make the current terminal window use the updated PATH, you need to run source ~/.bash_profile. You can also start a new terminal window which will automatically use the updated value of PATH.
Run flutter --version in any terminal window to verify the installation. You’ll see the same output as Figure 1-2.
Both Android and iOS platforms are supported on macOS. Continue the setup following Recipes 1-4 and 1-7.
1.4 Setting Up iOS Platform
Problem
You want to develop Flutter apps for iOS platform.
Solution
Set up iOS platform for Flutter SDK on your Mac.
Discussion
- 1.
Install Xcode ( https://developer.apple.com/xcode/ ) from App Store.
- 2.
Verify the path of the Xcode command-line tools. Run the following command to show the current path to the command-line tools. Usually you should see output like /Applications/Xcode.app/Contents/Developer.
$ xcode-select -pIf the path shown in the output is not the one you want, for example, you have different versions of Xcode command-line tools installed, use xcode-select -s to switch to a different path. If you don’t have the command-line tools installed, use xcode-select --install to open the installation dialog.
- 3.
You need to open Xcode once to accept its license agreement. Or you can choose to run the command sudo xcodebuild -license to view and accept it.
- 4.
Flutter SDK requires other tools for iOS platform, including libimobiledevice, usbmuxd, ideviceinstaller, ios-deploy, and CocoaPods ( https://cocoapods.org/ ). All these tools can be installed using Homebrew. If you run the command flutter doctor, it shows the commands to install these tools using Homebrew. Simply run these commands and use flutter doctor to check again. When you see the green tick of “iOS toolchain,” the iOS platform is set up successfully for Flutter SDK to use; see Figure 1-3 for a sample output.
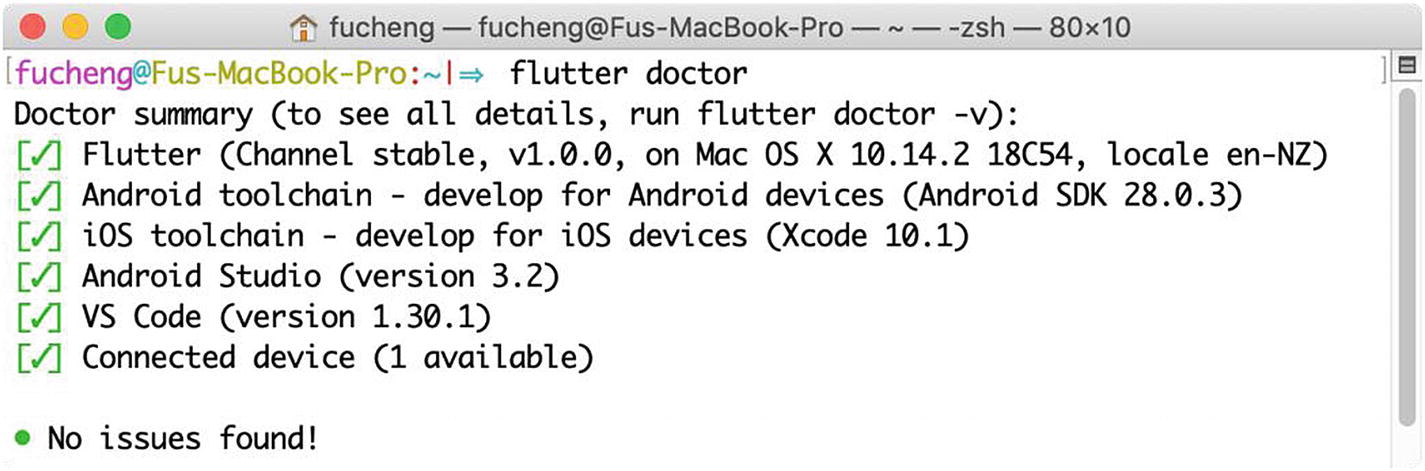
Output of flutter doctor
1.5 Setting Up iOS Simulators
Problem
You need a quick way to test Flutter apps on iOS platform.
Solution
Set up the iOS simulator.
Discussion
When the simulator is opened, you can switch the combination of different devices and iOS versions using the menu Hardware ➤ Device.
After the simulator is started, running flutter devices should show the simulator.
1.6 Setting Up iOS Devices
Problem
You have finished the testing of your Flutter apps on iOS simulator, and you want to test them on real iOS devices.
Solution
Deploy Flutter apps to iOS devices.
Discussion
Before deploying Flutter apps to iOS devices, you need to run flutter doctor to verify that iOS toolchain is set up correctly. To develop and test Flutter apps on devices, you need to have an Apple ID. If you want to distribute apps to App Store, you also need to enroll Apple Developer Program.

App signing in Xcode
The Flutter app can be deployed to the device using Xcode or the command flutter run. The first time you deploy the app, you may need to trust the development certificate in General ➤ Device Management of the Settings app on the iOS device.
1.7 Setting Up Android Platform
Problem
You want to develop Flutter apps for Android platform.
Solution
Install Android Studio to set up Android platform on your local machine.
Discussion
To develop Flutter apps for Android platform, we need to set up Android platform first. Flutter SDK requires a full installation of Android Studio for its Android platform dependencies, so we have to install Android Studio.

Download options of Android Studio
Android Studio provides a GUI-based installer, so it’s very easy to get it installed and running on the local machine. Installing Android Studio also installs Android SDK, Android SDK platform tools, and Android SDK build tools. Even you choose not to use Android Studio as the IDE, Android SDK and related tools are still required for Android development.

Manage Android SDK in Android Studio
1.8 Setting Up Android Emulators
Problem
You need a quick way to test Flutter apps for Android platform.
Solution
Set up the Android emulators.
Discussion
When developing Flutter apps, you can run them on Android emulators to see the results of running apps. To set up Android emulators, you can go through the following steps.

Android Virtual Device Manager
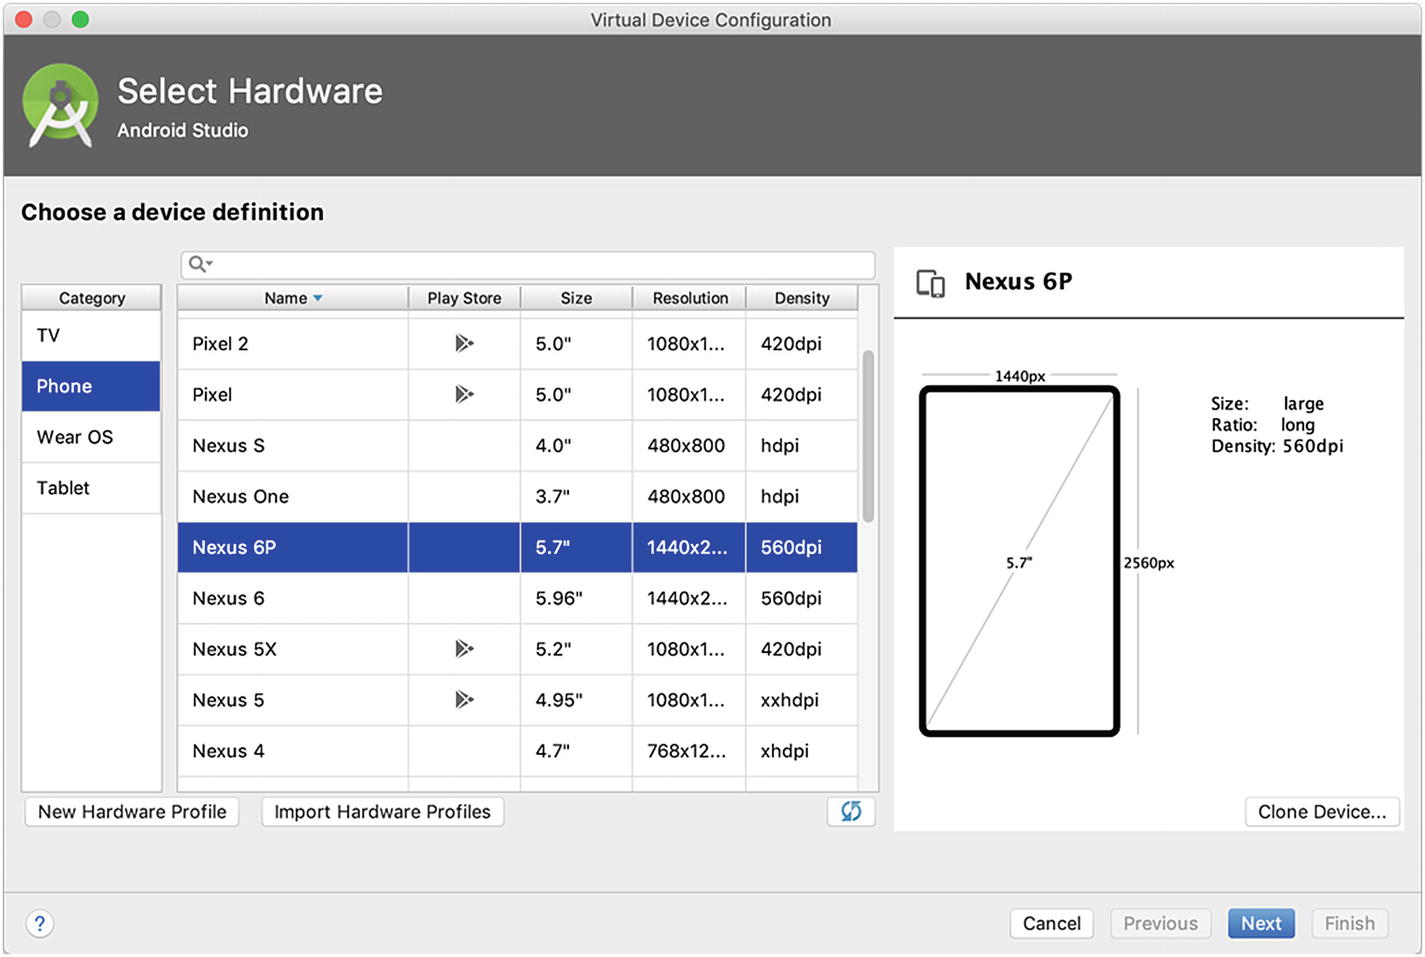
Select Hardware

Select a system image
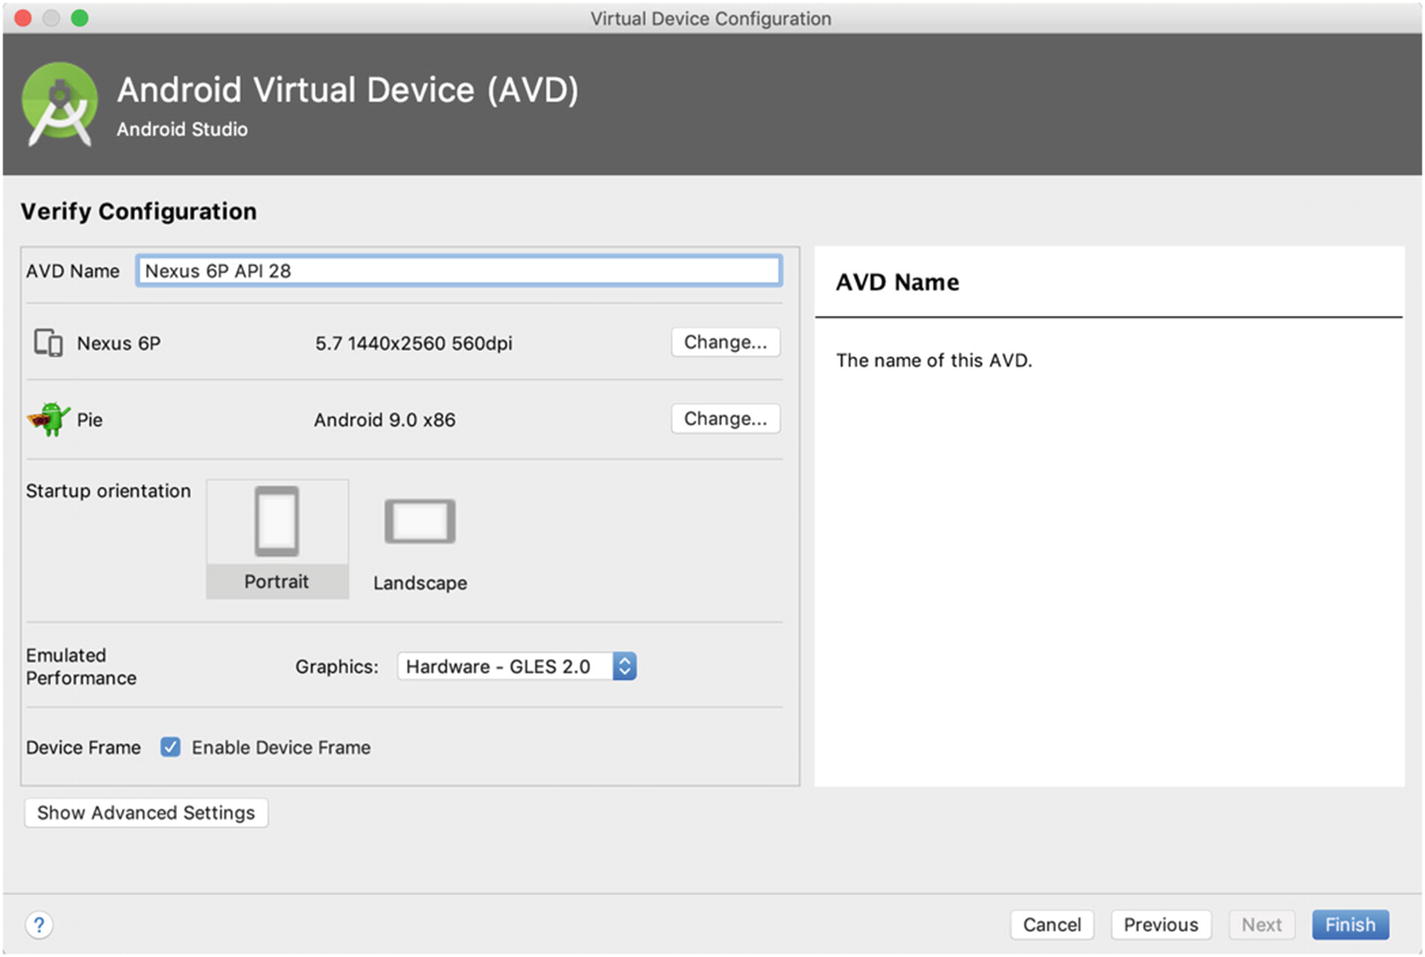
Select emulated performance
A new AVD is created and listed in AVD Manager. Android Studio official web site provides a comprehensive guide ( https://developer.android.com/studio/run/managing-avds ) on how to manage AVDs, if you want to know more details about AVD configurations.
In the AVD Manager, click the green triangle button to start the emulator. It may take some time for the emulator to start up and show the default Android home screen.
1.9 Setting Up Android Devices
Problem
You have finished the testing of your Flutter apps on emulators, and you want to test them on real Android devices.
Solution
Set up your Android device to run Flutter apps.
Discussion
- 1.
You need to enable Developer options and USB debugging on your device. Check the instructions on the official Android web site ( https://developer.android.com/studio/debug/dev-options#enable ). You may also need to install Google USB driver ( https://developer.android.com/studio/run/win-usb ) on Windows machines.
- 2.
Plug your device into your computer with a USB cable. The device prompts a dialog to ask for permissions, authorizing your computer to access your device.
- 3.
Run the command flutter devices to verify Flutter SDK can recognize your device.
The Flutter app can be deployed to the device using Android Studio or the command flutter run.
1.10 Creating Flutter Apps Using Command Line
Problem
You have already set up your local environment to develop Flutter apps. Even though using Android Studio or VS Code is a good choice for development, you may still want to know how to do this from command line.
Solution
Use the commands from Flutter SDK to create and build Flutter apps.
Discussion
Using tools like Android Studio and VS Code can make Flutter development much easier. However, it’s still valuable to know how to build Flutter apps using the command-line tools. This is important for continuous integration. It also allows you to use any other editors to develop Flutter apps.
This command creates various files in the specified directory as the skeleton code of the new app. Navigate to the directory flutter_app and use flutter run to run this app.
1.11 Creating Flutter Apps Using Android Studio
Problem
You want to have a powerful IDE that meets most of the requirements when developing Flutter apps.
Solution
Use Android Studio to create Flutter apps.
Discussion
Since we already have Android Studio installed to set up Android platform for Flutter SDK, it’s a natural choice to use Android Studio as the IDE to develop Flutter apps. Android Studio itself is a powerful IDE based on IntelliJ platform. If you have used other products from JetBrains, like IntelliJ IDEA or WebStorm, you may find it’s quite easy to get started with Android Studio.

Install Flutter plugin in Android Studio
After restarting Android Studio, you should see a new option to start a new Flutter project. The wizard for Flutter projects has different pages to configure the new project.

Select type of Flutter project
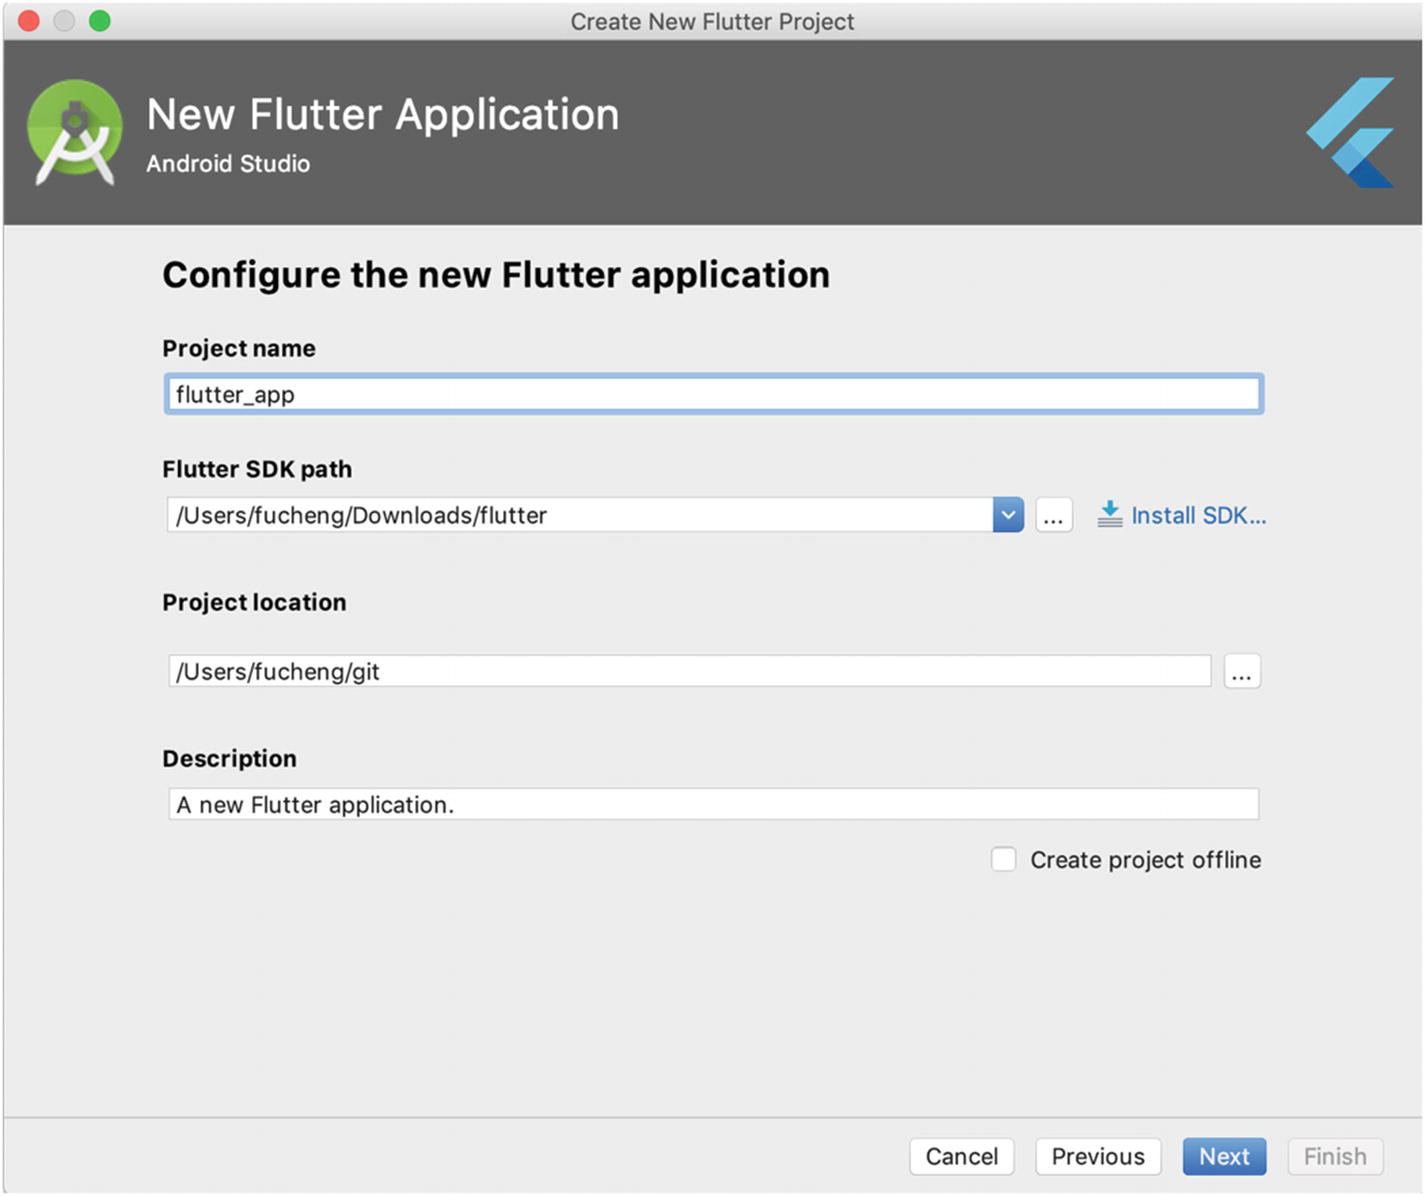
Basic project configurations

Advanced project configurations
After finishing the wizard, a new project is created and opened in Android Studio.
1.12 Creating Flutter Apps Using VS Code
Problem
You want to use a light-weight editor to develop Flutter apps.
Solution
Use VS Code to create Flutter apps.
Discussion
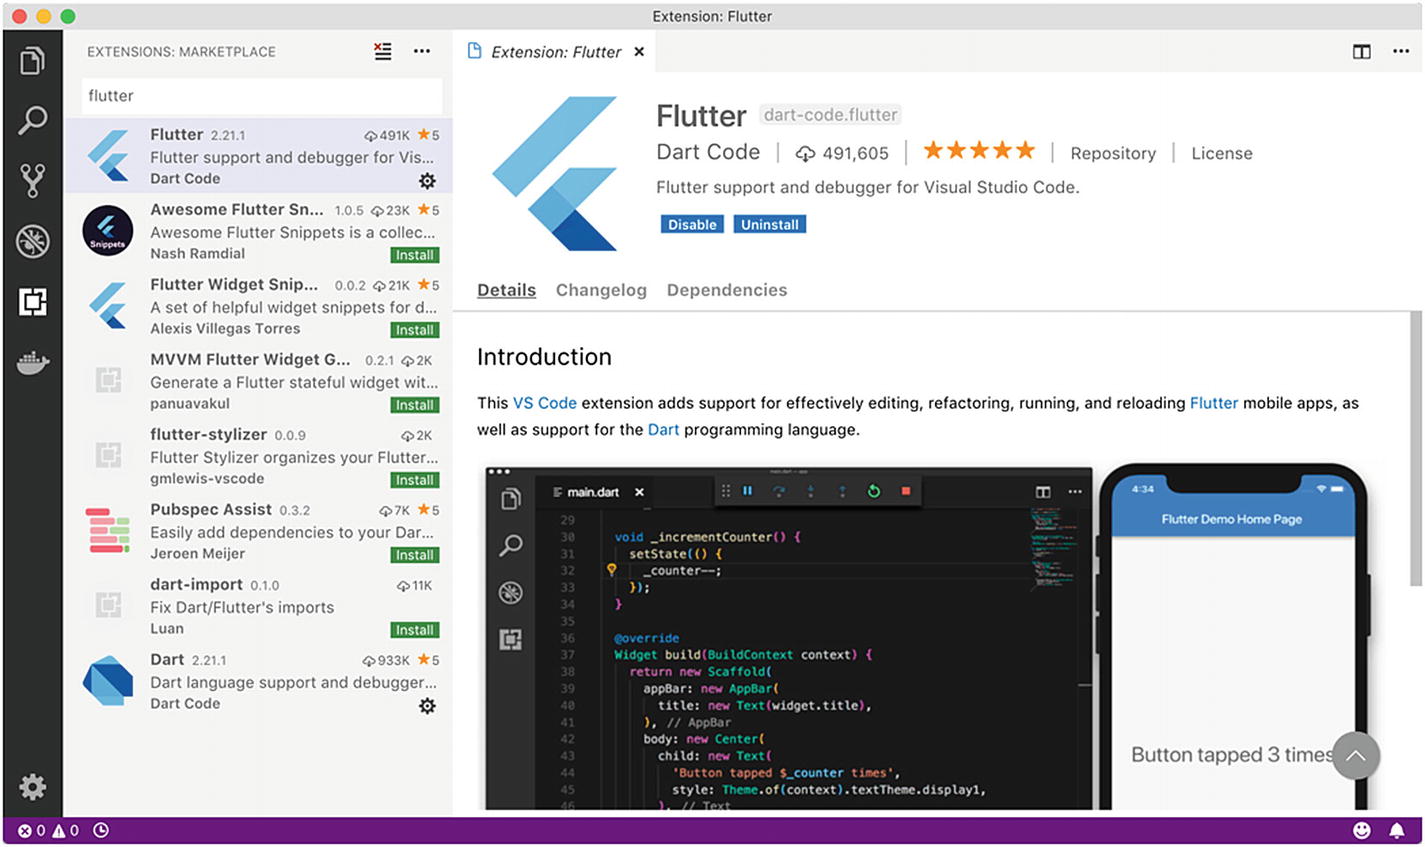
Install Flutter extension in VS Code
To create a new Flutter in VS Code, open the command palette and run the Flutter: New Project command. Input the name of the new project in the opened dialog. Select the directory of the project. VS Code opens a new window for the newly created project.
1.13 Running Flutter Apps
Problem
You want to run Flutter apps on emulators or devices.
Solution
Use flutter run command or IDEs to run Flutter apps.
Discussion
The command flutter run starts the current Flutter app.
In Android Studio, select the emulator or device from the dropdown menu shown in Figure 1-16, then click the Run button to start the app.
In VS Code, select Debug ➤ Start Without Debugging to start the app.

Select device in Android Studio
1.14 Understanding Code Structure of Flutter Apps
Problem
You want to know the typical structure of Flutter apps.
Solution
Go through the sample app generated by Flutter SDK and understand the files.
Discussion
Directories and files of a Flutter app
Name | Description |
|---|---|
lib | Main directory of app source code. The file main.dart is usually the entry point of the app. |
test | Directory that contains test files. |
android | Files for Android platform. |
ios | Files for iOS platform. |
pubspec.yaml | Package description for Dart pub tool. |
pubspec.lock | Lock file for Dart pub tool. |
.metadata | Flutter project description used by Flutter SDK. |
1.15 Fixing Configuration Issues of Flutter SDK
Problem
You want to make sure the configuration of your local development environment is correct for Flutter development.
Solution
Use the command flutter doctor.
Discussion
After Flutter SDK is installed, it needs to be configured with other supporting tools. The command flutter doctor is the primary tool to provide necessary help. This command checks the local environment and reports status of the Flutter SDK installation. For each problem it finds, it also gives instructions on how to fix them. All you need to do is to apply the suggested fixes and run flutter doctor again to verify the result. It’s not necessary to fix all issues reported by flutter doctor. You can safely ignore some issues if they are not relevant. For example, if you are not going to use VS Code as the primary IDE, then it doesn’t matter if VS Code is installed or not.
1.16 Summary
Recipes in this chapter provide instructions on how to get your local machine prepared for Flutter apps development. flutter doctor is a useful tool for setup. You should be able to fix most of the configuration issues by following instructions provided by this command. In the next chapter, we’ll see recipes about using tools provided by Dart SDK, Flutter SDK, and IDEs.