
Chapter 7. Flutter routing in depth
This chapter covers
- Setting up named routes
- Building routes on the fly
- Using the Navigator
- Custom page transition animations
When I was planning this chapter, I was trying to answer these questions: “Why?” or “Who cares?” These are standard questions that Manning encourages their authors to think about before writing a chapter. And, well, this time, these were pretty easy to answer: everyone who doesn’t want to make an app with a single page. Thus, a chapter on routing.
Routing can be a real pain on many platforms (but it shouldn’t have to be!). This point is all too clear in the web world. There are countless libraries that solely implement routing for different frameworks. And, speaking of the web world, I think the folks behind React Router nailed the solution. It’s easy to use, and it’s flexible. It matches the reactive and composable UI style of React.
According to their docs, they’re in the business of “dynamic routing,” rather than static. Historically, most routing was declarative, and routes were configured before the app rendered. The creators of React Router (https://reacttraining.com/react-router/) explained it well in their docs:
“When we say dynamic routing, we mean routing that takes place as your app is rendering. Not in a configuration or convention outside of a running app.”
I’m talking about React Router right now, because the mental-model needed for routing in Flutter is the same. And, to be candid, I didn’t know how to approach this topic, so I looked to people who are much smarter than me. (Thanks, React Router team).
7.1. Routing in Flutter
The advantage to dynamic routing is that it’s flexible. You can have a super complicated app without ever declaring a route, because you can create new pages on the fly. The Flutter Navigator also gives you the option of declaring routes and pages, if you want to take the static approach. And you can (and probably will) mix and match static routes and “on-the-fly” routes.
Note
Routing in Flutter is never really static, but you can declare all your routes up front, so the mental model is the same.
In Flutter, pages are just widgets that we assign to routes. And routes are managed by the Navigator, which is (you guessed it) just a widget! A Navigator widget is an abstraction over a widget that lays its children out in a stack nature. Because they’re widgets, you can nest Navigators up and down your app, willy-nilly. (Routers in routers in routers ....) But before we get into the how-tos, let’s take a look at the app that I’m using as reference for the next couple of chapters.
7.1.1. The Farmers Market app
I live in Portland, Oregon, where people love Farmers Markets. I mean deeply love them. In an unnatural way. So, I thought I’d get rich by breaking into that market. Figure 7.1 shows the app I made for people to buy veggies and other treats from farmers.
Figure 7.1. Screenshots of the Farmers Market app
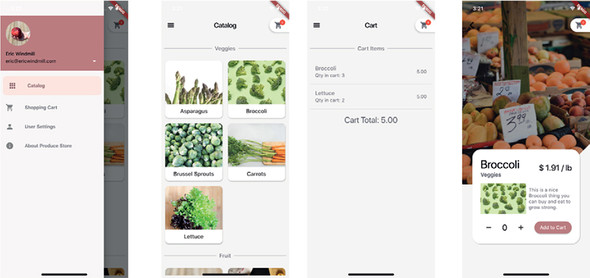
The routing structure of the app isn’t too complicated. It’s only four pages. Our job in this chapter is to wire up the menu with some routes and create a few on-the-fly routes. Then, we’re going to make it fancy with some page transition animations.
The interesting thing about the routes in this app, in my very biased opinion, is that all the pages share the same structural elements. The app bar, the cart icon, the menu, and some of the functionality and the scaffold are all written once, and I pass in the configuration based on the route. This is possible for two reasons: the way you compose an UI in Flutter and the fact that the Navigator is a widget that doesn’t have to be top-level.
7.1.2. The app source code
In the Git repository, you’ll find the relevant files for this book and, in particular, this app. The following listing shows these files.
Listing 7.1. Important files for the e-commerce Farmers Market app
libblocs 1

main.dart
- 1 This is where the logic lives. We’ll look at these blocs in a later chapter.
- 2 We’ll cover the menu in-depth in this chapter.
- 3 The pages are (mostly) already built in this chapter, but we’ll wire a lot of it up here.
- 4 The material_route_transition.dart file in this directory is the most fun part of the chapter. It’s a custom animation from one page to another.
- 5 Most of these files have to do with on-the-fly navigating.
- 6 The root widget of the project, where we’ll start the next section
7.2. Declarative routing and named routes
If you’ve built web apps or mobile apps on nearly any other platform, you’ve likely dealt with declarative routing. On the other application platforms that I’ve used (such as Ruby on Rails, Django, and front-end libraries of the not-very-distant past), routes are defined in their own “routes” file, and what you declare is what you get. In AngularDart, your routes page might look like the next listing.
Listing 7.2. AngularDart Router route definitions
static final routes = [
    new RouteDefinition(
        routePath: new RoutePath(path: '/user/1');     1
        component: main.AppMainComponentNgFactory),    2
    new RouteDefinition(
        routePath:  new RoutePath(path: '/404');
        component: page_not_found.PageNotFoundComponentNgFactory)
    //... etc.
  ];
- 1 The name of the route
- 2 The component to render at that route
Understanding Angular code isn’t important. This is an example of up-front route declarations written in Dart. The point is that you tell your app explicitly which routes you want to exist and which views they should route to. Each RouteDefinition has a path and a component (which is probably a page). This is generally done at the top level of an app. Pretty standard stuff here.
Flutter supports this. Although the routes and pages are still built while the app is running, the mental model that you can approach this with is that these are static. Mobile apps often support tens of pages, and it’s perhaps easier to reason about if you define them once and then reference them by name, rather than creating unnamed routes all over the app.
Flutter routes follow the path conventions of all programming, such as /users/1/ inbox or /login. And as you’d expect, the route of the home page of your app is / (a single forward slash).
7.2.1. Declaring routes
There are two parts to using named routes. The first is defining the routes. In the e-commerce app you’re building in this chapter, the named routes are set up in the lib/app.dart file. If you navigate to that file, you’ll see a MaterialApp widget with the routes established, and in the utils/e_commerce_routes.dart file, you’ll see the static variables with the actual route names. (This is just so I can safely use routes without fearing typos in the strings.)
Listing 7.3. Define routes in the MaterialApp widget
// e_commerce/lib/app.dart -- line ~ 51
// ...
return MaterialApp(
  debugShowCheckedModeBanner: false,
  theme: _theme,
  routes: {                                      1
    ECommerceRoutes.catalogPage: (context) =>
        PageContainer(pageType: PageType.Catalog),
    ECommerceRoutes.cartPage: (context) =>
        PageContainer(pageType: PageType.Cart),
    ECommerceRoutes.userSettingsPage: (context) =>
        PageContainer(pageType: PageType.Settings),
    ECommerceRoutes.addProductFormPage: (context) =>
        PageContainer(pageType: PageType.AddProductForm),
  },
  navigatorObservers: [routeObserver],           2
);

// e_commerce/lib/utils/e_commerce_routes.dart
class ECommerceRoutes {                          3
  static final catalogPage = '/';
  static final cartPage = '/cart';
  static final userSettingsPage = '/settings';
  static final cartItemDetailPage = '/itemDetail';
  static final addProductFormPage = '/addProduct';
}
- 1 Define the rest of your named routes here. Named routes are defined in a Map, where the key is the name of the route ( / ), and the value is a function which returns a widget.
- 2 We’ll cover routeObserver soon. Don’t worry about it for now.
- 3 The ECommerceRoutes class maps to these routes for constant variable safety.
7.2.2. Navigating to named routes
Navigating to named routes is as easy as using the Navigator.pushNamed method. The pushNamed method requires a BuildContext and a route name, so you can use it anywhere that you have access to your BuildContext. It looks like this:
final value = await Navigator.pushNamed(context, "/cart");
Pushing and popping routes is the bread and butter of routing in Flutter. Recall that the Navigator (figure 7.2) lays its children (the pages) out in a “stack” nature. The stack operates on a “last in, first out” principle, as stacks do in computer science. If you’re looking at the home page of your app, and you navigate to a new page, you “push” that new page on top of the stack (and on top of the home page). The top item on the stack is what you see on the screen. If you pushed another route, we’ll call it page three, and wanted to get back to the home page, you’d have to “pop” twice.
Figure 7.2. Flutter’s Navigator is a stack-like structure.

The Navigator class has a bunch of helpful methods to manage the stack. I find myself using only a handful of the methods:
- pop
- popUntil
- canPop
- push
- pushNamed
- popAndPushNamed
- replace
- pushAndRemoveUntil
One important note about pushing named routes is that they return a Future. If you’re not familiar with the await keyword, it’s used to mark expressions that return an asynchronous value. We’re not going to get into async Dart quite yet. But the quick version is that when you call Navigator.pushNamed, it immediately returns a Future object, which says, “Hey, I don’t have a value you for you yet, but I will as soon as this process finishes.” In the specific context of routing, this means: “As soon as they navigate back to here from the page they’re on now, I’ll give you whatever value they pass back from that page.” Later in this chapter, we’ll explore passing values between routes more in-depth.
In the e-commerce project repository, you can find an example of using Navigator .pushNamed in the AppBarCartIcon widget found in the lib/widget/appbar_cart_icon .dart file. Figure 7.3 shows the widget.
Figure 7.3. Highlighting the AppBarCartIcon widget

This icon has a little bubble on it that keeps track of how many items are in the user’s cart. And the widget is actually an IconButton widget. It’s wired up to navigate to the cart page when it’s tapped and the onPressed callback is called:
onPressed: () {
    return Navigator.of(context).pushNamed("/cartPage");
},
That’s all there is to it. For another example of using named routes, you can find a tutorial in the official docs at https://flutter.dev/docs/cookbook/navigation/named-routes.
Note
You might notice that Navigator.of(context).pushNamed(String routeName) function signature isn’t the same as the previously mentioned Navigator.pushNamed(BuildContext context, String routeName) signature. These are interchangeable.
7.2.3. MaterialDrawer widget and the full menu
If you’ve seen a Material Design app, you’re probably familiar with the type of app drawer shown in figure 7.4.
Figure 7.4. Screenshot of the menu drawer in the Farmers Market app

Because this chapter is about routing, I think now’s a good time to explore how to build that menu. First, let’s think about what we actually want it to do:
- The menu should display when a user taps a menu button.
- There should be a menu item for each page, which navigates to a route on tap.
- There should be an About menu item, which shows a modal with app information.
- There should be a menu header, which displays user information. When you tap on the user settings, it should route to the user settings page.
- The menu should highlight which route is currently active.
- The menu should close when a menu item is selected or when a user taps the menu overlay to the right of the menu.
- When the menu is opened or closed, it should animate nicely in and out.
This particular menu drawer is a combination of only five required widgets, all of which are built into Flutter:
- Drawer
- ListView
- UserAccountsDrawerHeader
- ListTile
- AboutListTile
The Drawer is the widget that houses this menu. It takes a single widget in its child argument. You can pass it whatever you want (because everything is a widget). A Drawer will most likely be passed to a Scaffold in its drawer argument.
If you also have an AppBar in a scaffold with a drawer, then Flutter automatically sets the right-side icon on the app bar to a menu button, which opens the menu on tap. The menu will animate out nicely, and close when you swipe it left or tap the overlay to the right.
Note
You can override the automatic menu button by setting Scaffold .automaticallyImplyLeading to false.
7.2.4. Menu items and the appropriate widgets: ListView and ListItems
Next, the ListView. A list view is a layout widget that arranges widgets in a scrollable container. It arranges its children vertically by default, but it’s quite customizable. We’ll talk about scrolling and scrollable widgets in-depth in the next chapter. For now though, you can use this widget just like you’d use a Column. You only need to pass it some children, which are all widgets.
A ListTile is a widget that has two special characteristics: they’re fixed-height, making them ideal for menus, and they’re opinionated. Unlike other generalized widgets, which expect an argument called child, the ListTile has properties like title, subtitle, and leading (figure 7.5). It also comes equipped with an onTap property.
Figure 7.5. Annotated Material ListTile widget

There are some other special Flutter widgets that are used specifically to enhance a ListView into a more “material-esque” menu drawer. Before looking at those directly, look at the structure of the menu in the code. (This code has some details removed as it’s meant to be a high-level overview of the Drawer’s widgets.)
Listing 7.4. AppMenu widget’s build method, condensed to widgets only
@override
  Widget build(BuildContext context) {
    _activeRoute ??= "/";
    return Drawer(
      child: ListView(
        children: <Widget>[
          StreamBuilder(                        1
            // ...
            builder: (                          2
              BuildContext context,
              AsyncSnapshot<ECommerceUser>
            ) => UserAccountsDrawerHeader(),    3
          ), // StreamBuilder
          ListTile(                             4
            leading: Icon(Icons.apps),
            title: Text("Catalog"),
            selected: _activeRoute == ECommerceRoutes.catalogPage,
            onTap: () => _navigate(ECommerceRoutes.catalogPage),
          ),
          ListTile(...),                        5
          ListTile(...),
          AboutListTile(...),                   6
        ],
      ),
    );
  }
- 1 StreamBuilder will be discussed in-depth in chapter 9. For now, keep in mind that it follows the builder pattern, rather than expecting a child.
- 2 AsyncSnapshot is a “jargon-y” name, which will also be discussed later.
- 3 UserAccountsDrawerHeader is a special widget that’s discussed in the next section.
- 4 ListTile is an opinionated widget, used to make all the children in a ListView uniform.
- 5 In this menu, there’s a ListTile for each menu item.
- 6 This is another special widget, also discussed soon.
First, I’d like to discuss these various widgets within the drawer from a high level, starting with the two special widgets, as their use cases are specific. Then, I’ll move into ListTile, which is more generic. In a couple pages, we’ll look at the nitty-gritty code details.
The UserAccountsDrawerHeader is a Material widget that’s used to display crucial user information. Imagine a Google app like GMail, which lets you switch between user accounts with the tap of the button. That GMail-like UI is built into Flutter, using the UserAccountsDrawerHeader. We don’t need this for this app. There’s no lesson here. It’s just a great example of how much Flutter gives you for free.
Finally, the AboutListTile. This widget can be passed into the ListView.children list, and configured in just a few lines of code, as the following listing shows.
Listing 7.5. Flutter’s AboutListTile Material widget
// e_commerce/lib/menu/app_menu_drawer.dart -- line ~81
AboutListTile(
  icon: Icon(Icons.info),
  applicationName: "Produce Store",
  aboutBoxChildren: <Widget>[
    Text("Thanks for reading Flutter in Action!"),
  ],
),
With that small amount of Flutter code, you get a fully functional menu button that displays a modal on tap, complete with a button to close the modal. Figure 7.6 shows what it looks like.
Figure 7.6. Screenshot of the About app dialog

With all that in mind, I think this brings our requirements list to this:
- The menu should display when a user taps a menu button.
- There should be a menu item for each page, which navigates to a route on tap.
- There should be an About menu item, which shows a modal with app information.
- There should be a menu header, which displays user information. When you tap on the user settings, it should route to the user settings page.
- The menu should highlight which route is currently active.
- The menu should close when a menu item is selected, or when a user taps the menu overlay to the right of the menu.
- When the menu is opened or closed, it should animate nicely in and out.
This is slightly over-exaggerated. Of course, you have to actually write those five lines of code for the AboutListTile. But that’s a heck of a lot easier than writing the logic to show a modal and then writing the layout for the modal itself.
Implementing the menu drawer
With all this widget knowledge in mind, most of the work is done for you. The bulk of implementing this menu is in the routing. This works well, because this is a chapter about routing. Most of this work is done in the lib/menu/app_menu_drawer.dart file.
For starters, menu items, when tapped, should route to a new page. In the build method, there is a ListTile for each of these menu items. One ListTile looks like the next listing.
Listing 7.6. Menu drawer item in a ListTile widget
// e_commerce/lib/menu/app_menu_drawer.dart -- line ~63
ListTile(
    leading: Icon(Icons.apps),
    title: Text("Catalog"),
    selected:
        _activeRoute == ECommerceRoutes.catalogPage,  1

    onTap: () =>
        _navigate(ECommerceRoutes.catalogPage),       2
),
- 1 If selected is true, ListTile configures its children’s colors to reflect the active route. I’ll talk about this more in the next section.
- 2 ListTile.onTap is the perfect place to call a method which navigates to a new route.
Tapping that list item calls AppMenu._navigate, which looks like the following code.
Listing 7.7. Navigating from the AppMenu widget
void _navigate(String route) {
    Navigator.popAndPushNamed(context, route);      1

}
- 1 Navigator.popAndPushNamed is another method to manage the route stack, like push and pushNamed. This method pops the current page off though, to ensure that there isn’t a giant stack of pages.
You can see another example of adding a page to the stack in the UserAccountsDrawerHeader widget in this same build method.
Listing 7.8. UserAccountsDrawerHeader usage in AppMenu widget
UserAccountsDrawerHeader(
  currentAccountPicture: CircleAvatar(                1
    backgroundImage:
        AssetImage("assets/images/apple-in-hand.jpg"),
  ),
  accountEmail: Text(s.data.contact),                 2
  accountName: Text(s.data.name),                     3

  onDetailsPressed: () {
    Navigator.pushReplacementNamed(                   4
        context, ECommerceRoutes.userSettingsPage);
  },
),
- 1 Takes a CircleAvatar as a child, which crops any image into a circle
- 2 Accepts some crucial details of user, such as contact information and name
- 3 Passes in user information from the aforementioned AsyncSnapshot, which is one way to get data asynchronously. (More on this soon).
- 4 Navigator.pushReplacementNamed ensures that the route stack won’t just keep adding new pages. It’ll remove the route you’re navigating from when the new route is finished animating in.
7.2.5. NavigatorObserver: Highlighting the active route with RouteAware
Another interesting aspect of the Flutter router is observers. You won’t get far into Dart programming without using observers and streams and emitting events. There’s an entire chapter devoted to that later in this book, but for now, I’m going to focus specifically on a NavigatorObserver. A navigator observer (figure 7.7) is an object that tells any widget that’s listening, “Hey, the Navigator is performing some event, if you’re interested.” That’s really its only job—but it’s an important one.
Figure 7.7. Route observer process diagram

A subclass of NavigatorObserver, and the one we’re interested in here, is RouteObserver. This observer specifically notifies all its listeners if the current active route of specific type changes (for instance, PageRoute).
This RouteObserver is how you’re going to keep track of which page is active, and use it to highlight the correct menu item in the menu. For many cases, you’ll only need one RouteObserver per Navigator. Which means there’ll likely be only one in your app. In this app, the route observer is built in the app file.
final RouteObserver<Route> routeObserver =
    RouteObserver<Route>();                   1

class ECommerceApp extends StatefulWidget {
  @override
  _ECommerceAppState createState() => _ECommerceAppState();
}

// ... rest of file
- 1 By giving it a type of <Route>, the observer will notify listeners of any route change. Alternatively, <PageRoute> would only notify page routes.
I created the observer in the global scope, not protected by the safety of any class, because I needed it to be visible through out the whole app. Also, if it was added to a class, it would be the singular member on that class, which is unnecessary. This is common for RouteObserver objects. After this, you need to tell your MaterialApp about it, in the same file, as shown in this listing.
Listing 7.9. Pass route observers into the MaterialApp widget
// e_commerce/lib/app.dart -- line ~51
return MaterialApp(
    debugShowCheckedModeBanner: false,
    theme: _theme,
    home: PageContainer(pageType: PageType.Catalog,),
    routes: { ... }
    navigatorObservers: [routeObserver],     1
);
- 1 Tell MaterialApp about the routeObserver that it needs to notify when a routing event takes place.
That’s all the set up; now you can listen to that observer on any State object. It has to be stateful though, because you’ll need to use some state lifecycle method. For our purposes, this is going to happen back in the AppMenu widget you’ve been working with in this section. First, the state object needs to be extended with the mixin RouteAware, as shown here:
// e-commerce/lib/menu/app_menu_drawer.dart -- line ~14
class AppMenu extends StatefulWidget {
  @override
  AppMenuState createState() => AppMenuState();
}

class AppMenuState extends State<AppMenu>
    with RouteAware { ... }                1
- 1 with is the Dart keyword needed to use mixins.
This RouteAware mixin is an abstract class that provides an interface to interact with a route observer. Now, your state object has access to the methods didPop, didPush, and a few others.
In order to update the menu with the correct active route, we need to be notified when there’s a new page on the stack. There are two steps to that: first, listen to the changes from the route observer, and second, listen to the observer to be notified when the route changes.
Listing 7.10. Listen to the route observer
// e_commerce/lib/menu/app_menu_drawer.dart -- line ~19
class AppMenuState extends State<AppMenu> with RouteAware {
  String _activeRoute;                                      1
  UserBloc _bloc;

    @override
    void didChangeDependencies() {                          2
        super.didChangeDependencies();
        routeObserver.subscribe(                            3
          this,
          ModalRoute.of(context),
        );
        _bloc = AppStateContainer.of(context)
            .blocProvider.userBloc;                         4
    }
// ... rest of class
}
- 1 The class variable I use to track the currently active route
- 2 This is a widget lifecycle method, and the correct place to listen to new streams and observers. We’ll cover this in the next chapter.
- 3 Accesses the created global routeObserver variable; subscribe is a method that listens to the observer. This method expects
a RouteAware object (which this state object is, because it extends the RouteAware class), and the route in which you’re interested—in
this case, the route you’re on now.[1]A ModalRoute is a route that covers the screen, even if it isn’t opaque on the whole screen. In other words, any route that disables interaction with any route underneath it. Examples would be pages, popups, and drawers.
- 4 The UserBloc lines can be ignored for now. I’m showing these for the sake of completeness.
Now that this widget is aware of route changes, it needs to update its active route variable when any Navigator activity happens. This is done in the didPush method that it inherited from RouteAware:
// e_commerce/lib/menu/app_menu_drawer.dart -- line ~30
@override
void didPush() {                              1

  _activeRoute =
    ModalRoute.of(context).settings.name;     2

}
- 1 Called when a route is pushed onto the stack. This happens as the menu itself is transitioning off screen. So, the next time you build the drawer (by opening the menu), the build method is called again. Thus, it’s redundant to call setState.
- 2 This line gets the name of the current route. Using context to grab route settings is similar to using a theme (discussed in chapter 4), but that paradigm will be explained in-depth in the next chapter.
Using the navigation observer and route aware is, in my opinion, the most complicated topic in this chapter. This list of resources might help if you want to read through more examples:
- https://api.flutter.dev/flutter/widgets/RouteObserver-class.html
- https://stackoverflow.com/questions/46165705/flutter-how-the-navigatorobserver-class-works
7.3. Routing on the fly
Routing on the fly is the idea that you can route to a page that doesn’t exist until it’s generated in response to an event. For example, you may want to navigate to a new page when the user taps a list item. You don’t have to establish this route ahead of time, because routes are just widgets. Here’s some example code.
Listing 7.11. Example code showing routing on the fly
void _showListItemDetailPage() async {
    await Navigator.push(                    1
      context,
      MaterialPageRoute(                     2
        builder: (context) => SettingsPage(
              settings: settings,
            ),
        fullscreenDialog: true,              3
      ),
    );
  }
- 1 Recall that named routes are navigated to via Navigator.pushNamed. Navigator.push requires a widget instead of a route.
- 2 This is just a built-in widget made to display like a page ...
- 3 ... if you want it to! This tells Flutter to make it fullscreen.
In Flutter, everything that seems like a new widget on the route stack is a route. Modals, bottom sheets, snack bars, and dialogs are all routes, and these are perfect candidates for routing on the fly.
7.3.1. MaterialRouteBuilder
The first important place that we route on the fly in this app is when we tap a product in the catalog page and navigate to a product detail page.
Note
On this page, there are a lot of widgets and concepts not yet covered in this book, like StreamBuilder and Slivers and all kinds of goodies. We will cover those later in the book.
Around line 93 in the lib/widget/catalog.dart file, I build the ProductDetailCard (figure 7.8), which is listening for a tap to navigate to another page.
Figure 7.8. Screenshot of product detail cards

The code for the product detail page looks like this:
// e_commerce/lib/widget/catalog.dart -- line ~93
return ProductDetailCard(
    key: ValueKey(_product.imageTitle.toString()),
    onTap: () => _toProductDetailPage(_product),                1
    onLongPress: () => _showQuickAddToCart(context, _product),
    product: _product,
);
- 1 This onTap responds to a gesture and calls the important method to us, _toProductDetailPage.
When that item is tapped, the next listing shows the method that will execute.
Listing 7.12. Navigate to a new route on the fly
// e_commerce/lib/widget/catalog.dart -- line ~37
Future _toProductDetailPage(Product product) async {
    await Navigator.push(                            1
        context,
        MaterialPageRoute(                           2
            builder: (context) =>
            ProductDetailPageContainer(              3
              product: product,
            ),
        ),
    );
}
- 1 Like the previous routing, you can use Navigator.push to add a new page to the stack.
- 2 MaterialPageRoute is a subclass of PageRoute, and it provides all the Material widget functionality in the new place in the widget tree.
- 3 Route objects like MaterialPageRoute require a builder argument, which takes a callback and returns a widget.
That’s it for navigating to new pages that aren’t established. Routes that don’t cover the whole screen are similar. This includes modals, dialogs, bottom sheets, and more.[2]
For a super simple second example of routing without named routes, check out this page in the official documentation: https://flutter.dev/docs/cookbook/navigation/navigation-basics.
7.3.2. showSnackBar, showBottomSheet, and the like
Flutter has widgets and logic to make it super easy to use routes that aren’t pages, like modals and snackbars. These are technically routes, but under the hood, they just don’t render like a whole page would. They’re still widgets that get added on the stack of the Navigator, rather than being attached to a page (figure 7.9).
Figure 7.9. Some routes don’t cover the entire screen.

In this app, we make use of the bottom sheet (which is common in iOS apps) and a snackbar. These are similar in the fact that they appear from the bottom of the screen and only cover a portion on the screen. They’re different, though, because a bottom sheet is a ModalRoute. Meaning that when it’s in view, you cannot interact with the page beneath it. A snack bar doesn’t obstruct the app, so you can still interact while it’s in view.
The bottom sheet is implemented in the same Catalog widget, and kicked off by pressing and holding a ProductDetailCard via the ProductDetailCard.onLongPress method:
// e_commerce/lib/widget/catalog.dart -- line ~93
return ProductDetailCard(
    key: ValueKey(_product.imageTitle.toString()),
    onTap: () => _toProductDetailPage(_product),
    onLongPress: () =>
        _showQuickAddToCart(_product),     1
    product: _product,
);
- 1 On a long press, show a bottom sheet.
This method, _showQuickAddToCart, is in the business of showing the BottomSheet (figure 7.10), waiting for the user to interact with it, and listening to the data that the bottom sheet passes back.
Figure 7.10. Bottom sheet widget example

The _showQuickAddToCart method looks like this:
// e_commerce/lib/widget/catalog.dart -- line ~48
void _showQuickAddToCart(BuildContext context, Product product) async {
  CartBloc _cartBloc = AppState.of(context).blocProvider.cartBloc;

  int qty = await showModalBottomSheet<int>(       1

    context: context,                              2

    builder: (BuildContext context) {              3
        return AddToCartBottomSheet(
            key: Key(product.id),
        );
    });

    _addToCart(product, qty, _cartBloc);
}
- 1 There’s a lot going on in this line alone. For starters, showModalBottomSheet is a global method, provided by Flutter, which takes care of the routing for you. The type declaration (<int>) tells us what type of data we can expect to be passed back from the bottom sheet. This line is also assigning a value to the return value of showModalBottomSheet. You have to use the await keyword, because the method returns a Future. This Future basically says, “Hey, I’m going to give you the proper value as soon as the user dismisses the bottom sheet and I get the correct value.”
- 2 All routes need a BuildContext so Flutter knows where to insert them into the tree.
- 3 All route change methods expect a callback that returns a widget.
To complete this implementation, we need to look at the AddToCartBottomSheet code. Within that widget, there’s a RaisedButton, which corresponds to this button on the screen (figure 7.11).
Figure 7.11. Bottom sheet screenshot from Farmers Market app

This AddToCartBottomSheet method is nearly 100 lines of code, but much of it is basic Flutter widget building. I would like to point out some pieces to complete this specific lesson. (Hint: the most important part for this lesson is the RaisedButton near the bottom of the code sample.)
Listing 7.13. Choice code from the AddToCartBottomSheet widget
// e_commerce/lib/widget/add_to_cart_bottom_sheet.dart
class AddToCartBottomSheet extends StatefulWidget {           1
  const AddToCartBottomSheet({Key key}) : super(key: key);

  @override
  _AddToCartBottomSheetState createState() => _AddToCartBottomSheetState();
}

class _AddToCartBottomSheetState extends State<AddToCartBottomSheet> {
  int _quantity = 0;
  // ...

  @override
  Widget build(BuildContext context) {
    return ConstrainedBox(                                    2
      constraints: BoxConstraints(
        minWidth: MediaQuery.of(context).size.width,
        minHeight: MediaQuery.of(context).size.height / 2,
      ),
      child: Column(
        children: <Widget>[
          Padding(
            // ...
            child: Text("Add item to Cart"),
          ),
          Padding(
            // ...
            child: Row(                                       3
              children: <Widget>[
                IconButton(...) // decrease qty button
                Text(...) // current quanity
                IconButton(...) // increase qty button
              ],
            ),
          ),
          RaisedButton(                                       4
            color: AppColors.primary[500],
            textColor: Colors.white,
            child: Text(
              "Add To Cart".toUpperCase(),
            ),
            onPressed: () =>
              Navigator.of(context).pop(_quantity),           5
          )
        ],
      ),
    );
}
- 1 I’m highlighting this first line just to show that this special kind of partial route, a bottom sheet, is just a widget. There is nothing special about it at all.
- 2 This is a good example of using box constraints, which is limiting the size of the bottom sheet.
- 3 This row is where the user adjust the quantity they would like to add to the cart.
- 4 This RaisedButton is where the most important pieces of this lesson lie.
- 5 This single line is what we care about specifically for routing.
This is a pretty run-of-the-mill button. The part we’re interested in is its onPressed callback. When the button is pressed, it pops the top route off the Navigator (which is the bottom sheet itself), and then passes that variable (_quantity), back to code that added this route onto the stack. Recall that this route was added to the stack by the Catalog._showQuickAddToCart method. Let’s revisit that code as shown in the next listing.
Listing 7.14. _showQuickAddToCart method revisited
// e_commerce/lib/widget/catalog.dart -- line ~48
void _showQuickAddToCart(BuildContext context, Product product) async {
CartBloc _cartBloc = AppState.of(context).blocProvider.cartBloc;

  int qty = await showModalBottomSheet<int>(       1
    context: context,
    builder: (BuildContext context) {
        return AddToCartBottomSheet(               2
            key: Key(product.id),
        );
    });

    _addToCart(product, qty, _cartBloc);           3
}
- 1 This method pushes a bottom sheet on the Navigator stack. And it’s awaiting a response, which can be saved as a variable.
- 2 This is where we’re building the AddToCartBottomSheet widget.
- 3 Here, the point of this whole exercise. We’re passing the value returned from the bottom sheet into a different method.
The point of this whole section is that bottom sheets and the like behave exactly like routes. And when you pop these routes off the Navigator, you can pass data back to the previous screen, as we’re doing with the qty variable.
Other pop-up style widgets work just as easily. For example, to show a snackbar, you can call showSnackbar, which lives on a scaffold: Scaffold.of(context).showSnackBar (Widget content);.
7.4. Routing animations
The final piece of the routing puzzle is making it pretty, which is my favorite part about writing apps. Believe it or not, though, there’s almost no work involved in adding custom route transitions. The real work, actually, is in writing the animation, if you want to do it super fancy. But as you saw in the previous app, Flutter gives you quite a few animations out of the box.
Before we dive in, consider how page transitions work in Flutter, by default. The following facts are important:
- Pages are just widgets, so they can be animated like any other widget.
- Pages have default transitions, which differ by platform: iOS style or Material style.
- All transitions involve two pages, one of which is coming into view, and one that is leaving view.
With that in mind, lets dive in. Transitions are handled by PageRoute, or in our case, MaterialPageRoute, which extends PageRoute, which extends ModalRoute, which extends TransitionRoute. Somewhere in this mess, there’s a method called buildTransitions, which, among other things, takes two animations as arguments. One is for itself as it exits, and the second to coordinate with the route that’s replacing it. MaterialPageRoute already implements transitions, which means you can override MaterialPageRoute.buildTransitions.
All this method has to do is return a widget. And by overriding it, you don’t have to worry about writing the AnimationController or Tween—that’s all taken care of in the superclass. Which means you can simply return a page that’s wrapped in an animated widget, and it will animate accordingly. Take a look at the code to make that less abstract. This can be found in lib/util/material_route_transition.dart.
Listing 7.15. Writing a custom page transition
// e_commerce/lib/util/material_route_transition.dart
class FadeInSlideOutRoute<T> extends
    MaterialPageRoute<T> {                                             1
  FadeInSlideOutRoute({WidgetBuilder builder, RouteSettings settings})
      : super(builder: builder, settings: settings);

  @override
  Widget buildTransitions(
    BuildContext context,
    Animation<double> animation,                                       2
    Animation<double> secondaryAnimation,
    Widget child,
  ) {
    if (settings.isInitialRoute) return child;
    if (animation.status == AnimationStatus.reverse) {
      return super.buildTransitions(
        context,
        animation,
        secondaryAnimation,
        child,
      );
    }
    return FadeTransition(
        opacity: animation,
        child: child,
    );                                                                 3
  }
}
- 1 To write this transition, we’re going to lean heavily on what Flutter gives us out of the box. Extend the MaterialPageRoute, and pass this class's properties to the superclass by calling super.
- 2 This overridden method is called internally, so we don’t have to mess with building the animation itself, but you could if you wanted!
- 3 Return a built-in Flutter FadeTransition, and pass it in the animation built by the superclass. Now anytime you push a FadeInSlideOutRoute onto the stack, it’ll use these animations.
There’s a bit of abstraction in that example, to be sure. But the most important line, by far, is the return statement. This buildTransitions method overrides the same method on the superclass, MaterialPageRoute, and does all the hard work of calculating how to animate between pages and implementing those transitions.
FadeTransition tells buildTransitions specifically to build a transition that fades the new page in. And buildTransitions is called internally. We never explicitly call it in the code. If you wanted to create something highly customized, you would need to call buildTransitions on your own, and you would likely be using WidgetsApp rather than a MaterialApp at the root of your application.
With all that in mind, FadeTransition is what we, the developers, really care about. You could also use one of the many other transitions that Flutter’s material library provides:
- SlideTransition
- SizeTransition
- RotationTransition
- AlignTransition
- and more
These are all provided by the framework, and implementing them is just as straight forward.
To use this, all you need to do is go to Catalog._toProductDetailPage and replace MaterialPageRoute with FadeInSlideOutRoute. Now when you tap a product detail card, the routes will fade. I guess it’s worth saying that you could get as fancy and wild with this as you wanted. You’re limited only by the animation you write. Finally, if you’d like to read another explanation, this article written by Divyanshu Bhargava on Medium is quite good: https://medium.com/flutter-community/everything-you-need-to-know-about-flutter-page-route-transition-9ef5c1b32823.
Summary
- Flutter uses dynamic routing, which makes routing much more flexible and fluid.
- Flutter’s Navigator allows you to create routes “on the fly” in your code, just as some user interaction takes place or the app receives new data.
- Flutter supports (practically) static routing using named routes. (Although these routes are still technically created as the app is running.)
- Define your named routes in your MaterialApp widget or whichever top-level App widget you’re using.
- The Navigator manages all the routes in a stack manner.
- Navigating to routes is done by calling variations of Navigator.push and Navigator.pop.
- Navigator.push calls return a Future that awaits a value which is to be passed back by the new route.
- Creating a full Material-style menu drawer in Flutter involves several incredibly generous widgets: Drawer, ListView, ListTile, AboutListTile, and DrawerHeader.
- You can anticipate changes in routing by setting up a RouteObserver and subscribing to it on any widget’s state object.
- Several UI elements are managed with the Navigator and are technically routes, though they aren’t pages, such as snackbars, bottom sheets, drawers, and menus.
- You can listen for user interactions using the GestureDetector widget.
- Implementing custom page transitions is done by extending Route classes.