
There are many processes in an organization that are handled manually, for example:
- If a user does not return the book in seven days, the librarian sends an e-mail reminder to him to return the same
- If a user updates his address in the system, an automated update should happen in an external inventory management system or an address book
- If a user misses out a payment of a fine or returns a book after the due date, the user is marked as black listed
Force.com provides us with a beautiful workflow management system to automate these manual problems. The solution for the problems such as the preceding one is given as a part of logic as a service. A typical flow of a workflow is as follows:
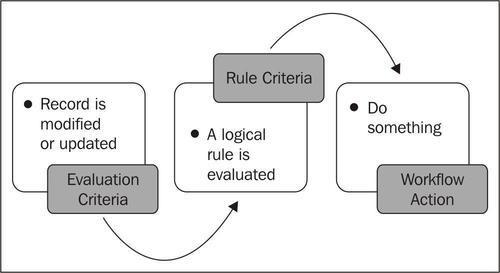
The workflow helps in automating the business process that usually requires manual intervention.
The library management wants to send an e-mail to the member who issues the media resource mentioning the details of the media item and the date of return with it. Create a workflow rule to send it to the member.
The following steps will illustrate how to create a workflow:
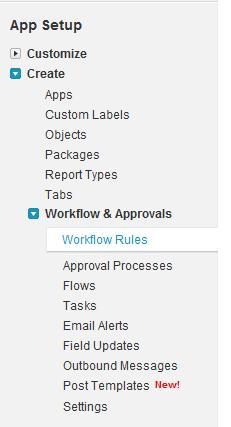
- Navigate to Setup | Create | Workflow & Approvals | Workflow Rules as shown in the following screenshot:
- Click on New Rule to begin.
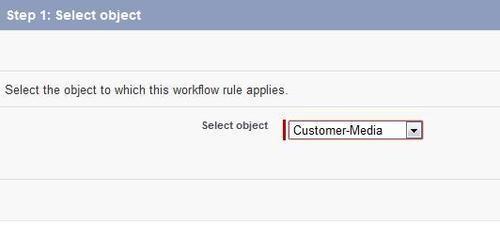
- Select the object on which the workflow will be fired and click on Next, in the example we will select Customer-Media object.
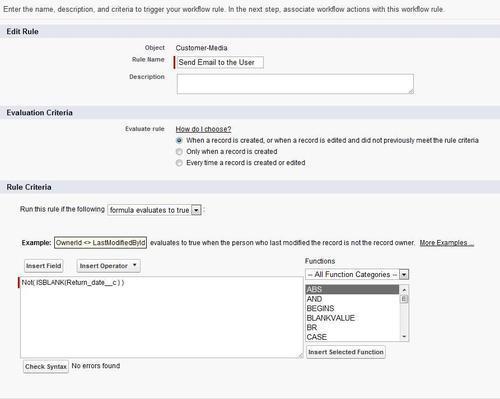
- Give the rule a name and select the Evaluation Criteria.
Evaluation Criteria: The evaluation criteia for a workflow can be any of the following:
- When a record is created or when a record is edited and did not previously meet the rule criteria: This rules triggers during creating and updating the object till the criteria is met. It is not re-triggered once the criteria are satisfied.
- Only when a record is created: This is an option to ignore updates to existing records.
- Every time a record is created or edited: This option triggers during creating and updating records irrespective of if it still meets the criteria. The workflow is repeated every time there is change in the value. We cannot add time-dependent actions to the rule if we choose Every time a record is created or edited.
For the purpose of the example, the evaluation criteria will be when a record is created or when a record is edited and did not previously meet the rule criteria.
Rule Criteria: As already mentioned in the previous section, rules can be evaluated against values or against formulas. The rule selection criteria are the same as we have seen before. For example, the rule criteria would be if the return date is not null as shown in the following screenshot:
- Click on Save & Next.
- Click on the Add Workflow Action to select an action as shown in the following screenshot:
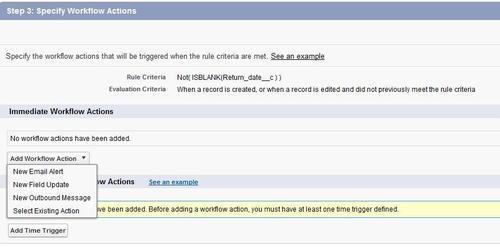
Workflow Actions: We can add different actions to the workflow to perform once the workflow rule criteria and the entry criteria are evaluated.We can add the following actions to the workflow:
- Task: A task is created for any user once the workflow is fired. Tasks are set in the Salesforce calendar and can be directly synchronized with the other calendar application by the user.
- E-mail alert: We can also send an e-mail alert to reach recipients if the criteria are met. For example, suppose a book reserved by the member has recently checked in, an e-mail alert will be fired to the customer to collect the book.
- Field update: We can make an automatic field update after a certain criterion is met. For example, if we automatically change the status of the book once it is returned, we can update the field using this action.
- Outbound message: An outbound message is sent to the external server or web service.
- Every action will open a new window with respective parameters. Save them.
- To add more actions repeat step four otherwise click on Done.
We can also reuse the workflow actions in the multiple workflows. To reuse an existing action, like, for example, sending a common e-mail for multiple workflows, select the fifth option of choosing Select Existing Action.
- Once you create a workflow it will not be Active automatically as shown in the figure below.
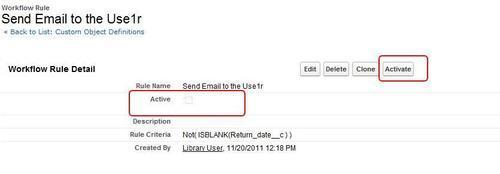
- To activate the workflow, do not forget to click on the Activate button on top of the workflow detail page.
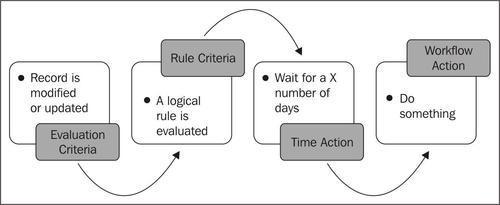
Generally, the workflow action is executed immediately, the moment the workflow is fired. However, in some cases we need to set an action after some amount of time. The general flow of the process is as shown in the next diagram:
For example, to send a reminder e-mail for due date of a checked out resource to the customer. In these cases we use the time-dependent workflows. The time dependent workflow waits for X number of days/hours/minutes after the workflow is fired. The time duration can be relative to the time of workflow or any date field on the record. For example, five hours after the workflow rule is evaluated or two days after the created date.
The time-dependent workflow cannot be used if the Evaluation Criteria is set to Every time a record is created or updated.
If the record has an action pending in the queue and the workflow is modified, this time without meeting the criteria, the pending action is cancelled.
If the record has an action pending in the queue and the workflow is updated again and the timing is changed, the pending action is modified with changes.
The library management wants a clear indicator when the member fails to return the book on the due date. Create a workflow rule to blacklist the member 48 hours after the due date.
To create a time-based workflow, perform steps one to three of creating a workflow and then continue with the following steps:
- Go to the workflow detail page and click on Add Time trigger as shown in the following screenshot:

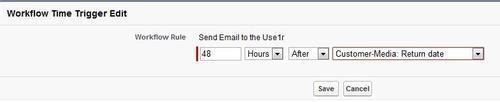
- Add the time trigger in the next screen for 48 Hours after the Return date as shown in the following screensot:
- Now that a time trigger is defined we can add the action as New Field Update with the time trigger. The actions are common for both types of workflows as shown in the following screenshot:

- Save the time-based trigger.
In the general library, they wish to send a reminder e-mail to the user about returning the book on time. The user has to return the media item 14 days after the check-in date. Create a time-based workflow that will send a reminder e-mail five days BEFORE the due date.
The library also wishes to send the reminder e-mail two days after the due date. However, if the user checks-in the book before the reminder it should automatically stop the alert. Create a time-based workflow for the same.
We have already seen how to create a time-based workflow; this exercise is to practice for the same. Use the example given in the section as a reference and create these time-based workflows.