
This chapter covers the following topics:
How the ActionScript event model works
How to work with event listeners
How to use input events from the mouse and keyboard to allow interactivity in your projects
The event flow and why it's useful
One of the facets that makes Flash movies and Flex applications so appealing to users is that developers (you and me) can tap into the Flash Player to handle mouse and keyboard events and provide immediate feedback. All of the projects you've looked at so far in this book have been lacking one vital ingredient: user interaction. I'm going to remedy that here and now by taking you on a journey through the magical world of events and event handling.
As you might have guessed from the title, events in ActionScript 3.0 let you do more than just allow your projects to interact with the users. They are the means by which you know when an external image file has finished loading, for example, or when the Flash Player shows the next frame of your movie. We'll get to these less tangible, but no less important, uses of events and event handling later in the chapter, and begin by concentrating on user interaction.
In the real world, you don't need to check your microwave every 2 seconds to see when your food has finished cooking. Instead, when the timer reaches zero, the microwave beeps to let you know that your gourmet all-in-one chicken dinner (complete with artificial gravy and green things that may once have been peas) is ready to eat. The fact that your microwave will tell you when the food is ready lets you get on with other stuff while it's cooking, like searching through the bathroom cabinet for some antacid tablets to extinguish the inevitable heartburn you'll get after consuming your "gourmet" meal.
The events system in ActionScript 3.0 is made up of three types of objects: events, event dispatchers, and event listeners. In ActionScript 3.0 parlance, the microwave would be known as the event dispatcher. The event would be the microwave timer reaching zero and beeping frantically. You, or more specifically, the part of your brain you've tasked with listening for the beep, would be the event listener. Figure 6-1 illustrates this concept.

An event is an instance of the Event class, which has a variety of properties that relate to the type of event that occurred. If the event in question were a mouse click, the event object would contain details about the position of the mouse pointer and which (if any) modifier keys—Shift or Ctrl—were held down at the time the event occurred.
Many different classes extend the core Event class in the Flash and Flex frameworks, each tailored to a specific type of event. For example, the mouse click is represented by the MouseEvent class, which adds stageX and stageY properties, among others, to describe the position of the mouse pointer when the event occurred. Additional event classes include KeyboardEvent for keyboard activity, NetStatusEvent for events that occur when streaming video and communicating with the Flash Media Server, and ProgressEvent for monitoring the loading of assets and data. Consult the Adobe documentation for a complete listing of all the event classes, including the additional ones in the Flex framework.
If you want to be notified of a specific type of event, you can register your interest in that event type with the event dispatcher using the addEventListener() method. When you set up a listener for an event using this method, you need to provide two crucial pieces of information: the type of event you are interested in and the method you want to be called when that type of event occurs (commonly called the event handler method).
someObject.addEventListener(type, listener);
The type parameter is the name of the event you want to listen for, in the form of a string. Rather than use a string literal, you should use the static event type constants that are part of the Event class and its descendants. These constants are provided so that you don't need to memorize the event names themselves, and they bring the added benefit that the compiler will probably catch any mistakes you might make in the event name.
The second parameter is a reference to the method you want to be called whenever an event of the specified type occurs. This method should have a single parameter, which corresponds to the class of event you want to listen for (Event for basic events, MouseEvent for mouse-related events, and so on) and have a return type of void.
private function methodName(event:EventClass):void {
   // Handle event in here
}
Note
Be careful when specifying the type for the handler's parameter: the Flash Player will throw a runtime error if the type of dispatched event does not match the specified data type in your event listener.
As an example, if you wanted to set up an event listener for the Event.ENTER_FRAME event, which is broadcast by all DisplayObject instances whenever a new frame is displayed, you would end up with something like this:
mySprite.addEventListener(Event.ENTER_FRAME, onSpriteEnterFrame);

private function onSpriteEnterFrame(event:Event):void {
 x += 2; // moves sprite 2 pixels right each frame
}
Event listeners are processed in the order in which they were added to the object, so if you added three listeners for the same event, the listeners will receive notification of the event in the order they were added as listeners.
Note
The addEventListener() method has a couple of extra optional parameters you can pass. Generally, you will not need to worry about these additional parameters, but it is good to understand what the options provide.
First, the useCapture parameter offers a way to have listeners receive event notifications at an earlier stage of the event flow. You'll learn more about this parameter in the "Listening for events in the capture phase" section later in this chapter.
The priority parameter allows you to specify an order in which listeners receive event notification. You'll learn more about this parameter in the "Stopping an event from propagating" section later in this chapter.
The useWeakReference parameter specifies that an object can be garbage-collected if its only reference is as a listener for another object's events. Basically, when an object adds an event listener for an event, a reference to that object is stored and cannot be garbage-collected (removed from memory), even when that object is no longer referenced anywhere but as an event listener. At that point, it is even impossible to remove the object as an event listener, since no other reference exists, so the object is said to be "orphaned" and is really just wasted memory. Passing true for the useWeakReference parameter tells the Flash runtime that if no other references to the object exist except as the event listener, the object may be marked for garbage collection.
Should you no longer wish to listen for an event, you just need to call the removeEventListener() method, passing the exact same parameters you passed to addEventListener() to set up the event listener in the first place: the event type (preferably using one of the event type constants from the Event classes) and a reference to the event listener method:
someObject.removeEventListener(type, listener);
Once you call the removeEventListener() method, your listener will no longer receive events of the specified type from the event dispatcher.
Note
It's important that you remove event listeners when you're finished with them in order to prevent your project from consuming more and more memory. An object will not be garbage-collected by the Flash Player when it has event listeners registered for it, meaning that those objects will just hang around for as long as your project is running in the Flash Player. You can get around this by passing true for the useWeakReference parameter in the addEventListener() method call, but it is still strongly recommended that you remove any event listener that no longer needs notification of an event.
Your event handler methods can have any name you like—they are your methods, and you're telling the event dispatcher which method to call. However, to make things easier for you (and anyone else reading your code) to know at a glance what a particular event listener method is designed to handle, you can use the following convention:
on + ObjectType + EventType
For example, if you have your own DisplayObject class to represent thumbnails of photographs (named, rather cunningly, PhotoThumbnail) that users can click to view a larger version (which will be communicated by the MouseEvent.CLICK event), name your event handler onPhotoThumbnailClick. Simple, huh?
Now is a good time to handle your first event in ActionScript 3.0. This example combines event handling with the drawing API (covered in the previous chapter).
The premise is simple: when the mouse button is held down and the mouse is moved, you draw a line from the last mouse position to the current one. When the mouse button is released, you stop drawing. Granted, it's more Etch-A-Sketch than Adobe Photoshop, but everyone needs to start somewhere, right?
Let's begin by setting up the basic framework for the simple drawing application.
Create a new Flash file and save it in the project folder with the name
drawingApplication.fla.Create a new ActionScript file for the document class, which will live in the
com.foundationAS3.ch6package. Create the appropriate package directory structure, and save the file namedDrawingApplication.asin thech6directory.Create the basic package and class definitions for the
DrawingApplicationclass, including an empty constructor method. You'll extend theSpriteclass, since you're not dealing with any timeline animation.package com.foundationAS3.ch6 { import flash.display.Sprite; public class DrawingApplication extends Sprite { public function DrawingApplication() { } } }You need a surface on which to draw, so create a new
Spritedisplay object (storing a reference to it in a new property namedcanvas).package com.foundationAS3.ch6 { import flash.display.Sprite; package com.foundationAS3.ch6 { import flash.display.Sprite; public class DrawingApplication extends Sprite {private var _canvas:Sprite;public function DrawingApplication() {_canvas = new Sprite();} } }In order for the canvas to receive mouse events, it needs to have a width and a height. The easiest way to provide that, as well as present some visual surface for the user, is to draw into it. Draw a light-gray rectangle that is the same size as the stage using the drawing API methods.
package com.foundationAS3.ch6 { import flash.display.Sprite; public class DrawingApplication extends Sprite { private var _canvas:Sprite; public function DrawingApplication() { _canvas = new Sprite();_canvas.graphics.beginFill(0xF0F0F0);_canvas.graphics.drawRect(0, 0, stage.stageWidth, stage.stageHeight);_canvas.graphics.endFill();} } }Set the line style of the canvas to be a 2-pixel black line, which will be used for all further drawing. Then add the canvas to the stage.
package com.foundationAS3.ch6 { import flash.display.Sprite; public class DrawingApplication extends Sprite { private var _canvas:Sprite; public function DrawingApplication() { _canvas = new Sprite(); _canvas.graphics.beginFill(0xF0F0F0); _canvas.graphics.drawRect(0, 0, stage.stageWidth, stage.stageHeight); _canvas.graphics.endFill();_canvas.graphics.lineStyle(2, 0x000000);addChild(_canvas);} } }
With this basic framework in place, you're ready to add the event listeners to your canvas object.
When the mouse button is pressed, communicated by the MouseEvent.MOUSE_DOWN event, you need to move the drawing pen to the current mouse location. You also need to start listening for the MouseEvent.MOUSE_MOVE event so that you can draw a line whenever the mouse moves. Finally, when the mouse button is released and a MouseEvent.MOUSE_UP event is dispatched, you need to draw a line to the current mouse position and remove the listener for the MouseEvent.MOUSE_MOVE event.
Create a new private method named
onCanvasMouseDown()that takes a single parameter,event, of typeMouseEvent, and add that method as a listener for theMouseEvent.MOUSE_DOWNevent of thecanvasobject. You'll need to import theMouseEventclass from theflash.eventspackage.package com.foundationAS3.ch6 { import flash.display.Sprite;import flash.events.MouseEvent;public class DrawingApplication extends Sprite { . . . addChild(_canvas);_canvas.addEventListener(MouseEvent.MOUSE_DOWN, onCanvasMouseDown);}private function onCanvasMouseDown(event:MouseEvent):void {}} }Within the
onCanvasMouseDown()event, move the Drawing API pen to the current mouse position, which is contained in thelocalXandlocalYproperties of the event object.localXandlocalYare good to use when it's important to obtain the mouse positions within a sprite's own coordinate space, as when you are drawing into that sprite. In this particular case,stageXandstageY, which return the global coordinates, could have been used, since the canvas is at coordinates (0, 0) within the main document class. However, it's still a good idea to be in the habit of looking at the local coordinates, just in case the canvas was moved to a different location.package com.foundationAS3.ch6 { import flash.display.Sprite; import flash.events.MouseEvent; public class DrawingApplication extends Sprite { . . . _canvas.addEventListener(MouseEvent.MOUSE_DOWN, onCanvasMouseDown); } private function onCanvasMouseDown(event:MouseEvent):void {_canvas.graphics.moveTo(event.localX, event.localY);} } }Create a new private method named
onCanvasMouseMove()to handle theMouseEvent.MOUSE_MOVEevent. Add theaddEventListener()call to set up this event listener within theonCanvasMouseDown()method, meaning that you'll be notified of mouse move events only after the mouse button has been pressed.package com.foundationAS3.ch6 { import flash.display.Sprite; import flash.events.MouseEvent; public class DrawingApplication extends Sprite { . . . private function onCanvasMouseDown(event:MouseEvent):void { _canvas.graphics.moveTo(event.localX, event.localY);_canvas.addEventListener(MouseEvent.MOUSE_MOVE, onCanvasMouseMove);}private function onCanvasMouseMove(event:MouseEvent):void {}} }Within the
onCanvasMouseMove()event, draw a line from the current pen position to the current position of the mouse pointer.package com.foundationAS3.ch6 { import flash.display.Sprite; import flash.events.MouseEvent; public class DrawingApplication extends Sprite { . . . private function onCanvasMouseDown(event:MouseEvent):void { _canvas.graphics.moveTo(event.localX, event.localY); _canvas.addEventListener(MouseEvent.MOUSE_MOVE, onCanvasMouseMove); } private function onCanvasMouseMove(event:MouseEvent):void {_canvas.graphics.lineTo(event.localX, event.localY);} } }Create a new private method named
onCanvasMouseUp()to handle theMouseEvent.MOUSE_UPevent. The event listener should be added in the same place theMouseEvent.MOUSE_DOWNevent was added: in the mainDrawingApplicationconstructor method.package com.foundationAS3.ch6 { import flash.display.Sprite; import flash.events.MouseEvent; public class DrawingApplication extends Sprite { . . . addChild(_canvas); _canvas.addEventListener(MouseEvent.MOUSE_DOWN, onCanvasMouseDown);_canvas.addEventListener(MouseEvent.MOUSE_UP, onCanvasMouseUp);} private function onCanvasMouseDown(event:MouseEvent):void { _canvas.graphics.moveTo(event.localX, event.localY); _canvas.addEventListener(MouseEvent.MOUSE_MOVE, onCanvasMouseMove); }private function onCanvasMouseMove(event:MouseEvent):void { _canvas.graphics.lineTo(event.localX, event.localY); }private function onCanvasMouseUp(event:MouseEvent):void {}} }Within the
onCanvasMouseUp()method, you need to draw a line to the current mouse location (just in case the mouse has been moved since the lastMouseEvent.MOUSE_MOVEevent was dispatched) and remove theMouseEvent.MOUSE_MOVEevent listener using theremoveEventListener()method.package com.foundationAS3.ch6 { import flash.display.Sprite; import flash.events.MouseEvent; public class DrawingApplication extends Sprite { . . . private function onCanvasMouseMove(event:MouseEvent):void { _canvas.graphics.lineTo(event.localX, event.localY); } private function onCanvasMouseUp(event:MouseEvent):void {_canvas.graphics.lineTo(event.localX, event.localY);_canvas.removeEventListener(MouseEvent.MOUSE_MOVE,
onCanvasMouseMove);} } }Save the changes to the
DrawingApplication.asfile and switch back to thedrawingApplication.flafile.Set
com.foundationAS3.ch6.DrawingApplicationas the document class in the Property inspector. Save the changes and test your movie.
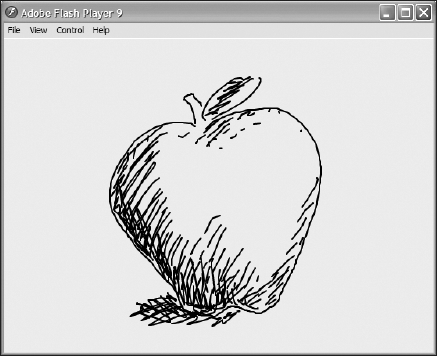
Figure 6-2 shows an example of the drawing application in action. You'll have to forgive my (lack of) drawing skills; I'm certainly no Rembrandt. But I think you'll agree that it's not a bad application for 30-odd lines of code.
One thing you might notice is a lack of smoothness in the drawing interaction. This is due to the fact that the movie will update the screen only at the frame rate that you have set prior to publishing, which may be slower than the rate at which you draw. You can get around this by forcing the screen to update whenever the mouse changes its position.
Mouse events have a method named updateAfterEvent() (in ActionScript 2.0, this method was a global function). By calling this method within your mouse move handler, you can force the screen refresh and create a smoother interaction.
Add the following line of code to the end of the onCanvasMoveHandler():
private function onCanvasMouseMove(event:MouseEvent):void {
  _canvas.graphics.lineTo(event.localX, event.localY);
  event.updateAfterEvent();
}
Save the file, then return to drawingApplication.fla and test your movie. (Alternatively, if you are using the Flash IDE to code your ActionScript,File press Ctrl+Enter to test the movie.) You should see a much smoother result.
One of the nice features of the event model is that it does not force you to have one method respond to each event (which can happen if you are using something like callback handlers—users of the version 1 Flash components may remember those days!). Multiple objects can have the same listener and handler method, if that suits your needs.
Also another useful tip is that you can now reduce the number of event listeners that you need to have running at one time, which will help when clearing up memory. For example, say you have a navigation bar with ten buttons on the screen. Instead of having to attach a listener to each of the button instances, you can attach a listener to the stage that can detect a mouse click event. Then, using a switch statement, you can catch which button was pressed to trigger the event for that button.
For instance, suppose that you have a group of Sprite instances that you want to scale in size when the user rolls over them. You can take care of all of this in a single method, and add it as the handler for the MouseEvent.MOUSE_ROLLOVER event. When any of the Sprite instances are rolled over, the method is called, and you can access the rolled-over Sprite instance through the MouseEvent object's target property.
private function onSpriteRollover(event:MouseEvent):void {
  // Get reference to rolled-over sprite
  var sprite:Sprite = event.target as Sprite;
  sprite.scaleX = sprite.scaleY = 1.5;
}
As shown in this snippet, you need to cast the target property to the appropriate class (Sprite in this case) using the as operator in order to use this property. This is necessary because any type of object can be the target of an event, so the data type of the target property in the Event class is Object. This type of operation is called—you guessed it—casting.
Now that you know how events work in ActionScript 3.0, it's time to look at some of the more interesting events that are dispatched by the various DisplayObject classes and the different ways in which those events can be used.
With enough time and energy, you could use the MouseEvent.MOUSE_UP and MouseEvent.MOUSE_DOWN events to handle single and double mouse clicks in your project. You would, however, need to listen for a MOUSE_DOWN, followed by a MOUSE_UP on the same object, and then wait a specified amount of time to see if another MOUSE_DOWN, MOUSE_UP sequence happened on the same object.
Thankfully, Adobe has taken pity on us poor time- and energy-deficient developers by providing us with ready-made MouseEvent.CLICK and MouseEvent.DOUBLE_CLICK events. The only small hoop you need to jump through is that display objects don't receive MouseEvent.DOUBLE_CLICK events by default. To remedy this, you just need to set the display object's doubleClickEnabled property to true.
myDisplayObject.doubleClickEnabled = true;
Once you've done that, you're ready to rock and roll, double-click style.
Let's work through a simple example to show how these two events work:
Create a new Flash document named
click.flaand save it in the project directory.Create a new ActionScript file for the document class, which will be in the
com.foundationAS3.ch6package, and save it in the appropriate location within the project directory with the nameClickTest.as.Create the basic package and class definitions for the
ClickTestclass, which will extend theSpriteclass.package com.foundationAS3.ch6 { import flash.display.Sprite; public class ClickTest extends Sprite { public function ClickTest() { } } }In the constructor method, create a new
Spriteobject in a local variable namedsquareand add it to the display list.package com.foundationAS3.ch6 { import flash.display.Sprite; public class ClickTest extends Sprite { public function ClickTest() {var square:Sprite = new Sprite();addChild(square);} } }Use the drawing API methods to draw a 100 × 100-pixel, red square with a black outline within the new
Spriteinstance.package com.foundationAS3.ch6 { import flash.display.Sprite; public class ClickTest extends Sprite {public function ClickTest() { var square:Sprite = new Sprite();square.graphics.lineStyle(2, 0x000000);square.graphics.beginFill(0xFF0000);square.graphics.drawRect(0, 0, 100, 100);square.graphics.endFill();addChild(square); } } }Create two private methods named
onSquareClick()andonSquareDoubleClick(), and add them as event listeners for theMouseEvent.CLICKandMouseEvent.DOUBLE_CLICKevents on the newSpriteinstance, respectively. You'll need to import theMouseEventclass from theflash.eventspackage. Also, don't forget to set thedoubleClickEnabledproperty of theSpriteinstance totrue; otherwise, the Flash Player will not dispatch double-click events for this object.package com.foundationAS3.ch6 { import flash.display.Sprite;import flash.events.MouseEvent;public class ClickTest extends Sprite { public function ClickTest() { var square:Sprite = new Sprite(); square.graphics.lineStyle(2, 0x000000); square.graphics.beginFill(0xFF0000); square.graphics.drawRect(0, 0, 100, 100); square.graphics.endFill(); addChild(square);square.doubleClickEnabled = true;square.addEventListener(MouseEvent.CLICK, onSquareClick);square.addEventListener(MouseEvent.DOUBLE_CLICK,onSquareDoubleClick);}private function onSquareClick(event:MouseEvent):void {}private function onSquareDoubleClick(event:MouseEvent):void {}} }In the
onSquareClick()andonSquareDoubleClick()methods, trace some string values to identify which method was clicked. I've gone for"ouch!"and"double ouch!", but feel free to be creative.package com.foundationAS3.ch6 { import flash.display.Sprite; import flash.events.MouseEvent; public class ClickTest extends Sprite { public function ClickTest() { var square:Sprite = new Sprite(); square.graphics.lineStyle(2, 0x000000); square.graphics.beginFill(0xFF0000); square.graphics.drawRect(0, 0, 100, 100); square.graphics.endFill(); addChild(square); square.doubleClickEnabled = true; square.addEventListener(MouseEvent.CLICK, onSquareClick); square.addEventListener(MouseEvent.DOUBLE_CLICK,onSquareDoubleClick); } private function onSquareClick(event:MouseEvent):void {trace("ouch!");} private function onSquareDoubleClick(event:MouseEvent):void {trace("double ouch!");} } }Save the changes to the
ClickTest.asfile and switch back to theclick.fladocument.In the Property inspector, set the document class to
com.foundationAS3.ch6.ClickTest. Then save the changes to theclick.fladocument.Test the Flash movie and go click-happy on the shiny red square.
If you click once, you'll see the string "ouch!" (or whatever you chose instead) added to the Output panel. If you click twice in quick succession, you'll see "ouch!" followed by "double ouch!," which is the initial MouseEvent.CLICK event firing, followed by the MouseEvent.DOUBLE_CLICK event. Figure 6-3 shows an example of the results.

Note
For me, the MouseEvent.DOUBLE_CLICK event behavior is a little counterintuitive. When double-clicking a DisplayObject instance, I would have expected a solitary MouseEvent.DOUBLE_CLICK event. The fact that the MouseEvent.CLICK event fires for the first mouse click of a double-click action means that you need to be wary when you're listening for both types of events, particularly if the actions you're performing are mutually exclusive.
When the mouse pointer passes over an InteractiveObject instance in the display list, several events are fired to help you respond appropriately:
MouseEvent.MOUSE_OVERandMouseEvent.MOUSE_OUT: These events are dispatched when the user moves the mouse pointer over and out of anInteractiveObjectinstance. They will fire whenever the mouse pointer moves from oneInteractiveObjectto another, even if that object is a descendant of the previous one.MouseEvent.ROLL_OVERandMouseEvent.ROLL_OUT: These have been added to make it easier to write event handlers forInteractiveObjectinstances that have children. They will fire only for a givenInteractiveObjectif the mouse pointer has moved to or from anotherInteractiveObjectinstance that is not one of its descendants.
Since using MouseEvent.MOUSE_OVER and MouseEvent.MOUSE_OUT can make it difficult to write event handlers for nested objects, I advise using MouseEvent.ROLL_OVER and MouseEvent.ROLL_OUT if you're trying to handle rollovers, even if the display objects in question have no children. On one of my projects, it took me an entire day to track down a problem with rollovers, all because the designers had changed the sprites to have children, and I was using the MouseEvent.MOUSE_OVER and MouseEvent.MOUSE_OUT events. Forewarned is forearmed, or so they say.
Let's change the previous example so that the square changes to blue when the mouse is over it.
Create a new Flash document named
rollover.flaand save it in the project directory.For the document class, save the previous example's
ClickTest.asfile asRolloverTest.as. Change the class name and constructor to useRolloverTestinstead ofClickTest.package com.foundationAS3.ch6 { import flash.display.Sprite; import flash.events.MouseEvent; public classRolloverTest extends Sprite {public functionRolloverTest() {var square:Sprite = new Sprite(); square.graphics.lineStyle(2, 0x000000); square.graphics.beginFill(0xFF0000); square.graphics.drawRect(0, 0, 100, 100); square.graphics.endFill(); addChild(square); square.doubleClickEnabled = true; square.addEventListener(MouseEvent.CLICK, onSquareClick); square.addEventListener(MouseEvent.DOUBLE_CLICK, onSquareDoubleClick); } private function onSquareClick(event:MouseEvent):void { trace("ouch!"); } private function onSquareDoubleClick(event:MouseEvent):void { trace("double ouch!"); } } }Create two new private methods named
onSquareRollOver()andonSquareRollOut(), and add them as event listeners for theMouseEvent.ROLL_OVERandMouseEvent.ROLL_OUTevents, respectively.package com.foundationAS3.ch6 { import flash.display.Sprite; import flash.events.MouseEvent; . . . square.addEventListener(MouseEvent.CLICK, onSquareClick); square.addEventListener(MouseEvent.DOUBLE_CLICK,onSquareDoubleClick);square.addEventListener(MouseEvent.ROLL_OVER, onSquareRollOver);square.addEventListener(MouseEvent.ROLL_OUT, onSquareRollOut);} private function onSquareClick(event:MouseEvent):void { trace("ouch!"); } private function onSquareDoubleClick(event:MouseEvent):void { trace("double ouch!"); }private function onSquareRollOver(event:MouseEvent):void {}private function onSquareRollOut(event:MouseEvent):void {}} }Since you're going to need a reference to the
squareobject in your new event handlers (so you can redraw it using different colors), change the localsquarevariable to be a private property of the object instead. To follow the previous naming conventions, you'll change its name to include a preceding underscore, so make sure to update this in the code.package com.foundationAS3.ch6 { import flash.display.Sprite; import flash.events.MouseEvent; public class RolloverTest extends Sprite {private var _square:Sprite;public function RolloverTest() { _square = new Sprite(); _square.graphics.lineStyle(2, 0x000000); _square.graphics.beginFill(0xff0000); _square.graphics.drawRect(0, 0, 100, 100); _square.graphics.endFill(); addChild(_square);_square.doubleClickEnabled = true; _square.addEventListener(MouseEvent.CLICK, onSquareClick); _square.addEventListener(MouseEvent.DOUBLE_CLICK,
onSquareDoubleClick); _square.addEventListener(MouseEvent.ROLL_OVER, onSquareRollOver); _square.addEventListener(MouseEvent.ROLL_OUT, onSquareRollOut); } . . . }Move the drawing code to a new private method named
drawSquare(). This method accepts a single parameter,color, which specifies the fill color for the shape. Add a call to this new method in place of the old drawing code in the constructor method. Also, add a call to thegraphics.clear()method at the start of this new method to clear the graphics layer, so you're not just drawing over the top of whatever was already there.package com.foundationAS3.ch6 { import flash.display.Sprite; import flash.events.MouseEvent; public class RolloverTest extends Sprite { private var _square:Sprite; public function RolloverTest() { _square = new Sprite();drawSquare(0xFF0000);addChild(_square); _square.doubleClickEnabled = true; _square.addEventListener(MouseEvent.CLICK, onSquareClick); _square.addEventListener(MouseEvent.DOUBLE_CLICK, onSquareDoubleClick); _square.addEventListener(MouseEvent.ROLL_OVER, onSquareRollOver); _square.addEventListener(MouseEvent.ROLL_OUT, onSquareRollOut); }private function drawSquare(color:uint):void {_square.graphics.clear();_square.graphics.lineStyle(2, 0x000000);_square.graphics.beginFill(color);_square.graphics.drawRect(0, 0, 100, 100);_square.graphics.endFill();}. . . }Note
Don't forget to use the
colorparameter of thedrawSquare()method in the call to thebeginFill()drawing API method in place of the hard-coded0xFF0000(red).Within the
onSquareRollOver()andonSquareRollOut()methods, call thedrawSquare()method with parameters of0x0000FF(blue) and0xFF0000(red), respectively.package com.foundationAS3.ch6 { . . . private function onSquareRollOver(event:MouseEvent):void { drawSquare(0x0000FF);} private function onSquareRollOut(event:MouseEvent):void { drawSquare(0xFF0000);} } }Save the changes to the
RolloverTest.asdocument and switch back to therollover.fladocument in the Flash IDE.In the Property inspector for the document, set the document class to
com.foundationAS3.ch6.RolloverTest.Save the changes to the
rollover.fladocument, and then test your movie.
Rolling your mouse over the square and off again should change the color from red to blue and then back to red again, as shown in Figure 6-4.

Note
If you were trying to turn the square object from the preceding example into a button, you might consider using the built-in SimpleButton class. That class allows you to specify a different DisplayObject for each of the up, over, down, and hit states that a simple button has, without needing to mess with setting up events.
One final change you should make to the RolloverTest class is to move the colors into constant properties for the class, as opposed to specifying them directly in the drawSquare() calls. Why do this?
Notice that even at this simple state, red is specified in two places in the code. If you wanted a different color for the up state, you would need to make sure to update both places in the code. What if the class was twice as long, with colors in more than three places? Sure, you could do a search and replace, and hope to catch everything, but the better solution is to move items like colors into properties that are easily accessed and updated. This works great not only for values that appear in multiple places, but also for values that appear only once but may require editing at some point. Placing such values in properties, perhaps defined at the top of the class, makes it much easier to go in and tweak values—you don't need to hunt through the code to see where things are set.
Place the following constants in your RolloverTest class:
package com.foundationAS3.ch6 {

  import flash.display.Sprite;
  import flash.events.MouseEvent;

  public class RolloverTest extends Sprite {

    private static var UP_COLOR:uint = 0xFF0000;
    private static var ROLLOVER_COLOR:uint = 0x0000FF;

    private var _square:Sprite;
. . .
}
Now update the places in the code where the colors were hard-coded with the new constant values.
package com.foundationAS3.ch6 {

  import flash.display.Sprite;
  import flash.events.MouseEvent;

  public class RolloverTest extends Sprite {

    private static var UP_COLOR:uint = 0xFF0000;
    private static var ROLLOVER_COLOR:uint = 0x0000FF;

    private var _square:Sprite;
public function RolloverTest() {
_square = new Sprite();
drawSquare(UP_COLOR);
addChild(_square);
_square.doubleClickEnabled = true;
_square.addEventListener(MouseEvent.CLICK, onSquareClick);
_square.addEventListener(MouseEvent.DOUBLE_CLICK,
onSquareDoubleClick);
_square.addEventListener(MouseEvent.ROLL_OVER, onSquareRollOver);
_square.addEventListener(MouseEvent.ROLL_OUT, onSquareRollOut);
}
. . .
private function onSquareRollOver(event:MouseEvent):void {
drawSquare(ROLLOVER_COLOR);
}
private function onSquareRollOut(event:MouseEvent):void {
drawSquare(UP_COLOR);
}
}
}Of course, there's no reason you couldn't also make the line color and thickness, as well as the width and height of the box, into properties. I will leave that as an exercise for you to do on your own.
The Flash Player dispatches keyboard events in response to user input through the keyboard. In contrast to the myriad of mouse-related events, only two events are associated with keyboard input: KeyboardEvent.KEY_DOWN and KeyboardEvent.KEY_UP. The events dispatched to listeners of these events are instances of the KeyboardEvent class, which includes information about which key was pressed and whether the Ctrl and/or Shift keys were held down at the time.
The keyCode and charCode properties can be used to determine which key was pressed. keyCode will give you a numeric value that corresponds to the key on the keyboard that was pressed (and which can be compared against the constants in the flash.ui.Keyboard class). charCode will give you the numeric value for the character represented by that key in the current character set. Thus, pressing 1 on the main keyboard and 1 on the numeric keypad will return different results for keyCode but the same result for charCode.
The flash.ui.Keyboard class also has two Boolean properties named capsLock and numLock, which will tell you whether the CapsLock and NumLock keys, respectively, are enabled.
For the modifier keys, you have the ctrlKey and shiftKey Boolean properties (there is also altKey, but it is not currently implemented and is reserved for future use). If you need to differentiate between the left and right Shift or Ctrl keys, you can use the keyLocation property along with the LEFT and RIGHT properties of the flash.ui.KeyLocation class. If you are a Mac user, the Ctrl key corresponds to the Command key (as you are probably well aware, with all the Windows-centric documentation out there!).
When a key is pressed, the Flash Player uses the focus property of the Stage object to determine which InteractiveObject instance in the display list should be the target of that event. The Stage.focus property contains a reference to the InteractiveObject instance on the display list that currently has input focus. By default, this will be the main Application object for your project. The user can change the object with the focus (by tabbing to a different text field or button, for example). And you can change the object with the focus programmatically, by assigning a new value to the Stage.focus property.
To demonstrate using the keyboard events, you'll re-create the simple drawing application from earlier so that it can be operated using the keyboard instead. You'll listen for keyboard events from the cursor keys and the spacebar. The cursor keys will be used to move a crosshair around the screen (our keyboard-friendly equivalent of the mouse pointer). If the cursor keys are used while the spacebar is held down, you will draw a line between the last known crosshair position and the current one.
Create a new Flash document named
keyboardDrawing.flaand save it in the project directory.Create a new ActionScript document for the document class, which will belong to the
com.foundationAS3.ch6package. Save the file with the nameKeyboardDrawing.asin the appropriate location in the project directory.Create the basic package and class definitions for the
KeyboardDrawingclass, extending theSpriteclass.package com.foundationAS3.ch6 { import flash.display.Sprite; public class KeyboardDrawing extends Sprite { public function KeyboardDrawing() { } } }Add two private properties,
_canvasand_crosshair, to the class definition, and create theSpriteandShapeinstances, respectively, in the constructor method before adding them both to the display list (canvas first, so that the crosshair is on top visually). You are making the crosshair aShapeinstance, since it does not need any of the interactive capabilities ofSprite.package com.foundationAS3.ch6 {import flash.display.Shape;import flash.display.Sprite;public class KeyboardDrawing extends Sprite {private var _canvas:Sprite;private var _crosshair:Shape;public function KeyboardDrawing() {_canvas = new Sprite();addChild(_canvas);_crosshair = new Shape();addChild(_crosshair);} } }Draw the crosshair using the drawing API. Use the
lineStyle()method to set the line style to draw 1-pixel black lines, and draw two lines—from (−5,0) to (6, 0) and from (0,−5) to (0,6)—using a combination of themoveTo()andlineTo()methods. To keep things clean, you will place this code in a separate method.package com.foundationAS3.ch6 { import flash.display.Shape; import flash.display.Sprite; public class KeyboardDrawing extends Sprite { private var _canvas:Sprite; private var _crosshair:Shape; public function KeyboardDrawing() { _canvas = new Sprite(); addChild(_canvas); _crosshair = new Shape();drawCrosshair();addChild(_crosshair); }private function drawCrosshair():Void {_crosshair.graphics.lineStyle(1, 0x000000);_crosshair.graphics.moveTo(−5, 0);_crosshair.graphics.lineTo(6, 0);_crosshair.graphics.moveTo(0, −5);_crosshair.graphics.lineTo(0, 6);} } }Set the line style of the canvas to draw 2-pixel black lines, and set the
stage.focusproperty to the canvas so it will receive keyboard events.package com.foundationAS3.ch6 { import flash.display.Shape; import flash.display.Sprite; public class KeyboardDrawing extends Sprite { private var _canvas:Sprite; private var _crosshair:Shape; public function KeyboardDrawing() { _canvas = new Sprite(); addChild(_canvas); _crosshair = new Shape(); drawCrosshair(); addChild(_crosshair);// Prepare canvas for drawing and keyboard input_canvas.graphics.lineStyle(2, 0x000000);stage.focus = _canvas;} private function drawCrosshair():void { _crosshair.graphics.lineStyle(1, 0x000000); _crosshair.graphics.moveTo(−5, 0); _crosshair.graphics.lineTo(6, 0); _crosshair.graphics.moveTo(0, −5); _crosshair.graphics.lineTo(0, 6); } } }
With that done, you're ready to devise a strategy for handling crosshair movement.
Since it would be neat to allow diagonal movement as well as horizontal and vertical movement, I've decided to use two private class properties—_xDirection and _yDirection—to store how to move in the x and y position of the virtual pen. This pen's position will be set when the relevant cursor keys are pressed and cleared when they're released. These values will then be checked in an Event.ENTER_FRAME event listener, and the crosshair will be moved by a specified amount each frame.
The final piece of the puzzle is determining whether you should be drawing or moving the drawing API pen from its current location to the new location of the crosshair object. This will be handled by a private Boolean _isDrawing class property, which will be set to true when the spacebar is pressed and set to false when it's released.
Create the
_xDirection, _yDirection, and_isDrawingproperties. The_xDirectionand_yDirectionproperties need to be of typeint, since they can have both positive (right/down) and negative (left/up) values, in addition to 0 (stationary). While you're there, add a constant for the pixel distance amount to draw each frame (which I've set to2).package com.foundationAS3.ch6 { import flash.display.Shape; import flash.display.Sprite; public class KeyboardDrawing extends Sprite {private const PIXEL_DISTANCE_TO_DRAW:uint = 2;private var _canvas:Sprite; private var _crosshair:Shape;private var _xDirection:int = 0;private var _yDirection:int = 0;private var _isDrawing:Boolean = false;public function KeyboardDrawing() { . . . } } }Create two private methods named
onCanvasKeyDown()andonCanvasKeyUp()and set them up as listeners for theKeyboardEvent.KEY_DOWNandKeyboardEvent.KEY_UPevents, respectively, on the_canvasinstance. You'll need to import theKeyboardEventclass from theflash.eventspackage.package com.foundationAS3.ch6 { import flash.display.Shape; import flash.display.Sprite;import flash.events.KeyboardEvent;public class KeyboardDrawing extends Sprite { . . . // Prepare canvas for drawing and keyboard input _canvas.graphics.lineStyle(2, 0x000000); stage.focus = _canvas;// Add canvas event listeners_canvas.addEventListener(KeyboardEvent.KEY_DOWN, onCanvasKeyDown);_canvas.addEventListener(KeyboardEvent.KEY_UP, onCanvasKeyUp);}private function onCanvasKeyDown(event:KeyboardEvent):void {}private function onCanvasKeyUp(event:KeyboardEvent):void {}} }In the
onCanvasKeyDown()listener, use thekeyCodeproperty of theKeyboardEventobject to determine which key was pressed by comparing it to the constants from theKeyboardclass. You'll need to import theKeyboardclass from theflash.uipackage. Depending on the key pressed, set the value of the_yDirectionor_xDirectionvariable to the appropriate value using thePIXEL_DISTANCE_TO_DRAWconstant you created earlier. Remember that positive is right/down and negative is left/up. If the spacebar has been pressed, set_isDrawingtotrue.package com.foundationAS3.ch6 { import flash.display.Shape; import flash.display.Sprite; import flash.events.KeyboardEvent;import flash.ui.Keyboard;public class KeyboardDrawing extends Sprite { . . . private function onCanvasKeyDown(event:KeyboardEvent):void {switch (event.keyCode) {case Keyboard.UP:_yDirection = -PIXEL_DISTANCE_TO_DRAW;break;case Keyboard.DOWN:_yDirection = PIXEL_DISTANCE_TO_DRAW;break;case Keyboard.LEFT:_xDirection = -PIXEL_DISTANCE_TO_DRAW;break;case Keyboard.RIGHT:_xDirection = PIXEL_DISTANCE_TO_DRAW;break;case Keyboard.SPACE:_isDrawing = true;break;}}private function onCanvasKeyUp(event:KeyboardEvent):void { } } }The
onCanvasKeyDown()listener uses a construct called theswitchstatement. This is a conditional statement similar to theif else ifconstruct. It allows you to run different lines of code based on whether a certain case is met.You begin a
switchstatement with a value you wish to match, almost certainly contained within some variable or variable property, followed bycases with the different possible values for the variable. The one that matches the current value of the variable will have its code run. Here's an example:switch (variable) { case value0: trace("run first block"); break; case value1: trace("run second block"); break; }If
variableequalsvalue0, then the firsttrace()will run. Ifvariableequalsvalue1, then the secondtrace()will run. This is equivalent to the followingif else ifstatement:if (variable == value0) { // run first block } else if (variable == value1) { // run second block }Well, that doesn't look so bad, does it? So why use
switchat all? In this case, usingif else ifmakes sense because there are only a couple conditions.switchstatements are useful when you need to test many more values. Try rewritingonCanvasKeyDown()withif else if, and you will see that theswitchstatement is much more readable.Each
casein the example here and inonCanvasKeyDown()has abreakstatement. Just as in a loop, when abreakstatement is encountered, the code block—in this case, theswitchstatement—will be exited. If abreakis not included in acase, theswitchstatement will continue to run, and the code in the nextcasewill be run as well, continuing until theswitchblock is complete or abreakstatement is reached. This is called falling through and allows for multiplecases to run a single section of code, as in the following:switch (action) { case "run": case "jump": raiseHeartrate(); break; case "sit":case "sleep" lowerHeartrate(); break; }In this example, if the current
actionis"run", there is no further code to execute for thatcase, and theswitchstatement will continue to run until it reaches the end or abreakstatement, which happens withincasefor"jump". The result is thatraiseHeartrate()will be called ifactionequals either"run"or"jump". lowerHeartrate()will be called if either"sit"or"sleep"is the currentaction.switchstatements may also include thedefaultkeyword, usually at the end of aswitchblock, to indicate code to run if nocases have been met (or nobreakstatement has been hit).switch (variable) { case value0: break; case value1: break; default: // default code runs }Here, the
defaultcode will run only ifvariabledoes not equal eithervalue0orvalue1. defaultcan be seen as similar to the finalelseblock in anif else if elsestatement, which will run only if no other conditions are met.In the
onCanvasKeyUp()listener, do the same thing but set the relevant property to0, since the key is no longer pressed. If the spacebar was released, set_isDrawingtofalse.package com.foundationAS3.ch6 { `. . . private function onCanvasKeyUp(event:KeyboardEvent):void {switch (event.keyCode) {case Keyboard.UP:case Keyboard.DOWN:_yDirection = 0;break;case Keyboard.LEFT:case Keyboard.RIGHT:_xDirection = 0;break;case Keyboard.SPACE:_isDrawing = false;break;}} } }Add a private
onCanvasEnterFrame()method, and add that as a listener for theEvent.ENTER_FRAMEevent on the canvasSprite. You'll use this for the actual drawing code. You'll need to import theEventclass from theflash.eventspackage.package com.foundationAS3.ch6 { import flash.display.Shape; import flash.display.Sprite;import flash.events.Event;import flash.events.KeyboardEvent; import flash.ui.Keyboard; public class KeyboardDrawing extends Sprite { . . . // Prepare canvas for drawing and keyboard input _canvas.graphics.lineStyle(2, 0x000000); stage.focus = _canvas; // Add canvas event listeners _canvas.addEventListener(KeyboardEvent.KEY_DOWN, onCanvasKeyDown); _canvas.addEventListener(KeyboardEvent.KEY_UP, onCanvasKeyUp);_canvas.addEventListener(Event.ENTER_FRAME, onCanvasEnterFrame);} . . .private function onCanvasEnterFrame(event:Event):void {}} }Within the
onCanvasEnterFrame()method, add the values of_xDirectionand_yDirectionto the crosshair's ownxandyproperties. Move the drawing API pen to the new crosshair location using either themoveTo()orlineTo()method, depending on whether the_isDrawingproperty is set totrueorfalse.package com.foundationAS3.ch6 { . . . private function onCanvasEnterFrame(event:Event):void {_crosshair.x += _xDirection;_crosshair.y += _yDirection;if (_isDrawing) {_canvas.graphics.lineTo(_crosshair.x, _crosshair.y);} else {_canvas.graphics.moveTo(_crosshair.x, _crosshair.y);}} } }Save the changes to the
KeyboardDrawing.asdocument and switch back to thekeyboardDrawing.fladocument in the Flash IDE.In the Property inspector for the document, set the document class to
com.foundationAS3.ch6.KeyboardDrawing.Save the changes to the
keyboardDrawing.fladocument and test your movie.
Use the cursor keys to move the crosshair around (it starts in the top-right corner), holding down the spacebar when you want to draw. You might end up with something like Figure 6-5.

Some of the events generated by the Flash Player for certain objects have default actions associated with them, and many of these default actions can be overridden programmatically by using the preventDefault() method of the Event object. When called, this method will prevent whatever default action is associated with the event.
Not all events have default actions, and of those that do, only some will allow you to prevent that default action from occurring. You can tell whether an event has a default action that can be prevented by checking the cancelable property of the Event object, which is a Boolean value indicating whether the event can be canceled.
One example of a cancelable event is TextEvent.TEXT_INPUT, which is dispatched when the user types a character into a TextField object while it has input focus. Unless you instruct it otherwise, the default action carried out by the Flash Player is to insert the character into the contents of the text field at the current insertion point.
If you wanted to filter the characters that can be entered into a TextField object (assuming the restrict property wasn't rich enough for your needs), you could register an event listener for that event and decide whether to allow the character to be inserted (or whether to do something else entirely) within your event handler.
Let's quickly code an example that will let you enter a particular character only once in a text field. Admittedly, this example is a little contrived—I certainly can't see this having many uses in the real world—but it does demonstrate something that can't be done using the TextField.restrict property.
Create a new Flash document and save it in the project directory as
preventDefault.fla.Create a new ActionScript document for the document class, which is going to be in the
com.foundationAS3.ch6package. Save it asPreventDefaultTest.asin the appropriate package directory in the project directory.Create the basic package and class definitions, including an empty constructor method. The
PreventDefaultTestclass should extend theSpritedisplay class, since you do not have any timeline animation.package com.foundationAS3.ch6 { import flash.display.Sprite; public class PreventDefaultTest extends Sprite { public function PreventDefaultTest() { } } }In the constructor method, create a new
TextFieldobject and add it to the display list. You'll need to import theTextFieldclass from theflash.textpackage.package com.foundationAS3.ch6 { import flash.display.Sprite;import flash.text.TextField;public class Application extends Sprite { public function Application() {var tf:TextField = new TextField();addChild(tf);} } }Set the
widthandheightproperties of the newTextFieldobject to match the stage width and height. Set thetypeandwordWrapproperties toTextFieldType.INPUTandtrue, respectively. You'll need to import theTextFieldTypeclass from theflash.textpackage.package com.foundationAS3.ch6 { import flash.display.Sprite; import flash.text.TextField;import flash.text.TextFieldType;public class PreventDefaultTest extends Sprite { public function PreventDefaultTest() { var tf:TextField = new TextField(); addChild(tf);tf.width = stage.stageWidth;tf.height = stage.stageWidth;tf.type = TextFieldType.INPUT;tf.wordWrap = true;} } }This will give you a
TextFieldobject that's as big as the stage, accepts user input, and will wrap the text. Next, you need to add a listener for theTextEvent.TEXT_INPUTevent that cancels the event if the character entered already exists in theTextField.Create a private method named
onTextFieldTextInput()(which nicely follows your naming convention for event listeners) and add it as a listener for theTextEvent.TEXT_INPUTevent of theTextFieldobject you created. You'll need to import theTextEventclass from theflash.eventspackage.package com.foundationAS3.ch6 { import flash.display.Sprite; import flash.text.TextField; import flash.text.TextFieldType;import flash.events.TextEvent;public class PreventDefaultTest extends Sprite { public function PreventDefaultTest() { var tf:TextField = new TextField(); addChild(tf); tf.width = stage.stageWidth; tf.height = stage.stageWidth; tf.type = TextFieldType.INPUT; tf.wordWrap = true;tf.addEventListener(TextEvent.TEXT_INPUT, onTextFieldTextInput);}private function onTextFieldTextInput(event:TextEvent):void {}} }Within the
onTextFieldTextInput()handler, use thetextproperty of theeventobject to get the character entered by the user, and then use theTextFieldobject'stextproperty in conjunction with theindexOf()method to see if that character is already present. If it is, call thepreventDefault()method of theeventobject to prevent the character being added to theTextFieldobject.package com.foundationAS3.ch6 { import flash.display.Sprite; import flash.text.TextField; import flash.text.TextFieldType; import flash.events.TextEvent; public class PreventDefaultTest extends Sprite { public function PreventDefaultTest() { var tf:TextField = new TextField(); addChild(tf); tf.width = stage.stageWidth; tf.height = stage.stageWidth; tf.type = TextFieldType.INPUT; tf.wordWrap = true; tf.addEventListener(TextEvent.TEXT_INPUT,onTextFieldTextInput); } private function onTextFieldTextInput(event:TextEvent):void {var tf:TextField = event.target as TextField;if (tf.text.indexOf(event.text) > −1) {event.preventDefault();}} } }Note
Remember that the
indexOf()method of aStringobject takes a single parameter—anotherStringobject—and returns either the position of the latter within the former or−1if the specified string could not be found.Save the changes to the
PreventDefaultTest.asfile and switch back to thepreventDefault.fladocument.In the Property inspector, set the document class to
com.foundationAS3.ch6.PreventDefaultTest.Save the changes to the
preventDefault.flafile and test the Flash movie.
Try to type a whole bunch of characters (let your inner keyboard masher go wild). You should see that you can enter each character only once. Good job!
When an event is dispatched by a DisplayObject instance on the display list, it progresses through three states: capture, at target, and bubble. These states are collectively known as the event flow, which is illustrated in Figure 6-6.
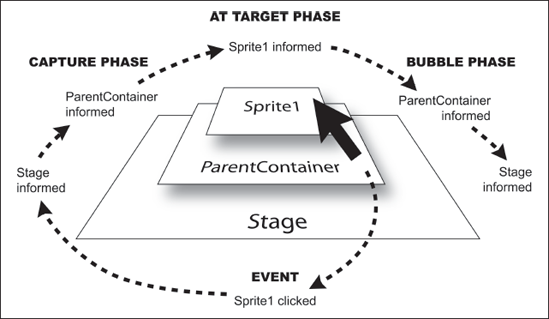
Let's use the MouseEvent.MOUSE_CLICK event as an example. When the user clicks a DisplayObject, a MouseEvent object is created by the Flash Player and dispatched from the topmost DisplayObject under the mouse pointer.
Initially, the event is in the capture phase. In the capture phase, an event works its way down the display list hierarchy through the event target's ancestors, until it reaches the target object itself. At each level of the hierarchy, any event handlers that match the event type and have been specified as capture event listeners (you'll learn how to do that in the "Listening for events in the capture phase" section, coming up soon) will be called.
Once the event reaches the target object, it is said to be in the at-target phase. (Whoever came up with that name isn't going to win any prizes for originality or creativity, but at least it's descriptive.) In the at-target phase, all the event listeners registered on the event target that match the event type are called.
After all the event listeners on the event target have been called, the event enters the bubble phase. In the bubble phase, the event travels back up through the display list hierarchy toward the Stage, calling any event listeners that match the specified event type.
If you're anything like me when I first encountered the event flow, you're probably thinking, "Well, that's interesting, but what's it useful for?" Actually, the event flow is useful for a lot of things. At any stage in the event flow, you can have an event handler respond to the event, and you get to choose whether to stop the event right there or allow it to continue its journey through the display hierarchy. You can also override some default actions associated with an event, such as text being entered into a TextField when a key is pressed.
Event objects even have a property, eventPhase, to help you determine the current phase. This property can have one of three values, for each of the event phases: EventPhase.CAPTURING_PHASE, EventPhase.AT_TARGET, or EventPhase.BUBBLING_PHASE.
Note
Not all events go through the bubble and capture phases. If an event is not associated with a display object, there is no display list hierarchy for the event to travel through. Effectively, the event flow consists of just the at-target phase.
In order to listen for events in the bubble phase, you just need to attach event listeners to an ancestor of the target object using the addEventListener() method. An event fired on the descendants of a display object will automatically bubble up through the display list hierarchy toward the stage.
One of the biggest use cases for listening for events in the bubble phase is event delegation. This technique allows you to register a single event listener for all of the descendants of a display list object. Consider a grid of thumbnails where each thumbnail can be clicked. Instead of registering a listener for every single thumbnail, you could register a listener to receive events from the parent container, and then use the properties of the Event object to determine which thumbnail had been clicked.
The key to using this technique successfully is the target property of the Event object passed to the event listener. This will give you a reference to the object that dispatched the event. To elaborate on this example, suppose that the thumbnails in question are instances of a custom PhotoThumbnail class. Using the target property when the event is handled in parent container, you can make sure that the object that was clicked was actually a PhotoThumbnail using the is operator. You need to do this because the container display object will receive MouseEvent.CLICK events both for itself and for all its descendants. The following code snippet shows what I'm talking about here.
photoContainer.addEventListener(MouseEvent.CLICK, onPhotoContainerClick);
. . .
private function onPhotoContainerClick(event:MouseEvent):void {
  if (event.target is PhotoThumbnail) {
    // Handle event in here
  }
}
Using the built-in event bubbling, you are able to listen for clicks on all thumbnails with only several lines of code.
Listening for events in the capture phase is most useful when you need to prevent an event from being dispatched to other objects or when the default behavior for the event sometimes needs to be prevented. To listen for events in the capture phase, you need to use one of the extra parameters to the addEventListener() method that I hinted about earlier. The first optional parameter for this method, useCapture, is a Boolean value indicating whether the event listener should listen for events of the specified type when they're in the capture phase.
someObject.addEventListener(type, listener, useCapture);
The default value for this parameter is false. By passing true, you set up a capture phase event listener for the specified event type.
Let's rework the previous snippet of code to listen for the capture phase of an event:
photoContainer.addEventListener(MouseEvent.CLICK, onPhotoContainerClick, true);
. . .
private function onPhotoContainerClick(event:MouseEvent):void {
  if (event.target is PhotoThumbnail) {
    // Handle event in here
  }
}
When you add an event listener for the capture phase of a specific type of event, that event listener will not be called in the at-target or bubble phase. If you want to set up a single event listener for all event phases, you'll need to call addEventListener() twice: once with useCapture set to true and once with it set to false (or omitted).
photoContainer.addEventListener(MouseEvent.click,onPhotoContainerClick, true);photoContainer.addEventListener(MouseEvent.click, onPhotoContainerClick);. . .
private function onPhotoContainerClick(event:MouseEvent):void {
  if (event.target is PhotoThumbnail) {
     // Handle event in here
  }
}
The capture phase is the first phase of an event where it trickles down the display list hierarchy to the event target. Because capture phase event handlers are called before any at-target or bubble phase event handlers, you can use this technique, together with either stopPropagation() or stopImmediatePropagation(), to effectively suppress an event, as discussed next.
You might have several event handlers for the same event attached at various points in the display list. If in one of these event handlers you decide that the event should be ignored or has been handled sufficiently, you can prevent the event from continuing through the rest of the event flow using the stopPropagation() method of the Event object. For example, you could prevent all clicks within an application from being registered by calling stopPropagation() within a capture phase MouseEvent.CLICK event listener attached to the main document class.
Note
Calling stopPropagation() does not mean that the default action of the event won't occur—that's the job of the preventDefault() method discussed earlier in this chapter.
When you have multiple handlers for the same event on the current display object, they will all be called, regardless of when you call stopPropagation(). The stopPropagation() method prevents events from continuing through the event flow, but it doesn't stop the remaining event handlers on the current display object from being called. If you need to stop all remaining event handlers from being called, use the stopImmediatePropagation() method instead.
Remember that event listeners are processed in the order in which they were added to the object. If it is important to have a listener receive notification of the event first, add it first as a listener. Alternatively, you could use the priority argument in addEventListener() method, which determines whether certain listeners take precedence over others when the event is dispatched. For instance, consider this line, which adds two event listeners, one with a specified priority and one without:
object.addEventListener(Event.CHANGE, callFirst, false, Number.MAX_VALUE);
object.addEventListener(Event.CHANGE, callSecond);
The first line adds a listener using an extremely high priority (the highest value a number can hold). The second line adds a listener without passing a priority, so it defaults to a priority of 0. When the CHANGE event fires on the object, the listener set at the higher priority will receive notification first, no matter the order in which the listeners were added.
To remove a capture phase event listener, use the optional useCapture parameter of the removeEventListener() method:
someObject.removeEventListener(type, listener, useCapture);
Again, this is a Boolean value specifying whether the event listener you want to remove is listening for the capture phase of events of the specified type.
When removing an event listener, it's important to make sure that you use the same parameters when calling removeEventListener() as you did when you called addEventListener(). If you don't use the same parameters, your event listener won't be removed, and you'll end up with a project that consumes more and more memory, because an object will not be garbage-collected by the Flash Player when it has event listeners registered for it.
This chapter has been a whistle-stop tour of events and event handling in ActionScript 3.0. You'll meet many different types of events throughout the rest of this book, and the knowledge gleaned in these pages will help you use them to their full effect.
In the next chapter, you'll learn how you can use ActionScript to work with video.