
In this chapter, you're going to put into practice all that you've learned about Flex in the previous chapter and ActionScript 3.0 throughout this book. Here, you'll develop the simple RSS reader application you built in Chapter 13 as a full-featured feed reader application. You'll see that although the Flex framework and the MXML markup language are extraordinary and powerful tools on their own, you need to add ActionScript to create truly robust, complex applications.
This chapter demonstrates the following:
How to conceptualize and plan a Flex project
How to create a new Flex project in Flex Builder
How to import and take advantage of external class libraries
How to lay out a UI using MXML
How to use controls and layout classes in the Flex framework
How to use data binding to wire components together
How to create pop-up dialog boxes
How to create custom classes for use within a Flex application
How to create and dispatch custom events
How to use web services to load data
How to save data between sessions using
SharedObject
You'll see how all of the ActionScript skills you've learned throughout this book can be applied to Flex development.
Before you rush headlong into building this application (yes, I saw you reaching for your mouse), you need to identify exactly what you want it to do and roughly how you want it to look. Proper planning of a large application is an important step during your development process, helping you to identify potential problems, ensure consistent architecture, and provide better visibility (both for you and your clients) of what you will be building.
Because planning is so important to creating a good application, I'm going to dispense a few personal opinions about how a project should be developed. I'm not going to teach you the "right" way to do it (which is just as well because there is no right way to do it, whatever the fat-cat consultants or hip Extreme Programming gurus might tell you). The point is to get you thinking about how to develop an application—from an initial idea to the finished article.
Let's walk through the five main steps of planning an application:
Gathering the requirements
Creating the functional specification
Designing the UI
Designing the interaction
Designing the data and logic
The first step in planning an application is to identify the requirements. In a real-world project, this can mean anything from an informal chat with the people who will be using your application to a full-blown, official requirements-gathering process. The aim in both cases is the same: make sure that your application is useful to the people who will be using it every day. Now, that's not to say that you must try to implement every little feature that each user says he wants. Part of the headache of the requirements-gathering process is that what your users think they want isn't what they really want most of the time, and you need to work hard to decipher their requests into a feasible requirement. You also have a responsibility to include only the features that will be useful to a significant portion of your user base. This means that some features will not make the cut, even though they may be good ideas.
So, what are the requirements for the application you'll build in this chapter? Because this is a practice application, I get to set the requirements. And because I'm being informal, I can just list what the application should do:
Support multiple feeds, allowing the user to add and remove feeds
Support the most common feed formats
Allow the user to manually refresh feeds
Automatically refresh feeds every five minutes
Show the user the number of articles in a given feed
Provide a way for the user to view the website associated with the feed
Remember the user's feed between sessions
Of course, this list could include even more features, but I want to keep version 1.0 of this application manageable, so these requirements will do just fine for now. At the end of chapter, I'll leave you with a few ideas of where you can take this application if you feel like tinkering.
When deciding on what you want your application to do, it's worth giving some thought to the things you won't be able to do. In the case of the feed reader application, limitations are imposed by the Flash Player in which the application will run.
One limitation relates to storage. Although you want to store the user's feed list, the only local storage medium available to a Flex application is a local SharedObject, which is limited in terms of how much content it can hold. This means that you won't be able to store the list of articles fetched from each feed, as would be the case in a normal feed reader application, so when the application is restarted, the history of articles in the feed will be lost. (Note that you could use Adobe AIR, introduced in the previous chapter, to build an application that has direct access to the file system.)
The other main limitation is imposed by the Flash Player's security sandbox. The Flash Player can't load XML data from another domain without express permission in the form of a crossdomain.xml file. This file, which is hosted on the server delivering the data, specifies other domains whose files, like SWFs, may access that data. This won't be a problem during development because you'll be running the application locally, which thankfully means it won't be subject to this particular security restriction. However, it does mean that you won't be able to upload this application and have it work for every feed.
Note
You could host the application remotely by creating a server-side proxy script to fetch the feed data on behalf of the application. Such a proxy would be hosted on the same domain as your application SWF and would load the data from the remote domain. Because the application SWF would need to communicate with only the proxy script, hosted on the same domain, there would be no security restriction in the Flash Player. Adobe has examples of this available at http://kb.adobe.com/selfservice/viewContent.do?externalId=tn_16520#proxy.
The Flash Player imposes other limitations, such as not being able to interface with the web browsers to have your application configured as the default feed reader, but these are relatively minor in comparison to the two just discussed.
Now that you know what your application needs to do (and what it does not need to do), you can start thinking about how it should work. The essence of the process is to convert the requirements you've gathered into tangible, measurable features.
In a more formal setting, this would involve drawing up a functional specification document, which would be circulated to all interested parties so that everyone knows exactly what is being built. Such a document could run to hundreds or thousands of pages, depending on the complexity of your application, and it may need to go through several rounds of revisions before everyone is happy with it.
However, for the sample application, you'll just flesh out the requirements gathered in the previous step into a list of features, with some basic details of how each feature will work.
Feed reading:
The users will be able to view a list of the feeds to which they have subscribed, with the list showing the title of the feed and the number of articles it contains.
The users will be able to see the date and title of the articles for a given feed, and the title and excerpt for a given article.
The users will be able to visit the website associated with a given feed, and they will be able to go to the page for an individual entry if they want to read more than the excerpt.
Subscription management:
The users will be able to manage their feed subscriptions from within the application. When subscribing to a feed, the users will be able to specify the URL from the feed. This URL will then be used to fetch the feed data, and the feed title will be extracted from the metadata that is part of the feed data.
The system will support the following feed formats: RSS 1.0, RSS 2.0, and Atom 1.0.
The format of a feed will be automatically detected so that the users do not need to know the type of a given feed when subscribing.
Refreshing feeds:
When the application is started, each feed in the user's subscription list will be refreshed, fetching the latest articles. The feeds will be refreshed automatically every five minutes.
A user will be able to manually refresh a given feed or all feeds in the subscription list.
When refreshing a feed, any old articles that no longer appear in the feed data will be kept until the end of the session.
Once you have the functional specification, you can start to think about the user experience. You want your application to be as easy to use as possible (in line with one of the application requirements), so you'll stick to a single screen.
Now, you don't need to go into a whole lot of detail here. You're not worried about the look and feel of the application. You just need to know what the major UI elements are and roughly where they sit on the screen. With that in mind, and having looked at some other feed reader applications for inspiration, I came up with the layout shown in Figure 14-1.

On the left is the list of feeds to which the user has subscribed, with the number of unread articles in brackets after the title of the feed. Below the list is a button to add a new subscription (labeled with a + sign) and another button to remove the selected subscription (labeled with a − sign). Also included in this area are controls for refreshing the feeds, either manually or automatically at a specified interval.
In the top-right area is the list of articles in the selected feed, displayed in a scrollable grid showing the date and the title of the article. Beneath that is a label to tell the user when the feed was last checked for updates and a Visit website button, which will take the user to the website associated with the feed.
Below the article list are the title and excerpt from the selected article, with a label telling the user when the article was posted and a button that will take the user to the full article.
Although you can probably guess which containers and controls from the Flex framework you might use to build this, it's a little too early in the planning stage to be thinking about the implementation. There's still one crucial step left that may have an impact on how you build the UI.
Interaction design means deciding how the application will behave in response to user input. The user interaction for this application will be as simple as the interface.
For the sample application, the interaction is implied by the UI design. However, in a more formal project, interaction design is a crucial step to getting your application right.
Note
If you're going to be doing interaction design as part of your job, I suggest getting hold of a copy of About Face 2.0: The Essentials of Interaction Design by Alan Cooper and Robert M. Reimann (Wiley, 2003). This book will help you to determine what your potential users want from the UI and aid you in avoiding the most common pitfalls when designing a UI. This book was written with desktop application development in mind, but because RIA development is all about bringing desktop-style applications to the Web, most of the concepts discussed in this book apply equally well to our line of work.
At this stage, you would normally look at designing the data entities (using UML or entity relationship diagrams) and the logic of the application (using UML or flowcharts), but this isn't a book on software design, and that topic is way too big for me to do it any justice in a page or two. Take a look at the UML website (http://www.uml.org) for the UML specification and an introduction to its use, plus its benefits for application development.
So now we get down to the fun stuff: using the Flex framework to build the application. In order to get a feel for MXML, you won't be using the Design view in Flex Builder; you'll use the Flex Builder IDE to set up and manage the project to save the bother of messing too much with the command line. If you are using the free Flex SDK, the ActionScript and the MXML covered here will be exactly the same. You will just need to manually create the directories and files, and compile through the command line (consult Adobe's documentation for instructions on compiling through the command line).
Note
If you are using Flex Builder and are a fan of its Design view, it's still a good idea to get to know MXML and how to write it on your own. You can't accomplish everything from the Design view, and someday you'll need to roll up your sleeves and get busy with the underlying code. When that day comes, you'll be glad you took the time to understand MXML. Using the Design view and checking the generated MXML is a great way to become familiar with the markup language.
You'll build the application in an incremental fashion, testing new features as you go. This means that you'll get the basics working first and then build on them step by step until you have the finished application. Building an application in this way means that you can spot any problems early instead of waiting until the very end to compile and test, only to find that the most basic things aren't working.
The first step in building the application is setting up the project. With Flex Builder open, select File
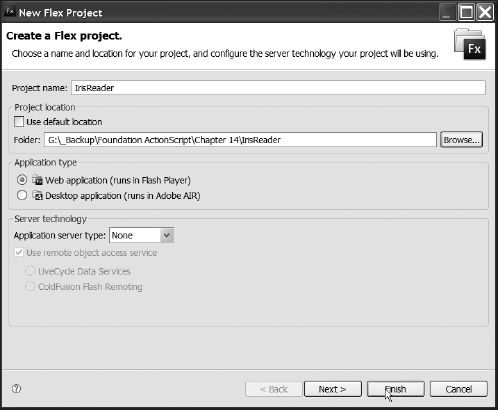
Enter IrisReader as the project name. Uncheck Use default location and create a project directory specifically for this chapter, following the same convention as you have for the examples in previous chapters. Leave the Application type radio button selected as web application. Click Finish to create the new project.
At this point, you have a project structure set up with the root directory containing your main MXML file, IrisReader.mxml, and a number of properties files, which you will not edit. In addition, four subdirectories have been created:
bin-debug: This directory contains all the files needed to deploy your application, including HTML for embedding the SWF; JavaScript for player detection, writing the SWF to the page, and history management; and the SWFs themselves, both normal and debug versions.html-template: This directory contains the files that are used to produce the output in thebindirectory, with tokens that can be replaced, based on your application. For instance, if you set the background color or width and height in your MXML, these values can be written into your HTML in thebindirectory using the template in thehtml-templatedirectory.libs: This directory can be used to store external or third-party libraries or resources that are used in your Flex project.src: This directory contains all source code files that a developer has created for the given project.
Now that you have set up the project, you can start to build the UI. In Flex, this generally means starting with the container components that will control the layout of your application. Let's take the wireframe from Figure 14-1 and break that down into a hierarchy of Flex containers, as shown in Figure 14-3.

As you can see, Panel containers (the boxed elements with title bars) separate the different elements of the UI, encapsulated in a combination of HDividedBox and VDividedBox containers. These containers position items horizontally or vertically, respectively, and provide a means to drag to resize the internal elements, giving the UI maximum flexibility.
You should be in Source view of the IrisReader.mxml file. Begin by changing the layout attribute of the <mx:Application> element to vertical. Then add an HDividedBox container with both width and height attributes set to 100%.
<mx:Application xmlns:mx="http://www.adobe.com/2006/mxml" layout="vertical"><mx:HDividedBox width="100%" height="100%"></mx:HDividedBox></mx:Application>
Within the HDividedBox, add a Panel container with a title of Subscriptions, a width of 40%, and a height of 100%.
<mx:Application xmlns:mx="http://www.adobe.com/2006/mxml" layout="vertical"> <mx:HDividedBox width="100%" height="100%"><mx:Panel title="Subscriptions" width="40%" height="100%"></mx:Panel></mx:HDividedBox> </mx:Application>
As a sibling of the Panel, add a VDividedBox with a width of 60% (so it occupies the remainder of the width of the HDividedBox parent) and a height of 100%.
<mx:Application xmlns:mx="http://www.adobe.com/2006/mxml" layout="vertical"> <mx:HDividedBox width="100%" height="100%"> <mx:Panel title="Subscriptions" width="40%" height="100%"> </mx:Panel><mx:VDividedBox width="60%" height="100%"></mx:VDividedBox></mx:HDividedBox> </mx:Application>
Finally, add two Panel containers as children of the VDividedBox, with titles of Articles and Article from top to bottom, and both with 100% width and 50% height (so they take up half the VDividedBox each).
<mx:Application xmlns:mx="http://www.adobe.com/2006/mxml" layout="vertical"> <mx:HDividedBox width="100%" height="100%"> <mx:Panel title="Subscriptions" width="40%" height="100%"> </mx:Panel> <mx:VDividedBox width="60%" height="100%"><mx:Panel title="Articles" width="100%" height="50%"></mx:Panel><mx:Panel title="Article" width="100%" height="50%"></mx:Panel>
</mx:VDividedBox>
  </mx:HDividedBox>
</mx:Application>
If you now switch to the Design view, you should see something like Figure 14-4.

If you don't see all three panels, there's a chance that Design view has fallen out of sync with Source view. This seems to happen randomly with Flex Builder when using the divided box components. Thankfully, Adobe has provided a handy Refresh button in the Design view to bring it up to date. The Refresh button is just to the right of the Source and Design buttons. If clicking that a few times doesn't solve the problem, double-check that your source code matches what is shown here.
With the very basic UI created, you can turn your attention to loading feeds. One of the requirements for the application is support for RSS 1.0, RSS 2.0, and Atom 1.0 syndication formats.
The proper approach for feed integration is to abstract the common functionality from all three feed formats into a set of classes and specialize those classes for each individual feed format. Creating these classes would be a lot of work and wouldn't necessarily teach you anything about building Flex applications (the whole point of this chapter). Thankfully, Adobe has already done the hard work for you with its XML syndication library, which is available from Adobe Labs.
The XML syndication library provides code that parses the XML feed formats into ActionScript objects that you can handle natively in your application. All you need to do is download this library and integrate it into your project:
The XML syndication library is available through Google's code repository. Visit
http://code.google.com/p/as3syndicationlib/and download the featured.zipfile.Extract the
.zipfile to your working directory. The file of interest isxmlsyndication.swc, located in thebindirectory of the extracted files.In the
docdirectory, you'll find API documentation for the XML syndication library, which is worth reviewing, as you're going to be using several of these classes and interfaces in the feed reader application.In the Flex
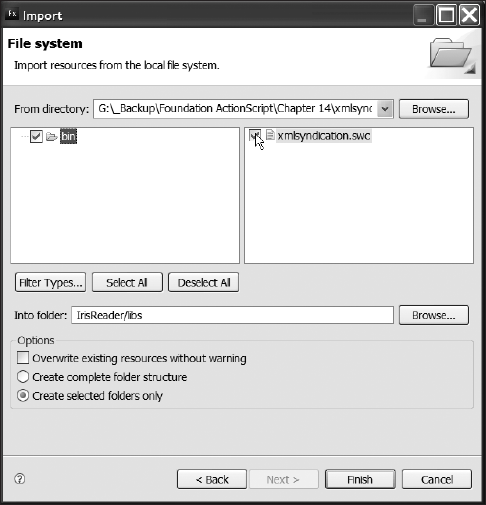
Navigatorpanel, right-click (Control-click for Mac OS X) thelibsfolder and selectImport. SelectFile systemunder theGeneralfolder in theSelectscreen of theImportwindow, as shown in Figure 14-5, and then clickNext.Click the
Browsebutton at the top right of theFile systemscreen. Find and select thebindirectory from the files extracted in step 2 and clickOK(Windows) orChoose(Mac OS X).Select the
bindirectory on the left side of theFile systemscreen of theImportwindow, and check the check box next to thexmlsyndication.swcentry on the right side, as shown in Figure 14-6.Click the
Finishbutton in theImportwindow to import thexmlsyndication.swcfile into your project.Now you need to tell Flex Builder that you want this file compiled as part of your project. Right-click (Windows) or Control-click (Mac OS X) the
IrisReaderproject in theNavigatorpanel and selectPropertiesfrom the context menu.Select
Flex Build Pathfrom the left side of theProperties for IrisReaderwindow, and then select theLibrary pathtab on the right side, as shown in Figure 14-7.Click the
Add SWCbutton and then click theBrowsebutton in theAdd SWCdialog box. Select thexmlsyndication.swcfile within thelibsdirectory of your main project directory. Then clickOK(Windows) orChoose(Mac OS X).Your
Library pathtab should look like Figure 14-8. ClickOKin theProperties for IrisReaderwindow to close it.


Note
If you're using Flex SDK 2, you can just create a lib directory in your chosen project directory and copy the xmlsyndication.swc file into that directory. Then all you need to do is add the xmlsyndication.swc file to the library-path option of the mxmlc compiler, which you can do as part of your compile command. In Windows, type this:
mxmlc -library-path+=libxmlsyndication.swc -output bin
IrisReader.swf srcIrisReader.mxml
In Mac OS, type this:
mxmlc -library-path+=lib/xmlsyndication.swc -output bin/
IrisReader.swf src/IrisReader.mxml
You're going to encapsulate all the information about a subscribed feed in a class named Subscription. The following is the bare minimum information that your feed class will need to contain:
The URL of the feed
The title of the feed (derived from the feed data)
The URL of the feed's website (derived from the feed data)
A list of articles for the feed
The date the feed was last checked
Armed with this information, you can sketch out the skeleton of your Subscription class:
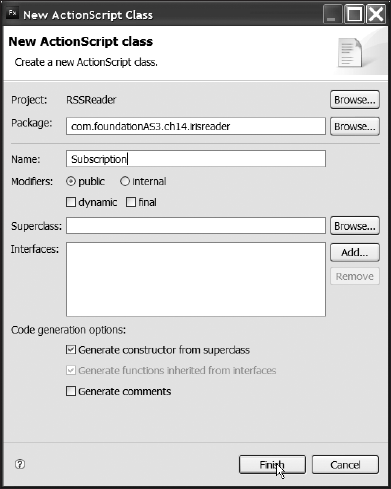
Right-click (Windows) or Control-click (Mac OS X) the
IrisReaderproject in theNavigatorpanel and selectNew
Enter
com.foundationAS3.ch14.irisreaderin thePackagetext box andSubscriptionin theNametext box, as shown in Figure 14-9.Click
Finishto create the class file and necessary package directories, as shown in Figure 14-10. Flex Builder will automatically open the file, ready for editing.

Now you can start to add the properties you need, beginning with feedURL, which is obviously going to be a String. At the moment, I can't see any reason why the URL of the feed will need to be changed from outside the Subscription class, so let's make it private with a public getter function and have the initial value passed through in the constructor:
package com.foundationAS3.ch14.irisreader {

  public class Subscription {

    private var _feedURL:String;

    public function Subscription(feedURL:String) {
      _feedURL = feedURL;
    }

    public function get feedURL():String {
      return _feedURL;
    }

  }

}
The other properties—title, url, articles, and lastChecked—will need to be visible from outside the Subscription class, but only for reading. With that in mind, let's add them as private variables, with each having a simple getter function:
package com.foundationAS3.ch14.irisreader {

  import mx.collections.ArrayCollection;

  public class Subscription {

    private var _feedURL:String;
    private var _title:String;
    private var _url:String;
    private var _articles:ArrayCollection;
    private var _lastChecked:Date;

    public function Subscription(feedURL:String) {
      _feedURL = feedURL;
      _articles = new ArrayCollection();
    }

    public function get feedURL():String {
      return _feedURL;
    }
public function get title():String {return _title;}public function get url():String {return _url;}public function get articles():ArrayCollection {return _articles;}public function get lastChecked():Date {return _lastChecked;}} }
Notice that you're using an ArrayCollection for the articles property instead of a simple Array. This means that you can take advantage of data binding, which is available in the Flex framework's ArrayCollection class, when dealing with the articles list (if you need to), and maybe save yourself a few lines of code later on. You're also initializing the articles property in the constructor so that it's ready to be filled with articles from the feed.
You have a way to go with the Subscription class, but I get nervous if I go too long without at least testing to check that a class compiles without errors. With that in mind, let's add some script to the IrisReader.mxml file that imports the Subscription class and creates a new instance of it.
Switch to the IrisReader.mxml document in Flex Builder and add an <mx:Script> element after the <mx:Application> tag. This element will allow you to write ActionScript directly into your MXML file.
Add an import statement for the Subscription class and then create a private variable to hold your test instance. Because you're here, you may as well make that variable an ArrayCollection that will hold all the Subscription objects for your application—there's no sense in adding extra work for yourself, now is there?
<mx:Application xmlns:mx="http://www.adobe.com/2006/mxml" layout="vertical"><mx:Script><![CDATA[import com.foundationAS3.ch14.irisreader.Subscription;import mx.collections.ArrayCollection;private var _subscriptions:ArrayCollection;]]></mx:Script>
<mx:HDividedBox width="100%" height="100%">
    <mx:Panel title="Subscriptions" width="40%" height="100%">
    </mx:Panel>
    <mx:VDividedBox width="60%" height="100%">
      <mx:Panel title="Articles" width="100%" height="50%">
      </mx:Panel>
      <mx:Panel title="Article" width="100%" height="50%">
      </mx:Panel>
    </mx:VDividedBox>
  </mx:HDividedBox>
</mx:Application>
Again, you used an ArrayCollection, instead of a simple Array, for its data-binding benefits.
Finally, you need to write the code to initialize the _subscriptions variable and feed it an instance of the Subscription class. This function needs to run once the application is ready to go, so you'll tie it into the creationComplete event of the Application class. You can add a listener for this event directly within the MXML tag for the Application. The handler for the event will be passed an instance of FlexEvent, so you'll import that class as well:
<mx:Application xmlns:mx="http://www.adobe.com/2006/mxml"layout="vertical" creationComplete="onCreationComplete(event)"> <mx:Script> <![CDATA[ import com.foundationAS3.ch14.irisreader.Subscription; import mx.collections.ArrayCollection;import mx.events.FlexEvent;private var _subscriptions:ArrayCollection;private function onCreationComplete(event:FlexEvent):void {_subscriptions = new ArrayCollection();_subscriptions.addItem(new Subscription("http://foundationas3.org/feed"));}]]> </mx:Script> <mx:HDividedBox width="100%" height="100%"> <mx:Panel title="Subscriptions" width="40%" height="100%"> </mx:Panel> <mx:VDividedBox width="60%" height="100%"> <mx:Panel title="Articles" width="100%" height="50%"> </mx:Panel> <mx:Panel title="Article" width="100%" height="50%"> </mx:Panel> </mx:VDividedBox> </mx:HDividedBox> </mx:Application>
With that done (and once you save any changes to the project files), you'll see any compile errors in the Problems panel. If you do see errors, don't fret. Just double-click each error to go to the appropriate line in the source code and see if you can figure out what's wrong.
Let's continue adding functionality to the Subscription class. You still need some way of retrieving the feed data, and you need to make use of the Adobe XML syndication library to process that feed data into something you can use in your application.
Note
Don't forget to keep saving your files as you proceed so that Flex Builder can compile your application after each step. Not only will that prevent you from losing too much work should Flex Builder crash but it will also detect any errors in your code early, so you can fix them right away.
You'll use the HTTPService class of the Flex framework to load the feed data, so the first thing you need is a private variable of this type that gets initialized with the feed URL in the constructor function:
package com.foundationAS3.ch14.irisreader {

  import mx.collections.ArrayCollection;
  import mx.rpc.http.HTTPService;

  public class Subscription {

    private var _feedURL:String;
    private var _title:String;
    private var _url:String;
    private var _articles:ArrayCollection;
    private var _lastChecked:Date;
    private var _service:HTTPService;

    public function Subscription(feedURL:String) {
      _feedURL = feedURL;
      _articles = new ArrayCollection();

      _service = new HTTPService();
      _service.url = _feedURL;
    }
. . .
}
By default, the HTTPService class returns its data as an Object, but the XML syndication library will deal only with either an XML object or a string containing the XML data. With that in mind, you need to change the resultFormat property of the _service object to HTTPService.RESULT_FORMAT_E4X so you get the data back in the desired format:
. . .
public function Subscription(feedURL:String) {
  _feedURL = feedURL;
  _articles = new ArrayCollection();

  _service = new HTTPService();
  _service.url = _feedURL;
  _service.resultFormat = HTTPService.RESULT_FORMAT_E4X;
}
. . .
Next, you need to add event listeners to the _service object to detect when a response is received from the server and to handle any errors that might occur:
package com.foundationAS3.ch14.irisreader {

  import mx.collections.ArrayCollection;
  import mx.rpc.http.HTTPService;
  import mx.rpc.events.FaultEvent;
  import mx.rpc.events.ResultEvent;
  . . .
    public function Subscription(feedURL:String) {
      _feedURL = feedURL;
      _articles = new ArrayCollection();

      _service = new HTTPService();
      _service.url = _feedURL;
      _service.resultFormat = HTTPService.RESULT_FORMAT_E4X;
      _service.addEventListener(ResultEvent.RESULT, onServiceResult);
      _service.addEventListener(FaultEvent.FAULT, onServiceFault);
    }

    private function onServiceResult(event:ResultEvent):void {
    }

    private function onServiceFault(event:FaultEvent):void {
    }
. . .
}
With that done, you can turn your attention to fleshing out the onServiceResult() event handler method of the Subscription class. Here is where you use the XML syndication library you went to all that bother to integrate into your project.
Within the generic package of the library, the FeedFactory class analyzes the feed data and parses it into the appropriate object. This class has two static methods: getFeedByString(), for dealing with a String containing XML data, and getFeedbyXML(), for dealing with an XML object. Both functions return an object that implements the IFeed interface (which is also part of the generic package).
Note
Interfaces are constructs in object-oriented languages that specify a group of methods that a class must implement. This is often described as a "contract" for a class that the class must fulfill. The reason to do this is so that objects of different classes that have different superclasses can all implement a common known interface. This allows other objects to call methods that are guaranteed to be defined on those classes implementing the interface. The methods in an interface do not contain any body, so therefore have no functionality. The methods exist only to specify which methods a class implementing the interface must define.
For example, suppose that you have a Farmer class, and a Farmer instance must feed both its Chicken instances and its Pig instances. Chicken extends Bird, while Pig extends Mammal. In the case of this farm, the inheritance stops there, without a grand Animal class from which all the animals extend. How can the farmer be guaranteed that both the chickens and the pigs will act the same way? An interface solves this problem.
You define an interface named IFeedable (interfaces usually have a capital I prefix) that specifies an eat() method. Pig and Chicken implement IFeedable, which will require them to define an eat() method. Then, if the farmer had an array of animals, and that array contained only classes that implemented IFeedable, it would not matter whether an index contained a pig or a chicken or whatever—the interface could be used to allow for the eat() method to be called without a compile-time error, as in the following code:
for each (animal:IFeedable in animals) {
  animal.eat();
}
Because an interface can be used for a data type just as a class can be used, the animal variable can be cast to the interface, so eat() can be called successfully.
Consider needing to check whether an animal actually had an eat() method, and having to use loose typing with Object, and you will begin to appreciate the value of interfaces:
for each (animal:Object in animals) {
  if (animal.hasOwnProperty("at")) {
    animal.eat();
  }
}
Import all classes from the com.adobe.xml.syndication.generic package, and add a call to the FeedFactory.getFeedByXML() method in the onServiceResult event handler to parse the resulting XML into a local IFeed object:
package com.foundationAS3.ch14.irisreader {

  import mx.collections.ArrayCollection;
  import mx.rpc.http.HTTPService;
  import mx.rpc.events.FaultEvent;
import mx.rpc.events.ResultEvent;import com.adobe.xml.syndication.generic.*;. . .private function onServiceResult(event:ResultEvent):void {var feed:IFeed = FeedFactory.getFeedByXML(event.result as XML);} . . .
You can now expand the onServiceResult() handler to use the information contained in your feed object, starting with pulling the feed title and URL out of the object's metadata property:
. . .
private function onServiceResult(event:ResultEvent):void {
  var feed:IFeed = FeedFactory.getFeedByXML(event.result as XML);

  _title = feed.metadata.title;
  _url = feed.metadata.link;
}
. . .
Next, you need to loop through the items array of the feed and add any new items to the articles collection of our Subscription object.
Each element of the items array is an object that implements the IItem interface. This interface has a date property, which is a Date object representing the time the article was posted. All you need to do is compare this date to the lastChecked property of your Subscription object to see whether the article is new:
. . .
private function onServiceResult(event:ResultEvent):void {
  var feed:IFeed = FeedFactory.getFeedByXML(event.result as XML);

  _title = feed.metadata.title;
  _url = feed.metadata.link;
  for each (var item:IItem in feed.items) {
    if (lastChecked == null ||
    item.date.getTime() > lastChecked.getTime()) {
      articles.addItem(item);
    }
  }
}
. . .
Notice that you add an extra check to the conditional to ensure that lastChecked exists before you call the getTime() method. If lastChecked didn't exist, which would happen when the class is first initialized, then calling getTime() would throw an error.
For this event handler, you need to set the lastChecked property to the current date, so that the next time you refresh the feed, you deal only with articles that have subsequently been added to the feed:
. . .
private function onServiceResult(event:ResultEvent):void {
  var feed:IFeed = FeedFactory.getFeedByXML(event.result as XML);

  _title = feed.metadata.title;
  _url = feed.metadata.link;
  for each (var item:IItem in feed.items) {
    if (lastChecked == null ||
  item.date.getTime() > lastChecked.getTime()) {
     articles.addItem(item);
    }
  }

  _lastChecked = new Date();
}
. . .
Now you need to add a public refresh function that can be called to refresh the feed by calling the send() method of the _service object. You also need to call this function internally from the constructor function to fetch the initial feed data.
. . .
    public function Subscription(feedURL:String) {
      _feedURL = feedURL;
      _articles = new ArrayCollection();

      _service = new HTTPService();
      _service.url = _feedURL;
      _service.resultFormat = HTTPService.RESULT_FORMAT_E4X;
      _service.addEventListener(ResultEvent.RESULT, onServiceResult);
      _service.addEventListener(FaultEvent.FAULT, onServiceFault);

     refresh();
    }
. . .
    private function onServiceFault(event:FaultEvent):void {
    }

    public function refresh():void {
      _service.send();
    }

    public function get feedURL():String {
      return _feedURL;
    }
. . .The last thing you need to do with the Subscription class is to prepare it so that it can be used as the source for data binding. This involves marking the relevant parts of the class for data binding and dispatching appropriate events when you change the values.
Because the properties of the Subscription class are read-only, you'll need to manually dispatch propertyChange events to enable them to be used as the source of data-binding expressions. This also means that you need your class to extend EventDispatcher so you can dispatch the necessary events.
Import the EventDispatcher class from the flash.events package and change the class definition so that the Subscription class extends EventDispatcher.
. . . import mx.rpc.events.ResultEvent; import com.adobe.xml.syndication.generic.*;import flash.events.EventDispatcher;public class Subscriptionextends EventDispatcher{ . . .
Add the [Bindable] metadata tag just before the class definition. This tag informs the Flex compiler that the class will broadcast a change event that can be used for data binding.
. . .
  import mx.rpc.events.ResultEvent;
  import com.adobe.xml.syndication.generic.*;
  import flash.events.EventDispatcher;

  [Bindable]
  public class Subscription extends EventDispatcher {
. . .
Because you have a lot of properties that need to dispatch the propertyChange event, let's create a helper function so you don't need to keep repeating the event-dispatching code. This function needs the name of the property that changed, the old value, and the new value, so it can create the PropertyChangeEvent object.
. . .
  import mx.rpc.events.ResultEvent;
  import mx.events.PropertyChangeEvent;
  import com.adobe.xml.syndication.generic.*;
  import flash.events.EventDispatcher;

  [Bindable]
  public class Subscription extends EventDispatcher {
. . .
    public function refresh():void {
      _service.send();
    }
private function notifyPropertyChange(name:String,oldValue:Object, value:Object):void {if (value !== oldValue) {dispatchEvent(PropertyChangeEvent.createUpdateEvent(this, name, oldValue, value));}}public function get feedURL():String { . . .
Notice that the value parameters for this function are of type Object so that they can be passed data of any type. Within the function, you're comparing the old and new values to make sure they are not the same before creating and dispatching the event, because you don't want to invoke the data-binding mechanism if nothing has changed.
Now you need to give each read-only property a private function that you can use to update the value and then call the notifyPropertyChange() function with the appropriate values. Let's start with feedURL:
. . .
    public function get feedURL():String {
      return _feedURL;
    }
    private function setFeedURL(value:String):void {
      var oldValue:Object = _feedURL;
      _feedURL = value;
      notifyPropertyChange("feedURL", oldValue, value);
    }
. . .
Here, the setFeedURL() function first stores the old value of the _feedURL property before overwriting it with the value passed it. It then passes the name of the public property along with both these values to the notifypropertyChange function to invoke the data-binding mechanism.
Now add the remaining public properties:
. . .
    public function get title():String {
      return _title;
    }
    private function setTitle(value:String):void {
      var oldValue:Object = _title;
      _title = value;
      notifyPropertyChange("title", oldValue, value);
    }

    public function get url():String {
      return _url;
    }
private function setURL(value:String):void {var oldValue:Object = _url;_url = value;notifyPropertyChange("url", oldValue, value);}public function get articles():ArrayCollection { return this._articles; }private function setArticles(value:ArrayCollection):void {var oldValue:Object = _articles;_articles = value;notifyPropertyChange("articles", oldValue, value);}public function get lastChecked():Date { return this._lastChecked; }private function setLastChecked(value:Date):void {var oldValue:Object = _lastChecked;_lastChecked = value;notifyPropertyChange("lastChecked", oldValue, value);}. . .
Finally, change the code in the onServiceResult() event handler to use these new functions instead of directly setting the private variable values. This will mean that the appropriate data-binding events will be dispatched and any associated UI controls will be updated.
. . .
    private function onServiceResult(event:ResultEvent):void {
      var feed:IFeed = FeedFactory.getFeedByXML(event.result as XML);

      setTitle(feed.metadata.title);
      setURL(feed.metadata.link);
      for each (var item:IItem in feed.items) {
        if (lastChecked == null ||
        item.date.getTime() > lastChecked.getTime()) {
          articles.addItem(item);
        }
      }

      setLastChecked(new Date());
    }
. . .
That's it. You're finished with the Subscription class. It's time to turn your attention to hooking up the UI.
The list of feeds that a user has subscribed to will be displayed in a simple List control. You already have a private _subscriptions property of the IrisReader.mxml file that will hold the user's Subscription objects, so all you need to do is to create a List control within the Subscriptions panel and bind it to the _subscriptions ArrayCollection.
Add a [Bindable] metatag just before the definition of the _subscriptions variable in the code block in the IrisReader.mxml file. While you're there, add a few more Subscription objects to the _subscriptions collection so that you can see more than one feed.
. . .
<mx:Script>
  <![CDATA[
    import mx.collections.ArrayCollection;
    import com.foundationas3.irisreader.Subscription;
    import mx.events.FlexEvent;


    [Bindable]
    private var _subscriptions:ArrayCollection;

    private function onCreationComplete(event:FlexEvent):void {
      _subscriptions = new ArrayCollection();
      _subscriptions.addItem
       (new Subscription("http://foundationas3.com/feed"));
      _subscriptions.addItem
      (new Subscription("http://dynamicflash.com/feed"));
      _subscriptions.addItem(
new Subscription("http://weblogs.macromedia.com/mxna/xml/rss.cfm"));
    }
  ]]>
</mx:Script>
. . .
Within the Subscriptions <mx:Panel> element, add a List control with its dataProvider property bound to the _subscriptions variable. Use title as the labelField, and set its width and height to 100%.
. . . <mx:Panel title="Subscriptions" width="40%" height="100%"><mx:List id="subscriptionsList" dataProvider="{_subscriptions}"labelField="title" width="100%" height="100%"/></mx:Panel> . . .
You've given the List control an id of subscriptionsList here because at some point in the future, you'll need to get the currently selected entry from that control in order to populate the Articles panel's data grid (shown in Figure 14-1). Any controls you need to refer to from other parts of the code should have id attributes. It's possible to refer to them without using IDs, but that's a painful process.
If you test your application now, you should see a list of feeds in the left panel, as shown in Figure 14-11. Once they have loaded, you'll see their titles.

Before you get drunk on the power of data binding, you should know that a couple of things are amiss here: before the feed data has loaded, each Subscription object is shown as [object Subscription] (yuck), and you're not displaying the total number of articles in each feed.
To set these misdemeanors right, you will need to tell the List control how you want the label for each item to be rendered, by using a custom label function.
Remove the labelField attribute from the List control and replace it with a labelFunction attribute with a value of renderSubscriptionsListLabel:
. . .
<mx:Panel title="Subscriptions" width="40%" height="100%">
  <mx:List id="subscriptionsList" dataProvider="{_subscriptions}"
    labelFunction="renderSubscriptionsListLabel"
    width="100%" height="100%"/>
</mx:Panel>
. . .
Now you need to create the renderSubscriptionsListLabel() function in the <mx:Script> block. Label-renderer functions get passed the object for a given item in the list and should return a String of the label to be displayed. In this case, you want to test to see whether the title of the Subscription object passed in is null, and if it is, display the feedURL property instead of the title. In any case, you also want to add the number of items in the feed after the URL or title in brackets. That all translates into a function that looks like this:
. . .
<mx:Script>
  <![CDATA[
    import mx.collections.ArrayCollection;
    import com.foundationas3.irisreader.Subscription;

    [Bindable]
    private var _subscriptions:ArrayCollection;

    private function onCreationComplete(event:FlexEvent):void {
      _subscriptions = new ArrayCollection();
      _subscriptions.addItem
      (new Subscription("http://foundationas3.com/feed"));
      _subscriptions.addItem
      (new Subscription("http://dynamicflash.com/feed"));
      _subscriptions.addItem(
new Subscription("http://weblogs.macromedia.com/mxna/xml/rss.cfm"));
    }

    private function renderSubscriptionsListLabel(
subscription:Subscription):String {
      var title:String = subscription.title;
      if (title == null) {
        title = subscription.feedURL;
      }
      title += " (" + subscription.articles.length + ")";
      return title;
    }
  ]]>
</mx:Script>
. . .
If you test the application now, you should see the feed URLs displayed in lieu of titles before the feed data is loaded, and each entry shows the number of items in that feed in brackets, as shown in Figure 14-12.

Figure 14.12. The list of feeds fixed to show URLs before data is loaded and the number of items in each feed
You'll come back to the Subscriptions panel later on to add the additional controls shown in Figure 14-1. Now let's get the basics of the other panels working.
From the wireframe, you can see that the articles for a feed are displayed in a DataGrid control with two columns, showing the date and title of each article. You'll use data binding to display the articles from the Subscription object currently selected in the subscriptions list.
Within the Articles <mx:Panel> element, add a 100% width and height DataGrid control with two columns displaying the date and title properties of each item in the articles collection:
. . . <mx:Panel title="Articles" width="100%" height="50%"><mx:DataGrid id="articlesGrid" width="100%" height="100%"><mx:columns><mx:DataGridColumn dataField="date" headerText="Date"/><mx:DataGridColumn dataField="title" headerText="Title"/></mx:columns></mx:DataGrid></mx:Panel> . . .
Once again, you gave this control an id attribute so you can refer to it later in the code (specifically, for populating the Article panel with information about the currently selected entry in the data grid).
Next, add a dataProvider property to the DataGrid object with the value shown:
. . .
<mx:Panel title="Articles" width="100%" height="50%">
  <mx:DataGrid id="articlesGrid" width="100%" height="100%"
    dataProvider="{subscriptionsList.selectedItem.articles}" >
    <mx:columns>
      <mx:DataGridColumn dataField="date" headerText="Date"/>
      <mx:DataGridColumn dataField="title" headerText="Title"/>
    </mx:columns>
  </mx:DataGrid>
</mx:Panel>
. . .
Go ahead and test your application now. Once the feeds have loaded, select each one in turn and marvel once again at the magic of data binding. Figure 14-13 shows an example.

But look again, and you'll see that something is not quite right with the way the application is working. According to the wireframe shown in Figure 14-1, the title of the Articles panel should change to be the title of the currently selected item in the subscriptions list. Luckily, you can use data binding to get around that, too.
Change the value of the title attribute of the Articles Panel component to match the following:
. . .
<mx:Panel title="{subscriptionsList.selectedItem.title}"
  width="100%" height="50%">
  <mx:DataGrid id="articlesGrid" width="100%" height="100%"
    dataProvider="{subscriptionsList.selectedItem.articles}" >
    <mx:columns>
      <mx:DataGridColumn dataField="date" headerText="Date"/>
<mx:DataGridColumn dataField="title" headerText="Title"/>
</mx:columns>
</mx:DataGrid>
</mx:Panel>
. . .Test the application again, and the results should look something like Figure 14-14.

You still have a little work to do on the Articles panel. The date format looks a little funky, and you're missing the last updated timestamp and a button to take the user to the website. But for now, let's move on to populating the Article panel.
The majority of the Article panel is taken up by a TextArea control that displays the excerpt of the currently selected item in the articlesGrid control. Let's add that now.
Add a 100% width and height TextArea control as a child of the Article <mx:Panel> container, and set the editable property to false (because there's no sense in allowing the user to change what's displayed in this control):
. . . <mx:Panel title="Article" width="100%" height="50%"><mx:TextArea id="excerptTextArea" editable="false"width="100%" height="100%"/></mx:Panel> . . .
Yet again, you've added an id attribute, and you should know why by now.
Set the htmlText property of the new TextArea control to be bound to the excerpt.value property of the currently selected item in the articlesGrid control:
. . .
<mx:Panel title="Article" width="100%" height="50%">
  <mx:TextArea id="excerptTextArea" editable="false"
    width="100%" height="100%"
    htmlText="{articlesGrid.selectedItem.excerpt.value}" />
</mx:Panel>
. . .
You used excerpt.value because excerpt is an object with several properties. In this case, you're interested in only the value property, so you read that directly. Flex Builder will warn you that it won't be able to detect assignments to the value property, and there's nothing you can do about that because it's an internal part of the XML syndication library, which doesn't seem to have been built with data binding in mind. However, it doesn't affect the functionality of the completed application.
You know that the title of the Article panel should be the title of the currently selected item from the articlesGrid control, so let's set that up next. Change the value of the title attribute of the Article panel to be bound to the title property of the currently selected item from the articlesGrid control:
. . .
<mx:Panel title="{articlesGrid.selectedItem.title}"
  width="100%" height="50%">
  <mx:TextArea id="excerptTextArea" editable="false"
    width="100%" height="100%"
    htmlText="{articlesGrid.selectedItem.excerpt.value}" />
</mx:Panel>
. . .
Now test your application's newfound capability to display the excerpt from the selected item in the Article panel. The result should look something like Figure 14-15.

Go ahead and take a break. When you're ready, you'll start fine-tuning the panels.
Although your application is technically working, you still have a way to go to satisfy the requirements drawn up earlier in the chapter. The most glaring omission at the moment is that the subscriptions are hard-coded, which is no good unless you fancy recompiling the application every time you want to add or remove a feed. Let's fix that now.
If you glance back at the application's UI in Figure 14-1, you'll see add/remove buttons below the list of subscribed feeds, which allow the users to manage their subscriptions. The section on interaction design mentioned that a dialog box should be shown when the user clicks the add button, but the dialog box wasn't part of the original wireframe. Figure 14-16 shows how that dialog box should appear.
This is a very simple dialog box with a Label, a TextArea, and a couple of Button controls, all neatly wrapped in a TitleWindow container. You need to create this as a component that you can then reference in your application to be opened as a modal window.
Let's begin by creating the new component and setting up its basic layout.
Right-click (Windows) or Control-click (Mac OS X) the IrisReader project in the Navigator panel of Flex Builder and select New
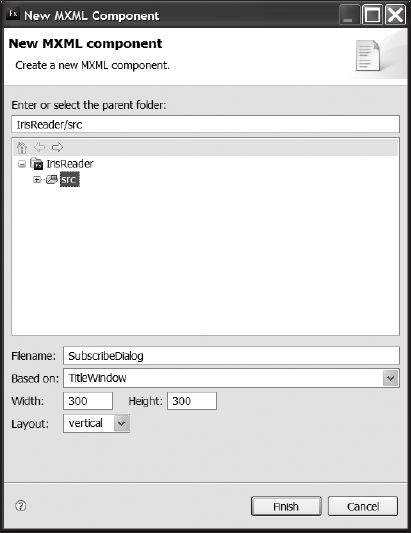
Now you have a new MXML file containing the values you selected for the TitleWindow container. In that file, set the title property of the TitleWindow container to "Subscribe to feed". Then add a 100% width HBox container containing Label and TextInput controls with the following configurations:
<mx:TitleWindow xmlns:mx="http://www.adobe.com/2006/mxml"title="Subscribe to feed" layout="vertical" width="300"><mx:HBox width="100%" verticalAlign="middle"><mx:Label text="Feed URL"/><mx:TextInput id="feedURL" width="100%"/></mx:HBox></mx:TitleWindow>
Add another HBox as a sibling of the previous one. It contains the two Button controls for the dialog box.
<mx:TitleWindow xmlns:mx="http://www.adobe.com/2006/mxml"
  title="Subscribe to feed" layout="vertical" width="300">
  <mx:HBox width="100%" verticalAlign="middle">
    <mx:Label text="Feed URL"/>
    <mx:TextInput id="feedURL" width="100%"/>
  </mx:HBox>
  <mx:HBox width="100%" horizontalAlign="right">
    <mx:Button id="okButton" label="OK"/>
    <mx:Button id="cancelButton" label="Cancel"/>
  </mx:HBox>
</mx:TitleWindow>
Now the main layout for the SubscribeDialog component is complete.
Next, you need to add the necessary buttons to the Subscriptions panel and wire up the subscribe button so that it opens the SubscribeDialog component you just created.
Switch back to the IrisReader.mxml file and add a ControlBar container below the List control in the Subscriptions <mx:Panel> container, containing the subscribe and unsubscribe buttons:
. . .
<mx:Panel title="Subscriptions" width="40%" height="100%">
  <mx:List id="subscriptionsList" dataProvider="{_subscriptions}"
    labelFunction="renderSubscriptionsListLabel"
    width="100%" height="100%"/>
  <mx:ControlBar>
    <mx:Button id="subscribeButton" label="+"/>
    <mx:Button id="unsubscribeButton" label="-"/>
  </mx:ControlBar>
</mx:Panel>
. . .
To make the subscribe button open the dialog box, you need to add a click event handler for the subscribeButton component. While you're there, you may as well do the same for the unsubscribeButton component. Have them call functions named subscribe and unsubscribe, respectively. You'll create those functions next.
. . .
<mx:Panel title="Subscriptions" width="40%" height="100%">
  <mx:List id="subscriptionsList" dataProvider="{_subscriptions}"
    labelFunction="renderSubscriptionsListLabel"
    width="100%" height="100%"/>
  <mx:ControlBar>
    <mx:Button id="subscribeButton" label="+"
      click="subscribe(event)"/>
    <mx:Button id="unsubscribeButton" label="-"
      click="unsubscribe(event)"/>
  </mx:ControlBar>
</mx:Panel>
. . .
Create the subscribe() and unsubscribe() functions, adding them to the bottom of the <mx:Script/> block in the IrisReader.mxml file:
. . .
      return title;
    }

    private function subscribe(event:MouseEvent):void {
    }

    private function unsubscribe(event:MouseEvent):void {
    }
  ]]>
</mx:Script>
. . .
Import the PopUpManager class from the mx.managers package and use it in the subscribe() function to create a modal window from your SubscribeDialog component. You'll also call the PopUpManager's centerPopUp() method to center the dialog box within the application window:
. . . import mx.events.FlexEvent;import mx.managers.PopUpManager;. . .private function subscribe(event:MouseEvent):void {var dialog:SubscribeDialog = PopUpManager.createPopUp(this,SubscribeDialog, true) as SubscribeDialog;PopUpManager.centerPopUp(dialog);} . . .
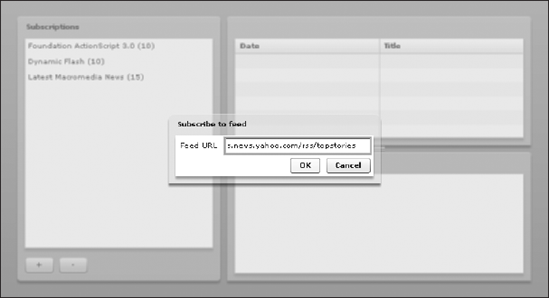
If you test the application now and click the new subscribe button in the Subscriptions panel, you should see the dialog box you just created pop up in the center of the screen, as shown in Figure 14-18.

This dialog box doesn't actually do much at the moment. You can't even close it once it has been opened. But it's a start.
Next, you need to wire up the OK and Cancel buttons so they at least close the dialog box. You can do that by using various methods of the PopUpManager class in response to the button clicks.
Switch back to the SubscribeDialog.mxml file in Flex Builder and add in an <mx:Script> element at the top. Then import the PopUpManager class from the mx.managers package.
<mx:TitleWindow xmlns:mx="http://www.adobe.com/2006/mxml" title="Subscribe to feed" layout="vertical" width="300"><mx:Script><![CDATA[import mx.managers.PopUpManager;]]></mx:Script><mx:HBox width="100%" verticalAlign="middle">
To close the dialog box, you need to use the PopUpManager.removePopUp() method, passing a reference to this so it knows which window to close. You'll do this in click event handlers for the two buttons.
<mx:TitleWindow xmlns:mx="http://www.adobe.com/2006/mxml"
  title="Subscribe to feed" layout="vertical" width="300"
  <mx:Script>
    <![CDATA[
      import mx.managers.PopUpManager;

      private function onOKButtonClick(event:MouseEvent):void {
        PopUpManager.removePopUp(this);
      }

      private function onCancelButtonClick(event:MouseEvent):void {
        PopUpManager.removePopUp(this);
      }
    ]]>
  </mx;Script>
  <mx:HBox width="100%" verticalAlign="middle">
. . .
<mx:HBox width="100%" horizontalAlign="right">
    <mx:Button id="okButton" label="OK"
      click="onOKButtonClick(event)"/>
    <mx:Button id="cancelButton" label="Cancel"
      click="onCancelButtonClick(event)"/>
  </mx:HBox>
</mx:TitleWindow>
With that done, you should now be able to close the dialog box by clicking either the OK or Cancel button.
That's not the end of the story, however. You still need to be able to get the feed URL from the dialog box and create a new Subscription object for it when the user clicks the OK button.
To get the new feed, you'll create an Event class to hold the feed URL and dispatch this event when the dialog box is being closed. Then you will have the main IrisReader class listen for this event being dispatched and act accordingly.
Right-click (Windows) or Control-click (Mac OS X) the IrisReader project in the Navigator panel and select New
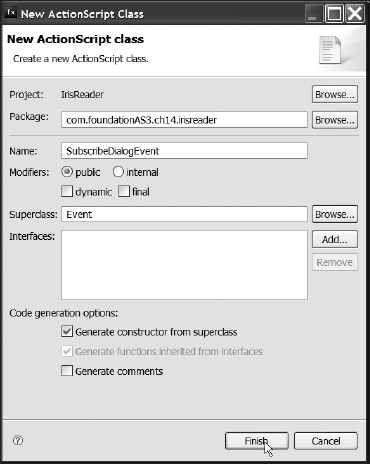
In the newly created SubscribeDialogEvent.as file, add a constructor function that accepts the event type and feed URL, both as a String, as well as the bubbles and cancelable properties, and passes them to the superclass Event constructor:
package com.foundationAS3.ch14.irisreader.events {

  import flash.events.Event;

  public class SubscribeDialogEvent extends Event {

    public function SubscribeDialogEvent(
      type:String,
      feedURL:String,
      bubbles:Boolean=false,
      cancelable:Boolean=false
    ) {
      super(type, bubbles, cancelable);
    }

 }

}
Create a read-only feedURL property and modify the constructor to store the feedURL parameter in this property:
package com.foundationAS3.ch14.irisreader.events {

  import flash.events.Event;

  public class SubscribeDialogEvent extends Event {

    private var _feedURL:String;

    public function SubscribeDialogEvent(
      type:String,
      feedURL:String,
      bubbles:Boolean=false,
      cancelable:Boolean=false
    ) {
       super(type, bubbles, cancelable);
       _feedURL = feedURL;
    }

    public function get feedURL():String {
       return _feedURL;
    }

  }

}
Finally, add a public static constant to represent the event type. The constant name is completely arbitrary but is generally a verb, so let's call it SUBSCRIBE. You also need to override Event's clone() method, which should be done for any child class of Event.
package com.foundationAS3.ch14.irisreader.events {

  import flash.events.Event;

  public class SubscribeDialogEvent extends Event {

    public static const SUBSCRIBE:String = "subscribe";
    private var _feedURL:String;

    public function SubscribeDialogEvent(
      type:String,
      feedURL:String,
      bubbles:Boolean=false,
      cancelable:Boolean=false
    ) {
super(type, bubbles, cancelable);
_feedURL = feedURL;
}
override public function clone():Event {
return new SubscribeDialogEvent
(type, feedURL, bubbles, cancelable);
}
public function get feedURL():String {
return _feedURL;
}
}
}Next, modify the onOKButtonClick() method of the SubscribeDialog.mxml to dispatch your new event before the dialog box is closed, passing the text from the feedURL control as the feedURL parameter:
. . .
      import mx.managers.PopUpManager;
      import
      com.foundationAS3.ch14.irisreader.events.SubscribeDialogEvent;

      private function onOKButtonClick(event:MouseEvent):void {
        dispatchEvent(new SubscribeDialogEvent(
SubscribeDialogEvent.SUBSCRIBE, feedURL.text));
        PopUpManager.removePopUp(this);
      }
. . .
In the subscribe() method in the IrisReader.mxml file, you need to listen for the subscribe event of the SubscribeDialog, and when it has fired, add a new Subscription object to the _subscriptions array using the feedURL that is included as part of the event data:
. . .
      import mx.managers.PopUpManager;
      import
      com.foundationAS3.ch14.irisreader.events.SubscribeDialogEvent;

      [Bindable]
      private var _subscriptions:ArrayCollection;
. . .
      private function subscribe(event:MouseEvent):void {
var dialog:SubscribeDialog =PopUpManager.createPopUp(this,SubscribeDialog, true) as SubscribeDialog; PopUpManager.centerPopUp(dialog);dialog.addEventListener(SubscribeDialogEvent.SUBSCRIBE,onSubscribeDialogSubscribe);} private function unsubscribe(event:MouseEvent):void { }private function onSubscribeDialogSubscribe(event:SubscribeDialogEvent):void {_subscriptions.addItem(new Subscription(event.feedURL));}. . .
That's all that needs to be done to allow users to add their own subscriptions. Give it a try using feed URLs from your favorite blogs or news sites. Figures 14-20 and 14-21 show an example of adding a subscription.

Before moving on to the unsubscribe functionality, you need to tidy up a couple of subscription areas. First, a number of hard-coded subscriptions are in the application, and now that users can add their own subscriptions, you can get rid of the hard-coded ones. Change the init() method of the IrisReader.mxml file to remove the creation of the three Subscription objects:
. . .
      private function onCreationComplete(event:FlexEvent):void {
        _subscriptions = new ArrayCollection();
      }
. . .
Another slight problem is that the user can click the OK button in the Subscribe to feed dialog box without having entered a feed URL. You could solve that by implementing a regular expression to check that what the user has entered is a valid URL, but for the sake of simplicity, you'll just disable the OK button if the feedURL control is empty.
Note
If this were a production-quality application being developed for a client, I would definitely make sure the URL entered was a valid URL. Depending on the requirements, I might even go so far as loading the contents of the URL to check that it is a valid feed before allowing the user to click the OK button.
In the SubscribeDialog.mxml file, bind the enabled property of the OK button using a data-binding expression to check that the length of the feedURL control's text property is greater than zero:
<mx:Button id="okButton" label="OK"click="onOKButtonClick(event)"enabled="{feedURL.text.length > 0}"/>
Now that users can subscribe to a feed, they'll need some way of unsubscribing if the feed becomes boring (or, like mine, dormant for long periods of time). You already have a button in the Subscriptions panel for this purpose, and it's wired up to the unsubscribe method. So, all you need to do is to remove the selected item in the list from the _subscriptions collection when this button is clicked.
In the IrisReader.mxml file, modify the unsubscribe() method to remove the currently selected item in the subscriptionsList control from the _subscriptions collection:
. . .
      private function unsubscribe(event:MouseEvent):void {
        _subscriptions.removeItemAt(subscriptionsList.selectedIndex);
      }
. . .
You're removing the selected item by index in the list because the ArrayCollection class doesn't have a removeItem method; it has only a removeItemAt method.
To tidy up, you want the unsubscribe button enabled only if there is something selected in the _subscriptions list. To handle this, bind the enabled property of the unsubscribeButton using a data-binding expression that checks the selectedItem property of the subscriptionsList control to make sure it's not null.
. . .
<mx:Button id="unsubscribeButton" label="-"click="unsubscribe(event)"
  enabled="{subscriptionsList.selectedItem !== null}"/>
. . .
Users can now add and remove subscriptions at their leisure. However, if they restart the application, all of their subscriptions are lost. Because one of the requirements was that the application remember the subscriptions list between sessions, let's tackle that now.
As a Flex developer, you have basically two choices for data storage: store the data on the client in a local SharedObject or store it on the server using one of the variety of remote communication protocols that Flex supports. Because this section of the book is about Flex application development, you'll go with the former approach. Local SharedObjects aren't without their limitations, though. They're the Flash equivalent of browser cookies, and like cookies, they can store only a limited amount of information. With this in mind, the plan is to store only a list of URLs for the user's subscriptions list instead of the Subscription objects themselves and all the articles they contain.
Let's start by creating a function to save the subscriptions list to a local SharedObject.
In the IrisReader.mxml file, import the SharedObject class from the flash.net package, and then create a new function named saveData() that initially loads the local SharedObject named IrisReader:
import mx.managers.PopUpManager;
      import com.foundationAS3.ch14.irisreader.
events.SubscribeDialogEvent;
import flash.net.SharedObject;. . . private function unsubscribe(event:MouseEvent):void { _subscriptions.removeItemAt(subscriptionsList.selectedIndex); }private function saveData():void {var so:SharedObject = SharedObject.getLocal("IrisReader");}. . .
Create a new feedURLs array, and then loop through all the Subscription objects in the _subscriptions collection and add the feedURL property of each to the feedURLs array:
. . .
      private function saveData():void {
        var so:SharedObject = SharedObject.getLocal("IrisReader");
        var feedURLs:Array = new Array();
        for each (var subscription:Subscription in _subscriptions) {
          feedURLs.push(subscription.feedURL);
        }
      }
. . .
Finally, add the feedURLs array to the data property of the so object and call the flush() method to write the data to disk:
. . .
      private function saveData():void {
        var so:SharedObject = SharedObject.getLocal("IrisReader");
        var feedURLs:Array = new Array();
        for each (var subscription:Subscription in _subscriptions) {
          feedURLs.push(subscription.feedURL);
        }
        so.data.feedURLs = feedURLs;
        so.flush();
      }
. . .
With that done, you need an equivalent function to get the feed URLs from the SharedObject and re-create the _subscriptions collection. Create a function named loadData() that initially clears the _subscriptions collection and then loads the local SharedObject named IrisReader:
. . .
       so.data.feedURLs = feedURLs;
       so.flush();
     }

     private function loadData():void {
       _subscriptions.removeAll();
var so:SharedObject = SharedObject.getLocal("IrisReader");}. . .
After checking to make sure the feedURLs array exists as part of the SharedObject's data (which is necessary because it won't exist the first time the user uses the application), loop through all the entries and create a Subscription object for each one, adding it to the _subscriptions collection:
. . .
      private function loadData():void {
        _subscriptions.removeAll();
        var so:SharedObject = SharedObject.getLocal("IrisReader");
        if (so.data.feedURLs) {
          for each (var feedURL:String in so.data.feedURLs) {
            _subscriptions.addItem(new Subscription(feedURL));
          }
        }
      }
. . .
With these functions ready to go, you'll load the data when the application starts and save the data whenever it changes. Loading the subscriptions list when the application starts can be taken care of in the handler for the application's creationComplete event. Saving the data can be done whenever a new feed is added or removed in the onSubscribeDialogSubscribe() and unsubscribe() methods.
Add a call to the loadData() method just after the initialization of the _subscriptions collection in the onCreationComplete() method of the IrisReader.mxml file:
. . .
      private function onCreationComplete(event:FlexEvent):void {
        _subscriptions = new ArrayCollection();
        loadData();
      }
. . .
Next, add calls to saveData() in both the onSubscribeDialogSubscribe() and unsubscribe() methods:
. . .
      private function unsubscribe(event:MouseEvent):void {
        _subscriptions.removeItemAt(subscriptionsList.selectedIndex);
        saveData();
      }
. . .
      private function onSubscribeDialogSubscribe(
event:SubscribeDialogEvent):void {
        _subscriptions.addItem(new Subscription(event.feedURL));
        saveData();
      }
. . .
And that's another feature you can check off your list. If you run the application now, subscribe to a few feeds, and then restart the application, you should see your feed list reloaded. Nice.
At this point, you're almost finished with the Subscriptions panel, with one last feature to add.
Of course, the users will want to see updates to their feeds. Let's take care of that now.
The big feature that the feed reader application is missing is automatic checking of the subscriptions list and fetching of new articles. Users won't want to need to repeatedly click a refresh button just to see if there have been any updates to their favorite feeds. Let's get the feed to automatically refresh itself every five minutes.
Create a function named refreshAll() in the IrisReader.mxml file that loops through all the Subscription objects in the _subscriptions collection and calls their refresh methods:
. . .
        }
      }

      private function refreshAll(event:Event):void {
        for each (var subscription:Subscription in _subscriptions) {
          subscription.refresh();
        }
      }

      private function onSubscribeDialogSubscribe(
event:SubscribeDialogEvent):void {
        _subscriptions.addItem(new Subscription(event.feedURL));
        saveData();
      }
. . .
Now create a new private variable named refreshTimer to hold the Timer object and initialize the timer in the onCreationComplete() function. While you're there, add an event listener for the TimerEvent.TIMER event.
. . .
      import com.foundationAS3.ch14.irisreader.
events.SubscribeDialogEvent;
      import flash.net.SharedObject;
      import flash.utils.Timer;
      import flash.events.TimerEvent;

      [Bindable]
      private var _subscriptions:ArrayCollection;
      private var _refreshTimer:Timer;
private function onCreationComplete(event:FlexEvent):void {
_subscriptions = new ArrayCollection();
loadData();
_refreshTimer = new Timer(5 * 60 * 1000);
_refreshTimer.addEventListener(TimerEvent.TIMER,
onRefreshTimer);
_refreshTimer.start();
}
. . .Now add the onRefreshTimer() event handler function, which just needs to call the refreshAll() method you wrote earlier:
. . .
      private function refreshAll(event:Event):void {
        for each (var subscription:Subscription in _subscriptions) {
          subscription.refresh();
        }
      }

      private function onRefreshTimer(event:TimerEvent):void {
        refreshAll(event);
      }
. . .
That handles automatic refreshing. Now let's allow for manual updates.
You can finish the Subscriptions panel by adding some buttons to allow the users to manually refresh the selected feed or all feeds in their subscriptions list.
In the IrisReader.mxml file, add a Label and two Button controls to the ControlBar container within the Subscriptions Panel component and give them appropriate labels. Add a 100% width Spacer to push the subscription buttons over to the right side of the control bar:
<mx:Panel title="Subscriptions" width="40%" height="100%">
  <mx:List id="subscriptionsList" dataProvider="{_subscriptions}"
    labelFunction="renderSubscriptionsListLabel"
    width="100%" height="100%"/>
  <mx:ControlBar>
    <mx:Label text="Refresh: "/>
    <mx:Button label="Selected"/>
    <mx:Button label="All"/>
    <mx:Spacer width="100%"/>
    <mx:Button id="subscribeButton" label="+"
      click="subscribe(event)"/>
    <mx:Button id="unsubscribeButton" label="-"
      click="unsubscribe(event)"
enabled="{subscriptionsList.selectedItem !== null}"/>
</mx:ControlBar>
</mx:Panel>Add a click handler to the All button, which calls the refreshAll() function you created earlier:
<mx:Button label="All" click="refreshAll(event)"/>Add a click handler to the Selected button, which calls a function named refreshSelected() (you'll create that in a moment). While you're there, bind the enabled property of this button using a data-binding expression to check that the selectedItem property of the subscriptionsList control isn't null.
<mx:Button label="Selected" click="refreshSelected(event)"
  enabled="{subscriptionsList.selectedItem !== null}"/>
Create the refreshSelected() function, which needs to cast the selectedItem property of the subscriptionsList control as a Subscription object and then call its refresh method:
private function refreshAll(event:Event):void {
  for each (var subscription:Subscription in _subscriptions) {
    subscription.refresh();
  }
}

private function refreshSelected(event:Event):void {
  (subscriptionsList.selectedItem as Subscription).refresh();
}
If you test your application, you should be able to refresh all subscriptions or just the selected feeds using the buttons you've just added, which are shown in Figure 14-22.

You'll be glad to know that you're now finished with the Subscriptions panel. However, you could make some improvements, as I'll suggest at the end of the chapter.
The hard work is complete. Now you just need to add some finishing touches to the Articles and Article panels.
The Articles panel is actually very nearly complete. If you look at the original UI design (refer to Figure 14-1), all that's missing is a label showing when the feed was last checked and a button to take users to the website for the feed.
However, before you get to those items, you have a little housework to do. The display formats for the dates in the application are not what you would call human-friendly. To make the dates prettier, you need to create a DateFormatter object and use this to render all the dates in the application.
Add a new private DateFormatter variable to the IrisReader.mxml file and initialize this variable in the init method to use DD MMM YYYY HH:MM as its format. This will display dates in a format such as 25 Dec 2007 18:47.
. . .
      import flash.utils.Timer;
      import flash.events.TimerEvent;
      import mx.formatters.DateFormatter;

      [Bindable]
      private var _subscriptions:ArrayCollection;
      private var _refreshTimer:Timer;
      private var _dateFormatter:DateFormatter;

      private function onCreationComplete(event:FlexEvent):void {
        _subscriptions = new ArrayCollection();
        _loadData();

        _dateFormatter = new DateFormatter();
        _dateFormatter.formatString = "DD MMM YYYY HH:NN";

        _refreshTimer = new Timer(5 * 60 * 1000);
        _refreshTimer.addEventListener
      (TimerEvent.TIMER, onRefreshTimer);
        _refreshTimer.start();
      }
. . .
Now create a new private function that accepts a string and returns that string formatted using your DateFormatter instance:
. . .
      private function onCreationComplete(event:FlexEvent):void {
        _subscriptions = new ArrayCollection();
        _loadData();

        _dateFormatter = new DateFormatter();
        _dateFormatter.formatString = "DD MMM YYYY HH:NN";

        _refreshTimer = new Timer(5 * 60 * 1000);
        _refreshTimer.addEventListener
        (TimerEvent.TIMER, onRefreshTimer);
        _refreshTimer.start();
      }

      private function formatDate(date:String):String {
        return _dateFormatter.format(date);
      }
. . .
Add a ControlBar container to the Articles panel containing a Label and a Text control. Bind the text property of the Text control to the lastChecked property of the currently selected Subscription object in the subscriptionsList control, formatting it by calling your new formatDate() method.
. . .
      <mx:Panel title="{subscriptionsList.selectedItem.title}"
        width="100%" height="50%">
        <mx:DataGrid id="articlesGrid" width="100%" height="100%"
          dataProvider="{subscriptionsList.selectedItem.articles}" >
          <mx:columns>
            <mx:DataGridColumn dataField="date" headerText="Date"/>
            <mx:DataGridColumn dataField="title" headerText="Title"/>
          </mx:columns>
        </mx:DataGrid>
        <mx:ControlBar>
          <mx:Label text="Last checked:"/>
          <mx:Text text=
"{formatDate(subscriptionsList.selectedItem.lastChecked)}"/>
        </mx:ControlBar>
      </mx:Panel>
. . .
That takes care of the last-checked date display and format, as shown in Figure 14-23, but what about the values in the Date column of the articlesGrid control? You can use a custom label function to render these dates using the same DateFormatter object.

Set the labelFunction property of the DataGridColumn instance representing the Date column of the articlesGrid control to renderArticlesGridDate(). While you're there, set the width of the column to 150, because you won't need so much space for the date once it has been property formatted.
. . .
      <mx:DataGrid id="articlesGrid" width="100%" height="100%"
        dataProvider="{subscriptionsList.selectedItem.articles}">
        <mx:columns>
          <mx:DataGridColumn dataField="date" headerText="Date"
            labelFunction="renderArticlesGridDate" width="150"/>
          <mx:DataGridColumn dataField="title" headerText="Title"/>
        </mx:columns>
      </mx:DataGrid>
. . .
Now create the renderArticlesGridDate() function to return the formatted date. Label-renderer functions for DataGrid controls receive references to the item currently being rendered and the DataGridColumn in question. In this case. the current item will be an IItem object from the com.adobe.xml.syndication.generic.IItem package, which has a date property that you need to format. You need to feed this date to the format method of your DateFormatter object and return the resultant string.
. . .
      import flash.events.TimerEvent;
      import mx.formatters.DateFormatter;
      import com.adobe.xml.syndication.generic.IItem;
. . .
      private function formatDate(date:String):String {
        return _dateFormatter.format(date);
      }
private function renderArticlesGridDate(item:IItem,column:DataGridColumn):String {return _dateFormatter.format(item.date);}. . .
Test the application again to see the prettier dates in all their glory, as shown in Figure 14-24.
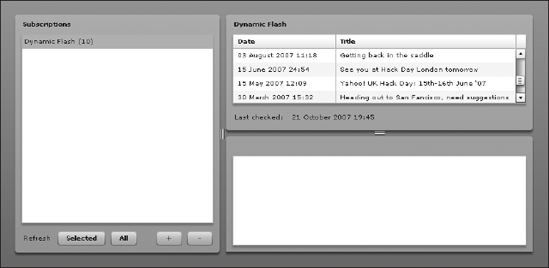
Now that you have pretty dates all round, you just need to add the Visit site button. In the ControlBar for the Articles panel, add a 100% width Spacer and a Button control with a label of "Visit site" and click handler of visitSelectedSite(). Bind the enabled property of the button using a data-binding expression to check that there is something selected in the subscriptionsList control.
. . .
        <mx:ControlBar>
          <mx:Label text="Last checked:"/>
          <mx:Text text=
"{formatDate(subscriptionsList.selectedItem.lastChecked)}"/>
          <mx:Spacer width="100%"/>
          <mx:Button label="Visit site"
            click="visitSelectedSite(event)"
            enabled="{subscriptionsList.selectedItem !== null}"/>
        </mx:ControlBar>
. . .
Now create the visitSelectedSite() function, which should use the url property of the selected Subscription object in the subscriptionsList control to open a new window to the site using the built-in navigateToURL() function:
. . .
      private function refreshSelected(event:Event):void {
        (subscriptionsList.selectedItem as Subscription).refresh();
      }

      private function visitSelectedSite(event:Event):void {
        var subscription:Subscription =
(subscriptionsList.selectedItem as Subscription);
        navigateToURL(new URLRequest(subscription.url));
      }
. . .
That's all there is to it. If you test the project now, you'll see the Visit site button, as shown in Figure 14-25. You can click it to visit the site referenced in the metadata of your subscribed feeds.

With that, you've finished your work on the Articles panel and can turn your attention to the Article panel.
As with the Articles panel, the Article panel needs very little to satisfy the application's requirements. It's missing a label to show the date of the currently selected item in the Articles panel and a button to take users to the URL associated with the item so they can read the rest of the article.
Let's start with the article date. Add a ControlBar to the Articles panel in the IrisReader.mxml file, containing a Label and a Text control. Bind the text property of the Text control to the date property of the currently selected item in the articlesGrid control, passing it through the DateFormatter object so it's nice and pretty:
. . .
      <mx:Panel title="{articlesGrid.selectedItem.title}"
        width="100%" height="50%">
        <mx:TextArea id="excerptTextArea" editable="false"
          width="100%" height="100%"
          htmlText="{articlesGrid.selectedItem.excerpt.value}" />
        <mx:ControlBar>
          <mx:Label text="Posted:"/>
          <mx:Text text=
"{formatDate(articlesGrid.selectedItem.date)}"/>
          </mx:ControlBar>
        </mx:Panel>
. . .
Figure 14-26 shows the date added to the Article panel.
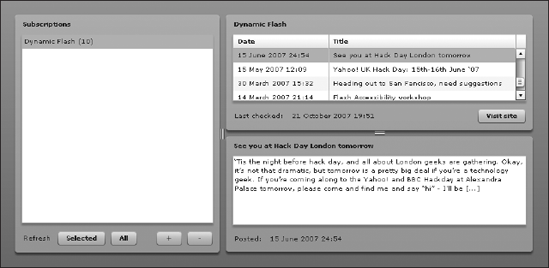
Well, that was easy. Now you just need to add in and wire up the Read more button.
In the ControlBar for the Article panel, add a 100% width Spacer and a Button control with a label of "Read more" and click handler of readSelectedArticle(). Bind the enabled property of the button using a data-binding expression to check that there is something selected in the articlesGrid control.
. . .
        <mx:ControlBar>
          <mx:Label text="Posted:"/>
          <mx:Text text=
"{formatDate(articlesGrid.selectedItem.date)}"/>
          <mx:Spacer width="100%"/>
          <mx:Button label="Read more"
            click="readSelectedArticle(event)"
            enabled="{articlesGrid.selectedItem !== null}"/>
        </mx:ControlBar>
. . .
Now create the readSelectedArticle() function, which should use the link property of the selected IItem object in the articlesGrid control to open a new window to the site using the built-in navigateToURL() function:
. . .
      private function visitSelectedSite(event:Event):void {
        var subscription:Subscription =
(subscriptionsList.selectedItem as Subscription);
        navigateToURL(new URLRequest(subscription.url));
      }

      private function readSelectedArticle(event:Event):void {
        var item:IItem = (articlesGrid.selectedItem as IItem);
        navigateToURL(new URLRequest(item.link));
      }
And now you can relax. You have finally nailed down the final feature of our feed reader application, as shown in Figure 14-27. Save your changes, run the project, and bask in the reflective glow of your achievement.

While putting this chapter together, I made a conscious decision to omit some features that you would want to have in a high-quality feed reader application. That's not to say that the application you've built is useless. In fact, I'm using this application every day to keep an eye on the feeds that I subscribe to in a simple and unobtrusive way. However, the application would be even more useful if it had some of the following features:
User-specified refresh interval: Currently, the feeds are refreshed every five minutes. This may be too frequent (or not frequent enough) for some users, so allowing them to specify their own interval (using a
Slideror aNumberStepper, for example) would be a good idea. You would need to save their interval along with the subscriptions list in the localSharedObject; otherwise, the users would need to reset this value every time they started the application, which wouldn't be ideal.Control columns in the panel: The
Articlespanel could contain more information about an item. Some extra fields may be important to users, so allowing them to specify which fields are visible (and in what order) would be a good idea.The ability to organize subscriptions into folders: Subscriptions can get a bit overwhelming if you've subscribed to hundreds of feeds, so the ability to add folders to the subscriptions list would be ideal. This would involve swapping the
Listcontrol for aTreecontrol, and you would need to tweak how you get the data into it in the first place.Reading list support: You could add the ability to read Outline Processor Markup Language (OPML) files, which contain lists of feeds supplied by someone else. This would involve extending the Adobe XML syndication library to add support for OPML files. OPML files can contain folders, so the feature suggested in the previous item would be good to go with this one.
I hope that this chapter has been a bit of an eye-opener about the power of Flex framework when coupled with your own ActionScript for rapidly building high-quality, complex web applications. We started from the conceptualization stage and went all the way through full implementation, utilizing the built-in UI, utility, and management classes in Flex to wire together a set of common widgets to display remote data in an intuitive, straightforward manner that is both easy to use and aesthetically pleasing.
Flex in itself is a fantastic tool, but it can go only so far. It takes extra knowledge of the underlying ActionScript 3.0 language to truly bring out its full potential. The topics presented in this book—from the basic constructs of ActionScript all the way through event handling, graphic creation, and remote communication—can all be applied when developing Flex applications.
And remember that the Flex framework is built on ActionScript. The source code is available to peruse to gain insight into how some of its powerful features were implemented. Use it to learn more. Build your own classes that suit your own needs. The beauty of ActionScript is that it can be used to accomplish so many varied tasks, ranging from scripting animation, to building games, to creating full-blown e-commerce and social media sites.
Take advantage of ActionScript's potential and create what you want to create.