After completing much of the site in the previous chapter, it’s time to set it up so it can accept data from the backend. We start this chapter by learning how to set up the Contentful CMS. Next, we will create the Places component. We are also going to use the data stored in the Contentful CMS in the Places component.
Setting Up Contentful
It’s time to display data in our project. We can do this with internal data, but we will use a headless CMS (Content Management System) to store our data and then consume it. We will use the Contentful CMS1 for this project.
CMS Setup
Go ahead and sign up. When you go to the dashboard the first time, you will get the screen shown in Figure 4-1.
Figure 4-1
Contentful space
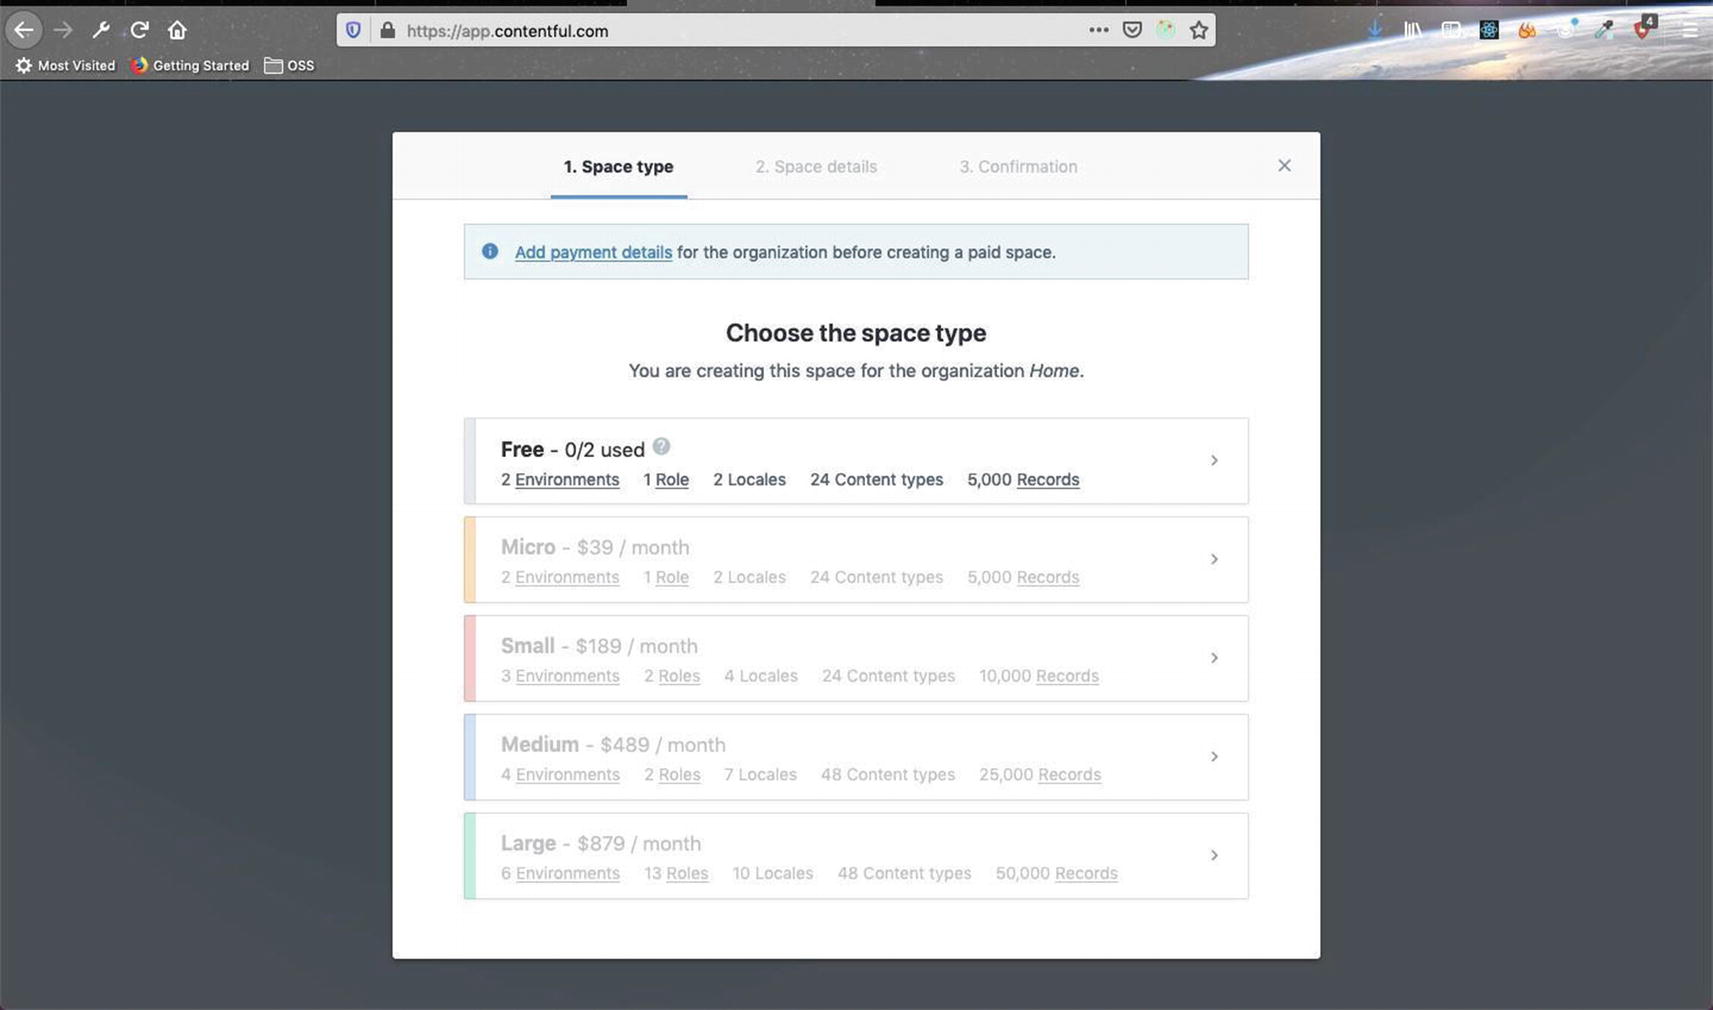
When you click Add a Space, you will see the popup in Figure 4-2. It shows that we have two free spaces and can have up to 5,000 records in the free account.
Figure 4-2
Add a space
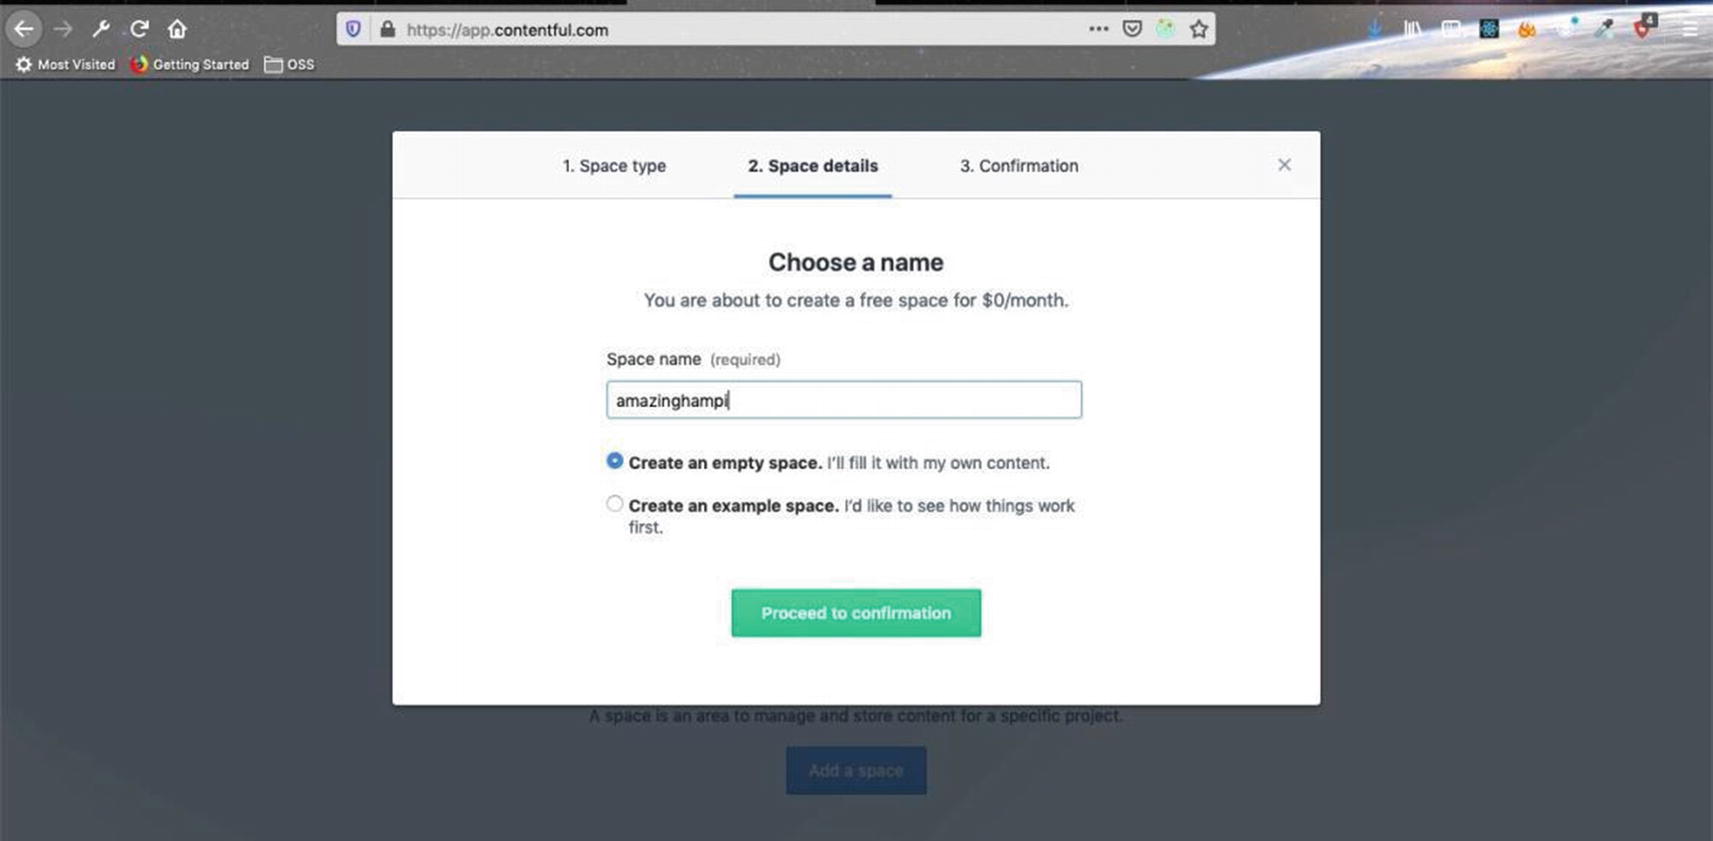
When you click the Free tab, it will open the popup shown in Figure 4-3. Here, you have to enter a Space Name.
Figure 4-3
Name the space amazinghampi
After you click the Proceed to Confirmation button, you will see the Confirmation screen shown in Figure 4-4.
Figure 4-4
Confirm your selection
Once you click Confirm and Create Space, it will take you to the screen in Figure 4-5. Here, Content Model and Content are the important tabs.
Figure 4-5
Home page
The Content Model tab describes the fields of data and the Content tab describes the data. Head over to the Content Model tab and click Add Content Type, as shown in Figure 4-6.
Figure 4-6
Add content type
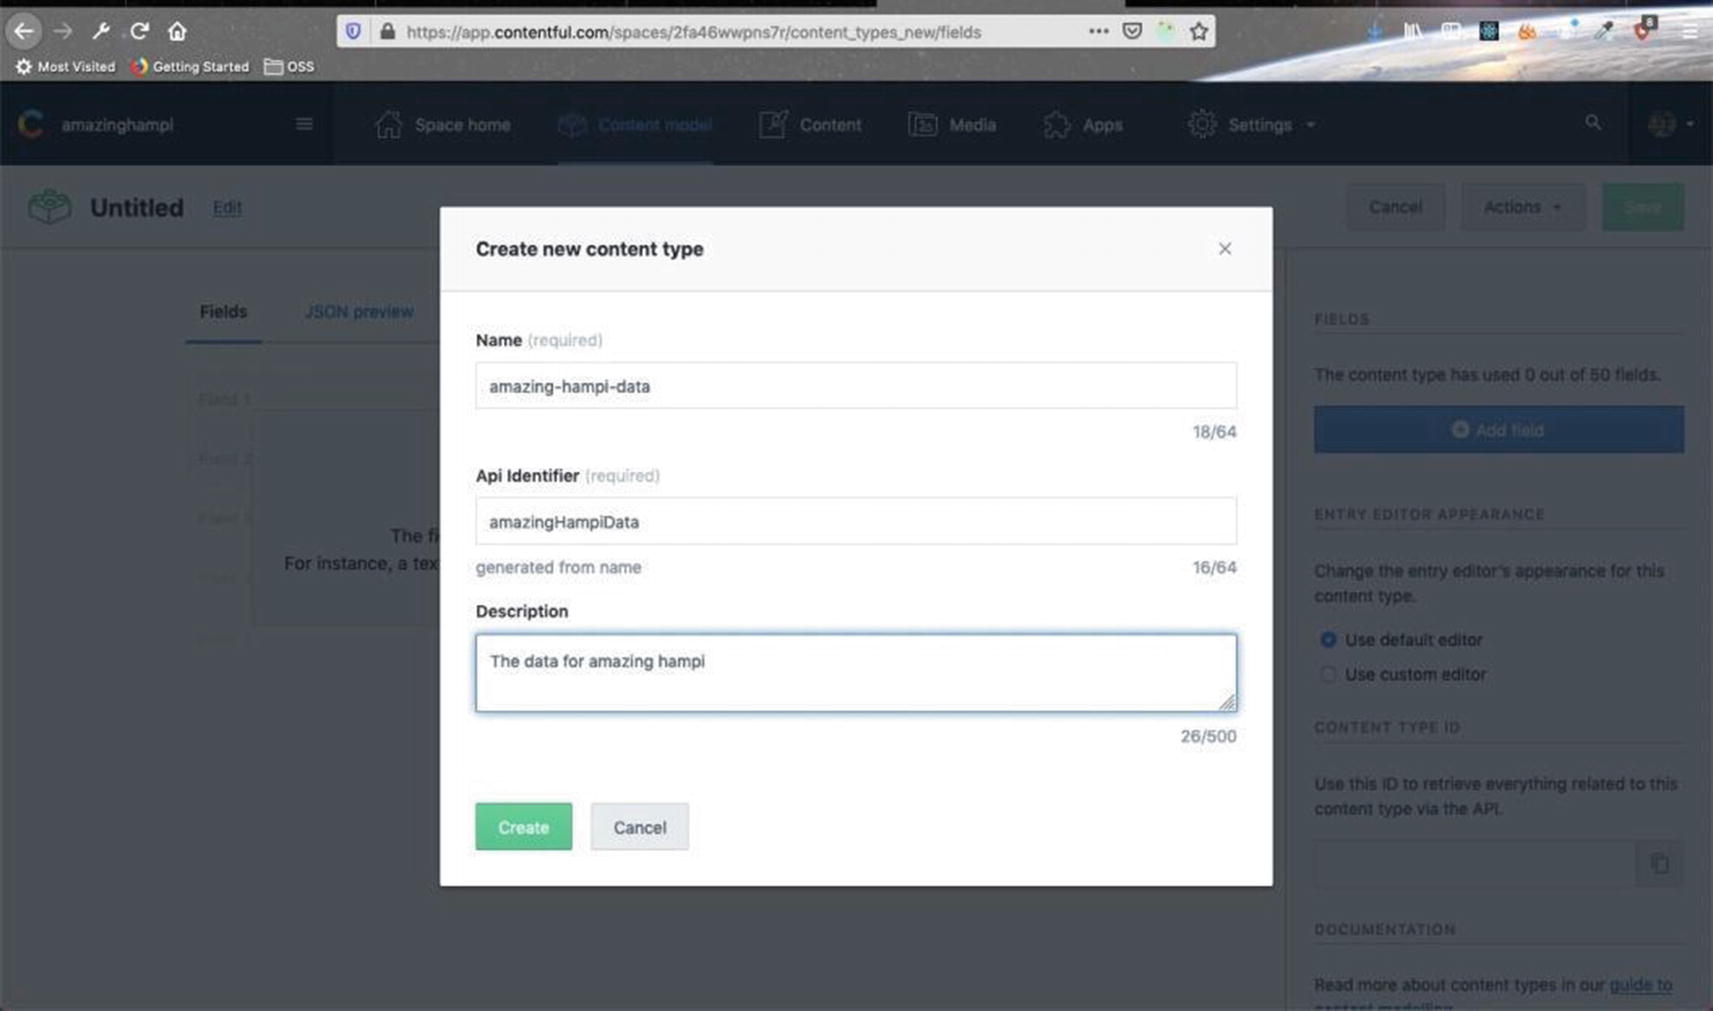
Next, you have to provide a name and description and click Create, as shown in Figure 4-7.
Figure 4-7
Provide a name and description
We are basically creating data about different places to visit in Hampi. The next screen will ask us to add some fields, as shown in Figure 4-8.
Figure 4-8
Adding fields
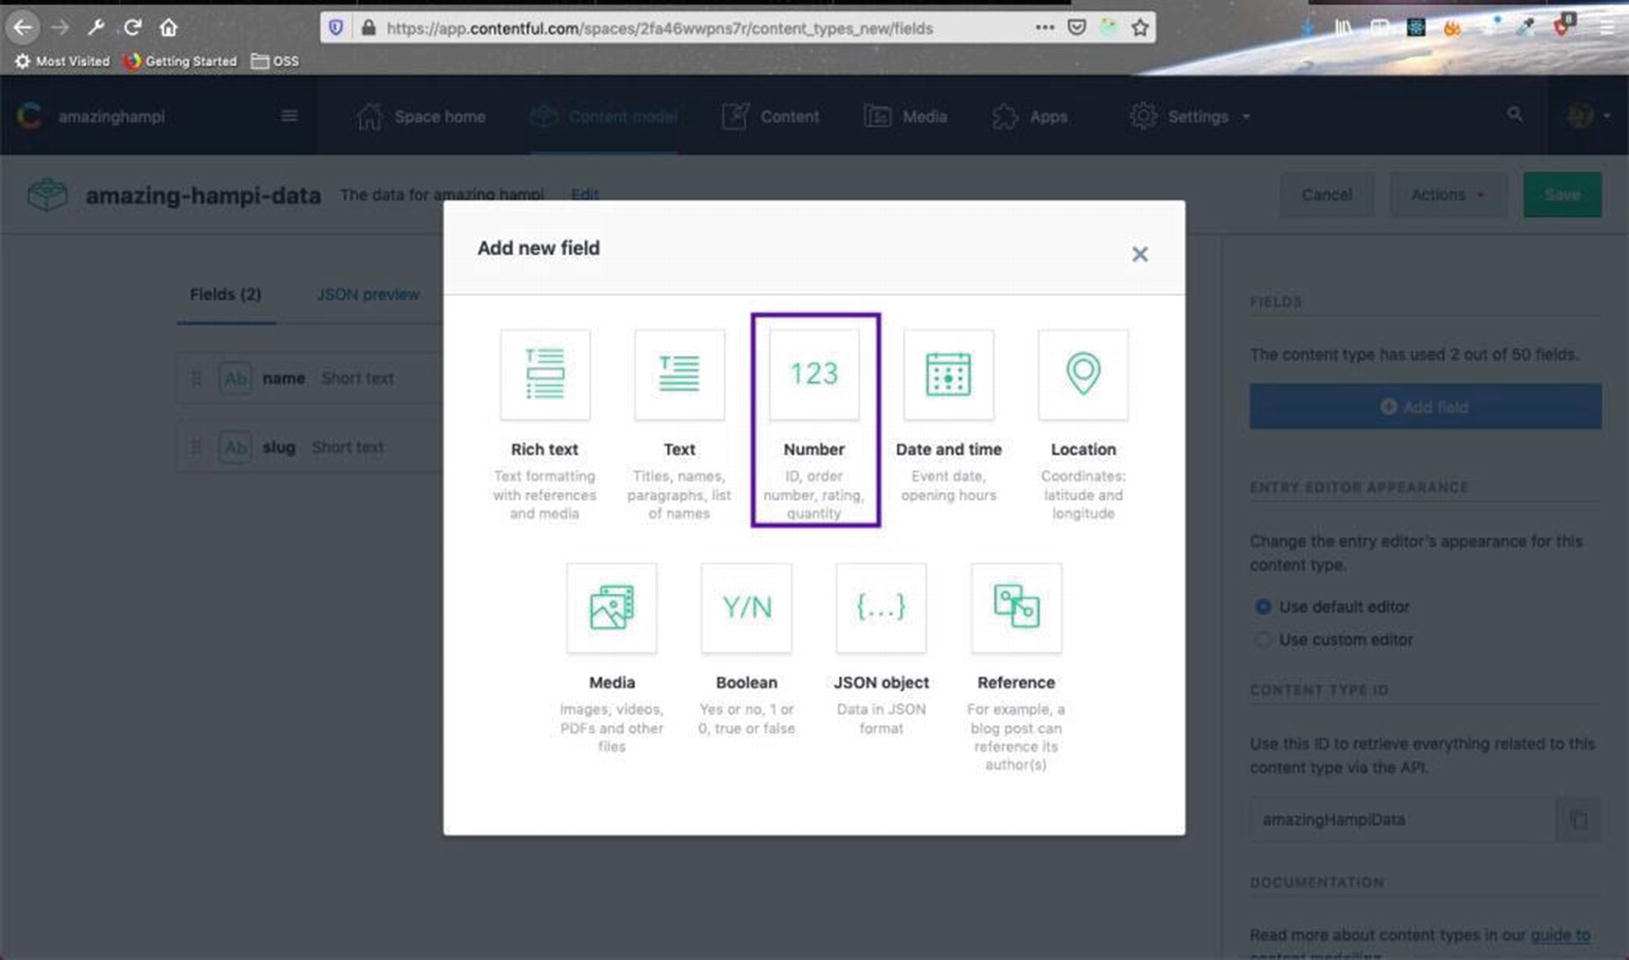
Let’s add some fields by clicking the Add Field button. The next screen lists the types of fields, as shown in Figure 4-9. Select Text by clicking it.
Figure 4-9
Adding a new field
In Figure 4-10, provide a name for this text field. In this case, it is simply called name. Click Create and Configure.
Figure 4-10
The New Text field
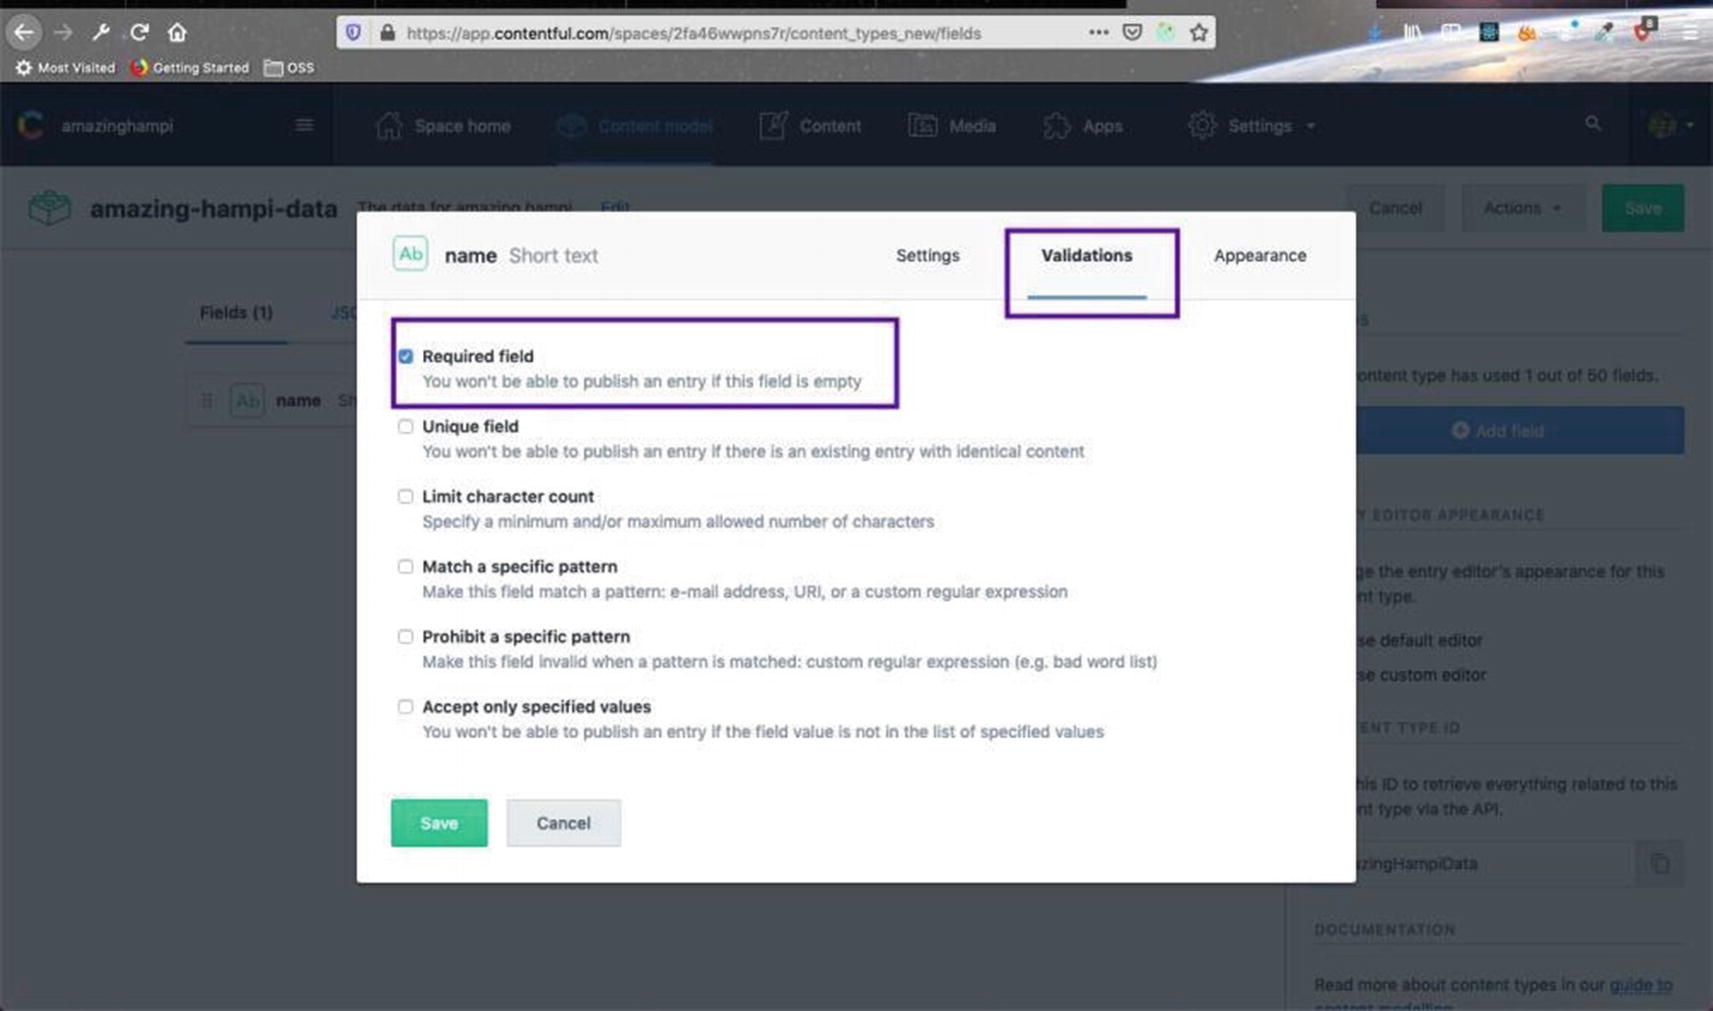
Then in the next screen, shown in Figure 4-11, click the Validations tab and then check the Required Field option. We are doing this so that users cannot leave this field empty. After that, click the Save button.
Figure 4-11
Making validations a required field
The next field will be slug and it will be a text field and will be required. This field is for the text at the end of the URL, which represents each place. Follow the same process as for name and create the field. It is shown in Figure 4-12.
Figure 4-12
The slug field
Next, we will create a Time Required field, as shown in Figure 4-14. This field tells the tourist the time required to visit a place. This will be an integer field, but not a required field. Once you click Add Field, choose Number from the popup, as shown in Figure 4-13.
Figure 4-13
The Number field
Give it a name and then click Create, since it is not a required field. It is shown in Figure 4-14.
Figure 4-14
Creating the time-required field
Next, create the Timings and Entry Fees fields. Both of them will consist of short text and will not be required. This is shown in Figure 4-15.
Figure 4-15
The timings and entry-fees fields
Next, create the Description field, as shown in Figure 4-16. It will be long text and will be required.
Figure 4-16
The Description field
On the home page, we will have Featured Places, which will contain the top three places to visit in Hampi. Let’s create a Boolean field for this. Click Add Field and choose Boolean, as shown in Figure 4-17.
Figure 4-17
Adding a Boolean field
Give it the name featured and click Create and Configure to make it a required field, as shown in Figure 4-18.
Figure 4-18
The featured field is a Boolean
Next, we will create the field for the images. It will hold one or more images, required for a place. Click Add Field and then choose Media, as shown in Figure 4-19.
Figure 4-19
Media is selected
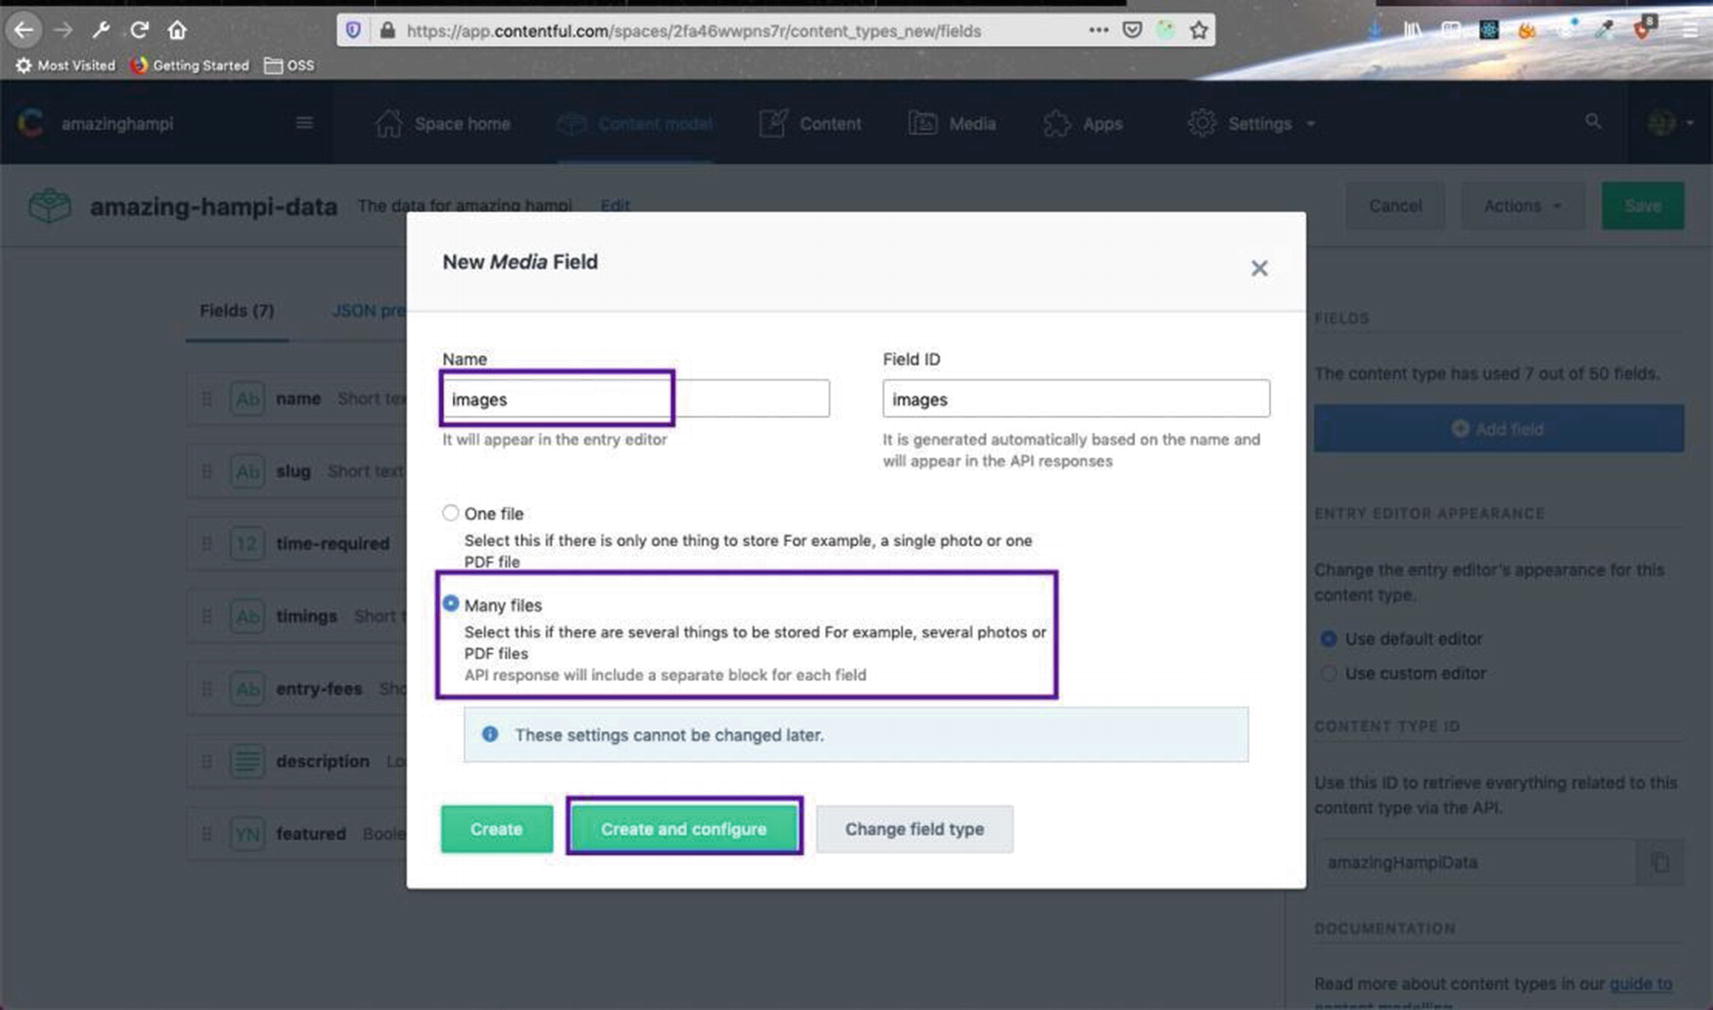
Call this field images, then select the radio button for Many Files. Then click Create and Configure to make it a required field, before saving. This process is shown in Figure 4-20.
Figure 4-20
Creating a Media field called images
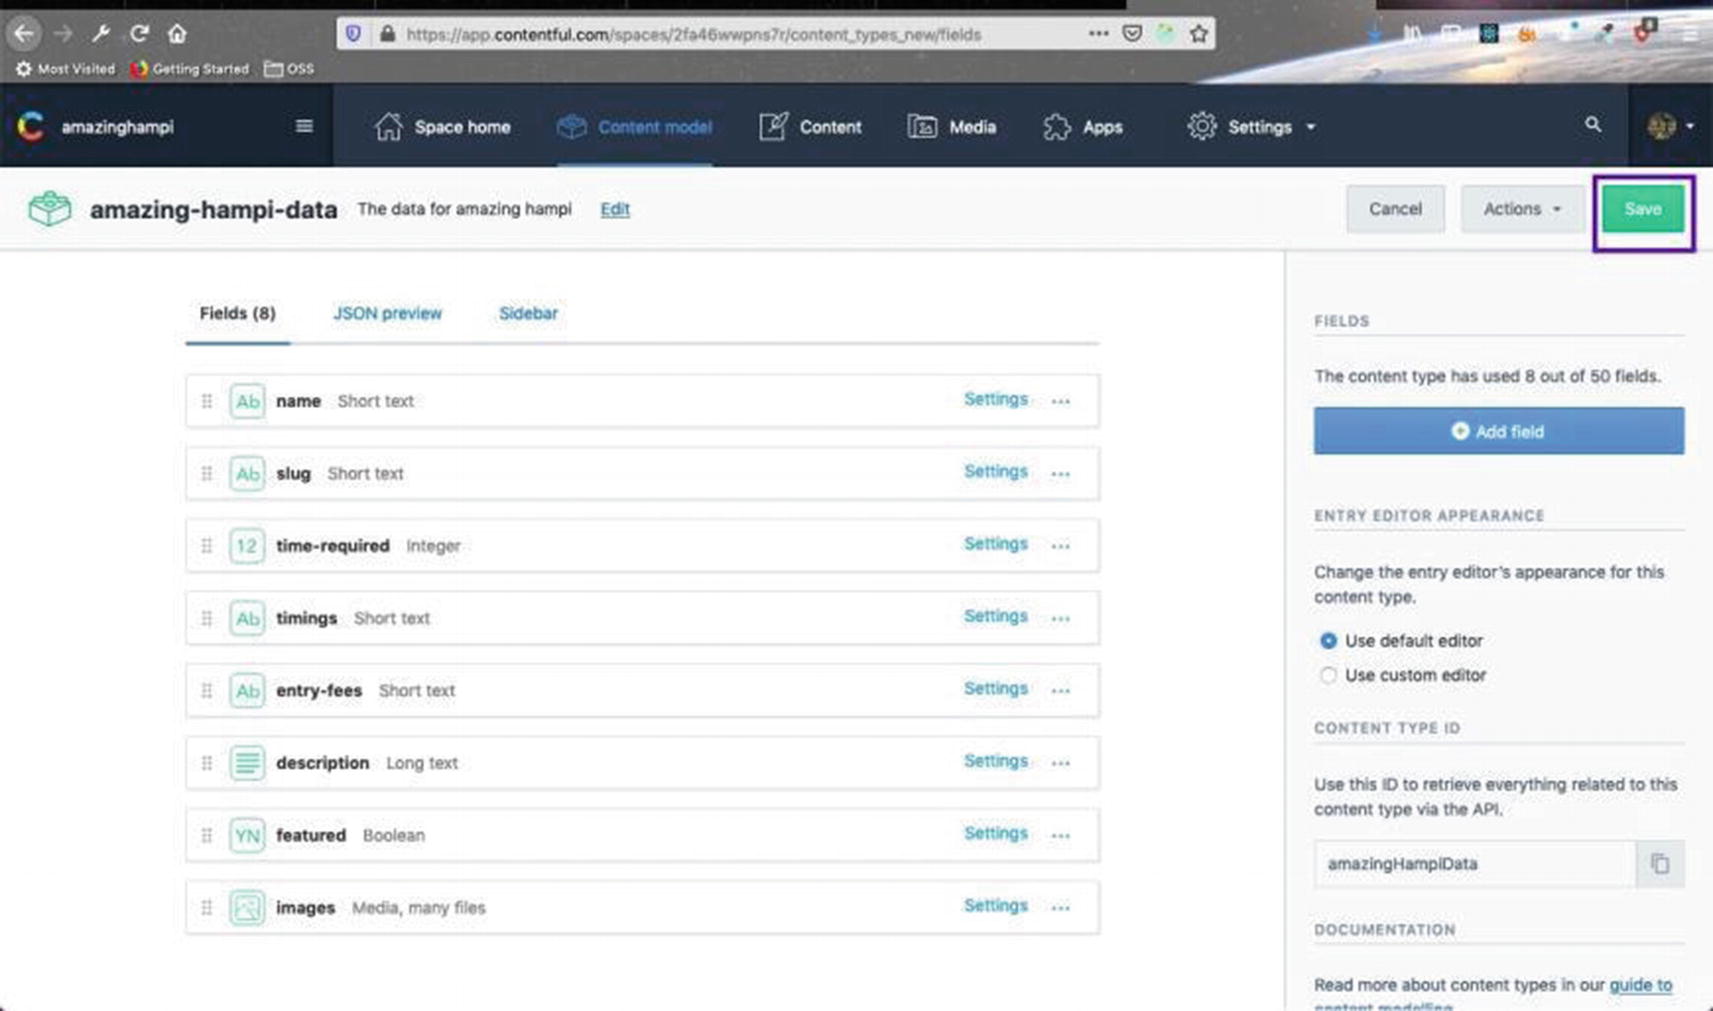
We are done with all the models. Click the Save button on the top-right corner, as shown in Figure 4-21.
Figure 4-21
Save your efforts
It’s time to add some content. Head over to the Content tab. You will see the screen shown in Figure 4-22. Click the Add amazing-hampi-data button.
Figure 4-22
Adding data
We will add data from the next screen, as shown in Figure 4-23.
Figure 4-23
Adding data
Let’s add some content about our first place in Hampi, as shown in Figure 4-24.
Figure 4-24
Adding content
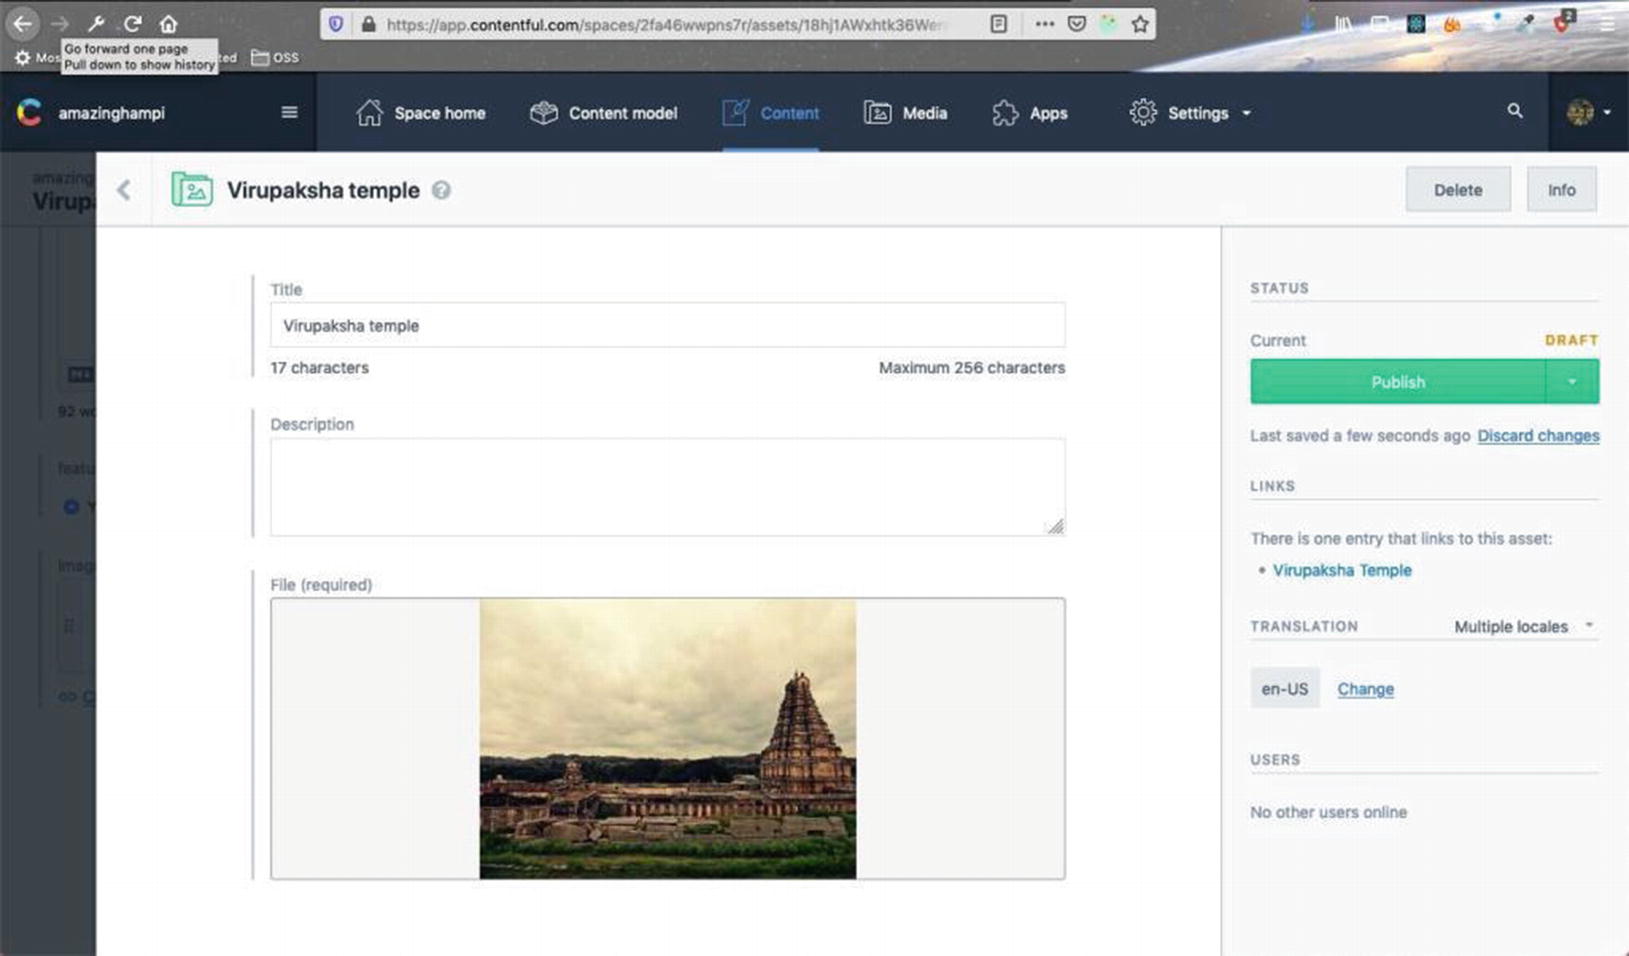
To add images, we select the image and then click the Publish button, as shown in Figure 4-25.
Publish this on the main screen by clicking the Publish button, as shown in Figure 4-27.
Figure 4-27
Published
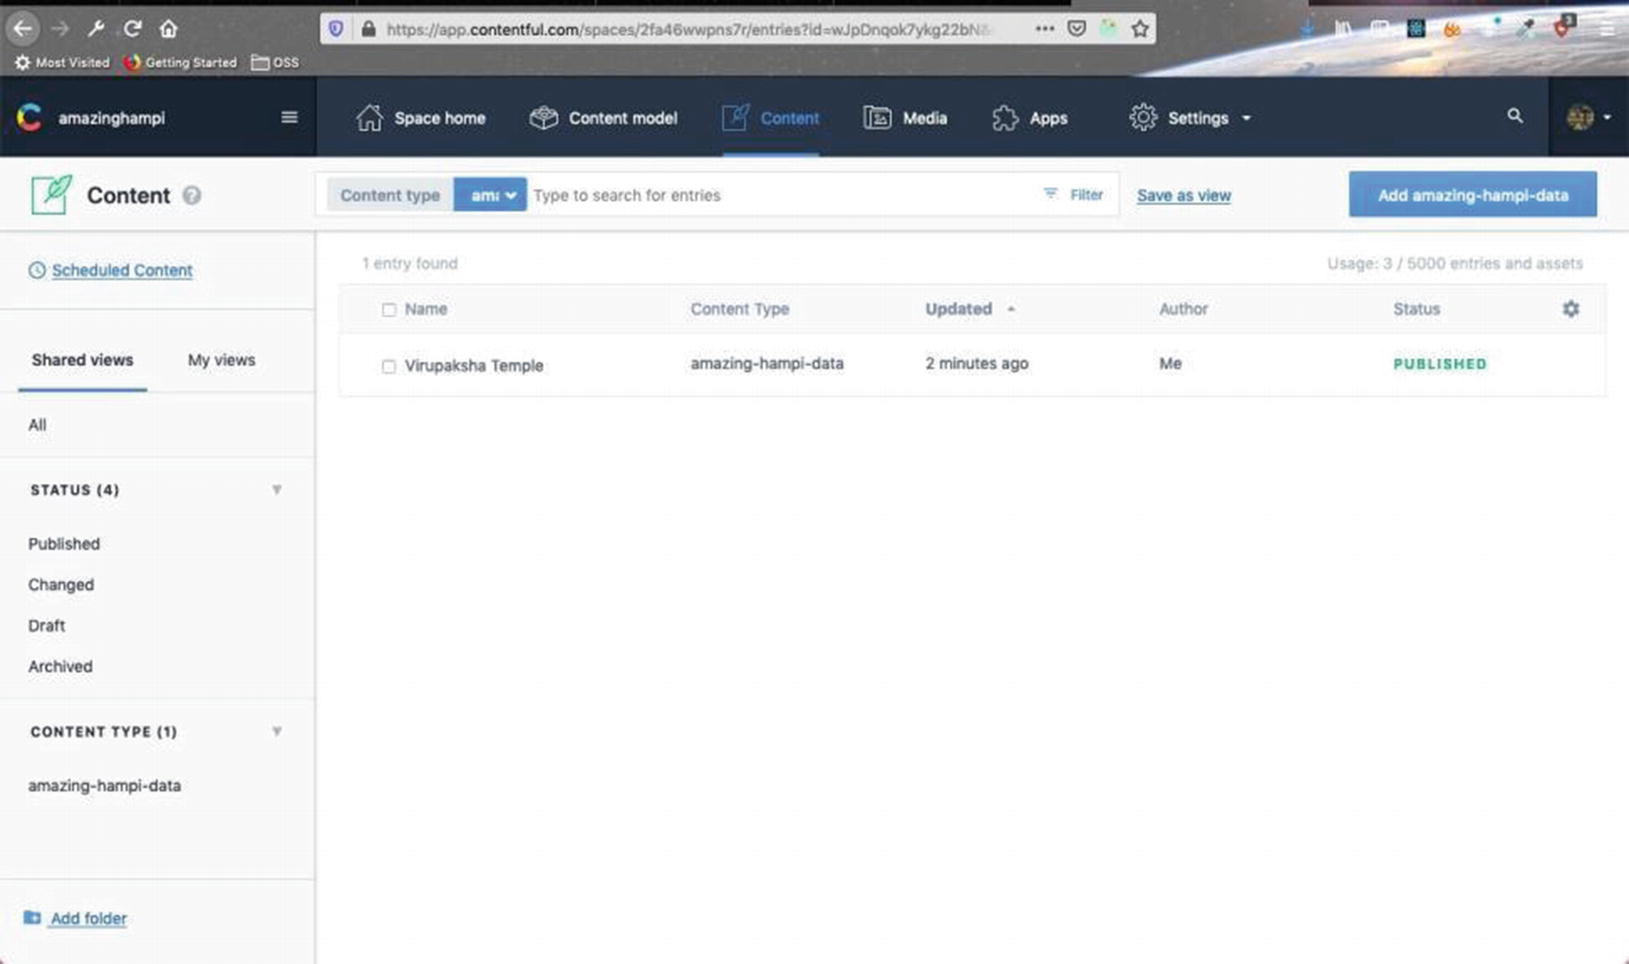
Contentful will show these published items in the Content screen, as shown in Figure 4-28.
Figure 4-28
Published content
Next, I will add more places to visit in Hampi by following the same steps. In fact, I added entries about 22 places in Contentful, as shown in Figure 4-29. You can add your own data.
Figure 4-29
Places to visit in Hampi added as content
Install the Gatsby Plugins
Next, we will import this data into our site. To do this, we will install the gatsby-source-contentful plugin. The docs can be found here2.
As usual, we need to first npm install in our project directory, with the following command.
npm install --save gatsby-source-contentful
Next, in gatsby-config.js we had to add the plugin, which is highlighted in bold in Listing 4-1. As per the docs, let’s add the object.
module.exports = {
plugins: [
{
resolve: `gatsby-source-filesystem`,
options: {
name: `images`,
path: `${__dirname}/src/images/`,
},
},
{
resolve: `gatsby-source-contentful`,
options: {
spaceId: `your_space_id`,
accessToken: process.env.CONTENTFUL_ACCESS_TOKEN,
},
},
`gatsby-plugin-styled-components`,
`gatsby-transformer-sharp`,
`gatsby-plugin-sharp`,
`gatsby-plugin-transition-link`
]
}
Listing 4-1
gatsby-config.js
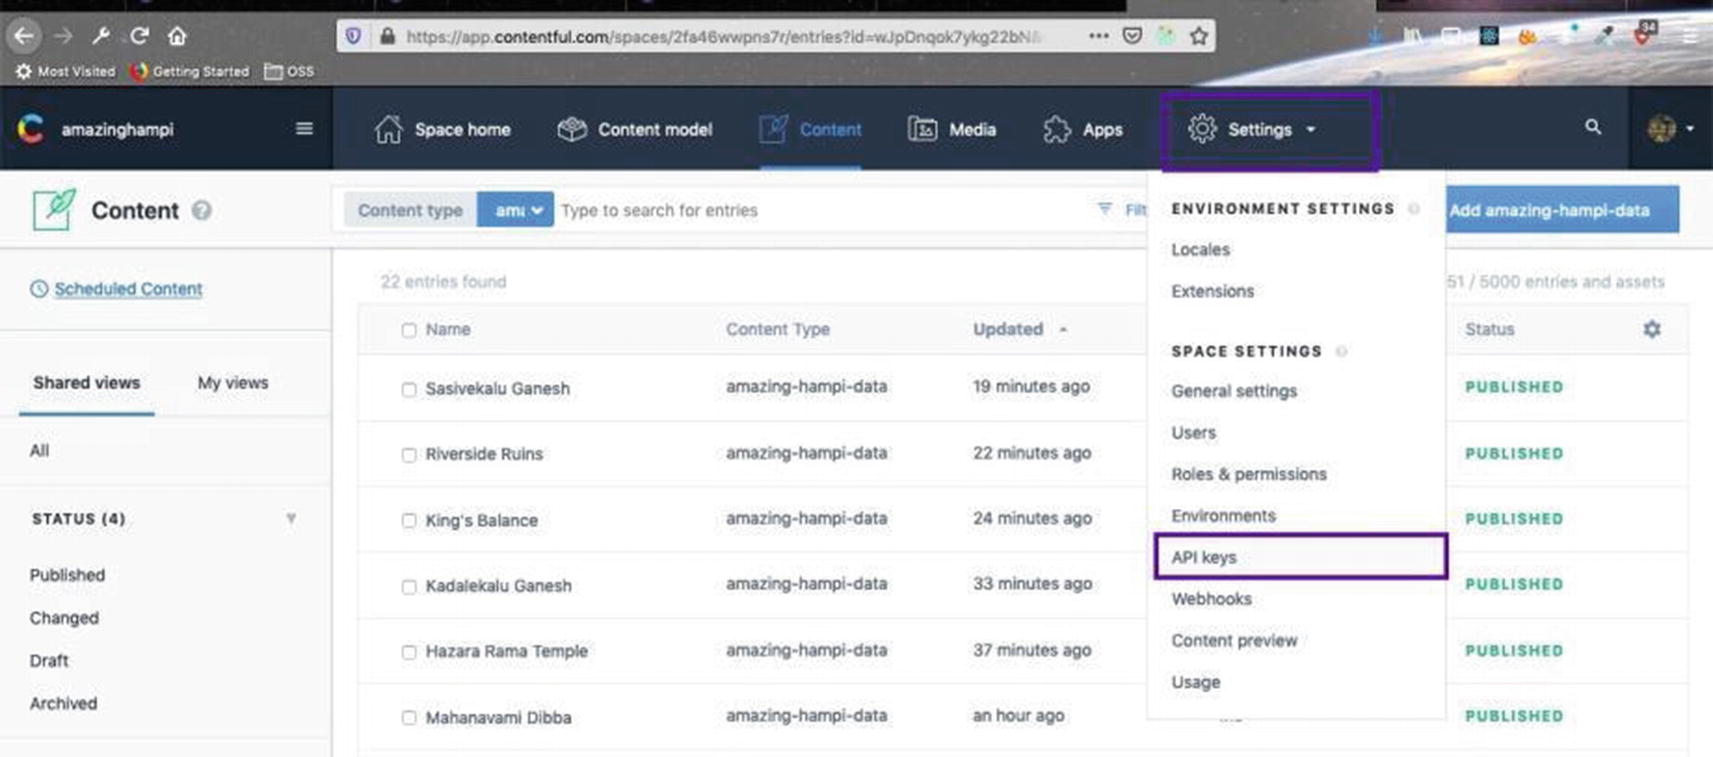
Let’s get our API keys from Contentful. From the Contentful API, choose Settings ➤ API Keys, as shown in Figure 4-30.
Figure 4-30
Getting the API keys
It looks like a key has been created for us, as shown in Figure 4-31.
Figure 4-31
Example key 1
Click Example Key 1 shown in Figure 4-31 to edit the name of the key. We need to note our Space ID and Content Delivery API - Access Token from here (see Figure 4-32).
Figure 4-32
Make note of the Space ID and Content Delivery API - Access Token
Head over to your code and add these two numbers, as shown in bold in Listing 4-2. We are not going to keep these here and will soon move them to an environment variable, as we don’t need to push these keys to GitHub and have everyone see them.
module.exports = {
plugins: [
{
resolve: `gatsby-source-filesystem`,
options: {
name: `images`,
path: `${__dirname}/src/images/`,
},
},
{
resolve: `gatsby-source-contentful`,
options: {
spaceId: `2XXXXXXXXX2`,
accessToken: `RXXXXXXXXXXXXXXXXXXXE`,
},
},
`gatsby-plugin-styled-components`,
`gatsby-transformer-sharp`,
`gatsby-plugin-sharp`,
`gatsby-plugin-transition-link`
]
}
Listing 4-2
The gatsby-config.js File
Let’s head over to our terminal to check whether the setup was right, by running gatsby develop. The command runs without error and the connection also fetches the correct data from Contentful, as shown in Figure 4-33.
Figure 4-33
Fetching data from Contentful
Let’s go to GraphQL and refresh the browser. Click docs to see Contentful’s queries, as shown in Figure 4-34.
Figure 4-34
GraphQL
Next, we will use environment variables to store the spaceId and accessToken. For that, we need to install the dotenv package. Head over to your terminal and stop gatsby develop. Then npm install the package, using the following command.
npm install --save dotenv
As per the docs,3 we need to add the lines in Listing 4-3 to our gatsby-config.js file.
require("dotenv").config({
path: `.env.${process.env.NODE_ENV}`,
})
module.exports = {
plugins: [
...
...
]
}
Listing 4-3
The gatsby-config.js File
We need to create an .env.development file in the root directory. Then take the keys from gatsby-config.js and add them (without quotation marks) to the two variables, as shown in Listing 4-4.
CONTENTFUL_SPACE_ID=2XXXXXXXXX2
CONTENTFUL_ACCESS_TOKEN=RXXXXXXXXXXXXXXXXXXXE
Listing 4-4
The env.development File
Next, in gatsby-config.js, add this using process.env, as highlighted in Listing 4-5.
require("dotenv").config({
path: `.env.${process.env.NODE_ENV}`,
})
module.exports = {
plugins: [
...
...
{
resolve: `gatsby-source-contentful`,
options: {
spaceId: process.env.CONTENTFUL_SPACE_ID,
accessToken: process.env.CONTENTFUL_ACCESS_TOKEN,
},
},
...
...
]
}
Listing 4-5
The gatsby-config.js File
Head over to .gitignore and add the .env.development file to it, as highlighted in Listing 4-6.
# Logs
logs
*.log
npm-debug.log*
yarn-debug.log*
yarn-error.log*
.env.development
# Runtime data
pids
*.pid
*.seed
*.pid.lock
...
...
Listing 4-6
The .gitignore File
Once again, head over to the terminal and run gatsby develop, to check if all runs well. Figure 4-35 shows that it’s running well.
Figure 4-35
Run gatsby develop to check if it’s running well
Before pushing to GitHub, we need to add these variables to our Netlify deployment. Head over to your Netlify deployment, as shown in Figure 4-36.
Figure 4-36
The Netlify deployment
Click the Site Settings button. On the left menu, click Build & Deploy and then choose Environment, as shown in Figure 4-37.
Figure 4-37
Deploy the environment
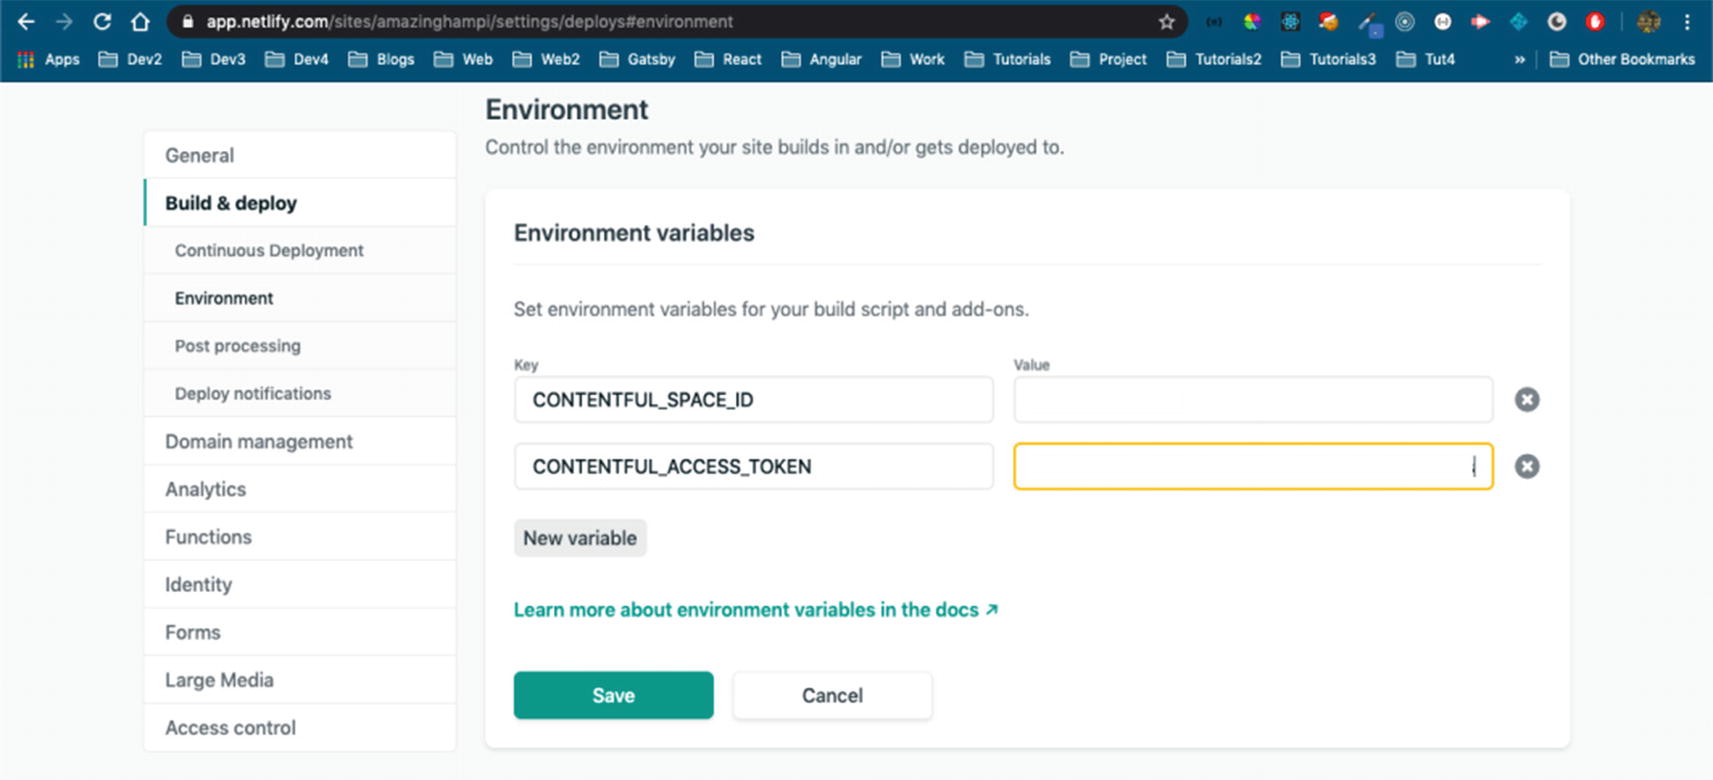
Click Edit Variables and add the two variables. After that, click Save, as shown in Figure 4-38.
Figure 4-38
Adding two variables
Commit your code and push it to GitHub. You can find my code in my GitHub account here4. In addition, because of continuous deployment, it was successfully pushed to the Netlify site5.
Adding Queries for the Places Component
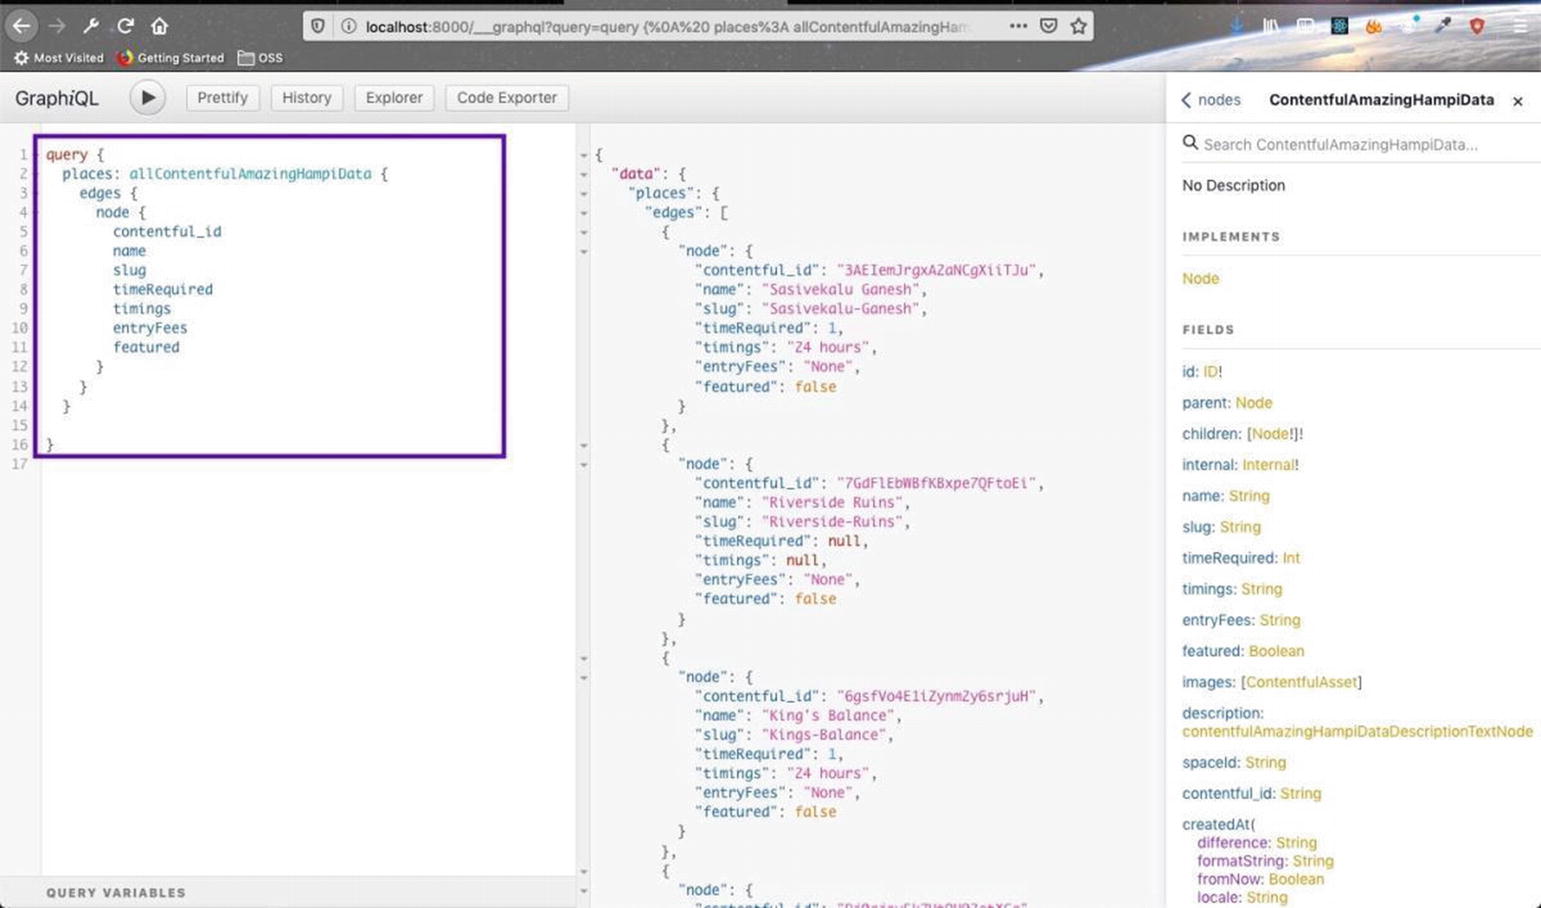
We will first create the queries in GraphQL for our places. We have a Places page on our project and will also show Featured Places on the home page. Head over to GraphiQL and type the query shown in Figure 4-39 to get all the places. We can also see the details of the query from the docs, on the right side.
Figure 4-39
Using GraphiQL
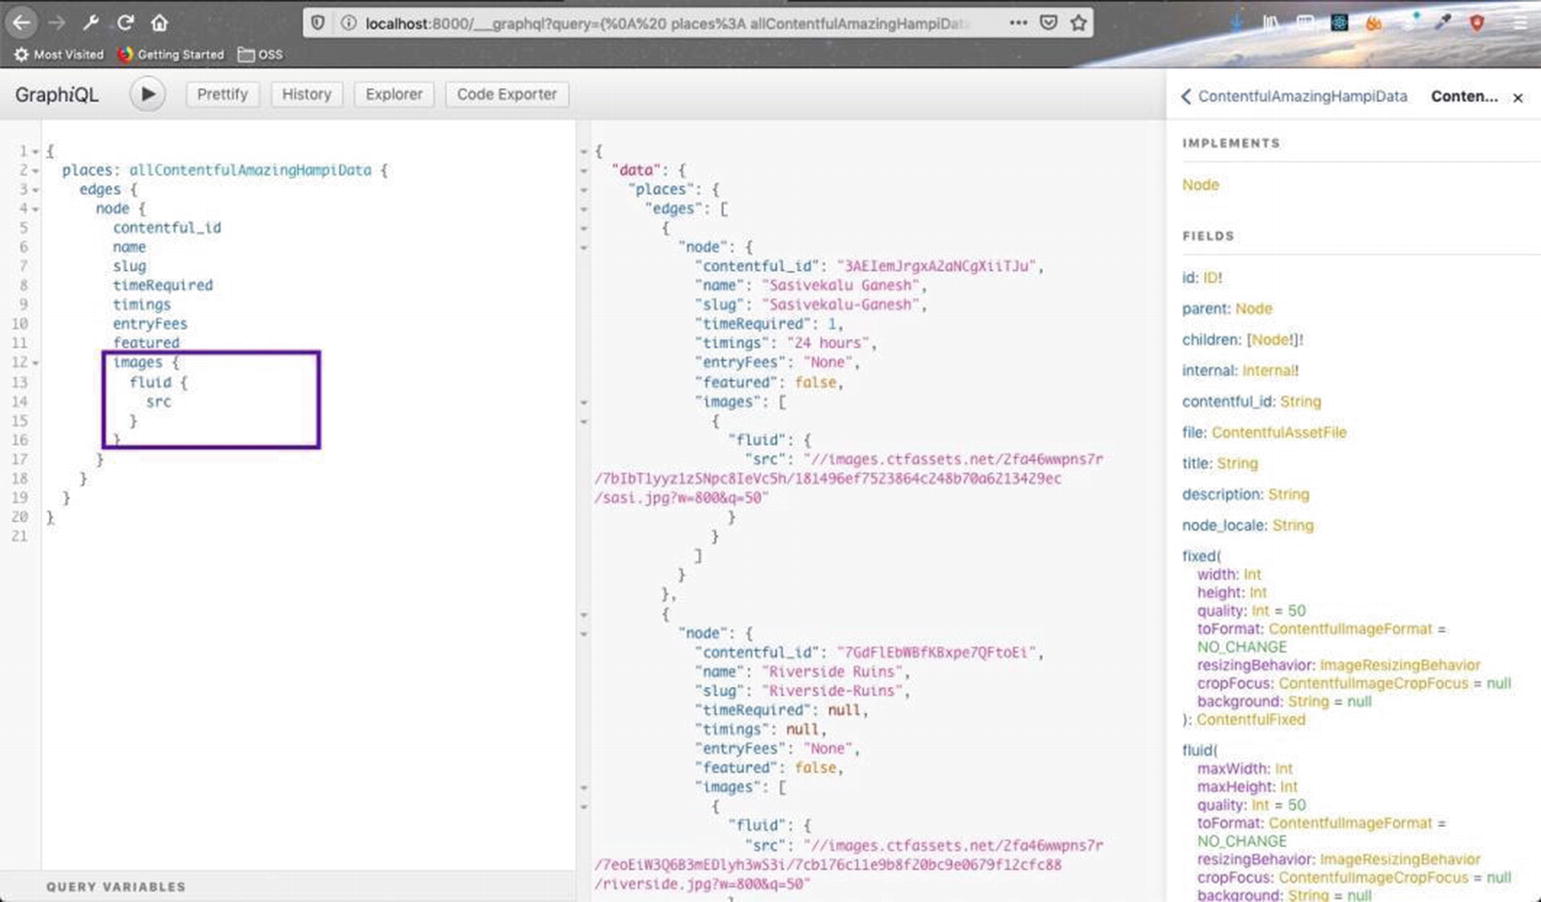
Let’s also search for images. As per the docs, we can have fluid or fixed images. But we cannot use the fragment in GraphiQL as usual and we will use src, which we are going to later change in the code. This is shown in Figure 4-40.
Figure 4-40
Searching for images
Let’s also add a query for Featured Places, as shown in Figure 4-41. Here we are using the filter option to get only the featured places (there are four).
Figure 4-41
Getting only the featured places
Next, move to your code editor and create a folder called places inside the components folder. Create three files—Places.js, PlaceList.js, and Place.js. Also, create a file called FeaturedPlaces.js inside the home folder. Add an items.module.css file to the css folder. The contents of this file are shown Listing 4-7.
Next, let’s update the FeaturedPlaces.js file. Here, we will add our query for featured places, which we created in GraphiQL. The only thing that changes is the GatsbyContent-fulFluid_tracedSVG fragment, instead of src. We also check to see if we are getting data correctly, by placing a console.log() in the code. The whole code is shown in Listing 4-8.
import React from 'react'
import { useStaticQuery, graphql } from "gatsby"
import Title from "../Title"
import styles from "../../css/items.module.css"
import AniLink from "gatsby-plugin-transition-link/AniLink"
We will create a simple Place component for now. Create a Place.js file inside the Places folder, using the content in Listing 4-11.
import React from 'react'
const Place = () => {
return (
<div>
Single place
</div>
)
}
export default Place
Listing 4-11
The Place.js File
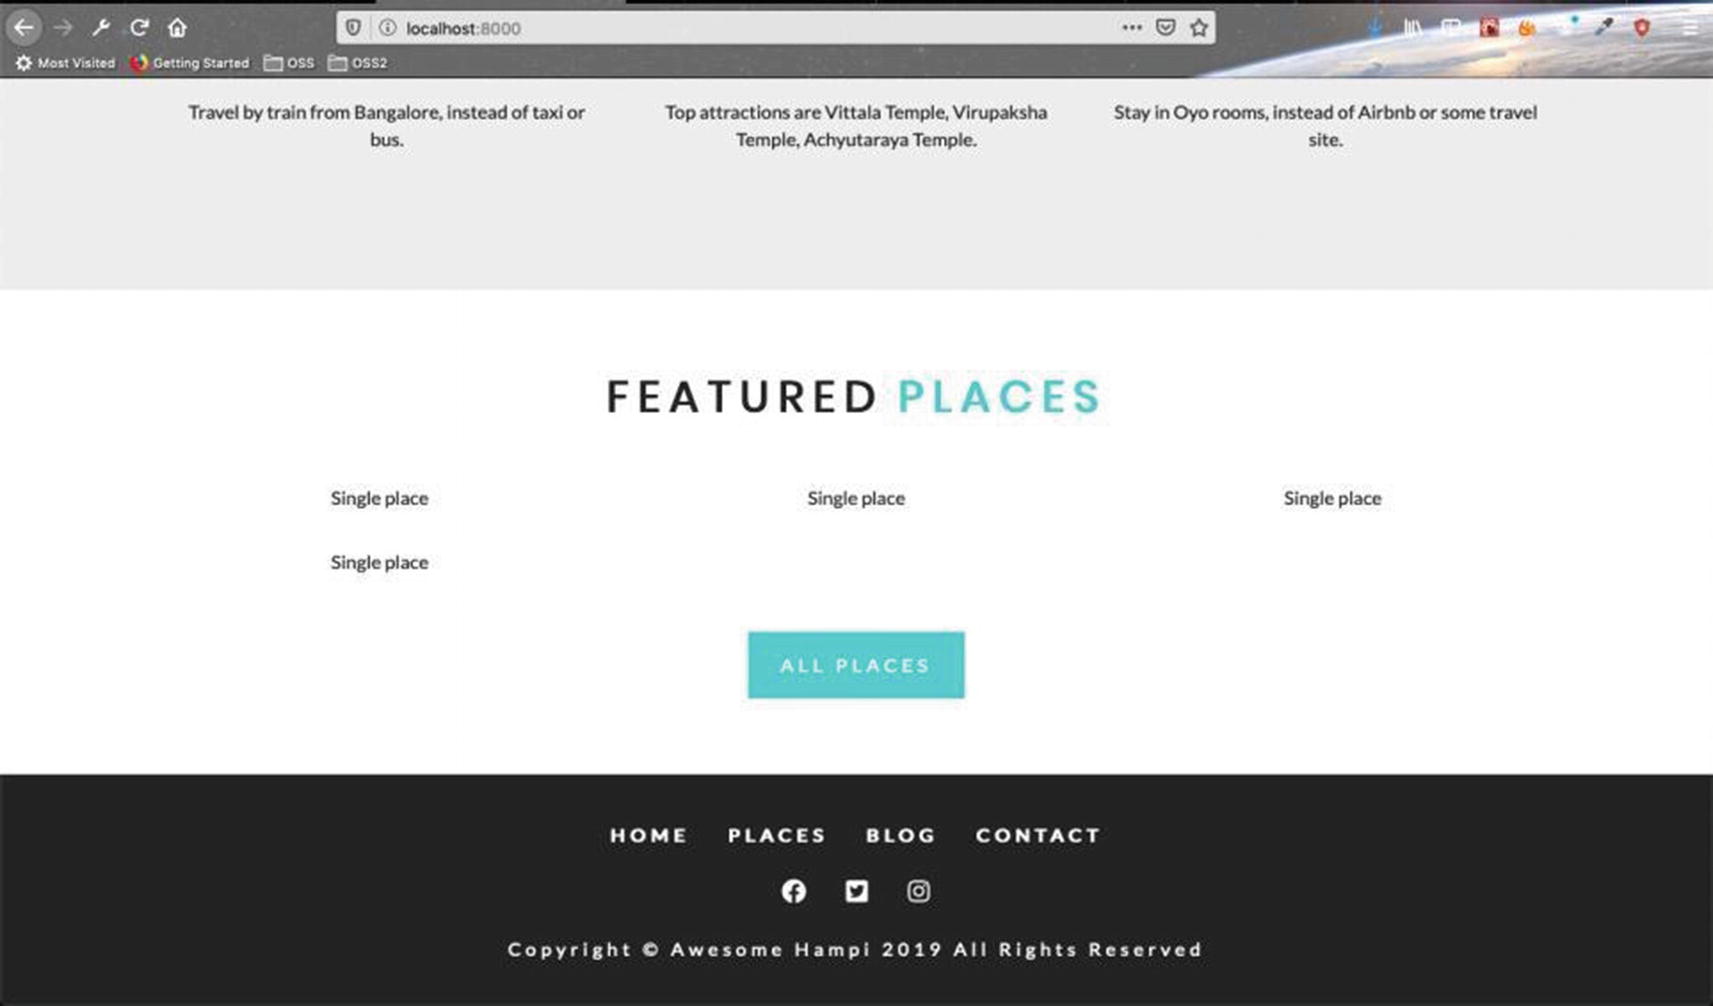
When we move to the browser, we can see four single places, as shown in Figure 4-43.
Figure 4-43
Four single places
Adding the Place Component
Next, we will start to work on our Place component. First, let’s add place.module.css inside the css folder. The content of it is shown in Listing 4-12.
.place {
box-shadow: var(--lightShadow);
transition: var(--mainTransition);
}
.place:hover {
box-shadow: var(--darkShadow);
}
.img-container {
position: relative;
background: var(--primaryColor);
transition: var(--mainTransition);
}
.img {
transition: var(--mainTransition);
}
.img-container:hover .img {
opacity: 0.3;
}
.link {
position: absolute;
top: 50%;
left: 50%;
transform: translate(-50%, -50%);
opacity: 0;
text-transform: uppercase;
letter-spacing: var(--mainSpacing);
color: var(--mainWhite);
border: 2px solid var(--mainWhite);
padding: 0.9rem 1.6rem;
display: inline-block;
transition: var(--mainTransition);
cursor: pointer;
}
.link:hover {
background: var(--mainWhite);
color: var(--primaryColor);
}
.img-container:hover .link {
opacity: 1;
}
.footer {
padding: 1rem;
text-align: left;
}
.footer h3 {
text-transform: capitalize;
margin-bottom: 0;
}
.info {
display: flex;
flex-wrap: wrap;
justify-content: space-between;
text-transform: uppercase;
align-items: center;
margin-top: 0.5rem;
}
.info h6,
.info h4 {
margin-bottom: 0;
}
.country {
text-transform: capitalize;
color: var(--primaryColor);
display: flex;
align-items: center;
}
.icon {
margin-right: 0.4rem;
}
.details {
color: var(--darkGrey);
text-transform: uppercase;
text-align: right;
}
Listing 4-12
The place.module.css File
Next, let’s add some code to Place.js to show the images. The content is shown in Listing 4-13.
import React from 'react'
import Image from "gatsby-image"
import styles from "../../css/place.module.css"
import AniLink from "gatsby-plugin-transition-link/AniLink"
This code will show all our three images on the Featured Places page, as shown in Figure 4-44.
Figure 4-44
Images of the featured places
Let’s complete the code by adding the AniLink, as highlighted in Listing 4-14, which will take visitors to the slug when they click it. We also show the name after the image.
import React from 'react'
import Image from "gatsby-image"
import styles from "../../css/place.module.css"
import AniLink from "gatsby-plugin-transition-link/AniLink"
This code will show the Featured Places with the names of the places below them, as shown in Figure 4-45.
Figure 4-45
Featured places with descriptive names
Creating the Places Component
Let’s start by creating our Places component. Open your Places.js file and update it as shown in Listing 4-15. We are basically using the GraphQL query, which we created in GraphiQL in the previous section.
import React from "react"
import PlaceList from "./PlaceList"
import { useStaticQuery, graphql } from "gatsby"
const getPlaces = graphql`
query {
places: allContentfulAmazingHampiData {
edges {
node {
name
timeRequired
slug
timings
contentful_id
entryFees
images {
fluid {
...GatsbyContentfulFluid
}
}
}
}
}
}
`
const Places = () => {
const { places } = useStaticQuery(getPlaces)
return <PlaceList places={places} />
}
export default Places
Listing 4-15
The Places.js File
As we are getting the places, we are passing them to the PlaceList component. Let’s create a simple PlaceList component now. Create a PlaceList.js file inside the places folder and add the content from Listing 4-16 to it.
import React, { Component } from 'react'
class PlaceList extends Component {
render() {
return (
<div>
PlaceList...
</div>
)
}
}
export default PlaceList
Listing 4-16
The PlaceList.js File
Next, we will show the places component in the places.js page. It is highlighted in Listing 4-17.
Let’s now update PlaceList.js to show all the places. Here we are using a class-based component and accessing the places passes from the Places component, by this.props.places.
We also have two local states of places and sortedPlaces. This is updated by this.props.places once the components loads and is updated by a React lifecycle called componentDidMount().
After that, we sort over sortedPlaces and pass its value to an already created Place component. The contents are shown in Listing 4-18.
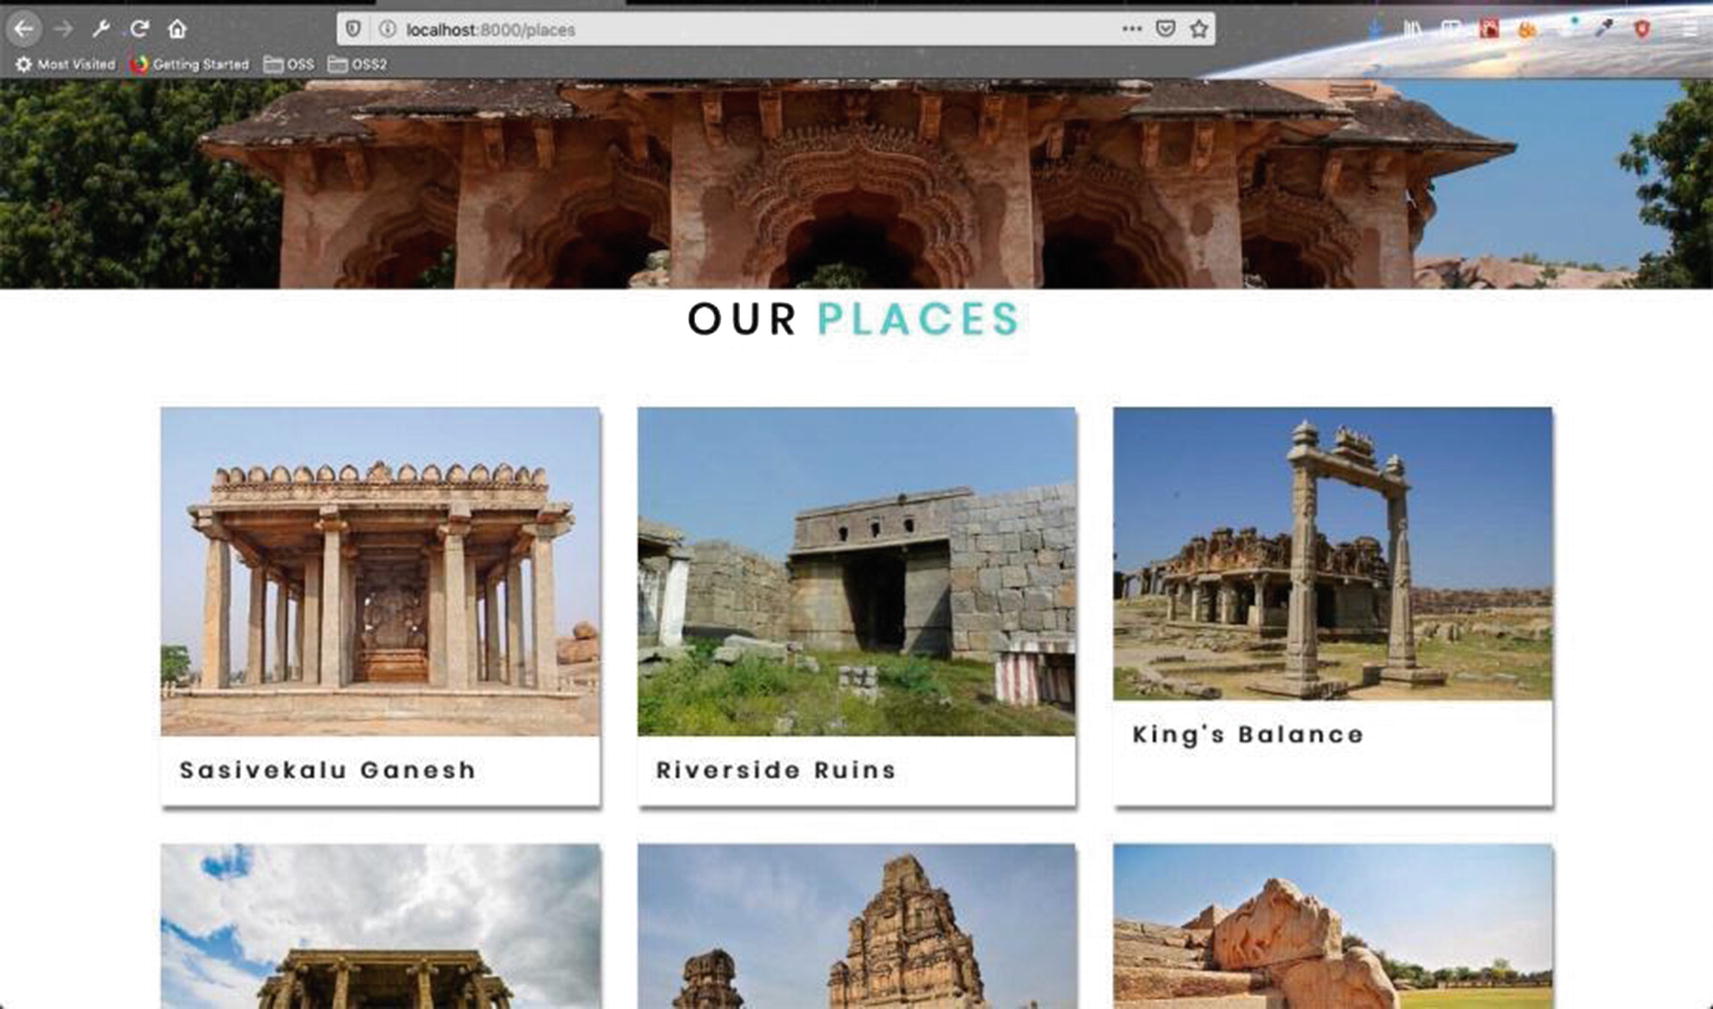
When we move to the Places page6, it will show all 22 places, as shown in Figure 4-46.
Figure 4-46
All 22 places are shown on this page
Create a Place Template
Next, we will create a template to show when we go to a single place. Head over to your code editor and create a templates folder inside the src folder. Create a file called place-template.js inside that folder. Add the basic code shown in Listing 4-19 to it.
import React from 'react'
const placeTemplate = () => {
return (
<div>
Dummy Place
</div>
)
}
export default placeTemplate
Listing 4-19
The place-template.js File
We are basically creating our pages programmatically through the templates. Create a file called gatsby-node.js in the root directory.
Let’s first create the query in GraphiQL. Head over to GraphQL7 and create the query shown in Figure 4-47, which lists all the slugs.
Figure 4-47
The slugs query
Head over to the gatsby-node.js file and add the content in Listing 4-20. Here, we are using async-await syntax to make the call. We are using the GraphQL query we created in the GraphiQL playground.
Once we receive the data, we loop over it and create the pages with the slug and template.
After saving the file, we need to restart the server. After restarting the browser, go to any nonexistent page and you will be shown the 404 page with all pages. We can see all the pages dynamically created, as shown in Figure 4-48.
Figure 4-48
All pages
If we click any area of the page, it will show us data from place-template.js, as shown in Figure 4-49.
Figure 4-49
Dummy place
We will create the place-template.js file next. In this part, we will start by creating the query for the template page. We will first create the query to get data of a single slug, as shown in Figure 4-50.
Figure 4-50
Single slug
We need to dynamically pass a variable to this query from our code. To test this, we will update the query and pass the variable from the Query Variables screen. This is shown in Figure 4-51.
Figure 4-51
Passing variables
Let’s complete this query by adding all the fields, as shown in Figure 4-52.
Figure 4-52
All fields added to the query
Next, we will add the query to place-template.js and display it. We are destructuring the data, which we receive from the query.
Some of our places have multiple images, so we are destructuring the images. We keep the first image as mainImage and the rest of the images in the array as placeImages. The code is shown in Listing 4-21.
Once we move to a place with multiple images and open the console, we can see the variables. The name is also displayed on the page, as shown in Figure 4-53.
Figure 4-53
The variables at work
Let’s add the styles for the templates by creating a file called template.module.css inside the css folder. The file’s contents are shown in Listing 4-22.
Next, we need to update place-template.js to show more fields. Also, we need to change our src in the query to a fragment or the code will give an error. The updated code is marked in bold in Listing 4-23.
Once we go to a page, we can see our images and the text, as shown in Figure 4-54.
Figure 4-54
Images and text are now displayed
Next, let’s add all the fields to the place-template.js for our places. It will contain the timeRequired, timings, and description fields. The updated code is marked in bold in Listing 4-24.
...
...
import { FaMoneyBillWave, FaClock, FaTypo3 } from "react-icons/fa"
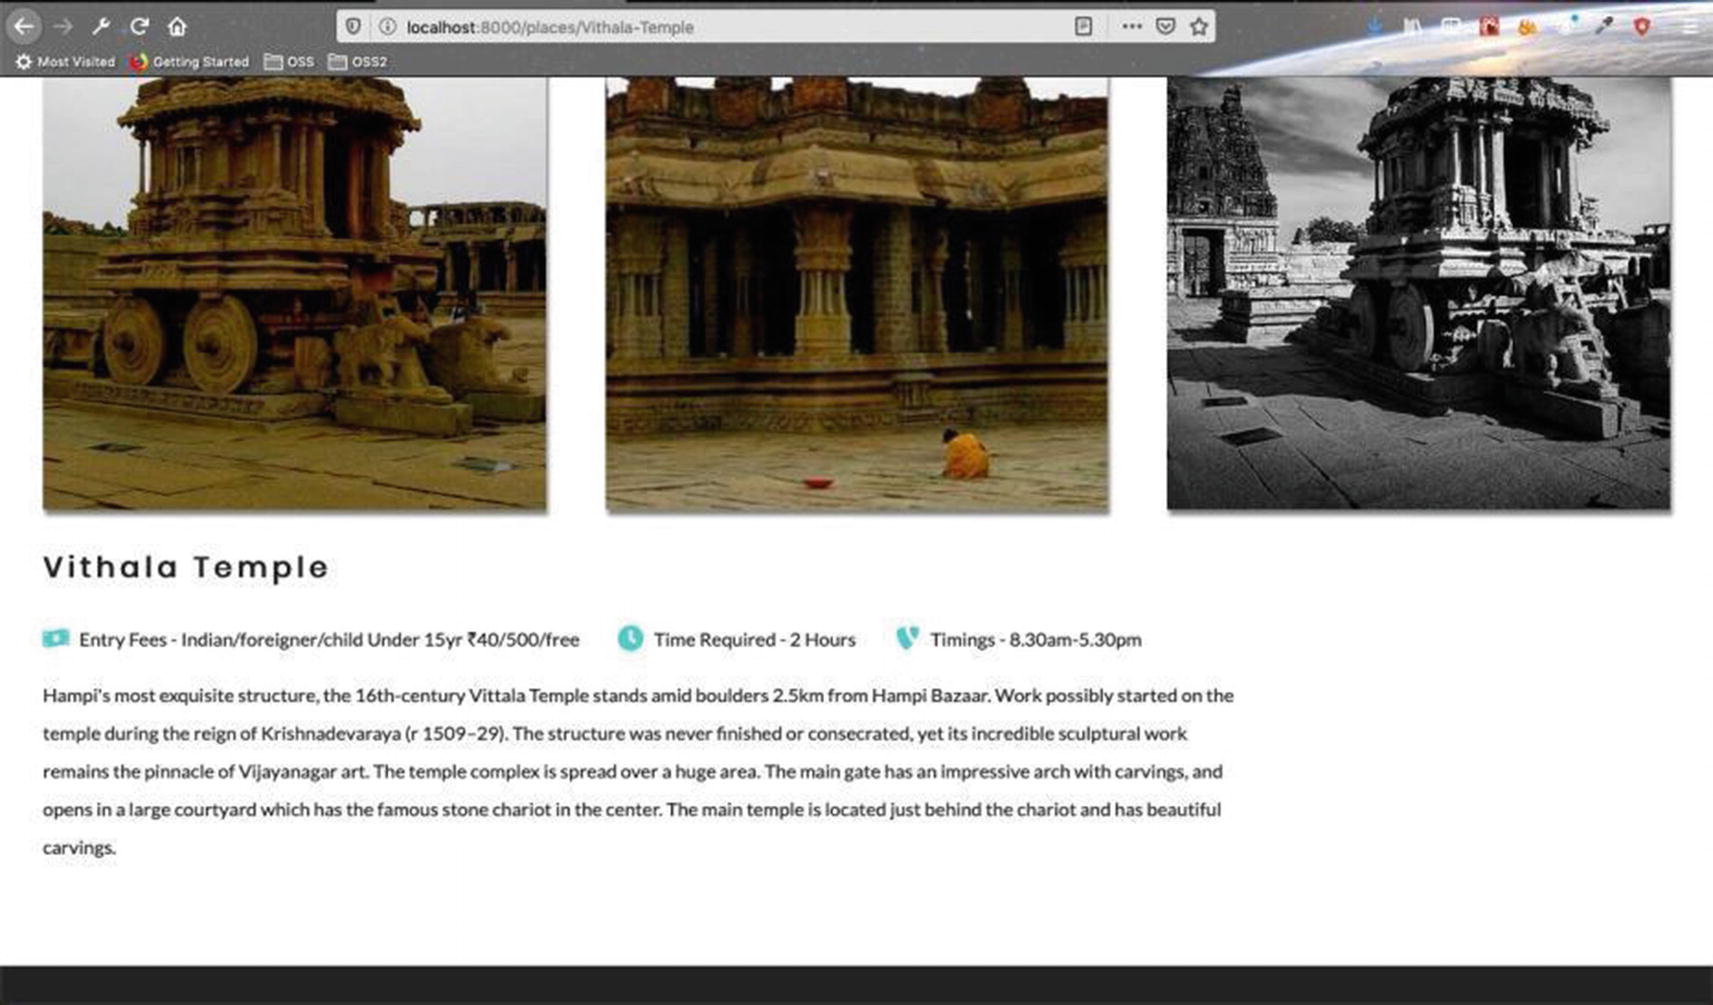
Our page now looks almost complete, as shown in Figure 4-55.
Figure 4-55
The page is nearly complete
One last thing to do is to add a button that allows visitors to go back to the Places page. Add an AniLink to place-template.js. The updated code is marked in bold in Listing 4-25.
...
...
import { FaMoneyBillWave, FaClock, FaTypo3 } from "react-icons/fa"
import AniLink from "gatsby-plugin-transition-link/AniLink"
<AniLink fade to="/places" className="btn-primary">back to places</AniLink>
</div>
</section>
</Layout>
)
}
...
Listing 4-25
AniLink in place-template.js
This will display a nice return button (called Back to Tours), as shown in Figure 4-56.
Figure 4-56
The Back to Tours button is displayed
Once it has pushed the code to GitHub, it starts the automatic deployment to Netlify. My Netlify build failed because of the GatsbyContentfulFluid_tracedSVG fragment that’s used in three places (see Figure 4-57).
Figure 4-57
The Netlify error
I fixed the error by changing the fragment from GatsbyContentfulFluid_tracedSVG to GatsbyContentfulFluid in all three files, as shown in Figure 4-58.
Figure 4-58
Changing this fragment fixes the error
You can find my code in my GitHub account here8. The site is successfully live here9.
Summary
This completes Chapter 4 and the second part of the tourism site using Contentful. We covered the following topics in this chapter:
Setting up the Contentful CMS and connecting to the project
Creating the Places component, which shows data stored in the Contentful CMS
In the next chapter, we continue with the tourism site using Contentful. We will create the Blog and Photos components in that chapter.