
Sometimes improving a game concept means improving some of the structural components of the game, which may not yield any visual improvements. For example, if you want artists to contribute to the game and create 2D animations to embellish the game, it would save everyone some time if the artists could define each animation frame’s position and dimensions on the sprite sheet. As it is right now, that information is defined in the code, so modifying a sprite sheet may require code changes. If you moved the animation details into the Content Pipeline Tool, artists would then be able to change animations without changing any code.
As in Chapter 1, you will keep improving the game developed in the MonoGame Mastery book.
How to extend the Content Pipeline Tool to handle custom assets
How to migrating the player’s animation into an asset managed by the Pipeline Tool
How to add text translations to the game
The Content Pipeline Tool
First, let’s start with a quick recap of what the Content Pipeline tool does for us. Its main utility to MonoGame developers is preprocessing assets so they are ready to be used in a game. It takes assets produced by graphic artists, musicians, level designers, and even programmers and transforms them so they can be used by the game code without needing to be processed again, even as the code changes and is recompiled. Once transformed, an asset does not need to be transformed again and is saved to disk in its new, transformed state as an .xnb file. As a bonus, it is also compressed to take up less space.

How the Content Pipeline Tool works

The Content.mgcb build action
Let’s look at the four types of objects needed by the content pipeline individually and look at how an image is imported and processed into a Texture2D object by the pipeline.
The Content Importer

The list of importers available in the Content Pipeline Tool
The code above declares a TextureImporter class that inherits from the ContentImporter with a generic type TextureContent that is a class type that will be used to hold the image data in memory once the asset is loaded. The TextureImporter is marked with the ContentImporter class attribute that defines which file types can be imported by this code, which display name to put in the drop-down selection of the content pipeline tool, and which content processor class will be needed to process the asset once loaded.
The importer’s job is simple: open up a file stream, read the content of the file, and store the data into an instance of an object designed to hold that data. This is done within the Import() function of the importer. Once loaded, the content pipeline takes the data and passes it to the next stage of the pipeline, where it will be processed.
You will keep looking at how the content pipeline handles textures in this section, so it is important to note that the TextureImporter actually creates an instance of a Texture2DContent when loading an image, which is fine because Texture2DContent inherits from TextureContent, used as the generic type of the importer. This will be important to remember later.
The Content Processor
Similarly to the importer above, the content processor is also selectable from a drop-down in the Content Pipeline Tool, as Figure 2-4 shows. The processors available to the Pipeline Tool must inherit from the ContentProcessor<TInput, TOutput> abstract class and be marked by a ContentProcessor attribute that is used to specify the display name of the processor in the drop-down. The idea behind the processor is to take an object of type TInput and transform it into an object of type TOutput before passing it onto the next stage of the pipeline.
Here, the TextureProcessor class is designed to transform an object of type TextureContent into a new object of the same type. Since the importer you looked at above creates Texture2DContent objects, which inherit from TextureContent, the output of the TextureProcessor is also a Texture2DContent instance. One of the things that is done by the processor is the generation of mipmaps, if they are needed.
ColorKeyColor
ColorKeyEnabled
GenerateMipmaps
PremultiplyAlpha
MakeSquare
ResizeToPowerOfTwo
TextureFormat

The list of processors available in the Content Pipeline Tool and available processor parameters
The processor parameters can be marked with a DefaultValueAttribute if you desire to change their default values, which is based on the type of the parameter.
Now that you have imported and processed your textures, it is time to save them back to disk.
The Content Writer
Saving a processed asset back to disk in an .xnb format is the job of the content writer. Content writers are discovered at runtime by the content pipeline tool when the time comes to save processed data of a certain type, so in order to save data of a certain type, T, there must be a class in the codebase that inherits from ContentTypeWriter<T> and is marked by the ContentTypeWriter attribute. Without that, no writer class will be found and the Pipeline Tool will fail to generate an .xnb file.
Note that BuiltInContentWriter<T> inherits from ContentTypeWriter<T>, so this works. The BuiltInContentWriter class is private and is only used for the content types that are built into the framework.
The Write() method of a given content writer will be called by the pipeline tool with two parameters: an output object with an interface allowing its user to write many different kinds of values to disk as binary data, and the content object that needs to be saved.
One secondary aspect of the content writer is that it is also responsible for indicating which content reader will be needed to load the .xnb file back into memory. Once the content object has been serialized, the Flush() method is called on the output object by the pipeline. This will cause a header to be written near the start of the .xnb file, and one of the elements in the header is the full class name of the content reader that will be instantiated to load the data back from disk. The name is accessed by calling the GetRuntimeReader() function on the content reader. You will not see one on the Texture2DWriter because it is overridden in its BuiltInContentWriter base class, where the content reader class name is set to the same name as the content writer (Texture2DWriter here), except that “Writer” is replaced with “Reader.” Using that logic, loading a Texture2DContent object will require an instance of the Texture2DReader, which we will discuss next.
The Content Reader
The content reader is a class that must inherit from ContentTypeReader<T>. Contrary to the other three classes used by the Content Pipeline Tool, this class does not need to be marked by an attribute. This is because this class is not auto-discovered by the MonoGame framework. Instead, when loading an .xnb file from disk, one of the file headers has the full class name that needs to be used to load the file. Once the class name has been read from the file headers, MonoGame will create an instance of the class and call its Read() function, which will load the same binary data that was written to disk by the content writer. This is all done when the content manager’s Load<T>() function is called to load an asset into the game.
A .png file (or other supported file format) is loaded by the TextureImporter, which creates a Texture2DContent object.
The Texture2DContent object is processed and enriched by the TextureProcessor.
The enriched Texture2DContent object is then saved to an .xnb file by the Texture2DWriter, where one of the .xnb file headers is set to the full class name of the Texture2DReader class so it can be read from disk.
Finally, the MonoGame reads an .xnb file, determines that a Texture2DReader instance is required, and uses it to read the file into a Texture2D object for the game.
We covered quite a bit of internal details here, but this knowledge will be important should you want to develop your own importers, processors, writers, and readers. Extending the content pipeline tool to be able to handle custom data types is not too unusual and it is something you can do right now.
Extending the Content Pipeline Tool
One improvement you can make to the game is to extract the level text files from the solution, where LevelsLevelDatalevel1.txt is currently set as an embedded resource, and instead treat them as game assets. This allows level designers to contribute to the game without having to open the code and compile it whenever they make a change. They instead only need to open the text files in their favorite text editor, edit the levels, and then run the Content Pipeline Tool.
But because the content pipeline does not know how to turn a level text file into a Level object that can be used by the game, you need to teach it how to use the LevelReader to create an instance of a Level object.
To quickly recap how levels are loaded in the game, the LevelReader reads the text file, which is a grid of comma-separated numbers where a 0 indicates an empty tile and a 1 indicates the presence of a shooting turret. The last element at the end of every row represents an event. An underscore means nothing happens and a letter g followed by a number tells the game to generate that many numbers of choppers. It is very simplistic and will be improved upon in Chapter 4. For now, you will concentrate on making the level text files assets managed by the pipeline.
As you saw earlier, to create your own pipeline extension, you need to create a level importer, a level processor, a level writer, and a level reader. Once they are compiled into a library DLL, you tell the Content Pipeline Tool to reference that DLL and it will be able to scan it and offer you the new importer and processor.
Creating a Pipeline Extension

The MonoGame Pipeline Extension template

Setting your pipeline extension projects to be built in release mode

The properties of the Content root item

Adding references to the Content Pipeline Tool

Importer1 is now an option
Note that from this point on, you will need to close the Content Pipeline Tool application when you make changes to the PipelineExtensions project because it is using its DLL file and Visual Studio will not be able to overwrite it. Close it now since you are about to make changes.
Adding Logic to Your Extension
LevelImporter
LevelProcessor
LevelWriter
LevelReader
Your level importer will read the level text files and transform them into a single string. Then your level processor will take in the string and output a Level object that will be saved as an .xnb file by the level writer. Finally, the level reader will be in charge of reading in the .xnb level file and giving your game a Level object to work with.
This will change how the game code accesses and interacts with level assets. While we will not cover this part of the code in this chapter, please refer to the book’s source code for the full details of how the game code was modified to accommodate the new pipeline extensions. We will only go over the extension’s code in this chapter. It suffices to say that the responsibilities of reading in a level text file as a string and transforming it to a list of level events has been moved to the pipeline extension project in the Level.cs file.
Loading and Saving Assets
The class inherits from ContentImporter<string>, meaning it will load the asset file and output a string. It is also marked with the ContentImporter attribute, which specifies that level asset files will be .txt files, that the Content Pipeline Tool application will use the name LevelImporter in the drop-down options and that the pipeline will pass the output string to the LevelProcessor class .
You then override the Import() function and use the basic IO.File.ReadAllText() function to read the entire .txt file, referenced by the filename parameter provided to you by the content pipeline when it calls your extension, as a string.
While you do not use the context parameter here, it can be useful for debugging purposes. Its properties can be used to inspect the intermediate and output directories of the current processor and the Logger property provides a logger that you can use to output messages while running the Content Pipeline Tool.
The LevelProcessor inherits from ContentProcessor<string, Level>, which means that its overridden Process() function takes a string as input and will output a Level object. It is also marked by the ContentProcessor attribute with a DisplayName of LevelProcessor. Note that in the book’s source code, there is a Level class in the PipelineExtensions project and this is what the code is referring to here, not the Game’s Level class. The process of transforming a string into a Level is described in detail in the MonoGame Mastery book and its code has been migrated into the extension’s Level class.
The LevelWriter is discovered by the content pipeline when the time comes to save the processed output into an .xnb file, because it is marked by the ContentTypeWriter attribute. A lot of work is done for you by the framework at this point, like creating the .xnb file and writing its headers. All you need to provide here is an overridden GetRuntimeReader() function that returns the full class name of the LevelReader class that will be used to read the .xnb file back, and an overridden Write() method that you can use to write the Level value to disk as a binary file.
The LevelReader inherits from ContentTypeReader<Level>, which indicates that its Read() function will return an instance of the Level class. Read() takes two parameters: a ContentReader object that knows how to read different binary values and convert them into basic types, and an existingInstance of the object you are trying to create, which can be confusing. Before calling the Read() function , the pipeline will create a default instance of the desired object and pass it in as the existingInstance. Here, you are ignoring the parameter and creating a new instance of the level yourself.
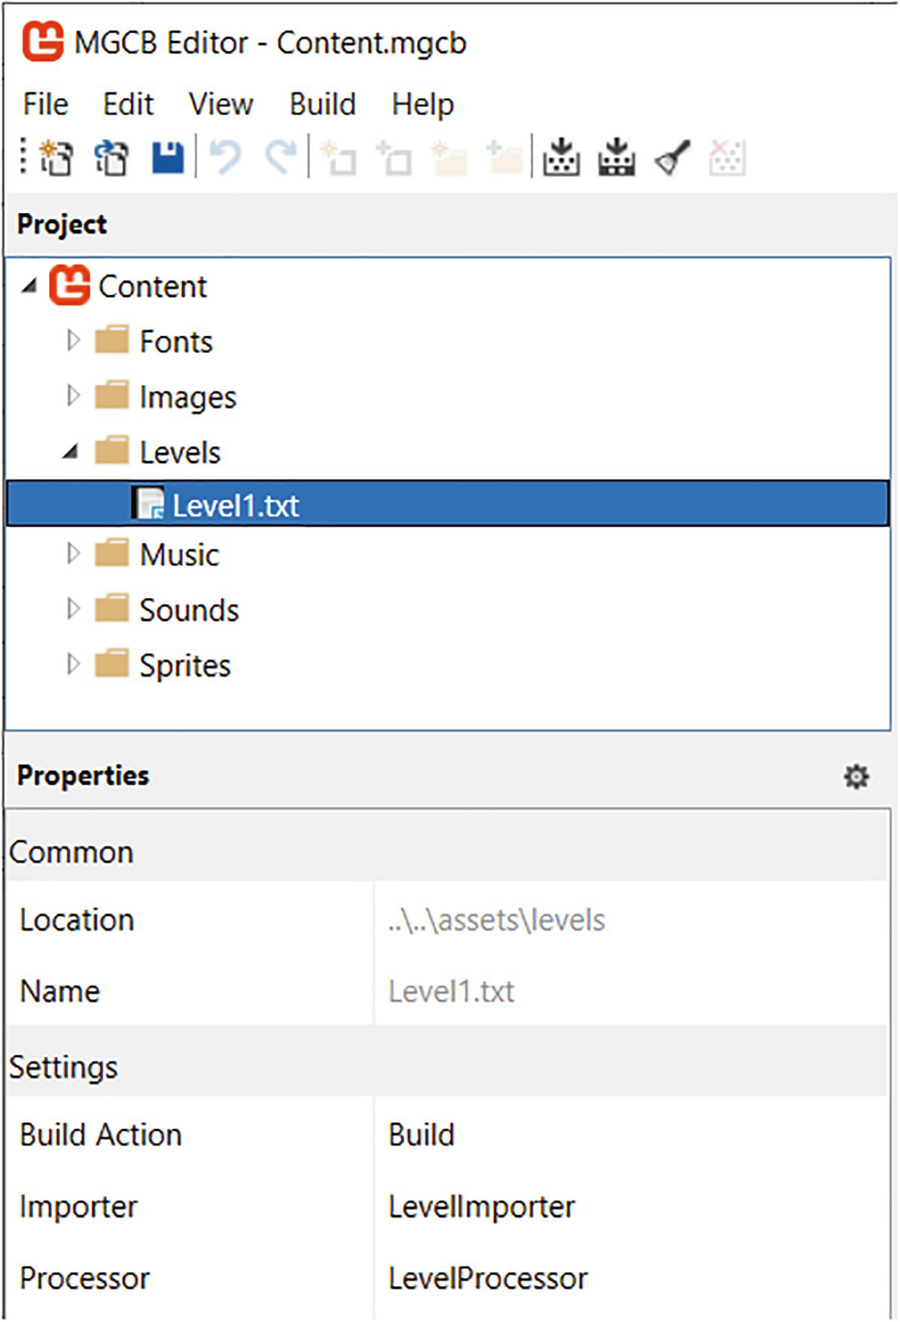
level1.txt is now an asset
Adding Animations to the Content Pipeline
Each animation only has four frames to define but specifying all of this in code for more complex animations with more frames will get cumbersome very quickly. Instead, you could move all that information into an XML file that lives as an asset right next to its associated sprite sheet asset. While you could store that information in a different format, like JSON or YAML, the Content Pipeline Tool comes with a built-in XML importer that you can use and thus avoid building another extension.
Before you build the XML asset, however, you define the data structure that will store the animation data in the code and then use it to create your XML file. This data structure must be referenced by the Content Pipeline Tool so it can access it. When it parses the XML file, it will instantiate it and populate its public properties automatically for you. This means the data structure must be in a library whose DLL is referenced by the Content pipeline Tool, similarly to what you did earlier.
You could add a new class to your PipelineExtensions project since it is already being referenced, but you would miss the opportunity to improve your game engine. Animations are already part of the engine and defining animation cell positions, dimensions, and lifespans should belong to the engine. So, the engine also needs a reference to your data structure. The only way to gracefully handle this scenario is to create a new MonoGame PipelineExtension project in your solution that will strictly be used by the engine and not your game. Go ahead and create the project as you did in the previous section and name it Engine2DPipelineExtensions. One day, when the engine is ready to be separated from the game into its own library, it will come with its own sets of pipeline extensions, which will include the ability to read animation data from an XML file.
The data structure above mimics what you see in the code. First, an animation is created with a flag that indicates if it is a looping animation or not. You also add the animation speed at the animation level instead of in the frames because animations tend to use the same speed for all their frames. Then you have a list of animation frame data that includes its position on the sprite sheet and its dimensions.
When the XML asset is read, it will create an AnimationData object that will include all the frames needed to perform the animation. But what will this XML look like and how do you create it? One quick trick you can use is to write code that creates an AnimationData object and saves it as XML, and then use the resulting XML file as your template to build the asset.
Creating the XML Template
This code starts with two comments that indicate which namespaces need to be imported into the code if you are not using Visual Studio to auto-discover them.
The XML file starts with an XnaContent tag that indicates which assembly contains the class that you want to write the data to. It is followed by an Asset tag that is used to map the data below with a specific class that will receive it. From there, each tag represents a public variable on the class and lists, like the Frames list, contain a series of Item tags that are used to fill each frame in the list. With this information, you can move your PlayerSprite animation data into an asset.
Creating the TurnLeft Animation Asset
This file follows the same format as your template, but is filled with the data used in original game code used to create the _turnLeftAnimation animation. Now add this file to the content pipeline tool, set the importer to the “Xml Importer – MonoGame,” the processor to “No Processing Required,” and build the assets, which should build the .xnb file for the animation. All that you need to do now is load it as game content and build the animation from the AnimationData object.
Finally, after doing the same thing for the turnRightAnimation, running the game should give you the exact same behavior as the original game. While you have not improved the game itself, you have added flexibility into how you build your game assets and decoupled animation details from the code.
Internationalizing Game Text
Use string resources for each language the game will support and let the .Net Framework localize your game appropriately.
Use the Localized Font Processor to generate Unicode SpriteFonts.

Selecting the Localized Font Processor
For each resource file, it looks at all the strings in the file and only creates textures for the characters in the string.

Adding your first resource

English text
This sets the culture of the app to the current culture of the machine that is running the game.
Strings.fr.resx
Strings.ja.resx
By using this format, the .Net Framework will automatically choose the right Strings resource file based on which culture is set for the game. The French and Japanese cultures are codified by the “fr” and “ja” codes, so if you set the game to those cultures, .Net will use the codes to find the right resource file. If a resource file is not found for a certain code, then .Net will default to the Strings.resx file , which uses English text.

French text

Japanese text

Blank text fonts
This is because you are using the Arial font, which, as installed on my Windows machine, does not have Japanese characters. When the Content Pipeline Tool builds the font textures, it rasterizes the font found on the builder’s machine into a texture. But if the font does not have the desired characters, then a blank box is instead rendered into the texture.

Japanese text correctly rendered on the screen
Conclusion
In this chapter, you took a deep dive into the Content Pipeline Tool and how its four building blocks (the content importer, the content processor, the content writer, and the content reader) all work together to take an asset file and produce a reusable game asset. You then extended the Content Pipeline Tool so it can process level files and animation details as proper game assets. Finally, you set up your game to be translated into many different languages using the Localized Font Processor and resource strings.