‘And that’s a delightful shot from Johnson there, Jim. Both players have found the green in two.’
‘It sure was, Corey. Johnson is sitting about 18 feet from the hole with Miller maybe only 10 feet away, but with a trickier downhill putt. You can cut the tension here with a knife…’
- 5.
Power meter.
- 6.
Move the ball.
Step 5: Power meter
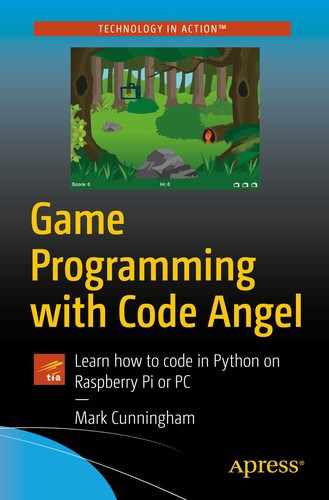
The power meter is used to determine the strength of the player’s shot. The easiest solution would have been to have the player type in a number between 1 and 30. However, we will use a power meter to make hitting a shot that bit more difficult, and the game will look much better too.

Golf code listing 6
- 1.
Move the slider up or down.
- 2.
Start a new timer.
Let’s look at how we move the slider first of all.
Line 117 tests the slider_direction to see if it equals 'up'.
Line 118 increases the shot_power by 1.
Line 119 checks to see if the shot_power has reached the MAX_POWER (set to 30 at the start of the program). If shot_power equals MAX_POWER, then we set slider_direction to 'down' so that the slider starts moving downward.
If the slider is not moving up, then line 123 tests slider_direction to see if it equals 'down'.
Line 124 decreases the shot_power by 1.
Line 125 checks to see if the shot_power has reached the MIN_POWER (set to 1 at the start of the program). If shot_power equals MIN_POWER, then we change the direction of the slider to 'up'.
Line 129 tests to see if shot_power <= SLOW_PUTT_RANGE, which is a constant used to determine when the slider should move more slowly. We can see from line 36 that SLOW_PUTT_RANGE is 3. Therefore, if shot_power equals 1, 2, or 3, then the new slider_timer will be set to SLOW_SLIDER_SPEED (which is 20).
However, we can see that if the shot_power is anything above 3, the new slider_timer will be set to SLIDER_SPEED (which is 5). This means that the speed of the slider on bars 4–30 of the power meter will be four times as fast as the speed of the slider on bars 1–3.
You can change the values of SLIDER_SPEED and SLOW_SLIDER_SPEED to make the game easier or more difficult.

Golf code listing 7
Line 139 displays the power_meter.
Lines 141 and 142 do some basic math to work out the y coordinate of the slider depending on the value of shot_power.
Line 143 blits the slider image onto the screen.
Run the program, and you should see the slider moving up and down the power meter, and it will move more slowly when it reaches the bottom.
Step 6: Move the ball
The player must judge how much power their golf shot requires. If they hit their shot while the slider is near the bottom of the power meter, the ball will go a very short distance. Hitting a shot when the slider is near the top of the power meter means the ball will go much further. The player hits the ball by tapping the spacebar.

Golf code listing 8
The spacebar has been tapped.
The ball_distance is 0 (this means the ball is not already moving).
in_the_hole is False (the ball is not already in the hole).
Line 110 sets slider_direction to 'none' to stop the slider moving up or down.
Line 111 calculates the total number of pixels that the ball will move by multiplying the shot_power (the value of the slider on the power meter) by the moves_per_flag (the number of pixels between each flag position). The result is stored in the variable ball_distance which we will use when actually moving the ball.
Line 113 adds one onto the number of strokes in the hole. We will look at this line in a bit more depth shortly.
Line 115 tests to see if the ball is moving right and then calculates the final location of the ball by adding the shot power onto the current location of the ball.
The else statement at line 117 means that the ball_direction is not 'right', and so it must be 'left'. In this case, the final ball location is calculated by subtracting the shot power from the current ball location.
Lastly, line 120 plays a sound effect of the ball hitting the golf club.
More about lists
We looked briefly at lists when we wrote Forest Bomber, but it’s time to consider them in a bit more detail.
A list in Python is a container which can hold multiple elements or objects. To create a list, we write the elements between square brackets, separated by commas.
So the hole_strokes list has three elements.
Each item in a list can be identified by its index, but it should be noted that the index always starts at 0 and not 1. So the three elements in the hole_strokes list have indexes 0, 1, and 2, respectively.
Should we wish to access a list element, we place its index in square brackets.
Assuming we are on the first hole, the hole will equal 1. We want to add 1 to the value of the first element of our list. But remember the index always starts at 0, so actually we want to add one to hole_strokes[0]. Using hole – 1 as the index means we will reference index 0 for hole 1, index 1 for hole 2, and index 2 for hole 3.
After the first shot has been hit, we add 1 onto hole_strokes[0], and so the list will become
[1, 0, 0]
Key learning
A list is a variable which can hold multiple elements.
We reference individual list items by using their index.
List indexes start at 0.
Update ball location

Golf code listing 9
As you can see, there is quite a bit of code in Figure 14-4, so let’s take a closer look at what it does.
Line 150 checks to see if ball_distance > 0. The variable ball_distance is greater than zero when the ball is moving. It will become zero when it reaches its final destination and therefore stop moving.
Lines 152–155 update the ball’s x coordinate (stored in ball_x). If the ball is moving to the right, we add to the x coordinate, and if the ball is moving to the left, we subtract from the x coordinate. The amount the ball moves each time is held in the constant BALL_STEP. BALL_STEP was initialized to 3 at the start of the program, so the ball moves 3 pixels on each frame.
If it is greater than SCREEN_WIDTH: Which means the ball has rolled off the right-hand edge of the screen.
If it is less than 0: Which means the ball has rolled of the left-hand edge of the screen.
Line 161 places the ball back at the tee by setting ball_x to START_BALL_X.
Line 162 resets ball_distance to 0, because the ball should no longer be moving.
Line 163 sets the ball_direction to go right.
Line 164 resets the shot_power on the power meter to 1.
Lines 167–169 reset the power meter values so that the slider starts back at the bottom.
Line 173 subtracts 1 from the ball_distance, because the ball has moved 1 place closer to the hole.
Line 176 checks to see if ball_distance has become 0; in other words, the ball has reached its destination.
Set the Boolean in_the_hole to True.
Add the number of strokes for the hole to the overall round_strokes.
Play the sound of the crowd clapping.
Update the direction so that if the ball is to the left of the flag, the direction will become 'right', or if the ball is to the right of the flag, the direction will become 'left'.
Reset the slider so that it starts at the bottom of the power meter.
Draw the ball

Golf code listing 10
The code in Figure 14-5 is fairly straightforward. The only aspect that is worth further note is at line 220 where we add BALL_DESCENT to the ball’s y coordinate (BALL_Y) if the ball has landed in the hole. By moving the ball down the screen a few pixels, it will give the effect of the ball dropping into the hole.
Run the game and see if you can get the ball in the hole.
In the next and final chapter of the book, we will pull the remaining parts of the game together so that our Golf game runs for all three holes.