This chapter is dedicated to the NSX-T edge transport nodes and NSX-T edge clusters.
Edge Node
The NSX-T edge (also referred to as edge transport node) is an essential component of the NSX-T transport zone.
Edge transport nodes are appliances that provide pools of capacity that can host distributed routing and non-distributed services. An edge transport node is responsible for hosting the Tier-1 and Tier-0 gateways. Edge nodes are also used to host network and security services like NAT, load balancing, gateway firewalling VPN, and so on through the Tier-0 and Tier-1 gateways.
High performance is possible with the support of DPDK, and the edge transport nodes are the direct tunnel endpoints.
The control plane of an edge transport node is Linux-based, and the routing table for management and overlay traffic is fully separated because they use dedicated interfaces for this.
Administrative background
Computational power for dynamic routing and network services
High availability by using active/active and active/standby operation models to provide resiliency
Because the edge transport node typically offers north-south routing, these are generally deployed close to the network’s border. This can be a border leaf (in the case of a spine/leaf network architecture) or in the DMZ.
Edge Node Cluster
The edge node cluster contains edge transport nodes to offer high availability. Also, an edge cluster is mandatory if you plan to configure stateful network and security services provided by an edge transport node (Tier-0 and Tier-1 gateways). A maximum of ten edge transport nodes can be part of one single edge cluster. And an edge transport node can only be part of one edge cluster at a time. The maximum amount of edge clusters that NSX-T can host is 160. The configuration maximums can be different per NSX-T version, and this can be verified from the https://configmax.vmware.com website. One edge cluster can provide ECMP across eight paths northbound. Another cluster can offer tenants centralized services to maximize the network throughput northbound, as ECMP cannot be combined with stateful services.
Edge Node Form Factors
Virtual machine edge transport nodes
Bare metal edge transport nodes
It is not possible to mix these two in an edge cluster. So when you create an edge cluster, it can only contain either virtual machine edge transport nodes or bare metal edge transport nodes.
Edge VM Form Factor
The small size is for proof-of-concept deployments.
The medium size is suitable for a typical production environment and can support up to 64 hypervisors.
The large size is for large-scale deployments with more than 64 hypervisors and deployments that require load balancing.
The extra-large size is for environments that require heavy load balancing and advanced services such as URL filtering or L7 firewall.
Edge VM Sizing
Edge VM Resource Requirements
Size | Memory | vCPU | Disk Space | VM Hardware Version |
|---|---|---|---|---|
Small | 4GB | 2 | 200GB | 11 or later (vSphere 6 or later) |
Medium | 8GB | 4 | 200GB | 11 or later (vSphere 6 or later) |
Large | 32GB | 8 | 200GB | 11 or later (vSphere 6 or later) |
Extra Large | 64GB | 16 | 200GB | 11 or later (vSphere 6 or later) |
This sizing may be different based on the NSX-T version you are using.
Edge VM Deployment Prerequisites
To deploy a virtual NSX edge transport node, you can use an OVA, OVF, an ISO file, and an ISO file together with a Preboot Execution Environment (PXE). The virtual NSX edge transport node can only be deployed on an ESXi hypervisor (so not on KVM), and when you use the PXE boot method with the ISO file, you must encrypt the passwords for root and admin users with SHA-512 encryption. Also, the hostname must not contain unsupported characters or spaces. VMware tools will be installed by default, and this version cannot be removed or replaced with a newer/older version.
The virtual NSX edge transport node requires some TCP/UDP/IP ports to be opened to operate correctly. You can find the necessary ports on the https://ports.vmware.com/ website. All virtual NSX edge transport nodes need to be configured with the same NTP server.
Edge VM Interface Considerations
The virtual NSX edge transport node will leverage the physical network interfaces in the ESXi host, and therefore two physical interfaces are required.
The virtual interfaces in the virtual NSX edge transport node are four interfaces (Figure 6-1). The first interface is always used for management traffic and therefore needs to be connected to a VSS/VDS/N-VDS port group dedicated to management traffic. The other three virtual interfaces are called fast-path interfaces, and they carry GENEVE overlay traffic and BGP uplink traffic that can be trunk ports to allow flexible use of these interfaces.
An edge VM can only be attached to VSS port-groups when the edge VM is deployed manually (not through the NSX-T Manager GUI) and registered manually.
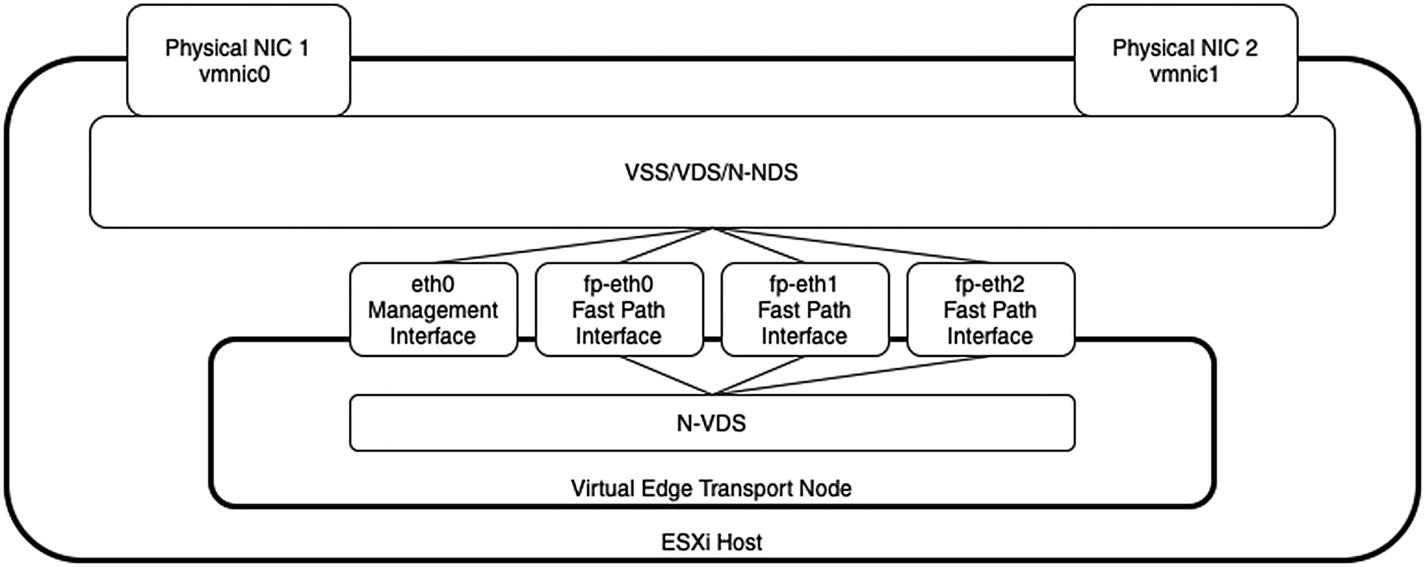
Fast-path to VSS/VDS/N-VDS connectivity
The N-VDS (inside the edge VM) will be used together with the fast-path interfaces to allow GENEVE overlay traffic and uplink traffic.
Edge VM on Multiple Virtual Switches
When you host the virtual NSX edge transport node on an ESXi host, this host can have multiple virtual switches (VSS/VDS/N-VDS).
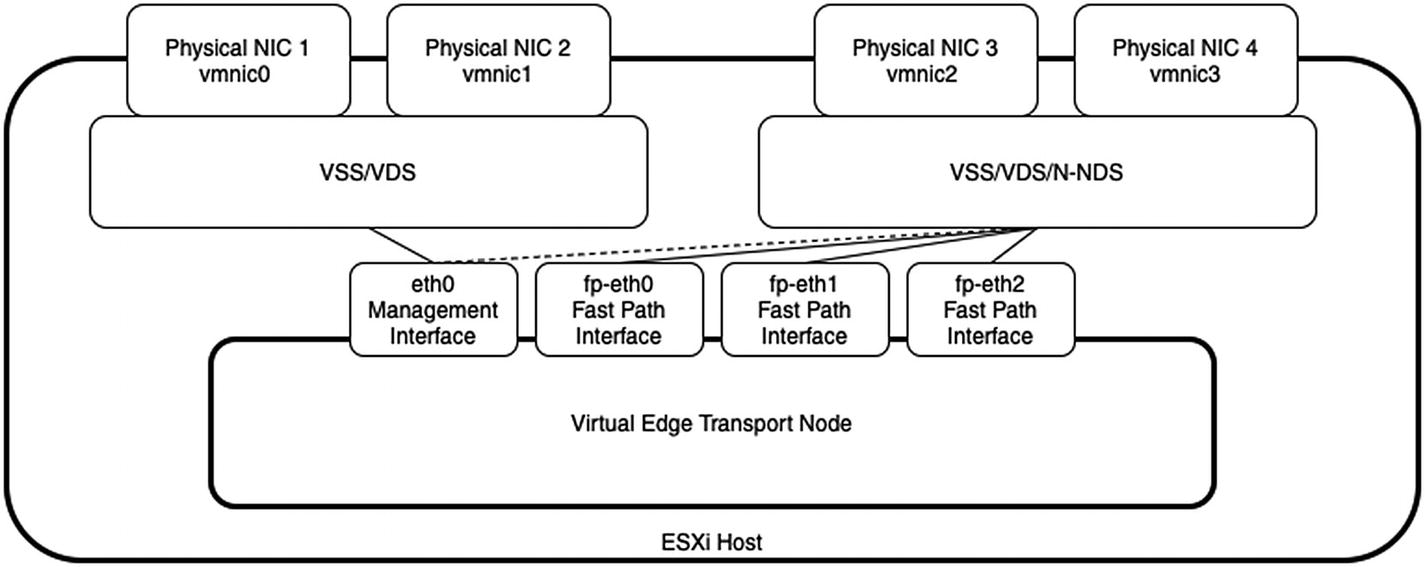
Edge VM connected to multiple virtual switches
It is also better to attach the virtual interfaces to a virtual switch that is not prepared by NSX-T. This means that this needs to be a VSS or VDS switch and not an N-VDS switch. Unfortunately, this is not always possible.
Attaching the virtual edge transport node interfaces to an N-VDS (on an NSX-T prepared host) is still a supported and valid option, but less recommended.
The networks and VLANS of that switch are responsible for the overlay (GENEVE) traffic that can be the same between the host transport node and the virtual edge transport node (as long as you do not host a virtual edge transport node on an NSX-T prepared switch). This example is given in the next section.
Edge VM on One Virtual Switch
When you deploy the virtual edge transport node on an ESXi host prepared for NSX and have only one VDS/N-VDS, you need to consider some ground rules.

TEP VLAN assignment across host and edge transport nodes
Starting from vSphere 7 and VDS 7, it is only possible to use a VDS that works directly together with NSX-T when you plan a single VDS deployment with two or more physical NICs attached to this VDS.
Deployment Options for Virtual Edge Nodes
Edge Transport Node Deployment Options
Edge Transport Node Type | Deployment Option |
|---|---|
Virtual Machine | • NSX GUI • OVF deployment through the vCenter Server • OVF deployment through the OVF tool command-line utility • ISO file installation • ISO file PXE boot |
Bare Metal | • ISO file installation • ISO file PXE boot |
Virtual Edge Node Deployment from the NSX-T GUI
To create a new virtual edge transport node (Figures 6-4 through 6-8), choose System ➤ Fabric ➤ Nodes ➤ Edge Transport Nodes ➤ Add Edge VM.

Name and description for the new edge VM
Virtual Edge Transport Node Parameters | Name and Description
Parameter | Description |
|---|---|
Name | The descriptive name you assign to the virtual edge. |
Hostname/FQDN | The hostname or FQDN. The edge transport node will access it and perform management on it. |
Description (optional) | A description of the edge transport node. |
Form Factor | The size of the edge transport node you want to deploy, depending on the responsibilities and features you will configure. |
Advanced Resource Reservations | The resources you want to allocate on the vCenter Server side. |

Credentials for the new edge VM
Virtual Edge Transport Node Parameters | Credentials
Parameter | Description |
|---|---|
CLI Credentials | You will use the credentials to log in to the NSX GUI and NSX CLI through the console or SSH. The default admin username can be changed here. |
Root Credentials | The root password. |
Audit Credentials (optional) | The audit credentials are optional but need to be specified when you need a user with read-only access. |
Allow SSH Login | When you enable this option, SSH will be enabled on the virtual edge transport node. SSH can also be enabled later. |
Allow Root SSH Login | By default, the “root” user will not be allowed to log in through SSH for security reasons, but this setting overrides this. |

Configure the new edge VM deployment
Virtual Edge Transport Node Parameters | Configure Deployment
Parameter | Description |
|---|---|
Compute Manager | The Compute Manager is the vCenter Server that holds the resources to deploy this specific virtual edge transport node. |
Cluster | The vSphere Cluster where you want to deploy this virtual edge transport node. |
Resource Pool (Optional) | When you have vSphere resource pools configured, you can select a resource pool for the virtual edge transport node deployment. |
Host (Optional) | When you want to deploy your virtual edge transport node on a specific host, you can select it here. |
Data Store | The data store where you want to deploy the virtual edge transport node. |
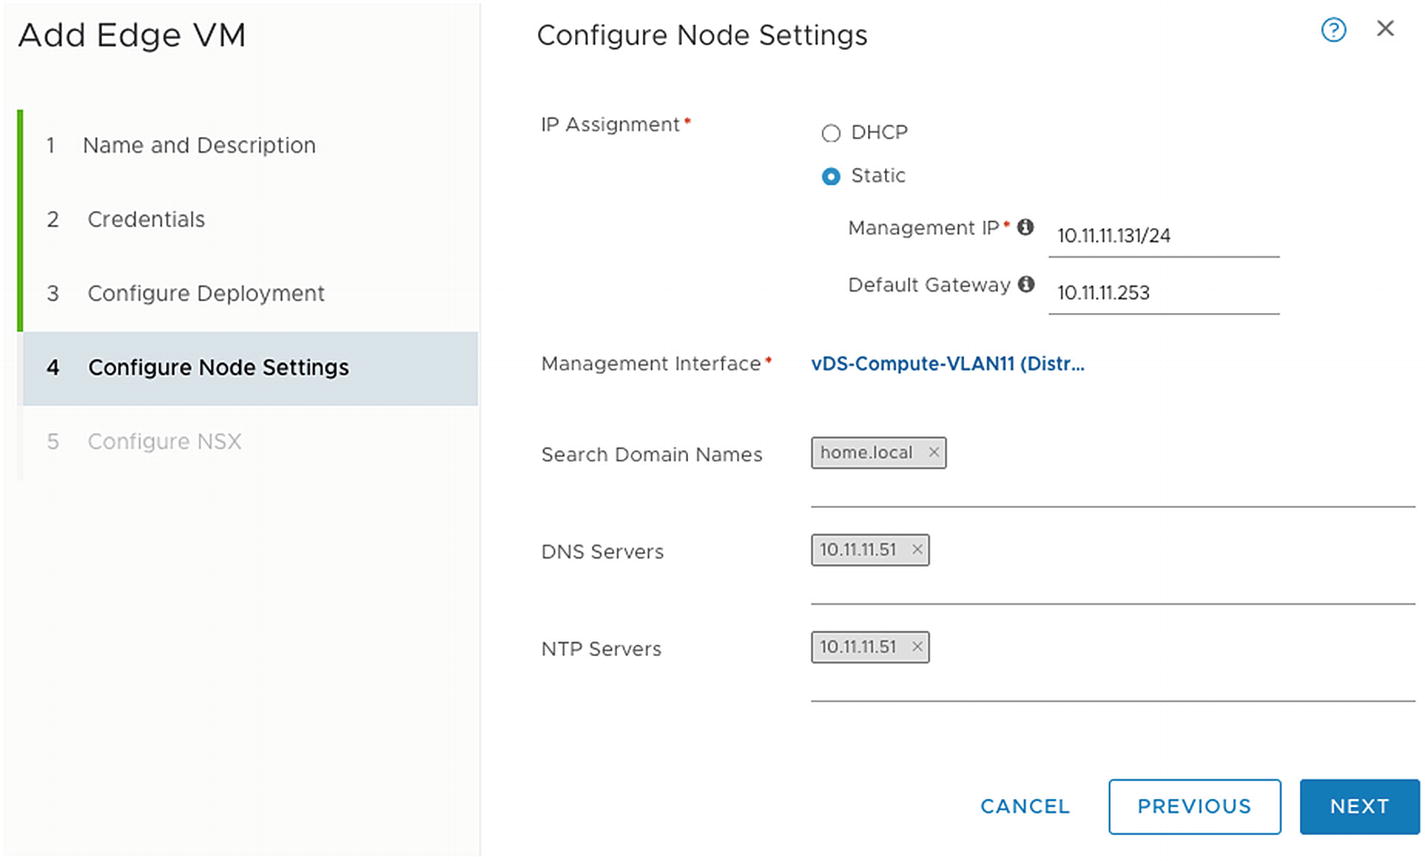
Configure the new edge VM’s node settings
Virtual Edge Transport Node Parameters | Configure Node Settings
Parameter | Description |
|---|---|
IP Assignment | The management IP address can either be assigned statically or with DHCP. |
Management IP/Default Gateway | In case of a static assignment, you need to specify the IP address and default gateway here. |
Management Interface | The management interface is the port group that provides networking to the management network. |
Search Domain Names | The DNS search domain where that node belongs to the management network. |
DNS Servers | The DNS server that can resolve this virtual edge transport node. |
NTP Servers | The NTP server that can provide the correct time to this virtual edge transport node. This NTP server needs to be the same across all edge transport nodes. |

Configure the NSX for the new edge VM
Virtual Edge Transport Node Parameters | Configure NSX
Parameter | Description |
|---|---|
Edge Switch Name | The NSX internal N-VDS switch is used to provide overlay networking. |
Transport Zone | The transport zones define where this virtual edge transport node can provide network and security services. |
Uplink Profile | The uplink profile specifies how the interfaces should behave on the virtual edge transport node. That also defines the load balancing mechanism and the VLAN for the GENEVE overlay network, including the MTU. |
Teaming Policy Switch Mapping | The mapping between a port group and the virtual fast-path interfaces of the virtual edge transport node. |
Virtual Edge Node Deployment from the vCenter Server GUI
If you prefer an edge installation that is more interactive, you can use a UI-based VM management tool, such as the vSphere Client connected to vCenter Server.
Figures 6-9 and 6-10 show you the deploy option through the vSphere Client. The wizard will guide you through the steps so that you can provide the required details.
The parameters that you have to enter in the wizards are similar to the parameters you entered when you deployed the virtual edge transport node using the NSX-T GUI.
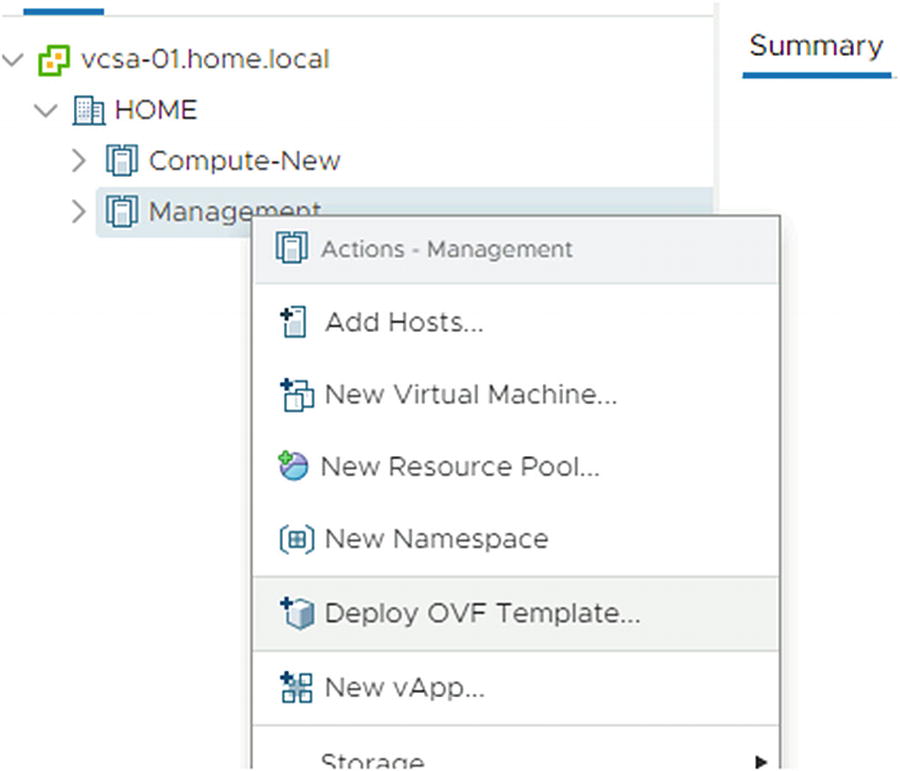
Deploy an edge VM using the vSphere Client | Deploy OVF Template

Deploy an edge VM using the vSphere Client | Select an OVF Template
You must join the virtual edge transport node with the management plane so they can communicate.
When you join the virtual edge transport node to the management plane, it ensures that the edge transport nodes are available from the management plane as managed nodes.
Step 1 is to verify that you have the administration privileges to access NSX edge nodes and the NSX UI. When you have this, you can use the CLI to join the NSX edge nodes to the management plane.
The IP address 10.10.10.100 is one of the NSX-T Manager’s addresses, and the thumbprint is the thumbprint you just retrieved from the NSX-T Manager. Also, you need to use your admin user credentials to complete the registration.
Edge VM Resource Reservation
When you deploy a virtual edge transport node from the NSX-T GUI, you can select the number of resources you want reserved on the vCenter Server side.
The resource reservation settings can be changed afterward, only when after deploy the virtual edge transport node through the NSX-T GUI.

The Change Edge VM Resource Reservations menu (available)
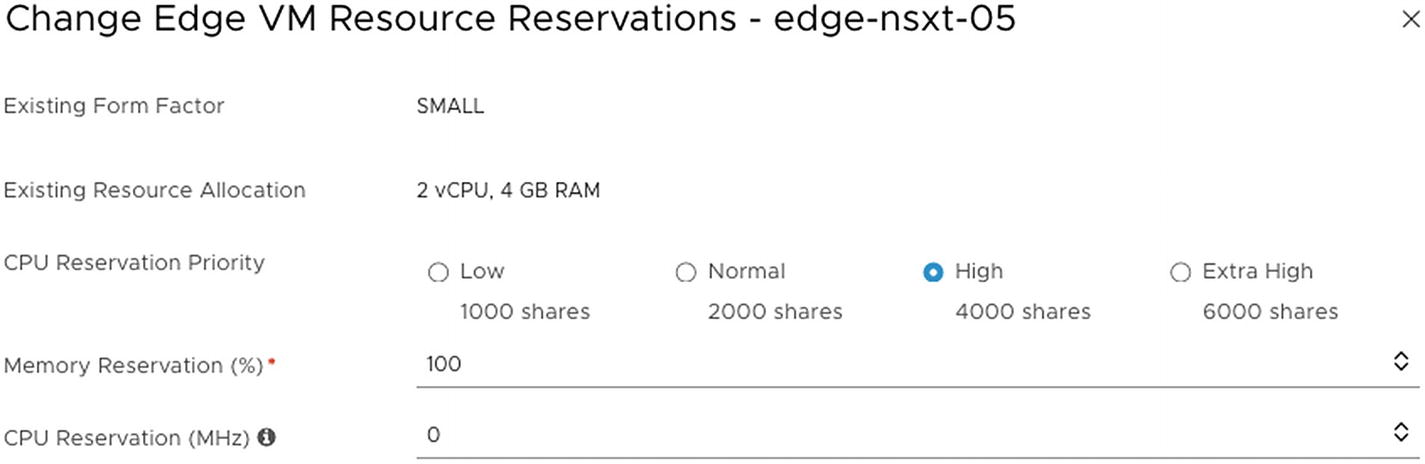
The Change Edge VM Resource Reservations options

The Change Edge VM Resource Reservations menu (not available)
Bare Metal Edge Form Factor
The bare metal edge transport node is typically used when you have high bandwidth throughput requirements.
The bare metal edge transport node only supports specific CPU types and has some specific physical NIC requirements. This list of specific requirements can be found on the VMware website in the (official) NSX-T installation guide.
When the hardware you are trying to use to set up the bare metal edge transport node is not listed, you will risk that the storage, video adapter, or motherboard components will not work correctly.
One essential CPU requirement is that it must have AES-NI1 B huge page capabilities.
Bare Metal Edge and Virtual Switches
The bare metal edge transport node can support multiple virtual switches in the form of N-VDSs. Each N-VDS will require at least two physical NICs, so if you plan on configuring more than one N-VDS, you need multiple physical NICs on your bare metal edge transport node.
Bare Metal Edge Deployment Prerequisites
To deploy a bare metal NSX edge transport node, you can use an ISO file for OS installation and the ISO file together with a Preboot Execution Environment (PXE) .
The bare metal NSX edge transport node hardware requirements need to be satisfied, and when you use the PXE Boot method with the ISO file, you must encrypt the passwords for root and admin users using SHA-512 encryption. Also, the hostname must not contain strange characters or spaces.
The virtual NSX edge transport node requires some TCP/UDP/IP ports to be opened in order to operate correctly. You can find the necessary ports on the https://ports.vmware.com/ website. All virtual NSX edge transport nodes also need to be configured with the same NTP server.
Bare Metal Edge Server Hardware Requirements
The hardware requirements for a bare metal edge transport node can be found on this VMware website:
The hardware requirements may change when the NSX-T version evolves, but this information is publicly available on the NSX-T installation guide; it’s version-specific.
Edge Node Deployment on Bare Metal Edges
Manual installation is also available when you install NSX edge nodes on a bare metal server. After you satisfy the requirements mentioned in the previous section, the installation process should start automatically from the installation media using an ISO file.
After the bootup and power-on processes are complete, the system requests an IP address manually or with DHCP. The default username is root and the password is vmware. The admin login password is default.
During the setup procedure, you need to enable the interfaces and join the bare metal edge transport node to the management plane.
- 1.
Set the system BIOS to Legacy BIOS.
- 2.
Download the NSX edge ISO file and either create a physical CD-ROM or use a method to mount the ISO file to a virtual drive.
- 3.
Boot the physical machine from the ISO.
- 4.
Select Automated Install (Figure 6-14).

Bare metal edge transport node installation screen
You can use a PXE Boot to automate the network configuration installation process. The PXE Boot can be used to install NSX edge nodes on a bare metal or virtual platform.
PXE Boot automates the installation process of the edge transport nodes. You can preconfigure the deployment with all the required network settings for the edge transport node. The password for root and admin users must be encrypted with SHA-512.
The PXE method supports only the NSX edge node deployment. It does not support NSX Manager deployments.
By using PXE, the networking settings—like the IP address, the default gateway, the network mask, the NTP server, and the DNS server—are automatically set.
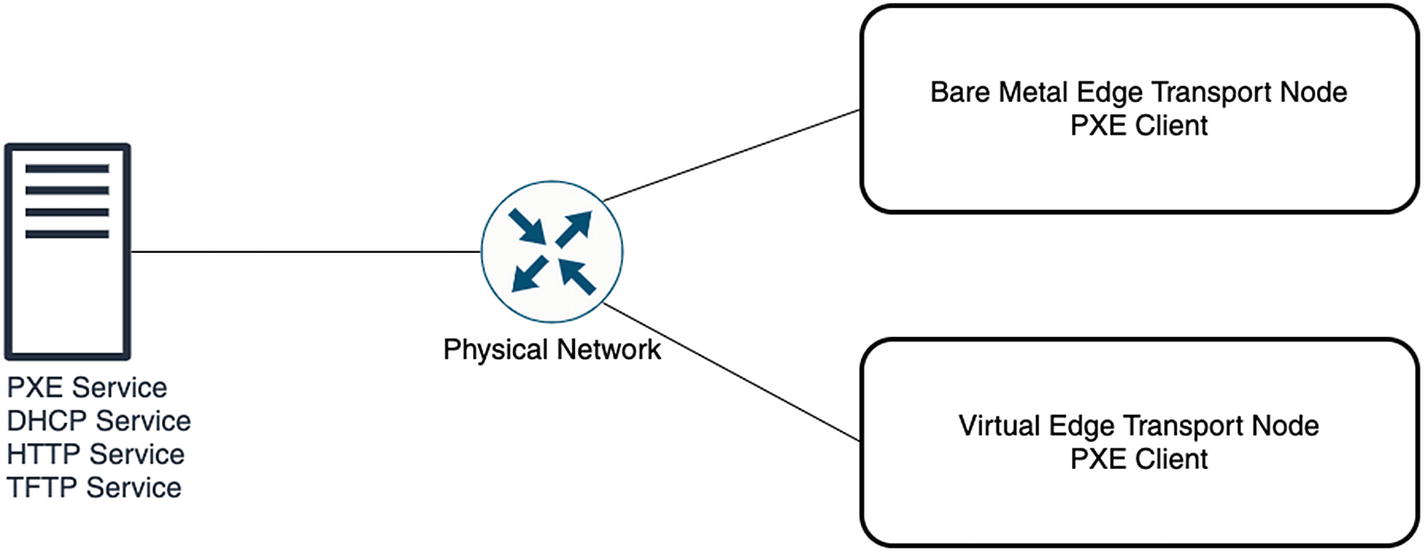
Edge transport node PXE boot components
Edge Node Settings

Edge Transport Node | Change Node Settings menu

Edge Transport Node | Change Node Settings
Verifying the Edge After the Initial Deployment (Before Configuration)
After you have deployed an edge transport node, you need to perform some validation steps to ensure it is operating properly before you start using it (or configure it if the configuration is not done).
When you enable SSH, you can set up an SSH session to the edge transport node and verify if access is working.
You can try to ping the IP management address of the edge transport node.
- When you’re logged in to the CLI (using the console, SSH session), try these steps:
Ping the management subnet’s default gateway where the edge transport node is hosted.
Ping some of the ESXi hosts management interfaces (vmk0), which will be part of your NSX-T infrastructure.
Ping the DNS and NTP server that is configured on the edge transport node.
Verifying the Edge Transport Node (After Deployment and Registration)
Configuration state
Node status
Switches (N-VDS)
NSX version
When you click the little “i” (information icon) next to the node status, you will see more information about the given status.
When you click the number after the N-VDS, you’ll see information about the attached transport zones.

Edge transport node overview screen
Creating an Edge Cluster
When you have multiple edge transport nodes active, you want to make sure these nodes are highly available.
When you want to use stateful services such as NAT, load balancing, VPN, gateway firewalling, and so on.
To create a new edge cluster, choose System ➤ Fabric ➤ Nodes ➤ Edge Clusters.
- 1.
Click +ADD.
- 2.
Create an edge cluster profile, either before or during the Add Edge Cluster wizard.
- 3.
Include the edge transport node members that will be part of the edge cluster (Figure 6-20).

Edge cluster overview screen

Edge transport node member selection to be part of the edge cluster
Summary
In this chapter, you learned what type of edge transport nodes you can deploy. You also learned the prerequisites for edge transport node deployment and how the actual deployment is done using the proper verification steps.
The next chapter explains how to leverage the edge transport nodes to create logical routers and perform north-south and east-west (logical) routing.