
If you have made it to this chapter of the book, then till now you have gained an idea about how you can develop widgets of different sizes that not only display static data but also have the capability to fetch fresh data from a server at a specified interval. Also, you have learned how you can add tap targets to your widgets and also make your widgets configurable.
By following the procedure given in the previous chapter, you developed widgets that offered users a list of hard-coded configuration options, using which they configured their widgets. To be more specific, in the OnThisDay app’s widgets, users could select a category of events from the widgets’ configuration screen and, hence, make the widgets display event information related only to that particular category. You hard-coded all those categories which users could choose from. That is where the difference between that chapter and this chapter lies.
In this chapter, you will learn how you can fetch data from a server so that you can use those data as configuration options for the parameter in your configurable widgets. If you apply what you learned in this chapter to the OnThisDay app, you will be able to replace the category options you had previously hard-coded, with dynamic category options fetched from a server.
Now, we understand that you must have been fed up with working on the same app for a long time. So, in this chapter, you will work in a new app, TwitterTrends (our friends who love Twitter are gonna enjoy this).
Getting Started
To begin working on TwitterTrends, unzip the file named TwitterTrends.zip, and from the TwitterTrendsStarter folder, open TwitterTrends.xcodeproj. As this project needs to use Twitter’s API endpoints, it is necessary to generate a bearer token. You have to pass that bearer token in the header of each request/API call, and Twitter checks that bearer token for authentication. If a valid bearer token is passed, Twitter sends a response with the data you request. Otherwise, Twitter will not give you access.
If you already own a Twitter Developer Account, you should be able to generate your own bearer token. But in case you do not own a developer account, you will first have to apply for it from Twitter’s developer account page.1 Generally, it takes a day or two, or sometimes even more, for Twitter to review your application.
If your Twitter Developer Account is ready to use, generate your own bearer token by going through the article at this link.2 Then, open TwitterTrendsAPI.swift in the TwitterTrends folder of the project and replace the string that says, “Your bearer token here,” with your bearer token string. Finally, you are ready to run the app.

The homescreen of TwitterTrends displaying a list of trends trending worldwide on Twitter
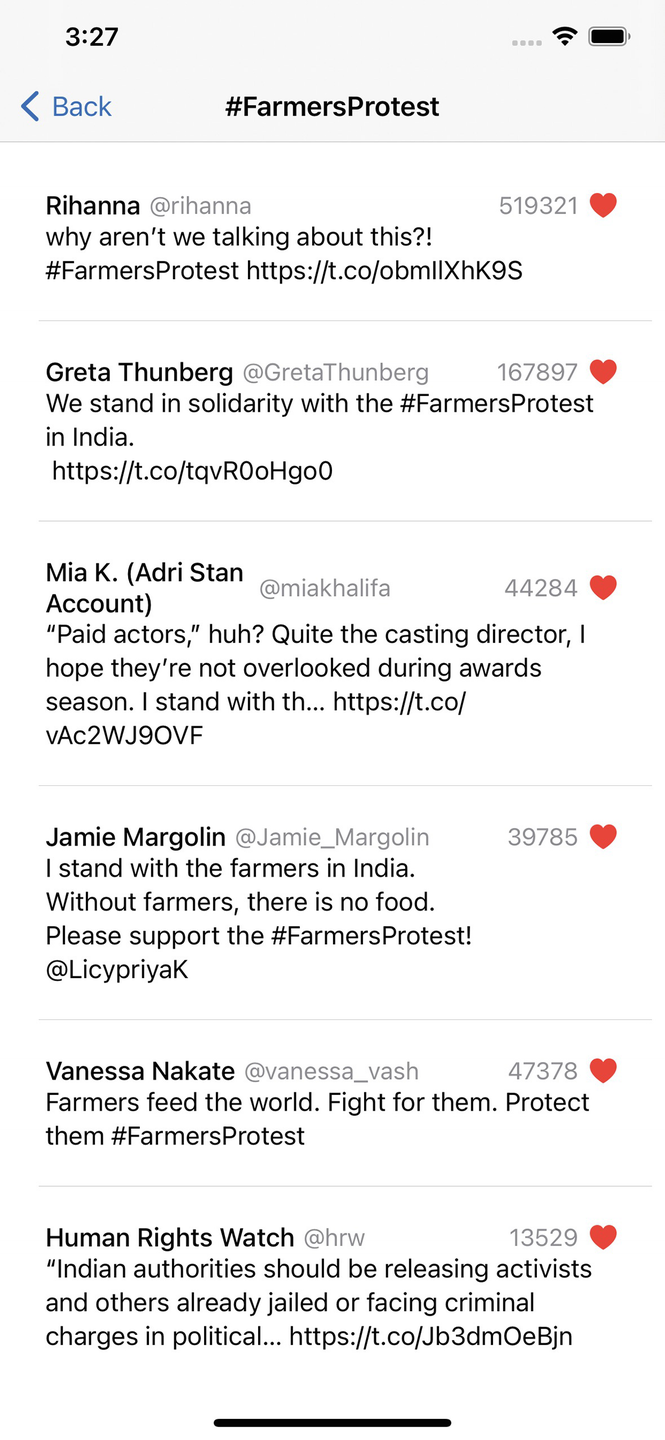
TwitterTrends displaying a list of tweets about the trend “#FarmersProtest”
Figure 5-2 shows the screen with a list of tweets which was shown after the #FarmersProtest trend was tapped in TwitterTrends’ homescreen. The list of tweets has been fetched by using Twitter’s GET search/tweets4 API endpoint.

Large-sized widget of TwitterTrends
In Figure 5-3, you can see how the large widget of TwitterTrends looks. The large widget is the only widget family that TwitterTrends has. At the top of the widget, the name of the trend is displayed. Below that, the tweets related to that trend are listed, along with some more information about each tweet. If there are more than three tweets, a Text that displays the number of tweets that could not be accommodated in the widget is shown.

The configuration screen of TwitterTrends’ widget

The trends users can choose from to set as the “Selected Trend”
From the screen shown in Figure 5-5, users can choose any one of the trends, and then the widget will display tweets related to that selected trend.
Doesn’t that sound fun? Now let’s take a look at the already existing code. We have already set up some basic stuff for you in TwitterTrends.
If you go to the Project Navigator and open the TwitterTrends project, you will see two main folders, that is, TwitterTrends and TwitterTrendsWidget. The TwitterTrends folder contains the files and folders related to the app, and the TwitterTrendsWidget folder contains the files and folders related to the widget. And there are certain files which are shared by both folders using Target Membership.
In the TwitterTrends folder, other than Assets.xcassets and Info.plist, you will see the Extensions folder that contains a file named View.swift. It contains an extension of View that helps to handle the redacted(reason:) view modifier.
The Models folder contains TrendTweets.swift, Trends.swift, and Tweets.swift, which are the models used for decoding the response data received from Twitter’s API. These files are used by both the app and the widget.
The Preview Content folder is a folder generated automatically by Xcode for storing the assets required for development purposes. Xcode does not include any assets in this folder in your release builds.
The next file is TwitterTrendsAPI.swift. It is responsible to handle communications with Twitter’s API endpoints. This file is used by both the app and the widget to fetch tweets and trends from Twitter.
There is a file named TwitterTrendsApp.swift which is the entry point of the app.
Now, the only folders remaining are ViewModel and Views. The ViewModel folder consists of TTViewModel.swift, which contains the view model used by the app. And Views contains TrendsView.swift and TweetsView.swift which contain the user interface of the screens that display the top trends and the tweets related to those trends, respectively.
That’s the description of the folders and files in the TwitterTrends folder.
Currently, there are less files and folders in TwitterTrendsWidget. In addition to Assets.xcassets and Info.plist, there is a folder called Model that contains TweetWidgetEntry.swift. This file contains a TimelineEntry called TweetWidgetEntry which is vital for your widgets to work.
The Provider folder contains TwitterProvider.swift, which is the TimelineProvider of the widget.
Likewise, you can see another folder, View. It contains LargeWidgetView.swift, which contains the user interface of your widget.
Lastly, there is a folder called Widget, and it contains TwitterTrendsWidget.swift. It is the entry point of your widget.
Throughout this chapter, you will add more files and folders in your widget’s folder and give your widget the power to fetch configuration options from a remote server.
Now, it’s finally time to start working to give your widget the capability to communicate with Twitter’s API to fetch the top trends and allow users to select any one of them to see the tweets related to that particular trend in the widget.
Time to Create a SiriKit Intent Definition File
- 1.
Right-click the TwitterTrendsWidget folder in the project and click New Group to create a new folder. Name it Intent.
- 2.
Now, right-click the Intent folder and click New File….
- 3.
In the dialog box that appears, select SiriKit Intent Definition File, name it TwitterTrends.intentdefinition, and create the file. While creating the file, make sure that both TwitterTrendsWidgetExtension and TwitterTrends targets are checked at the bottom of the dialog box.
- 4.
Open TwitterTrends.intentdefinition and click the “+” icon at the bottom left of the intent file. After that, from the list of options, click New Intent (Figure 5-6).
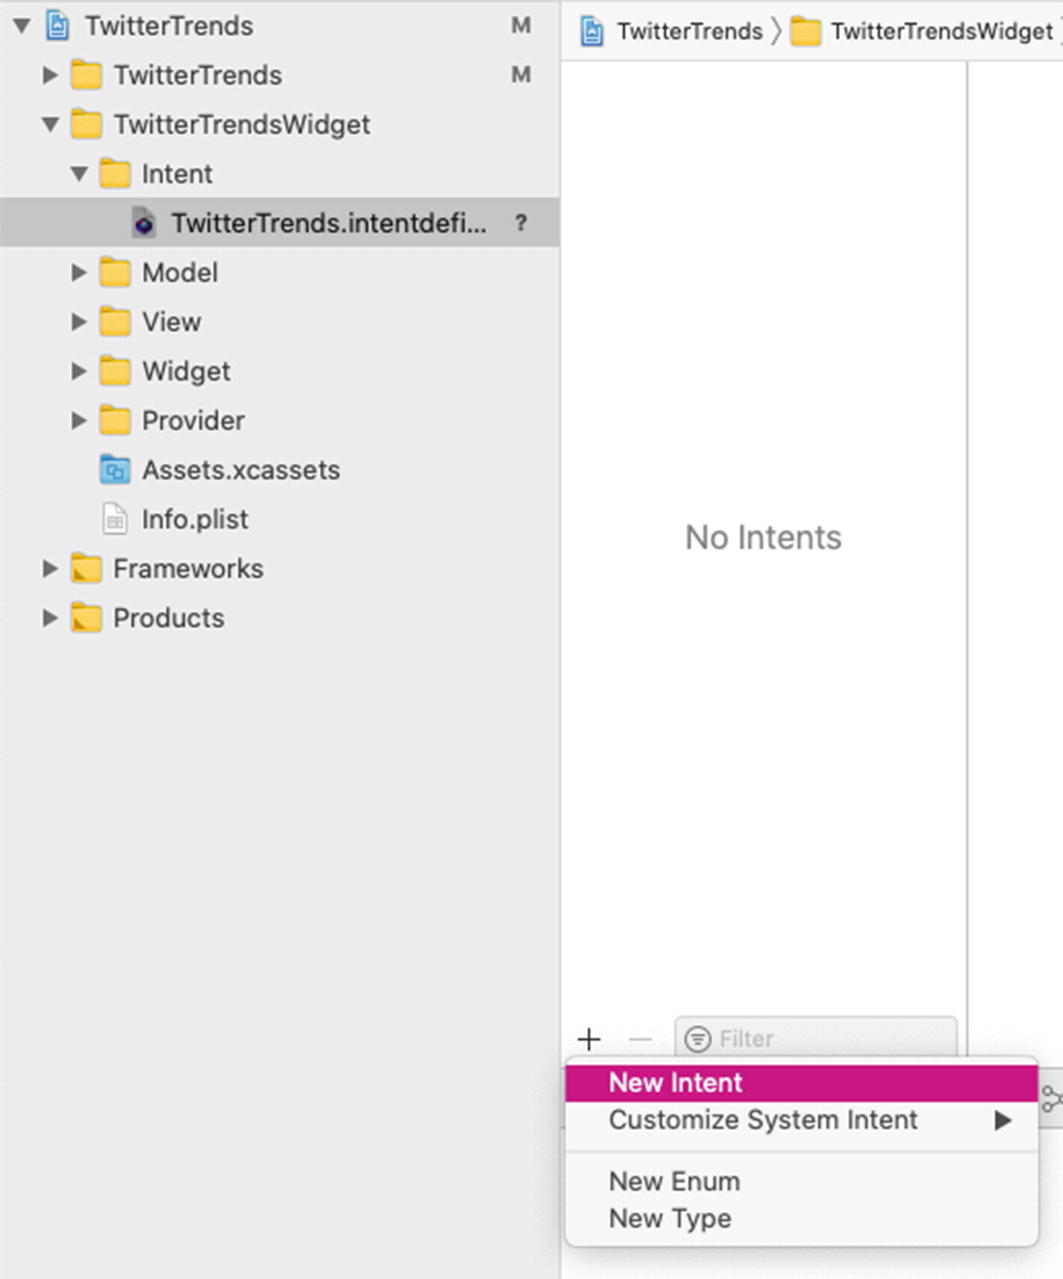
Creating a new intent in the intent definition file
- 5.
Name the intent as Trends and modify some configuration of that intent. Since you are going to use the intent for widgets only, put a checkmark on Intent is eligible for widgets and remove checkmarks from Intent is user-configurable in the Shortcuts app and Add to Siri and Intent is eligible for Siri Suggestions.
- 6.
Now, add a parameter named selectedTrend in the Parameters section by clicking the “+” button below it. Parameters are the properties that users will see and modify in the configuration screen of your widget to configure your widget. The display name that is displayed in the configuration screen of your widget (Figure 5-4) is automatically set to Selected Trend.
- 7.
Then, change the type of the selectedTrend parameter to Add Type… (Figure 5-7).
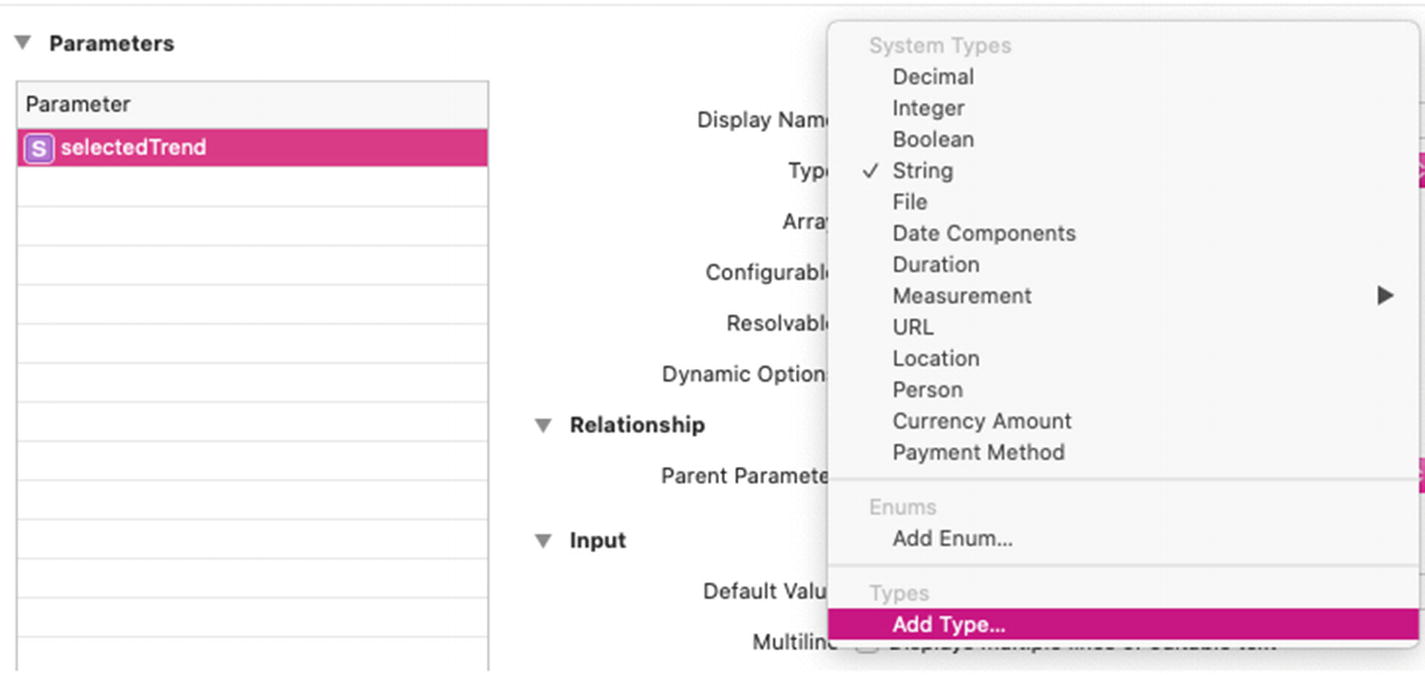
Creating a parameter called “selectedTrend” and changing its “Type” to “Add Type…”
- 8.
As soon as you click Add Type…, a new screen is displayed that appears similar to Figure 5-8. Change the name of the new type to SelectedTrend by typing it in the item under the TYPES header at the left.
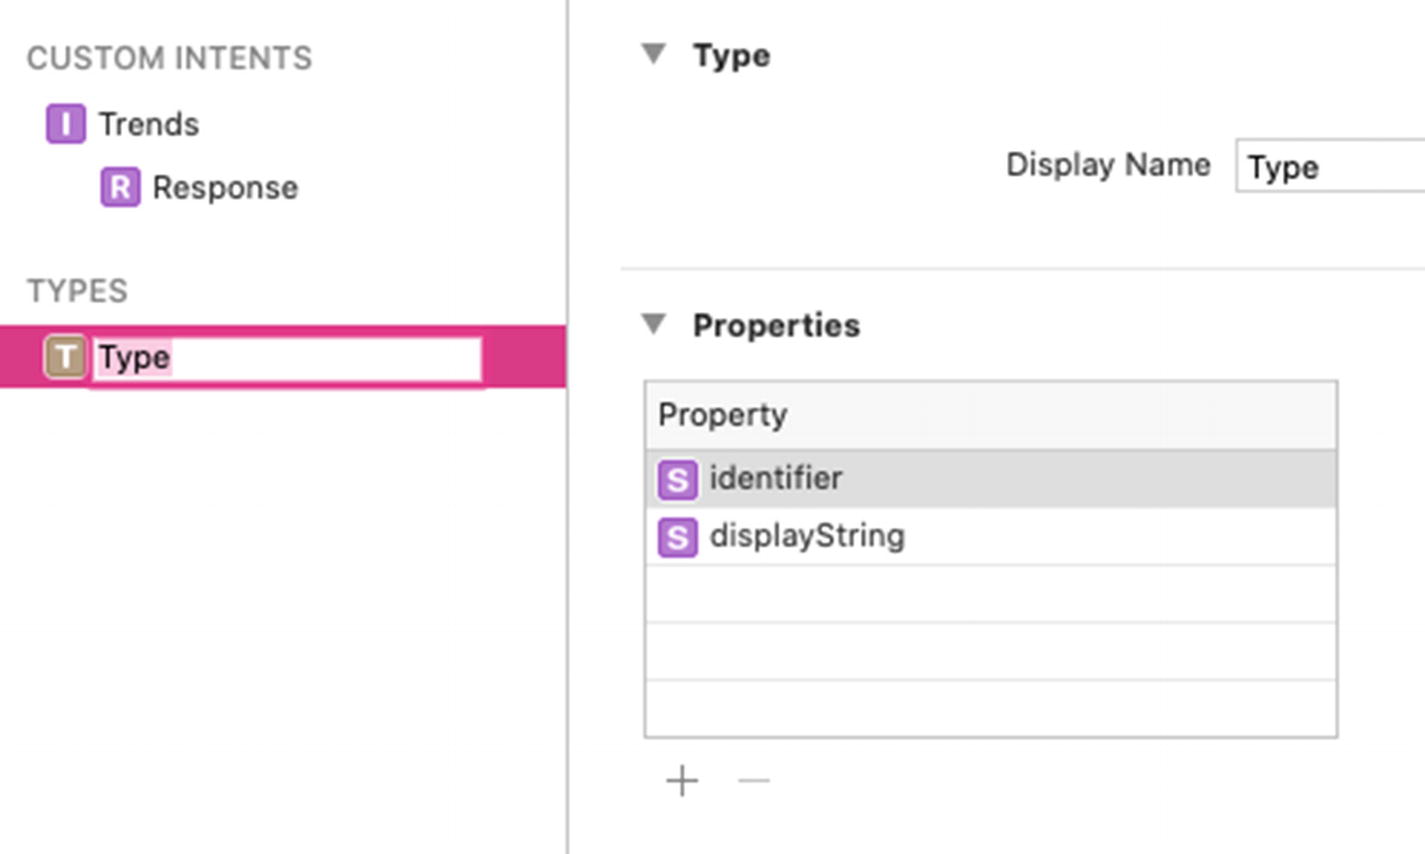
The screen shown after clicking “Add Type.”
- 9.
Again, go back to the Trends custom intent and select the selectedTrend parameter and add a checkmark in Options are provided dynamically as you want to provide options for that parameter dynamically by fetching them from a remote server. Also, remove the checkmark from Siri can ask for value when run since you do not want to work with Siri.
In this way, you have created an intent definition file and added the parameter, selectedTrend, using which users will select a trend of their choice from the widget’s configuration screen.
Setting Up IntentHandler to Fetch Top Trends and Send Them to the Widget
Now, you have to add a mechanism to use selectedTrend parameter when the timeline is created. In the previous chapter, it was a straightforward and simple process, as you had an enum with a set of values you had defined or hard-coded. But this time, you are using a class, and things are going to be different.
- 1.
In Xcode, go to File ➤ New ➤ Target to create a new target. In the dialog box that appears, select Intents Extension and click Next.
- 2.
In the dialog box displayed, set TwitterTrendsIntent as Product Name, Swift as Language, and None as Starting Point. Make sure that Include UI Extension is not checked. And set Project to TwitterTrends and the value of Embed in Application to TwitterTrends. Then, click Finish. And click Cancel if you are asked to Activate “TwitterTrendsIntent” scheme because you will not have to activate that scheme to run your widget or app later.
Now, a new folder called TwitterTrendsIntent is created in your project, and it contains IntentHandler.swift and Info.plist. The IntentHandler.swift file is where you will write the code to fetch the top trends from Twitter’s server and send them to your widget.
- 3.
Now, open the TwitterTrends.intentdefinition file in TwitterTrendsWidget’s Intent folder and update its Target Membership by adding a checkmark to TwitterTrendsIntent. Now, that file is accessible from TwitterTrends, TwitterTrendsWidget, and TwitterTrendsIntent.
- 4.
One thing to keep in mind is that the TwitterTrendsIntent target should know the types of intents it can support. For that, select the TwitterTrends project (and not the TwitterTrends folder) located at the top of the Project Navigator to go to project settings. Now, select the TwitterTrendsIntent target under the TARGETS section and go to its General tab.
- 5.
In the General tab of TwitterTrendsIntent, go to the Supported Intents section and click the “+” sign below it to add a new supported intent. Then the screen will look like Figure 5-9.
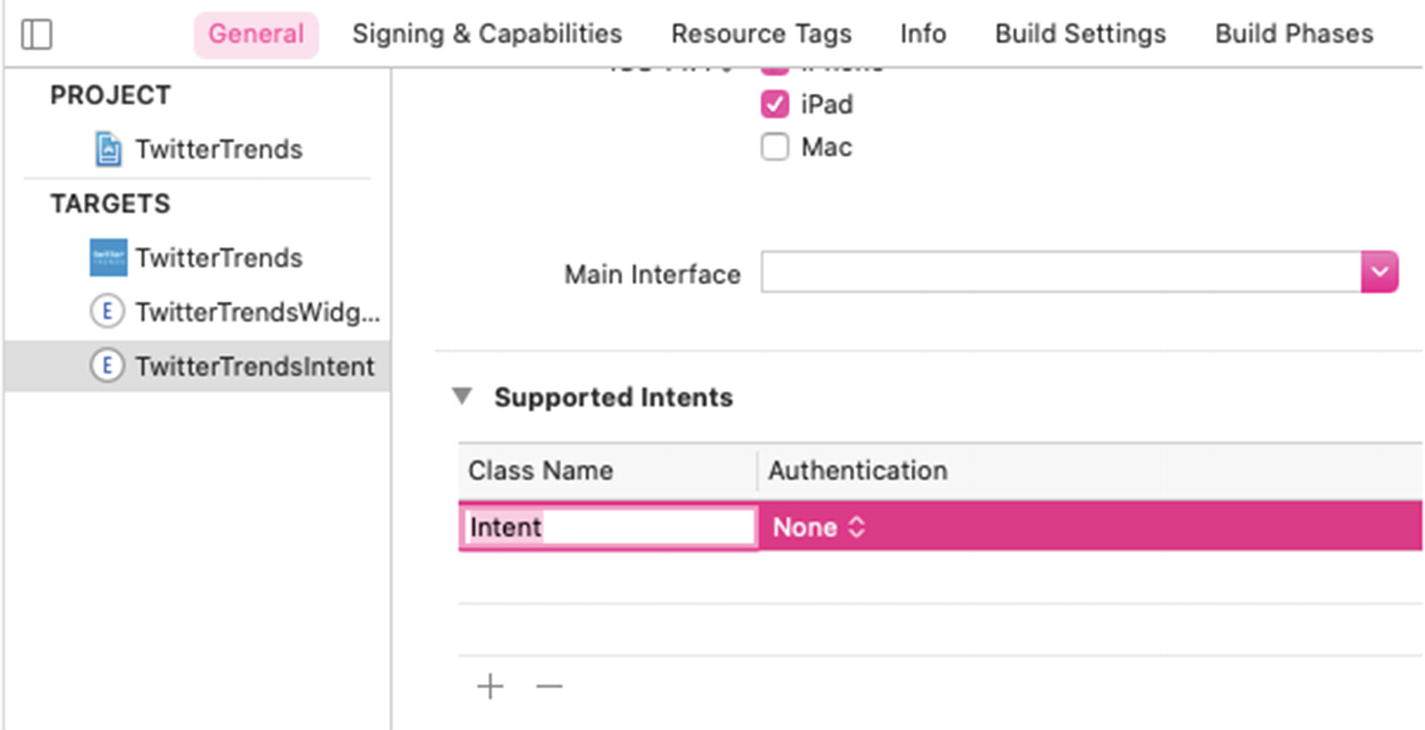
The screen shown after clicking the “+” icon below Supported Intents
- 6.
Type TrendsIntent under the Class Name heading. Since you have made TwitterTrends.intentdefinition a member of the TwitterTrendsIntent target in step 3, you will see a suggestion as soon as you begin typing. The name TrendsIntent has been generated automatically by Xcode using the name of the custom intent, Trends, you had added in TwitterTrends.intentdefinition in step 5 of the Time to Create a SiriKit Intent Definition File section of this chapter. At last, let TrendsIntent’s Authentication remain None.
- 7.
Now, open IntentHandler.swift in the TwitterTrendsIntent folder. Right now, the IntentHandler class is inheriting from the INExtension class. Now make IntentHandler conform to the TrendsIntentHandling protocol that has been generated automatically by Xcode. After doing that, your code in IntentHandler.swift will look like Listing 5-1.
IntentHandler after conforming to TrendsIntentHandling
- 8.
As soon as you make IntentHandler conform to TrendsIntentHandling, Xcode will show you an error message saying, “Type ‘IntentHandler’ does not conform to protocol ‘TrendsIntentHandling’. Do you want to add protocol stubs?” It is because you have not yet implemented the properties of the TrendsIntentHandling protocol in IntentHandler.
- 9.
Click Fix to see Xcode generate the implementation of provideSelectedTrendOptionsCollection(for:with:). This is where you will fetch top Twitter trends by communicating with its servers using TwitterTrendsAPI. But TwitterTrendsAPI is not currently accessible from IntentHandler.swift. So, you need to update its Target Membership.
- 10.
Open TwitterTrendsAPI.swift in the TwitterTrends folder. Then, update its Target Membership by adding a checkmark to TwitterTrendsIntent. Now you will be able to access it from IntentHandler.swift.
- 11.
Open IntentHandler.swift and implement provideSelectedTrendOptionsCollection(for:with:) by replacing the current implementation with the code given in Listing 5-2.
Implementation of provideSelectedTrendOptionsCollection(for:with:)
After pasting the code of Listing 5-2, you must be seeing a lot of errors. So, before describing what is happening in Listing 5-2, first let’s get rid of the errors. If you go through the error messages, you will see that Xcode is complaining about being unable to find the types Trends, TrendTweets, Trend, and Tweets. It is because TwitterTrendsAPI is now a member of the TwitterTrendsIntent target also, but the structs that it uses (TrendTweets, Trend, and Tweets) are not the members of that target. So, you need to make those structs members of TwitterTrendsIntent.
- 12.Now build your project to find all the errors gone. Now, let’s get back to knowing what is happening in Listing 5-2.
- a.
Since the provideSelectedTrendOptionsCollection(for:with:) method is the location from where you will fetch top Twitter trends and pass them as the options of the selectedTrend parameter, you begin the implementation by calling the getAvailableTrends(id:completion:) method of TwitterTrendsAPI.
- b.
getAvailableTrends(id:completion:) returns response using its completion handler. response can either be .success or .failure. So, it is put through a switch case.
- c.
If response has a .success value, it contains trends which is the data about the top trends.
- d.
If you study the response format of Twitter’s GET trends/place API endpoint, you will see that it returns an array with a single object. That single object is accessed using trends.first and stored in firstTrend.
- e.
Now, all the trends that have been fetched are stored in the trends property of firstTrend. So, they are accessed using firstTrend.trends and stored in availableTrends.
- f.
Since you have defined the data type of the selectedTrend parameter in TwitterTrends.intentdefinition as SelectedTrend, now you will have to convert the trends fetched from Twitter’s API to that type. For that, map is run through all the values in the availableTrends array, and each iteration’s query and name are used to create a new SelectedTrend instance. Then, they are stored in the usableTrends array, which is an array that stores SelectedTrend values.
- g.
In this step, usableTrends is passed into the INObjectCollection initializer and stored in inObjectCollection. Then, the completion handler is called by passing inObjectCollection as an argument. This is how the top trends fetched from Twitter’s server are sent to the selectedTrend parameter of the widget.
- h.
In case response contains .failure, then its error property is accessed and printed into the console.
In this way, you fetched the trends from Twitter’s API, converted them to the type of the selectedTrend parameter you created in TwitterTrends.intentdefinition, and passed them to selectedTrend.
Switching to IntentConfiguration
Right now, if you build and run your project, you will see that long pressing your widgets does not give the option to Edit Widget. It is because you have still not made necessary preparations to replace StaticConfiguration with IntentConfiguration . And to use IntentConfiguration, you will need a different timeline provider than the one you are using right now. Just follow the steps given to make “the big switch” to IntentConfiguration.
Create an IntentTimelineProvider
- 1.
Right-click the Provider folder of the TwitterTrendsWidget folder, click New File…, and create a new Swift file named TwitterTrendsIntentProvider.swift. Make sure the TwitterTrendsWidgetExtension target is checked at the bottom of the dialog box before creating the file.
You could use the existing TwitterProvider.swift file instead of creating TwitterTrendsIntentProvider.swift, but for better clarity, we recommend you to create TwitterTrendsIntentProvider.swift.
- 2.
Open TwitterTrendsIntentProvider.swift and replace the existing code content with the code given in Listing 5-3.
Creating TwitterTrendsIntentProvider that conforms to IntentTimelineProvider
- 3.
In Listing 5-3, a struct named TwitterTrendsIntentProvider that conforms to IntentTimelineProvider is created. As soon as you add the code, Xcode will ask if you want to add protocol stubs. Click Fix and add them to see two typealiases, Entry and Intent, added to the struct.
- 4.
In TwitterTrendsIntentProvider, replace the type placeholder of Entry with TweetWidgetEntry, a type of timeline entry. Also, replace the type placeholder of Intent with TrendsIntent, whose name was generated from the custom intent, Trends, you had created in TwitterTrends.intentdefinition.
Now your code should look like the code in Listing 5-4.
TwitterTrendsIntentProvider after adding Entry and Intent types
- 5.
You will still see Xcode asking you to add protocol stubs. Add them too. Then, placeholder(in:), getSnapshot(for:in:completion:), and getTimeline(for:in:completion:) methods will get generated.
- 6.
For implementing the placeholder(in:) and getSnapshot(for:in:completion:) methods of TwitterTrendsIntentProvider, you can copy the code from the placeholder(in:) and getSnapshot(for:in:completion:) methods of TwitterProvider in TwitterProvider.swift as the same implementations will work.
- 7.
The getTimeline(for:in:completion:) method of TwitterTrendsIntentProvider is different than the getTimeline(in:completion:) method of TwitterProvider as TwitterTrendsIntentProvider conforms to IntentTimelineProvider, but TwitterProvider conforms to TimelineProvider. And the getTimeline(for:in:completion:) method of TwitterTrendsIntentProvider allows you to access the data from the configuration of the widget.
In the current scenario, you will access the selected trend from the widget’s configuration and use it to perform the API call to fetch tweets related to that selected trend. In case there isn’t a selected trend, you will make the widget fetch the tweets related to the first trend in the array of the trends fetched from Twitter’s API. And you will do everything in getTimeline(for:in:completion:).
Before you start working on getTimeline(for:in:completion:), let’s first create a method, createTimelineFromTweets(response:), to create a timeline from the tweets that will be fetched from the API. Then, you can call this method from getTimeline(for:in:completion:). This will make the code readable and easy to understand. Copy the code given in Listing 5-5 and paste it in TwitterTrendsIntentProvider.
Creating the createTimelineFromTweets(response:) method
In Listing 5-5, you created a method createTimelineFromTweets(response:) that has response as the parameter and returns a timeline. In it, the following things have been done:
- a.
At the beginning, the current date is stored in currentDate.
- b.
Now, the date after adding 30 minutes to currentDate is generated and stored in refreshDate. You will use it later to set up the widget’s refresh policy.
- c.
In this step, the TweetWidgetEntry timeline entry is created by passing refreshDate, dummy tweets, and an empty title string to its initializer. Then, it is stored in entry.
- d.
Now a timeline is created using entry and by setting the refresh policy to make the widget request a new timeline after 30 minutes. In this way, the timeline is created.
- e.
As response may either have a .success value or a .failure value, it is put through a switch case. If response has a .success value, it uses tweets received with .success and creates a new TweetWidgetEntry by using tweets’ title and statuses properties. Then, the value of the entry variable is replaced by this new entry. And the value of the timeline variable is also replaced with a new timeline created using the new value of entry, and therefore the timeline is returned.
- f.
In case response contains .failure, the error variable is accessed, and its value is printed into the console. Also, since the method must return a timeline, the timeline variable with dummy tweets and empty title (that you created in steps “c” and “d”) is returned.
- 8.
Now it’s time to start working in the getTimeline(for:in:completion:) method. Replace the existing getTimeline(for:in:completion:) method with the code given in Listing 5-6.
Implementation of the getTimeline(for:in:completion:) method
- a.
This method checks for two cases – the first is the case when there exists a value of selectedTrend in configuration, and the second one is the case when selectedTrend does not contain any value. The selectedTrend property is the parameter that you had created in TwitterTrends.intentdefinition in the previous sections of this chapter.
In the current step, the code checks if users have already selected a trend from their configuration screen. Thus, if users have selected a trend, meaning that there exists a value in selectedTrend, it is stored in trend, and a new instance of Trend is created by using the trend’s displayString and identifier.
Then, the getTweets(on:completion:) method of TwitterTrendsAPI is called to fetch the tweets related to that trend. When a response is received, the completion handler of the getTimeline(for:in:completion:) method is called by passing the call to createTimelineFromTweets(response:) as its argument.
The createTimelineFromTweets(response:) takes the response received from the API call as an argument, generates a timeline, and returns it. At last, the completion handler of getTimeline(for:in:completion:) uses that timeline, and a timeline is created for the widget.
- b.
But in case users have not selected any trend (or there is no value in the selectedTrend property of configuration), the getLatestTweets(completion:) method of TwitterTrendsAPI is called. This method first fetches all the trends from Twitter’s API, selects the first trend from the API’s response, fetches the tweets related to that trend, and returns it as response. On receiving the response, the completion handler of the getTimeline(for:in:completion:) method is called by passing the call to createTimelineFromTweets(response:) as its argument.
Then, the createTimelineFromTweets(response:) uses the response received from the API call as an argument, generates a timeline, and returns it. At last, the completion handler of getTimeline(for:in:completion:) uses that timeline, and a timeline is created for the widget.
In this way, you created an IntentTimelineProvider, which is necessary for switching to IntentConfiguration.
Make the Switch to IntentConfiguration
Now you are all set to make the switch to IntentConfiguration. If you open the TwitterTrendsWidget.swift file of the Widget folder in the TwitterTrendsWidget folder, you will see that StaticConfiguration has been used right now in the body of TwitterTrendsWidget.
Creation of a dynamicConfiguration variable
In Listing 5-7, a variable named dynamicConfiguration is created which returns an IntentConfiguration initializer. It uses the value of TwitterTrendsWidget’s kind variable, TrendsIntent as its intent, and the initializer of TwitterTrendsIntentProvider as its timeline provider. All the other lines of code are similar to that of the StaticConfiguration that exists in the body of TwitterTrendsWidget.
Using dynamicConfiguration in the body of TwitterTrendsWidget
The code given in Listing 5-8 replaces the StaticConfiguration with the dynamicConfiguration variable that contains IntentConfiguration.
Well done! You have switched to IntentConfiguration.
Test – Test – Test!
Uninstall all the existing installations of TwitterTrends in your device or simulator. Now, select the TwitterTrends scheme and run it. To test your widget, add the TwitterTrends widget to your homescreen and try editing it. You should see a configuration screen similar to the one shown in Figure 5-4. Tap on Choose to see a screen where you can see a list of trends fetched from Twitter. This screen will look similar to Figure 5-5. From that screen, select any trend and go back to your homescreen. Now, in your widget, you should see the tweets related to that particular trend you had selected.
Awesome job! We hope you had fun.
Summary
Congratulations on making it this far! In this chapter, you learned how you can make your widget fetch data from a server so that you can use those data as configuration options for the parameter in your configurable widget. Some part of this chapter must have been like a revision of the previous chapters to you. And we hope you enjoyed following along and learning. If you have any confusions, please check out the final version of the code by opening the final project folder named TwitterTrendsFinal in TwitterTrends.zip.
Now you are able to create any kind of widgets – be it a widget that can or cannot be configured or a widget whose parameter has hard-coded configuration options or dynamic configuration options fetched from a server. You have mastered them all.
We wish you luck for the future. Happy coding!