

You’ve made some great performance enhancements to your website. Using the combined power of the Cache API and the Fetch API, you’re making your site nice and zippy.
If you recall, here’s the logic of your fetch events:
- When the browser requests a file,
There are a few reasons why a file couldn’t be fetched. Perhaps your server has been taken down for maintenance, or perhaps the user has lost their internet connection. The end result is the same—the file that the user is requesting is unavailable.
At the close of Chapter 3, you saw how you could create a fallback response to deal with this situation:
return new Response(
'<h1>Oops!</h1> <p>Something went wrong.</p>',
{
headers: {'Content-type': 'text/html; charset=utf-8'}
}
);
Now that you’ve mastered the power of caching, you can create a much richer fallback. You can make a fallback page ahead of time—then, when the user requests a page that’s unavailable, you can channel your inner TV chef and declare, “Here’s one I made earlier!”
Your Offline Page
Start by creating your fallback page. I usually put this at the root of the site, so it has a URL like /offline.html. In this page, you can make use of any of the assets—styles, scripts, fonts, and images—that you are putting in your static cache.
Once you’ve got your offline page up and running, add its URL to the list of files in your static cache. Update the list of files in the code you’ve written for the install event:
const version = 'V0.04';
const staticCacheName = version + 'staticfiles';
addEventListener('install', installEvent => {
installEvent.waitUntil(
caches.open(staticCacheName)
.then( staticCache => {
// These files don't block installation
staticCache.addAll([
'/path/to/font.woff',
'/path/to/icon.svg'
]); // end addAll
// These files must be cached for installation
return staticCache.addAll([
'/path/to/stylesheet.css',
'/path/to/javascript.js',
'/offline.html'
]); // end return addAll
}) // end open then
); // end waitUntil
}); // end addEventListener
Your code for the activate event remains the same as before—you still want to clean up old caches before activating the updated service worker.
But the code you’ve written for every fetch event needs to be updated. The part where you attempt to fetch from the network currently doesn’t have a then clause or a catch clause:
return fetch(request);
A catch clause would be the perfect place to, well, “catch” any problems:
return fetch(request)
.catch( error => {
// Serve up a fallback
});
In this case, your fallback is the offline page that you’ve put in your cache:
return fetch(request)
.catch( error => {
return caches.match('/offline.html');
});
There’s that familiar pattern of passing results up the chain using return statements. At one end of the chain is fetchEvent.respondWith. At the other end of the chain is the catch clause. If that catch code is executed, the offline page is the response that’s sent back.
Putting it all together, your fetch-handling code looks like this:
addEventListener('fetch', fetchEvent => {
const request = fetchEvent.request;
fetchEvent.respondWith(
// First look in the cache
caches.match(request)
.then( responseFromCache => {
if (responseFromCache) {
return responseFromCache;
} // end if
// Otherwise fetch from the network
return fetch(request)
.catch( error => {
// Show a fallback page instead
return caches.match('/offline.html');
}); // end fetch catch and return
}) // end match then
); // end respondWith
}); // end addEventListener
You can test how well this is working by going offline. Just as we learned in Chapter 3, the simplest solution is to tick the checkbox marked Offline in Chrome’s Developer Tools. (Remember to make sure that the latest version of your service worker is installed and activated first). Now if you refresh the page, you’ll be rewarded with your glorious custom offline page.
Notice that the URL doesn’t change—you aren’t redirected to /offline.html. Rather, the content of that fallback page is served up as a temporary replacement for the usual content of the page you’re trying to access.
Much like an oh-so-clever 404 page, your offline page is another opportunity to show off your brand. Instead of showing your site’s visitors a generic offline dinosaur, you can regale them with a witty message of sympathy (assuming that’s in your brand’s wheelhouse) (Fig 5.1).
Hotel comparison website Trivago has a particularly nice fallback: if a page is unavailable, you can try completing a maze instead (Fig 5.2).
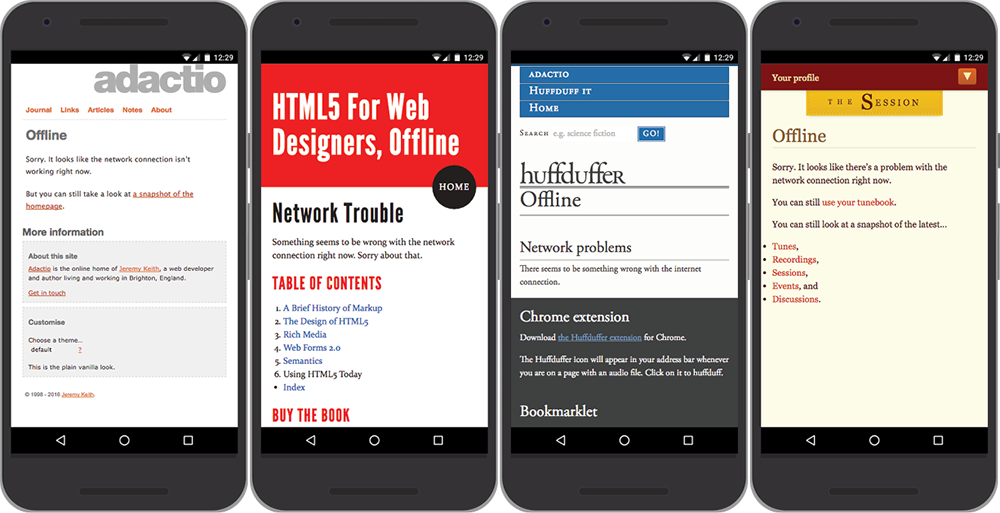

Fig 5.2: Trivago’s offline maze game.
Choosing Your Strategy
Your fetch-handling code can be tweaked to accommodate all kinds of circumstances. A service worker script written for one site might not be a good fit for a different site—the install and activate code may require only minor tweaking, but the fetch code should be designed on a case-by-case basis.
Sniffing headers
There are plenty of sites where the text content is updated frequently, but images are unlikely to change. In that situation, you might want to write different logic for HTML requests and image requests. You can do that by looking in the headers of the request. The Accept header will tell you what kind of file is being requested:
request.headers.get('Accept')
You have access to request.headers, which is an array. The get method allows you to find the exact header you want, which in this case is the Accept header.
The includes method is perfect for searching one string for a shorter string. You can ask if the Accept header includes the string text/html:
request.headers.get('Accept').includes('text/html')
This will give a true or false answer. That makes it perfect for an if statement. An if statement expects a true/false question for it to evaluate:
if (request.headers.get('Accept').includes('text/html')) {
// True!
} else {
// False!
}
Repeating this pattern allows you to build up a logical structure to your fetch-handling code:
addEventListener('fetch', fetchEvent => {
const request = fetchEvent.request;
if (request.headers.get('Accept').includes('text/html')) {
// HTML-handling logic goes here
} else if (request.headers.get('Accept').includes('image')) {
// Image-handling logic goes here
} else {
// Logic for everything else goes here
}
});
If you don’t like all of the if/else pairing going on, you could flatten the structure a bit by using return statements inside each if block. That way, if the code inside the if block is executed, none of the code after that will be executed:
addEventListener('fetch', fetchEvent => {
const request = fetchEvent.request;
if (request.headers.get('Accept').includes('text/html')) {
// HTML-handling logic goes here
return; // Go no further
}
if (request.headers.get('Accept').includes('image')) {
// Image-handling logic goes here
return; // Go no further
}
// Logic for everything else goes here
});
A strategy for pages
For HTML files, you probably want to serve up the freshest possible version. Your logic might look something like this:
- When the user requests an HTML file,
- fetch that page from the network;
- otherwise show the fallback page.
Here’s how that translates into code:
// When the user requests an HTML file
if (request.headers.get('Accept').includes('text/html')) {
fetchEvent.respondWith(
// Fetch that page from the network
fetch(request)
.catch( error => {
// Otherwise show the fallback page
return caches.match('/offline.html');
}) // end fetch catch
); // end respondWith
return; // Go no further
} // end if
A strategy for images
You could also have a whole other cache—separate from your existing cache for static files—that’s just for storing images. This will make repeat visits speedier and speedier, loading images straight from the cache for repeat visitors. The logic would look like this:
- Every time a visitor makes a request for an image,
- look for a cached version of the image;
- otherwise fetch the image from the network
- and put the image in the cache.
First of all, you’ll need to name your new cache—let’s call it images—alongside your existing cache for static files. There’s no need to add versioning to this one.
const version = 'V0.04';
const staticCacheName = version + 'staticfiles';
const imageCacheName = 'images';
Near the start of your service worker script, create an array that contains the names of your caches. You could call it cacheList:
const cacheList = [
staticCacheName,
imageCacheName
];
You’ll need to update the filtering part of your activation code. Currently it’s looking to see whether the name of the cache being checked isn’t equal to the name of the static cache:
if (cacheName != staticCacheName) {
return caches.delete(cacheName);
}
Change that line of code so that it’s now looking to see whether there’s a matching name in your cacheList array. The includes method is perfect for this:
if (!cacheList.includes(cacheName)) {
return caches.delete(cacheName);
}
See that exclamation mark? The if statement is asking if the cacheList array does not include cacheName.
Your updated activation code looks like this:
addEventListener('activate', activateEvent => {
activateEvent.waitUntil(
caches.keys()
.then( cacheNames => {
return Promise.all(
cacheNames.map( cacheName => {
if (!cacheList.includes(cacheName)) {
return caches.delete(cacheName);
} // end if
}) // end map
); // end return Promise.all
}) // end keys then
.then( () => {
return clients.claim();
}) // end then
); // end waitUntil
}); // end addEventListener
Now for the fetch-handling code. Here’s the logic again:
- When the user requests an image,
- look for a cached version of the image;
- otherwise fetch the image from the network
- and put the image in the cache.
Here’s the first part in code:
// When the user requests an image
if (request.headers.get('Accept').includes('image')) {
fetchEvent.respondWith(
For the second step, it doesn’t matter which cache the image is in. It might be in the static cache, or it might be in the cache dedicated to images. In that situation, you can use the catch-all caches.match instead of opening a specific cache by name:
// Look for a cached version of the image
caches.match(request)
.then( responseFromCache => {
if (responseFromCache) {
return responseFromCache;
}
If there’s no match found in any cache, you’ll need to move on to the next step—fetching the image:
// Otherwise fetch the image from the network
return fetch(request);
Here it is in its expanded form:
// Otherwise fetch the image from the network
return fetch(request)
.then( responseFromFetch => {
return responseFromFetch;
});
It’s worth remembering that “fetch” doesn’t strictly mean “Fetch this from the network.” It means, “Do what you would do anyway.” The browser will first look in the HTTP cache before making a network request.
Either way, once you have the image, you don’t want to just serve it up. There’s one other step before that: put the image in the cache.
You can use the put method to add a file to a cache. You give it the name of the file, and the contents. But if you try putting the contents of responseFromFetch directly into a cache, you’ll run into problems:
// Otherwise fetch the image from the network
return fetch(request)
.then( responseFromFetch => {
// Put the image in the cache
caches.open(imageCacheName)
.then( imageCache => {
// This will cause an error!
imageCache.put(request, responseFromFetch);
});
return responseFromFetch;
});
It turns out that you can only use responseFromFetch once. That’s because responseFromFetch isn’t a standalone chunk of data like a string or an object. It’s a stream of data. Once that data has been streamed, it can’t be used again.
That’s okay. You can make a copy of the data using the clone method, then you can put the copy into the cache while you’re returning the original response:
// Otherwise fetch the image from the network
return fetch(request)
.then( responseFromFetch => {
// Put a copy in the cache
const copy = responseFromFetch.clone();
caches.open(imageCacheName)
.then( imageCache => {
imageCache.put(request, copy);
});
return responseFromFetch;
});
There’s a little bit of a problem here. You’re hoping that the copy will be put into the cache at the same time as you’re sending the response back to the browser. There’s a chance that the service worker might “power down” once the user has received the response. If that happens, the copy might never end up in the cache.
It’s not the end of the world if that happens—the important thing is that the browser sends the user a response. Still, you can make sure that the copy gets cached by invoking waitUntil on the fetchEvent. You’re telling the fetchEvent to stay active until the caching code completes, even if a response has already been received:
// Otherwise fetch the image from the network
return fetch(request)
.then( responseFromFetch => {
// Put a copy in the cache
const copy = responseFromFetch.clone();
fetchEvent.waitUntil(
caches.open(imageCacheName)
.then( imageCache => {
return imageCache.put(request, copy);
})
);
return responseFromFetch;
});
Here’s all the code for your image-handling logic:
// When the user requests an image
if (request.headers.get('Accept').includes('image')) {
fetchEvent.respondWith(
// Look for a cached version of the image
caches.match(request)
.then( responseFromCache => {
if (responseFromCache) {
return responseFromCache;
} // end if
// Otherwise fetch the image from the network
return fetch(request)
.then( responseFromFetch => {
// Put a copy in the cache
const copy = responseFromFetch.clone();
fetchEvent.waitUntil(
caches.open(imageCacheName)
.then( imageCache => {
return imageCache.put(request, copy);
}) // end open then
); // end waitUntil
return responseFromFetch;
}); // end fetch then and return
}) // end match then
); // end respondWith
return; // Go no further
} // end if
A strategy for everything else
That still leaves other types of files, like CSS and JavaScript. The logic for handling those files could be:
- For everything else,
- look for a cached copy of the file;
- otherwise fetch the file from the network.
Here’s that logic translated into code:
// For everything else...
fetchEvent.respondWith(
// Look for a cached copy of the file
caches.match(request)
.then( responseFromCache => {
if (responseFromCache) {
return responseFromCache;
} // end if
// Otherwise fetch the file from the network
return fetch(request);
}) // end match then
); // end respondWith
Putting it all together
Now you’ve got different code for different kinds of files:
- The code for handling HTML pages (try the network first, otherwise show a fallback)
- The code for handing images (try the cache first, otherwise go to the network and keep a copy)
- The code for handling everything else (try the cache first, otherwise go to the network)
Here’s your logic in English:
- When the user requests an HTML file,
- fetch that page from the network;
- otherwise show the fallback page.
- When the user requests an image,
- look for a cached version of the image;
- otherwise fetch the image from the network
- and put a copy in the cache.
- For everything else,
- look for a cached version of the file;
- otherwise fetch from the network.
Translating all of that into code, you get this:
addEventListener('fetch', fetchEvent => {
const request = fetchEvent.request;
// When the user requests an HTML file
if (request.headers.get('Accept').includes('text/html')) {
fetchEvent.respondWith(
// Fetch that page from the network
fetch(request)
.catch( error => {
// Otherwise show the fallback page
return caches.match('/offline.html');
}) // end fetch catch
); // end respondWith
return; // Go no further
} // end if
// When the user requests an image
if (request.headers.get('Accept').includes('image')) {
fetchEvent.respondWith(
// Look for a cached version of the image
caches.match(request)
.then( responseFromCache => {
if (responseFromCache) {
return responseFromCache;
} // end if
// Otherwise fetch the image from the network
return fetch(request)
.then( responseFromFetch => {
// Put a copy in the cache
const copy = responseFromFetch.clone();
fetchEvent.waitUntil(
caches.open(imageCacheName)
.then( imageCache => {
return imageCache.put(request, copy);
}) // end open then
); // end waitUntil
return responseFromFetch;
}); // end fetch then and return
}) // end match then
); // end respondWith
return; // Go no further
} // end if
// For everything else...
fetchEvent.respondWith(
// Look for a cached version of the file
caches.match(request)
.then( responseFromCache => {
if (responseFromCache) {
return responseFromCache;
} // end if
// Otherwise fetch the file from the network
return fetch(request);
}) // end match then
); // end respondWith
}); // end addEventListener
Phew! It’s quite overwhelming to see pages of JavaScript like that, isn’t it? Bear in mind that what looks like one big block of code is made up of smaller self-contained pieces. As long as you understand what’s happening within the individual parts, don’t worry about how intimidating it looks when they're all joined together.
If the code doesn’t work for you, don’t despair. Often the problem turns out to be a single mistyped character. JavaScript is less forgiving than CSS or HTML—you need to make sure your curly braces and parentheses all match up. The JavaScript console in your browser’s developer tools can help you track down where the problem might be. Most of the time it turns out to be a stray comma, a missing period, or some other punctuation problem.
I find it helps to imagine I’m in a film like Sneakers, Hackers, or War Games. It doesn’t make debugging any easier, but I feel better about myself.