Google Earth is a fantastic tool for showing the geography of regions to your students. Use it to show famous landmarks, compare the sizes of towns and cities, or download features such as Amnesty International’s Crisis in Darfur project for lessons in current events. With the help of the Google Earth Community (a resource-sharing message board), you can show famous battles overlayed on current geography, such as a battle map of Gettysburg shown over a modern-day Gettysburg. To use Google Earth in the classroom, you’ll need:
A computer with broadband access to Internet
A video projector hooked up to the computer with the broadband Internet
A projector screen
To download Google Earth:
Go to www.google.com and type “Google Earth download” in the search box.
Follow the first link, which takes you to the Google Earth download page.
Download the version of Google Earth available for your operating system.
To use Google Earth (Figure 5):
Start Google Earth.
After Google Earth has completely loaded, explore the application before using it in the classroom. To start, type a location in the Fly-To box. Press enter, and it will fly you to your location. If you type “Jackson,” but do not specify “Mississippi,” a screen will come up with a list of all available Jacksons and you can choose the correct one.
Once at your location, you can adjust the height, direction, and angle of the view by using the tools in the upper right corner of your screen.
To add features to your location, look at the options in the Layers folder in the lower left corner of your screen. You can add featured content, see what Google Community members have added, and add 3D buildings. You can also set up a tour and add placemarks—this will be discussed in the section Setting Up a Tour in Google Earth.

To find topics in Google Earth:
First consider what you want to use Google Earth for. For the history lesson example, I searched the Google Earth Community as well as Google for “Gettysburg.” There were quite a few options to choose from, and I had to examine a number of them to find the most appropriate one.
Once you have found what you are looking for, you can save it to your computer and bring it up on Google Earth. This can be used to supplement your lesson and grab the students' attentions.
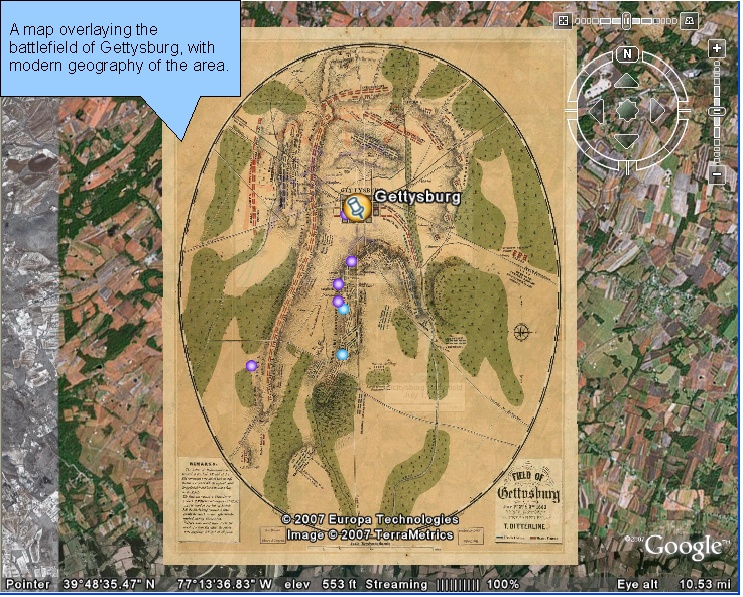
Using Google Earth to show a particular moment in history is easy to do. Students can interact with moments in history and explore the grounds on which an actual battle took place without ever going to the battlefield itself (Figure 6):
One useful aspect of Google Earth is that many people have already put together maps, such as of the Battle of Gettysburg, that are free for anyone to use. One such map shows the placement of troops as of July 2, 1864. To locate maps, type a Google search string that is something like “Google Earth Gettysburg.” You'll get a lot of results. As a teacher, it's important that you research what you are going to use in the classroom. Many of these maps can be found on the Google Earth Community. This message board can be used for many classroom resources, such as the Crisis in Darfur project, which we will discuss later.
Once you find a map that suits your needs, it's important to learn all of the map’s capabilities before using it in the classroom. With the interactive map of the Battle of Gettysburg, you have many options to explore. For example, you can teach a lesson that requires the students to use computers, such as in the school library or computer lab. (To cut down on transition time, have the interactive map of Gettysburg already on the screen when the students arrive.)
To begin this lesson, instruct the students to explore the map on their own for five minutes, so they can learn to use the map. After the five minutes are up, assign each student a place with a description, a picture, a corps, and a memorial to research on the map and on the Internet. An example of this is Devil’s Den, Pickett's Charge, A. P. Hill's corps, and the Mississippi Monument. The students will use the map to locate and research the historical significance of each, find out what occurred there and when, and learn the significance of the memorial. Sometimes the students can use the map to find actual research, as in the case of Pickett's Charge, and sometimes additional research will be needed, as with the picture of the Devil’s Den.
Note
Let the students know that this research should be from credible sources only, and that the students are to use only the Internet to perform this research.
The assignment should take the students the entire period to accomplish, and for some, it may take extra time for homework. Instruct the students that they will present their findings to the class the next day. This exercise allows students to research important aspects of the battle, and to connect the facts of the battle with the 3D map of where it actually took place.
During the lesson, walk around and observe the students to make sure they are on task. Some students may need extra help with Google Earth, so it's important to help these students when needed.
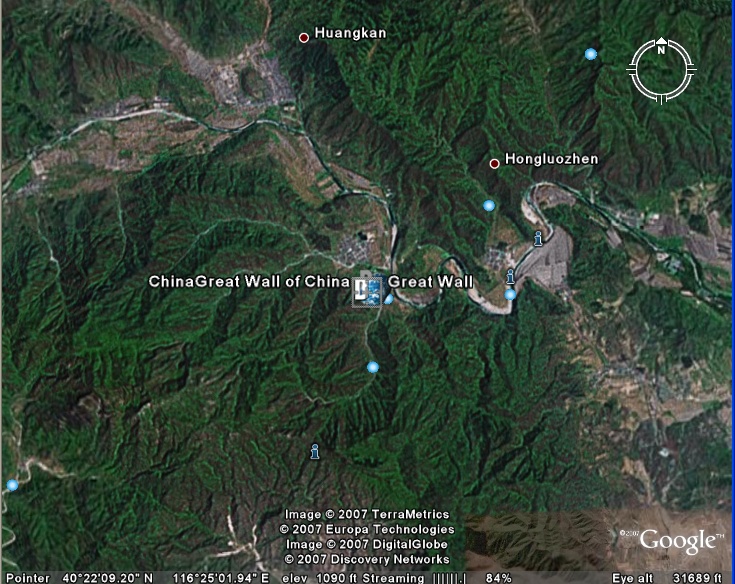
Google Earth is a great tool for helping students understand the magnitude of buildings and places. An excellent way to open a new unit is to show pictures of a place and its location in the world. For example, if you are teaching a unit on China, you can use Google Earth to show the Great Wall of China (Figure 7):
To locate material through Google Earth, you normally search the Google Earth Community. This web site will direct you to information on many points of interest. In this particular case, the Great Wall is so popular that Google Earth already knows the location, so it is not necessary to use the Google Earth Community.
To find the Great Wall of China, type “Great Wall of China” in the Google Earth Fly-To box, and it will take you directly there. In the lower left corner of the Google Earth screen, locate the Layers box. Scroll through this box and select Terrain, Geographic Web, Featured Content, Global Awareness, Google Earth Community, and Geographic Features.
Selecting these options will cause a number of things to appear, such as pictures and information about the Great Wall of China. You will also see a link through Discovery.com that provides background information on the subject. This overview will give the students some basic facts, such as the Great Wall of China is the only manmade structure visible from space. It is also an effective way to grab the students’ attentions and show them interesting physical features of the area they will be studying.
A tour of famous places is an easy and effective way to open a new lesson or unit. With the variety of options in Google Earth, it's possible to show famous landmarks and geographical features. You can also compare and contrast things, such as a small town and a large city. Putting together a tour is a simple task:
First, determine exactly which places and things you want on your tour.
After picking your set of destinations, start looking for and locating each point of interest.
Note
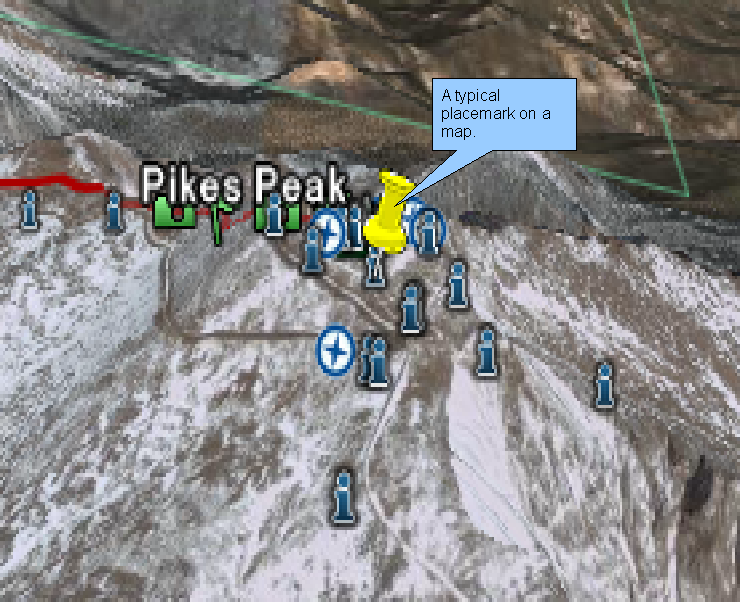
As impressive as Google Earth is, it does have some limitations, such as not being able to locate places that are not towns or cities. Some large and famous locations like the Grand Canyon and Mount Kilimanjaro can be found, but places that are less well-known, such as Pike's Peak, may not show up on Google Earth. The best way to locate places such as Pike's Peak is to do research on Google and find the closest town to the area.
Type your location into the Google Earth Fly-To box. After locating a town close to it, use the compass points in the navigator (in the upper right corner) to move your screen to the desired location.
Use the zoom slider (on the right) and tilt slider (on the top) tools to move the elevation and the view.
Note
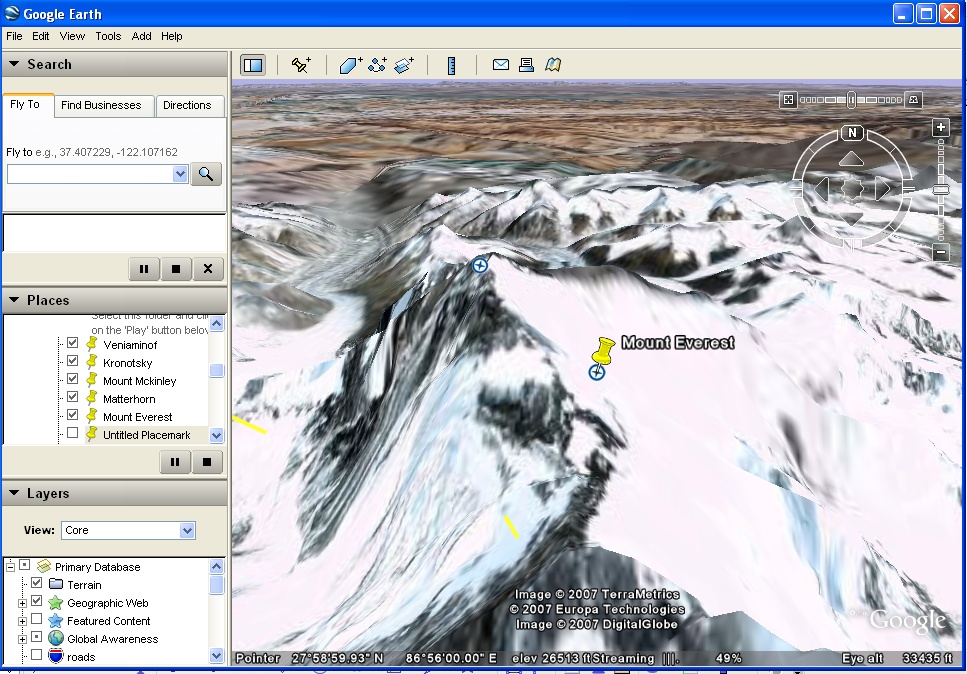
For this example, I set up a tour of large mountains around the world. The first location I picked was Mount Kilimanjaro in Eastern Africa.
After finding your desired location, select the button on the upper toolbar that looks like a pushpin, and put your placemark on the desired location (Figure 8).
After placing your placemark, a screen will appear that lets you change the style, description, altitude, name, and view.
After this is done, you will see your selected placemark with a checkmark in the box on the middle scroll bar on the lefthand side. Boxes that don't have a checkmark are not selected and will not be shown on your tour.
To complete the tour, repeat this process until all your desired locations are selected.
Once every desired location has a placemark, go to the Tools menu and select the Touring tab (Figure 9). In this screen you can change the speed of the tour, how long you stay at one location, at what angle you want the tour to be given, and how many times you want to play the tour.
To start your tour, click on the Play button (the arrow button). If you would like to stop your tour to show a particular area in more detail, click on the Stop button, which is a small square. See Figure 10.

You tour is now ready to be shown in the classroom. A word of caution: when you are finished, watch your completed product to make sure everything is exactly the way you want it and there are no problems with your tour.
A common problem when teaching current events is that many students have no way of connecting their own experiences to what is happening in the world around them. With Google Earth, you can help students understand the impact that something such as the crisis in Darfur has had on the people living there.
To search for a topic of a current events lesson, go to www.google.com and in the search box type keywords about your topic plus the words “google earth.” This search will return anything available in Google Earth on the subject. Another way is to go to the Google Earth Community web site and search for your chosen topic there.
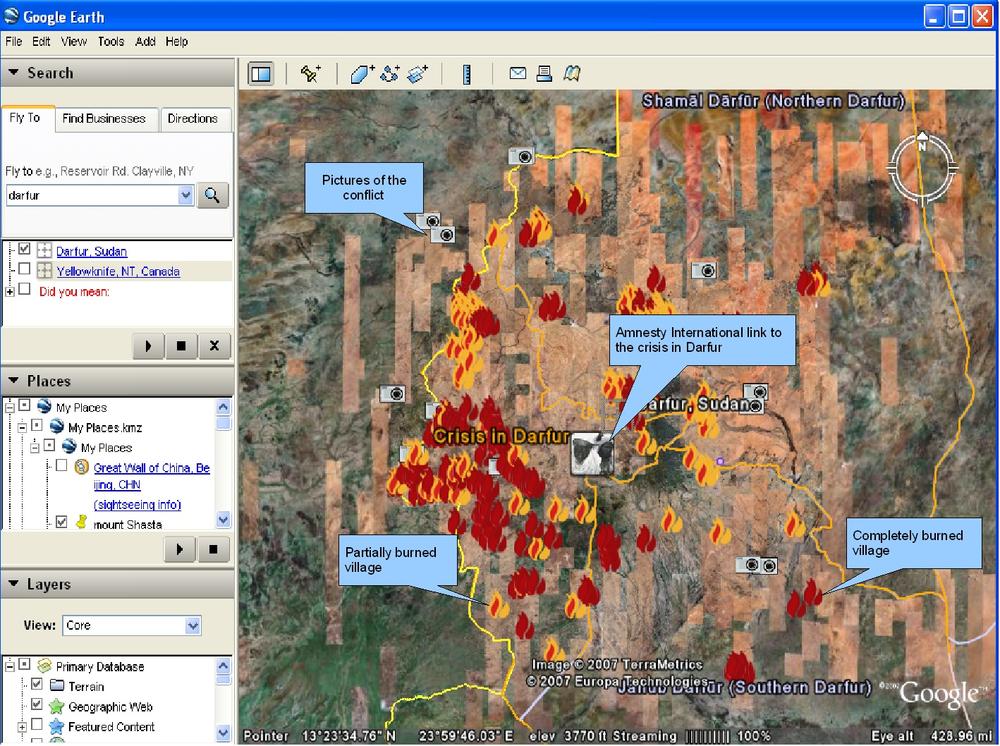
In our Darfur conflict example, Amnesty International has already created a map and an overview of the Darfur crisis (Figure 11).
In this particular map of Darfur, villages that have been completely destroyed are red, and villages that have been partially destroyed are orange. Clicking the camera icons brings up pictures of burned villages and of human sacrifice.
Here are just a few ways to teach this lesson using Google Earth:
After showing the students how many villages have been destroyed and how widespread the destruction has been, lead a group discussion. This will encourage students to ask why the crisis is occurring, and will help them develop analytical skills. To lead the discussion effectively, you should open the class with a brief overview of the situation in Darfur. After the overview, you should ask the students a set of questions, such as:
How many villages do you think have been destroyed?
How many people have been killed by this conflict?
Why should you care about something that is so far away from your home?
What can be done about it?
These questions will help get the students motivated for the discussion.
You can also start with the Google Earth presentation and add components to the discussion as the lesson moves along. Start out by showing only a small glimpse of the fighting, with just a few burned villages. The key is to be able to show the students the scope of the fighting and compare the number of people that have been affected. Any way that you can associate something the students are familiar with will increase the chances of the students not only learning the material, but becoming truly interested.
Another way you can effectively teach this lesson is to arrange for each student to have access to a computer, through a library or computer lab, and let them explore Google Earth’s Crisis in Darfur. The lesson should start with the students meeting in the library or lab, and the computers should already have Google Earth running with Crisis in Darfur on the screen. Instruct the students to explore the Darfur region for five minutes. After this, ask students to pick a destroyed village and record what occurred there, and then to click on a camera and describe what happened in that particular picture. Students can then click on the Crisis in Darfur button in the middle of the screen. The students should read about the conflict, and then summarize it and write their opinions about what is happening and what they feel about the conflict. This exercise can be completed during class time or assigned as homework, with students to present their findings the following day in class. The examples will help the students grasp this very important conflict of today and make connections about the magnitude of these current events.
Picasa is a Google application that allows you to create slideshows, edit pictures, and post pictures to the Internet (through a web site or a blog). Teachers and students can create slideshows that amplify the subject of study. For example, you can show how things change over time, such as Mount Saint Helens before and after the eruption. Another way to use the slideshow feature is to show pictures from a given time period, such as the Gilded Age.
To download Picasa or almost any other Google application, go to www.google.com and click the “more” link at the top. Select Photos from the menu. After the Picasa page appears, click the Picasa link to reach the download page.
After installing Picasa, when you first launch the program it will gather all the pictures you have on your computer and put them into folders. If there are any pictures you don’t want in Picasa, simply select that folder and go to the folder selection in the toolbar. Scroll down until you reach “remove from Picasa.” This will remove the selected files.
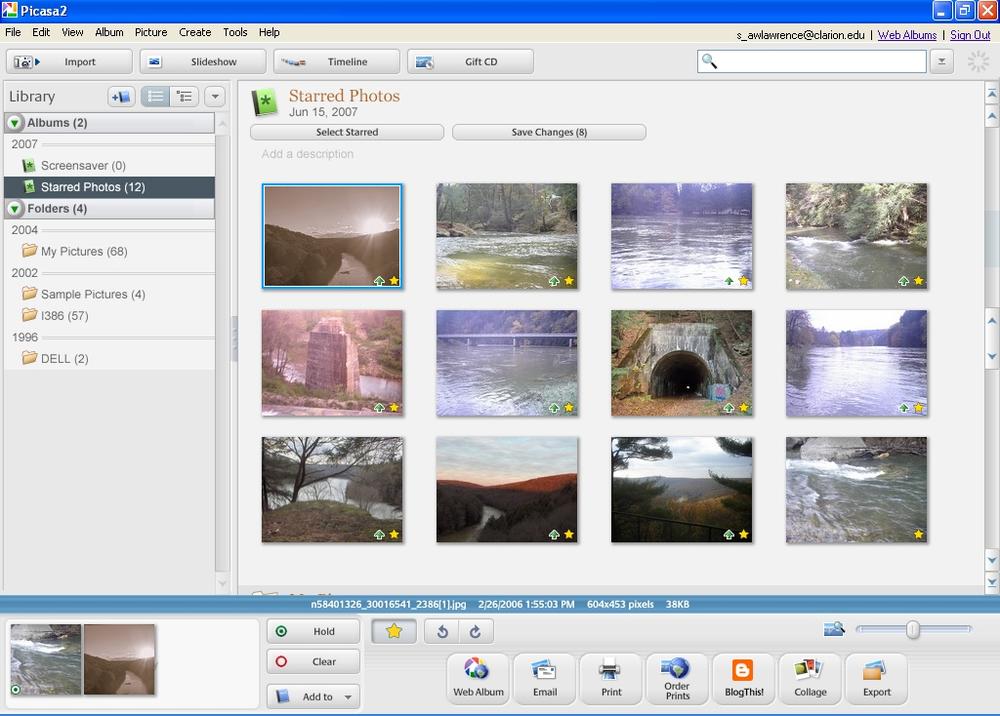
To select the photos you wish to post on the Internet or to make into a slideshow, click on a photo and then click the Hold button. Repeat this step until all your desired pictures are added to the bin in the lower left corner of your screen.
Click on the “add to” button to add these pictures to a different folder, such as Starred Photos (Figure 12).
To edit a picture, double-click on the picture and it will bring you to a screen with an enlarged view. From this screen you have the choice to edit or change the lighting and color of each picture.
To set up a slideshow, click on the folder that has your pictures and then click on the Slideshow button on the top of your screen. This will bring you to a screen that plays your slideshow. In this screen, you can adjust how long each picture is shown, and you can pause and restart the show.
To publish your pictures to a web page, select a folder of pictures that you want to be published. Click the Web Album button at the bottom of your screen. A screen will appear that prompts you to decide whether to create a new album or to use an existing online album. It will also ask if you want this to be published for a select group of people to view, or if you want anyone on the Internet to be able to view the material. You can use this option to limit your slideshow to be viewed by your class or your desired audience.
Once you have created a web album, all your chosen pictures will appear there. To invite people to view your pictures, you must send out invitations through email. This invitation step protects your web album from being viewed by anyone on the Internet.
The people you invite to view your pictures can download and share them. This is perfect for group work among students because each student can have an individual picture file, and together they can all create a final album of the pictures as a group.
The pictures can also be downloaded to Blogger.
Students and teachers are already finding creative ways to leverage Google Apps Docs & Spreadsheets in the classroom. One high school is using Docs for all the writing assignments in journalism classes. Teachers have access not only to the documents, but also to each revision. Teachers can guide the entire writing process and make comments within the documents. Schools are even collaborating with other schools, sharing Google Spreadsheets between classes that are working on joint science projects or playing stock market games. The advantages of having the entire class work in a shared environment are amazing:
Students all have the same word processor and spreadsheet application. Even better, these applications are generally easier to use than the applications on their home computers.
Students can work together on group projects without having to physically go to each other's houses. They can communicate via email, chat, or phone and all work in the same document.
Students can build a portfolio, including all revisions and teacher comments, without the clutter of carrying around reams of paper in a binder.
Before you begin collaborating with students, you'll want to consider limiting access to the student's documents. While iGoogle does not support limiting access to a domain, Google Apps certainly does. A Google Apps domain admin can limit access of documents to only those people with a domain account, which would be students, faculty, and staff. Moreover, the administrator can prevent students from receiving documents from outside the domain. This provides a measure of security and privacy to the students.
A domain admin can limit access through the administrative dashboard. Simply click Docs & Spreadsheets and look under Sharing options. Select “Users cannot share documents outside this domain” to limit access. Note the checkbox that will allow users to receive documents from outside the domain, which would be useful if collaborating with another school.
Remember that collaborating electronically will require a little training. You might want to consider assigning homework early on that is specifically geared toward mastering the collaborative functions of Google Apps.
Beyond what is controlled by the domain administrator, the rule of collaboration is that the person who has the document in the Documents area of their account gets to control the options. The document owner controls when the document (either word processor or spreadsheet) is shared, who it is shared with, and who can share it. The owner can extend that right to others, and they can revoke it.
When a student creates a document and turns it in, the sequence goes something like this:
The student logs into the Google Apps account and creates a spreadsheet or word processor document. When the document is ready to be turned in, the student clicks the Share tab.
The student clicks “Choose from contacts.”
The student selects the teacher from the list.
The student makes sure that “as collaborators” is checked.
The student clicks “Invite collaborators.”
The document appears in the teacher's Documents list.
The student is given the option to send an email to the teacher with information about the document.
Now your Documents list not only contains the student's document, it also tells you when it was last edited, which amounts to when it was turned in (Figure 13). Because you're a collaborator, you can add comments throughout the document. Since both Docs and Spreadsheets keeps each saved copy in its revision history, you can always go back to the one turned in.
There are a number of things to consider when collaborating:
Any version you save is kept in the revision list ... as long as the document itself is around.
Being a collaborator means that not only can you comment, you can accidentally change the text as well. Since each revision can be pulled back from the revision history, that's not a big problem.
The student can allow additional people to collaborate. This is handy if you want to implement peer editing or group projects.
Basic collaboration is pretty simple, but Docs & Spreadsheets provides many collaborative options. Let's go over all of these, so you get a really good idea of what these applications can do. Within the Share tab, students can invite people (only within the domain if the domain admin has set this restriction) either to collaborate or to view the document (Figure 14). As previously mentioned, a collaborator can pretty much do anything. A viewer is limited to just looking at a document or saving a copy. Sometimes you may wish to send out a document to the class as viewers. For example, you might want to send a template, an assignment, or notes. In the template case, the student can save the file and then reload it into Docs as a working copy. This prevents the original from being changed. The best formats for saving and reloading are Word .doc and Open Office. Both will lose all comments and some formatting. Using an .rtf file is much less useful because it puts examples of the various formatting styles at the top of the document.

The advanced permissions control who can collaborate and how:
- Collaborators may invite others
This setting allows anyone the student invites to collaborate on the document to invite others. If the domain administrator restricts access to the domain, then collaborators can only invite other collaborators within the domain.
- Invitations may be used by anyone
If students are working on a group project, it may easier to send out one invitation to an email group than to send out many to individuals. To use a mailing list, this option must be checked.
- Anyone at
Domain_Titlemay view/edit this document at This is useful if you want to share things with everyone in the domain, such as templates, assignments, or instructions. In view mode, each person who accesses the document can read it and download a copy. In edit mode, anyone in the domain can edit the document.
Each document has a unique URL within the domain. So, if you want to share a document this way, you'll need to copy that address and email it to all the members of the class or domain.
The right side of the screen shows the current collaboration status. Collaborators and Viewers are listed, and the checkbox next to each allows the document owner to remove that person for collaboration or viewing. The “Email viewers/collaborators” links launches Google Apps Mail and preloads all the collaborators or viewers as recipients.
The Publish tab provides a similar function to the “Anyone at
Domain_Title may view/edit this document
at” advanced permission, but with finer control. They should not be
used together because they are separate controls. Within the Publish
tab you can set the document to be automatically republished whenever
changes are made, which can be handy if it's something you want to
autoupdate (this is exactly the same functionality as the advanced
permission). However, you can also choose to manually republish only
when you click the Re-publish document button. The Un-publish button
removes web access from the document, but only if the advanced
permission isn't set, which is why these controls should be used
separately.
Collaborating with students is easy to do, your primary tool being comments. When you want to place a comment in the text, simply:
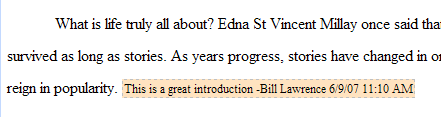
You can change the color of your comment by right-clicking it and then selecting the color from the menu. Color-coding can be a great help if more than one person is making comments in the document. Each comment carries the name of the person who inserted it, as well as the date and time it was inserted.
So what happens if more than one person is working on the document at the same time? Google Apps is remarkably resilient to problems that might occur when multiple people are commenting or even editing. When an additional person starts editing the file, Google Apps provides a brightly colored message at the lower left of the window that announces who else is editing (Figure 17). The Refresh link is important; each person editing the document should click this occasionally because it will show the changes that others have made in the current document.
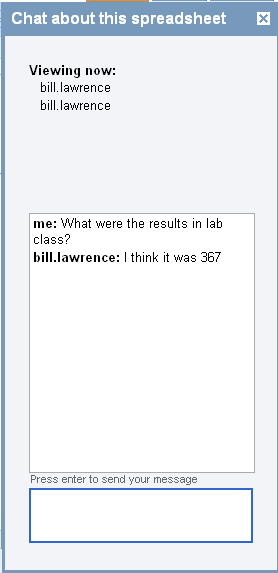
Unlike Docs, Spreadsheets has no commenting function. However, it does provide real-time collaboration via a chat window with anyone working on the spreadsheet. The chat automatically links in anyone currently collaborating (Figure 18).
Google Docs & Spreadsheets keeps a copy of each saved version of a file. Versioning gives you the ability to:
Compare any two drafts in Docs that a student turns in, to track progress in improving writing.
Look through the entire change history of an assignment in either Docs or Spreadsheets, to monitor progress as the student works.
View your own comments in Docs and see how the student changed the assignment accordingly.
In either Docs or Spreadsheets documents, you can access previous revisions through the Revisions tab; however, your options from there are different between the two applications.
Versioning in Spreadsheets is limited to viewing a single version. This is still very useful because each version is saved intact and with a time and date. The drop-down list shows all the saved versions, as well as the time they were saved. The Older and Newer buttons cycle through the list, either showing the next older or newer version in the list. The “Revert to this one” button causes the currently displayed spreadsheet to become the current spreadsheet, replacing the current version. This provides a way to revert back to a previous version.
Versioning in Docs provides many more options than in Spreadsheets, and can be accessed either from within the document (through the Revisions tab) or through the drop-down menu beside each document. Either way, Revisions opens the document to the current revision and launches the revision controls.
Browse Revisions simply shows a list of the various versions with a time/date stamp. However, Revision History provides a list of the files with a few extras: a checkbox for selecting two revisions to compare, and a brief preview of the first change in the document. To see a comparison of two documents, simply select two of the checkboxes and select Compare Two Revisions,
The comparison shows the deletions and additions between the selected versions. The deletions and additions are color-coded by author, and the color key is shown at the top right of the document. You can also switch which revision is compared using the “Select first” and “Select second” at the top of the document.
Groups of students can work together on a joint project via Docs. One student must be the owner of the document, and he will invite the others. However, any of the students can print the document or convert it to PDF.
Collaborating in large groups offers some interesting challenges and opportunities. If multiple authors are working on a document at the same time, which is likely in a big group, consider suggesting that they work on separate sections. This prevents the possibility of two or more authors attempting to edit the same paragraph. While Google Apps Docs is quite robust in its ability to resolve such conflicts, there is always the possibility of one author overwriting the work of another.
Team collaboration also offers a unique opportunity for you as the teacher. Using the compare-versions capability, you can actually see each of the students’ work in the document. However, use your judgement when doing this, as it can be difficult to sort out individual work from team efforts.
Tip
A requirement for using Blogger is that you must have a Google account; a Google Apps account alone won't do. You can ask your school information technologies group (or person) to do this for you, or you can schedule some time in class for students to create their own Google accounts. Each Google account should use the student's Google Apps email as the email address for the account, and should have the same password as the Google Apps account. Using the Google Apps email address allows students to log into a blog simply by using their Google Apps username and password, which makes things easier for everyone in the long term. Don't forget that you need a Google account yourself.
Blogger provides an opportunity to engage your students in thinking and writing about the subject you teach. And it can provide much more. By using a blog in the classroom, students can write about a subject they choose; they can tackle the subject, post the conclusions of their research, and begin a voyage of self-discovery through the power of writing.
While blogging can be a great way to do work in almost any subject, it really shines in journalism and writing classes. Blogging now has a real place within the world of journalism, and by working on their own blogs, students can get a taste of what that world is like.
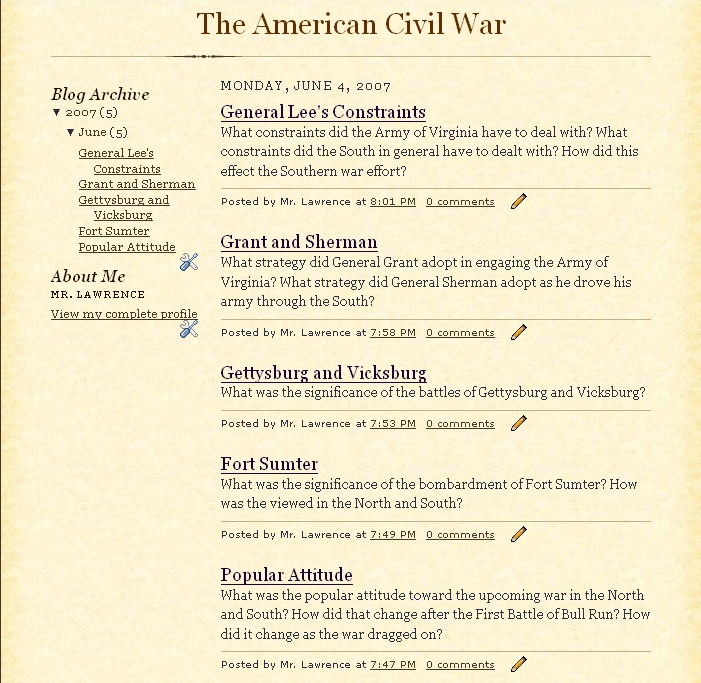
As with everything in Google Apps, there are several ways you can approach Blogger. You can set up a blog and post questions on it, and have your students respond either as required work or for extra credit (see Figure 19 for an example). Since you are the blog owner, the student is just a reader and can only post comments, not blog entries. An alternative is to have the students post on a topic of their choice that is relevant to your subject. Then other students can comment and (ideally) start a conversation about the topic. Having students build their own blogs is a great way to get them to explore the process of writing and expression. In this approach, the student is an author and can post entries as well as comments.
Blogger provides the ability to restrict authors as well as viewers, but only the blog owner can do this. Therefore, it's a good idea for you to set up all the class-related blogs and control them. Doing this avoids a number of problems, such as:
Blogging on the open Internet means that anyone can read and comment. Not everyone on the Net plays well with others, and some are very nasty. Restricting access can keep everyone safe from that kind of abuse and risk.
Blogs without restrictions can be linked ad infinitum. If a student posts something particularly insightful as part of a class assignment, there’s a chance it can be linked to by bloggers across the Net. While this can create a certain celebrity status for a while, it also opens up the student's post to attacks, which is not a desired outcome of the assignment.
Blogging is forever. If you don’t control access, you might as well have the student carve their every thought in granite, because even removing the blog doesn’t mean its content can’t be copied and recopied across the Net. There's no point in having a student regret for decades something that was penned as an adolescent or young adult.
Controlling the blogs means that you can also give access to parents, so they can follow their child's progress throughout the course. You can, if it's appropriate, even open up the blogs for viewing by the rest of the school.
To actually go to Blogger, simply navigate your browser to www.blogger.com. It's also possible to get there by clicking the “more” link at the top of your Google Apps Inbox, Calendar, or Docs & Spreadsheet pages, and then clicking Blogger. Either way, you'll need to sign in with your Google account email address and password.
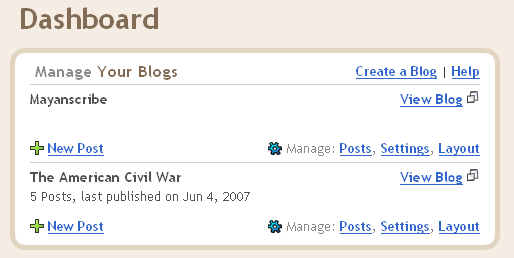
Once signed in, you'll see the dashboard (Figure 20). From there, you can create as many blogs as you wish. Creating a blog is as simple as clicking the “Create a Blog” link.
After you've chosen the name and template for your blog (click Next for each), and opened the blog for posting, click the Settings tab and then the Permissions link so that you can set the privacy rules for the blog (Figure 21). If you don't set permissions, the blog will be open to the Internet at large. You can limit viewing by setting the “Who can view this blog” option to “Only people I choose.” Once set, you must specifically invite people to view the blog. You invite them by typing their email addresses in the “Invite some people to read your blog” field and clicking the Invite button. Each email address must be separated by a comma.
Fortunately, you can save yourself from having to type all the addresses of your class by using an email list defined for your Google Apps domain. You can ask your domain administrator to set up an email list of your entire class. You can also set up email lists for smaller groups of students, useful for group projects.
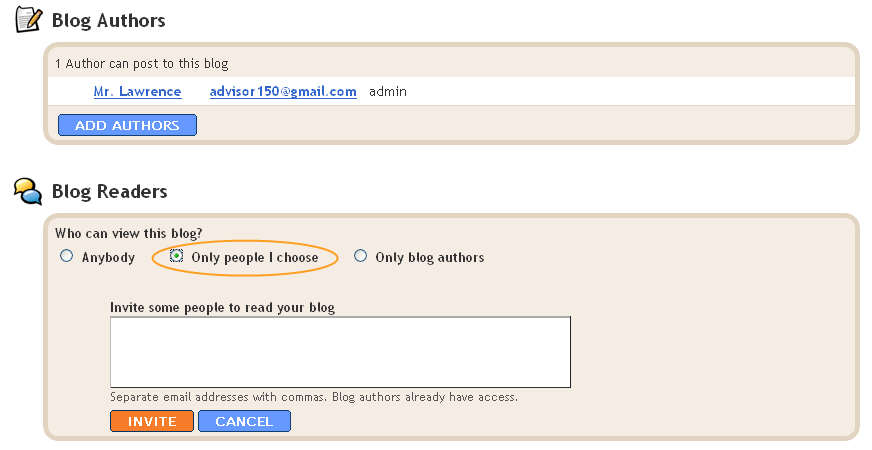
If you're creating blogs for individual students, or for groups of student authors, you'll need to invite them as authors. To do that, simply click the Add Authors button. Again, simply add the addresses separated by commas or use an email list.
There are a few other restrictions you might want to consider using:
Clicking the Comments link on the Settings page provides controls over how comments are managed and formatted.
On the Posting tab, you'll notice a link for Edit Posts, This leads to a page where you can view and delete posts on the blog. This can be a handy thing if someone posts something they shouldn't have.
Using the school domain for a blog requires some cooperation from the domain admin; however, it's a fairly simple matter:
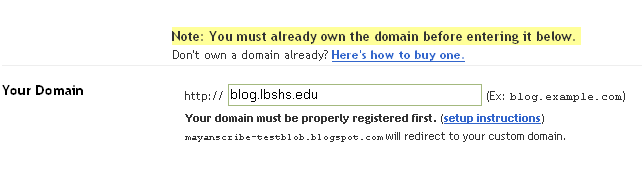
Pick a URL using your school's domain where the third-level domain is a word like “blog” (Figure 22). For example, blog.jglhs.edu.
Ask the domain admin to add a CNAME record with that third-level domain name in the domain settings. The domain admin can log into the domain provider to add this.
In Blogger, navigate to the Settings page and click the Publishing link.
On the Publishing page, in the “Your domain” field type the complete URL.
Click the Save settings button, and you're done.
Note
You can't use the same custom domain name with more than one blog, so this method has to be reserved for a school-wide blog.
Really Simple Syndication (RSS) is a way of publishing the posts and comments on a blog so that a feed reader application can subscribe to them. Subscribing simply means downloading the content, either on command or periodically. While there are lots of applications that can read RSS feeds, the ideal way to do this in a Google Apps environment is on each student's home page. Each home page has an “Add stuff” link that allows you to add a feed reader gadget. Many of these gadgets already point to feeds from various sources, but you can specify any feed you want. To make this work, you must:
Turn on feeds.
Get the feed address.
Subscribe to the feed.
Actually, feeds are turned on by default, but it's worth looking at the controls for a moment. From the Blogger Settings tab, click the Site Feed link. The Allow Blog Feed setting controls how much of the content can be downloaded. “Full” means that the entire post can be downloaded, while “Short” means that only the first paragraph (or the first 255 characters, whichever comes first) is downloaded. “None” means, well, none of the content is downloaded. There are similar controls for comments if you click the Advanced link. If you want students to read the entire post via their feed reader gadgets, you'll need to set posts to “Full.”
The Feed Item Footer specifies text that follows the feed. You can use this to identify your class, for example. Remember to click the Save Settings button when you're done making adjustments.
Once feeds are set the way you want them, navigate to the blog page by clicking the View Blog link. Scroll to the bottom and you'll find the “Subscribe to: Posts Atom” link. Right-click on the link, and select Properties from the menu. The address is at the top of the dialog box that appears. Copy the address by holding down the mouse button and sweeping the cursor over the length of the address. When the entire address is highlighted, press Ctrl-C. You've now copied the address.
Paste the address (Ctrl-V) into an email and send it to everyone that should subscribe to the blog. Tell them to do the following:
On their Google Apps home page, click the “Add stuff” link.
Click the tiny “Add by URL” link beside the Search Homepage button.
Paste the URL into the field and click Add.
Google Apps Chat is very similar to instant messenging programs, and can be launched either from within the Google Apps inbox or through the separate Google Talk application. With either method, each conversation window is one-on-one, although you can also have multiple conversation windows.
By default, each Chat session is saved, and can later be searched or viewed. Students can turn off the logging feature from within the Inbox by clicking Settings, then Chat, and selecting "Don’t save” under Chat History. Students can temporarily turn off logging by selecting “Go off the record” in either the Google Talk or Google Apps Chat windows.
Google Spreadsheets is a special case—it has its own internal chat window that automatically allows everyone currently editing the document (not just pairs) to chat.
The domain admin has a small amount of control over to whom students can talk in Google Apps Chat (Figure 23), but the admin can't block access from outside the domain. The domain admin can choose to:
Display users' chat status outside the domain.
Warn users when they are chatting with someone outside this domain.
The domain admin can also completely shut off Chat for the domain.

Chat can be a big help when collaborating on group projects, especially when using Docs & Spreadsheets. Since Docs doesn't have an internal chat, students will have to connect through the Inbox or Google Talk. In the Google Talk inbox, a student can invite another student to chat simply by hovering the mouse over the Quick Contacts or the Contacts list and waiting for the invite window to launch. The student then clicks the Chat button (Figure 24).
If the invited student is online (you can tell by the green ball beside the contact's name), the chat window will appear for the invitee. If the invited student is offline, they can view the chat message when they go online.

A typical scenario for using Chat and Google Docs is working on a group paper. Members of the group can edit the document together and talk via Chat without having to be at the same physical location. As long as they work on separate sections of the document, they can all view each other’s work and chat while editing the same file.
Google Spreadsheets makes it even simpler to chat and work on the same document. Each person collaborating on the document can access the Discuss tab, and can talk with each other. Each entry has the person's name attached to it. This provides the closest thing to an "online meeting" currently available in Google Apps.
Note
The Setting Up Google Apps Standard Edition Short Cut covers Page Creator in more detail; this section will provide a basic tour of its features and capabilities.
Google Apps for Education provides free web site hosting for your domain, with 100 MB of storage for web pages and graphics. You'll need domain admin privileges to access Page Creator and to build your web site. As a bit of background, you can:
Pick a template for your web page "look-and-feel."
Pick another template for the layout (number) of columns.
Use a word-processor-like editor (Page Creator) to create content for your pages.
Use the link tool to link pages together.
Upload any graphics you'd like to use on your web pages, and place these on your pages via Page Creator.
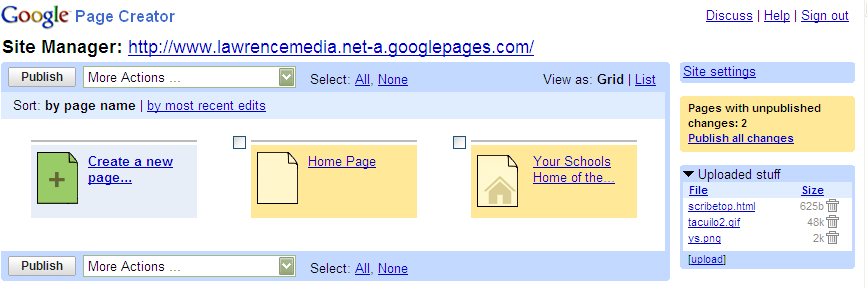
Everything is controlled through the Site Manager, which a domain admin can access by clicking the Web Pages link on the administrative dashboard. The Site Manager lists all the pages and uploaded graphics, and from there you can create new pages (Figure 25).
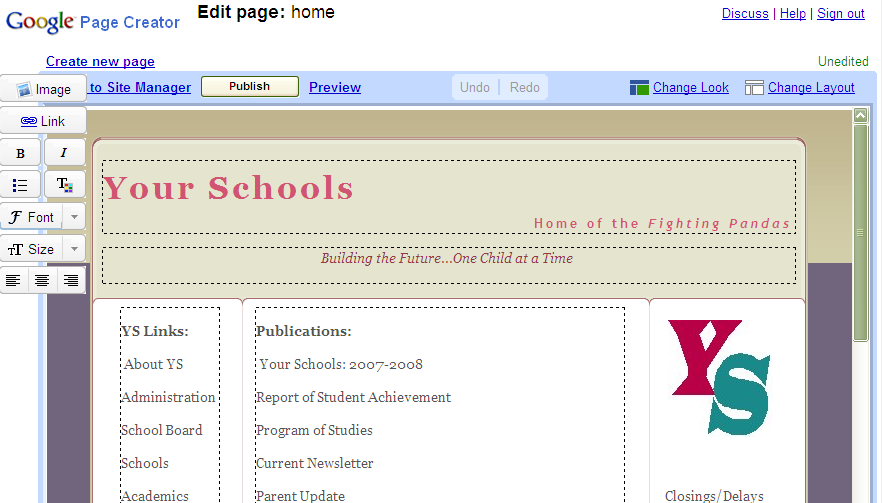
From the Site Manager, you can simply click any of the existing pages or click “Create a new page" to launch the Page Creator. The Page Creator has familiar text-formatting tools along the left, while in the upper right are controls to change the look and layout templates (Figure 26).
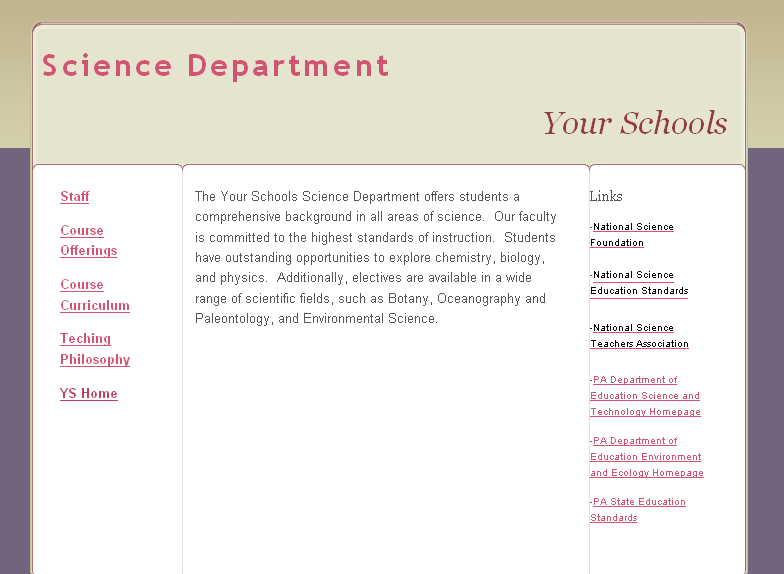
Once you've selected the basic format of the page, creating content is as simple as clicking on any of the frames (the boxes with hashed outlines) and typing whatever you want. Linking to other pages you create is as simple as clicking the Link button and selecting from the list the page to which you want to link. You can also link to pages outside the domain, and to email addresses. If you upload a file, such as a PDF version of a newsletter or permission form, you can link to that as well. Doing this creates a “download link” from your page. Since Google Apps Docs can create PDF files, you have a quick and easy way to provide all sorts of material to students, parents, or whoever via the web site (Figure 27).

Taken together, these tools make building web pages a snap. You can assemble a complete school web site in a few hours, including special pages for departments, athletics, etc. Each page can have mail-to links, photographs, downloadable files, and many more features. The best part is that you can build and host everything for free (Figure 28).
You can also link in Calendars directly on web pages. Google Apps Calendar has an Embeddable Calendar Helper tool that builds the HTML code, which you then embed in a web page to make the Google Calendar show up (Figure 29). You can set all sorts of options using this tool, such as the title, whether navigational controls are available, even the calendar’s background color. As you set these parameters, the tool builds the HTML code. When it's done, simply copy the code to the clipboard.
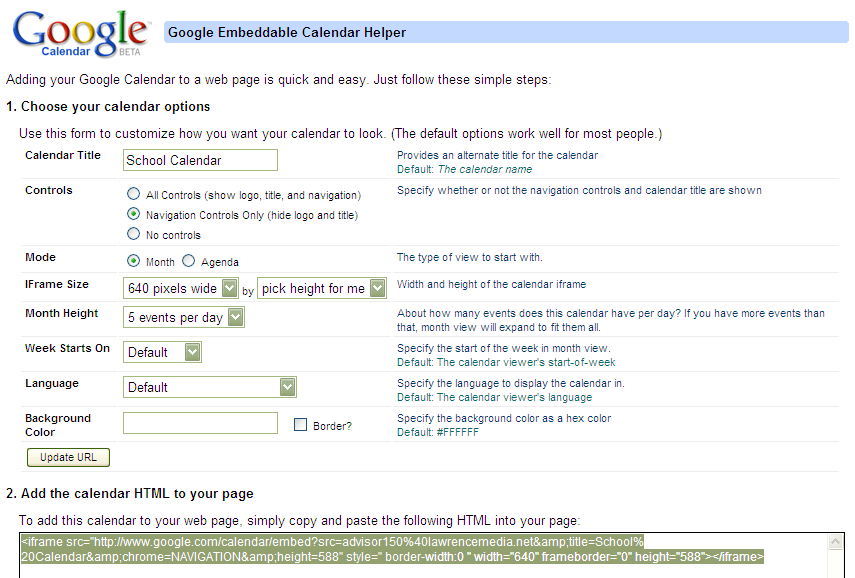
Back in Page Creator, put your cursor in the frame you'd like to hold the calendar. Click the Edit HTML link at the bottom-right of the screen. In the HTML editing page that appears, simply paste the HTML code into the big white editing area and save it. Automatically, the calendar appears on the page. Now all you (or anyone else in the domain with access to the calendar) need do is update the calendar with new school events on the Calendar page, and the calendar on the web page updates as well.
You can set up and publish as many calendars as you like this way. Each department, team, etc. can have its own calendar on its own page in the web site. Remember, once shared outside the domain and published, these calendars can be viewed by anyone.
If you use no other capabilities within Google Apps except email for your school, you're still a big winner. Each Google Apps account gets access to an email address branded with the domain name. So, if your school domain is yourschool.edu, each email account will have that domain name attached to it. Google provides 2 GB of email storage for each account. That's a nice gesture even if you've got a few hundred accounts, and they also offer this for colleges and universities with no restriction on the number of accounts. In fact, the University of Arizona (with about 49,000 undergraduates alone) uses Google's email service. If you consider the amount of storage, the number of servers, the IT people to run it all, and the bandwidth that the University would require if they set up an email service privately, the cost would be staggering. Yet Google provides that service for free.
If you're setting up the domain from scratch, setting up the email accounts is easy. You get one account per user you set up, and the domain admin can set up accounts in batches by uploading comma-separated-value (CSV) files. (The Setting Up Google Apps Standard Edition Short Cut covers this process in detail, if you're curious.) However, if you have an existing email system that you need to migrate, it can be a very tricky task. Fortunately, the Premier and Education editions of Google Apps have an Email Migration Tool.
Let's step back a minute and talk about email protocols. Out of the box, any Google Apps Mail edition or Gmail by itself can talk to email servers via POP-3 (for incoming) and SMTP (for outgoing) protocols. This is pretty easy to set up through the Gmail/Google Apps Settings link, on the Forwarding and POP tab.
However, it's an entirely different matter to migrate a large number of accounts from an existing email system. Google has recently added the Email Migration Tool to their Education and Premier editions. You must be a domain admin to use it, and it can be accessed from the dashboard, through the “Manage my domain” link. You'll find email migration under the advanced tools.
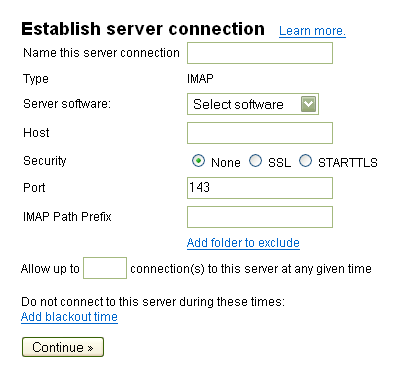
The Email Migration Tool allows you to connect to an existing mail server via IMAP (Internet Message Access Protocol). Supported mail server software is:
Cyrus IMAP Server
Courier-IMAP
Dovecot IMAP
Microsoft Exchange Server 2003 with IMAP enabled
Unsupported software that's listed in the tool menu includes:
Lotus Domino
UW
You'll need to be a system administrator on the existing mail server and know how it operates. The idea is that you'll:
Get a complete list of all the email addresses and passwords on the IMAP server and create a CSV file of this list. If your list contains more than 200,000 entries, you should create a number of CSV files with no more than 200,000 names in each.
Open the IMAP port on your firewall.
Open access to the following IP addresses:
64.233.160.0/19 66.249.80.0/20 72.14.192.0/18 209.85.128.0/17 66.102.0.0/20 Run the Migration Tool.
Google provides detailed instructions for various scenarios in migrating email. These are available from the Learn More link in the Migration Tool (Figure 30).
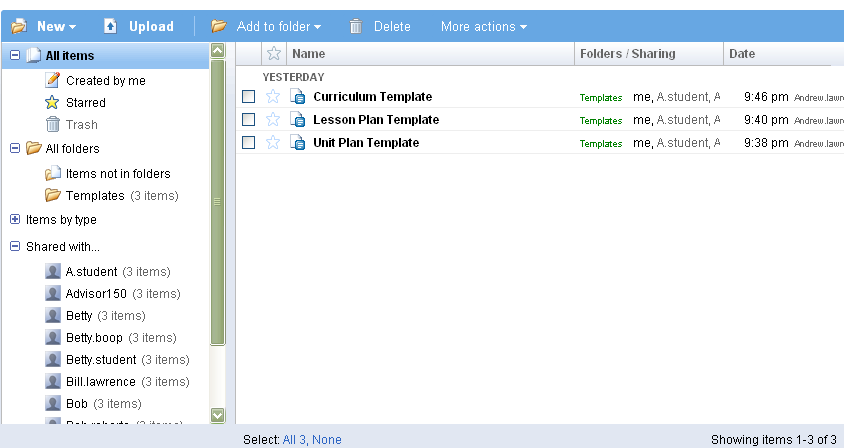
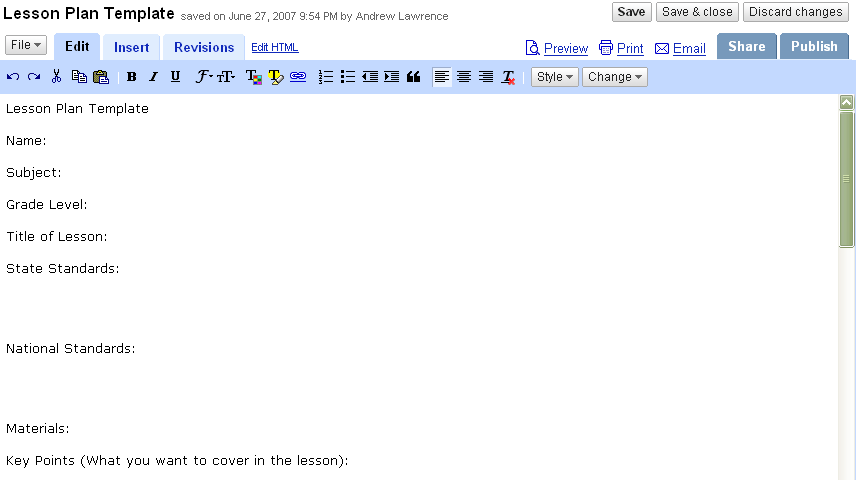
You can use Docs to create documents to be shared by your faculty, such as lesson, unit, and curriculum plan templates (Figure 31). If you already have templates in Word, simply upload them to Docs. If you don’t already have templates, select Document under the New button on the Docs toolbar and create one document for each template. Google recently added the ability in Docs to create folders to organize documents, just like folders in the file system on your computer. You can add these with the New button on the toolbar as well.
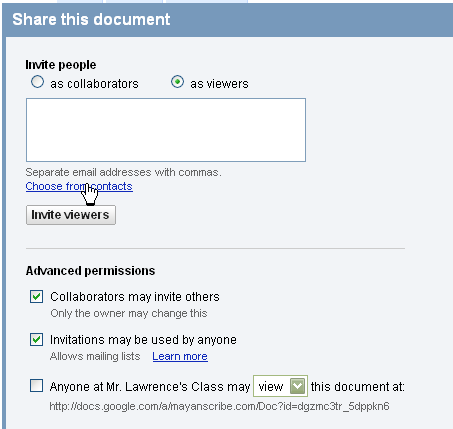
After you've completed each template, click the Share tab. You'll see the “Share this document” page. Select “as viewers” (since you want people to be able to download it but not change the master), and then click “Choose from contacts” (Figure 32).
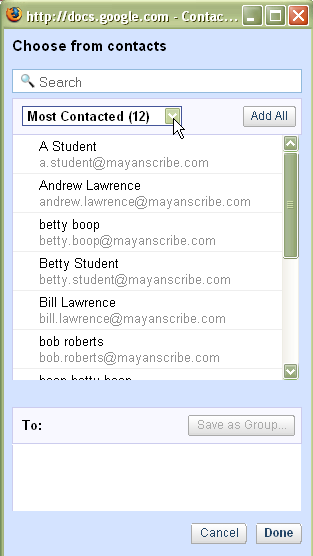
In the “Choose from contacts” page, you can select any or all of the people in your Google Apps Mail contacts list (Figure 33). If you add more than one, as in the case of adding an entire faculty, you can click the Save as Group button. This allows you to create a named group that you can share documents with in the future. After clicking Done, you'll get a chance to send an email to the group telling them about the document. Just repeat this process for each template you create.
Once you've created your templates, you can organize them in a folder. Just click New and choose Folder, and give the folder an appropriate name. Then you can check the box beside each template document and click the Add to folder button on the toolbar. Select the folder, and the documents will move to their new location (Figure 34).