
Chapter 3. Rich Media

THE HISTORY OF THE WEB is punctuated with technological improvements. One of the earliest additions to HTML was the img element, which fundamentally altered the web. Then, the introduction of JavaScript allowed the web to become a more dynamic environment. Later, the proliferation of Ajax made the web a viable option for full-fledged applications.
Web standards have advanced so much that it’s now possible to build almost anything using HTML, CSS, and JavaScript—almost anything.
For many years, if you wanted to publish text and images, HTML and CSS were all you needed. But if you wanted to publish audio or video, you had to use a plugin technology like Flash or Silverlight.
“Plugin” is an accurate term for these technologies—they helped to fill the holes on the web. They made it relatively easy to get games, films, and music online. But these technologies are not open. They were not created by the community. They are under the control of individual companies.
Over the past few years, HTML5 has begun to offer alternatives. As such, it is in direct competition with proprietary technologies like Flash and Silverlight. But instead of requiring a plugin, the rich media elements in HTML5 are native to the browser. In this chapter, we’ll take a look at how HTML5 enables the creation of images that can respond to the device they are being served to with the picture and srcset elements. We’ll look at how SVG and the canvas element can be used to create dynamic images. We will also see how the audio and video elements can make embedding media as simple as adding an image to your web page.
RESPONSIVE IMAGES
As we began to develop responsively—creating sites that display equally well on the smallest smartphone and the largest desktop monitor—images quickly became an issue. The standard advice when dealing with a responsive layout is to use CSS to set your images to max-width: 100%. This allows them to shrink down on smaller devices but not stretch larger than their actual dimensions on wider displays.
The first problem with this approach is that every device downloads the same image. A phone that displays an image at 200 pixels wide may be downloading—using mobile data—a high-quality JPG saved to look good on an Apple Cinema Display.
The second issue is termed the “art direction” problem: the size and format of an image that works well in our desktop layout may well be too small to see on mobile. Ideally, we would show a different crop or magnification of the image, rather than selecting an image that tries to work in all contexts.
A third concern is that we sometimes need more flexible alternative image options, such as serving high-resolution images to Retina displays, or providing images in the new WebP format to those browsers that have support.
HTML5 seeks to solve all of these problems with a new approach to using images on the web. The history of this new approach is an interesting one: the work on the standard was undertaken by the Responsive Images Community Group (responsiveimages.org) (now the Responsive Issues Community Group at ricg.io)—notably the first time that a group of web developers, rather than specification writers, came together to work on part of a specification and succeeded in getting it into the spec itself.
The picture element
The picture element is a new element that acts as a container for image source files. The very last child inside this element needs to be a standard image element. This ensures backward compatibility. If the picture element is unsupported, the browser will ignore it and show your image—just as it would if you had simply put the image there.
<picture>
<img src="fallback-image.jpg" alt="My image">
</picture>
Before your fallback img element, you can now add multiple image assets using the source element. In this example, viewports wider than 1024 pixels get the full-size image, viewports wider than 700 pixels get the midsize image, and smaller screens get the crop—which is also the fallback image if the browser has no support.
The media attribute takes any valid media query—just as you would use in your CSS.
<picture>
<source media="(min-width: 1024px)" »
srcset="fullsize.jpg">
<source media="(min-width: 700px)" »
srcset="midsize.jpg">
<img src="crop.jpg" alt="My image">
</picture>
The srcset and sizes attributes
In the previous example, you can see the srcset attribute used with a value of the image file we wish to load, according to the media query set using the media attribute. It’s an example of the art direction problem described earlier—we want to display a cropped image to smaller devices and a larger (and perhaps more detailed) image to desktops.
You can also use srcset to deliver multiple images for high-resolution screens. Note that srcset is available to use as an attribute on the img element as well. If you want to display images only for high-resolution screens, you could just use the img element with a srcset attribute, rather than putting it inside the picture element.
<picture>
<source media="(min-width: 1024px)"
srcset="fullsize-1x.jpg 1x, fullsize-2x.jpg »
2x, fullsize-3x.jpg 3x">
<img src="crop-1x.jpg" alt="My image" »
srcset="crop-2x.jpg 2x, crop-3x.jpg 3x">
</picture>
There is an additional new attribute for both source and img: the sizes attribute. Using sizes, you can tell the browser that the selected image will fill a certain amount of the viewport. The browser can then select the most appropriate image from the list in the srcset attribute.
<img src="image-160.jpg" alt="My image" sizes="50vw"
srcset="image-160.jpg 160w, image-620.jpg »
620w, image-1024.jpg 1024w">
The images you list are essentially suggestions to the browser. User agents will select what they believe to be the most appropriate image to use.
As you can see from these few examples, there is a huge amount of potential for tailoring both the size of downloaded images and the way they display for different devices. The work around responsive images is very exciting for designers.
There is an ever-increasing amount of information available online about picture and srcset. To get started, take a look at this article and examples on the Dev.Opera website (http://bkaprt.com/html52e/03-01/).
CANVAS
When the Mosaic browser added the ability to embed images within web pages, it gave the web a turbo boost. But images have remained static ever since. You can create animated GIFs. You can use JavaScript to update an image’s styles. You can generate an image dynamically on the server. But once an image has been served up to a browser, its contents cannot be updated.
The canvas element is an environment for creating dynamic images.
The element itself is very simple. All you specify within the opening tag are the dimensions:
<canvas id="my-first-canvas" width="360" »
height="240">
</canvas>
If you put anything between the opening and closing tags, only browsers that don’t support canvas will see it (FIG 3.01):
<canvas id="my-first-canvas" width="360" »
height="240">
<p>No canvas support? Have an old-fashioned image »
instead:</p>
<img src="puppy.jpg" alt="a cute puppy">
</canvas>

FIG 3.01: Users without canvas support will see the image of a cute puppy.
All the hard work is done in JavaScript. First of all, you’ll need to reference the canvas element and its context. The word context here simply means an API. For now, the only context is two-dimensional:
var canvas = »
document.getElementById('my-first-canvas');
var context = canvas.getContext('2d');
Now you can start drawing on the tw`o-dimensional surface of the canvas element using the API documented in the HTML5 specification at http://bkaprt.com/html52e/03-02/.
The 2D API offers a lot of the same tools that you find in a graphics program like Illustrator: strokes, fills, gradients, shadows, shapes, and Bézier curves. The difference is that, instead of using a Graphical User Interface, you have to specify everything using JavaScript.
Dancing about architecture: drawing with code
This is how you specify that the stroke color should be red:
context.strokeStyle = '#990000';
Now anything you draw will have a red outline. For example, if you want to draw a rectangle, use this syntax:
strokeRect ( left, top, width, height )
If you want to draw a rectangle that’s 100 by 50 pixels in size, positioned 20 pixels from the left and 30 pixels from the top of the canvas element, you’d write this (FIG 3.02):
context.strokeRect(20,30,100,50);

FIG 3.02: A rectangle, drawn with canvas.
That’s one very simple example. The 2D API provides lots of methods: fillStyle, fillRect, lineWidth, shadowColor, and many more.
In theory, any image that can be created in a program like Illustrator can be created in the canvas element. In practice, doing so would be laborious and could result in excessively long JavaScript. Besides, that isn’t really the point of canvas.
Canvas. Huh! What is it good for?
It’s all well and good using JavaScript and canvas to create images on the fly, but unless you’re a hardcore masochist, what’s the point?
The real power of canvas is that its contents can be updated at any moment, drawing new content based on the actions of the user. This ability to respond to user-triggered events makes it possible to create tools and games that would have previously required a plugin technology such as Flash.
Access denied
Every document on the web can be described with a Document Object Model. This DOM can have many different nodes, the most important of which are element nodes, text nodes, and attributes. Those three building blocks are enough to put together just about any document you can imagine.
The canvas element has no DOM. The content drawn within canvas cannot be represented as a tree of nodes. Screen readers and other assistive technology rely on having access to a Document Object Model to make sense of a document. No DOM, no access.
To further complicate matters, assistive devices also cannot read content placed between opening and closing canvas tags—exactly where you would place fallback content to be used if the browser doesn’t support canvas.
The fallback DOM concept, also referred to as the “sub DOM,” helps resolve this accessibility concern. It allows you to create an element to match each element inside the opening and closing canvas tags, which can then be read by screen readers and other devices. If these elements are interactive, they should be included in the tab order so that a user who is navigating via keyboard can interact with them accordingly. You can see an example at http://bkaprt.com/html52e/03-03/and further explanation at http://bkaprt.com/html52e/03-04/.
Clever canvas
While modern browsers support the fallback DOM concept, you should still take care not to lock up content in canvas, potentially rendering parts of the information inaccessible to some users. The concept of unobtrusive JavaScript—using JavaScript as an enhancement to a website, rather than its core—is a good analogy here. Visitors who don’t have JavaScript still have access to all the content, but the experience might not be quite as dynamic as in a JavaScript-capable environment. This multitiered approach can also be applied to canvas: instead of using canvas to create content, use it to recycle existing content.
Suppose you have a table filled with data. You might want to illustrate the trends in the data using a graph. If the data is static, you can generate an image of a graph—using the Google Chart API, for example. If the data is editable, updating in response to user-triggered events, then canvas is a good tool for generating the changing graph. Crucially, the content represented within the canvas element is already accessible in the preexisting table element.
The clever folks at Filament Group have put together a jQuery plugin for that very situation (FIG 3.03; http://bkaprt.com/html52e/03-05/). The repository for that plugin is now on GitHub at http://bkaprt.com/html52e/03-06/.
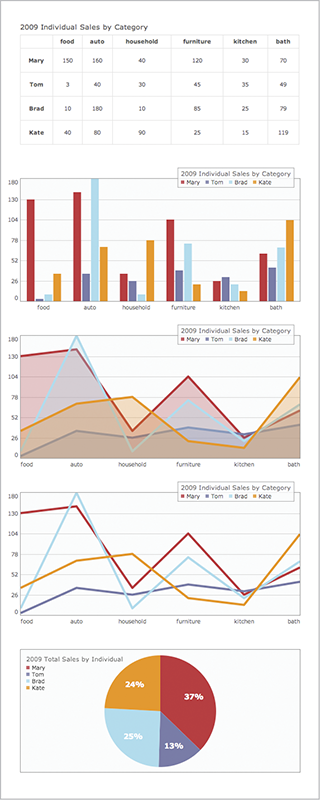
FIG 3.03: Using canvas to generate a graph from data input by users.
There is another option—canvas isn’t the only API for generating dynamic images. Scalable Vector Graphics (SVG) is an XML format that can describe the same kinds of shapes as canvas. Because XML is a text-based data format, the contents of SVG are theoretically available to screen readers.
Given its mantras of “Pave the cowpaths” and “Don’t reinvent the wheel,” it might seem odd that the WHATWG would advocate canvas in HTML5 when SVG already exists. As is so often the case, the HTML5 specification really just documents what browsers already do. The canvas element wasn’t dreamt up for HTML5; it was created by Apple and implemented in Safari. Other browser makers saw what Apple was doing, liked what they saw, and copied it.
SVG isn’t part of HTML5 in the way that canvas is. It is, however, an open standard developed by the W3C, and has been in existence since 1999. In the last few years, as browser support has improved, SVG has seen increased interest from designers. Many designers come to SVG to create scalable icons and other images, such as those described by Sara Soueidan in her 24 Ways article, “An Overview of SVG Sprite Creation Techniques” (http://bkaprt.com/html52e/03-07/).
Both SVG and canvas can be put to similar uses. SVG is vector-based, whereas canvas manipulates pixels. And SVG is defined in XML, making it more readable than the JavaScript required by canvas. Whether you choose to use canvas or SVG may simply be down to whether you prefer to work with XML or in JavaScript.
AUDIO
The first website Jeremy ever made was a showcase for his band. He wanted visitors to the site to be able to listen to the band’s songs—and that prompted a journey into the underworld to investigate the many formats and media players competing for attention: QuickTime, Windows Media Player, Real Audio. Far too much time was spent worrying about relative market share and cross-platform compatibility.
In the intervening years, the MP3 format won the battle for ubiquity. But providing visitors with an easy way to listen to a sound file still required a proprietary technology, and the Flash player ultimately emerged victorious.
Then HTML5 stepped into the ring in an attempt to take on the reigning champion. In the time between editions of this book, Flash moved from the only real way to play media on the web to a plugin which many people no longer have installed in their browser.
Embedding an audio file in an HTML5 document is now radically simple:
<audio src="witchitalineman.mp3">
</audio>
That’s a little too simple. You probably want to be a bit more specific about what the audio should do.
Suppose there’s an evil bastard out there who hates the web and all who sail her. This person probably doesn’t care that it’s incredibly rude and stupid to embed an audio file that plays automatically. Thanks to the autoplay attribute, such malevolent ambitions can be realized:
<audio src="witchitalineman.mp3" autoplay>
</audio>
If you ever use the autoplay attribute in this way, you will be hunted down by legions of users.
Notice that the autoplay attribute doesn’t have a value. This is known as a Boolean attribute, named for that grand Cork mathematician, George Boole.
Computer logic is based entirely on Boolean logic: an electric current is either flowing or it isn’t; a binary value is either one or zero; the result of a computation is either true or false.
Don’t confuse Boolean attributes with Boolean values. You’d be forgiven for thinking that a Boolean attribute would take the values “true” or “false.” Actually, it’s the very existence of the attribute that is Boolean in nature: either the attribute is included or it isn’t. Even if you give the attribute a value, it will have no effect. Writing autoplay="false" or autoplay="no thanks" is the same as writing autoplay.
If you are using XHTML syntax, you can write autoplay= "autoplay". This is brought to you by the Department of Redundancy Department.
When an autoplaying audio file isn’t evil enough, you can inflict even more misery by having the audio loop forever. Another Boolean attribute, called loop, fulfills this dastardly plan:
<audio src="witchitalineman.mp3" autoplay loop>
</audio>
Using the loop attribute in combination with the autoplay attribute in this way will renew site visitors’ determination to hunt you down.
Out of control
The audio element can be used for good as well as evil. Giving users control over the playback of an audio file is a sensible idea that is easily accomplished using the Boolean attribute controls:
<audio src="witchitalineman.mp3" controls>
</audio>
The presence of the controls attribute prompts the browser to provide native controls for playing and pausing the audio, as well as adjusting the volume (FIG 3.04).
If you’re not happy with the browser’s native controls, you can create your own. Using JavaScript, you can interact with the Audio API, which gives you access to methods such as play and pause and properties such as volume. Here’s a quick ’n’ dirty example using button elements and nasty inline event handlers (FIG 3.05):
FIG 3.04: Use controls to display play, pause, and volume controls for your audio.
FIG 3.05: The controls produced by the button elements.
<audio id="player" src="witchitalineman.mp3">
</audio>
<div>
<button »
onclick="document.getElementById('player').play()"> »
Play
</button>
<button »
onclick="document.getElementById('player').pause()"> »
Pause
</button>
<button »
onclick="document.getElementById('player').volume »
+= 0.1">
Volume Up
</button>
<button »
onclick="document.getElementById('player').volume »
-= 0.1">
Volume Down
</button>
</div>
Buffering
At one point, the HTML5 spec included another Boolean attribute for the audio element. The autobuffer attribute was politer and more thoughtful than the nasty autoplay attribute. It provided a way for authors to inform the browser that, although the audio file shouldn’t play automatically, it will probably be played at some point, so the browser should start preloading the file in the background.
This would have been a useful attribute, but unfortunately Safari went a step further. It preloaded audio files regardless of whether or not the autobuffer attribute was present. Remember that because autobuffer was a Boolean attribute, there was no way to tell Safari not to preload the audio: autobuffer="false" was the same as autobuffer="true" or any other value (http://bkaprt.com/html52e/03-08/).
The autobuffer attribute has now been replaced with the preload attribute. This isn’t a Boolean attribute. It can take three possible values: none, auto, and metadata. Using
preload="none", you can now explicitly tell browsers not to preload the audio:
<audio src="witchitalineman.mp3" controls »
preload="none">
</audio>
If you only have one audio element on a page, you might want to use preload="auto", but the more audio elements you have, the more your visitors’ bandwidth is going to get hammered by excessive preloading.
You play to-may-to, I play to-mah-to
The audio element appears to be nigh-on perfect. Surely there must be a catch somewhere. There is.
The problem with the audio element isn’t in the specification. The problem lies with audio formats.
Although the MP3 format has become ubiquitous, it is not an open format. Because the format is patent-encumbered, technologies can’t decode MP3 files without paying the patent piper. That’s fine for corporations like Apple or Adobe, but it’s not so easy for smaller companies or open-source groups. Hence, Safari will happily play back MP3 files while Firefox will not.
There are other audio formats out there. The Vorbis codec—usually delivered as an OGG file—isn’t crippled by any patents. Firefox supports Ogg Vorbis—but Safari doesn’t.
Fortunately, there’s a way to use the audio element without having to choose between file formats. Instead of using the src attribute in the opening audio tag, you can specify multiple file formats using the source element:
<audio controls>
<source src="witchitalineman.ogg">
<source src="witchitalineman.mp3">
</audio>
A browser that can play back Ogg Vorbis files will look no further than the first source element. A browser that can play MP3 files but not Ogg Vorbis files will skip over the first source element and play the file in the second source element.
You can help the browsers by providing the MIME types for each source file:
<audio controls>
<source src="witchitalineman.ogg" »
type="audio/ogg">
<source src="witchitalineman.mp3" »
type="audio/mpeg">
</audio>
The source element is a standalone—or “void”—element, so if you are using XHTML syntax, remember to include a trailing slash at the end of each source tag.
Falling back
The ability to specify multiple source elements is very useful. But some very old browsers don’t support the audio element at all.
Internet Explorer 8 and below still needs to be spoon-fed audio files the old-fashioned way, via Flash. The content model of the audio element supports this. Anything between the opening and closing audio tags that isn’t a source element will be exposed to browsers that don’t understand the audio element:
<audio controls>
<source src="witchitalineman.ogg" type="audio/ogg">
<source src="witchitalineman.mp3" type="audio/mpeg">
<object type="application/x-shockwave-flash" »
data="player.swf?soundFile=witchitalineman.mp3">
<param name="movie" »
value="player.swf?soundFile=witchitalineman.mp3">
</object>
</audio>
The object element in this example will only be exposed to browsers that don’t support the audio element.
You can go even further. The object element also allows you to include fallback content. That means you can provide a good old-fashioned hyperlink as a last resort:
<audio controls>
<source src="witchitalineman.ogg" »
type="audio/ogg">
<source src="witchitalineman.mp3" »
type="audio/mpeg">
<object type="application/x-shockwave-flash" »
data="player.swf?soundFile=witchitalineman.mp3">
<param name="movie" »
value="player.swf?soundFile=witchitalineman.mp3">
<a href="witchitalineman.mp3">Download the »
song</a>
</object>
</audio>
This example has four levels of graceful degradation:
- The browser supports the
audioelement and the Ogg Vorbis format. - The browser supports the
audioelement and the MP3 format. - The browser doesn’t support the
audioelement but does have the Flash plugin installed. - The browser doesn’t support the
audioelement and doesn’t have the Flash plugin installed.
Access all areas
The content model of the audio element is very useful for providing fallback content. But fallback content is not the same as accessibility content.
Suppose there’s a transcript to go along with an audio file. This is not the way to mark it up:
<audio controls>
<source src="witchitalineman.ogg" type="audio/ogg">
<source src="witchitalineman.mp3" type="audio/mpeg">
<p>I am a lineman for the county...</p>
</audio>
The transcript will only be visible to browsers that don’t support the audio element. Marking up the non-audio content in that way isn’t going to help a deaf user with a good browser. Besides, so-called accessibility content is often very useful for everyone, so why hide it?
<audio controls>
<source src="witchitalineman.ogg" type="audio/ogg">
<source src="witchitalineman.mp3" type="audio/mpeg">
</audio>
<p>I am a lineman for the county...</p>
VIDEO
If browser-native audio was exciting, the prospect of browser-native video had web designers salivating in anticipation. As with audio, the Flash plugin became the popular choice for playing and controlling online video, and when the first edition of this book was published, HTML5 video was tantalizingly on the horizon. The demise of Flash for video was hastened by Apple’s refusal to allow the Flash player onto iOS devices (http://bkaprt.com/html52e/03-09/), making HTML5 video the best way to support video on Safari for iOS.
The video element works just like the audio element. It has the optional autoplay, loop, and preload attributes. You can specify the location of the video file either by using the src attribute on the video element or by using source elements nested within the opening and closing video tags. You can let the browser take care of providing a user interface with the controls attribute, or you can script your own controls.
The main difference between audio and video content is that movies, by their nature, take up more room on the screen, so you’ll probably want to provide dimensions:
<video src="movie.mp4" controls width="360" »
height="240">
</video>
You can choose a representative image for the video and tell the browser to display it using the poster attribute (FIG 3.06):
<video src="movie.mp4" controls width="360" »
height="240" poster="placeholder.jpg">
</video>
The battleground of competing video formats is even bloodier than that of audio. Two of the big players are MP4—which is patent-encumbered—and Theora Video, which isn’t. Once again, you’ll need to provide alternate encodings and fallback content if you want your video to play in very old browsers:
<video controls width="360" height="240" »
poster="placeholder.jpg">
<source src="movie.mp4" type="video/mp4">
<source src="movie.ogv" type="video/ogg">
<source src="movie.webm" type="video/webm">
<object type="application/x-shockwave-flash" »
width="360" height="240" »
data="player.swf?file=movie.mp4">
<param name="movie" »
value="player.swf?file=movie.mp4">
<a href="movie.mp4">Download the movie</a>
</object>
</video>
The authors of the HTML5 specification had originally hoped to specify a baseline level of format support. Alas, the browser makers could not agree on a single format.

FIG 3.06: This placeholder image is displayed using the poster attribute.
Going native
The ability to embed video natively in web pages has been one of the most exciting additions to HTML since the introduction of the img element. More than any other factor, it has changed the look of the average website the most since the first edition of this book. One of the biggest problems with relying on a plugin for rich media was that plugin content was sandboxed from the rest of the document. Having native rich-media elements in HTML means that they play nicely with the other browser technologies, JavaScript and CSS.
So the video element is not only scriptable—it is also styleable (FIG 3.07). This means we can use video quite creatively—for instance, as page backgrounds (http://bkaprt.com/html52e/03-10/).

FIG 3.07: Digital agency Mediaboom uses a subtle background video on their site at http://mediaboom.com.
Try doing that to a plugin.
Creating captions with WebVTT
As the web becomes a richer medium, and we add more audio and video to websites, we need to bear in mind that not all users can access this content. HTML5 does bring us ways to ensure that our content remains accessible. In the case of video, a key area to explore is captioning with Web Video Text Tracks (WebVTT).
WebVTT can be used to provide subtitles or captions for your video content. A WebVTT file is a plain-text file, served with a text/vtt header, which uses a special format to mark up text captions for your video.
A simple WebVTT file looks like this:
WEBVTT - This file has cues.
14
00:01:14.815 --> 00:01:18.114
- What?
- Where are we now?
15
00:01:18.171 --> 00:01:20.991
- This is big bat country.
16
00:01:21.058 --> 00:01:23.868
- [ Bats Screeching ]
- They won't get in your hair. They're after the bugs.
The file opens with the string WEBVTT and a space, followed by an optional comment. To display text at specific moments during the video, add cues to the file using a timestamp. Supporting browsers will display the text as captions. You could use this technique to display a transcript, allowing viewers to read any content they can’t hear.
Audio and video are welcome additions to HTML5, but the web isn’t a broadcast medium—it’s interactive. Forms are the oldest and most powerful way of enabling interaction. In Chapter 4, we’ll take a look at how forms are getting an upgrade in HTML5.