Microsoft Windows (with such versions as Windows XP, Windows Server 2003, Windows Vista, and Windows 7) is the most widely used operating system (OS) in the world. It's also the most widely abused. Is this because Microsoft doesn't care as much about security as other OS vendors? The short answer is no. Sure, numerous security flaws were overlooked — especially in the Windows NT days — but Microsoft products are so pervasive throughout today's networks, Microsoft is the easiest vendor to pick on; therefore Microsoft products often end up in the bad guys' crosshairs. The one positive about hackers is that they're driving the requirement for better security!
Many of the security flaws in the headlines aren't new. They're variants of vulnerabilities that have been around for a long time in UNIX and Linux, such as the remote procedure call (RPC) vulnerabilities that the Blaster worm exploited. You've heard the saying, "The more things change, the more they stay the same." That applies here, too. Most Windows attacks are preventable if the patches are properly applied. Thus, poor security management is often the real reason Windows attacks are successful, yet Microsoft takes the blame and must carry the burden.
In addition to the password attacks I cover in Chapter 7, many other attacks are possible against a Windows-based system. Tons of information can be extracted from Windows by simply connecting to the system across a network and using tools to pull out the information. Many of these tests don't even require you to be authenticated to the remote system. All someone with malicious intent needs to find on your network is a vulnerable Windows computer with a default configuration that's not protected by such measures as a personal firewall and the latest security patches.
When you start poking around on your network, you might be surprised at how many of your Windows-based computers have security vulnerabilities. Furthermore, you'll be even more surprised at just how easy it is to exploit vulnerabilities to gain complete remote control of Windows by using a tool such as Metasploit. After you connect to a Windows system and have a valid username and password (by knowing it or deriving it by using the password-cracking techniques in Chapter 7 or other techniques outlined in this chapter), you can dig deeper and exploit other aspects of Windows.
This chapter shows you how to test for some of the most critical attacks against the Windows OS and outlines countermeasures to make sure your systems are secure.
Given the ease of use of Windows, its enterprise-ready Active Directory service, and the feature-rich .NET development platform, many organizations have moved to the Microsoft platform for their networking and computing needs. Many businesses — especially the small- to medium-sized ones — depend solely on the Windows OS for network usage. Many large organizations run critical servers, such as Web servers and database servers, on the Windows platform as well. If security vulnerabilities aren't addressed and managed properly, they can bring a network or an entire organization to its knees.
When Windows and other Microsoft software are attacked — especially by a widespread Internet-based worm or virus — hundreds of thousands of organizations and millions of computers are affected. Many well-known attacks against Windows can lead to
Leakage of sensitive information, including files containing healthcare information and credit card numbers
Passwords being cracked and used to carry out other attacks
Systems taken completely offline by denial of service (DoS) attacks
Full remote control being obtained
Entire databases being corrupted or deleted
Note
When unsecure Windows-based systems are attacked, serious things can happen to a tremendous number of computers around the world.
Literally hundreds of Windows hacking and testing tools are available. The key is to find a set of tools that can do what you need and that you're comfortable using.
Note
Many security tools — including some of the tools in this chapter — work with only certain versions of Windows. The most recent version of each tool in this chapter is compatible with Windows NT, Windows 2000, Windows XP, and Windows Server 2003. I've even found many tools to be compatible with Windows 7, which happens to be the OS I use.
Warning
The more security tools and other power-user applications you install in Windows — especially programs that tie into the network drivers and TCP/IP stack — the more unstable Windows becomes. I'm talking about slow performance, blue screens of death, and general instability issues. Unfortunately, often the only fix is to reinstall Windows and all your applications. After rebuilding my laptop every few months, I finally wised up and bought a copy of VMware and a dedicated computer that I can junk up with testing tools without worrying about it affecting my ability to get my other work done. (Ah, the memories of those DOS and Windows 3.x days when things were much simpler!)
You can use the following free Microsoft tools to test your systems for various security weaknesses.
Built-in Windows programs (Windows 9x and later versions) for NetBIOS and TCP/UDP service enumeration, such as:
Microsoft Baseline Security Analyzer (
www.microsoft.com/technet/security/tools/mbsahome.mspx) to test for missing patches and basic Windows security settingsSysinternals (
http://technet.microsoft.com/en-us/sysinternals/default.aspx) to poke, prod, and monitor Windows services, processes, and resources both locally and over the network
All-in-one tools perform a wide variety of security tests, including
Port scanning
OS fingerprinting
Basic password cracking
Detailed vulnerability mappings of the various security weaknesses that the tools find on your Windows systems
I use the following tools in my work with very good results:
GFI LANguard (
www.gfi.com/lannetscan)QualysGuard (
www.qualys.com)
Tip
Qualys's managed service/application service provider/software as a service (whatever term you want to use these days) is very easy to use (simply log in to the interface, give it the IP addresses to scan, and tell it to go) and has very detailed and accurate vulnerability testing — it's my all-time favorite for network/OS vulnerability testing.
The following tools perform one or two specific tasks. These tools provide detailed security assessments of your Windows systems and insight that you might not otherwise get from all-in-one assessment tools:
Metasploit (
www.metasploit.com) for exploiting vulnerabilities that such tools as QualysGuard and Nessus (www.nessus.org) discover to obtain remote command prompts, add users, and much more.ShareEnum (
http://technet.microsoft.com/en-us/sysinternals/bb897442.aspx) for share enumeration.SuperScan (
www.foundstone.com/us/resources/proddesc/superscan.htm) for TCP port scanning, ping sweeps, and share enumeration.TCPView (
http://technet.microsoft.com/en-us/sysinternals/bb897437.aspx) to view TCP and UDP session information.Winfo (
www.ntsecurity.nu/toolbox/winfo) for null session enumeration to gather such configuration information as security policies, local user accounts, and shares.
Warning
Windows XP SP2 and later versions, as well as Windows Server 2003 SP1 and later versions, have a new "undocumented feature" that can (and will) severely limit your network scanning speeds: Only ten half-open TCP connections can be made at a time. If you think your system might be affected by this, check out the Event ID 4226 Patcher tool (www.lvllord.de) for a hack to run on the Windows TCP/IP stack that will allow you to adjust the TCP half-open connections setting to a more realistic number. The default is to change it to 50, which seems to work well.
Be forewarned that Microsoft doesn't support this hack. Having said that, I haven't had any trouble with this hack at all. Disabling the Windows Firewall (or other third-party firewall) can help speed things up, too.
When you assess Windows vulnerabilities, start by scanning your computers to see what the bad guys can see.
Note
The exploits in this chapter were run against Windows from inside a firewall. Unless I point out otherwise, all the tests in this chapter can be run against all versions of the Windows OS. The attacks in this chapter are significant enough to warrant testing for, regardless of your current setup. Your results might vary from mine depending on the specific version of Windows, patch levels, and other system hardening you've done.
A few straightforward processes can identify weaknesses in Windows systems.
Start gathering information about your Windows systems by running an initial port scan:
Run basic scans to find which ports are open on each Windows system:
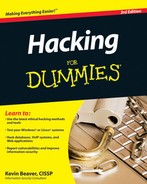
Scan for TCP ports with a port scanning tool, such as SuperScan. The SuperScan results in Figure 10-1 show several potentially vulnerable ports open on a Windows Server 2003 system, including those for a Web server (port 80), and the ever-popular — and easily hacked — NetBIOS (port 139).
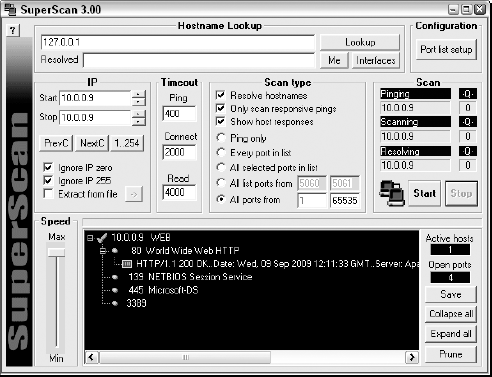
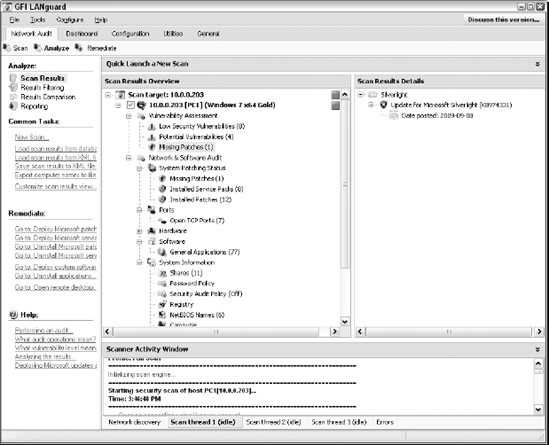
Perform OS enumeration (such as scanning for shares and specific OS versions) by using an all-in-one assessment tool, such as LANguard.
Figure 10-2 shows a LANguard scan that reveals the server version, vulnerabilities, open ports, and more.
If you need to quickly identify the specific version of Windows that's running, you can use Nmap (
http://nmap.org/download.html) with the-Ooption, as shown in Figure 10-3.Tip
Other OS fingerprinting tools are available, but I've found Nmap to be the most accurate.
Determine potential security vulnerabilities.
This is subjective and might vary from system to system, but what you want to look for are interesting services and applications and proceed from there.

You can prevent an external attacker or malicious internal user from gathering certain information about your Windows systems by implementing the proper security settings on your network and on the Windows hosts. You have the following options:
Use a network firewall.
Use the Windows Firewall or other personal firewall software on each system. You want to block the Windows networking ports for RPC (port 135) and NetBIOS (ports 137–139 and 445).
Disable unnecessary services so that they don't appear when a connection is made.
You can gather Windows information by poking around with NetBIOS (Network Basic Input/Output System) functions and programs. NetBIOS allows applications to make networking calls and communicate with other hosts within a LAN.
The hacks described in the following two sections can be carried out on unprotected systems running NetBIOS.
When you're performing your unauthenticated enumeration tests, you can gather configuration information about the local or remote systems two ways:
All-in-one scanners, such as LANguard or QualysGuard
The nbtstat program that's built in to Windows (nbtstat stands for NetBIOS over TCP/IP Statistics)
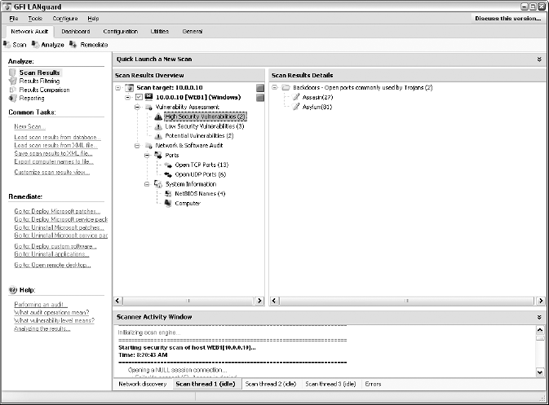
Figure 10-4 shows information that you can gather from a Windows 7 system with a simple nbtstat query.
nbtstat shows the remote computer's NetBIOS name table, which you gather by using the nbtstat -A command. This displays the following information:
Computer name
Domain name
Computer's MAC address
When running nbtstat against a Windows NT or Windows 2000 server, you might even glean the ID of the user who's currently logged in.
Tip
An advanced program such as LANguard isn't necessary to gather this basic information from a Windows system. However, the graphical interface offered by commercial software such as this presents its findings in a prettier fashion and is often much easier to use. Additionally, you have the benefit of gathering the information you need with one tool.
Windows uses network shares to share certain folders or drives on the system so other users can access them across the network. Shares are easy to set up and work very well. However, they're often misconfigured, allowing hackers and other unauthorized users to access information they shouldn't be able to get to. You can search for Windows network shares by using the Share Finder tool built in to LANguard. This tool scans an entire range of IP addresses, looking for Windows shares, as shown in Figure 10-5.
The shares displayed in Figure 10-5 are just what malicious insiders are looking for because the share names give a hint of what type of files might be accessible if they connect to the shares. After the bad guys discover these shares, they're likely to dig a little further to see whether they can browse the files within the shares. I cover shares and rooting out sensitive information on network shares and other storage devices in Chapter 15.
You can implement the following security countermeasures to minimize NetBIOS and NetBIOS over TCP/IP attacks on your Windows systems:
Use a network firewall.
Use the Windows Firewall or other personal firewall software on each system.
Disable NetBIOS — or at least Windows File and Printer Sharing.
Tip
Disabling NetBIOS might not be practical in a network where users and applications depend on file sharing or in a mixed environment where older Windows 2000 and NT systems rely on NetBIOS for file and printer sharing.
Educate your users on the dangers of enabling file shares for everyone to access. I cover these risks in detail in Chapter 15.
Warning
Hidden shares — those with a dollar sign ($) appended to the end of the share name — don't really help hide the share name. Any of the tools I've mentioned can see right through this form of security by obscurity.
A well-known vulnerability within Windows can map an anonymous connection (or null session) to a hidden share called IPC$ (which stands for interprocess communication). This attack method can be used to:
Gather Windows host configuration information, such as user IDs and share names
Edit parts of the remote computer's registry
Although Windows Server 2003/2008, Windows XP, Windows Vista, and Windows 7 don't allow null session connections by default, Windows 2000 Server and NT Server do — and plenty of those systems are still around to cause problems on most networks.
Warning
Although later versions of Windows are much more secure than their predecessors, don't assume that all's well in Windows land. I can't tell you how many times I see supposedly secure Windows installations "tweaked" to accommodate an application or other business need that happens to facilitate exploitation.
To map a null session, follow these steps for each Windows computer to which you want to map a null session:
Format the basic net command, like this:
net use \host_name_or_IP_addressipc$ "" "/user:"
The net command to map null sessions requires these parameters:
net(the built-in Windows network command) followed by theusecommandIP address or hostname of the system to which you want to map a null connection
A blank password and username
Note
The blanks are why it's called a null connection.
Press Enter to make the connection.
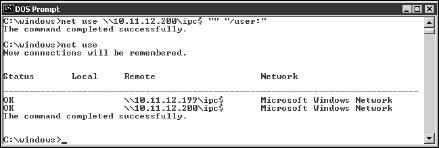
Figure 10-6 shows an example of the complete command when mapping a null session. After you map the null session, you should see the message
The command completed successfully.
Tip
To confirm that the sessions are mapped, enter this command at the command prompt:
net use
As shown in Figure 10-6, you should see the mappings to the IPC$ share on each computer to which you're connected.
With a null session connection, you can use other utilities to gather critical Windows information remotely. Dozens of tools can gather this type of information.
You — like a hacker — can take the output of these enumeration programs and attempt (as an unauthorized user) to:
Crack the passwords of the users found. (See Chapter 7 for more on password cracking.)
Map drives to the network shares.
You can use the following applications for system enumeration against server versions of Windows prior to Server 2003 as well as Windows XP.
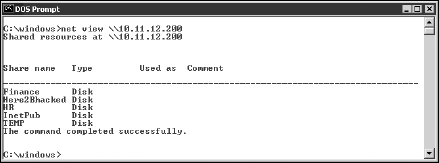
The net view command (see Figure 10-7) shows shares that the Windows host has available. You can use the output of this program to see information that the server is advertising to the world and what can be done with it, including:
Share information that a hacker can use to attack your systems, such as mapping drives and cracking share passwords.
Share permissions that might need to be removed, such as the permission for the Everyone group, to at least see the share on Windows NT and Windows 2000 systems.
Winfo and DumpSec can gather useful information about users and configurations, such as
Your preference might depend on whether you like graphical interfaces or a command line:
Winfo (
www.ntsecurity.nu/toolbox/winfo) is a command-line tool.Tip
Because Winfo is a command-line tool, you can create batch (script) files that automate the enumeration process. The following is an abbreviated version of Winfo's output of a Windows NT server, but you can collect the same information from other Windows systems:
Winfo 2.0 - copyright (c) 1999-2003, Arne Vidstrom
          - http://www.ntsecurity.nu/toolbox/winfo/
SYSTEM INFORMATION:
 - OS version: 4.0
PASSWORD POLICY:
 - Time between end of logon time and forced logoff: No forced logoff
 - Maximum password age: 42 days
 - Minimum password age: 0 days
 - Password history length: 0 passwords
 - Minimum password length: 0 characters
USER ACCOUNTS:
 * Administrator
   (This account is the built-in administrator account)
 * doctorx
 * Guest
   (This account is the built-in guest account)
 * IUSR_WINNT
 * kbeaver
 * nikki
SHARES:
 * ADMIN$
    - Type: Special share reserved for IPC or administrative share
 * IPC$
    - Type: Unknown
 * Here2Bhacked
    - Type: Disk drive
 * C$
    - Type: Special share reserved for IPC or administrative share
 * Finance
    - Type: Disk drive
 * HR
    - Type: Disk drive
Tip
This information cannot be gleaned from a default installation of Windows Server 2003, Windows XP, Windows Vista, or Windows 7.
You can peruse the output of such tools for user IDs that don't belong on your system, such as
Ex-employee accounts that haven't been disabled
Potential backdoor accounts that a hacker might have created
Warning
If attackers get this information, they can attempt to exploit potentially weak passwords and log in as those users.
The NetUsers tool (www.systemtools.com/free.htm) can show who has logged into a remote Windows computer. You can see such information as
Abused account privileges
Users currently logged into the system
Figure 10-8 shows the history of local logins of a remote Windows workstation.
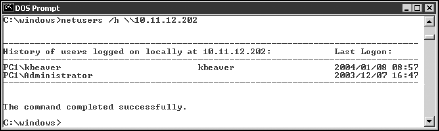
This information can help you track, for auditing purposes, who's logging into a system. Unfortunately, this information can be useful for hackers when they're trying to figure out what user IDs are available to crack. They might even determine the system's daily use if the users IDs are descriptive, such as backup (for a backup server) or devuser (for a development user).
Tip
If it makes good business sense and the timing is right, upgrade to the more secure Windows Server 2003, Windows Server 2008, and Windows 7. They don't have the vulnerabilities described in the following list.
You can easily prevent null session connection hacks by implementing one or more of the following security measures:
Block NetBIOS on your Windows server by preventing these TCP ports from passing through your network firewall or personal firewall:
139 (NetBIOS sessions services)
445 (runs SMB over TCP/IP without NetBIOS)
Disable File and Printer Sharing for Microsoft Networks in the Properties tab of the machine's network connection for those systems that don't need it.
Restrict anonymous connections to the system. For Windows NT and Windows 2000 systems, you can set
HKEY_LOCAL_MACHINESYSTEMCurrentControlSetControlLSARestrictAnonymousto a DWORD value as follows:None: This is the default setting.
Rely on Default Permissions (Setting 0): This setting allows the default null session connections.
Do Not Allow Enumeration of SAM Accounts and Shares (Setting 1): This is the medium security level setting. This setting still allows null sessions to be mapped to IPC$, enabling such tools as Walksam to garner information from the system.
No Access without Explicit Anonymous Permissions (Setting 2): This high security setting prevents null session connections and system enumeration.
Warning
High security creates problems for domain controller communication and network browsing, so be careful!
Tip
Microsoft Knowledge Base Article 246261 covers the caveats of using the high security setting for RestrictAnonymous. It's available on the Web at http://support.microsoft.com/default.aspx?scid=KB;en-us;246261.
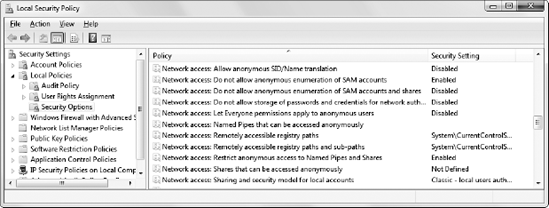
For later versions of Windows, such as Windows Server 2003 and Windows 7, ensure that the Network Access "anonymous" components of the local or group security policy are set as shown in Figure 10-9.
Windows shares — the available network drives that show up when browsing the network in My Network Places — are often misconfigured, allowing more people to have access to them than they should. The casual browser can exploit this security vulnerability, but a malicious insider gaining unauthorized access to a Windows system can result in serious security and compliance consequences, including the leakage of sensitive information and even the corruption or deletion of critical files.
The default share permission depends on the Windows system version.
When creating shares in Windows NT and Windows 2000, the group Everyone is given Full Control access in the share by default for all files to
Browse files
Read files
Write files
Warning
Anyone who maps to the IPC$ connection with a null session (as described in the previous section, "Null Sessions") is automatically made part of the Everyone group. This means that remote hackers can automatically gain Browse, Read, and Write access to a Windows NT or Windows 2000 server after establishing a null session.
In Windows XP and newer (Windows 2003 Server, Windows Vista, Windows 7), the Everyone group is given only Read access to shares. This is definitely an improvement over the defaults in Windows 2000 and Windows NT. However, you still might have situations in which you don't want the Everyone group to have Read access to a share.
Note
Share permissions are different from file permissions. When creating shares, you have to set both. In current versions of Windows, this helps create hoops for casual users to jump through and discourage share creation but it's not foolproof. Unless you have your Windows desktops completely locked down, users can still share at will.
Assessing your share permissions is a good way to get an overall view of who can access what. This testing shows how vulnerable your network shares — and sensitive information — can be. You can find shares with default permissions and unnecessary access rights enabled. Trust me, they're everywhere!
The best way to test for share weaknesses is to log in to the Windows system via a standard local or domain user with no special privileges and run an enumeration program so you can see who has access to what.
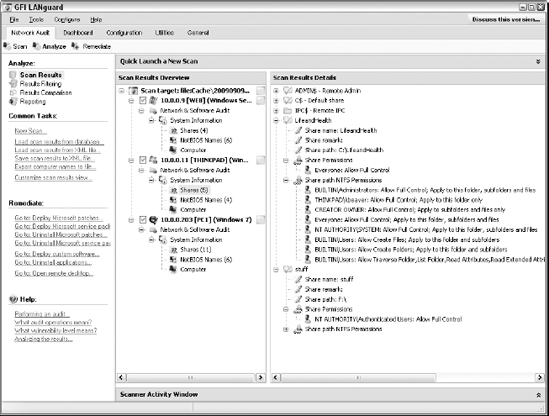
LANguard has a built-in share finder tool for uncovering unprotected shares, as shown in Figure 10-10.
The Everyone group has full share and file access to the LifeandHealth share on the THINKPAD host. I see situations like this all the time where someone shares their local drive so others can access it. The problem is they often forget to remove the permissions and leave a gaping hole for a security breach. I outline how to uncover sensitive information in unstructured files on shares and other storage systems in Chapter 15.

It's one thing to poke and prod Windows to find vulnerabilities that might eventually lead to some good information — maybe system access. However, it's quite another to stumble across a vulnerability that will provide you with full and complete system access — all within 10 minutes or less. Well, it's no longer an empty threat that "arbitrary code" can be run on a system that may lead to a vulnerability exploitation. Now, with such tools as Metasploit, all it takes is one missing patch on one system to gain access and demonstrate how the entire network can be compromised. This is the ethical hacker's pot of gold.
Note
Even with all the strict policies and fancy patch management tools, a handful of Windows systems on every network I come across don't have all the patches applied. Even if you think all your systems have the latest patches installed, you have to be sure. It's what ethical hacking is all about: trust but verify.
Warning
Before you go 'sploitin' vulnerabilities with Metasploit, it's very important to know that you're venturing into sensitive territory. Not only can you gain full, unauthorized access to sensitive systems, you can also put your test systems into a state where they can lock up or reboot. So, read each exploit's documentation and proceed with caution.
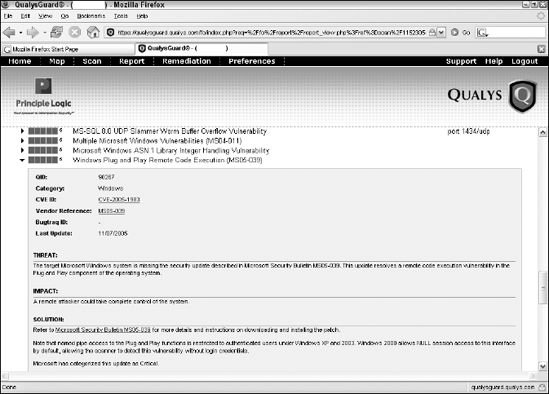
Before you can seriously exploit a missing patch or related vulnerability, you have to find out what's exploitable. The best way to go about doing this is to use a tool such as QualysGuard or LANguard to find them. I've found QualysGuard to be very good at rooting out such vulnerabilities even as an unauthenticated user on the network. Figure 10-11 shows QualysGuard scan results of a Windows server system that has the nasty Windows Plug and Play Remote Code Execution vulnerability.
After you find a vulnerability, the next step is to exploit it. In this example, I use Metasploit (an open source tool now owned by Rapid7) and obtain a remote command prompt on the vulnerable server. Here's how:
Download and install Metasploit from
www.metasploit.com/framework.I use the Windows version; all you have to do is download and run the executable. The process takes a couple of minutes because it has to install the Linux/UNIX environment, called cygwin, for Windows. There's a version of Metasploit for Linux/UNIX, too.
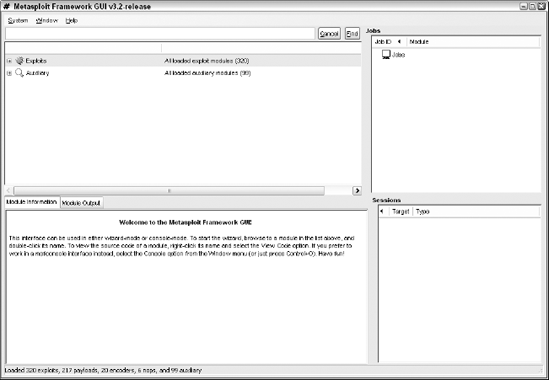
After the installation is complete, run the Metasploit GUI, which is Metasploit's main console.
There's also a Web-based version of Metasploit that you can access through your browser (Metasploit Web) but I prefer the GUI interface.
You see a screen similar to the one shown in Figure 10-12.
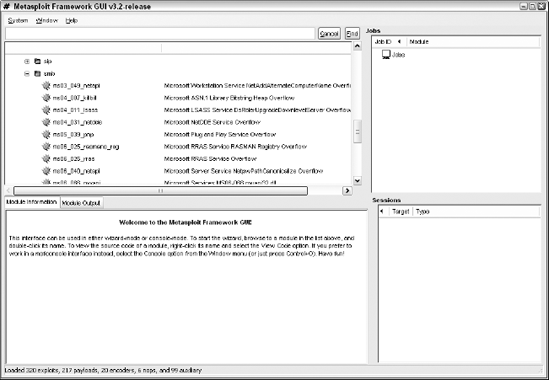
Expand the Exploits option to see what exploits are available to run, as shown in Figure 10-13.
If you know the specific vulnerability (say Microsoft's MS08-067), you can simply enter part or all of the search term (such as ms08) in the search field at the top and then click Find.
After you find the exploit you wish to run against your target system, simply double-click the exploit and then follow the steps starting with selecting the target operating system, as shown in Figure 10-14; click Forward.
Select Automatic Targeting if it's available; otherwise, make your best guess of which version of Windows is running and then click Forward.
Select the payload (the specific hack) you wish to send to the target, and click Forward.
I typically choose windows/shell/reverse_tcp, as shown in Figure 10-15.
Enter the IP address of the target system in the RHOST field and confirm that the IP address shown in the LHOST field is the address of your testing system, as shown in Figure 10-16, and click Forward.
Confirm your settings on the final screen, as shown in Figure 10-17, and click Apply.
The job executes, and you see the shell session in the Sessions section in the lower-right quadrant of the Metasploit GUI.
Double-click the session and a new window opens with a command prompt on the target system, as shown in Figure 10-18.
I now "own" the system and can do whatever I want.


For example, one thing I commonly do is add a user account to the exploited system. You can actually do this within Metasploit (via the adduser payloads) but I prefer to do it on my own so I can get screenshots of my actions. To add a user, simply enter net user username password /add at the Metapsloit command prompt.
Next, I add the user to the local administrators group by entering net local-group administrators username /add at the Metasploit command prompt. You can then log in to the remote system by mapping a drive to the C$ share or by connecting via Remote Desktop.
Warning
If you choose to add a user account during this phase, be sure to remove it when you finish. Otherwise, you can create another vulnerability on the system — especially if the account has a weak password.
All in all, this is ethical hacking at its finest!
Keep in mind that I demonstrate only a small fraction of what Metasploit can do. I highly recommend you download it and familiarize yourself with it. Numerous resources on Metasploit include the Metasploit mailing list, which can be found at www.metasploit.com/framework/support. The power of Metasploit is unbelievable — especially when combined with the exploit code that's continually updated at the milw0rm site (www.milw0rm.com).
Patch your systems. Seriously, that's all there is to it. Combine that with the other hardening recommendations I provide in this chapter, and you have a pretty darned secure Windows environment.
To get your arms around the patching process, you have to automate it wherever you can. You can use Windows Update — or better yet — Windows Server Update Services (WSUS), which can be found at http://technet.microsoft.com/en-us/wsus/default.aspx. If you're looking for a commercial alternative such as BigFix Patch Management (www.bigfix.com/content/patch-management) and Lumension Patch and Remediation (www.lumension.com/vulnerability-management/patch-management-software.jsp).
Another test you can run against your Windows systems is an "authenticated" scan — essentially looking for vulnerabilities as a trusted insider. I find these types of tests to be very beneficial because they often highlight system problems and even operational security weaknesses (such as poor change management processes and lack of information classification) that would never be discovered otherwise.
Note
A trusted insider who has physical access to your network and the right tools can exploit vulnerabilities even more easily. This is especially true if no internal access control lists or IPS is in place.
A way to look for Windows weaknesses while you're logged in (that is, through the eyes of a malicious insider) is by using some of the general vulnerability scanning tools I've mentioned, such as LANguard and QualysGuard. Figure 10-19 shows confirmed and potential security issues found on a Windows 7 system.
I recommend running authenticated scans as a regular local or domain user and as an administrator or any other user type you might have. This will show you who has access to what in the event a vulnerability is present. You'll likely be surprised to find out that a large portion of vulnerabilities, such as those listed in Figure 10-19, are accessible via a standard user account.
You can also use Microsoft Baseline Security Analyzer (MBSA) to check for basic vulnerabilities and missing patches. MBSA is a free utility from Microsoft that can be downloaded at www.microsoft.com/technet/security/tools/mbsahome.mspx. MBSA checks all Windows 2000 and later operating systems for missing patches. It also tests Windows, SQL Server, and IIS for basic security settings, such as weak passwords. You can use these tests to identify security weaknesses in your systems.
With MBSA, you can scan either the local system you're logged into or computers across the network. One caveat: MBSA requires an administrator account on the local machines you're scanning.