Chapter 9
Casual Operating
IN THIS CHAPTER
![]() Operating via repeaters
Operating via repeaters
![]() Getting your radio ready to use
Getting your radio ready to use
![]() Using simplex communication
Using simplex communication
![]() Introducing digital voice systems
Introducing digital voice systems
![]() Having a conversation
Having a conversation
You can dip another toe in the water with this chapter’s review of easygoing operating. The technical aspects of station configuration and operation are covered in Part 4. (Links to even more technical stuff are available on the Ham Radio For Dummies page at www.dummies.com.)
After you tune around the amateur bands for a while, you’ll agree that the lion’s share of the ham’s life is making relaxed, casual contacts. Some contacts are just random “Hello, anybody out there?” encounters. You’ll also hear contacts between hams who are obviously old friends or family members who meet on the air on a regular basis.
In this chapter, you find out about the different ways to conduct these casual contacts. As with most things in life, “There’s kindy a knack to it,” as my dear Aunt Lexie used to say. Learning the ways and means of ham radio will help you fit in quickly and enjoy ham radio more.
 Before I start on this operating business, allow me to suggest that you get two books:
- The FCC Rules and Regulations for the Amateur Radio Service: This book is available from the ARRL (
www.arrl.org/shop) for only a few dollars. It conveniently includes not only the rules themselves, but also a clear discussion of do’s and don’ts, along with information on technical standards and the FCC Universal Licensing System. Hams really should have a copy in their shack, whether they’re veterans or beginners. - The ARRL Operating Manual: The manual dedicates a separate chapter to all kinds of on-the-air operating; provides handy references, tables, and maps; and answers just about any operating question you can come up with. It’s also available at
www.arrl.org/shop. A series of how-to books is available for various operating specialties such as using digital modes on HF. Check the “Operating” products for the latest materials.
There are many other online resources that you can use if you have specific questions. YouTube videos on every topic are available and some are available at www.dummies.com. Other resources include
- AC6V and The DX Zone websites (
www.ac6v.comandwww.dxzone.com): These sites offer comprehensive links to many ham radio topics. - QRZ.com (
qrz.com): The site started out as a U.S. call sign lookup service and has expanded to world-wide license databases, an active news area, and numerous forums on a variety of topics. eHam.net: This ham radio portal includes numerous areas of interest to hams, including a handy Guide to Amateur Radio for New Hams page (www.eham.net/newham). Click the Basic Operating link for information about repeater operating.- ARRL Technical Information Service (
www.arrl.org/technical-information-service): This site has many public links and numerous in-depth articles for ARRL members.
You don’t have to learn about ham radio all by yourself!
Operating FM — Repeaters and Simplex
Most new hams begin operating as Technician class licensees, with access to the entire amateur VHF and UHF bands. By far the most common means of communicating on those bands is through the use of an FM repeater (introduced in Chapter 8). In this chapter, I begin with the basics of regular analog FM voice repeaters then move to the more sophisticated digital systems.
Understanding repeater basics
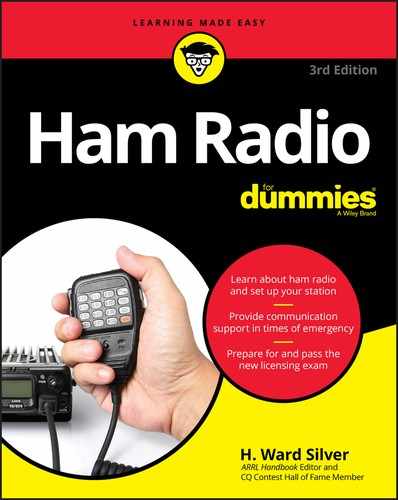
Figure 9-1 explains the general idea behind a repeater. A repeater receives FM signals on one frequency and simultaneously retransmits (or repeats) them on another frequency. The received signals aren’t stored and played back; they’re retransmitted on a different frequency at the same time they’re received, in a process called duplex operation. (Talking directly from one station to another without relays is called simplex operation.)

FIGURE 9-1: The basic repeater system.
 Most voice repeaters use analog FM, although there are more digital systems every day. FM is used instead of single sideband (SSB) because of the relative simplicity of the transmitters and receivers — an important consideration for equipment that’s operating all the time and needs to be reliable. FM is also relatively immune from static if signal strength is good, so it makes for a more pleasant contact. Except for a small segment of the 10 meter band, FM is rarely found on HF due to restrictions on signal bandwidth and to FM’s relatively poor quality for weak signals when compared with SSB. Above 30 MHz, FM’s qualities are ideal for local and regional coverage.
If the repeater is located on a high building, tower, or hill, its sensitive receiver picks up signals clearly from even tiny handheld radios. Then it uses a powerful transmitter to relay that input signal over a wide area. Stations can be separated by tens of miles yet communicate with a watt or two of power by using a repeater.
Ham radio repeaters are constructed and maintained by radio clubs or individual hams as a service to the community. Installing equipment on towers and high buildings often involves rental or access fees, even for not-for-profit amateur groups. If a repeater users’ group or club exists in your area, consider joining or donating to it to help defray the cost of keeping the repeater on the air.
Understanding repeater frequencies
To communicate through a repeater you have to know the frequency on which it’s listening and the frequency on which it’s transmitting. The listening frequency (the one that listens for your signal) is called the repeater’s input frequency, and the frequency that you listen to is called the repeater’s output frequency. The difference between the two frequencies is called the repeater’s offset. The combination of a repeater’s input and output frequencies is called a repeater pair.
As Figure 9-2 shows, repeater pairs are organized in groups, with their inputs in one part of the band and their outputs in another, all of them having a common offset. Each pair leapfrogs its neighbor, the channels all spaced equally in frequency; this is the channel spacing. The input channel may be at a lower frequency than the output, or vice versa.
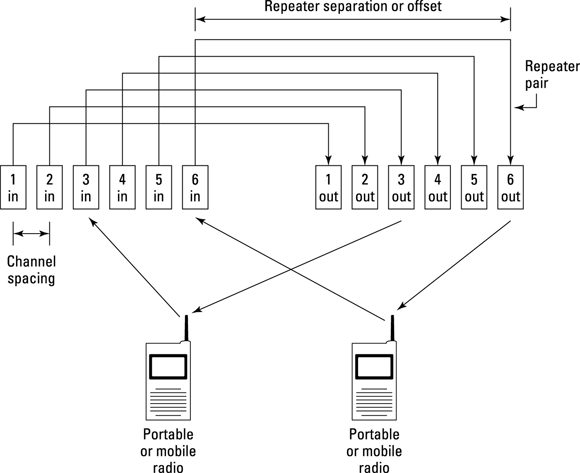
FIGURE 9-2: Repeater input and output frequency pairs.
Figure 9-3 shows the locations of repeater segments on the five primary VHF/UHF bands. The 6 meter band has three groups of repeaters: 51.12 to 51.98 MHz, 52 to 53 MHz, and 53 to 54 MHz. The 2 meter band also has three groups: 144.6 to 145.5 MHz, 146.01 to 147 MHz, and 147 to 147.99 MHz. The 70 cm band hosts one segment with a large simplex segment in the middle: from 440 to 449.99 MHz. The 222 and 1296 MHz bands have a single group. Repeaters are allowed on the 902 MHz and 2304 MHz bands but aren’t common. If you have a license with HF privileges, you may want to give the 10 meter FM repeaters a try. They have output frequencies between 29.610 and 29.700 MHz and an offset of –100 kHz.
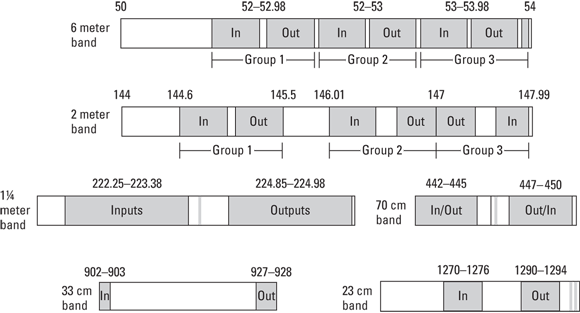
FIGURE 9-3: Repeater allocations on the five primary VHF/UHF bands (frequencies in MHz).
Finding repeater frequencies
Not all channels are occupied in every area. Also, around the country, some local variations exist in channel spacing and, in rare cases, offset. To find out where the repeater inputs and outputs are for a specific area, you need a repeater directory (see Chapter 8). You’ll also find a growing number of repeaters in the 902-928 MHz (33 cm) band.
The online directory at www.artscipub.com/repeaters/welcome.html is a good resource for locating repeaters in your area. It also provides information about any access codes, whether the system is digital or analog, and if it is part of a network of repeaters, as discussed later in this chapter.
If you don’t have a repeater directory and are just tuning across the band, try using Table 9-1, which lists the most common output frequencies and repeater offsets to try. Tune to different output frequencies, and listen for activity.
TABLE 9-1 Repeater Channel Spacings and Offsets
Band |
Output Frequencies of Each Group (In MHz) |
Offset from Output to Input Frequency |
6 meters |
51.62–51.98 |
–500 kHz |
52.5–52.98 |
||
53.5–53.98 |
||
2 meters (a mix of 20 and 15 kHz channel spacing) |
145.2–145.5 |
–600 kHz |
146.61–147.00 |
–600 kHz |
|
147.00–147.39 |
+600 kHz |
|
220 MHz or 1-1/4 meters |
223.85–224.98 |
–1.6 MHz |
440 MHz or 70 cm (local options determine whether inputs are above or below outputs) |
442–445 (California repeaters start at 440 MHz) |
+5 MHz |
447–450 |
–5 MHz |
|
902 MHz or 33 cm |
902-903 and 927-928 |
+25 MHz |
1296 MHz or 23 cm |
1282–1288 |
–12 MHz |
Most FM VHF/UHF radios are capable of scanning so they can switch among channels rapidly, stopping when they receive a signal. Scanning allows you to monitor several repeaters for activity without having to switch channels manually. You can learn more about scanners and scanning in my Dummies book Two-Way Radios and Scanners For Dummies.
 Set your radio’s offset appropriately for each band, and tune to the center frequency of each channel to avoid signal distortion from being off-frequency.
 There are two geographic restrictions for U.S. hams using repeaters on the 440 MHz or 70 cm band. Operating on some frequencies is not allowed in Canada and the FCC rules restrict U.S. hams from operating near the border to prevent interference. Look up “Line A” in your Technician study guide for more information. Hams near U.S. Air Force bases with Pave PAWS radars may also find repeater operation curtailed. The 70 cm band is shared with the primary radiolocation and military users so hams have to avoid interference with these important installations.
Using access control tones
To minimize interference from other repeaters and strong signals from nearby transmitters, extra audio tones are used as described in the following paragraphs. Sometimes, individual hams use these control tones when talking to each other in crowded areas, such at hamfests or conventions. Find out what system is used and how to configure your radio to use it. Repeater directories provide the information you need.
Most repeaters now use a system called tone access — also known as subaudible, PL, or CTCSS (Continuous Tone Coded Squelch System). You may have used tone access on the popular Family Radio Service (FRS) and General Mobile Radio Service (GMRS) radios. where the tones are known as privacy codes. Tone access keeps a repeater or radio output quiet (or squelched) for all signals except those that carry the proper tone.
Using tone access
Regardless of what it’s called, tone access works this way: When you transmit to a repeater, a low-frequency tone (between 67 Hz and 254.1Hz) is added to your voice. (You can find a list of these tones and how to select them in your radio’s operating manual.) When the repeater receives your transmission, it checks your transmitted signal for the correct tone. If it detects the correct tone, the repeater forwards your voice to the repeater output. This system prevents interfering signals from activating the repeater transmitter; those signals won’t carry the correct tone signal and aren’t retransmitted.
For a more detailed discussion of tone access, see The ARRL Handbook or the article “Decoding the Secrets of CTCSS,” by Ken Collier (KO6UX), at olyham.net/library/CTSS%20Secrets.pdf.
Most radios also offer tone squelch, which uses the same set of tones to control the squelch circuit. It works just like the repeater receiver’s tone access, in that only signals with the right tone are output as audio. Most of the time, the same tone is used for both transmitting and receiving.
Many recent radio models also have a tone-decoder function that detects which tone a repeater is using. If your radio doesn’t have this function, and you don’t know the correct tone, you can’t use the repeater. How can you find out what the proper tone is? Check a repeater directory, which lists the tone and other vital statistics about the repeater. When you determine the correct tone, either via the tone-decoder function or the repeater directory, you can program your radio to send the correct tone and activate the repeater.
Using Digital Coded Squelch (DCS)
DCS is another method of reducing interference. It allows you to hear only audio transmitted by selected stations. DCS consists of a continuous sequence of low-frequency tones that accompanies the transmitted voice. If your receiver is set to the same code sequence, it passes the audio to the radio’s speaker. If the transmission uses a different code, your radio remains silent.
Most people use DCS to keep from having to listen to all the chatter on a repeater, hearing only the audio of others who use the same DCS sequence, such as friends or club members.
Not all repeaters pass the tone access or DCS tones through to the transmitter and may filter them out.
Miscellaneous repeater features
You can find an amazing set of features in repeater land. Many repeaters have voice synthesizers that identify the repeater and announce the time and temperature. Hams who use the repeater can activate and deactivate some functions, such as the ability to make phone calls on the air and automated announcements of time or temperature, by using the keypads commonly used on microphones. Repeaters are linked to provide wide coverage even across bands or may have connections via the Internet, as described in “Digital repeater networks,” later in this chapter.
Time-out
Repeaters have a time-out function that disables the transmitter if the input is busy for more than just a few minutes (typically, three). This function prevents the transmitter from overheating and also keeps a long-winded speaker from locking out other users. If you stop transmitting and no repeater signal comes back, you may have “timed out” the repeater. Just let the repeater rest for 10 or 15 seconds until the receiver is reenabled and the timer resets. There’s no need to be embarrassed about timing out a repeater (unless you keep doing it), because it’s a rare ham who hasn’t done it.
Autopatch
Some repeaters have a feature called autopatch, which allows a repeater user to make a telephone call through the repeater. You may think that mobile phones make autopatch unnecessary and mostly, you’re right! Autopatch is not widely used today. However, even in a world full of mobile phones, autopatch can still come in handy if your mobile phone’s battery goes out or the network malfunctions.
All autopatch calls occur over the air; they’re not private.
Remote receivers
Within a local or regional area, many repeater systems may use remote receivers that relay weak signals from outlying areas back to the main repeater transmitter. The relayed signal is transmitted over a control link, which is a dedicated transmitter and receiver operating on a VHF or UHF band. It’s not unusual for a repeater to have three or more remote receivers. To link repeaters over wide areas and long distances, however, it is common for repeater systems to use the Internet.
Open and closed repeaters
If you purchase a repeater directory, you may see some repeaters that are marked as closed, meaning that they’re not open to the ham-radio public. Some repeaters are closed because they’re dedicated to a specific purpose, such as emergency communications. Other repeaters are intended to be used only by members of their supporting group.
Rest assured that you can use a closed repeater in case of emergency, but respect the wishes of its owners, and don’t use it for casual operation. If you aren’t sure whether a repeater is closed or not, transmit to it and say something like this: “This is NØAX. Is a control operator monitoring?” If you get a response, that person is the one to ask.
Setting up your radio
Now that you know about offsets, tones, and repeater frequencies, it’s time to set up your radio to use them. While you’re in there, take a few more minutes to check out the rest of your radio’s operating manual, too!
The new digital systems discussed later in this chapter require some extra setup instructions. I address that later. This section deals with the most common type of VHF/UHF radio used for analog FM.
To use your radio effectively, you need to know how to do each of the following things. Find the pages in your manual showing you how to do each one and practice a little bit.
- Set the radio’s receive frequency and transmit offset. Know how to switch to simplex (no offset) or to listen on the repeater’s input frequency. Some radios have a REV (reverse) button just for this purpose.
- Switch between VFO and Memory modes. In VFO mode, a radio can be tuned to any frequency; this is usually how you select a frequency to be stored in a memory channel. In Memory mode, tuning the radio changes from channel to channel.
- Turn subaudible tones on or off and change the tone. If your radio can detect and display the tone frequency being used (a feature called tone scanning), learn how to use it.
- Control the Digital Squelch System (DCS) function. You’ll need to know to activate and deactivate DCS in your radio. To use DCS, you also need to know how to pick the tones used to make the DCS code.
- Store the radio settings in a memory channel, and select different memory channels. Storing information in a memory channel (called programming a channel) usually requires you to first use the VFO mode to configure the radio’s operating settings. Then you press a “memory write” button, select the channel number you want, and press the memory write button again to program the radio’s memory for that channel. Some radios have hundreds of programmable memories.
To avoid carrying an operating manual around, make a cheat sheet for the most common functions or get a condensed operating guide like the Nifty Mini-Manuals from Nifty Ham Accessories (www.niftyaccessories.com). It offers condensed operating guides as small as wallet cards and on weatherproof laminated paper. I have one for each of my radios.
Using radio programming software
The manufacturers of portable radios recognize that having so much flexibility and so many features can make setting up a radio a long process. Most of them offer a simple software package to help you configure your radio. You can do it through the radio’s keypad or front panel, but this is often a cumbersome process for all but the basic steps, particularly creating easy-to-read labels for channels and storing messages.
Software for programming radios is also available from independent groups. Two of the most popular are from RT Systems (www.rtsystemsinc.com) and Chirp Software (chirpsoftware.com). Figure 9-4 shows a programming table for the popular Wouxon KG-UV6 handheld radio. The RT Systems software programs each memory channel with frequencies and all the necessary control or access code information. This is far easier than entering each channel through the radio’s small keypad! Chirp is a free open-source programming package. RT Systems is not free, but it is a more complete programming system with cables and USB adapters.

FIGURE 9-4: An RT Systems setup table.
The typical programming package includes a CD-ROM or downloadable file and a programming cable that connects to a PC. The interface to most radios is a serial port (RS-232 or COM). Few portable or mobile radios have USB interfaces as of 2018. You may need a USB-to-COM port adapter if your PC doesn’t have a COM port. The cable usually plugs into some kind of audio jack that does double-duty for programming. Make sure you have the right cable as the required connections are usually different than standard audio cables and the software won’t work.
Check for sales and package deals, particularly at the bigger hamfests, where vendors may include programming software and cables in a single package at a discount.
The process begins with installing the software and following the instructions about when to connect your radio and turn it on. The software then “detects” your radio (it’s not plug-and-play, but similar). If necessary, you can “read” your radio and transfer all its internal channels and other setup information to the software. At this point, save your radio’s data (see the software help function) in the event there is a mistake or other problem and you want to return the radio to its previous configuration.
Now go through the process of selecting all the options and features your radio offers. This is a good time to enter all the local repeaters and simplex channels with a label so you don’t have to remember all the frequencies. For example, my local St. Charles Radio Club primary repeater is labeled “SCARC1.” You can also program in call signs if that’s easier to remember. Be sure to get all the access control tones and codes in there, as well. Then save a copy of all the information so you can reload it later, if necessary. I use the radio model number and date as the file name, such as VX8-7-OCT-2017.
Most 2 meter (VHF) radios can also receive frequencies close to the ham bands, such as the common 136 to 174 MHz. When setting up your radio, program a few channels to receive the NOAA National Weather Service broadcasts of weather information and severe weather alerts (www.nws.noaa.gov/os/marine/wxradio.htm). There are seven channels just above 162 MHz, WX1 through WX7, and at least one will be receivable almost anywhere in the U.S. If your radio has “extended receive,” it may also be able to receive commercial wideband FM broadcasts (88–108 MHz), aircraft Civil Aviation Band channels (wiki.radioreference.com/index.php/Aircraft, 108–136 MHz, AM), and even AM broadcasts (550–1700 kHz, AM).
Cloning radio configurations
Most radios can also be “cloned,” that is, the configuration of one radio can be transferred to another radio of the same model without having to do the full programming operation. This time-saving feature can be very useful in the field where a PC with the host software isn’t available. The ability to clone radios is a good reason for public service or emergency response teams to use radios of the same type.
Your manual shows the exact the steps for your radio. The usual procedure involves turning both radios off and holding down a switch or key when turning the power back on. The user’s manual provides the necessary instructions and the order in which each step is to be performed. The cloning process then transfers the necessary information from the “master” radio. The radios notify you when the process is finished. You then cycle power on each radio, and the job is done!
You must use the right cable for cloning. Cloning cables or adapters are often available with the software programming package. The order of the required steps in the manual must be followed exactly to start the process and to be sure you clone the right radio! Don’t interrupt the cloning process or the radio being reprogrammed may require a complete reset operation.
Using simplex
When one station calls another without the aid of a repeater, both stations listen and talk on the same frequency, just as contacts are made on the HF bands, which is called simplex operation. Hams usually use FM simplex when they’re just making a local contact over a few miles and don’t need to use a repeater. Interspersed with the repeater frequency bands shown in Figure 9-1, earlier in this chapter, are small sets of channels designated for simplex operation.
If the station you’re contacting via a repeater is nearby, it’s good manners to switch to a simplex frequency instead of tying up the repeater. This is a good idea at hamfests and conventions. Public service teams may also use simplex channels to keep a main repeater channel clear. Practice switching to simplex quickly.
Having a common simplex channel is a good way for a local group of hams to keep in touch. Simplex frequencies are usually less busy than repeater frequencies and have a smaller coverage area, which makes them useful as local or town intercoms. Clubs and informal groups often decide to keep their radios tuned to a certain simplex frequency just for this purpose. If these groups aren’t having a meeting or conducting some other business, feel free to make a short call (such as “NØAX monitoring” or “KDØYJN, this is NØAX”) and make a friend.
On bands that have a lot of space, such as the VHF and UHF bands, making contacts outside the repeater channels is easier if you know approximately where the other hams are. That’s the purpose of calling frequencies: to get contacts started. On a calling frequency, you may hear hams call CQ (the general “Come in, anybody” call) or just announce they are present and listening. After establishing contact, they then move to a nearby frequency to complete it. If I call CQ on the 6 meter FM simplex calling frequency (52.525 MHz), and AE7SD answers me, I say, “AE7SD from NØAX. Hi, Sharon. Let’s move to five-four, OK?” This transaction means that I am receiving AE7SD’s signal and am changing frequency to 52.54 MHz, a nearby simplex channel.
Making a couple of complete contacts on calling frequencies is okay if the band isn’t busy. Otherwise, move to a nearby frequency.
A national FM simplex calling frequency is set aside on each band just for general “Anybody want to chat?” calls. These frequencies are 52.525, 146.52, 223.50, 446.00, and 1294.5 MHz. When driving between cities, I often tune my radio to one of these channels in case I hear a call from other travelers on the highways. With in-vehicle GPS now common and scanning functions built in to most radios, the simplex channels are not used as much. Nevertheless, having them stored in a memory channel of your radio is a good idea.
If you’re traveling and want to make a contact on the simplex calling frequencies, the best way to do so is to just announce that you’re monitoring, as you would on a repeater channel, or make a transmission similar to this one:
This is NØAX November Zero Alfa X-ray mobile, headed southwest on Interstate 44 near Leasburg. Anybody around?
Repeat this transmission a few times, spacing the repeats a few seconds apart. If you’re moving, try making a call once every five minutes or so.
Because simplex communications don’t take advantage of a repeater’s lofty position and powerful signal, you may have to listen harder than usual on these frequencies. Keep your squelch setting just above the noise level. After making a call, you may want to open the squelch completely (use the monitor or MON function) so you can hear a weak station responding.
Solid simplex communications usually require more power and better antennas than typical handheld radios have — at least, on one end of the contact. To get better results on simplex with just a few watts, try replacing a handheld radio’s flexible antenna with a full-size ground plane or a small beam. I discuss these antennas in Chapter 12.
Digital Voice Systems
The traditional analog voice modes of SSB and FM have some competition! In recent years, individual hams and manufacturers have developed a variety of methods for sending voice signals over the air as digital signals. More are added to the amateur’s toolbox every year. Being digital, most of the new modes offer ways to connect beyond station-to-station contacts over the air. At a minimum, they all employ multiple layers of technology to get the job done. As such, they are all rightfully considered to be digital voice systems and not just a signal mode.
This section describes the most common digital voice systems as of late 2017. You can find out more about each of them in publications like The ARRL Handbook, magazine and web articles about the different modes, and the websites of manufacturers that produce equipment compatible with those modes. The best compilation of technical information about all the digital voice modes are The ARRL Handbook chapters on Digital Modes and Digital Operation.
Except for using a digital signal, the procedures and customs for making digital voice QSOs are about the same as for the analog voice modes of FM and SSB. A little more technology is involved, but you can listen and respond and call in the same basic ways. (The DMR system described below has a very different setup and more tuning selections.) The websites shown for each of the systems explain the details of configuring your radio and making a contact.
HF digital voice
The following two digital voice systems are active on the HF phone bands. If you tune them in with an analog SSB receiver, you’ll hear a “roaring” noise. The decoding equipment or software that turns the “noises” into “voices” has tuning indicators to help you adjust the frequency for proper reception. When the frequency is adjusted properly, the associated software can decode the digital system and regenerate the original voice.
At their core, digital voice systems depend on a codec (short for “code-decode”) to convert between the analog voice and digital data. Some codecs are proprietary and can only be used with permission or licensing. Each type of codec, whether it is software that runs on a PC or firmware in a special IC, does the job a little differently and so “colors” the voice a little bit. Different codecs are selected or developed for the type of signals used to carry the voices around. A codec designed for telephone audio won’t work as well for audio transmitted over the amateur HF bands.
- AOR Digital Voice (
www.aorusa.com) — This is the oldest of the digital voice modes used on HF. It requires modems produced by the AOR company which are connected between a microphone and the microphone input of an SSB transceiver to create the digital voice signal. The modem changes the headphone or speaker output of the radio back to analog speech. - FreeDV (
freedv.org) — FreeDV is an open-source software system including software package that runs on a PC and controls tuning, receiving, and transmitting. The codec used by FreeDV is called codec2. Both FreeDV and codec2 are used on both HF and VHF/UHF bands. Using FreeDV requires a PC sound card to be connected to an SSB transceiver’s microphone input and audio output. The microphone and speakers are connected to the PC.
VHF/UHF digital voice
Several digital voice systems are in use on the VHF and UHF bands. They are organized on the same channels that analog FM repeaters use.
Regular analog FM voice radios can’t receive digital voice signals, and vice versa. An analog FM radio hears digital voice signals as white noise. A digital voice radio simply rejects the analog FM signal. (Some radios can operate in either FM or digital voice mode.)
A digital voice repeater receives the digital stream of data and retransmits it just like an analog FM repeater does, but it is still digital data. Because the voice signal is already digital when it’s transmitted, it can be shared or relayed over digital networks easily. Some digital voice repeaters can receive and retransmit either analog FM or digital voice signals automatically.
Some of the digital system repeaters support both analog and digital voice signals. Typically, a repeater’s users tend to be all-analog or all-digital but some systems support both types of users although sharing is somewhat difficult. You can check a repeater directory or just search online for repeaters supporting a specific system in your area. For example, searching for d-star repeater missouri turned up several lists of local repeaters and links to national repeater databases.
Amateur radio data may seem pretty slow and compared to WiFi or household broadband service it certainly is. This results from the relatively narrow bandwidths available to hams. Commercial wireless data uses many megahertz of spectrum whereas hams have access only to tens of kilohertz. Amateur data rates are faster on the shared microwave bands where reprogrammed commercial wireless routers and access points can be operated on the ham bands at full speed and with much higher power.
The most popular digital voice systems in use today include
- D-STAR (
www.dstarinfo.com) — This is a combination voice-and-data mode that was designed under an open standard. Both Icom and Kenwood make D-STAR-compatible equipment. D-STAR is used on the VHF and UHF bands and has three modes: DV (digital voice and 1200 bits/sec data), Fast DV (4800 bits/sec data), and DD (high-speed data, approximately 100k bits/sec). D-STAR also links to a world-wide system of repeaters via microwave and Internet links. Several applications are available to exchange data over D-STAR links. - System Fusion (
systemfusion.yaesu.com/what-is-system-fusion) – This is a voice-only system created by Yaesu for use on the VHF and UHF bands. It is also referred to as C4FM, which is the type of modulation used to send the digital data over the air. System Fusion radios and repeaters can operate as either analog or digital voice. System Fusion equipment can also use the Yaesu WIRES-X system to link stations via the Internet (systemfusion.yaesu.com/wires-x). - DMR (Digital Mobile Radio;
www.trbo.org/docs/Amateur_Radio_Guide_to_DMR.pdf) — Created by Motorola for commercial and government users under the trade name MOTOTRBO, amateurs have adapted DMR to ham radio and administer world-wide networks that link DMR equipment together via the Internet. DMR is very similar to “trunking” systems that allow many users to share a few radio channels through the use of “talk groups” and routing protocols via the Internet.
Data-only network systems such as Broadband-Hamnet (www.broadband-hamnet.org, also known as HSMM-MESH) create networks using Internet protocols and reprogrammed wireless data router equipment. These systems operate on the same bands that are shared between hams and WiFi equipment — 2.4 GHz and 5.6 GHz. Digitized voice can be sent across these networks using standard Internet protocols like VoIP (Voice over IP) just as from a home computer.
Because the various digital voice modes are incompatible over the air, amateurs have developed “translators” known as hotspots. A hotspot contains a low-power VHF/UHF digital transceiver and connects through a host PC to the Internet. The hotspot transceiver communicates with the users low-power handheld or mobile transceiver over any supported digital voice mode. (Most hotspots support all three current digital voice modes.) The hotspot also communicates with a digital voice repeater on the Internet, acting as a bridge between the user’s transceiver and the network. Hotspots are available for D-STAR, System Fusion, and DMR systems.
Digital repeater networks
A full discussion of the way repeater networks operate is beyond the intentions of this book. However, an overview of the way the systems of repeaters and stations are built is worth including.
If you decide to dive deeply into the networks, there is a lot of information online at the manufacturer website or through Internet searches. Building and using repeaters is a fast-moving area of amateur radio and hams are creating interesting apps and features every day.
The systems described below are active and more repeaters are linked to the systems every day. The IRLP system includes about 3,000 stations around the world. EchoLink currently lists more than 2,000 repeaters and more than 200 conference servers. The D-STAR system lists about 1,000 gateways, many serving more than one repeater. To find other hams who use these systems, you’ll want to join an online user group. The following are just the most visible groups — there are lots of others:
- EchoLink:
groups.yahoo.com/group/echolink - D-STAR:
www.dstarusers.org/ - IRLP:
groups.yahoo.com/group/irlp - System Fusion:
groups.yahoo.com/neo/groups/YaesuSystemFusion/info - Digital Mobile Radio (DMR):
www.facebook.com/groups/DMRTrack
Complete information about how the repeater networks are connected and used is available on the home pages for each system, along with extensive “getting started” instructions, FAQs, and resources for finding and even installing your own system repeater or station.
Voice over Internet Protocol (VoIP) systems
Two ham radio systems link repeaters via the Voice over Internet Protocol (VoIP): EchoLink (www.echolink.org) and the Internet Relay Linking Project (IRLP; www.irlp.net). Voice signals and control information is exchanged in much the same way that the Skype web communication application does. Figure 9-5 illustrates the basic IRLP system.

FIGURE 9-5: The basic IRLP system. The EchoLink system is very similar.
The links between repeaters and individual stations in the IRLP and EchoLink systems are controlled manually by the system users. When you’re connecting to either system beyond your local repeater, you must enter an access code manually using the radio’s keypad. The code identifies the repeater system you want to use; then the system sets up the connection and routes the audio for you. When you finish, another code or a disconnect message ends the sharing. This overview is very simplified, of course, and both systems offer useful features beyond simple voice links.
EchoLink systems can also be accessed directly from a computer via the Internet, so users don’t have to have a radio at all, making EchoLink a popular way to communicate if you don’t have a radio handy or are traveling away from your home repeater but still want to have contacts with local stations. The best guide for learning about and using EchoLink is the Nifty E-Z Guide to EchoLink Operation by Bernie LaFreniere, N6FN (www.niftyaccessories.com/EchoLink_book.php).
An IRLP node is a regular FM repeater with an Internet link for relaying digitized voice. A user or control operator can direct an IRLP node to connect to any other IRLP node. When the node-to-node connection is made, the audio on the two repeaters is exchanged, just as though both users were talking on the same repeater. It’s common for a ham in Europe to communicate with a ham in New Zealand, for example, with both parties using handheld radios that put out just a watt or two.
You can also connect several nodes by using an IRLP reflector. The reflector exchanges digitized audio data from any node with several other nodes in real time. Even a user who doesn’t have a radio can join in by logging on to an IRLP reflector or node. (All users who create radio transmissions have to be licensed, however.)
To use the IRLP system you don’t need anything more than your radio, the IRLP system’s control-tone sequences for your repeater, and a list of the four-digit node on-codes that form the IRLP address of an active IRLP repeater. Using the IRLP system is described at www.irlp.net/guidelines.html. The introductory article at www.eham.net/newham/irlp gives a good overview of the system, as well.
The D-STAR system
D-STAR is not only a type of repeater system, but also a complete set of digital communication protocols for individual radios. D-STAR’s digital voice protocol must be used by everyone on the system, requiring the use of radios that are compatible with D-STAR. D-STAR’s fully digital system in Figure 9-6 also enables data-only operation, and many software applications have been developed to use that capability.

FIGURE 9-6: An overview of the D-STAR system.
D-STAR repeaters are connected to the D-STAR system through gateways: computers that are connected to the repeater and to the Internet. Hams establish links from one D-STAR repeater to another by entering call signs into their D-STAR radios. The D-STAR system’s servers use these call signs to look up the low-level Internet network addresses of individual repeaters. Then the system directs each repeater to make the connection and share the voice data.
Call-sign lookup is an interesting feature because hams don’t have to know where another ham is to contact that person; the D-STAR system remembers where each ham last used a D-STAR repeater. Calls to a specific ham are routed to his or her last-known D-STAR repeater. This feature is a lot like the mobile phone system, which keeps track of where your phone is connected to the network so it can route your calls to that point.
The WIRES-X system
This system shown in Figure 9-7 is similar to the IRLP and EchoLink systems. Individual stations are connected to the Internet through WIRES-X routers, creating a WIRES-X node. The node has a unique ID that can be accessed by other WIRES-X nodes through the Internet.
FIGURE 9-7: An overview of the WIRES-X system.
The radio connected to the router can be used directly by a user so that talking into the microphone communicates through the Internet without transmitting an RF signal. Another radio, such as a nearby handheld or mobile radio, can communicate over the air to the node-connected host radio and be connected to other WIRES-X nodes through the Internet as well. This creates user-to-user communication.
On the Internet, computers can host a WIRES-X room, like an Internet chat room. When a node is connected to a room, the node user hears all the audio from every node connected to that room. This supports round-table contacts and nets. Rooms can be semi-permanent and have a theme, such as “DXing” or “Local Traffic” or they can be temporary, created for a specific need.
The DMR system
The DMR or Digital Mobile Radio system was originally designed by Motorola for shared communications systems used by public safety, government, and commercial users. It operates similarly to the earlier “trunked” systems that were intended to support fleet and department-level operations with many users. Hams adapted this technology as they had done with analog FM systems decades before. Because DMR was designed for commercial use, much low-cost equipment is available, although the user interface and programming are not as user-friendly as equipment designed for ham radio. DMR’s popularity is increasing rapidly.
In the DMR system (see Figure 9-8), each radio connects to the local repeater and is assigned one of two alternating time slots during which it can transmit and listen to the digital voice stream of the repeater. (DMR digital voice transmissions consist of two alternating streams of data. This is referred to as TDMA — Time-Division, Multiple Access.) Much like a mobile phone and its host system, the radio must request permission to transmit from the repeater.
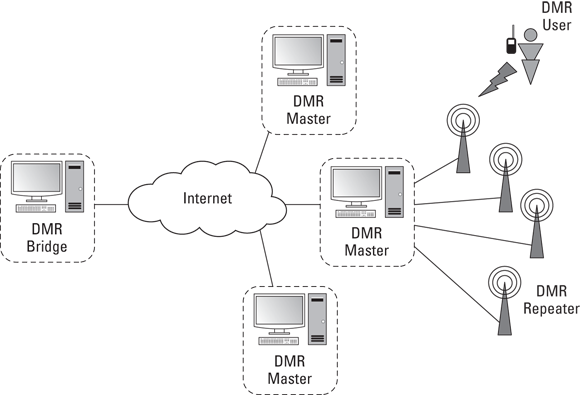
FIGURE 9-8: An overview of the DMR system.
The repeater is in constant communication with a local or regional “master” that manages all the data streams from the repeaters connected to it. This allows the DMR system to create “talk groups” so that groups of users can share the same repeater without interference. In addition, masters are also in communication with central “bridge” systems, creating networks that route communications between thousands of users. There are two primary bridge systems today (2017), the MARC (Motorola Amateur Radio Club) and the Bridge-Com systems.
There are numerous other features that make DMR the most flexible amateur communications network currently in use. Talk groups can be local, regional, or even international in scope. Various levels of authorization and authentication can be created. If you are interested in the technical details of DMR, the Amateur Radio Guide to Digital Mobile Radio (DMR) by John Burningham (W2XAB) is an excellent introduction (www.trbo.org/docs/Amateur_Radio_Guide_to_DMR.pdf).
Chewing the Rag
I first mention ragchewing in Chapter 8 the most likely way of making your first contacts. In this section, I go into deeper detail about the etiquette of the ragchew, ham radio’s conversational art!
Knowing where to chew
Although ragchewing isn’t listed on any band plan, you can find ragchewers in common areas of every band.
HF bands
Below 30 MHz, all the bands have a similar structure. CW (Morse code) and digital modes occupy the lower third (more or less), and voice modes occupy the upper two-thirds (less or more).
Figure 9-9 shows where you can expect to find contacts of different styles on a typical HF band. You find the ragchewers mixed in with the long-distance (DX) contacts at the low end of the band. This is oversimplified, of course, but gives you an idea of how to start.
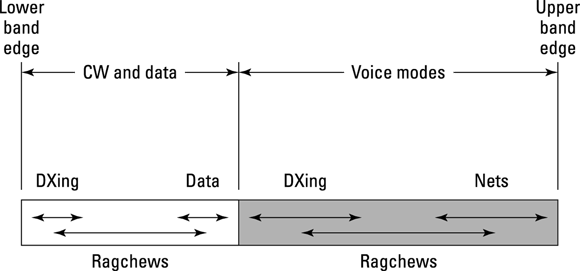
FIGURE 9-9: The general operating conventions on the HF bands.
You can always find CW at the low frequencies of the HF bands. The faster operators tend to be at the bottom of the bands, with average code speed dropping slowly as you tune higher.
Digital signals nearly always cluster close to the published calling frequencies listed in the band plans for that particular mode unless a major contest or some other event is going on. Stations spread out higher in frequency from there.
You may think that ragchewers are buffeted from all sides, but that’s not really the case. Ragchew contacts take place all the time, so they tend to occupy just about any spare bit of band. To be sure, in the case of disasters (when a lot of nets are active), major operations from rare places, or weekends of big contests, the bands may seem to be too full for you to get a word in edgewise. In those cases, try a different band or mode; you’ll probably find plenty of room.
When the bands sound too full to use, try reducing your receiver’s sensitivity. It could be overloading or just making it too easy for you to hear noise. Turn off the preamp, turn down the RF Gain, or turn on the attenuator … or all three! You will probably be able to hear just fine, and the noise and “crud” will be a lot less objectionable. While you’re at it, turn off the Noise Blanker, which can generate distortion all by itself if strong signals are present.
The FCC can declare a communications emergency and designate certain frequencies for emergency traffic and other communications. Keeping those frequencies clear is every amateur’s responsibility. The ARRL transmits special bulletins over the air on W1AW, by email, and on its website if the FCC does make such a declaration. The restrictions are in place until the FCC lifts them.
VHF and UHF bands
On the VHF and UHF bands, you usually find ragchewing in the repeater sections, although wide-open spaces for an SSB, CW, or digital conversation are available in the so-called weak signal segments. Scan the wide-open spaces away from the repeater channels and you may come across a local group using a frequency as their “watering hole.” Join in and say hello!
The bottom portion of the VHF/UHF bands is referred to as weak signal, although that’s really a misnomer. The reason for the name is that contacts via CW and SSB can be made with considerably weaker signals than on FM. Most of the weak-signal signals you hear are sufficiently strong for excellent contacts, thank you!
Table 9-2 lists the calling frequencies and portions of the VHF/UHF bands. The operating style in this portion of the bands is similar to HF as far as calling CQ and making random contacts go, but the bands are far less crowded because propagation generally limits activity to regional contacts.
TABLE 9-2 VHF/UHF CW and SSB Calling Frequencies
Band |
Frequencies (In MHz) |
Use |
6 meters |
50.0–50.3 |
CW and SSB |
50.070, 50.090 |
CW calling frequencies |
|
50.125 and 50.200 |
SSB calling frequency; use upper sideband (USB) |
|
2 meters |
144.0–144.3 |
CW and SSB |
144.200 |
CW and SSB calling frequency; use USB |
|
222 MHz (1¼ meters) |
222.0–222.15 |
CW and SSB |
222.100 |
CW and SSB calling frequency; use USB |
|
440 MHz (70 cm) |
432.07–433.0 |
CW and SSB |
432.100 |
CW and SSB calling frequency; use USB |
The digital repeater networks create Internet-like ways for people with similar interests to find each other. For example, the WIRES-X network has “rooms” and the DMR system has “talk groups.” These function similarly to the analog FM calling frequencies in that they are great ways to connect with other stations with a minimum of searching.
Knowing when to chew
Whether you’re on HF or VHF/UHF, you’ll find that ragchewing has its good times and its poor times. When calling CQ (signifying that you want to talk to any station), you can let it be known in several ways that you’re looking for an extended contact. You also hear numerous clues that a ragchew may not be what another station has in mind.
I keep coming back to this point, but listening is the best way to learn operating procedures in ham radio. The most important part of any amateur’s station is between the ears. If you want to call CQ successfully, spend some time listening to more experienced hams do it.
Good times
Assuming that you’re tuning an open band (with signals coming in from various points), when is a good time to ragchew? First, consider the social aspects of your contact timing. Weekdays generally are good days to ragchew, especially during the daylight hours, when hams who have day jobs are at work or student hams are in class.
You may want to revisit Chapter 8 when considering what band is best to use. If you like to talk regionally, you can always use a repeater or one of the low-frequency HF bands. For a coast-to-coast talk, one of the high-frequency bands is your best bet. The better your antenna system, the more options you have.
Lots of hams do their operating on weekends, but that’s also when special events and contests are held. Be prepared for a full band every weekend of the year. The silver lining of this cloud is that plenty of hams will be on the air for you to contact. If you know that one mode or band is hosting some major event, you can almost always find a quiet spot on another mode or band.
The WARC bands (see the nearby sidebar “What’s a WARC?”) never have contests and usually are wide open for ragchews and casual operating.
Not-so-good times
Because a ragchew can last for a long time, pick a time and band that offer stable conditions. Propagation changes rapidly around sunrise and sunset. Local noon can be difficult on the higher bands. Don’t be afraid to make contacts at any old time, though. You may surprise yourself and find out about propagation from the best teacher: experience.
Because weekends are busy times, you should check the contest and special-event calendars (see Chapter 11). A little warning keeps you from being surprised when you get on the air and allows you to be flexible in your operating.
It can be a very different time of day at the other end of a DX contact.
When the bands seem to be frustratingly full, here are some helpful strategies that keep you doing your thing:
- Try a nontraditional band. Most nets and all contests are run on the traditional bands. The WARC bands almost always have sufficient space for a QSO.
- Try a different mode. Very few big contests have activity on more than one mode. You can change modes and enjoy a nice ragchew, too.
- Be sure that you know how to operate your receiver. Cut back on the RF gain, use narrower filter settings, know how to use controls such as the IF Shift and Passband Tuning controls, and generally be a sharp operator. You can remove much interference and noise just by using all the adjustments that your receiver provides.
- Always have a backup plan. There’s no guarantee that any particular frequency will be clear on any given day. Hams have frequency freedom second to none, so use that big knob on the front of your radio.
Receivers are very sensitive and can easily be overloaded by strong signals, causing distortion that sounds like interference. You can make a huge improvement in listening quality by ensuring that your receiver is operating linearly. Start by turning off the preamp and noise blanker. Turn down the RF Gain control until the signal you’re listening to is at the lowest comfortable level; you’ll hear the noise background fade away. You can even switch on the receiver’s attenuator to knock down strong signals even more. Use the minimum amount of sensitivity required to make the contact, and you’ll enjoy listening a lot more.
Identifying a ragchewer
If you’re in the mood for a ragchew, and you’re tuning the bands, how can you tell whether a station wants to ragchew? The easiest way is to find an ongoing ragchew and join it. You can break in (see Chapter 8) or wait until one station is signing off and then call the remaining station.
Look for a station that has a solid signal — not necessarily a needle-pinning strong station, but one that’s easy to copy and has steady signal strength. The best ragchews are contacts that last long enough for you to get past the opening pleasantries, so find a signal that you think will hold up.
One cue that the station isn’t looking for a ragchew is a targeted call. You may tune in a PSK signal and see “CQ New York, CQ New York de W7VMI.” W7VMI likely has some kind of errand or message and is interested in getting the job done. Perhaps the station on voice is calling “CQ DX” or “CQ mobiles.” In that case, if you’re not one of the target audience, keep on tuning.
Another not-a-ragchew cue is a hurried call or a call that has lots of stations responding. This station may be in a rare spot, in a contest, or at a special event. Keep tuning if you’re really looking for a ragchew.
Calling CQ for a ragchew
Although responding to someone else’s CQ is a good way to get started, it’s also fun to go fishing — to call CQ and see what the bands bring.
The best CQ is one that’s long enough to attract the attention of a station that’s tuning by but not so long that that station loses interest and tunes away again. If the band is quiet, you may want to send long CQs; a busy band may require only a short CQ. As with fishing, try different lures until you get a feel for what works.
On voice modes, the key is in the tone of the CQ. Use a relaxed tone of voice and an easy tempo. Remember that the other station hears only your voice, so speak clearly, and be sure to use phonetics when signing your call. Sometimes, a little extra information — such as “from the Windy City” — helps attract attention. Don’t overdo it, but don’t be afraid to have a little fun.
Be sure your transmitted audio is not distorted and that your RF signal is not splattering. Have a friend listen in and make sure you have a clear, clean signal. Take note of your transmitter settings and how the meters respond when you’re speaking.
Evaluate on-the-air technique as you tune across the bands. Consider what you like and dislike about the various styles. Adopt the practices you like, and try to make them better; that’s the amateur way.
Sharing a ragchew
Hams come from all walks of life and have all kinds of personalities, of course, so you’ll come across both garrulous types, for whom a ragchew that doesn’t last an hour is too short, and mike-shy hams, who consider more than a signal report to be a ragchew. Relax and enjoy the different people you meet.
If your radio has the capability to listen between CW dits and dahs (which your operating manual calls break-in or QSK), use it to listen for a station sending dits while you are CQing. That means “I hear you, so stop CQing and let me call!” Then you can finish with “DE [your call] K,” and the other station can call instead of waiting.
Roundtables — contacts among three or more hams on a single frequency — are also great ways to have a ragchew. Imagine getting together with your friends for lunch. If only one of you could talk at a time, that would be a roundtable. Roundtables aren’t formal, like nets; they generally just go around the circle, with each station talking in turn. Stations can sign off and join in at any time.
Ragchewing by keyboard and Morse
You’ll find that having a conversation using a keyboard or Morse (CW) has many similarities to voice contacts. The general structure is the same and much of the same information is exchanged. There are some minor differences you’ll quickly get used to. Like learning voice operating, just monitor QSOs and you’ll quickly learn how other operators do things.
The basic style of most CW and digital QSOs is the same on RTTY as it is for PSK31 and other character-oriented modes. Figure 9-10 shows some of a PSK31 QSO between Gil, F2SI (in Marseilles, France) and Skip, KH6TY (in Charleston, SC). Monitored by a third station, this QSO is too long to fit entirely in the decoded information window, but I’ll do a play-by-play, since this contact has some important elements:
F2SI Calls CQ: |
CQ CQ de F2SI F2SI F2SI K (before the figure starts) |
KH6TY Responds: |
F2SI DE KH6TY KH6TY KH6TY/4 K |
F2SI starts the QSO: |
KH6TY KH6TY de F2SI |
|
You are 589 589 — Good copy. (the figure starts here) |
|
QTH MARoeEILE MARSEILLE … sohern FRANCE |

FIGURE 9-10: A PSK31 QSO using the DigiPan software.
This is why even digital modes need to sometimes repeat information — some noise or fading or interference caused the “oe” and misspelling of “southern” to appear on our screen.
|
How copy? |
|
KH6TY KH6TY de F2SI F2| (noise or fading here) |
KH6TY calls again: |
F2SI F2SI F2SI DE KH6TY KH6TY/4 K |
Skip is not sure that Gil was talking to him and gave him another call. The fading or noise goes away and Gil responds to confirm he is contacting Skip.
Gil confirms: |
6TY de F2SI F2SI pse K (go ahead, please, KH6TY!) |
|
L (a noise burst decoded as spaces and “L”) |
Skip gives his info: |
F2SI DE KH6TY Hi Gil, Name is Skip and I am in |
|
Charleston, SC on the east coast. You are running 569 |
|
here nice signal. I am running one watt one watt to |
|
a dipole. So BTU (back to you) F2SI DE KH6TY K |
There is some fading or noise and we only see the last part of Gil responding to Skip’s information:
F2SI responding: |
… SI F2SI F2SIa |
|
rellr OM Skip |
|
e thak you very much for the report. |
|
You are 589 589 good copy. |
Now, Gil sends a preprogrammed set of information called a brag tape (see below):
|
My equipment is : ICOOLLINS 30L-s linr |
|
Antenna : Hy-Gain 5 elementsH5DX |
|
Computer : Pentium III – z – |
And so on. An experienced ham would read right through the noise causing the extra or missing characters to understand that Gil has a Collins 30L-1 S-line linear amplifier, a TH-5DX antenna, and a P3 computer. The noise “takes out” a few characters here and there but like smudges on a printout of an article, missing a few characters doesn’t render the information unreadable.
Why show a noisy contact? It’s unreasonable to give you the idea that ham radio contacts are all perfect! You’ll get the hang of dealing with the various impediments — that’s part of what makes it fun and not just another mobile phone exercise. Your abilities play an important part, too!
For CW, you send each character manually at an appropriate rate. Digital QSOs are another matter. If you are a quick typist, you may feel comfortable typing characters while the transmitter is sending them. This makes many new hams uncomfortable and feel like they are under pressure to keep the characters coming! You can get around this with macros or brag tapes. It’s really okay, too, to just let the transmitter idle (send null characters) while you think of something to type. This is the digital mode equivalent of “Uhhhh …”
If you find yourself at a loss for words, just enter “BTU” (back to you) as Skip did, both call signs, a “K” to indicate you’re done transmitting, and follow it with a new-line character (Enter). The other station will wait to see his or her call and K before assuming your transmission is complete. We’ve all been flustered at one point but don’t be embarrassed; just “turn it around” and let the other station type!
Brag tapes
Rather than type everything each time, common information such as operator or station information is saved in a brag tape file. A typical brag tape (also known as a macro) has information about the operator or the station or something else that is sent frequently enough to have recorded and not have to type every time.
For example, here’s a typical brag tape with station details:
- Rig: IC-7300 and MFJ-939 Auto-tuner
- Power: 25 watts
- Ant: HF-6V Vertical with 32 radials
- Software: FLDIGI 4.0.9
- OS: Windows 10
You can have brag tapes for all sorts of things and have them ready to play back with a single key press. If you find yourself having to type in the same information over and over, perhaps putting it in a brag tape is a good idea.
Brag tapes come from the old days of electromechanical teleprinters when “tape” literally meant “paper tape”! RTTY operators usually had several rolled up and ready to go with one loaded into the tape reader for CQs and that sort of thing. Today, brag tapes are typically a file on a computer that is sent with a key press.
Concluding the QSO
Finally, the end of a digital mode QSO looks a lot like the end of a CW QSO which is a lot like the end of a phone QSO. Refer to the section “The long goodbye” in Chapter 8 for that discussion.
Remember that most software in use today has a screen width of about 80 characters. If you don’t break up your lines of text, the characters may scroll out of the receive window of the receiving station! Keep your lines of characters reasonably short, like this example that shows a CQ message consisting of two lines. The “K” at the end of the second message is a prosign used for both Morse and digital modes to mean “I am done transmitting” when on voice you would say “Over”:
- CQ CQ CQ de NØAX NØAX NØAX (new line here)
- CQ CQ CQ de NØAX NØAX NØAX K (new line)
Many operators report good luck with 3-by-2-by-3 CQs (CQ CQ CQ de NØAX NØAX, repeated three times). It is also common to end with “PSE K” (please respond now, go ahead) instead of the plain “K.”