An entity class is a simple Java class that is annotated with JPA's @Entity annotation. Entity classes use the standard JavaBean naming convention and have proper getter and setter methods. The class fields have private visibility.
JPA creates a database table called the name of the class when the application is initialized. If you want to use some other name for the database table, you can use the @Table annotation.
To be able to use JPA and the H2 database, we have to add the following dependencies to the pom.xml file:
    <dependency>
      <groupId>org.springframework.boot</groupId>
      <artifactId>spring-boot-starter-data-jpa</artifactId>
    </dependency>
    <dependency>
        <groupId>com.h2database</groupId>
        <artifactId>h2</artifactId>
        <scope>runtime</scope>
    </dependency>
Following are the steps for creating entity classes:
- To create an entity class in Spring Boot, we will first create our own package for entities. The package should be created under the root package.
- Activate the root package in Eclipse Project Explorer and right-click to show a menu.
- From the menu, select New | Package. The following screenshot shows the creation of package for entity classes:

- We name our package com.packt.cardatabase.domain:

- Next, we create our entity class. Activate a new entity package, right-click, and select New | Class from the menu. Because we are going to create a car database, the name of the entity class is Car. Type Car in the Name field and then press the Finish button:

- Open the Car class file in the editor by double-clicking it in the project explorer. First, we have to annotate the class with the @Entity annotation. The Entity annotation is imported from the javax.persistence package:
      package com.packt.cardatabase.domain;

      import javax.persistence.Entity;

      @Entity
      public class Car {

      }
- Next, we add some fields to our class. The entity class fields are mapped to database table columns. The entity class must also contain a unique ID that is used as a primary key in the database:
      package com.packt.cardatabase.domain;

      import javax.persistence.Entity;
      import javax.persistence.GeneratedValue;
      import javax.persistence.GenerationType;
      import javax.persistence.Id;

      @Entity
      public class Car {
        @Id
        @GeneratedValue(strategy=GenerationType.AUTO)
        private long id;
        private String brand, model, color, registerNumber;
        private int year, price;
      }
The primary key is defined by using the @Id annotation. The @GeneratedValue annotation defines that the ID is automatically generated by the database. We can also define our key generation strategy. Type AUTO means that the JPA provider selects the best strategy for a particular database. You can also create a composite primary key by annotating multiple attributes with the @Id annotation.
The database columns are named according to class field naming by default. If you want to use some other naming convention, you can use the @Column annotation. With the @Column annotation, you can also define the column's length and whether the column is nullable. The following code shows an example of using the @Column annotation. With this definition, the column's name in the database is desc and the length of the column is 512 and it is not nullable:
@Column(name="desc", nullable=false, length=512)
private String description
-
Finally we add getters, setters and constructors with attributes to the entity class. We don't need an ID field in our constructor due to automatic ID generation. The source code of Car entity class constructors follows:
package com.packt.cardatabase.domain;

import javax.persistence.Entity;
import javax.persistence.GeneratedValue;
import javax.persistence.GenerationType;
import javax.persistence.Id;

@Entity
public class Car {
  @Id
  @GeneratedValue(strategy=GenerationType.AUTO)
  private long id;
  private String brand, model, color, registerNumber;
  private int year, price;

  public Car() {}

  public Car(String brand, String model, String color,
    String registerNumber, int year, int price) {
    super();
    this.brand = brand;
    this.model = model;
    this.color = color;
    this.registerNumber = registerNumber;
    this.year = year;
    this.price = price;
  }
The following is the source code of Car entity class getters and setters:
  public String getBrand() {
    return brand;
  }
  public void setBrand(String brand) {
    this.brand = brand;
  }
  public String getModel() {
    return model;
  }
  public void setModel(String model) {
    this.model = model;
  }
  public String getColor() {
    return color;
  }
  public void setColor(String color) {
    this.color = color;
  }
  public String getRegisterNumber() {
    return registerNumber;
  }
  public void setRegisterNumber(String registerNumber) {
    this.registerNumber = registerNumber;
  }
  public int getYear() {
    return year;
  }
  public void setYear(int year) {
    this.year = year;
  }
  public int getPrice() {
    return price;
  }
  public void setPrice(int price) {
    this.price = price;
  }
}
The table called car must be created in the database when we run the application. To ensure that, we will add one new property to the application.properties file. This enables the logging of SQL statements to the console:
spring.jpa.show-sql=true
We can now see the table creation statements when running the application:

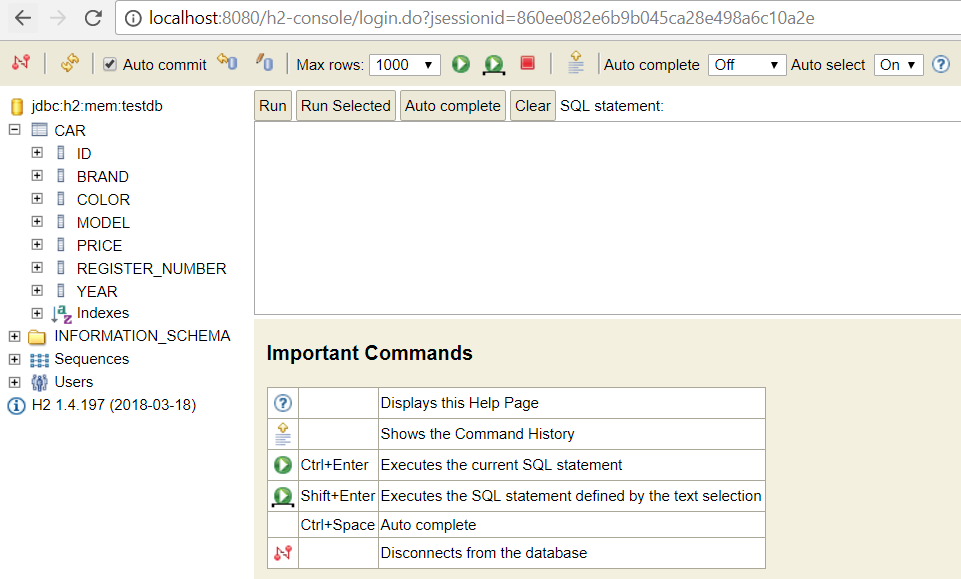
H2 provides a web-based console that can be used to explore a database and execute SQL statements. To enable the console, we have to add the following lines to the application.properties file. The first setting enables the H2 console and the second setting defines the endpoint that we can use to access the console:
spring.h2.console.enabled=true
spring.h2.console.path=/h2-console
You can access the H2 console by navigating to localhost:8080/h2-console with the web browser. Use jdbc:h2:mem:testdb as the JDBC URL and leave the Password field empty in the login window. Press the Connect button to log in to the console:

Now you can see our car table in the database. You may notice that the register number has an underscore between the words. That is due to the camel case naming of the attribute (registerNumber):