
Windows Media Quick Start
You need to get up to speed as quickly as possible on the basics of streaming media and Windows Media Series. Maybe you’re on a tight deadline or you have to learn this stuff in between 63 other projects that were due yesterday. You’ve come to the right place!
This chapter walks you step-by-step through a number of important installations. By the time you’re finished, you’ll be streaming a video file. Just to make things extra fast, the instructions assume that most default settings, automatically set by the installer, work for you. However, for this chapter to make sense, the text makes a number of further assumptions:
• You have a source audio or video file in a “raw” format, that is, a file with the extension .wav or .avi.
• You are allowed to install software on your system.
• You are familiar with the basics of using an FTP client.
• You are running a computer with Windows® XP operating system, preferably Windows XP Professional.
• You have access to a computer running at least Windows Server™ 2003 Standard Edition with Windows Media® Services installed.
• You have permission to upload files to a Windows Media Server and a Microsoft Internet Information Services (IIS) web server.
• You know something about writing HTML.
Even if you’re not sure about all of the above, we can still get started. By the time you finish this chapter, you’ll know how to:
• Update Windows Media Player
• Use the main player features
• Prepare your media file for encoding
• Install a Windows Media Encoder 9 Series
• Encode your media file
• Publish your media file
• Troubleshoot the installation process
Update Your Media Player
Unless you’ve built your own system from parts or bought a “bare bones” system, there’s a better than 99% chance that Windows Media Player is already installed on your hard drive. But you may not have the latest version, especially if you don’t have the latest version of the Windows operating system and its service packs.
Inside the Industry
![]()
What Is a Media Player?
The term media player refers to a piece of software that transforms digital signals transmitted over a computer network into signals that generate pressure waves in speakers, or patterns of light and color on a computer monitor. A software media player performs the same function as Thomas Edison’s original 1877 phonograph and similar devices that followed. On a phonograph, a needle followed the hills and valleys of a groove etched in wax. A diaphragm converted the needle’s vibrations into sound that humans could perceive. A phonograph is just an analog version of a twenty-first century piece of high-tech. Radios and televisions do something similar, converting invisible radiation (radio and television signals) into sound waves and visible light.
Author’s Tip
If you’re not part of the information technology team at your company, or you haven’t talked with your Internet service provider (ISP) for a while, now is a good time to make contact with your high priests of networking and tell them your plans. They will appreciate being “in the loop,” especially when it comes time to streaming your audio and video files.
Using the Player Update Feature
Fortunately, updating the player is free and easy. First, start up your player. A typical location is Start ![]() Programs
Programs ![]() Accessories
Accessories ![]() Windows Media Player. You’ll use the Player Update feature built into your version of the software. Here’s the procedure, as illustrated in Figure 1-1.
Windows Media Player. You’ll use the Player Update feature built into your version of the software. Here’s the procedure, as illustrated in Figure 1-1.
1. Click the Help menu
2. Select Check for Player Updates
The player will now contact the Microsoft network and check whether there’s a new version. If so, installation will begin. As of this writing, the latest version of Windows Media Player is 10.
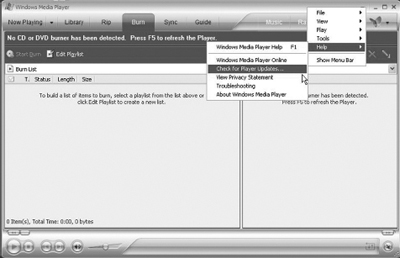
Figure 1-1
To update your player, click Help, then Check for Player Updates.
![]()
OK, you’re already confused. You’ve noticed that Microsoft advertises Windows Media 9 Series all over the place. But the latest version of the player is 10? Chalk it up to a type of logic only Microsoft understands and expects the rest of us to figure out.
Windows Media Series Player 10 requires Windows XP.
Updating via the Microsoft Website
You also can update your player via the Microsoft website. It takes only a little longer, and it gives you an opportunity to get familiar with Microsoft’s Windows Media webpages.
Author’s Tip
From now on, the instructions assume you are logged on to the Internet. You’re going to be downloading some large files, so if you’re on a dial-up connection, be patient. If you’re on a DSL/cable line or better, be happy.
Unfortunately, Microsoft has decided to offer its latest version of the player only to XP users. (See the QuickTip below for update information for non-XP users.) Here’s the procedure for Windows XP:
1. Go to Microsoft’s Windows Media page: http://www.microsoft.com/windowsmedia/
2. Click the “Windows Media Player 10 for XP” button, as shown in Figure 1-2. (By the time you read this, the webpage may have changed somewhat, but the link will still be the same.)
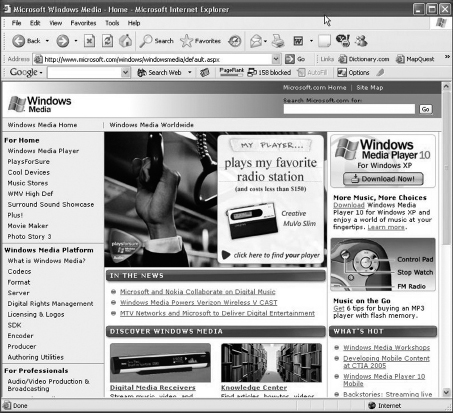
Figure 1-2
Click the “Windows Media Player 0 for XP” button on the Microsoft Window Media Player page to begin updating your player.
3. In the Windows Media Player Download Page, click the “Download” button.
4. In the File Download box, click “Save,” and place the installer in a directory on your hard drive where you can find it later.
5. Click Start ![]() Run…
Run… ![]() Browse…, find the directory where you put the installer, select it, and click OK.
Browse…, find the directory where you put the installer, select it, and click OK.
6. Accept the Supplemental End Users License Agreement.
7. In the “Welcome to Windows Media Player 10” window, click Next.
8. Review the options under “Select Your Privacy Options,” though it’s safe to go with the defaults, as shown in Figure 1-3. Click Next.
9. Review the options under “Customize the Installation Options.” It’s safe to use the defaults. Click Finish.
The player is now installed.
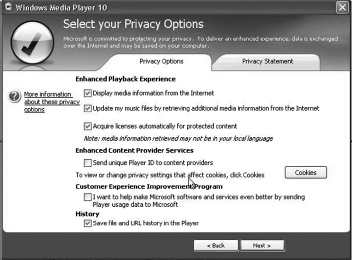
Figure 1-3
The Windows Media Player Installer offers several privacy options. You should also review the Privacy Statement.
![]()
If you have configured other applications to play certain file types, such as MP3 audio, Windows Media Player will now be the default player for those file types. If you’d prefer otherwise, uncheck the relevant boxes.
Overview of Main Player Features
The Windows Media Player offers a rich array of media management tools that go beyond simple playback of streaming media. This section covers the player’s main features, as shown in Figure 1-4.
Author’s Tip
For Non-XP Users
The instructions in this chapter assume you are using the Windows XP operating system. If you prefer not to upgrade to Windows XP, or you are using another operating system, you can upgrade to older versions of the player, including Windows Media Series 9, by visiting the Windows Media Download Center at: http://www.microsoft.com/windows/windowsmedia/download/default.asp.
The main features are arranged under tabs (and one arrow) at the top of the user interface: Now Playing, Library, Rip, Burn, Sync, Guide, and three tabs for MSN Music: Music, Radio, and Movies & TV. Now Playing
Now Playing
Now Playing shows you what is currently streaming. Depending on how you accessed the stream, the Now Playing panel shows more information about the stream, or, if you’re listening to music or a radio station, a colorful visualization, an often hypnotic graphical representation of the sounds you’re hearing.
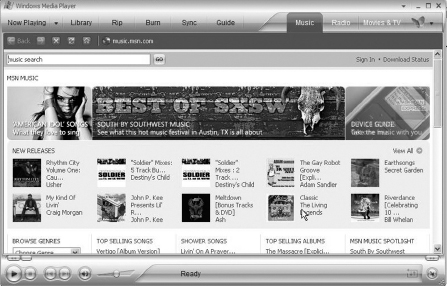
Figure 1-4
The Windows Media Player is a sophisticated media manager, as well as a streaming audio and video player.
Author’s Tip
To change the visualization, click the down arrow next to the Minimize button in the upper-right corner.
Select View ![]() Visualizations and choose one of dozens of choices.
Visualizations and choose one of dozens of choices.
Quick Access Panel
Nestled between the Now Playing and Library tabs is a down arrow. When clicked, it displays the Quick Access Panel, a handy way to select items from the personal media library that you create.
Library
The Library shows you all of the media files you’ve organized using your Windows Media Player.
Author’s Tip
This book is focused on streaming media, so it won’t show you how to build your own music library with Windows Media Player. For more information about these media management features, key F1 for help or visit the “Using Windows Media Player 10” page online at http://www.microsoft.com/windows/windowsmedia/mp10/usingplayer.aspx.
Rip
The Rip feature enables you to copy tracks from your music CDs to your hard drive. The files are automatically converted from the CD audio format to Windows Media format. (More about formats in Chapter 5, Optimizing Your Audio and Video.)
A Note about Copyrights
A copyright is the right of authors and composers to control who makes copies of their work. Without copyright, creative people would have a harder time earning money from their products. Generally speaking, copying music for your own enjoyment is legally OK. But if you copy a musician’s work and give it or, heaven forbid, sell it to someone without the artist’s permission, you are essentially picking his or her pocket. The vast majority of musicians make little money from their creativity. Why steal from them? To learn more about copyright, visit the US Copyright Office website, http://www.copyright.gov.
Burn
Burn helps you make your own audio CDs from your Windows Media library. Burn converts the Windows Media formatted files on your hard drive to the CD audio format so you can play the CD in your car, home stereo, or certain portable devices.
Sync
The Sync feature synchronizes audio files and playlists created through Windows Media Player and devices such as portable media players that are compatible with Windows Media file formats. Sync also allows the transfer of files protected with Microsoft’s digital rights management system.
Guide
The Windows Media Guide is a website for all kinds of streaming media content in Windows Media formats, from music to news to movie trailers, including downloadable files. The guide is updated frequently, so it’s a good idea to check it out whenever you can.
MSN Music
You’ll notice that the tabs change color slightly to the right. This is the online store section of Windows Media Player, which offers a variety of vendors selling everything from audio books to full-length movies. Microsoft’s MSN service is shown by default, but there are nearly a dozen other stores. The following text explains MSN’s main offerings to give you a sense of what’s available in this marketplace of streams and downloads.
Music — The Music tab opens an interface to MSN Music, MSN’s online site for sampling and buying music. You can listen to streaming samples of music in nearly all genres, buy individual songs or whole albums, and listen via Windows Media Player or via a Windows Media-compatible device.
Radio — Radio is MSN’s free and pay-to-listen live broadcasting service. Many of the offerings don’t cost a dime. Others give you access to specific genres of music or artists for a nominal fee.
Movies & TV — MSN’s Movies & TV tab in Windows Media Player offers movie trailers, behind-the-scenes stories, and promotional spots for TV shows.
Other Important Features
Windows Media Player has several other important features related to streaming media that the book will touch on here, and explain in more detail later.
Properties
The Properties window under the File menu shows technical information about the file itself, such as the codec used to encode the file, as shown in Figure 1-5. It also shows copyright information, data such as the author of the content, and license information, if applicable.
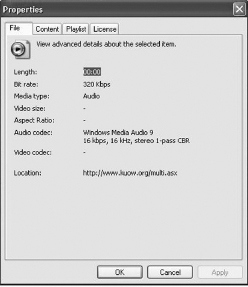
Figure 1-5
The Properties window under the File menu gives you important information about the file you’re playing.
Statistics
The Statistics window under the View menu shows important information about your connection to the Internet and the stream as the data arrives, which can help you diagnose problems.
Captions
New rules under the Americans with Disabilities Act require some media producers to include features that make their content accessible to the hearing impaired. Windows Media Series has features that enable compliance, but they are switched off by default. Hit Ctrl + Shift + C or Play ![]() Captions and Subtitles
Captions and Subtitles ![]() On to switch the feature on.
On to switch the feature on.
Prepare Your Media File for Encoding
If you’ve worked with audio or video files at all, you’re probably familiar with the .wav or .avi extension. These are industry-standard formats for audio (.wav) and video (.avi). But most of these files are far too large to send through the Internet, especially .avi files, even in these days of high-speed broadband. It’s also important to remember that many home users prefer dial-up connections. Sending large files through these connections is like pouring Niagara Falls through a straw.
Streaming media technology solves this problem by converting .wav and .avi files into smaller files that retain most of the sound and picture quality of the originals. The word “most” is important, because the quality of the encoded files depends on several variables, which the book discusses in Chapter 6, Encoding for Windows Media. Because this chapter is designed to get you going quickly, the book will skip the details and get right to using the Windows Media Encoder.
Inside the Industry
![]()
Encoding in streaming media technology refers to the process of converting certain audio and video files into smaller, compressed files optimized for transmission over a computer network.
Find Your Audio or Video File
Remember the assumptions at the beginning of this chapter? For the following instructions to make sense, you’ll need a .wav or .avi file to encode. Even if you’re not on a deadline, you should find one to practice on. There’s a couple of ways to do this:
• Use the Search in your operating system to find a file. Search for the extension with a wild card, a la “*.avi”. Be sure to include all your folders, including system folders.
• Check installation CDs for other kinds of software you have. Companies often include media files that play during installations.
• Search the Internet for files with the .wav or .avi extension. Government sites are good to mine, because the files usually aren’t protected by copyright.
Find a file of at least a couple of megabytes. Then put it on your hard drive in a place where you can find it later.
Install a Windows Media Encoder
The following section walks you through the installation of a Windows Media Encoder, the software that converts “raw” .wav and .avi files into files suitable for streaming. (For information on minimum recommended system requirements, see Chapter 3, Get Ready to Capture Audio and Video.)
You’ll notice immediately, especially if you’ve installed Windows Media Player 10, that the encoder is called “Windows Media Encoder Series 9.” This is the latest version of the encoder software as of this writing. Should Microsoft update the encoder to a new version by the time you read this, the procedures below should still work.
1. Load the Microsoft Windows Media Encoder webpage in your browser, as shown in Figure 1-6:
http://www.microsoft.com/windows/windowsmedia/9series/encoder/default.aspx
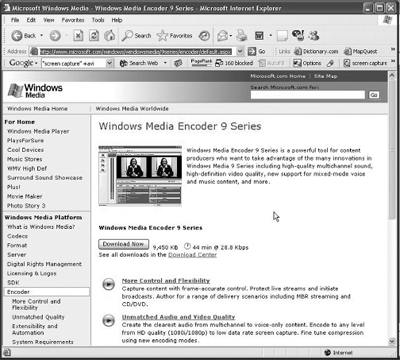
Figure 1-6
The Microsoft Windows Media Encoder Series 9 webpage. You’ll download the encoder from here.
2. Click the Download Now button and then click Save, placing the file in a convenient spot on your hard drive.
3. Click Start ![]() Run…
Run… ![]() Browse…, find the directory where you put the installer, select it, and click OK.
Browse…, find the directory where you put the installer, select it, and click OK.
4. When the Windows Media Encoder Series 9 Setup Wizard appears, click Next.
5. Accept the terms of the End User License Agreement.
6. Accept the suggested installation folder by clicking Next.
7. Click Install.
8. When installation is complete, click Finish.
Unlike most other programs, clicking Finish doesn’t actually start the program to give you a chance to see what you’ve accomplished. You’ll see the encoder in action in the next section.
Encode Your Media File
Now’s the time for some real interesting stuff! You’re going to convert your original file into a streaming media file. Step-by-step instructions follow.
![]()
For the rest of this chapter, you’ll work with an .avi (video) file. But most of the steps also work on .wav (audio) files.
1. Start the Windows Media Encoder by clicking the encoder icon on your desktop or selecting Start ![]() Programs
Programs ![]() Windows Media
Windows Media ![]() Windows Media Encoder. Note that on startup, the encoder’s New Session Wizard appears. This helps you walk through a simple encode.
Windows Media Encoder. Note that on startup, the encoder’s New Session Wizard appears. This helps you walk through a simple encode.
2. Select the “Convert a File” option and click OK, as shown in Figure 1-7.
3. Click the “Browse…” button under Source File, locate your .avi file, and click OK. Note how the wizard automatically puts a location and a filename with the extension in the Output File box, as shown in Figure 1-8. Feel free to modify this information to taste.
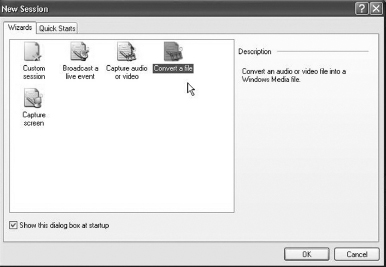
Figure 1-7
Select the “Convert a file” in the Windows Media Encoder New Session Wizard.
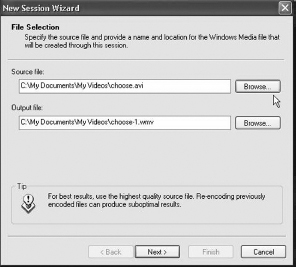
Figure 1-8
When you select the file to be encoded, the Session Wizard automatically assigns an output path and file name to the source file.
4. Click Next.
5. In the box labeled “Content Distribution,” select “Windows Media Server (streaming),” as shown in Figure 1-9.
6. Click Next.
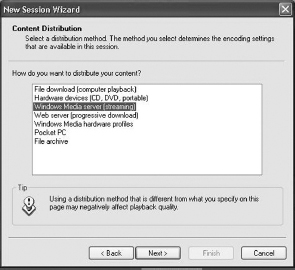
Figure 1-9
Choose “Windows Media Server (streaming)” as your Content Distribution option.
7. In the “Encoding Options,” you can ignore most of the gobbledygook for now. However, take a moment to scroll down the box with the checkboxes until you find the checked box or boxes, which tell you the target bandwidth for the file, as shown in Figure 1-10. (More on these options in Chapter 6.)
8. Click Finish.
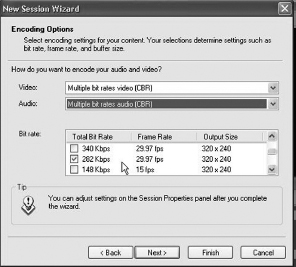
Figure 1-10
Scroll down the “Bit Rate” box to see the default bit rate for video encoding in the Session Wizard.
9. After the encoder completes its work, it shows you some statistics describing the results, as shown in Figure 1-11. Click Close.
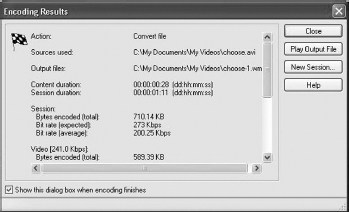
Figure 1-11
When the encoder finishes, it shows you some statistics about the encoded file.
You’ve successfully encoded your video file.
View the Encoded File
To view the encoded video, use the following procedure.
1. Start your Windows Media Player by clicking Start ![]() Programs
Programs ![]() Windows Media Player.
Windows Media Player.
2. Click the down arrow in the upper right corner.
3. Select File ![]() Open and find the output location of the encoded file you set in the encoder wizard.
Open and find the output location of the encoded file you set in the encoder wizard.
4. Look for the file name with the .wmv (video) or .wma (audio only) extension.
5. Select the file, and click Open.
The encoded file begins to play.
Publishing Your Windows Media File
For the highest quality user experience, you should stream your newly encoded file with Windows Media Services, which is software designed specifically to deliver streaming media files. You have two main options for media serving:
• Place your encoded file on your Windows Media Server.
• Place your encoded file on a Windows Media Server provided by your Internet service provider (ISP).
Each option requires somewhat different skills and knowledge. To keep this chapter brief and to the point, the instructions assume you have access to your own Windows Server 2003 with Windows Media Services installed. That enables the following section to make use of two wizards that speed up the media publishing process.
Unfortunately, the book’s assumption that you’ll have access to a Windows Server 2003 running Windows Media Services isn’t very realistic, especially if you’re not part of your company’s networking team. But the assumption does allow the book to use Microsoft’s publishing wizards to illustrate the ease of publishing Windows Media files.
![]()
Note carefully where the book tells you to Stop! what you’re doing before finishing the publishing points task just ahead. You need to do so before moving on to the next task.
Inside the Industry
![]()
Within Windows Media technology, you’ll sometimes hear the labels “Windows Media Services” and “Windows Media Server.” The former is Microsoft’s name for a set of technologies and tools for delivering and managing streaming media, such as managing content licenses and log files. The latter is just one of the Windows Media Services.
When a Windows Media Player requests a file to play, it uses a URL, similar to the URL of a webpage. The streaming URL points to a virtual location at the Windows Media Server, which redirects the request to the true location of the streaming file.
You create the virtual location by setting up a publishing point. The following instructions explain how:
1. At your Windows Server 2003 computer, open the Windows Media Services Administration Tool by clicking Start ![]() Programs
Programs ![]() Administrative Tools
Administrative Tools ![]() Windows Media Services.
Windows Media Services.
2. With your mouse, highlight “Publishing Point” in the left panel, as shown in Figure 1-12.
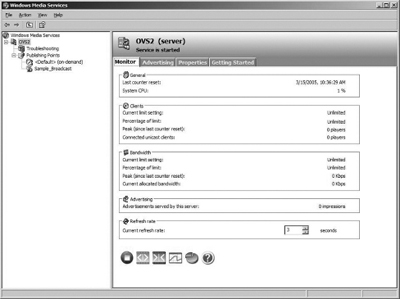
Figure 1-12
The Windows Media Services Administration Tool. Note the Publishing Points branch in the directory tree.
3. Right click, select Add Publishing Point Wizard, and click Next. This starts the wizard, a shown in Figure 1-13.
4. Create a Publishing Point name, if you don’t want to use the default, and click Next, as shown in Figure 1-14.
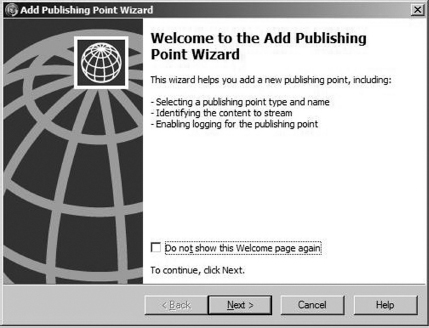
Figure 1-13
The Add Publishing Point Wizard.
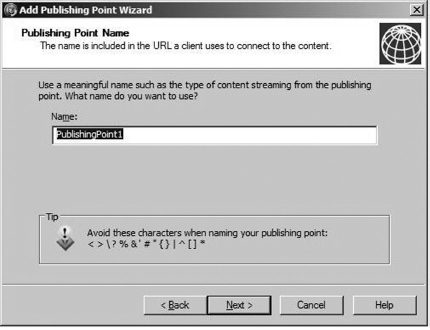
Figure 1-14
Create a name for the publishing point, if you decide not to use the default.
5. In the Content Type box, select the “One File” radio button, and click Next, as shown in Figure 1-15.
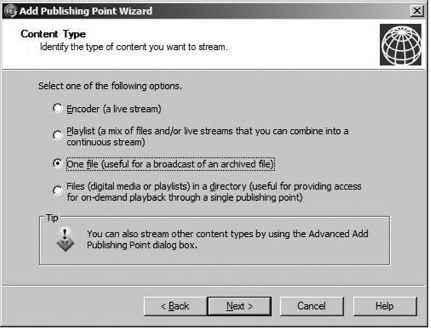
Figure 1-15
Select the “One File” option.
6. In the Publishing Point Type box, select the “On-Demand Publishing Point” radio button, and click Next, as shown in Figure 1-16.
7. In the Existing Publishing Point box, select the “Add New Publishing Point” radio button, and click Next, as shown in Figure 1-17.
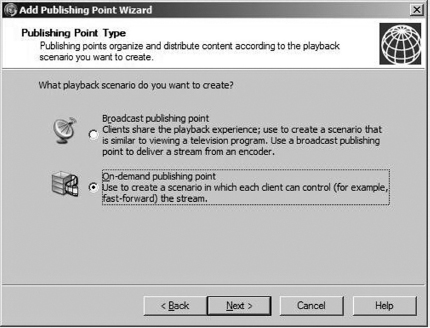
Figure 1-16
Select the “On-Demand Publishing Point” option.
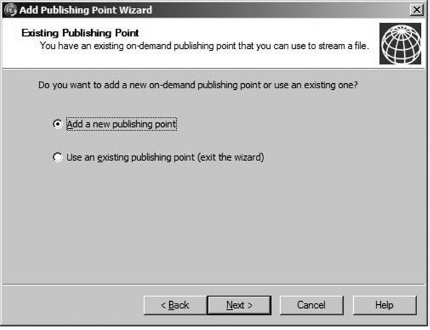
Figure 1-17
Select the “Add New Publishing Point” option.
8. In the File Location box, click the Browse… button, find the location of your media file, highlight it, click Open, then click Next, as shown in Figure 1-18. (See also QuickTip below.)
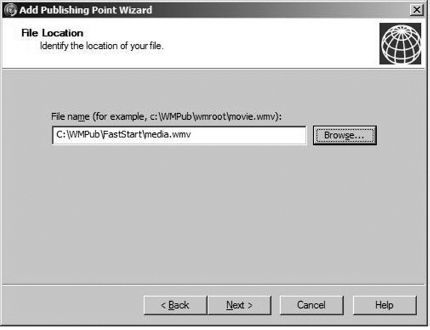
Figure 1-18
Place the location of your media file in the File Location dialog box.
9. In the Unicast Logging box, click Next, as shown in Figure 1-19.
10. Review the Publishing Point Summary box, and click Next, as shown in Figure 1-20.
Now you’re ready to create an announcement file.
Author’s Tip
When Windows Media Services is installed, a directory called “c:WMPub” is automatically created. This is the best place to put your media files. You may want to create a new sub-directory for each project, and place your Windows Media files there.
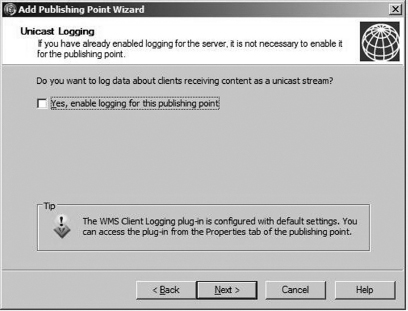
Figure 1-19
Leave the Unicast Logging box unchecked.
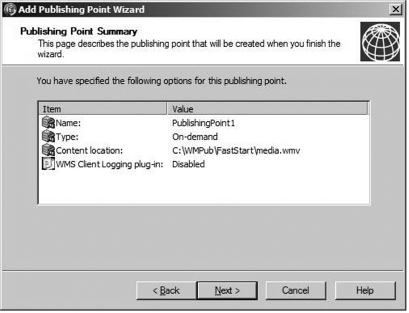
Figure 1-20
The “Publishing Point Summary” tells you what you’ve just accomplished. Stop here! A box appears saying “Completing the Add Publishing Point Wizard.” Don’t click Finish yet. We’re going to use the next wizard in the next step via this box.
You’re probably familiar with how to go to a specific address on the World Wide Web: You type the location in the location bar of your browser, starting with “http://”. You can do something similar with your Windows Media Player, but most links to streaming media files are found on webpages. That means you have to add an extra step to the process, a link on your webpage to a metafile, or as Microsoft calls it, an announcement file.
Inside the Industry
![]()
A metafile is a small text file that contains the location of your streaming media file. Your webpage links to this file. When you click the link, the browser downloads the file and gives it your Windows Media Player. The player opens it, finds the location of your media file, and plays it.
Here’s the procedure for creating the announcement file using the wizard in Windows Media Services. Afterwards, the book shows you how to link to it in your webpage.
Remember when you were told to Stop! in the previous section? Let’s start at the same place, the “Completing the Add Publishing Point Wizard” dialog, as shown in Figure 1-21.
1. In the “Completing the Add Publishing Point Wizard” dialog, check the checkbox “After the wizard finishes,” and select the radio button “Create an announcement file (.asx) or webpage (.htm),” as shown in Figure 1-21.
2. The “Welcome to the Unicast Announcement Wizard” appears, as shown in Figure 1-21. Click Next.
3. In the “Access the Content” dialog, click the “Browse…” button, locate your media file, highlight the file, and click Open, as shown in Figure 1-22.
4. In the same dialog box, replace the server name with the full domain address of your server. Click Next.
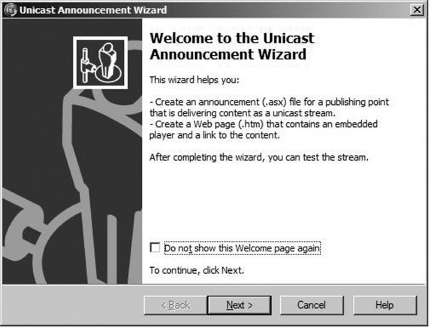
Figure 1-21
The “Unicast Announcement Wizard” helps you create announcement files.
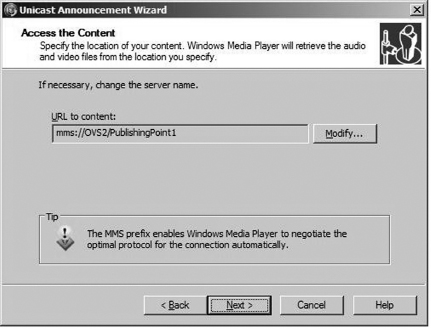
Figure 1-22
Tell the announcement wizard the location of your media file.
5. In the “Save Announcement Options” dialog, note the suggested location for your announcement file, which has the extension .asx, as shown in Figure 1-23.
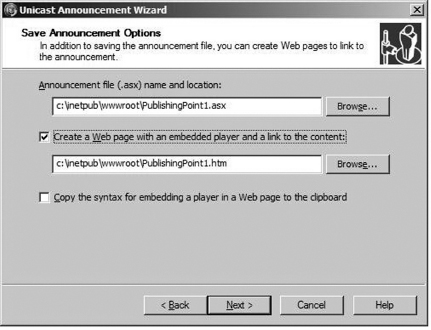
Figure 1-23
Note the suggested locations of your announcement file.
6. In the same dialog (see Figure 1-24), check the option “Create a webpage with an embedded player and a link to the content.” (You won’t use this webpage, but let’s take the opportunity to create this code, which you’ll use later in the book.)
7. Click Next.
8. In the “Edit Announcement Metadata” dialog, enter title, author, and copyright information, as shown in Figure 1-24. Click Next.
9. In the “Completing the Unicast Announcement Wizard” dialog, check the “Test” box, as shown in Figure 1-25. Click Finish.
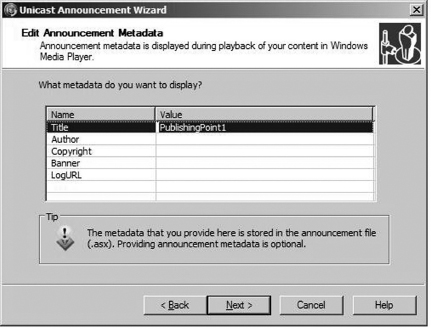
Figure 1-24
Title, author, and copyright information will be stored in the announcement file.
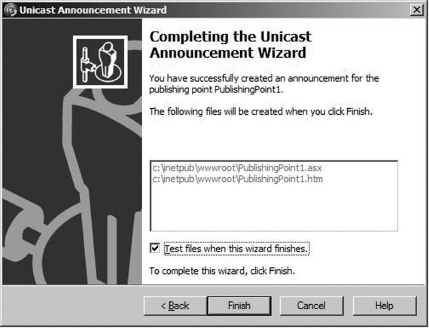
Figure 1-25
The final dialog in the announcement file wizard offers an opportunity to test your file.
10. A “Test Unicast Announcement” dialog appears with two buttons, labeled “Test,” as shown in Figure 1-26.
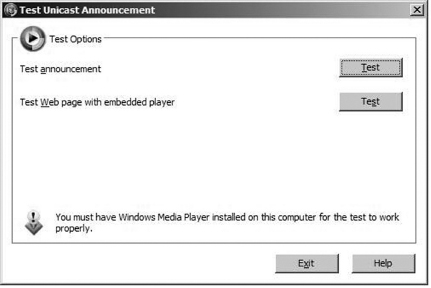
Figure 1-26
Click the “Test” buttons in this dialog to check whether the announcement files work.
Author’s Tip
Replacing the Server Name with Your Domain
In step 4 of the above procedure, the book asked you to replace the name of the server with your domain. In the example, which is shown in Figure 1-23, you would replace “OVS1” with something like “www.mydomain.com.” Do NOT put an “http://” in front of the domain. The “mms://” serves that purpose. (More on this in Chapter 8.)
11. Click the upper Test button. Your media file should start playing. But don’t be dismayed if your file doesn’t start playing. Playback is somewhat dependent on how your network is configured, a subject beyond the scope of this book.
You’re now ready to link to your media file via your webpage.
Link to Your Announcement File via Your Webpage
As noted previously, most websites link to a streaming media file by first pointing to an announcement file. To do this, you need to know some of the basics of hypertext markup language (HTML). Specifically, you need to understand hyperlink tags. If you’re unsure, pick up a good, basic HTML book, or review the excellent free tutorials at W3 Schools, http://www.w3schools.com/.
First, you need to place your .asx file on a web server, most likely where your website lives. It’s probably not the same server as your Windows Media Server.
Author’s Tip
What about that announcement file with the .htm at the end? It’s not actually an announcement file, but a webpage with a player embedded into the code. Save the location of this file somewhere handy. You’ll refer back to it in Chapter 8. In the meantime, it’s safe to click Test, and watch it in action, if you like.
Uploading and Testing Your Announcement File —
Contact your network administrator or ISP to obtain the address, username, and password for your FTP access. (In some networks, you may only need a directory location.) With your FTP client, upload the .asx file to your web server. For example, your website address may be www.mydomain.com. If you use an ISP, there’s a good chance your FTP address is ftp.mydomain.com. Try this with your username and password.
Author’s Tip
To move your files from place to place, nothing beats a good file transfer protocol (FTP) program. WS_FTP Pro is the author’s favorite, followed by FTP Commander and CuteFTP. To try these, check out the links below.
WS_FTP: http://www.ipswitch.com/downloads
FTP Commander: http://www.internet-soft.com/ftpcomm.htm CuteFTP: http://www.globalscape.com/cuteftp/
Once you’re logged on, create a directory called “metafiles” under your site’s root directory to distinguish your Windows Media announcement files from webpages that may contain announcements in the more common sense of the word. Upload your .asx file to the “announcements” directory.
To test the file, load the site address, path, and file name in your browser’s location bar. A typical address would look like this: http://www.mydomain.com/metafiles/myvideo.asx
Hit Return on your keyboard and the video should start playing.
Putting a Link in Your Webpage — Now comes the last step in this chapter, creating a link to your Windows Media file all the world can see. Using your favorite HTML editor, add a set of anchor tags containing the path to your file. Here’s one way to do it:
<html>
    <body>
           <a href=“http://
    http://www.mydomain.com/metafiles/myvideo.asx”>
    Audio/Video</a>
</body>
</html>
This code actually creates a small webpage. It might be a good idea to create a small test page with your link and check the path for yourself before releasing it to your users.
Inside the Industry
![]()
Why metafiles and what do they do?
Web browsers are designed to handle static kinds of data, such as text and photographs. Audio and video, however, change dynamically over time; one sound follows another, an image dissolves into the next. The browser needs what’s called a helper application to handle this data.
When you click a metafile/announcement file link, the browser downloads the file, reads the .asx extension, and matches the extension against a list of extensions in its configuration file. When it sees a match between .asx and Windows Media Player, the browser hands the .asx file to the player, essentially saying, “Help me play this data.” Windows Media Player opens the .asx file, reads the contents, including the URL to the audio or video file, requests the file, and starts playing it.
Troubleshooting
If you’ve followed all the instructions in this chapter closely, you’re well on your way to mastering streaming media technology. But you’re bound to run into problems. This chapter won’t go into every conceivable issue that could crop up. However, three problems cause the bulk of headaches.
1. Error in the path to the .asx file: This is actually an issue with your HTML in the webpage. Your web browser will complain that “the page could not be found” or something similar. To troubleshoot, check the URL you placed in the anchor tags. It could be something as simple as a misspelling. If you used a relative path, instead of the full or absolute path, your reference to the “metafiles” directory could be broken.
2. Error in the path to the media file: In this case, Windows Media Player will show you an error message, such as the one in Figure 1-27. You need to look inside the .asx file, using a simple text editor, such as Notepad, and see if you put it in the right location for your media file. Like the preceding problem, it could be something as simple as a misspelling of a directory name or the file itself. Once you’ve discovered the error and fixed it, upload the repaired .asx file to your web server and try to play the file again.
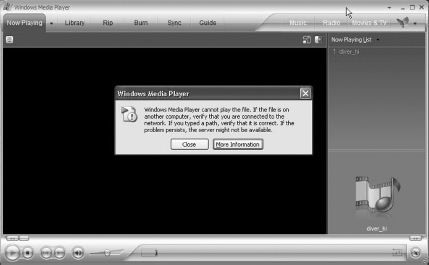
Figure 1-27
An error message from your Windows Media Player usually means the path to your media file and/or the media file name referenced in the .asx file has an error.
3. Windows Media Server unavailable: This error likely means the Windows Media Server is shut down for some reason. If you’re certain that your paths and filenames are correct, restart the Windows Media Server or ask your network administrator to restart it for you.
Other explanations for problems include a corrupt media file, which would require you to re-encode it, or a networking issue, which means you should contact your network administrator. The vast majority of issues can be fixed quickly and painlessly.
Conclusion
This chapter showed you how to update and install a Windows Media Player from scratch, and explained some of the program’s basic features. The chapter then took you through the steps for downloading and installing a Windows Media Encoder. The instructions demonstrated how to encode a simple video file. The chapter included information on publishing your media file on a Windows Media Server, and linking to the file with HTML on your webpage. The last section explained some basic troubleshooting.
The next chapter gives you a foundation in streaming basics.