Chapter 2. Build Supply Chain DApps with Hyperledger Fabric
In the part III, we learned about how to develop a smart contract, invoke smart contract function and maintenance and testing Hyperledger Fabric. In this chapter, we will put all this information together to design and build a simple supply chain blockchain application called Pharma Ledger Network (PLN) using Hyperledger Fabric. It will give you a taste of how blockchain enables global business transactions with greater transparency, streamlined supplier onboarding, better response to disruptions and a secure environment. Specifically, the PLN project illustrates how blockchain can help manufacturers, wholesalers, and other supply chain members like pharmacies to deliver a medical supply.
This chapter will help you to achieve the following practical goals:
-
Blockchain supply chain design
-
Writing chaincode as a smart contract
-
Compiling and deploying Fabric chaincode
-
Running and testing the smart contract
-
Developing an application with Hyperledger Fabric through the SDK
1. Blockchain supply chain design
The traditional supply chain usually lacks transparency and reliable reporting. Large organizations have built their own systems to enable global control of their daily operations while recording the transactions between suppliers and distributors in real-time. Other small companies, however, lack that information and have limited visibility and trace their products at any given moment. That means, in their entire supply chain product process flow (from the production to consumption), the transparency from upstream to downstream is very limited. This could lead to inaccurate reports and a lack of interoperability.
By design, the blockchain is a shared ledger, transparent, immutable, and secure decentralized system. As such, it is considered to be a good solution for traditional supply chain industries at registering, controlling, and transferring assets. Indeed, the popularity of blockchain and its adoption, in part, stems from its use in the supply chain systems around the world.
Smart contract, which defines business function, deployed in blockchain can be accessed by multiple parties in the blockchain network. Each member in the blockchain will be assigned unique identifiers to sign and verify the blocks they add to the blockchain. During the lifecycle of the supply chain, when authorized members in a consortium network invoke a smart contract function, the state data will be updated, after which current assets’ status and the transaction data will become a permanent record in the ledger. Likewise, the processes related to assets can be easily and quickly moved from one step to another. The digital transactions in the ledger can be tracked, shared and queried by all supply chain participants in real time. It provides organizations with new opportunities to correct problems within their supply chain system as it revolves around a single source of truth.
In this section, we will discuss a simple supply chain system and we will build a pharmaceutical ledger network (PLN) use case with application design. It will give a good foundation on how to analyze and implement an application based on Hyperledger Fabric. We will start with analyzing the business process workflow, identifying the organizations in the network and then designing the consortium network. We also define a smart contract function which will be performed by each organization.
Supply chain workflow
Let’s take a look at organizations in the PLN business scenario, as shown in the Figure 2-17.1. For demonstration purposes, we simplified the pharma ledger process, as it can be much more complex in a real-world use case:
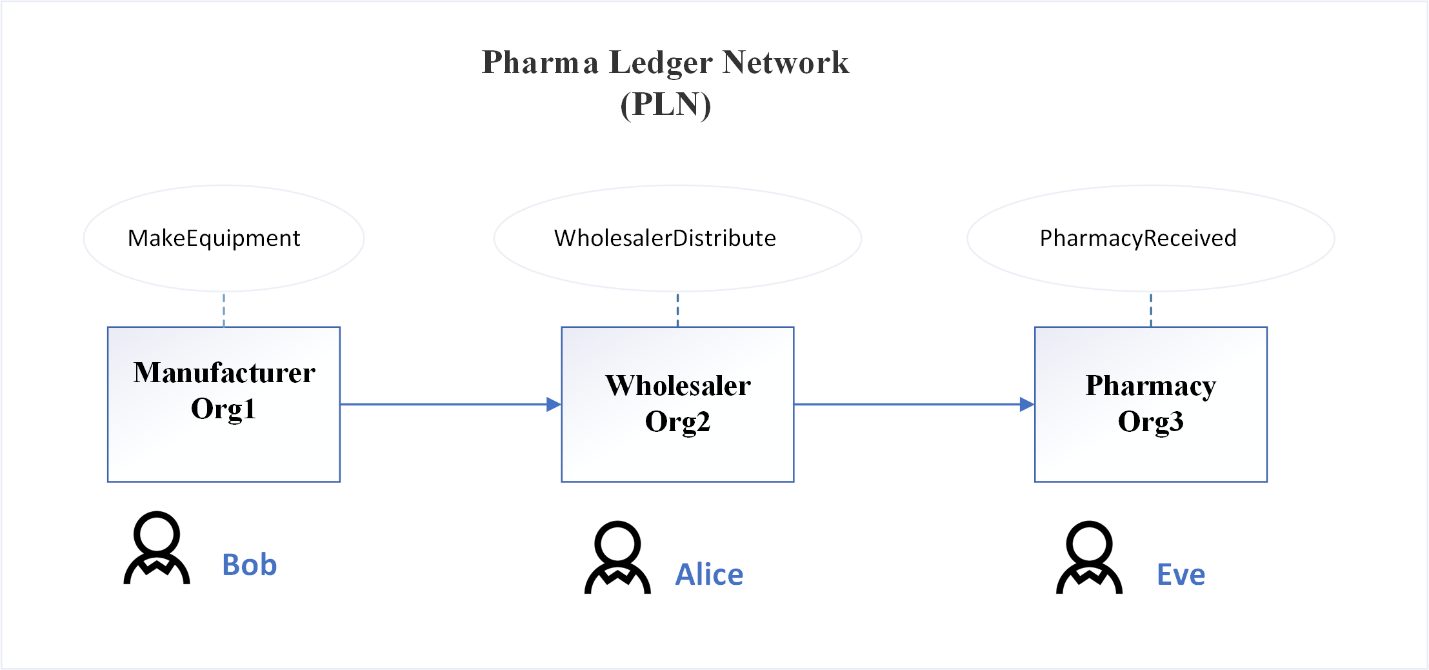
Figure 2-1. Organizations under PLN
Our PLN process is divided by the following three steps:
-
A manufacturer makes an equipment and ships to wholesaler
-
A wholesaler distributes the equipment to pharmacy
-
The pharmacy, as a consumer, receives the equipment, and the supply chain workflow is completed.
Defining a Consortium
As we can see from the process workflow, our PLN involves three organizations: manufacturer, wholesaler and pharmacy. These three entities will join together to build a consortium network to carry out the supply chain business. The consortium members can create users, invoke smart contracts and query blockchain data. Table 7-1 depicts the organizations and users in PLN consortium
| Organization Name | User | MSP | peer |
| Manufacturer | Bob | Org1MSP | peer0.org1.example.com |
| Wholesaler | Alice | Org2MSP | peer0.org2.example.com |
| Pharmacy | Eve | Org3MSP | peer0.org3.example.com |
Table 7-1: Organizations and users in the PLN consortium.
In our PLN consortium, each of the three organizations has a user, an MSP, and peer.. For manufacturer organization, we have user Bob as application user, Org1MSP is an MSP id to load the MSPdefinition. We define AnchorPeers with hostname peer0.org1.example.com to gossip communication across. Similarly, wholesaler is the second organization, Alice is its application user, and its MSP id is Org2MSP. Eve is the pharmacy organization user with Org3MSP.
With the organizations identified, we can define our Hyperledger Fabric network topology as shown in figure 7.2.

Figure 2-2. Hyperledger Fabric network topology
Since installing and deploying PLN in multiple physical nodes may not be within the scope of this chapter, we define one peer with four orgs, representing manufacturer, wholesaler, pharmacy and orderer node.
The channel plnchannel provides a private communications mechanism that will be used by orderer and the other three orgs to validate and execute the transaction.
PLN lifecycle
A piece of equipment with equipment id 2000.001 was made by a manufacturer on Jan 1, with equipment and other attributes and values as shown in Figure 2-17.3.
equipmentNumber: 2000.001
manufacturer: GlobalEquipmentCorp
equipmentName: e360-Ventilator
ownerName: GlobalEquipmentCorp
previousOwnerType: MANUAFACTURER,
currentOwnerType: MANUAFACTURER,
createDateTime: Jan 1, 2021,
lastUpdated: Jan 1, 2021, 10:01:02
Figure 2-3. Placeholder caption
Equipment attributes and values
Here we define a unique identification equipment number to represent a equipment. Each equipment is owned by an equipment owner at a certain period of time. In our case, we define three different owner types - manufacturer, wholesaler and pharmacy.
When a manufacturer makes a piece of equipment and records it in the PLN, the transaction result shows the equipment with a unique identification number of 2000.001 in the ledger. The current owner is GlobalEquipmentCorp. Current owner type and previous one are the same - manufacturer. The equipment was made on Jan 1, 2021. The last update date is when the transaction was recorded in PLN.
After few weeks, the manufacturer ships the equipment to the wholesaler, the equipment state will change including ownership, previous and current owner Type, last update. Let’s take a look at what equipment states change as shown in figure 7.4.
equipmentNumber: 2000.001
manufacturer: GlobalEquipmentCorp
equipmentName: e360-Ventilator
ownerName: GlobalWholesalerCorp
previousOwnerType: MANUAFACTURER,
currentOwnerType: WHOLESALER,
createDateTime: Jan 1, 2021,
lastUpdated: Jan 20, 2021, 07:12:12
equipment
Figure 2-4. Placeholder caption
Equipment state changes
One of the most significant changes is that the equipment is now owned by GlobalEquipmentCorp. The previous owner type is manufacturer. The last updated date has also changed.
After one month, the pharmacy finally receives this equipment order. The ownership is now transferred from wholesaler to pharmacy as shown in figure 7.5. The supply chain flow can be considered closed.
equipmentNumber: 2000.001
manufacturer: GlobalEquipmentCorp
equipmentName: e360-Ventilator
ownerName: PharmacyCorp
previousOwnerType: WHOLESALER,
currentOwnerType: PHARMACY,
createDateTime: Jan 1, 2021,
lastUpdated: Feb 25, 2021, 11:01:08
Figure 2-5. Placeholder caption
Equipment at the hand of pharmacy
With the same equipment identity, the peer organization can trace the equipment’s entire history of transaction records by looking up the equipment number.
Transactions
In the PLN workflow section, we learned there are three steps in the entire lifecycle. Originated from the manufacturer, the equipment moves from wholesaler to pharmacy. As such, as a result of making an equipment, the wholesaler distributes and the pharmacy receives the transaction.
With all above design and analysis, we can now start to write our PLN smart contract.
2. Writing chaincode as a smart contract
We have discussed how equipment state and attributes change during the lifecycle of transaction as the equipment moves among parties in our pharma ledger network.
As discussed in part III, in Hyperledger Fabric, a smart contract is a program that implements the business logic and manages the world state of a business object during the lifecycle. During the deployment, it will be packaged into the chaincode and installed on each endorsing peer node that runs in a secured Docker container. The Hyperledger Fabric smart contract can be programmed in Go, JavaScript, Java and Python. In this section, we will write smart contract implementation for our PLN using JavaScript. All of the pharma ledger network codes for this chapter can be found in the book github. Also we use Fabric v2.1.0 and Fabric CA v1.4.7 throughout the entire project.
Project Structure
To start our PLN smart contract development, first we need to create our smart contract project. Since we have three organizations, all peers must agree and approve of the new version of the smart contract which will be installed and deployed to the network. For our PLN, we will assume they are all the same.
We define a smart contract called pharmaledgercontract.js. The project structure shown in the figure 7.6:

Figure 2-6. Placeholder caption
package.json define two most important fabric libraries:
    "dependencies": {
        "fabric-contract-api": "^2.1.2",
        "fabric-shim": "^2.1.2"
    },
The fabric-contract-api provides the contract interface. It has two critical classes that every smart contract needs to use -Contract and Context.
const { Contract, Context } = require('fabric-contract-api');
The Contract has beforeTransaction, afterTransaction, unknownTransaction and createContext methods which are all optional and overridable in subclass. The JavaScript explicit contract class name can be specified by using its superclass to initialize itself.
The Context class provides the transactional context for every transactional invocation. It can be overridden for additional application behavior to support smart contract execution.
Contract class
Our pharma ledger contract implementation will extend from default built-in contract class from fabric-contract-api lib. Let’s first define PharmaLedgerContract with a constructor. org.pln.PharmaLedgerContract gives a very descriptive name with a unique name space for our contract. The unique contract name space is important to avoid conflict when there are many contracts from different users and operations in a shared system.
const { Contract, Context } = require('fabric-contract-api');
class PharmaLedgerContract extends Contract {

    constructor() {
        super('org.pln.PharmaLedgerContract');
    }
}
Transaction logic
As we discussed, PharmaLedgerContract will need three business functions to move the equipment owner from manufacturer, to wholesaler and finally pharmacy.
async makeEquipment(ctx, manufacturer, equipmentNumber, equipmentName, ownerName) {
// makeEquipment logic
}
async wholesalerDistribute(ctx, equipmentNumber, ownerName) {
// wholesalerDistribute logic
}
async pharmacyReceived(ctx, equipmentNumber, ownerName) {
// pharmacyReceived logic
}
The manufacturer will be initialized and an equipment entry is created. As you will notice, these functions accept a context as default first parameter with equipment related arguments ( manufacturer, equipmentNumber, equipmentName, ownerName) from client input. When makeEquipment is called, the function expects four equipment attributes from the client and assigns it to new equipment.
async makeEquipment(ctx, manufacturer, equipmentNumber, equipmentName, ownerName){
        let dt = new Date().toString();
        const equipment = {
            equipmentNumber,
            manufacturer,
            equipmentName,
            ownerName,
            previousOwnerType: 'MANUFACTURER',
            currentOwnerType: 'MANUFACTURER',
            createDateTime: dt,
            lastUpdated: dt
        };
await ctx.stub.putState(equipmentNumber, Buffer.from(JSON.stringify(equipment)));
}
At the end of makeEquipment , ctx.stub.putState will store the equipment initial state value with the equipment number key on the ledger. The equipment JSON data will be stringified using JSON.stringify, then converted to a buffer. The buffer conversion is required by the shim API to communicate with the peer.
The function uses JavaScript new Date() to get current date time and assigned to lastUpdated date time. When transaction data is submitted, each peer will validate and commit a transaction.
After the equipment record was created by the manufacturer, the wholesaler and pharmacy will just need to update ownership to track the current owner. Both functions are very similar.
async wholesalerDistribute(ctx, equipmentNumber, ownerName) {
        const equipmentAsBytes = await ctx.stub.getState(equipmentNumber);
        if (!equipmentAsBytes || equipmentAsBytes.length === 0) {
            throw new Error(`${equipmentNumber} does not exist`);
        }
        let dt = new Date().toString();
        const strValue = Buffer.from(equipmentAsBytes).toString('utf8');
        let record;
        try {
            record = JSON.parse(strValue);
            if(record.currentOwnerType!=='MANUAFACTURER') {
  throw new Error(` equipment - ${equipmentNumber} owner must be MANUAFACTURER`);
            }
            record.previousOwnerType= record.currentOwnerType;
            record.currentOwnerType = 'WHOLESALER';
            record.ownerName = ownerName;
            record.lastUpdated = dt;
       } catch (err) {
          throw new Error(`equipmet ${equipmentNumber} data can't be processed`);
       }
   await ctx.stub.putState(equipmentNumber, Buffer.from(JSON.stringify(record)));
   }
In the wholesalerDistribute function, we query current equipment ledger data by calling ctx.stub.getState(equipmentNumber). Once data returns, we need to make sure equipmentAsBytes is not empty and equipmentNumber is a valid number. Since ledger data is JSON string byte format, it needs to convert encoded data to a readable JSON format by using Buffer.from().toString('utf8'). We then verify if the current equipment owner type is the manufacturer using the returned data. Once all these conditions are met, ctx.stub.putState is called again. The equipment owner state would be updated to the wholesaler with the current timestamp. But as an immutable transaction log, all historical changes of the world state will permanently store in the ledger. We will define the queryHistoryByKey function to query all these data in the next step.
The pharmacyReceived function is very similar to wholesalerDistribute, so it needs to validate if the current owner is wholesaler and then transfer ownership to pharmacy before updating the equipment record.
         if(record.currentOwnerType!=='WHOLESALER') {
               throw new Error(` equipment - ${equipmentNumber} owner must be WHOLESALER`);
            }
            record.previousOwnerType= record.currentOwnerType;
            record.currentOwnerType = 'PHARMACY';
Query the ledger
After we implement all three equipment business functions, the ledger still needs a query function to search current equipment data and a query history function to get all of historical records.
ChaincodeStub is implemented by the fabric-shim library and provides GetState, GetHistoryForKey functions. In our case, the query definition is straightforward: we just need to call ctx.stub.getState to get the corresponding result.
GetHistoryForKey returns all historical transaction key values across time, we can iterate through these records and convert it to JSON byte and send the data back as a response. The timestamp tells us when the equipment state was updated. Each record contains a related transaction ID and a timestamp.
async queryHistoryByKey(ctx, key) {
      let iterator = await ctx.stub.getHistoryForKey(key);
      let result = [];
      let res = await iterator.next();
      while (!res.done) {
        if (res.value) {
          const obj = JSON.parse(res.value.value.toString('utf8'));
          result.push(obj);
        }
        res = await iterator.next();
      }
      await iterator.close();
      console.info(result);
      return JSON.stringify(result);
  }
That is all for the smart contract function we will implement for our PLN. Next, we will see how to compile and deploy fabric chaincode.
3. Compiling and deploying Fabric chaincode
We have now successfully written our PLN chaincode using JavaScript. Before deploying our contract, we need to set up the Fabric network first.
To get started with Hyperledger Fabric, we need first to meet some prerequisites. We assume you have already installed the software covered in the part II, If you haven’t already done so, please install them first.
Prerequisites
Before advancing any further we need to install the following third-party tools:
-
Linux (Ubuntu)
-
Git (https://git-scm.com)
-
cURL (https://curl.haxx.se/)
-
Docker and Docker Compose: Docker version 17.06.2-ce or greater is required.
-
Go Language: Go version 1.14.x
-
Node.js Runtime and NPM: Node.js version 8 is supported (from 8.9.4 and higher). Node.js version 10 is supported (from 10.15.3 and higher).
To set up a network, we will create an organization using the Fabric cryptogen tool, then create a consortium, and bring up PLN docker-compose. Let’s first set up our project.
Project structure
We have defined all set up scripts and configuration files for our PLN project, the source code can be found in the book Github page. The project structure is organized as shown in the figure 7.7.
Project
-- pharma-ledger-network
-- configtx (configtx.yaml)
-- docker (docker-compose-pln-net.yaml)
-- organizations
-- manufacturer, -- pharmacy, -- wholesaler,
--cryptogen
-- scripts
net-pln.sh
loadFabric.sh
Figure 2-7. 7. The project structure
Let’s take a look at important configurations:
configtx
configtx.yaml in the Configtx folder defines the different organizational identities, which will be used to create a consortium. The Fabric configtxgen tool will generate orderer system channel genesis and related artifacts by configtx.yaml configuration. In configtx.yaml organizations section, we define OrdererOrg and other three peer orgs – org1, org2, orgg3, represents manufacturer, wholesaler and pharmacy respectively. Each organization will define its name, ID, MSPDir, and AnchorPeers. MSPDir describes cryptogen generated output MSP directories. AnchorPeers specify the peer node’s host and port. It updates transactions based on peer policy to communication between network organizations and finds all active participants of the channel.
Organizations:
    - &OrdererOrg
        Name: OrdererOrg
        ID: OrdererMSP
        MSPDir: ../organizations/ordererOrganizations/example.com/msp
        Policies:
           ....
        OrdererEndpoints:
            - orderer.example.com:7050
    - &Org1
        Name: Org1MSP
        ID: Org1MSP
        MSPDir: ../organizations/peerOrganizations/org1.example.com/msp
        Policies:
...
        AnchorPeers:
            - Host: peer0.org1.example.com
              Port: 7051
- &Org2
        AnchorPeers:
            - Host: peer0.org2.example.com
              Port: 9051
- &Org3
        AnchorPeers:
            - Host: peer0.org3.example.com
              Port: 11051
The Organization Policies section defines who needs to approve the organization resource. In PLN, we use signature policies. For example, we define org2 Readers policy below, it allows org2 admin, peer and client to access the resource in this node and only allows peers to do transaction endorsement. You can define your own policy per application needs.
Policies:
            Readers:
                Type: Signature
                Rule: "OR('Org2MSP.admin', 'Org2MSP.peer', 'Org2MSP.client')"
            Endorsement:
                Type: Signature
                Rule: "OR('Org2MSP.peer')"
The Profile section defines how to generate pharma ledger Orderer Genesis, including order configuration and organizations in the PLN Consortiums.
Profiles:
    PharmaLedgerOrdererGenesis:
        <<: *ChannelDefaults
        Orderer:
            <<: *OrdererDefaults
            Organizations:
                - *OrdererOrg
            Capabilities:
                <<: *OrdererCapabilities
        Consortiums:
            PharmaLedgerConsortium:
                Organizations:
                    - *Org1
                    - *Org2
                    - *Org3
    PharmaLedgerChannel:
        Consortium: PharmaLedgerConsortium
        <<: *ChannelDefaults
        Application:
            <<: *ApplicationDefaults
            Organizations:
                - *Org1
                - *Org2
                - *Org3
            Capabilities:
                <<: *ApplicationCapabilities
Docker
The docker folder contains docker-compose configuration file - docker-compose-pln-net.yaml. The docker-compose tool uses this configuration file to initialize the Fabric runtime environment. It defines volumes, networks and services. In our PLN project, we define our network name as pln. We first need to specify the docker runtime environment variable for each organization service. For example, we define our blockchain network name as ${COMPOSE_PROJECT_NAME}_pln, when we assign environment variable COMPOSE_PROJECT_NAME as “net"value, then the network name will be net_pln. The container will pull the images from hyperledger/fabric-peer. Volume configuration maps the directories where MSP, TLS and other organization Fabric configurations are being used in the environment configurations. working_dir sets the working directory for the peer.
services:
  orderer.example.com:
    container_name: orderer.example.com
    image: hyperledger/fabric-orderer:$IMAGE_TAG
    environment:..
    working_dir: /opt/gopath/src/github.com/hyperledger/fabric
    command: orderer
    volumes:..
    ports:
      - 7050:7050
    networks:
      - pln

  peer0.org1.example.com:
    container_name: peer0.org1.example.com
    image: hyperledger/fabric-peer:$IMAGE_TAG
    environment:
      - CORE_VM_DOCKER_HOSTCONFIG_NETWORKMODE=${COMPOSE_PROJECT_NAME}_pln
..
      - CORE_PEER_ADDRESS=peer0.org1.example.com:7051
      - CORE_PEER_LISTENADDRESS=0.0.0.0:7051
      - CORE_PEER_CHAINCODEADDRESS=peer0.org1.example.com:7052
      - CORE_PEER_CHAINCODELISTENADDRESS=0.0.0.0:7052
      - CORE_PEER_GOSSIP_BOOTSTRAP=peer0.org1.example.com:7051
      - CORE_PEER_GOSSIP_EXTERNALENDPOINT=peer0.org1.example.com:7051
      - CORE_PEER_LOCALMSPID=Org1MSP
    volumes:
...
    working_dir: /opt/gopath/src/github.com/hyperledger/fabric/peer
    command: peer node start
    ports:
      - 7051:7051
    networks:
      - pln
Cryptogen
There are four crypto configurations under this folder for Orderer, and the other three peer orgs. OrdererOrgs define ordering nodes and create an organization definition. PeerOrgs define peers organization and managing peer nodes.
As we know, to run components in the network, it requires certificate authority (CA). The Fabric cryptogen tool will use those four crypto configuration files to generate the required X.509 certificates for all orgs.
For odererOrgs, we define below crypto configuration:
OrdererOrgs:
  - Name: Orderer
    Domain: example.com
    EnableNodeOUs: true
    Specs:
      - Hostname: orderer
        SANS:
          - localhost
For peerOrgs, we define below crypto configuration for org1 – manufacturer. Other two orgs are very similar.
PeerOrgs:
  - Name: Org1
    Domain: org1.example.com
    EnableNodeOUs: true
    Template:
      Count: 1
      SANS:
        - localhost
    Users:
      Count: 1
We set EnableNodeOUs as true, which enables the identify classification.
Install Binaries, and Docker Images
We have reviewed important configurations in order to run the PLN network. net-pln.sh is a script to bring up the PLN network. We first need to download and install Fabric binaries to your system. Under the root project folder, there is a file called loadFabric.sh. Run the below command to load Fabric binaries and configs:
./loadFabric.sh
It will install the Hyperledger Fabric platform-specific binaries and config files into the /bin and /config directories under the project. The version we use for this project is the current latest production releases - Fabric v2.1.0 and Fabric CA v1.4.7. Run ‘docker images -a’ to check installed Fabric images.
Note
Make sure all of the scripts in the project are executable. For example, You can run chmod +x laodFabric.sh to make it executable.
It is now time to start our PLN network.
Start the PLN network
As we mentioned before, to start the PLN network, we need:
Generate Orderer Org Identities and peer certificates by cryptogen tool.
Here is command for org1:
cryptogen generate --config=./organizations/cryptogen/crypto-config-org1.yaml --output="organizations"
The generated output will be stored under the organizations folder.
Create Orderer Org Identities by cryptogen tool.
cryptogen generate --config=./organizations/cryptogen/crypto-config-orderer.yaml --output="organizations"
Generate Common Connection Profile (CCP) for Org1, Org2 and Org3
./organizations/ccp-generate.sh
ccp-generate.sh is under the organizations folder. It uses ccp-template.json and ccp-template.yaml files as template, passing org name, peer port, CA port and CA PEM certificates to generate orgs connection files. And ccp-generate.sh copy generated connection files to peer orgs folder:
echo "$(json_ccp $ORG $P0PORT $CAPORT $PEERPEM $CAPEM)" > organizations/peerOrganizations/org1.example.com/connection-org1.json
echo "$(yaml_ccp $ORG $P0PORT $CAPORT $PEERPEM $CAPEM)" > organizations/peerOrganizations/org1.example.com/connection-org1.yaml
These connection files will be used by each peer web client to connect to the Fabric network.
Create consortium and generate an orderer system channel genesis block.
configtxgen -profile PharmaLedgerOrdererGenesis -channelID system-channel -outputBlock ./system-genesis-block/genesis.block
configtxgen reads configtx.yaml profile and generates the genesis.block file under the system-genesis-block folder.
Bring up the peer and orderer nodes
The docker composer file is defined under docker/docker-compose-pln-net.yaml. The command will pull the latest Fabric oderer and peer images, builds the orderer and peers images, and starts the services we defined in the yaml file. Run the below docker compose command to bring up the peer and orderer nodes:
IMAGE_TAG=$IMAGETAG docker-compose ${COMPOSE_FILES} up -d 2>&1
Now, let’s bring up the PLN network. Open a terminal window and run net-pln.sh under the pharma-ledger-network folder:
cd pharma-ledger-network
./net-pln.sh up
You should see below success log (shown in figure 7.8):
Creating network “net_pln” with the default driver
Creating volume “net_orderer.example.com” with default driver
Creating volume “net_peer0.org1.example.com” with default driver
Creating volume “net_peer0.org2.example.com” with default driver
Creating volume “net_peer0.org3.example.com” with default driver
Creating orderer.example.com ... done
Creating peer0.org2.example.com ... done
Creating peer0.org1.example.com ... done
Creating peer0.org3.example.com ... done
CONTAINER ID IMAGE COMMAND CREATED STATUS PORTS NAMES
5a1fb5778a94 hyperledger/fabric-peer:latest “peer node start” 4 seconds ago Up Less than a second 7051/tcp, 0.0.0.0:11051->11051/tcp peer0.org3.example.com
969a5a9f5a85 hyperledger/fabric-peer:latest “peer node start” 4 seconds ago Up Less than a second 0.0.0.0:7051->7051/tcp peer0.org1.example.com
2f2cf2b0463d hyperledger/fabric-peer:latest “peer node start” 4 seconds ago Up 1 second 7051/tcp, 0.0.0.0:9051->9051/tcp peer0.org2.example.com
f327510667ff hyperledger/fabric-orderer:latest “orderer” 4 seconds ago Up Less than a second 0.0.0.0:7050->7050/tcp orderer.example.com
Figure 2-8. 8. Success log
We have 4 organizations including three peers and one orderer that are running in net_pln network. In the next step, we will use the script to create a PLN channel for all orgs.
Monitor the PLN network
The Fabric images in the PLN network are Docker based. During project development or production lifecycle, you may encounter many errors. For troubleshooting the code, log monitoring is definitely one of the most important things to do from a DevOps standpoint. It will help troubleshoot and find the root cause much easier and faster. Logspout is an open source container log tool for monitoring Docker logs. It collects Docker’s logs from all nodes in your cluster to be aggregated into one place. In our PLN project, we will use Logspout to monitor channel creation, smart contracts installation and others actions. Navigate to the pharma-ledger-network folder, open a new terminate window.
cd pharma-ledger-network
run the following command from the net-pln.sh script and start the logspout tool for the containers running on the PLN network net_pln:
./net-pln.sh monitor-up

...
Starting docker log monitoring on network 'net_pln'
Starting monitoring on all containers on the network net_pln
Unable to find image 'gliderlabs/logspout:latest' locally
latest: Pulling from gliderlabs/logspout
cbdbe7a5bc2a: Pull complete
956fa3cf18b6: Pull complete
94f24e0675e0: Pull complete
Digest: sha256:872555b51b73d7f50726baeae8d8c138b6b48b550fc71d733df7ffcadc9072e1
Status: Downloaded newer image for gliderlabs/logspout:latest
e8a8ad1787b69cfb7387264ee6ff63fd5a805aabe50ca6af6356d4cd8b27e052
here is script logic to bring logsprout tool up, it pulls gliderlabs/logspout images by passing theLN network name.
docker run -d --name="logspout"
   --volume=/var/run/docker.sock:/var/run/docker.sock
   --publish=127.0.0.1:${PORT}:80
   --network  ${DOCKER_NETWORK} gliderlabs/logspout
This terminal window will now show the PLN network containers output for the remainder of the project development.
Note
If you run into trouble during the process, check the logsprout terminal window to see errors.
Creating PLN channel
In the process of creating the channel, we will use the configtxgen CLI tool to generate a genesis block and then we use per channel commands to join a channel with other peers. There are several steps for creating a PLN channel. All these script logic can be found in scripts/createChannel.sh.
First, Generate a channel configuration transaction file
In the createChannel.sh script, we define the createChannelTxn function. The critical command in this function is below:
configtxgen -profile PharmaLedgerChannel -outputCreateChannelTx ./channel-artifacts/${CHANNEL_NAME}.tx -channelID $CHANNEL_NAME
configtxgen tool reads the profile PharmaLedgerChannel section from configtx.yaml, which defines channel related configuration to generate the transaction and genesis block. And then generates plnchannel.tx file.
Second, Create an AncorPeer configuration transaction file.
we define the createAncorPeerTxn function. Similar to the previous step, we have defined the different organizational identities in configtx.yaml. configtxgen reads PharmaLedgerChannel organizational configuration and generates peer configuration transaction files.
configtxgen -profile PharmaLedgerChannel -outputAnchorPeersUpdate ./channel-artifacts/${orgmsp}anchors.tx -channelID $CHANNEL_NAME -asOrg ${orgmsp}
After createAncorPeerTxn runs, we should see Org1MSPanchors.tx, Org2MSPanchors.tx and Org3MSPanchors.tx transaction files generated.
Third, Create channel using peer channel command. The createChannel function uses ‘peer channel create’ command to create our PLN channel. When the command is issued, it will submit the channel creation transaction to the ordering service. Ordering service will check channel creation policy permissions defined in configtx.yaml. Only admin users can create a channel. setGlobalVars() in scripts/utils.sh will allow us to set peer organization as the admin user. We use org1 as an admin to create our channel.
The create a channel commands are as follow:
setGlobalVars 1
peer channel create -o localhost:7050 -c $CHANNEL_NAME --ordererTLSHostnameOverride orderer.example.com -f ./channel-artifacts/${CHANNEL_NAME}.tx --outputBlock ./channel-
setGlobalVars() in scripts/utils.sh has the following logic for setting org1 as an admin user. We can also use this function to set other peer orgs as admin users.
setGlobalVars() {
..
  if [ $USING_ORG -eq 1 ]; then
    export CORE_PEER_LOCALMSPID="Org1MSP"
    export CORE_PEER_TLS_ROOTCERT_FILE=$PEER0_ORG1_CA
    export CORE_PEER_MSPCONFIGPATH=${PWD}/organizations/peerOrganizations/org1.example.com/users/[email protected]/msp
export CORE_PEER_ADDRESS=localhost:7051
..
}
Once the channel is created, we will join peers to the channel.
Fourth, Join all the peers to the channel. After our PLN channel has been created, we can join all peers into this channel. joinMultiPeersToChannel in createChannel.sh script will join all three peer orgs into our PLN channel by running ‘peer channel join’ command:
for org in $(seq 1 $TOTAL_ORGS); do
  setGlobalVars $ORG
  peer channel join -b ./channel-artifacts/$CHANNEL_NAME.block >&log.txt
done
When peer orgs join a channel, they need to be assigned as admin users by calling the setGlobalVars function by passing $ORG parameter. Peer channel join command will use genesis.block to join peer orgs to the channel. Once the peer is joined to the channel, it can attend channel ledger block creation when receiving ordering service transaction submission.
Fifth, update AncorPeer for peers.As the last step in the channel creation process, we need to select at least one peer as an anchor peer. An anchor peer’s main role is private data and service discovery. The endpoints of the anchor peer are fixed, other peer nodes belonging to different members can communicate with the anchor peers to discover all existing peers on a channel. To update an anchor peer, we set a selected peer as an admin user and issue peer channel update’ command.
setGlobalVars $ORG
peer channel update -o localhost:7050 --ordererTLSHostnameOverride orderer.example.com -c $CHANNEL_NAME -f ./channel-artifacts/${CORE_PEER_LOCALMSPID}anchors.tx --tls $CORE_PEER_TLS_ENABLED --cafile $ORDERER_CA >&log.txt
You can use net-pln.sh script to create the PLN channel by run below command:
./net-pln.sh createChannel
Once channel creation completed, you should see below log:
...

***** [Step: 5]: start call updateAnchorPeers 3 on peer: peer0.org3, channelID: plnchannel, smartcontract: , version , sequence  *****
Using organization 3
2020-06-06 03:24:36.333 UTC [channelCmd] InitCmdFactory -> INFO 001 Endorser and orderer connections initialized
2020-06-06 03:24:36.392 UTC [channelCmd] update -> INFO 002 Successfully submitted channel update
***** completed call updateAnchorPeers, updated peer0.org3 on anchorPeers on channelID: plnchannel, smartcontract: , version , sequence  *****

***** completed call updateOrgsOnAnchorPeers, anchorPeers updated on channelID: plnchannel, smartcontract: , version , sequence  *****

========= Pharma Ledger Network (PLN) Channel plnchannel successfully joined ===========
To see the related container information, you can check the log sprout terminal window which we opened earlier.
4. Running and testing the smart contract
We need to package a smart contract before we can install it to the channel. Navigate to the manufacturer contract folder directory and run the npm install command:
cd pharma-ledger-network/organizations/manufacturer/contract
npm install
This will install pharmaledgercontract node dependency under node_modules.
Now we can start install our smart contract by running the below deploySmartContract.sh script.
The first step is to package the pharmaledger smart contract.
The peer lifecycle chaincode package command will package our smart contract. We assign manufacturer as an administrator user to run the package command.
setGlobalVars 1
peer lifecycle chaincode package ${CHINCODE_NAME}.tar.gz --path ${CC_SRC_PATH} --lang ${CC_RUNTIME_LANGUAGE} --label ${CHINCODE_NAME}_${VERSION}
Next, we can now install the chaincode on all peer orgs as an admin with the peer lifecycle chaincode install command:
for org in $(seq 1 $CHAINCODE_ORGS); do
setGlobalVars $ORG
peer lifecycle chaincode install ${CHINCODE_NAME}.tar.gz >&log.txt
done
When the chaincode package is installed, you will see messages similar to the following printed in your terminal:
2020-06-06 03:30:50.025 UTC [cli.lifecycle.chaincode] submitInstallProposal -> INFO 001 Installed remotely: response:<status:200 payload:" WpharmaLedgerContract_1:1940852a477d7697bb3a12d032268ff48c741c585db166403dd35f5e0b5c4e74�22�26pharmaLedgerContract_1" > 2020-06-06 03:30:50.025 UTC [cli.lifecycle.chaincode] submitInstallProposal -> INFO 002 Chaincode code package identifier: pharmaLedgerContract_1:1940852a477d7697bb3a12d032268ff48c741c585db166403dd35f5e0b5c4e74 ***** completed call installChaincode, Chaincode is installed on peer0.org1 on channelID: plnchannel, smartcontract: pharmaLedgerContract, version 1, sequence 1 *****
After we install the smart contract, we need to query whether the chaincode is installed. We can query the packageID using the peer lifecycle chaincode queryinstalled command.
peer lifecycle chaincode queryinstalled >&log.txt
If the command completes successfully, you will see logs similar to the following:
Installed chaincodes on peer:
Package ID: pharmaLedgerContract_1:1940852a477d7697bb3a12d032268ff48c741c585db166403dd35f5e0b5c4e74, Label: pharmaLedgerContract_1
***** completed call queryInstalled, Query installed successful with PackageID is pharmaLedgerContract_1:1940852a477d7697bb3a12d032268ff48c741c585db166403dd35f5e0b5c4e74 on channelID: plnchannel, smartcontract: pharmaLedgerContract, version 1, sequence 1 *****
With the returned package ID, we can now approve the chaincode definition for manufacturer using approveForMyOrg which calls the peer lifecycle chaincode approveformyorg command.
peer lifecycle chaincode approveformyorg -o localhost:7050 --ordererTLSHostnameOverride orderer.example.com --tls $CORE_PEER_TLS_ENABLED --cafile $ORDERER_CA --channelID $CHANNEL_NAME --name ${CHINCODE_NAME} --version ${VERSION} --package-id ${PACKAGE_ID} --sequence ${VERSION} >&log.txt
We can check whether channel members have approved the same chaincode definition using checkOrgsCommitReadiness which runs the peer lifecycle chaincode checkcommitreadiness command
peer lifecycle chaincode checkcommitreadiness --channelID $CHANNEL_NAME --name ${CHINCODE_NAME} --version ${VERSION} --sequence ${VERSION} --output json >&log.txt
As expected, we should see approvals for Org1MSP is true, other two orgs are false.
***** [Step: 5]: start call checkCommitReadiness org1 on peer: peer0.org1, channelID: plnchannel, smartcontract: pharmaLedgerContract, version 1, sequence 1 *****
Attempting to check the commit readiness of the chaincode definition on peer0.org1, Retry after 3 seconds.
+ peer lifecycle chaincode checkcommitreadiness --channelID plnchannel --name pharmaLedgerContract --version 1 --sequence 1 --output json
{
        "approvals": {
                "Org1MSP": true, "Org2MSP": false, "Org3MSP": false
        }
}
The endorsement policy requires a set of majority organizations that must endorse a transaction before it can commit chaincode.
We continue to run the peer lifecycle chaincode approveformyorg command for Org2 and Org3, all three orgs will approve chain code installation.
## approve org2
approveForMyOrg 2
## check whether the chaincode definition is ready to be committed, two orgs should be approved
checkOrgsCommitReadiness 3 1 1 0
## approve org3
approveForMyOrg 3
## check whether the chaincode definition is ready to be committed, all 3 orgs should be approved
checkOrgsCommitReadiness 3 1 1 1
If all commands execute successfully, all three orgs will get the approval of chaincode installation.
{
        "approvals": {
                "Org1MSP": true, "Org2MSP": true, "Org3MSP": true
        }
}
***** completed call checkCommitReadiness, Checking the commit readiness of the chaincode definition successful on peer0.org3 on channel 'plnchannel' on channelID: plnchannel,
Now that we know for sure the manufacturer, wholesaler and pharmacy have all approved the pharmaledgercontract chaincode, we commit the definition. We have the required majority organizations (3 out of 3) to commit the chaincode definition to the channel. Any of the three organizations can commit the chaincode to the channel using peer lifecycle chaincode commit command.
peer lifecycle chaincode commit -o localhost:7050 --ordererTLSHostnameOverride orderer.example.com --tls $CORE_PEER_TLS_ENABLED --cafile $ORDERER_CA --channelID $CHANNEL_NAME --name ${CHINCODE_NAME} $PEER_CONN_PARMS --version ${VERSION} --sequence ${VERSION} >&log.txt
We will use the command peer lifecycle chaincode querycommitted to check the chaincode commit status.
peer lifecycle chaincode querycommitted --channelID $CHANNEL_NAME --name ${CHINCODE_NAME} >&log.txt
We have walked through chaincode deployment steps, so now let’s run the following command to deploy pharmaledgercontract chaincode in our PLN network:
./net-pln.sh deploySmartContract
If the command is successful, you should see the following response at the last few lines...
Committed chaincode definition for chaincode 'pharmaLedgerContract' on channel 'plnchannel':
Version: 1, Sequence: 1, Endorsement Plugin: escc, Validation Plugin: vscc, Approvals: [Org1MSP: true, Org2MSP: true, Org3MSP: true]
***** completed call queryCommitted, Query committed on channel 'plnchannel' on channelID: plnchannel, smartcontract: pharmaLedgerContract, version 1, sequence 1 *****
***** completed call queryAllCommitted, Chaincode installed on channelID: plnchannel, smartcontract: pharmaLedgerContract, version 1, sequence 1 *****
=== Pharma Ledger Network (PLN) contract successfully deployed on channel plnchannel  ====
After the chaincode is installed, we can start to invoke and test the chaincode methods for pharmaledgercontract.
Testing smart contract
We have created invokeContract.sh for this project. It defines an invocation method for makeEquipment, wholesalerDistribute, pharmacyReceived and query function.
We first call makeEquipment chaincode method:
./net-pln.sh invoke equipment GlobalEquipmentCorp 2000.001 e360-Ventilator GlobalEquipmentCorp
We pass manufacturer, equipmentNumber, equipmentName and ownerName as arguments. The script basically calls peer chaincode invoke commands by passing related function arguments.
peer chaincode invoke -o localhost:7050 --ordererTLSHostnameOverride orderer.example.com --tls $CORE_PEER_TLS_ENABLED --cafile $ORDERER_CA -C $CHANNEL_NAME -n ${CHINCODE_NAME} $PEER_CONN_PARMS -c '{"function":"makeEquipment","Args":["'$manufacturer'","'$equipmentNumber'", "'$equipmentName'", "'$ownerName'"]}' >&log.txt
You will see the logs like the below:
invokeMakeEquipment--> manufacturer:GlobalEquipmentCorp, equipmentNumber:2000.001, equipmentName: e360-Ventilator,ownerName:GlobalEquipmentCorp
+ peer chaincode invoke -o localhost:7050 --ordererTLSHostnameOverride orderer.example.com --tls true --cafile /home/ubuntu/Hyperledger-Fabric-V2/chapter7-supplychain/pharma-ledger-network/organizations/ordererOrganizations/example.com/orderers/orderer.example.com/msp/tlscacerts/tlsca.example.com-cert.pem -C plnchannel -n pharmaLedgerContract --peerAddresses localhost:7051 --tlsRootCertFiles /home/ubuntu/Hyperledger-Fabric-V2/chapter7-supplychain/pharma-ledger-network/organizations/peerOrganizations/org1.example.com/peers/peer0.org1.example.com/tls/ca.crt --peerAddresses localhost:9051 --tlsRootCertFiles /home/ubuntu/Hyperledger-Fabric-V2/chapter7-supplychain/pharma-ledger-network/organizations/peerOrganizations/org2.example.com/peers/peer0.org2.example.com/tls/ca.crt --peerAddresses localhost:11051 --tlsRootCertFiles /home/ubuntu/Hyperledger-Fabric-V2/chapter7-supplychain/pharma-ledger-network/organizations/peerOrganizations/org3.example.com/peers/peer0.org3.example.com/tls/ca.crt -c '{"function":"makeEquipment","Args":["GlobalEquipmentCorp","2000.001", "e360-Ventilator", "GlobalEquipmentCorp"]}'
2020-06-06 03:43:09.186 UTC [chaincodeCmd] chaincodeInvokeOrQuery -> INFO 001 Chaincode invoke successful. result: status:200
After invoking makeEquipment, we can run a query function to verify the ledger result. The query function uses peer chaincode query command
peer chaincode query -C $CHANNEL_NAME -n ${CHINCODE_NAME} -c '{"function":"queryByKey","Args":["'$QUERY_KEY'"]}' >&log.txt
Then, issue the following script command to query equipment
./net-pln.sh invoke query 2000.001
The query should return current equipment state data.
{"Key":"2000.001","Record":{"equipmentNumber":"2000.001","manufacturer":"GlobalEquipmentCorp","equipmentName":"e360-Ventilator","ownerName":"GlobalEquipmentCorp","previousOwnerType":"MANUAFACTURER","currentOwnerType":"MANUAFACTURER","createDateTime":"Sat Jun 06 2020 03:43:09 GMT+0000 (Coordinated Universal Time)","lastUpdated":"Sat Jun 06 2020 03:43:09 GMT+0000 (Coordinated Universal Time)"}}
Continue to invoke remaining equipment functions for wholesaler and pharmacy.
./net-pln.sh invoke wholesaler 2000.001 GlobalWholesalerCorp
./net-pln.sh invoke pharmacy 2000.001 PharmacyCorp
Once equipment ownership is moved to pharmacy, the supply chain reaches its final state. We can issue queryHistoryByKey from the peer chaincode query command. Let’s check equipment historical data.
./net-pln.sh invoke queryHistory 2000.001
We can see the below output in the terminal:
***** start call chaincodeQueryHistory on peer: peer0.org1, channelID: plnchannel, smartcontract: pharmaLedgerContract, version 1, sequence 1 *****
+ peer chaincode query -C plnchannel -n pharmaLedgerContract -c '{"function":"queryHistoryByKey","Args":["2000.001"]}'
[{"equipmentNumber":"2000.001","manufacturer":"GlobalEquipmentCorp","equipmentName":"e360-Ventilator","ownerName":"PharmacyCorp","previousOwnerType":"WHOLESALER","currentOwnerType":"PHARMACY","createDateTime":"Sat Jun 06 2020 03:43:09 GMT+0000 (Coordinated Universal Time)","lastUpdated":"Sat Jun 06 2020 03:48:48 GMT+0000 (Coordinated Universal Time)"},{"equipmentNumber":"2000.001","manufacturer":"GlobalEquipmentCorp","equipmentName":"e360-Ventilator","ownerName":"GlobalWholesalerCorp","previousOwnerType":"MANUAFACTURER","currentOwnerType":"WHOLESALER","createDateTime":"Sat Jun 06 2020 03:43:09 GMT+0000 (Coordinated Universal Time)","lastUpdated":"Sat Jun 06 2020 03:46:41 GMT+0000 (Coordinated Universal Time)"},{"equipmentNumber":"2000.001","manufacturer":"GlobalEquipmentCorp","equipmentName":"e360-Ventilator","ownerName":"GlobalEquipmentCorp","previousOwnerType":"MANUAFACTURER","currentOwnerType":"MANUAFACTURER","createDateTime":"Sat Jun 06 2020 03:43:09 GMT+0000 (Coordinated Universal Time)","lastUpdated":"Sat Jun 06 2020 03:43:09 GMT+0000 (Coordinated Universal Time)"}]
***** completed call chaincodeQuery, Query History successful on channelID: plnchannel, smartcontract: pharmaLedgerContract, version 1, sequence 1 *****
All of the transaction history records are displayed as output. We have tested our smart contract and it works as expected.
5. Developing an application with Hyperledger Fabric through the SDK
We just deployed pharma-ledger-network in the Fabric network. The next step is to build a pharma-ledger client application to interact with the smart contract function in the network. Let’s take a moment to examine the application architecture.
At the beginning of our PLN network section, we generated a Common Connection Profile (CCP) for Org1, Org2 and Org3. We will use these connection files to connect to our PLN network for each peer org. When manufacturer application user Bob submits a makeEquipment transaction to the ledger, the pharma-ledger process flow starts. Let’s quickly examine how our application works as shown in the figure 7.9.

Figure 2-9. How PLN application works
Manufacturer web user Alice connects to the Fabric network through wallet. Wallet provides user an authorized identity which will be verified by the blockchain network to ensure access security. Fabric SDK then submits a makeEquipment transaction proposal to peer0.org1.example.com. Endorsing peers verify the signature, simulate the proposal, and invoke makeEquipment chaincode function with required arguments. The transaction is initiated after “proposal response” is sent back to the SDK. The application collects and verifies the endorsements until the endorsement policy of the chaincode is satisfied with producing the same result. The client then “broadcasts'' the transaction proposal and “proposal response” to the ordering service. The ordering service orders them chronologically by channel and creates blocks and delivers the blocks of transactions to all peers on the channel. The peers validate transactions to ensure that the endorsement policy is satisfied and to ensure that there have been no changes to the ledger state since the proposal response was generated by the transaction execution. After successful validation, the block is committed to the ledger, world states are updated for each valid transaction.
We now understand the transaction end to end workflow. It is time to start building our pharma ledger client application. Here is the application client project structure as shown in figure 7.10.

Figure 2-10. Application client project structure
We use express.js to build our node application. Let’s review some important files.
package.json defines two Fabric related dependency
    "dependencies": {
        "fabric-contract-api": "^2.1.2",
        "fabric-shim": "^2.1.2"
    }
app.js defines all entry points for the manufacturer, and addUser will add a client user for the manufacturer which in our case is Bob. makeEquipment will create equipment records when the manufacturer is an owner. queryByKey and queryHistoryByKey are common functions for all three orgs. Wholesaler and Pharmacy will have similar functions.
app.post('/addUser', async (req, res, next) => {
});
app.post('/makeEquipment', async (req, res, next) => {
})
app.get('/queryHistoryByKey', async (req, res, next) => {
})
app.get('/queryByKey', async (req, res, next) => {
})
addUser will call walletsService to add a user. Let’s take a look at addToWallet(user) in walletsService.
const wallet = await Wallets.newFileSystemWallet('../identity/user/'+user+'/wallet');
newFileSystemWallet will create a wallet for an input user (Bob) under the provided file system directory. Next, we find user certificate and privateKey and generate X.509 certificate to be stored in the wallet
const credPath = path.join(fixtures, '/peerOrganizations/org1.example.com/users/[email protected]');
const certificate = fs.readFileSync(path.join(credPath, '/msp/signcerts/[email protected]')).toString();
const privateKey = fs.readFileSync(path.join(credPath, '/msp/keystore/priv_sk')).toString();
The wallet calls key class methods to manage theX509WalletMixin.createIdentity which is used to create an Org1MSP identity using X.509 credentials. The function needs three inputs: mspid, the certificate, and the private key.
const identityLabel = user;
const identity = {
            credentials: {
                certificate,
                privateKey
            },
            mspId: 'Org1MSP',
            type: 'X.509'
 }
const response = await wallet.put(identityLabel, identity);
User from the manufacturer will call equipmentService makeEquipment function.
First, find the user wallet created by adding user function.
const wallet = await Wallets.newFileSystemWallet('../identity/user/'+userName+'/wallet');
Next, load the connection profile associated with the user, then wallet will be used to locate a gateway and then connect to it.
const gateway = new Gateway();
    let connectionProfile = yaml.safeLoad(fs.readFileSync('../../../organizations/peerOrganizations/org1.example.com/connection-org1.json', 'utf8'));
      // Set connection options; identity and wallet
      let connectionOptions = {
        identity: userName,
        wallet: wallet,
        discovery: { enabled:true, asLocalhost: true }
      };
      await gateway.connect(connectionProfile, connectionOptions);
Once a gateway is connected to a channel, we can find our pharmaLedgerContract with a unique namespace when we create a contract.
const network = await gateway.getNetwork('plnchannel');
const contract = await network.getContract('pharmaLedgerContract', 'org.pln.PharmaLedgerContract');
Then we can submit makeEquipment chain code invocation.
const response = await contract.submitTransaction('makeEquipment', manufacturer, equipmentNumber, equipmentName, ownerName);
To verify equipment records are stored in the blockchain, we can use fabric query functions to retrieve the result. The following code shows how we can submit a query or queryHistory function to get equipment results.
const response = await contract.submitTransaction('queryByKey', key);
const response = await contract.submitTransaction('queryHistoryByKey', key);
Let’s bring up a manufacturer and create a Bob user, then submit a transaction to our PLN blockchain.
Navigate to pharma-ledger-network/organizations/manufacturer/application folder, run npm install. When we start the application, we also make sure update client ip address in plnClient.js under public/js
var urlBase = " http://your-machine-public-ip:30000“;
npm install
pharma-ledger-network/organizations/manufacturer/application$ node app.js
App listening at http://:::30000
In manufacturer, we define application port as 30000.
Note
Make sure this port is open or you can change it to another available port number under app.js line
var port = process.env.PORT || 30000;
Open a browser, enter http://your-machine-public-ip:30000
We will see the screen shown figure 7.11.
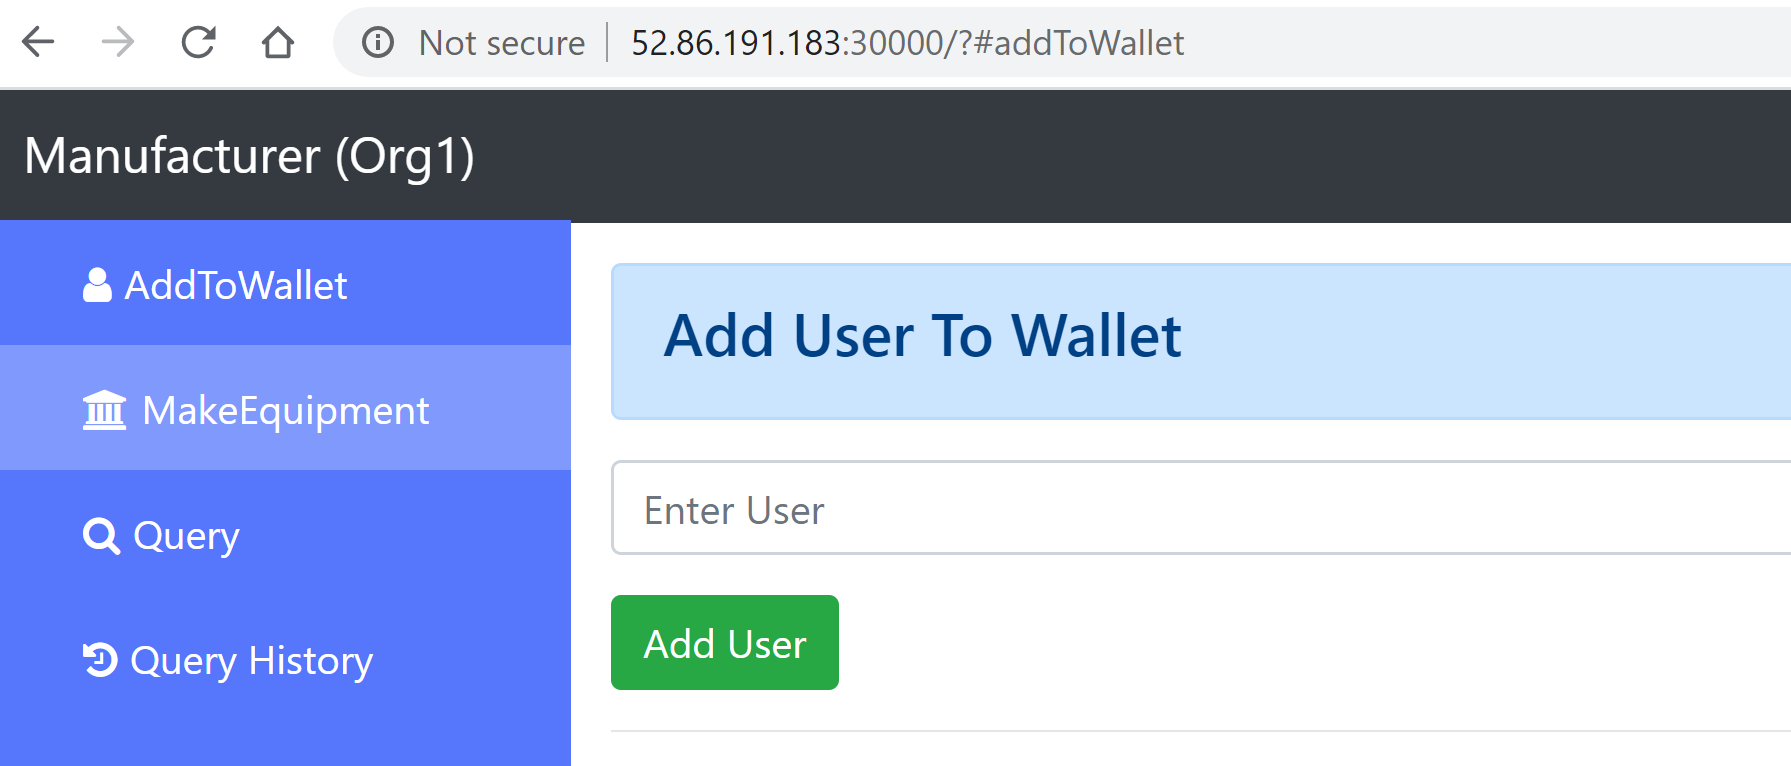
Figure 2-11. Add user to wallet for manufacturer
The default page is addToWallet. Since we have added any user to the wallet so far, you can’t submit makeEquipment and query history transactions at this moment. You have to add a user in the wallet. Let’s add Bob as a manufacturer user as shown in figure 7.12.
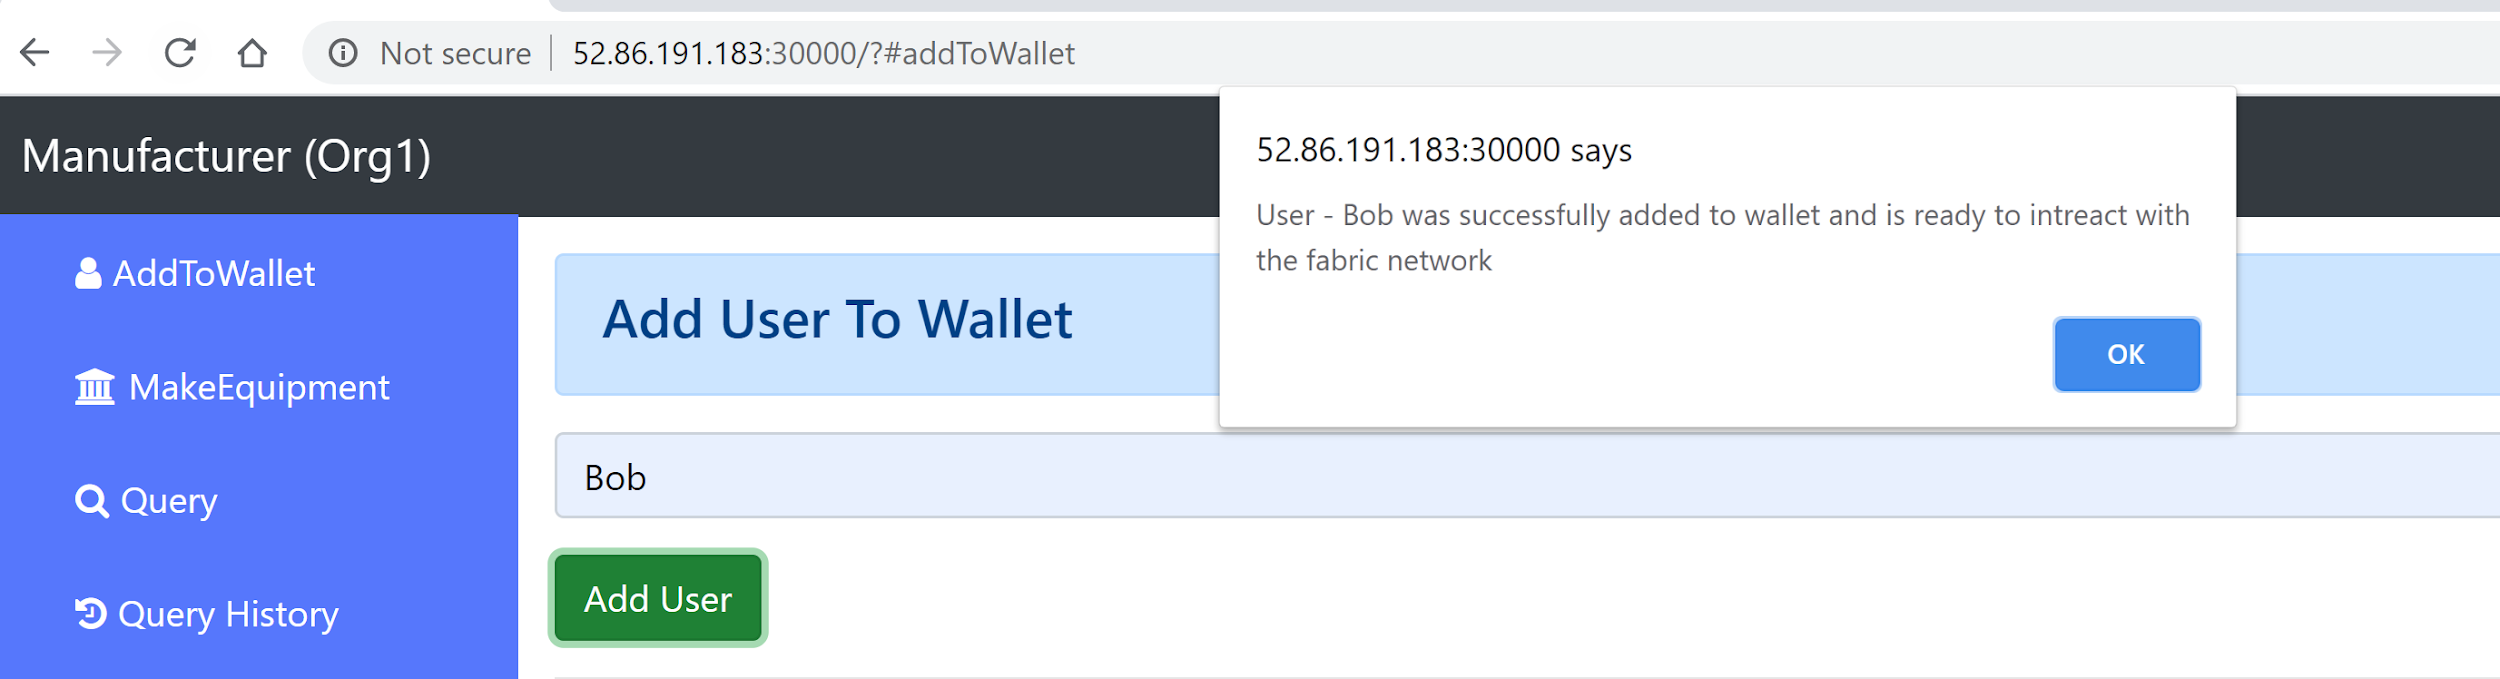
Figure 2-12. New user (Bob) is added
With the user wallet being set up, the application can now connect to our PLN and interact with chaincode. Click on MakeEquipment on the left menu, enter all required equipment information and submit the request (Figure 2-17.13). The success response will be returned from blockchain.

Figure 2-13. Adding an equipment to PLN network
We can now query equipment data in PLN network by equipment number, the result will be as shown in Figure 2-17.14
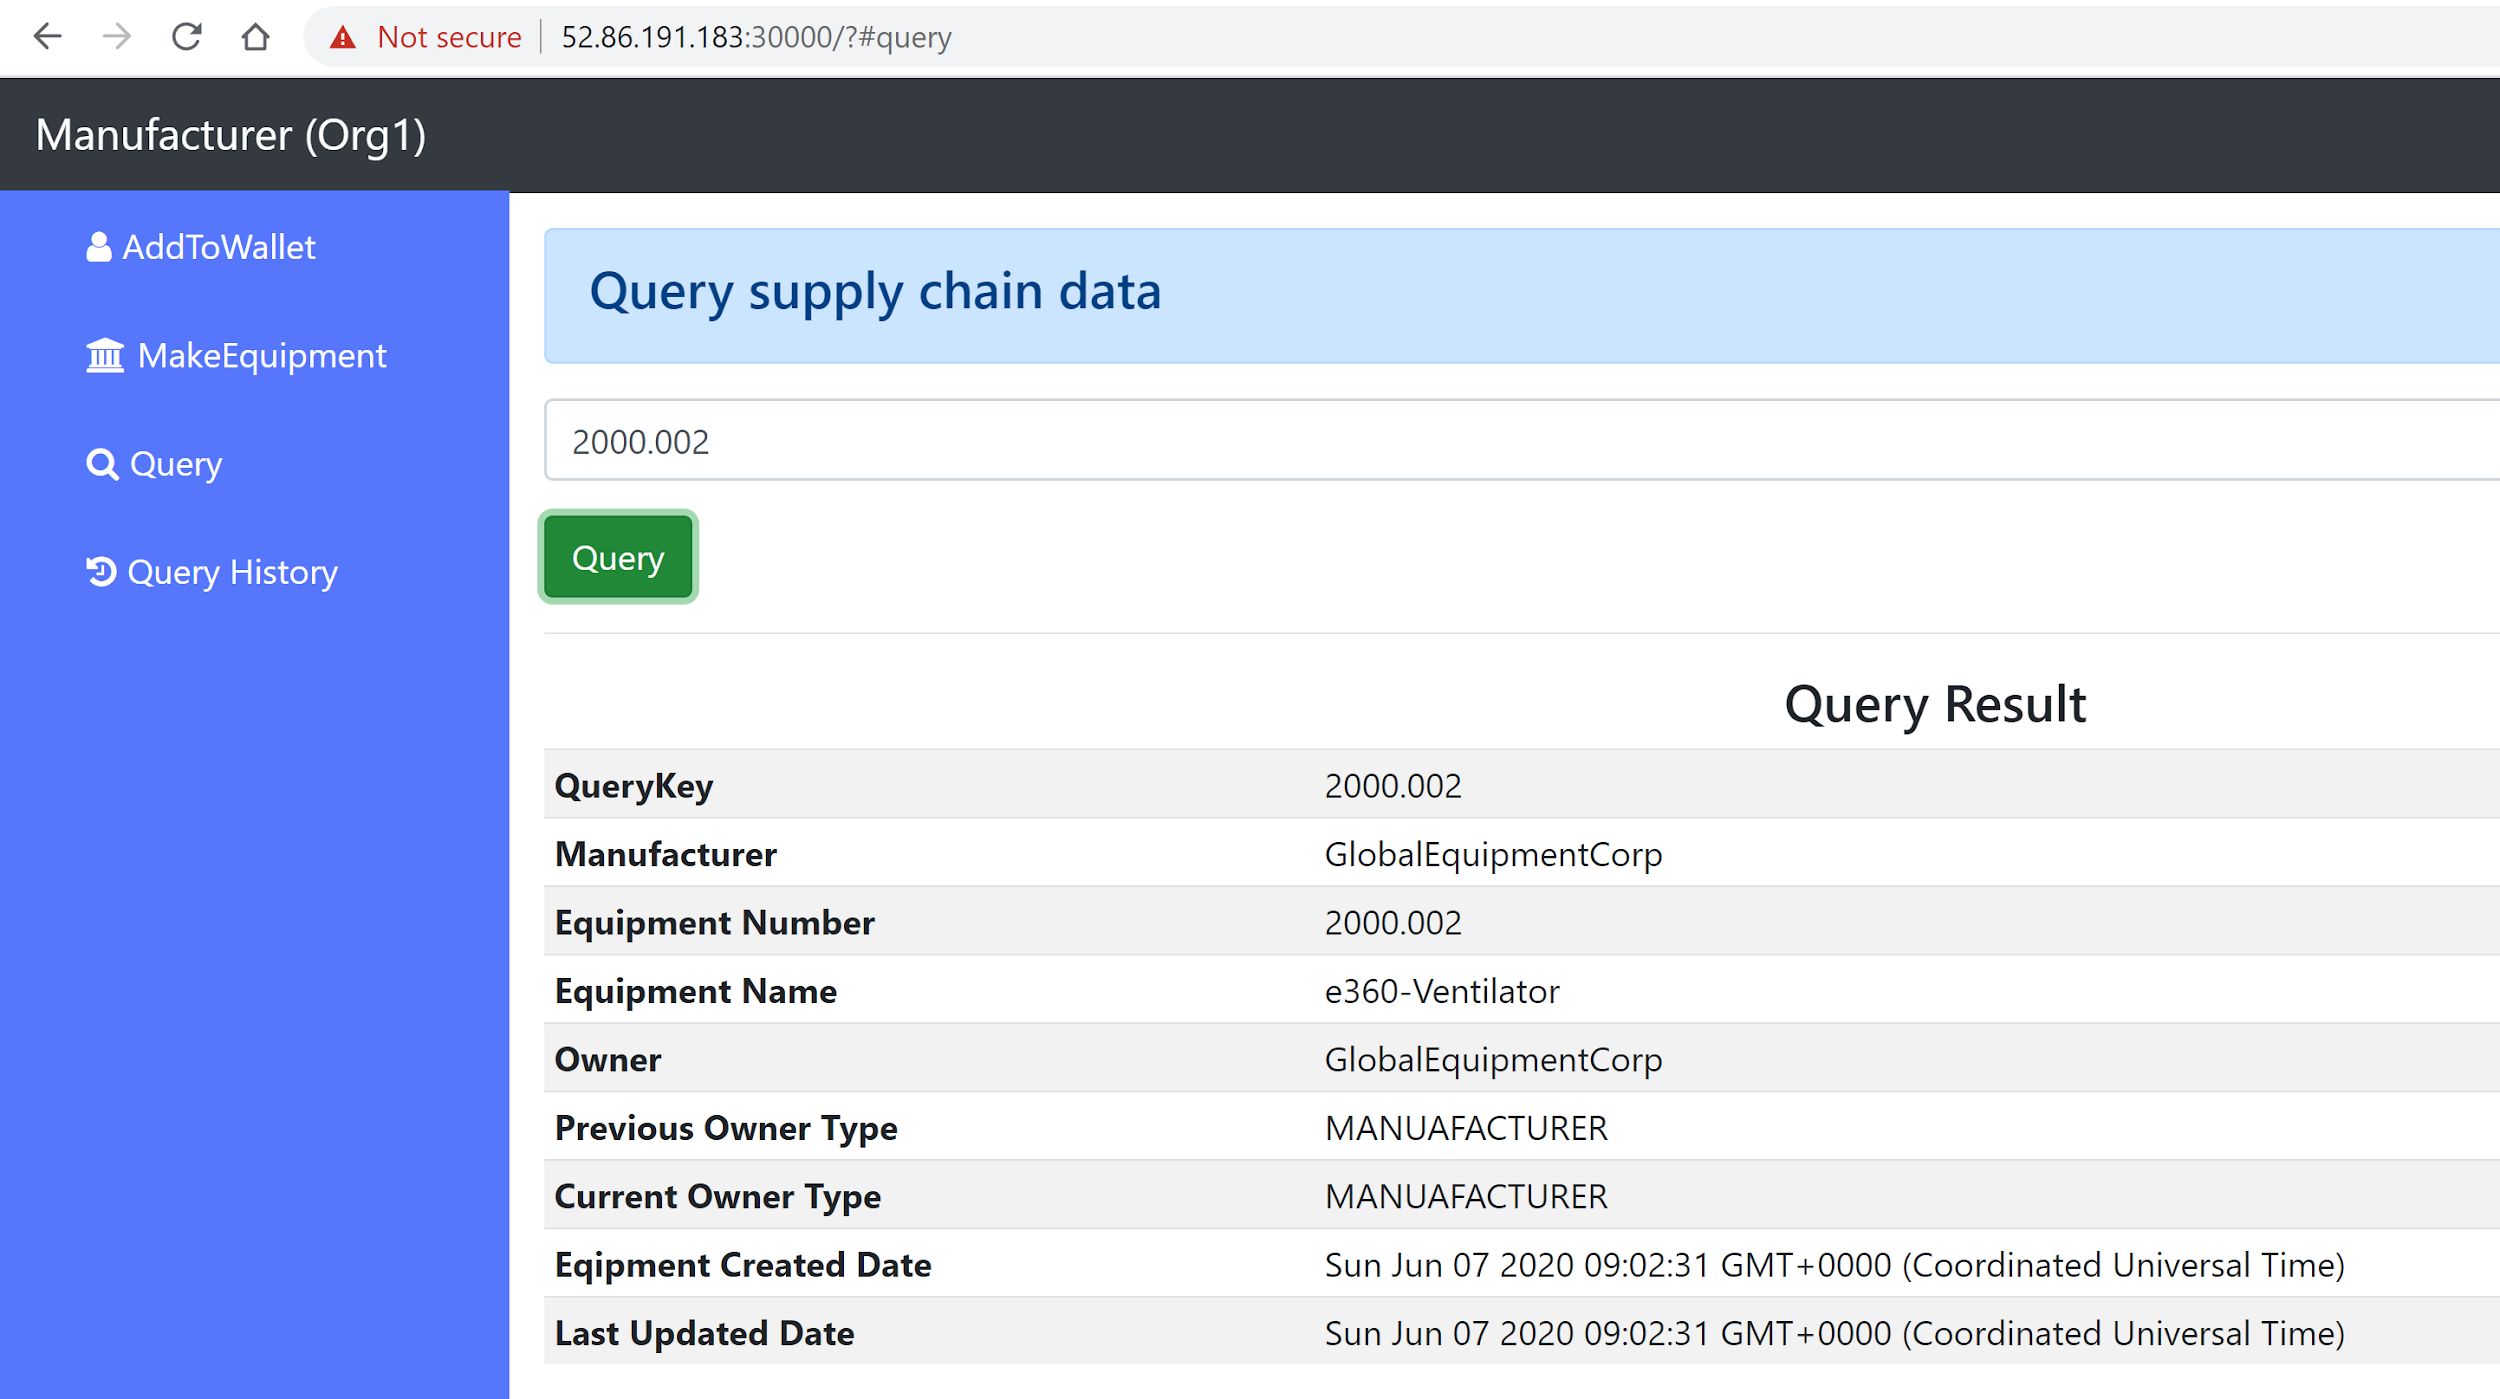
Figure 2-14. Query equipment on PLN network
Now open two other terminal windows which will bring up node servers for wholesaler and pharmacy respectively.
Navigate to /pharma-ledger-network/organizations/wholesaler/contract
Run ‘npm install’ to install smart contract dependency first.
Make sure to update the base url to http://your-machine-public-ip:30001 in plnClient.js. Then navigate back to pharma-ledger-network/organizations/wholesaler/application folder and run
npm install
node app.js
This starts the wholesaler web App. Open a browser and enter: http://your-machine-public-ip:30001
Add Alice as a wholesaler user (Figure 2-17.15) and submit wholesalerDisctribute request.
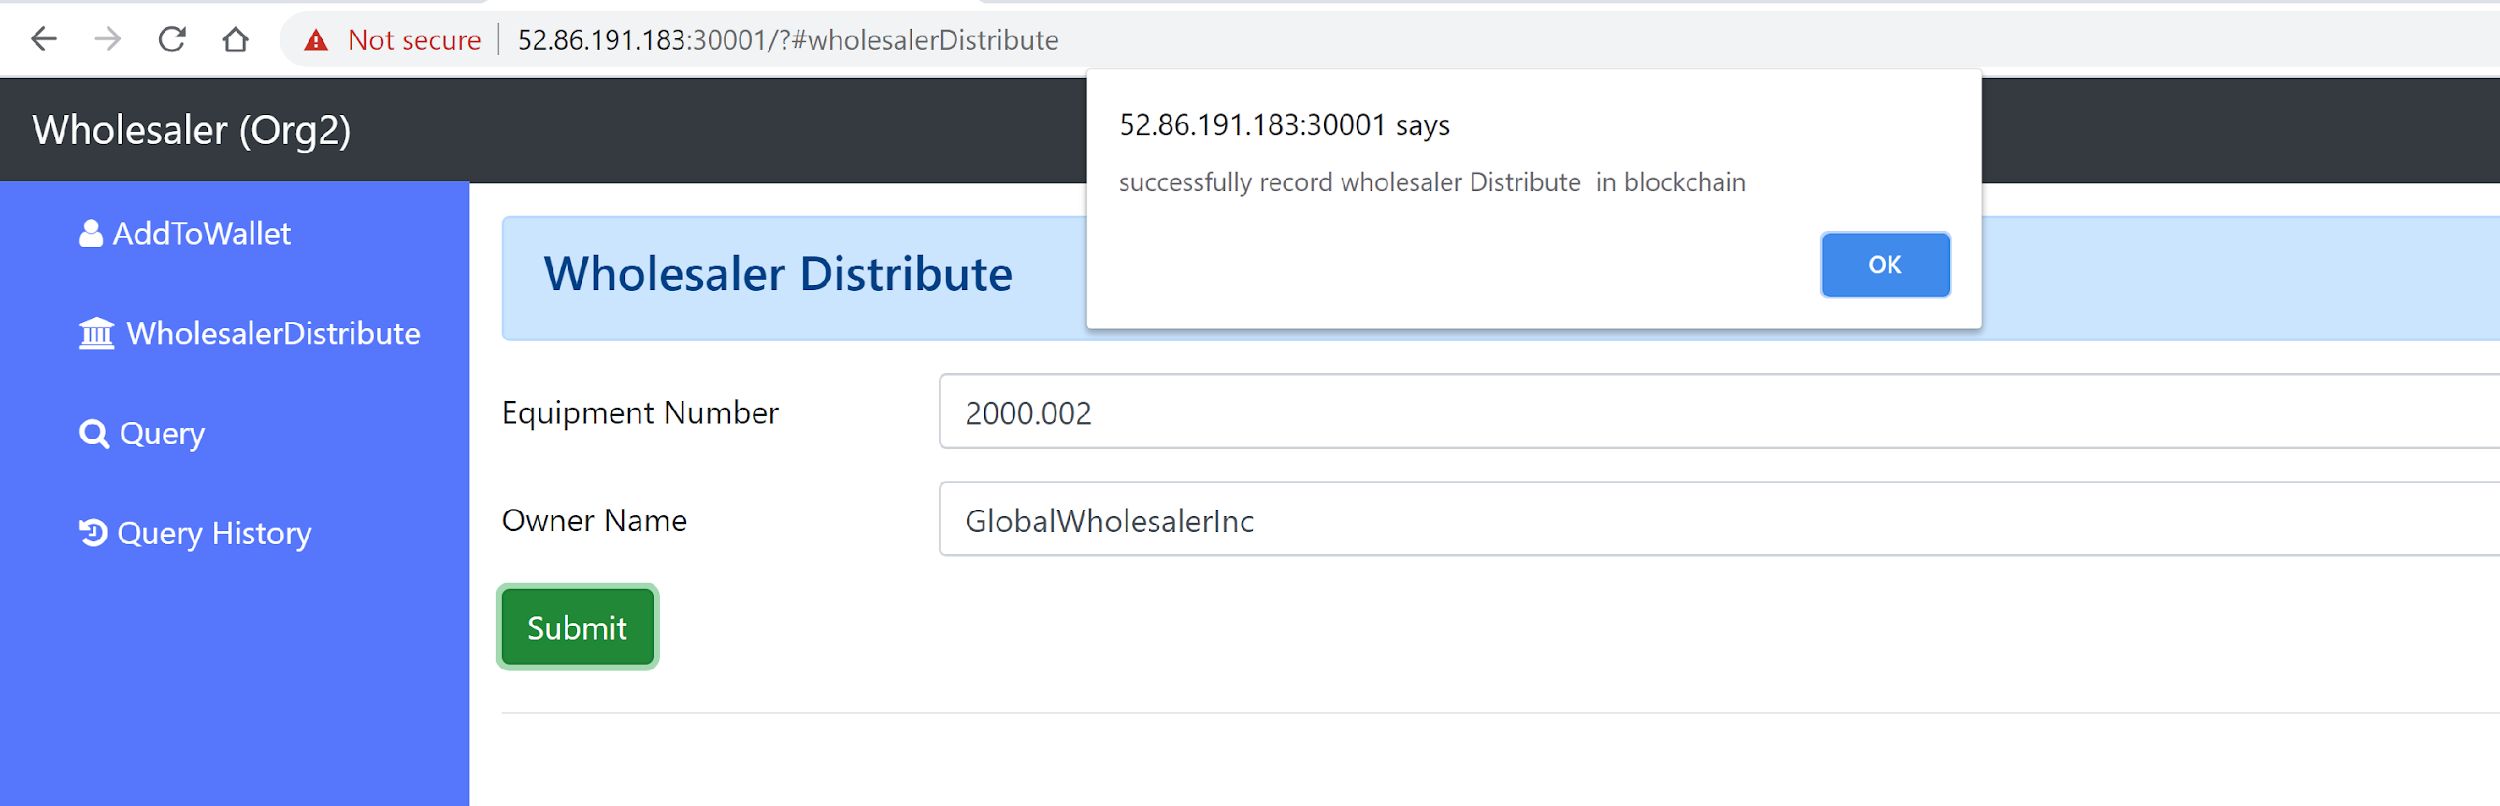
Figure 2-15. Add user (Alice) to wholesaler
Follow the same steps by bringing up the phamacy node server and add Eve as a pharmacy user (Figure 2-17.16). Submit PharmacyReceived request.

Figure 2-16. Add user (Eva) to pharmacy
Now the pharma ledger supply chain flow ends. Bob, Alice and Eve can query equipment data and trace the entire supply chain process by querying historic data. Just go to any user and on the ‘Query History’ page, search equipment 2000.002, you should see all query history results as shown in Figure 2-17.17.
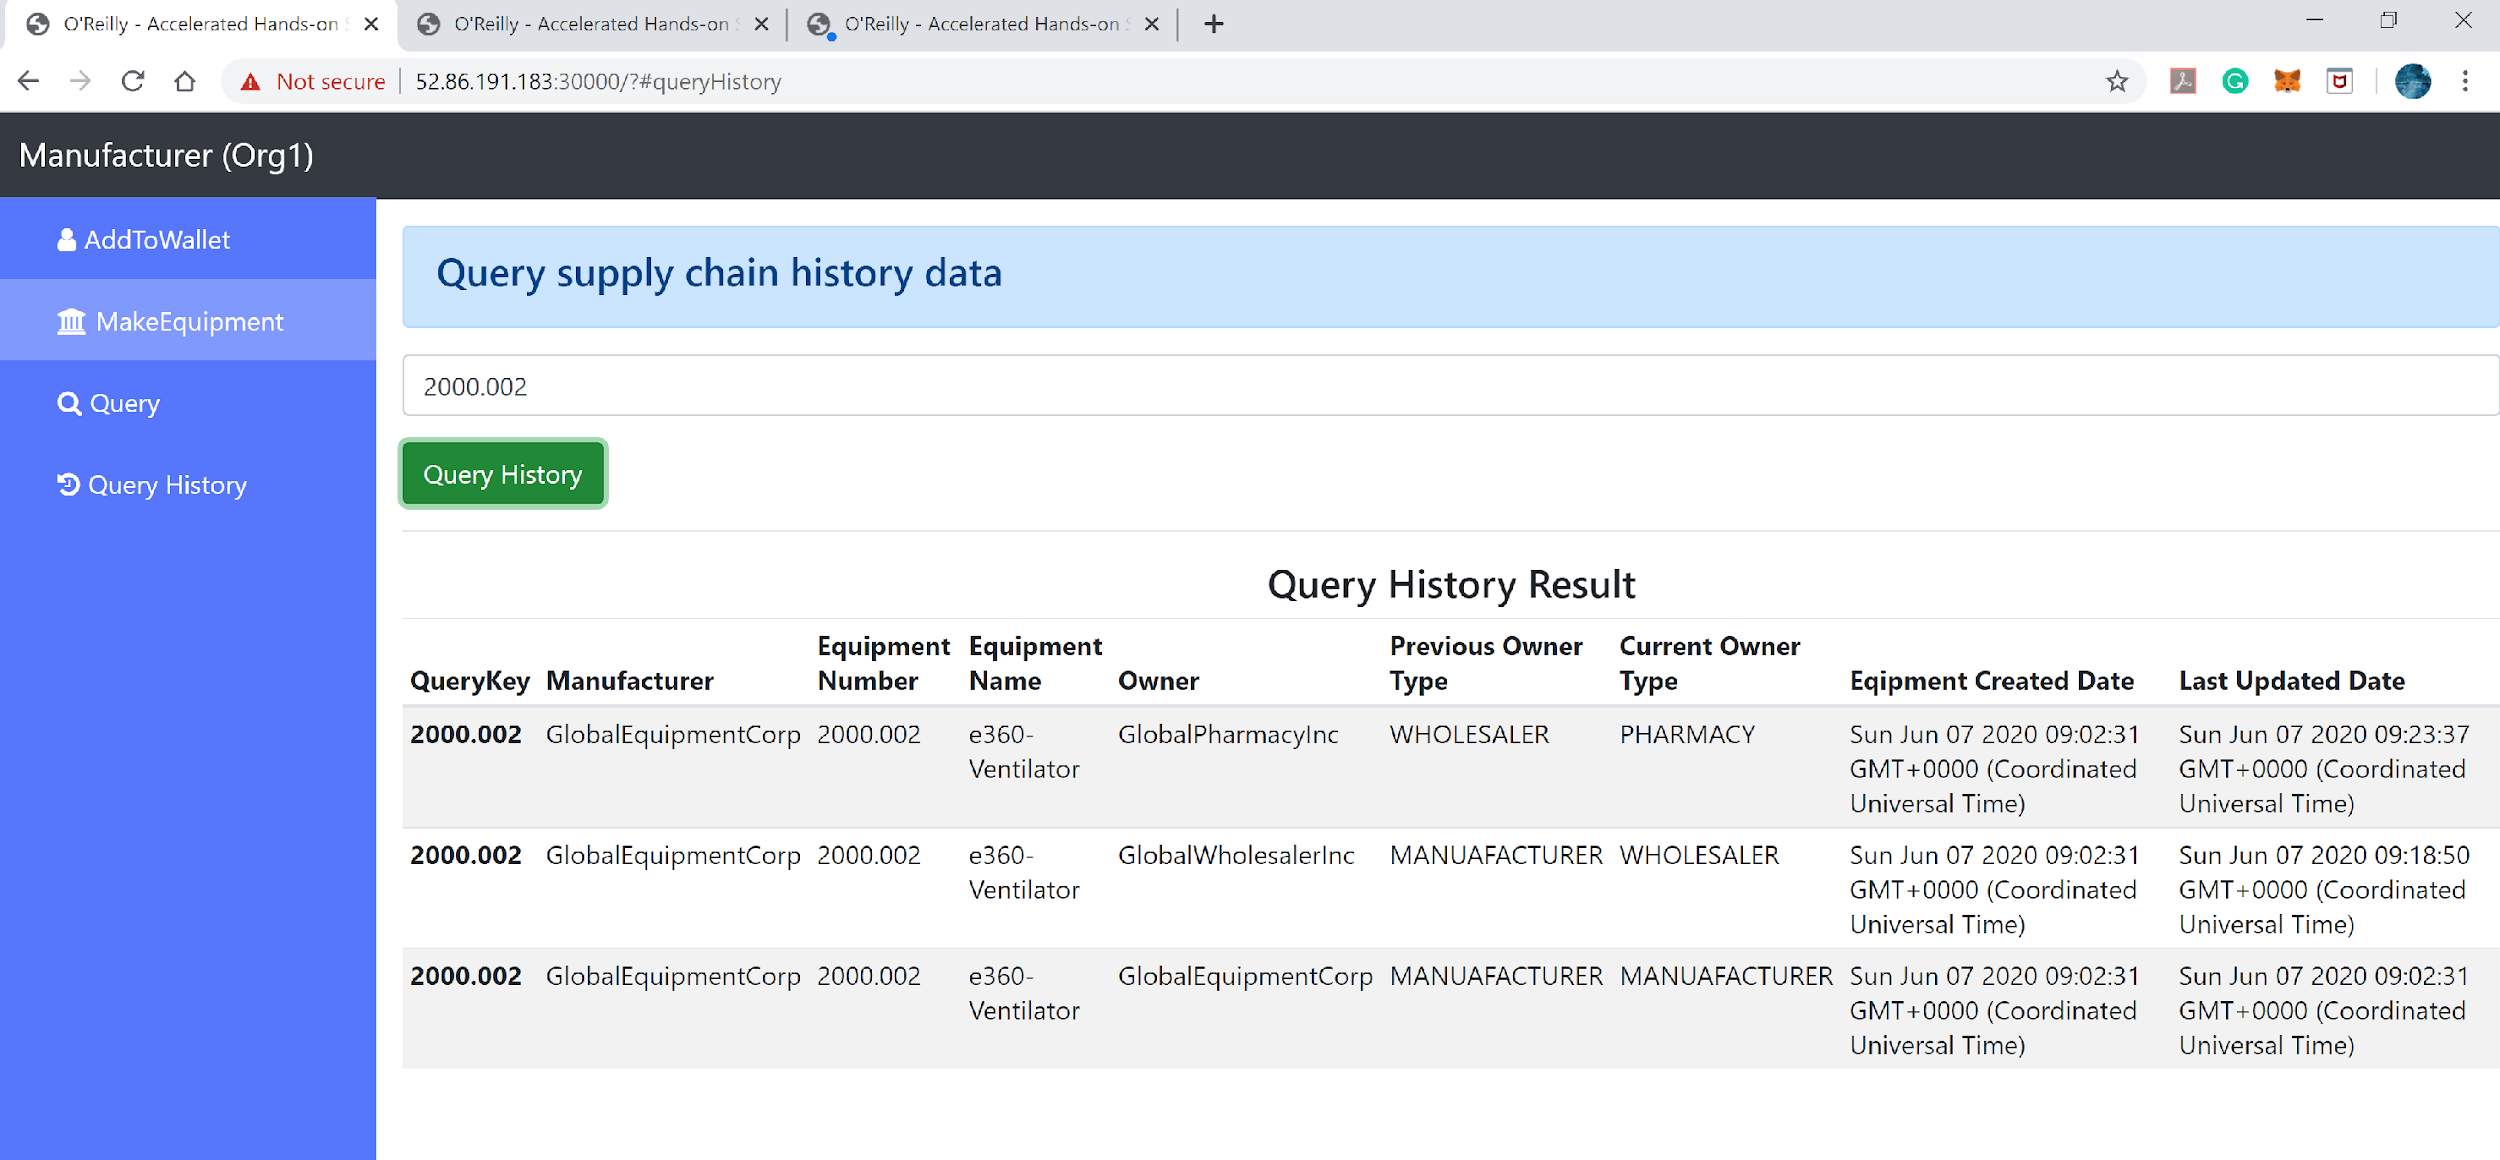
Figure 2-17. Query on equipment historic data
Summary
In this chapter, we have learned about how to build supply chain DApps with Hyperledger Fabric. We have introduced, among other things, how to define a consortium, analyze pharma ledger network lifecycle and understand how to trace the equipment’s entire transaction history. We spent a lot of time writing chaincode as a smart contract including manufacturer, wholesaler and pharmacy smart contract logics. After setting up a pharmaledger Fabric network environment, we installed and deployed our smart contract to blockchain step by step.
We have also tested smart contract function through command line script to make sure all functions we defined work as expected. With these works complete, we started to work on a UI page, where we learned how to add users into a wallet, how to connect Fabric blockchain through SDK. We also build UI pages for the manufacturer, wholesaler and pharmacy which allow users in these orgs to submit related requests to invoke the smart contract in the PLN blockchain.
You can see that it is quite a lot of work to build the end to end Hyperledger Fabric application. So we hope you are not tired, since, in the next chapter, we will explore another exciting topic - Deploy Hyperledger Fabric on Cloud.