Chapter 6. The Command Pattern: Encapsulating Invocation
In this chapter, we take encapsulation to a whole new level: we’re going to encapsulate method invocation. That’s right; by encapsulating method invocation, we can crystallize pieces of computation so that the object invoking the computation doesn’t need to worry about how to do things, it just uses our crystallized method to get it done. We can also do some wickedly smart things with these encapsulated method invocations, like save them away for logging or reuse them to implement undo in our code.
Home Automation or Bust, Inc. 1221 Industrial Avenue, Suite 2000 Future City, IL 62914 |
Greetings! |
I recently received a demo and briefing from Johnny Hurricane, CEO of Weather-O-Rama, on their new expandable weather station. I have to say, I was so impressed with the software architecture that I’d like to ask you to design the API for our new Home Automation Remote Control. In return for your services we’d be happy to handsomely reward you with stock options in Home Automation or Bust, Inc. |
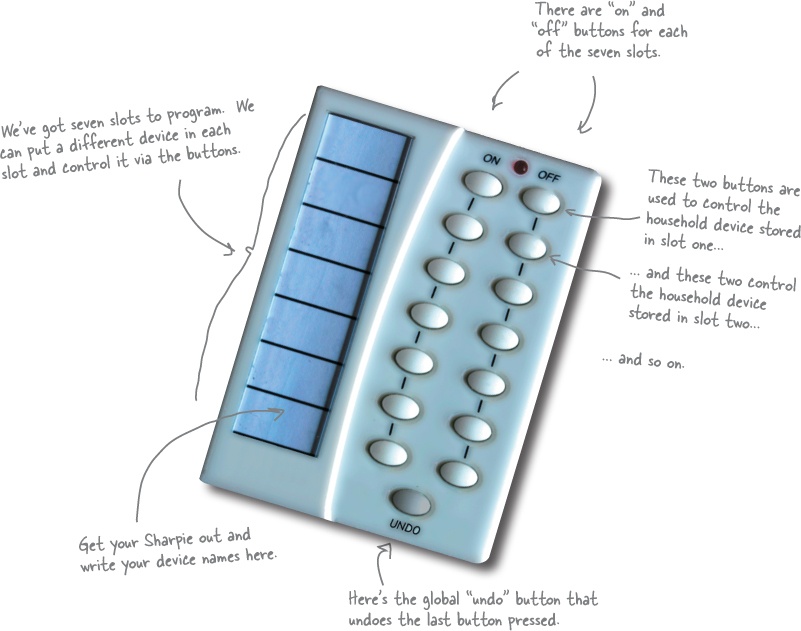
I’m enclosing a prototype of our ground-breaking remote control for your perusal. The remote control features seven programmable slots (each can be assigned to a different household device) along with corresponding on/off buttons for each. The remote also has a global undo button. |
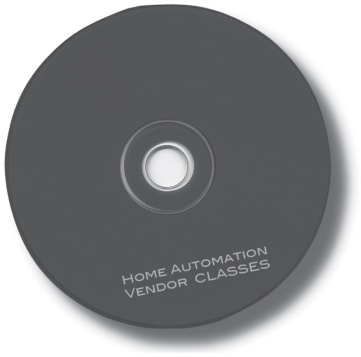
I’m also enclosing a set of Java classes on CD-R that were created by various vendors to control home automation devices such as lights, fans, hot tubs, audio equipment, and other similar controllable appliances. |
We’d like you to create an API for programming the remote so that each slot can be assigned to control a device or set of devices. Note that it is important that we be able to control the current devices on the disc, and also any future devices that the vendors may supply. |
Given the work you did on the Weather-O-Rama weather station, we know you’ll do a great job on our remote control! We look forward to seeing your design. |
Sincerely, |
Bill “X-10” Thompson, CEO |
Taking a look at the vendor classes
Check out the vendor classes on the CD-R. These should give you some idea of the interfaces of the objects we need to control from the remote.
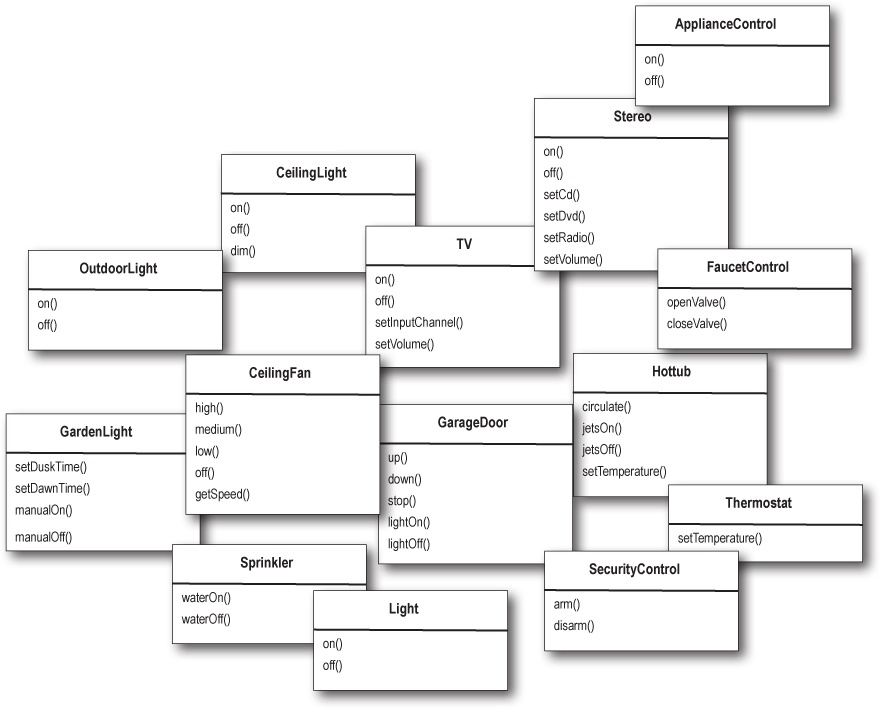
It looks like we have quite a set of classes here, and not a lot of industry effort to come up with a set of common interfaces. Not only that, it sounds like we can expect more of these classes in the future. Designing a remote control API is going to be interesting. Let’s get on to the design.
Cubicle Conversation
Your teammates are already discussing how to design the remote control API...

Mary: Yes, I thought we’d see a bunch of classes with on() and off() methods, but here we’ve got methods like dim(), setTemperature(), setVolume(), and setInputChannel().
Sue: Not only that, it sounds like we can expect more vendor classes in the future with just as diverse methods.
Mary: I think it’s important we view this as a separation of concerns: the remote should know how to interpret button presses and make requests, but it shouldn’t know a lot about home automation or how to turn on a hot tub.
Sue: Sounds like good design. But if the remote is dumb and just knows how to make generic requests, how do we design the remote so that it can invoke an action that, say, turns on a light or opens a garage door?
Mary: I’m not sure, but we don’t want the remote to have to know the specifics of the vendor classes.
Sue: What do you mean?
Mary: We don’t want the remote to consist of a set of if statements, like “if slot1 == Light, then light.on(), else if slot1 == Hottub then hottub.jetsOn()”. We know that is a bad design.
Sue: I agree. Whenever a new vendor class comes out, we’d have to go in and modify the code, potentially creating bugs and more work for ourselves!
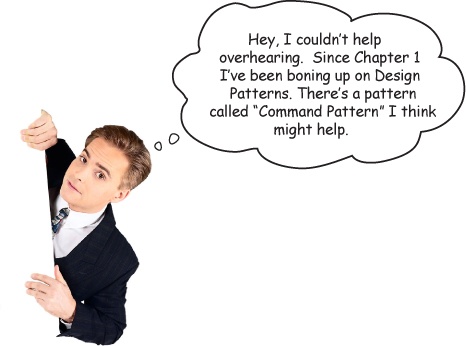
Joe: The Command Pattern allows you to decouple the requester of an action from the object that actually performs the action. So, here the requester would be the remote control and the object that performs the action would be an instance of one of your vendor classes.
Sue: How is that possible? How can we decouple them? After all, when I press a button, the remote has to turn on a light.
Joe: You can do that by introducing “command objects” into your design. A command object encapsulates a request to do something (like turn on a light) on a specific object (say, the living room light object). So, if we store a command object for each button, when the button is pressed we ask the command object to do some work. The remote doesn’t have any idea what the work is, it just has a command object that knows how to talk to the right object to get the work done. So, you see, the remote is decoupled from the light object!
Sue: This certainly sounds like it’s going in the right direction.
Mary: Still, I’m having a hard time wrapping my head around the pattern.
Joe: Given that the objects are so decoupled, it’s a little difficult to picture how the pattern actually works.
Mary: Let me see if I at least have the right idea: using this pattern, we could create an API in which these command objects can be loaded into button slots, allowing the remote code to stay very simple. And, the command objects encapsulate how to do a home automation task along with the object that needs to do it.
Joe: Yes, I think so. I also think this pattern can help you with that undo button, but I haven’t studied that part yet.
Mary: This sounds really encouraging, but I think I have a bit of work to do to really “get” the pattern.
Sue: Me too.
Meanwhile, back at the Diner..., or, A brief introduction to the Command Pattern
As Joe said, it is a little hard to understand the Command Pattern by just hearing its description. But don’t fear, we have some friends ready to help: remember our friendly diner from Chapter 1? It’s been a while since we visited Alice, Flo, and the short-order cook, but we’ve got good reason for returning (well, beyond the food and great conversation): the diner is going to help us understand the Command Pattern.

So, let’s take a short detour back to the diner and study the interactions between the customers, the waitress, the orders and the short-order cook. Through these interactions, you’re going to understand the objects involved in the Command Pattern and also get a feel for how the decoupling works. After that, we’re going to knock out that remote control API.
Checking in at the Objectville Diner...
Okay, we all know how the Diner operates:

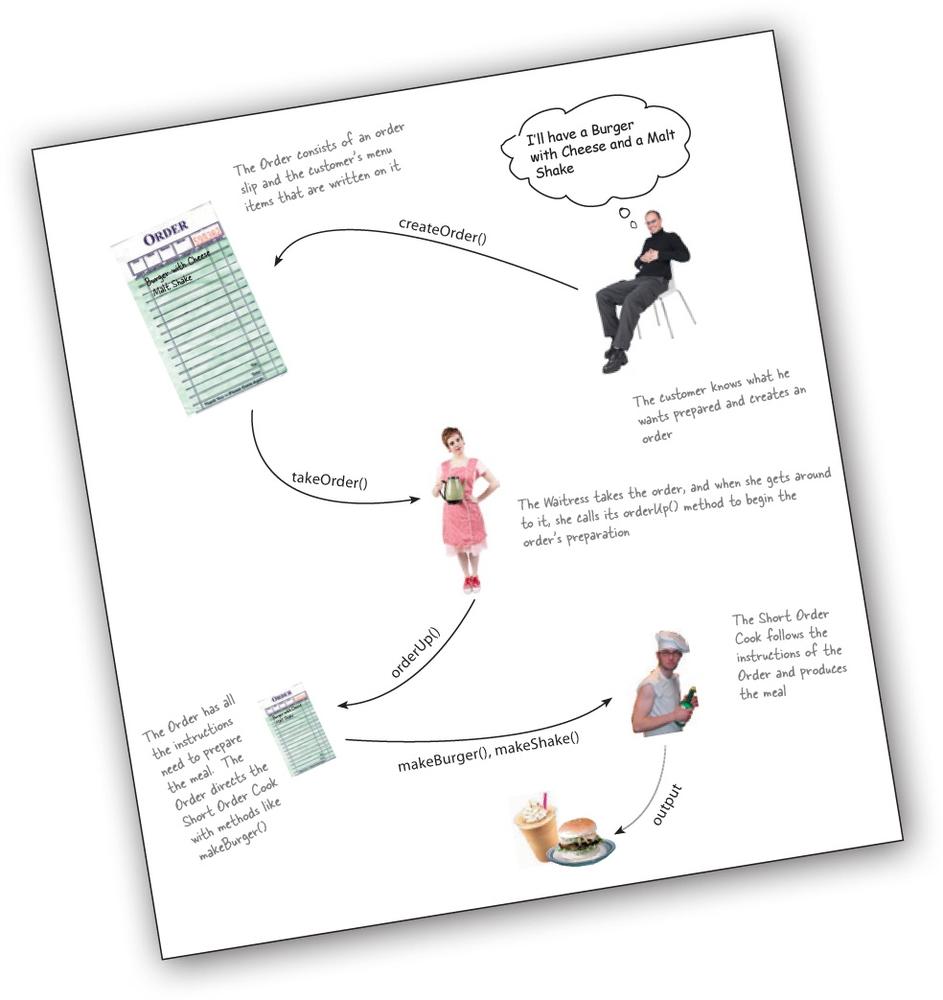
Let’s study the interaction in a little more detail...
...and given this Diner is in Objectville, let’s think about the object and method calls involved, too!
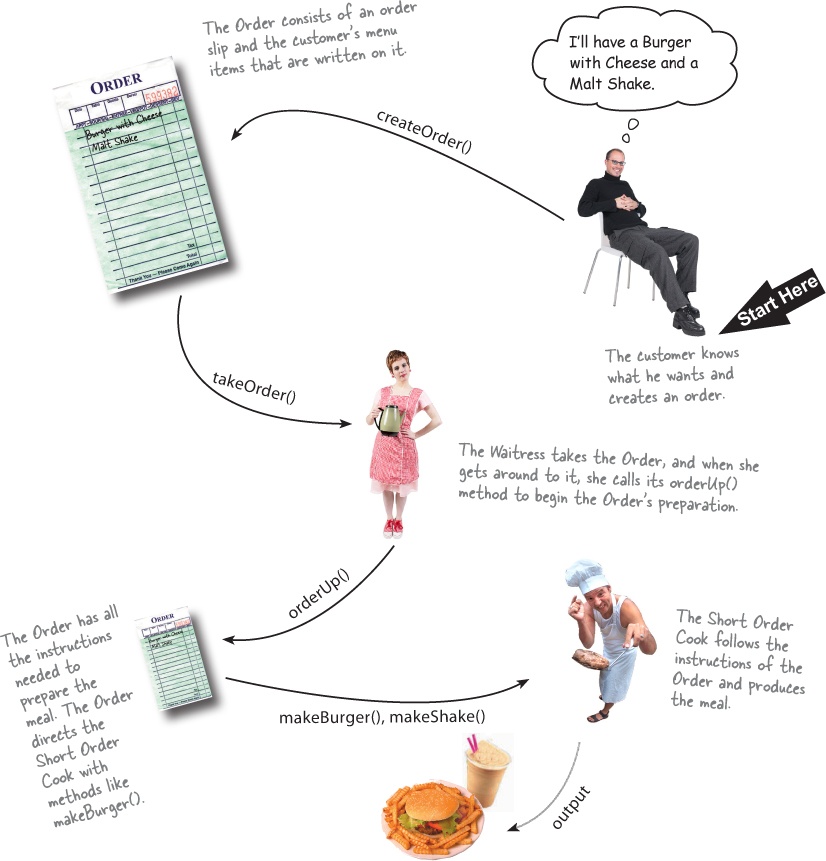
The Objectville Diner roles and responsibilities
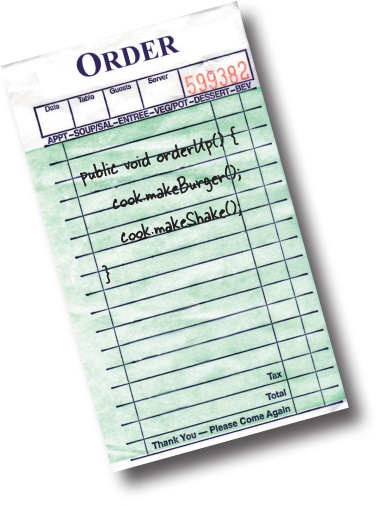
An Order Slip encapsulates a request to prepare a meal.
Think of the Order Slip as an object, an object that acts as a request to prepare a meal. Like any object, it can be passed around—from the Waitress to the order counter, or to the next Waitress taking over her shift. It has an interface that consists of only one method, orderUp(), that encapsulates the actions needed to prepare the meal. It also has a reference to the object that needs to prepare it (in our case, the Cook). It’s encapsulated in that the Waitress doesn’t have to know what’s in the order or even who prepares the meal; she only needs to pass the slip through the order window and call “Order up!”
Note
Okay, in real life a waitress would probably care what is on the Order Slip and who cooks it, but this is Objectville... work with us here!
The Waitress’s job is to take Order Slips and invoke the orderUp() method on them.
The Waitress has it easy: take an order from the customer, continue helping customers until she makes it back to the order counter, then invoke the orderUp() method to have the meal prepared. As we’ve already discussed, in Objectville, the Waitress really isn’t worried about what’s on the order or who is going to prepare it; she just knows Order Slips have an orderUp() method she can call to get the job done.
Now, throughout the day, the Waitress’s takeOrder() method gets parameterized with different Order Slips from different customers, but that doesn’t faze her; she knows all Order Slips support the orderUp() method and she can call orderUp() any time she needs a meal prepared.

The Short Order Cook has the knowledge required to prepare the meal.
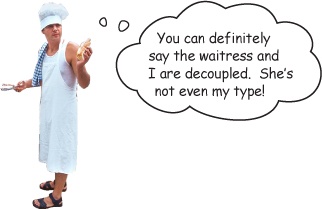
The Short Order Cook is the object that really knows how to prepare meals. Once the Waitress has invoked the orderUp() method; the Short Order Cook takes over and implements all the methods that are needed to create meals. Notice the Waitress and the Cook are totally decoupled: the Waitress has Order Slips that encapsulate the details of the meal; she just calls a method on each order to get it prepared. Likewise, the Cook gets his instructions from the Order Slip; he never needs to directly communicate with the Waitress.

Patience, we’re getting there...
Think of the Diner as a model for an OO design pattern that allows us to separate an object making a request from the objects that receive and execute those requests. For instance, in our remote control API, we need to separate the code that gets invoked when we press a button from the objects of the vendor-specific classes that carry out those requests. What if each slot of the remote held an object like the Diner’s Order Slip object? Then, when a button is pressed, we could just call the equivalent of the “orderUp()” method on this object and have the lights turn on without the remote knowing the details of how to make those things happen or what objects are making them happen.
Now, let’s switch gears a bit and map all this Diner talk to the Command Pattern...
From the Diner to the Command Pattern
Okay, we’ve spent enough time in the Objectville Diner that we know all the personalities and their responsibilities quite well. Now we’re going to rework the Diner diagram to reflect the Command Pattern. You’ll see that all the players are the same; only the names have changed.

Our first command object
Isn’t it about time we build our first command object? Let’s go ahead and write some code for the remote control. While we haven’t figured out how to design the remote control API yet, building a few things from the bottom up may help us...

Implementing the Command interface
First things first: all command objects implement the same interface, which consists of one method. In the Diner we called this method orderUp(); however, we typically just use the name execute().
Here’s the Command interface:

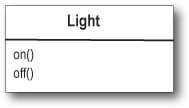
Implementing a command to turn a light on
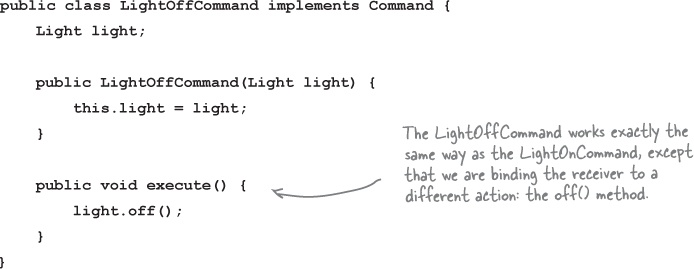
Now, let’s say you want to implement a command for turning a light on. Referring to our set of vendor classes, the Light class has two methods: on() and off(). Here’s how you can implement this as a command:
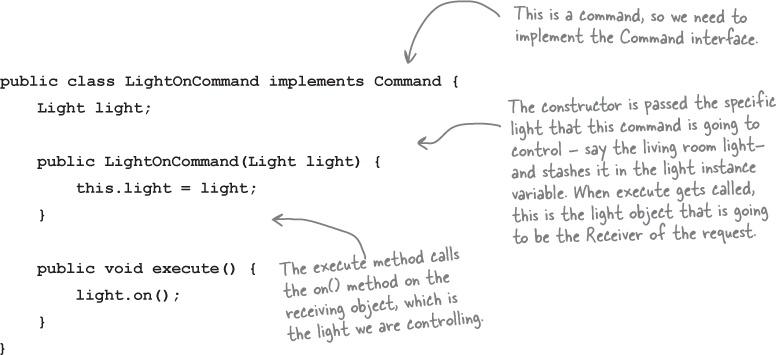
Now that you’ve got a LightOnCommand class, let’s see if we can put it to use...
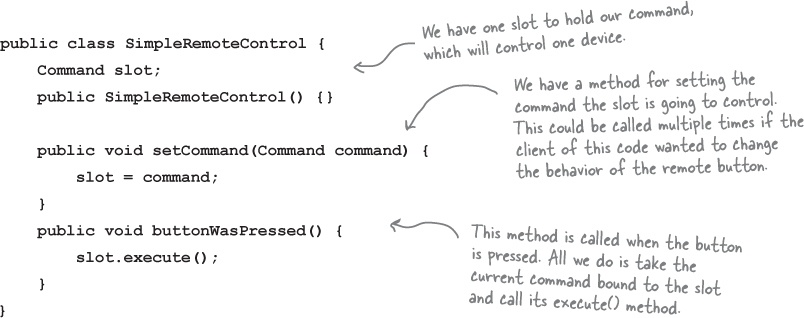
Using the command object
Okay, let’s make things simple: say we’ve got a remote control with only one button and corresponding slot to hold a device to control:
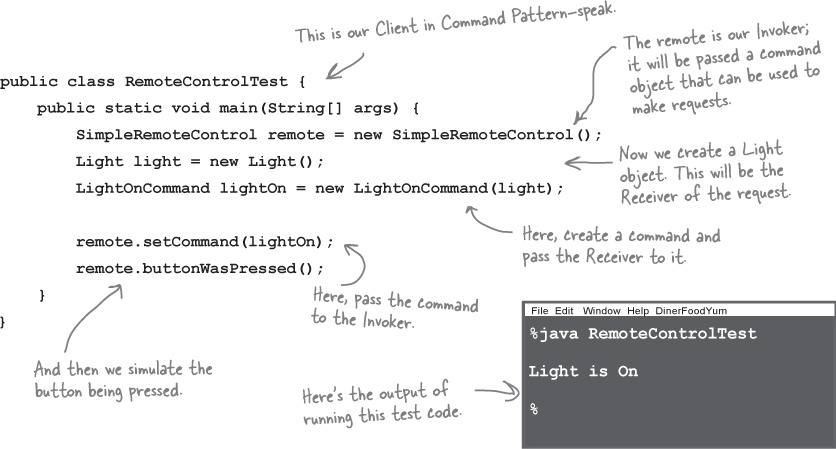
Creating a simple test to use the Remote Control
Here’s just a bit of code to test out the simple remote control. Let’s take a look and we’ll point out how the pieces match the Command Pattern diagram:
Okay, it’s time for you to implement the GarageDoorOpenCommand class. First, supply the code for the class below. You’ll need the GarageDoor class diagram.


Now that you’ve got your class, what is the output of the following code? (Hint: the GarageDoor up() method prints out “Garage Door is Open” when it is complete.)
public class RemoteControlTest {
    public static void main(String[] args) {
        SimpleRemoteControl remote = new SimpleRemoteControl();
        Light light = new Light();
        GarageDoor garageDoor = new GarageDoor();
        LightOnCommand lightOn = new LightOnCommand(light);
        GarageDoorOpenCommand garageOpen =
            new GarageDoorOpenCommand(garageDoor);


        remote.setCommand(lightOn);
        remote.buttonWasPressed();
        remote.setCommand(garageOpen);
        remote.buttonWasPressed();
    }
}

The Command Pattern defined
You’ve done your time in the Objectville Diner, you’ve partly implemented the remote control API, and in the process you’ve got a fairly good picture of how the classes and objects interact in the Command Pattern. Now we’re going to define the Command Pattern and nail down all the details.
Let’s start with its official definition:
Note
The Command Pattern encapsulates a request as an object, thereby letting you parameterize other objects with different requests, queue or log requests, and support undoable operations.
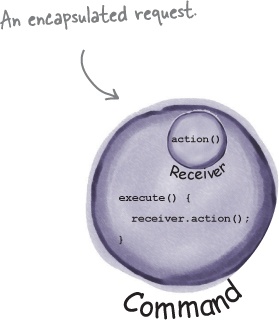
Let’s step through this. We know that a command object encapsulates a request by binding together a set of actions on a specific receiver. To achieve this, it packages the actions and the receiver up into an object that exposes just one method, execute(). When called, execute() causes the actions to be invoked on the receiver. From the outside, no other objects really know what actions get performed on what receiver; they just know that if they call the execute() method, their request will be serviced.
We’ve also seen a couple examples of parameterizing an object with a command. Back at the diner, the Waitress was parameterized with multiple orders throughout the day. In the simple remote control, we first loaded the button slot with a “light on” command and then later replaced it with a “garage door open” command. Like the Waitress, your remote slot didn’t care what command object it had, as long as it implemented the Command interface.
What we haven’t encountered yet is using commands to implement queues and logs and support undo operations. Don’t worry, those are pretty straightforward extensions of the basic Command Pattern and we will get to them soon. We can also easily support what’s known as the Meta Command Pattern once we have the basics in place. The Meta Command Pattern allows you to create macros of commands so that you can execute multiple commands at once.

The Command Pattern defined: the class diagram

Brain Power
How does the design of the Command Pattern support the decoupling of the invoker of a request and the receiver of the request?
Mary: Me too. So where do we begin?
Sue: Like we did in the SimpleRemote, we need to provide a way to assign commands to slots. In our case we have seven slots, each with an “on” and “off” button. So we might assign commands to the remote something like this:
onCommands[0] = onCommand;
offCommands[0] = offCommand;
and so on for each of the seven command slots.
Mary: That makes sense, except for the Light objects. How does the remote know the living room from the kitchen light?
Sue: Ah, that’s just it, it doesn’t! The remote doesn’t know anything but how to call execute() on the corresponding command object when a button is pressed.
Mary: Yeah, I sorta got that, but in the implementation, how do we make sure the right objects are turning on and off the right devices?
Sue: When we create the commands to be loaded into the remote, we create one LightCommand that is bound to the living room light object and another that is bound to the kitchen light object. Remember, the receiver of the request gets bound to the command it’s encapsulated in. So, by the time the button is pressed, no one cares which light is which; the right thing just happens when the execute() method is called.
Mary: I think I’ve got it. Let’s implement the remote and I think this will get clearer!
Sue: Sounds good. Let’s give it a shot...
Assigning Commands to slots
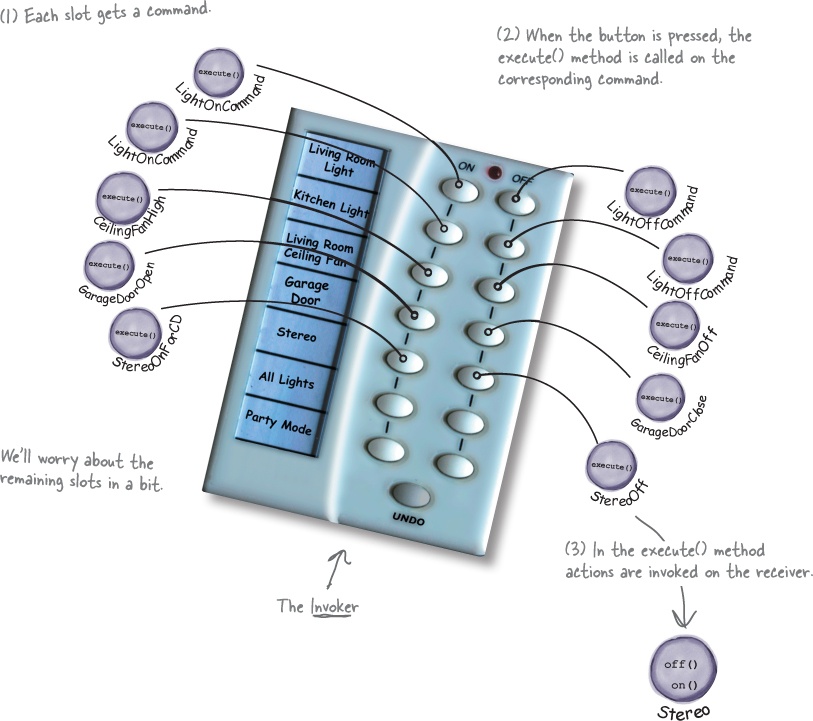
So we have a plan: we’re going to assign each slot to a command in the remote control. This makes the remote control our invoker. When a button is pressed the execute() method is going to be called on the corresponding command, which results in actions being invoked on the receiver (like lights, ceiling fans, and stereos).
Implementing the Commands
Well, we’ve already gotten our feet wet implementing the LightOnCommand for the SimpleRemoteControl. We can plug that same code in here and everything works beautifully. Off commands are no different; in fact, the LightOffCommand looks like this:
Let’s try something a little more challenging; how about writing on and off commands for the Stereo? Okay, off is easy, we just bind the Stereo to the off() method in the StereoOffCommand. On is a little more complicated; let’s say we want to write a StereoOnWithCDCommand...
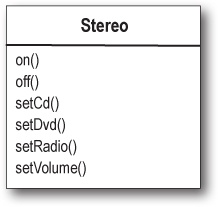

Not too bad. Take a look at the rest of the vendor classes; by now, you can definitely knock out the rest of the Command classes we need for those.
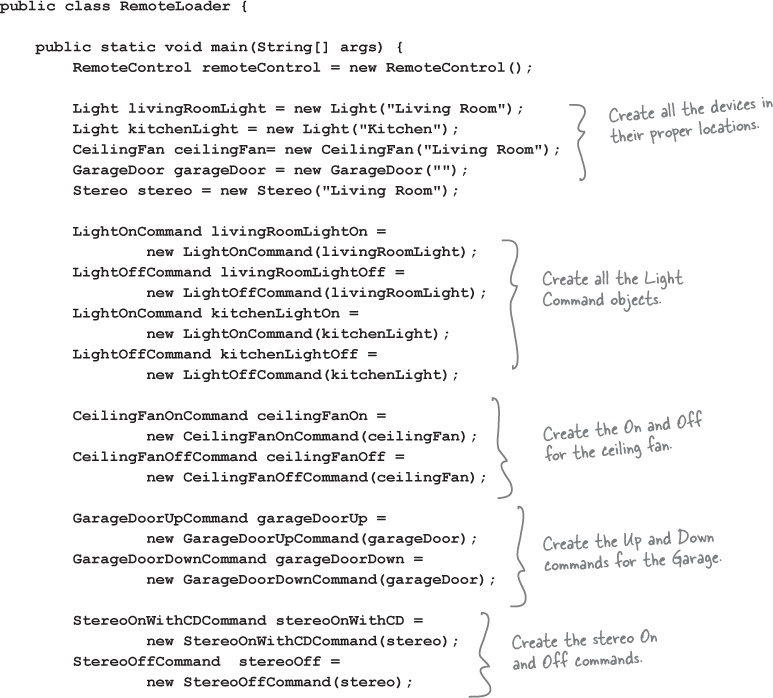
Putting the Remote Control through its paces
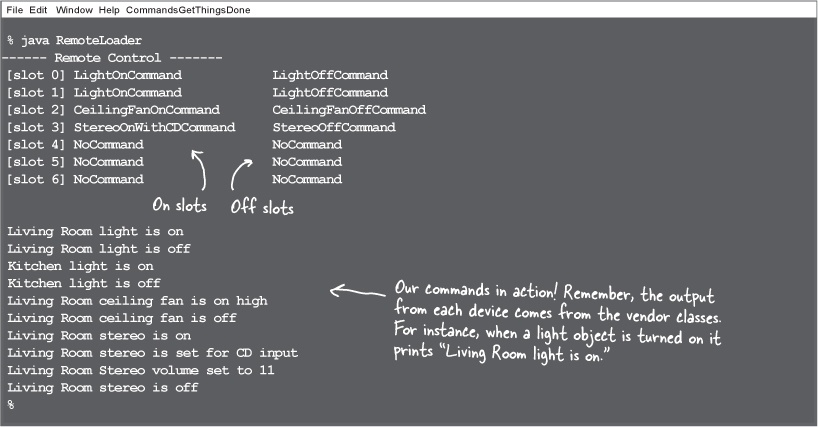
Our job with the remote is pretty much done; all we need to do is run some tests and get some documentation together to describe the API. Home Automation or Bust, Inc. sure is going to be impressed, don’t ya think? We’ve managed to come up with a design that is going to allow them to produce a remote that is easy to maintain and they’re going to have no trouble convincing the vendors to write some simple command classes in the future since they are so easy to write.
Let’s get to testing this code!
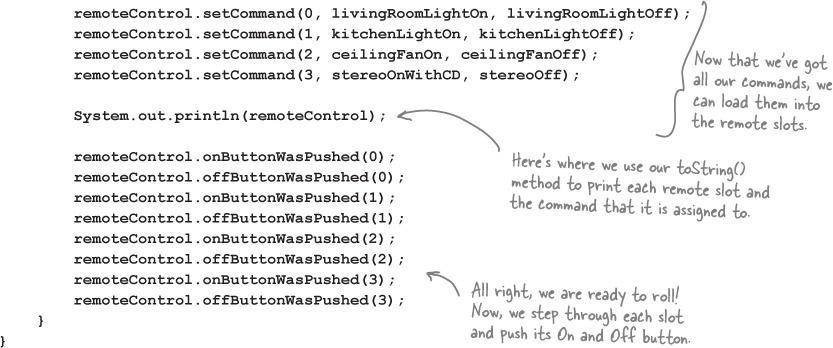
Now, let’s check out the execution of our remote control test...

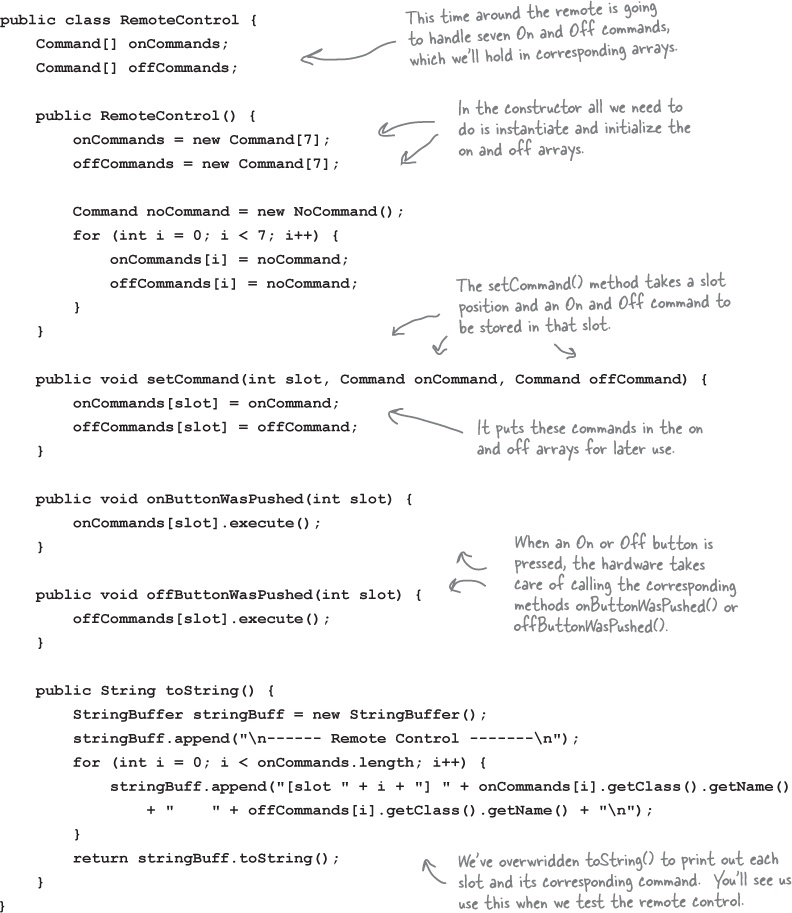
Good catch. We did sneak a little something in there. In the remote control, we didn’t want to check to see if a command was loaded every time we referenced a slot. For instance, in the onButtonWasPushed() method, we would need code like this:
public void onButtonWasPushed(int slot) {
    if (onCommands[slot] != null) {
        onCommands[slot].execute();
    }
}
So, how do we get around that? Implement a command that does nothing!
public class NoCommand implements Command {
    public void execute() { }
}
Then, in our RemoteControl constructor, we assign every slot a NoCommand object by default and we know we’ll always have some command to call in each slot.
Command noCommand = new NoCommand();
for (int i = 0; i < 7; i++) {
    onCommands[i] = noCommand;
    offCommands[i] = noCommand;
}
So in the output of our test run, you are seeing only slots that have been assigned to a command other than the default NoCommand object, which we assigned when we created the RemoteControl.
Time to write that documentation...
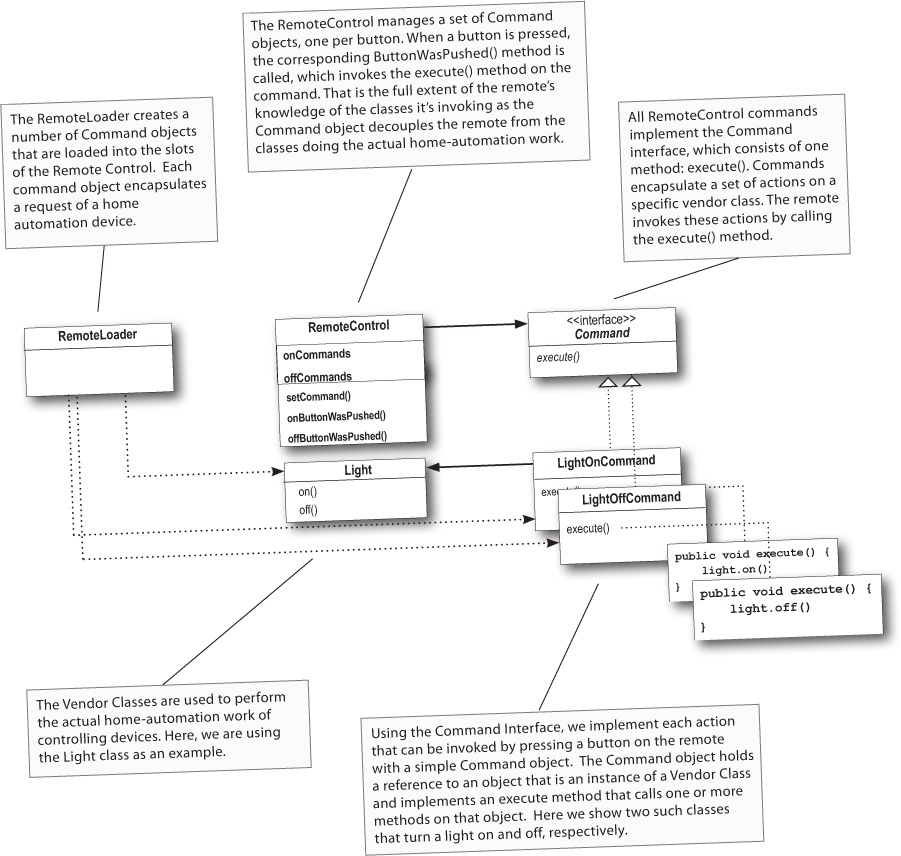
We are pleased to present you with the following design and application programming interface for your Home Automation Remote Control. Our primary design goal was to keep the remote control code as simple as possible so that it doesn’t require changes as new vendor classes are produced. To this end we have employed the Command Pattern to logically decouple the RemoteControl class from the Vendor Classes. We believe this will reduce the cost of producing the remote as well as drastically reduce your ongoing maintenance costs.
The following class diagram provides an overview of our design:
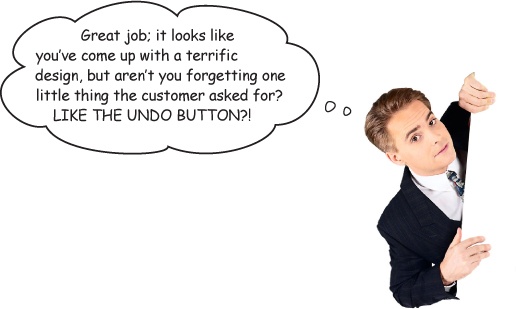
Whoops! We almost forgot... luckily, once we have our basic Command classes, undo is easy to add. Let’s step through adding undo to our commands and to the remote control...
What are we doing?
Okay, we need to add functionality to support the undo button on the remote. It works like this: say the Living Room Light is off and you press the on button on the remote. Obviously the light turns on. Now if you press the undo button then the last action will be reversed—in this case, the light will turn off. Before we get into more complex examples, let’s get the light working with the undo button:
① When commands support undo, they have an undo() method that mirrors the execute() method. Whatever execute() last did, undo() reverses. So, before we can add undo to our commands, we need to add an undo() method to the Command interface:
That was simple enough.
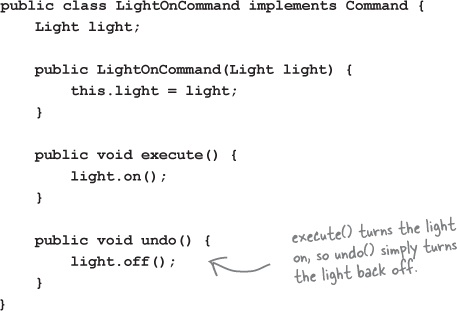
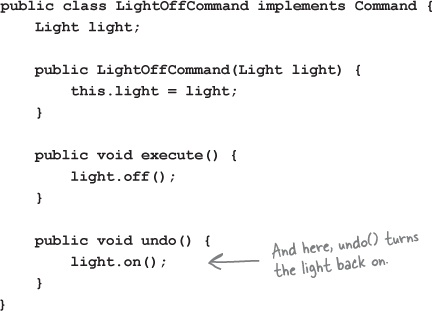
Now, let’s dive into the Light command and implement the undo() method.
② Let’s start with the LightOnCommand: if the LightOnCommand’s execute() method was called, then the on() method was last called. We know that undo() needs to do the opposite of this by calling the off() method.
Piece of cake! Now for the LightOffCommand. Here the undo() method just needs to call the Light’s on() method.
Could this be any easier? Okay, we aren’t done yet; we need to work a little support into the Remote Control to handle tracking the last button pressed and the undo button press.
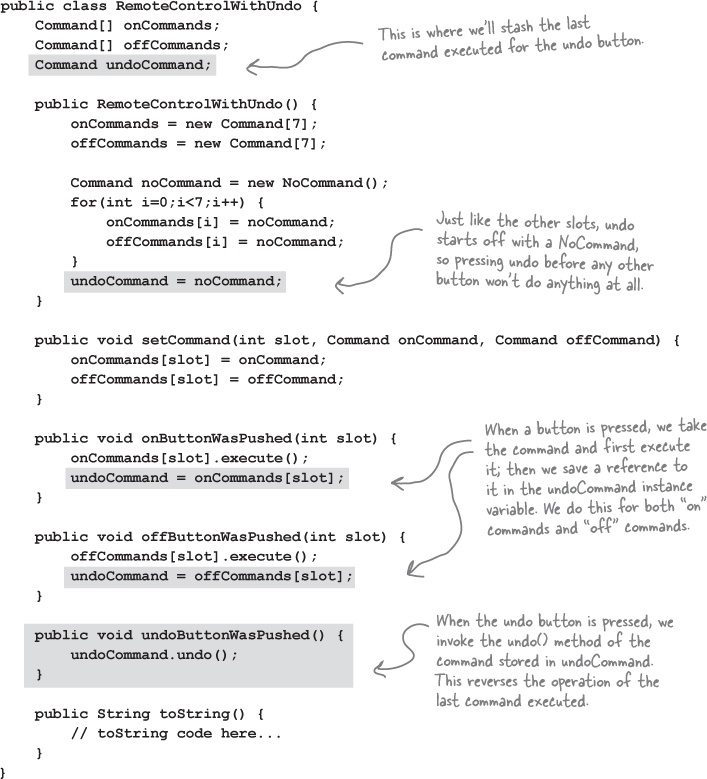
③ To add support for the undo button we only have to make a few small changes to the Remote Control class. Here’s how we’re going to do it: we’ll add a new instance variable to track the last command invoked; then, whenever the undo button is pressed, we retrieve that command and invoke its undo() method.

Time to QA that Undo button!
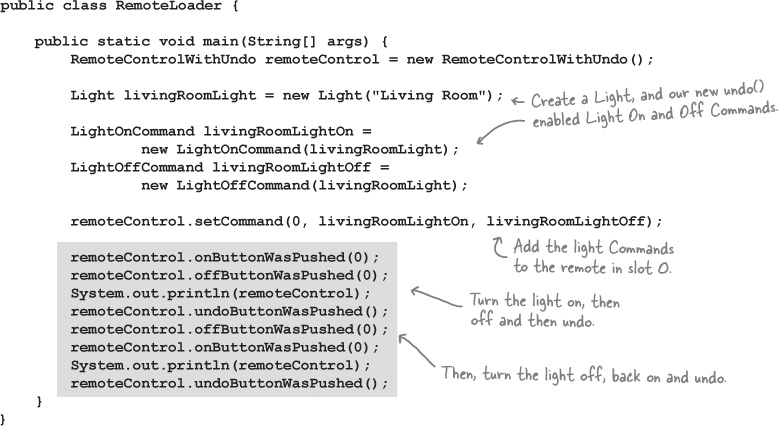
Okay, let’s rework the test harness a bit to test the undo button:
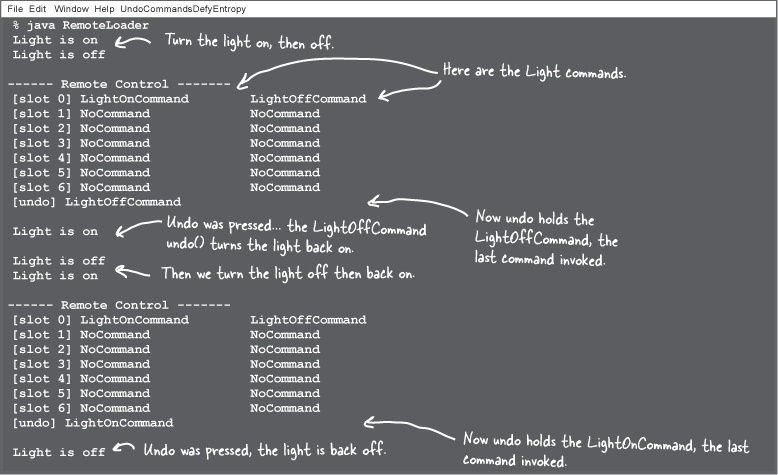
And here are the test results...
Using state to implement Undo
Okay, implementing undo on the Light was instructive but a little too easy. Typically, we need to manage a bit of state to implement undo. Let’s try something a little more interesting, like the CeilingFan from the vendor classes. The CeilingFan allows a number of speeds to be set along with an off method.
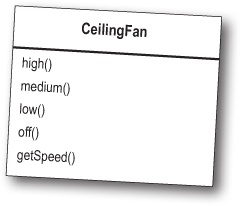
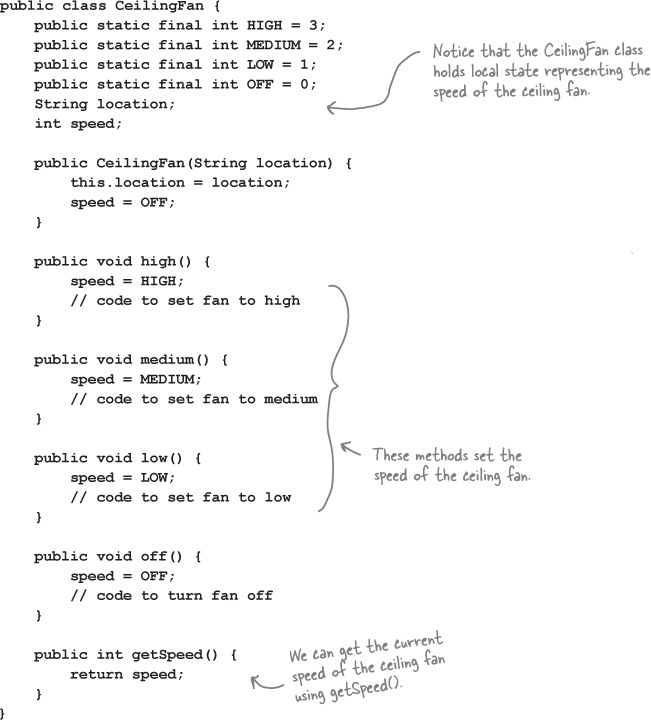
Here’s the source code for the CeilingFan:

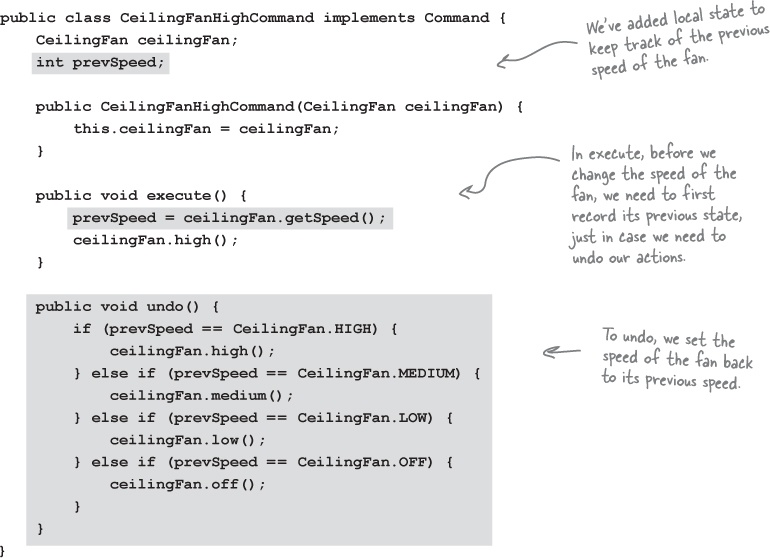
Adding Undo to the CeilingFan commands
Now let’s tackle adding undo to the various CeilingFan commands. To do so, we need to track the last speed setting of the fan and, if the undo() method is called, restore the fan to its previous setting. Here’s the code for the CeilingFanHighCommand:

Get ready to test the ceiling fan
Time to load up our remote control with the ceiling fan commands. We’re going to load slot 0’s on button with the medium setting for the fan and slot 1 with the high setting. Both corresponding off buttons will hold the ceiling fan off command.

Here’s our test script:

Testing the ceiling fan...
Okay, let’s fire up the remote, load it with commands, and push some buttons!

Every remote needs a Party Mode!
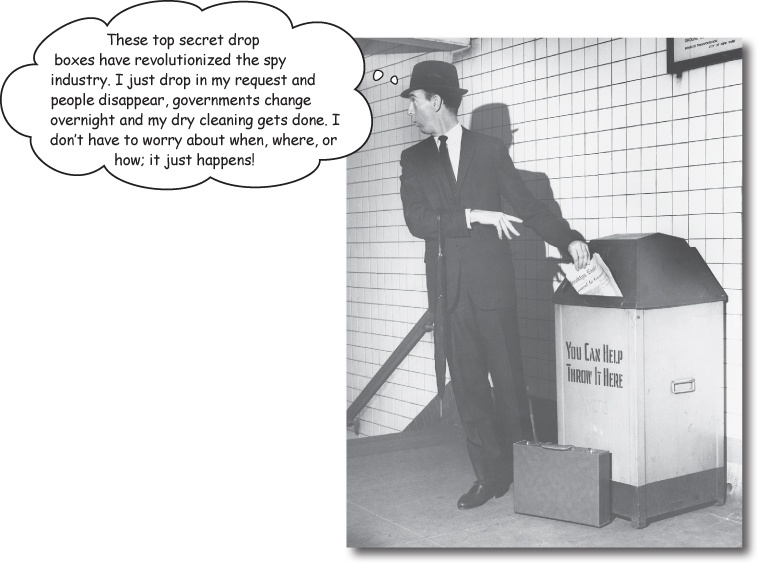
What’s the point of having a remote if you can’t push one button and have the lights dimmed, the stereo and TV turned on and set to a DVD, and the hot tub fired up?


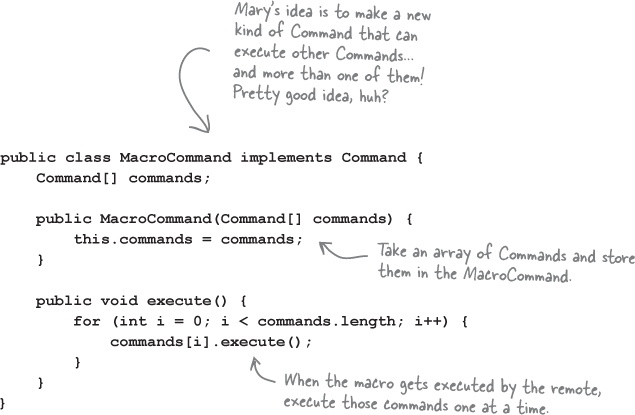
Using a macro command
Let’s step through how we use a macro command:
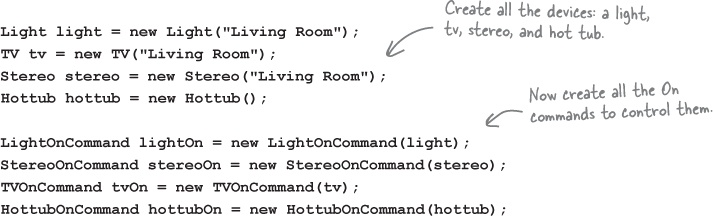
① First we create the set of commands we want to go into the macro:
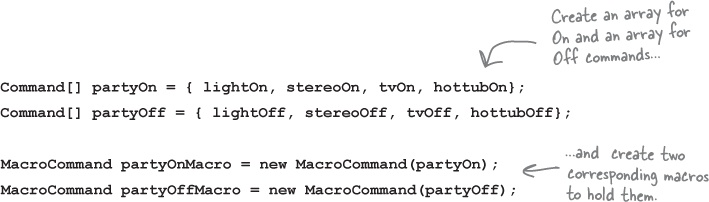
② Next we create two arrays, one for the On commands and one for the Off commands, and load them with the corresponding commands:
③ Then we assign MacroCommand to a button like we always do:
④ Finally, we just need to push some buttons and see if this works.


The Command Pattern means lots of command classes
When you use the Command Pattern, you end up with a lot of small classes—the concrete Command implementations—that each encapsulate the request to the corresponding receiver. In our remote control implementation, we have two command classes for each receiver class. For instance, for the Light receiver, we have LightOnCommand and LightOffCommand; for the GarageDoor receiver, we have GarageDoorUpCommand and GarageDoorDownCommand, and so on. That’s a lot of extra stuff that’s needed to create little bits of packaged-up computation that all have the same interface for the RemoteControl:
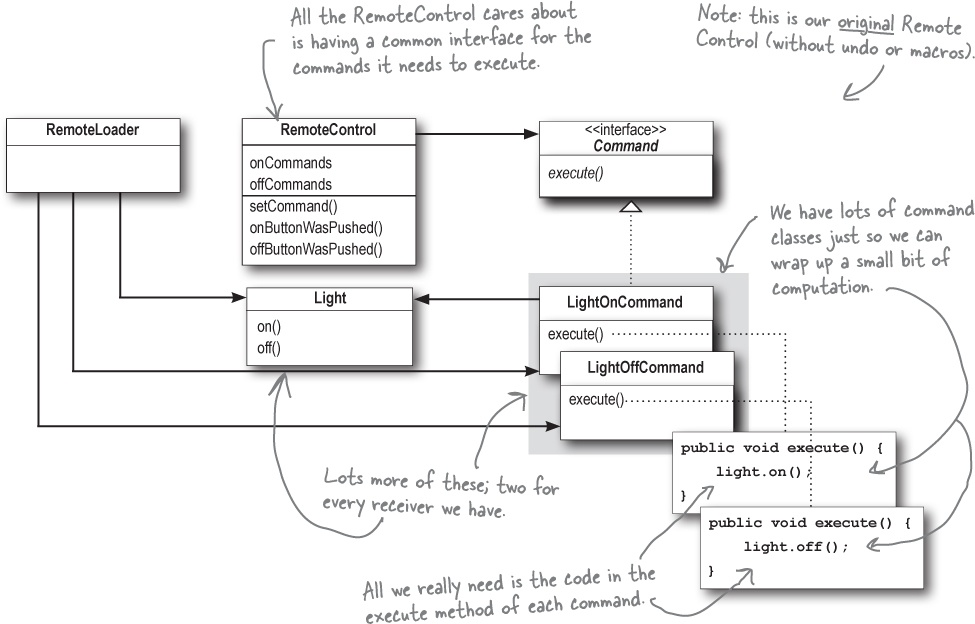
Do we really need all these command classes?
A command is simply a piece of packaged-up computation. It’s a way for us to have a common interface to the behavior of many different receivers (lights, hot tubs, stereos) each with its own set of actions.
What if you could keep the common interface for all your commands, but take out the bits of computation from inside the concrete Command implementations and use them directly instead? And you could get rid of all those extra classes and simplify your code? Well, with lambda expressions you can. Let’s see how...
Simplifying the Remote Control with lambda expressions
While you’ve seen how straightforward the Command Pattern is, Java gives us a nice tool to simplify things even more; namely, the lambda expression. A lambda expression is a short hand for a method—a bit of computation—exactly where you need it. Instead of creating a whole separate class containing that method, instantiating an object from that class, and then calling the method, you can just say, “here’s the method I want called” by using a lambda expression. In our case, the method we want called is the execute() method.
Note
If you aren’t yet familiar with lambda expressions (they were added in Java 8) they can take some getting used to. You should be able to follow along over the next few pages, but consult a Java reference to get up to speed on the syntax and semantics if you need to.
Let’s replace the LightOnCommand and LightOffCommand objects with lambda expressions to see how this works. Here are the steps to use lambda expressions instead of command objects to add the light on and off commands to the remote control:
Step 1: Create the Receiver
This step is exactly the same as before.
Light livingRoomLight = new Light("Living Room");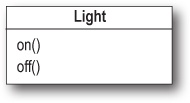
Step 2: Set the remote control’s commands using lambda expressions
This is where the magic happens. Now, instead of creating LightOnCommand and LightOffCommand objects to pass to remoteControl.setCommand(), we simply pass a lambda expression in place of each object, with the code from their respective execute() methods:

Step 3: Push the remote control buttons
This step doesn’t change either. Except now, when we call the remote’s onButtonWasPushed(0) method, the command that’s in slot 0 is a function object (created by the lambda expression). When we call execute() on the command, that method is matched up with the method defined by the lambda expression, which is then executed.


Well, we did say “magic” didn’t we?
Just kidding... it’s actually not all that magical. We’re using lambda expressions to stand in for Command objects, and the Command interface has just one method: execute(). The lambda expression we use must have a compatible signature with this method—and it does: execute() takes no arguments (neither does our lambda expression), and returns no value (neither does our lambda expression), so the compiler is happy.
We pass the lambda expression into the Command parameter of the setCommand() method:
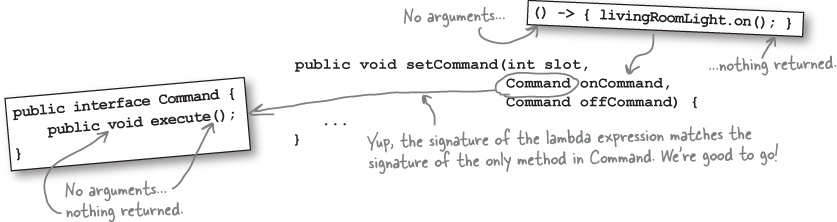
The compiler checks to see if the Command interface has one method that matches the lambda expression, and it does: execute().
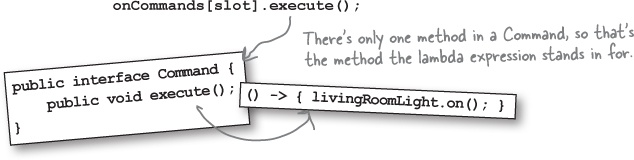
Then, when we call execute() on that command, the method in the lambda expression is called:
Just remember: as long as the interface of the parameter we’re passing the lambda expression to has one (and only one!) method, and that method has a compatible signature with the lambda expression, this will work.
Simplifying even more with method references
We can simplify our code even more using method references. When the lambda expression you’re passing calls just one method, you can pass a method reference in place of the lambda expression. Like this:

So now, instead of passing a lambda expression that calls the livingRoomLight’s on() method, we’re passing a reference to the method itself.
What if we need to do more than one thing in our lambda expression?
Sometimes, the lambda expressions you’ll use to stand in for Command objects have to do more than one thing. Let’s take a quick look at how to replace the stereoOnWithCDCommand and stereoOffCommand objects with lambda expressions, and then we’ll look at the complete code for the RemoteLoader so you can see all these ideas come together.
The stereoOffCommand just executes a simple one-line command:
stereo.off();So we can use a method reference, stereo::off, in place of a lambda expression for this command.
But the stereoOnWithCDCommand does three things:
stereo.on();
stereo.setCD();
stereo.setVolume(11);
In this case, then, we can’t use a method reference. Instead, we can either write the lambda expression in line, or we can create it separately, give it a name, and then pass it to the remoteControl’s setCommand() method using that name. Here’s how you can create the lambda expression separately, and give it a name:

Notice that we use Command as the type of the lambda expression. The lambda expression will match the Command interface’s execute() method, and the Command parameter we’re passing it to in the setCommand() method.
Test the remote control with lambda expressions
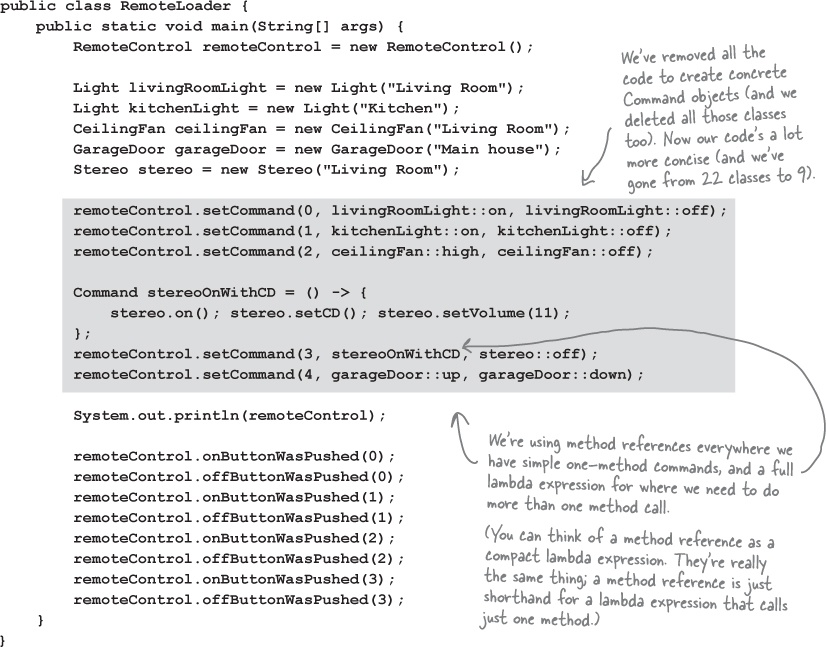
To use lambda expressions to simplify the code for the original Remote Control implementation (without undo), we’re going to change the code in the RemoteLoader to replace the concrete Command objects with lambda expressions, and change the RemoteControl constructor to use lambda expressions instead of a NoCommand object. Once we’ve done that, we can delete all the concrete Command classes (LightOnCommand, LightOffCommand, HottubOnCommand, HottubOffCommand, and so on). And that’s it. Everything else stays the same. Make sure you don’t delete the Command interface; you still need that to match the type of the function objects created by the lambda expressions that get stored in the remote control, and passed to the various methods.
Here’s the new code for the RemoteLoader class:
And don’t forget, we need to modify the RemoteControl constructor to remove the code to construct NoCommand objects, and replace those with lambda expressions too:


More uses of the Command Pattern: queuing requests
Commands give us a way to package a piece of computation (a receiver and a set of actions) and pass it around as a first-class object. Now, the computation itself may be invoked long after some client application creates the command object. In fact, it may even be invoked by a different thread. We can take this scenario and apply it to many useful applications such as schedulers, thread pools, and job queues, to name a few.
Imagine a job queue: you add commands to the queue on one end, and on the other end sits a group of threads. Threads run the following script: they remove a command from the queue, call its execute() method, wait for the call to finish, then discard the command object and retrieve a new one.
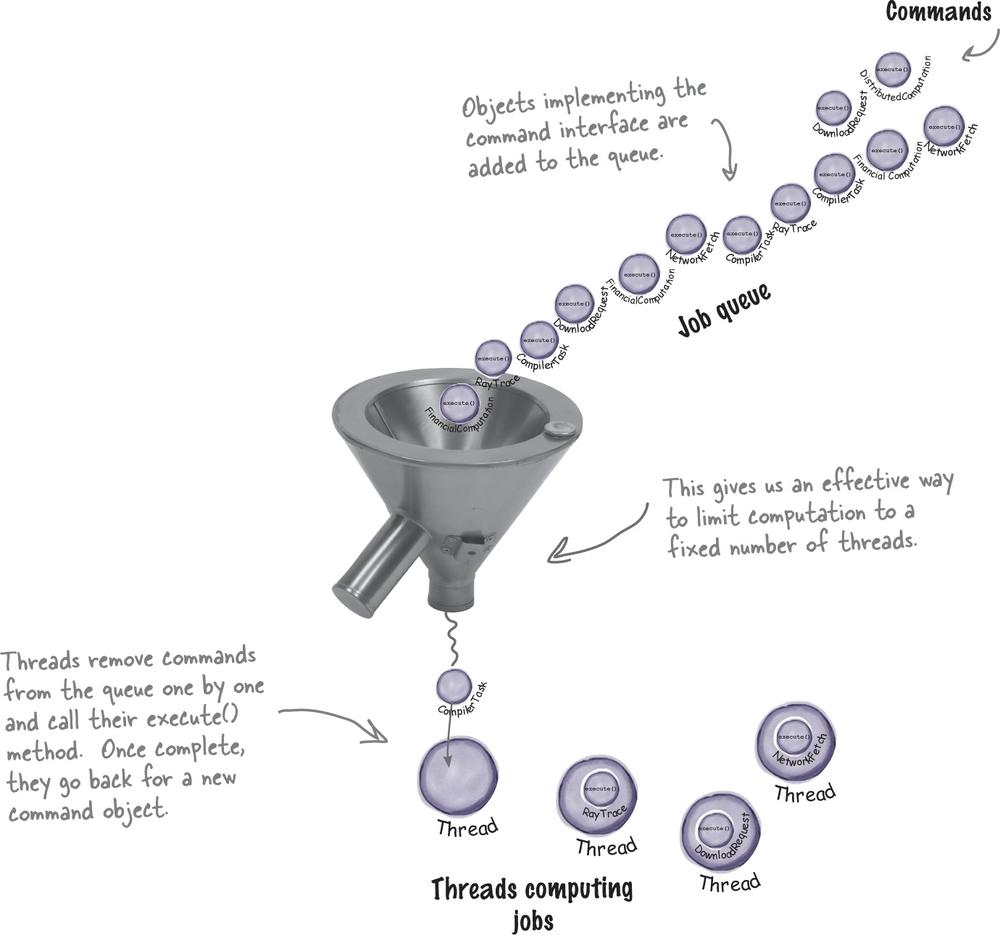
Note that the job queue classes are totally decoupled from the objects that are doing the computation. One minute a thread may be computing a financial computation, and the next it may be retrieving something from the network. The job queue objects don’t care; they just retrieve commands and call execute(). Likewise, as long as you put objects into the queue that implement the Command Pattern, your execute() method will be invoked when a thread is available.
More uses of the Command Pattern: logging requests
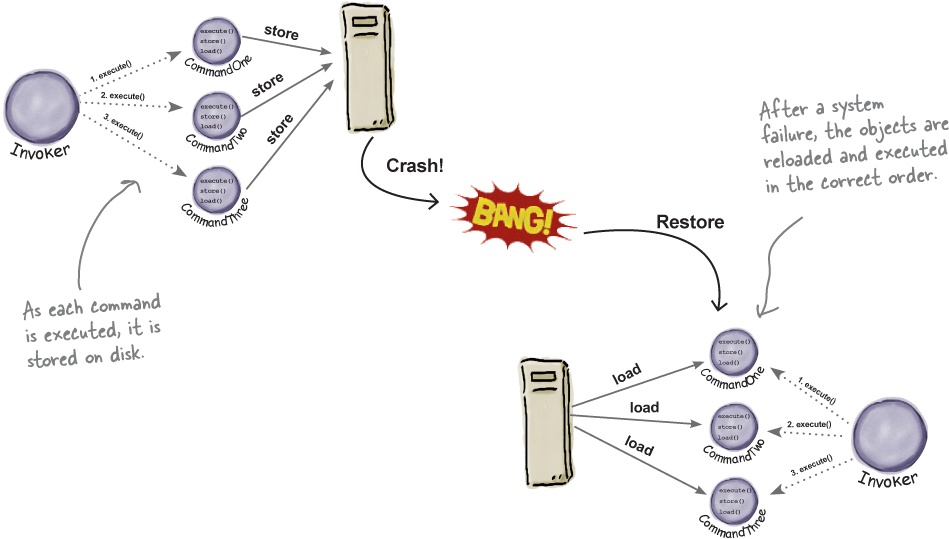
The semantics of some applications require that we log all actions and be able to recover after a crash by reinvoking those actions. The Command Pattern can support these semantics with the addition of two methods: store() and load(). In Java we could use object serialization to implement these methods, but the normal caveats for using serialization for persistence apply.
How does this work? As we execute commands, we store a history of them on disk. When a crash occurs, we reload the command objects and invoke their execute() methods in batch and in order.
Now, this kind of logging wouldn’t make sense for a remote control; however, there are many applications that invoke actions on large data structures that can’t be quickly saved each time a change is made. By using logging, we can save all the operations since the last check point, and if there is a system failure, apply those operations to our checkpoint. Take, for example, a spreadsheet application: we might want to implement our failure recovery by logging the actions on the spreadsheet rather than writing a copy of the spreadsheet to disk every time a change occurs. In more advanced applications, these techniques can be extended to apply to sets of operations in a transactional manner so that all of the operations complete, or none of them do.

Tools for your Design Toolbox
Your toolbox is starting to get heavy! In this chapter we’ve added a pattern that allows us to encapsulate methods into Command objects: store them, pass them around, and invoke them when you need them.

Time to take a breather and let it all sink in.
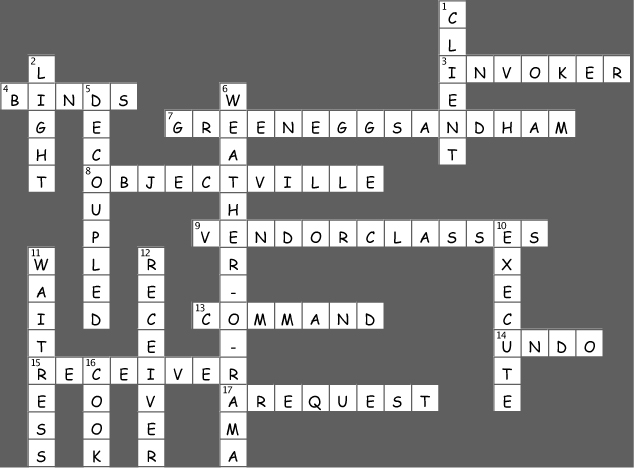
It’s another crossword; all of the solution words are from this chapter.
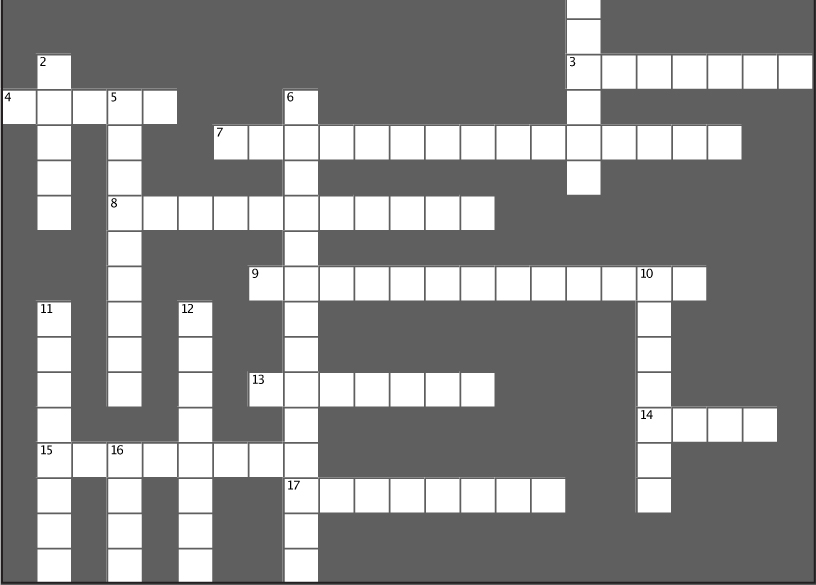
Across | Down |
3. The Waitress was one. 4. A command __________ a set of actions and a receiver. 7. Dr. Seuss diner food. 8. Our favorite city. 9. Act as the receivers in the remote control. 13. Object that knows the actions and the receiver. 14. Another thing Command can do. 15. Object that knows how to get things done. 17. A command encapsulates this. | 1. Role of customer in the Command Pattern. 2. Our first command object controlled this. 5. Invoker and receiver are _________. 6. Company that got us word-of-mouth business. 10. All commands provide this. 11. The Cook and this person were definitely decoupled. 12. Carries out a request. 16. Waitress didn’t do this. |