
Chapter 10. Twisted networking
In this chapter, we’ll be revisiting the adventure game you wrote in chapter 6 and extending it so you can log in and play it with other people via the internet. Normally these games are referred to as MUDs, which stands for Multi-User Dungeon. Depending on the person creating them, MUDs can range from fantasy hack-and-slash to science fiction, and players can compete or cooperate to earn treasure, points, or fame.
To get you started quickly, we’ll use a framework called Twisted, which contains libraries for working with many different networking protocols and servers.
Installing Twisted
The first step is to install Twisted and get a test application running. Twisted comes with installers for Windows and Macintosh, which are available from the Twisted homepage at http://twistedmatrix.com/. Some versions of MacOS ship with Twisted already installed, in which case it’s easier to use that version. If you’re using Linux, there should be packages available through your package manager.
The installer will pop up a window as it compiles things, but once you see the window on the right in figure 10.1, Twisted is installed!

Figure 10.1. Installing Twisted on Windows

The only other thing you need is a Telnet application. Most operating systems come with one built-in, and there are many free ones you can download. I normally use an SSH terminal program called PuTTY, which is available for Windows.
Your first application
You’ll start by writing a simple chat server. The idea is that people will be able to log into it via a program called Telnet and send each other messages. It’s a little more complex than “Hello World!” but you can extend this program and use it in your game later on in this chapter. Open a new file, and save it as something like chat_server.py.
Let’s start with the first part of your application: the protocol for the chat server. In Twisted terminology, a protocol refers to the part of your application that handles the low-level details: opening connections, receiving data, and closing connections when you’re finished. You can do this in Twisted by subclassing its existing networking classes. The next listing shows a simple chat client, which you’ll build on when you write your game in later sections.
Listing 10.1. A simple chat-server protocol


For your chat server, you use Twisted’s StatefulTelnetProtocol ![]() . It takes care of the low-level line-parsing code, which means you can write your code at the level of individual lines and
not have to worry about whether you have a complete line or not.
. It takes care of the low-level line-parsing code, which means you can write your code at the level of individual lines and
not have to worry about whether you have a complete line or not.
You’re customizing the protocol by overriding the built-in connectionMade method ![]() . This will called by for each connection the first time it’s made.
. This will called by for each connection the first time it’s made.
You’re taking care of a bit of housekeeping here—storing the client’s IP address and informing everyone who’s already connected
of the new connection ![]() . You also store the new connection so you can send it broadcast messages in the future.
. You also store the new connection so you can send it broadcast messages in the future.
The Telnet protocol class provides the lineReceived method ![]() , which gets called whenever a complete line is ready for you to use (that is, whenever the person at the other end presses
the return key). In your chat server, all you need to do is send whatever’s been typed to everyone else who’s connected to
the server. The only tricky thing you need to do is to remove any line feeds; otherwise, your lines will overwrite each other
when you print them.
, which gets called whenever a complete line is ready for you to use (that is, whenever the person at the other end presses
the return key). In your chat server, all you need to do is send whatever’s been typed to everyone else who’s connected to
the server. The only tricky thing you need to do is to remove any line feeds; otherwise, your lines will overwrite each other
when you print them.
If the connection is lost for some reason—either the client disconnects, or is disconnected by you—connectionLost will be called so you can tidy things up ![]() . In this case, you don’t really need to do much, just remove the client from the list of connections so you don’t send them
any more messages.
. In this case, you don’t really need to do much, just remove the client from the list of connections so you don’t send them
any more messages.
To make the code easier to follow, I’ve created the msg_all and msg_me methods, which will send out a message to everyone and just you, respectively ![]() . msg_all takes a sender attribute, which you can use to let people know who the message is coming from.
. msg_all takes a sender attribute, which you can use to let people know who the message is coming from.
Note
Factory is a programming term for something that creates a class for you to use. It’s another way to hide some of the complexity of a library from the programmers who make use of it.
That takes care of how you want your program to behave. Now, how do you link it to Twisted? You use what Twisted refers to as a Factory, which is responsible for handling connections and creating new instances of ChatProtocol for each one. You can think of the Factory as a switchboard operator: as people connect to your server, the Factory creates new protocols and links them together, similar to figure 10.2.
Figure 10.2. A Factory creating protocols

So how do you do this in Twisted? Easy! Add a factory class, as shown in the next listing.
Listing 10.2. Connecting your protocol


A Factory is object-oriented terminology for something that creates instances of another class ![]() . In this case, it will create instances of ChatProtocol.
. In this case, it will create instances of ChatProtocol.
The ChatFactory is the natural place to store data that is shared among all of the ChatProtocol instances. The send-ToAll method is responsible for sending a message to each of the clients specified in the clients list ![]() . As you saw in listing 10.1, the client protocols are responsible for updating this list whenever they connect or disconnect.
. As you saw in listing 10.1, the client protocols are responsible for updating this list whenever they connect or disconnect.
The final step is to let Twisted know about your new protocol and Factory. You do this by creating an instance of ChatFactory, binding it to a particular port with the listenTCP method, and then starting Twisted with a call to its main loop, reactor.run() ![]() . Here you use 4242 as the port to listen to—it doesn’t matter too much which one you use, as long as it’s above 1024 so it
doesn’t interfere with existing network applications.
. Here you use 4242 as the port to listen to—it doesn’t matter too much which one you use, as long as it’s above 1024 so it
doesn’t interfere with existing network applications.
If you save the program and run it, you should see the message “Chat server running!” If you connect to your computer via Telnet on port 4242 (usually by typing telnet localhost 4242), then you should see something like figure 10.3.
Figure 10.3. Your chat server is running.


It may not seem like much, but you’ve already got the basic functionality of the MUD server going. If you’d like to explore the chat server further, there’s a more fully featured version included with the source code, available from http://manning.com/HelloPython/. That version adds commands to change your name and see who else is connected, as well as limit some common sorts of misbehavior and allow you to remove anyone who’s behaving badly.
First steps with your MUD
Now you’re ready to start connecting your adventure game to the network. You’ll base it on the chat server, but instead of only broadcasting what’s typed to everyone who’s connected, you’ll feed it directly into the adventure game. This is a common way to get things done when programming—find two programs (or functions or libraries) that do separate parts of what you need, and then “glue” them together.
The basic gist is that you’ll have multiple players logged in at once, all trying to execute commands (such as “get sword”) at the same time. This could potentially cause problems for the server because you’re mixing real-time Twisted code with the one-step-at-a-time of your adventure game. You’ll head off most of the issues by queuing up player commands and updating your game’s state once per second.
Let’s get started. Copy your adventure code from chapter 6 into a new folder, along with the chat-server code you just created. You’ll probably also want to rename chat_server.py to something like mud_server.py, to help keep things straight, and rename your classes and variables as in the next listing.
Listing 10.3. Updating your chat protocol

The first step is to import the Game and Player classes into your code ![]() . I’ve also changed the name of the protocol so it’s obvious what you’re trying to write.
. I’ve also changed the name of the protocol so it’s obvious what you’re trying to write.

Next, you give a nice, friendly start when someone first connects to your MUD ![]() .
.
Now you’ll start to do the real work. But it turns out to not be that hard. I’ve assumed the game will keep track of its players
somehow, and added a new player object to the game’s list of players ![]() . To make it possible for you to talk to the player from within the game, I’ve also added the protocol to the player. You’ll
see how that works in a minute.
. To make it possible for you to talk to the player from within the game, I’ve also added the protocol to the player. You’ll
see how that works in a minute.
You’ll still need to handle the case where a player disconnects from the server ![]() . But, again, it’s straightforward: remove them from the game’s list of players, and delete them.
. But, again, it’s straightforward: remove them from the game’s list of players, and delete them.
Once players are connected, they’ll want to type commands, like “go north” and “attack orc” ![]() . First, you sanitize the input you’ve received (in testing, I found that different Telnet programs can send different weird
characters). When it’s trimmed down to only printable characters, you assume the player has a list of commands waiting to
be executed, and push this one to the end.
. First, you sanitize the input you’ve received (in testing, I found that different Telnet programs can send different weird
characters). When it’s trimmed down to only printable characters, you assume the player has a list of commands waiting to
be executed, and push this one to the end.
Your protocol is done, but what about the Factory and the rest of it? It turns out that you don’t need to do too much to your Factory—just change a few lines.
Listing 10.4. Updating your chat Factory

You don’t need to do too much to update your Factory ![]() —change its protocol and rename it.
—change its protocol and rename it.

You’ll need a Game object, too, so you create it here ![]() . You don’t want to use the old run method, though, because it still handles things the old way.
. You don’t want to use the old run method, though, because it still handles things the old way.
The design calls for you to run a game update once per second. Because you’re using Twisted’s event loop (that’s the reactor.run() part), you’ll need to use Twisted’s task.LoopingCall to call the game’s update method ![]() , run_one_tick, which you’ll also create shortly.
, run_one_tick, which you’ll also create shortly.
That should be all you need to do to the network code for now. You’ve made a few assumptions about how the game code will work, but often this is easier than jumping back and forth between the Game and Mud-Protocol classes and trying to fit it all together. Now that your protocol is written, you have to make Game and Player play along, too.
Listing 10.5. Changing your game code to work with the new interface

The single-player version of the adventure game had one player, but you’ll potentially have many, so you’ll make it a list
instead ![]() . You’re also giving the starting cave a sensible name.
. You’re also giving the starting cave a sensible name.
![]() is the main loop you called from the networking part of your code. You should be able to follow what it’s doing from the
names—get input for each Player object (including monsters), run the update, and then send the results back.
is the main loop you called from the networking part of your code. You should be able to follow what it’s doing from the
names—get input for each Player object (including monsters), run the update, and then send the results back.
You already have methods for getting input and processing orders, but you’ll need something to send back the results of each
player’s actions ![]() . To do that, you’ll make another assumption: that each Player object knows how to send results back to the player.
. To do that, you’ll make another assumption: that each Player object knows how to send results back to the player.
Now you have only two assumptions left to fill in, and they’re both in the Player class. The first is that Player will have a list of pending commands, and the second is that it will have a way to send the results of any commands or events back to the player. The other thing you need to do is make sure the Player class reads from the list of pending commands, rather than using raw_input.
Listing 10.6. Changing the Player code
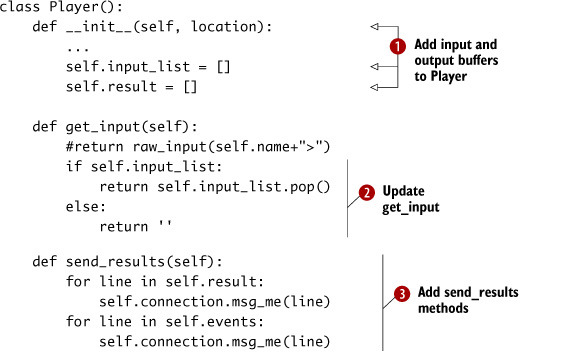


You start by creating your list of pending commands and the result that needs to be sent back to the player ![]() . They’re just lists, and when they’re in use they’ll have a list of strings.
. They’re just lists, and when they’re in use they’ll have a list of strings.
You can’t use raw_input any more, so you need to read your next command from self.input_list![]() . pop removes the command for you so you don’t have to worry about removing it from the list later. pop called on an empty list raises an exception, so you check for that case and assume the command is blank if there’s nothing
there.
. pop removes the command for you so you don’t have to worry about removing it from the list later. pop called on an empty list raises an exception, so you check for that case and assume the command is blank if there’s nothing
there.
To send the results of a player’s actions ![]() , you use the self.connection object that you set up in mudserver.py. Note that even if the player isn’t doing anything, other players and monsters are,
so you have two separate sections: one for the results of your actions and another for events.
, you use the self.connection object that you set up in mudserver.py. Note that even if the player isn’t doing anything, other players and monsters are,
so you have two separate sections: one for the results of your actions and another for events.
In the old version of the game, when the player died, the game ended. That’s no longer the case, so you’ll need to gracefully
handle the situation where a player dies ![]() . To do that, you make the player drop whatever they’re carrying, send them a message, and drop the connection. If you extend
your game, you might want to make the player keep their items. Alternatively, you can allow other players to “get sword from
Anthony” if you’re feeling mean.
. To do that, you make the player drop whatever they’re carrying, send them a message, and drop the connection. If you extend
your game, you might want to make the player keep their items. Alternatively, you can allow other players to “get sword from
Anthony” if you’re feeling mean.
Monsters don’t connect over the network and don’t have the self. connection object, so the default send_results from the Player class won’t work. They don’t need to know the results of their actions, so you’ll stub out their version of send_results and return immediately ![]() .
.
The previous adventure game looked at the player’s name to figure out whether to attack them. Now that you have multiple players,
who probably all have different names, you’ll need to be a bit more discerning ![]() . A better way is to examine the class of the object the monster is looking at, using the __class__ method. That will return the class, which you can compare to player.Player.
. A better way is to examine the class of the object the monster is looking at, using the __class__ method. That will return the class, which you can compare to player.Player.
Note
This works so well because your game has only one point of communication with the player: the commands the player types and the responses the game returns.
That should be all you need to do. Now, when you run your server and connect via Telnet, you’ll see your familiar adventure-game prompt, and you can run around the server collecting loot and slaying monsters. Go ahead and bask in the adventure and glory.
Well, sort of. Although the game works, and you can explore and do everything you need to, there are a few more things to take care of before your game is playable.
Making the game more fun
I made the previous code available to some of my friends online and got feedback from them. They raised two major issues: the monster was too hard to beat, and there wasn’t enough interaction between the players. Normally, in an adventure game like this, you’ll be able to change your name and description, talk to other players, look at their description, and so on.

Bad monster!
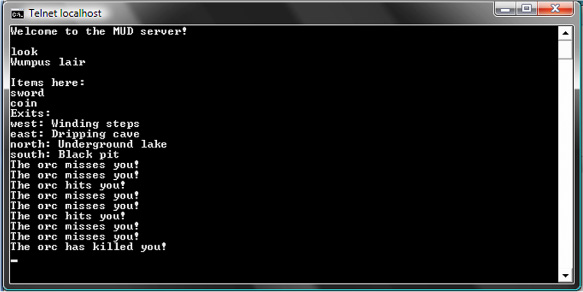
The problem with combat is pretty obvious once you run into the orc for the first time. You’re limited to the actions you type in—but the monsters react at computer speed. The next figure shows what I mean.
The solution that most MUDs use is what’s known as an angry list. Rather than attacking things directly, the game maintains a list of monsters and other players you’re angry at. If you’re not explicitly doing anything else, and there’s something present that’s on your angry list, then you’ll attack it. If something attacks you, then it will go on your angry list, too, so you’ll at least put up a token defense. Let’s look at how you can implement the angry list in your game.
Figure 10.4. Bad monster! No beating on the player!
Listing 10.7. Angry lists


Both players and monsters will need a way to remember who they’re angry at. You’ll make it a list ![]() , because you’re not expecting it to grow too large.
, because you’re not expecting it to grow too large.
Next, you’ll modify your update method. If your input attribute is blank, you know that the player (or monster) hasn’t entered any commands, and you can go ahead and attack if
necessary. You build a list of all the things you’re angry at that are present, and then attack one of them ![]() .
.
If a player or monster is dead, they shouldn’t keep attacking, so you clear their angry list ![]() .
.
The players will also need a way to stop attacking things (maybe they’re friends again). The stop command will remove an attacker from the list of things that the player is angry at ![]() .
.
The final major thing you’ll do is make the attack command modify the angry lists of both the attacker and attacked ![]() . Now, when something gets attacked, it will automatically fight back. Note how you build your result before you do the attack.
That way, if the target dies, you won’t see “You attack the dead orc.” do_attack is the mechanism from your old attack attribute with a different name.
. Now, when something gets attacked, it will automatically fight back. Note how you build your result before you do the attack.
That way, if the target dies, you won’t see “You attack the dead orc.” do_attack is the mechanism from your old attack attribute with a different name.
The final, final thing is to add stop to your list of commands ![]() —other-wise you won’t be able to use it!
—other-wise you won’t be able to use it!
Now the player should have half a chance against the orc. If the orc beats the player now, the player will at least feel that they haven’t been completely robbed by the game. If you pick up the sword, you’ll find it helps a lot, which is what you want. There are plenty of other opportunities for improving the combat system, but you need to deal with a more pressing problem, instead.
Back to the chat server
The second problem is that players can’t interact with each other. This is often a big draw when it comes to a multiplayer game—players will come for the game but stay for the company. Fortunately, making your game more social is easy to do. You’ll add a few extra commands to the Player class.
Listing 10.8. Social gaming

If a player is completely new to the game, you need to give them at least half an idea of what they can do. You’ll make “help”
output some helpful instructions ![]() . The full help text I added is in the source code.
. The full help text I added is in the source code.
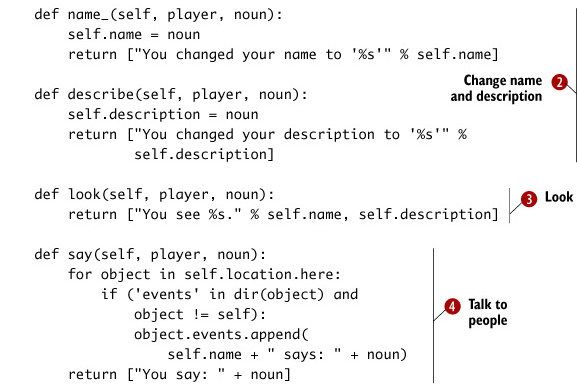
Another easy win is to let players customize their appearance by changing their name and description ![]() . Rather than being “player #4,” the player can now be “Grognir, Slayer of Orcs.”
. Rather than being “player #4,” the player can now be “Grognir, Slayer of Orcs.”
Of course, the description’s not much good if other players can’t see it ![]() .
.

You’ll also need to add to most important case of all: a say command, so your players can talk to each other ![]() . All this command needs to do is send what you’ve typed to every other object in the current room. This simple change will
allow players to interact on a human level, which will in turn help keep them coming back.
. All this command needs to do is send what you’ve typed to every other object in the current room. This simple change will
allow players to interact on a human level, which will in turn help keep them coming back.
One of the issues you’ll run into is that with the new commands, the old find_handler method will sometimes call the wrong thing. For example, both the player and the location have a look method, and which one is correct will depend on the context. Additionally, some of the commands you’ve just added only apply to the players themselves, and you shouldn’t look for an object to apply them to. The following listing has an updated version that is a lot more explicit about which objects it should look at.
Listing 10.9. Updating find_handler
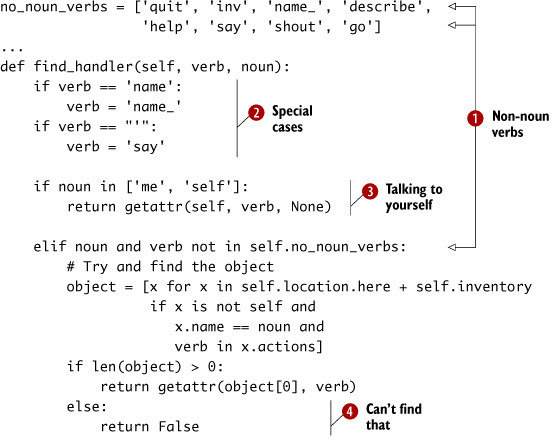


Let’s pay close attention to word choice. Some verbs don’t apply to nouns, or else they implicitly apply to the player ![]() .
.
There are a few special-case commands ![]() that you can’t handle with your current system. You could rewrite the entire handler, but it’s easier to catch those commands
and explicitly convert them to something you can handle. Of course, if it becomes more than a handful of conversions, then you’ll have to rethink things; but it will do for
now.
that you can’t handle with your current system. You could rewrite the entire handler, but it’s easier to catch those commands
and explicitly convert them to something you can handle. Of course, if it becomes more than a handful of conversions, then you’ll have to rethink things; but it will do for
now.
So that you can see how you look, you’ll add a self object, too ![]() . “Look self” should return your description as it appears to other people.
. “Look self” should return your description as it appears to other people.
![]() is another improvement to make things easier for the new player. Rather than have one error message when things go wrong,
you’ll have one for a command you don’t understand, and another when you can’t find what the player’s looking for.
is another improvement to make things easier for the new player. Rather than have one error message when things go wrong,
you’ll have one for a command you don’t understand, and another when you can’t find what the player’s looking for.
Now your players can chat to each other and compliment each other on their fine threads.
Finally, what would social gaming be without the opportunity to be antisocial, too? Most MUDs have the option to shout, which works much like speaking, except that everyone connected can hear you.
Listing 10.10. Antisocial gaming


First, you’ll convert the text to uppercase ![]() , SO THAT IT LOOKS A LOT MORE LIKE SHOUTING!
, SO THAT IT LOOKS A LOT MORE LIKE SHOUTING!

Now you need to visit each cave in turn—but there doesn’t seem to be any way to find out what the caves are. For now, you’ll
assume you have access to the game’s list of caves ![]() .
.
This is pretty much the same as when players talk to each other ![]() . Merging the two together—for example, by pushing the code into the location class—is left as an exercise for the reader.
. Merging the two together—for example, by pushing the code into the location class—is left as an exercise for the reader.
Now you need to give your Player class access to the caves list from the game ![]() by making it a variable you pass in from the game when you create a player or monster. Then, update each place where you create an instance of a player or monster
by making it a variable you pass in from the game when you create a player or monster. Then, update each place where you create an instance of a player or monster ![]() , so it now knows about the game object and can tell where all the caves are.
, so it now knows about the game object and can tell where all the caves are.
There! That’s a few more rough edges smoothed off your game. There’s plenty left to do, but you won’t be writing any new features for the game now. Instead, you’ll focus on making the infrastructure around the game a bit more robust, so players won’t be put off by having all their hard work disappear.
Making your life easier
If you only want to write the game for your friends, you can probably stop here; they can connect and play your game, after all. Currently, though, there are still a few issues that will make your life harder than it needs to be. Anyone can log on as anyone else, so the game isn’t particularly secure; and the game doesn’t save any progress, so every time you restart the game server, the player will have to start over from scratch.
Let’s fix that. You’ll add usernames and passwords to the game, as well as a mechanism to allow new players to register. Once you know who’s logged on, you can save the players’ progress every so often, and also when they quit the game. You’ll need to learn a bit more about Twisted, though, because you’ll be digging into the guts of one of its Telnet classes. But don’t worry; it’s straightforward once you get the hang of it.
Exploring unfamiliar code
Twisted is a large codebase and has a huge number of modules to help you network your application. That’s great, because it means you don’t have to write your own code to handle the networking in your application, but it raises a related problem: you must have at least a basic understanding of how everything fits together before you can make use of all that great code.
Ideally, the documentation for libraries like Twisted would be 100% up-to-date and cover everything you need to do with a nice, gentle introduction—but this isn’t always the case. Often, you’ll be able to find something close, but then you’ll need to piece together how the code works with some guessing, experimentation, and detective work.
It sounds hard, but in practice it’s usually pretty easy. The trick is not to get too overwhelmed, and to use all the resources at your disposal. Here are some ideas on how you can get a grip on a large codebase and make it work in your application.

Find an Example
Searching for “twisted tutorial” online gives you a number of starting points, and you can also add “telnet” or “telnet protocol” into the mix. As you learn more about Twisted, you’ll find other keywords or method names that will help you narrow down what you’re looking for. You can also start with a working example that sort of does what you need, and then tweak it until it covers exactly what you need it to do.
The Twisted Documentation
There’s reasonably comprehensive documentation available in the Conch section of the main Twisted site, http://twistedmatrix.com/documents/, but it doesn’t cover all of what you need to do. There are some simple examples of SSH and Telnet servers, which you can skim through to get an idea of how everything fits together.
The Twisted API Docs
Detailed, automatically generated documentation is available for the entire Twisted codebase, which you can see at http://twistedmatrix.com/documents/current/api/. Don’t let the sheer number of packages put you off—we’ll focus on the Telnet one: http://twistedmatrix.com/documents/current/api/twisted.conch.telnet.html.
The Twisted Code
You can also read most of the Twisted code directly. The Windows version of Python stores its libraries at C:Python26Libsite-packages wisted; under Linux, it will be somewhere like /usr/lib/python2.6/ dist-packages/twisted; and under Mac, it’s usually at /Developer/SDKs/ MacOSX10.6.sdk/System/Library/Frameworks/Python.framework/ Versions/2.5/Extras/lib/python/twisted. All the Twisted code is stored there, and you can open the files and read the code to find out exactly what a method does.
Introspection
If a library doesn’t have API documentation, all is not lost. You can still create instances of classes and use dir(), help(), and method.__doc__to find out what they do. If you have a one-off method you need to know about, this can often be easier than reading the code or documentation.
In practice, none of these sources will cover all the details you need to know when writing your program, so you’ll end up using a combination of them going back and forth as you learn new parts or run into problems.
Putting it all together
Let’s get started putting together your login system. From a quick scan of Twisted’s Telnet module, it looks like the best starting point is the AuthenticatingTelnetProtocol class. You’ll get that working with your code, then make it register new players, and finally make the game able to save player data.
To start with, I looked at the Twisted documentation and the API reference for AuthenticatingTelnetProtocol. It sort of made sense, but from the methods and classes it’s hard to see how to tie everything together. The protocol needs a Portal, which in turn depends on a Realm, an Avatar, and a PasswordChecker. Hmm, confusing. It looks like it’s time to try to find an example of how the classes fit together.

There are a few different searches you could try: “twisted telnet,” “twisted telnet example,” and so on, but I didn’t find much until I put in some terms from the code. The search “twisted telnet TelnetProtocol example” led me to www.mail-archive.com/[email protected]/msg01490.html, which, if you follow it through to the end, gives you some example code that is enough to see how the classes work together.
The basic gist is something like this: set up a Realm class, along with a Portal to get into it. The docs don’t say whether it’s a magic portal, but it should do. A Portal controls access to your Realm, using one or more password Checkers, via a TelnetTransport. Of course, the Authenticating-TelnetProtocol only handles authentication, so you’ll need to hand off to another protocol like your MudProtocol once you’re logged in.
Got all that? No, me neither. I had to draw a picture to see how it all worked, and without the example I probably would’ve been lost. Figure 10.5 shows what I came up with.
Figure 10.5. The Twisted class structure

Using the diagram and the example code, you can get a simple login going. The following listing shows how I changed the mudserver.py file.
Listing 10.11. Mudserver.py


To start, you’ll import all the bits of Twisted you need ![]() . There are a lot, but think of it as code you don’t have to write.
. There are a lot, but think of it as code you don’t have to write.
The Realm is the core class that represents your game’s login ![]() . You only need to override one method: the one to get an Avatar. Avatars are instances of the MudProtocol and represent the player’s login. Notice that you set the player’s name so you have access to it in MudProtocol, and set state to "Command"; otherwise, you’ll get logged out right away.
. You only need to override one method: the one to get an Avatar. Avatars are instances of the MudProtocol and represent the player’s login. Notice that you set the player’s name so you have access to it in MudProtocol, and set state to "Command"; otherwise, you’ll get logged out right away.
Note
The “code that you don’t have to write” part is important. It’s easy to overestimate how hard it is to learn how existing code works, and underestimate how hard it is to write new code that’s as well tested.
While you’re figuring out how everything works, it’s perfectly fine to print out things to the screen to try and work out
what each object does ![]() . You can use what you learn to search online, or through the code to find out what else uses these classes.
. You can use what you learn to search online, or through the code to find out what else uses these classes.
Most of MudProtocol is unchanged, but you’ll need to know your player’s username and password for later ![]() , when you start saving to a file. The Realm has already given you the username, so you can use that to get the password from the checker. The other thing you change
is the connectionLost method—if you lose the connection to the player, you want to clean up properly.
, when you start saving to a file. The Realm has already given you the username, so you can use that to get the password from the checker. The other thing you change
is the connectionLost method—if you lose the connection to the player, you want to clean up properly.

Now we’re into the section where you set the code in motion. The first thing to do is create a Realm and then attach a Portal and Checkers to it. Once you’ve done that, you can insert usernames and passwords into your checker ![]() . InMemory..DontUse is fine for your purposes, even though, in theory, it’s insecure and you’re not supposed to use it. There’s also a file-based
checker available, but it doesn’t support saving new users back to the file.
. InMemory..DontUse is fine for your purposes, even though, in theory, it’s insecure and you’re not supposed to use it. There’s also a file-based
checker available, but it doesn’t support saving new users back to the file.
Now that you’re using TelnetTransport and your Realm to control things, you don’t need a custom Factory, and you won’t need to manually track the clients in the factory any more
![]() . The TelnetTransport will use AuthenticatingTelnetProtocol to handle usernames and passwords, but once that’s done it will hand off to the Realm to get the final protocol.
. The TelnetTransport will use AuthenticatingTelnetProtocol to handle usernames and passwords, but once that’s done it will hand off to the Realm to get the final protocol.
One last thing is that Twisted uses Python’s log facility. To see what it’s up to, you can add this line ![]() , which will redirect the logging to sys.stdout—that is, print it on the screen.
, which will redirect the logging to sys.stdout—that is, print it on the screen.
What does all this give you? Well, if you run your server now and try to connect to it, you should be presented with a login request instead of a password, similar to what’s shown in figure 10.6. If you enter the username and password that are in the script, you should connect to the game.
Figure 10.6. Logging in to your game

That’s not all you need to do, though. Remember that you want to allow players to register their own username and password. For that you’ll have to learn a bit more about Twisted.
Write your own state machine
What you’re going to do in this section is create a subclass of the class you’ve been using so far, which is AuthenticatingTelnetProtocol. It’s what generates the User-name: and Password: prompts in the login. What you’d like instead is a prompt that asks the player whether they want to log in or register a new account. If it’s a registration, then it still asks you for a username and password, but creates the account instead of checking whether it exists.

Let’s first take a look at AuthenticatingTelnetProtocol, to see how it’s done. You can find the Telnet module on your computer at C:Python26Libsite-packages wistedconch elnet.py, or somewhere like /usr/lib/python2.6/ site-packages/twisted/conch/telnet.py if you’re using Linux or MacOS X. If you open that file and scroll to the bottom, you’ll find the class you’re looking for; it’s also shown in listing 10.12.
Listing 10.12. Twisted’s AuthenticatingTelnetProtocol class


All the Telnet classes we’ve looked at so far are state machines—there are multiple steps involved in logging in, and the next one depends
on the input you get. You’re initially in the "User" state, which means input is fed to the telnet_User method ![]() . Each method returns a string, which determines the next state.
. Each method returns a string, which determines the next state.

There are a few other methods: connectionMade and connectionLost, but you don’t need to deal with them in this case ![]() .
.
The first line (after the initial greeting) goes to telnet_User and sets the username within the instance ![]() . The transport.will() call tells the local client that the server (that is, you) will be responsible for echoing anything the user types—but in
this case, it’s the password, so you don’t. Then "Password" is returned, so the next line goes to telnet_Password.
. The transport.will() call tells the local client that the server (that is, you) will be responsible for echoing anything the user types—but in
this case, it’s the password, so you don’t. Then "Password" is returned, so the next line goes to telnet_Password.
Now that you have the password, you can compare it with what you have for that username in the portal’s password checker ![]() .
.
Twisted has a mechanism called a Deferred, that helps to speed up the server ![]() . A password checker might look at a file on disk, or connect to a different server to see whether the password is correct.
If it waits for the result (normally known a blocking), nobody else will be able to do anything until the disk or remote server responds. Deferred objects are a way to say “When
we get a response, handle it with this function” and then continue with other tasks. There are two possibilities: a callback
and an error back.
. A password checker might look at a file on disk, or connect to a different server to see whether the password is correct.
If it waits for the result (normally known a blocking), nobody else will be able to do anything until the disk or remote server responds. Deferred objects are a way to say “When
we get a response, handle it with this function” and then continue with other tasks. There are two possibilities: a callback
and an error back.
If the checker responds that the password is right ![]() , you can go ahead and do the rest of the login, which means storing some values, setting your state to "Command", and switching out your protocol for the final one.
, you can go ahead and do the rest of the login, which means storing some values, setting your state to "Command", and switching out your protocol for the final one.
If the checker tells you the password or the username is wrong ![]() , then you can tell the user off and switch back to the "User" state. The user will need to type in the username and password again—and you the user will get it right this time.
, then you can tell the user off and switch back to the "User" state. The user will need to type in the username and password again—and you the user will get it right this time.
How can you subclass AuthenticatingTelnetProtocol? The answer is to add some new states so there’s a registration branch as well as the normal login one, similar to the flowchart in figure 10.7.
Figure 10.7. The states in RegisteringTelnet-Protocol

The next listing adds a new protocol with three extra states—"Welcome", "NewUserName", and "New Password"—along with methods to handle each of them.
Listing 10.13. RegisteringTelnetProtocol

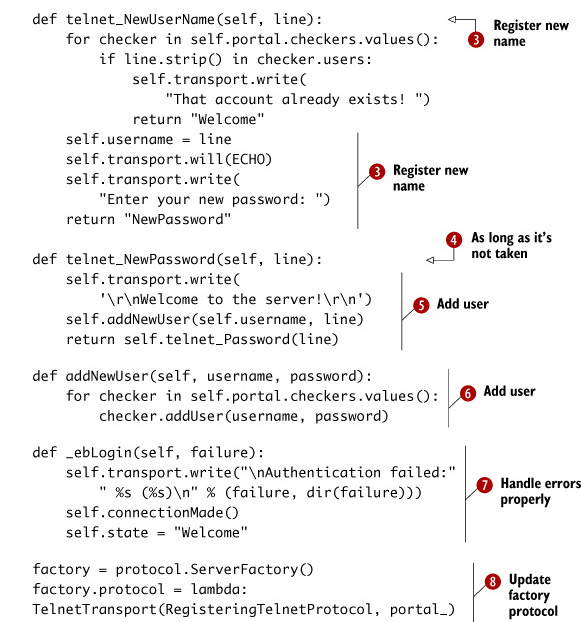
Welcoming the user to the server ![]() is pretty much the same as the previous example, only with different values. You’re prompting the user to enter R to register or L to login.
is pretty much the same as the previous example, only with different values. You’re prompting the user to enter R to register or L to login.

Because your previous state was "Welcome", the first method is telnet_Welcome. The code is straightforward: R sets the state to "NewUser-Name", L to "User", and anything else will kick them back to "Welcome"![]() . telnet_NewUserName is the same as telnet_User, too
. telnet_NewUserName is the same as telnet_User, too ![]() . It prompts slightly differently and passes to a different state: "NewPassword" instead of "Password".
. It prompts slightly differently and passes to a different state: "NewPassword" instead of "Password".
Of course, you can’t have two Gandalfs or Conans running around your server, so you need to check that the username doesn’t
already exist on the server ![]() . If it does, you kick the user back to "Welcome". Pick something more original!
. If it does, you kick the user back to "Welcome". Pick something more original!
Now that the player has passed all the hurdles you’ve set, you should probably add the player to the server ![]() . To make life easier for the player, you also automatically log the player in.
. To make life easier for the player, you also automatically log the player in.
The last bit didn’t add the user, it only pretended to. ![]() will do the trick. You’re calling each of your checkers in turn and calling their addUser method. Note that this won’t work if you use the file-based checker, twisted.cred.FilePasswordDB—or at least not permanently, because it won’t write the players back to the file.
will do the trick. You’re calling each of your checkers in turn and calling their addUser method. Note that this won’t work if you use the file-based checker, twisted.cred.FilePasswordDB—or at least not permanently, because it won’t write the players back to the file.
If the login raises an error, you should return to the initial "Welcome" state ![]() , rather than to "User", so the user can register instead if the user can’t remember their username (or if you’ve deleted it for some reason).
, rather than to "User", so the user can register instead if the user can’t remember their username (or if you’ve deleted it for some reason).
Finally, you need to update your factory’s protocol so it uses Registering-TelnetProtocol instead of the old AuthenticatingTelnetProtocol ![]() .
.
Awesome! Now you won’t have to enter usernames and passwords for everyone who wants to check out your cool new game. In practice, this will mean you’ll get more players, because it sets the bar to entry much lower, and the players won’t have to wait around for you to check your email. The next step, if you’re interested, is to include a password-reset or -retrieval mechanism, so the players (if they’ve set their email address in-game) can be sent their password if they forget it.
Making your world permanent
You have a few more pressing concerns now: players can register and log in, but if you restart the server for some reason (say, to add a new feature), then they lose all their progress and have to reregister! You don’t have to save everything, though—what you’ll do is save only the players and their items and restart all the monsters from scratch. This is common practice in most MUDs, so the monsters, puzzles, and stories reset each night.
Note
One of the other reasons to implement saving is that it breaks the player’s suspension of disbelief if everything suddenly vanishes. You want the player to believe on some level that the world you’re creating is real, and real worlds don’t disappear in a puff of virtual smoke.
Listing 10.14. Loading players

You don’t need to store every player, because you’re only interested in players’ data—what they’ve called themselves, how
they look and which items they’re carrying. You’ll put that information into the store ![]() so you can call it out at will.
so you can call it out at will.
The next thing you’ll do is figure out how you’re going to call the code you’ll use to load the player store ![]() . I think you’ll be alright if you create a method.
. I think you’ll be alright if you create a method.
The method to load the player store ![]() turns out to be pretty simple. Check to see if the file exists—if it does, then open it and load the player_store from it using Pickle.
turns out to be pretty simple. Check to see if the file exists—if it does, then open it and load the player_store from it using Pickle.
Easy! Of course, you’re not done yet—that only loads the player store. Now you need to work out what goes in the store, and save it to a file.
Listing 10.15. Saving players

You add each player to the player store in typical object-oriented fashion—by calling player.save to find out what should be stored for each player ![]() .
.
Once you’ve refreshed the store, you can go ahead and save it to disk ![]() , ready for the next time you start the game.
, ready for the next time you start the game.
All the player.save method needs to do is make a dictionary of all of the player’s data and return it ![]() .
.
Now your game.save method should be working, and you can load from it. The last step is to trigger game.save at appropriate points and make sure the players are loaded with all their data when they log in.
Listing 10.16. Updating the server


Loading the player is much the same as saving it ![]() , only the other way around. Rather than dump your state into a dictionary, you update the state from one.
, only the other way around. Rather than dump your state into a dictionary, you update the state from one.
Rather than have the players die whenever they quit, they’ll now save themselves and exit nicely ![]() . For this game you only have one sword and one coin to share among all the players, so you’ll drop all your items; but that’s
not normal practice for an adventure game.
. For this game you only have one sword and one coin to share among all the players, so you’ll drop all your items; but that’s
not normal practice for an adventure game.
To save everything ![]() , you’ll set up another periodic function using Twisted.
, you’ll set up another periodic function using Twisted.
The players can change their passwords in game, so it makes sense to refresh the server’s password list along with saving
the game ![]() . You do this right after the call to game.save(), so you know game.player_store is as fresh as possible.
. You do this right after the call to game.save(), so you know game.player_store is as fresh as possible.

Note that there’s a bug in this code: when a player changes their name, the old name isn’t removed. You’ll want to either update the name-changing code in Player to delete the old name from both the portals and player_store, or else disable the name-changing code. Disallowing name changes is probably the best option, because it also discourages bad behavior.
Once your function is complete, you only call it when you start up, and every minute or so after that ![]() . I’ve picked 60 seconds as a reasonable timeframe, but you might find that a longer or shorter span works better for you.
In practice, it will be a tradeoff between the load on the server when the game is saved, and the risk of losing your players’
stuff.
. I’ve picked 60 seconds as a reasonable timeframe, but you might find that a longer or shorter span works better for you.
In practice, it will be a tradeoff between the load on the server when the game is saved, and the risk of losing your players’
stuff.
That should be it. Now you have a stable base for your future development, and you don’t have to worry about players not being able to log in, or having to respond to everyone who wants to log in.
Where to from here?
Your MUD is working and feature complete, but you’ve only scratched the surface of what you could do. One way to find out what needs to be done is to invite some of your friends to play—make sure they know it’s a work in progress—and ask them for suggestions and bug fixes. If you don’t have any friends who are into MUDs, the following is a list of some ideas you could try:
- Make the orc respawn once you’ve killed it (in a different location), or add different monsters. They might have different attacks, take more or fewer hits to kill, and drop different sorts of treasure.
- Saving the cave layout as well as the players’ info will help players identify it more strongly as an actual place. Also, most MUDs will let you log in as a “wizard” and extend the game while you’re playing it, adding rooms or monsters.
- Different items, armor, and weapons can add an extra level of interest, as players explore or save up their gold for new ones.

- Let the players gain experience and levels, with higher-level characters being tougher and more powerful. Different character classes and statistics (strength, intelligence, dexterity, and so on) can help players identify with the game and make it more enjoyable.
- A number of open source MUDs are available, in several languages; download them and see how they work. Most of the core components will be similar, so you’ll know what to look for when you’re trying to make sense of them.
Summary
In this chapter, you learned how to add networking to a game and about the issues you need to deal with in networked environments. You started with a simple chat server and learned about Twisted’s Protocol and Server classes, before creating a similar setup so you could play your game over Telnet. Because Twisted is asynchronous (does lots of things simultaneously), you also needed to learn how to use Twisted’s task.LoopingCall for your game loop.
Once you’d done that, you opened your game for testing and discovered a few issues with the game play in the new environment. To fix these, you added some new features, such as angry lists, talking to other players, and commands to change player names and descriptions.
Finally, you set up a system so new players could log into your system without you having to add them to a list of users. You learned a bit more about the details of Twisted, particularly its Telnet implementation, but also about how it interfaces with Protocols, Servers, and also Deferreds—one of Twisted’s lower-level features.