9
Flash to video
■ One day your client may request that their online content be re-purposed for video. They may look to you for answers as to how possible this process is. Rest assured, Flash-to-video is widely produced for a variety of broadcast content. The line between online and offline Flash content is officially blurred.
FLASH IS EVERYWHERE. NOT ONLY IS FLASH THE development tool for animation, websites, games and applications, but also for DVD and broadcast television. In fact, my first years as a Flash user were spent authoring Flash content for several broadcast animated series. Exporting from Flash to video formats (QuickTime and AVI) to be imported and edited in an Avid workstation was my only authoring requirement of Flash. I had no knowledge of Flash for the Web, including ActionScript, optimizing, preloaders and even buttons of any kind. It was analog Flash at its purest, and that was the Flash world in which I lived. Today, I still use many of the same Flash-to-video techniques for many client projects with the added benefit of an improved QuickTime Exporter from Adobe.
Document setup

SOME OF THE MOST POPULAR FLASH TO video questions I am asked are: What Flash content can and cannot be exported to video? Why do some animations play in video format while others do not? What frame rate do you use? What is NTSC? What is PAL? What is the resolution for a 16:9 screen? What is the correct stage size? Should you be concerned about color correction? What video format should you export to? Do you export the audio from Flash? Are you getting enough sleep? (OK, that last one was from my mother, but you get the idea). This entire chapter is devoted to the topic of getting your Flash project to video format. Sounds simple enough, but there’s a lot to know, so let’s boogie.
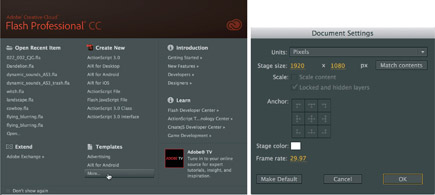
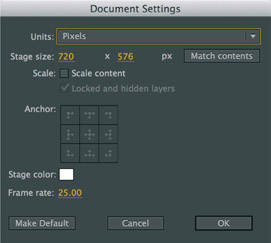
1 Let’s start with the basics and open a new Flash document. Open the Document Properties panel using ![]() or click the “Size” button in the Properties panel. Here you can determine the width and height of the movie and its frame rate. But before we change anything we need to decide what aspect ratio we are authoring to.
or click the “Size” button in the Properties panel. Here you can determine the width and height of the movie and its frame rate. But before we change anything we need to decide what aspect ratio we are authoring to.
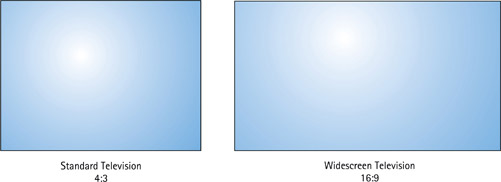
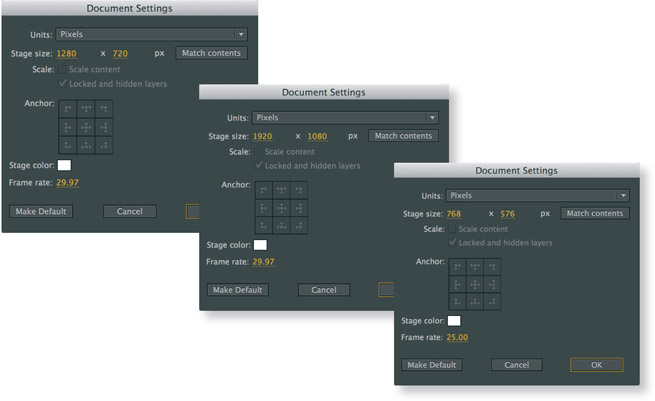
2 NTSC (National Television Standards Commission), the video standard used in North America and most of South America, uses a 4:3 aspect ratio, which essentially means the width and height of a standard television set. To break it down in even simpler terms, 4:3 means that for every four units wide, the picture is three units high. Apply this formula to a 16:9 screen, and you’ll get 16 units of width for every nine units of height. It’s simple arithmetic so far, but it’s about to get tricky.
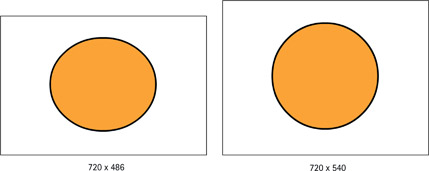
3 NTSC doesn’t use square pixels; they are rectangular. A problem arises when you develop content for video on your computer because you are creating square pixels to be displayed as rectangular pixels. The problem is your video will look slightly stretched. To compensate for change in pixel shape, adjust the width of the movie so that the aspect ratio is 720 × 540.
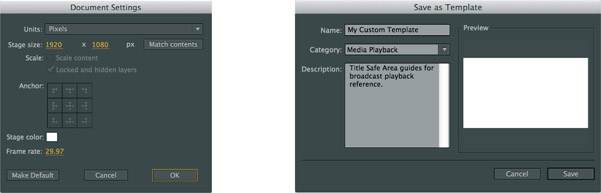
4 NTSC uses a frame rate of 29.97 fps. You can export Flash movies that have different frame rates such as 12, 15, or 24 fps and convert them to 30 with video editing software, although a movie converted from 12 to 30 fps will not look as smooth as a movie originally authored at 30 fps. You can save your NTSC Flash document as a Template if you plan to create multiple files (File > Save as Template…). You can also create your own template categories by creating new folders in the “Templates” folder on your local hard drive where Flash CC is installed.
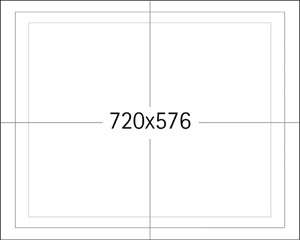
5 PAL (Phase Alternating Line), the predominant video standard outside the Americas, also uses the 4:3 aspect ratio but uses a 720 × 576 pixel aspect ratio. The frame rate is 25 fps. PAL has a greater resolution than NTSC and therefore has a better picture quality. Its higher color gamut level produces higher contrast levels as well. But the lower frame rate, compared to NTSC’s frame rate, will not be as smooth.
6 Film uses 24 fps, which is also a popular frame rate among animators. Although you can use 24 fps in your Flash project, when you export it to video, you will need to convert the frame rate as well. This conversion is easily done during the export process by specifying the appropriate frame rate.
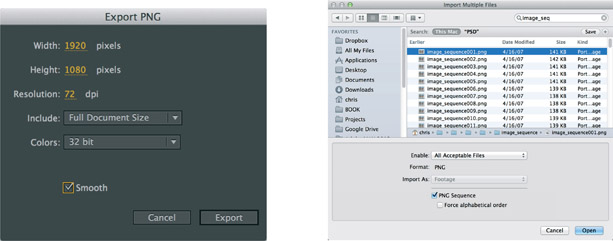
7 Exporting your movie as a PNG image sequence is often the best and most popular method. Go to File > Export Movie and select PNG Sequence as your format. I highly recommend creating a new folder where your image sequence can be saved since the number of images Flash creates is directly related to the number of frames in your animation (which can easily be hundreds or even thousands). A PNG sequence insures your animation is frame accurate with lossless compression. If you are using After Effects to further refine or add effects to your animation, importing a PNG sequence is not only supported but is also treated as a single object, making it easy to manage.
Hot Tip

Using a video-based aspect ratio for the Web is always a good idea. You never know when the client might ask you to convert the Web-based Flash movie into video format to be burned onto DVD and shown at their next big company summit meeting.
Title and action safety
TELEVISIONS DO NOT GENERALLY display the entire width and height of your movie. In almost all cases, televisons will show a smaller portion of the true display size. Using a visual guide that represents the potential stage area in danger of being cropped will help guarantee that what you create in Flash shows up in its entirety on a variety of television sets.
SHEN SHU SHUA: MUDBUBBLE ORIGINAL SHORT
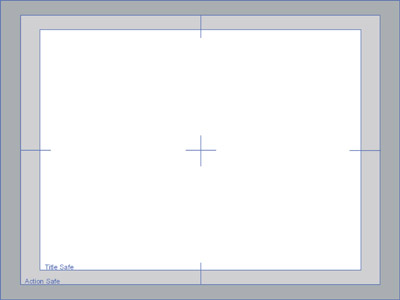
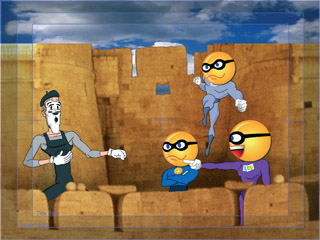
1 There’s nothing worse than finding out too late that the title sequence you labored over for ten hours appears on most televisions with several characters cropped, or is even completely invisible. To prevent this cropping, you need to define which area is considered the safe zone within the dimensions of your movie. There are two safe zones to consider: the action-safe zone and the title-safe zone.

2 The title-safe zone is smaller than the action-safe zone because it is much more important to ensure that all titles are clearly legible without any chance of a single letter being cropped. For this reason, the title-safe zone lies 20% in from the absolute edge of the video. When you add titles to your movie, make sure they are positioned entirely within this safer title-safe zone to avoid being cropped.

3 The action-safe zone lies 10% inside the absolute edge of the video. You can assume that everything falling within this zone will appear on a television screen. Anything outside this zone can be potentially cropped and not visible. Compose your scenes based on the area within the action-safe zone, assuming this part will be the only area not cropped by the majority of televisions.

4 Place the title-safe zone in your Flash project on its own layer above all other content. When you are ready to export to video, delete this layer to prevent it from being included in the video file. If you don’t want to delete it from your document, just convert the layer to a guide layer. Guide layers will not be included in your final export.
Convert the layer containing the title-safe graphic to outline mode to reduce its visual impact and make it less noticeable. You can easily change the color of outline mode by clicking on the color swatch in the layer and selecting a different color in the swatch panel.
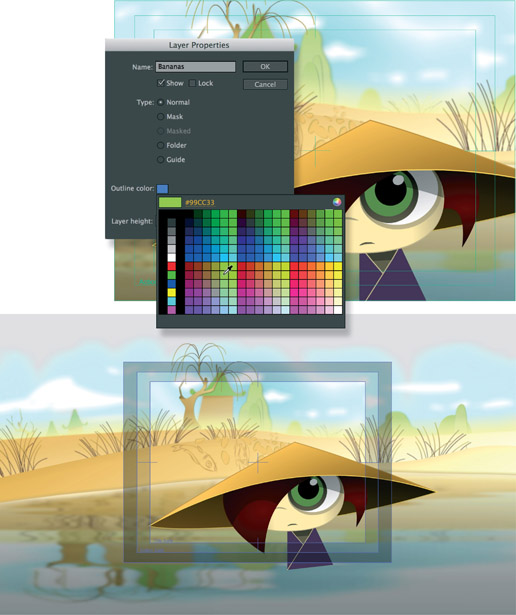
5 View > Pasteboard will allow you to see the work area beyond the stage dimensions. This view is useful for working with graphics that extend beyond the width and height of the stage. Having the title safety visible will indicate where the stage is in relation to your artwork. Having the title-safe area visible is particularly useful for simulating camera moves such as panning and zooming.
Hot Tip

Flash CC supports the “Include Hidden Layers” option. Go to File > Publish Settings > Flash to locate this feature. When this feature is turned off, all layers with visibility turned off will not be exported. The advantage here is not having to delete the layer from your timeline. You just need to remember to turn off its visibility before exporting.
CC video templates
ONE OF THE NICEST features of CC is actually more of a convenience. Adobe has provided us with an easy way to create Flash documents for video output in the form of templates. These template files provide everything you need to get started if you are producing content for video output. In some cases, it’s actually a good idea to use these formats for Web content as clients often will need to output their content to both the Web and video formats.
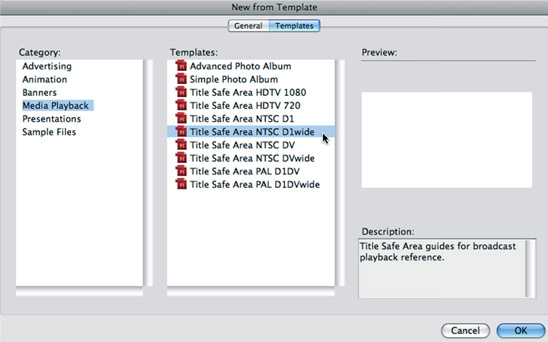
1 Go to File > New… and in the New Document panel click on the Templates button near the top. In the Category section select Media Playback. The Templates section will update with all of the various template files needed to produce content for video output. Select the template that best applies to your needs. The NTSC templates are for video output in America while PAL is used throughout Europe.
2 Each template file is already created with the correct aspect ratio and frame rate. There’s nothing else you need to do to this file except add your content.
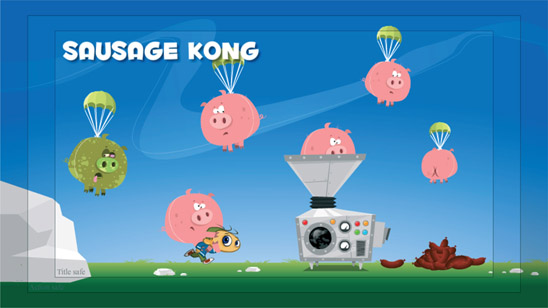
3 The title safety provides a clear defining boundary for text-based content as well as action-based content (everything other than text). The title safety region is indicated by guides that represent a 20% margin of the viewable area. The action-safe guides represent a 10% margin of the viewable area. To help discern between these 2 regions, the borders contain a fill color mixed with alpha transparency to allow for the content underneath to still be seen. Keeping within these guides insures your content will not be cropped on older screens.
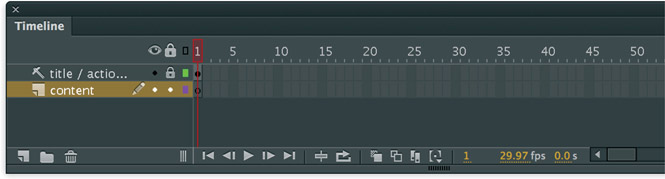
4 The timeline consists of two layers; the action-safe layer and an empty layer for content. The action-safe layer is already converted to a guide layer so that it will not be included during export to SWF, to video or as an image sequence. There is only one layer for content, but depending on your needs you may need more. Feel free to add as many layers as you like.
Hot Tip

I highly recommend working with several smaller files rather than having a very long timeline in a single document. The longer the timeline and the more assets within a single FLA, the greater the risk of instability and possibly a corrupt file that can no longer be opened. Having several smaller files is simply more manageable and more stable.
Safe colors
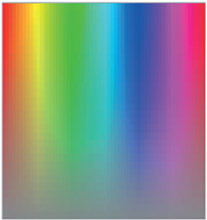
COLOR IS CRITICAL TO THE success of your final file format. Since Flash is technically a Web-based authoring tool, the range of colors far exceeds the color range a television can display. This example will show you how to mix colors while keeping them television-safe and also provide instructions for replacing the default color palette with a color-safe one (included in the downloadable assets from the book website).
1 Your computer monitor is designed to display the full range of RGB color values (0-255). Television can only display a limited range of color values. There’s a good chance you may be using colors in your Flash movie that fall outside the television value range, resulting in very noticeable color bleeding.
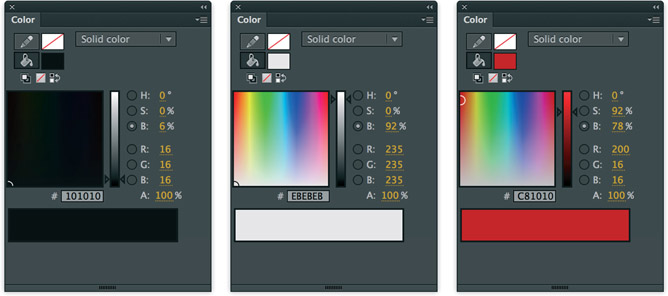
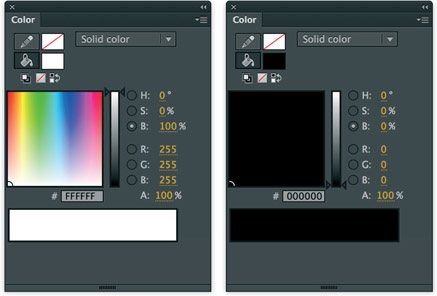
2 You will need to limit this range to between 16 and 235. The RGB color value of the darkest color (black) is 0-0-0. For television this value must be limited to 16-16-16. This setting should be your new black color for any project exported to video. The RGB value of the lightest color (white) is 255-255-255. This television white must be limited to 235-235-235 for export to video format. Since this will be the brightest color in your palette, it will appear to be stark white in comparison to all other colors. The color red has a tendency to bleed more than any other color, so it may be a good idea to compensate more than you need to by lowering the value to around 200-16-16.
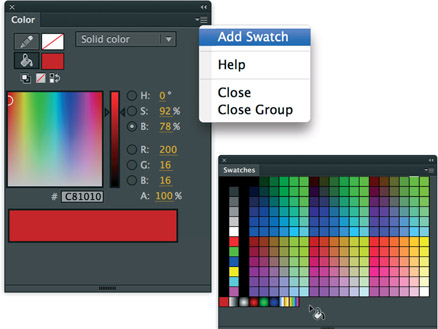
3 To add your new color as a swatch, use the drop-down menu in the upper right corner of the Color Mixer panel. An alternative method for adding colors to your Swatch panel is to hover over the empty area below the existing swatches. Your cursor will automatically become a paint bucket and when you click anywhere in this area, the current color will be added.
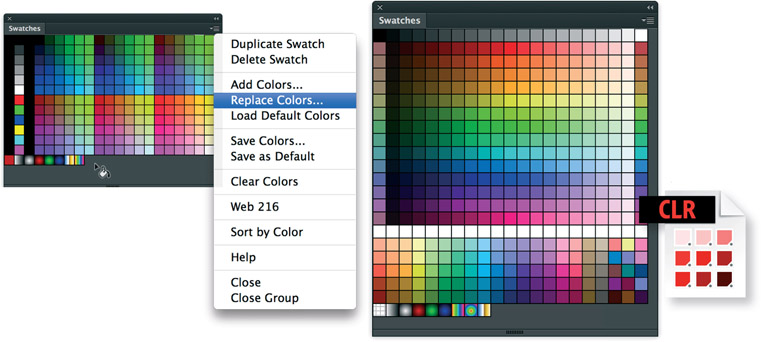
4 Sometimes the default color palette is not needed and simply gets in the way of your workflow. This is a good time to remove or replace the current swatches. You can start over by mixing and adding new colors one at a time or by importing an existing color set, color table or even a GIF file. From the drop-down menu choose Replace Colors and navigate to the *.clr, *.act or *.gif file containing the colors you want to use. Here I have imported an NTSC safety color palette provided by Warren Fuller (www.animonger.com).
Hot Tip

Remember, Flash is resolution-free; as long as you are working in the correct aspect ratio, you can always resize when exporting without a loss in quality. If you have imported bitmaps in your Flash movie, you’ll want to use a width and height that is 100% of your final output to avoid having them scaled in Flash.
Ape Escape
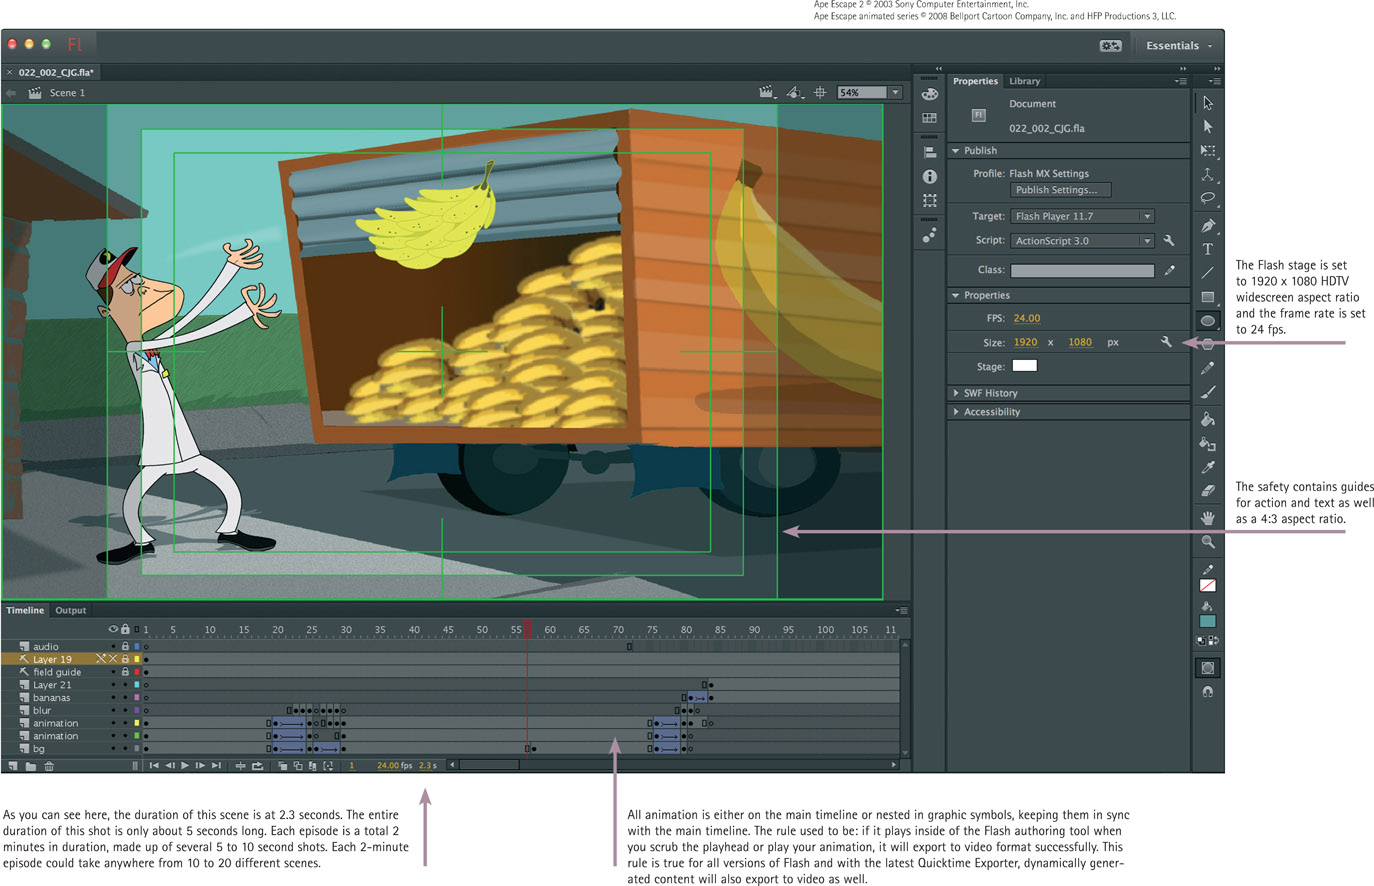
APE ESCAPE IS BEST KNOWN as a platform game for Sony’s PlayStation gaming console, but it’s also an animated series for television. Recently I was asked to help animate a few scenes and thought it would make for a great example of how a professional production creates animation with Flash as its primary tool for television broadcast. Many of the animators worked remotely including myself. We shared files via FTP (File Transfer Protocol) and we were initially given storyboards in QuickTime format. The main characters were already setup for us in Flash and each episode was broken down into several small chunks of time, specifically from 5 to 10 seconds in length. Breaking down the episodes created more files but they were very small in size and easily shared via the Web. All we had to do was upload the Flash source file so that the post-production crew could then export a PNG image sequence or QuickTime movie and edit all the scenes together using a video editing tool.
Keeping it all in sync
WE HAVE TWO OPTIONS FOR authoring Flash for video output. The old school method requires everything to be on the main timeline. Movie Clip symbols must be avoided altogether since their Timelines are independent of the main Timeline and only render during runtime in the Flash Player.
Flash 8 introduced filters and the ability to add drop shadows, blurring and other cool effects to Movie Clip symbols. But due to the dynamic nature of Movie Clips, they had to be avoided as well. Flash CS3 introduced the QuickTime Exporter which solved this problem. We will take a look at the enhanced QuickTime Exporter in Flash CC later in this chapter.
For now, let’s take a look at the old school method of creating Flash animation for export to video. This example is analog Flash in its purest form: straight-ahead timeline animation, streaming sound and nested Graphic symbols.
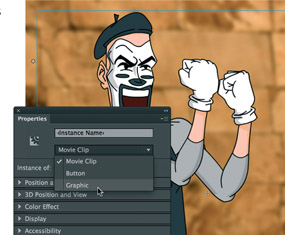
1 If your Timeline contains Movie Clips, convert them to Graphic behavior so they sync with the main Timeline. To convert a Movie Clip to a Graphic symbol, select the Movie Clip instance and change its behavior from Movie Clip to Graphic using the Properties panel. Then change its property from Single Frame to Loop or Play Once depending on your needs.
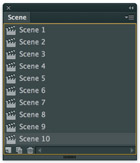
2 Scenes are a great way to manage long Timelines. For example, you could have your title sequence in Scene 1, your story in Scene 2 and ending credits in Scene 3. Using scenes is similar to multiple files chained together since each scene has its own Timeline. The Timeline of each scene combines into a single Timeline in the exported file. The advantage here is having the entire project in one FLA.


3 One of the disadvantages of using scenes is confusion during the editing process as it can be difficult to find assets within multiple scenes. Another disadvantage with multiple scenes is having more content in your FLA, which can result in a very large file size. This larger file size increases the chances of corruption and loss of work. It’s usually better to work with several smaller files, then edit the individual exported video files together in your video editor.

4 The Flash Timeline has its own limitations. 16,000 is the number that represents the maximum number of layers in a single Flash movie as well as the maximum amount of symbol instances and number of frames. It is rare to see this number reached in any situation, but it is good to understand the limitations in order to avoid them. A Flash document that is 16,000 frames long at 30 fps is nearly nine minutes long. A file that large will cause problems even in the best situations. The file will take longer to open as well as to save. It will exhaust your system’s resources and make it harder to work with multiple Flash documents open at the same time. It will also take a very long time to export to video and will create an enormous file. If you export to AVI, you will very likely exceed the 2 GB limit that is placed on AVI files on most operating systems. Best practice is to break up your project into several smaller FLA files, typically between 30 and 60 seconds each. I often work with FLA files less than 20 seconds in length. It makes the entire process more manageable when animating, exporting and editing.
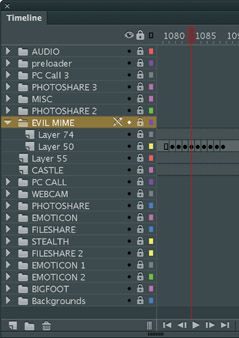
5 Layer folders are a great way to organize your Timeline, especially if your animation involves a great number of layers, which is often the case with animation. Layer folders combined with nesting animations can go a long way in making efficient Timelines. You can place all your character animations inside a Graphic symbol. One graphic symbol each character makes it much easier to edit and control your entire scene from the main Timeline if you need to position, scale, pan, zoom as if playing the role of a Director. Since the nested animations are inside Graphic symbols, you can still scrub the Timeline with the playhead to see the animations play.
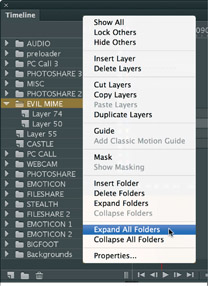
6 You can quickly expand all layer folders by right-clicking over any one of your folders and selecting “Expand All Folders” from the context menu. Collapsing all folders is done the same way.
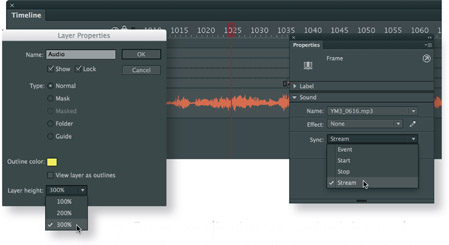
7 To sync your animations to a soundtrack, import your sound file and place it on the Timeline in its own layer. You can drag it from the Library to the stage or use the Sound drop-down menu in the Properties panel to select the file. By default, the Sync setting will be Event and must be changed to Stream. The Stream behavior embeds the sound into the Timeline and will be in sync with any Timeline animation. You can adjust the height of a layer by right-clicking over the layer name and selecting Properties. In the Properties panel you can set the layer height to as much as 300%. This height can be useful if you want to see the waveform in as much detail as possible.
Hot Tip

To keep the file size of your FLA as small as possible, it is sometimes good practice to avoid importing high-quality stereo sound files. If you’re planning on editing several exported video files together in your video editing program, then import a compressed MP3 audio file into Flash to use as a “scratch track.” Place the sound file(s) on its own layer so that it can be easily deleted before export. In Flash CS3, CS4, CS5 and now in Flash CC, you can simply turn off the visibilty of this layer to exclude it from export. Use the high-quality stereo sound file in your video editing program instead.
QuickTime Exporter

EXPORTING FLASH MOVIES TO VIDEO FORMAT used to require that all animation be on the main timeline. Dynamic content could not be exported to a fixed-frame video format. This content included Movie Clip animations, filters, ActionScript and just about anything dynamically loaded into your SWF file. If it didn’t play on the main timeline, then it wasn’t included in the exported video.
Welcome the newly enhanced Flash CC QuickTime Exporter. As of Adobe Flash CS5.5, you can export dynamically created Flash content including effects generated with ActionScript as well as effects created with Movie Clips and filters.
The biggest enhancement to the QuickTime Exporter in Flash CC is the integration of the Adobe Media Encoder, providing a number of encoding presets for various devices and platforms. The next biggest enhancement to the exporter is performance. In previous versions of Flash, larger stage sizes, higher frame rates, multiple filters, Blend Modes, animated effects and lack of system resources could contribute to frames being dropped during the export process. As a result, the exported content would suffer from dropped frames or graphic anomalies. In Flash CC, these export issues are now a thing of the past, which is great news for anyone wanting to export their dynamic or timeline-generated Flash content to video format.
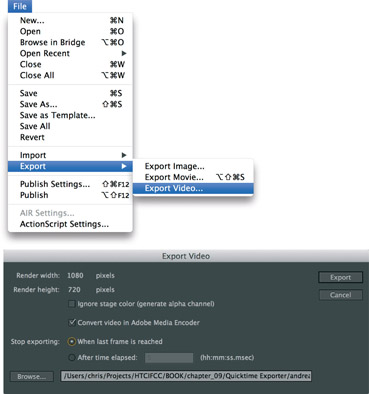
1 When you are ready to export your Flash movie to video format, go to File > Export > Export Video. In the Export Video window, the Convert video in Adobe Media Encoder is checked by default – leave it as is. Select When last frame is reached for timeline-based animation. If your movie is dynamic, then select After time elapsed and then enter the desired duration in hh:mm:ss.msec format. Click Export when your settings are ready.
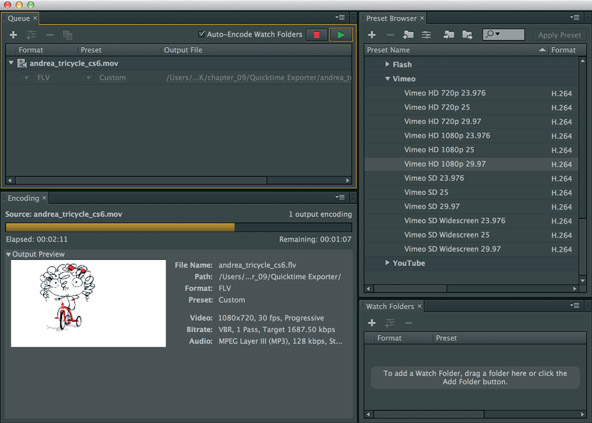
2 Once the export from Flash is complete, the Adobe Media Encoder will launch automatically. The exported MOV file will be automatically added to the queue as seen in the upper left panel. In the lower left corner is the Encoding panel where you can see a preview of the encoded movie along with data specific to the file itself. Along the right side is the Preset panel where you’ll find a list of presets for just about any output you can imagine. From audio and broadcast output, to mobile devices and the web, the Adobe Media Encoder has just about every platform covered. With your preset selected, click the green arrow button in the top right corner of the Queue panel to start the encoding process. The Encoding panel progress bar will indicate the elapsed and remaining time encoding duration.

3 Preset categories offer several encoding formats to choose. Within the Web Video drop-down you will find a variety of formats within the Vimeo and YouTube sections. These formats will ensure your video will be encoded with the right compression for viewing on these types of web platforms.
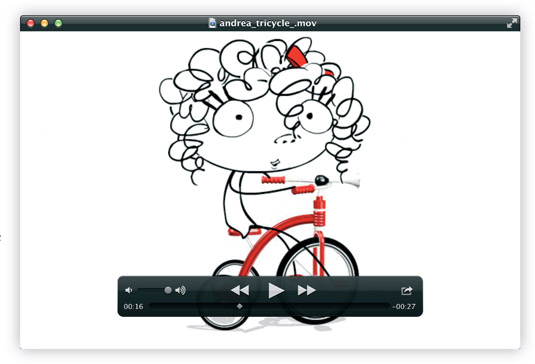
4 The encoded movie can be opened and played with the QuickTime Player before uploading to the web. The most notable enhancement besides the integration of the Adobe Media Encoder is the flawless export quality. No more dropped frames and image quality is as expected: excellent.
Hot Tip
Knowing your intended output at the planning stage of your project can help smooth the production process. If you know you want to use a web-based platform such as Vimeo or You-Tube, you can use the Adobe Media Encoder to check out the file format specifications and use that information when setting up your files. Do you want to develop for an Apple iPad 2? The Adobe Media Encoder lists that resolution as 1024x768 with a frame rate of 29.97. Use these settings when you create a new Flash document to ensure compatability with the Apple iPad 2 platform.
SWF & FLV Toolbox
THE SWF & FLV TOOLBOX IS A VERY HANDY 3rd-party program that converts Adobe Flash files (SWF), Flash Video (FLV) and Projector (EXE) files to several different formats (AVI, JPEG, GIF and BMP). You have complete control over the settings for each file format including codec, keyframe rate, movie quality, bitrate, cropping, resizing and more. I’ve been using this software quite a lot recently, and I really like its ease of use and no-frills interface.
Find out more by visiting www.eltima.com. SWF & FLV Toolbox is only supported for the Windows platform as of this writing.

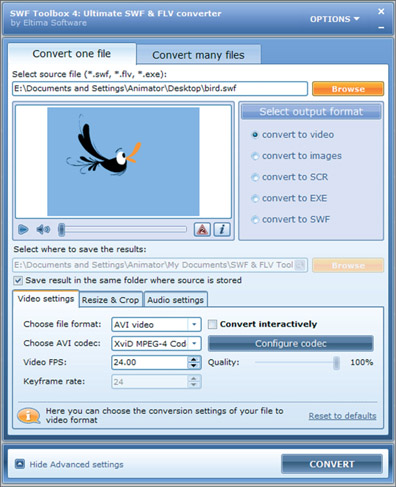
1 The first step is to publish your Flash document to generate a SWF file. Launch SWF & FLV Toolbox, click the Browse button and select the SWF file. Select the output format and click Convert. That’s basically all you need to do to convert your SWF files to a different format. Of course you have advanced settings to play with as well.
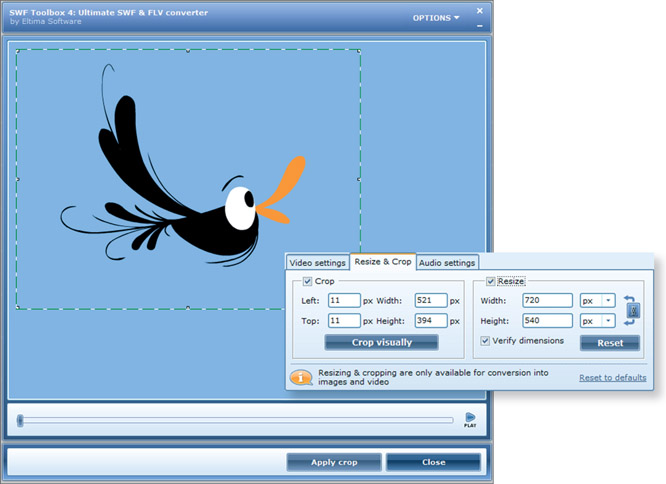
2 The advanced settings provide the option to crop your SWF file to any width and height by dragging the edges of the crop marquee or by typing in the numerical values. You can also resize the SWF by providing new values for the width and the height.
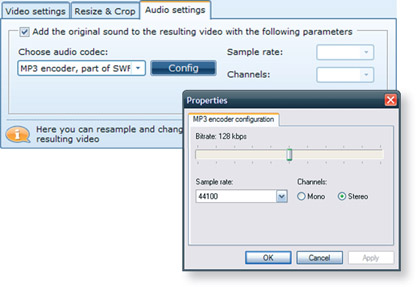
3 Select an audio codec and configure your desired audio settings to include your sound in the converted video file (if sound was published along with the original SWF file).
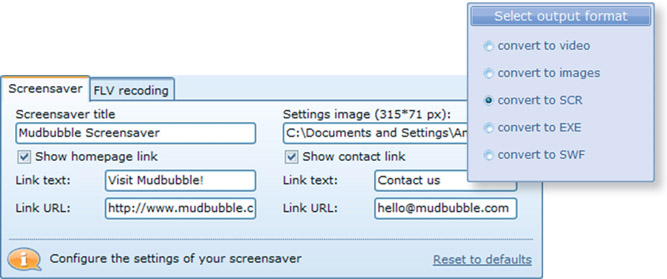
4 You can easily convert any SWF, FLV or Projector EXE file to a Windows screensaver file. SWF & FLV Toolbox offers several options that allow you to customize your screensaver by adding a title, website URL and email address.
Hot Tip
SWF & FLV Toolbox even allows you to batch convert several files at one time. Select the “Convert many files” tab in the main window and then click the “Add” button.
Wacom tablets
THERE ARE SOME THINGS I JUST CAN’T WORK WITHOUT, AND ONE OF THEM is my Wacom tablet. Graphics tablets are indispensable when it comes to design workflows, and they save valuable production time on a daily basis.
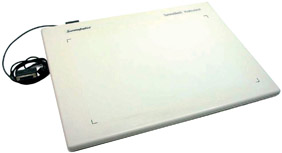
My first graphics tablet was a 12x12 SummaSketch. I distinctly remember the stylus being tethered by a chord, because during the drawing process it would constantly wrap itself around my wrist. Every 20 minutes or so I had to stop, and unravel myself from the stronghold the tablet had on me. Since the only other option was to draw with a mouse, it was a nuisance I easily tolerated. I wasn’t aware that a wireless stylus even existed. I didn’t know any other way.
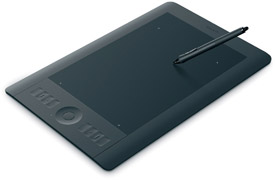
After a couple of years of using SummaSketch tablets, I discovered the Intuos series from Wacom. My design life was changed forever. The sleek design of the tablet, its multiple levels of pressure sensitivity and the wireless stylus were all wonders of the modern world for me. Over the years, I’ve used almost every Intuos and Cintiq model as well as a couple Wacom Bamboo series tablets. Each model has their strengths and weaknesses depending on your design needs.
The Intuos tablets come in three sizes: small, medium and large. The medium size has an overall dimension of 15x9.9? and active drawing area of 8.8x5.5?. My personal preference is marketed as the medium size. I don’t have to physically move my hand and arm as much as with the larger version, and the small size is a little too small for any serious graphics work. Combine the medium Intuos with the wireless accessory kit, 2048 levels of pressure sensitivity, customizable ExpressKeys, TouchRing and multi-touch gesture support, and you’ve got a portable tablet that fits alongside your laptop in your backpack.
Lately I have been lucky enough to spend my working days with a Wacom Cintiq 24HD Touch. Most of my design time is split between Adobe Photoshop CC and Flash CC. The 24HD Cintiq is the Shangri-La of graphics tablets. It’s simply huge and incredibly well engineered. I think if our planet exploded, this Cintiq would spend the rest of its life floating around space fully intact. The construction just feels solid.
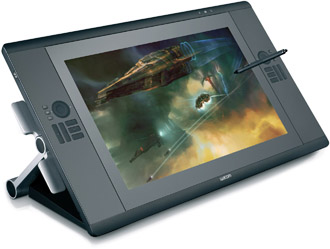
It’s called the 24HD but in terms of its active area, we’re really talking about 20.4x12.8? (518.4x324mm). But don’t let that sway you. The 24HD’s screen size and aspect ratio will surely satisfy your design appetite with no room for dessert. The size of the Cintiq fills the majority of your peripheral field of view, a side effect that tends to draw you into your work (pun intentional). The Cintiq 24HD connects via a DVI output that requires a DVI-to-Thunderbolt adapter. What surprised me, however, was the lack of HDMI-to-HDMI connectivity from the Cintiq to support the newer Retina MacBook Pros. I would think HDMI would be a no-brainer, but for now the DVI-Thunderbolt works fine and supports older, non-Retina display MacBooks. The Cintiq 24HD display can be adjusted by height and incline. The angle of the display itself is adjusted by grasping the levers on both sides and squeezing to release the clutch mechanism. As you squeeze the levers, tilt the display to the desired angle and then release the levers to engage the clutch to lock the display in place. I have fun angling the display due to Wacom’s perfectionist build quality in the hinging joints that connect the display to the support arms. It’s like opening the hood of a high-end luxury car while still on the showroom floor kind-of-feel. Adjusting the Cintiq almost becomes more about how good it feels than achieving the desired position angle. The support arms lock when in vertical position and unlock by accessing the release latch located at the very back of Cintiq’s base. When unlocked, you can lower the entire display to achieve a flatter angle. The Cintiq series offers a 24HD without the touch feature for a little less money.

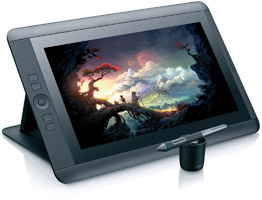
THE NEXT CINTIQ MODEL IS THE 22HD WITH OR WITHOUT THE MULTI-TOUCH feature. The biggest difference besides the slightly smaller size is the ability to physically rotate the display on a center pivot point. I used the 22HD for an entire day as a demo artist for Wacom and found the rotation feature very useful. Another slight difference in the 22HD is the lack of a TouchRing. To make up for it are 16 customizable ExpressKeys and 2 rear-mounted Touch Strips.
The Cintiq 13HD is the perfect choice if you want a portable Cintiq tablet. The 13? tablet fits easily in most laptop bags, making it extremely handy if you want the Cintiq experience on-the-go. Keep in mind, you’ll need a power source wherever your travels take you as the Cintiq 13 is not wireless in any way. In fact, I found the tethered nature of the 13 slightly annoying, but I’ll admit I’m splitting hairs with that complaint, so don’t take it too seriously. The small screen also means that everything being displayed is very small. I had a difficult time selecting menu items and tools across Adobe Flash and Photoshop. Over time, the more I worked with the 13? Cintiq, the more used to it I got. The tethering issue all but went away. The screen still felt too small, but it didn’t hamper my workflow when drawing. Still the best part: Transporting the Cintiq alongside the MacBook Pro in my backpack between work and home. Portability is this tablet’s key strength.
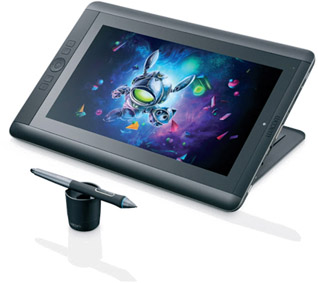
As of this writing, Wacom announced the new Cintiq Companion tablets: Cintiq Companion and the Companion Hybrid. The Cintiq Companion Hybrid is both a Cintiq pen display and an Android™ tablet, giving you the freedom to sketch, draw and paint with Android creative apps. The Cintiq Companion combines the Cintiq pen display with the mobility of a high-performance Windows 8 creative tablet. This combination means you can run applications that support Windows 8 such as the Adobe Creative Cloud. The Cintiq Companion is available with an Intel® Core™ i7 processor and Intel® HD Graphics 4000, Windows 8, 8 GB DDR memory / 256 GB SSD or Windows 8 Pro, 8 GB DDR memory / 512 SSD.
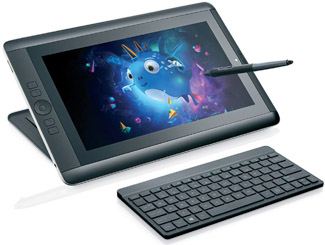
The Cintiq Companion Hybrid is a quad-core NVIDIA® TEGRA® 4 powered tablet running Android® 4.2, Jelly Bean, and comes with Wacom Creative Canvas software. You can connect the hybrid to your Mac or PC to transfer your files and use it as a second monitor.
Both the Companion and the Companion Hybrid come with an optional wireless keyboard, 2048 levels of pressure sensitivity and an ergonomic Pro Pen stylus with extra pen nibs and carrying case.
Wacom has defined the graphics tablet industry by offering something for even the most discriminating designer. With the introduction of the Cintiq Companion models, it’s clear that portability is the new black in the digital design space.