CHAPTER
01
Understanding Manga Hair
How Hair Influences Characters & Scenes
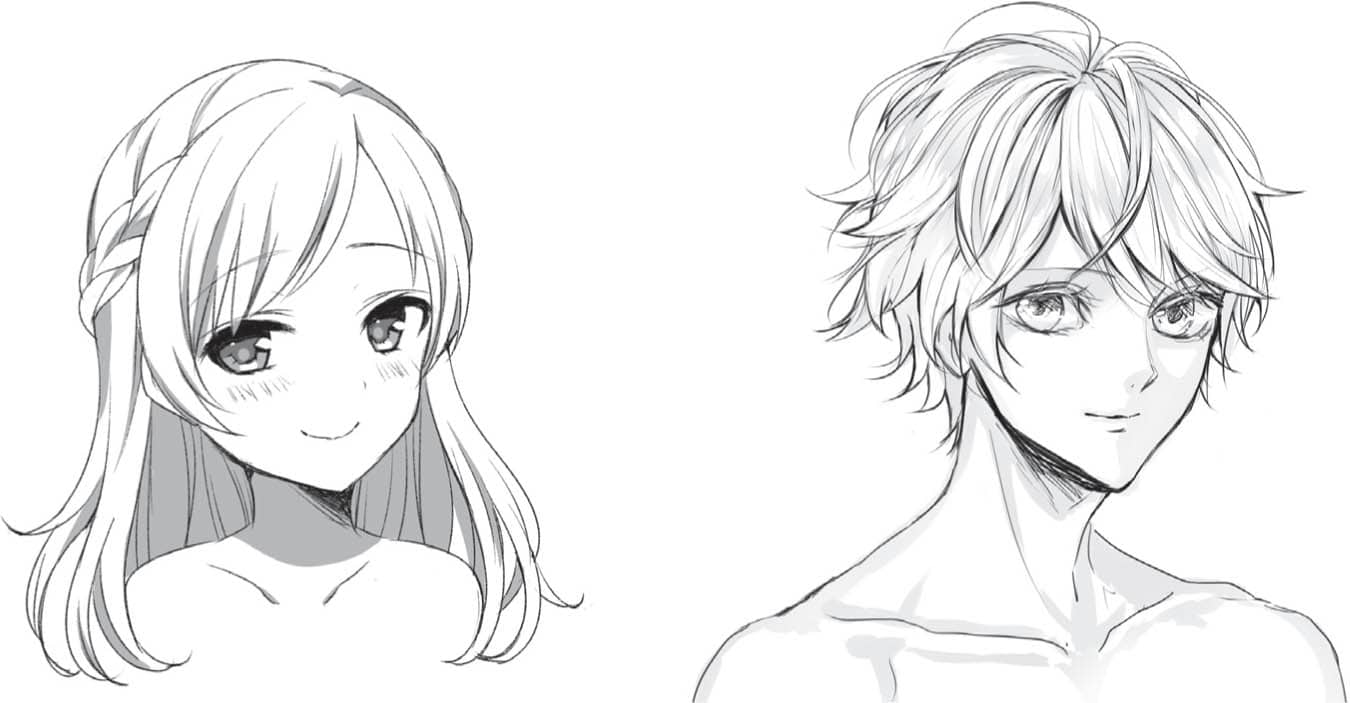
Expressing Personality
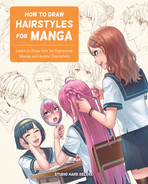
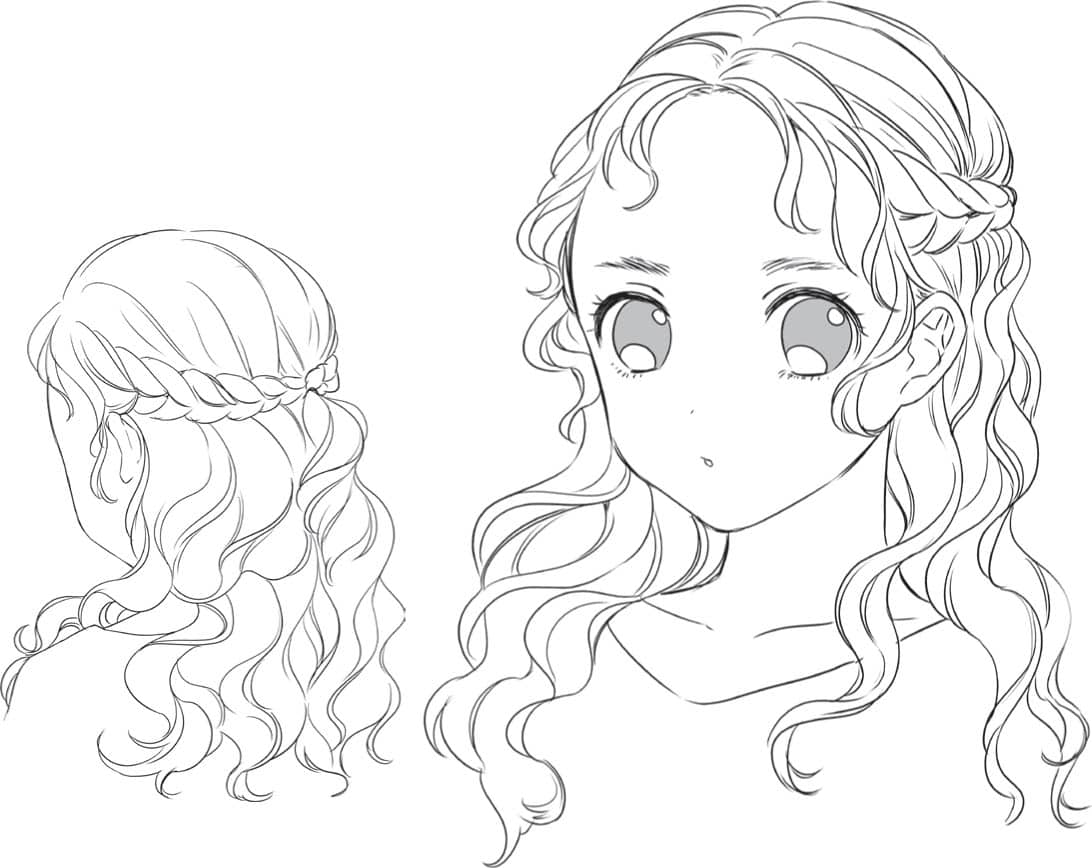
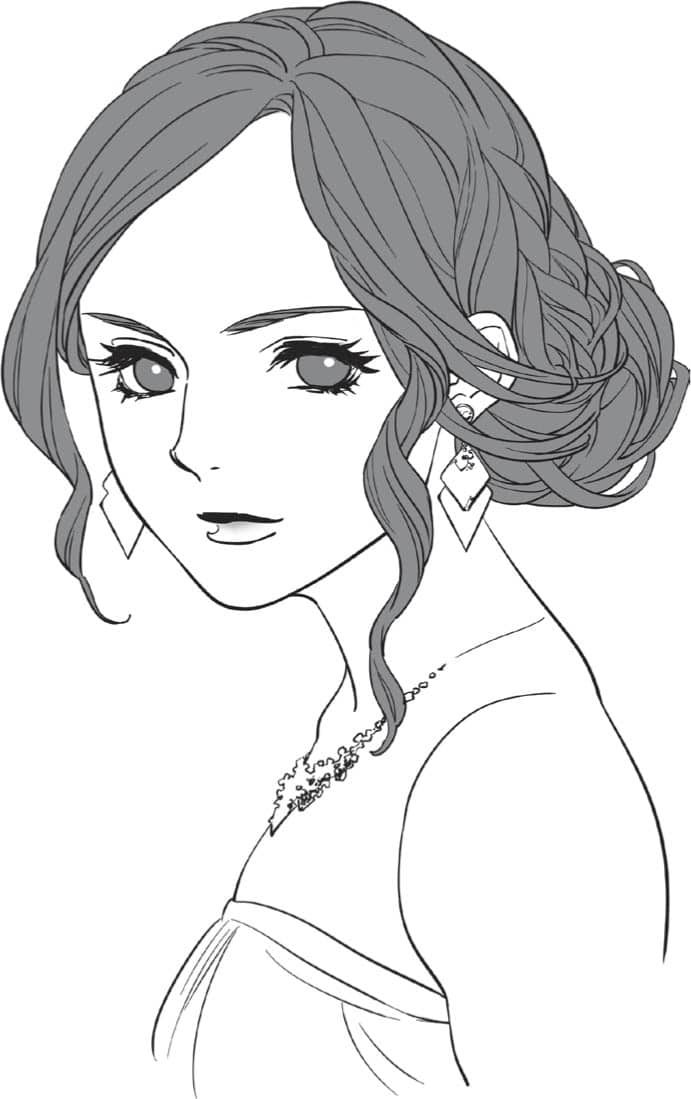
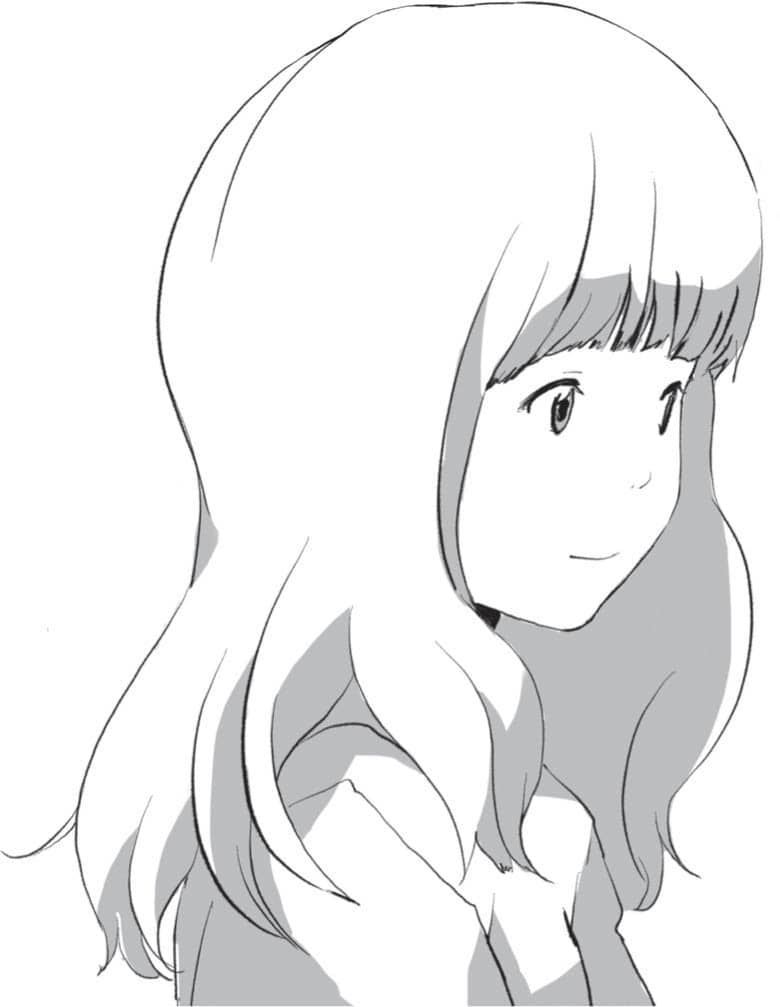
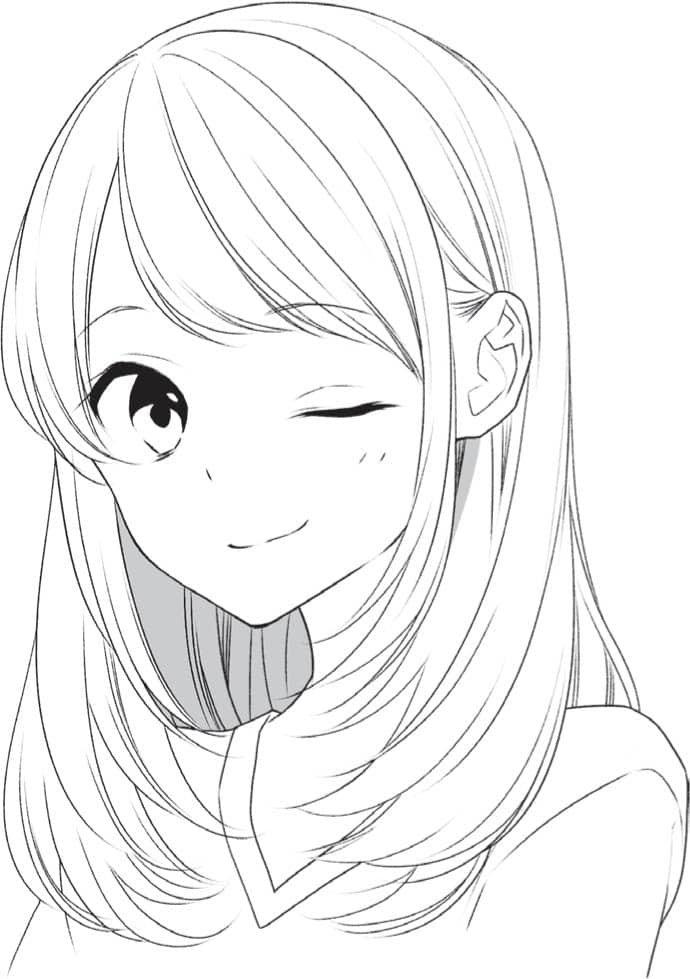
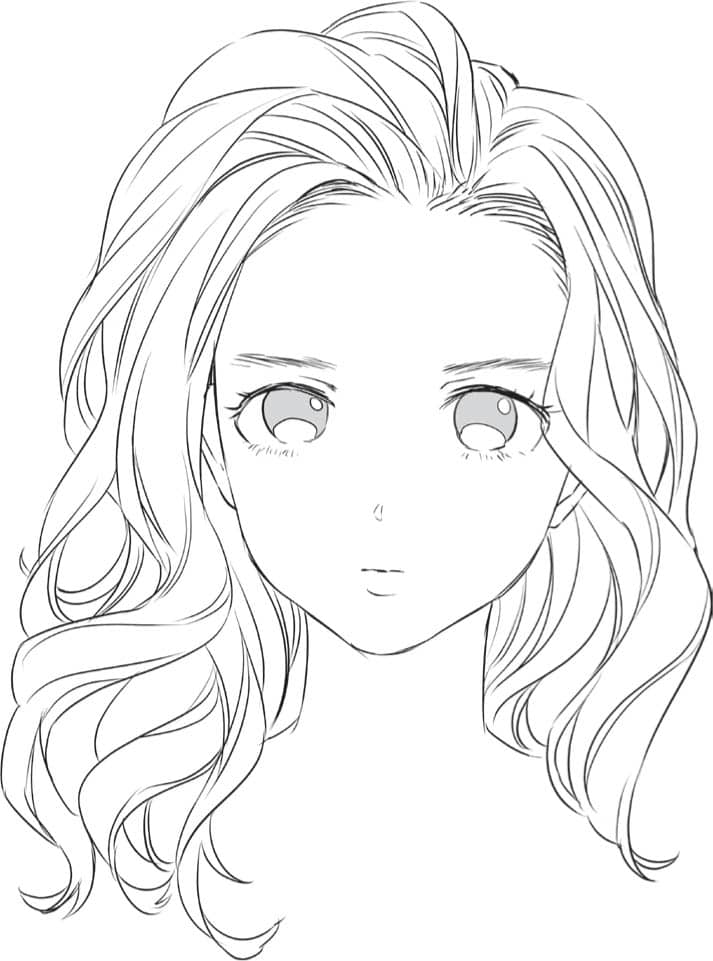
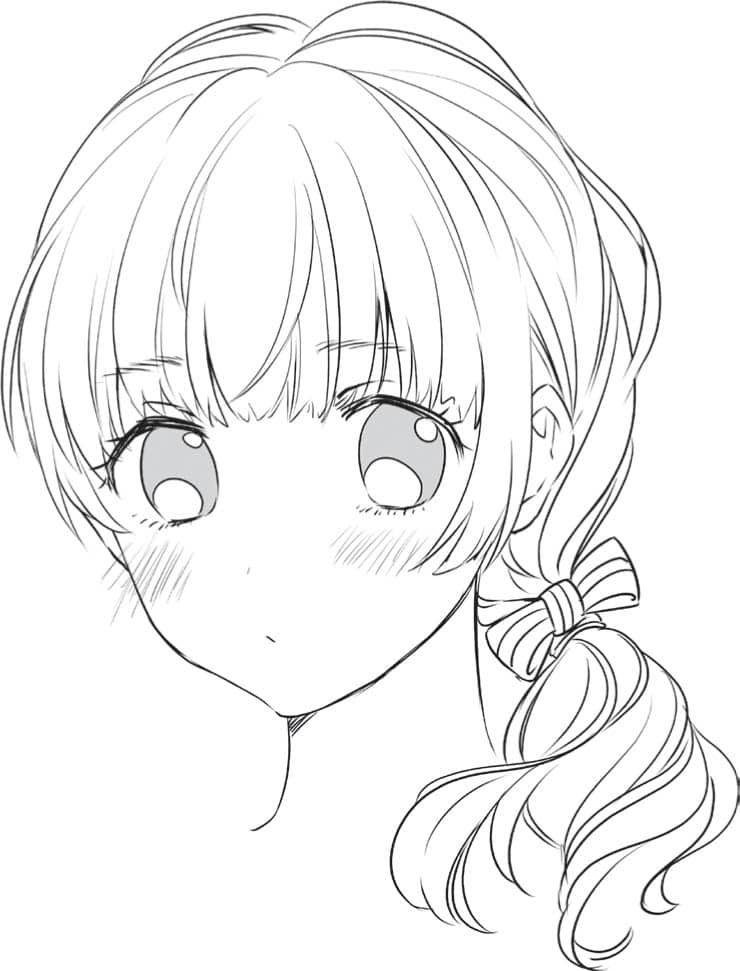
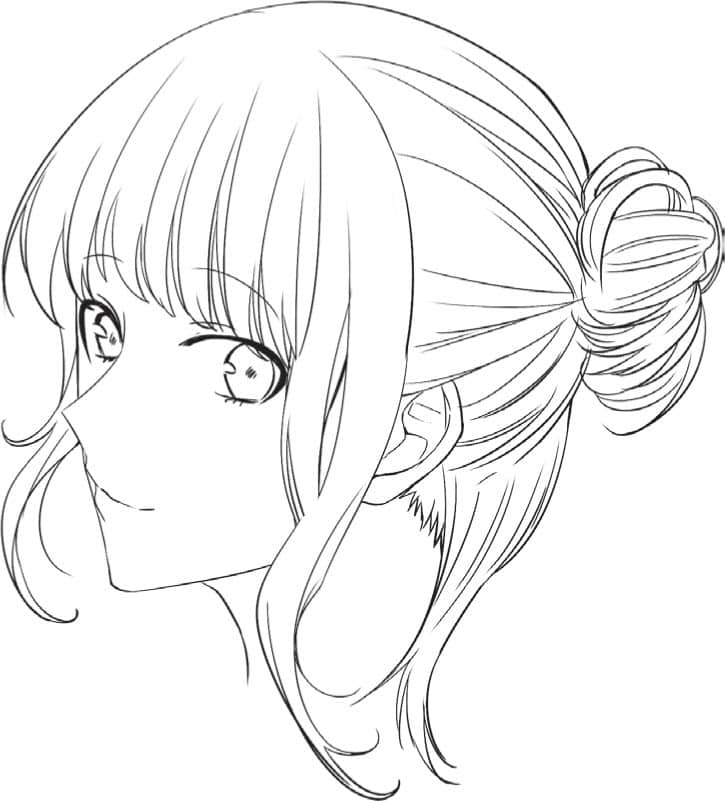
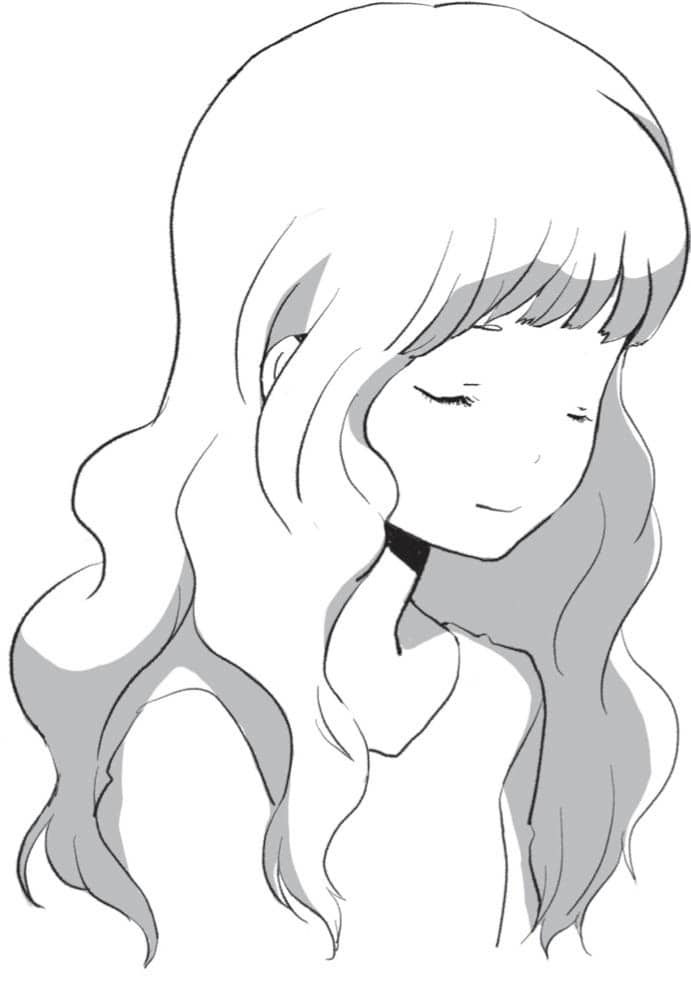
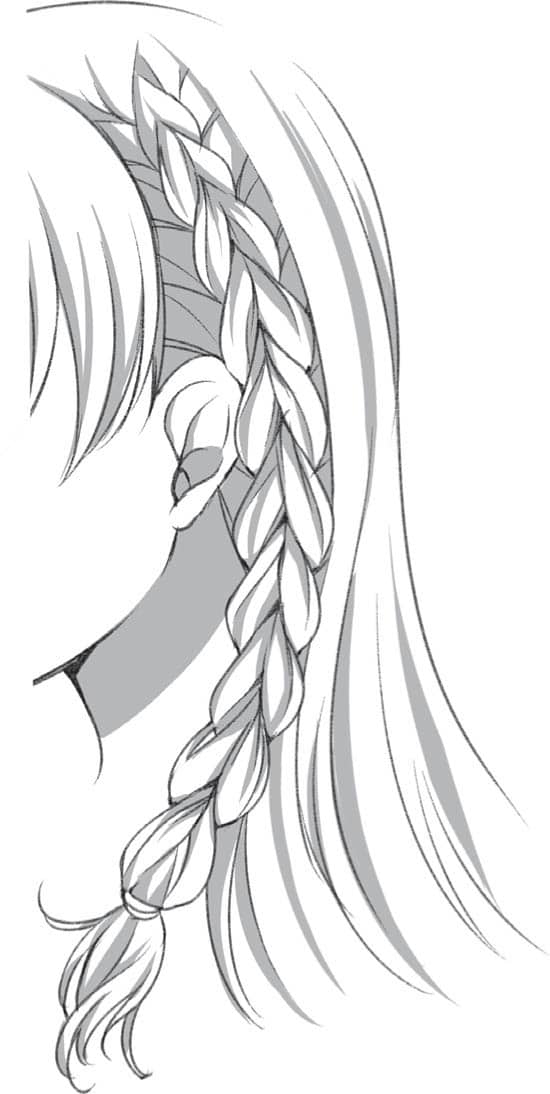
A character’s hairstyle can suggest their personality just as much as their clothing. Paired with a strong facial expression, you can assume a lot about the character’s intent in a scene. Looking at the characters here, what do you think their hair says about them?
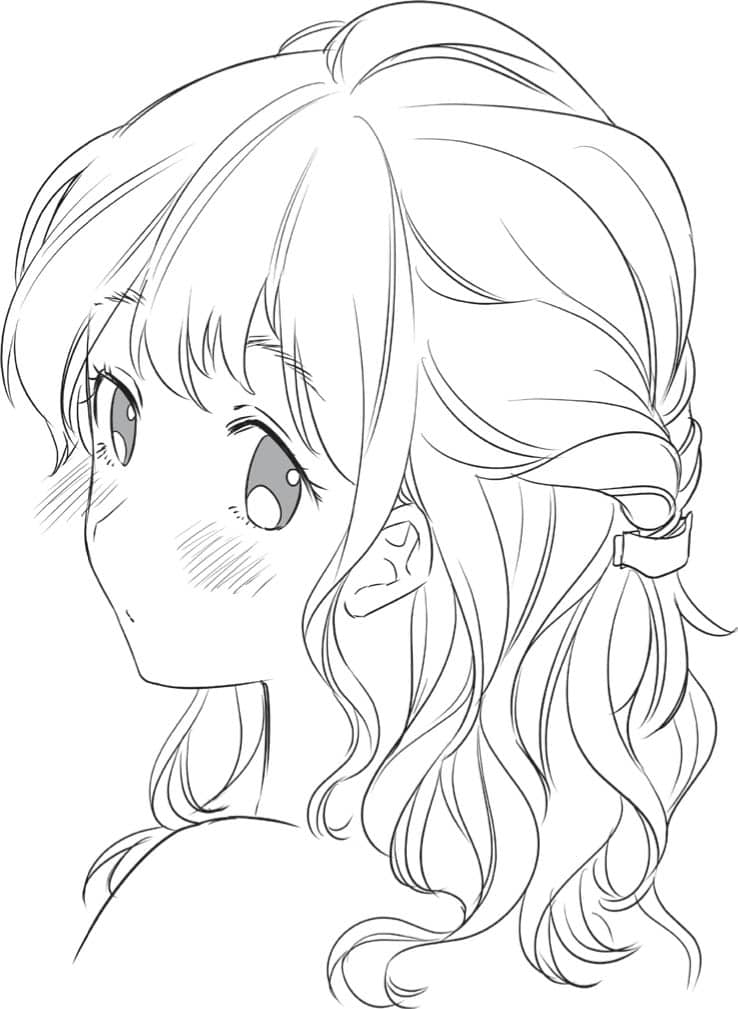
Long wavy hair with braids lifted up halfway

Bouncy, slicked back style

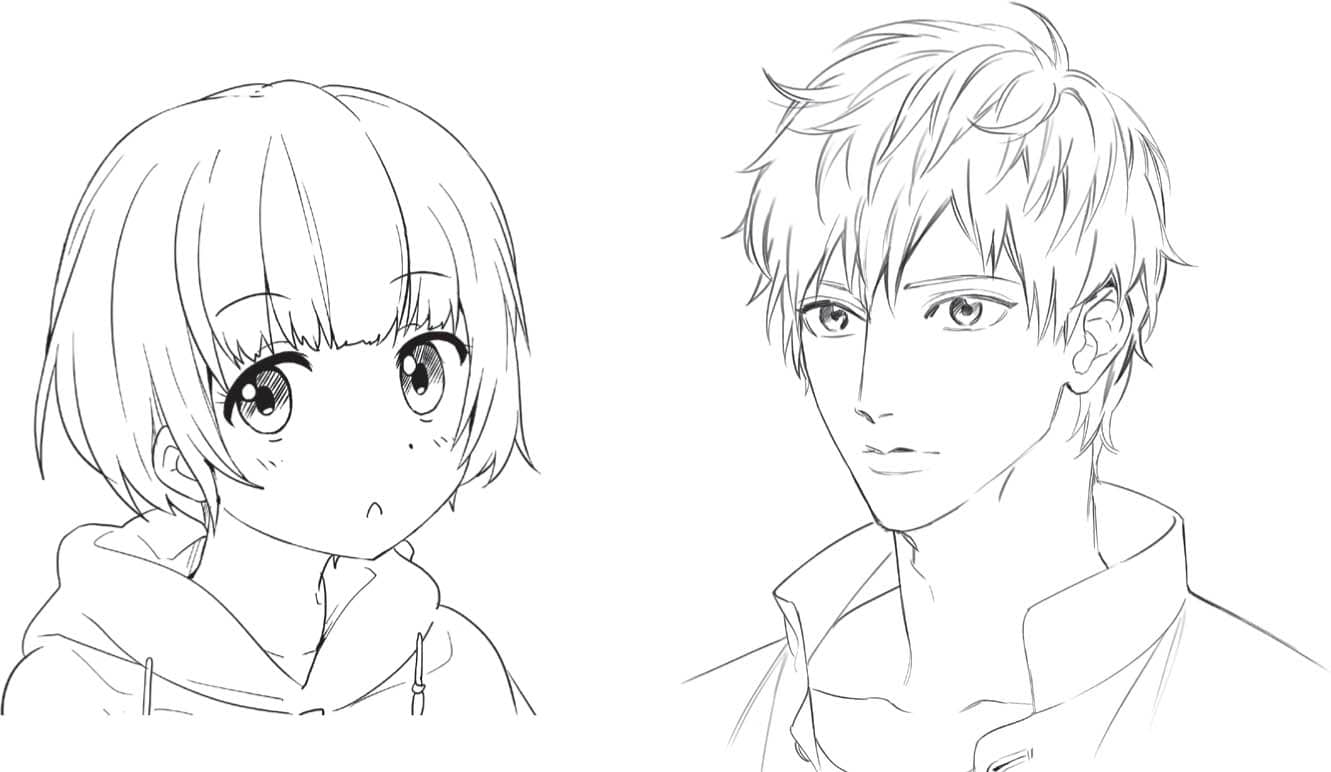
Short hair with bangs
Twin ponytails with flair
Expressing Different Occasions
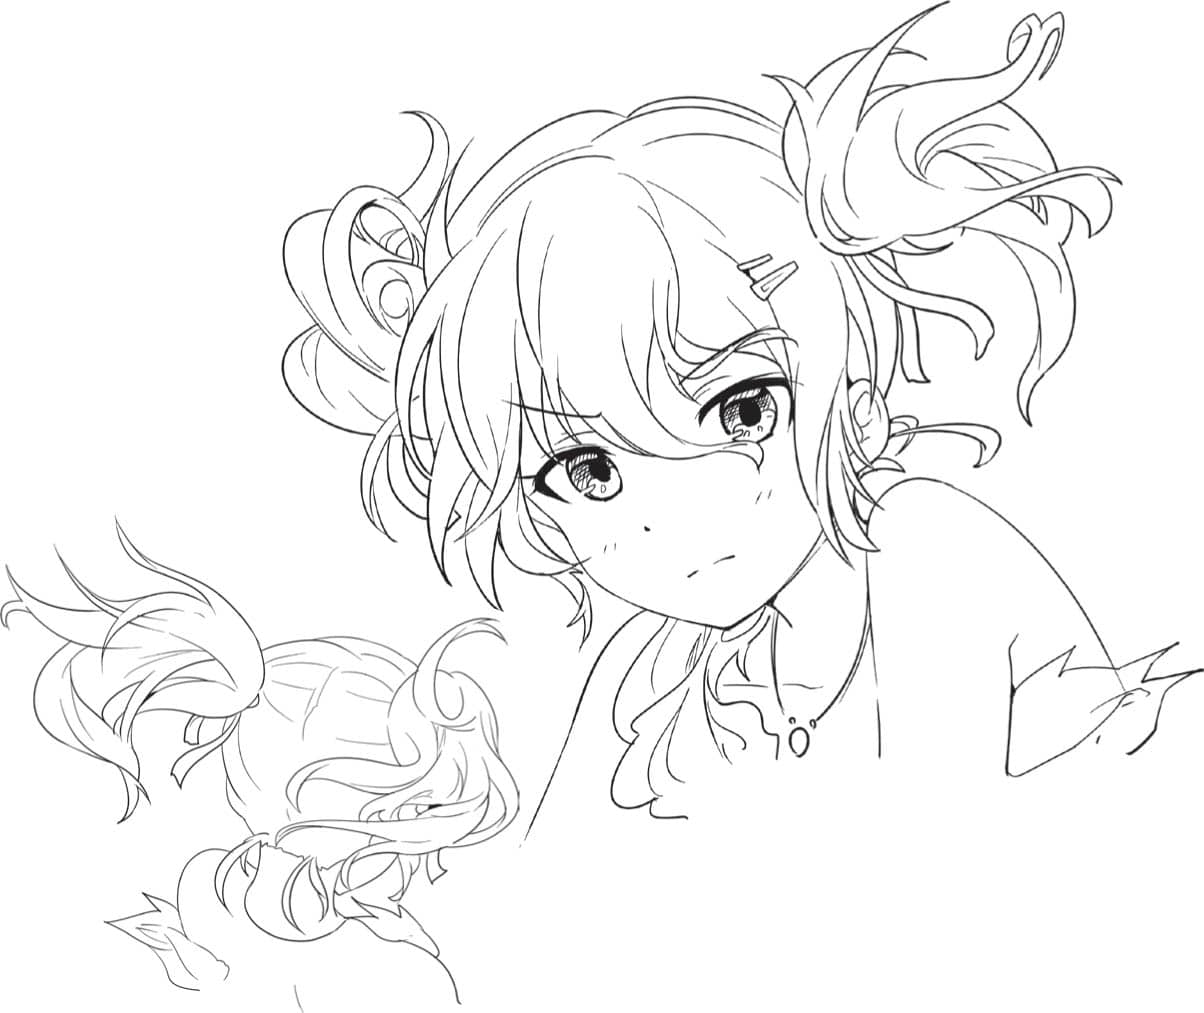
People change their hairstyles to suit different occasions. You can even express the time of day through a hairstyle. Hair is messy when first waking up, but when ready for a day at the office, it is combed and styled. A formal updo suggests a special evening event.
Messy hair when just waking up
Short hair styled for business
A formal style for a special occasion
Expressing Movement
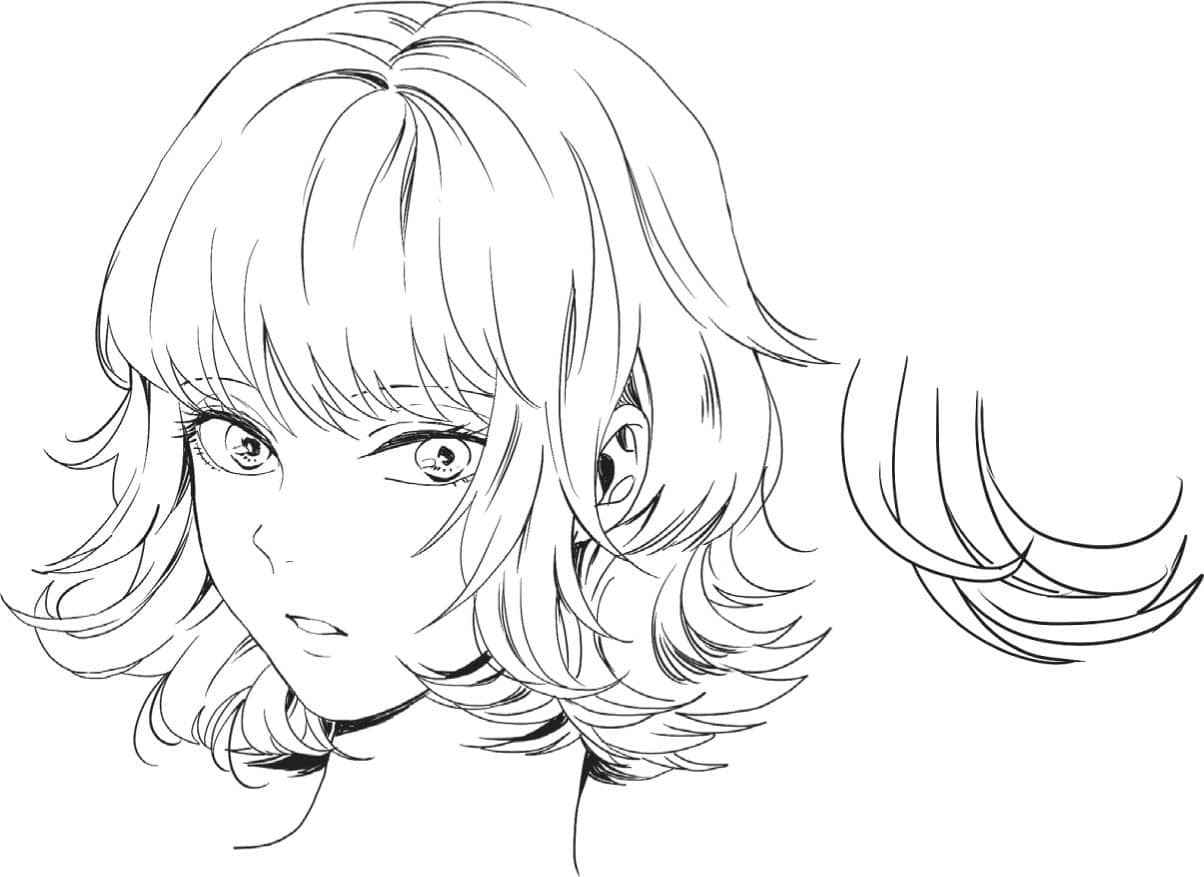
Hair moves and changes shape as it is blown by the wind or when the body moves. Hair movement is an essential element to drawing dynamic manga characters.
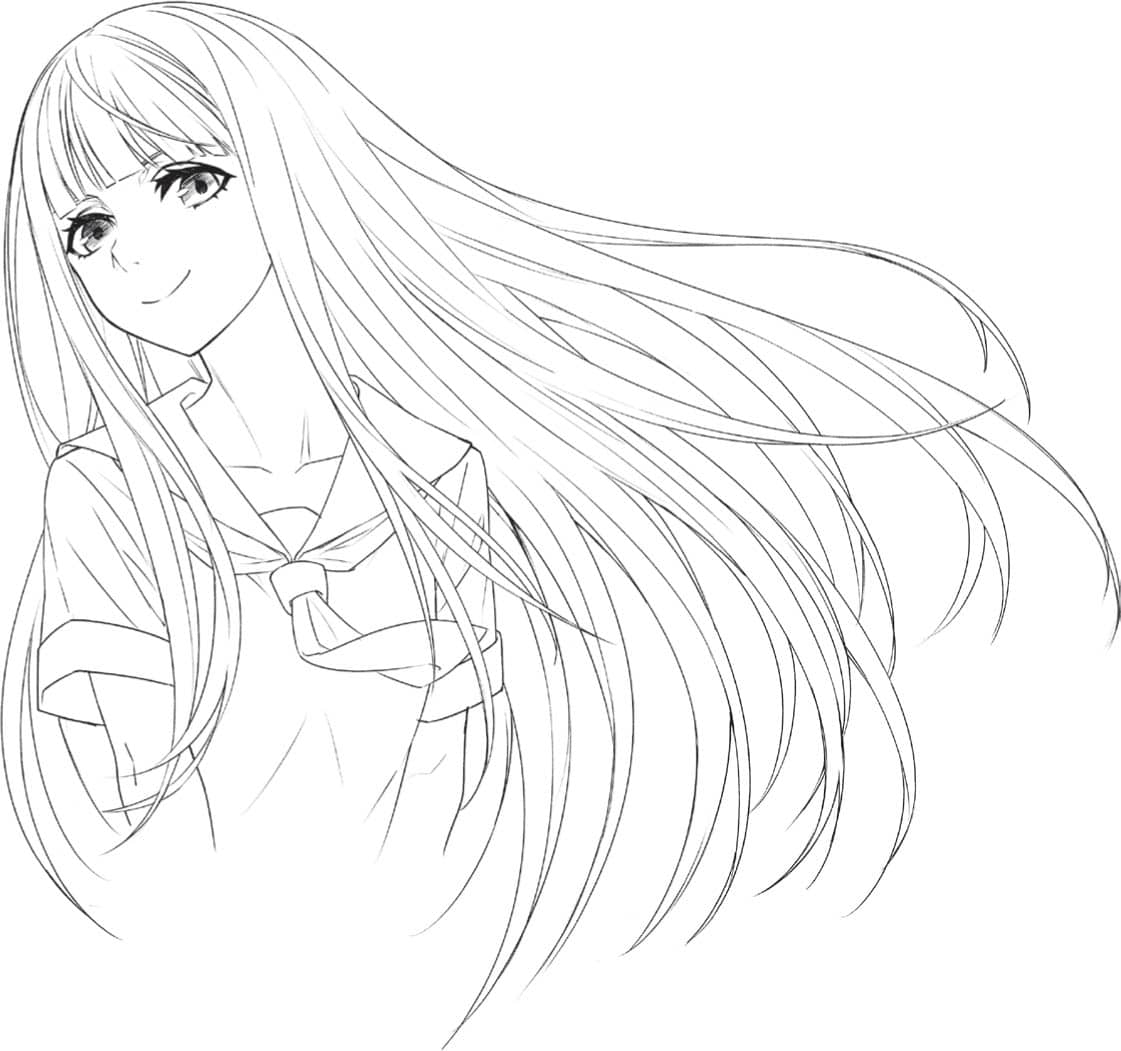
Blown by the wind

Floating in the water
Types of Hairstyles
Hair Texture
Hair textures can be broadly divided into two types: straight and curly. By combining these two, various hairstyles can be created.

STRAIGHT
Straight hair grows straight down from the root without resisting gravity.
CURLY
Curly hair grows with bends and waves from the root and appears to defy gravity.
Hair Length
Hair length is the most obvious way to classify hairstyles. They are divided into three types: short, medium, and long.
SHORT HAIR
Short hairstyles are those where the ends of the hair fall between the top of the ear and the bottom of the chin.
MEDIUM-LENGTH HAIR
Medium-length hairstyles are those from below the chin to the shoulder for women and from below the ears to around the chin for men.

LONG HAIR
Long hair reaches past the shoulders and down to the chest for women, and under the chin for men. Hair longer than this is classified as super-long for both men and women.
Understanding How Hair Grows
Sectioning Hair
Hair is roughly divided into four sections around the head: front, side, crown, and back. Each section tends to grow in its own direction. The front typically grows forward toward the face, the sides grow and flow down the side of the head, and the back grows down the back. The trickiest part is the crown of the head. This is where the sides and back come together and form a swirl. Hair that grows in a different direction from the rest is called a cowlick.
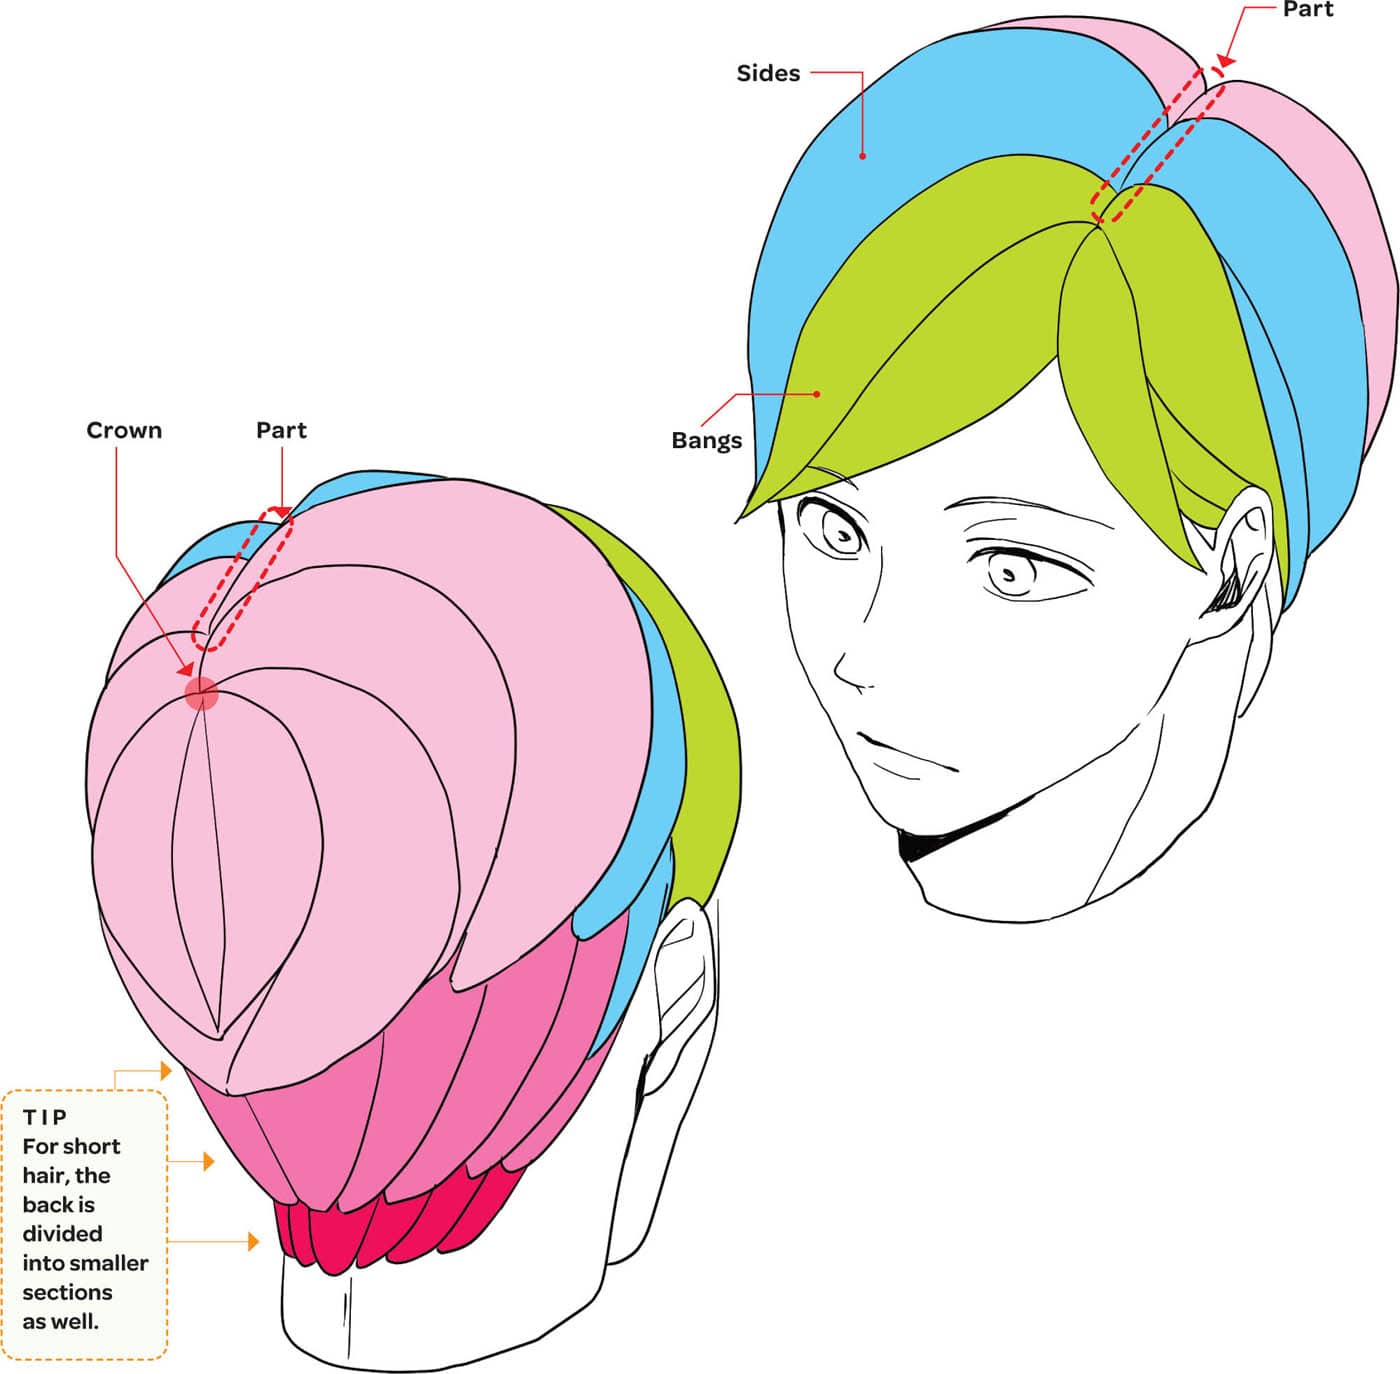
Once the hair is divided into the main sections, it is divided again into several smaller subsections. Lines should be drawn from the part or crown in the direction the hair is growing. So, from the part to the bangs, the sides, and the back.
Changing Directions
The three examples below show the same length of hair in three very different styles. What makes them different? The direction in which they were combed! When brushing or combing hair, you can change the direction from which the hair is flowing. By understanding these three styles and then learning to combine them in different ways, you can create a countless variety of looks.
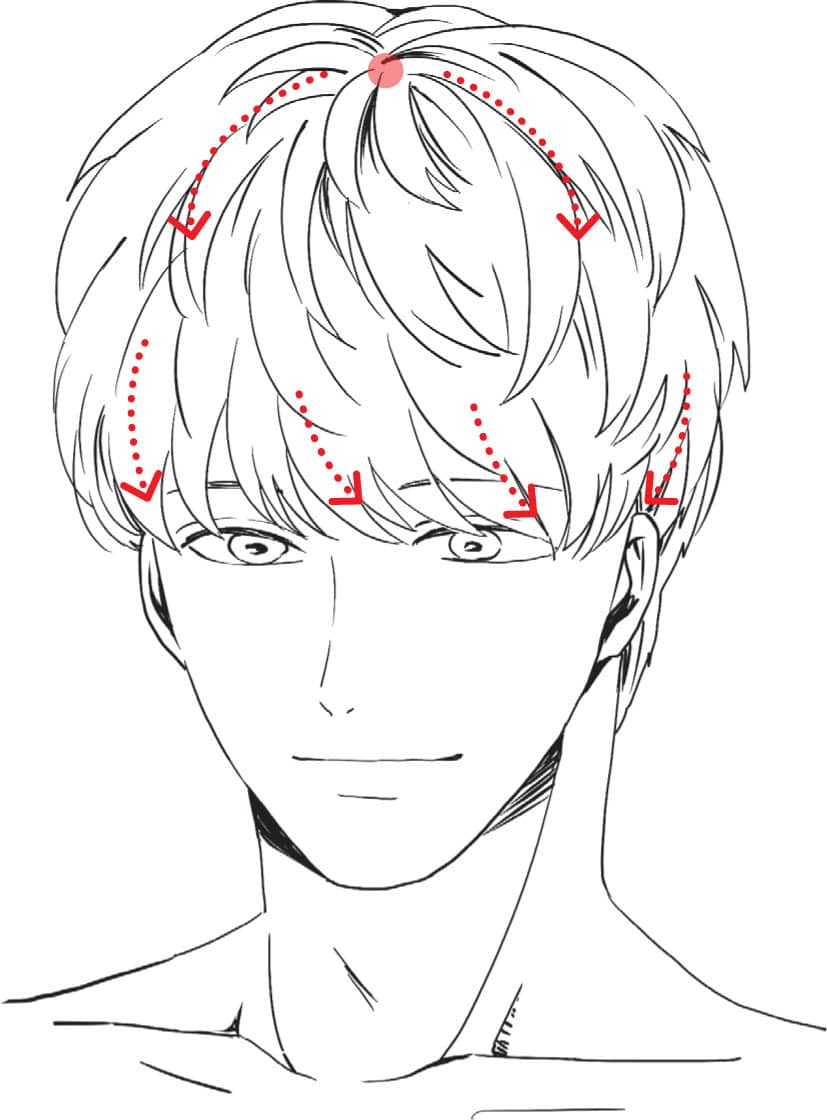
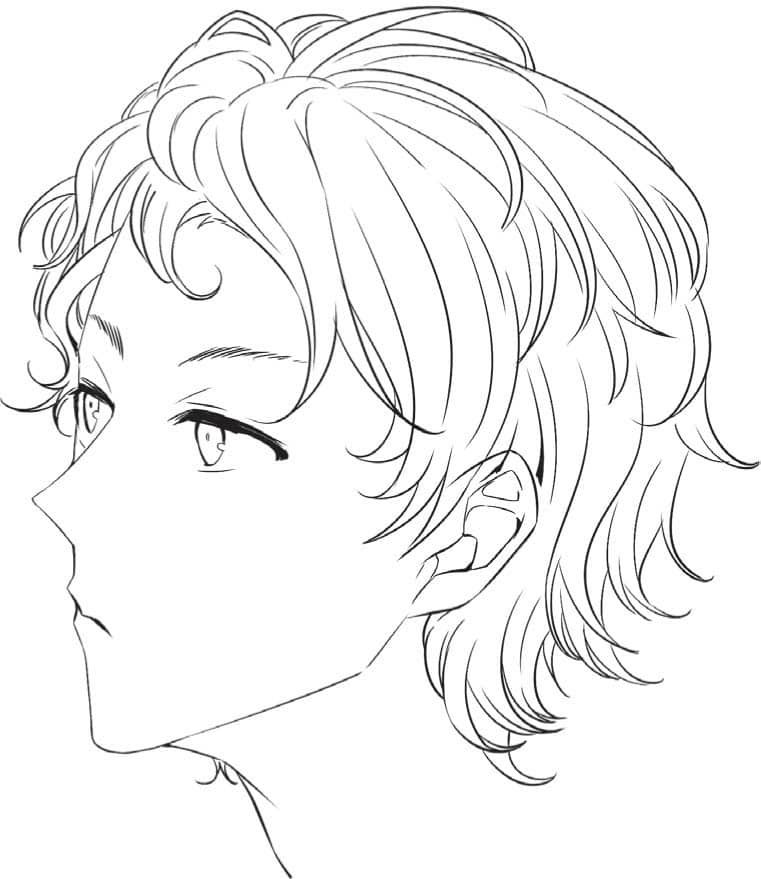
FROM THE CROWN
In this style, the hair flows from the crown on the top of the head. From the center point, the hair flows radially (in a circle) along the shape of the head. However, if you draw all the hairs from the same position as the starting point, it looks a little strange. So, you’ll need to shift the position where the hairs grow along the shape of the head.

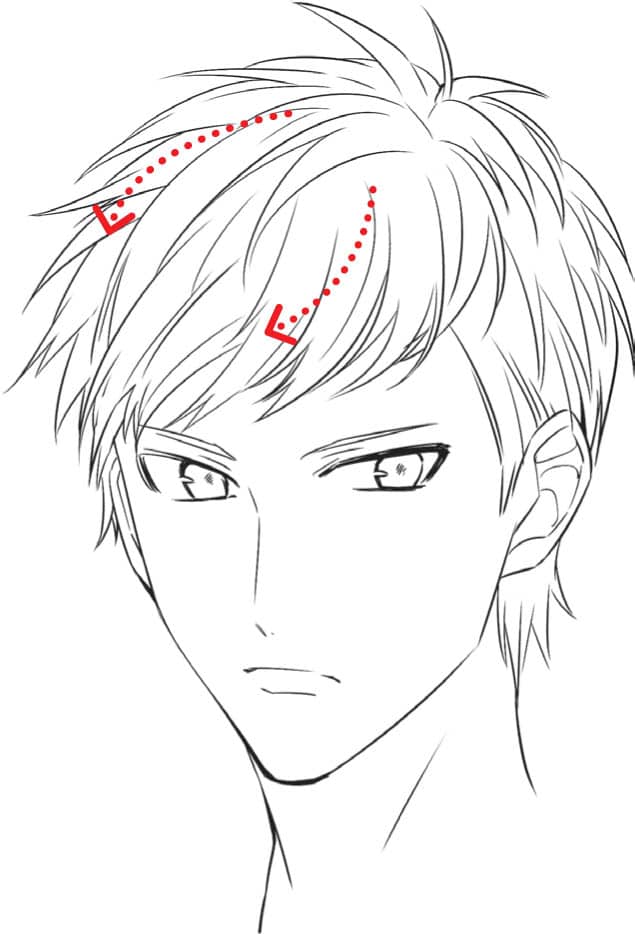
FROM THE PART
You can part a character’s hair on the left, right, or center. It’s totally up to you! Here, the part is in the center with the hair hanging more toward the face. The hairs all grow out of the part, but appear to bend and curve with the shape of the head.
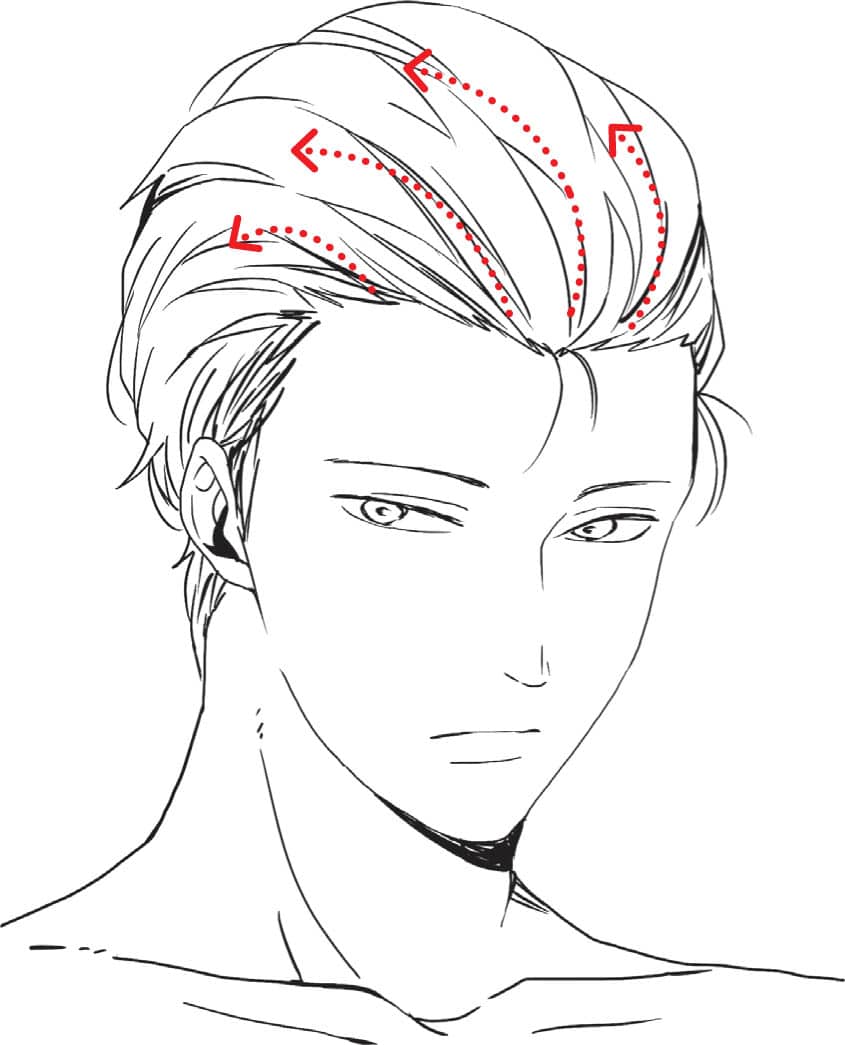
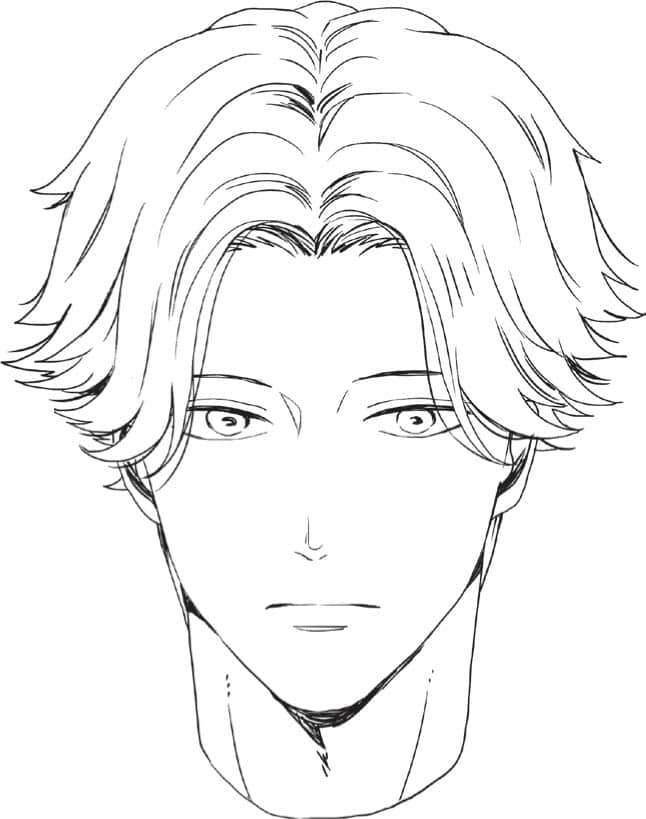
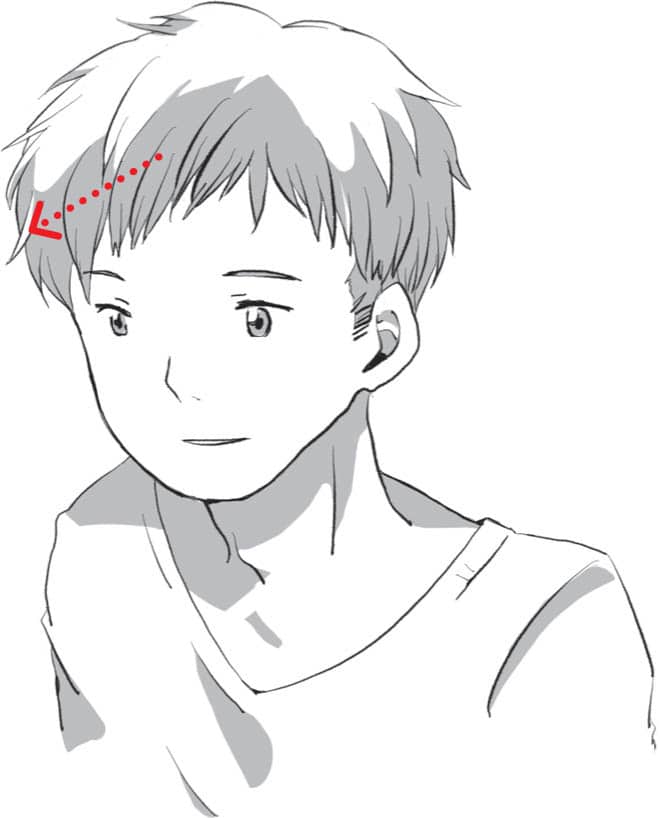
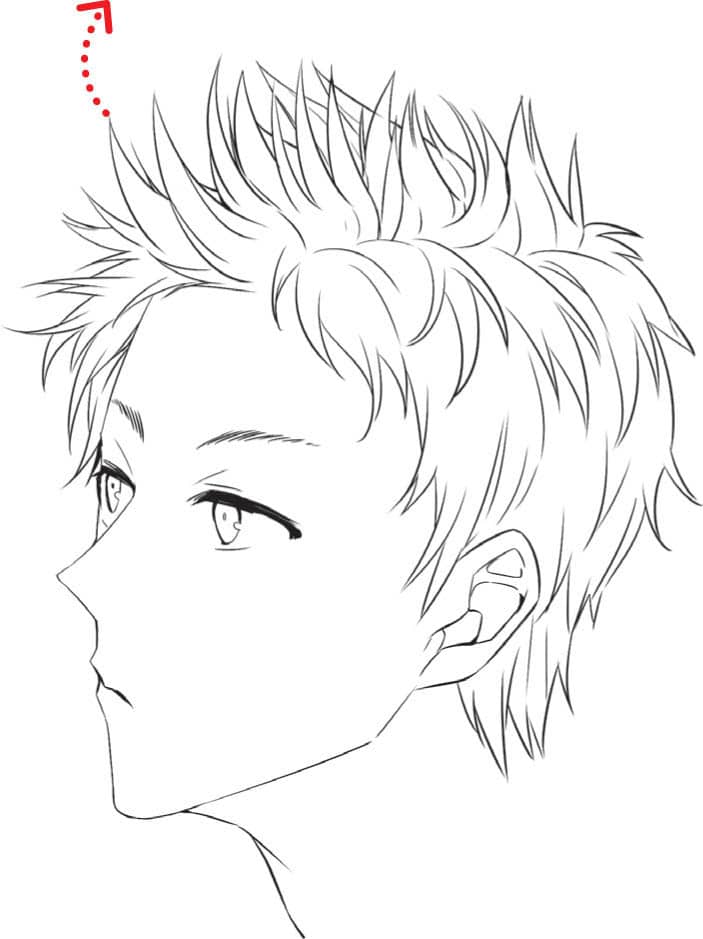
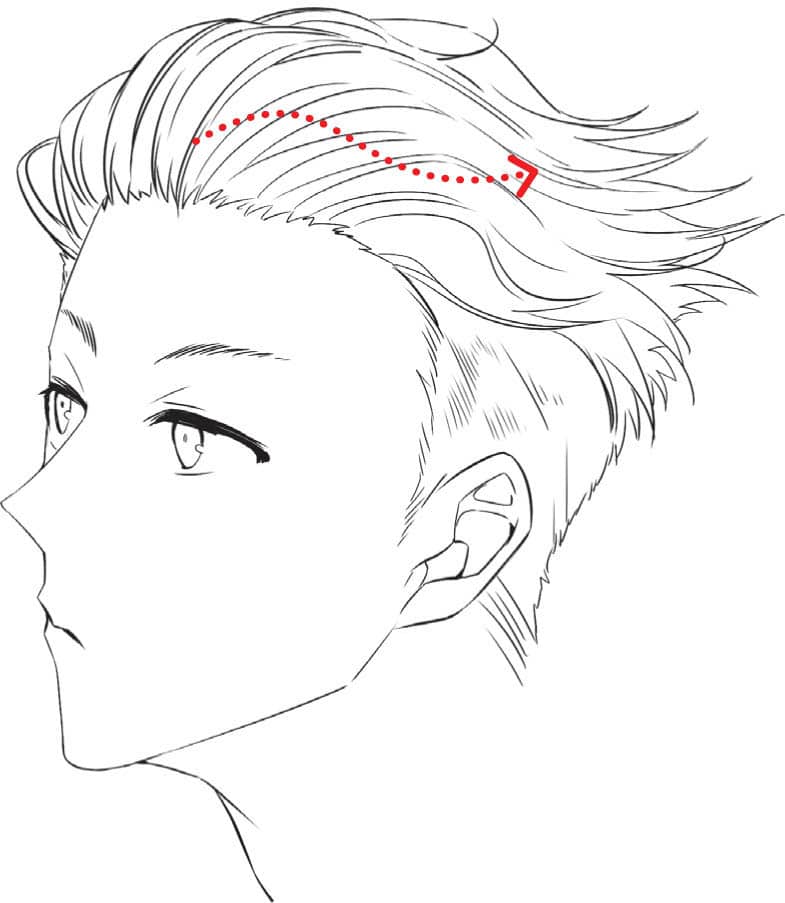
FROM THE HAIRLINE
Starting from the hairline of the forehead can create a dramatic look. In this style, the hair is drawn with a lot of height, which makes it appear to have volume. To achieve a combed back look, the hair would be drawn tight against the scalp.
Basic Steps to Drawing Hair
Medium-Length, Straight Hair—Front View

Draw the outline of the head while paying attention to the roundness of the head. Add a guideline marking the center of the head from back to front. This guideline will become the part.

While continuing to pay attention to the roundness of the forehead, draw the bangs radially from the hairline.

Add hair to either side of the face from the part at the top center of the head. Curve the hair that flows from the top of the head to the sides following the shape of the head.
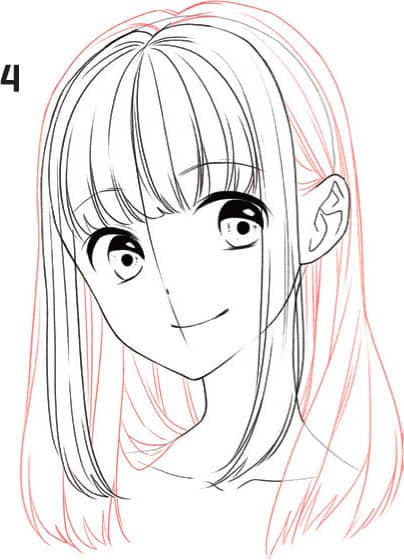
Draw the back of the hair while paying attention to how the hair hangs down on the shoulders, the flow of hair behind the ears, the hair that comes to the front of the shoulders, and the ends of the hair.

Add thin bundles of hair to the sides and back. These stray sections of hair add to the realism of the character.

FINISHED
The finished medium-length, straight hairstyle.
Medium-Length, Straight Hair—Back View
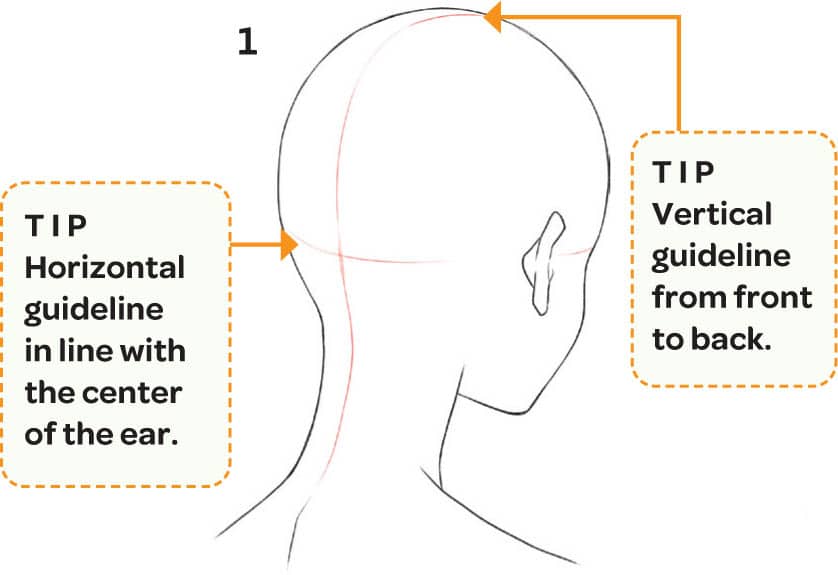
Draw an outline of the head. Add guidelines for the center of the head, dividing the head from front to back and from right to left.

You can’t see the front hairline of the bangs when viewed from behind, but for this style, they end at the middle of the ear. Using the horizontal guidelines as the end point, add the bangs.
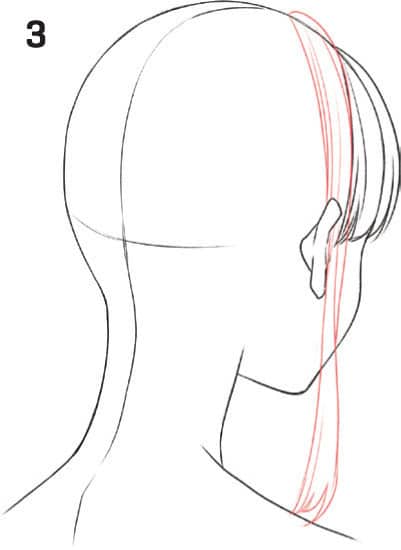
Draw the side hair section in front of the ears in the same way as the bangs. Draw the hair from the top of the head to the ends following the shape of the head.

Draw the back section of hair from the center part and the crown. The hair should follow the shape of the head.
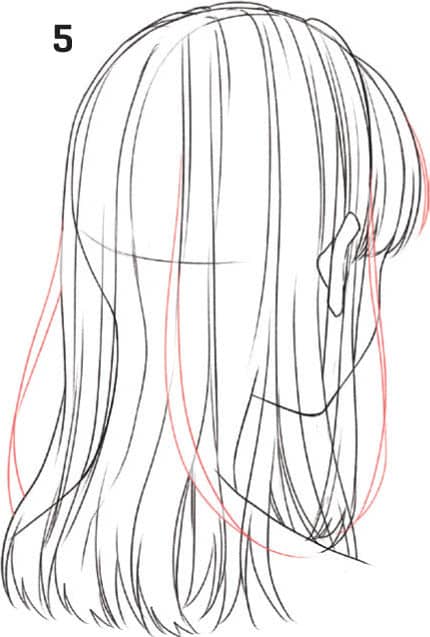
Add a few separated bundles of hair to the bangs, sides, and back hair to give a three-dimensional and natural look.
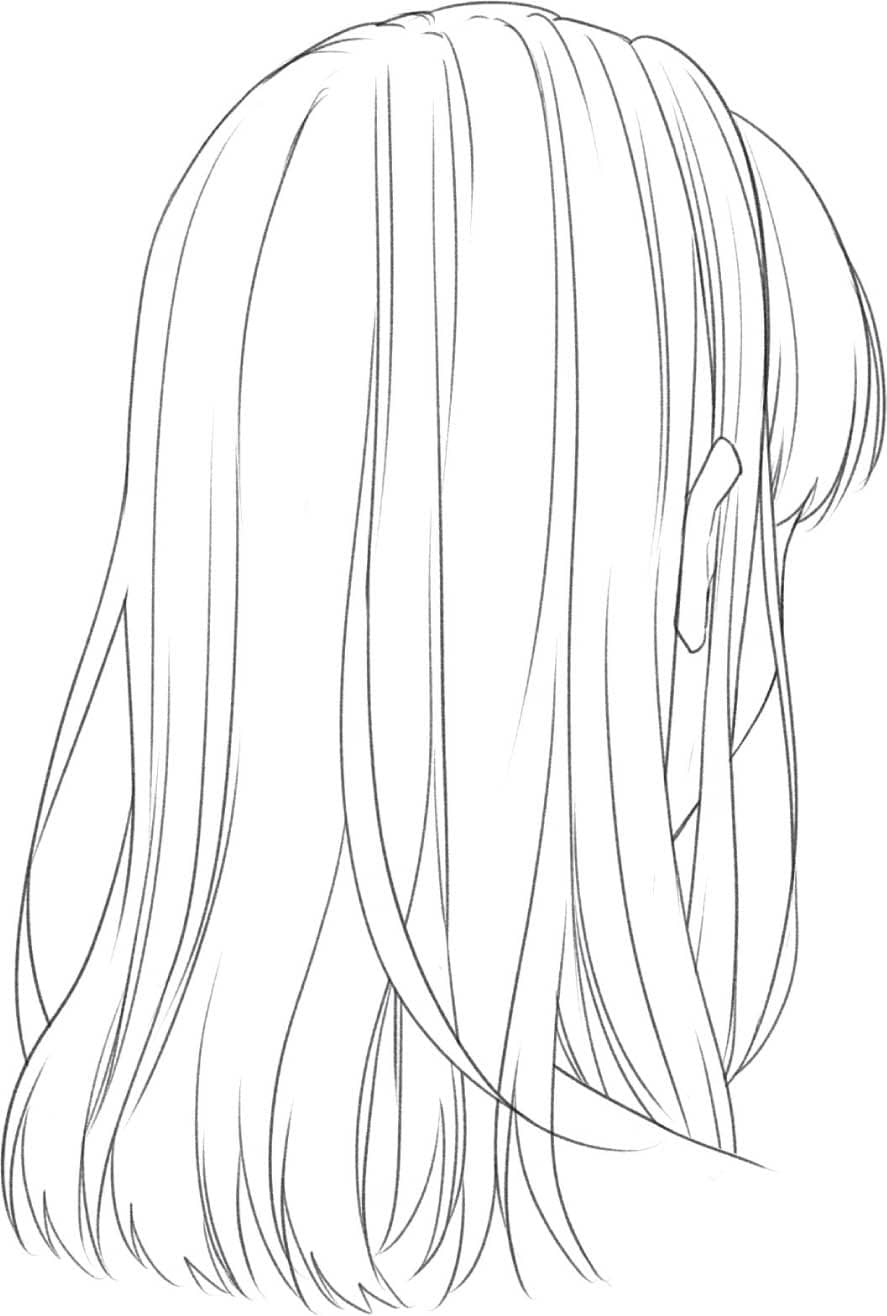
FINISHED
Erase the lines where the main hair and separated bundles overlap. Finish the bangs and side hair in the same way.
Short, Wavy Hair—Front View

Draw the outline of the head, adding a guideline for the front hairline from the forehead to the top of the ears.

Draw the bangs across the front hairline of the forehead.

Draw the outline of the hair that wraps the entire head. Be aware of the hair’s volume that spreads outward from the line of the head. You don’t want to have too much hair.
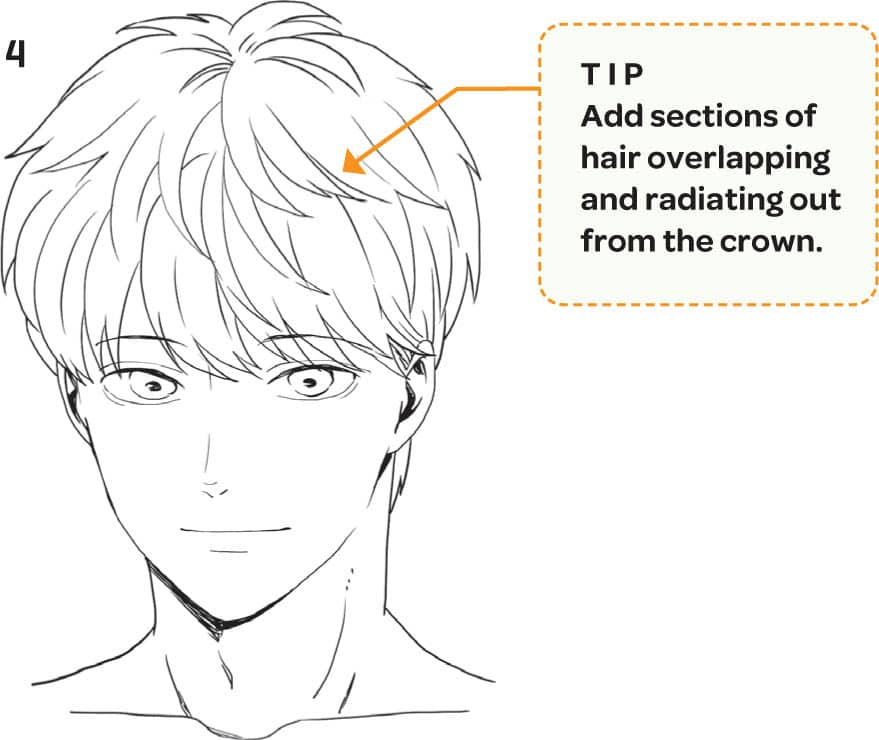
Draw a whorl of hair from the crown on the top of the head. Add smaller sections of hair, keeping in mind that the short hair sections overlap.
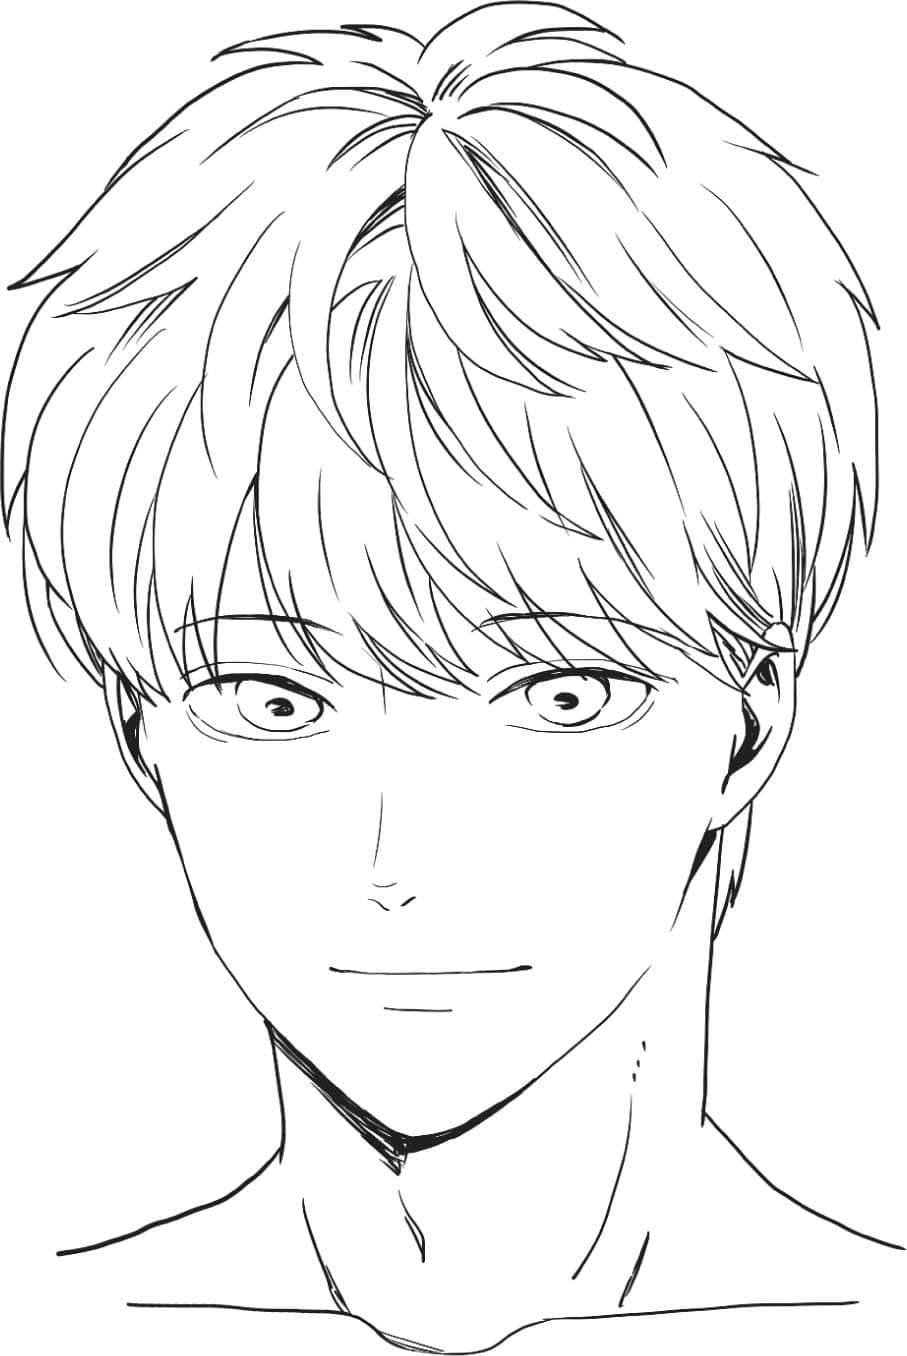
FINISHED
Add finer single strands of hair throughout the larger sections. Add them lightly while checking for balance. It will look unnatural if you draw too many of them.
Short, Wavy Hair—Back View

Draw the outline of the back of the head and add guidelines from front to back and side to side. The guidelines should cross at the crown of the head.

Draw a whorl of hair roughly centered on the crown of the head.
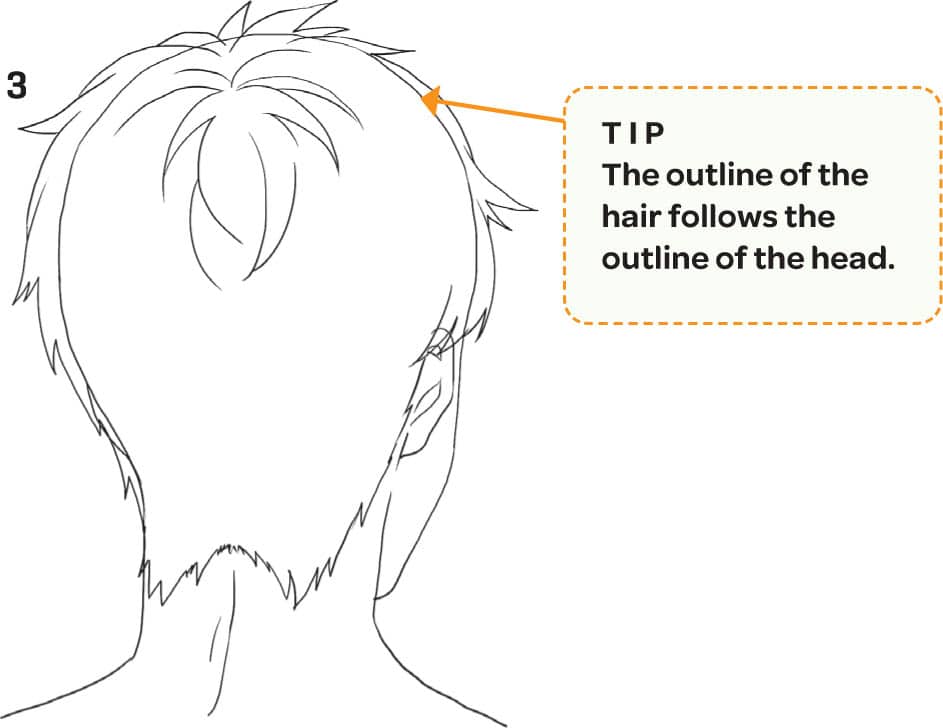
Following the outline of the head, draw the outline of the hair covering the head. As with the front, be careful not to make your head look too big.
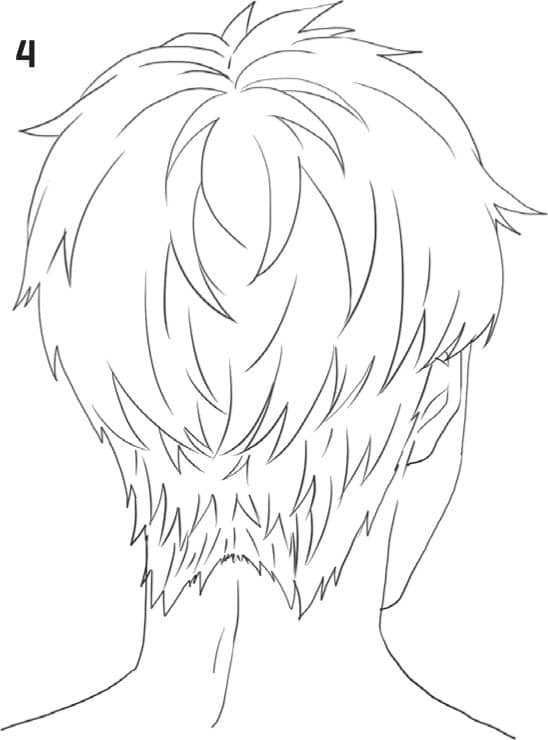
Starting from the crown, draw the hair over the entire back of the head. The hair below the ear line and around the nape is shorter than the top and sides.
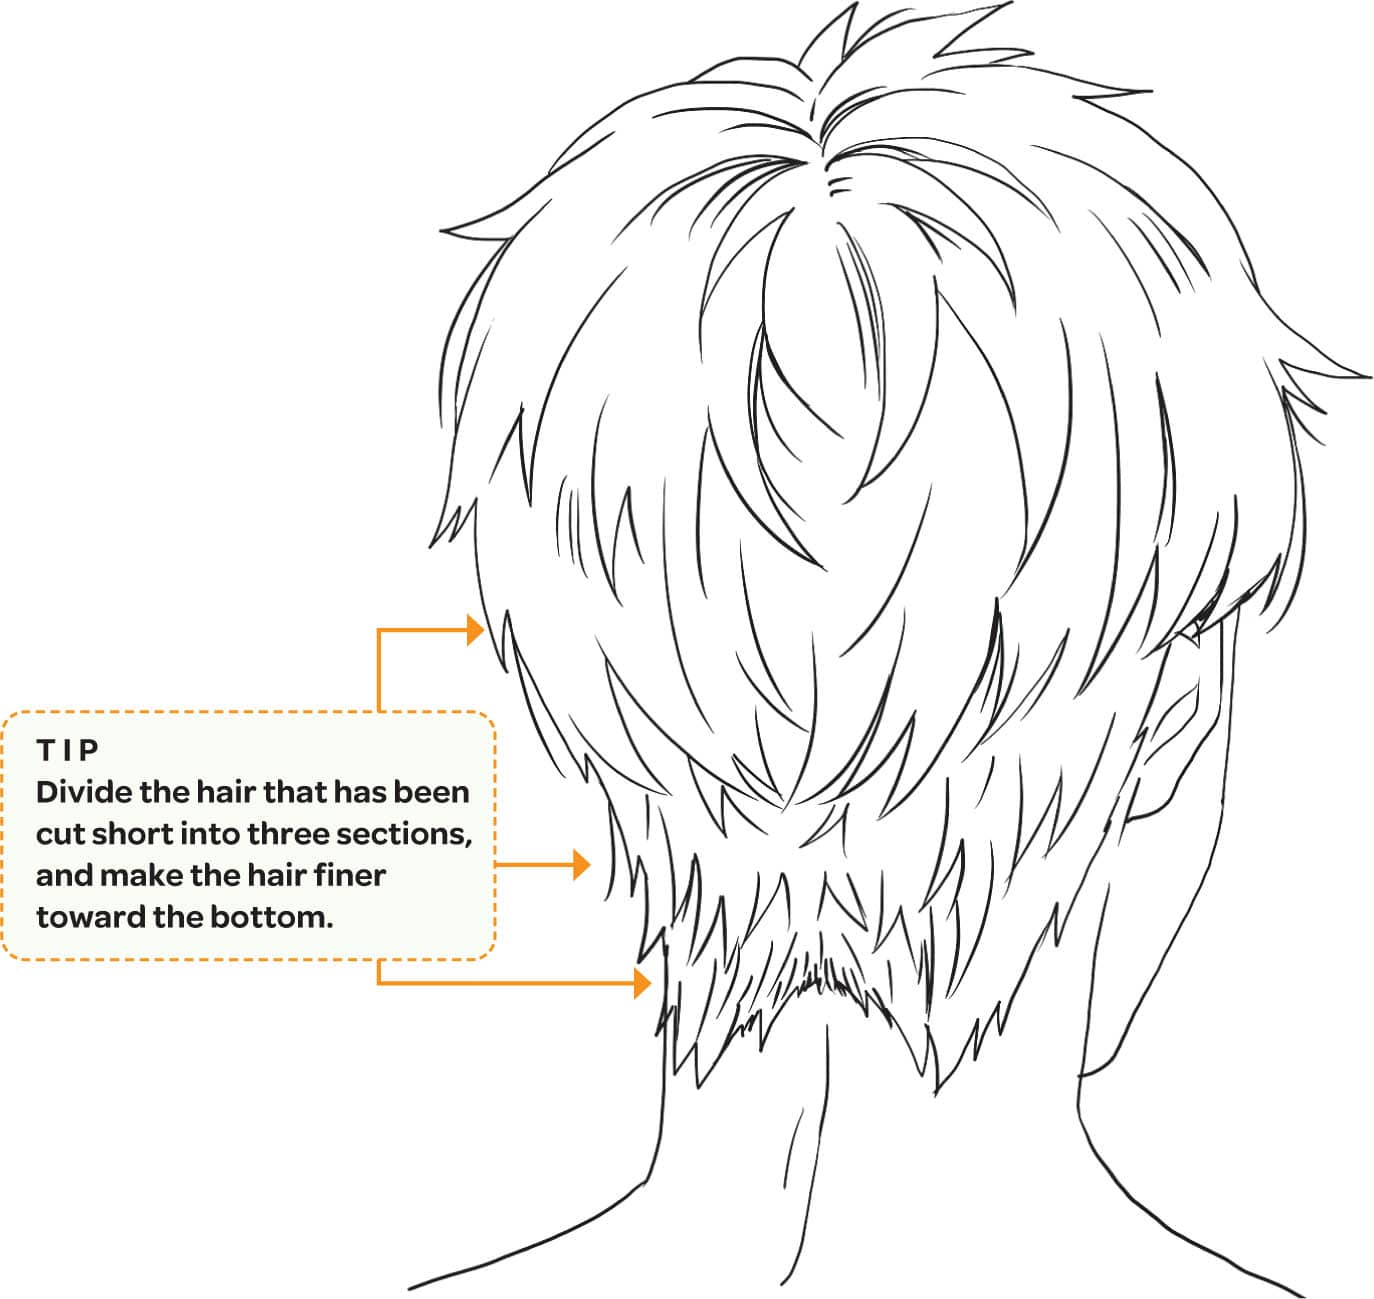
FINISHED
Add finer hair lines throughout the sections of hair in the same way as the front view. And, as with the front view, check the balance being careful not add too many.
Beyond the Basics

GENTLE BENDS
Gentle bends at the ends of straight hairstyles are the easiest to draw and achieve a simple, natural look.
BOUNCY WAVES
Adding pronounced curves at the end of wavy hair suggests light, bouncy hair that defies gravity. The ends overlap and change direction.

BLUNT BUNDLES
Straight hair hangs down without resisting gravity. The ends of a blunt cut are straight across the bottom, even when the hair twists and moves.
TIGHT CURLS
For coils in curly hair with tightly wound hair bundles, draw the hair sections so that they become thinner and stronger toward the ends of the hair.
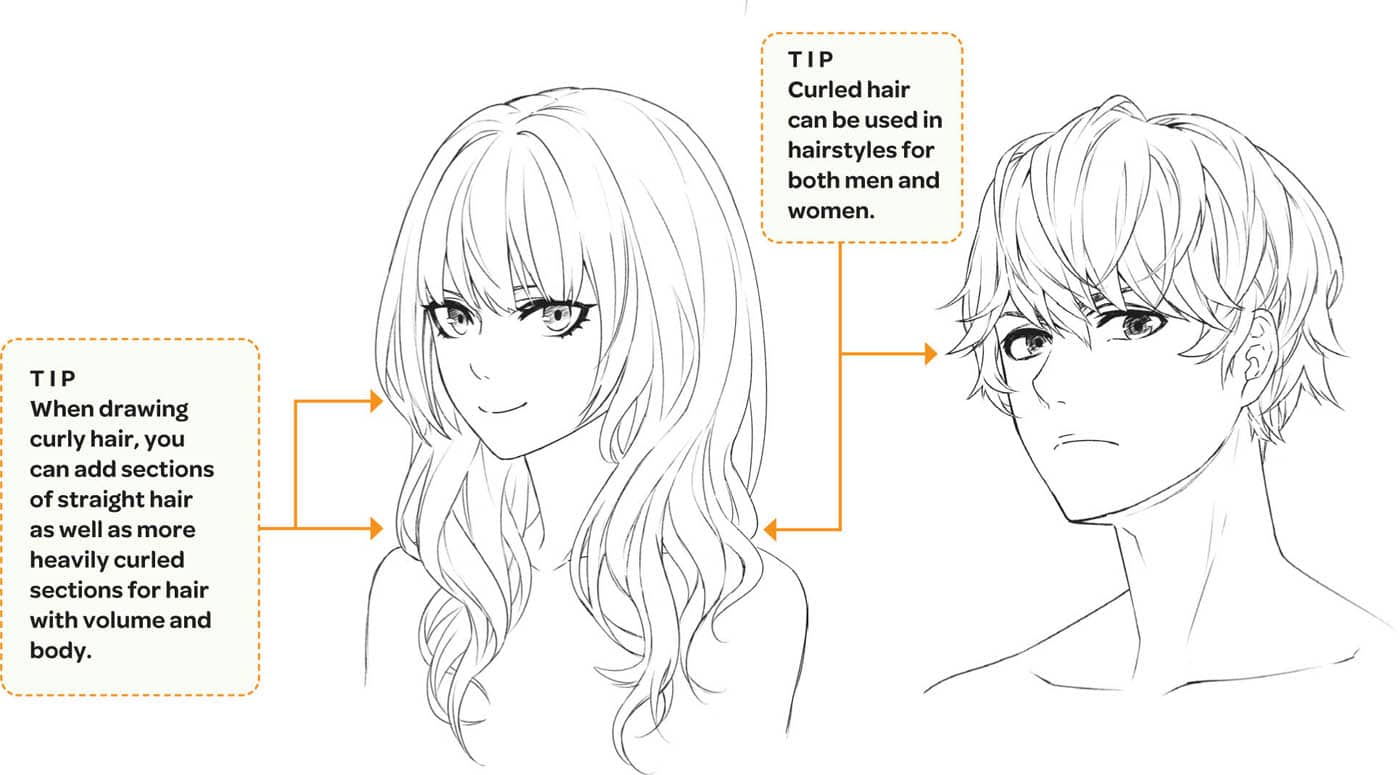
WAVY HAIR
For loose, wavy hair, draw large sections of hair that have exaggerated S-curves and bends.

SPIKY HAIR
Spiky hair, which is often seen in shōnen (boy’s) manga, has the look of hard, sharp needles, with the tips of the hair extending toward the outside of the head.
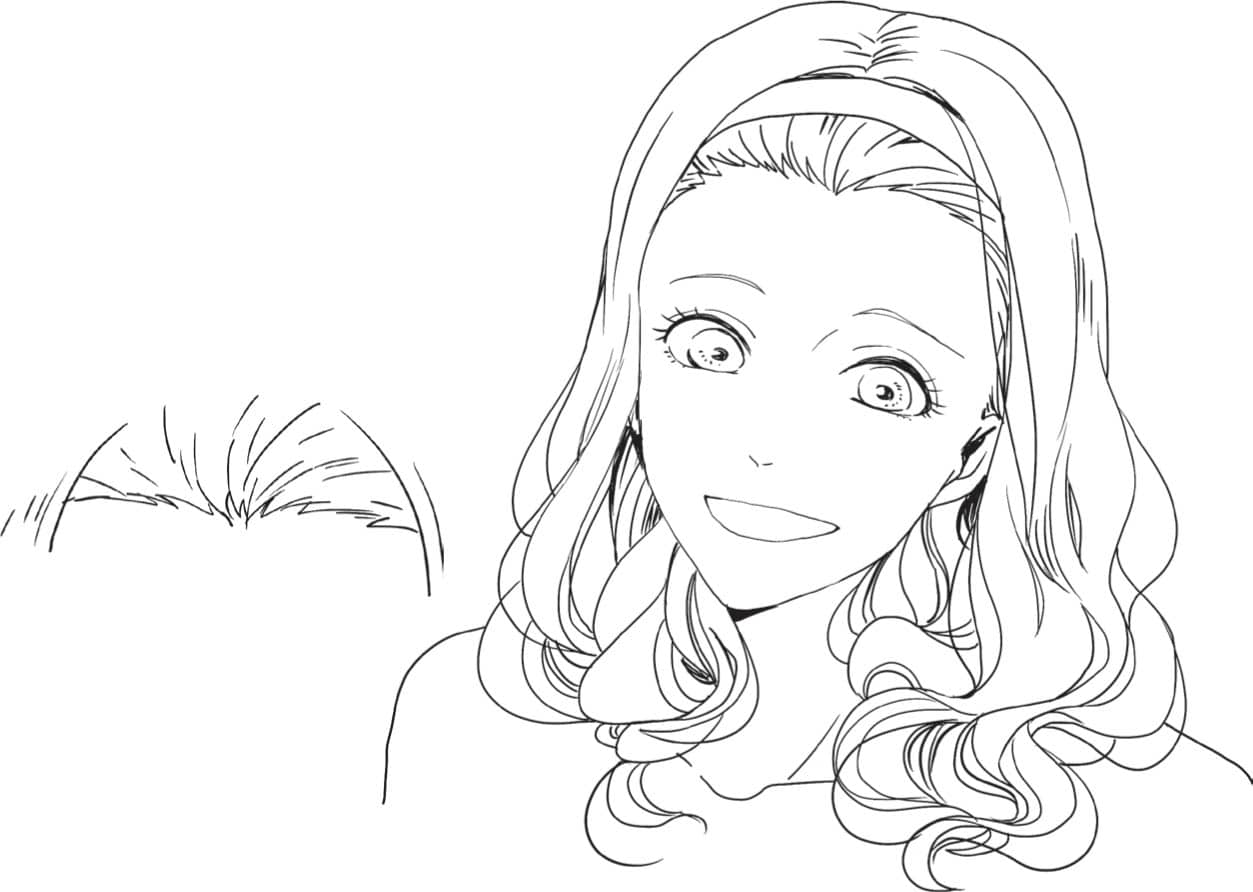
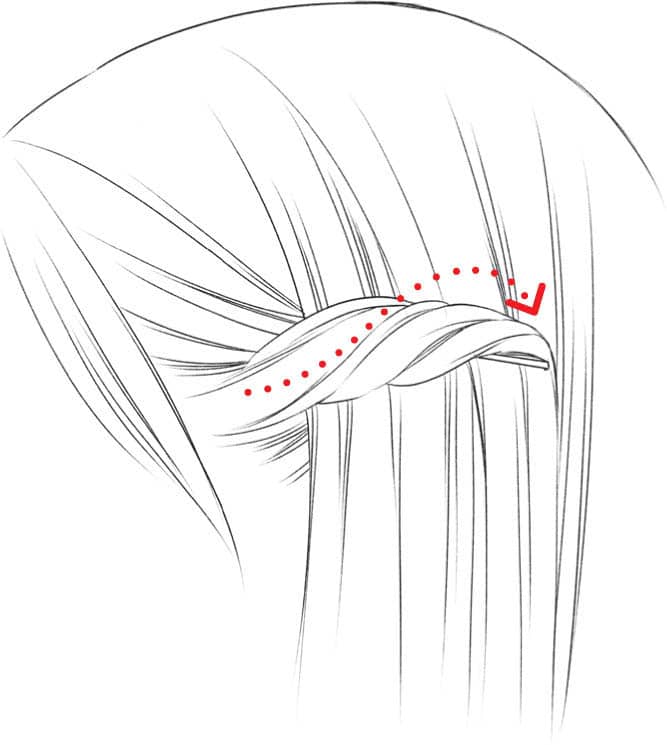
HEADBANDS
Hair grows radially from the center of the hairline to the left and right. When drawing a character with their hair pulled back with a headband, the hairline is drawn with a zigzag line.
Adding Shadows to Manga Hair
Long Hair—Front View
The main places where shadows are formed on long hair are the bangs, the underside of the back hair, the overlapping parts of the hair, and the ends. The shadow on the underside of the back hair is the most important in the front view.
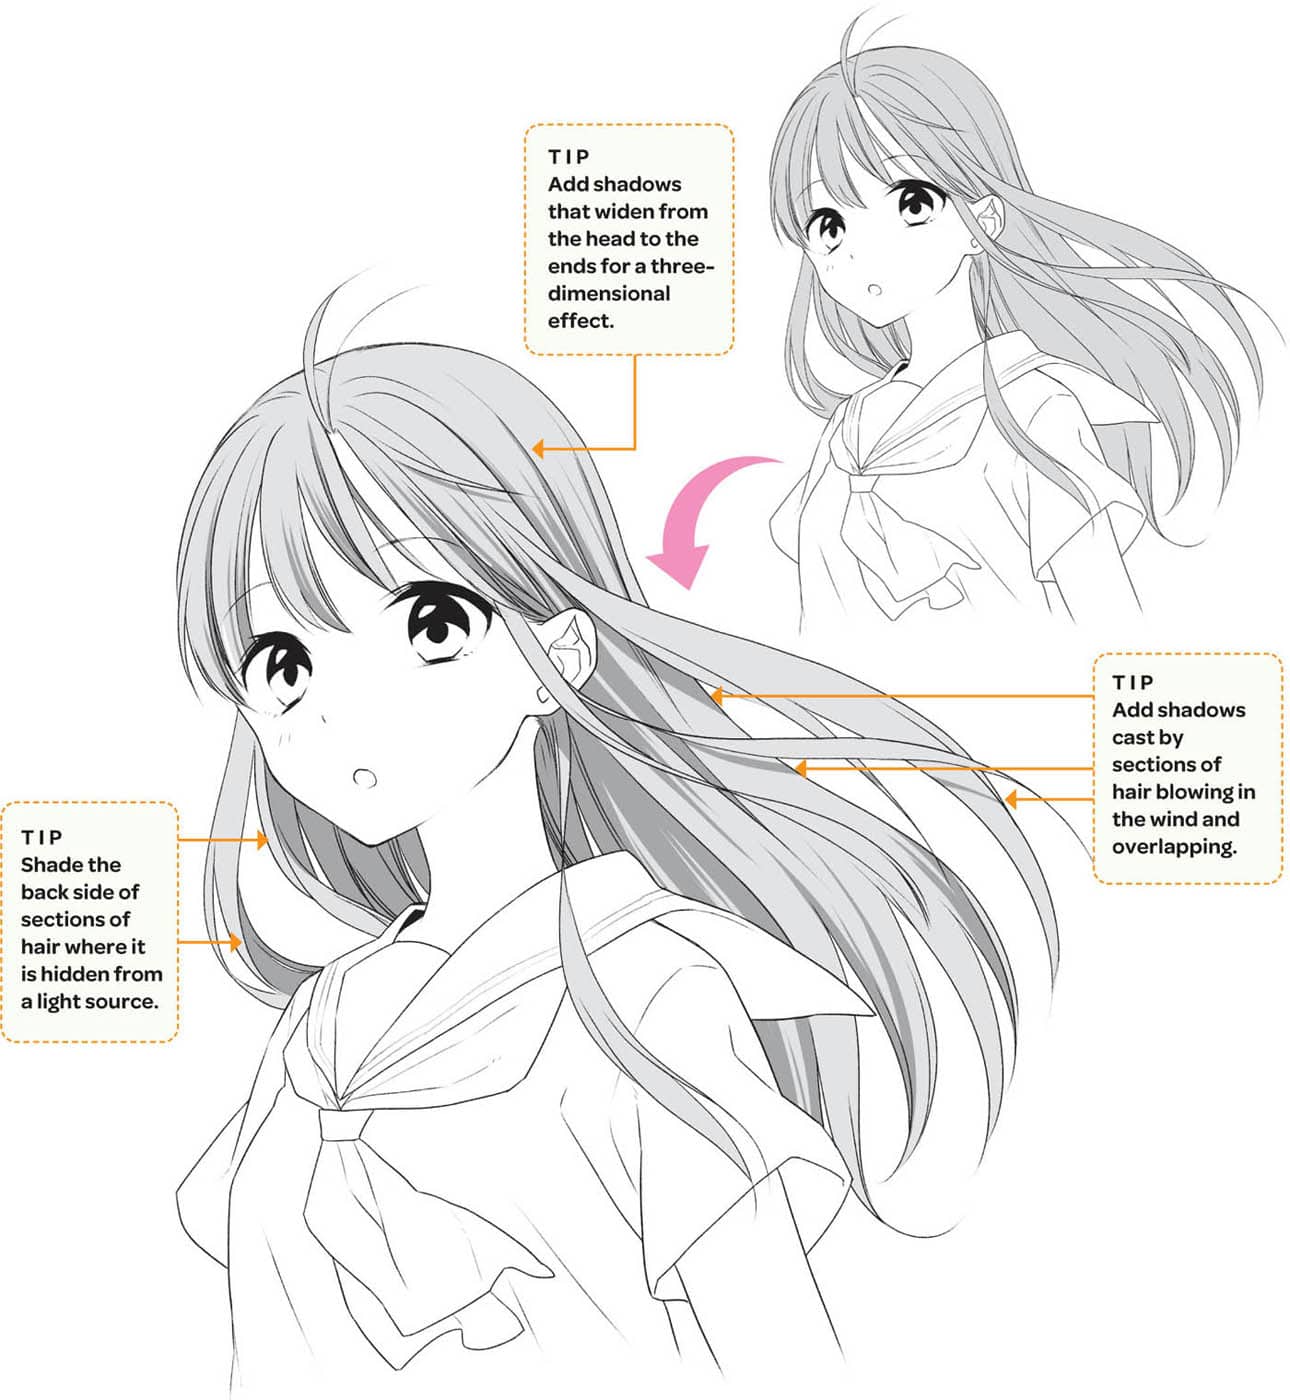
Add shadows that follow the shape of the various sections of hair throughout the hairstyle. There are fewer shadows where the hair is close to the head and more as the hair extends down.
Long Hair—Back View
When viewing a hairstyle from the back, there are shadows on the parts that are braided or uniquely styled, the back side of the curled hair sections, and areas where hair is overlapping.
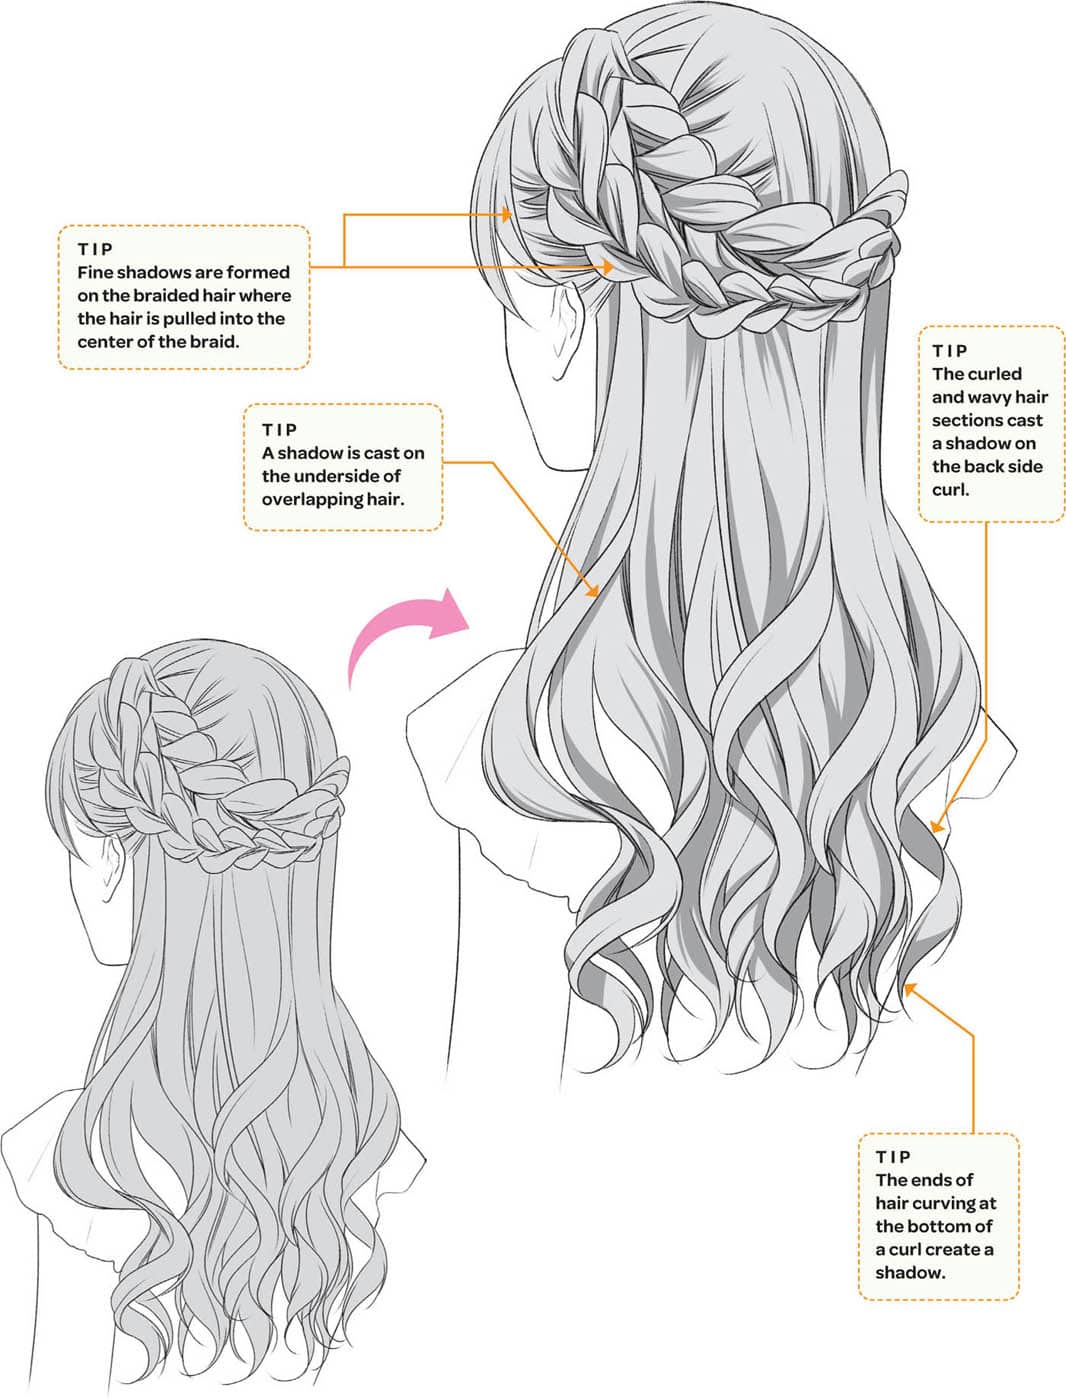
Since the ends of the hair are wavy, the front and back positions of the hair sections are made three-dimensional when shadows are added.
Short Hair—Front View
Short hairstyles work well in scenes with dramatic lighting. For this example, imagine that the top of the head is exposed to strong light, and draw shadows only where sections of hair overlap. The strong contrast of light and dark sections produces an interesting three-dimensional effect.

It’s easy to overdo it with intense shadows and lighting. Be sure to check your work often to keep it balanced.
Short Hair—Back View
Unique hairstyles like the one shown here are even more interesting when viewed from the back. Again, exaggerated lighting has been used and the results are surprisingly easy to achieve.
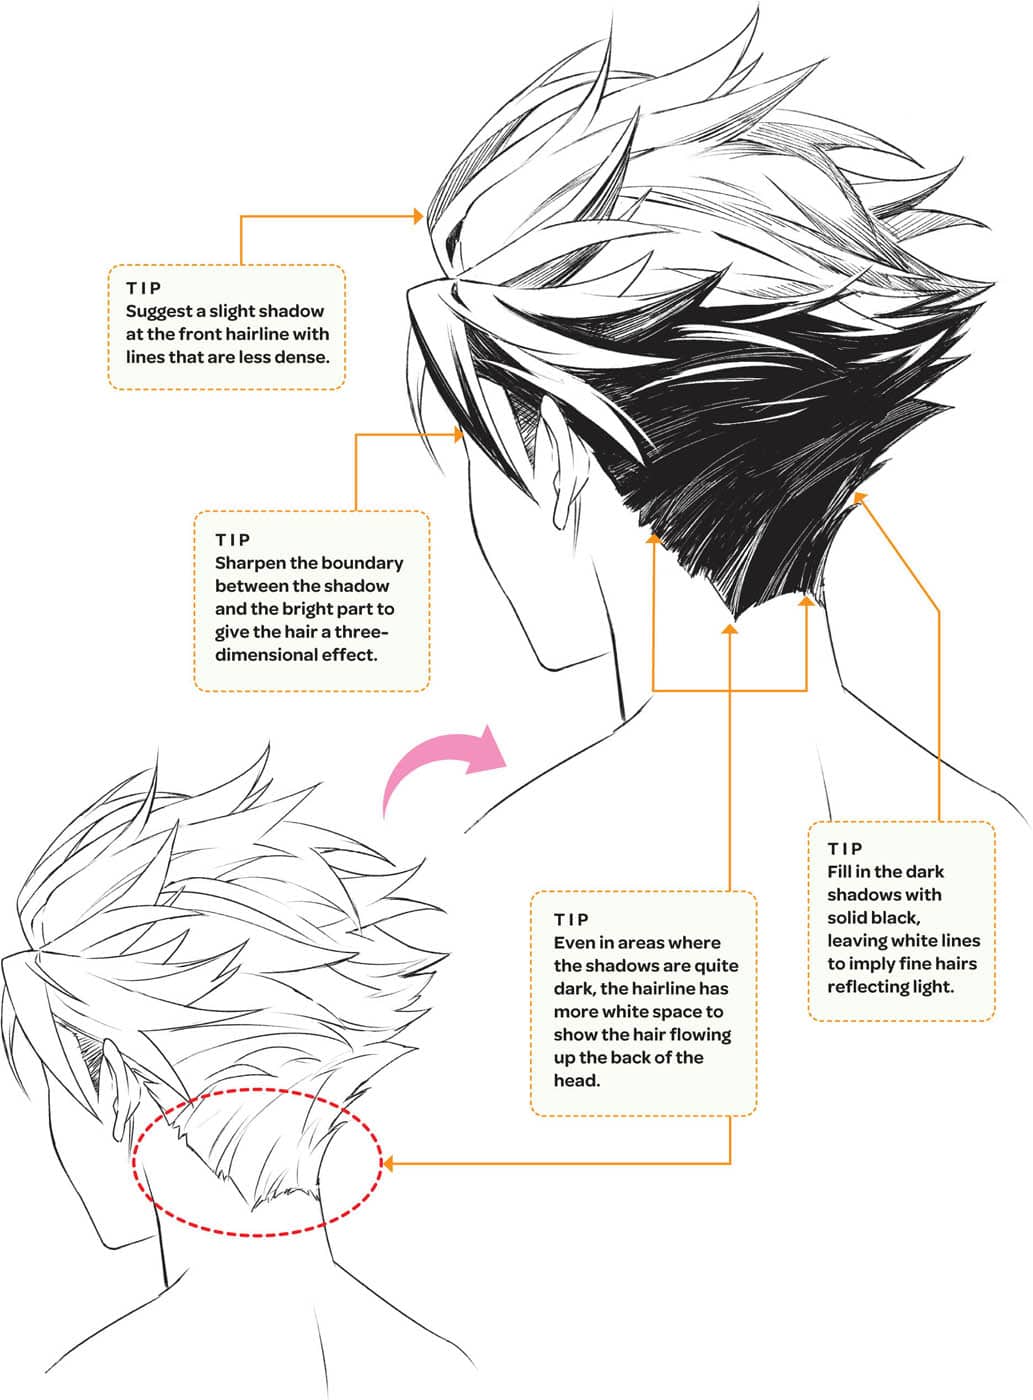
By adding shadows with lines instead of solids, a gap is created between the lines that shows the direction in which the hair is flowing.
Traditional Female Hairstyles
Bangs
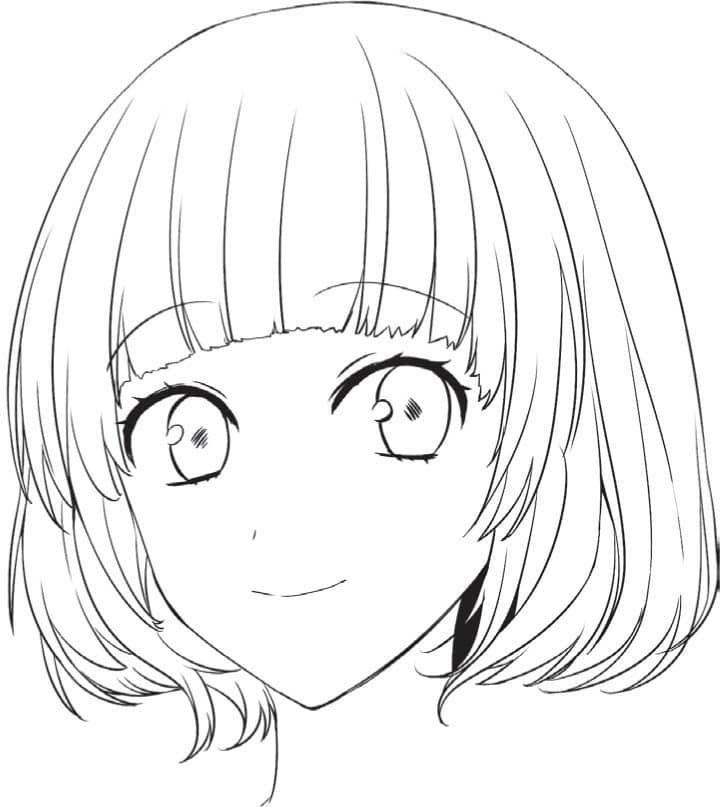
STRAIGHT, FULL BANGS
These bangs are trimmed at the same length across the forehead. This look completely hides the forehead.
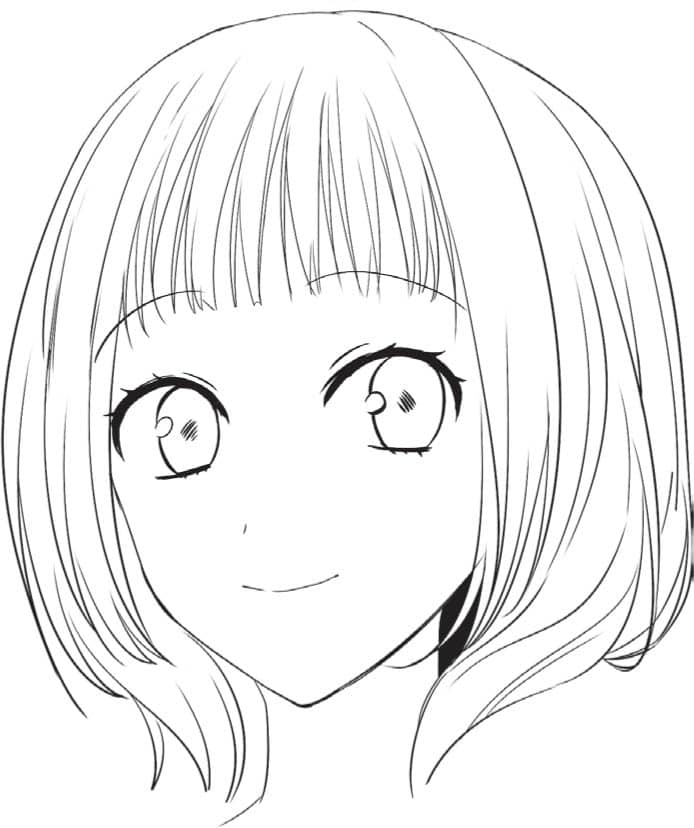
STRAIGHT, THIN BANGS
Thinner sections of bangs allow the forehead to show through. The overall look is lighter and less dense.

SIDESWEPT BANGS
With the bangs divided and flowing diagonally to one side, the forehead shows through. This style can be thick or thin.
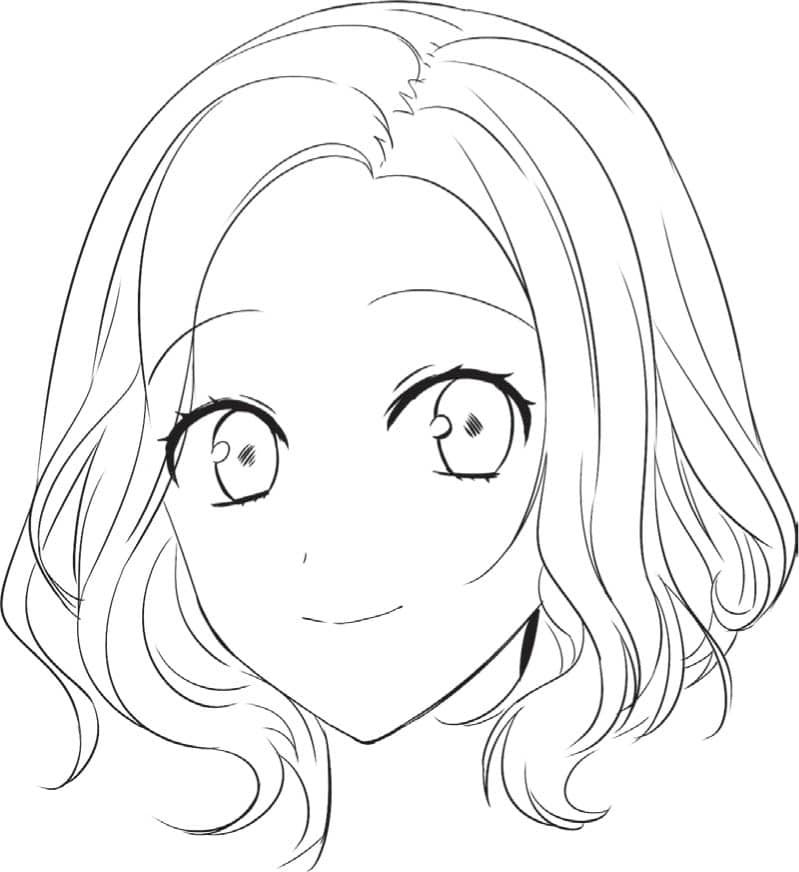
NO BANGS
Without bangs, the hair is parted and flows down around both sides of the face.
LONG HAIR, FULL BANGS
When drawing thick bangs, be sure the rest of the hair balances. The back and sides should be as full and thick.

LONG HAIR, THIN BANGS
How far back on the head you take bangs will impact where the sides of the hair fall. In this look, the bangs are deep-set and the sides start at the ears.
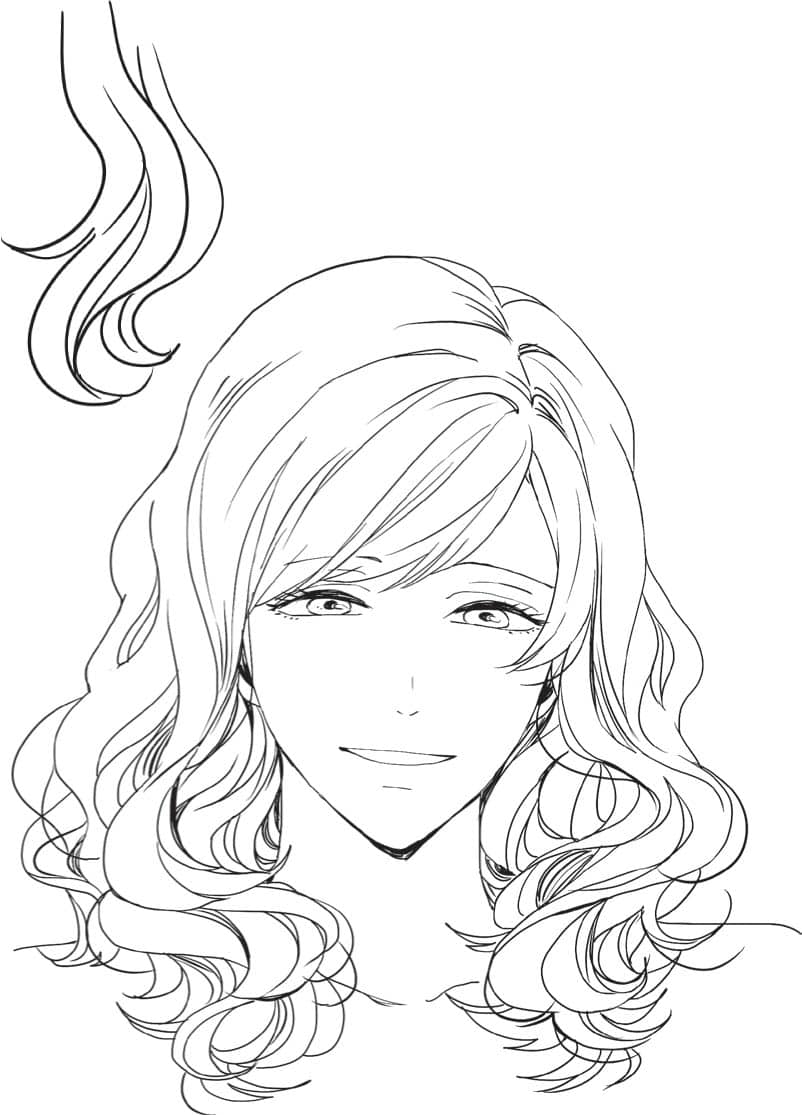
DIAGONAL BANGS, INWARD CURLED HAIR
With a cute facial expression, you’ll want to add a hairstyle that’s just as adorable. Here, the hair has been curled toward the face at the ends, the side section tucked behind the ear, and the bangs are swept to one side.
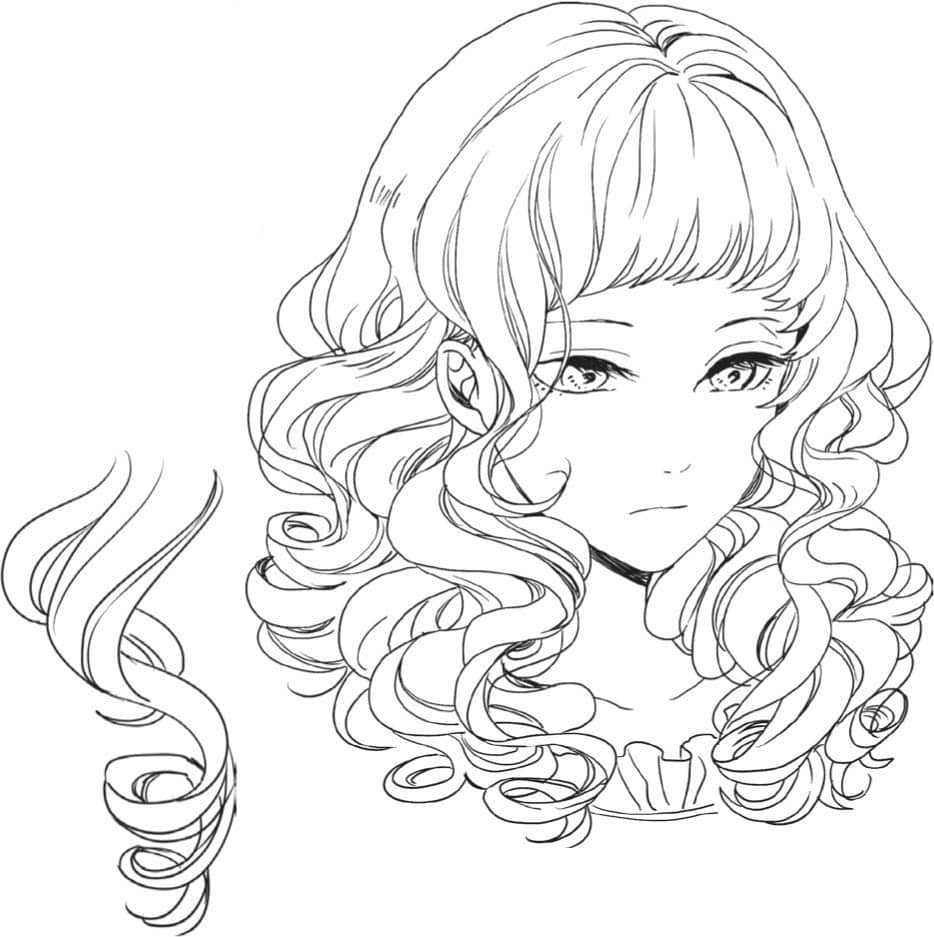
LONG, CURLY HAIR, NO BANGS
Bangs and curly hair are a challenge. The shorter the hair, the more it wants to curl up tight. For this curly style, the hair is swept back with no bangs.
Hair Accessories
HAIRPINS
Hairpins and bobby pins are used to hold hair in place without being seen.
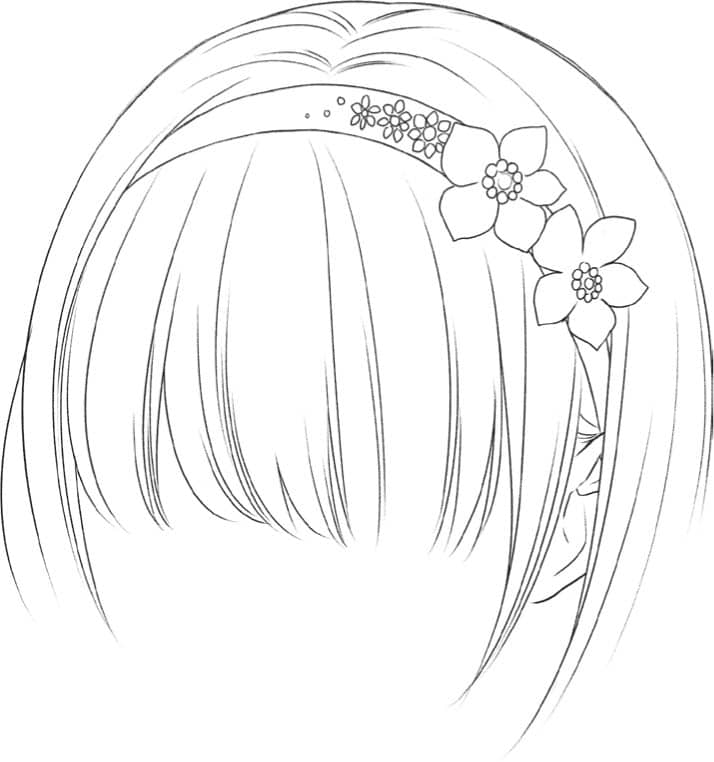
HEADBAND
Centered on the top of the head, headbands are used to hold back the hair and can be used as a decorative accessory. The ends of the headband tuck behind the ears.
LONG HAIR STICK
Long hair sticks are used to add whimsy to buns and other updos. They’re a visible version of a hairpin.

HAIR CLIP
Hair brought from both sides to the back is held in place with a hair clip.

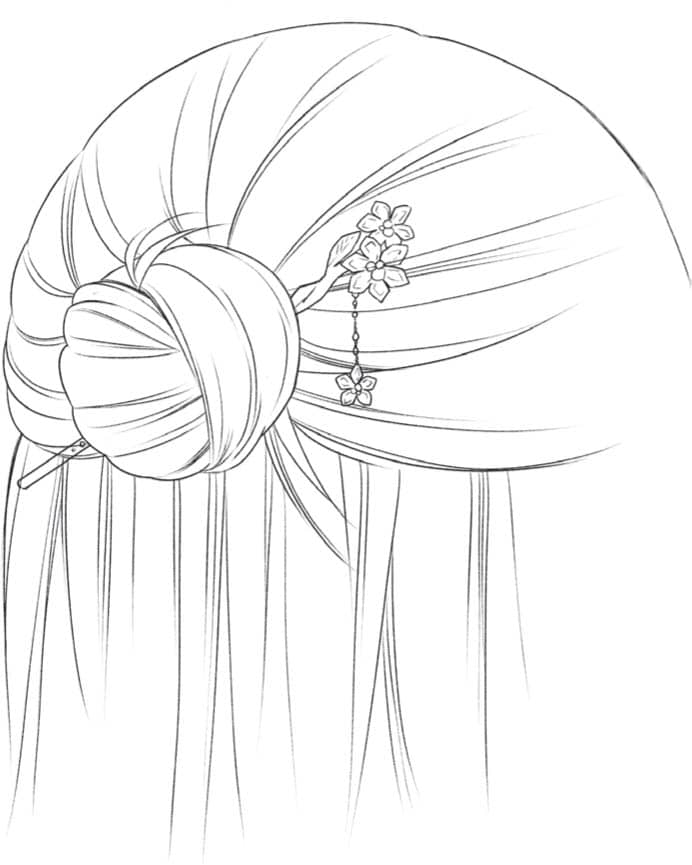
COMB
Decorative combs are used to hold twisted hairstyles in place. The hair all flows toward the comb.
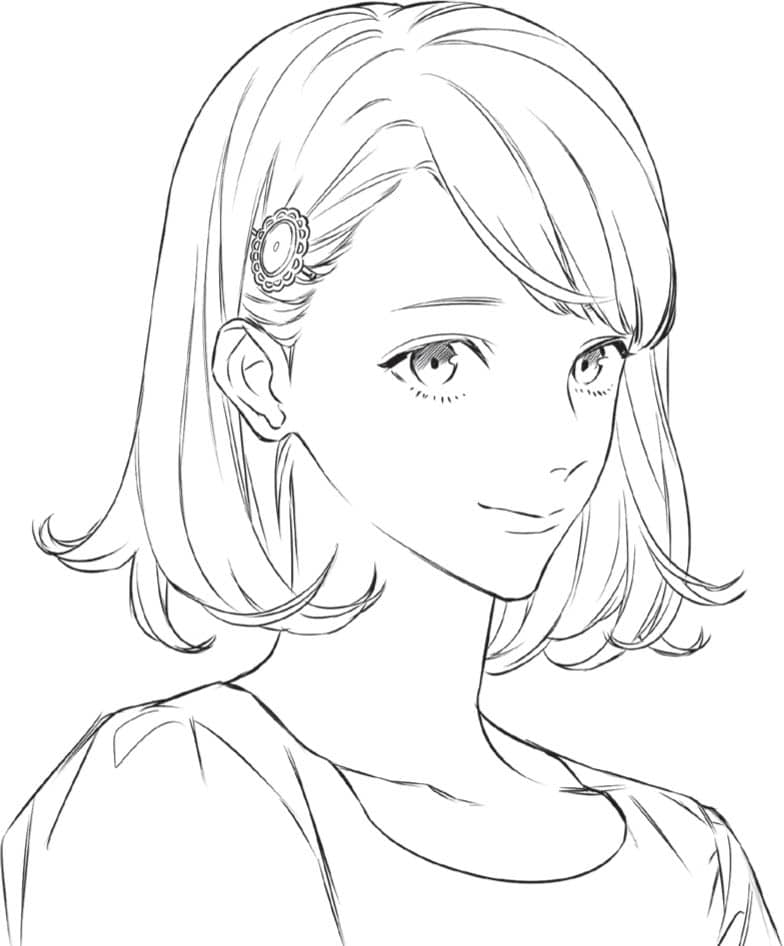
BARRETTE, SIDESWEPT BANGS
Hair can be kept back from the face with a decorative barrette. Here, just one side is held back above the ear and bangs are swept to the opposite side.
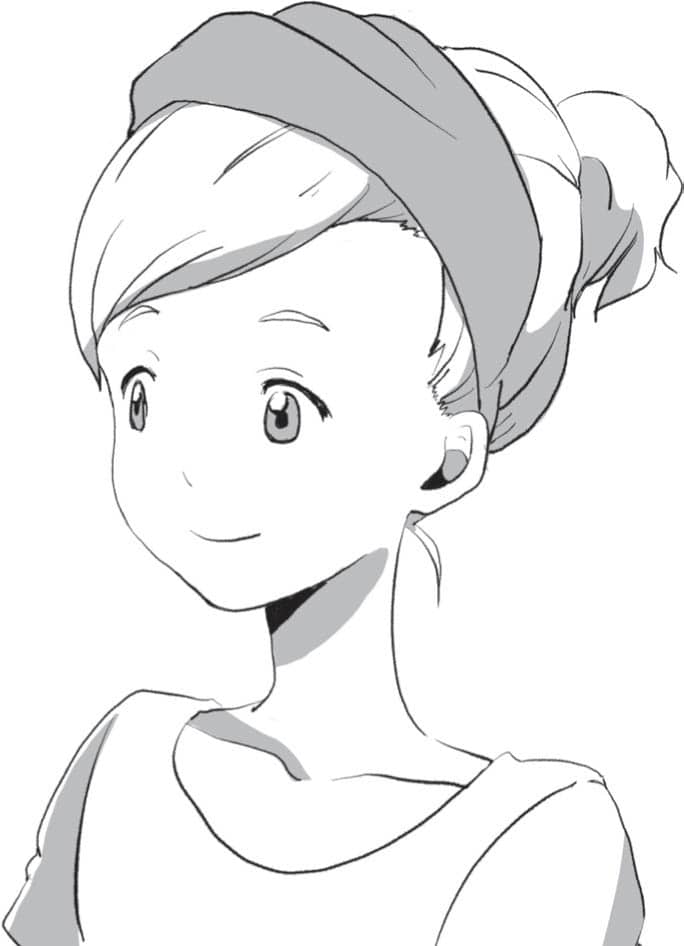
HEADSCARF, HAIR PULLED UP
Headscarves are similar to headbands but have the fuller look of fabric. They wrap the head all the way around and are typically tied in the back, under the hair.
BRAID, HAIR CLIP
For added style, hair clips can be used to secure the end of a braid in place of a simple hair tie.

FRENCH TWIST, HAIRPINS
The dramatic look of a French twist is achieved with hairpins pushed into the hair and hidden for a seamless style. The key is that the hair flows to a point where the hairpins are used.
Ponytails
CLASSIC PONYTAIL
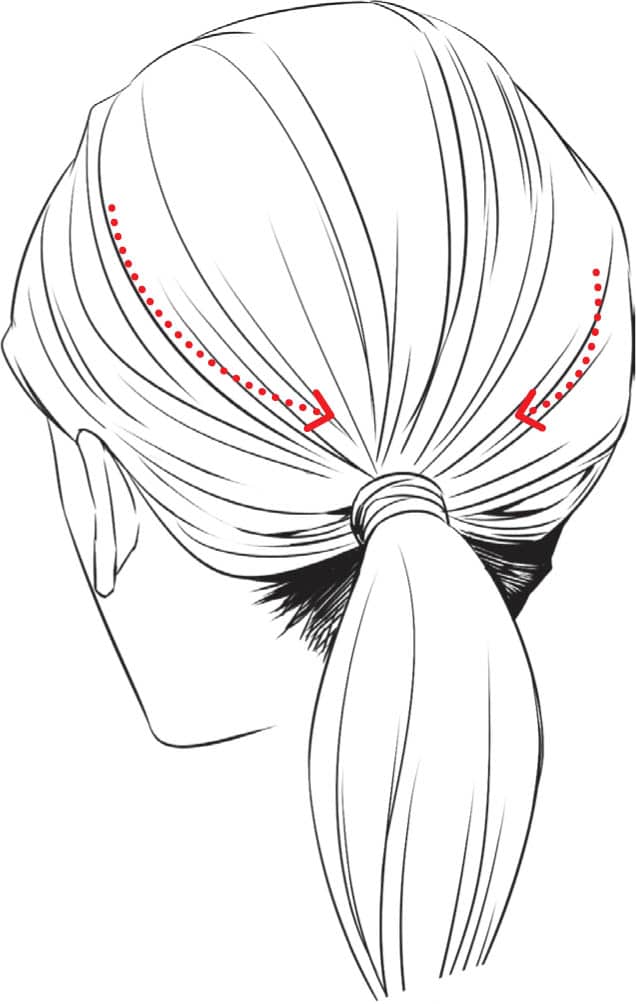
A simple, classic ponytail pulls all the hair from the sides, crown, and back of the head up into a large bundle. It is tied with an elastic hair tie.
LOW PONYTAIL
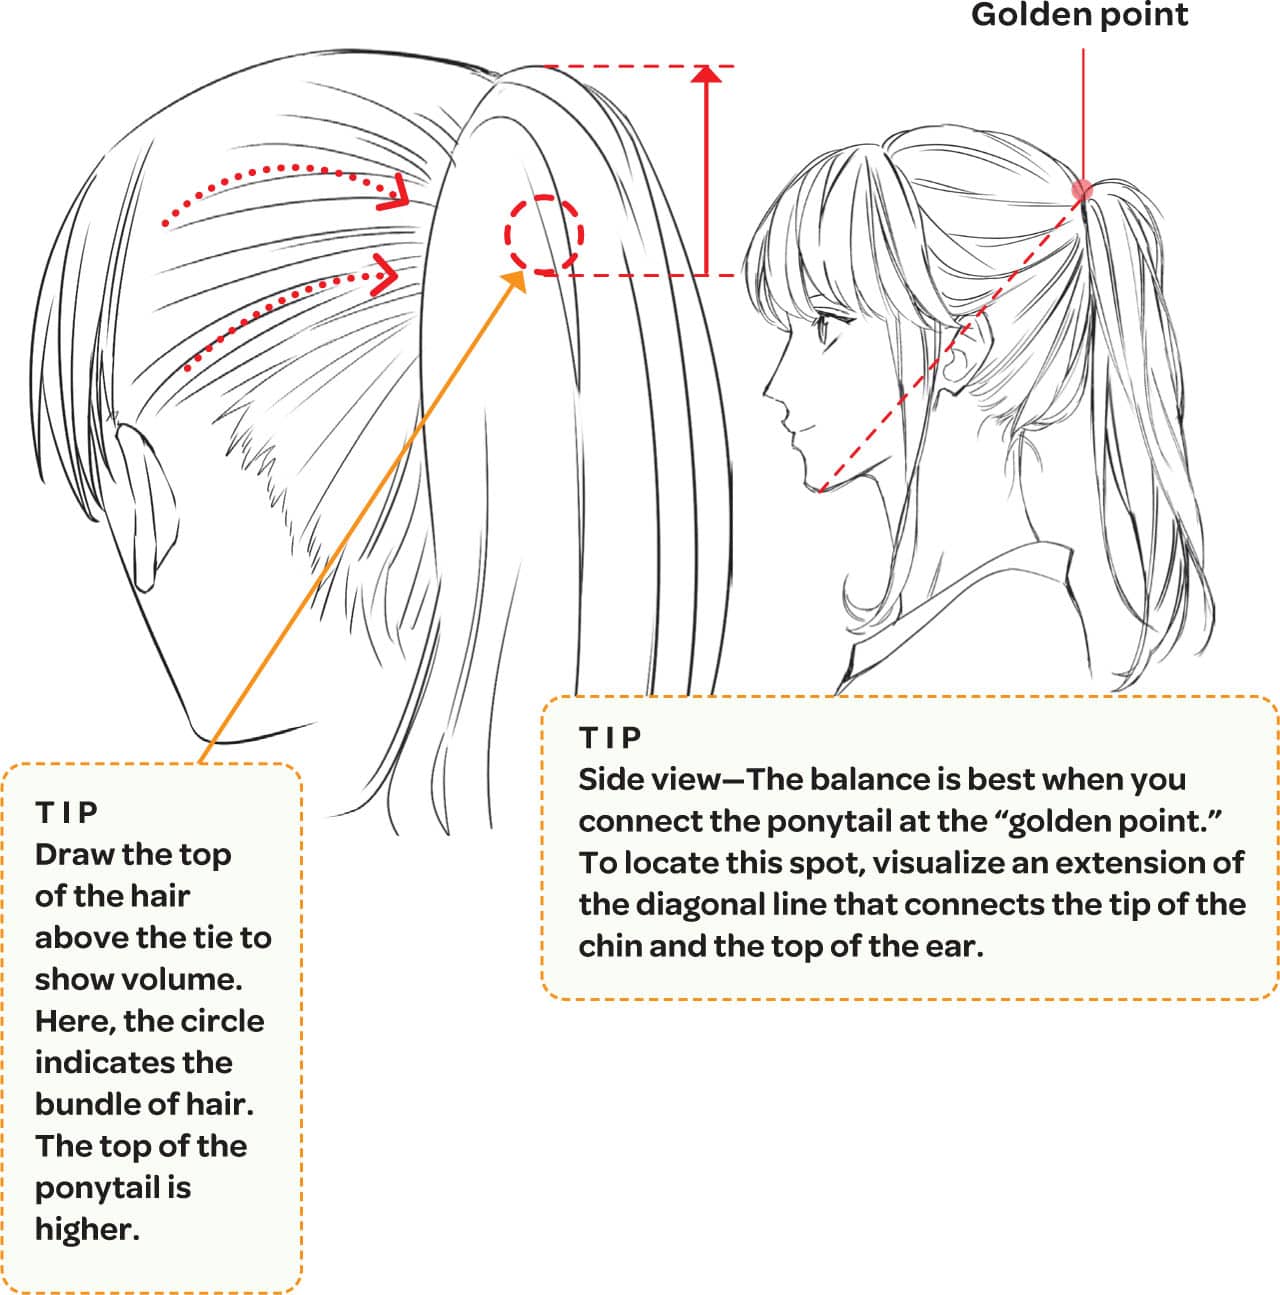
For a more relaxed look, the ponytail can sit lower on the back of the head. The hair should flow to the point where it is gathered and can be tied with a decorative elastic or wrapped with hair.
SIDE PONYTAIL
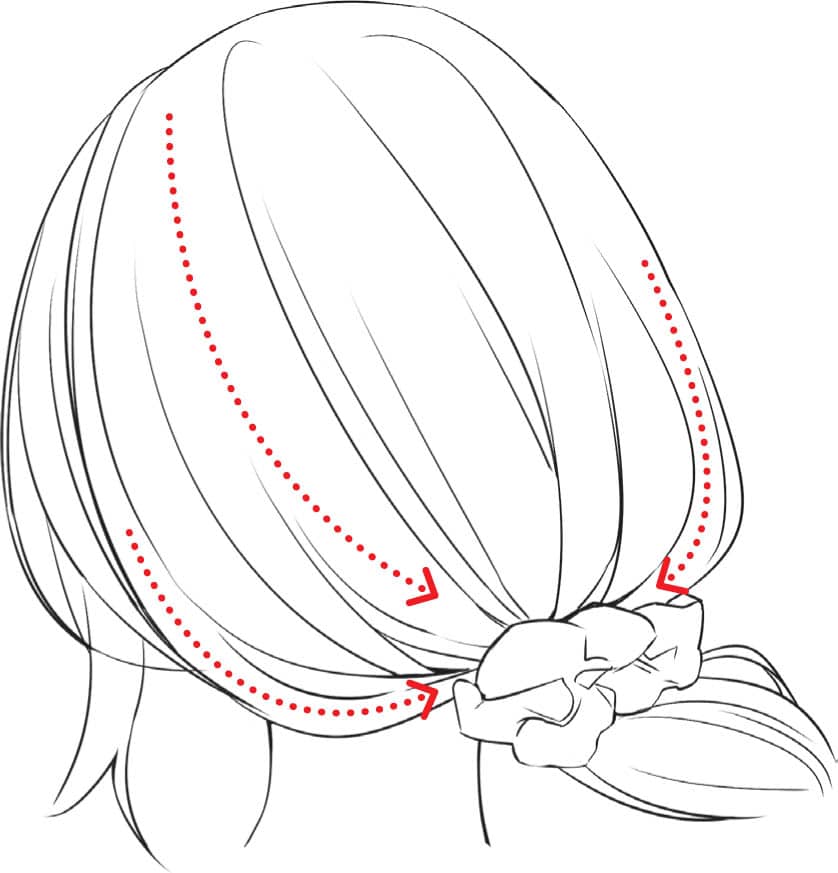
Create a loose ponytail by drawing hair gathered but sagging where it is held with a tie. Here, a scrunchie is used to tie the hair in a very low side ponytail.

TWISTED HALF PONYTAIL
This look is achieved when half the hair is pulled into a low ponytail and tied with an elastic. Once tied, the ponytail is rotated and pulled through the gathered hair to create twists on either side of the tie.

HIGH PONYTAIL, SCRUNCHIE
Scrunchie hair ties can be used on classic ponytails, too. Here, high contrast is used to show this stylish accessory.

LOW PONYTAIL, LOOSELY TIED
A loose, messy ponytail is a style that can be worn on a variety of characters. The sections of hair being gathered in the ponytail often fly free of the tie.

TWIN PONYTAILS
Sometimes called pigtails, twin ponytails are equally sized bundles of hair that are gathered high on either side of the head.
LOW PONYTAIL, DECORATIVE TIE
Have fun adding bows, ribbons, or decorative clips to tie ponytails, as seen here.
SHORT HAIR, PONYTAIL
When styling a ponytail on a character with short hair, the ponytail will be small. Some sections of hair may be too short to reach the tie and will hang loosely out of the ponytail.
Curly Hairstyles

FORWARD CURLS
As the name suggests, forward curls twist forward toward the face. In this example, the curls are loosely separated into sections for an easy look.
REVERSE CURLS
This style of curl twists away from the face. When drawing curly styles, the curled hair should start at the sides of the head near the ears.

LARGE RINGLET CURLS
Ringlet curls are bundles of tightly coiled hair that stay in clearly defined sections. Here, two large ringlets coil in toward the face.

WAVY HAIR
Wavy hair doesn’t have a curl with a full twist, rather it bends back and forth over the entire head.

MEDIUM-LENGTH HAIR, FORWARD CURLS
This medium-length hairstyle has straight sections on the top of the head with forward curls below the chin.

LONG HAIR, REVERSE CURLS
In this look, long hair curls away from the face with “curtain” bangs. These bangs part close to the middle of the forehead and dramatically swoop left and right.

LONG HAIR, RINGLET CURLS
Long defined curls such as these don’t always curl in the same direction. Twist the curls in multiple directions for a realistic look.

RINGLET CURLS, TWIN PONYTAILS
Curly hair can be twisted together into a large single ringlet in twin ponytails. This look is typically associated with young girls.
SOFT WAVY HAIR
Create the look of a soft, wavy curl by only drawing the outline of the hair. Without the smaller sections of curled hair, the overall effect is looser and more relaxed.
Braided Hairstyles

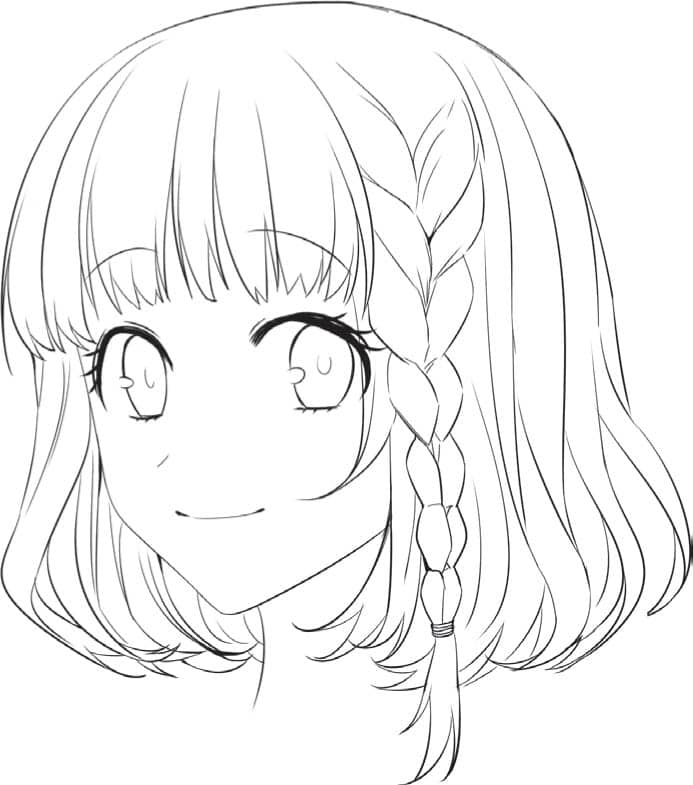
TRADITIONAL BRAID
One large section hair is divided into three subsections and twisted in an over-under pattern to create a classic braid. The end is tied and the braid can swing freely on the head.

FRENCH BRAID
Three small sections of hair start this braid. After each side is twisted from the outside into the braid, another section of hair is joined from the sides into the main sections. This braid is attached to the head, only the end swings freely.
REVERSE BRAID
Sometimes called a horsetail braid, this braid is very similar to a French braid. However, the smaller sections are twisted from inside out, which reverses the direction of the twists.

FISHTAIL BRAID
This style braid is shaped like the bones of a fish. The look is much tighter and wider than classic, French, or reversed braids.
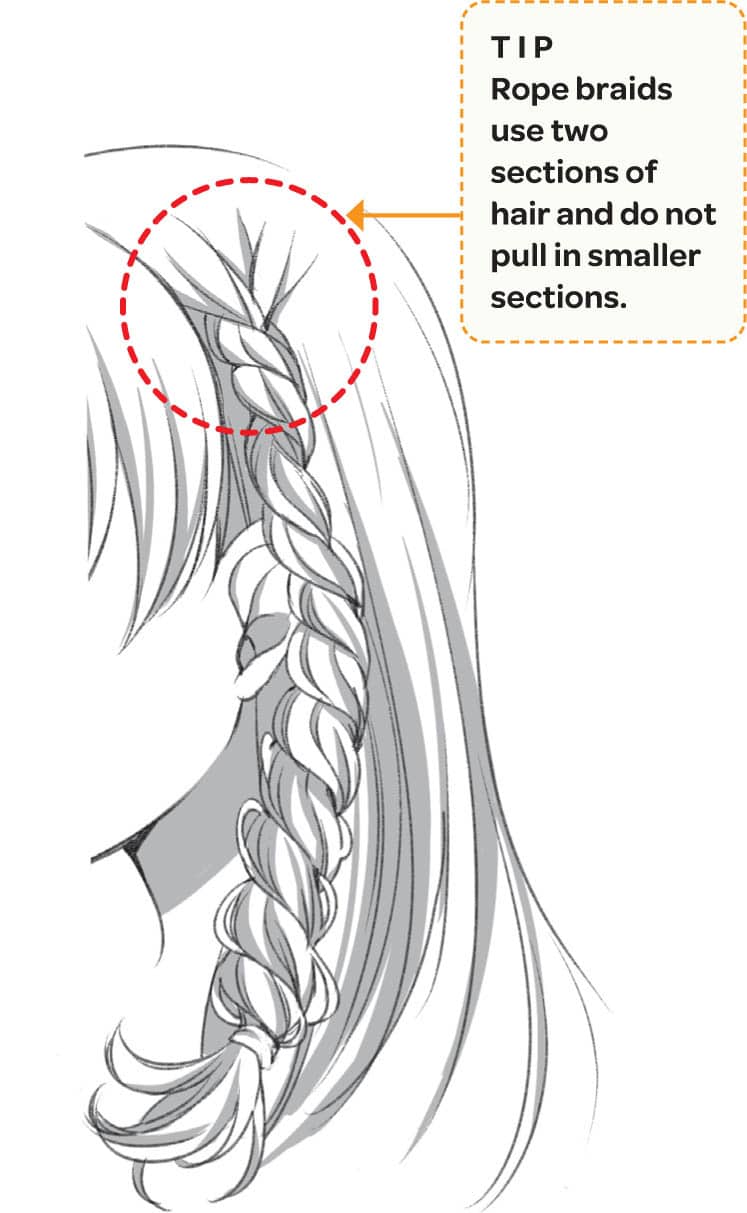
ROPE BRAID
Rope braids are freely swinging braids that are created by twisting two sections of hair and then winding them together.
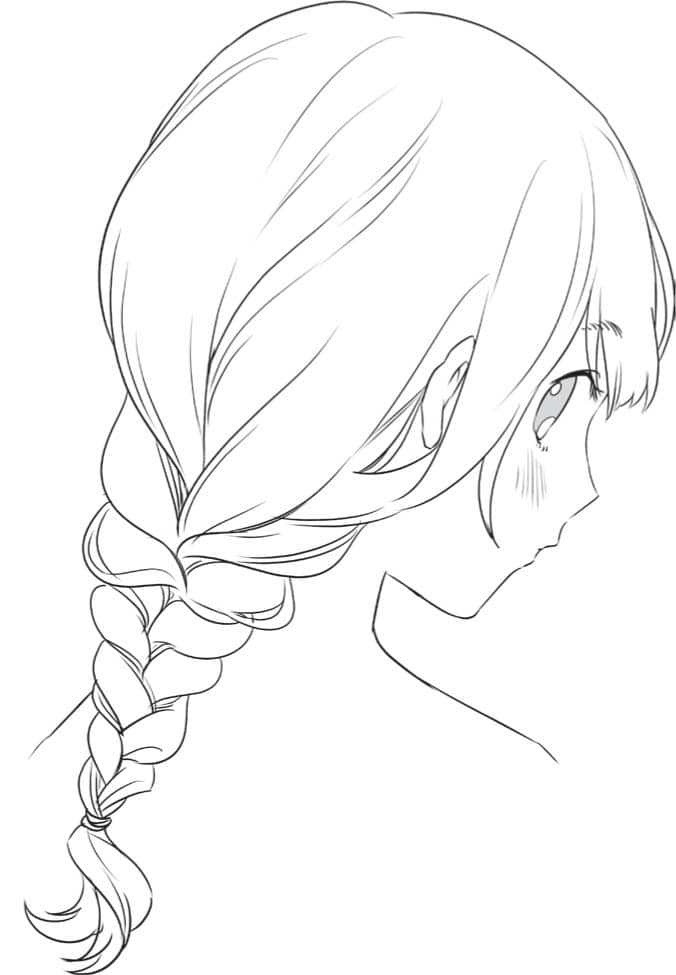
SINGLE SIDE BRAID
This side braid is thicker at the top where it begins. It tapers as it is braided and the hair is thinner.
BACK FISHTAIL BRAID
Many of the styles shown here feature braids on the side of the head, but hair can be braided down the back as well. Here, a loose fishtail braid is shown.

REVERSE BRAID, DECORATIVE TIE
Here, a rose-shaped clip is used to secure the end of a reverse braid featuring a ribbon that is woven into the character's hair. Only small sections of hair near the face and the bangs are left free of the braid.

TWIN FISHTAIL BRAIDS
Twin braids are a unique look for longer hairstyles. The fishtail braids shown here are wider near the head and taper toward the ends.

LARGE SIDE ROPE BRAID
Create a look with a lot of volume with this side rope braid. The finished style looks like a large ringlet, but is held by a hair tie.
Traditional Male Hairstyles
Short Hairstyles
NO BANGS
This short look does not have bangs. The hair along the forehead is slightly spiked and falls away from the face.
DIVIDED BANGS
The top sections of this style are longer than the back and sides. With the hair parted down the center of the head, this creates divided bangs.

SIDESWEPT BANGS
In this look, the hair has been styled to swoop to one side. The hair looks full with a lot of movement.

SHORT BANGS
A classic style for men, this short look has bangs that come halfway down the forehead. The hair is generally combed to one side, but it doesn’t have the movement of the sideswept bangs.
SHORT HAIR, SIDE PART
When drawing a firm part in the hair, remember that the hair needs to be drawn growing out from that part while still following the curve of the head.
MEDIUM-LENGTH HAIR, CENTER PART
This unique hairstyle features longer hair with bangs hanging down on the left and right sides of the forehead. There are spiked bangs in the center along the part line as well.
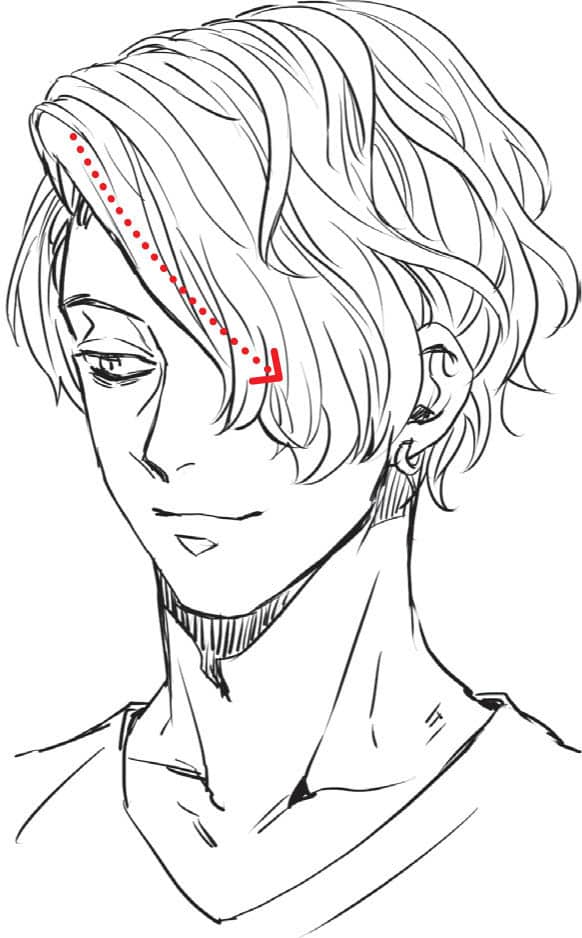
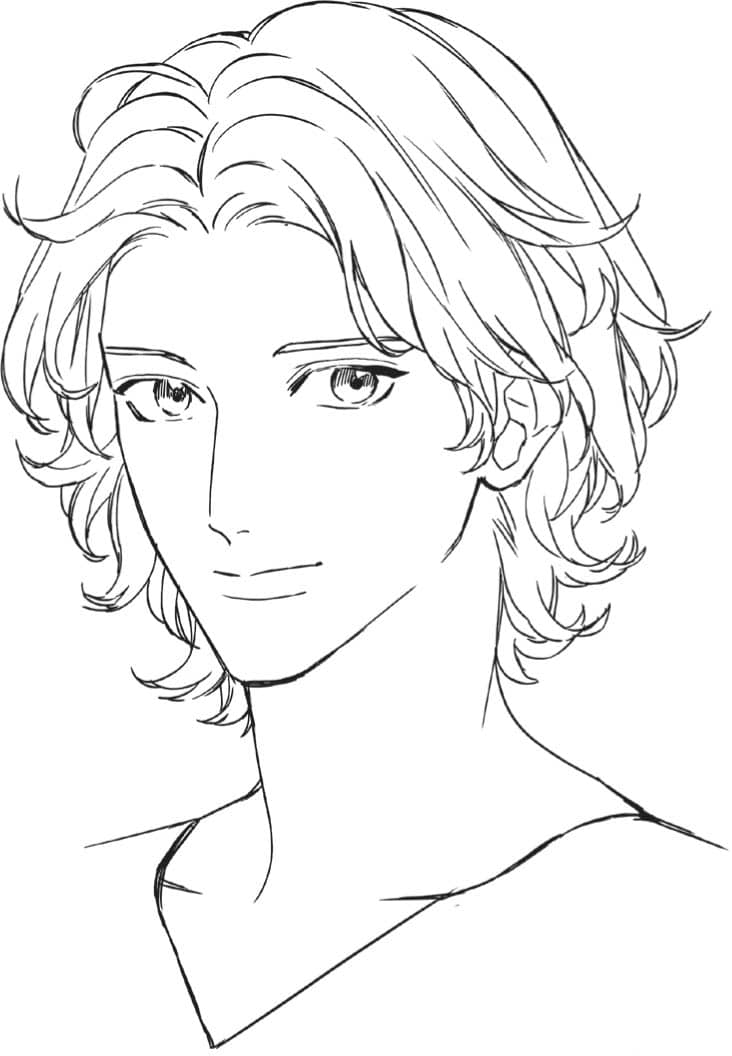
MEDIUM-LENGTH, WAVY HAIR
Bangs hanging diagonally across the face with loosely curled sections of hair creates a trendy look.
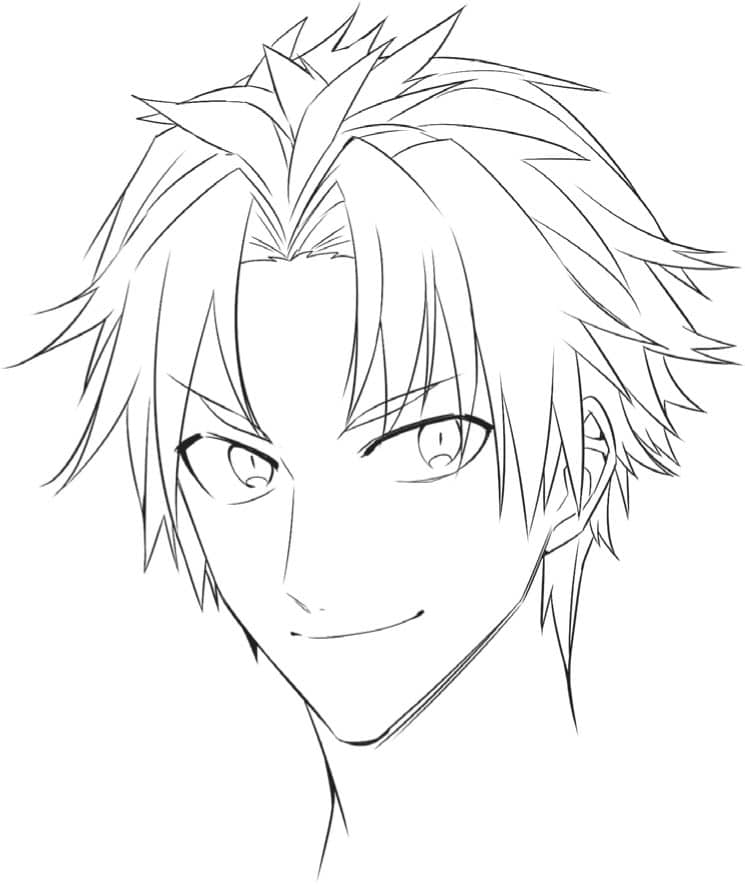
SPIKED HAIR, SIDESWEPT BANGS
For a wilder style, hair is worked into spiked sections that flow to one side. The crown and sides illustrate the spikes prominently, while the bangs fall into each other.
SOFT SHORT HAIR
For a more youthful appearance, this hairstyle is drawn with very few defined sections, which gives the look a soft, fluffy feel. The bangs are pushed diagonally and show more of the forehead.
Unique Hairstyles
SPIKED WITH HAIR PRODUCTS
Styling products such as wax, balm, or gel, can make short hairstyles defy gravity in creative ways.
WAVY HAIR, MIXED LENGTHS
In this style, hair is cut in shaggy mixed lengths. It’s longer in some areas and shorter in others. The wavy texture causes the ends to curl erratically.
BLOWN BACK WAVES
Whether combed back or styled with a hair dryer, this hairstyle sets waves in a sleek, blown back look. The height at the front of the face adds volume and interest.

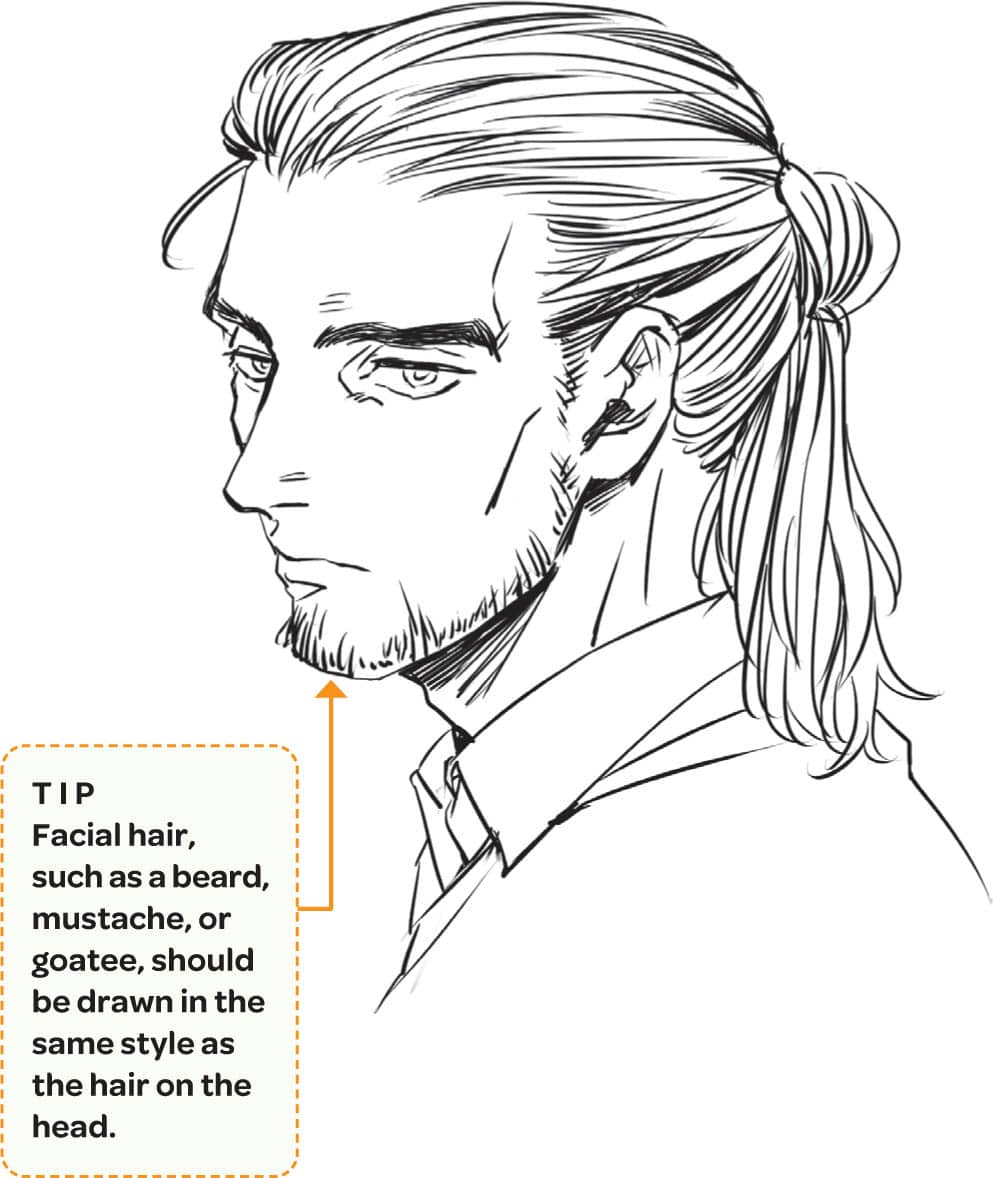
LONG HAIR BUN, BACK VIEW
Long hairstyles for men can be pulled into a ball or “bun” at the back of the head and tied. Here, half of the back section of hair has been left hanging down.
CASUAL MEDIUM-LENGTH HAIR
For a refreshing look, style the bangs diagonally to the side to reveal the forehead. Casually curl the ends of the hair to create a relaxed expression.

SOFT MOHAWK
Short hair styled with height and volume can give the look of a soft mohawk. Stronger mohawk looks can be drawn with even more height and sharply defined sides.

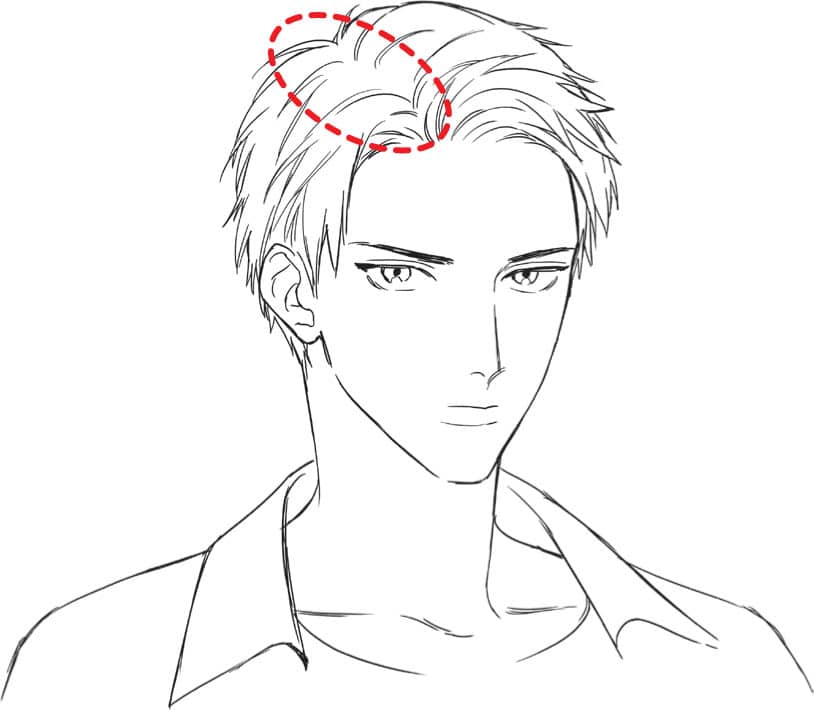
SHORT SIDES, LONGER TOP AND CROWN
This youthful style shows the sides and back of the head shaved very short with the top left long. The longer top is styled with the hair flowing back away from the face.
LONG HAIR BUN, FRONT VIEW
Remember, when drawing long hairstyles that are pulled into a bun or ponytail, the lines of hair should flow to the area where the hair is being gathered.
Adding Age to Hair
Women
As hair ages, it loses elasticity, making it difficult to maintain style and volume. Hair also tends to become drier and thinner with age. Keep these tendencies in mind when expressing a character’s age.

Men
As men’s hair ages, the overall volume decreases as the hair gets thinner and softer. In addition, many men experience bald spots at the crown and receding along the hairline.
