

Mobile hybrid scenario: Secure Gateway, Connect & Compose, and DataWorks
This chapter provides a sample scenario where a company can use integration service offerings on Bluemix to create a mobile application (app) to use enterprise data.
This chapter has the following sections:
9.1 Solution overview
CompanyC is a local retailer that has served the area for years, and is looking to expand its area of services. After studying the market, CompanyC decides to try a pilot program to provide same day delivery service for loyal customers in the area. To accomplish the task efficiently, CompanyC needs a mobile web application to facilitate the process for employees to claim an order, pick up all the items in the order from different aisles, and deliver the order to the customer’s door.
Technology wise, CompanyC uses on-premises IBM DB2 as its secured data storage. The inventory table that is needed for this application contains several columns that are confidential, and must be excluded from any over-the-air exchanges.
Now that the business goal is clear, the following section explains how we can use Secure Gateway and various Connect & Compose offerings to create an application programming interface (API) that caters to each step of the delivery process.
|
Business case for this scenario: For more information about the business case for this scenario and the company profile, see 1.3.5, “Solutions and actions by CompanyC CIO” on page 11.
|
9.1.1 Objectives
This scenario presents an example on the order delivery process by the employee of CompanyC:
1. When EmployeeA claims an order, nobody should be able to claim it anymore: We can create an API by using the connect feature from Connect & Compose, with the help of Secure Gateway, to retrieve and update the Order record to indicate that the order is under process. We need to make sure that this API is strictly retrieve and update only, and does not return more than the necessary information.
2. EmployeeA should see a list of products ordered by aisle: Similarly, we can create an API that retrieves product details from the Inventory table. To prevent leaking confidential information, the API limits the available parameter to just Name, Description, Product ID, and link to a product picture if available.
3. EmployeeA should indicate product availability as he or she retrieves them: By using the update function created in objective 1, EmployeeA should be able to indicate a product is retrieved or unavailable, and recalculate the order accordingly.
4. When EmployeeA is done loading the goods, an email should be sent to the customer with estimated delivery time, and directions to the customer’s location should be displayed: By using the compose feature in Connect & Compose, we can create an API that shows EmployeeA the directions to the location that the customer has indicated, as well as sending an email to the customer to expect delivery.
5. When the order is received by the customer, EmployeeA should update order status and complete the transaction: We again reuse the update function created in objective 1 to indicate in the database record that the goods have been delivered. We can also use the compose feature to bind the action to call another hypothetical external API that will process the credit card payment for the transaction.
9.2 Step-by-step implementation
We show how to use Bluemix to create a web application using NodeJS, and several hybrid cloud service offerings.
9.2.1 Creating a NodeJS Web APP on Bluemix
First, we create a NodeJS Web APP on Bluemix:
1. After logging in to Bluemix, in the DASHBOARD view, select the wanted space, and create a Cloud Foundry app.
2. The first window is shown in Figure 9-1. We select WEB for the type of app to create for more flexibility.

Figure 9-1 First step in creating a Cloud Foundry application
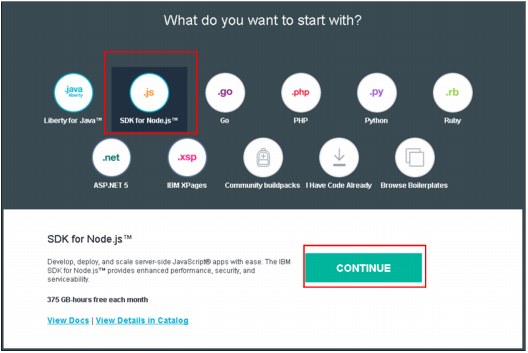
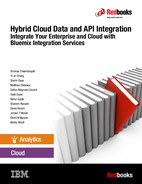
Figure 9-2 Select the language for the application template

Figure 9-3 Enter APP NAME
5. Bluemix then creates an application template and deploys it. When the process is done, the template application is accessible at {application-name}.mybluemix.net, in this case, companyc.mybluemix.net.
6. The setup wizard then shows three ways to work with the source code. Follow the instructions to set up according to your preference. This sample uses git. Figure 9-4 shows the app overview page. Notice that this page displays the app route, app status, and various options.

Figure 9-4 Application overview page
7. After setting up the application for git, Bluemix provides an online code editor. By clicking EDIT CODE, as shown in the middle of Figure 9-4, a web editor is shown to allow online edits of the template source code.
|
Tip: If you are familiar with git, you can also clone the source to your local machine by using the regular git way.
|
9.2.2 Setting up Secure Gateway
Because CompanyC hosts their database in an enterprise zone, it is necessary to establish a secured connection through the firewall:
1. First, provision the Secure Gateway service. The service can be found by typing in the CATALOG search bar, or filter by the Integration category.
2. From the Secure Gateway service landing page, click ADD GATEWAY. Give the Secure Gateway a name and click CONNECT IT. The name is used in Connect & Compose later.
3. As Figure 9-6 shows, there are currently two options to set up a Secure Connector. In this example, we used the Docker variety, which requires installation of Docker on a Linux machine that has network access to the on-premises database.
|
Instructions for Docker installation: For Docker installation instructions, see the following site:
|
4. Simply copy the command to run as administrator on the Docker machine, as shown in Figure 9-5.

Figure 9-5 Starting Secure Gateway Client on the Docker machine
You will see “[INFO] secure tunnel connected” on your Docker machine terminal, and a new panel on Secure Gateway service indicating that the gateway has been connected.

Figure 9-6 Secure Gateway setup information
6. Provide and note the name of the destination because this will be used in Connect & Compose later. Complete the host name and port information, then click + as shown in Figure 9-7. Ensure that the + has been clicked before clicking I’M DONE.
 C
CFigure 9-7 Create a destination on the Secure Gateway client
9.2.3 Connecting an API to retrieve and update orders
Now that Secure Gateway is set up, we can use Connect & Compose to create a Representational State Transfer (REST) API to interact with the database. Figure 9-8 shows the landing page of Connect & Compose. We describe connecting to the Orders table in this section.
1. On the Connect & Compose landing page, click CONNECT.

Figure 9-8 Connect & Compose landing page
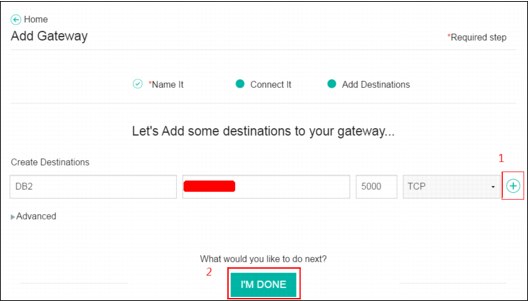
a. As shown in Figure 9-9, there are three different types of locations. Because CompanyC is using IBM DB2, we find DB2 in the Enterprise location, and click NEXT.
Figure 9-9 Connection types
2. Because Secure Gateway has already been set up to access our on-premises database in previous steps, Figure 9-10 shows a form to configure the connection. In the case where no Secure Gateway is set up, Connect & Compose prompts and provides options to redirect to the Secure Gateway service to set up first.
3. After inputting all the credentials, including selecting the Secure Gateway and Destination that we set up in previous steps, click TEST CONNECTION. Connect & Compose tests to see if the connection is established and the credentials are correct.
4. When “Connection Successful” is displayed, proceed and click FINISH.
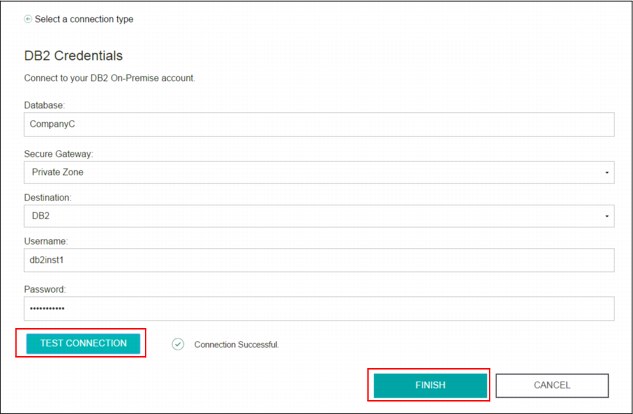
Figure 9-10 DB2 credentials
5. The model selection box becomes active, as shown in Figure 9-11. Click ADD A MODEL to see the model panel in Figure 9-12 on page 228. This is where we select the table that we want to use.
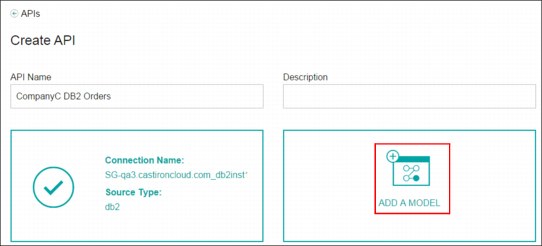
Figure 9-11 ADD A MODEL becomes active when a connection is created
6. First, select the schema from the drop-down list. Connect & Compose will then query for the list of tables.
7. Then, click the wanted table. For this section, we need to get ORDERS. Connect & Compose will then query for all the columns.
8. Finally, clear any columns that we do not want to expose with this API. As shown in Figure 9-12, CompanyC’s employees should not see any payment information; therefore, the credit card is cleared.
|
Tip: Any column that does not include a NOT NULL restraint can be cleared.
|
9. When you have completed your selection, click FINISH.
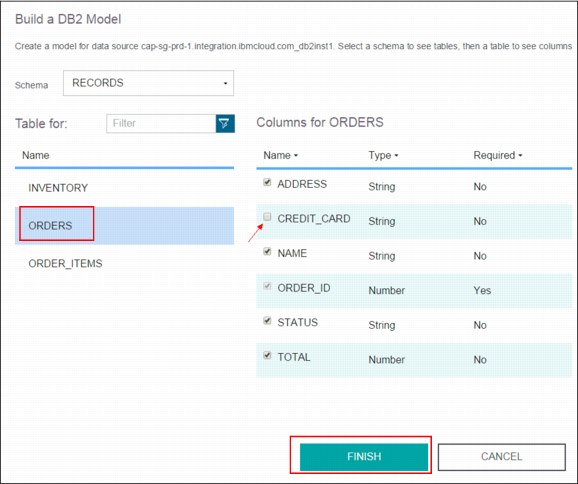
Figure 9-12 Model selection view. Clear properties to exclude from the API
10. After clicking FINISH, the pop-up module closes, and the REST resources are populated. For this API, we only want updates with primary key and retrieve functions. We can clear it by clicking the X to the right of the endpoints, as in Figure 9-13.
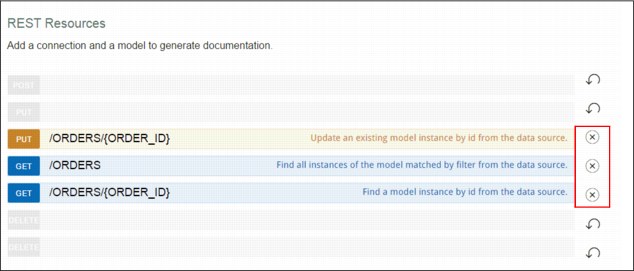
Figure 9-13 Clear API endpoints that we do not want to include in the API
11. Click SAVE to create the API. There might be a pop-up window that indicates the API is undergoing creation. Because it might take a while to make available the API routes, feel free to explore other functionalities in the meantime.
9.2.4 Connecting an API to retrieve product details
This operation has two parts to it because it involves two different tables in the database.
To create a connection to ordered items (order_items table), follow Steps 1 - 10 from the previous section (9.2.3, “Connecting an API to retrieve and update orders” on page 224). All of the properties are needed at step 8, and clear the same endpoints at step 9.
The second part of this operation is to create a connection to the Inventory table, which provides us with inventory and stock details. Again, follow Steps 1 - 10 from the previous section (9.2.3, “Connecting an API to retrieve and update orders” on page 224):
1. Figure 9-14 shows the models to select for Step 8, and Figure 9-15 on page 231 shows the endpoints that we use for Step 9.
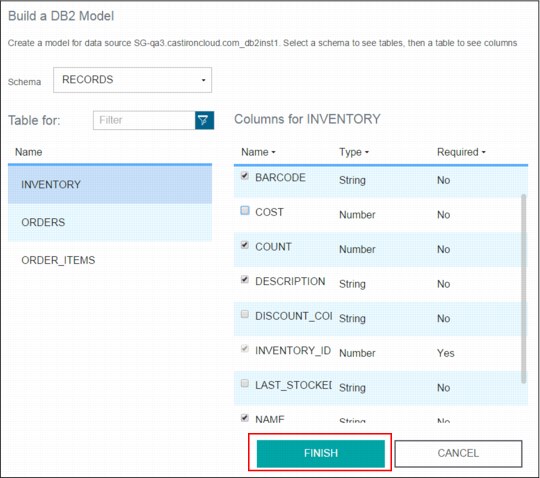
Figure 9-14 Only retain properties that are useful for the employees to prepare for delivery
2. The inventory data is only used to assist employees in CompanyC to find the products in the store. Therefore, as shown in Figure 9-15, we only retrieve by primary key function.

Figure 9-15 Inventory is internal data, therefore we only want to retrieve information
3. After both APIs are created, we can then go to the landing page for Connect & Compose, shown in Figure 9-16. Next, we see the API creation page for Composition API in Figure 9-16. Click COMPOSITION.

Figure 9-16 Connect & Compose landing page with API listing

Figure 9-17 Create a Composition API
5. A Node-RED composition editor starts. To put together the two APIs that just created, follow the next steps. To start with a REST endpoint, pull the http node from input, and http response from output on to the flow editor.
6. Double-click the http node, and you can see a panel to configure the node, as shown in Figure 9-18.

Figure 9-18 Configuration panel for http node
7. After completing the wanted URL, click EDIT next to Docs. As shown in Figure 9-19, you can configure the Swagger-Doc for the node. For our scenario, we need to receive the id from the query parameter.
Figure 9-19 Swagger-Doc configuration for the http node
8. To use the Ordered Items API that we created, pull http request node from under “Function”. To allow advanced configuration, pull a function node under the “Function” category. As shown in Figure 9-20, set the API key in the header.

Figure 9-20 Set header, url, and method with a Function node
The specific header key name can be found in the swagger document shown in Figure 9-21. The url consists of the base url, the base path to the endpoint, and item ID, which we obtain from the original request.

Figure 9-21 Swagger document
9. Connect the initial http node to the function node, then to the http request.
10. Next, we use the INVENTORY_ID from the previous request to query for inventory details. Figure 9-22 shows how we get the INVENTORY_ID from a previous call. We also want to keep a record of the payload, and combine it with the payload from the next call for the final response.
Figure 9-22 Use INVENTORY_ID from previous request for the next request to Inventory API
11. Again, we drag another http request node and place after the function node.
12. Lastly, we use a functional node to merge two responses. See Figure 9-23 for the final flow graph.
Figure 9-23 Full flow to get full item details
9.2.5 Using API composition with Google Directions and email service
When an employee is done loading the ordered goods, we need to update the order, find directions, and send an email to the customer with an estimated arrival time. Figure 9-24 shows the flow that we composed:
1. We start with an HTTP POST request that we call to pass in the order details.
2. On the top lane, we modify the payload and configure the request to make a call to the order’s API’s PUT (update) endpoint. Because the employee does not need the response, we just record it with a debug node.
3. On the bottom lane, we pull out the address, and form it into a proper payload to use Google Directions node, which in turn returns directions and estimated amount of time to reach the destination. We pass the full response from Google Directions service back to our application, and parse the estimated time to create an email for the customer.
Figure 9-24 Composition flow for OrderLoaded endpoint
9.2.6 Using DataWorks for address cleansing
DataWorks service provides an Address Cleansing API that puts addresses in CASS format, which is useful for mailing future promotions.
|
CASS: CASS stands for Coding Accuracy Support System. It enables the United States Postal Service (USPS) to evaluate the accuracy of software that corrects and matches street addresses.
|
The following section describes how to integrate the Address Cleansing API to the application we created earlier:
1. First, in package.json, under dependencies, add request and body-parser modules.
2. Next, in app.js, after the app variable has been declared, get the two modules from Step 1, and use the body-parser middleware as shown in lines 26 - 28 in Figure 9-25.
3. Lines 32 - 45 in Figure 9-25 show the function that performs the call to DataWorks’s API.
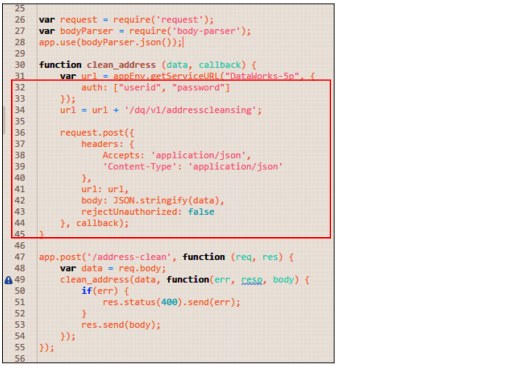
Figure 9-25 Code to integrate DataWorks API
4. Lines 47 - 55 implement a route that we can use to test that the function in Step 3 is working.
5. With this function, we can connect to another database table to store the customer’s sanitized address information.
9.2.7 Creating a page to list all the orders
Routes of an app are used to serve contents to the user. We created many APIs to be used for this application. Here, we show the detailed steps to render a page with the list of orders. This list acts as the first step for an employee from CompanyC to start the delivery process. The rest of the application can be implemented in similarly:
1. Bind Orders API to app:
a. On the landing page, find the API that is connected to the Orders table, click the gear icon, and select share to Bluemix.
b. On Bluemix Dashboard, we see among Services listings, our API CompanyC DB2 Orders.
c. Click CompanyC (our application), select BIND A SERVICE OR API. Select CompanyC DB2 Orders (our API), then click ADD.
d. The API credentials then become available in VCAP_SERVICES, and we can access it by using appEnv.getServiceURL("CompanyC DB2 Orders").
2. Create a route to serve the page. Figure 9-26 shows the route that we need to display our Orders listing page.
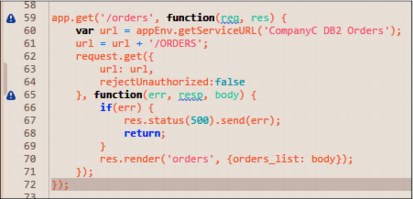
Figure 9-26 Route to display list of orders
a. Use Jade templates to populate the list of orders. Jade (jade-lang.com) is one of the popular template engines for NodeJS. To use Jade, first add the jade module to package.json.
b. Then, in app.js, configure the app to use jade as the view engine: app.set(‘view engine’, ‘jade’);
c. You can also set the folder from which views files are stored, views folder in this case, by using the following command: app.set('views', __dirname + '/views');
Figure 9-27 shows the basic template that corresponds to line 70 shown in Figure 9-26. Notice that the orders_list variable with the list of orders was passed in for rendering. The variable then became available in the template, as shown in line 13 in Figure 9-27.

Figure 9-27 Jade template code for order listing
From looking at Figure 9-28 on page 240, you can see the page at http://companyc.mybluemix.net/orders. Notice how Jade handles conditional statements and iterative statements to accommodate impracticability of the data.

Figure 9-28 Rendered view for the orders list
3. Use Cascading Style Sheets (CSS) to improve the visuals. Lastly, for the app to be visually pleasant, we use CSS stylesheets to touch up the page. To apply the styles in Figure 9-29, we used a third-party CSS style sheet from the ZURB Foundation:
Figure 9-29 Styled page for orders list
This concludes a simple implementation of an application using hybrid cloud services provided in Bluemix.
..................Content has been hidden....................
You can't read the all page of ebook, please click here login for view all page.