

Watson Analytics in hybrid cloud using Secure Gateway and
DataWorks
DataWorks
This chapter shows how to ingest data from databases in cloud or on-premises servers into Watson Analytics service in IBM Cloud. The scenario described in this chapter takes selected data from the retailers transaction database to analyze the patterns of high selling products from its stores. This chapter is a hands-on tutorial that you can perform by using your computer and a Bluemix account. The tutorial documentation explains the steps in detail and is sufficient to understand the procedure without having to perform the implementation steps.
You learn how to use the Secure Gateway and DataWorks services in Bluemix, to create secure data transfer tunnel for Watson Analytics.
This chapter contains the following sections:
|
Recording of this scenario: You can find the recording of this scenario at the following link:
|
8.1 Solution overview
The solution created in this chapter shows how Watson Analytics service in IBM Cloud could be used for analyzing data in cloud or on-premises databases. As described in Section 1.3.7, “Retail example CompanyB background” on page 12, CompanyB is a local retailer and has its own private data center. The business requirement for CompanyB is to quickly analyze the high-selling products from their stores to enable their supply chain, without having their IT teams to spend time on setting their own analytics environment for this problem.
|
Business case for this scenario: For more information about the business case for this scenario and the company profile, see 1.3.10, “Solutions and actions by the CompanyB CIO” on page 13.
|
CompanyB uses an on-premises database as its secure data storage. Some data for this analytics is stored in transaction-related tables, which also contain other sensitive and confidential data. The objective is to set up a Watson Analytics environment with secure and limited visibility of their data.
You can perform this tutorial by using your computer and Bluemix account. This chapter simulates a database on-premises by using an IBM DB2 database. The techniques shown in this chapter can easily be applied to true production data hosted in cloud or on-premises databases.
Figure 8-1 on page 197 shows the architecture of the solution that will be created for CompanyB. The solution enables the data analyst to import data from an on-premises database into Watson Analytics. This integration is possible through the two services (Secure Gateway, DataWorks) in Bluemix. The Secure Gateway service provides a secure way to access cloud or on-premises data to applications running in over a secure passage that is the gateway. DataWorks is a service on Bluemix that can be used for data load, migration, refinement, transformation, and gaining insights from the data. Section 3.1.2, “API-centric service: Secure Gateway” on page 32 and section 3.1.4, “Data-centric service: IBM DataWorks” on page 43 in this book provide more details about these two services in Bluemix.
The database used in this chapter is IBM DB2 and hosts tables for storing customer transactions and other details. The Secure Gateway client is hosted on another machine that simulates a machine in a DMZ environment. The Secure Gateway client connects to Secure Gateway service in Bluemix to create a secure gateway tunnel for data transfer. After the tunnel is established, the DataWorks service can connect to the remote database and perform filters for the visibility of data to the Watson Analytics application. Now DataWorks can copy the data from an on-premises database to Watson Analytics service for further exploration and prediction analytics.

Figure 8-1 Architecture of the solution
8.2 Step-by-step implementation
This section explains the step-by-step procedure to create a solution for this problem. The following steps will be executed to set up this hybrid cloud scenario for Watson Analytics:
•IBM DB2 setup: This step explains creation of tables in the IBM DB2 database, understanding the sample data, and uploading the sample data in the table created by using a sample Java program. Refer to section 8.2.1, “Setting the IBM DB2 database for on-premises data” on page 198.
•Secure Gateway client setup: This section explains the installation of Docker and Secure Gateway client. Refer to section 8.2.2, “Setting the Secure Gateway client in the on-premises environment” on page 201.
•Secure Gateway setup: This section explains the creation and configuration of Secure Gateway service in Bluemix. Refer to section 8.2.3, “Setting Secure Gateway service in Bluemix” on page 202.
•DataWorks setup: This section explains the creation and configuration of DataWorks service in Bluemix. Refer to section 8.2.4, “Setting DataWorks service in Bluemix” on page 205.
•WatsonAnalytic setup: This section explains the registration and initial configuration with Watson Analytics service in IBM Cloud. Refer to section 8.2.5, “Create a Watson Analytics user in IBM Cloud” on page 206.
|
Note: You can download the .CSV file and Java program used in this scenario from the ITSO Redbooks FTP site. Refer to section “Locating the web material” on page 241 for downloading instructions.
|
8.2.1 Setting the IBM DB2 database for on-premises data
This step assumes that an IBM DB2 database is already installed and is configured to listen on a specific TCP port. We proceed by creating a database ITSODB for the retailer. Example 8-1 shows the command to create a database.
Example 8-1 Create database ITSODB
>db2 create db ITSODB
DB20000I The CREATE DATABASE command completed successfully.
The database is successfully created and the next step is to create a table TRANSACTIONVIEW. This table stores data described in Table 8-1. The purpose of the table is to store customer purchases with transaction, product, and customer details.
Table 8-1 Data to be stored in the table TRANSACTIONVIEW
|
Name
|
Data type
|
Explanation
|
|
TRANSACTIONID
|
VARCHAR(9)
|
This column stores the transaction ID.
|
|
CUSTOMERID
|
VARCHAR(12)
|
This column stores the customer ID.
|
|
TRANSACTIONDATE
|
DATE
|
This column stores the transaction date.
|
|
PRODUCTID
|
VARCHAR(9)
|
This column store the product ID.
|
|
PRODUCTDESCRIPTION
|
VARCHAR(30)
|
This column stores the product description.
|
|
PRODUCTPRICE
|
INTEGER
|
This column stores the product selling price.
|
|
CUSTOMERNAME
|
VARCHAR(50)
|
This column stores the customer name.
|
|
CUSTOMEREMAIL
|
VARCHAR(70)
|
This column stores the customer email address.
|
Example 8-2 shows the commands to create table TRANSACTIONVIEW from the DB2 command shell.
Example 8-2 Create table TRANSACTIONVIEW
>db2 connect to ITSODB
Database Connection Information
Database server = DB2/NT64 10.5.3
SQL authorization ID = DB2ADMIN
Local database alias = ITSODB
>db2
db2 => CREATE TABLE TRANSACTIONVIEW ( TRANSACTIONID VARCHAR(9), CUSTOMERID VARCHAR(12), TRANSACTIONDATE DATE, PRODUCTID VARCHAR(9), PRODUCTDESCRIPTION VARCHAR(30), PRODUCTPRICE INTEGER, CUSTOMERNAME VARCHAR(50), CUSTOMEREMAIL VARCHAR(70))
DB20000I The SQL command completed successfully.
db2 => describe table TRANSACTIONVIEW
Data type Column
Column name schema Data type name Length Scale Nulls
------------------- --------- ------------------- ---------- ----- ------
TRANSACTIONID SYSIBM VARCHAR 9 0 Yes
CUSTOMERID SYSIBM VARCHAR 12 0 Yes
TRANSACTIONDATE SYSIBM DATE 4 0 Yes
PRODUCTID SYSIBM VARCHAR 9 0 Yes
PRODUCTDESCRIPTION SYSIBM VARCHAR 30 0 Yes
PRODUCTPRICE SYSIBM INTEGER 4 0 Yes
CUSTOMERNAME SYSIBM VARCHAR 50 0 Yes
CUSTOMEREMAIL SYSIBM VARCHAR 70 0 Yes
8 record(s) selected.
The sample data is stored in the TransactionView.csv file. The sample data from the CSV file is processed by using a stand-alone Java program that is shown in Example 8-3, which inserts this data into the TRANSACTIONVIEW table using JDBC. Both the CSV file and Java program are made available on the ITSO FTP site. Refer to “Locating the web material” on page 241 for downloading instructions.
Example 8-3 Stand-alone Java program to insert data in ITSODB
import java.io.BufferedReader;
import java.io.FileReader;
import java.sql.Connection;
import java.sql.DriverManager;
import java.sql.SQLException;
import java.sql.Statement;
public class TransactionView {
public static void main(String[] args) {
String serverName = "0.0.0.0";
String serverPort = "50000";
String databaseName = "ITSODB";
String userID = "********";
String password = "********";
String query = null;
String url = null;
Connection con = null;
int counter = 0;
String csvFile = "TransactionView.csv";
BufferedReader br = null;
String line = "";
String cvsSplitBy = ",";
System.out.println("********************************************************");
System.out.println("> INSERTING RECORDS INTO TABLE TRANSACTIONVIEW OF ITSODB");
try
{
Class.forName("com.ibm.db2.jcc.DB2Driver").newInstance();
url = "jdbc:db2://" + serverName + ":" + serverPort + "/"+databaseName;
con = DriverManager.getConnection(url,userID,password);
br = new BufferedReader(new FileReader(csvFile));
while ((line = br.readLine()) != null) {
String[] tx = line.split(cvsSplitBy);
query = "INSERT INTO TRANSACTIONVIEW (TRANSACTIONID, CUSTOMERID, "+
"TRANSACTIONDATE, PRODUCTID, PRODUCTDESCRIPTION, PRODUCTPRICE,"+
"CUSTOMERNAME, CUSTOMEREMAIL) VALUES "+ "("+"'"+tx[0]+"',"+
"'"+tx[1]+"',"+"'"+tx[2]+"'"+",'"+tx[3]+"','"+tx[4]+"',"+
tx[5]+",'"+tx[6]+"',"+"'"+tx[7]+"'"+")";
Statement stmt = con.createStatement();
stmt.executeUpdate(query);
counter++;
}
}catch(Exception e){
e.printStackTrace();
}
finally {
try {
con.close();
} catch (SQLException e) {
e.printStackTrace();
}
}
System.out.println("> TOTAL OF"+counter+" RECORDS INSERTED INTO TRANSACTIONVIEW");
System.out.println("***********************************************************");
}
}
This Java program could be executed from the command line and produces the following results on the standard output console. Example 8-4 shows the execution of the Java program from command line.
Example 8-4 Execution of Java program from command line
> java TransactionView
*****************************************************************
> INSERTING RECORDS INTO TABLE TRANSACTIONVIEW OF ITSODB
> TOTAL OF 100000 RECORDS INSERTED INTO TRANSACTIONVIEW
*****************************************************************
|
Note: Ensure that the DB2 client JAR files are in CLASSPATH while executing this Java program.
|
Now the data is ready in the on-premises database and could be accessed by configuring the Docker client for Secure Gateway.
8.2.2 Setting the Secure Gateway client in the on-premises environment
Secure Gateway service in Bluemix requires a client to be installed in the on-premises environment, and the simplest client implementation to install is one that is already installed in a Docker client (Docker client for Secure Gateway). The on-premises server needs the Docker run time installed, and later the Secure Gateway client needs to be pulled into Docker run time. To install Docker, depending on the operating system, refer to the documentation in the following websites:
•“Installing Docker” explains how to install Docker:
•Bluemix also documents installing the Docker run time. See “Services: Secure Gateway: Docker” in the Bluemix documentation:
When Docker run time is installed, the Secure Gateway client should be pulled in the Docker run time. Example 8-5 shows the installation of the Secure Gateway client in Docker run time.
Example 8-5 Pull Secure Gateway client in Docker run time
$ docker pull ibmcom/secure-gateway-client
latest: Pulling from ibmcom/secure-gateway-client
0ec088cf2a05: Pull complete
798be516e56c: Pull complete
3520f279093f: Pull complete
dc8cb9033694: Pull complete
e19abe4bb3c4: Pull complete
427fb8b33dae: Pull complete
e791321f459d: Already exists
Digest: sha256:acbdaa37538bba312429a1443dfb153d84e95db5b4d02a59388cbb362b0b06de
Status: Downloaded newer image for ibmcom/secure-gateway-client:latest
Now the Secure Gateway client is set up in the on-premises environment and the next step is to set up Secure Gateway service in Bluemix.
8.2.3 Setting Secure Gateway service in Bluemix
The Secure Gateway service provides a secure way to access cloud or on-premises data from Bluemix application through a secure passage. To create an instance of Secure Gateway service, log in to the Bluemix dashboard:
1. In the Bluemix dashboard, select your space. Figure 8-2 shows the selection of Bluemix space hybrid-cloud.
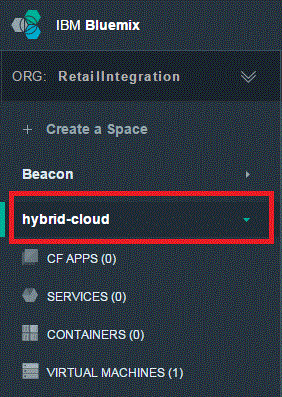
Figure 8-2 Select the space in Bluemix dashboard
2. In the main view of the space, select Use Services or APIs.
3. In the Service catalog, select Secure Gateway service, as shown in Figure 8-3.

Figure 8-3 Secure Gateway service in Bluemix dashboard
4. Create an instance of Secure Gateway using the default setting and leaving it unbound, as shown in Figure 8-4.
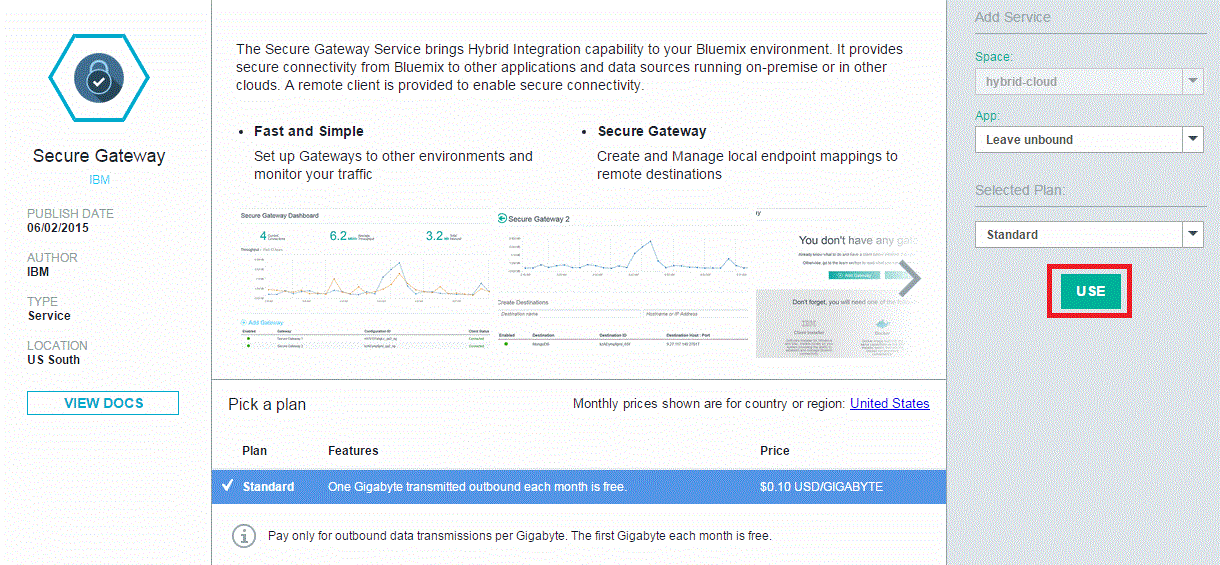
Figure 8-4 Create an instance of Secure Gateway service in Bluemix
5. Rename the Secure Gateway service to Retail DB Secure Gateway.
6. In the dashboard, click the Retail DB Secure Gateway, which then takes you to the service landing page of Secure Gateway.

Figure 8-5 Add a gateway in Retail DB Secure Gateway service
8. In the Add Gateway page, add a short description about the gateway and click I’M DONE, as shown in Figure 8-6.

Figure 8-6 Complete gateway description
9. Click RETAILDB GATEWAY in the Secure Gateway dashboard and its status should show disconnected because none of the Secure Gateway clients are connected yet.
10. Click Connect Gateway to capture the command for executing the Secure Gateway client in Docker. Figure 8-7 shows how to capture the command.
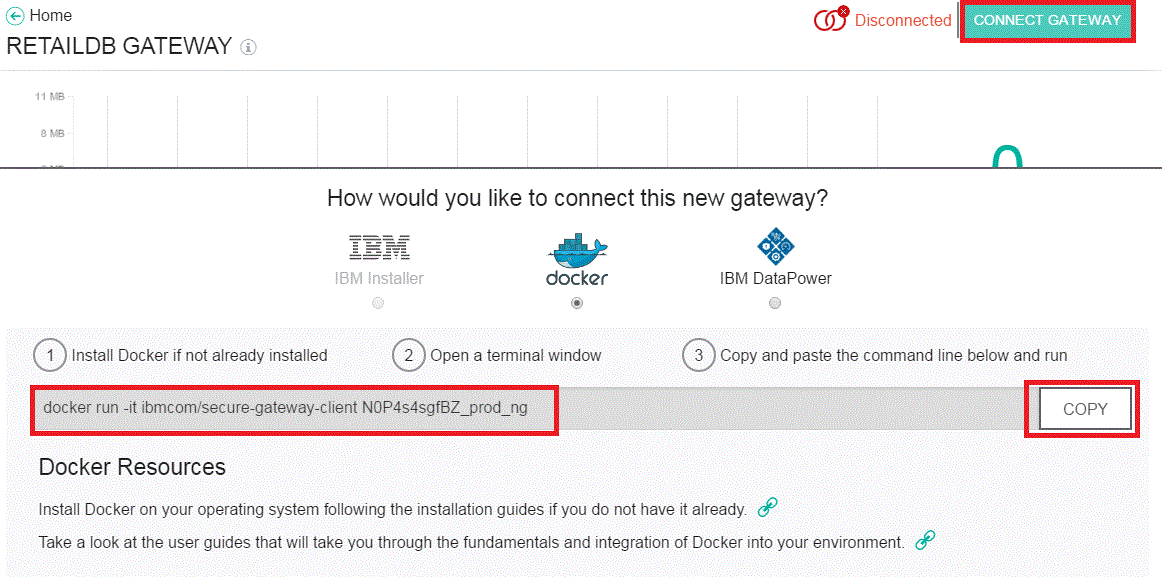
Figure 8-7 Command to run the Secure Gateway Docker client
11. Keep a reference of the following command because it is required to start the Secure Gateway Docker clients later.
|
Note: docker run -it ibmcom/secure-gateway-client N0P4s4sgfBZ_prod_ng
|
Now the Secure Gateway service is created in Bluemix and the next step is to create an instance of DataWorks service.
|
Note: A destination is not added in this gateway because the DataWorks service automatically creates a destination when trying to connect to the database in the on-premises server.
|
Also, refer to “Services: Secure Gateway: Creating a Secure Gateway by using the Bluemix UI” in the Bluemix documentation:
The next step is to create an instance of DataWorks service in Bluemix.
8.2.4 Setting DataWorks service in Bluemix
DataWorks in Bluemix equips users with trustworthy, useful, and relevant data. DataWorks Forge enables users to find data, shape it, and deliver it to applications and systems. To create an instance of DataWorks, log in to the Bluemix dashboard:
2. In the main view of the space, select Use Services or APIs.

Figure 8-8 DataWorks service in Bluemix dashboard
4. Create an instance of DataWorks by leaving the service unbound, and providing it a name Retail DB DataWorks as shown in Figure 8-9.

Figure 8-9 Create an instance of DataWorks service in Bluemix
5. Click Retail DB DataWorks service and it takes you to the landing page of DataWorks service.
6. The DataWorks Forge service is used for exporting data into Watson Analytics in section 8.5, “Exploring data in Watson Analytics” on page 215.
Also, refer to “Services: DataWorks: Adding a DataWorks service to your application” in the Bluemix documentation:
The next step is to configure Watson Analytics service in IBM Cloud.
8.2.5 Create a Watson Analytics user in IBM Cloud
Watson Analytics in IBM Cloud is a breakthrough cloud analytics service for business users. Watson Analytics allows users to make business decisions with confidence by using data exploration predictive analytics features. It allows users to explore data with natural language. To get started with this analytic solution, you need to register for this service in IBM Cloud.
You can register for Watson Analytics service by using the following website:
When registered, use the following Watson Analytics website to access the service:
|
Note: This chapter uses the no-cost account of Watson Analytics. However, you can upgrade at any time based on the features and data to be analyzed. More details about Watson Analytics features and pricing model can be seen at the following website:
|
Now the setup for various components is complete. The next section explains how to start Secure Gateway client to enable data transfer from the on-premises database to Watson Analytics service in IBM Cloud.
8.3 Starting Secure Gateway client
The Secure Gateway service in Bluemix needs a Secure Gateway client to be running in the on-premises host. The Secure Gateway client hosted on an on-premises machine should have access to the on-premises database server and to Secure Gateway services hosted in Bluemix. Typically, this means that the Secure Gateway client should be installed on a machine that is connected to the same network segment (subnet or VLAN) as the host of the database and that is connected to the network connection having access to Bluemix. A good architecture should host the Secure Gateway client machine in a DMZ environment.
The Secure Gateway client can run in a Docker container or in IBM DataPower. This chapter uses Secure Gateway client in a Docker container. The machine simulating on-premises server in DMZ already has a Docker run time installed and the Secure Gateway client pulled into it. Refer to 8.2.2, “Setting the Secure Gateway client in the on-premises environment” on page 201 for more details.
Section 8.2.3, “Setting Secure Gateway service in Bluemix” on page 202 explained how to create an instance of Secure Gateway service in Bluemix. Step 10 on page 204 showed how to capture the command for starting the Secure Gateway client in Docker. The command shown in Example 8-6 is used to start this client from the on-premises host. This command contains the Secure Gateway ID, which tells the Secure Gateway service in Bluemix on which specific Secure Gateway service instance the client is trying to connect.
Example 8-6 Command to start the Secure Gateway client
docker run -it ibmcom/secure-gateway-client N0P4s4sgfBZ_prod_ng
Example 8-7 shows the output of the command shown in Example 8-6. This output shows that the Secure Gateway client is successfully connected to Secure Gateway instance N0P4s4sgfBZ_prod_ng.
Example 8-7 Secure Gateway client connected to service in Bluemix
$ docker run -it ibmcom/secure-gateway-client N0P4s4sgfBZ_prod_ng
IBM Bluemix Secure Gateway Client Version 1.2.2
************************************************************************************************
You are running the IBM Secure Gateway Client for Bluemix. When you enter the provided docker
command the IBM Secure Gateway Client for Bluemix automatically downloads as a Docker image and
is executed on your system/device. This is released under an IBM license. The license agreement
for IBM Secure Gateway Client for Bluemix is available at the following location:
http://www.ibm.com/software/sla/sladb.nsf/lilookup/986C7686F22D4D3585257E13004EA6CB?OpenDocument
Your use of the components of the package and dependencies constitutes your acceptance of this
license agreement. If you do not want to accept the license, immediately quit the container by
closing the terminal window or by entering 'quit' followed by the ENTER key. Then, delete any
pulled Docker image from your device.
************************************************************************************************
>
[2015-08-28 20:06:26.843] [INFO] The Secure Gateway tunnel is connected
The command in Example 8-8 shows the Docker container is running in Docker run time.
Example 8-8 Secure Gateway client running in Docker run time
$ docker ps
CONTAINER ID IMAGE STATUS NAMES
91eb2d2ae546 ibmcom/secure-gateway-client Up 2 minutes reverent_feynman
Figure 8-10 shows the Secure Gateway Dashboard and the client connectivity status on RETAILDB GATEWAY changed from red to green.
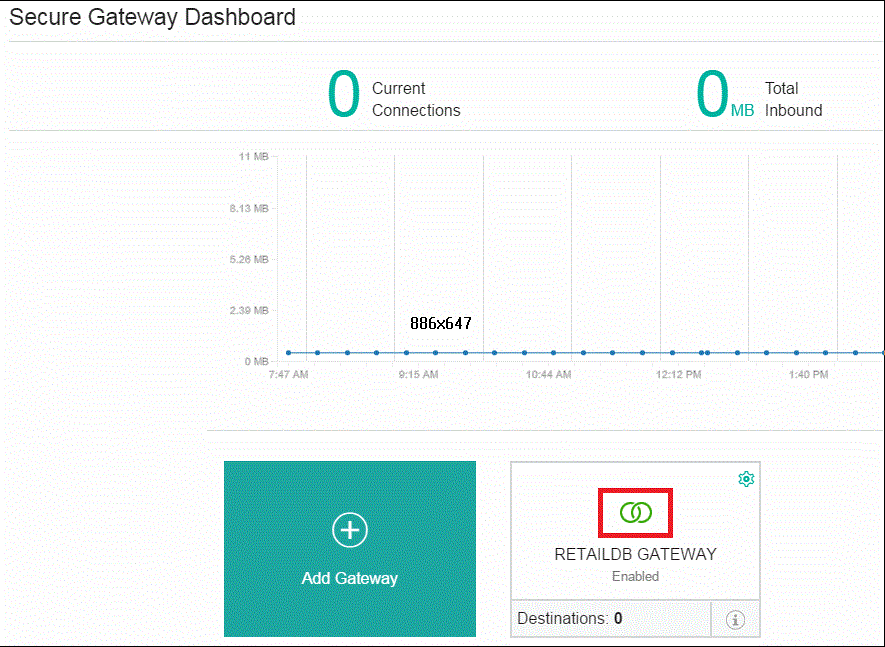
Figure 8-10 Secure Gateway client status in Secure Gateway Dashboard
Now we have the Secure Gateway client connected and the secure tunnel is established between the on-premises host and Bluemix. This system is now ready for transfer of data for Watson Analytics, however, before that, DataWorks needs to be configured to provide visibility of non-confidential data and then copy it to Watson Analytics. Steps to achieve this are executed in section 8.4, “Load data into Watson Analytics” on page 208.
8.4 Load data into Watson Analytics
DataWorks Forge allows you to identify relevant data, transform the data to suit user needs, and load it to a system for use. The instance of DataWorks service created in section 8.2.4, “Setting DataWorks service in Bluemix” on page 205 is used to load data from the on-premises database into Watson Analytics. To read more about DataWorks Forge, see the following website:
To use the DataWorks Forge service to load data into Watson Analytics, use the following steps:
1. In Bluemix dashboard, click the DataWorks service created earlier. This takes you to the Retail DB DataWorks dashboard. As shown in Figure 8-11, click IBM DataWorks Forge service to extract data from the on-premises database and load it into Watson Analytics.
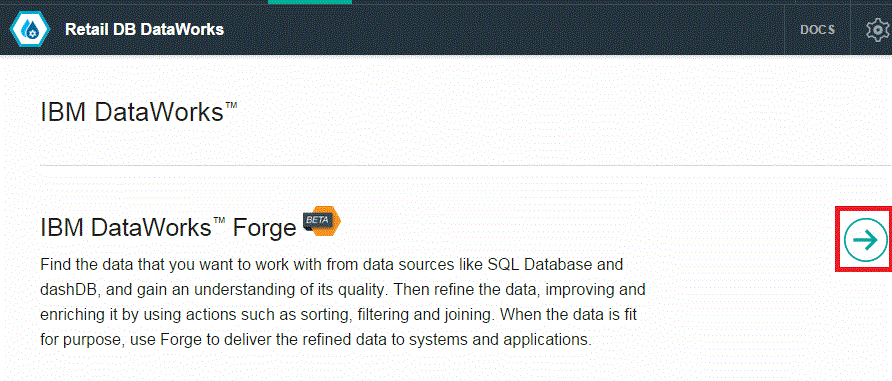
Figure 8-11 IBM DataWorks Forge
2. In the IBM DataWorks Forge application, start by adding the IBM DB2 data source, as shown in Figure 8-12.

Figure 8-12 Add a DB2 data source in IBM DataWorks Forge
3. The next step is to create a connection for this data source by using the connection details provided in Table 8-2.
Table 8-2 Connection property, detail, and value for IBM DB2 data source
|
Property
|
Detail
|
Value
|
|
Connection name
|
Name of the connection and a destination with the same name will be created in the Secure Gateway
|
RETAILDB
|
|
Connection description
|
Description for this connection
|
Connection for RETAILDB
|
|
Secure gateway
|
Secure Gateway created for this service
|
Select the Gateway with gateway ID N0P4s4sgfBZ_prod_ng
|
|
Host
|
Host IP for on-premises DB2 server
|
192.168.0.4
|
|
Port
|
TCP port for DB2
|
50000
|
|
Database
|
Name of the database
|
RETAILDB
|
|
User
|
User name to access DB2
|
********
|
|
Password
|
Password for the user name
|
********
|
4. As shown in Figure 8-13, click Connect to establish connection to RETAILDB database after adding the connection details.
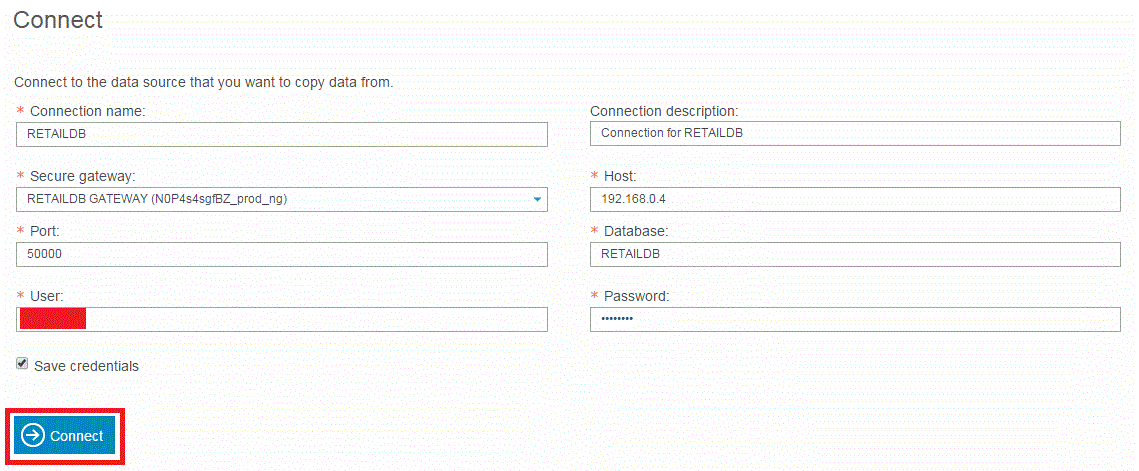
Figure 8-13 Establish connection to RETAILDB
5. The connection request is sent through the Secure Gateway and the Secure Gateway client logging shows information, such as when connections from the gateway are open and closed, as shown in Example 8-9.
Example 8-9 Gateway client logging information
[2015-08-30 00:38:51.160] [INFO] The Secure Gateway tunnel is connected
[2015-08-30 00:39:37.504] [INFO] Connection #0 is being established to 192.168.0.4:50000
[2015-08-30 00:39:43.832] [INFO] Connection #0 to 192.168.0.4:50000 was closed
[2015-08-30 00:41:38.130] [INFO] Connection #1 is being established to 192.168.0.4:50000
[2015-08-30 00:41:40.901] [INFO] Connection #1 to 192.168.0.4:50000 was closed
[2015-08-30 00:41:42.719] [INFO] Connection #2 is being established to 192.168.0.4:50000
[2015-08-30 00:41:46.900] [INFO] Connection #2 to 192.168.0.4:50000 was closed
6. Select the table and columns from which the data needs to be loaded into Watson Analytics. As shown in Figure 8-14, select columns in table TRANSACTIONVIEW, omitting two columns related to customer name and customer email, and then click Complete.
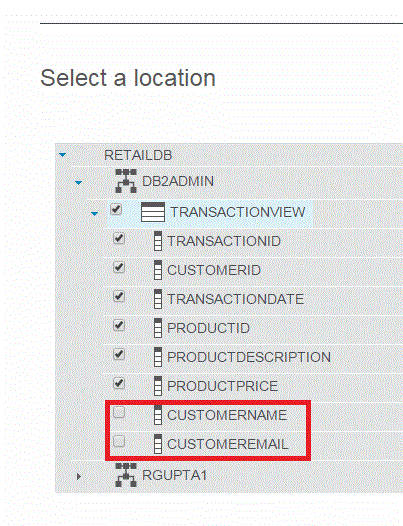
Figure 8-14 Select data to be loaded into Watson Analytics
7. Click Copy and then select the destination for copying this data. Select IBM Watson Analytics as shown in Figure 8-15.
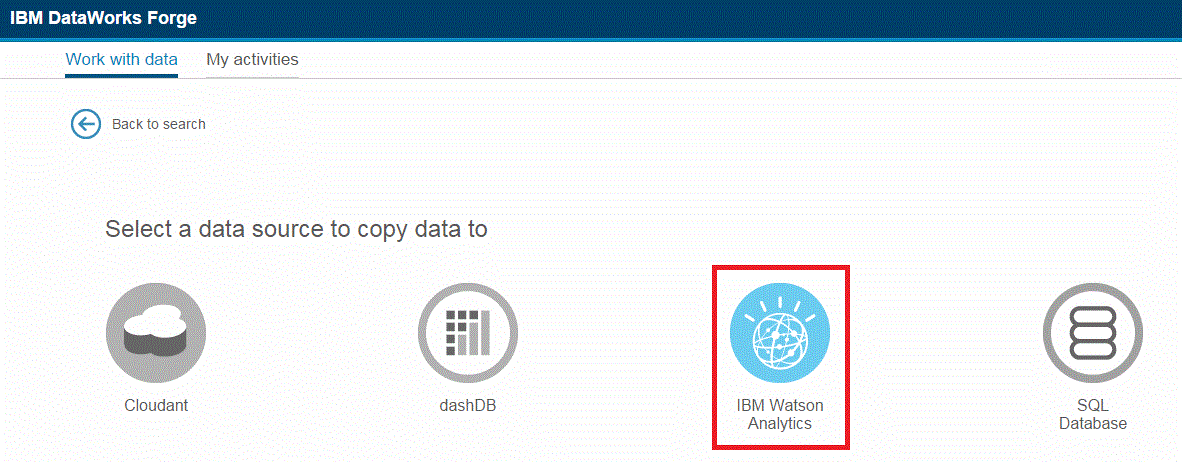
Figure 8-15 Select destination as Watson Analytics
8. Add the connection details for Watson Analytics by using the connection details provided in Table 8-3.
Table 8-3 Connection property, detail, and value for Watson Analytics service
|
Property
|
Detail
|
Value
|
|
Connection name
|
Connection name for Watson Analytics service
|
RETAILDB_WATSON
|
|
Connection description
|
Connection description
|
Watson Analytics Connection
|
|
User
|
User name for Watson Analytics service
|
***********************
|
|
Password
|
Password for Watson Analytics service
|
***********************
|
9. As shown in Figure 8-16, click Connect after adding the connection details for Watson Analytics service. Refer to 8.2.5, “Create a Watson Analytics user in IBM Cloud” on page 206 for registering with Watson Analytics service.
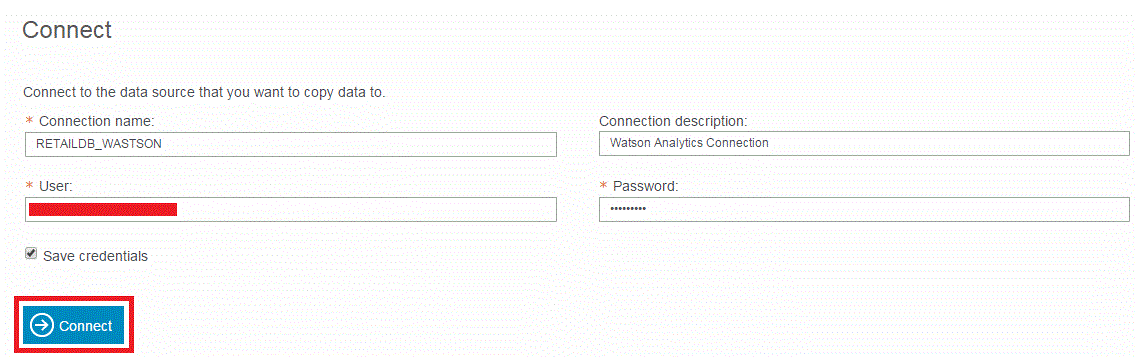
Figure 8-16 Establish connection to Watson Analytics service
10. Data can now be loaded into Watson Analytics service by creating an activity, as shown in Figure 8-17.
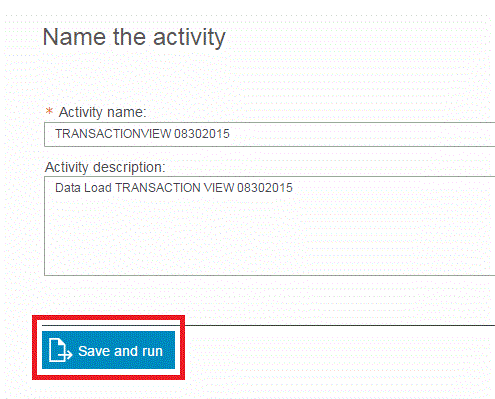
Figure 8-17 Watson Analytics activity
11. The Monitoring tab can be used to check the status of this activity. Figure 8-18 shows the successful completion of a data load in Watson Analytics service.

Figure 8-18 Successful completion of data upload in Watson Analytics
12. Sign in to Watson Analytics dashboard by using the following URL to validate if the data is successfully loaded:
Figure 8-19 shows that a data set for the TRANSACTIONVIEW table from RETAILDB was successfully loaded into Watson Analytics. This data set can now be used for exploration, prediction, and assembling charts.

Figure 8-19 Data set available in Watson Analytics
8.5 Exploring data in Watson Analytics
This section shows how the data uploaded in Watson Analytics can be used to explore data in natural language:
1. Sign in to Watson Analytics dashboard and click data set DB2ADMIN.TRANSACTIONVIEW to create a new exploration, as shown in Figure 8-20.
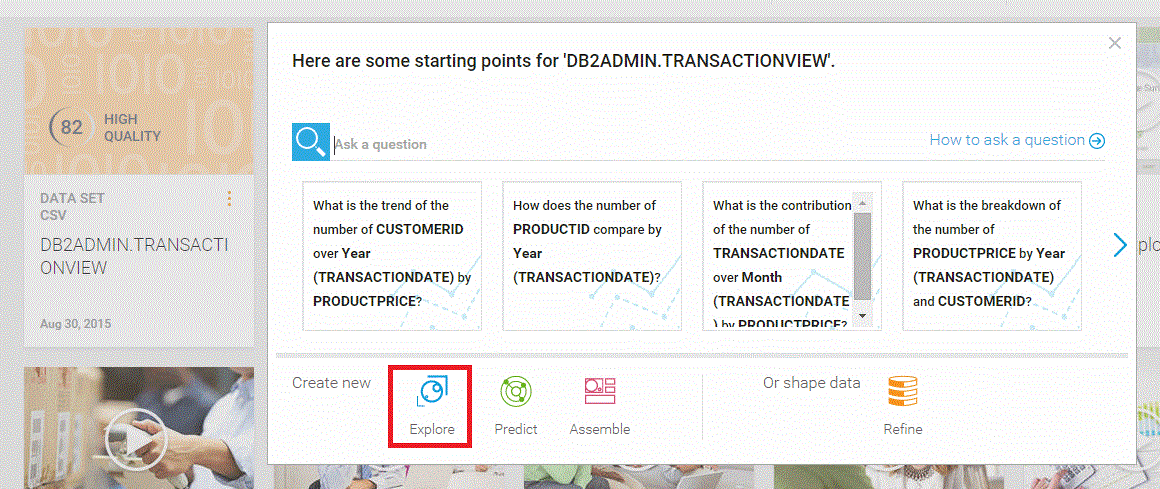
Figure 8-20 Create a new exploration in Watson Analytics
2. As shown in Figure 8-21, a data analyst can type a question in natural language to explore the data set.
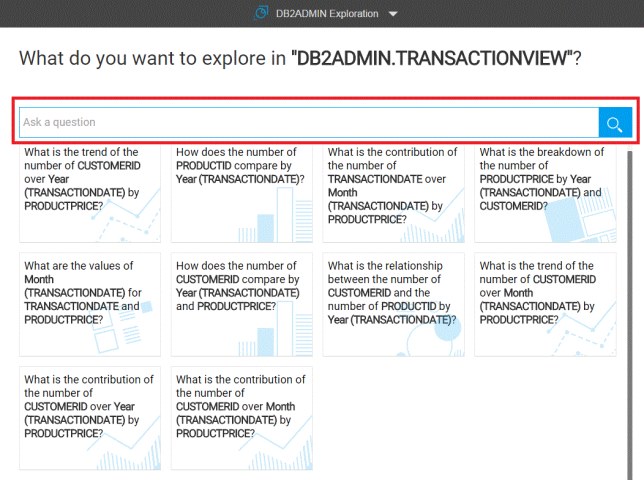
Figure 8-21 Explore data set in natural language
3. The data analyst wants to know the answer for the most selling product in retail stores, so the analyst types a question in natural language shown in Figure 8-22 on page 217. Watson Analytics responds and recommends exploration areas. Click the box showing the question “What is the breakdown of the number of Rows by PRODUCTID?”
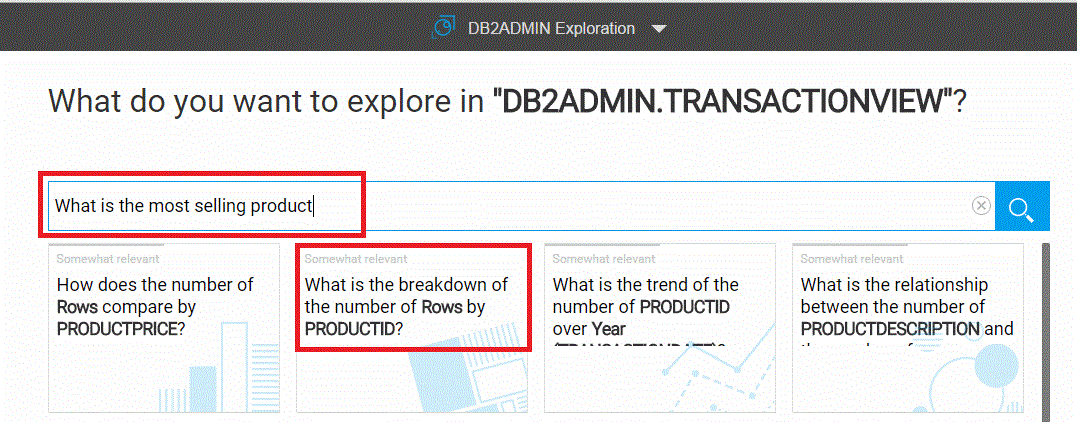
Figure 8-22 Ask a question in natural language
Figure 8-23 shows a treemap showing the highest selling product ID in the given data set of TRANSACTIONVIEW from RETAILDB.

Figure 8-23 Treemap for highest selling product ID
4. The treemap can be re-created by changing the field from PRODUCTID to PRODUCTDESCRIPTION, as shown in Figure 8-24. The highest selling products are canned peas, canned tomatoes, and canned beans.

Figure 8-24 Treemap for the highest selling product
8.6 Conclusion
This chapter explained the step-by-step procedure to load data from cloud or on-premises databases into Watson Analytics service in IBM Cloud. It also provides instructions to perform the following actions:
•Load sample data in IBM DB2 databases.
•Configure the Secure Gateway service in Bluemix and the gateway client in on-premises server.
•Configure the DataWorks service in Bluemix.
•Use DataWorks Forge to load data in Watson Analytics.
•Explore data in natural language in Watson Analytics service.
With this knowledge, users can configure Secure Gateway and DataWorks to access data in on-premises databases and then analyze the data set in Watson Analytics service.
..................Content has been hidden....................
You can't read the all page of ebook, please click here login for view all page.