


Multitenancy
Multitenancy provides the option to allocate storage resources to several independent administrative domains. This capability means that any resource that is allocated to a specific domain can be seen and acted upon within that domain only. Other resources are considered to be global resources that can be used or seen by all domains, such as the System view, the Fibre Channel (FC) and internet Small Computer System Interface (iSCSI) ports, and events on the system.
Multitenancy provides several advantages:
•Secure division and isolation of storage resources among numerous tenants
•Simple, quick delegation of administration tasks and role-based permissions
•Simple, rapid deployment without the need for extensive planning and tuning, and also field upgradability
In this chapter, we cover the details of domain administration by using the Hyper-Scale Manager with IBM XIV Gen3, IBM FlashSystem A9000 and A9000R, and IBM Spectrum Accelerate software.
4.1 Multitenancy
Today, many organizations are moving toward cloud-based infrastructures, where both compute and storage resources are viewed as commodity services. Users of these resources expect a pay-as-you-go model, where the resources that they require are rapidly available when needed, but they pay only for the resources that they require, nothing more. For storage providers, this shift represents a significant challenge.
From both capital expenditure and resource management (personnel) perspectives, storage consolidation becomes an important consideration. This new approach necessitates storage systems that can easily and securely support the provisioning, administration, and service level management of storage resources for multiple resources to be used concurrently.
The multitenancy of IBM XIV Gen3, IBM FlashSystem A9000 and A9000R, and IBM Spectrum Accelerate software brings flexibility and simplicity to management of tenant data and storage resources across one or more systems. In this chapter, we cover a summary of the domain objects and the details of domain administration by using management tools.
4.1.1 Domains
With IBM XIV Gen3, IBM FlashSystem A9000 and A9000R, and IBM Spectrum Accelerate software, multitenancy is realized through the concept of domains. A domain is a logically partitioned container (more than one can exist in a system) with its own administrators and resources. This partitioning enables the secure isolation of users and resources among domains.
Domains enable the ability to control what object a user can perform actions on. A user is able to see and act upon resources only within the domains they are associated with. When a domain user connects to a system using either the graphical user interface (GUI) or command-line interface (CLI), they can access only the resources within their domains.
IBM XIV Gen3, IBM FlashSystem A9000 and A9000R, and IBM Spectrum Accelerate software uses a role-based access control (RBAC) model to control what actions a user can perform. For more information about the available user roles, see Chapter 3, “Security” on page 95.
Domains can be associated with the following objects:
•Users and user groups
•Storage pools and all of their content, which can be associated with only a single domain
•Hosts and clusters
•Remote mirror targets
|
Important: The implementation of domains occurs at the management and virtualization level. All physical system resources (IBM MicroLatency® modules, CPUs, memory, and interfaces) are shared among domains.
|
Domain administrators cannot modify physical system resources and they cannot access resources that belong to another domain, including the “global domain” resources of the system. However, they can be notified of events that relate to physical system attributes because these events might affect the objects within their domain. For example, a domain administrator can be alerted upon the failure of a MicroLatency module or the disconnection of an interface link.
4.1.2 Domain attributes
A domain is assigned resources, including capacity and the maximum number of pools, volumes, consistency groups, mirrors, and data migrations that can be used in the domain. The global storage administrator (the storage administrator of the entire IBM XIV Gen3, IBM FlashSystem A9000 and A9000R, or IBM Spectrum Accelerate software defines these numbers when the global storage administrator creates a domain.
The global administrator must remember that these numbers are system-wide numbers. The global administrator must ensure that other domains have the required number of resources available for use. These other domains include resources that are used and that are not in a domain. Resources that are not in a domain are known as “global space” resources.
4.1.3 Global administrators and domain administrators
The same user roles in IBM XIV Gen3, IBM FlashSystem A9000 and A9000R, and IBM Spectrum Accelerate software can also be assigned to users within a domain. The main difference between users is with the storage administrator. A super user or overall administrator, which we refer to as the global administrator, is required to create domains. The global administrator then can create a new storage administrator user and associate that user with a domain.
The domain storage administrator, after they log in to the system through either the GUI or CLI, can then manage their domain in the same way that the global administrator can manage the domain, including creating users, such as an application administrator and backup storage administrators.
|
Note: The domain administrator cannot create a domain within a domain.
|
The domain administrator is also limited in the amount of capacity that is assigned to the domain by the global administrator. This capacity can be in the form of free space and predefined pools. If extra space is needed for the domain, the domain administrator must request more space from the global administrator.
The global administrator also sets how many objects can be created within the domain. To accurately account for the system-wide requirements, the global administrator must plan carefully to ensure that the domain and global space requirements are met. For example, the domain might be allotted four storage pools and 30 volumes. This number contributes to the total for the system-wide allocation.
4.1.4 Domain policy
|
Note: The security administrator of the system has the authority to set the domain policy to closed or open, depending on business needs.
|
The domain policy can be set to open or closed with the CLI by the security administrator. The command to do this is domain_policy_set. Let’s look at what these settings mean.
Open policy
If the policy is set to open, the global administrator is able to see several attributes of the domain, such as the number of pools and volumes, but the global administrator cannot see any attributes of those resources, such as the name or size of a pool or volume.
In addition, the domain administrator can add resources and modify attributes for an existing domain if the domain administrator requests additional capacity for the domain or needs to create additional pools, volumes, and other objects but reached the limit for their domain.
With the domain policy set to open, the global administrator can address these requests while still managing those finite system-wide resource limits, such as the maximum number of volumes in a system, to ensure that enough resources exist for all of the users of the system.
Closed policy
If the policy is set to closed, the global administrator has no access to any domain other than the global domain (the resources that are not contained in any domain). The global administrator can still create a domain but after the domain is created, the global administrator has no view or access to the domain.
If any changes need to be made to the domain resources, the security administrator must change the domain resources or change the domain policy back to open for the global administrator. This setting is system-wide so all domains are inaccessible to the global administrator, except for the global space, after the policy is set to closed.
All of the examples in the next section, 4.2, “Managing domains with the GUI” on page 114, were run with the domain policy set to open.
4.2 Managing domains with the GUI
Domains are managed by the domain administrator. The global administrator (which is also called the storage administrator) cannot manage the resources within a domain, but they can add capacity, pools, users, hosts, clusters, and targets to a domain if the domain policy is set to open. The day-to-day operations within a domain are performed by the domain administrator.
The domain administrator can add a user who has access only to resources within the domain. The domain administrator can also add a performance class on a pool or volume within the domain. A global administrator can define iSCSI and Fibre Channel interfaces, as these resources are not unique to a domain. A domain administrator cannot perform any actions on these interfaces. The domain administrator can access alerts and events that affect system-wide resources and domain resources.
In this section, we describe the following topics:
•Creating domains
•Viewing and editing domain properties
•Managing domain associations
•Managing from within a domain
•Removing domains
Managing domains with the GUI is simple. You can access the Domain view as shown in Figure 4-1. A tabular view is displayed of all of the domains that are configured on the system (or systems if multiple systems are managed by Hyper-Scale Manager) and the global space. After the list of domains is displayed, you can select a domain and then use the Actions menu to manage the domain and resources.
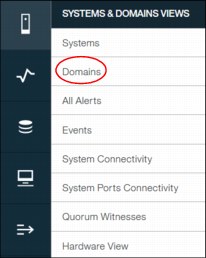
Figure 4-1 SYSTEMS & DOMAINS VIEWS
4.2.1 Creating domains
It is a simple process to create a domain with the Storage Management GUI of IBM XIV Gen3, IBM FlashSystem A9000 and A9000R, and IBM Spectrum Accelerate software:
1. Select New from the top navigation pane to open the CREATE NEW menu with a listing of all of the objects that can be created within this menu. Domain is the first item in the list.
2. By clicking Domain, as shown in Figure 4-2, a new wizard opens with all of the attribute fields for the domain.

Figure 4-2 Create a domain
3. Fill out the required information for creating a domain, as shown in Figure 4-3.
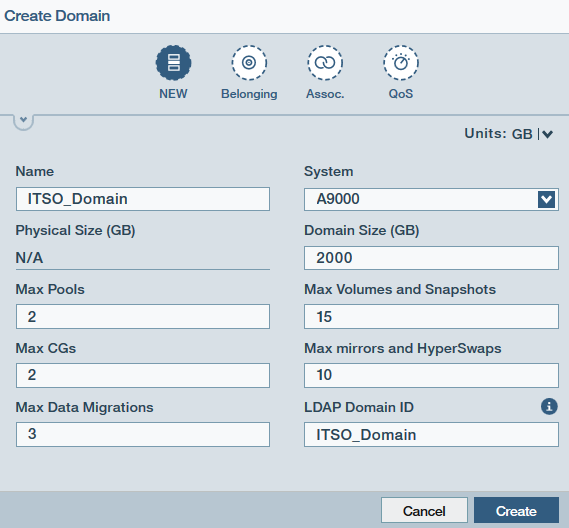
Figure 4-3 New domain attributes
In this example, we created a domain with a maximum capacity of 2000 GB on an IBM FlashSystem A9000 system.
The fields that are shown in Figure 4-3 are described in detail in Table 4-1.
Table 4-1 Domain attributes
|
Field name
|
Description
|
|
Name
|
The logical name of the domain. It must be unique within a system.
|
|
System
|
IBM XIV Gen3, IBM FlashSystem A9000, IBM FlashSystem A9000R or IBM Spectrum Accelerate software where the domain will be defined.
|
|
Size (GB)
|
The capacity that is given to the domain that can be used to create pools within the domain, the minimum capacity is 2000 GB for IBM FlashSystem A9000 and A9000R.
|
|
Max Pools
|
The maximum number of pools that can be configured within this domain.
|
|
Max Volumes and Snapshots
|
The maximum number of volumes and snapshots that can be defined within this domain.
|
|
Max CGs
|
The maximum number of consistency groups that are allowed within this domain.
|
|
Max mirrors and HyperSwap
|
The maximum number of remote mirrors and HyperSwap operations that are allowed within this domain.
|
|
Max Data Migrations
|
The maximum number of active data migrations that can be defined within this domain at any time.
|
|
LDAP Domain ID
|
The ID attribute of the domain to use when you configure multitenancy with Lightweight Directory Access Protocol (LDAP) authentication. The default is set to the name of the domain.
|
|
Note: By default, the LDAP Domain ID field is populated with the value of the Domain Name. You can modify this value to a name other than the Domain Name. If you clear the field, the LDAP Domain ID value is automatically set to the value of the Domain Name.
|
4. You can now verify that the domain was created by using the Domains view, as shown in Figure 4-4. In addition to the new domain, the Global Space (global domain) is also listed. The Global Space is the view of the entire system resources that are not associated with a domain on the system.

Figure 4-4 Domain list
4.2.2 Customize the Domain view
First, we describe the customization of this tabular view for domains. Default settings for the view must be changed as needed after the view is closed. After you are in the Domain view, right-click anywhere in the headings, which opens the menu to view the default settings and to customize what you see in this table. An example is shown in Figure 4-5, specifically looking at the domain Associations. In this view, the box next to the fields either shows a check mark or a selection indicator.
The selection indicator means that all of the items within that category were not selected. The check mark indicates that this field or all of the fields within the category are visible in the table. In our example, the Hosts option is the only item that is selected under Associations. You can also choose to see Clusters, Users, User Groups, and Targets from this category.
Figure 4-5 shows you how to customize the Domain view.

Figure 4-5 Customize the tabular view of domains
By using this technique, you can customize the tabular view for domains to suit your needs. You can then save this view either as a filter or sidebar, as shown in Figure 4-6. After the view is saved, this user will see this view every time they log on to the GUI. Alternatively, you do not have to save the customized view.

Figure 4-6 Save the customized view
4.2.3 Adding a user to a domain
To manage local user associations with a domain select the User view, as shown in Figure 4-7. By selecting one of the users, the properties of that user display to the right of the list, as shown in Figure 4-7.
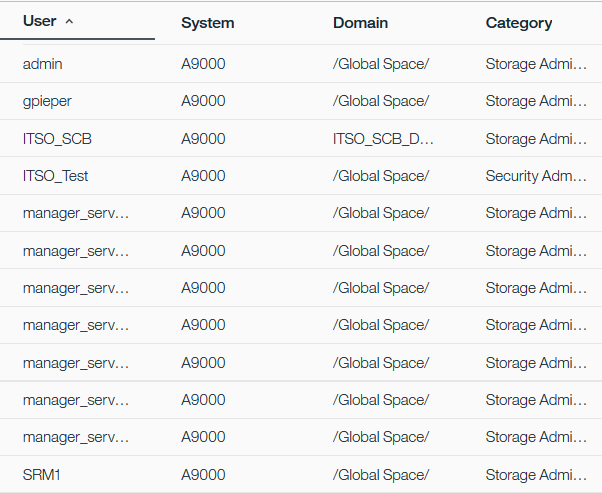
Figure 4-7 User list
We look at the necessary steps to add a user to a domain. In this example, we selected the user ITSO_Test with the storage administrator role. In the Properties view of this user in Figure 4-8, the user is not yet associated with a domain.
|
Global Space: A user that is not associated with a specific domain is designated as Global Space in the domain field.
|
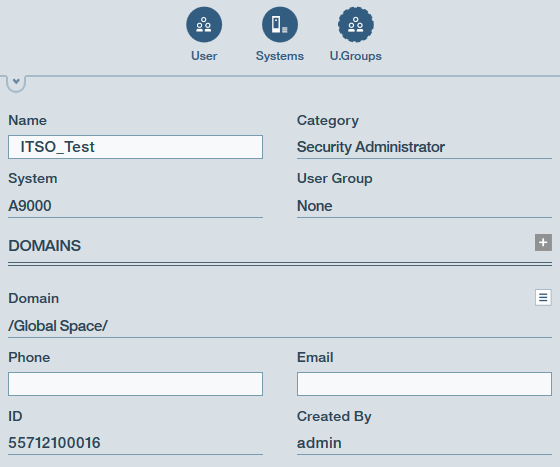
Figure 4-8 User properties
By clicking the plus sign (+) in the Domains section of the User Properties view, a list of the current domains is displayed (as shown in Figure 4-9). In this example, two domains are shown. Alternatively, you can launch the Create Domain wizard by clicking Create Domain. For this example, we selected ITSO_Domain and selected Apply.

Figure 4-9 Associate a user with a domain
This action results in a warning message, which is shown in Figure 4-10. The system is warning the storage administrator that the particular user will lose all global privileges of the system. A user that is associated with a domain can access the resources that belong to that domain only.
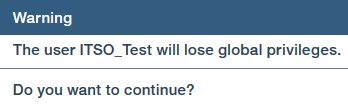
Figure 4-10 Warning message
|
Important: Associating a global user with a domain removes the global privileges from that user. Therefore, that user can only access domains that the user is associated with. For a local user that is associated with one or more domains, removal of that local user from its last domain association results in the deletion of the user itself from the system. A user cannot be converted from a domain user to a global user.
|
Figure 4-11 shows the user that was created in the Users view. The Domain field lists ITSO_Domain as the associated domain for this user.
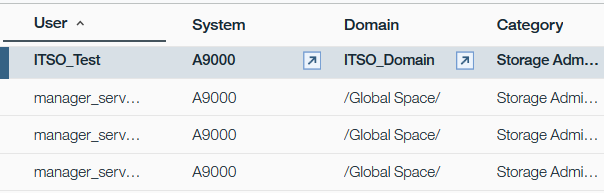
Figure 4-11 New user that is listed
|
Reminder: If the domain policy is set to closed, this user is no longer visible by the global administrator.
|
4.2.4 Domain properties
After a domain is created, a global administrator with a storage administrator role can manage the system resources that are associated with that domain if the domain policy is set to open. We first look at the domain properties as shown in Figure 4-12. You can see this view by first selecting the Domains view, clicking a specific domain, and selecting Actions.

Figure 4-12 Domain properties
Under the Properties section, the global administrator can perform the following tasks:
•View domain properties
•Rename a domain
•Resize a domain
•Modify object limits, such as pools and volumes
Most of these tasks are self-explanatory. We describe the option Modify Object Limits in more detail. After you select Actions → Modify Object Limits, the properties of the domain are shown to the right of the tabular view, which is displayed in Figure 4-13. The editable fields are shown in a lighter-colored or dark blue box, such as Size (GB).
The global administrator can change the domain based on requirements or requests from the domain administrator, such as requesting an increase in the number of volumes that the domain can configure and use.
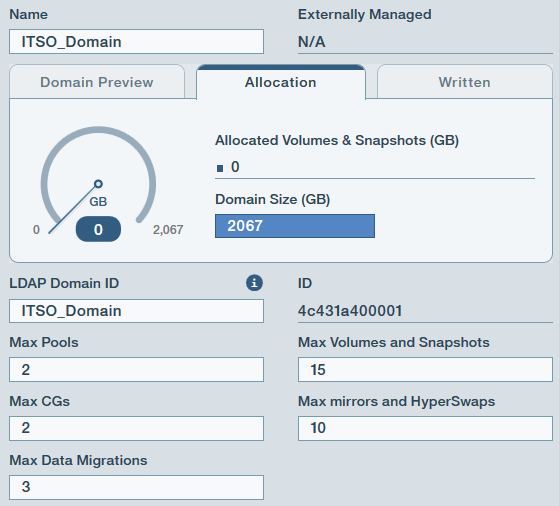
Figure 4-13 Modify domain objects
After the changes are made, the global administrator clicks Apply. The changes take effect immediately, and they are ready for use by the domain administrator. Other changes can be made as needed in this section.
|
Note: Although we selected 2000 GB for the domain size, the system rounded the value to 2067 GB.
|
4.2.5 Managing domains
From the Actions menu that is shown in Figure 4-12 on page 120, the global administrator can manage various aspects of a domain, as explained in the following sections.
Managing domain pools and systems
The global administrator can globally manage a domain by using the Pools, Systems option. The View Pools/Systems and Create Pool Here options are shown in Figure 4-14.
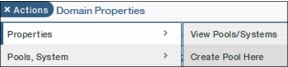
Figure 4-14 Domain: Pools and systems
Figure 4-15 shows an example of the View Pools/Systems output. This information is displayed to the right of the tabular view under the Hub graphic. This information can also be seen in the tabular view with customization of the view. Although the GUI displays the name of the system to which the domain belongs, the GUI does not return any details about the pools other than the number of pools that are configured within the domain.

Figure 4-15 Domain: List of pools and systems
When you select Create Pool Here (Figure 4-16 on page 123), the information displays to the right of the tabular view. This selection opens the Create Pool wizard. The details for the new pool need to be completed. The system and domain fields are prepopulated based on where the wizard was launched from.
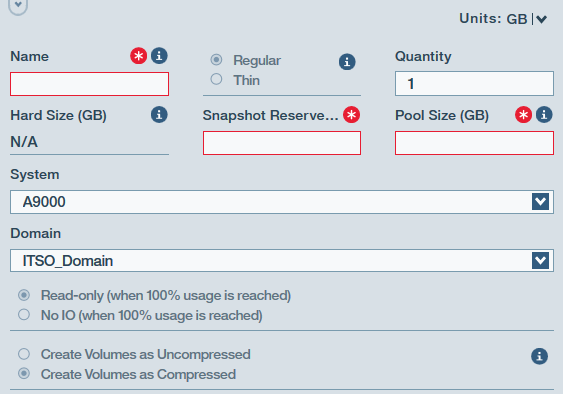
Figure 4-16 Create a pool for a domain
Figure 4-17 on page 124 shows an example of the completed fields. Despite arriving at this wizard from the Domain view, you can change the system and the domain through the drop-down lists as indicated in the example.
|
Tip: Enough space must be left in the domain for the requested pool size or the system does not allow the creation of the pool.
|
After the global administrator clicks Apply, the new pool is associated with the domain and ready for use. After the pool parameters are set and applied, the pool size is automatically rounded up, as shown in Figure 4-17 on page 124. To view the pool and change any information, select the Pool view. The global administrator uses this selection to change the pool, including the domain which it belongs to, if the domain policy is set to Open.
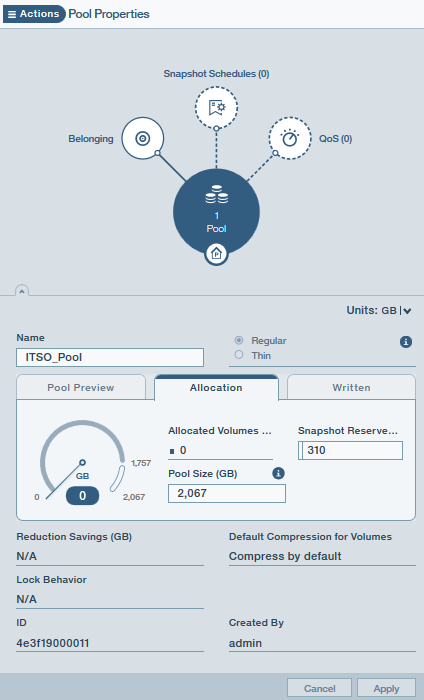
Figure 4-17 New pool properties
|
Important:
•Attempting to add a pool to a domain that is larger than the domain’s free capacity will fail.
•Associating an existing pool that has preexisting resource associations (hosts, clusters, or targets) with a domain, automatically associates those resources with the domain.
•Associating an existing pool with a domain when it has a preexisting association with another domain removes the association with the other domain.
•A pool can belong to only one domain at a time.
|
After the pool is created with this method, the Pool view is displayed, as shown in Figure 4-18.
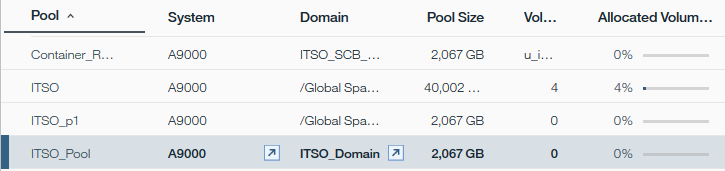
Figure 4-18 Viewing the new pool and domain association
Figure 4-19 shows the graphical Hub view of the domain associations. We expanded the Belonging circle, which shows that the domain is associated with one system and one pool. The global administrator can also create and associate a new pool from this view by selecting NEW on the listed pool line.

Figure 4-19 Graphical domain pool list
Domain capacity
This action allows the storage administrator to generate a capacity report for just the domain. Figure 4-20 shows the Domain Capacity option under the Actions menu. The Capacity Trend/Forecast Report option is available under Domain Capacity.
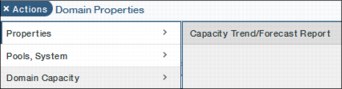
Figure 4-20 Generate domain capacity report
After you select this option, Hyper-Scale Manager generates the report and automatically downloads it through the browser to your workstation, as shown in Figure 4-21.

Figure 4-21 Downloading the capacity planing report
|
Restriction: The domain administrator can generate a capacity planning report, but the domain administrator can see resources from the domain only, not system-wide resources.
|
Domain associations
The next section under Domain Actions is Association. Two options exist: View Associations and Unassociate All, as shown in Figure 4-22.

Figure 4-22 View domain associations
Looking at the details that are displayed with View Associations, we can see the Hub figure that is shown to the right of the tabular view (Figure 4-23). Here, you can see the number of objects that are associated with the domain under each category in a graphical view. The association categories are listed:
•Hosts
•Clusters
•Targets (for mirroring, HyperSwap or migration)
•Users
•User Groups
This domain is new, so the only association is a single user. Again, no details about the associations are shown, just the quantity for each category.

Figure 4-23 Domain users
On Figure 4-22, by selecting Unassociate All, you remove the associations to the domain.
|
Reminder: Unassociating all objects from a domain deletes the users from the system if they are not associated with another domain. The user running the command will not be removed from the system. “Users cannot remove themselves”.
|
Domain quality of service
The global administrator can also assign a performance class to a domain by setting a quality of service for the domain. For information about quality of service, see 4.3, “Performance classes (quality of service)” on page 135.
Domain statistics
The next option on the Actions menu is the Statistics option. Two options are available: Show Performance Statistics and Show Capacity Statistics, as shown in Figure 4-24.

Figure 4-24 Domain statistics
In our example, we select Show Performance Statistics for the domain from the Actions menu. This action causes the Statistics view to expand, as shown in Figure 4-25.
From this view, you can select a specific interface and other statistical views as shown in the drop-down list. Two buttons are available on the upper-right side of this view. If the plus sign (+) is selected, a new statistics window opens above the current statistics window. The domain administrator can use this new window to see multiple options in the same view. By clicking x, the domain administrator closes this expanded view and returns to the summary, as shown in Figure 4-25.
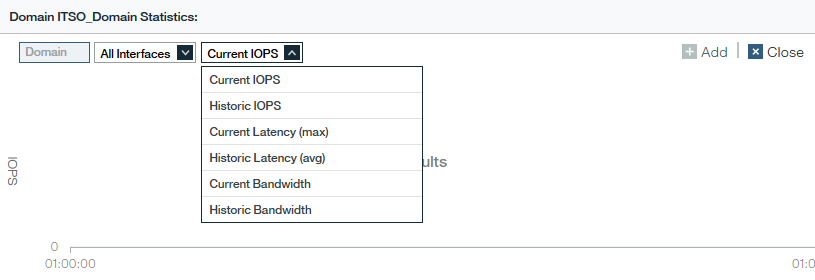
Figure 4-25 Expanded statistics view
4.2.6 Managing within a domain
Up to this point, we focused on what the global administrator can do with a domain if the domain policy is set to Open. We briefly look at the view from the perspective of the domain administrator with the storage administrator role.
After the domain administrator connects to the GUI, the Dashboard view is shown, as with all other users. However, the amount of capacity and the amount of potential capacity that are seen by this user are restricted. We look at the All Systems table view, as shown in Figure 4-26. The state of the system and version are the same as with the global administrator but the amount of capacity that is seen by this user is less.
Figure 4-26 All Systems view for the domain administrator
We can see a similar view when we look at the Hub and System Properties, as shown in Figure 4-27.

Figure 4-27 System Properties from the domain administrator’s viewpoint
The domain administrator can also look at the hardware view of the system. Because these resources affect the domain, this user can view the hardware but this user cannot perform any actions against the hardware. An example with an expanded view of a flash enclosure is shown in Figure 4-28.

Figure 4-28 Hardware view for the domain administrator
The domain administrator can look in more detail at other hardware components but the domain administrator can view only. Any actions that are taken on these global resources are reserved for the global administrator.
In Figure 4-29, when the domain administrator attempts to look at the capacity view for the systems, a message is displayed about who can view this information (the global domain administrator, which is also referred to as the global administrator in this chapter).

Figure 4-29 Capacity view restricted
We look at several of the common activities of the domain administrator. All of these actions are covered in other parts of this book, including Chapter 2, “Storage management and configuration” on page 33, we point out several tasks that differ slightly for the domain administrator.
We first look at creating a pool. The domain administrator clicks NEW in the upper-right corner of the menu and selects Pool from the list, as shown in Figure 4-30. Selecting this option opens the new pool wizard.

Figure 4-30 Domain administrator creates a pool
|
Restriction: A domain administrator is unable to create a domain. Attempting to create a new domain results in failure.
|
After the wizard is displayed, the domain administrator completes the required fields. The size of the pool cannot exceed the size of the domain. If the domain administrator tries to create a pool that is larger than the domain, the Hyper-Scale Manager GUI displays a message that indicates insufficient free space. In addition, the domain administrator must select their domain from the list and their system. An example is shown in Figure 4-31.

Figure 4-31 Create a pool within a domain
Also, only the domains that the domain administrator has authority to access display in the list of available domains (Figure 4-32).
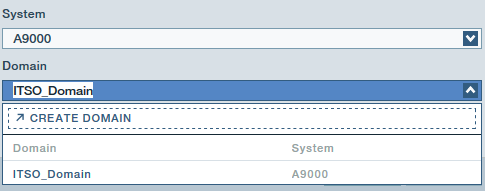
Figure 4-32 List of domains for a new pool
After the pool is created, the domain administrator can create volumes within the pool container. Although the new volumes wizard can be launched from the NEW option as shown in Figure 4-30 on page 130, we show another path to launch the wizard, which automatically prepopulates several of the fields. From the pools table view, select a pool and then click Actions. From the list of actions, select Volumes and click Create volumes here as shown in Figure 4-33.

Figure 4-33 Create volumes from the pool view
After the Create Volume wizard opens, the system and domain fields are prepopulated based on the pool that was selected in the table view. Even though these fields can be changed if needed, the wizard takes care of this step for you. An example is shown in Figure 4-34.

Figure 4-34 Create a volume within a domain
The domain administrator can list only the volumes within the domain that they are associated with. Although many more volumes might be on the system, only those volumes in the domain or domains are listed. An example is shown in Figure 4-35. The volume in this list is associated with a domain, unlike the volumes that the global administrator sees if the domain policy is set to Open (all global space volumes and domain volumes).

Figure 4-35 Volumes within a domain
An example of what the global administrator sees is shown in Figure 4-36.

Figure 4-36 Global administrator’s view of volumes
The domain administrator can create as many volumes and pools as are allocated for the domain by the global administrator. If the domain administrator runs out of capacity to create pools or volumes, a request for more capacity can be made. Only the global administrator can increase the capacity and the number of pools and volumes that can be created in the domain. An example of running into the volume limit is shown in Figure 4-37. The system displays a message about the limit. In this example, the message states that the maximum number of volumes was created in this domain.

Figure 4-37 Number of volumes exceeds the domain allocation
The domain administrator (and other authorized users) also can set up data migrations, mirroring, consistency groups, and snapshots, like users in the non-domain environment. The number of mirroring pairs, data migration pairs, and consistency groups depends on what the global administrator authorized for the domain. However, the number of snapshots does not need to be specified by the global administrator.
If snapshot space was reserved in the pool, volume snapshots can be created. One of the ways to create a snapshot is to select the Pools & Volumes Views, click a volume, and select Actions → Snapshots → Create Snapshot(s), as shown in Figure 4-38. This task is performed the same way whether or not the volume is part of a domain. For more information about snapshots, see Chapter 2, “Storage management and configuration” on page 33.

Figure 4-38 Create a snapshot of a volume within a domain
We look more closely at what the domain administrator will see when they look at the properties and Hub view for a volume (Figure 4-39).
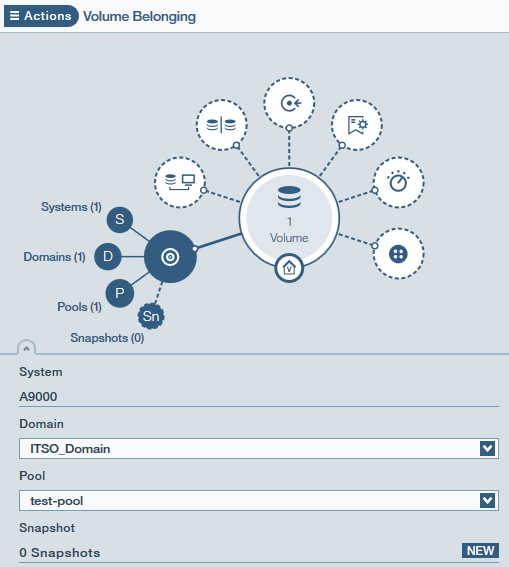
Figure 4-39 Volume properties within a domain
4.2.7 Removing a domain
To remove a domain, login as global administrator and select the Systems & Domains Views → Domains. Select the domain to remove. Click Actions → Delete → Delete Domain(s) as shown in Figure 4-40.

Figure 4-40 Domain: Delete a domain
This option deletes a domain if users and pools are not associated with the domain. If the pool has either of these associations, the system prevents the deletion and displays a message similar to the one shown in Figure 4-41 on page 134. The global administrator must first remove or move the pool or pools from the domain and all of the users that are associated with the domain.

Figure 4-41 Domain: Preventing a deletion
We look at how the global administrator can move a pool and all of its volumes from a domain. Alternatively, the pool can be deleted.
The global administrator can move a pool from the Pools view by selecting the pool and clicking Actions → Properties → View/Modify Domain.
The Pool Belonging window opens, as shown in Figure 4-42. Alternatively, the global administrator can click the Belonging circle in the Hub view to display the same information.
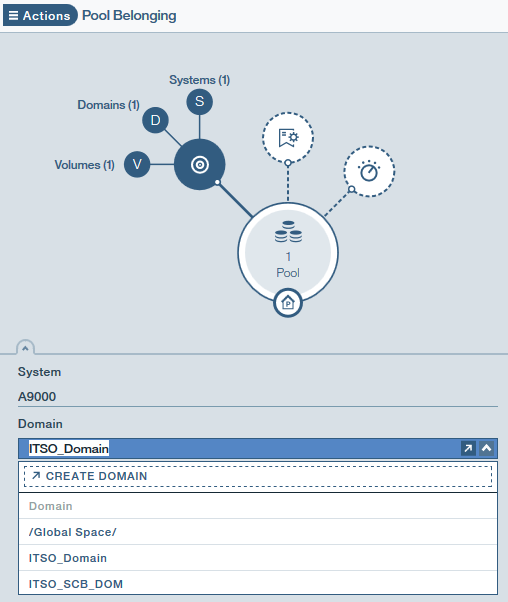
Figure 4-42 Pool Belonging window with system domains list
The global administrator can select the domain or Global Space to move the pool and all its volumes to. After a pool is selected, a new symbol (an asterisk (*)) is displayed next to the domain as shown in Figure 4-43. By hovering over this new symbol, additional information is displayed that indicates that the pool will be moved from one domain to another domain (or to the global space).
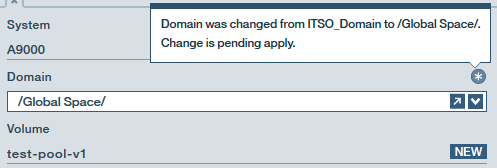
Figure 4-43 Domain attribute for a pool will change
After all of the pools are removed from a domain, the global administrator must disassociate the users from the domain. The domain can then be deleted from the system.
|
Important: Removing a user from the user’s last domain association removes the user from the system.
|
4.3 Performance classes (quality of service)
The quality of service (QoS) feature allows IBM XIV Gen3, IBM FlashSystem A9000 and A9000R, and IBM Spectrum Accelerate software to deliver different service levels to hosts that are connected to the same system. The QoS feature favors the performance of critical business applications that run concurrently with noncritical applications. Because resources are shared among all applications and all hosts are attached to the same resources, division of these resources among both critical and noncritical applications might negatively affect the performance of critical applications.
QoS can address this issue by limiting the rate, based on bandwidth and input/output operations per second (IOPS), for noncritical applications. Limiting performance resources for non-critical applications means that the remaining resources are available without limitation for the business-critical applications.
The QoS feature is managed through the definition of performance classes and then by associating hosts with a performance class. The feature can also be set by domains and storage pools. Each performance class is now implicitly one of two types: A host type or a pool/domain type.
The possibilities and limitations of the QoS feature can be summarized in the following manner:
•Up to 500 performance classes are configurable.
•QoS is applicable to host, domain, pool, volume, and restricted combinations of these entities. For instance, hosts cannot be specified for a performance class that already contains a domain or pool.
•Limits can be defined as Total, which means for an IBM XIV Gen3, IBM FlashSystem A9000 and A9000R, or IBM Spectrum Accelerate software system as a whole, or Per Interface.
•Limits are specified as IOPS or bandwidth, as shown in Figure 4-44.
•The limit calculation is based on preferred practices for setup and zoning.
The limited IOPS processes are expected to always come through all active interface nodes (equal to active interface modules). For example, on an FlashSystem A9000 with four grid controllers, the total I/O or bandwidth rate is divided by 4 (the number of active interface modules). If a limit total of 3,000 IOPS is specified, it results in a limitation of 750 IOPS per interface module.
In addition, if the limited IOPS come through only two of the four interface modules (as a result of the storage area network (SAN) zoning), the effective limitation is 2 x 750 IOPS = 1,500 IOPS rather than the expected 3,000 I/O limitation.
The calculation-related information is visible in the GUI, as shown in Figure 4-44.

Figure 4-44 QoS can be set by bandwidth or IOPS
4.3.1 Creating a performance class
The management of the QoS feature is easy. To define a new performance class, click NEW+ and then select QoS Performance Class from the menu (Figure 4-45), which opens the menu that is shown in Figure 4-46 on page 137.

Figure 4-45 QoS: Create a performance class
Figure 4-46 shows the window to create a QoS performance class.

Figure 4-46 Fields to create a QoS performance class
Enter a suitable performance class name and an IOPS limit, a bandwidth limit, or a combination of both, based on your business needs. You can set this limit so that your reporting systems are not allowed to use excessive IOPS to the detriment of other systems or other tenants of you storage system.
Two choices are available when you enter the limitation settings: Shared or Independent. Shared indicates that the limits will be shared across the QoS members. Independent means that the limit is specific to each QoS member.
4.3.2 Associating a domain with an existing performance class
After we create a QoS performance class, we can easily use this class to apply these limits to an existing domain. First, we navigate to the Domain view and select the domain that we are interested in on the left side of the window. Then, we click Actions → QoS → Limit traffic by QoS Perf Class as shown in Figure 4-47.

Figure 4-47 QoS: Limit a domain with a performance class
From the Domain QoS Performance Class window, we choose an existing QoS Performance Class, as in Figure 4-48 and click Apply. Alternatively, we can create a QoS performance class by selecting that option from the menu that is shown in Figure 4-48.
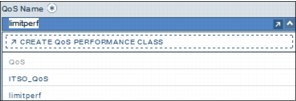
Figure 4-48 QoS: Choose a performance class to apply to this domain
|
Tip: You can also use the CLI. With the CLI, look for domain commands by typing domain followed by pressing the Tab key twice. To look at QoS commands, type perf_class followed by pressing the Tab key twice. For the user, type user, followed by pressing the Tab key twice. Typing help lists all of the commands.
|
..................Content has been hidden....................
You can't read the all page of ebook, please click here login for view all page.