A
IBM Information Server setups
In this appendix we describe the setup of various products used in the retail industry scenario, such as IBM Information Integrator Classic Federation server for z/OS, creating a Queue Manager, setting up the XA parameters on Queue Manager, and creating the queues.
The topics covered include:
A.1 Introduction
WantThatStuff’s operational systems are provided on a z/OS platform. While most of the data sources are on DB2 for z/OS, two of the data sources (Product and Store) are VSAM files, while three data sources (Customer, Employee, and SalesTrans) are sequential files.
The sequential files (Customer, Employee, and SalesTrans) are processed on the IBM Information Server (kazan.itsosj.sanjose.ibm.com) using the IBM InfoSphere DataStage FTP Enterprise and CFF stages similar to that described in “J01_IL_FTPCustomerFile” on page 159 and “J02_IL_LoadCustomerDim” on page 184.
The VSAM files (Product and Store) are accessed as relational tables on the IBM Information Server (kazan.itsosj.sanjose.ibm.com) platform using IBM InfoSphere Classic Federation Server for z/OS similar to that described in “J03_IL_LoadProductDim” on page 202.
Classic Data Architect is used to create relational tables and views that map to data sources in supported non-relational database management systems. With IBM InfoSphere Classic Federation Server for z/OS, client applications can issue SQL queries against these tables to access data in the non-relational databases. Client applications can also issue INSERT, DELETE, and UPDATE requests against the tables to modify the data in the non-relational databases. Before you begin, you must perform the following tasks on the data server where the query processor will run:
Create and initialize a metadata catalog as described in A.2.2, “Configuration of IBM InfoSphere Classic Federation for z/OS system catalog” on page 567.
Set up the configuration file (contents are shown in Example A-1 on page 568 — the highlighted portion shows the changes made for our scenario).
Start the data server (not shown here).
The configuration of IBM InfoSphere Classic Federation Server for z/OS for the Product and Store VSAM files is described in “Configure IBM InfoSphere Classic Federation Server for z/OS” on page 565.
The “J13_Daily_UpdateLookupDim (Day 1)” on page 356 retrieves changes to customer, product, and store attributes (Type 1 and Type 2) from an IBM WebSphere MQ queue, updates the dimension lookup tables, and creates a data set for each dimension table (with nulls in the sales transaction1 portion of the records) for input to the SCD stage in the job, “J17_DailyCreateSalesFactDS (Day1)” on page 424.
The configuration of the IBM WebSphere MQ queue manager, setting up the XA parameters for the queue manager, and creating the queues, are described in “Create the Queue Manager” on page 580, “Set up the XA parameters on Queue Manager” on page 587, and “Create the queues” on page 591.
A.2 Configure IBM InfoSphere Classic Federation Server for z/OS
IBM InfoSphere Classic Federation Server for z/OS is a complete, high-powered solution that provides SQL access to mainframe databases and files without mainframe programming.
Using the key product features, you can:
 Read from and write to mainframe data sources using SQL.
- Map logical relational table structures to existing physical mainframe databases and files.
- Use the Classic Data Architect graphical user interface (GUI) to issue standard SQL commands to the logical tables.
- Use standards-based access with ODBC, JDBC, or CLI interfaces.
- Take advantage of multi-threading with native drivers for scalable performance.
The architecture of InfoSphere Classic Federation Server for z/OS consists of the following major components:
- Data server
Data servers perform all data access. The architecture of the data server is service-based. The data server consists of several components, or services. A major service embedded in the data server is the query processor that acts as the relational engine for Classic federation.
- Data connectors
The query processor dynamically loads one or more data connectors to access the target database or file system that is referenced in an SQL request.
- Classic Data Architect
To process SQL data access requests, data definitions must be mapped to logical tables. Classic Data Architect2 is the administrative tool that you should use to perform this mapping.
Classic Data Architect is the enhanced interface introduced in Version 9 that replaces the Classic Data Mapper. The purpose of the Classic Data Architect is to administer the logical table definitions, views, and SQL security information that are stored in the metadata catalog.
The key benefits that the Classic Data Architect tool provides make it easier for you to perform the following tasks:
– Define tables, columns, primary keys, indexes, stored procedures, and views.
– Specify user authorization for all objects.
– Import existing physical definitions from copybooks, CA-IDMS schemas, and IMS database descriptors (DBDs).
– Generate DDL for the objects that you create that can be run directly on a server or saved to a script file.
– Generate DDL script from objects already defined in the catalog and export DDL scripts to a data set on the server for use with the metadata utility.
– Connect directly to a Classic data source and view the objects in the system catalog.
- Metadata catalog
The information that you generate from the Classic Data Architect is stored in metadata catalogs. A metadata catalog is a set of relational tables that contain information about how to convert data from non-relational to relational formats. The data server accesses the information stored in these catalogs.
- Clients (ODBC, JDBC, and CLI)
InfoSphere Classic Federation Server for z/OS provides the ODBC, JDBC, and CLI clients. The clients enable client applications or tools to submit SQL queries to the data server.
The following sections briefly describe the installation of Classic Data Architect and IBM InfoSphere Classic Federation Server for z/OS, configuration of the IBM InfoSphere Classic Federation Server for z/OS system catalog, and the configuration of Classic Data Architect.
A.2.1 Installation
The installation of Classic Data Architect and IBM InfoSphere Classic Federation Server for z/OS is briefly described here:
Install Classic Data Architect with the typical setup option on the Linux platform where IBM InfoSphere DataStage is installed — kazan.itsosj.sanjose.ibm.com in our case.
For details on installing Classic Data Architect, refer to: http://publib.boulder.ibm.com/infocenter/iisclzos/v9r1/index.jsp?topic=/com.ibm.websphere.ii.product.install.clas.doc/topics/iiypicac-instcda.html
Install IBM InfoSphere Classic Federation Server for z/OS on the z/OS platform where WantThatStuff’s VSAM data sources are located.
For details on installing IBM InfoSphere Classic Federation Server for z/OS, refer to Program Directory for IBM WebSphere Classic Federation Server for z/OS V09.01.00, Program Number 5655-R52, GI10-8750-00.
Attention: It is essential that you install Classic Data Architect before you install IBM InfoSphere Classic Federation Server for z/OS. Failure to do so will result in the ODBC drivers for z/OS not being installed if you happen to use them in your scenario. For examples of configuring ODBC data sources on the z/OS platform, refer to the Redbooks publication, IBM WebSphere Information Analyzer & Data Quality Assessment, SG24-7508.
A.2.2 Configuration of IBM InfoSphere Classic Federation for z/OS system catalog
In this section we allocate the system (metadata) catalog and update it with metadata about the Product and Store VSAM files (Example A-1 on page 568).
Example A-2 on page 570 shows the CACPOST job that allocates and populates the appropriate data sets such as the error message catalog and the metadata catalog. The catalog initialization and maintenance utility (CACCATUT) is a z/OS batch job that creates or performs operations on an offline metadata catalog — the INIT operation of the CACCATUT initializes data sets for a version 9.1 sequential metadata catalog and creates the SYSIBM and SYSCAC system tables that make up the metadata catalog. The ENGCAT DD statement references the message catalog3.
Example A-3 on page 571 shows the CACMETAU4 job that connects to the data server (Example A-4 on page 573 shows the connect configuration details), then reads the DDL statements from SYSIN * and sends the statements to the server to update the system catalog. Example A-5 on page 573 shows the DDL statements for the PRODUCT data source, while Example A-6 on page 573 shows the DDL statements for the STORE data source.
Example: A-1 Configuration file contents on the data server
**********************************************************************
* *
* DATA SERVER CONFIGURATION *
* *
* THIS FILE CONTAINS CONFIGURATION DATA REQUIRED *
* FOR THE OPERATION OF THE DATA SERVER. *
* *
* THE FILE IS ORGANIZED AS A SERIES OF ENTRIES EACH *
* OF WHICH CONSISTS OF A KEYWORD AND VALUE PAIR *
* SEPARATED BY A REQUIRED "=" SIGN. ORDER OF THE *
* ENTRIES IS NOT IMPORTANT, EXCEPT WHERE NOTED. *
* MAXIMUM LENGTH OF AN ENTRY IS 80 CHARACTERS PER *
* LINE, WITH A MAXIMUM PARAMETER LENGTH OF 255 *
* CHARACTERS, SPANNED BY THE BACKSLASH CONTINUATION *
* CHARACTER - . *
* *
* NOTE: WHEN EDITING CONFIGURATION MEMBERS ENSURE THAT *
* "NUM OFF" IS SPECIFIED. IF THE CONFIGURATION *
* CONTAINS SEQUENCE NUMBERS, UNKNOWN CONFIGURATION *
* PARAMETERS, OR INVALID SUB-PARAMETER VALUES THE *
* DATA SERVER WILL NOT RUN. *
* *
**********************************************************************
*
* THE FOLLOWING SERVICE INFO ENTRIES ARE REQUIRED.
SERVICE INFO ENTRY = CACCNTL CNTL 0 1 1 100 4 5M 5M NO_DATA
SERVICE INFO ENTRY = CACLOG LOG 1 1 1 100 1 5M 5M DISPLAY
SERVICE INFO ENTRY = CACOPER OPER 2 1 1 100 4 5M 5M NO_DATA
*
**************************************************************
*
* LANGUAGE ENVIRONMENT
* UNCOMMENT THE FOLLOWING SERVICE INFO ENTRIES IF YOU WILL BE
* USING RECORD EXITS OR STORED PROCEDURES USING IBM'S
* LANGUAGE ENVIRONMENT OR COBOL II. THE FIRST ENTRY IS FOR LE
* AND THE SECOND FOR COBOL II.
* FOR COBOL II, IF YOU WILL HAVE MORE THAN ONE CONCURRENT USER,
* DO NOT ACTIVATE THIS INTERFACE.
*SERVICE INFO ENTRY = CACLE LANGENV 2 1 1 50 4 5M 5M CEEPIPI
*SERVICE INFO ENTRY = CACLE LANGENV 2 1 1 50 4 5M 5M IGZERRE
*
**************************************************************
*
* WLM USER EXIT INTERFACE INITIALIZATION
*SERVICE INFO ENTRY = CACWLM WLM01 2 1 1 1 4 5M 5M
* CACSX06,SUBSYS=JES,SUBSYSNM=CAC01
*
**************************************************************
*
* QUERY PROCESSOR SERVICE INFO ENTRY
* THE LAST SUBPARAMETER POINTS TO A QP SERVICE CONFIGURATION FILE
SERVICE INFO ENTRY = CACQP CACSAMP 2 5 10 20 4 5M 5M CACQPCF
*
**************************************************************
*
* CA-DATACOM/DB INTERFACE
*SERVICE INFO ENTRY = CACDCI DCOM 2 1 1 50 4 5M 5M 4
*
* DB2 INTERFACE
* CHANGE THE DSN FIELD TO THE SUBSYSTEM IDENTIFIER FOR
* YOUR SITE'S DB2 SUBSYSTEM.
*SERVICE INFO ENTRY = CACCAF DB8A 2 1 5 1 4 5M 5M CAC91PLN
SERVICE INFO ENTRY = CACCAF DB8A 2 1 5 1 1 5M 5M CAC91PLN
*
* IMS DBB/BMP INTERFACE
*SERVICE INFO ENTRY = CACIMSIF IMS 2 1 1 50 4 5M 5M NO_DATA
*
* IMS DRA INTERFACE
*SERVICE INFO ENTRY = CACDRA IMS 2 1 1 50 4 5M 5M 00,DRAUSER,DEFPSB
*
* IMS ODBA INTERFACE
*SERVICE INFO ENTRY = CACRRSI IMS 2 1 1 50 4 5M 5M SSID,DEFPSB
*
* VSAM INTERFACE
SERVICE INFO ENTRY = CACVSMS VSAMSRV 2 1 1 50 4 5M 5M CLOSE_ON_IDLE
*
**************************************************************
*
* TCP/IP CONNECTION HANDLER
* REFER TO DOCUMENTATION FOR DETAILED INFORMATION ON LAST SUBPARAMETER
SERVICE INFO ENTRY = CACINIT TCPIP 2 1 1 100 4 5M 5M
TCP/0.0.0.0/5525
*TCP/WTSC59.ITSO.IBM.COM/5001
*
* TCP/IP SYSTEM FILE HIGH LEVEL QUALIFIER, SUBSYSTEM NAME
* AND TIMEZONE SETTING
*TASK PARAMETERS = =TCPIP_PREFIX=HLQUAL =TCPIP_MACH=TCPIP =TZ=PST9PDT
*
* XM CONNECTION HANDLER
* REFER TO DOCUMENTATION FOR DETAILED INFORMATION ON LAST SUBPARAMETER
*SERVICE INFO ENTRY = CACINIT XMNT 2 1 1 50 4 5M 5M
* XM1/CAC/CAC
*
* MQ-SERIES CONNECTION HANDLER
* REFER TO DOCUMENTATION FOR DETAILED INFORMATION ON LAST SUBPARAMETER
*SERVICE INFO ENTRY = CACINIT MQI 2 1 1 50 4 5M 5M
* MQI/SCQ1/CAC.SERVER
*
**************************************************************
*
* SAF (SECURITY) SYSTEM EXIT
*SAF EXIT = CACSX04 IMS CLASS=PIMS
*
* SMF (REPORTING) SYSTEM EXIT
*SMF EXIT = CACSX02 RECTYPE=255,SYSID=JES2
*
*************************************************************
*
* MISC REQUIRED PARAMETERS
*
MESSAGE POOL SIZE = 16777216
*
NL = US ENGLISH
NL CAT = DD:ENGCAT
*
* IF YOU ARE NOT ALLOWING UPDATES TO THE CATALOG FILES WHILE
* ANY DATA SERVERS ARE ACCESSING THE CATALOG FILES, CHANGE THE
* VALUE TO A ONE. THE CATALOG FILES WILL ONLY BE OPENED DURING
* QP INITIALIZATION RATHER THAN DURING EACH QUERY OPEN CURSOR.
*
STATIC CATALOGS = 0
Example: A-2 Allocate data sets
//CACPOST JOB (999,POK),'POST SMPE TASKS',CLASS=A,
// MSGCLASS=X,NOTIFY=&SYSUID
//********************************************************************
//CACCLN EXEC PGM=IEFBR14
//SCACMENU DD DISP=(MOD,DELETE,DELETE),VOL=SER=OP1TSD,
// UNIT=SYSALLDA,RECFM=FBS,LRECL=80,BLKSIZE=27920,
// SPACE=(CYL,(1,1)),
// DSN=NALUR1.CAC.PRODUCT.SCACMENU
//*
//CACENG1 EXEC PGM=IEBGENER
//SYSPRINT DD SYSOUT=*
//SYSUT1 DD DISP=SHR,
// DSN=CAC.SCACSAMP(CACENGCT)
//SYSUT2 DD DISP=(NEW,CATLG,DELETE),VOL=SER=OP1TSD,
// UNIT=SYSALLDA,RECFM=FBS,LRECL=80,BLKSIZE=27920,
// SPACE=(CYL,(1,1)),
// DSN=NALUR1.CAC.PRODUCT.SCACMENU
//SYSIN DD DUMMY
//*
//CACCATAL EXEC PGM=IEFBR14
//CACCAT DD UNIT=SYSALLDA,VOL=SER=OP1TSD,
// DSN=NALUR1.CAC.PRODUCT.CATALOG,
// SPACE=(CYL,(10,10)),
// DCB=(RECFM=FBS,LRECL=1,BLKSIZE=5120),
// DISP=(NEW,CATLG,DELETE)
//CACINDX DD UNIT=SYSALLDA,VOL=SER=OP1TSD,
// DSN=NALUR1.CAC.PRODUCT.CATINDX,
// SPACE=(CYL,(2,1)),
// DCB=(RECFM=FBS,LRECL=1,BLKSIZE=5120),
// DISP=(NEW,CATLG,DELETE)
//*
//CACCATIN EXEC PGM=CACCATUT,PARM='INIT'
//STEPLIB DD DISP=SHR,DSN=CAC.SCACLOAD
//ENGCAT DD DISP=SHR,DSN=NALUR1.CAC.PRODUCT.SCACMENU
//CTRANS DD DISP=SHR,DSN=CAC.SCACSASC
//CACCAT DD DISP=SHR,DSN=NALUR1.CAC.PRODUCT.CATALOG
//CACINDX DD DISP=SHR,DSN=NALUR1.CAC.PRODUCT.CATINDX
//SYSTERM DD SYSOUT=*
//SYSPRINT DD SYSOUT=*
//*
Example: A-3 Update IBM InfoSphere Classic Federation Server system catalog
//CACMETAU JOB (POK,999),'METADATA UTILITY',CLASS=A,MSGCLASS=X,
// NOTIFY=&SYSUID
//********************************************************************
//* *
//* CACMETAU - JCL TO UPDATE THE SYSTEM CATALOG *
//* *
//* THIS JOB INVOKES THE META DATA UTILITY. *
//* THE METADATA UTILITY CONNECTS TO DATA THE SERVER IDENTIFIED BY *
//* THE CONNECT TO SERVER STATEMENT. A SAMPLE CONNECT TO STATEMENT *
//* IS PROVIDED IN THE SCACCONF CACMETAU MEMBER. *
//* *
//* THE METADATA UTILITY THEN READS THE DDL STATEMENTS FROM SYSIN *
//* AND SENDS THE STATEMENTS TO THE SERVER IDENTIFIED IN THE *
//* CONNECT TO SERVER STATEMENT TO UPDATE THE SYSTEM CATALOG. *
//* THE METADATA UTILITY ALSO ACCEPTS CONNECT TO DB2 AND DB2 *
//* IMPORT STATEMENTS THAT CAUSE THE METADATA UTILITY TO ACCESS A *
//* LOCAL DB2 SUBSYSTEM TO EXTRACT THE REQUIRED INFORMATION TO *
//* GENERATE CREATE TABLE AND INDEX STATEMENTS FOR DB2 OBJECTS. *
//* *
//* 1) PROVIDE A JOB CARD THAT IS VALID FOR YOUR SITE *
//* 2) CHANGE CAC PARM TO INSTALLED HIGH LEVEL QUALIFIER *
//* 3) UNCOMMENT THE DB2 PARM AND THEN CHANGE TO THE APPROPRIATE *
//* SYSTEM HLQ IF YOU ARE IMPORTING DB2 DEFINITIONS *
//* 4) TAILOR CONNECT MEMBER (CACMETAU) AND PROVIDE SERVER *
//* CONNECTION AND IDENTIFICATION INFORMATION *
//* 5) CHANGE THE DDLIN PARM TO THE MEMBER THAT CONTAINS THE *
//* DDL STATEMENTS TO BE PROCESSED *
//* 6) UPDATE THE RGN PARAMETER IF YOU NEED TO PROCESS LARGE *
//* DDL STATEMENTS. IF 'OUT-OF-MEMORY' ERRORS ARE REPORTED BY *
//* THE METADATA UTILITY THEN THE REGION SIZE NEEDS TO BE *
//* INCREASED. INCRESE THE REGION SIZE IN TWO MEGA-BYTE *
//* INCREMENTS. *
//* *
//********************************************************************
//*
//METAUTL PROC CAC='CAC', INSTALLED HIGH LEVEL QUALIFIER
// CONNECT=CACMUCON, SAMPLE CONFIGURATION MEMBER
// DB2='DB8A8', DB2 HIGH LEVEL QUALIFIER
// DDLIN=CACDB2P, INPUT DDL STATEMENT MEMBER NAME
// RGN=8M, REGION SIZE
// SOUT='*' SYSOUT CLASS
//*
//********************************************************************
//METAU EXEC PGM=CACMETA,REGION=&RGN
//STEPLIB DD DISP=SHR,DSN=&CAC..SCACLOAD
// DD DISP=SHR,DSN=&DB2..SDSNLOAD
//*
//CTRANS DD DISP=SHR,DSN=&CAC..SCACSASC
//*
//CACCAT DD DISP=SHR,DSN=NALUR1.CAC.PRODUCT.CATALOG
//CACINDX DD DISP=SHR,DSN=NALUR1.CAC.PRODUCT.CATINDX
//*
//ENGCAT DD DISP=SHR,DSN=NALUR1.CAC.PRODUCT.SCACMENU
//SYSTERM DD SYSOUT=&SOUT
//SYSPRINT DD SYSOUT=&SOUT
//SYSIN DD DISP=SHR,DSN=&CAC..SCACCONF(&CONNECT)
// DD DISP=SHR,DSN=&CAC..SCACSAMP(&DDLIN)
// PEND
//METAUTL EXEC METAUTL
Example: A-4 Contents of CACMUCON file
CONNECT TO SERVER CACSAMP "TCP/0.0.0.0/5525";
Example: A-5 Product VSAM file DDL definition
DROP TABLE CAC.PRODUCT;
USE TABLE CAC.PRODUCT DBTYPE VSAM
DS 'NALUR1.CAC.VSAM.PRODUCT' (
PRODUCT_ID SOURCE DEFINITION DATAMAP
OFFSET 0 LENGTH 4 DATATYPE C USE AS DECIMAL(6),
DESCRIPTION SOURCE DEFINITION DATAMAP
OFFSET 5 LENGTH 50 DATATYPE C USE AS CHAR(50),
BRAND SOURCE DEFINITION DATAMAP
OFFSET 55 LENGTH 50 DATATYPE C USE AS CHAR(50),
CATEGORY SOURCE DEFINITION DATAMAP
OFFSET 105 LENGTH 50 DATATYPE C USE AS CHAR(50),
FACTORY SOURCE DEFINITION DATAMAP
OFFSET 155 LENGTH 50 DATATYPE C USE AS CHAR(50),
SUPPLIER SOURCE DEFINITION DATAMAP
OFFSET 205 LENGTH 50 DATATYPE C USE AS CHAR(50),
SKU SOURCE DEFINITION DATAMAP
OFFSET 255 LENGTH 50 DATATYPE C USE AS CHAR(50));
Example: A-6 Store VSAM file DDL definition
DROP TABLE CAC.STORE;
USE TABLE CAC.STORE DBTYPE VSAM
DS 'NALUR1.CAC.VSAM.STORE' (
STORE_ID SOURCE DEFINITION DATAMAP
OFFSET 0 LENGTH 4 DATATYPE C USE AS DECIMAL(6),
ADDRESS SOURCE DEFINITION DATAMAP
OFFSET 5 LENGTH 50 DATATYPE C USE AS CHAR(50),
CITY SOURCE DEFINITION DATAMAP
OFFSET 55 LENGTH 50 DATATYPE C USE AS CHAR(50),
CITY_POPULATION SOURCE DEFINITION DATAMAP
OFFSET 105 LENGTH 8 DATATYPE C USE AS DECIMAL(10),
STATE SOURCE DEFINITION DATAMAP
OFFSET 114 LENGTH 50 DATATYPE C USE AS CHAR(50),
STATE_POPULATION SOURCE DEFINITION DATAMAP
OFFSET 164 LENGTH 8 DATATYPE C USE AS DECIMAL(10),
ZIP SOURCE DEFINITION DATAMAP
OFFSET 173 LENGTH 15 DATATYPE C USE AS CHAR(15),
COUNTRY SOURCE DEFINITION DATAMAP
OFFSET 188 LENGTH 50 DATATYPE C USE AS CHAR(50),
MANAGER_ID SOURCE DEFINITION DATAMAP
OFFSET 238 LENGTH 4 DATATYPE C USE AS DECIMAL(6));
A.2.3 Configuration of Classic Data Architect
In this section, Figure A-1 on page 575 through Figure A-8 on page 580 show how Classic Data Architect (CDA) is used to access the Product (VSAM) file as a logical relational table:
Launch CDA from your desktop (not shown here), choose the workspace for your session, and click OK as shown in Figure A-1 on page 575.
Right-click Connections in Database Explorer and select New Connection as shown in Figure A-2 on page 575.
Provide details of the database manager, JDBC driver and required connection parameters including User ID and Password, and click Test Connection.
A successful connection is shown in Figure A-4 on page 576. Click OK.
Click Next in Figure A-5 on page 577 to specify any filter for the objects to view in the CACSAMP database.
Check the Disable filter box and click Finish in Figure A-6 on page 578 to proceed to view all the objects in the CACSAMP database.
Expand the navigation tree in the CACSAMP database, and right-click PRODUCT (VSAM) → Data → Sample Contents as shown in Figure A-7 on page 579 to view the contents of the PRODUCT table (4 rows is shown under the Data Output tab in Figure A-8 on page 580).
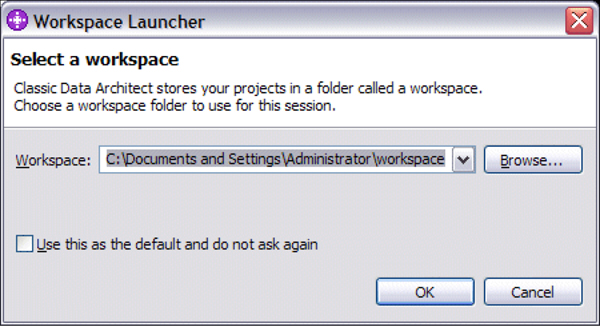
Figure A-1 Configure access to PRODUCT VSAM file 1/8
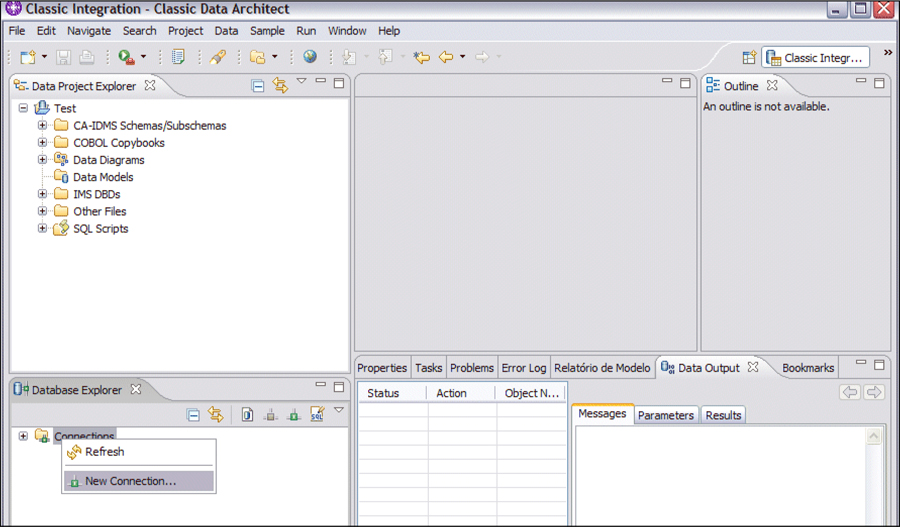
Figure A-2 Configure access to PRODUCT VSAM file 2/8
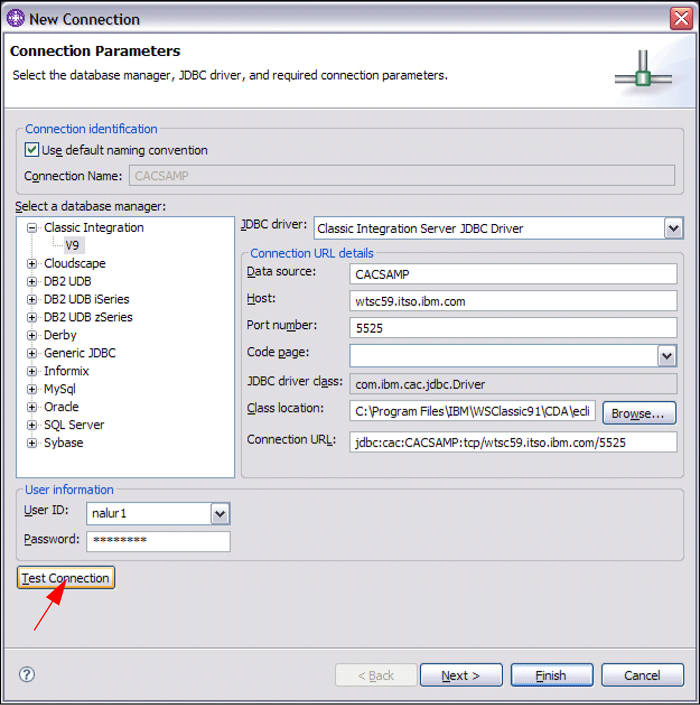
Figure A-3 Configure access to PRODUCT VSAM file 3/8
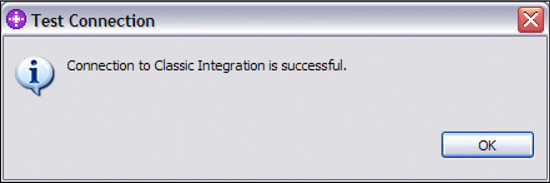
Figure A-4 Configure access to PRODUCT VSAM file 4/8
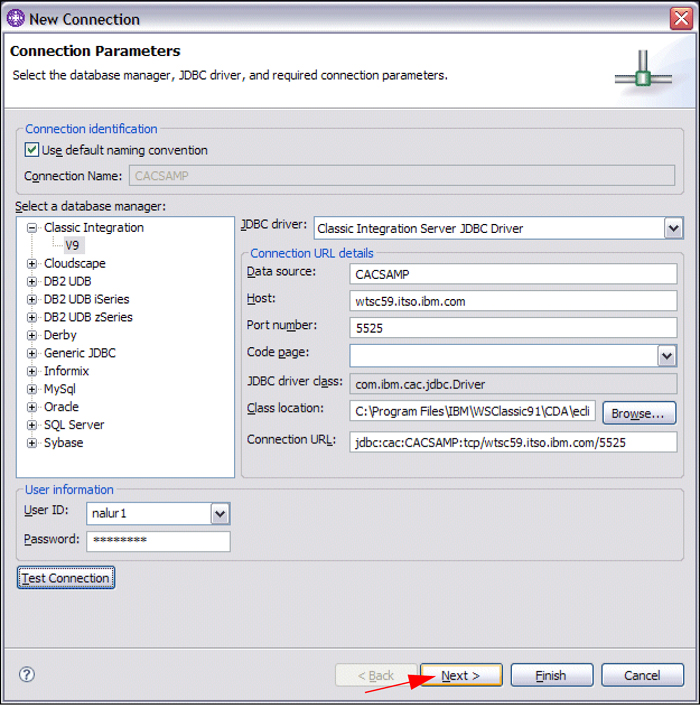
Figure A-5 Configure access to PRODUCT VSAM file 5/8
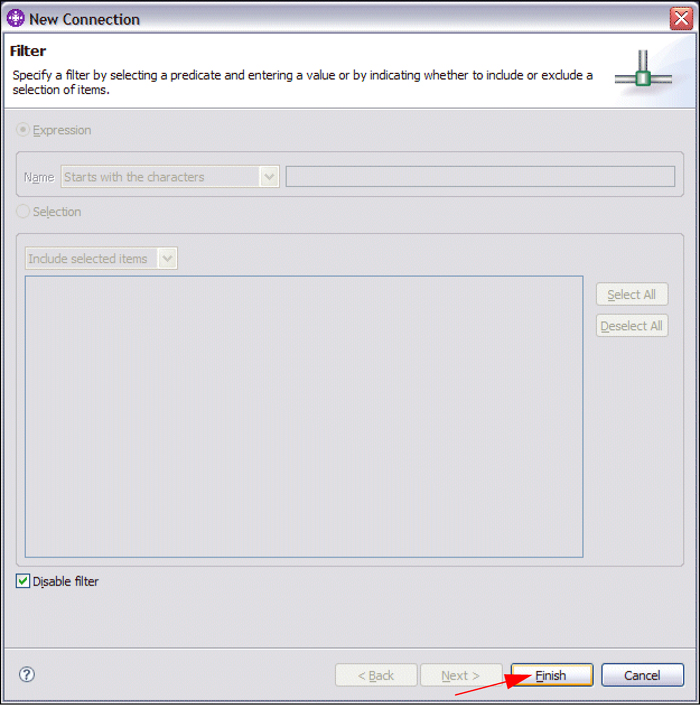
Figure A-6 Configure access to PRODUCT VSAM file 6/8
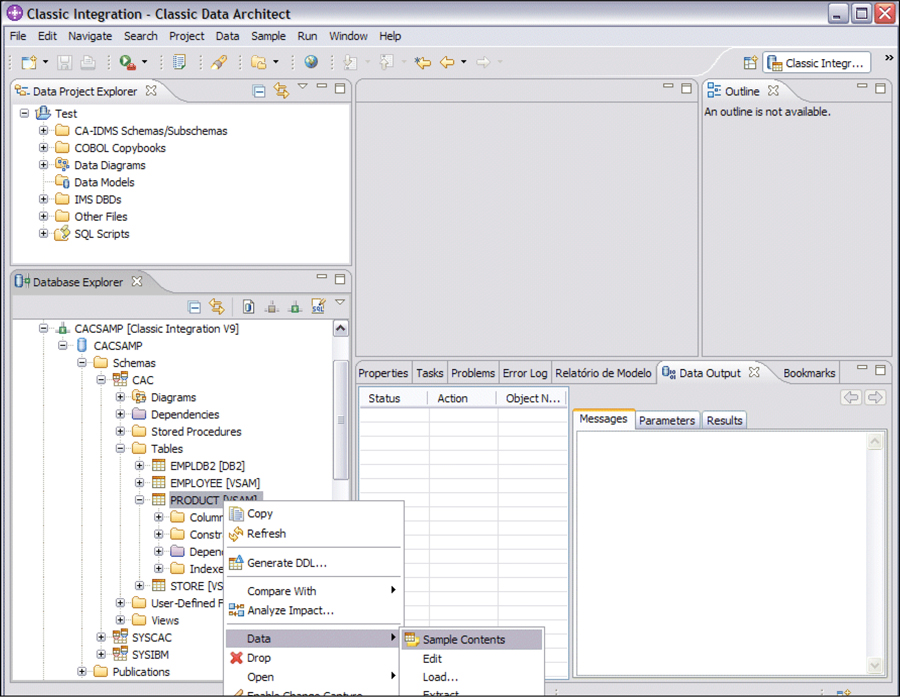
Figure A-7 Configure access to PRODUCT VSAM file 7/8
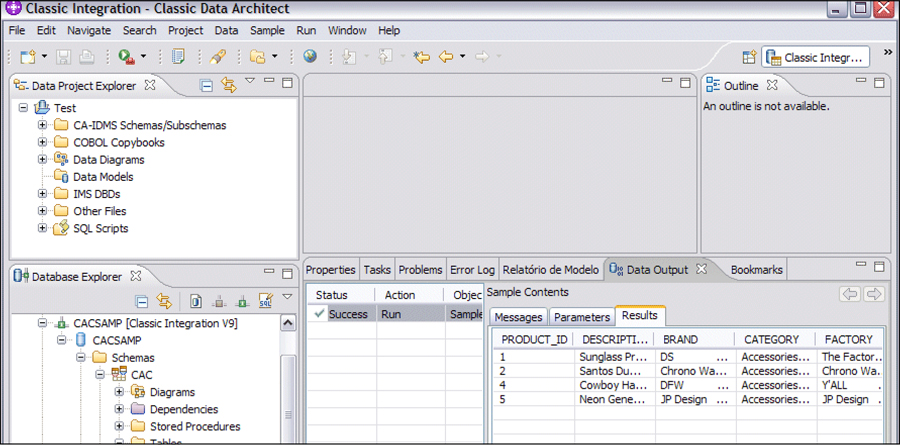
Figure A-8 Configure access to PRODUCT VSAM file 8/8
A.3 Create the Queue Manager
In this section, Figure A-9 on page 581 through Figure A-16 on page 587 show the creation of a queue manager5 QM_Kazan using WebSphere MQ Explorer, as follows:
From the WebSphere MQ Explorer window, expand the IBM WebSphere MQ label, then right-click Queue Managers and select New → Queue Manager from the pop-up menu as shown in Figure A-9 on page 581.
In Figure A-10 on page 582, provide the name of the queue manager (QM_Kazan) and other details, and check the box to make this your default queue manager. Click Next.
Specify the type of logging that the queue manager will perform, and the maximum number of log files that can be produced in Figure A-11 on page 583, and click Next.
Check the Start queue manager box and click Next in Figure A-11 on page 583.
In Figure A-12 on page 584, specify the information that enables the WebSphere MQ applications that are running on your machine to communicate with other machines. Check the Create listener configured for TCP/IP box, and enter the port number for WebSphere MQ (default is 1414) as shown in Figure A-13 on page 585. Click Next to continue.
Check the Autoreconnect and Automatically refresh information shown for this queue manager boxes in Figure A-14 on page 586, and click Finish to create your queue manager. It might take a minute to create and start the queue manager as shown in Figure A-15 on page 586.
On successful creation and startup, the status of this queue manager QM_Kazan is shown in Figure A-16 on page 587.
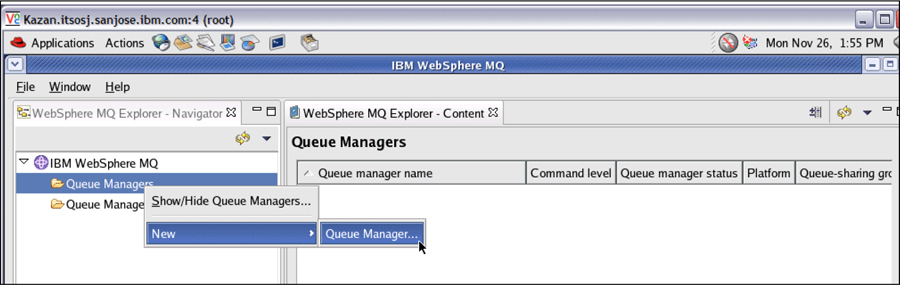
Figure A-9 Create the Queue Manager 1/8
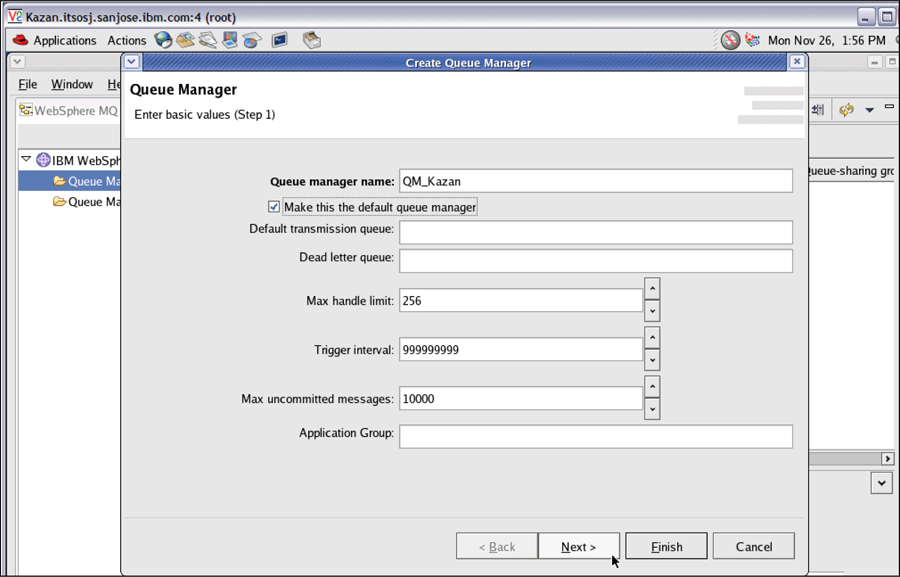
Figure A-10 Create the Queue Manager 2/8
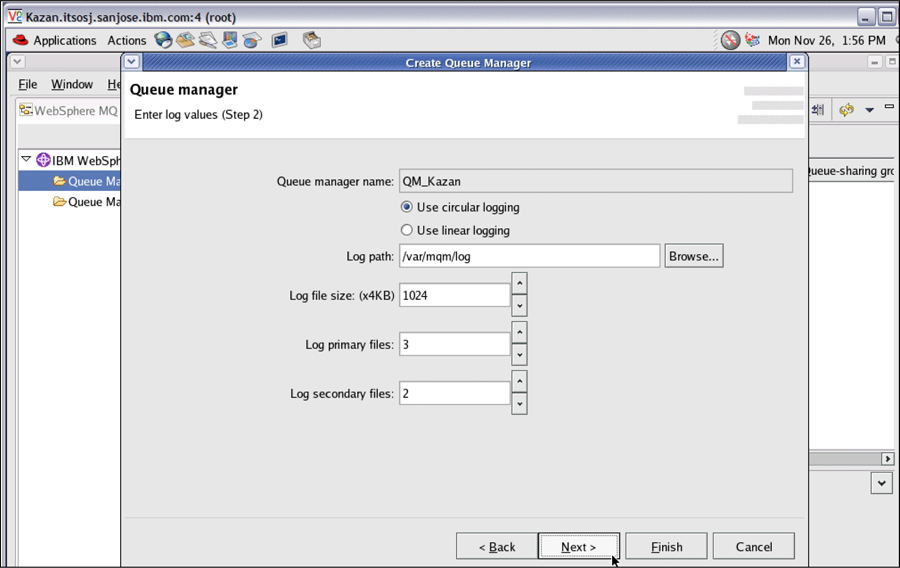
Figure A-11 Create the Queue Manager 3/8
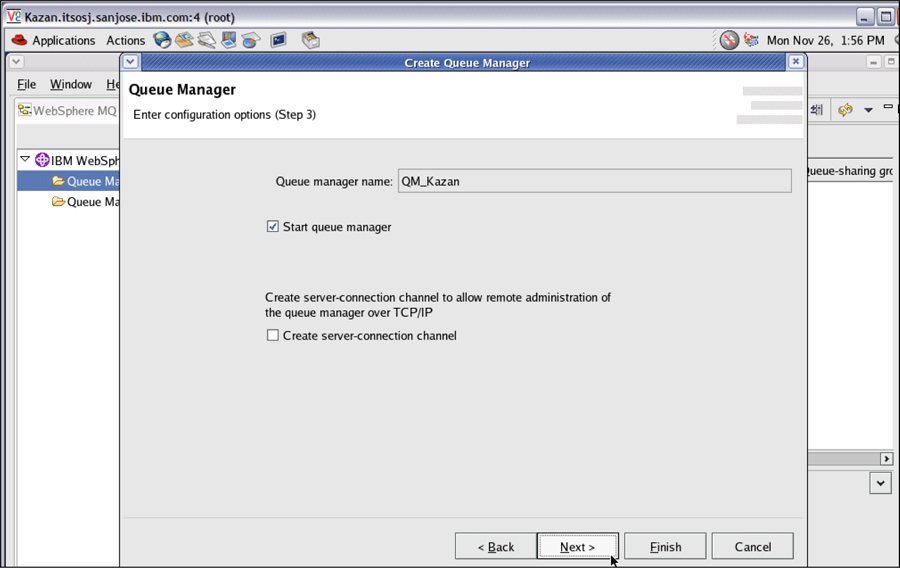
Figure A-12 Create the Queue Manager 4/8
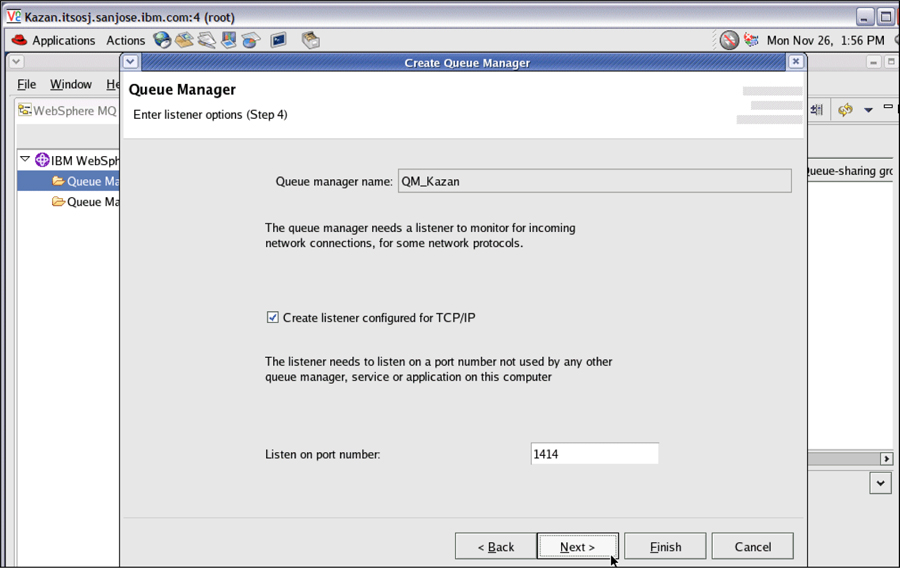
Figure A-13 Create the Queue Manager 5/8
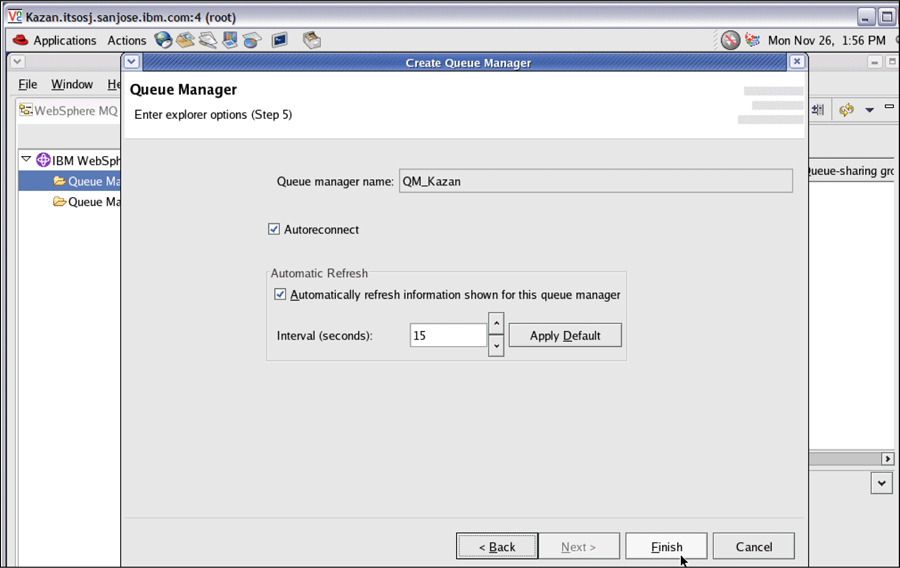
Figure A-14 Create the Queue Manager 6/8
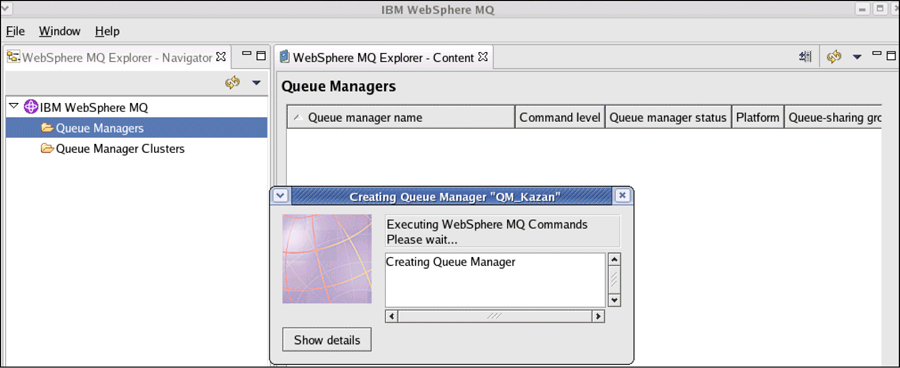
Figure A-15 Create the Queue Manager 7/8
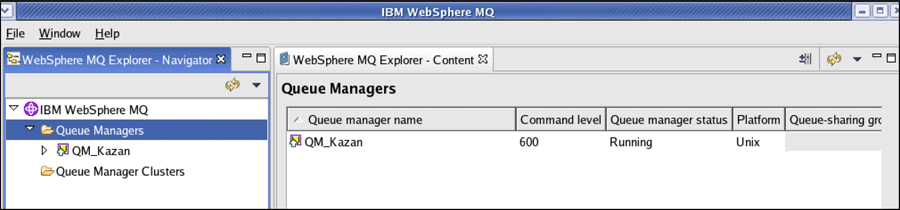
Figure A-16 Create the Queue Manager 8/8
A.4 Set up the XA parameters on Queue Manager
IBM WebSphere MQ has to be configured for the distributed transaction support provided by the Distributed Transaction stage described in 2.7, “Distributed Transaction (new in Version 8.1)” on page 63 as follows:
Ensure that your DB2 environment variables are set for queue manager processes as well as in your application processes. In particular, you must always set the DB2INSTANCE environment variable before you start the queue manager. The DB2INSTANCE environment variable identifies the DB2 instance containing the DB2 databases that are being updated. For example:
set DB2INSTANCE=DB2
Copy db2swit.dll6 to the appropriate directory (default location is C:Program FilesIBMWebSphere MQexits on the Microsoft Windows platform) of IBM WebSphere MQ.
Launch IBM WebSphere MQ Explorer (not shown here), right-click the queue manager (QM_Kazan) to configure, and select Properties... as shown in Figure A-17 on page 588.
Click XA resource managers from the Properties dialog and click the Add... button to add an XA resource as shown in Figure A-18 on page 589.
In the dialog shown in Figure A-19 on page 590, enter the values for Name (db2) and SwitchFile (which matches the name of the DLL you copied above). The XAOpenString is composed of these components:
– databaseName,username,password,toc=c
– toc=p means ‘thread of control is thread’. Include this in the XAOpenString and make sure you set ThreadOfControl to Thread.
Click OK in Figure A-19 on page 590 to complete the successful application of the changes is shown in Figure A-20 on page 590.
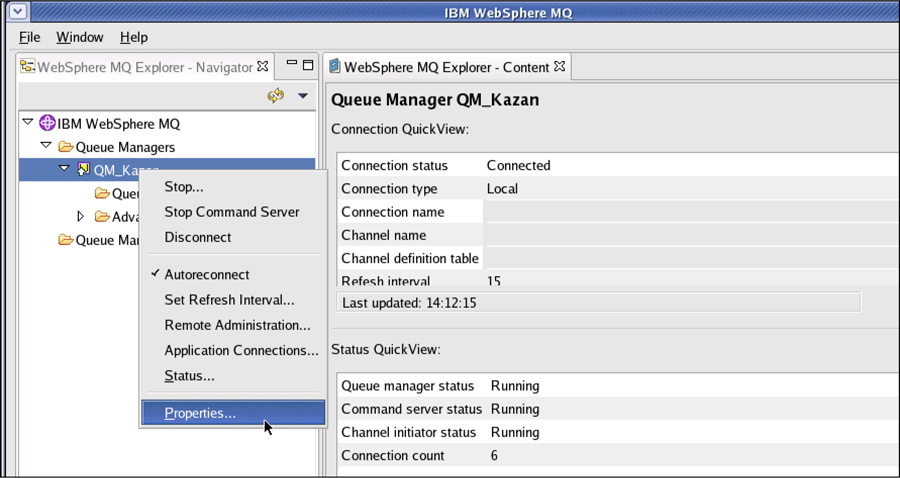
Figure A-17 Set up the XA parameters on Queue Manager 1/4
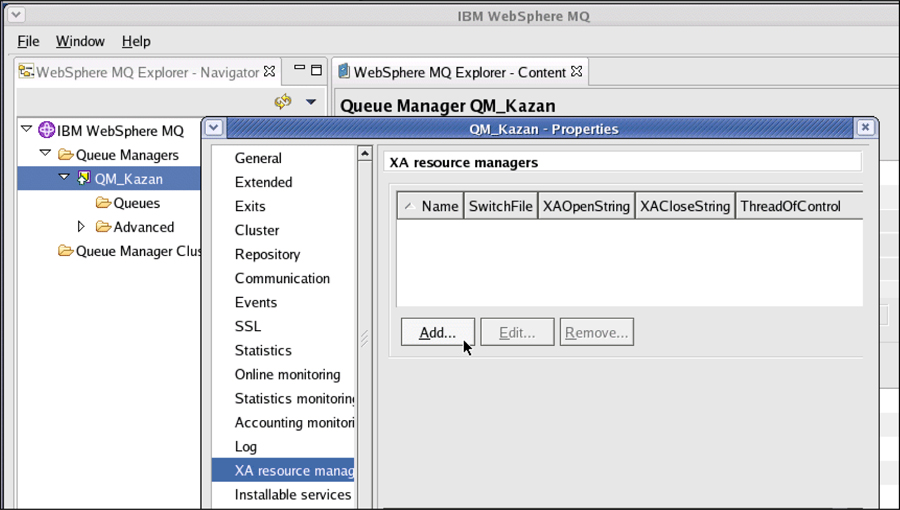
Figure A-18 Set up the XA parameters on Queue Manager 2/4
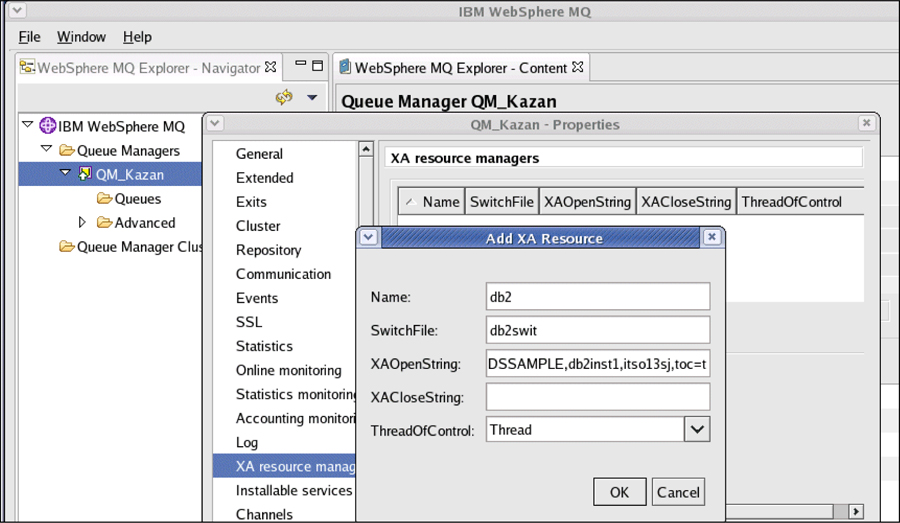
Figure A-19 Set up the XA parameters on Queue Manager 3/4
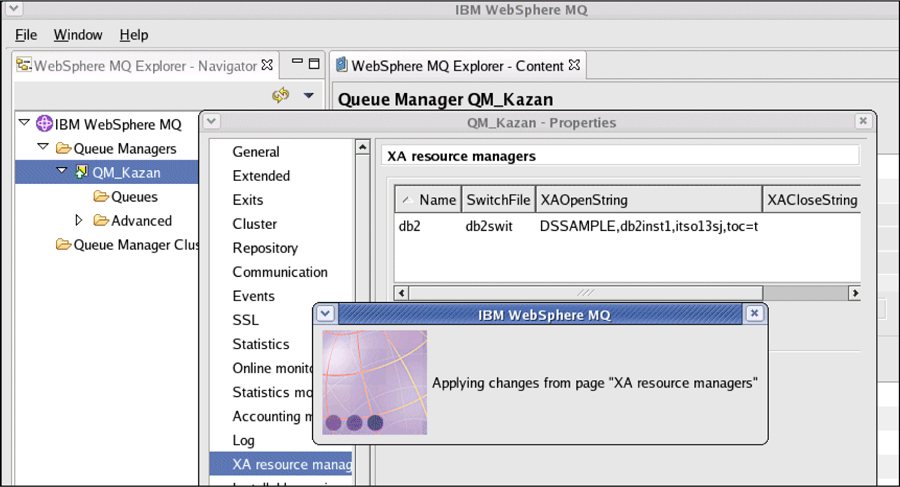
Figure A-20 Set up the XA parameters on Queue Manager 4/4
A.5 Create the queues
The Distributed Transaction stage uses the following IBM WebSphere MQ queues:
- SOURCEQ is the source queue for the Distributed Transaction stage jobs.
- WORKQ is the work queue used by the Distributed Transaction stage jobs.
- REJECTQ is the reject queue used by job RejectTransaction.
Figure A-21 on page 592 through Figure A-26 on page 595 show the definition of the SOURCEQ using IBM WebSphere MQ Explorer:
Expand the navigation tree and right-click Queues (under the QM_Kazan queue manager), and then select New → Local Queue from the pop-up menu as shown in Figure A-21.
Provide details of the local queue to be create such as Name (SOURCEQ) and model it with the attributes of the SYSTEM.DEFAULT.LOCAL.QUEUE. Click Next in Figure A-22 on page 592 to view and change the properties of the queue.
Change the properties as required and click Finish as shown in Figure A-23 on page 593.
The successful creation of this queue is shown in Figure A-24 on page 594 Figure A-25 on page 594.
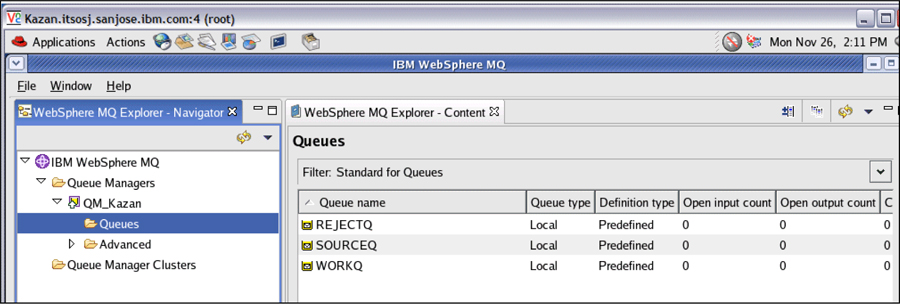
Figure A-26 on page 595 shows the three local queues (SOURCEQ, REJECTQ, and WORKQ) created for the Distributed Transaction stage.
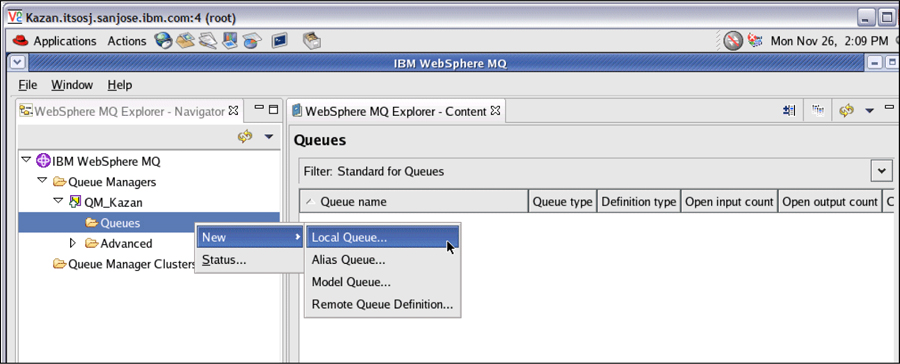
Figure A-21 Create the queues 1/6
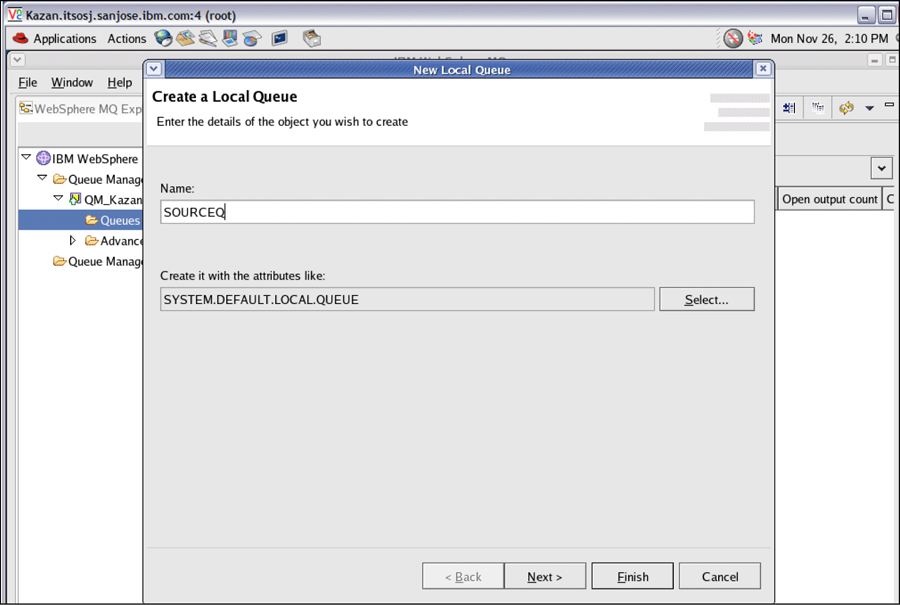
Figure A-22 Create the queues 2/6
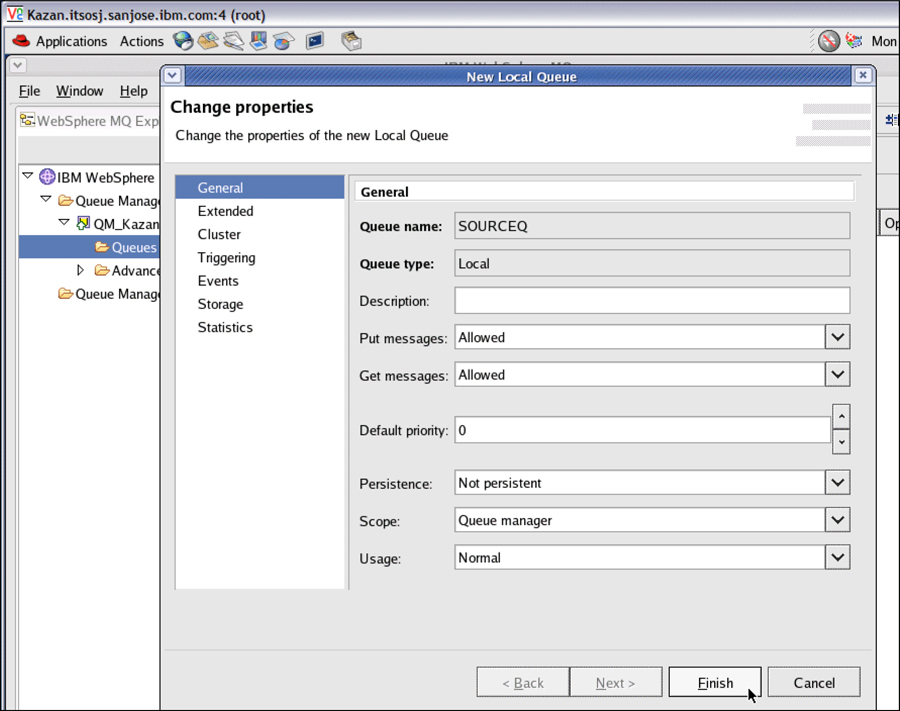
Figure A-23 Create the queues 3/6
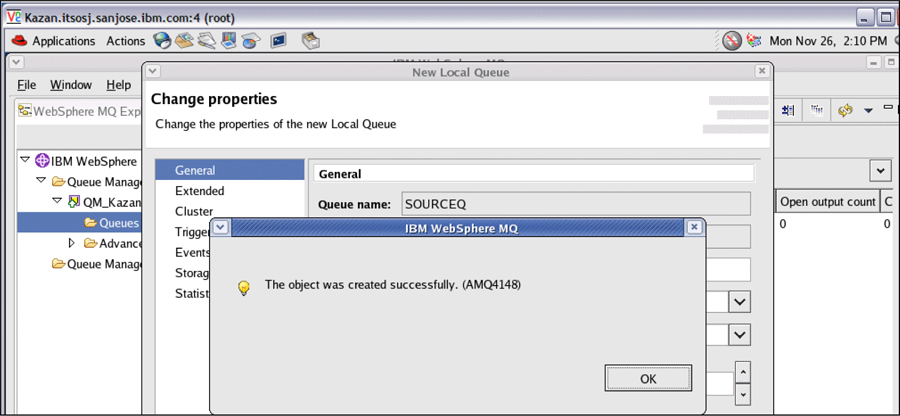
Figure A-24 Create the queues 4/6
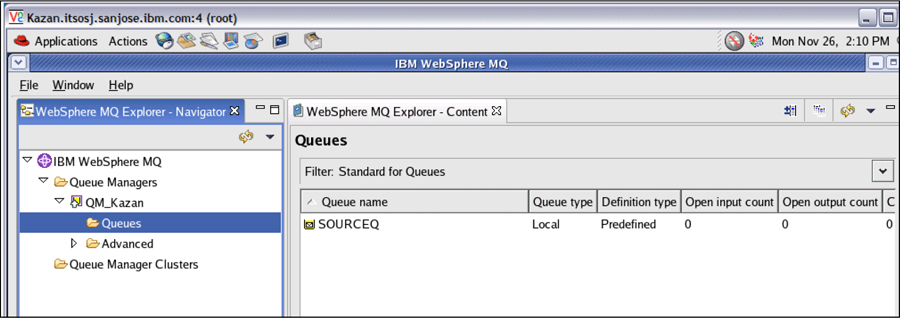
Figure A-25 Create the queues 5/6