


Managing projects using the Eclipse and PTP framework
This chapter describes how to set up Eclipse and PTP Framework either by importing existing code or starting new projects. We also explain how to manage these projects from a local or remote site perspective. Through the chapter, we present different customizations involving building, running, and debugging parallel applications.
The following topics are covered:
– Remote
– Local
•Customize Eclipse to build and run parallel applications
|
Note: The Eclipse and PTP Framework client side is available for Linux (32/64 bit), Mac OSX (64 bit), and Windows (32/64 bit) distributions. For further details, check “Supported operating systems (software)” on page 3.
|
5.1 Available project scenarios
Depending on what resources we have or which target the code must run against, it is possible to use different approaches for each case. In this chapter, we present three specific code development layouts supported by Eclipse. From the complex one to the simple one, we have:
•Synchronized projects
•Remote projects
•Local projects
In Table 5-1, we can evaluate some differences between the three methods.
Table 5-1 Properties for the three project scenarios (client view)
|
Property
|
Synchronized
|
Remote
|
Local
|
|
Ability to build, run and debug
|
Remote/Local
|
Remote
|
Local
|
|
Development for x86 architecture
|
Remote/Local
|
Remote
|
Local
|
|
Development for Power architecture
|
Remote
|
Remote
|
NA
|
|
Code indexing
|
Fast (local)
|
Slow (remote)
|
Fast (local)
|
|
Symmetric dual-site code development
(same toolchain)
|
Yes
x86 (32/64 bit)
|
No
|
No
|
5.1.1 Synchronized
Synchronized projects mirror project files on the local and remote machines. Build, run, and debug can take place on either or both. They use SSH connections to connect to a remote server and, currently, the Git software revision control subsystem to maintain the coherency between local files and remote ones. Figure 5-1 on page 63 demonstrates the workflow for the synchronized scenario.

Figure 5-1 Communication workflow for synchronized Eclipse projects
The advantages of synchronized projects:
•Ability to use local machines to continue code development while the remote machine is not available.
•Maintain fast indexing of local code for speedy editing tasks like code navigation, code assist, outline, and search.
•Ability to develop code on different architectures without forcing eclipse to move to the same respective architectures.
•Ability to create and index Fortran projects. Remote projects do not provide indexing on Fortran code.
To create a synchronized project:
1. Select File → New → Other. A new dialog appears (see Figure 5-2 on page 64), and in the Remote folder you can create either a:
– Synchronized C/C++ project
– Synchronized Fortran project1
2. Under the same folder, you can also convert an existing C/C++ or Fortran local project to a synchronized one with the option: Convert a C/C++ or Fortran project to a synchronized project

Figure 5-2 Remote folder in new project wizard
5.1.2 Remote
Remote projects are based on a remote toolchain to build, run, and debug the code. They rely on SSH connections to connect to the targeted host for edit, index, build, run, and debug commands. Figure 5-3 on page 65 demonstrates the workflow for the remote scenario.
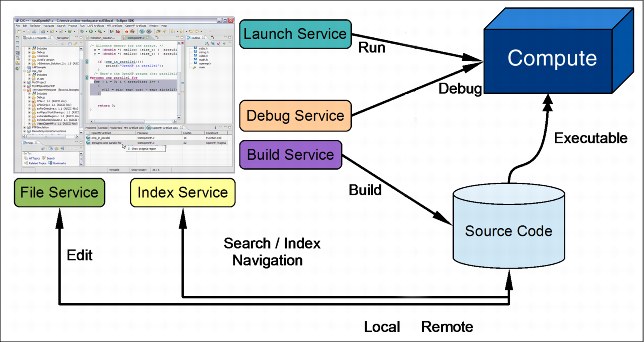
Figure 5-3 Communication workflow for remote Eclipse projects
Advantages of remote projects:
•No space requirements for code development in the local machine due to absence of code locally (the only space consumed will be for Eclipse internal management files). Also for security reasons, some developers might prefer not to store source code on the local machine.
•Decreased requirements for CPU performance on local machine because indexing, build, run, and so on, are all on the remote machine, and the local machine only needs to run Eclipse.
•Ability to develop code on different architectures without forcing eclipse to move to the same respective architectures.
To create remote projects, select File → New → Other. A new dialog (see Figure 5-2 on page 64) appears. In the Remote folder you can create a Remote C/C++ project. Under the same folder, you can also convert an existing C/C++ project to a remote one with the option, Convert to a remote project.
5.1.3 Local
Local projects are based on a local toolchain to build, run, and debug the code. They have no dependencies on other machines and therefore can be more reliable and fast (assuming the same code sizes compared with the other two scenarios).
Advantages of local projects:
•Easy to start with and has no external hardware requirements
•Local host has full control of development availability
Disadvantages of local projects:
•Most local machines (for example, mobile computers and workstations) do not provide the best environment for developing and running large parallel codes
There are two ways to create local projects:
•File → New → <PROJECT>
•File → New → Other
For the last option, a new window appears, and in the C/C++ and Fortran folders you can choose a local project.
5.2 Creating a new parallel application
In this section, we demonstrate how to create a simple Eclipse managed Hello World C and MPI code project. The Eclipse project example is used on an x86 architecture platform using a synchronized scenario. For the example in this section, we used the following resources and respective requirements.
Resources:
•Local machine: x86_64 (Intel i5 560 M) with RHEL 6.2
•Remote machine: x86_64 (Intel Xeon X5570) with RHEL 6.2
Local machine requirements:
•Java 1.6, or later installed
•IBM PEDE client installed
Remote machine requirements (for a synchronized project):
•Reachable through SSH (with password or ssh key)
•Have Git installed for synchronization
•IBM PEDE server installed (check Table 4-1 on page 48)
To create a new parallel application:
1. After you completed those prerequisites, click File → New → Other (or Ctrl+N). A new dialog appears as shown in Figure 5-2 on page 64.
2. Under the folder Remote, select Synchronized C/C++ Project, and click Next.The New Synchronized Project window is displayed, as shown in Figure 5-4 on page 67.

Figure 5-4 New synchronized C/C++ project wizard
In Figure 5-4:
1. Type a name for the project.
2. At the Local directory group, type a path to the project local directory, or use the default location (based on your workspace directory and project name).
3. At the Remote directory group, select the connection to the remote host (if already created) or create a new one:
a. To create a new connection, click New, and a new window named Generic Remote Host is displayed, as shown in Figure 5-5 on page 68.
b. Give a name to the target connection (target name).
c. At the Host Information group, select the Remote host option, specify the fully qualified host name or IP address of the remote host (Host), and the user that will login (User). For the ssh authentication method, there are two possible ways: either through passphrase or through public key authentication:
i. For password authentication, type the selected user password (password).
ii. For public key authentication, specify the path location for the private ssh key file of the selected user. If the private key file has a passphrase, enter it on the respective field (passphrase).
d. Click the Finish to complete the Target Environment Configuration. The window returns to the new synchronized project dialog.

Figure 5-5 Target environment configuration wizard
4. On the Remote directory group, click Browse, and select the project remote directory path (If the directory does not exist, it will be created).
5. Inside Project type, under the Executable folder, select MPI Hello World C Project.
6. Inside Remote Toolchain, select Remote Linux GCC Tool Chain.
7. Inside Local Toolchain, select Linux GCC. If you do not require a build on the local machine, a local toolchain is not required at all.
8. Click Next.
9. In the Basic Settings window, Figure 5-6 on page 69, use the defaults, and click Next or edit the following items:
a. Code author
b. Copyright notice
c. Hello world greeting
d. Source directory name
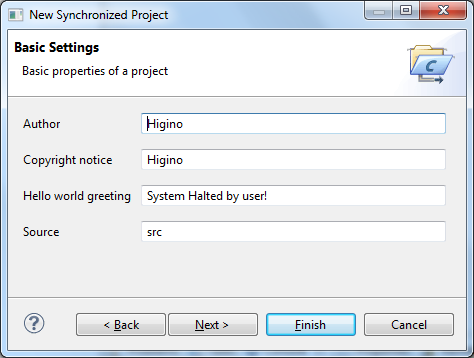
Figure 5-6 Basic settings dialog for MPI project
10. This project is specified before as an MPI project; therefore, the next window presents you with MPI Project Settings (see Figure 5-7) where it can be used to add paths to the build. For this example, accept the default settings by clicking Next.

Figure 5-7 MPI project settings dialog
11. The last window (Figure 5-8 on page 70) shows two pre-built build configurations. Accept the two default selected configurations to include them in your project, and finally click Finish.
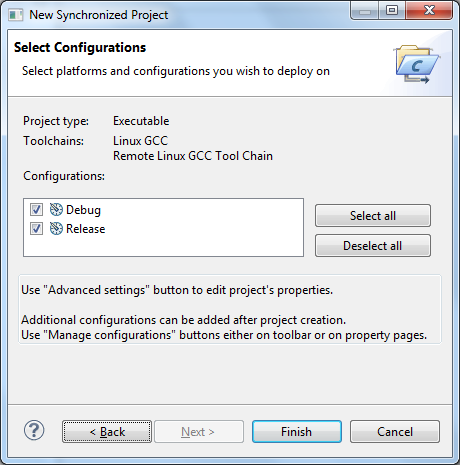
Figure 5-8 Available pre-built configurations for the MPI based hello world project
Eclipse now creates the Hello World project and synchronizes all data with the remote host.
5.3 Importing an existing parallel application
In this section, we demonstrate how to import an existing C based code (makefile project) to Eclipse using a synchronized scenario. When creating a project with existing code, it can initially be located either locally or remotely. For the presented example, we are using a code that already exists on the local machine and the synchronized project setup copies automatically the code to the remote machine.
Resources:
•Local machine: x86_64 (Intel i5 560M) with RHEL 6.2
•Remote machine: x86_64 (Intel Xeon X5570) with RHEL 6.2
Local machine requirements:
•Java 1.6, or later installed
•IBM PEDE client installed
Remote machine requirements (for a synchronized project):
•Reachable through SSH (with password or ssh key)
•Have Git installed for synchronization
•IBM PEDE server installed (check Table 4-1 on page 48)
To import an existing parallel application:
1. After you have all the prerequisites, click File → New → Other (or Ctrl+N). A new window is displayed, as shown in Figure 5-2 on page 64.
2. Under the Remote folder, select Synchronized C/C++ project, and click Next. The New Synchronized Project window is displayed, as shown in Figure 5-4 on page 67.
In this window (Figure 5-4 on page 67):
1. Type a name for the project.
2. At the Local directory group, type a path to the directory where the code resides. This directory will be used as your local project directory.
3. At the Remote directory group, select the connection to the remote host (if already created) or create a new one:
a. To create a new connection, click New, and a new window named Generic Remote Host is displayed, as shown in Figure 5-5 on page 68.
b. Give a name to the target connection (target name).
c. At the Host Information group, select the Remote host option, specify the fully qualified host name or IP of the remote host (host), and specify the user that will login (user). For the authentication method, there are two possible ways, either using passphrase or through public key authentication:
i. For the first method, type the selected user password (password)
ii. For the second method, specify the path location for the private key file of the selected user. If the private key file has a passphrase, enter it on the respective field (passphrase)
d. Click Finish to complete the Target Environment Configuration.
4. On the Remote directory group, click Browse, and select the Project remote directory path (path must be already created).
5. Inside the Project type, under the folder Makefile project, select Empty Project.
6. Inside the Remote Toolchain, select Remote Linux GCC Tool Chain.
7. Inside the Local Toolchain, select Linux GCC.
8. Click Next.
9. The last window presents you with two pre-built build configurations. Accept the two default selected configurations to include them in your project, and click Finish.
Eclipse now synchronizes all of the files between the two sites. After the synchronization process is completed, the project can be built and run.
|
Assumptions: This section example is based on a makefile that is built with the make all command.
|
5.4 Building and running an application
In this section, we demonstrate how to create Eclipse builds (targets) and profile runs using an existing code (makefile based) already imported to Eclipse, and inside a synchronized scenario.
When you create a synchronized Eclipse Project, there are two locations implicit: local and remote. Creating additional build configurations depend only on the toolchain you choose. So we can create new configurations for different compilers or event environment variables depending on the objectives, and when required inspect these build properties by right-clicking the project directory and then clicking Properties. This procedure applies to the active build configurations. So whenever you need to edit the properties of a certain build, you need either to edit that configuration directly or activate it first and then go through the same process again. The next steps demonstrates how to go through both ways:
To create a new toolchain build configuration in Eclipse:
1. Go to Project → Build Configurations → Manage.

Figure 5-9 Manage build configurations
3. When Figure 5-10 is displayed:
a. Type the new build configuration name.
b. Type a description for that build.
c. Select the creation method of this new build, which might be one of the following items:
i. Existing configuration (can be one of already created build configurations)
ii. Default configuration (if you have set some one already)
iii. Import from projects (other projects that you have already configured in Eclipse)
iv. Import predefined configurations (delivered with Eclipse)
d. Click OK when you are satisfied with the options.

Figure 5-10 Create new build configuration wizard
The window in Figure 5-9 is displayed again, now with the newly created configuration.
4. If you want, select it and make it active. The options, Delete and Rename are also available.
5. To exit this management area, click OK to accept all changes or Cancel to discard them.
5.4.1 Building (using targets)
Eclipse is flexible enough to allow you to configure the build environment in many details, so the build process can be entirely controlled through its GUI. For either a C/C++ or Fortran project, it allows you to change several build settings, for example:
•Build directory (root folder by default), command (make by default), and targets.
•Customize environment variables that are exported at build time.
•Enable and disable build logging.
•Choose binary and error parsers that best fits.
•Switch between toolchain.
•Change toolchain flags (only for Eclipse managed build). For makefile-based projects where the makefile content is not managed by Eclipse, change the toolchain settings (compiler, flags, steps,) manually.
All build properties are accessible by right-clicking the project folder and then selecting Properties → C/C++ Build (or Fortran Build). The project properties window along with sections for build configuration are shown in Figure 5-11.

Figure 5-11 Project properties window
The simplest way to build a synchronized project is to right-click the project folder and then click Build project, as shown in Figure 5-12 on page 74. Eclipse uses connection configuration specified when the project was created to log into the remote target and then run make all to build the application. A similar procedure can be followed to clean up build artifacts (right-click the project folder and then select Clean Project) where it executes make clean.
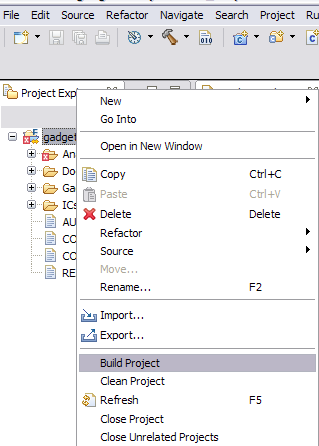
Figure 5-12 Build project
Custom build targets
It is relatively common for projects requiring makefile targets to build and clean up other than all and clean defaults. Thus, we can create specific build targets for the project without changing the toolchain or creating an entirely new configuration (as the one presented in 5.4, “Building and running an application” on page 71).
Custom build targets are often used when a makefile project has several ways of building a program or when there are different targets inside the makefile. Therefore, you must execute different targets.
When creating targets, you can either use the Project Explorer view or use the Make Target view. To do this, make sure you are already in the C/C++ or Fortran perspective. Go to Window → Show View → Make Target.
The Make Target view appears at the right-top corner of the Eclipse window (see Figure 5-16 on page 77).
Depending on your current view, the Make Target view might be shown or not in the Show View submenu of the Menu Window. To open it, in these cases, you can either switch back to the C/C++ or Fortran views first or go to Window → Show View → Other (Alt+Shift+Q) → Make → Make Target.
In this case, the Make Target view appears at the bottom of Eclipse window, as shown in Figure 5-13 on page 75.
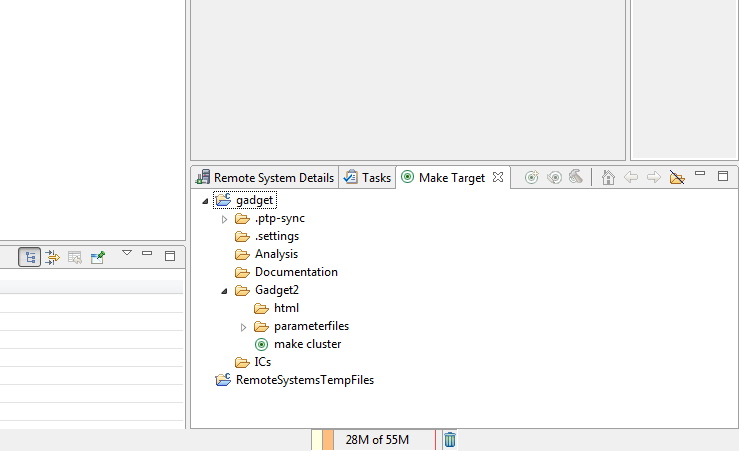
Figure 5-13 Alternative location for the make target view
To actually create a target example, we use the Project Explorer:
1. Select a directory inside the Project Explorer where you have a makefile, and right-click it.

Figure 5-14 Create targets from the project explorer view
3. A new window is displayed named Create Make Target (see Figure 5-15 on page 77):
a. Type a new name for this target.
b. Customize the Make Target if needed.
c. Customize the Build Command.
d. Leave all the other options default. After you finish, click OK.

Figure 5-15 Create make target dialog
The Target will now appear on the Make Target view under the same directory you issued the creation. For example, Figure 5-16 shows two custom build targets called install and cluster.
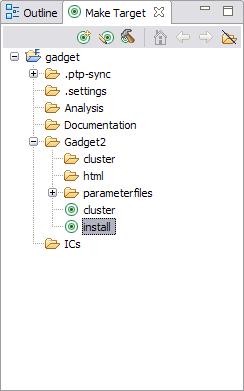
Figure 5-16 Make target view
To execute a specific build target, we can do it through the:
1. Eclipse menu:
a. Select Project → Make Target → Build (Shift+F9).
b. Select a target build configuration and click Build.
2. Project Explorer:
a. Right-click over the directory containing a Make Target configuration.
b. Select Make Targets → Build (Shift+F9).
c. Select a target build configuration, and click Build.
3. Make Target view:
a. Double-click the target configuration or right-click it, and select Build Target.
5.4.2 Running
When your code is built and becomes ready to be tested, you can either execute it and watch the whole process from beginning to the end, debug it, or profile it. There is also a fourth option that is available for external applications, but we talk about it at the end of this chapter. In Eclipse, we can create separate configurations for each of these three types:
•Run configuration
•Debug configuration
•Profile configuration
All three are separate configurations (although they can be created from each other) and therefore run independently. When a specific configuration is created, it is automatically made available to the other two options because some of the configurations are shared between them and others are specific, for example:
•After creating an Eclipse project, and building it, usually a run configuration has to be configured for the program to run (unless it runs in a command line or is used by a third party program). After creating this run configuration, you can also debug it and profile it. If necessary, it is possible to edit these configurations in debug or profile mode to access the specific options for each mode.
•For example, if a run configuration is created, both the debug and profile configurations are available for the same run configuration options but with specific configurations (debug options and profile options respectively) that are not configured by the time that the run configuration is created (assumes default values).
•External applications mode does not share these configurations, as detailed in the “Integrating external applications” on page 91.
•You can access these modes through the Eclipse Run menu or using the Eclipse quick buttons, as shown in Figure 5-17.

Figure 5-17 Eclipse quick access buttons for debug, run and profile options
Run configuration
To create, edit, and delete run configurations:
1. Select Run → Run Configurations.
2. The Run Configurations window is displayed, shown in Figure 5-18 on page 79. In this window, you have two separate areas, the left side is where you manage your configurations, and the right side is where you actually edit the configurations for the selected run configuration.
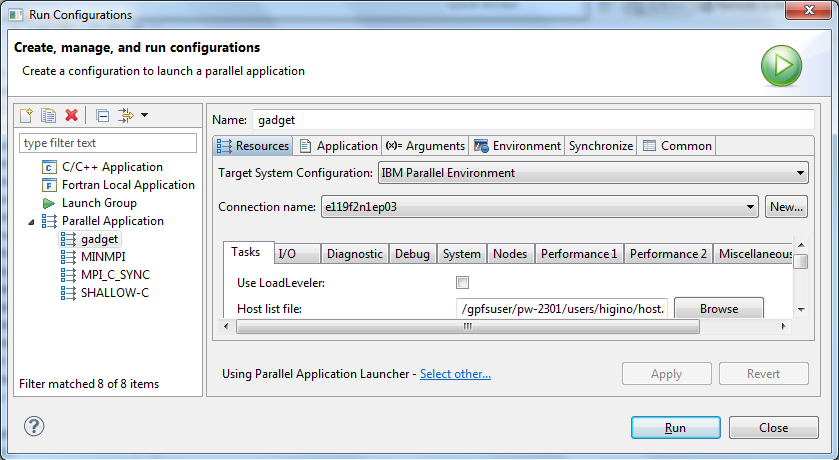
Figure 5-18 Run configurations dialog
3. Figure 5-24 on page 83 illustrates the buttons you can use to create, duplicate (for already created configurations), and delete configurations, respectively from left to right.
4. In Run Configurations (Figure 5-18), you have the following predefined configurations from where you can create customized configurations:
– C/C++ application
– Fortran local application
– Launch group
– Parallel application
5. To create an example of a Parallel Application, select it, and click New Launch configuration (first button as shown in Figure 5-24 on page 83). A new subentry label of the Parallel Application label is displayed. You can name it and customize it with the following options, which are available on the right side of the Run Configurations window:
– Resources (Figure 5-19 on page 80).
– Application (Figure 5-21 on page 81).
– Arguments (Figure 5-22 on page 81).
– Environment (Figure 5-23 on page 82).
– Synchronize
– Common
6. This mode represents the baseline configuration of a run, and it shares all the configurations with the other two modes (except synchronize for the profile mode). The most important tabs are the Resources, Application, Arguments, and Environment tabs. Inside these tabs, we can edit:
– The engine that distributes the processes and their respective options. Currently it is the available interface to several target system configurations, including IBM Parallel Environment (PE) and LoadLeveler, as shown in Figure 5-20 on page 80.
– The nodes that are used to run the application.
– The application path (available in all nodes).
– The application arguments and alternative working paths.
– The definition of additional environment variables.
7. To save the changes, click Apply or just click Run to save them and run the configuration.

Figure 5-19 Run configurations (resources tab)

Figure 5-20 List of target system configurations in the resources tab
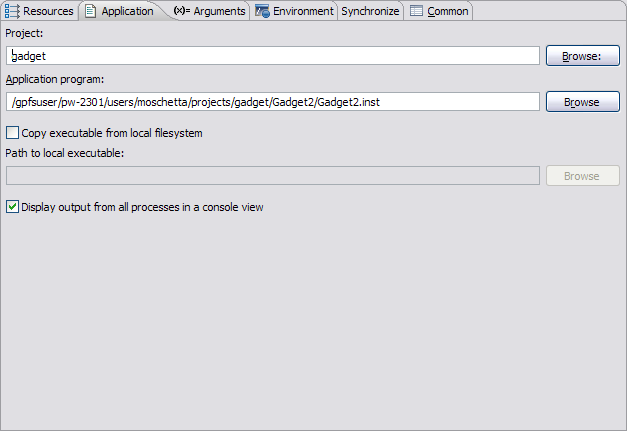
Figure 5-21 Run configurations (application tab)

Figure 5-22 Run configurations (arguments tab)
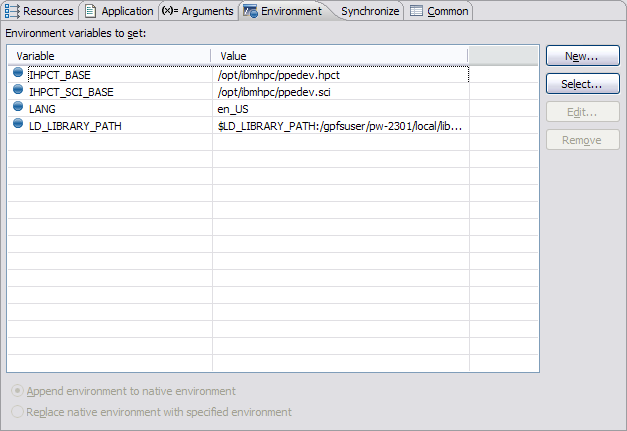
Figure 5-23 Run configurations (environment tab)
Detailed information about how to create a run configuration for a parallel application and submit it to any job scheduler supported, as for instance IBM PE or LoadLeveler, can be performed with the following menu path Help → Help Contents → Parallel Tools Platform (PTP) User Guide → Running Parallel Programs.
Debug configuration
To create, edit, and delete debug configurations:
1. Select Run → Debug Configurations.
2. The Debug Configurations window is displayed, shown in Figure 5-25 on page 84. In this window, you have two separate areas, the left side where you manage your configurations and the right side where you actually edit the configurations for the selected debug configuration.
Figure 5-24 on page 83 illustrates the buttons you can use to create, duplicate (for already created configurations) and delete configurations, respectively from left to right.

Figure 5-24 Eclipse configuration management buttons
3. In the Debug Configurations window (Figure 5-24), you have the following predefined configurations from where you can create customized configurations:
– C/C++ application
– C/C++ attach to application
– C/C++ postmortem debugger
– C/C++ remote application
– Fortran local application
– Launch group
– Parallel application
4. To create an example of a Parallel Application, select it, and click New launch configuration (first button from Figure 5-24). A new subentry label of the Parallel Application label is displayed. You can name it and customize it with the following options, which are available on the right side of the Debug Configurations window:
– Resources
– Application
– Arguments
– Debugger
– Environment
– Synchronize
– Source
– Common
5. As the name suggests, the specific configuration in this mode is the Debugger tab. Inside that tab, choose which debugger to use and what options it uses, as shown in Figure 5-25 on page 84.
6. To save the changes, click Apply, or click Debug to save them and run the debug configuration.
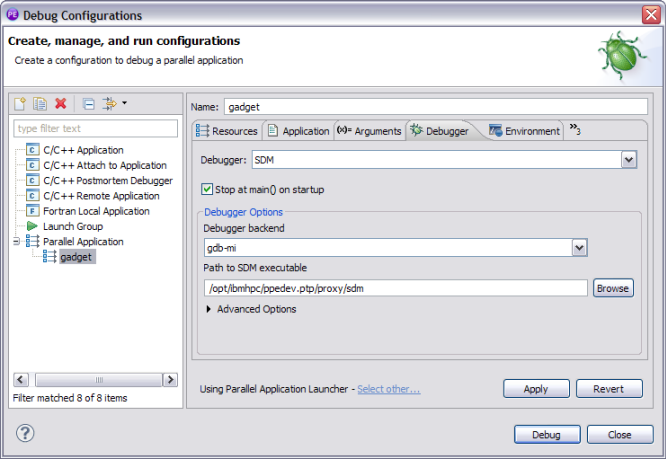
Figure 5-25 Debug configurations dialog
The Eclipse PTP parallel debugger capabilities and more details about how to set up a debug configuration properly are described in “Eclipse PTP Parallel debugger” on page 138.
Profile configuration
To create, edit, and delete profile configurations:
1. Select Run → Profile Configurations. The Profile Configurations window is displayed, shown in Figure 5-26 on page 85. In this window, you have two separate areas. The left side is where you manage your configurations, and the right side is where you actually edit the configurations for the selected profile configuration.
Figure 5-24 on page 83 illustrates the buttons you can use to create, duplicate (for already created configurations) and delete configurations, respectively from left to right.
In the Profile Configurations window (Figure 5-26 on page 85), you have the following predefined configurations from where you can create customized configurations:
– C/C++ application
– Launch group
– Parallel application
2. To create an example of a Parallel Application, select it, and click New launch configuration (first button from Figure 5-24 on page 83). A new subentry label of the Parallel Application label appears. You can name it and customize it with the following options that are available on the right side of the Profile Configurations window:
– Resources
– Application
– Arguments
– Environment
– Performance analysis
– Parametric study
– Common
– HPC Toolkit
3. The specific configurations for this mode are the Performance Analysis, Parametric Study and the HPC Toolkit tabs, shown in Figure 5-26. Inside these tabs we can edit the tool to use for performance analysis (currently only HPC Toolkit is available), parametric tests options, and the HPC Toolkit specific options for instrumentation:
– Data collection
– Performance analysis using HPM (Hardware Performance Monitoring)
– Profiling and trace MPI calls
– MIO (I/O analysis and optimization)
4. To save the changes, click Apply, or just press Profile to save them and run the profile configuration.
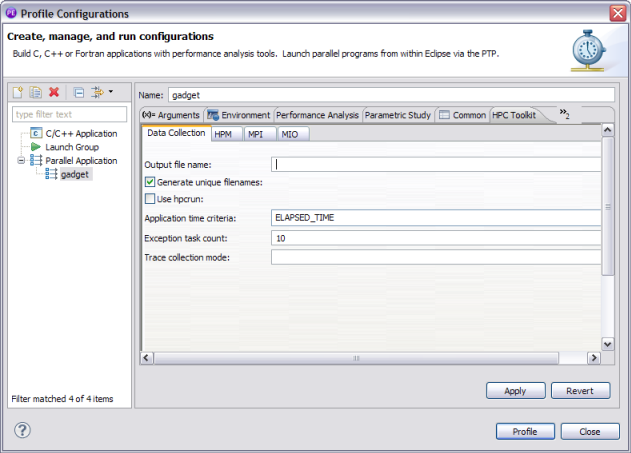
Figure 5-26 Profile configurations (HPC Toolkit tab)
5.5 Edit features of Eclipse
For the current section, we gathered a group of features, which Eclipse can help enhance your code development of C, C++, or Fortran parallel applications.
The C/C++ editor
Eclipse CDT (C/C++ Development Toolkit) provides a full-featured and rich editor for C and C++ languages. In the C/C++ perspective, you cannot perform common tasks, such as the following ones but also the more advanced tasks, which are described in Table 5-2 on page 86:
– Code with syntax highlights for C, C++ and makefile
– Code navigation
– Outline C/C++ syntax elements
– View user-defined make targets
– Outline makefile syntax elements
– Source code refactoring and transformation
Table 5-2 Eclipse edit features for C/C++
|
Feature
|
Description
|
|
Jump into function declaration
|
Can right-click and jump into the function code.
|
|
Code template
|
Provides hundreds of code templates to make coding faster and easier. Moreover, there are templates for Fortran language in its diverse variants and code statements for OpenACC, OpenMP, and MPI frameworks.
Code templates can be inserted into application code by pressing Ctrl+Space and then selecting a desired template, as shown in Figure 5-30 on page 89.
|
|
Content assist
|
As you are typing, it displays a list of statements, such as variables, subroutines, intrinsics, and code templates, based in the scope and alphabetical in what you typed. The content assist is also triggered by pressing Ctrl+Space. See Figure 5-31 on page 89 as an example of content assist.
|
|
Show type hierarchy
|
Shows a tree display of a type or method. The operation is executed when you select a type or method, right-click it, and select Open Type Hierarchy. As a result, it shows a type hierarchy view, as shown in Figure 5-27 on page 87.
|
|
Show call hierarchy
|
Shows a tree display of function call hierarchy. The operation is executed when you select function call or declaration, right-click it, and select Open Call Hierarchy. As a result, it shows a call hierarchy view, as shown in Figure 5-28 on page 87.
|
|
Include browser
|
Shows a tree display with a relationship between the source and header files. The view is opened by right-clicking an open file in the editor and then selecting Show In → Include Browser. As a result, it opens a view, as shown in Figure 5-29 on page 88.
|

Figure 5-27 C/C++ editor type hierarchy
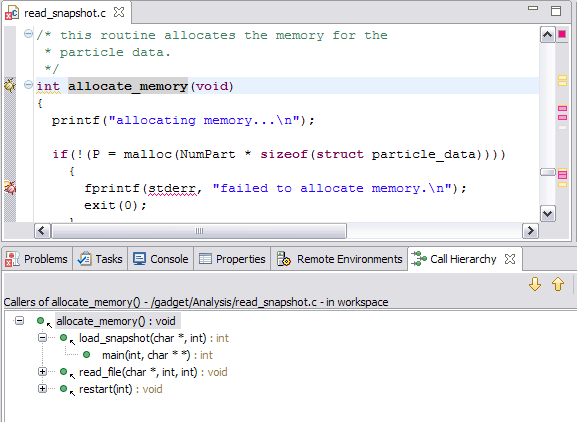
Figure 5-28 C/C++ editor call hierarchy view
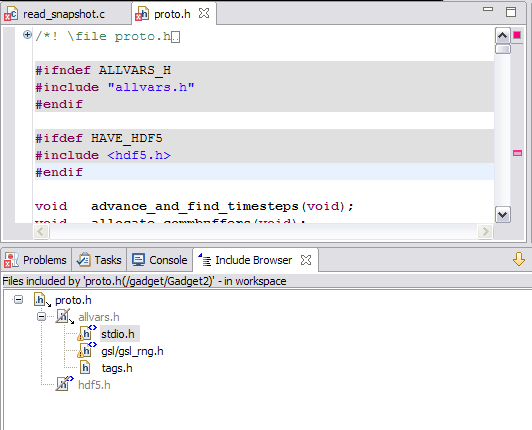
Figure 5-29 C/C++ include browser
The Fortran editor
Eclipse Photran implements a full-featured and rich editor but rather specific for the Fortran language, which are discussed in Table 5-3. Likewise the CDT editor provides the following features:
•Code navigation
•Syntax-highlighting editor
•Outline view
•Makefile-based compilation along with make target view
Table 5-3 Eclipse edit features for Fortran
|
Feature
|
Description
|
|
Code template
|
It provides hundreds of code templates to make coding faster and easier. Moreover, there are templates for Fortran language in its diverse variants and code statements for OpenACC, OpenMP, and MPI frameworks.
Code templates can be inserted into application code by pressing Ctrl+Space and then selecting a desired template, as shown in Figure 5-30 on page 89.
|
|
Content assist
|
As you type, it displays a list of statements, such as variables, subroutines, intrinsics, and code templates based on the scope and alphabets that you typed. The content assist is also triggered by pressing Ctrl+Space. See Figure 5-31 on page 89 as an example of content assist.
|
|
Declaration view
|
Provides a view tab that displays detailed information about any selected (positioning cursor in) program, variable, subprogram, or subroutine statement. See the bottom view tab in Figure 5-32 on page 90 as an example.
|
|
Hover Tip
|
Fortran hover tips display the same information as the declaration view but in an embedded window just below the selected statement. See the hover tip in Figure 5-32 on page 90 as an example.
|
|
Fortran language-based search
|
Provides search mechanics focused in Fortran syntax, allowing specific queries in statements (variable, function, subroutine, module, and so on.). The fortran search window (see Figure 5-33 on page 90) can be opened in the menu Search → Fortran.
|

Figure 5-30 Fortran editor code templates
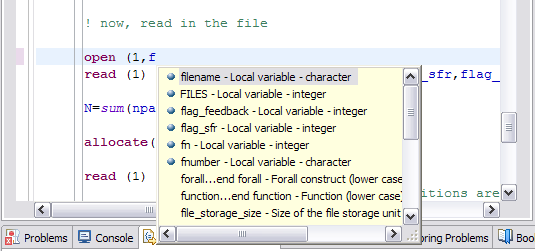
Figure 5-31 Fortran editor content assist

Figure 5-32 Fortran declaration view and hover tip
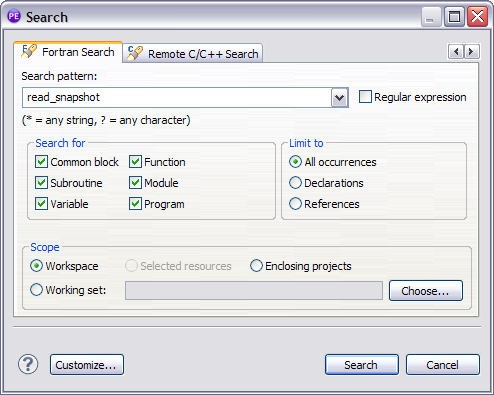
Figure 5-33 Fortran search window
Notice that most of the Fortran editor features described in Table 5-3 on page 88 rely on source code analysis that must be enabled using the menu Project → properties → Fortran general → Analysis/refactoring and then setting the options for each feature, as shown in Figure 5-34 on page 91.

Figure 5-34 Enable Fortran analysis
The Eclipse PTP also provides tools for static analysis of parallel applications source code that is discussed in “Parallel Static Analysis” on page 133.
5.6 Debugging using Eclipse
The Eclipse PTP comes with a parallel debugger that provides parallel applications some specific debugging features that distinguish it from the Eclipse debugger for serial applications. In particular, it was designed to threat parallel application as a set of processes; therefore, providing different visualization modes, a special type of breakpoint called Parallel Breakpoint, multiple current instruction pointers, and other features that ease the debugging of parallel applications.
Refer to “Eclipse PTP Parallel debugger” on page 138 for further details about PTP parallel debugger features along with information about how it integrates within IBM Parallel Environment (PE) Developer Edition.
5.7 Integrating external applications
In this section, we present the option to incorporate an external tool or call program into Eclipse. These programs can either be configured to run after building a project or for all projects of the same selected workspace.
To create, edit, and delete external program configurations:
1. Select Run → External Tools → External Tools Configurations. The External Tools Configurations window is displayed, as shown in Figure 5-35. In this window, you can create, duplicate (for already created configurations), and delete configurations, respectively from left to right, as shown also in Figure 5-24 on page 83.
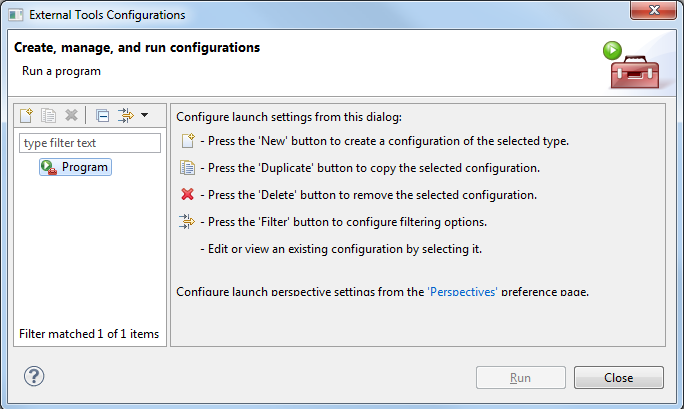
Figure 5-35 External tools configurations dialog
2. In the External Tools Configurations window (Figure 5-35), you have a predefined configuration called Program from where you can create customized configurations.

Figure 5-36 Creating a program configuration inside the external tools configurations
3. To create an example of a Program configuration, select it, and click New Launch Configuration (first button from Figure 5-24 on page 83). A new subentry label of the Program label appears. After creating it, a second area is distinguished to the right side of the External Tools Configuration window, where you actually give it a name and customize it within the following tabs:
– Main
– Refresh
– Build
– Environment
– Common
4. The specific configurations for this mode are the Main, Refresh and the Build tabs (Figure 5-36). Inside these tabs, we can edit which program to use where and for what projects to run it:
– At the Main tab, you specify the program to run, where it runs, and its arguments (Figure 5-36).
– Inside the Refresh tab, you can specify what you want to refresh in the Eclipse workspace upon completion of the program you specified (see Figure 5-37 on page 94).
– Under the Build tab, you can choose when to run the program. The available options are the possibility to run it after or before building a specific project or the entire workspace (Figure 5-38 on page 94).

Figure 5-37 Refreshing the configuration tab

Figure 5-38 Build configuration tab
5. To save the changes, click Apply, or just press Run to save them and run the external tool configuration.
1 Synchronized Fortran project includes all the features of a C/C++ project too
..................Content has been hidden....................
You can't read the all page of ebook, please click here login for view all page.