

Deploying IBM PowerAI
This chapter includes installation guides and instructions to set up and test different frameworks inside IBM PowerAI. This chapter focuses mostly on details for system administrators and teams that are responsible for deploying and supporting IBM PowerAI.
This chapter contains the following topics:
4.1 IBM PowerAI V1.4 setup guide
This chapter contains information about how to set up IBM PowerAI V1.4.
4.1.1 About this chapter
This chapter shows the procedure for installing Ubuntu 16.04 on a bare metal IBM Power System S822LC for High Performance Computing (M/T 8335-GTB) server. This POWER8 server is equipped with a NVIDIA Tesla P100 graphical processing unit (GPU).
After the installation of Ubuntu, this chapter describes the procedure for installing
IBM PowerAI V1.4.
IBM PowerAI V1.4.
This chapter is a comprehensive and a visual guide to IBM PowerAI installation and setup by using the most common installation scenario. For more information for all IBM PowerAI releases, see the IBM PowerAI Release Notes.
|
Note: To avoid conflicts with untested or unsupported versions of certain system libraries, disable automatic updates.
|
4.1.2 Preparing to install IBM PowerAI V1.4
Because the IBM Power System S822LC for High Performance Computing model does not have a DVD drive, you must install the operating system in one of the following ways:
1. Mounting virtual media with the Remote Console function of the baseboard management controller (BMC)
2. USB device
3. Network boot installation
During the use of any of these methods, you must have a terminal to connect to the system through Intelligent Platform Management Interface (IPMI).
For more information about installing Linux on IBM Power Systems LC servers, see IBM Knowledge Center.
Preparation steps
Before starting the configuration, prepare the connection environment from the target server to the internet. When installing the package, the download is performed from the internet to update any dependency relationship.
Downloads
This section describes the installation packages to be downloaded.
Ubuntu installation media
The Ubuntu installation media files are the following ones:
•Ubuntu 16.04.x ISO image file (ubuntu - 16.04.3 - server - ppc64el.iso)
•Ubuntu 16.04.3 LTS (Xenial Xerus)
Fixes for IBM Power System S822LC for High Performance Computing server
As a preferred practice, check for firmware updates for the IBM Power System S822LC for High Performance Computing server at IBM Fix Central.
NVIDIA device driver
The NVIDIA GPU TESLA P100 device driver can be downloaded from NVIDIA.
When downloading the device driver, select the appropriate version of the drivers, as described in “Installing NVIDIA drivers and components” on page 94 and shown in Figure 4-1.

Figure 4-1 NVIDIA drivers download options
Figure 4-2 shows the TESLA drive for Linux on POWER8 download window.

Figure 4-2 NVIDIA drivers download webpage
IBM PowerAI
IBM PowerAI deep learning (DL) packages can be downloaded from Index of /software/server/POWER/LInux/mldl/ubuntu.
NVIDIA components
This section shows the additional NVIDIA components to be downloaded:
Download the following files for POWER8, checking the appropriate version, as shown in Figure 4-2 on page 61:
•cuDNN vX.0 Runtime Library for Ubuntu16.04 POWER8 (Deb)
•cuDNN vX.0 Developer Library for Ubuntu16.04 POWER8 (Deb)
•cuDNN vX.0 Code Samples and User Guide POWER8 (Deb)
4.1.3 IBM Power System S822LC for High Performance Computing initial setup
This section describes the initial setup for the IBM Power System S822LC for High Performance Computing server.
Configuring the management processor IP
The section describes the steps to configure the processor IP:
1. Connect the VGA port on the back of the IBM Power System S822LC for High Performance Computing server to the display and the USB keyboard, as shown in Figure 4-3.

Figure 4-3 VGA and USB connection ports for terminal (IBM Power System S822LC for High Performance Computing rear panel)
|
Tip: The management processor's IP address is set to DHCP by default. Therefore, if there is a DHCP server that is prepared in the network, the IP address is automatically assigned to the management processor. For checking the IP address that is assigned by DHCP or assigning a static IP address, you must enter the shell from Petitboot (boot loader) and check and change the setting.
|
2. Power on the IBM Power System S822LC for High Performance Computing server.

Figure 4-4 Petitboot initial window
4. Use the ipmitool command to check or change the network settings that are assigned to the management processor:
# ipmitool lan print 1
If DHCP is set, check the IP address, as shown in Figure 4-5.

Figure 4-5 The ipmitool lan print 1 command sample output
5. Change the IP address to static:
# ipmitool lan set 1 ipsrc static
6. Set up the IP, gateway, and network mask addresses:
# ipmitool lan set 1 ipaddr IP_ADDRESS
# ipmitool lan set 1 defgw ipaddr GATEWAY_ADDRESS
# ipmitool lan set 1 netmask NETMASK_ADDRESS
7. Confirm the settings:
# ipmitool lan print 1
8. Stop the system to restart the management processor:
# ipmitool power off
9. After the system stops, disconnect both power cords, and reconnect the power cords after 30 seconds.
10. Set the system power to ON.
11. Using the set IP address, confirm that you can access the BMC by using your browser2 to connect to https://IP_ADDRESS.
Figure 4-6 shows the BMC/IPMI Ethernet ports for the IBM Power System S822LC for High Performance Computing server.

Figure 4-6 BMC/IPMI Ethernet port (IBM Power System S822LC for High Performance Computing rear panel)
How to access the baseboard management controller
To access the BMC, complete the following steps:
1. Use your browser to connect to https://IP_ADDRESS.
Figure 4-7 on page 65 shows the BMC login window.

Figure 4-7 BMC login window3
2. Log in to the system with the following values (these are the default values):
– User name: ADMIN
– Password: admin
3. Access the remote Java-based console:

Figure 4-8 Enabling console redirection

Figure 4-9 Opening Java Console
c. Accept the Java jviewer.jnpl dialog.
The Java application starts and the console window, opens, as shown in Figure 4-10.

Figure 4-10 Sample Java Console
4.1.4 Installing Ubuntu 16.04.x
This section provides details about an Ubuntu 16.04.x installation.
Attaching a virtual media (a .iso file as a CD/DVD)
This section describes how to attach virtual media. Complete the following steps:
1. In the Java Console application menu, select Media → Virtual Media Wizard, as shown in Figure 4-11.

Figure 4-11 Opening the Virtual Media Wizard
2. On the computer accessing the BMC, select the .iso file previously downloaded (“Downloads” on page 60) and assign as a CD/DVD:

Figure 4-12 Connecting a CD/DVD
b. Click Open and select a file.

Figure 4-13 Clicking Connect CD/DVD
4. Click Close to complete the attachment.
Installing Ubuntu 16.044
This section describes the steps for installing Ubuntu 16.04:
1. Power on the server by using the red icon at the upper right corner of the console window or under the Power option menu (Power On Server option).
2. The system starts and the Petitboot boot menu is available. Select the Ubuntu installation media, as shown in Figure 4-14.

Figure 4-14 Petitboot boot window

Figure 4-15 Install Ubuntu Server

Figure 4-16 Select kernel
|
Tip: When the installer starts, the window session of the remote control can be disconnected. In that case, switch from the working terminal to ipmitool on Serial over LAN with the following command:
# ipmitool -I lanplus -H BMC_IPADDRESS -U USER -P PASSWORD sol activate
Note: Ubuntu LTS installation media can also be installed by using Hardware Enablement (HWE) in addition to the normal kernel.
|

Figure 4-17 Selecting a language
6. Select the location of your preference.
7. Configure the system locale, as shown in Figure 4-18.

Figure 4-18 Selecting a locale
|
Note: To avoid possible conflicts with the locale settings of some of the frameworks that are deployed by IBM PowerAI, choose United States - en_US_UTF-8 or any other UTF-8 locale as the default locale.
|
8. Set up the keyboard:

Figure 4-19 Automatic keyboard selection
b. In Keyboard layout, select the keyboard of your preference, as shown in Figure 4-20 on page 71.

Figure 4-20 Selecting the keyboard layout
Figure 4-21 shows the keyboard selection.

Figure 4-21 Selecting the keyboard layout
Network setup
This section describes the steps to configure the network setup:

Figure 4-22 Selecting the primary network interface
2. Configure the interface if no DHCP server is available in the network. The message that is shown in Figure 4-24 on page 73 is displayed. Manually continue to configure the network.

Figure 4-23 No DHCP server is present
3. Begin the manual network setup, as shown in Figure 4-24 on page 73.

Figure 4-24 Configuring the network manually
4. Configure the IP address, as shown in Figure 4-25.

Figure 4-25 Configuring the IP
5. Configuring the netmask, as shown in Figure 4-26.

Figure 4-26 Configuring the netmask
6. Configuring the default gateway, as shown in Figure 4-27.

Figure 4-27 Configuring the default gateway
7. Configuring the name server (DNS), as shown in Figure 4-28.

Figure 4-28 Configuring the name server
8. Choose a host name, as shown in Figure 4-29 on page 75.

Figure 4-29 Choosing a host name
9. Configure the domain name, as shown in Figure 4-30.

Figure 4-30 Configuring the domain name
Creating the default user
This section explains how to create the default user:
1. Set the full name and user name of the new user, as shown in Figure 4-31.

Figure 4-31 Providing the full name for the default user
Figure 4-32 shows setting the default user name for the account.

Figure 4-32 Choosing the user name for the default user
2. Choose a password for the default user, as shown in Figure 4-33.

Figure 4-33 Choosing a password
Figure 4-34 shows reentering the password for the default user account.

Figure 4-34 Confirming the password
3. You can choose to encrypt $HOME for this user, but we choose not to encrypt it in this example, as shown in Figure 4-35 on page 77.

Figure 4-35 $HOME directory encryption
Preparing disks for a RAID array
As the onboard SATA adapter does not provide any hardware RAID features, the following steps can be taken to configure software RAID. Although software RAID is not a requirement of IBM PowerAI, it is a preferred practice to mitigate against local disk failure. Creating a RAID array device is not mandatory for the installation of IBM PowerAI, although it is preferred because it provides high availability (HA) if there is a failure of one of the disks (SDDs or hard disk drives (HDDs)) that are part of the RAID array.
For more information, see the Ubuntu wiki.
If you choose not to define the RAID device, continue on to Figure 4-55 on page 86.
Complete the following steps:

Figure 4-36 Selecting a partitioning method
2. Initialize the partition table of the device.
3. Create an empty partition table for each of the displayed disk devices:
– SCSI1 (0,0,0) (sda)
– SCSI2 (0,0,0) (sdb)
Figure 4-37 shows the initialized partition table for a device.

Figure 4-37 Initializing a partition table for a device
Figure 4-38 confirms the partitioning of the device.

Figure 4-38 Confirming the partitioning of a device
4. Check that the entire capacity of each disk (1 TB) is created as FREE SPACE, as shown in Figure 4-39 on page 79.

Figure 4-39 Checking that the disk is properly initialized
Creating a PReP boot partition
This section describes how to create a PReP boot partition.
|
Warning: First, create a free area of 8 MB on sda because it is not possible to create the PReP boot device on a software RAID device.
|
Complete the following steps:

Figure 4-40 Selecting the sda FREE SPACE

Figure 4-41 Create a new partition

Figure 4-42 Specifying the PReP partition size
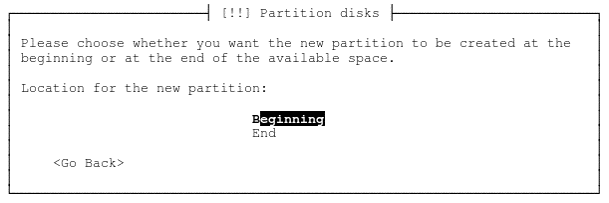
Figure 4-43 Position of the new partition
5. Define the partition file system, as shown in Figure 4-44 on page 81. Then, set the new partition use as an IBM PowerPC® PReP boot Partition,7 as shown in Figure 4-45 on page 81.

Figure 4-44 Defining the partition use

Figure 4-45 Defining the partition as a PowerPC PReP boot partition

Figure 4-46 End creating boot partition
After the partition on sda is formatted, the same process must be applied for partition sdb so that both disks are prepared for the creation of the software RAID1. To achieve this task, perform steps 1 on page 79 - 6 on partition sdb, substituting sdb where necessary.
Creating a RAID1 array
This section shows how to create a RAID1 array configuration:

Figure 4-47 Configure software RAID

Figure 4-48 Confirming the devices selection

Figure 4-49 Create MD device

Figure 4-50 Selecting RAID1

Figure 4-51 Defining the number of copies of the mirror

Figure 4-52 Setting the number of spare devices to none
7. Select all FREE SPACE from /dev/sda and /dev/sdb and click Continue, as shown in Figure 4-53 on page 85.

Figure 4-53 Selecting the free space to use for the RAID array
8. Apply the changes, as shown in Figure 4-54.

Figure 4-54 Confirming the selection

Figure 4-55 Confirming the creation of the multiple devices
Partitioning the RAID array for the operating system installation
This section describes how to partition the RAID array for the operating system installation:
1. To configure LVM with the created MD and create partitions on it, select Guided partitioning, as shown in Figure 4-56.

Figure 4-56 Selecting Guided partitioning

Figure 4-57 Selecting the entire disk to set up LVM

Figure 4-58 Selecting the device

Figure 4-59 Confirming your selection
5. Specify the size of the volume group to be configured and select Continue, as shown in Figure 4-60.

Figure 4-60 Setting the size of the volume

Figure 4-61 Save and finish

Figure 4-62 Applying the changes
Installing operating system packages
After the partitions are created, the installation of all operating system packages starts. For this guide, we assume that the system can access the internet or a repository with all of the operating system packages through an HTTP Proxy.
Complete the following steps:
1. Set up the HTTP proxy, as shown in Figure 4-63.

Figure 4-63 Setting up the HTTP proxy
2. Configure automatic updates, as shown in Figure 4-64.

Figure 4-64 Setting up automatic updates
|
Note: To avoid conflicts with untested or unsupported versions of certain system libraries, disable automatic updates.
It is not mandatory to select to install security updates automatically. You, as the sysadmin, can determine whether your system is exposed to threats, and whether you need Linux updates to be deployed automatically.
|
Configuring system time zone
This section describes how to configure the system time zone. Choose a configuration that fits your needs, as shown in Figure 4-65.

Figure 4-65 Setting up a system clock
Finishing the operating system installation
This section shows how to complete the operating system installation. Choose Continue to finish the installation, as shown in Figure 4-66 on page 91.

Figure 4-66 Installation complete
Operating system setup
After a restart, the system console is available for log in to the system, as shown in Figure 4-67.

Figure 4-67 Login window
Complete the following steps:
1. Log in as the user that was created at the time of installation.
2. If necessary, set up other network adapters. A sample configuration is provided as follows:
$ sudo vi / etc / network / interfaces
auto enP3p3s0f1
iface enP3p3s0f1 inet static
address 192.168.1.xxx
netmask 255.255.255.0
network 192.168.1.0
gateway 192.168.1.1
dns-nameservers 192.168.1.xxx
auto enP3p3s0f2
iface enP3p3s0f1 inet dhcp
3. Update the package list:
– If there is an internet connection available, update from the default operating system repository by running the following command:
$ sudo apt-get update
– If there is no internet connection available, create a local repository by using a DVD image and update the list:
i. Attach the DVD ISO image by using remote control virtual media.
ii. Add the following entry to /etc/fstab and mount it:
/dev/sr0/media/cdrom iso 9660 ro 0 0
iii. Run the following command and add the DVD to the repository:
$ sudo apt-cdrom -d /media/cdrom add 0
iv. Update the package list:
$ sudo apt-get update
– Install additional packages. For example, install OpenSSH:
$ sudo apt - get install - y openssh - server
Setting up a boot device
This section describes how to set up the boot device:
1. Specify PowerPC PReP boot type in /dev/sdb1 as follows:
$ sudo fdisk /dev/sdb
Welcome to fdisk (util-linux 2.27.1).
Changes will remain in memory only until you decide to write them.
Be careful before using the write command.
Command (m for help): p
Disk / dev / sdb: 931.5 GiB, 1000204886016 bytes, 1953525168 sectors
Units: sectors of 1 * 512 = 512 bytes
Sector size (logical / physical): 512 bytes / 512 bytes
I / O size (minimum / optimal): 512 bytes / 512 bytes
Disklabel type: gpt
Disk identifier: FADBB 551 - 1006 - 4 D 21 - 8 BB 2 - 2 D 0 EF 16 D 893
Device Start End Sectors Size Type
/ dev / sdb 1 2048 16383 14336 7 M Linux filesystem
/ dev / sdb 2 16384 195 35 23 7 11 195 3 50 7 32 8 931.5 G Linux RAID
Command (m for help): t
Partition number (1, 2, default 2): 1
Hex code (type L to list all codes): 7
Changed type of partition 'Linux filesystem' to 'PowerPC PReP boot'.
Command (m for help): p
Disk / dev / sdb: 931.5 GiB, 1000204886016 bytes, 1953525168 sectors
Units: sectors of 1 * 512 = 512 bytes
Sector size (logical / physical): 512 bytes / 512 bytes
I / O size (minimum / optimal): 512 bytes / 512 bytes
Disklabel type: gpt
Disk identifier: FADBB 551 - 1006 - 4 D 21 - 8 BB 2 - 2 D 0 EF 16 D 893
Device Start End Sectors Size Type
/ dev / sdb 1 2048 16383 14336 7 M PowerPC PReP boot
/ dev / sdb 2 16384 195 35 23 7 11 195 3 50 7 32 8 931.5 G Linux RAID
Command (m for help): w
The partition table has been altered.
Calling ioctl () to re-read partition table.
Re-reading the partition table failed .: Device or resource busy
The new table will be used at the next reboot or after you run partprobe (8) or kpartx (8).
2. In the initial installation state, if a failure occurs on the disk where the PReP boot area is created, the system cannot start properly. Therefore, copy the contents of PReP boot area of /dev/sda1 to /dev/sdb1, which is created as an empty area at the time of installation.
$ sudo dd if=/dev/sda1 of=/dev/sdb1
14336 + 0 records in
14336 + 0 records out
7340032 bytes (7.3 MB, 7.0 MiB) copied, 0.116626 s, 62.9 MB/s
4.1.5 Installing IBM PowerAI V1.4
IBM PowerAI provides a streamlined process to install all libraries and frameworks that are needed to deploy a DL workload. However, because of license limitations, some of the core components cannot be included in the meta-package. This section provides instructions about how to deploy IBM PowerAI V4.0 and every component that is required.
One of the co-authors of this book has created a short video to demonstrate the IBM PowerAI V1.4 installation process.
For reference, the official IBM PowerAI release notes include installation instructions for every version of the solution.
Checking the prerequisites
This section describes how to check for the prerequisites:
1. Confirm the version of the libc6 package by running the following command:
$ dpkg -s libc 6 | grep -i version
Version: 2.23-0ubuntu7
the system. This package includes shared version s of the standard C library
If the version is 2.23-0ubuntu5 or earlier, update it.
2. Confirm whether you must install the python-socketio package. Only when you use Deep Learning GPU Training System (DIGITS) is necessary to uninstall the python-socketio package that is provided in Ubuntu to avoid package conflict.
To confirm the presence of the package, run the following command:
$ dpkg -r python-socketio
dpkg-query: package 'python-socketio' is not installed and no information is available
Installing NVIDIA drivers and components
This section provides installation instructions for the NVIDIA drivers and components:
1. Download the NVIDIA required files:
To install IBM PowerAI, you need copies of all of the following files, as shown in Figure 4-68.

Figure 4-68 IBM PowerAI and NVIDIA installation files
– 7fa2af80.pub: This GPG Key, which you get from accepting the NVIDIA license agreement, is required to install the NVIDIA CUDA libraries (for download instructions, see 3.1.5, “NVIDIA components” on page 42).
– cuda-repo-ubuntu1604-8-0-local-ga2v2_8.0.61-1_ppc64el.deb: The local installation file for the NVIDIA CUDA API for GPU development. This file is available directly from NVIDIA and provides a collection of libraries and functions for GPU development that is needed for the IBM PowerAI frameworks (for download instructions, see “CUDA” on page 42, and “NVIDIA CUDA Toolkit” on page 43).
– libcudnn6*:- NVIDIA cuDNN is a library of GPU-accelerated primitives for deep neural network development (for download instructions, see “NVIDIA cuDNN” on page 43).
– nvidia-driver-local-repo-ubuntu1604-384.81_1.0-1_ppc64el.deb: The current NVIDIA GPU driver (for download instructions, see “NVIDIA drivers download” on page 44).
– mldl-repo-local_4.0.0_ppc64el.deb; The IBM PowerAI installation file, which contains prebuilt versions of all your favorite artificial intelligence (AI) frameworks and their dependencies (for download instructions, see 3.1.7, “IBM PowerAI deep learning package” on page 45).
|
Tip: Although NVIDIA provides a network installation of the CUDA repository, use the local version. The network installer automatically updates the CUDA version, which can cause a driver mismatch.
|
2. Install the NVIDIA device driver:
a. Add the GPG key for the CUDA repository by running the following command:
$ sudo apt-key add 7fa2af80.pub
b. Use the Debian package manager (dpkg) to install CUDA first, as shown in Figure 4-69 on page 95:
$ sudo dpkg -i cuda-repo-ubuntu1604-8-0-local-gav2_8.0.61-1_ppc64el.deb

Figure 4-69 Installing CUDA
c. Resynchronize the package index files, as shown in Figure 4-70:
$ sudo apt-get update
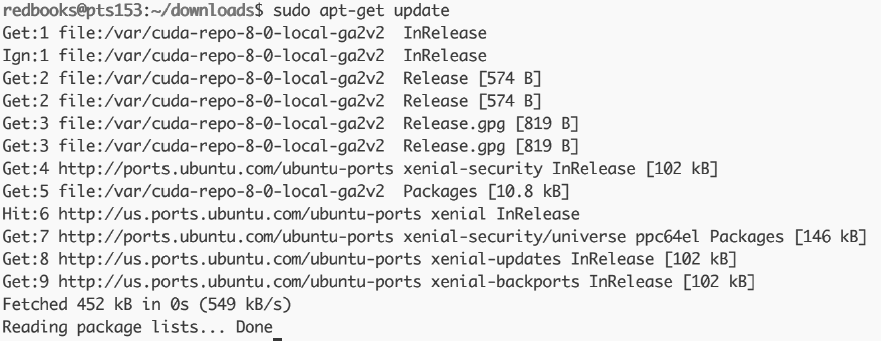
Figure 4-70 The apt-get update sample output
d. Install the CUDA tools:
$ sudo apt-get install cuda
e. Export paths to the CUDA libraries:
$ export PATH=/usr/local/cuda-8.0/bin${PATH:+:${PATH}}
$ export LD_LIBRARY_PATH=/usr/local/cuda-8.0/ lib64${LD_LIBRARY_PATH:+:{$LD_LIBRARY_PATH}}
f. Set the PATH variable definition at boot time. Add these two lines to /etc/bash.bashrc:
PATH=/usr/local/cuda-8.0/bin${PATH:+:${PATH}}
LD_LIBRARY_PATH=/usr/local/cuda-8.0/lib64${LD_LIBRARY_PATH:+:{$LD_LIBRARY_PATH}}
|
Tip: This step is optional but preferable because IBM PowerAI will not have to export the variables for each login.
|
g. Install the cuDNN library by using the dpkg tool, as shown in Figure 4-71:
$ sudo dpkg -i libcudnn*

Figure 4-71 Installing the CUDA Deep Neural Network library
|
Note: These CUDA and cuDNN libraries include an outdated version of the NVIDIA driver. Install the current version for performance and support reasons. Table 3-7 on page 43 shows the minimum and recommended levels of NVIDIA drivers for every IBM PowerAI release.
|
3. Install the NVIDIA drivers:
a. Unpack the driver installation file, as shown in Figure 4-72:
$ sudo dpkg -i nvidia-driver-local-repo-ubuntu1604-384.81_1.0-1_ppc64el.deb

Figure 4-72 Unpacking the NVIDIA drivers
b. Resynchronize the package index files from their sources:
$ sudo apt-get update
c. Install the driver:
$ sudo apt-get install cuda-drivers
d. Restart:
$ sudo reboot
e. Check that the PATH variables are set and the components are installed:
i. Run the NVIDIA CUDA compiler:
$ nvcc - V
nvcc: NVIDIA (R) Cuda compiler driverCopyright (c) 2005-2016 NVIDIA Corporation Buildt Tue_Jan_10_13: 28: 28_CST_2017
Cuda compilation tools, release 8.0, V 8.0.61
ii. After the system restarts, run nvidia-smi to check the status of the GPUs, as shown in Figure 4-73 on page 97:
$ nvidia-smi

Figure 4-73 The nvidia-smi sample output
|
Tip: For a complete nvidia-smi command options reference guide, see the Ubuntu man page for this command.
|
Installing IBM PowerAI
This section describes the installation of IBM PowerAI:
1. Extract IBM PowerAI installer, as shown in Figure 4-74:
sudo dpkg -i mldl-repo-local-4.0.0_ppc64el.deb

Figure 4-74 Unpacking the IBM PowerAI meta-package
2. Resynchronize the package index files from their sources, as shown in Figure 4-75:
$ sudo apt-get update

Figure 4-75 Updating the package information
3. If you plan to use certain frameworks, there are extra steps to perform:
a. Installation note for IBM Caffe and Distributed Deep Learning (DDL) custom operator for TensorFlow
The caffe-ibm and ddl-tensorflow packages require the IBM PowerAI OpenMPI package, which is built with NVIDIA CUDA support. That OpenMPI package conflicts with Ubuntu non-CUDA-enabled OpenMPI packages.
Uninstall any openmpi or libopenmpi packages before installing IBM Caffe or DDL custom operator for TensorFlow. Purge any configuration files to avoid interference:
$ dpkg -l | grep openmpi
$ sudo apt-get purge ...
b. Installation note for DIGITS
The digits and python-socketio-server packages conflict with the Ubuntu older python-socketio package. Uninstall the python-socketio package before installing DIGITS.
4. Install IBM PowerAI libraries and frameworks:
$ sudo apt-get install power-mldl
|
Tip: It is also possible to install individual frameworks instead of the complete package by running the following command:
$ sudo apt-get install <framework name>
The framework packages that are included in IBM PowerAI V4.0 are the following ones:
•caffe-bvlcL Berkeley Vision and Learning Center (BVLC) upstream Caffe V1.0.0
•caffe-ibm: IBM Optimized version of BVLC Caffe V1.0.0
•caffe-nv: NVIDIA fork of Caffe V0.15.14
•chainer: Chainer V1.23.0
•digits: DIGITS V5.0.0
•tensorflow: Google TensorFlow V1.1.0
•ddl-tensorflow: DDL custom operator for TensorFlow
•theano: Theano V0.9.0
•torch: Torch V7
For a list of components that are included in all IBM PowerAI releases, see 3.2, “IBM PowerAI compatibility matrix” on page 58.
|
5. Depending on the IBM PowerAI release and the packages that are installed in step 3 on page 98, the content of this directory can be different. Check that the components are installed by running the following command:
$ ls /opt/DL/
bazel
caffe
caffe-bvlc
caffe-ibm
caffe-nv
chainer
ddl
ddl-tensorflow
digits
nccl
openml
...
|
Note about Python setup tools and easy_install:
The python easy_install utility can interfere with the proper functioning of some of the IBM PowerAI framework packages, including TensorFlow and Chainer.
The IBM PowerAI packages include local copies of Python modules such as protobuf (TensorFlow) and pillow (Chainer) because they require versions newer than those that are provided by Canonical and Ubuntu. The <framework>-activate scripts set up the pathing that is needed to make it work (they set PYTHONPATH to give the local copies priority over the system default versions).
The easy_install utility adds a script that can cause the system's default paths to be searched ahead of PYTHONPATH entries, which might result in protobuf or pillow related failures in TensorFlow and Chainer.
If easy-install runs as root, the problematic script can be found in the following directory:
/usr/local/lib/python2.7/dist-packages/easy-install.pth
|
Optimizing the environment
To get the most out of the system, there is more tuning to perform, and in some cases this tuning depends on the framework that is used:
•Enable Performance Governor:
$ sudo apt-get install linux-tools-common linux-tools-generic cpufrequtils lsb-release
$ sudo cpupower -c all frequency-set -g performance
•SMT value for TensorFlow:
This is a specific parameter to set for TensorFlow workloads. This reduces the CPU parallelism by changing the value of SMT from default (8) to the recommended value (2).
$ sudo apt-get install powerpc-ibm-utils
$ sudo ppc64_cpu --smt=2
If you are going to run other workloads in the system, it can negatively impact these workloads.
•HW parameters valid for all frameworks:
– Enable NVIDIA driver persistence mode:
This prevents the driver from hanging during the run time, which removes any latency while waiting for driver initialization between epochs:
$ sudo nvidia-smi -pm ENABLED
Enabled persistence mode for GPU 00000002:01:00.0.
Enabled persistence mode for GPU 00000003:01:00.0.
Enabled persistence mode for GPU 0000000A:01:00.0.
Enabled persistence mode for GPU 0000000B:01:00.0.
All done.
– Set all GPU clocks to the optimum value:
$ sudo nvidia-smi -ac 715,1480
Applications clocks set to “(MEM 715, SM 1480)” for GPU 00000002:01:00.0
Applications clocks set to “(MEM 715, SM 1480)” for GPU 00000002:03:00.0
Applications clocks set to “(MEM 715, SM 1480)” for GPU 00000002:0A:00.0
Applications clocks set to “(MEM 715, SM 1480)” for GPU 00000002:0B:00.0
|
Note: For more information about NVIDIA driver persistence mode, see GPn GPU Deployment and Management Documentation.
|
4.2 Testing IBM PowerAI V1.4
As with other machine learning (ML) environments, before you can use the framework, you must first source it so that your run time knows that the library is available. This task can be completed on an individual basis through the shell, globally in /etc/bash.basrc, or on a per user basis in ~/.bashrc:
$ source /opt/DL/<framework>/bin/<framework>-activate
All the frameworks in IBM PowerAI come with a simple test that you can run to ensure that everything is in working order. To run the test, ensure that you have sourced the framework, and then run the following command:
$ <framework>-test
The <framework>-test syntax is the same for all of the bundled frameworks.
For more information about the tutorial for using each framework, see Getting Started with <framework in the IBM PowerAI manual.
4.2.1 First test: TensorFlow test program
To test TensorFlow (or any other framework), complete the following steps:
1. Source the framework:
$ source /opt/DL/tensorflow/bin/tensorflow-activate
2. Run the test:
$ tensorflow-test
tensorflow/stream_executor/dso_loader.cc:135] successfully opened CUDA library libcupti.so.8.0 locally0.919
========================================================================DONE!!!
This is a technical verification that everything is installed correctly. Now, you can run some workloads.
4.2.2 Utilization of a multilayer perceptron on a sample data set
The first test runs on an open source data set. For this test, as shown in Figure 4-76, an MNIST database of handwritten numbers was chosen.

Figure 4-76 MNIST data set sample
MNIST data set
Here is the MNIS data set.
This data set has a training set of 60,000 examples, and a test set of 10,000 examples. It is a subset of a larger set available from NIST. The digits are size-normalized and centered in a fixed-size image.
The original black and white (bilevel) images from NIST are size-normalized to fit in a 20 x 20 pixel box while preserving their aspect ratio. The resulting images contain gray levels because of the anti-aliasing technique that is used by the normalization algorithm. The images are centered in a 28 x 28 image by computing the center of mass of the pixels, and converting the image to position this point at the center of the 28 x 28 field.
Multilayer perceptron
The most basic and most commonly used forward-propagation network among neural networks is multilayer perceptron (MLP). An MLP is a class of feed-forward artificial neural network. An MLP consists of at least three layers of nodes. Except for the input nodes, each node is a neuron that uses a nonlinear activation function. MLP uses a supervised learning technique that is called back propagation for training. Its multiple layers and non-linear activation distinguish MLP from a linear perceptron. It can distinguish data that is not linearly separable.
MLPs are sometimes colloquially referred to as vanilla neural networks, especially when they have a single hidden layer.
Figure 4-77 on page 103 shows a possible network architecture for an MLP that is used for character recognition over an MNIST data set.

Figure 4-77 Multilayer perceptron network architecture for MNIST
4.2.3 Using Caffe with MNIST
This section describes how to use Caffe with MNIST:9
1. Activate Caffe:
$ source /opt/DL/caffe-bvlc/bin/caffe-activate
2. Copy a sample of Caffe to any test directory (in this example, ./caffe) by using the sample copy script that is included with IBM PowerAI:
$ caffe-install-samples ./caffe
$ cd ./caffe
3. Download the MNIST data:
$ ./data/mnist/get_mnist.sh
4. Convert the MNIST data to LMDB format by using Caffe:
$ ./examples/mnist/create_mnist.sh
5. Run the training and testing:
$ ./examples/mnist/train_lenet.sh
I0609 12:02:41.426894 72649 data_layer.cpp:73]
Restarting data prefetching from start.
I0609 12:02:41.427927 72583 solver.cpp: 398]
Test net output #0: accuracy = 0.9915I0609
12:02:41.427958 72583 solver.cpp: 398] )
Test net output #1: loss = 0.027027
(* 1 = 0.027027 loss)
4.2.4 Using Caffe with TensorFlow
This section describes how to use Caffe with TensorFlow:10
1. Activate TensorFlow:
$ source / opt / DL / tensorflow / bin / tensorflow-activate
2. Download TensorFlow from GitHub and expand the tutorial script group to an arbitrary directory (~ / tensorflow in this case):
$ mkdir ~/tensorflow
$ git clone https://github.com/tensorflow/tensorflow.git
$ cd clone/tensorflow/examples/tutorials/mnist/
3. Run the training and testing:
$ cd clone/tensorflow/examples/
$ python mnist_softmax.py
[tensorflow/stream_executor/dso_loader.cc:135] successfully opened CUDA library libcublas.so.8.0
locally [tensorflow/stream_executor/dso_loader.cc:135] successfully opened CUDA library libcudnn.so.5
locally [tensorflow/stream_executor/dso_loader.cc:135] Successfully opened CUDA library libcurand.so.8.0 successfully opened CUDA library libcuda.so.1
locally [tensorflow/stream_executor/dso_loader.cc:135] successfully opened CUDA library libcurand.so.8.0
locally
Extracting /tmp/tensorflow/mnist/input_data/train-images-idx3-ubyte.gz
Extracting /tmp/tensorflow/mnist/input_data/train-labels-idx1-ubyte.gz
Extracting /tmp/tensorflow/mnist/input_data/t10k-images-idx3-ubyte.gz
:
[tensorflow/compiler/xla/service/service.cc:187] StreamExecutor device (2): Tesla P100-SXM2-16GB, Compute Capability 6.0
[tensorflow/compiler/xla/service/service.cc:187] StreamExecutor device (3): Tesla P100-SXM2-16GB, Compute Capability 6.0
0.9176
4.3 Setting up IBM PowerAI V1.5.0 on a POWER L822SC for High Performance Computing server
This setup guide is based on the official IBM PowerAI release notes.
4.3.1 Deep learning software packages
IBM PowerAI V1.5 provides software packages for several DL frameworks, supporting libraries, and tools:
•DL frameworks
– Caffe: BVLC and IBM variants
– TensorFlow
•Supporting libraries:
– NVIDIA Collective Communications Library (NCCL)
– OpenBLAS
•Tools”:
– Bazel
– TensorBoard
|
Note: For more information, see IBM PowerAI. Developer resources can be found at IBM PowerAI Developer.
|
It also includes a technology preview of IBM PowerAI DDL. DDL supports distributed (multi-host) model training. TensorFlow support is provided by a separate package that is included in the IBM PowerAI distribution.
All the packages are intended for use with the IBM Power Systems S822LC for High Performance Computing with NVIDIA Tesla P100 GPUs servers, RHEL 7.4 LE with NVIDIA CUDA 9.0, and cuDNN V7.0 packages.
|
Note: To avoid conflicts with untested or unsupported versions of certain system libraries, disable automatic updates.
It is not mandatory to install security updates automatically. You, as the sysadmin, can determine whether your system is exposed to threats, and whether you need Linux updates to be deployed automatically.
|
4.3.2 System setup
This section describes how to perform the system setup.
Operating system repository setup
This section describes how to set up the operating system repository:
1. Enable the optional and extra repository channels:
$ sudo subscription-manager repos --enable=rhel-7-for-power-le-optional-rpms
$ sudo subscription-manager repos --enable=rhel-7-for-power-le-extras-rpms
2. Enable the EPEL repository:
$ wget https://dl.fedoraproject.org/pub/epel/epel-release-latest-7.noarch.rpm
$ sudo rpm -ihv epel-release-latest-7.noarch.rpm
NVIDIA components
The DL packages require CUDA, cuDNN, and GPU driver packages from NVIDIA.
The required and recommended versions of these components are shown in Table 4-1.
Table 4-1 NVIDIA components for IBM PowerAI V1.5
|
Component
|
Required
|
Recommended
|
|
CUDA Toolkit
|
9.0.176
|
|
|
cuDNN
|
7.0.4
|
|
|
GPU Driver
|
384.81
|
|
To install these components, complete the following steps:
1. Download and install NIVDIA CUDA 9.0:
a. Select Operating System: Linux
b. Select Architecture: ppc64le
c. Select Distribution RHEL
d. Select Version 7
e. Select the Installer Type that fits your needs.
f. Follow the IBM PowerLinux™ installation instructions in the CUDA Quick Start Guide found at NIVDIA CUDA 9.0, including the steps describing how to set up the CUDA development environment by updating PATH and LD_LIBRARY_PATH.
|
Note: Registration in the NVIDIA Accelerated Computing Developer Program is required.
|
3. Install the cuDNN V7.0 packages:
$ sudo tar -C /usr/local --no-same-owner -xzvf cudnn-9.0-linux-ppc64le-v7.tgz
Anaconda
A number of the DL frameworks require Anaconda. Anaconda is a platform-neutral data science distribution with a collection of 1,000+ open source packages with complementary community support.
You need to download and install Anaconda. The installation requires input for a license agreement, installation location (the default is $HOME/anaconda2), and permission to modify the PATH environment variable (by way of .bashrc) as follows:
$ wget https://repo.continuum.io/archive/Anaconda2-5.0.0-Linux-ppc64le.sh
$ sudo yum install bzip2
$ bash Anaconda2-5.0.0-Linux-ppc64le.sh
$ source ~/.bashrc
|
Note: Anaconda2-5.0.0-Linux-ppc64le.sh is a large file (283 MB) and has an md5sum of 157890d591c61a9b511f8452476d6d19.
|
If multiple users are using the same system, each user must install Anaconda individually.
|
Note: Here is a framework-specific Anaconda setup for IBM PowerAI V1.5 for POWER9.
Anaconda is required for the following items:
•TensorFlow (“tensorflow”)
•TensorBoard (“tensorboard”)
Each of those packages includes an install_dependencies script that installs the necessary packages in the user's Anaconda environment:
$ /opt/DL/<framework>/bin/install_dependencies
Then, the framework can be used as usual:
$ source /opt/DL/<framework>/bin/<framework>-activate
$ <framework>-test
|
4.3.3 Installing the deep learning frameworks
This section describes how to install the DL frameworks.
IBM Spectrum MPI installation
The IBM PowerAI Deep Learning packages depend on IBM Spectrum MPI. To install it, complete the following steps:
1. Download IBM Spectrum MPI by completing the following steps:
a. Sign in with your IBM ID.
b. Select IBM Spectrum MPI v10.1 and click Continue.
c. View and agree to the license.
d. Select ibm_smpi_lic_s-10.1Eval-rh7_Aug11.ppc64le.rpm.
e. Select ibm_smpi-10.1.1.0Eval-rh7_Aug11.ppc64le.rpm.
f. Click Download now.
2. Install the RPMs on your system by running the following command:
$ sudo rpm -ihv ibm_smpi_lic_s-10.1Eval-rh7_Aug11.ppc64le.rpm ibm_smpi-10.1.1.0Eval-rh7_Aug11.ppc64le.rpm
Software repository setup
The IBM PowerAI Deep Learning packages are distributed in a tar.gz file containing an RPM and a readme file. The tar.gz file must be extracted on the local machine. Installing the RPM creates an installation repository on the local machine.
Install the repository package by running the following command:
$ sudo rpm -ihv mldl-repo-*.rpm
Installing all frameworks concurrently
The DL frameworks can be installed concurrently by using the power-mldl meta-package:
$ sudo yum install power-mldl-cuda9.0
Installing frameworks individually
The DL frameworks can be installed individually if you prefer. Here are the framework packages:
•caffe-bvlc: BVLC upstream Caffe V1.0.0
•caffe-ibm: IBM Optimized version of BVLC Caffe V1.0.0
•tensorflow: Google TensorFlow V1.4.0
•tensorboard: Web Applications for Inspecting TensorFlow Runs and Graphs V0.4.0rc3
•ddl-tensorflow: DDL custom operator for TensorFlow
Each can be installed by running the following command:
$ sudo yum install <framework>-cuda9.0
Accepting the license agreement
Read the license agreements and accept the terms and conditions before using IBM Spectrum MPI or any of the frameworks by running the following commands:
$ sudo IBM_SPECTRUM_MPI_LICENSE_ACCEPT=no /opt/ibm/spectrum_mpi/lap_se/bin/accept_spectrum_mpi_license.sh
$ sudo /opt/DL/license/bin/accept-powerai-license.sh
After reading the license agreements, future installation s can be automated to silently accept the license agreements by running the following commands:
$ sudo IBM_SPECTRUM_MPI_LICENSE_ACCEPT=yes /opt/ibm/spectrum_mpi/lap_se/bin/accept_spectrum_mpi_license.sh
$ sudo IBM_POWERAI_LICENSE_ACCEPT=yes /opt/DL/license/bin/accept-powerai-license.sh
4.3.4 Tuning recommendations
Here are the preferred settings for optimal DL performance on the Power S822LC for High Performance Computing:
•Enable Performance Governor:
$ sudo yum install kernel-tools
$ sudo cpupower -c all frequency-set -g performance
•Enable GPU persistence mode:
$ sudo systemctl enable nvidia-persistenced
$ sudo systemctl start nvidia-persistenced
•Set GPU memory and graphics clocks (P100 GPU only):
$ sudo nvidia-smi -ac 715,1480
•For TensorFlow, set the SMT mode:
$ sudo ppc64_cpu --smt=2
4.3.5 Getting started with machine learning and deep learning frameworks
This section shows how to get started with the machine learning and deep learning (MLDL) frameworks.
General setup
Most of the IBM PowerAI packages install outside the normal system search paths (to /opt/DL/...), so each framework package provides a shell script to simplify environmental setup (for example, PATH, LD_LIBRARY_PATH, PYTHONPATH).
Update your shell rc file (.bashrc) to source the necessary setup scripts. For example:
source /opt/DL/<framework>/bin/<framework>-activate
Any errors that occur when you run the activate scripts must be resolved before you use the framework.
Each framework also provides a test script to verify basic functions:
$ <framework>-test
Dependencies
Many IBM PowerAI frameworks (for example, TensorFlow, TensorBoard, and Caffe) have their dependencies satisfied by Anaconda packages. These dependencies are validated by the <framework>-activate script to ensure that they are installed. If they are not installed, the script fails.
For these frameworks, the /opt/DL/<framework>/bin/install_dependencies script must be run before activation to install the required packages.
For example:
$ source /opt/DL/tensorflow/bin/tensorflow-activate
Missing dependencies ['backports.weakref', 'mock', 'protobuf']
Run "/opt/DL/tensorflow/bin/install_dependencies" to resolve this problem.
$ /opt/DL/tensorflow/bin/install_dependencies
Fetching package metadata ...........
Solving package specifications: .
Package plan for installation in environment /home/rhel/anaconda2:
The following NEW packages will be INSTALLED:
backports.weakref: 1.0rc1-py27_0
libprotobuf: 3.4.0-hd26fab5_0
mock: 2.0.0-py27_0
pbr: 1.10.0-py27_0
protobuf: 3.4.0-py27h7448ec6_0
Proceed ([y]/n)? y
libprotobuf-3. 100% |###############################| Time: 0:00:02 2.04 MB/s
backports.weak 100% |###############################| Time: 0:00:00 12.83 MB/s
protobuf-3.4.0 100% |###############################| Time: 0:00:00 2.20 MB/s
pbr-1.10.0-py2 100% |###############################| Time: 0:00:00 3.35 MB/s
mock-2.0.0-py2 100% |###############################| Time: 0:00:00 3.26 MB/s
$ source /opt/DL/tensorflow/bin/tensorflow-activate
$
Getting started with Caffe
This section describes how to get started with Caffe.
Caffe alternatives
Packages are provided for upstream BVLC Caffe (/opt/DL/caffe-bvlc) and IBM optimized Caffe (/opt/DL/caffe-ibm). The system default Caffe (/opt/DL/caffe) can be selected by using the operating system's alternatives as follows:
$ sudo update-alternatives --config caffe
There are 2 programs which provide 'caffe'.
Selection Command
-----------------------------------------------
1 /opt/DL/caffe-bvlc
*+ 2 /opt/DL/caffe-ibm
Enter to keep the current selection[+], or type selection number:
Users can activate the system default Caffe:
source /opt/DL/caffe/bin/caffe-activate
Users can activate a specific variant. For example:
source /opt/DL/caffe-bvlc/bin/caffe-activate
Attempting to activate multiple Caffe packages in a single login session causes unpredictable behavior.
|
Note: The caffe-test failure in DeconvolutionLayerTest
Running caffe-test can fail with the test case 5 tests from DeconvolutionLayerTest/0, where TypeParam = caffe::CPUDevice. This is a known issue that is documented in Caffe Issue 4083. The workaround is to set the variable OMP_NUM_THREADS to the value of 1 before running the test:
$ source /opt/DL/caffe/bin/caffe-activate
$ export OMP_NUM_THREADS=1
$ caffe-test
|
Caffe samples and examples
Each Caffe package includes example scripts and sample models. A script is provided to copy the sample content into a specified directory:
$ caffe-install-samples <somedir>
References
For tutorials and example programs that you can run to get started, see Caffe.
Here are links to example programs:
Optimizations in IBM Caffe
The IBM Caffe package (caffe-ibm) in IBM PowerAI is based on BVLC Caffe and includes optimizations and enhancements from IBM:
•CPU and GPU layer-wise reduction
•Large Model Support (LMS)
•IBM PowerAI DDL
Command-line options
IBM Caffe supports all BVLC Caffe options and adds new ones to control the enhancements:
•-bvlc: Disables CPU and GPU layer-wise reduction.
•-threshold: Tunes CPU and GPU layer-wise reduction. If the number of parameters for one layer is greater than or equal to the threshold, their accumulation on the CPU is done in parallel. Otherwise, the accumulation is done by using one thread. By default, it is set to 2,000,000.
•-ddl ["-option1 param -option2 param"]: Enables DDL with an optional space-delimited parameter string. The supported parameters are as follows:
– mode <mode>
– dumo_iter <N>
– dev_sync <0, 1, or 2>
– rebind_iter <N>
– dbg_level <0, 1, or 2>
•-ddl_update: This option instructs Caffe to use a new custom version of the ApplyUpdate function that is optimized for DDL. It is faster, although it does not support gradient clipping, so it is off by default. It can be used in networks that do not support clipping.
•-ddl_align: This option ensures that the gradient buffers have a length that is a multiple of 256 bytes and have start addresses that are multiples of 256, which ensures cache line alignment on multiple platforms and alignment with NCCL slices. This option is off by default.
•-ddl_database_restart: This option ensures that every learner always looks at the same data set during an epoch, which enables a system to cache only the pages that are touched by the learners that are contained within it. It can help size the number of learners that are needed for a given data set size by establishing a known database footprint per system. This option is off by default.
•-lms <size>: This option enables LMS with a threshold of <size>.
•-lms_frac <fraction>: This option tunes LMS memory usage between the CPU and GPU.
Table 4-2 shows the command-line options.
Table 4-2 IBM Caffe command options
|
Feature
|
-blvc
|
-ddl
|
-lms
|
-gpu
|
|
CPU/GPU layer-wise reduction
|
Do not specify.
|
Do not care.
|
Do not care.
|
Multiple GPUs.
|
|
DDL
|
Do not care.
|
Do specify.
|
Do not care.
|
Do not specify.
|
|
LMS
|
Do not care.
|
Do not care.
|
Do specify.
|
Do not care.
|
LMS is effective regardless of the other options that are used if -lms is specified. For example, you can use DDL and LMS together.
CPU and GPU layer-wise reduction is enabled only if multiple GPUs are specified and layer_wise_reduce is false.
Using multiple GPUs with DDL is specified by the Message Passing Interface (MPI) rank file, so the -gpu flag cannot be used to specify multiple GPUs for DDL.
About CPU and GPU layer-wise reduction
This optimization aims to reduce the running time of a multiple-GPU training by using CPUs. In particular, gradient accumulation is offloaded to CPUs and done in parallel with the training. To gain the best performance with IBM Caffe, close unnecessary applications that consume a high percentage of CPU.
|
Note: If you use a single GPU, IBM Caffe and BVLC Caffe have similar performance.
|
The optimizations in IBM Caffe do not change the convergence of a neural network during training. IBM Caffe and BVLC Caffe produce the same convergence results.
CPU and GPU layer-wise reduction is enabled unless the -bvlc command-line flag is used.
About IBM PowerAI Distributed Deep Learning
For more information about using IBM PowerAI DDL, see /opt/DL/ddl-doc/doc/README.md.
About Large Model Support
IBM Caffe with LMS loads the neural model and data set in system memory and caches activity to GPU memory, enabling models and the training batch size to scale significantly beyond what was previously possible. LMS is available as a technology preview.
You can enable the LMS by adding -lms <size in KB>, for example -lms 1000. Then, any memory chunk larger than 1000 KB is kept in CPU memory, and fetched to GPU memory only when needed for computation. Thus, if you pass a large value such as -lms 10000000000, it effectively disables the feature, and a small value means more aggressive LMS. The value is used to control the performance tradeoff.
As a secondary option, there is -lms_frac <0~1.0>. For example, with -lms_frac 0.4, LMS does not take effect until more than at least 40% of GPU memory is expected to be taken. This is useful for disabling LMS for a small network.
Combining Large Model Support and Distributed Deep Learning
LMS and DDL can be combined, for example by running the following command:
$ mpirun -x PATH -x LD_LIBRARY_PATH -rf 4x4x2.rf -n 8 caffe train -solver alexnet_solver.prototxt -d
Getting started with TensorFlow
The TensorFlow home page has a variety of information, including tutorials, how to instructions, and a getting started guide.
For more tutorials and examples, see the following resources:
Distributed Deep Learning custom operator for TensorFlow
This release of IBM PowerAI includes a technology preview of the IBM PowerAI DDL custom operator for TensorFlow. The DDL custom operator uses IBM Spectrum MPI and NCCL to provide high-speed communications for distributed TensorFlow.
The DDL custom operator can be found in the ddl-tensorflow package. For more information about DDL and about the TensorFlow operator, see the following readme files:
•/opt/DL/ddl-doc/doc/README.md
•/opt/DL/ddl-tensorflow/doc/README.md
•/opt/DL/ddl-tensorflow/doc/README-API.md
The DDL TensorFlow operator makes it easy to enable Slim-style models for distribution. The following package includes examples of Slim models that are enabled with DDL:
$ source /opt/DL/ddl-tensorflow/bin/ddl-tensorflow-activate
$ ddl-tensorflow-install-samples <somedir>
These examples are based on a specific commit of the TensorFlow models repository with a small adjustment. If you prefer to work from an upstream clone rather than the packaged examples, run the following commands:
$ git clone https://github.com/tensorflow/models.git
$ cd models
$ git checkout 11883ec6461afe961def44221486053a59f90a1b
$ git revert fc7342bf047ec5fc7a707202adaf108661bd373d
$ cp /opt/DL/ddl-tensorflow/examples/slim/train_image_classifier.py slim/
Additional TensorFlow features
The IBM PowerAI TensorFlow packages include TensorBoard.
TensorFlow V1.4.0 package includes support for additional features:
•HDFS
•NCCL
4.3.6 Uninstalling machine learning and deep learning frameworks
The MLDL framework packages can be uninstalled individually the same way that they were installed. To uninstall all MLDL packages and the repositories that were used to install them, run the following commands:
$ sudo yum remove powerai-license
$ sudo yum remove mldl-repo-local-cuda9.0
4.4 IBM PowerAI V1.5.0 setup guide for POWER AC922
This section is based on the official IBM PowerAI release notes.
4.4.1 Deep learning software packages
IBM TensorFlow ESP for Power AC922 provides software packages for several DL frameworks, supporting libraries, and tools:
•Bazel
•NCCL
•OpenBLAS
•TensorFlow
•TensorBoard
It also includes a technology preview of IBM PowerAI DDL. DDL supports distributed (multi-host) model training. TensorFlow support is provided by a separate package that is included in the IBM PowerAI distribution.
|
Note: The IBM TensorFlow ESP for Power AC922 packages, the IBM Spectrum MPI packages, and a readme file are available at Box. Contact your ESP representative for access.
|
All the packages are intended for use with the Power AC922 with NVIDIA Tesla V100 GPUs, RHEL 7.4 LE with NVIDIA CUDA 9.1, and cuDNN V7.0 packages.
For more information about IBM PowerAI, see IBM PowerAI.
Developer resources can be found at Deep Learning and PowerAI Development.
4.4.2 System setup
This section describes setting up of the IBM PowerAI system.
Operating system
The DL packages require RHEL 7.4 for IBM POWER9. The RHEL installation image and license must be acquired from Red Hat.
Operating system and repository setup
To set up the OS and repository, complete the following steps:
1. Enable the 'optional' and 'extra' repository channels:
$ sudo subscription-manager repos --enable=rhel-7-for-power-9-optional-rpms
$ sudo subscription-manager repos --enable=rhel-7-for-power-9-extras-rpms
2. Install the packages that are needed for the installation:
$ sudo yum -y install wget nano bzip2
3. Enable the EPEL repository:
$ wget https://dl.fedoraproject.org/pub/epel/epel-release-latest-7.noarch.rpm
$ sudo rpm -ihv epel-release-latest-7.noarch.rpm
4. Load the current kernel:
$ sudo yum update kernel kernel-tools kernel-tools-libs kernel-bootwrapper
$ reboot # This reboot may be deferred until after the NVIDIA steps below.
Or do a full update:
$ sudo yum update
$ sudo reboot # This reboot may be deferred until after the NVIDIA steps below.
NVIDIA components
Before you install the NVIDIA components, the udev Memory Auto-Onlining Rule must be disabled for the CUDA driver to function properly. To disable it, complete the following steps:
1. Edit the /lib/udev/rules.d/40-redhat.rules file:
$ sudo nano /lib/udev/rules.d/40-redhat.rules
2. Comment out the following line and save the change:
SUBSYSTEM=="memory", ACTION=="add", PROGRAM="/bin/uname -p", RESULT!="s390*", ATTR{state}=="offline", ATTR{state}="online"
•Restart the system for the changes to take effect:
$ sudo reboot
The DL packages require the CUDA, cuDNN, and GPU driver packages from NVIDIA.
The required and recommended versions of these components are shown in Table 4-3.
Table 4-3 NVIDIA components for IBM PowerAI V1.5| for POWER9
|
Component
|
Required
|
Recommended
|
|
CUDA Toolkit
|
9.1
|
9.1.85
|
|
cuDNN
|
7.0.5
|
|
|
GPU Driver
|
387.36
|
|
To install these components, complete the following steps:
1. Download and install NVIDIA CUDA 9.1 from CUDA Downloads:
a. Select Operating System: Linux.
b. Select Architecture: ppc64le.
c. Select Distribution RHEL.
d. Select Version 7.
e. Select the Installer Type that best fits your needs.
f. Follow the Linux POWER9 installation instructions in the CUDA Quick Start Guide, including the steps that describe how to set up the CUDA development environment by updating PATH and LD_LIBRARY_PATH.
2. Download NVIDIA cuDNN V7.0.5 for CUDA 9.1 from NVIDIA cuDNN. (Registration in the NVIDIA Accelerated Computing Developer Program is required.) Ensure that you download cuDNN V7.0.5 Library for Linux (Power8/Power9).
3. Install the cuDNN V7.0 packages:
$ sudo tar -C /usr/local --no-same-owner -xzvf cudnn-9.1-linux-ppc64le-v7.0.5.tgz
Anaconda
A number of the DL frameworks require Anaconda. Anaconda is a platform-neutral data science distribution with a collection of 1,000+ open source packages with no-charge community support.
Download and install Anaconda. The installation requires input for a license agreement, the installation location (the default is $HOME/anaconda2), and permission to modify the PATH environment variable (by way of .bashrc). Use the following commands:
$ wget https://repo.continuum.io/archive/Anaconda2-5.0.0-Linux-ppc64le.sh
$ bash Anaconda2-5.0.0-Linux-ppc64le.sh
$ source ~/.bashrc
4.4.3 Installing the deep learning frameworks
This section describes how to install the DL frameworks.
IBM Spectrum MPI installation
Complete the following steps:
1. Download IBM Spectrum MPI from the ESP download site.
2. Install the RPMs:
$ sudo rpm -ihv ibm_smpi_lic_s-10.02.00*.ppc64le.rpm ibm_smpi-10.02.00*.ppc64le.rpm
Software repository setup
IBM TensorFlow ESP for Power AC922 Deep Learning packages are distributed in an RPM file and are available from the ESP download site. Installing the RPM creates an installation repository on the local machine. To install the repository package, run the following command:
$ sudo rpm -ihv mldl-repo-local*.rpm
Installing all frameworks together
All the DL frameworks can be installed together by using the power-mldl meta-package:
$ sudo yum install power-mldl-esp
Installing frameworks individually
The DL frameworks can be installed individually if you prefer. The framework packages are:
•tensorflow: Google TensorFlow V1.4.0
•tensorboard: Web Applications for Inspecting Tensorflow Runs and Graphs V0.4.0rc3
•ddl-tensorflow: DDL custom operator for TensorFlow
Each can be installed by running the following command:
$ sudo yum install <framework>-cuda9.1
Accepting the license agreements
Read the license agreements and accept the terms and conditions before using IBM Spectrum MPI or any of the frameworks by running the following commands:
$ sudo IBM_SPECTRUM_MPI_LICENSE_ACCEPT=no /opt/ibm/spectrum_mpi/lap_se/bin/accept_spectrum_mpi_license.sh
$ sudo /opt/DL/license/bin/accept-powerai-license.sh
After reading the license agreements, future installations may be automated to silently accept the license agreements by using the following commands:
$ sudo IBM_SPECTRUM_MPI_LICENSE_ACCEPT=yes /opt/ibm/spectrum_mpi/lap_se/bin/accept_spectrum_mpi_license.sh
$ sudo IBM_POWERAI_LICENSE_ACCEPT=yes /opt/DL/license/bin/accept-powerai-license.sh
4.4.4 Tuning recommendations
The recommended settings for optimal DL performance on the Power AC922 are as follows:
•Enable Performance Governor:
$ sudo yum install kernel-tools
$ sudo cpupower -c all frequency-set -g performance
•Enable the GPU persistence mode:
$ sudo systemctl enable nvidia-persistenced
$ sudo systemctl start nvidia-persistenced
•For TensorFlow, set the SMT mode:
$ sudo ppc64_cpu --smt=4
•For TensorFlow with DDL, set the SMT mode:
$ sudo ppc64_cpu --smt=2
4.4.5 Getting started with machine learning and deep learning frameworks
This section describes how to start using MLDL frameworks.
General setup
Most of the IBM PowerAI packages install outside the normal system search paths (to /opt/DL/...), so each framework package provides a shell script to simplify environmental setup (for example, PATH, LD_LIBRARY_PATH, PYTHONPATH).
You should update your shell rc file (for example, .bashrc) to source the setup scripts. For example:
$ source /opt/DL/<framework>/bin/<framework>-activate
Each framework also provides a test script to verify basic functions:
$ <framework>-test
Dependencies
Many IBM PowerAI frameworks (for example, TensorFlow and TensorBoard) have their dependencies satisfied by Anaconda packages. These dependencies are validated by the <framework>-activate script to ensure that they are installed; if not, the script fails.
For these frameworks, the /opt/DL/<framework>/bin/install_dependencies script must be run before activation to install the required packages. For example:
$ source /opt/DL/tensorflow/bin/tensorflow-activate
Missing dependencies ['backports.weakref', 'mock', 'protobuf']
Run "/opt/DL/tensorflow/bin/install_dependencies" to resolve this problem.
$ /opt/DL/tensorflow/bin/install_dependencies
Fetching package metadata ...........
Solving package specifications: .
Package plan for installation in environment /home/rhel/anaconda2:
The following NEW packages will be INSTALLED:
backports.weakref: 1.0rc1-py27_0
libprotobuf: 3.4.0-hd26fab5_0
mock: 2.0.0-py27_0
pbr: 1.10.0-py27_0
protobuf: 3.4.0-py27h7448ec6_0
Proceed ([y]/n)? y
libprotobuf-3. 100% |###############################| Time: 0:00:02 2.04 MB/s
backports.weak 100% |###############################| Time: 0:00:00 12.83 MB/s
protobuf-3.4.0 100% |###############################| Time: 0:00:00 2.20 MB/s
pbr-1.10.0-py2 100% |###############################| Time: 0:00:00 3.35 MB/s
mock-2.0.0-py2 100% |###############################| Time: 0:00:00 3.26 MB/s
$ source /opt/DL/tensorflow/bin/tensorflow-activate
$
Getting started with TensorFlow
The TensorFlow home page has a variety of information, including tutorials, how tos, and a Getting Started guide.
For more tutorials and examples, see the following resources:
Distributed Deep Learning Custom Operator for TensorFlow
IBM TensorFlow ESP for Power AC922 includes a technology preview of the IBM PowerAI DDL custom operator for TensorFlow. The DDL custom operator uses IBM Spectrum MPI and NCCL to provide high-speed communications for distributed TensorFlow.
The DDL custom operator can be found in the ddl-tensorflow package. For more information about DDL and about the TensorFlow operator, see the following documentation:
/opt/DL/ddl-doc/doc/README.md
/opt/DL/ddl-tensorflow/doc/README.md
/opt/DL/ddl-tensorflow/doc/README-API.md
The DDL TensorFlow operator makes it easy to enable Slim-style models for distribution. The package includes examples of Slim models that are enabled with DDL:
$ source /opt/DL/ddl-tensorflow/bin/ddl-tensorflow-activate
$ ddl-tensorflow-install-samples <somedir>
These examples are based on a specific commit of the TensorFlow models repository with a small adjustment. If you prefer to work from an upstream clone, rather than the packaged examples, run the following commands:
$ git clone https://github.com/tensorflow/models.git
$ cd models
$ git checkout 11883ec6461afe961def44221486053a59f90a1b
$ git revert fc7342bf047ec5fc7a707202adaf108661bd373d
$ cp /opt/DL/ddl-tensorflow/examples/slim/train_image_classifier.py slim/
Additional TensorFlow features
The IBM PowerAI TensorFlow packages include TensorBoard.
TensorFlow V1.4.0 package includes support for additional features:
•HDFS
•NCCL
4.4.6 Uninstalling machine learning and deep learning frameworks
The MLDL framework packages can be uninstalled individually the same way they were installed. To uninstall all MLDL packages and the repository that was used to install them, run the following command:
$ sudo yum remove powerai-license
$ sudo yum remove mldl-repo-local-esp
1 No-charge registration to the NVIDIA Accelerated Developer Program might be required.
2 To access the BMC by using the browser, it is necessary to connect this port and the working terminal to the same network.
3 In this screen capture, pop-up windows are not permitted in the browser.
4 This procedure was checked for Ubuntu 16.04.01 and 16.04.02.
5 Select normal kernel, not hwe-vmlinux.
6 If a DHCP server is present, after selecting the network interface, the setting of the primary network is completed automatically.
7 PReP is a raw and small (8 MB maximum) partition that carries only stage1 binary files.
8 The name is derived from the multiple device (MD) device nodes that are part of the RAID.
9 For more information, see http://caffe.berkeleyvision.org/gathered/examples/mnist.html.
10 The tests that follow the TensorFlow MNIST tutorial can be found at https://www.tensorflow.org/tutorials/.
..................Content has been hidden....................
You can't read the all page of ebook, please click here login for view all page.