14
Collapsing and Merging Data Files

Chapter Learning Objectives
- Combining data files: same people, different variables
- Combining data files: different people, same variables
This chapter is something of an advanced course in the use of the “get file” and “save outfile” commands. Here you will learn more about controlling the constituency of your data files. There are two primary reasons you would use the information in this chapter: (1) you have two or more data files with different information from the same individuals, or (2) you have two or more data files with similar information from different individuals. In both scenarios you ultimately want to get the files together.
The first situation is exemplified (in our field, for example) by one data file that contains applicant characteristics (typically applicants' scores on selection assessments) and another data file that contains job performance information (collected at a later time from those same applicants, now actual employees). Eventually, you'll need to combine these two files if you want to do anything meaningful with the information.
The second situation is typified by students who we recruit to help us with research projects. Any given semester, these student research assistants enter experimental data into a spreadsheet, such as an SPSS data file. When there are multiple individuals entering data from a stack of, for example, 200 or more completed questionnaires (such as the questionnaire in Appendix A), there are several data entry approaches you can take. One is to have students take turns entering information into one master data file. That's not very efficient – so what we typically do is define multiple duplicate empty data files (one for each student), give each student a stack of questionnaires (and an empty but variable‐defined data file), and then when they're done with their data entry, we combine all of the files (with similar information from different experimental participants) into one master data file.
Same People, Different Information
Using our personality questionnaire example, as part of an experiment, we could have the research assistants, while they are administering the questionnaire to participants, guess which of the five measured personality traits is most dominant for each individual who fills out the hundred‐item questionnaire.
This scenario would require not only that the study participants complete the questionnaire, but also that the research assistants record two pieces of information: the “casenum” of the individual they are rating and the trait they believe is most likely to be dominant (Agreeableness, Neuroticism, Extraversion, Openness to Experience, or Conscientiousness).1
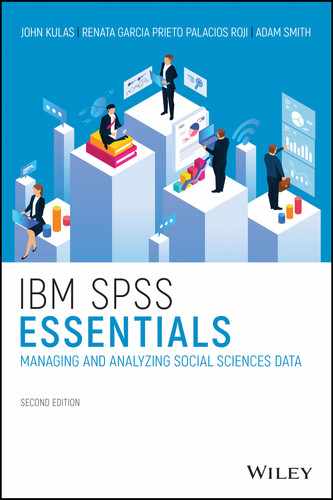
For these two different sources (research assistants and questionnaire participants) we would construct two different data files. The first data file we've already constructed (100 personality items, 1 casenum, and 1 gender variable). The second data file contains three pieces of information (casenum, rated dimension, and research assistant who provided the rating). As shown in Figure 14.1, we entered this information as numbers, rather than string variables – the value labels are showing in the data file because we've clicked the Value Labels button (introduced in Chapter 6).
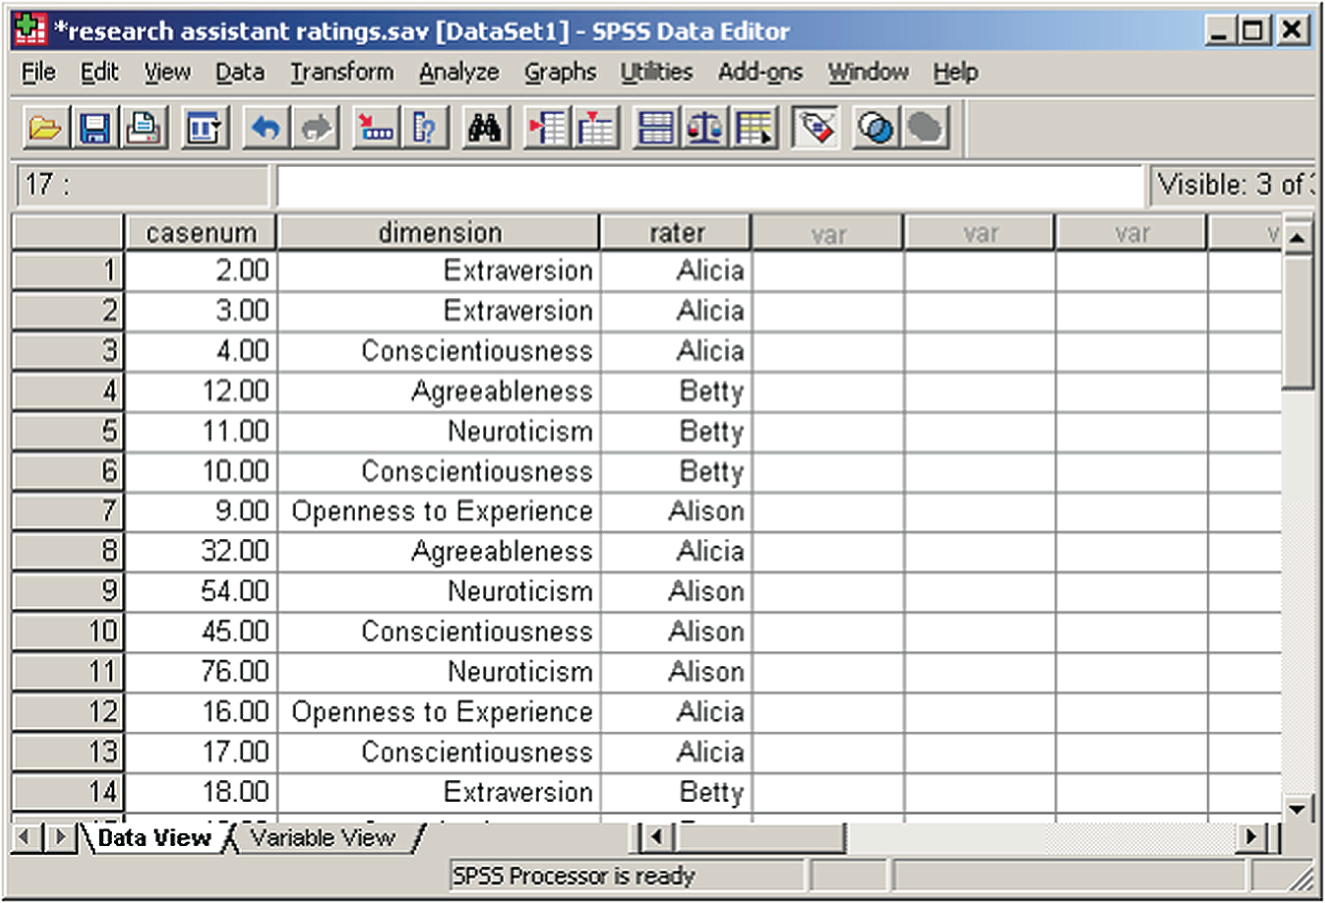
Figure 14.1 Research assistant ratings.
Now, to combine the two data files, we need to know just two things: (1) the names of the data files we want to combine and (2) the variable that identifies individuals in both files (in this situation, casenum).
There is one important requirement when you combine two files with different variables but the same people: you must rearrange your data so the values of your “matching” variables are numbered consecutively in both files. This is accomplished quite easily, but it will require a few extra syntax lines, as shown in Figures 14.2 and 14.3. You can also match files based on shared string variables, but just as with numeric variables, you must first organize the string variables alphabetically in both files.
The example shown accesses the original data file and rearranges the data so the smallest casenum is the first row in the file and the largest casenum is the last row in the file. The other option, with the “sort cases by” command, is to specify a “d” instead of the “a”. Where “d” stands for descending, and “a” represents ascending. It doesn't really matter which we choose, as long as we are consistent (if we pick ascending for one data file, we have to do so for the other as well). Next, we access the file we want to combine with our original data file, then combine the two files as shown in Figures 14.4 and 14.5 and save the new data file as shown in Figure 14.6 (this saved file contains unique information from both files).

Figure 14.2 Matching variable values consecutively.

Figure 14.3 Prepping data file to merge data.
The illustrated command specifications indicate that we want to match a file to the open file (that's what the asterisk [*] represents in the “match files” command line – here it means whichever data file is open). The second line identifies the file we want to combine – this file's variables will be added at the end of our open data file (that is, they'll be put to the “right” of the open file's variables). The third line identifies the variable you want to “match” – this is the person identifier. Notice that no period (.) is used until the third line.
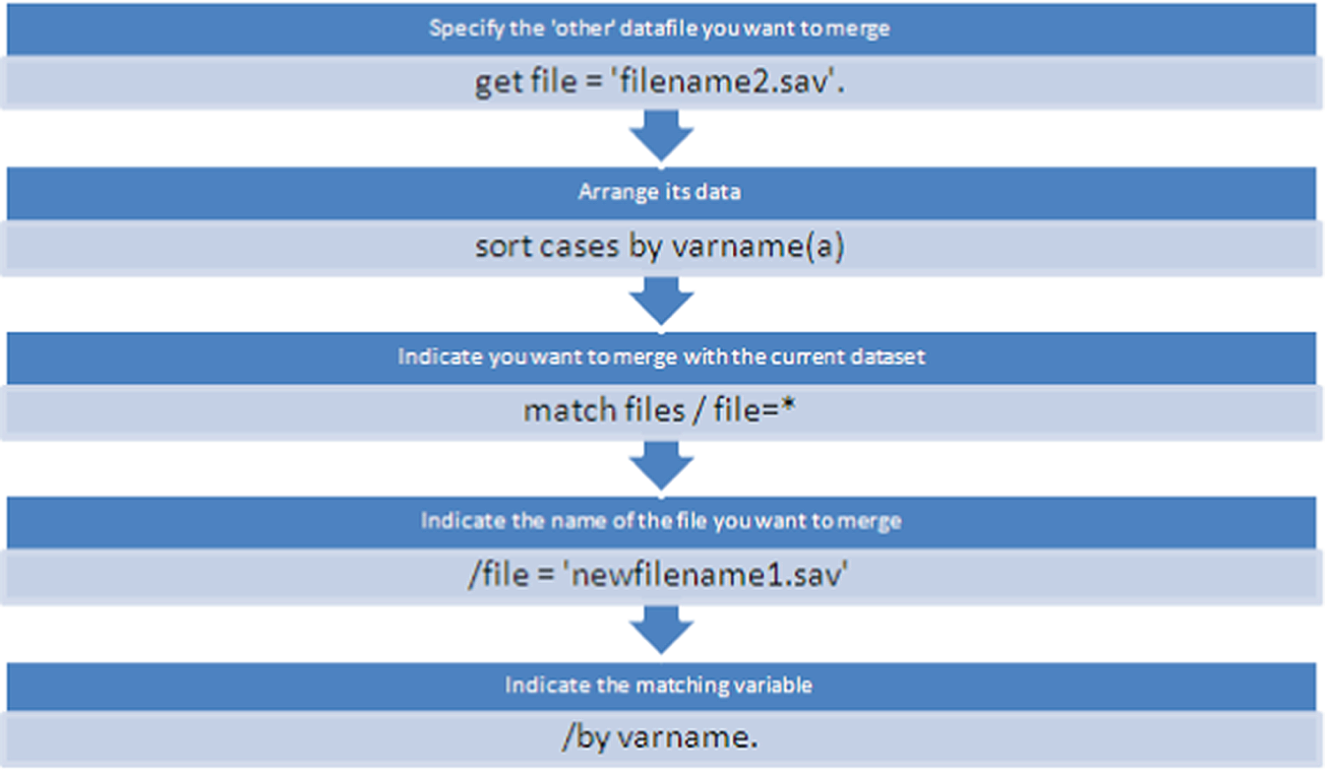
Figure 14.4 Specifying and rearranging data to match values.

Figure 14.5 Merging data files with matching values.
If we wanted our information arranged differently in the new data file, we could either switch the order of specification of the original files (this would put the two rater file variables at the end rather than the beginning of our new file) or use the “keep” subcommand on the “save outfile” statement to rearrange the order of our variables (see Chapter 5). As shown in Figure 14.7, we've taken the second approach and moved the “gender” variable more toward the end of the data file.

Figure 14.6 Saving merged data file.

Figure 14.7 Rearranging variable order in merged data file.

Figure 14.8 Personality questionnaire project data file.
Different People, Same Information
If you have identical data files with different people in them, you can use a similar procedure, although this time you don't have to first do a “sort cases by” command. In the case of multiple research assistants entering data into their own individual data files, as shown in Figure 14.8, we can first use the “save outfile” command at the end of our empty data file creation syntax to create three empty data files (one each for Alison, Alicia, and Betty). First, the data file variables are specified as seen in Figure 14.9, and then the data shells are saved as three separate files (Figure 14.8).
Now we give the three empty (but variable‐defined) data files to the three research assistants to work on while we are away for the weekend. When we return, we check our e‐mail and save the files they've sent us in the “c:kulasipipdata” folder. Then to merge the files together, we apply the flowchart shown in Figure 14.10 to generate our syntax as shown in Figure 14.11.
You can actually specify multiple files to add with one “add files” syntax command, but we recommend doing a separate “add file” command for each file you want to add. At least do this until you're comfortable with the use of the command. The “in” variables that we specified in Figure 14.11 (coder1 and coder2) are optional. These are the variables that identify who entered the data – Betty has values in the “coder2” variable column, Alicia has values in the “coder1” variable column, and Alison coded the rest of the rows in our merged data file. SPSS enters this information for you if you specify the “in” subcommand.
Figure 14.9 Specify data file variables.
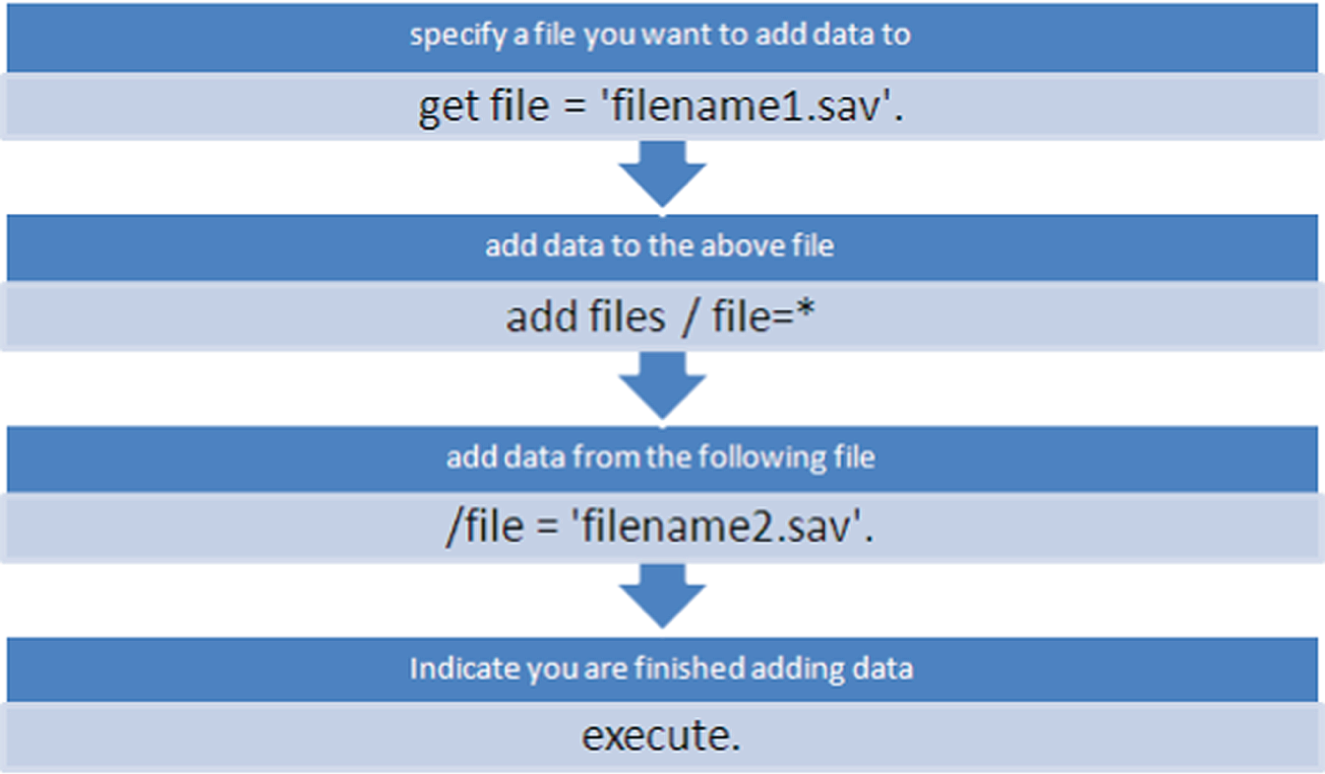
Figure 14.10 Commands to add rows to existing data file.
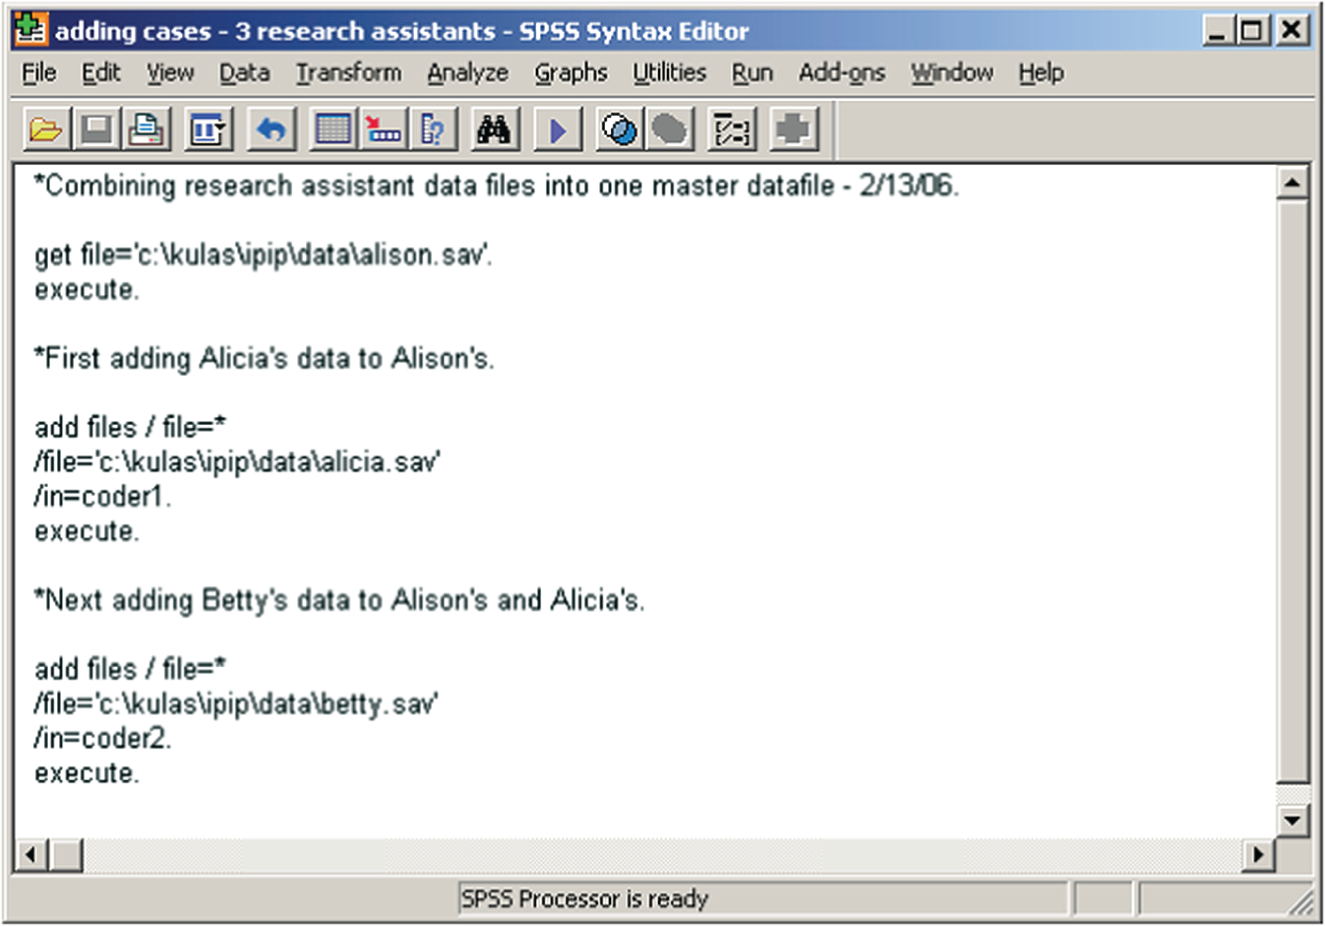
Figure 14.11 Adding cases from three research assistants.
Summary
When you need to combine different data files, you can use one of two different methods. If you have different information or variables from the same people, you need to sort both files first, then merge them together. If you have the same information or variables but different people, you can just add the files to each other without sorting first. Generally, you'll want to save the new, combined file after the merge or add by using the “save outfile” command.
Key Terms
“Add files” – SPSS command for combining files containing the same variables but different individuals.
“In” variables – Variables created by SPSS to identify which original file is associated with each combined file case/row.
Match files – SPSS command for combining files containing the same individuals but different variables.
“Matching” variables – Organizing/identifying variables that exist in more than one data file.
“Sort cases by” – SPSS command for reorganizing data sequentially.
Discussion Questions
- When matching files, the order of the command specifications indicates what files we want to match (what file's variables will be added at the end of the open file). What do the commands in each command line represent?
- When matching two sets of data containing string variables, what should you do prior to matching the files based on shared string variables?
Note
- 1 Appendix D contains another example of a situation in which you would want to combine files with similar people but different variables.