This chapter covers the creation and configuration of Java customizations required for processing Events triggered by the IBM FileNet Content Engine. It describes the development of custom Java code and the deployment of a Code Module which is invoked. The use of Workflow Subscriptions which enable a workflow to be launched on the storage of a document in the Content Engine Object Store is described with a step-by-step example.
The full Content Engine Java API documentation can be found with the following link:
www.ibm.com/docs/en/filenet-p8-platform/5.5.x?topic=development-content-engine-java-api-reference
IBM recommends that Content Engine Web Services can be used where a system is not compatible with the use of the IBM FileNet Java or .NET API. For further Content Engine Web Service code examples, see
For the application of a Code Module for IBM Business Process Automation, see
www.ibm.com/docs/en/baw/20.x?topic=events-using-event-handler-filenet-content-manager
Chapter Organization
This chapter contains the following five Parts:
Part 1 – Supporting Documents. This Part provides references to freely downloadable documents which provide additional reading material supporting the chapter.
Part 2 – Configuring Java Components for Content Engine Events. In this Part, a Java project is built, step by step, to create and deploy the example fn_eventhandlers.jar file, which we then show how to deploy, for use with the Audit Master solution covered in Chapter 1.
Part 3 – Testing the Add Document to Folder Event. In this Part, we test the Add Document to Folder Event. The TestHarness code in the Eclipse project requires a valid Document Object to be used to link to an existing AUDIT_TEST folder which is created and used as a test setup for the EventHandler code.
Part 4 – The DbExecute Workflow Step for Calling Database Stored Procedures. In this Part, we describe the use of the DbExecute workflow step. This allows a Database Stored procedure to be invoked from an IBM Case Manager Workflow step. This is supported using the IBM FileNet P8 Process Designer tool.
Part 5 – Standalone Process Designer Installation. This Part describes the installation and configuration required to install the Windows Client Standalone Process Designer, which is then used to add a DbExecute workflow step to the Audit Master Solution we created in Chapter 1.
Part 1 – Supporting Documents
There are two very useful downloads which provide additional examples and links to downloadable Java code supplied freely by IBM.
IBM FileNet Java API Call Examples
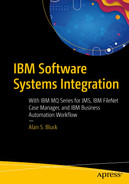
A screenshot represents the I B M FileNet P 8 development java document. The download and the read file buttons are placed on the right side.
Download the free IBM FileNet P8 Java Development Document
This gives the downloaded document, entitled
“IBM FileNet P8 Java Development on ECM Cloud Private Container P8 Examples”
This free download document, IBMFileNetP8JavaDevelopmentonECMCloudPrivateContainerP8Examples.docx, can be downloaded using the URL link:
Java Code Development
The Java code developed for custom events should be compiled into an appropriately named Java archive, or “jar” file. To install this code, the jar file should be made accessible to a machine that has access to the acce (IBM Administrative Console for Content Platform Engine) application.
“IBM FileNet P8 Java Development on ECM Cloud Private Container P8 Examples”
This describes the download and installation of an Eclipse IDE for Java development and the basic configuration of the supporting Java jar files for the IBM FileNet API on a Red Hat RHEL 8.0 Linux system.
For the Audit system, the following Java code in this chapter provides the custom event, AddDocToFolder. This Java code will work on Red Hat Linux or MS Windows operating systems which have IBM FileNet Content Engine installed.
In enterprise applications, normally code needs to be included in a “war” file and deployed so that its classes are accessible. The Content Engine Event code, however, uses a Java jar file with the classes required for events which can be contained within the Content Engine Object Store. This makes for easy deployment and maintenance. The jar file is added to the Object Store through the acce tool, which has the ability to choose hidden classes.
Part 2 – Configuring Java Components for Content Engine Events
In this Part, we will build a Java project, step by step, to create and deploy the example fn_eventhandlers.jar file, which we then show how to deploy, for use with the Audit Master solution covered in Chapter 1.
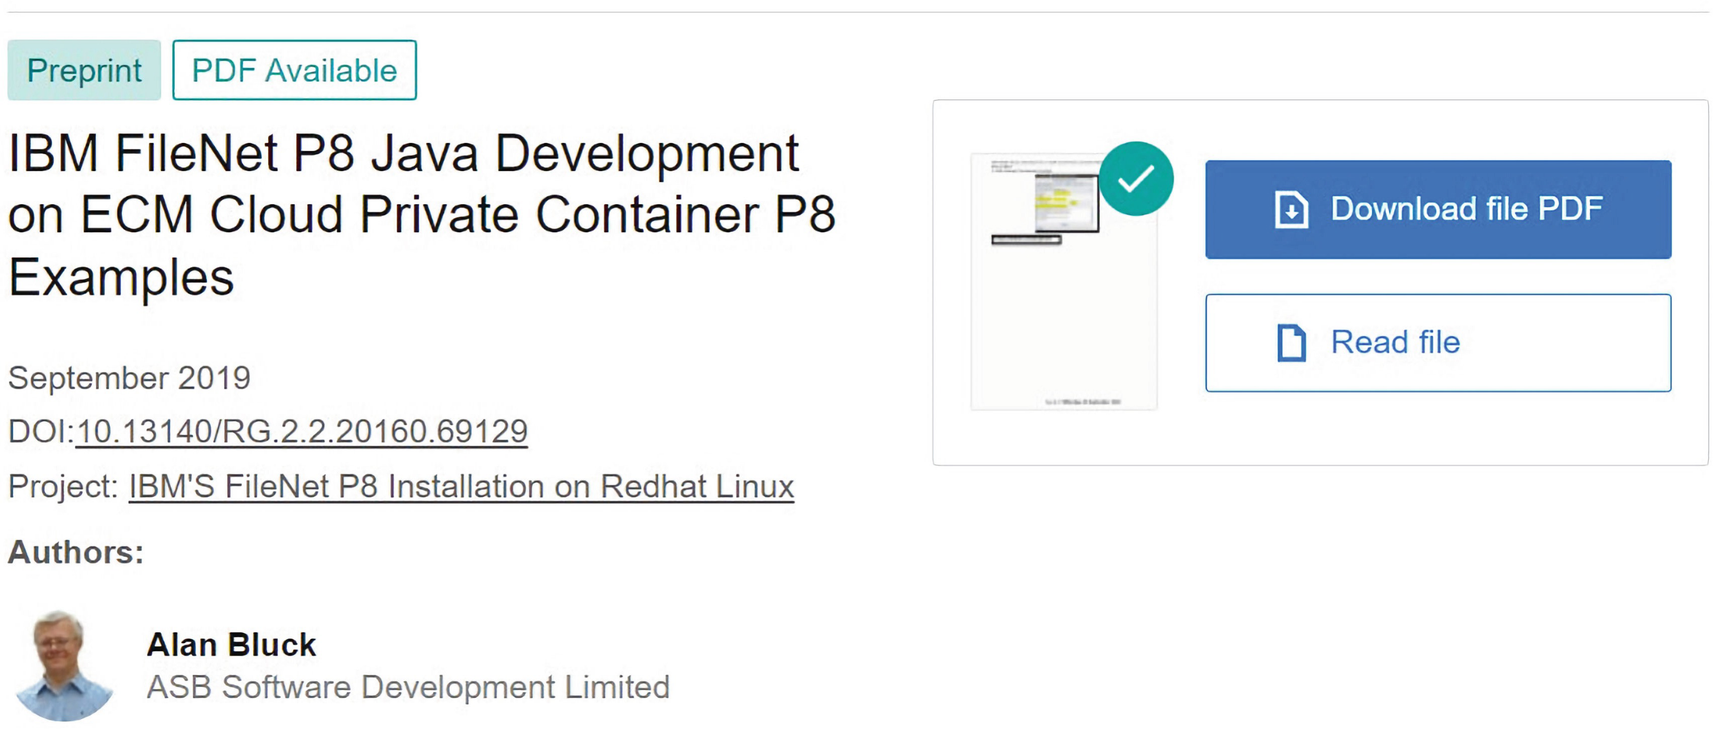
A screenshot of the project explorer tab, with the add doc to folder dot java option selected.
The AuditEventHandler Eclipse Java project structure
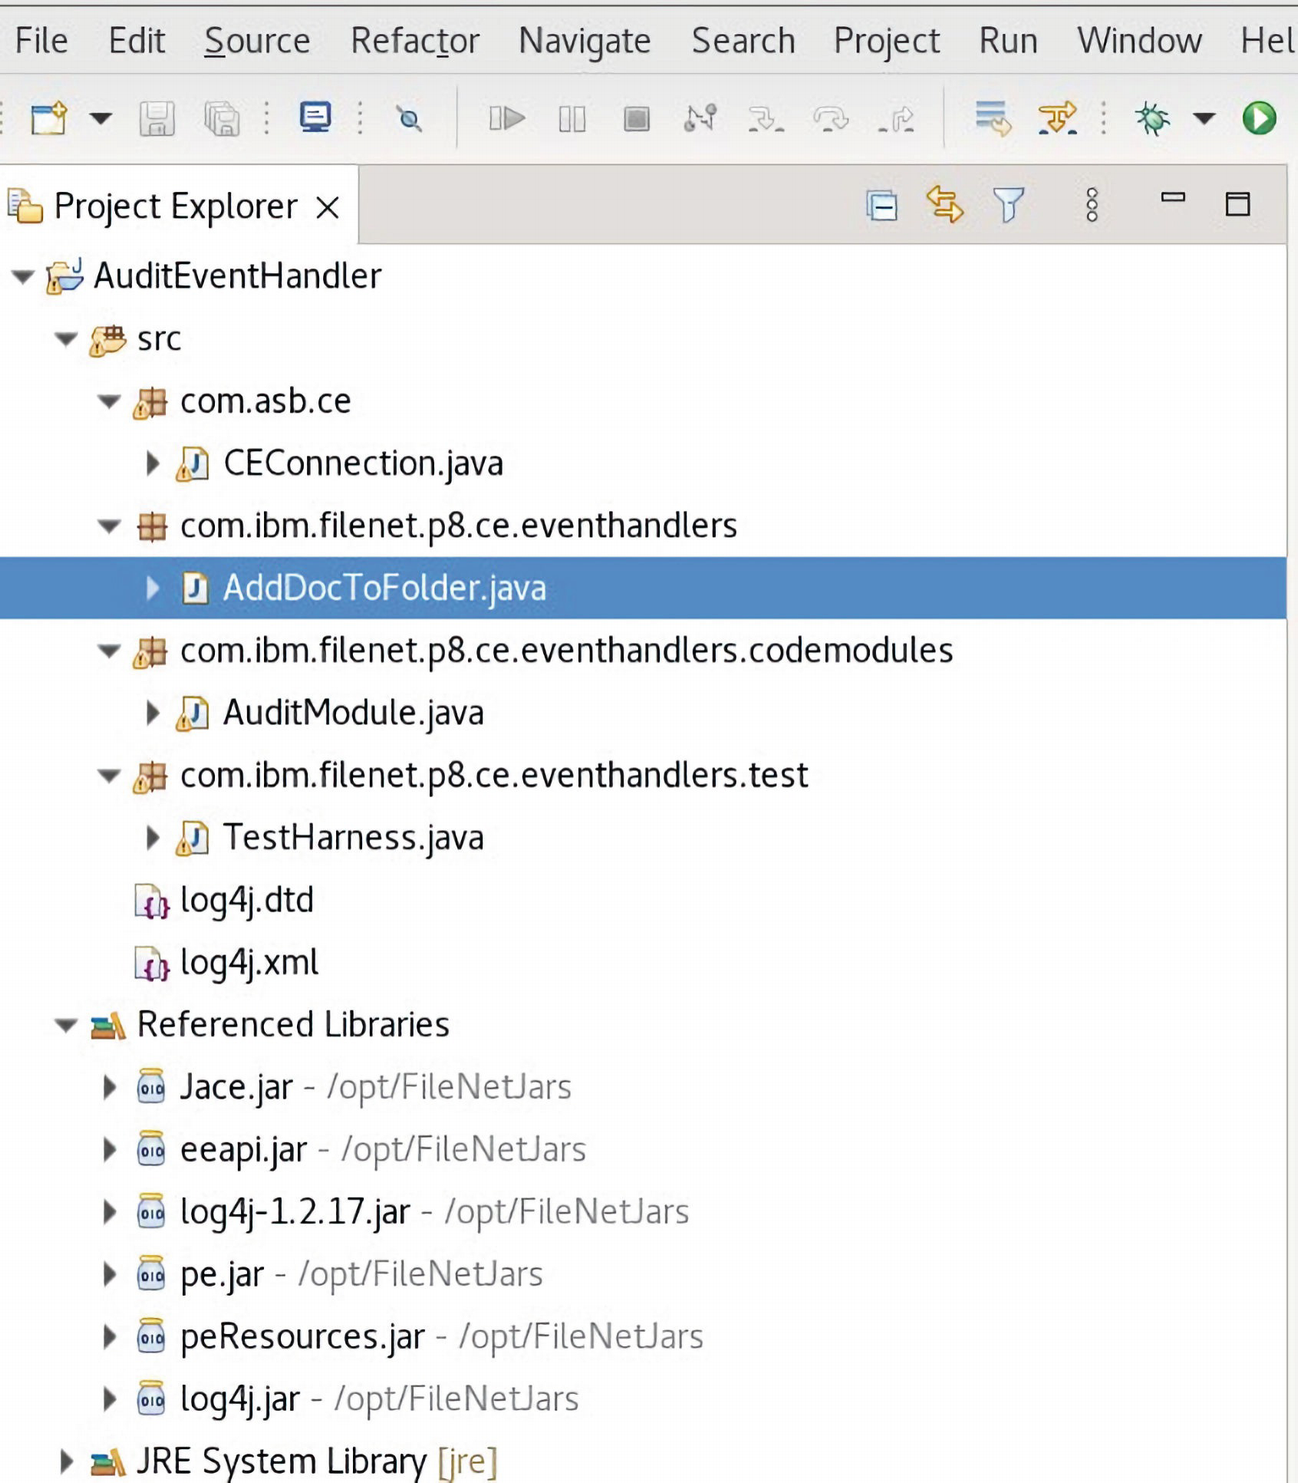
- 1.In the Eclipse Java IDE, select the menu items File ➤ New Project.
A screenshot of the eclipse software, with a new project tab opened.
Figure 2-3Open a New Project in Eclipse
- 2.Eclipse supports a number of different project types; we will select a standard Java project type.

A screenshot of a new project window with the java project folder opened and selected from the project wizard lists.
Figure 2-4Select the Java Project type from the Project Wizard types
- 3.The Next command is clicked to add the Project attributes.
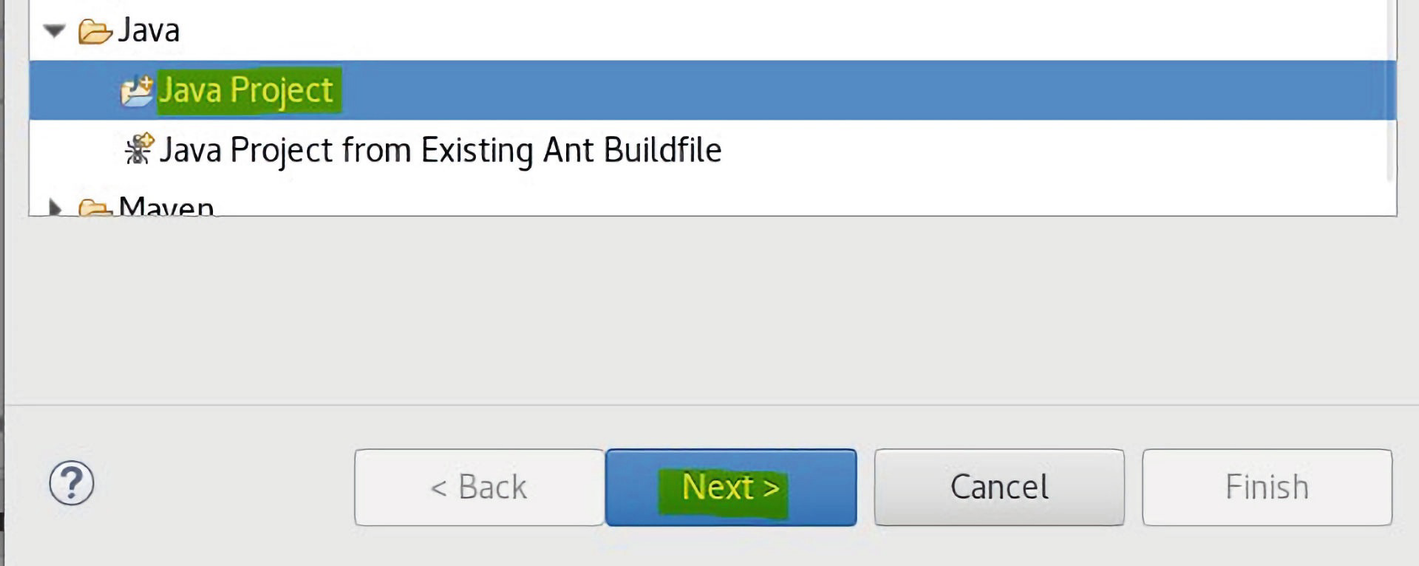
A screenshot of the java project option selected and highlighted and the next button below is also highlighted.
Figure 2-5Select the Next command button to add the Project attributes
- 4.The Project name is entered as AuditEventHandler.

A screenshot of the new java project window, with the project name as Audit Event Handler, and the type selected to j r e, and a finish button at the bottom. All these options are highlighted.
Figure 2-6Select the Finish command button to create the Project outline
- 5.The module-info.java was created as follows.
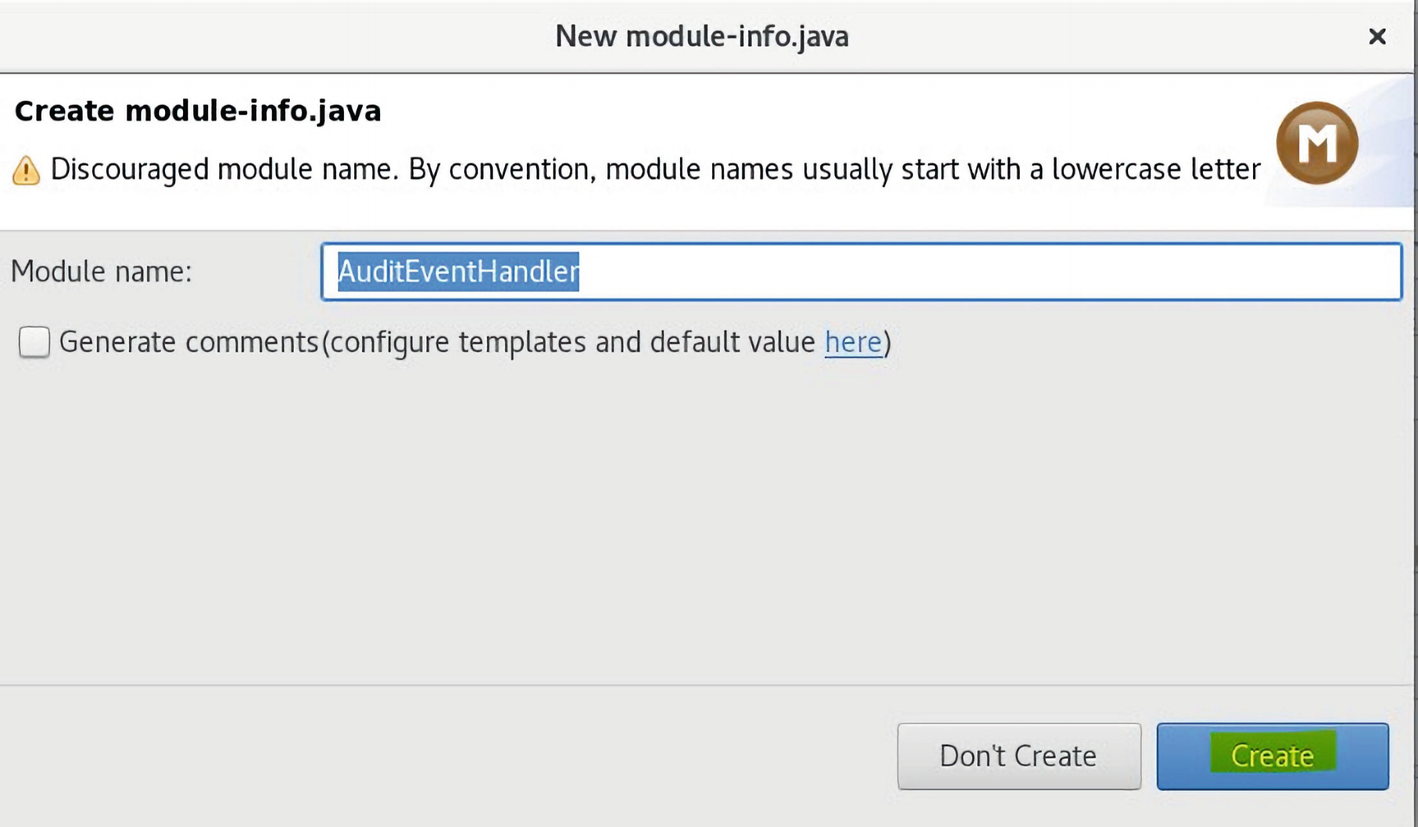
A screenshot represents the module name as an audit event handler, and create button is highlighted.
Figure 2-7Enter the Module name as AuditEventHandler and click Create
- 6.The Eclipse IDE prompts you to check if you wish to open the Java perspective. This predefines the window frames that are opened and the panels that are displayed, which are considered most useful for Java program development.
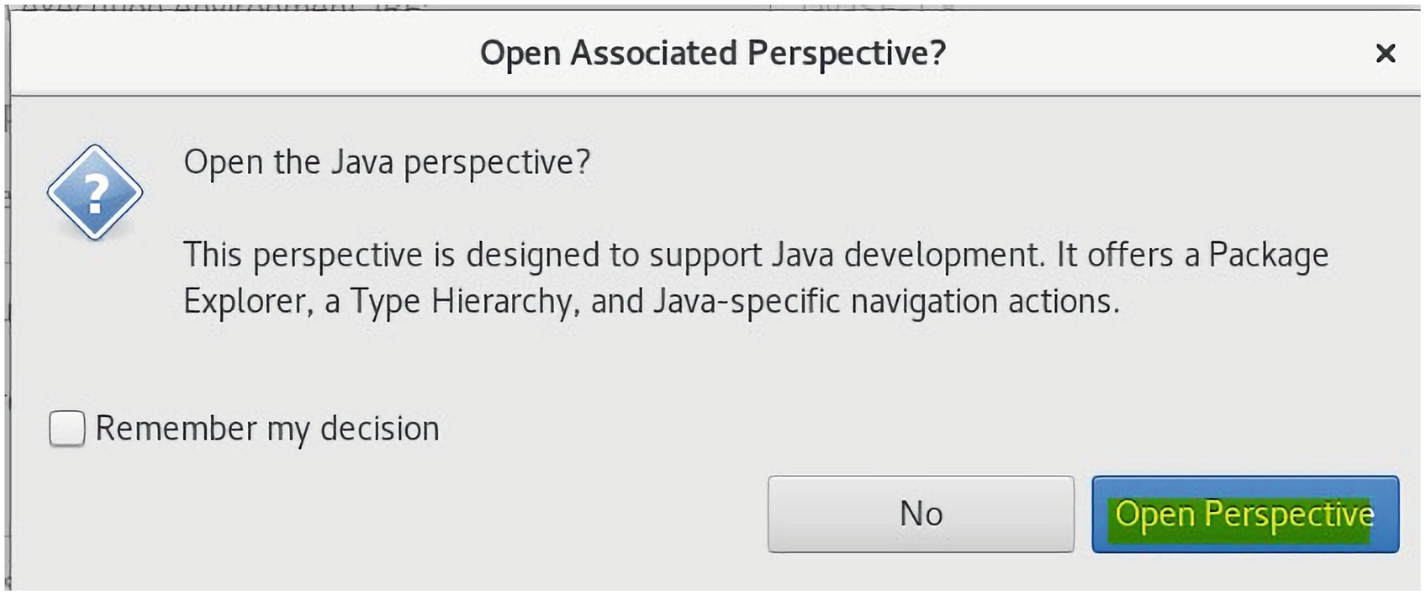
A screenshot of the open associated perspective window and the open perspective button is highlighted.
Figure 2-8Click the Open Perspective command to view the standard Java layout
- 7.At this point, we have just one empty Java class and the Java JRE System Library defined for the project.

A screenshot of the basic java project window with package explorer tab, audit event handler, J R E system library, s r c, and module info dot java file displayed in a menu.
Figure 2-9The basic Java project shown in the standard Java layout
- 8.To create a new Java package, com.asb.ce, we need to right-click the src folder, highlighted in Figure 2-9, and select the New ➤ Package option from the menu drop-downs. We can then enter the package name as shown in Figure 2-10.
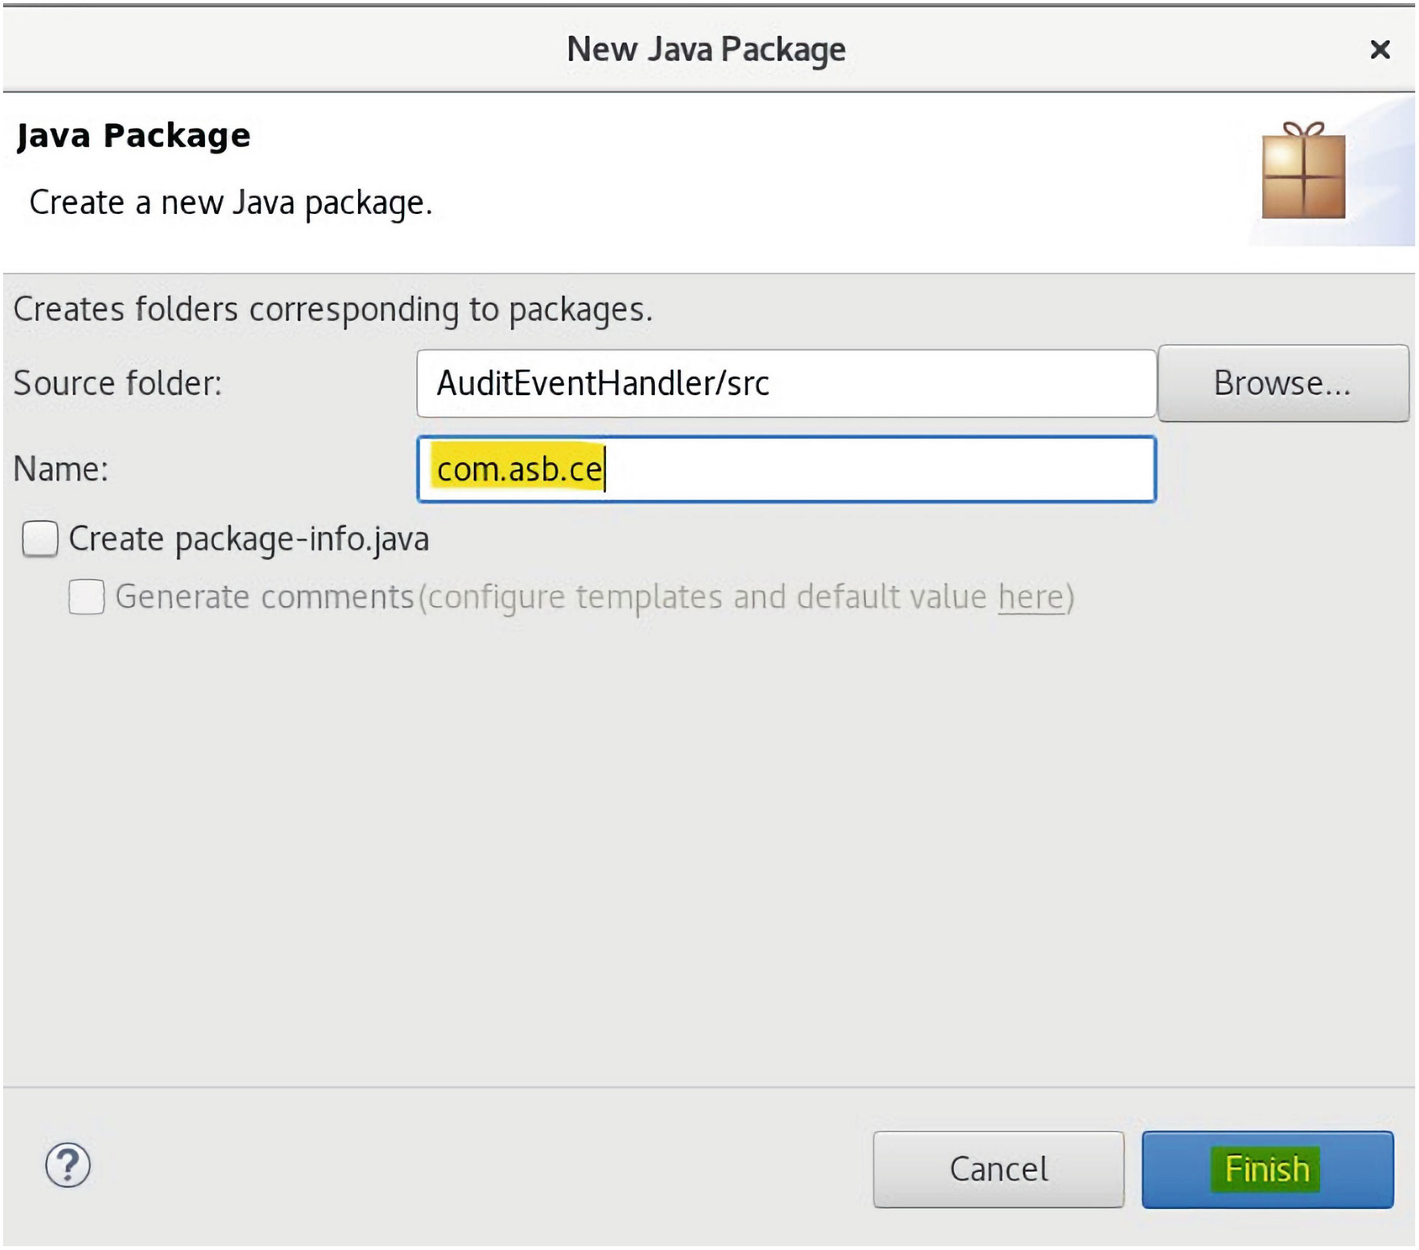
A screenshot of the new java package window, with space for the source folder, and the name, with cancel and finish buttons at the bottom.
Figure 2-10The Java package com.asb.ce is created under the Java src folder
- 9.We can now add Java code as a Java Class to the “empty” com.asb.ce package by right-clicking the com.asb.ce package we created in step 8 and then selecting the menu items, New ➤ Class (highlighted in Figure 2-11).
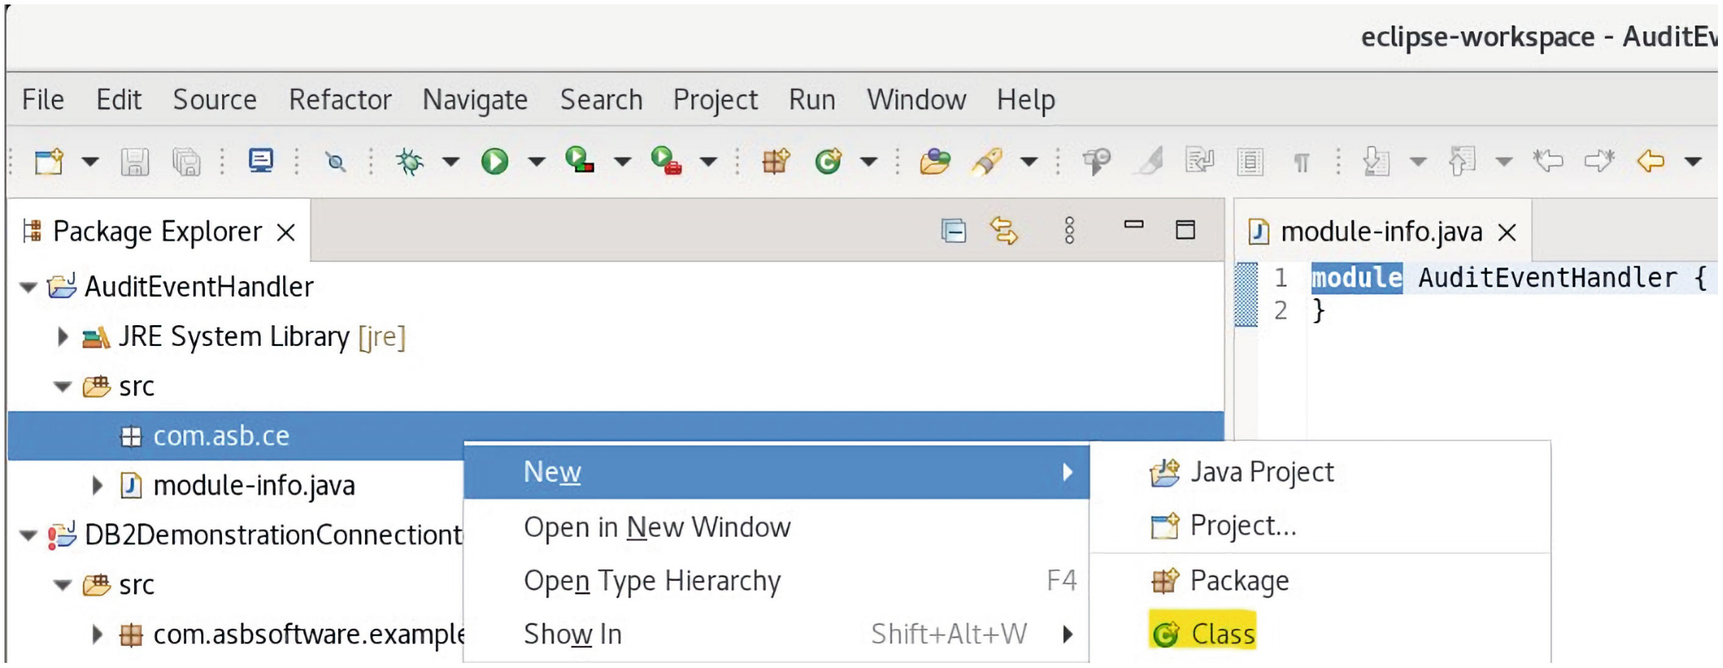
A screenshot of the eclipse workspace window. The package explorer menu is opened with a few drop down options.
Figure 2-11A new Java Class is added to the Java package com.asb.ce
- 10.The attributes required for the Java Class are displayed; we just add the name of the class we want to give as CEConnection. This class will be called to create a Java connection object to enable access to the IBM FileNet Content Engine Object Store.

A screenshot of the new C E Connection Java Class Content engine with source folder, package, superclass, interfaces, and other input and checkboxes.
Figure 2-12A new CEConnection Java Class is added to the Java package
- 11.For the CEConnection.java Java code, we just cut and paste a Standard IBM code example as shown in Figure 2-13 and listed fully in Listing 2-1 later in this chapter.

A screenshot illustrates a new C E Connection Java Class Content engine events with a set of instructions, which includes packages, library functions, and initializations.
Figure 2-13A new CEConnection Java Class is added to the Java package
- 12.Notice in Figure 2-13 that the imports for all the com.filenet.api… packages are flagged with errors (a white cross on a red background). This is because we need to add the IBM FileNet API jar files to the Java project properties, which we will now provide in the next steps.

A screenshot of a project menu with properties highlighted.
Figure 2-14The Project Properties are selected to update the Classpath details

A screenshot represents the I B M FileNet A P I commands.
The IBM FileNet Client API Content Engine .jar files are copied

A screenshot represents the continuation of the I B M FileNet A P I commands.
The IBM FileNet Client API Process Engine .jar files are copied
- 13.Next, we can add the copied .jar files created in step 12 to the Project Classpath.
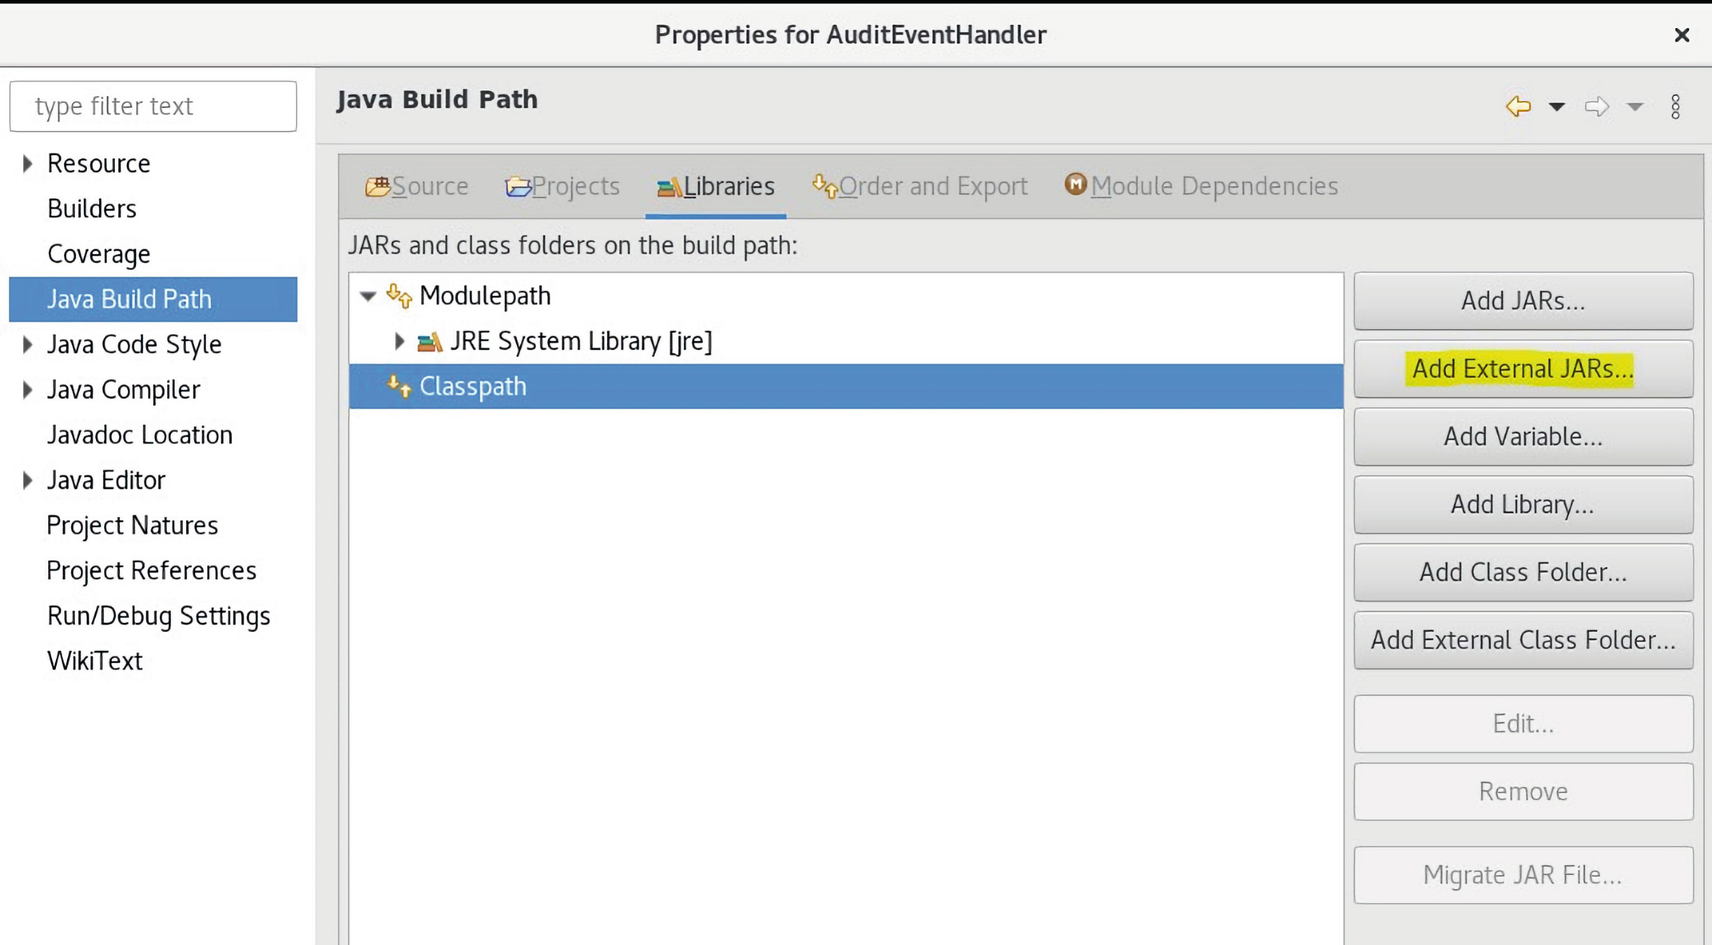
A screenshot of the properties for an audit event handler window, with java build path as the main tab, with selected classpath. Add external J A R s command is highlighted.
Figure 2-17The Add External JARs command is clicked on the highlighted Classpath node
- 14.The files are added as shown in Figure 2-18 from the /opt/FileNetJars directory.
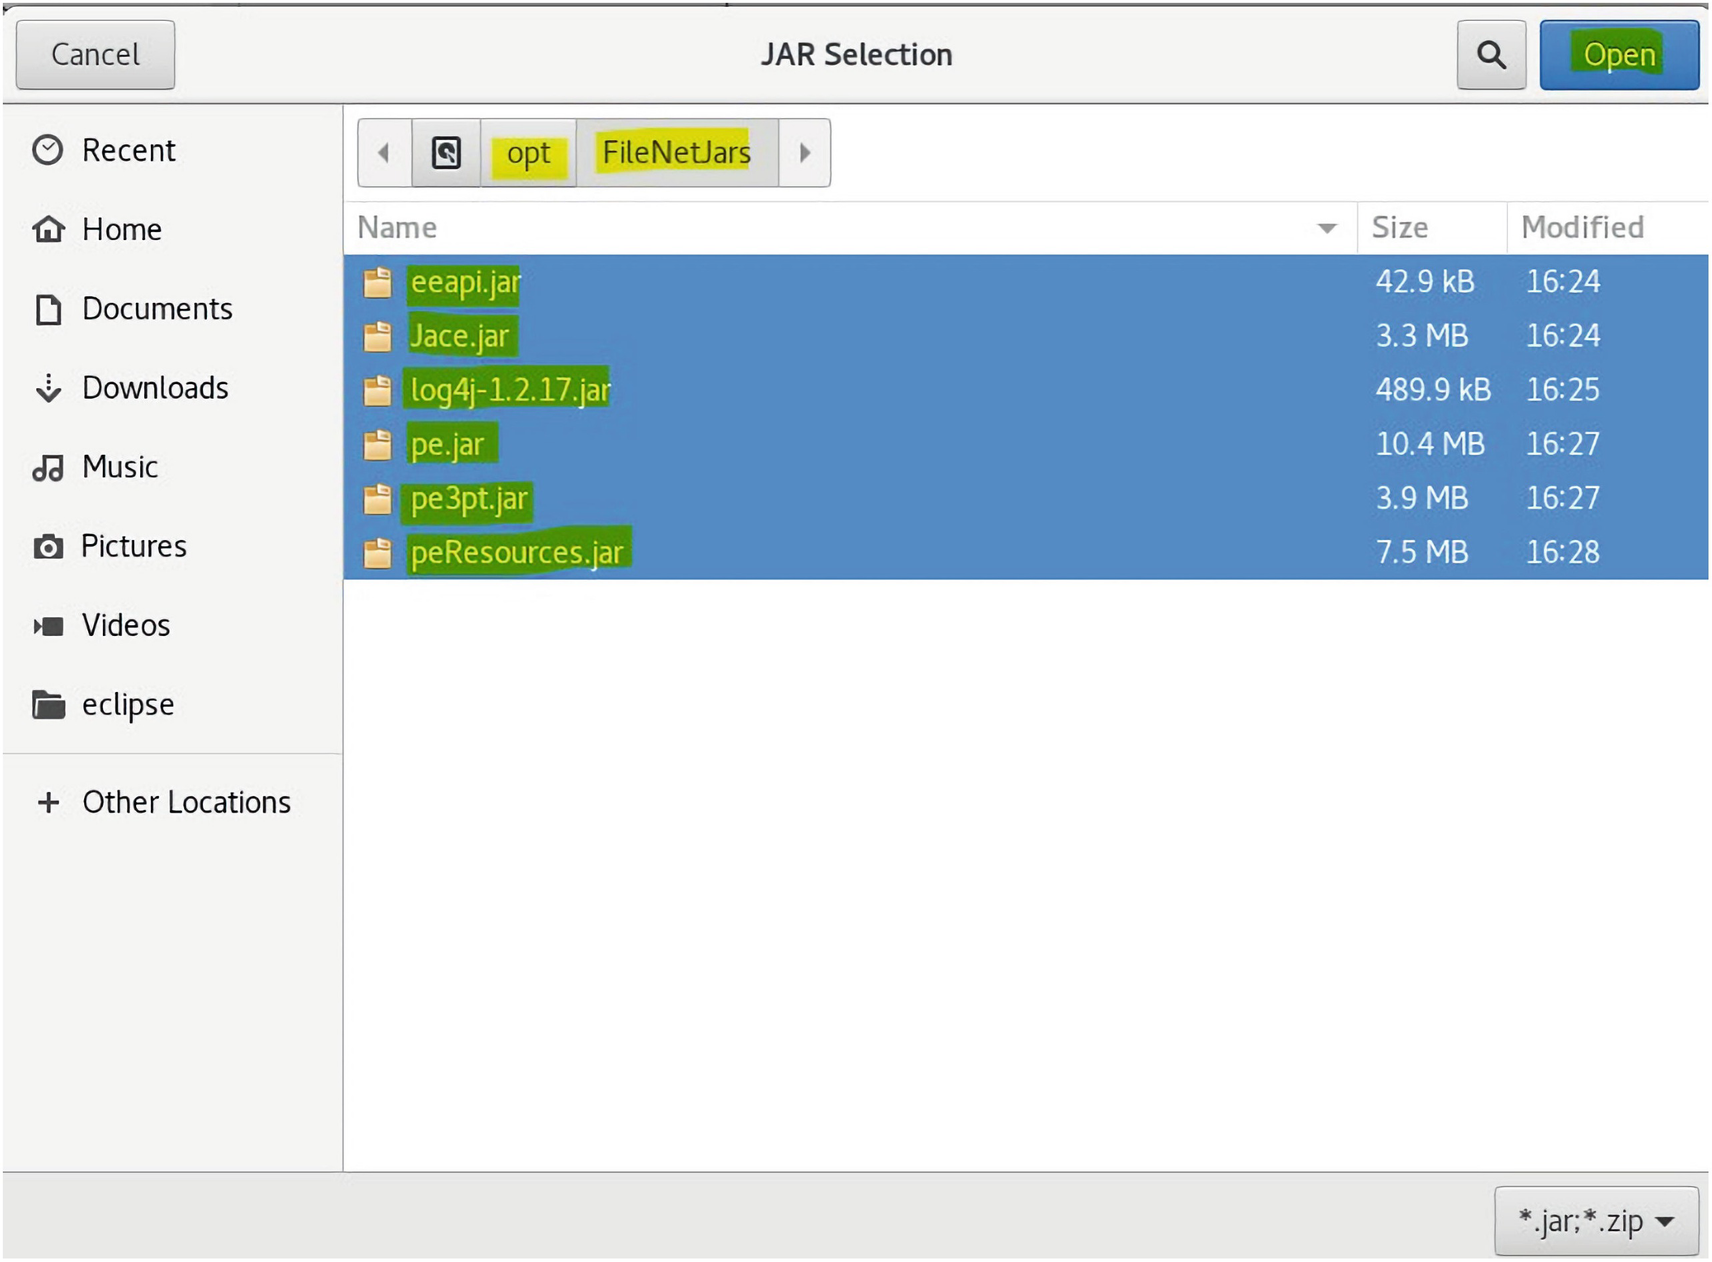
A screenshot of the add external J A R window, with a few highlighted and selected folders.
Figure 2-18The Add External JARs command is clicked on the highlighted Classpath node

A screenshot illustrates the addition of external J A R s command Content engine events with a set of instructions, which includes packages, library functions, and initializations.
The Add External JARs command fixes the highlighted imports
- 15.To correct the Java package import errors, we need to add a JRE library, using the Add Library command, to the Project Classpath as indicated in Figure 2-20.
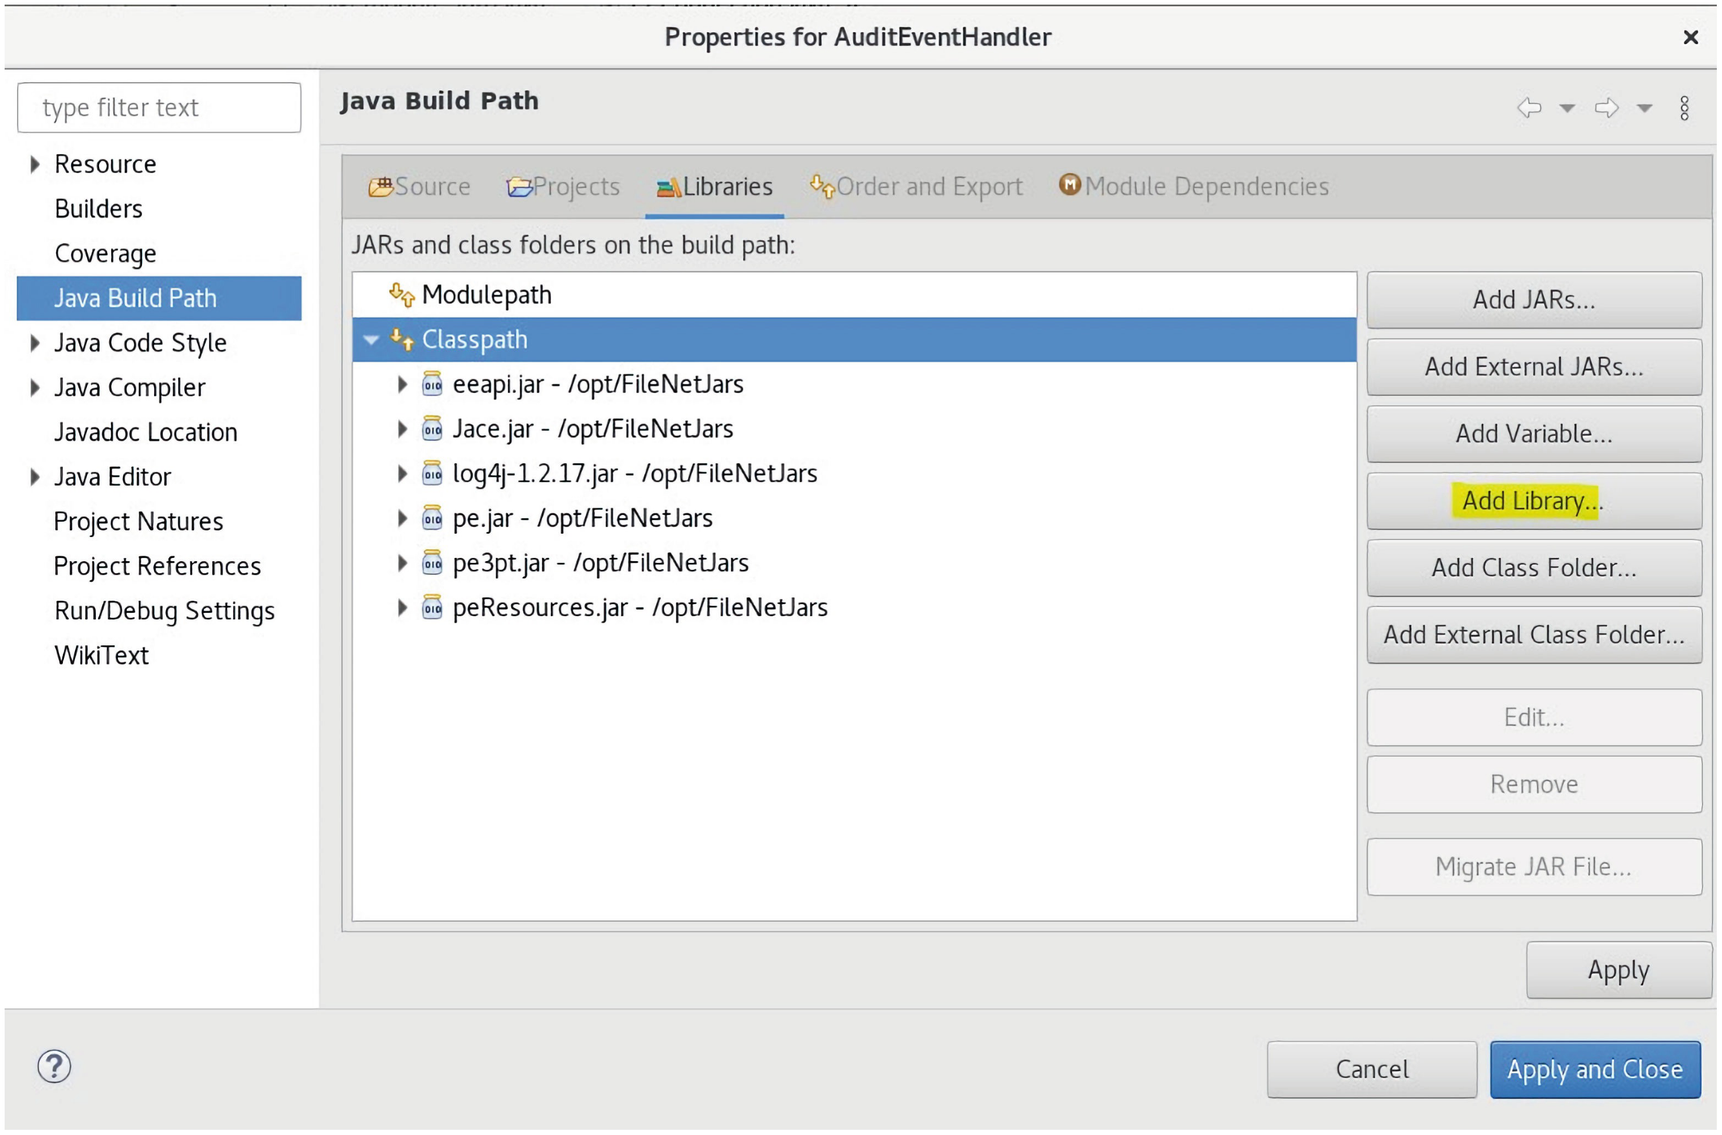
A screenshot illustrates how the add library command resolves the java package imports.
Figure 2-20The Add Library command fixes the Java package imports
- 16.We need to add a JRE System Library type which we select and then click the Next> command button to show a command which will give a list of the available JRE versions.

A screenshot of the J R E system library option selection, and the next button is highlighted.
Figure 2-21The JRE System Library option is selected and Next> is clicked
- 17.The Installed JREs command is clicked to allow a choice of installed JRE Java System .jar files.
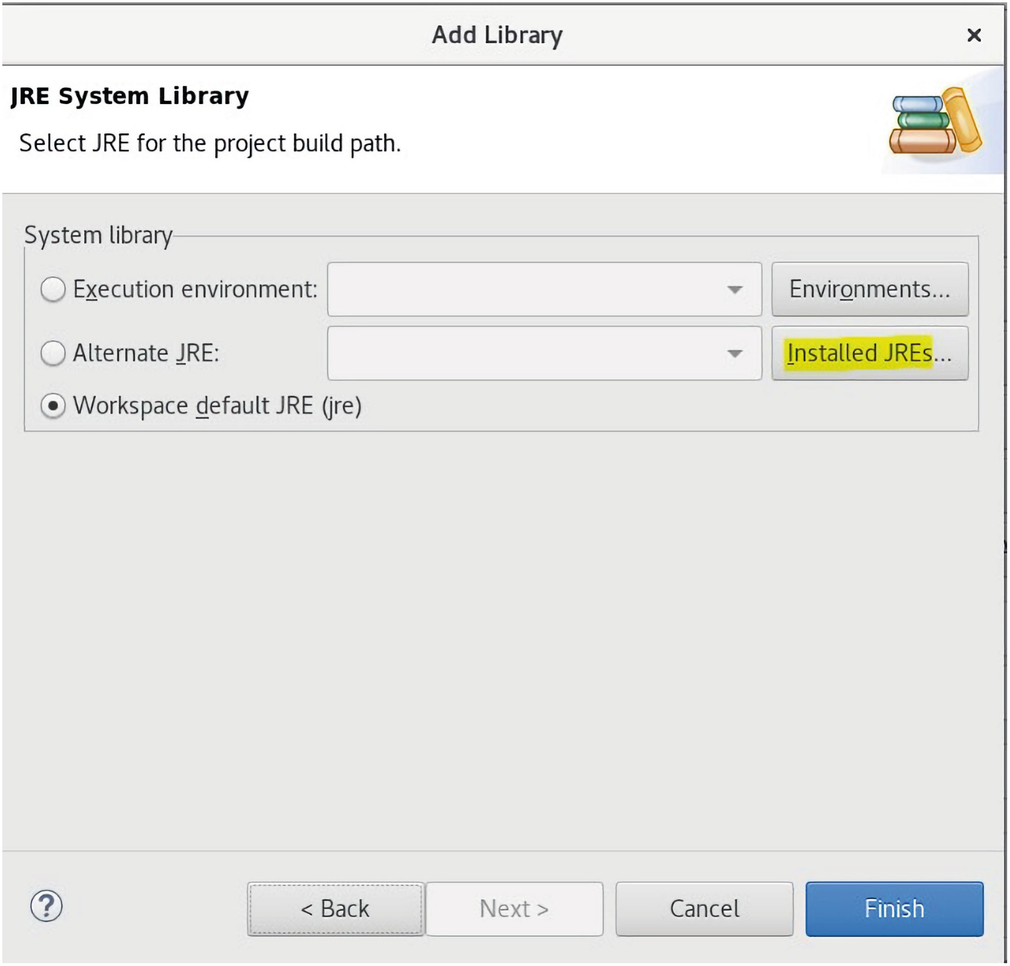
A screenshot of the add library window, with the workspace default J R E selected for the system library, and the installed J R E s is highlighted.
Figure 2-22The Installed JREs command button is selected

A screenshot represents the installed system content engine events with filtered preferences and installed J R E s.
Figure 2-23The Installed system JRE is selected, and the Apply and Close is clicked
- 18.As shown in Figure 2-23, the Add command is used to add the JRE to the Classpath for the project, and then the Apply and Close command is clicked.

A screenshot represents the properties for Audit Event Handler with java build path and libraries including module path, and class path displayed.
Figure 2-24The JRE System Library appears in the Project Classpath
- 19.In order to ensure the correct import packages are used to build the project, it is sometimes necessary to use a specific order of .jar files, so that the earlier versions of a package are consistent with the functions required, since it is possible that a Class module with the same name appears in more than one .jar file. The Classpath order of the referenced .jar files can be adjusted using the panel shown in Figure 2-25.
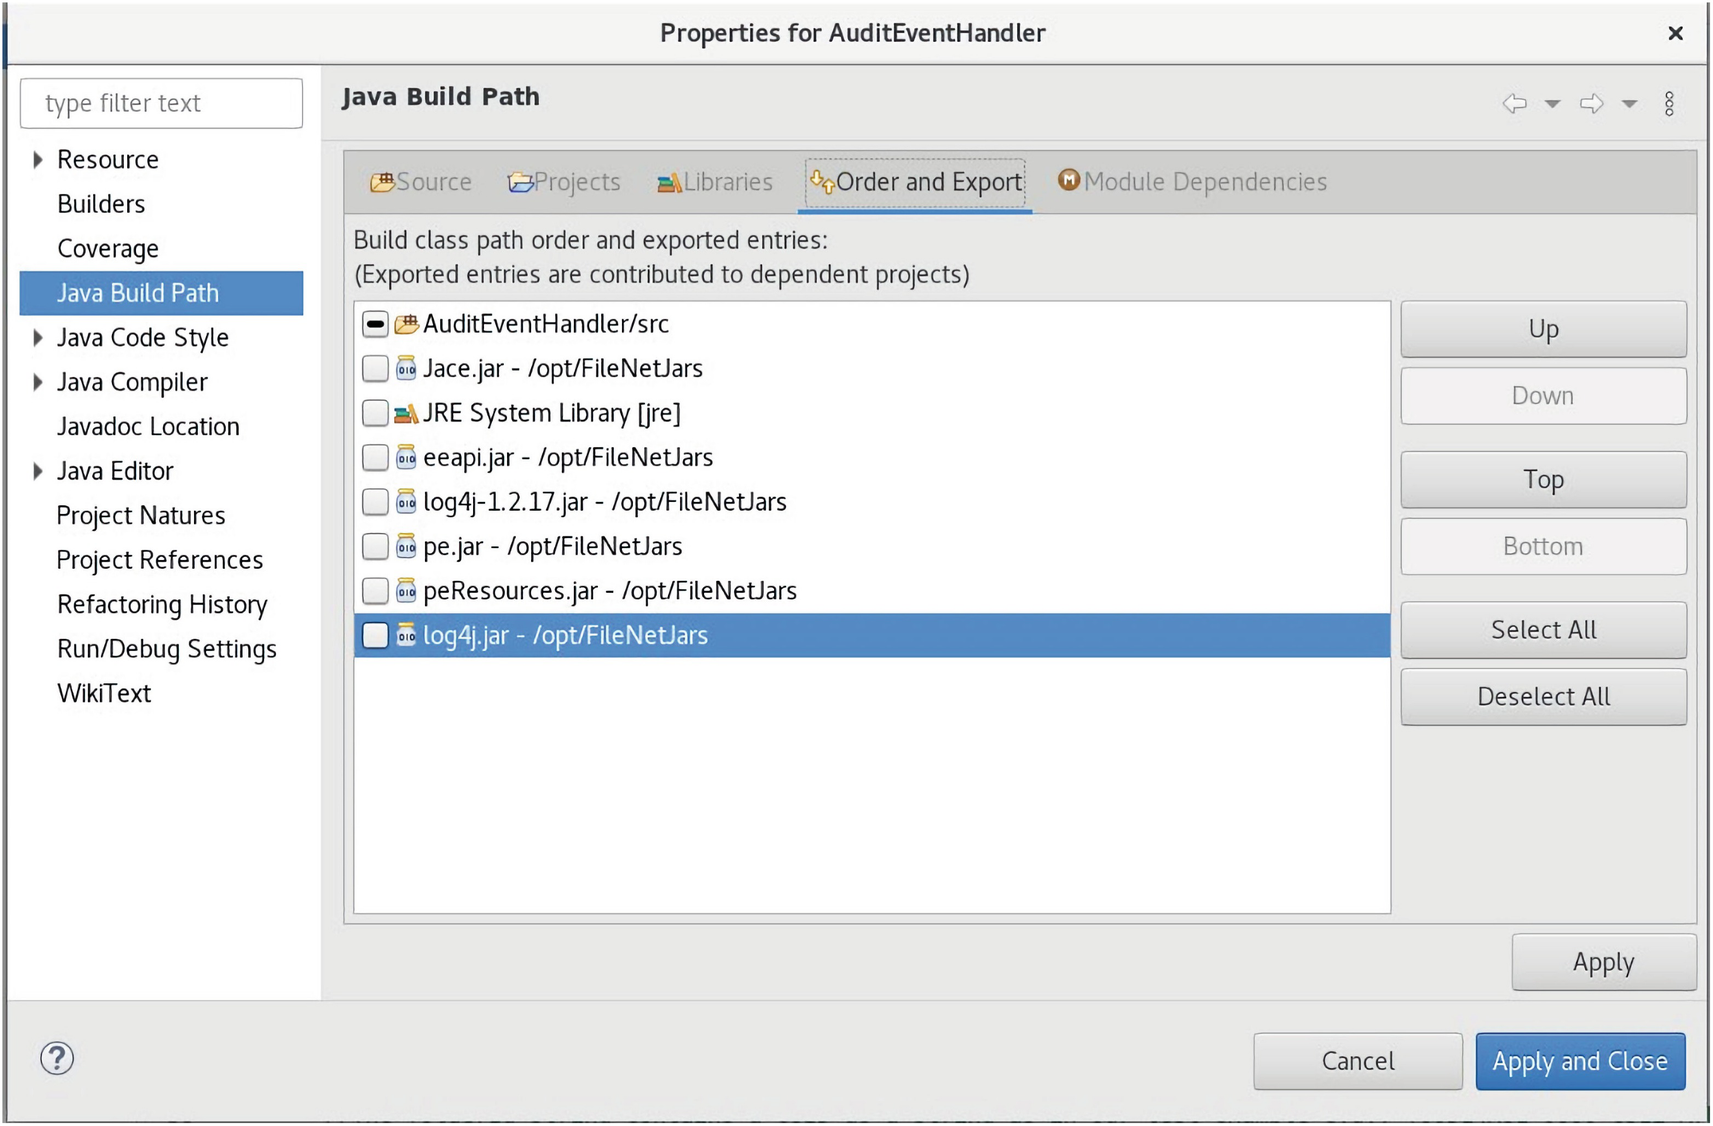
A screenshot represents the properties for Audit Event Handler. The java build path has files in it, with order and export menu.
Figure 2-25The final working order of the Classpath libraries is set
- 20.The CEConnection.java source code is now free of errors.
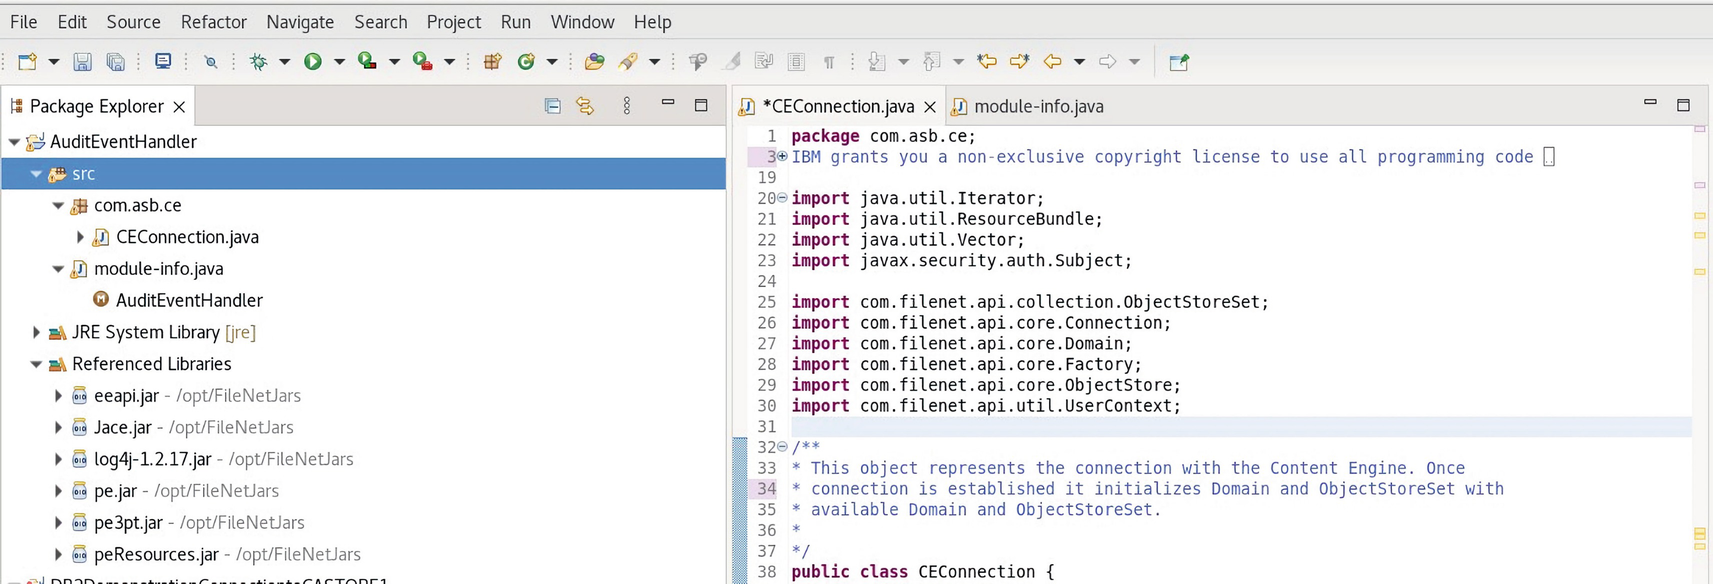
A screenshot represents the working C E connection java code and audit event handler with s r c.
Figure 2-26The working CEConnection.java code
This code is deployed as follows:
The CEConnection Java class object

A screenshot illustrates the process of creating a new Java package, specifying the source folder and name, with the Finish button.
The AuditModule Class package is created
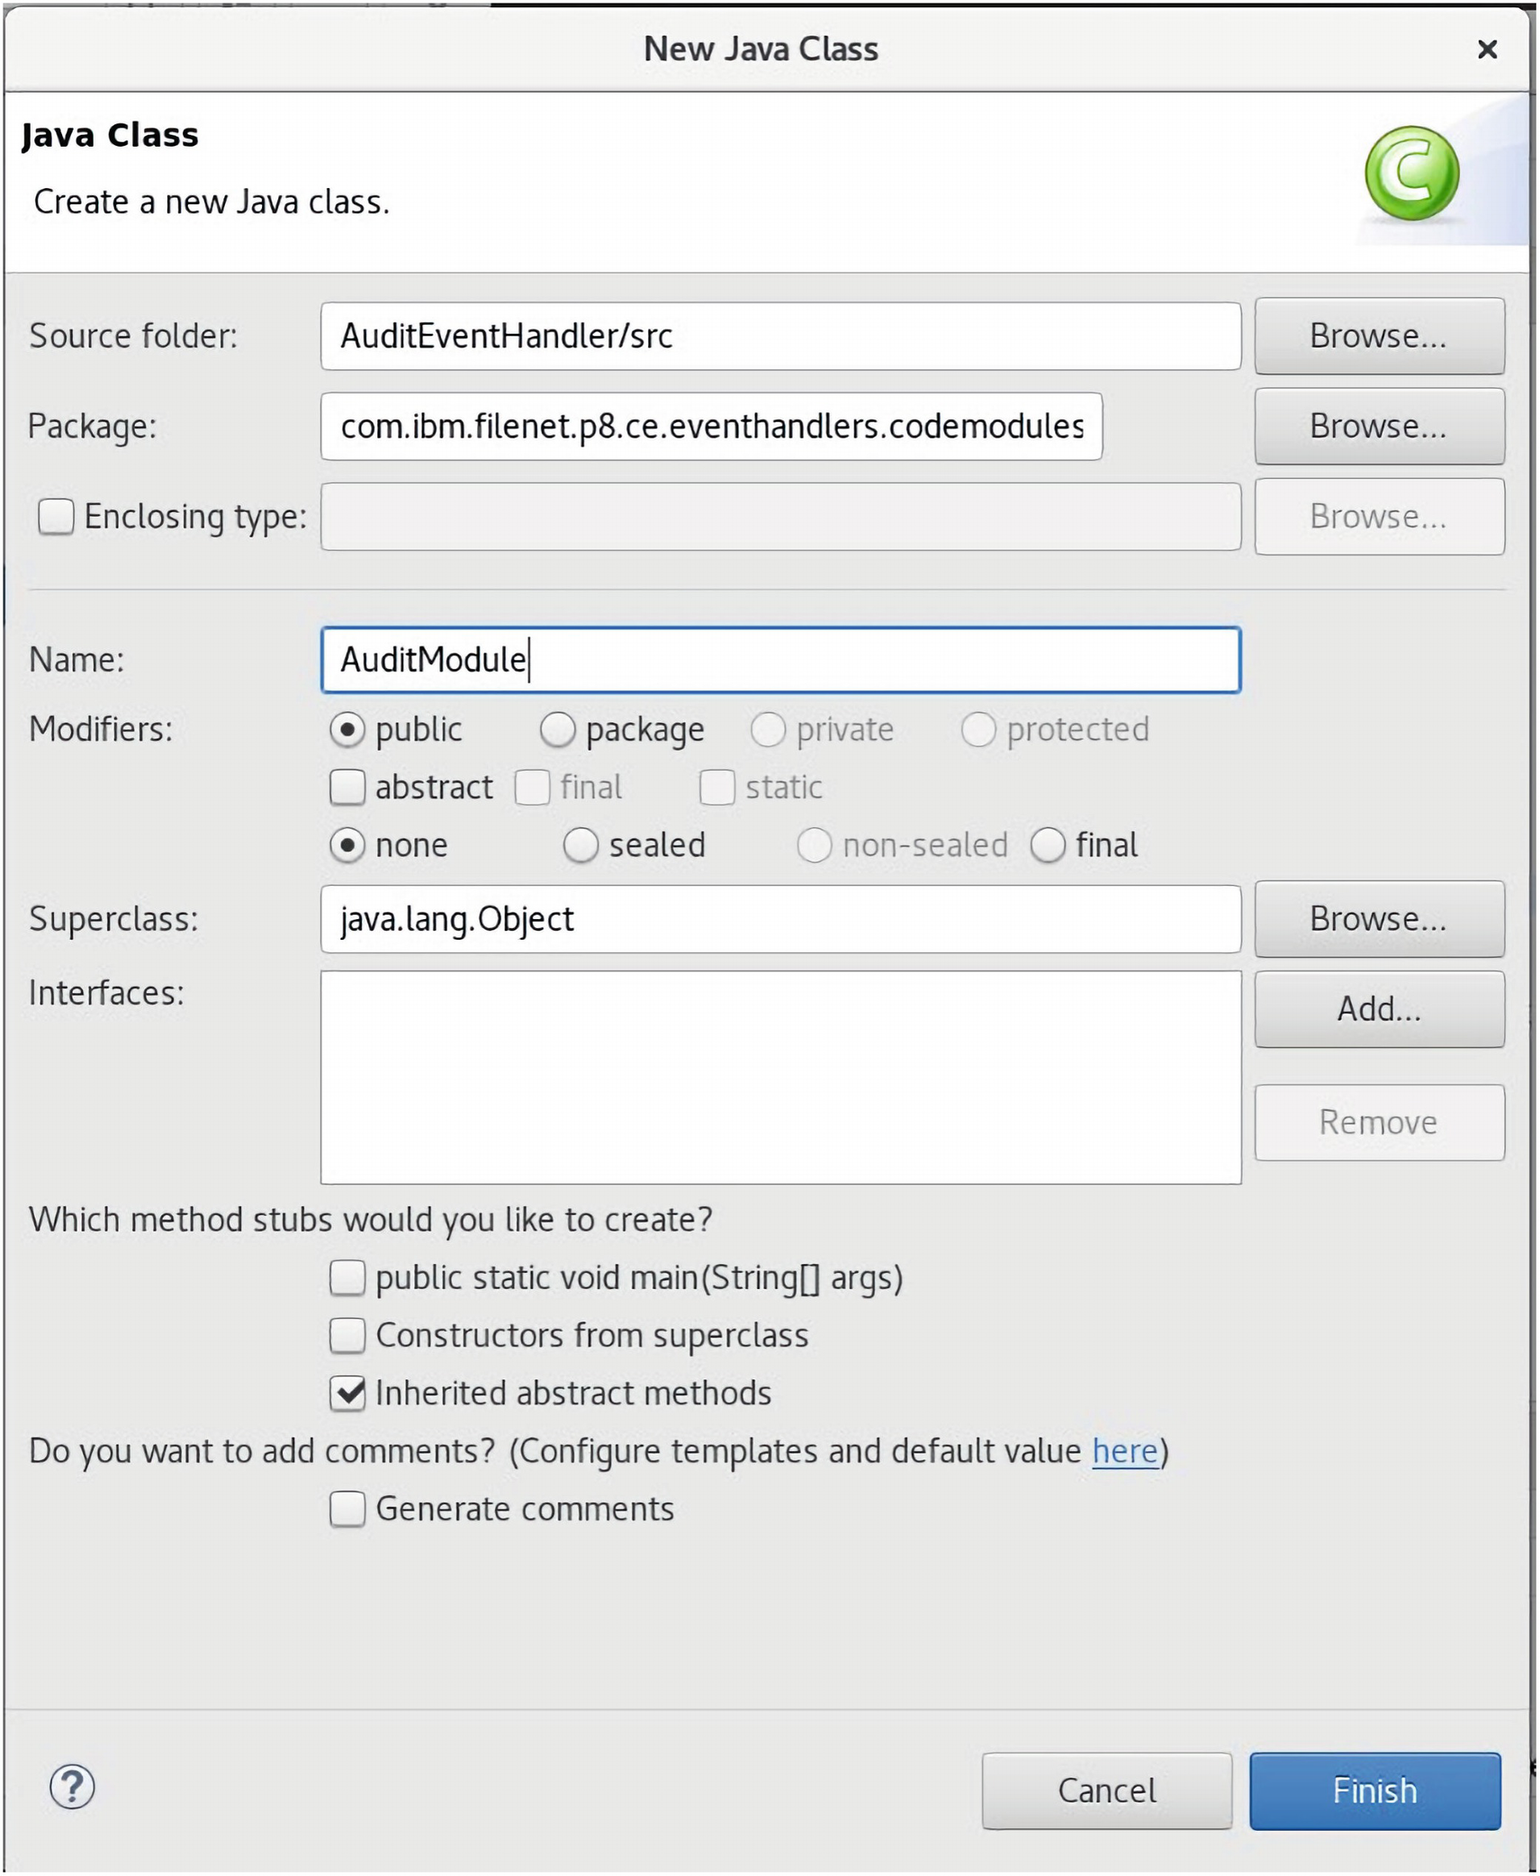
A screenshot illustrates the new java class window, with source folder, package, name, and superclass as input boxes, and the cancel and finish button below.
The AuditModule Java class is created
The AuditModule Java class object

A screenshot represents the test harness java class content engine events with source folder, package, name, superclass, and buttons for cancel and finish.
The TestHarness Java class is created
The TestHarness Java class object
The AddDocToFolder Event Java Class object code
Add the FileNet 5.5.x jar libraries to the project AuditEventHandler, TestHarness class module run configurations:

A screenshot of the run configurations window for the test harness.
The TestHarness Run Configurations for the Classpath
This AuditModule Code Module contains one Event Handler class, addDocToFolder. This is passed the Case Audit Report document object to be filed in an AUDIT_TEST common Folder for ease of access to audits using the IBM Case Manager Audit Master solution.
The code loads the Audit Report class Document Objects with the String property, AUD_folder_Id_to_file_in, which contains the GUID of the Case Target Object Store’s AUDIT_TEST folder. The addDocToFolder Event Handler is triggered and causes a new DRCR (Dynamic Referential Containment Relationship Object) Folder link object to be created, which is the standard linking method to allow an IBM FileNet Folder to link in a many-to-many relationship with the FileNet Audit Report Document objects.
Custom Code Module Java JAR API Call Development
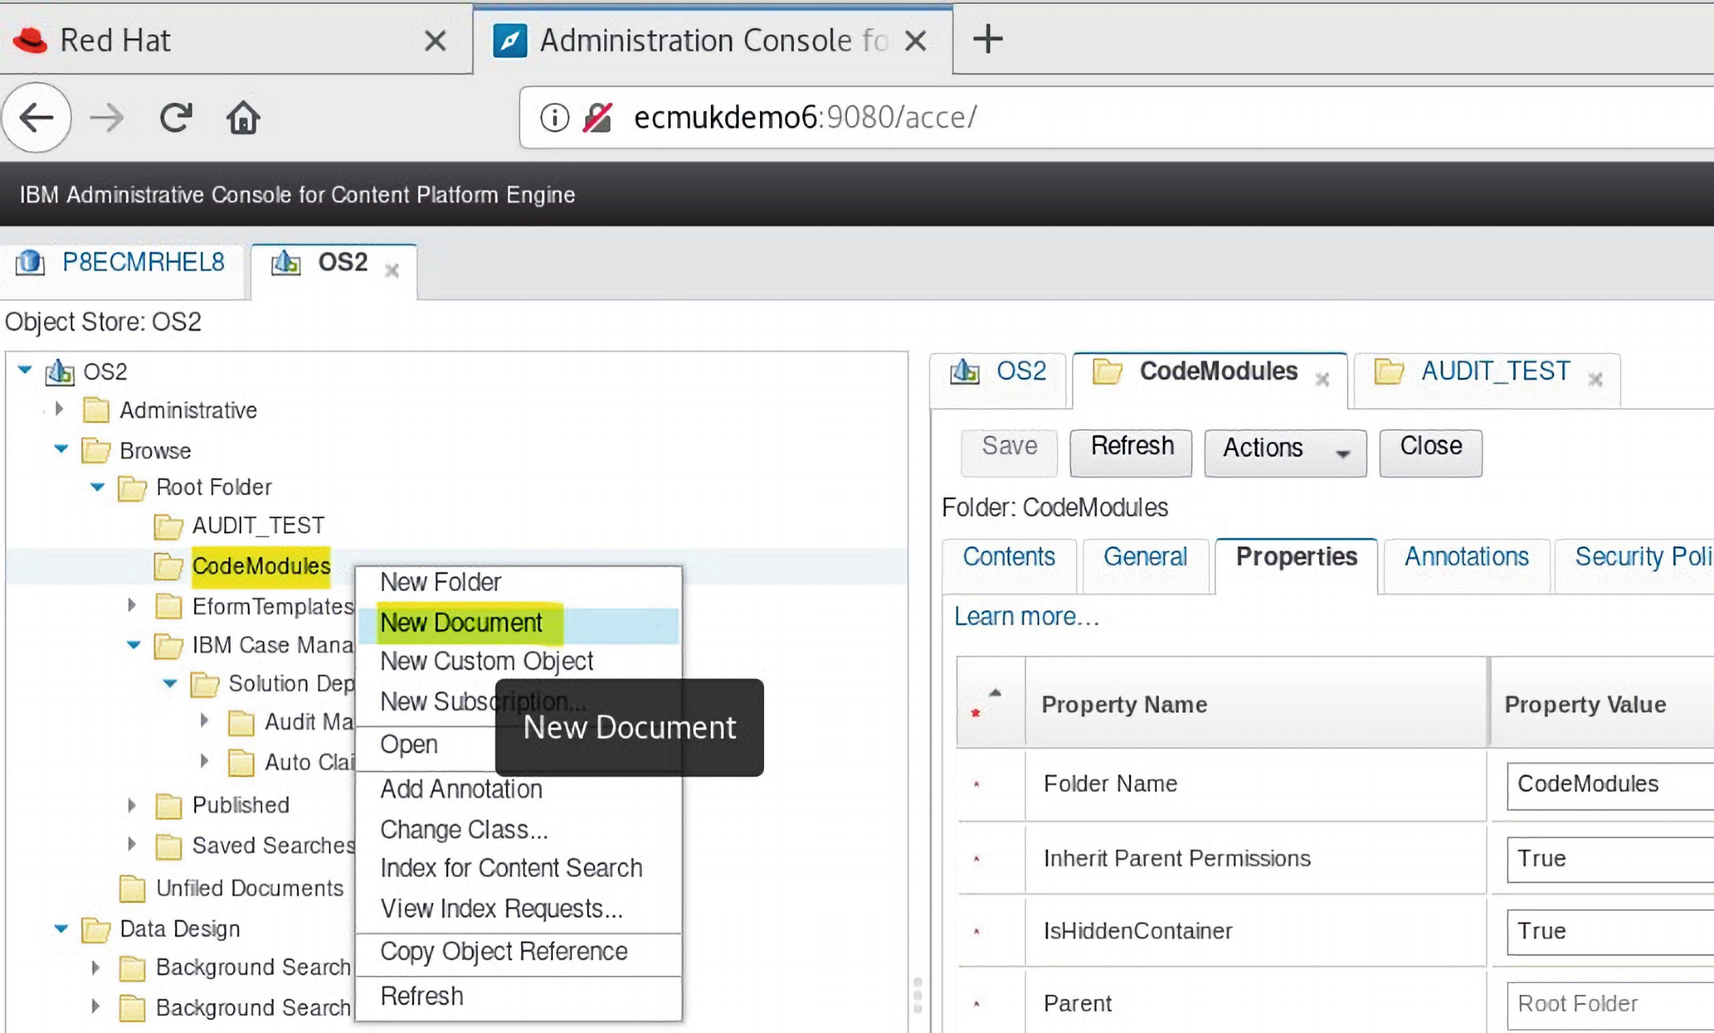
- 1.Confirm that the “CodeModules” folder exists. This is a root-level folder of class “Folder.” It only has one special attribute. It is a “hidden” folder and so is not visible in IBM Content Navigator. If this folder does not exist, create it as you would create any other folder, and then change its “isHiddenContainer” attribute as shown in Figure 2-31.

A screenshot represents the code modules folder, with properties of four columns for the property name, property value, data type, and cardinality.
Figure 2-31The CodeModules Folder isHiddenContainer property is set to True
Adding a Code Module
- 2.Create a new Document in this folder. Right-click the “CodeModules” folder in the tree view, and select “New Document.”
A screenshot represents the code modules folder new document menu item highlighted and selected.
Figure 2-32The CodeModules folder New Document menu item is selected
- 3.You will be presented with the AddDocument wizard. Enter a name (DocumentTitle) for the Document. We will see this later when we come to configure the Events. This will show as the name of the code module.
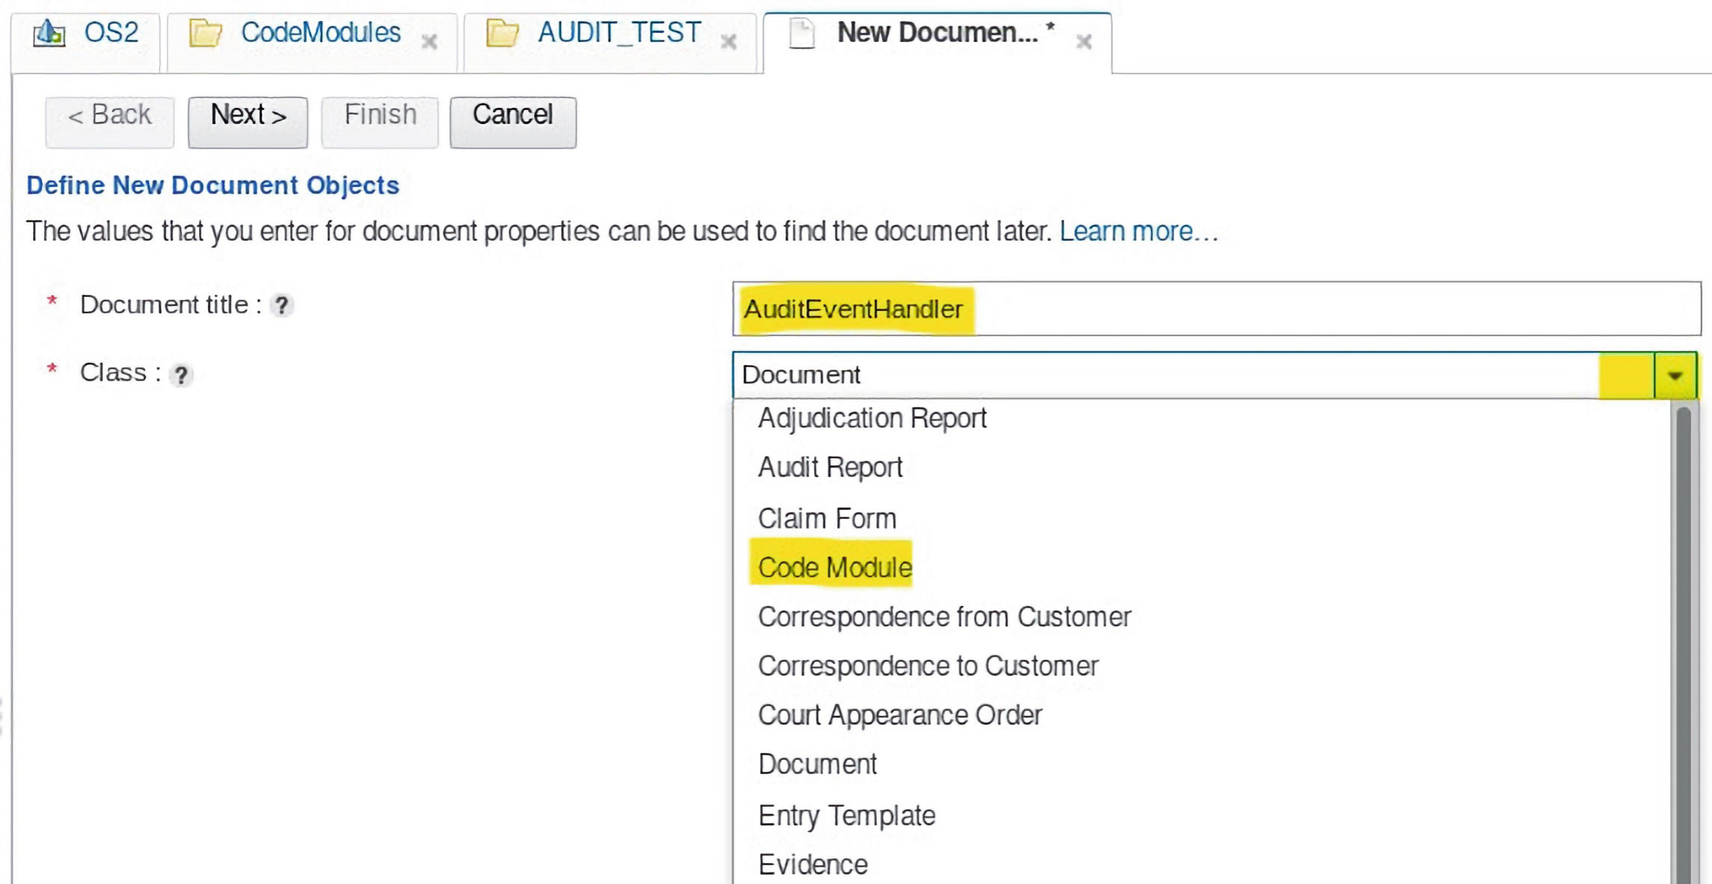
A screenshot of a new document tab opened with document title as an input box and class with a dropdown menu with code module highlighted.
Figure 2-33The Document title and Class of Code Module is selected
- 4.Select “Next>”, ensuring that the tick box is selected to indicate that the content is to be provided for the Code Module.

A screenshot represents the next command in the java runtime environment code module. The next button is highlighted with the class input box highlighted and filled as code module.
Figure 2-34The Next command is selected with the With content tick box ticked
- 5.On the next wizard page, use the “Add” button to select your jar file (fn_eventhandlers.jar).

A screenshot represents the mime type java runtime environment code module, where the mime type is changed to application.
Figure 2-35The mime type is changed to application/x-zip-compressed
- 6.
Change the MIME type before adding the File.

A screenshot of the add content element pop up window with file name, browse and add content highlighted.
Click the Add button to add the compiled fn_eventhandlers.jar file
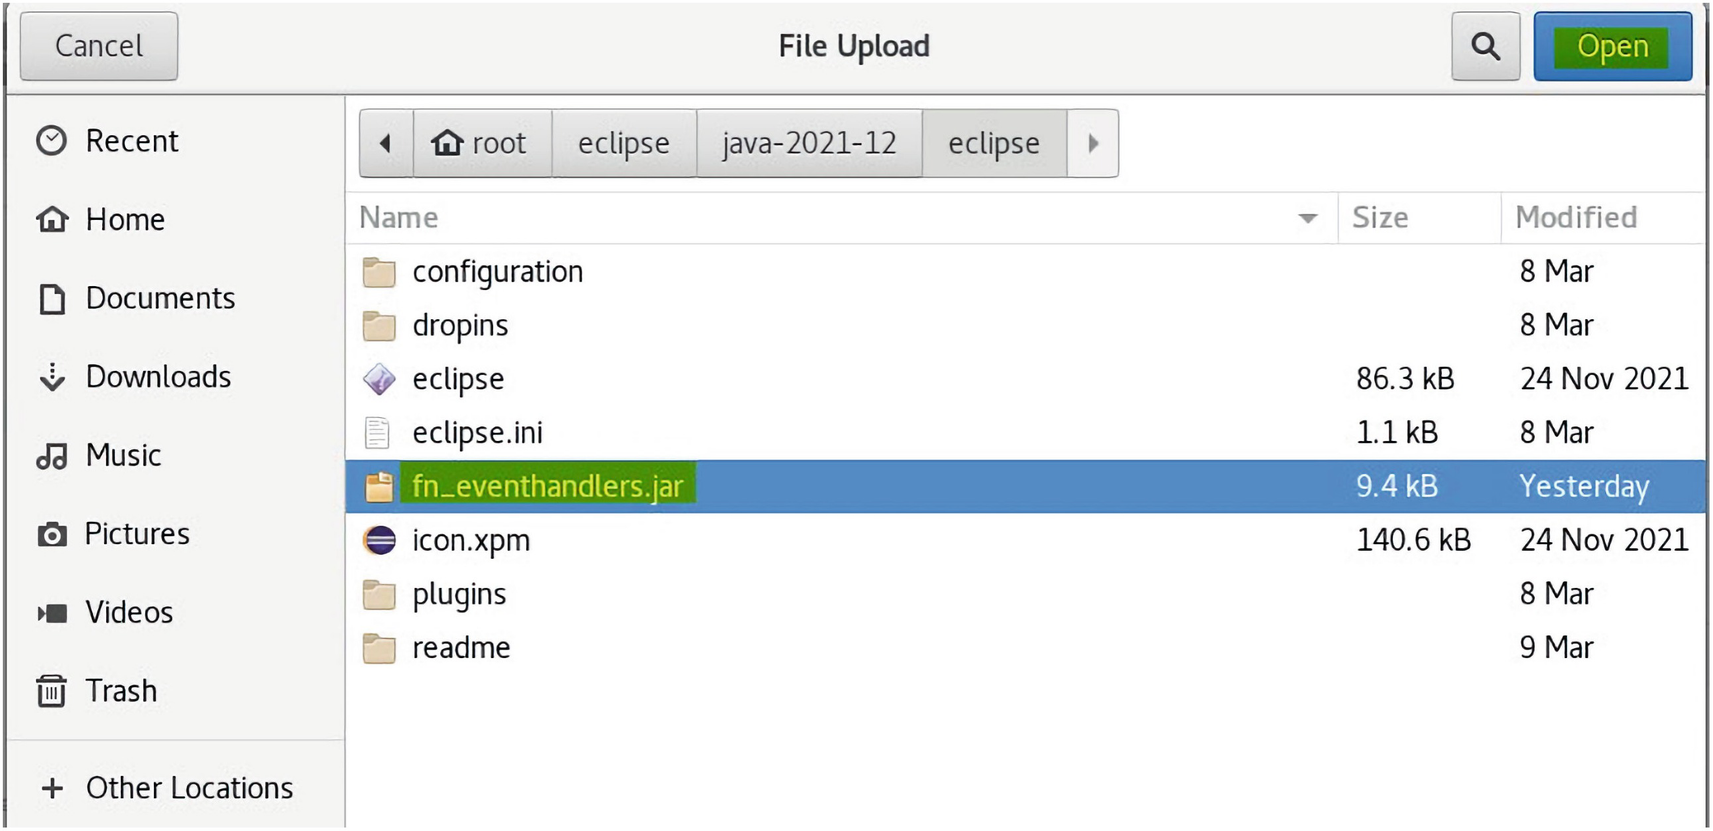
A screenshot represents the file upload window, the open button highlighted, and the file name f n event handlers dot jar also highlighted.
The Browse button shows the fn_eventhandlers.jar which is selected

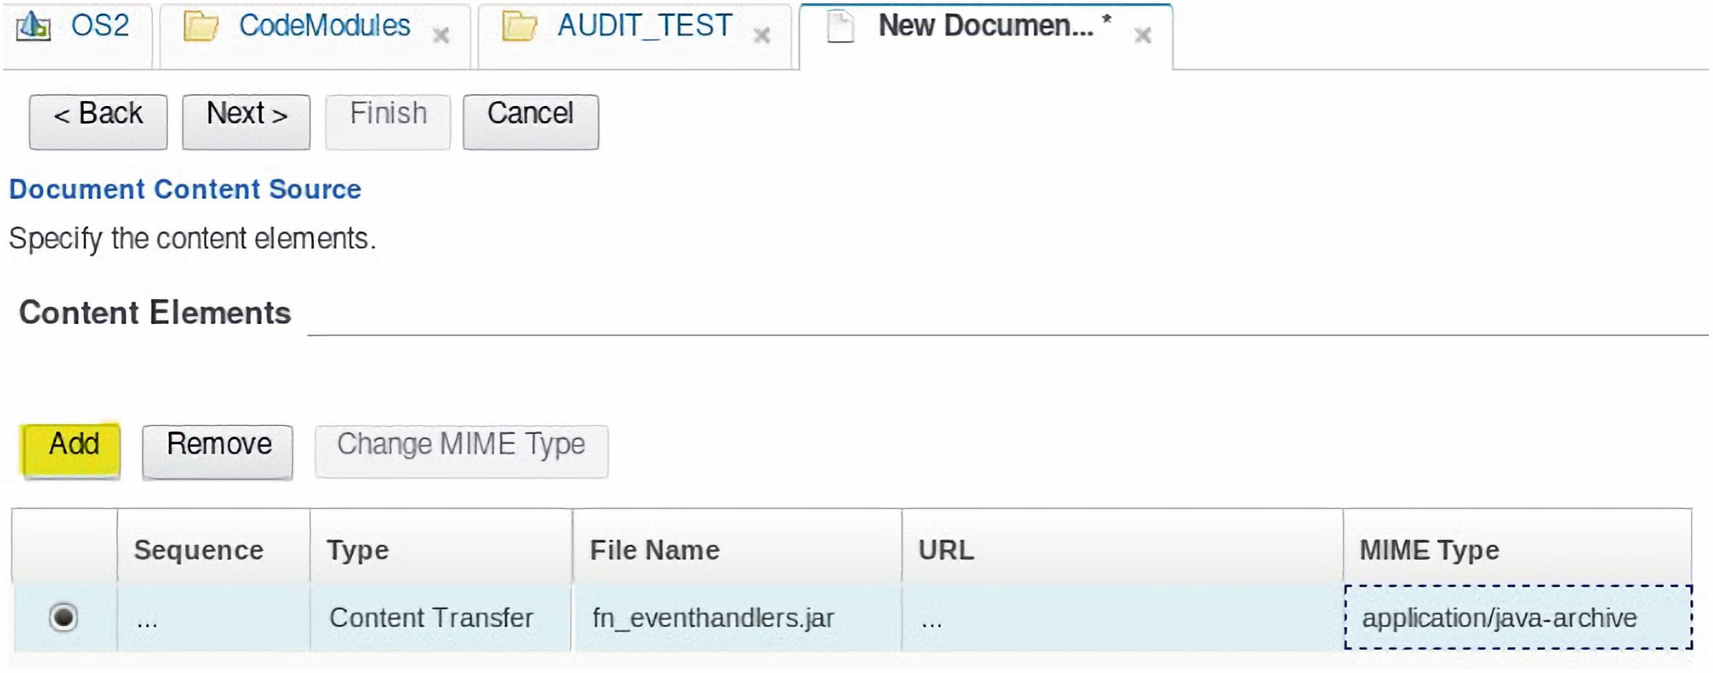
A screenshot represents the system to identify the java runtime environment code module, and also specifies the content elements.
The system identifies the Mime type as applicationjava-archive
A screenshot represents the system to identify the java runtime environment code module, and the add button is highlighted.
The Next button is clicked again

A screenshot of the new document window with property name, value, data type and cardinality input columns.
The Next> command is clicked (no changes are required here)

A screenshot represents the new document window for the default version property, and the next button is highlighted.
The default Version property is used here
The Next> command shows the Retention time options for the document, which can be set to allow automatic removal after a selected time interval.
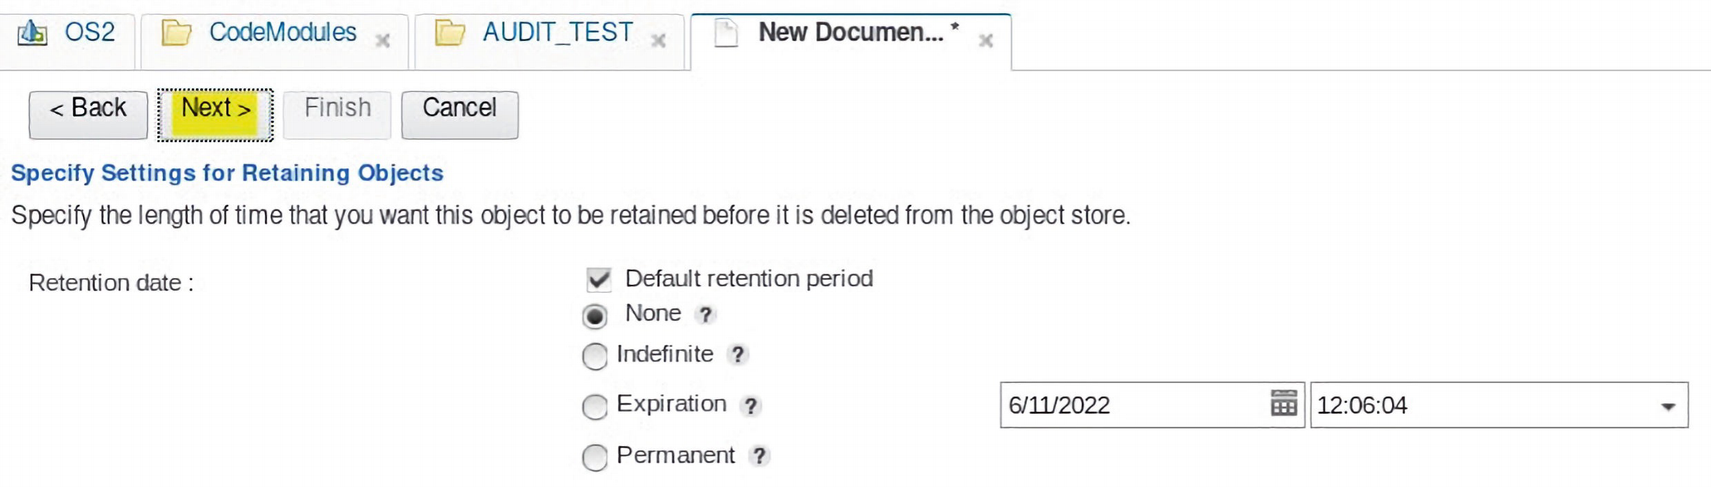
A screenshot of the next button being highlighted and clicked for the new document window.
The Next command is clicked to use the defaults

A screenshot represents the default database storage area in the java runtime environment module.
The Default Database Storage Area is selected
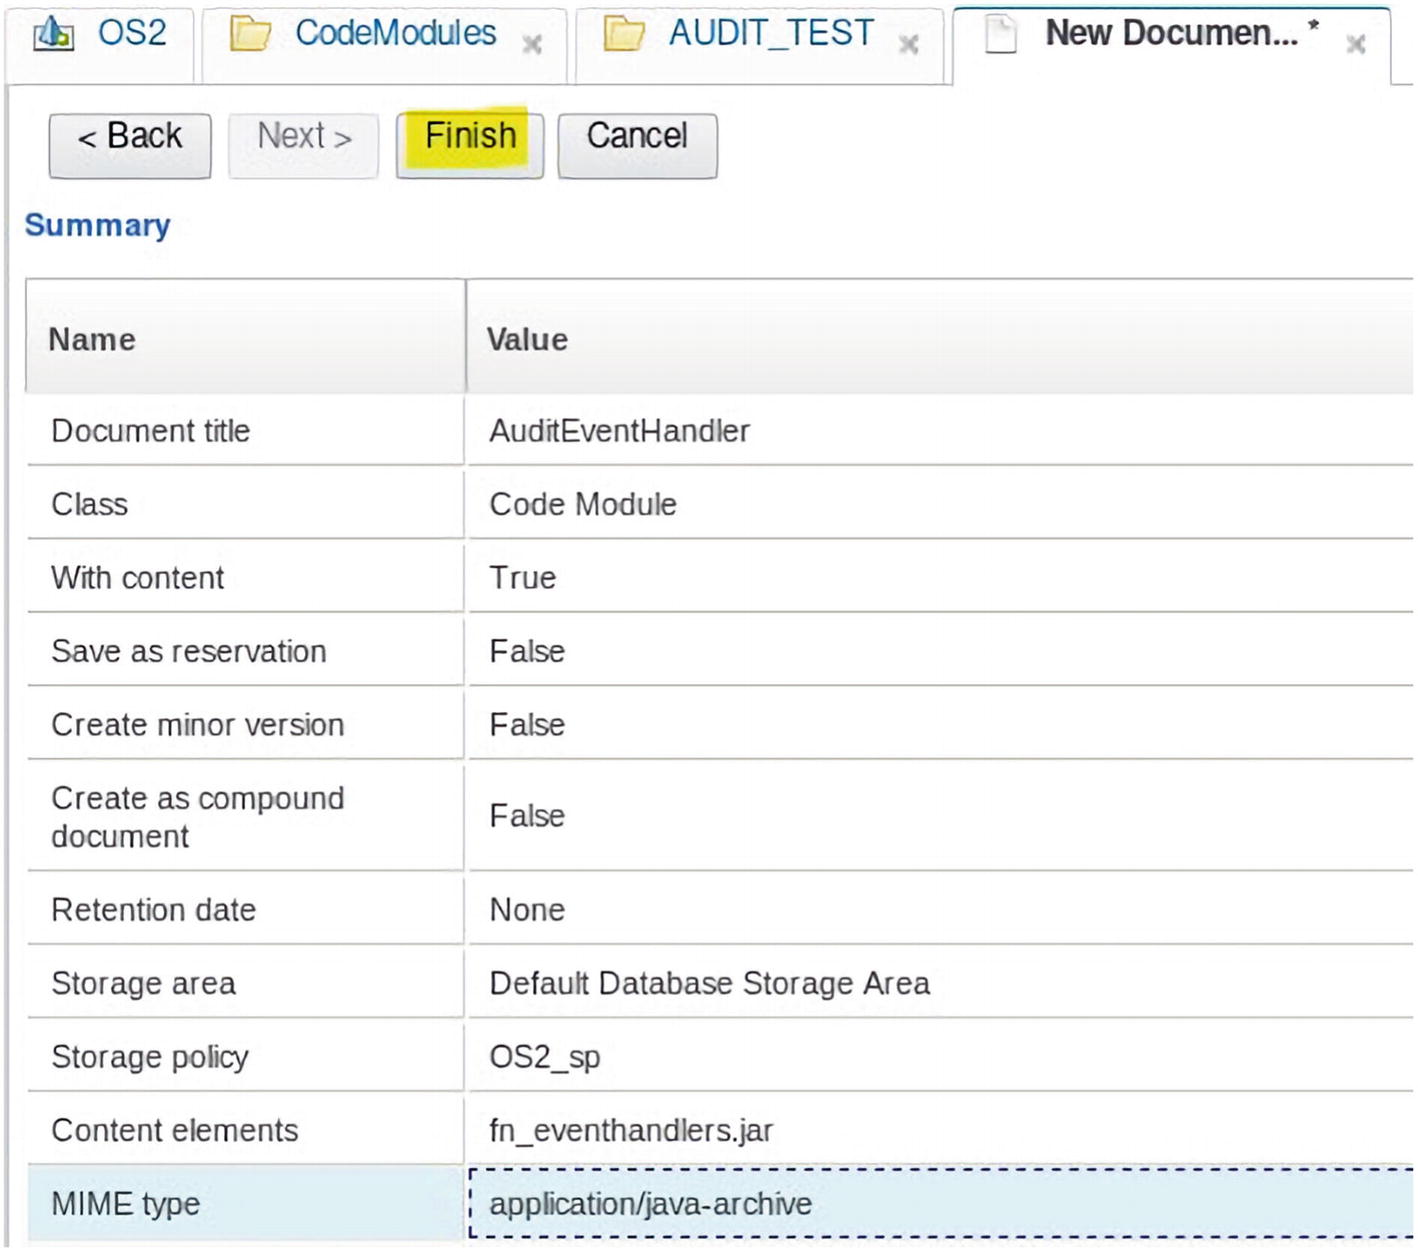
A screenshot represents the finish command that creates the code module document in J R E.
The Finish command creates the Code Module document

A screenshot of the status of a new document created, with an open and close button.
The status of the Document creation is displayed

A screenshot represents the audit event handler from the folder code modules, and the table with eight columns of containment name, document name, date created, created by class, and major version number.
The AuditEventHandler Code Module is now ready to be used
Creating a Custom Event Object
Before the AuditEventHandler Code Module can be integrated as a new Custom Event in the OS2 Object Store for IBM Case Manager, it has to be linked to other Object Store objects. The first of these is the Event Object.
We will now create a new Event Object called AddDocToFolder.
- 1.In the acce tree view, expand “Events, Actions, Processes” and select “Event Actions.” Right-click “Event Actions” and select “New Event Action.” You will be presented with the “Name and Describe the Event Action” wizard.
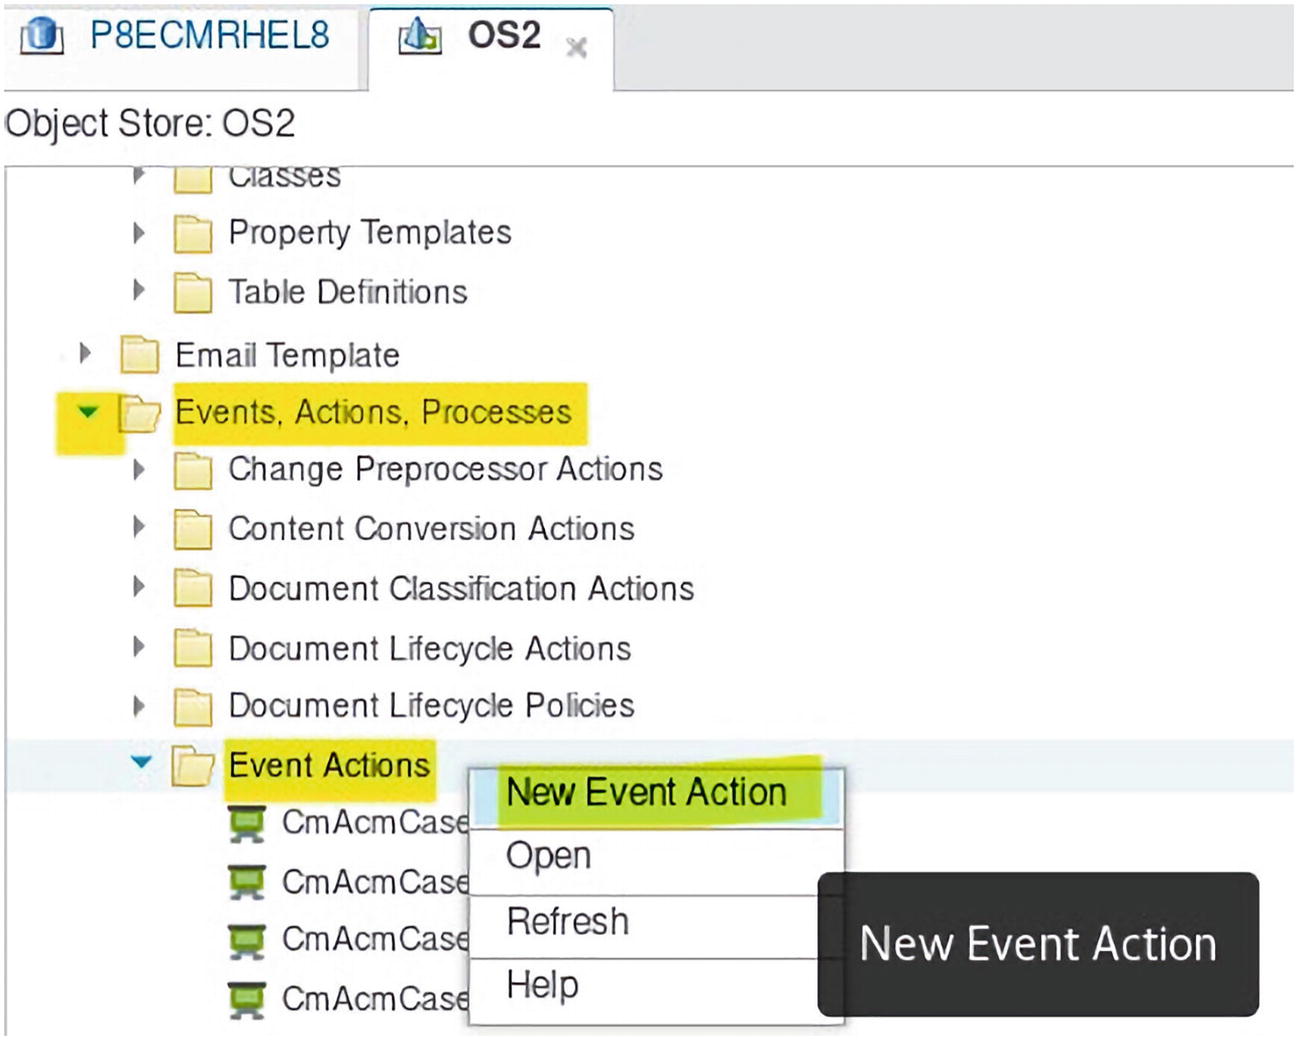
A screenshot represents the new event action from the event actions folder in the events, actions, processes main folder.
Figure 2-47The New Event Action menu is clicked

A screenshot represents the name and describes the event action wizard along with a list of event actions.
The “Name and Describe the Event Action” wizard
- 2.Select “Next.” In the “Name and Describe the Event Action” wizard page, enter “AddDocToFolder” in the name. The description is optional and defaults to the same as the name value. In this case, we select a slightly more detailed description.

A screenshot represents the java class handler from the specified type of event action with status, event action type, and type.
Figure 2-49The Java class handler full package name and class are entered
- 3.
Select “Next.” On the next wizard page, enter the “Event Action Handler Java Class Name.” This value is as follows for the event:
com.ibm.filenet.p8.ce.eventhandlers.AddDocToFolder
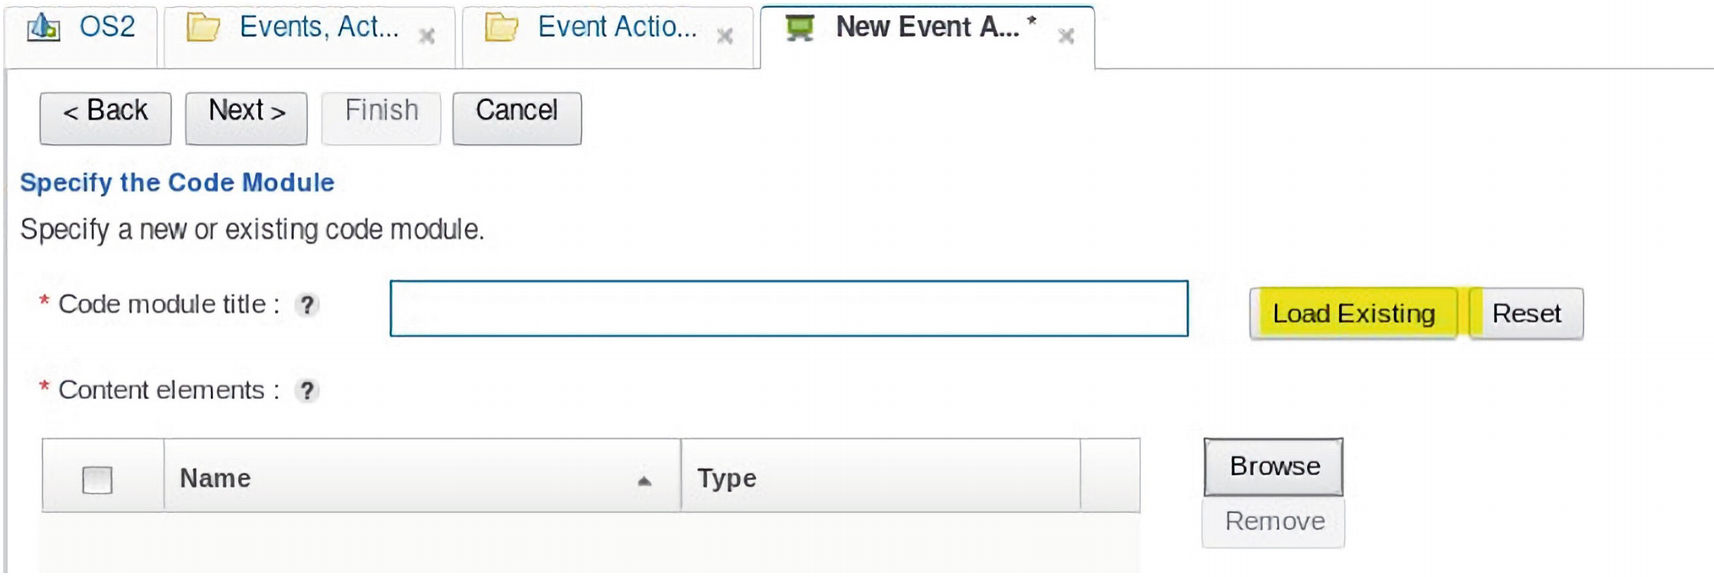
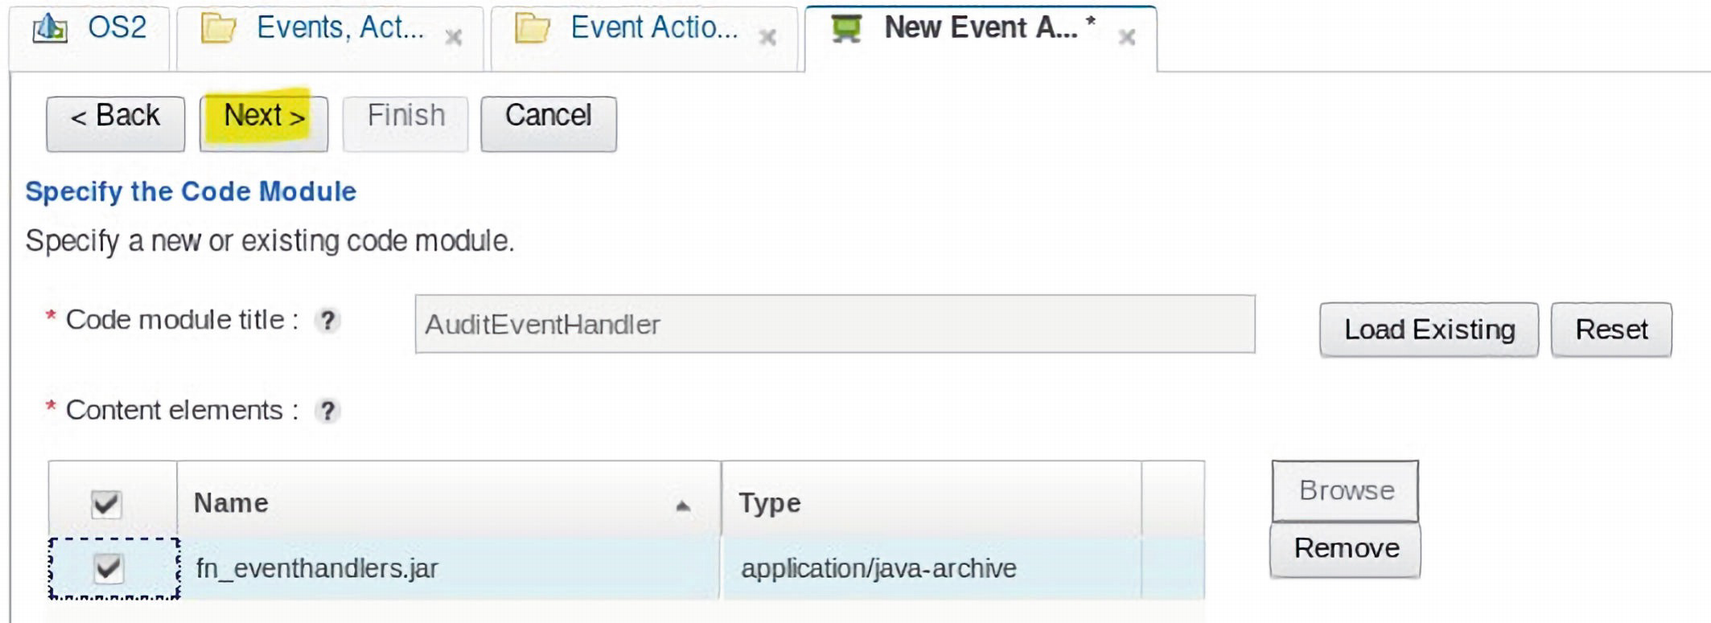
A screenshot represents the load existing command button, to specify the code module in the new event action.
The Load Existing command button is clicked
- 4.Click “Next.” On the next wizard page, click the “Load Existing” button; you should see a list with the code module name we created in the “Create Code Module Step 2” earlier. Select this item.

A screenshot represents the audit event handler code module in the select a code module, with ok and cancel buttons below.
Figure 2-51The AuditEventHandler code module we created is selected to be used
- 5.Click OK.
A screenshot represents the next command in specify the code module, from the new event action.
Figure 2-52The Next command is selected
- 6.Click “Next.” The parameters to be run to create an Event Handler are displayed.
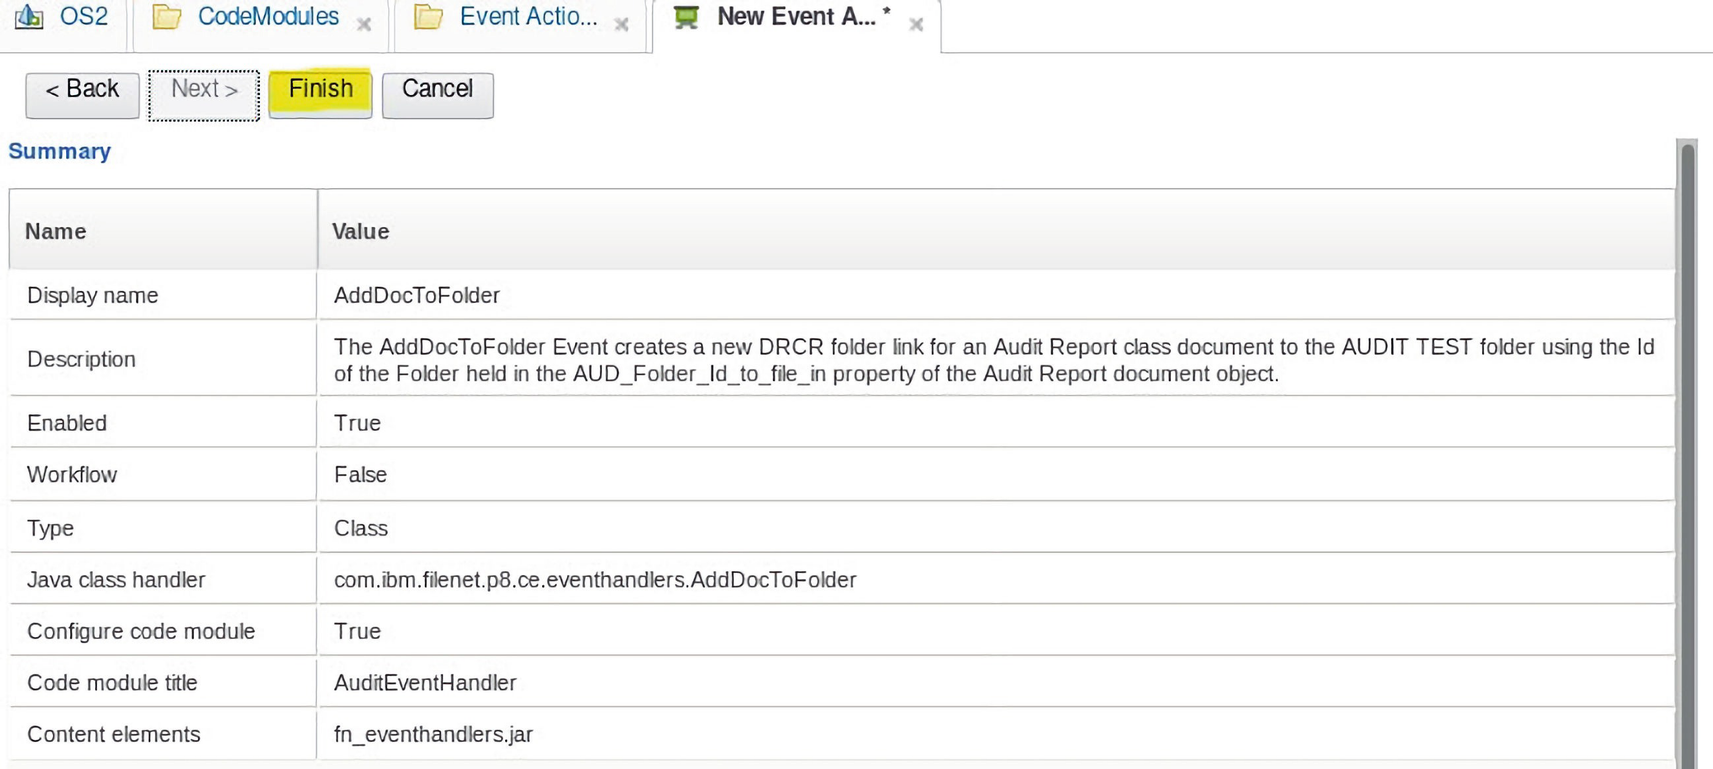
A screenshot represents the finish to build the event handler object and summary with two columns for name and value.
Figure 2-53Click Finish to build the Event Handler object and links
- 7.Click “Finish” to complete the wizard.
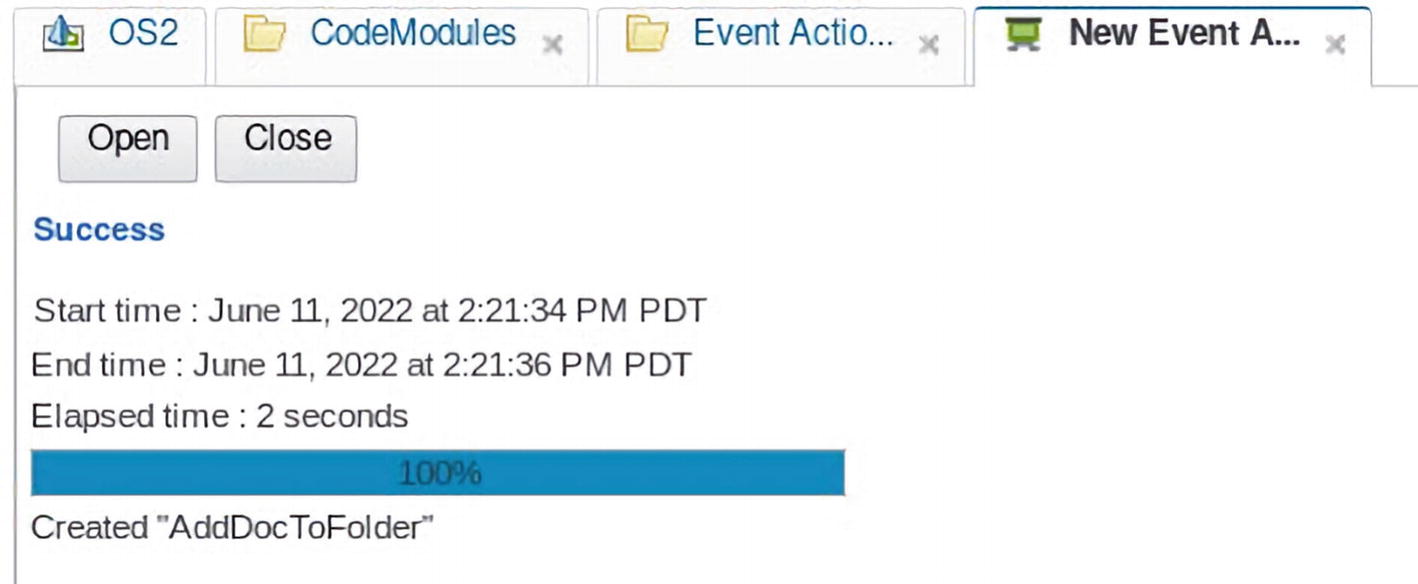
A screenshot represents the status of the new event handler with start time, end time, and elapsed time.
Figure 2-54The status of the New Event Handler creation process is shown
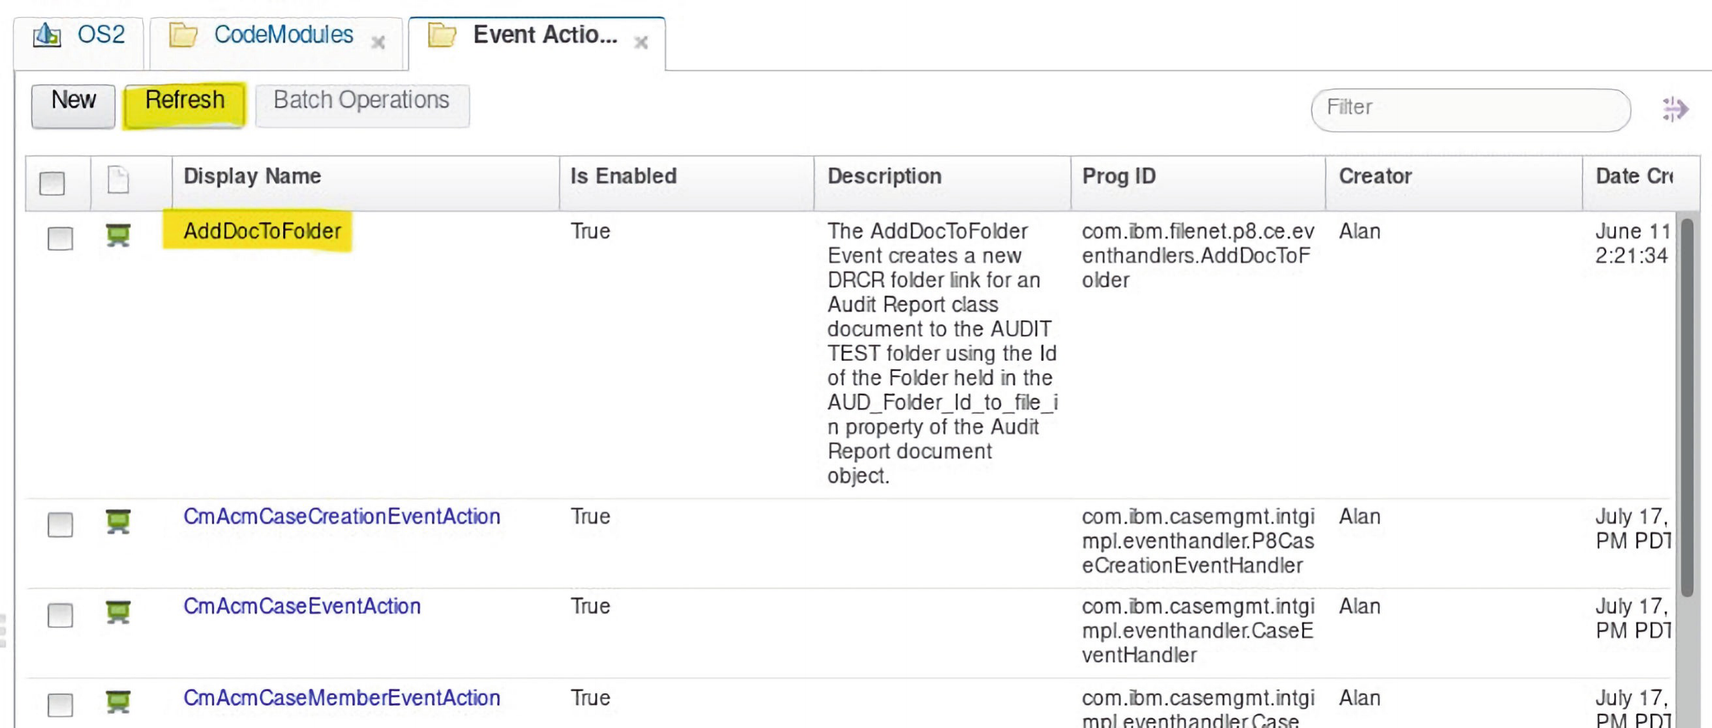
A screenshot represents the add doc to the folder with a few columns titled; display name, is enabled, description, prog I D, creator, and date created and four rows.
Figure 2-55The new AddDocToFolder Event Action is created in the OS2 Target Object Store
Configuring Workflow Subscriptions
Content Engine Objects, such as Folders and Documents, can subscribe to certain events and have the preceding “event action” code fire on these events. We will now describe how to subscribe the creation event of a Document of class “Audit Report” to the AddDocToFolder event action.
The AddDocToFolder event code creates a link of the created Audit Report Document to the AUDIT_TEST folder that is defined.
- 1.In acce, select Classes ➤ Document ➤ Audit Report from the tree view.

A screenshot represents the audit report class java customization workflow subscription in the object store.
Figure 2-56The Audit Report class is navigated down to
- 2.Right-click the Audit Report class and select “New Subscription” from the context menu.
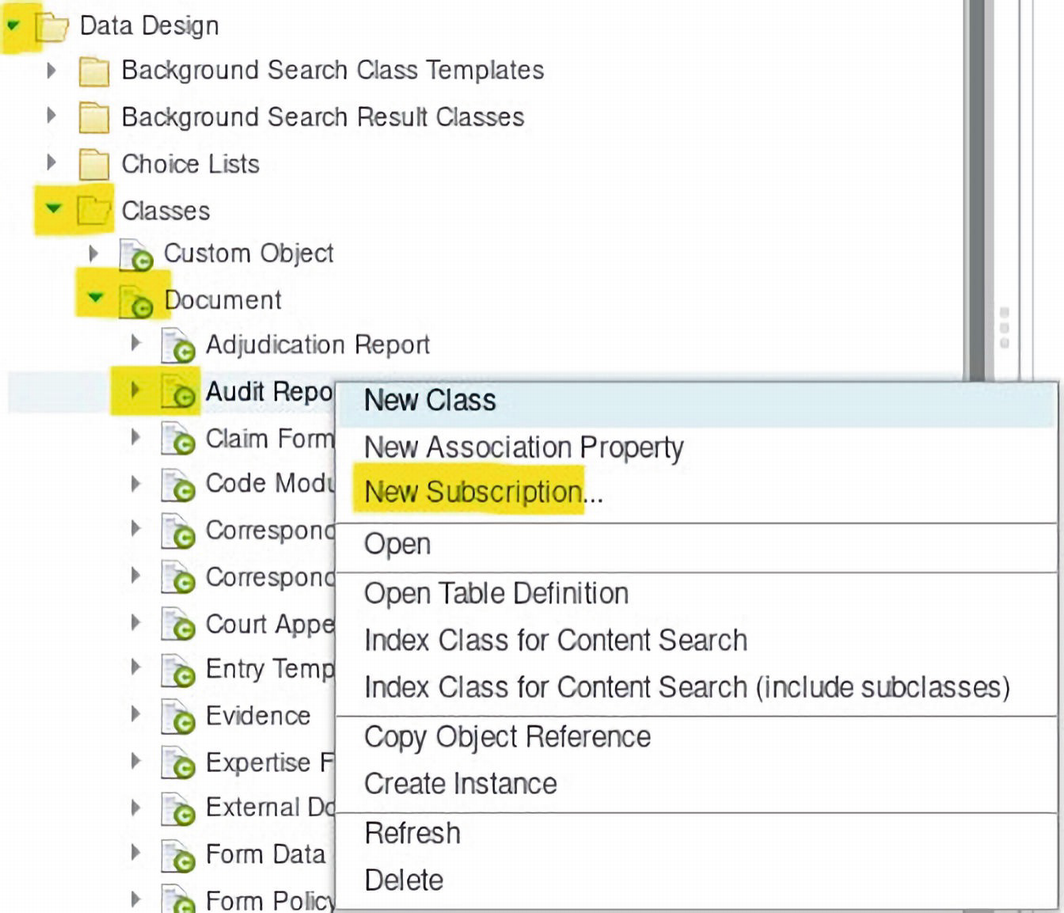
A screenshot represents the new subscription java customization from the context menu for the audit report class.
Figure 2-57Select “New Subscription” from the context menu for the Audit Report class
- 3.Enter the Subscription Name as AUD_AddDocumentToFolder and click “Next” on the “Create Subscription” screen.

A screenshot represents the subscription name and description.
Figure 2-58Enter the Subscription Name as AUD_AddDocumentToFolder
- 4.Select a name for the subscription that describes it for this type of object. This is because Event Actions can be used for multiple object types and for multiple events (Create, Update, etc.), and so well-named subscriptions are easier to understand and maintain.

A screenshot represents the default of applies to all objects of this class is left, and next is highlighted.
Figure 2-59The default of Applies to all Objects of this class is left; Next> is clicked
- 5.Click “Next.” The one or more system events (or custom events) can now be selected using tick boxes. We are just going to select the Document Object Creation Event.

A screenshot represents new subscription window, where create event is selected for triggering the event handler.
Figure 2-60The Creation Event is selected for triggering the Event Handler
- 6.On the “Select the Triggers” screen, select “Creation Event” from the list and click “Next.”

A screenshot represents the back, next, finish, and cancel options at the top, as well as selecting an event action and adding a doc to the folder event handler action created.
Figure 2-61The AddDocToFolder Event Handler action we created is selected
- 7.Click “Next.” On the “Specify an Event Action” page, select “AddDocToFolder” from the drop-down.

A screenshot represents the enable the subscription tick box, and the next button is clicked.
Figure 2-62The Enable this subscription tick box is selected, and Next> is clicked
- 8.Select “Next.”

A screenshot represents the finish command to build the event action subscription with a summary and two columns for name and value.
Figure 2-63The Finish command is clicked to build the Event Action Subscription
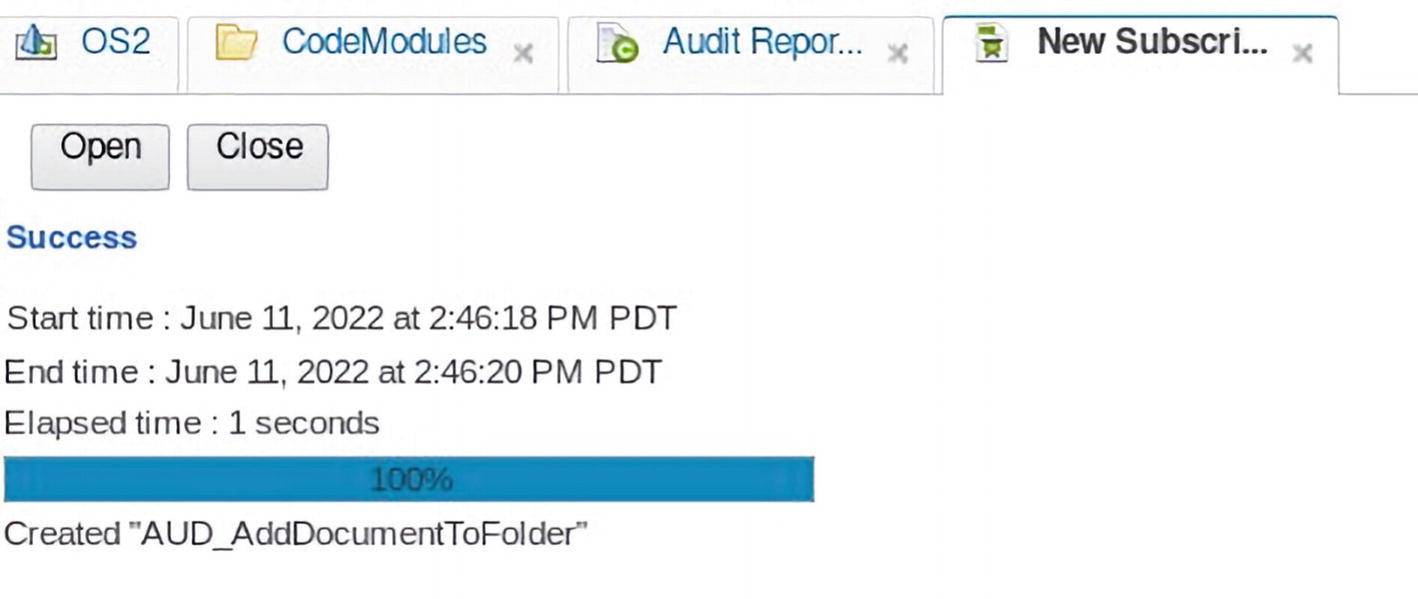
A screenshot of the O S 2, code modules, audit report, and new subscription in the A U D add the document to folder subscription is created.
Figure 2-64The AUD_AddDocumentToFolder Subscription is created
Click Finish. The preceding screen is displayed showing the status of the AUD_AddDocumentToFolder New subscription creation.
This subscription can now be tested by creating a document of class “Audit Report.” Once created, you should see the Document linked to the AUDIT_TEST folder.
Creating the fn_eventshandler.jar

A screenshot represents the eclipse file in the export menu selected for the audit event handler java project.
The Eclipse File ➤ Export menu option is selected for the AuditEventHandler Java project

A screenshot represents the java from J A R file export wizard option selected and the next command is clicked.
The Java ➤ JAR file export wizard option is selected, and the Next> command is clicked
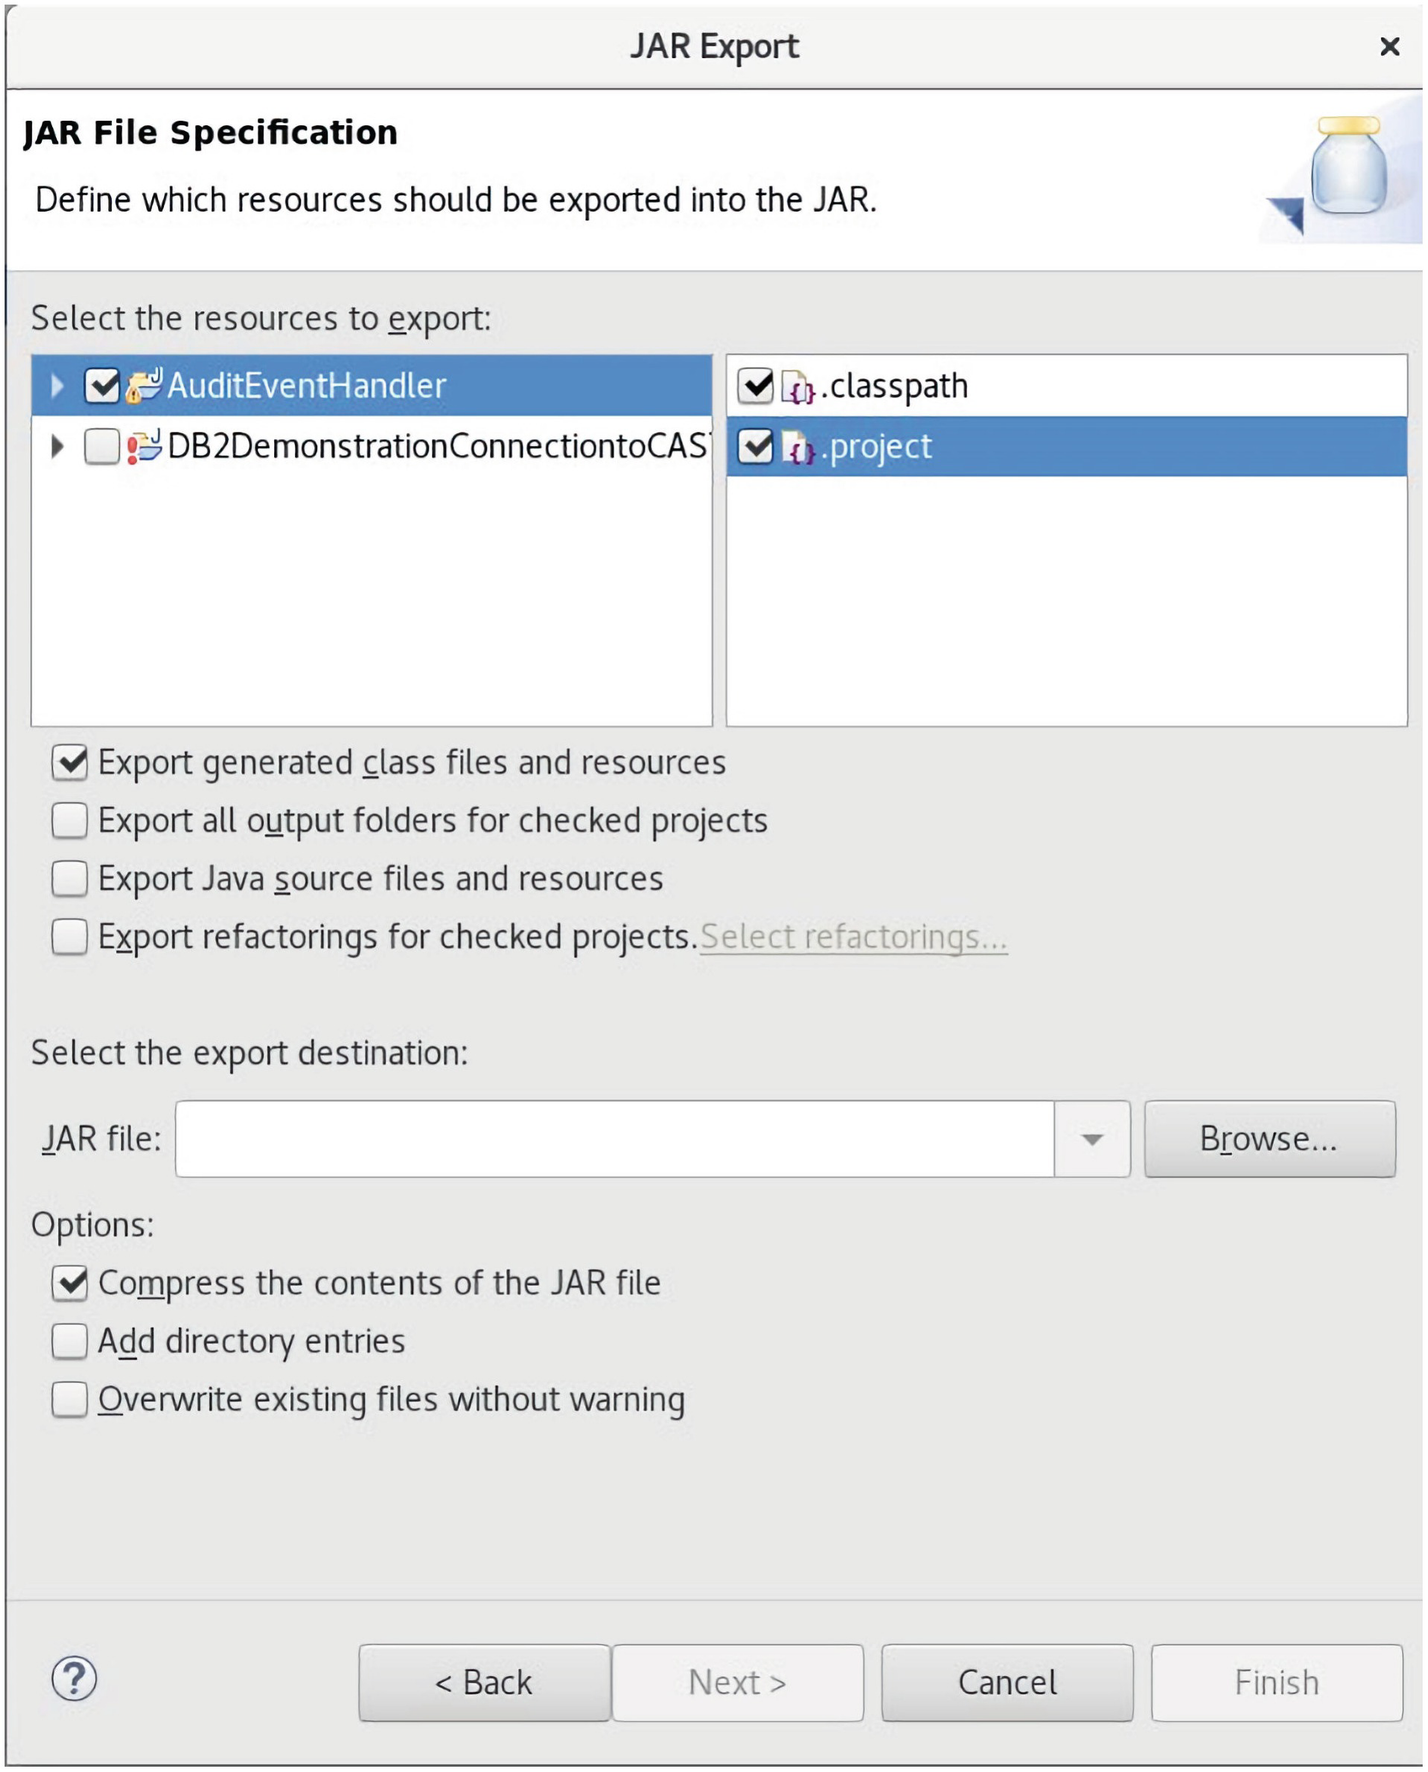
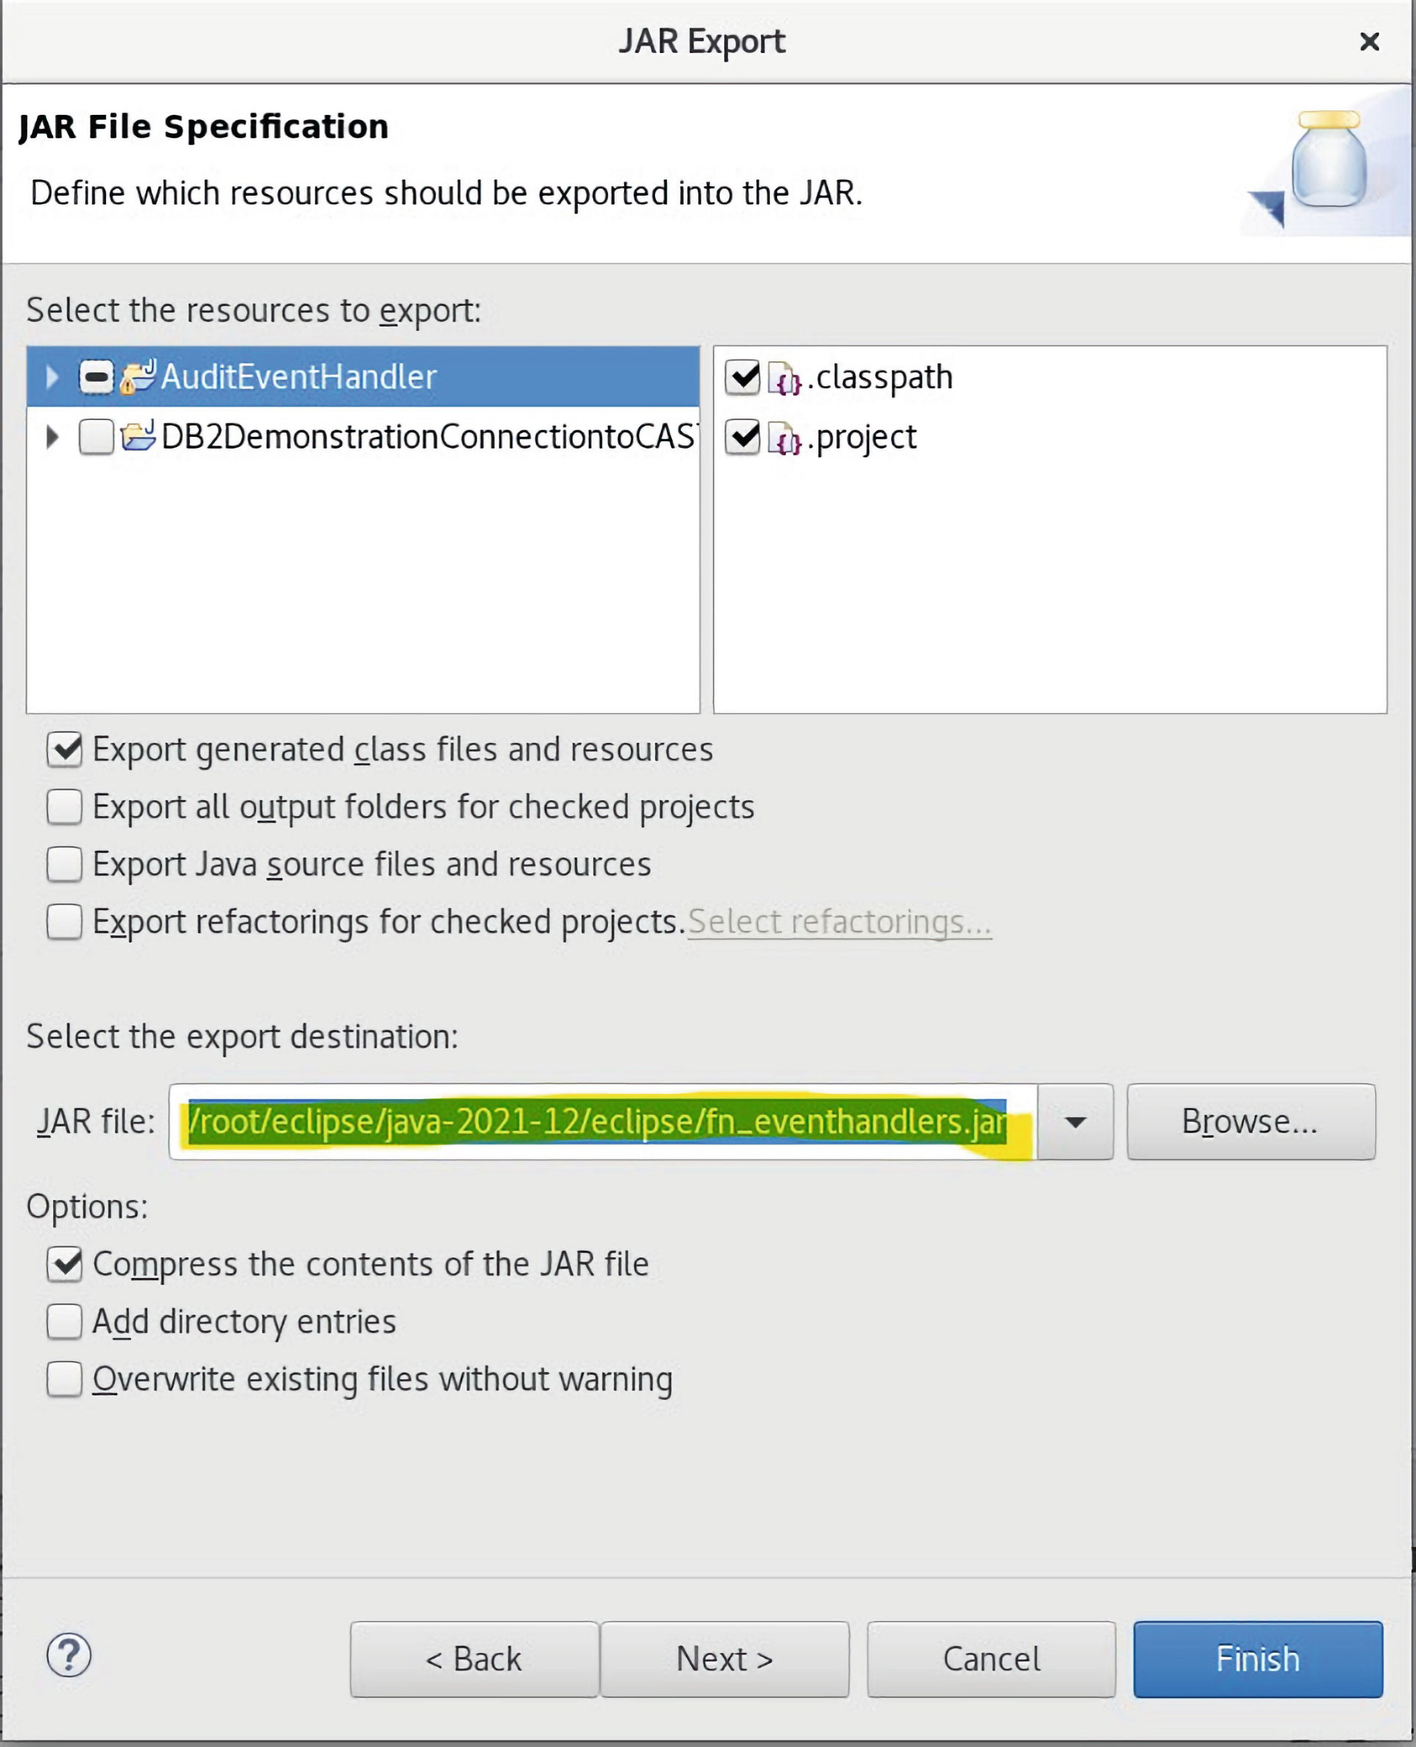
A screenshot represents the audit event handler project selected with the classpath and project attributes included.
The AuditEventHandler project is selected with the classpath and project attributes included

A screenshot depicts the home, documents, downloads, music, pictures, videos, eclipse, and other locations on the left, as well as configuration, drop ins, plugins, and readme.
The Browse button allows the Folder Path and the export JAR file name to be entered
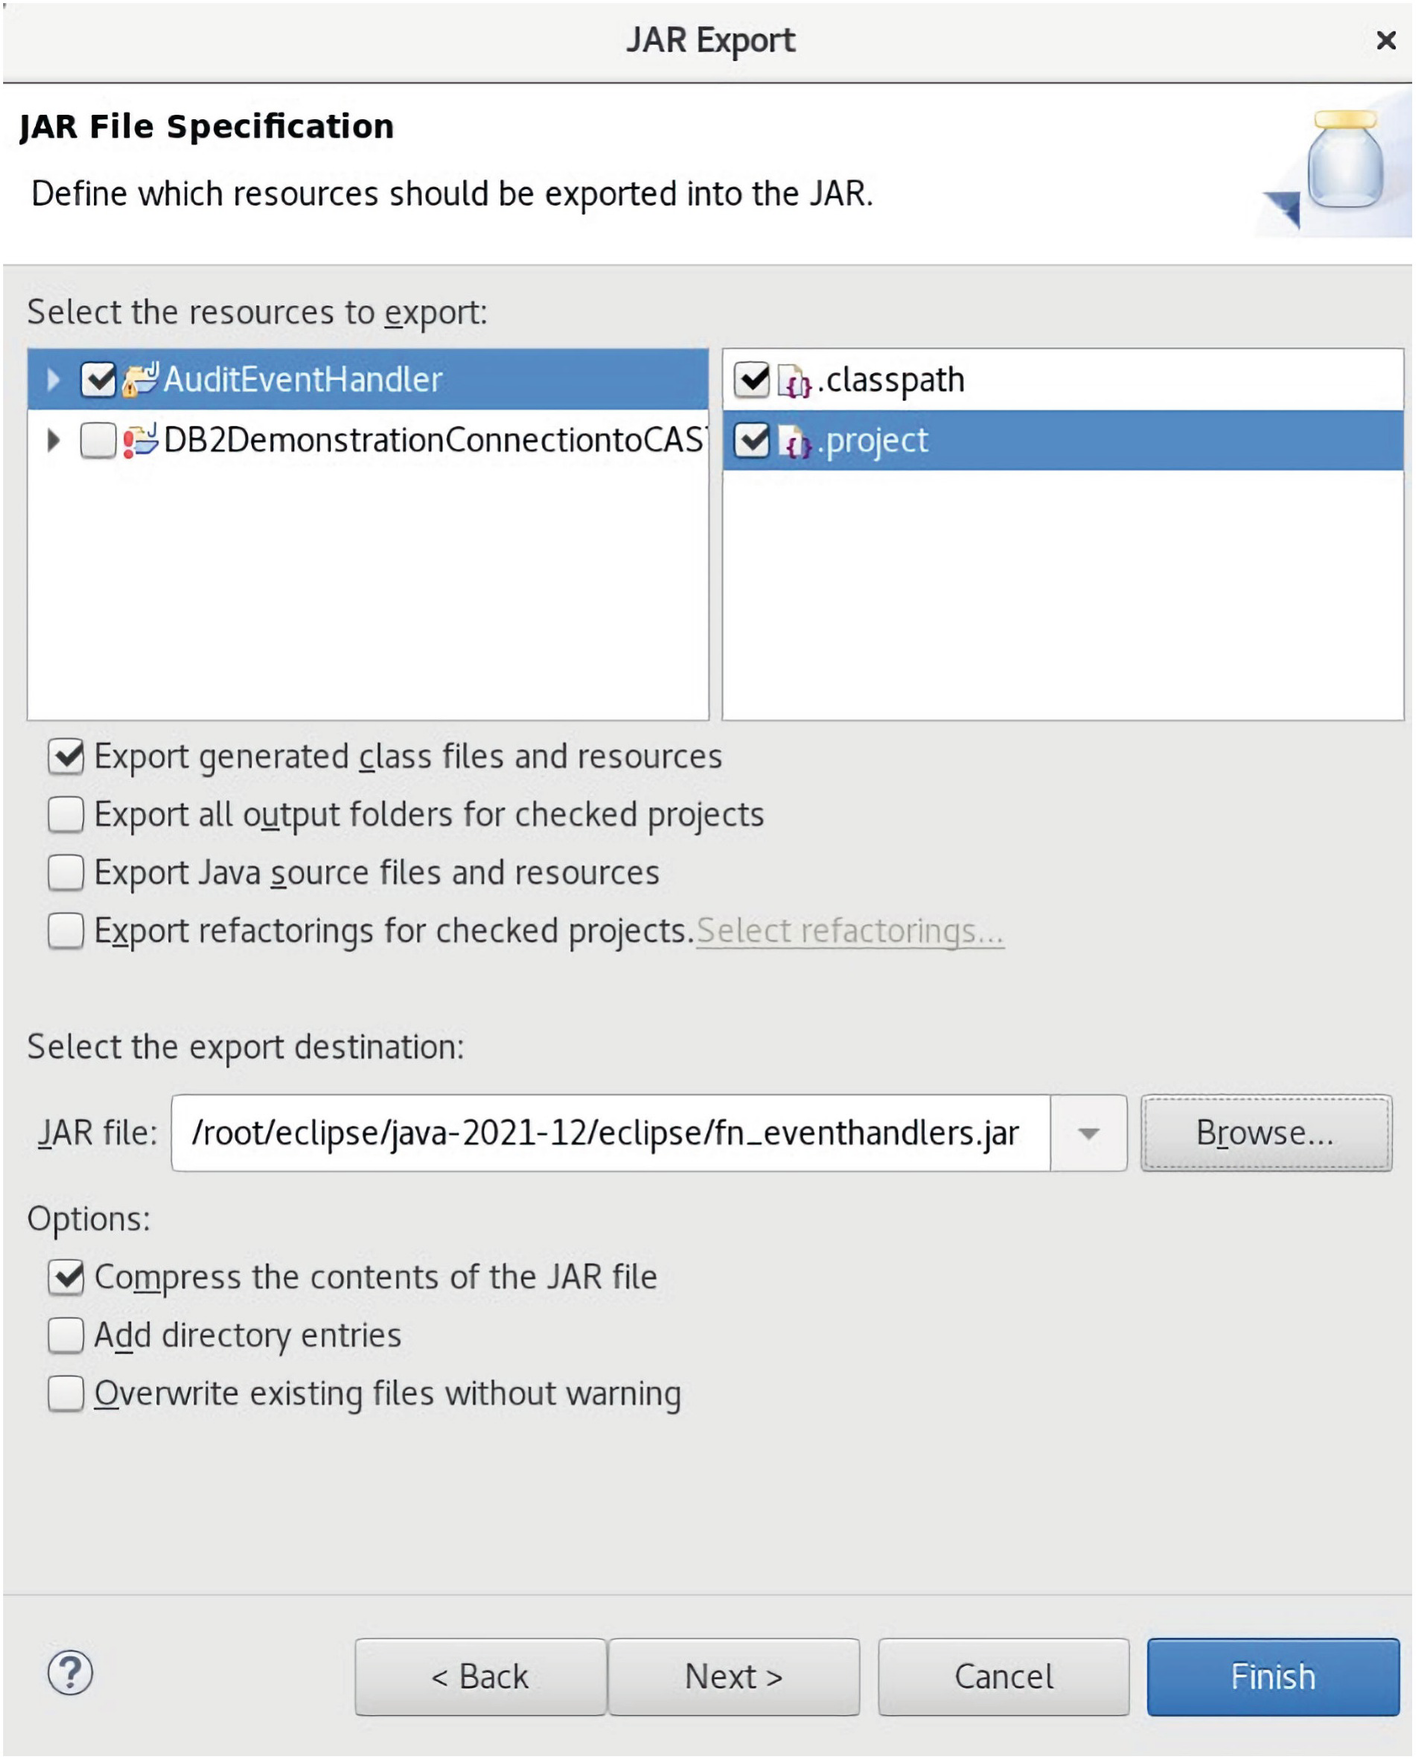
A screenshot represents the finish command that is clicked to create the jar file.
The Finish command button is clicked to create the fn_eventhandlers.jar file
Part 3 – Testing the Add Document to Folder Event

A screenshot represents the I B M administrative console login for content, user name and password, and login command.
Log in to the IBM FileNet acce administration web application tool

A screenshot represents the audit report document from data design in the object store.
The Audit Report document class Properties tab is highlighted in acce
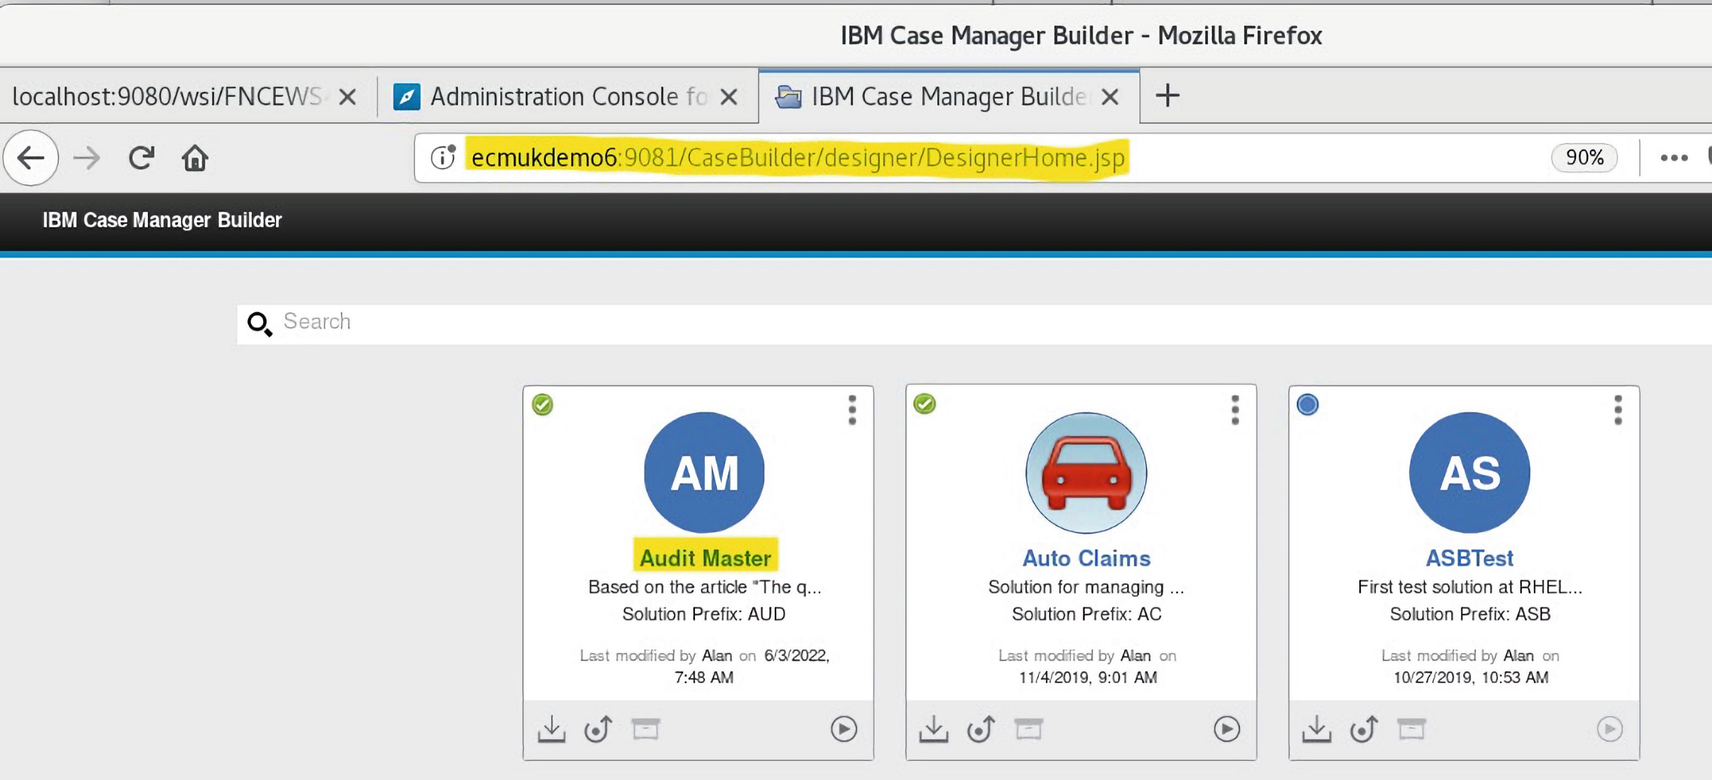
A screenshot represents the I B M case manager builder with audit master, auto claims, and A S B test.
The Audit Master solution created in Chapter 1 is edited again

A screenshot represents the audit master, with add property in the new drop down menu, selected.
The Add Property ➤ New menu item is selected on the Solution Properties tab

A screenshot illustrates the option to add a New property and enter the property details on the screen with the newly created Symbolic name.
The property with the SymbolicName AUD_folder_Id_to_file_in is created
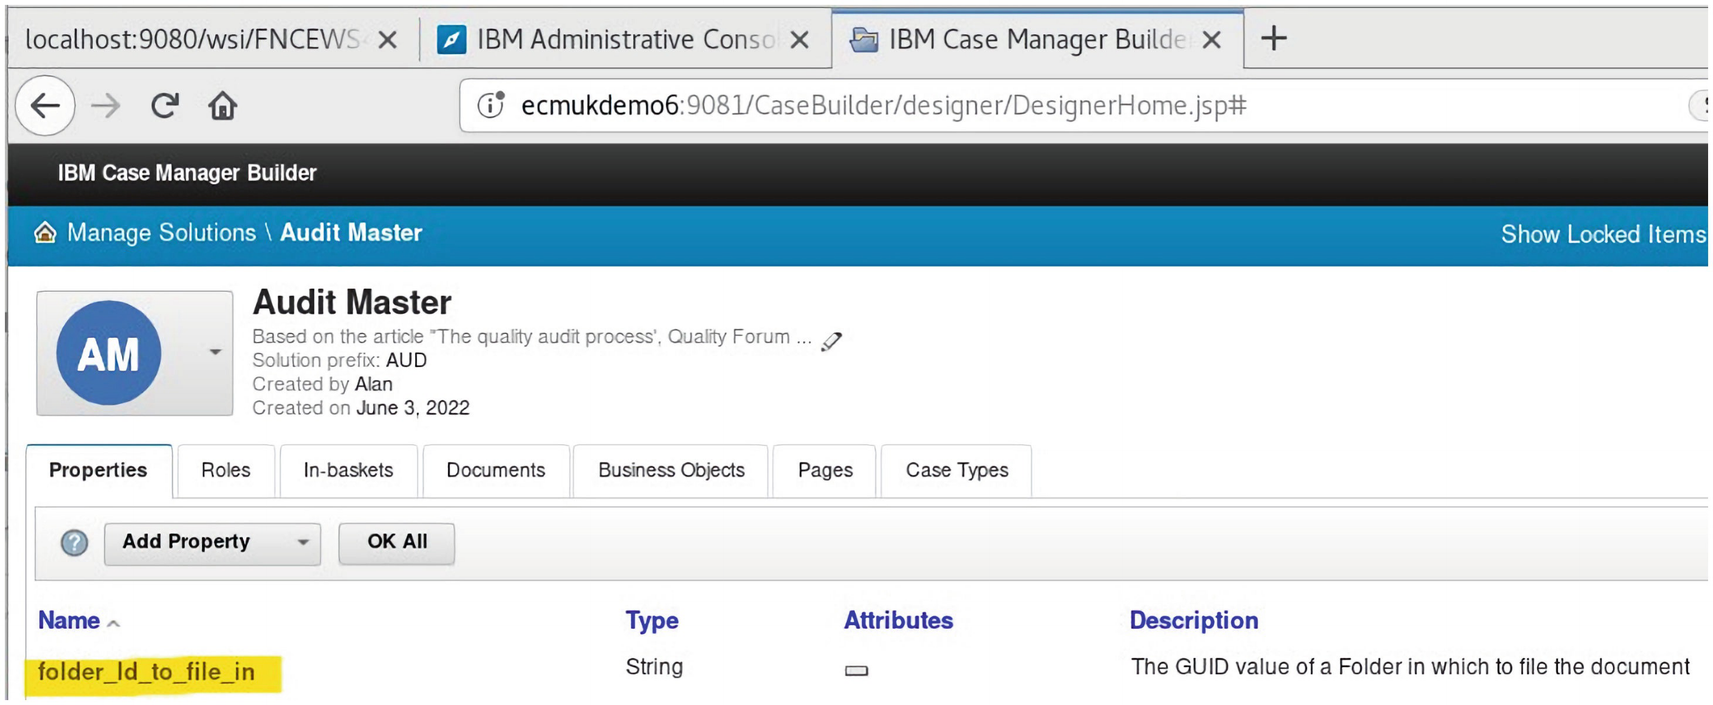
A screenshot represents the property with name, type, attributes, and description in the audit master solution.
The property can be seen displayed in the Audit Master solution

A screenshot represents the property tab of the audit report document class selected in the audit master.
The Properties tab of the Audit Report Document class is selected

A screenshot illustrates the add property drop down, and the existing folder is opened, to display properties created.
The Add Property drop-down is used to select the Existing folder_id_to_file_in property we created

A screenshot represents the name, type, attributes, and description in columns for the audit report document.
The Audit Report Document class can be seen to have the new folder_id_to_file_in property

A screenshot represents the redeploy all menu option used in the I B M case manager builder to deploy the updated solution.
The Redeploy All menu option is used in the IBM Case Manager Builder to deploy the updated solution

A screenshot represents the deploy command button to start the audit master solution redeployment in the confirmation.
The Deploy command button is clicked to start the Audit Master Solution redeployment
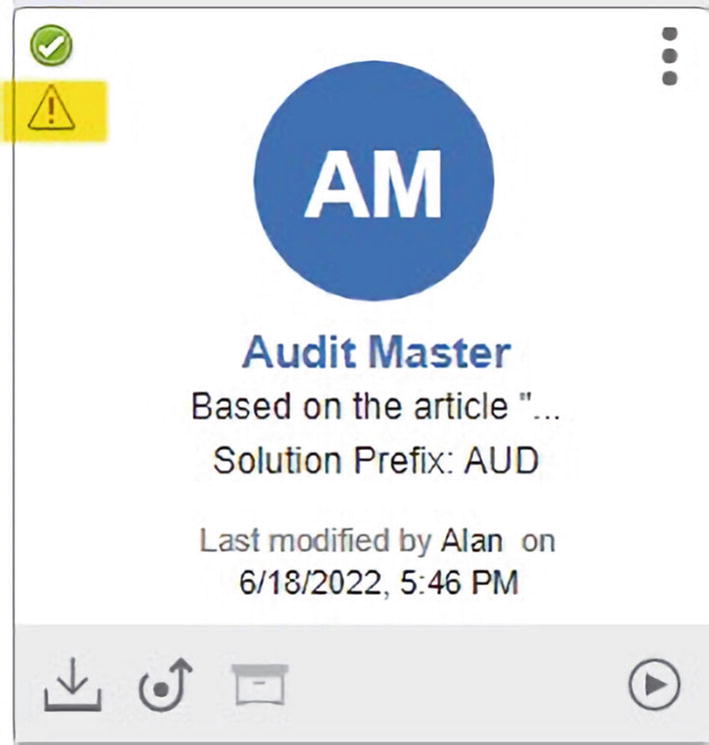
If there are changes edited into the Audit Master solution, and these are not deployed, a yellow warning triangle appears below the green tick mark icon.
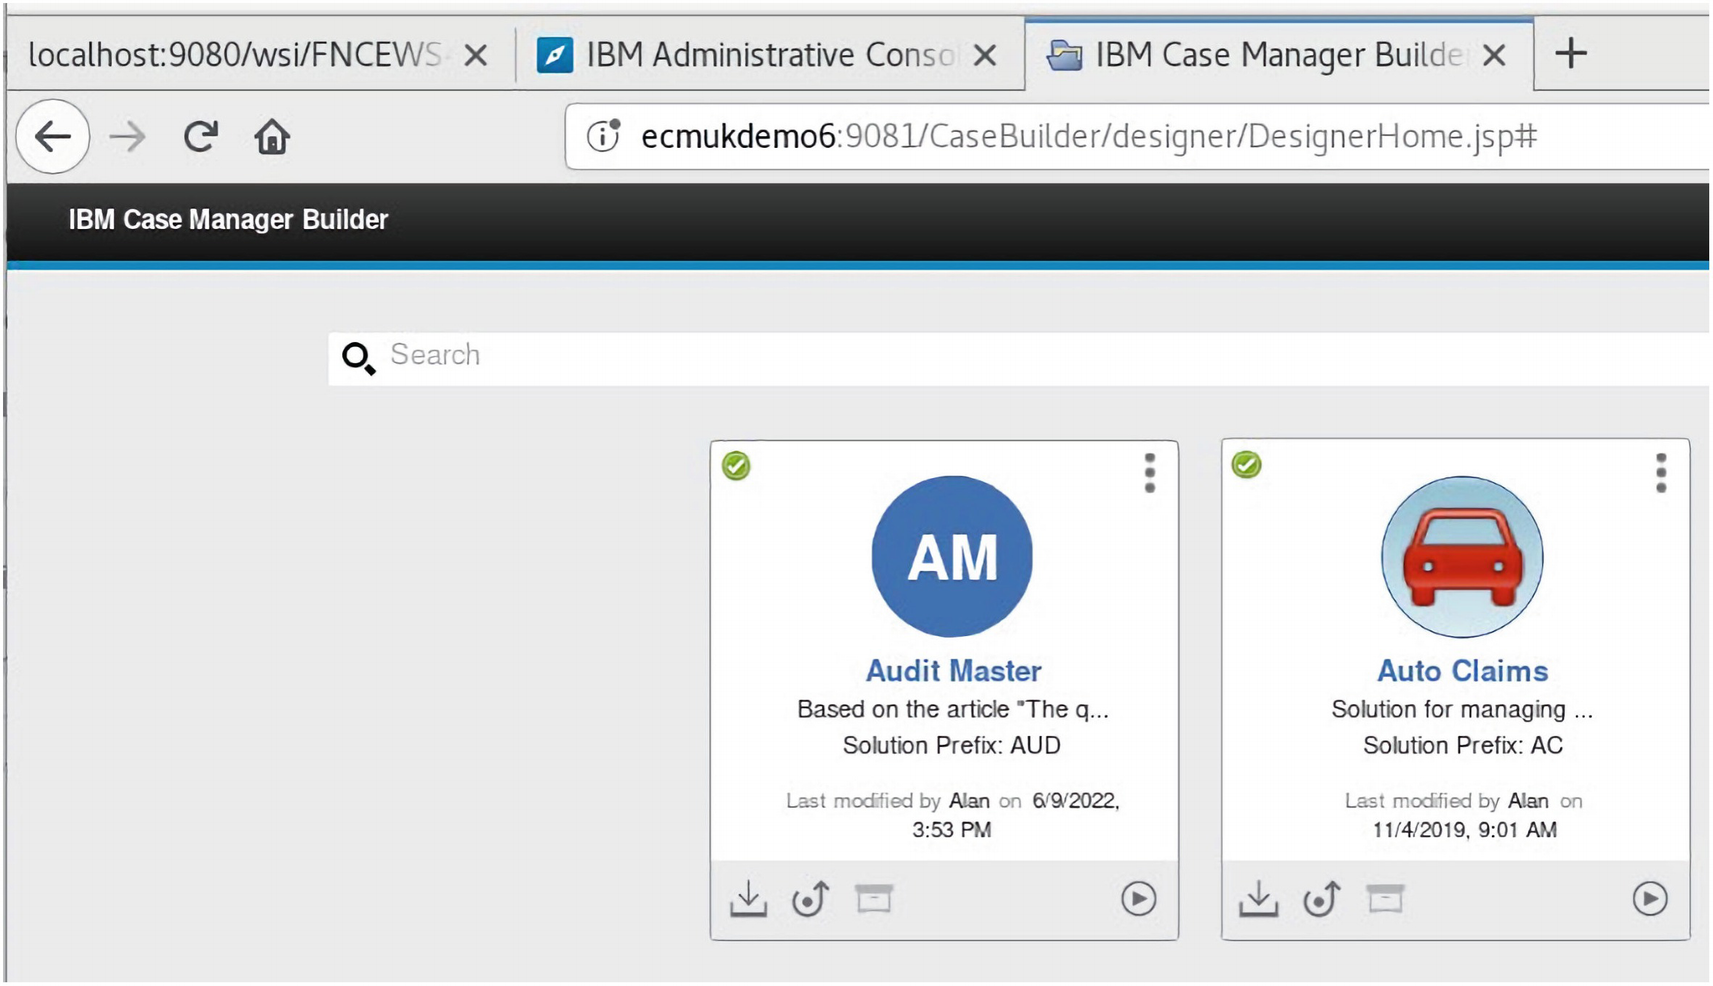
A screenshot represents the audit master and auto claims. The audit master solution is successfully redeployed to the O S 2 target objected store.
The Audit Master solution is successfully redeployed to the OS2 Target Object store
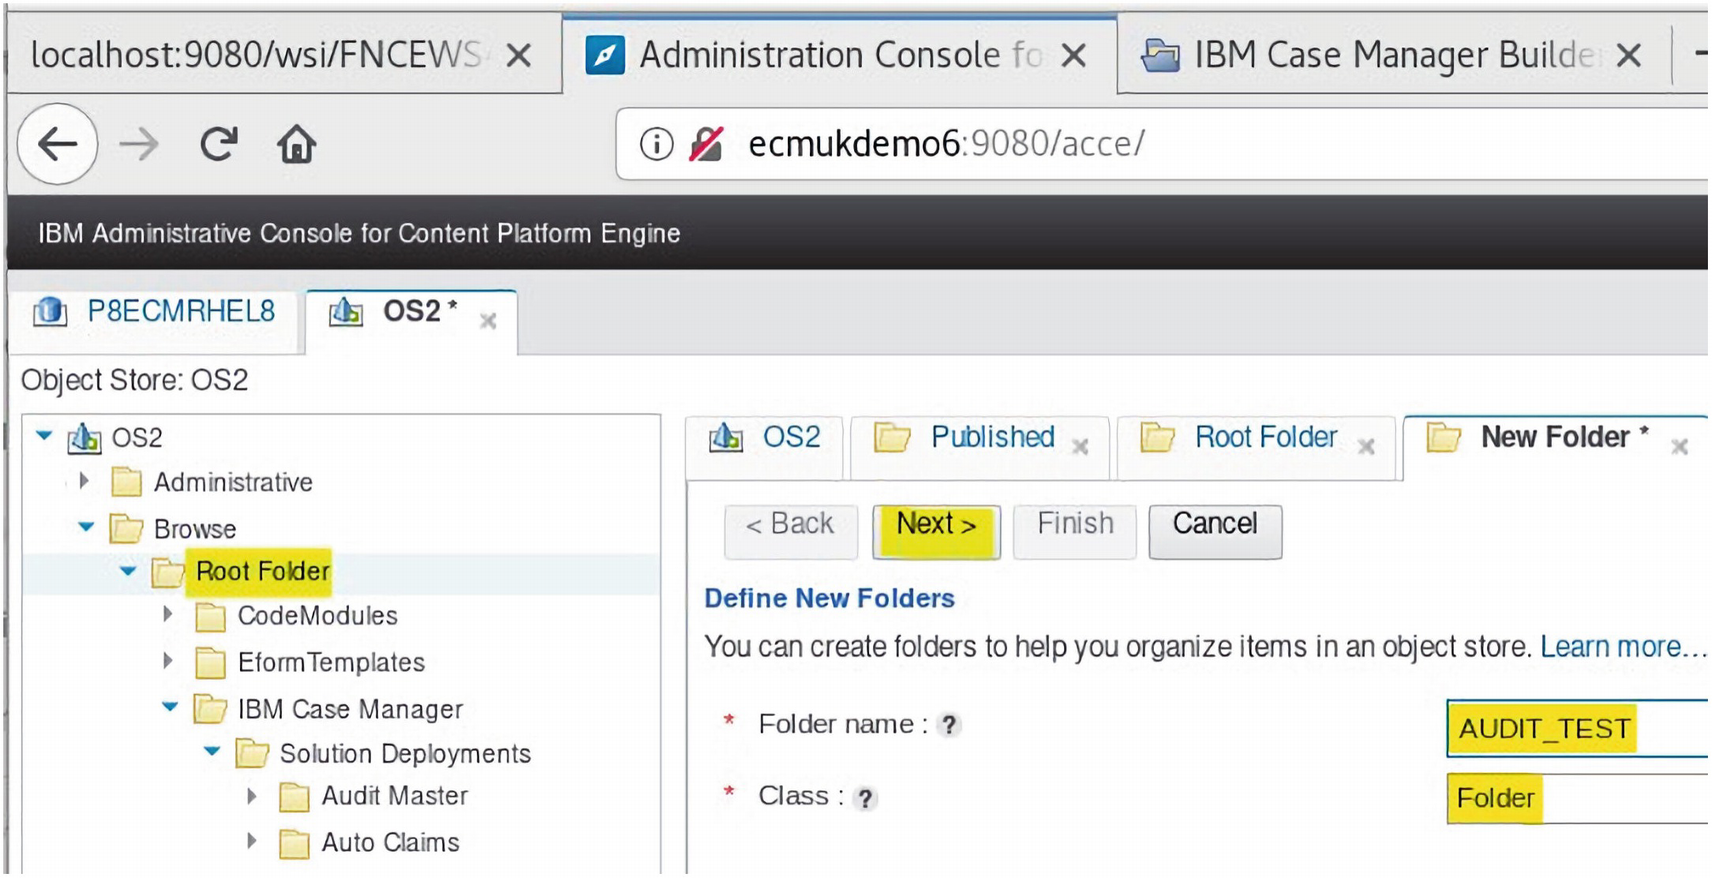
A screenshot represents the audit test folder created in the O S 2 target object store under the root folder.
The AUDIT_TEST folder is created in the OS2 Target object store under the Root Folder

A screenshot represents the next command used to leave the default retention options.
The Next> command is used to leave the default Retention options

A screenshot represents the finish command in the new folder with a summary, and two columns for name and value to create an audit test.
The Finish command is used to create the AUDIT_TEST folder

A screenshot represents the status of the new folder of the audit test in the java customization testing document in the object store.
The status of the New Folder creation of AUDIT_TEST is shown

A screenshot represents the I D property of the audit test folder which is displayed.
The ID property of the AUDIT_TEST folder is displayed
A screenshot represents the cases and work tab. The add the case, search folder, and the new case is created using the add case dropdown.
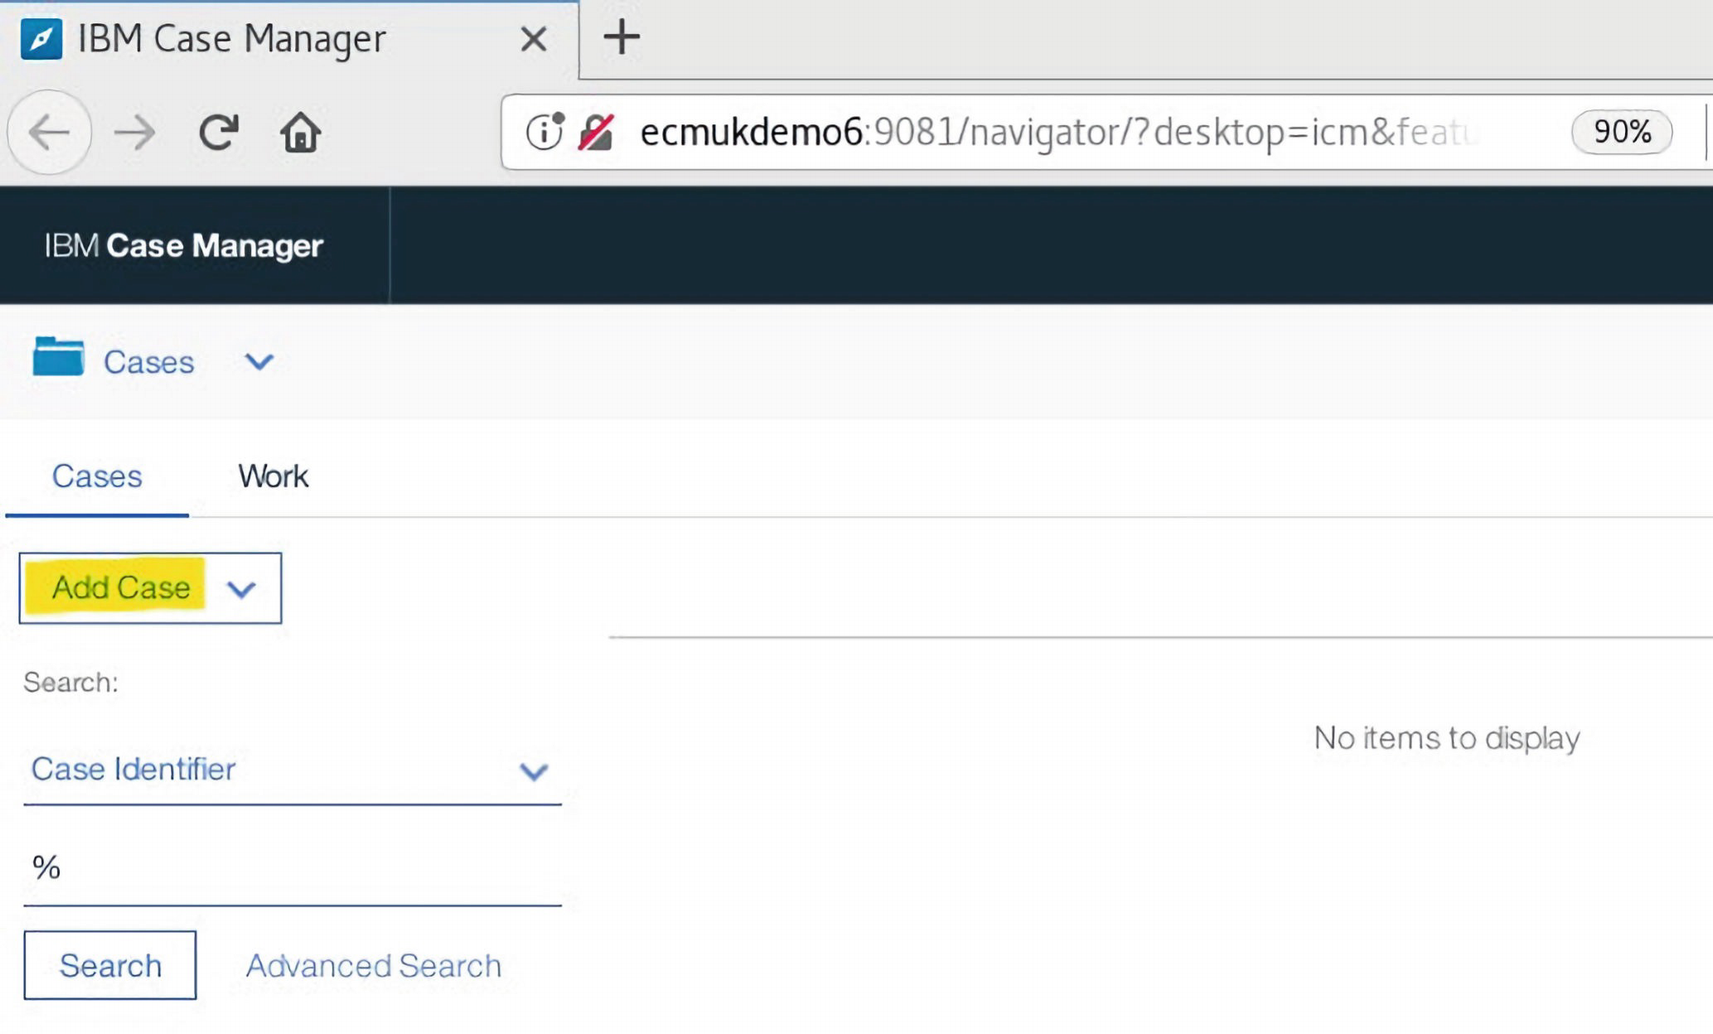
A new Case is created using the Add Case drop-down

A screenshot represents the case description.
The Case description is added
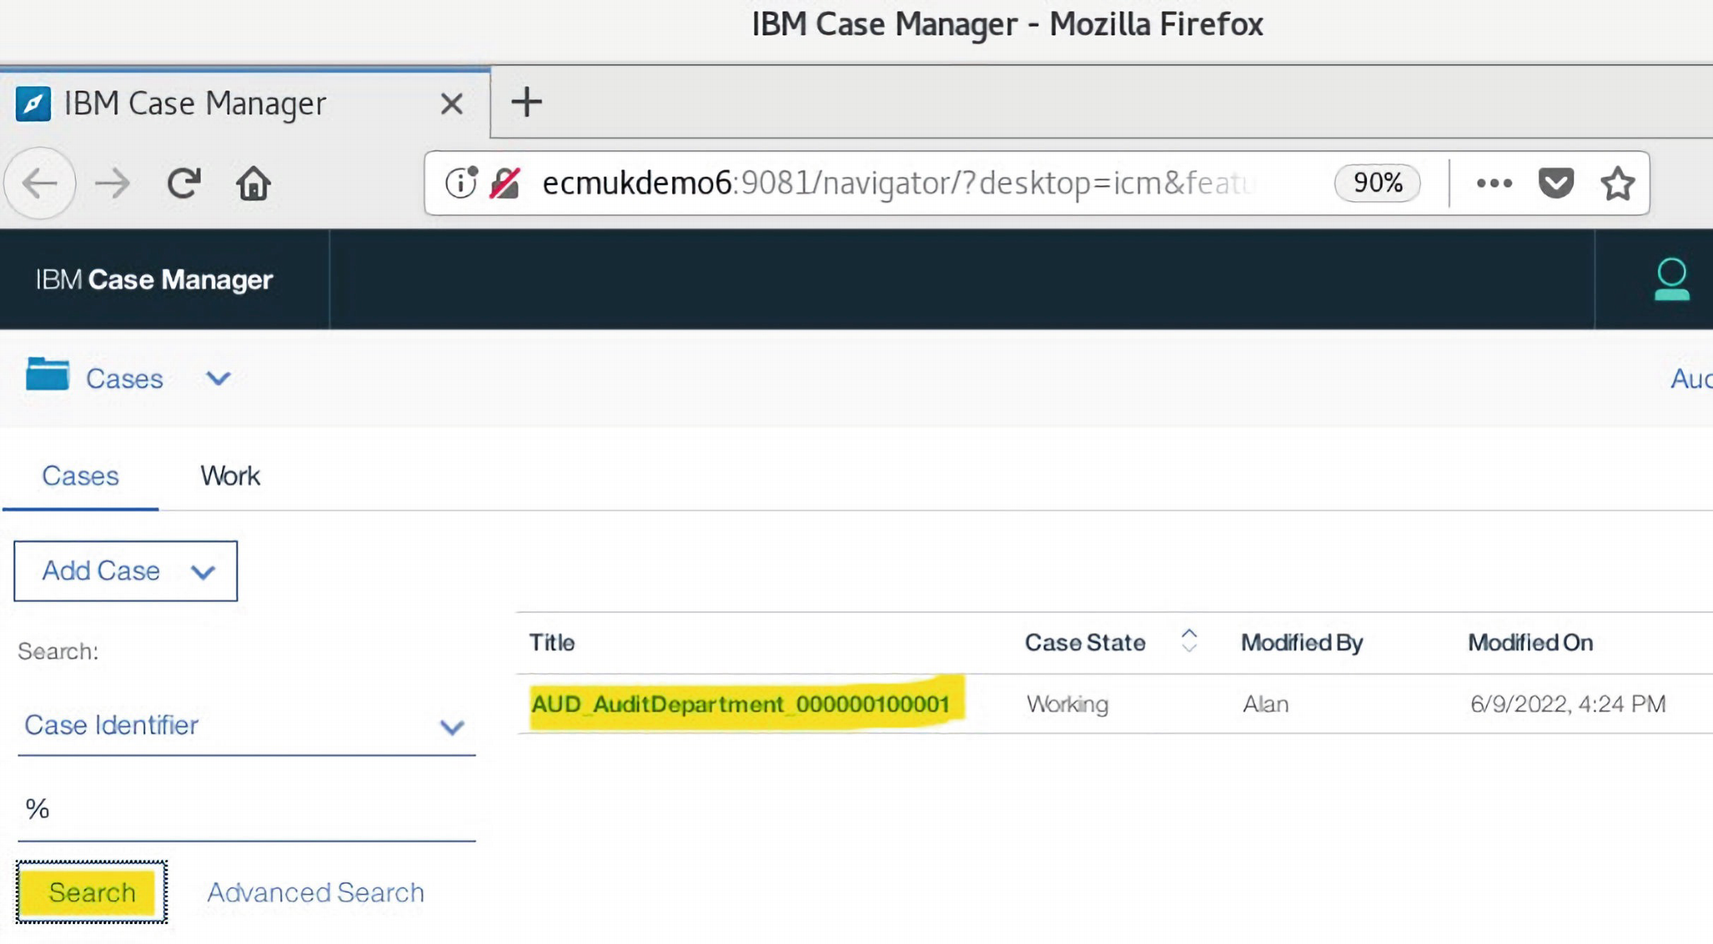
A screenshot represents the search button in cases of the I B M case manager.
A Search shows that this case is the first Case entered in the system

A screenshot represents the A U D audit department name, number, completion date, and audit object details entered for the case.
The Audit Department Audit details are entered for the Case

A screenshot represents documents, tasks, and history tab. The add a document from the local system option is selected for the case audit report document.
The Add Document from Local System option is selected for the Case Audit Report document

A screenshot represents the audit report class of the document selected and the ok and cancels buttons.
The highlighted Audit Report class of Document is selected from the drop-down choice
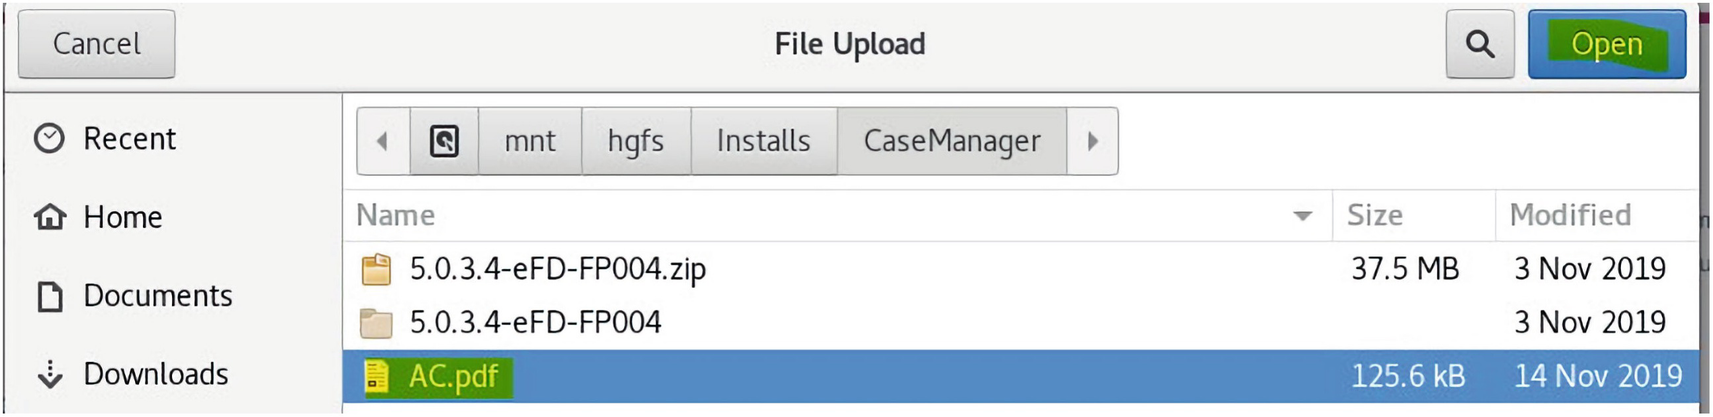
A screenshot represents the p d f document for the document content using the browse command.
A pdf document called AC.pdf is selected for the Document content using the Browse command

A screenshot represents the properties of the audit report class, document title, number, name, and manager, of the I B M case manager.
The Audit Report Document class properties are entered and committed using the Add command
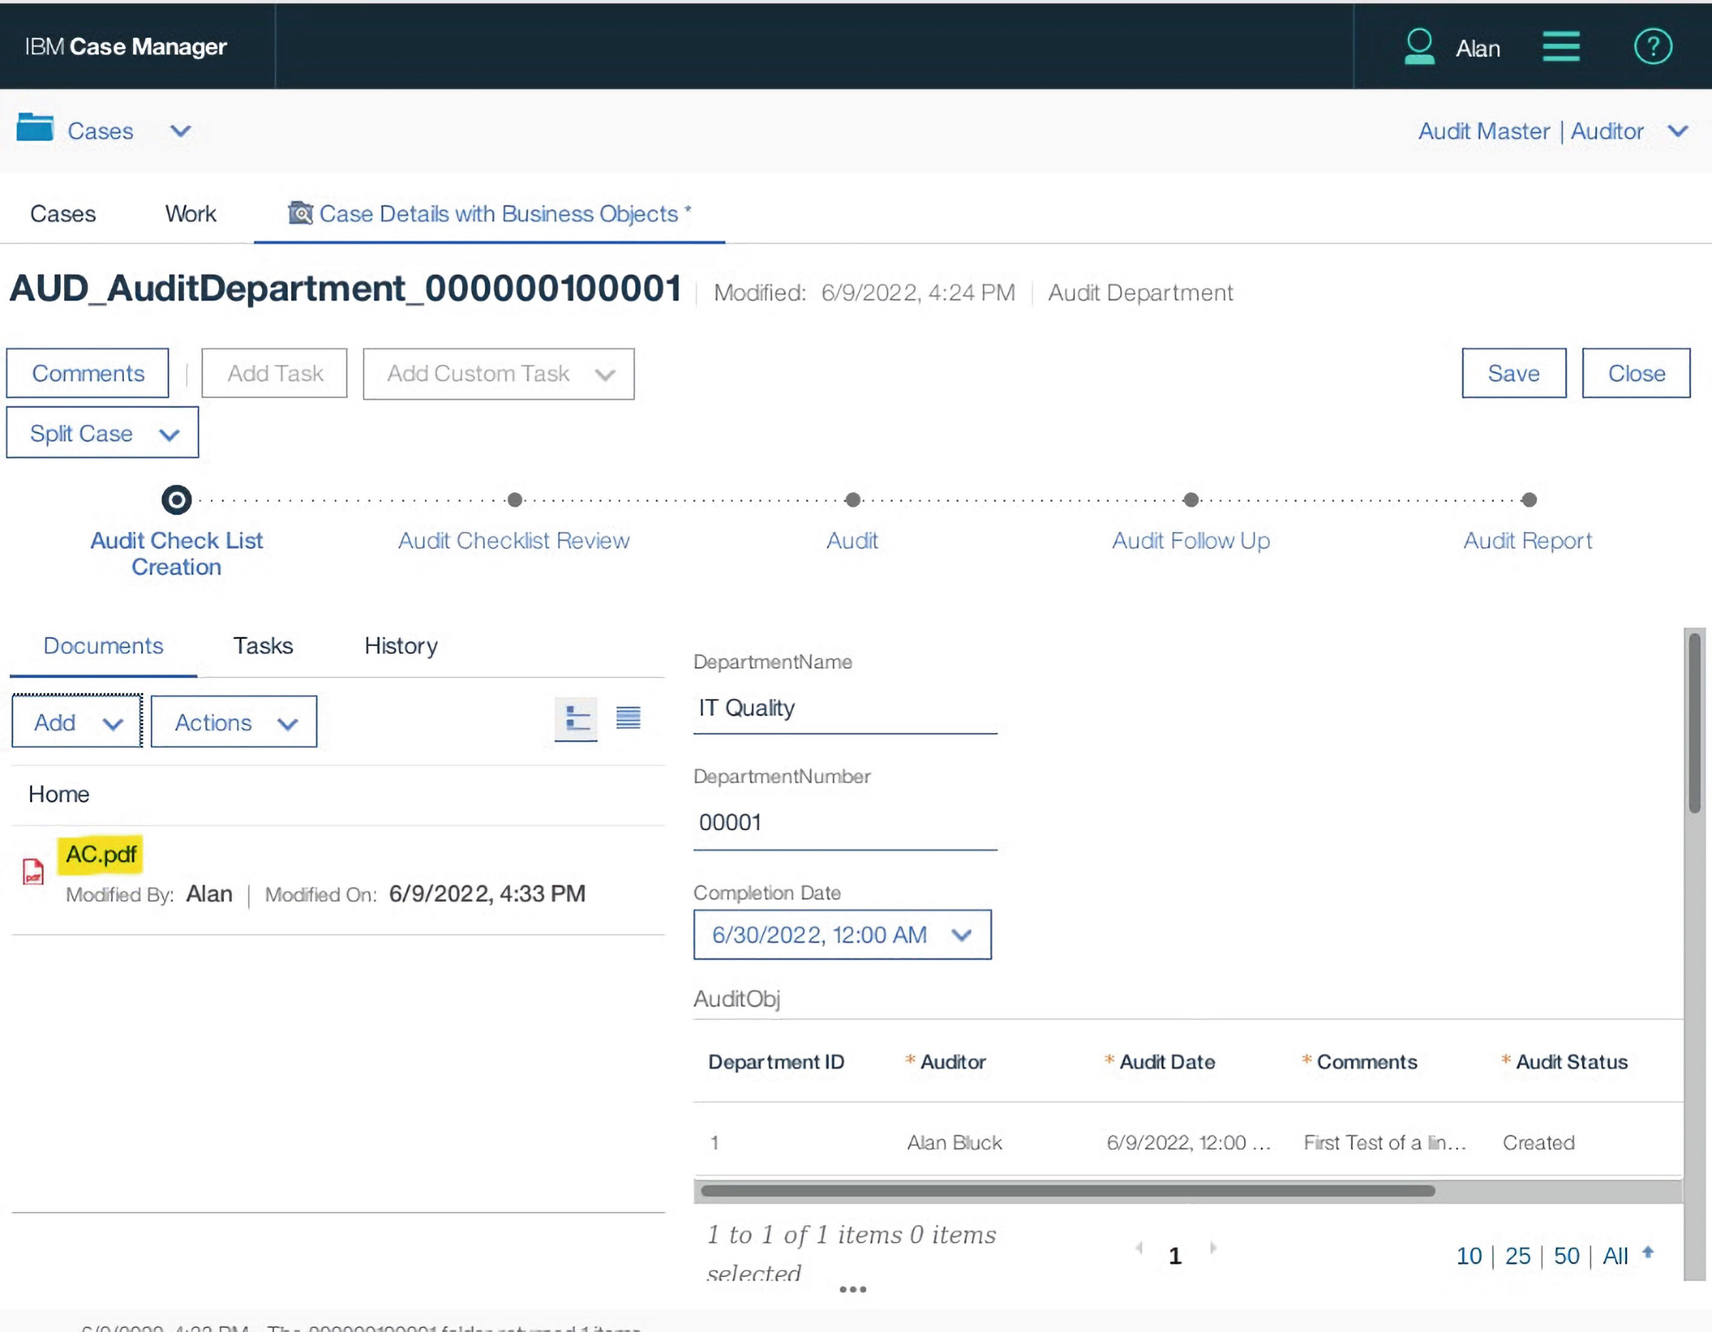
A screenshot represents the A C p d f document. The filename is highlighted and added to the case.
The AC.pdf document (highlighted) is added to the Case
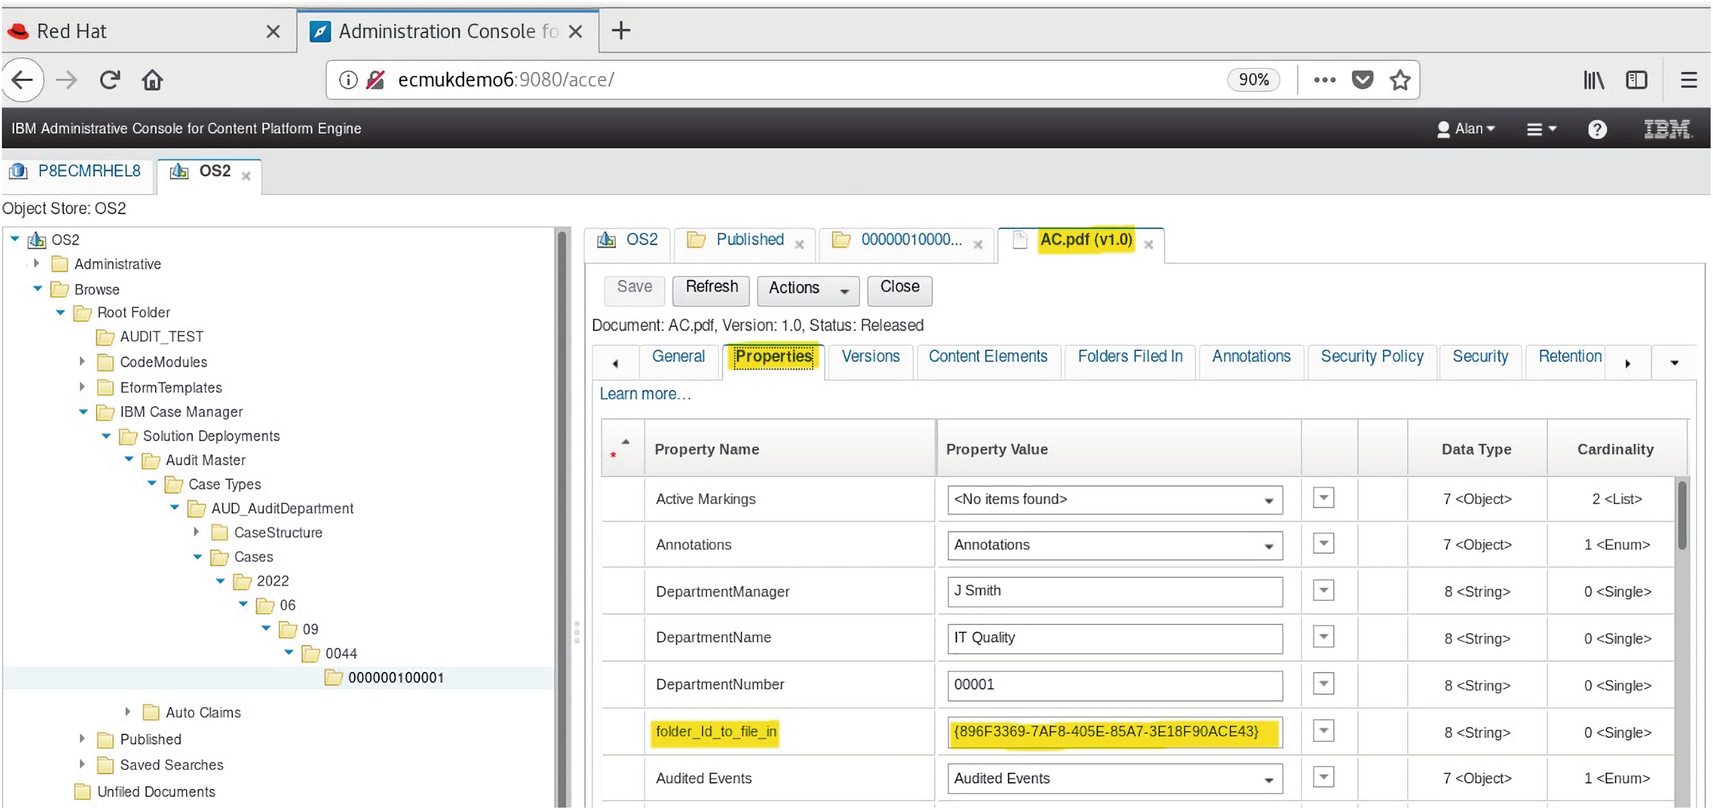
A screenshot represents the folder I D in the A C p d f properties.
The Folder Id {896F3369-7AF8-405E-85A7-3E18F90ACE43} is in the AC.pdf Properties

A screenshot represents the detail of the A C p d f document. The Property name and value are highlighted.
Detail of the AC.pdf Document Property ID is shown highlighted
The test_AddDocToFolder Java Class code

A screenshot represents the display value option with indexation I D, and the current version is true or false.
The Display Value option allows a unique Id to be copied and so can then be pasted

A screenshot represents the display value with options undo, cut, copy, paste, delete, and so on. The close button is at the bottom.
A unique Id can be selected for copy in acce by using the drop-down menu Copy item (highlighted)

A screenshot represents the test harness java code which includes the exception handling instructions block.
The TestHarness.java program
For the code block, see Listing 2-3 listed in the section “Configuring Java Components for Content Engine Events.”
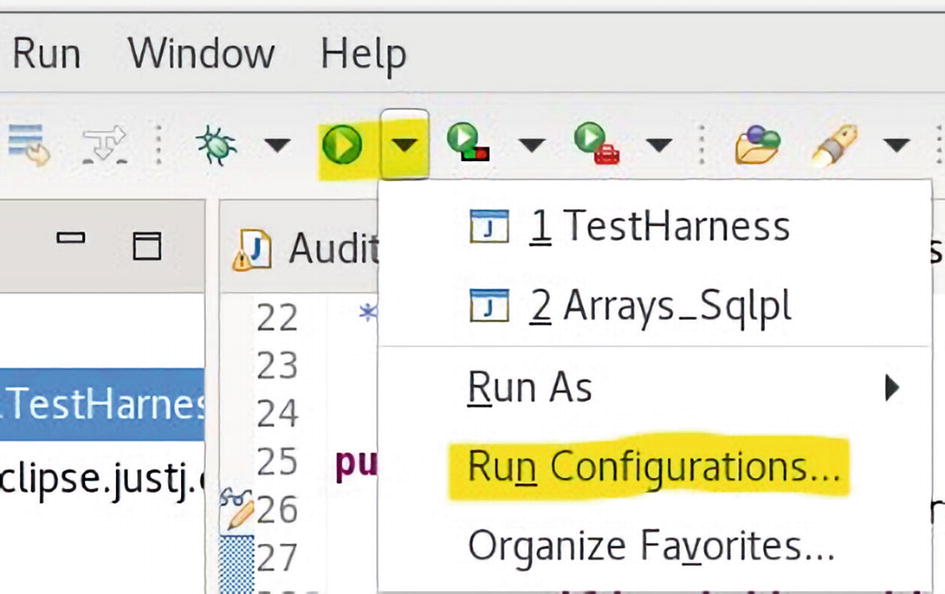
A screenshot represents the test harness run configuration menu item selected to set the required classpath.
The TestHarness Run Configurations… menu item is selected to set the required Classpath
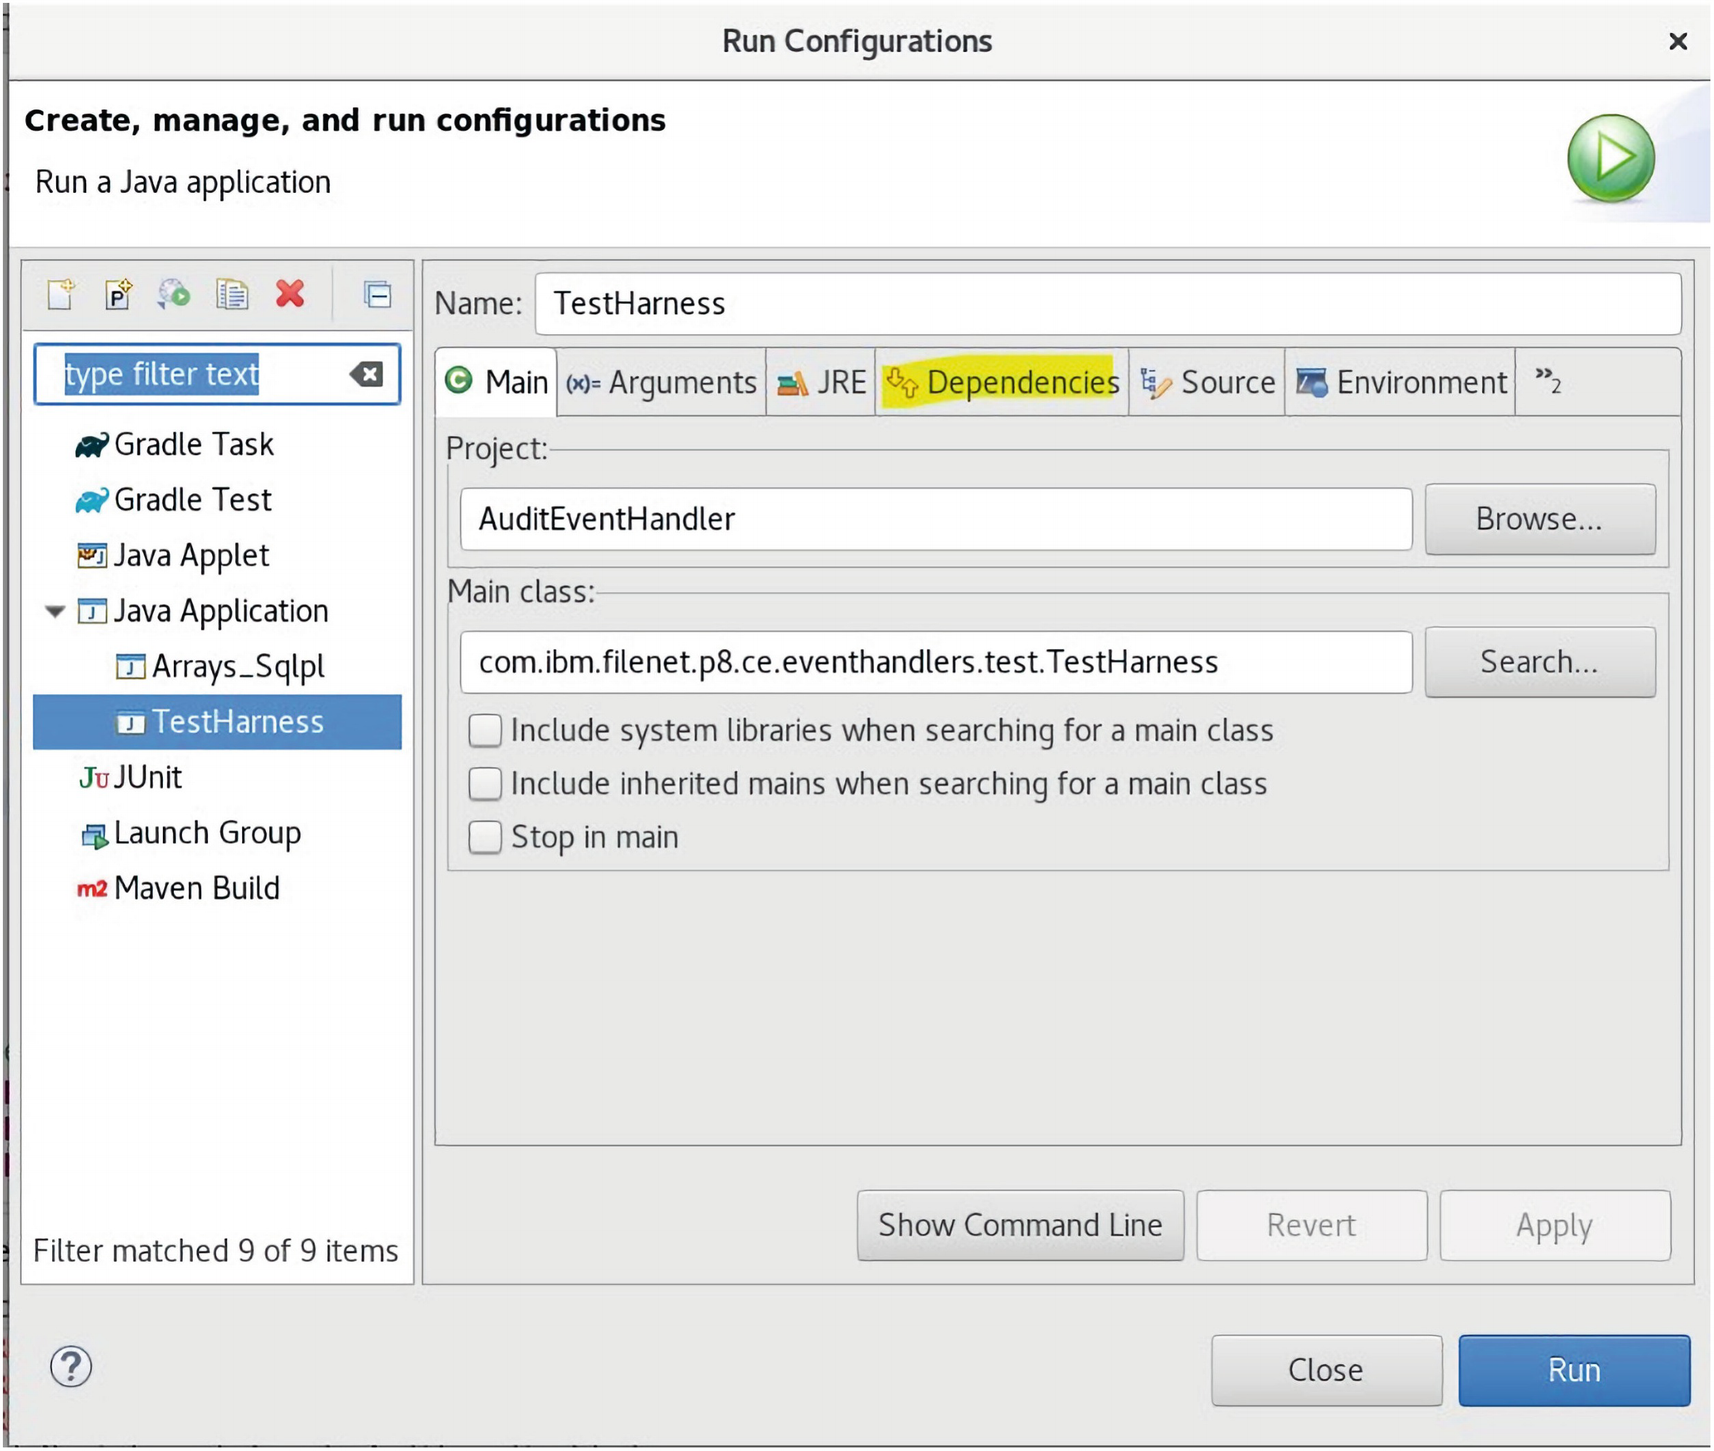
A screenshot represents the dependence tab selected.
The Dependencies tab is selected

A screenshot represents the list of classpath j a r files. The classpath entries are highlighted.
The list of Classpath .jar files we used is shown highlighted

A screenshot represents the A C p d f file that appears linked to the audit test folder.
The AC.pdf file appears linked to the AUDIT_TEST folder

A screenshot represents the new s r c selection, where other option is used to create a log 4 j dot x m l configuration file and the log 4 j dot d t d file.
The New ➤ Other option is used to create a log4j.xml configuration file and the log4j.dtd file

A screenshot represents the logger warn messages in the java customization testing folder event to define appenders.
The logger WARN messages indicate that we need to add a log4j.xml file to define appenders

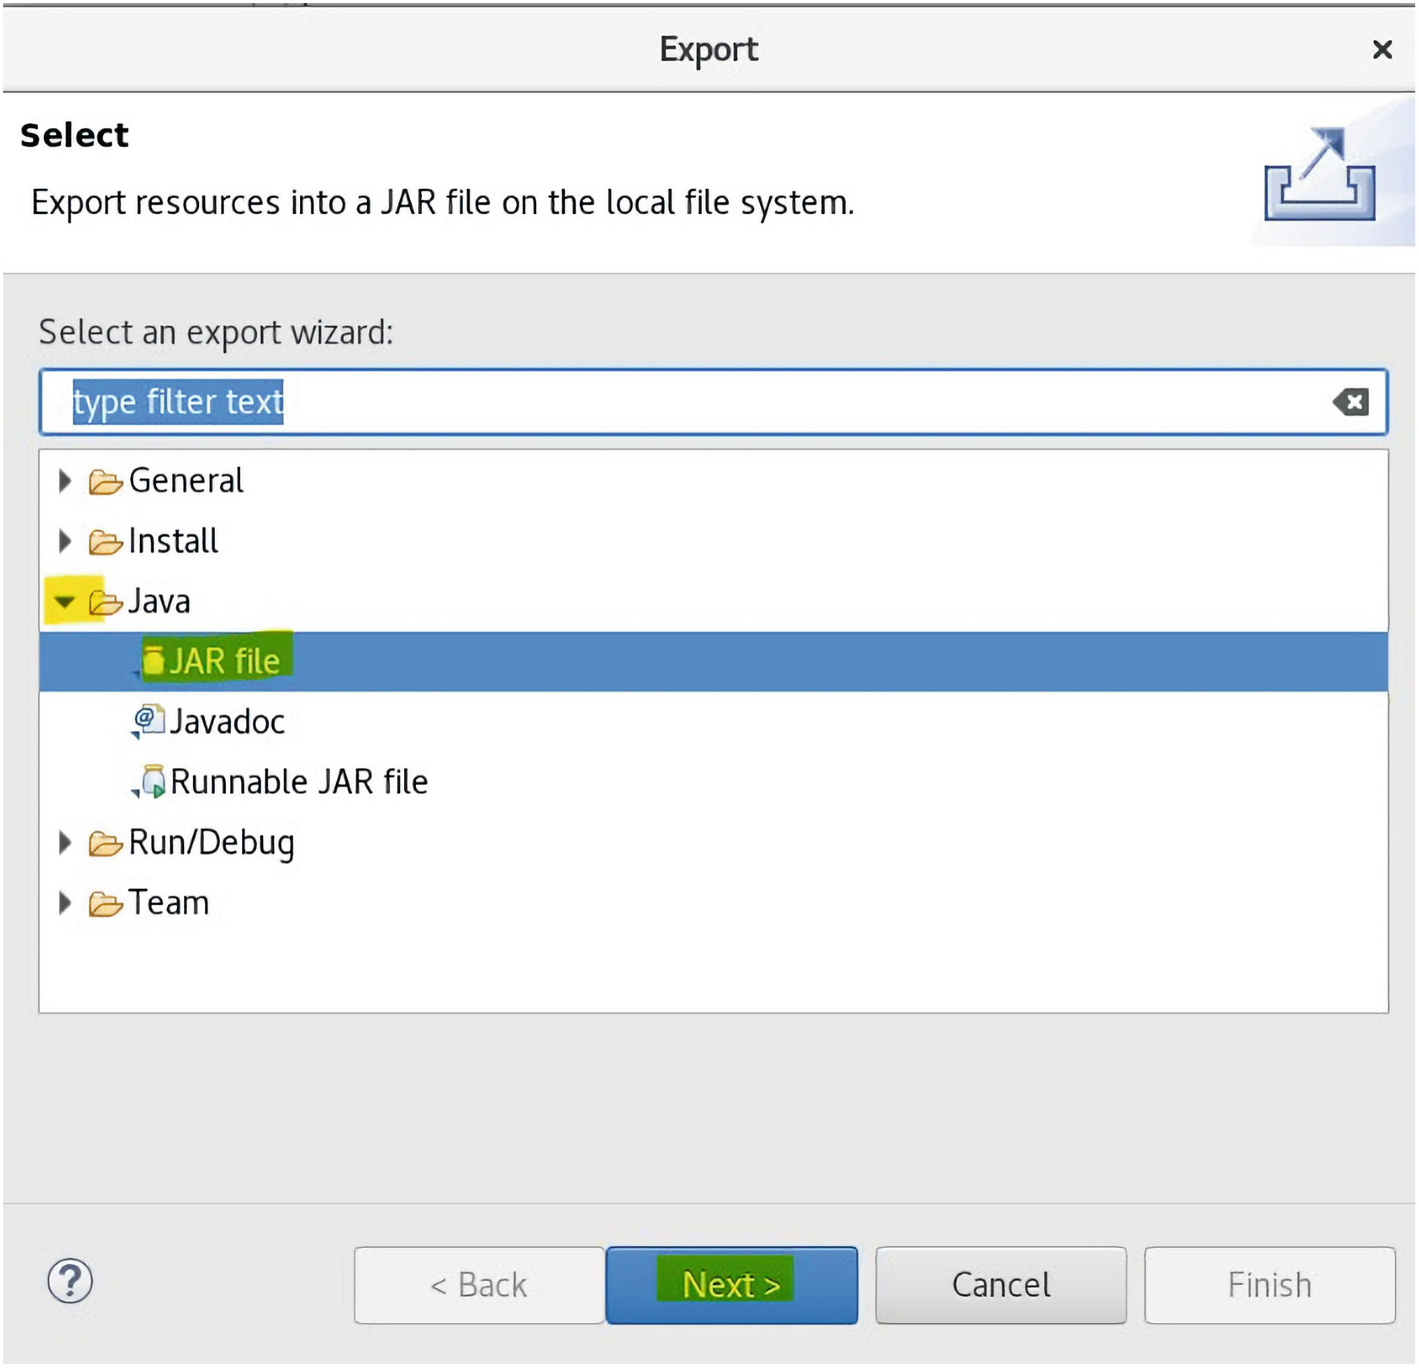
A screenshot represents the general, file option in the java customization testing document from the select a wizard window.
The General ➤ File option is selected for adding the log4j.xml file
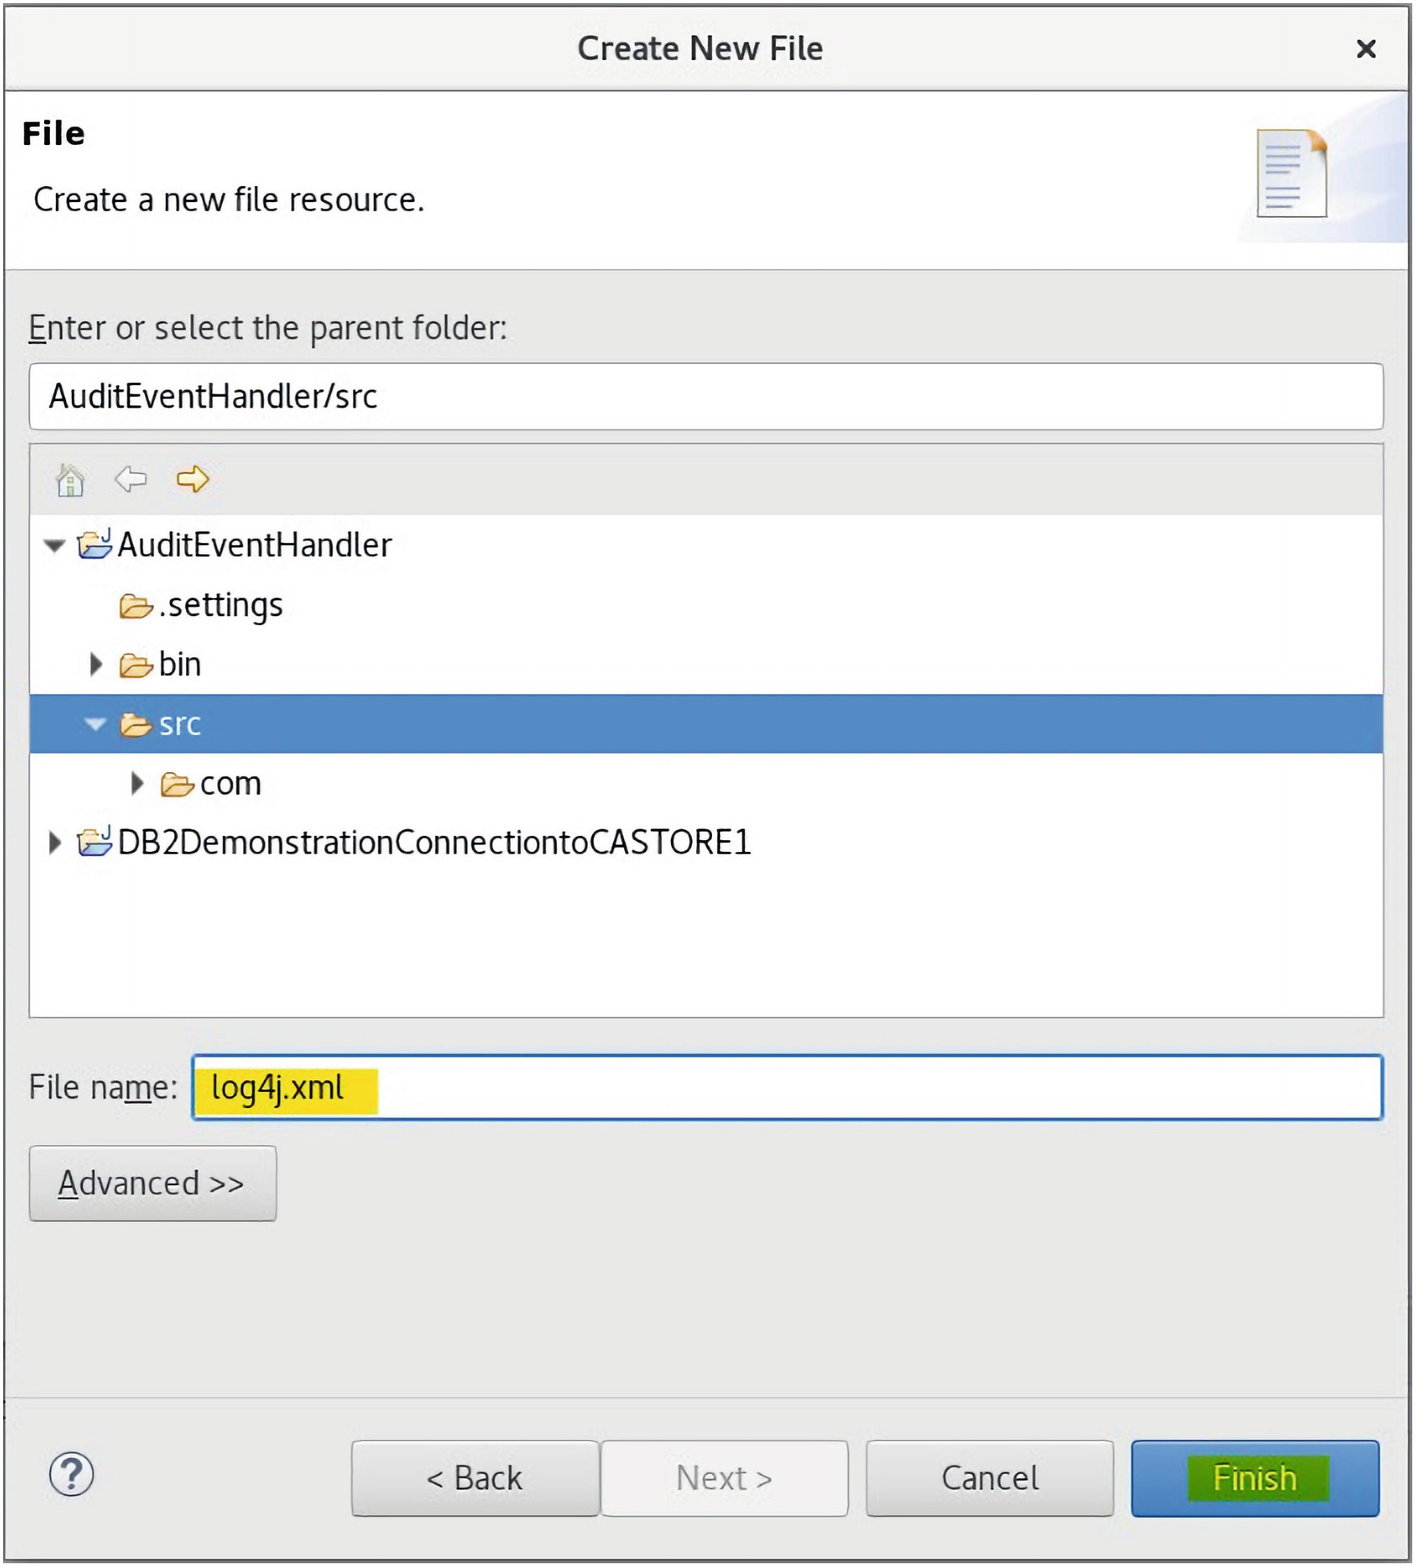
A screenshot represents the create a new file resource with the file name log 4 j dot x m l entered in the folder.
The log4j.xml file name is entered

A screenshot represents the standard x m l file in the java customization testing document with a set of instructions.
The XML for the standard log4j.xml file content is shown
The log4j.xml file content

A screenshot represents the x m l file from the apache download site and the contents are saved using the eclipse file save command.
The log4j.xml file and contents are saved, using the Eclipse file Save command

A screenshot represents the logger appender and the class name is highlighted.
The logger appender is still requested and displays the highlighted class
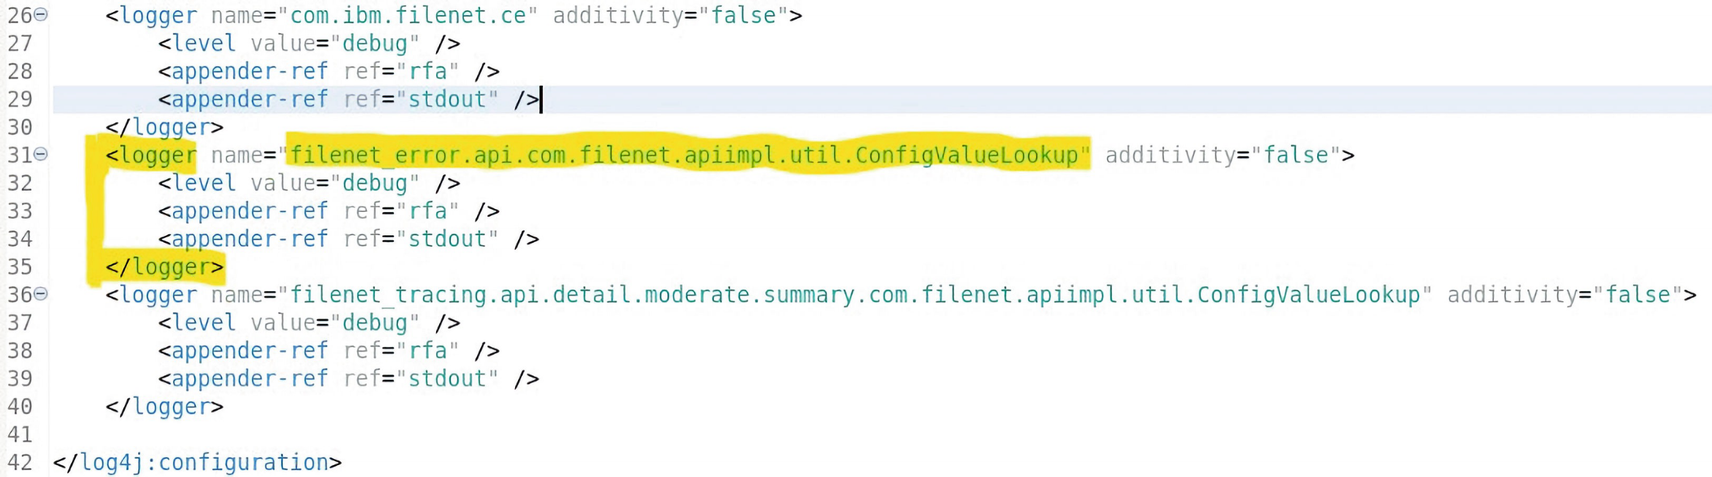
A screenshot represents the set of instructions where appender x m l is highlighted.
The highlighted appender XML is added which corrects the WARN messages

A screenshot represents the file, the export command used to create an updated f n event handlers dot j a r file.
The File ➤ Export command is used to create an updated fn_eventhandlers.jar file
A screenshot represents the J A R file from the export wizard in the java customizations testing document, and the next command i d clicked.
The Java ➤ JAR file export wizard is selected, and the Next> command is clicked
A screenshot represents the full path to the f n event handlers, the j a r file is selected and the finish is clicked.
The full path to the fn_eventhandlers.jar file is selected, and Finish is clicked

A screenshot represents the compiled jar file java customizations testing document, and the file is in the Linux eclipse folder.
The compiled fn_eventhandlers.jar file is shown in the Linux Eclipse folder
We can now retest the Audit Solution cases.

A screenshot represents the test audit events document linked to the audit test folder which has a contents table, with containment name, document name, date created, created, class, major and minor version number.
The Test Audit Events document is linked to the AUDIT_TEST folder by the Event call

A screenshot of I B M case manager opened in Mozilla Firefox. It represents the settings for general and properties. It highlights the button to browse the P D F file, the document title, the folder I D to file in, and the add button at the end.
A second test Audit Report class Case document is added to the Case

A screenshot of I B M case manager opened in a browser. It represents the available files in the case details with business objects tab. It highlights a file named, audit event test version 2.
The highlighted document is shown saved in the case
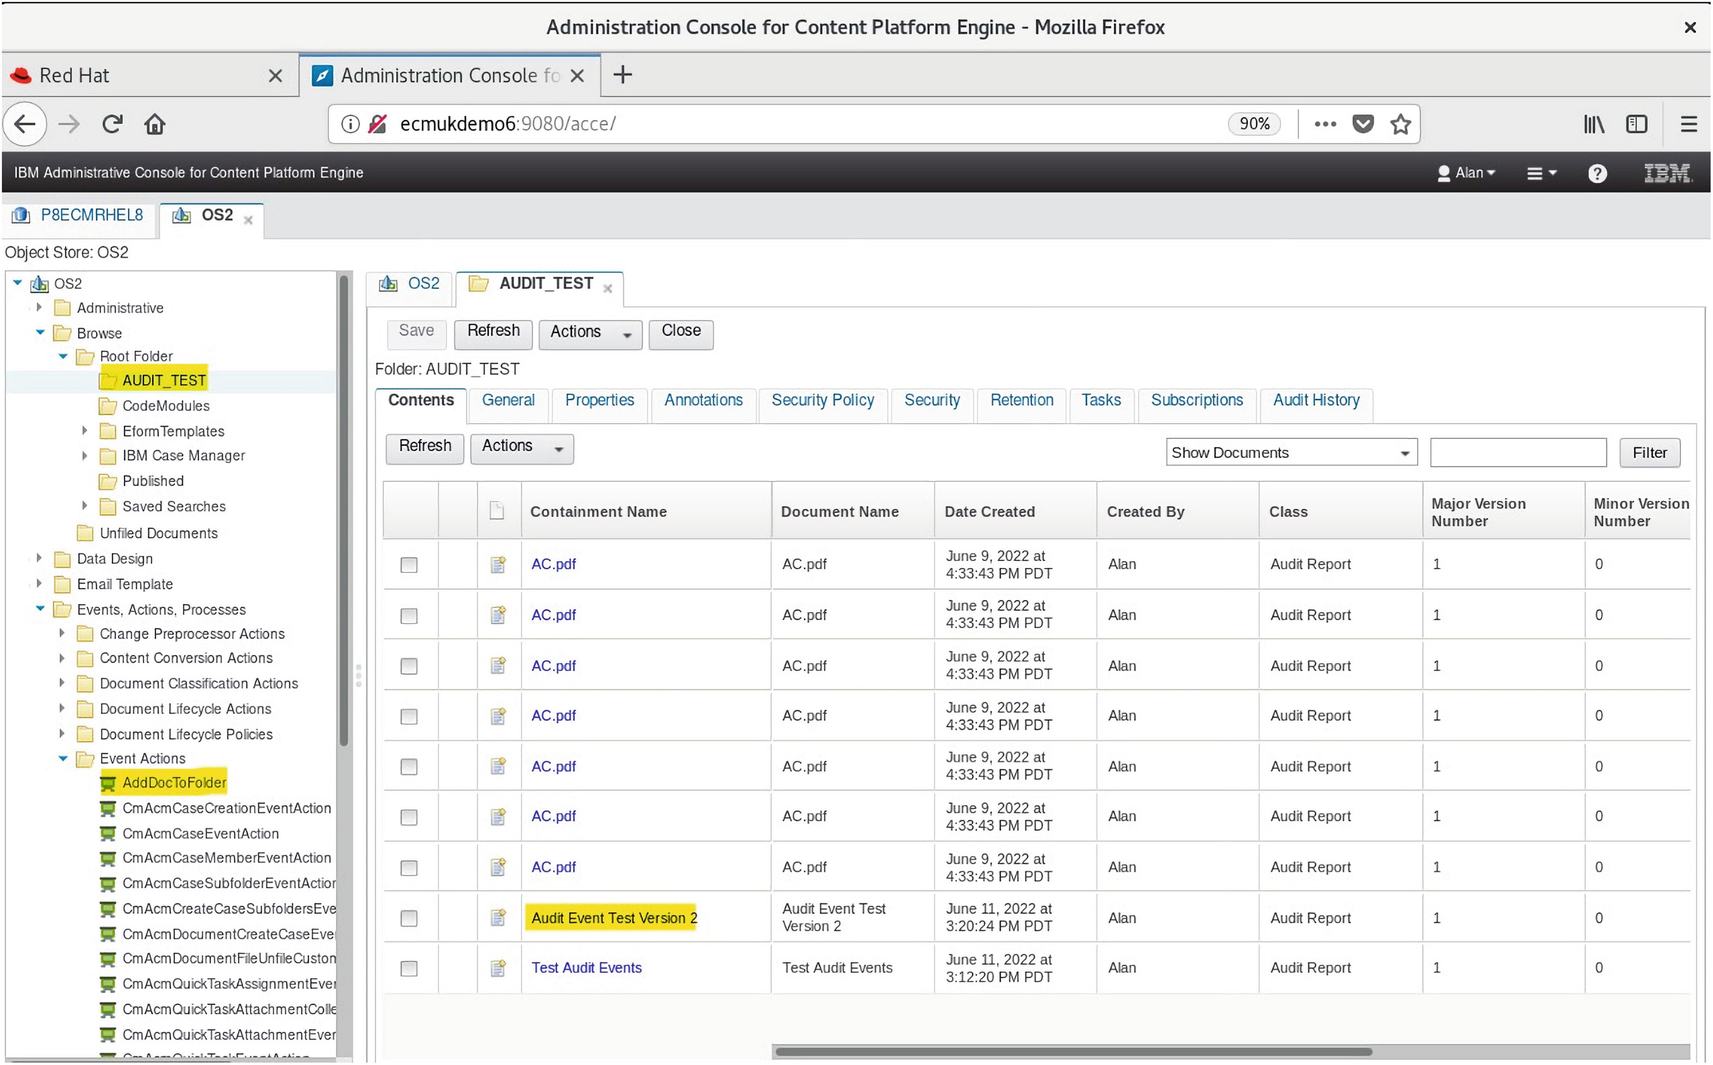
A screenshot of the administration console opened in Mozilla Firefox. It highlights the files under the audit test folder. A table at the right represents the containment name, document name, creation date, class, and version numbers.
The test successfully shows the Audit Report document highlighted appearing
In the preceding examples we tested, we have manually added the Folder Id, for AUDIT_TEST folder, which is the string GUID, {896F3369-7AF8-405E-85A7-3E18F90ACE43}, to the Audit Report Document class String property, folder_Id_to_file_in (with the full unique Id, AUD_folder_Id_to_file_in).

A screenshot of the I B M case manager builder opened in a browser. It highlights a text, audit master.
Click the Audit Master solution highlighted to open the IBM Case Builder editor
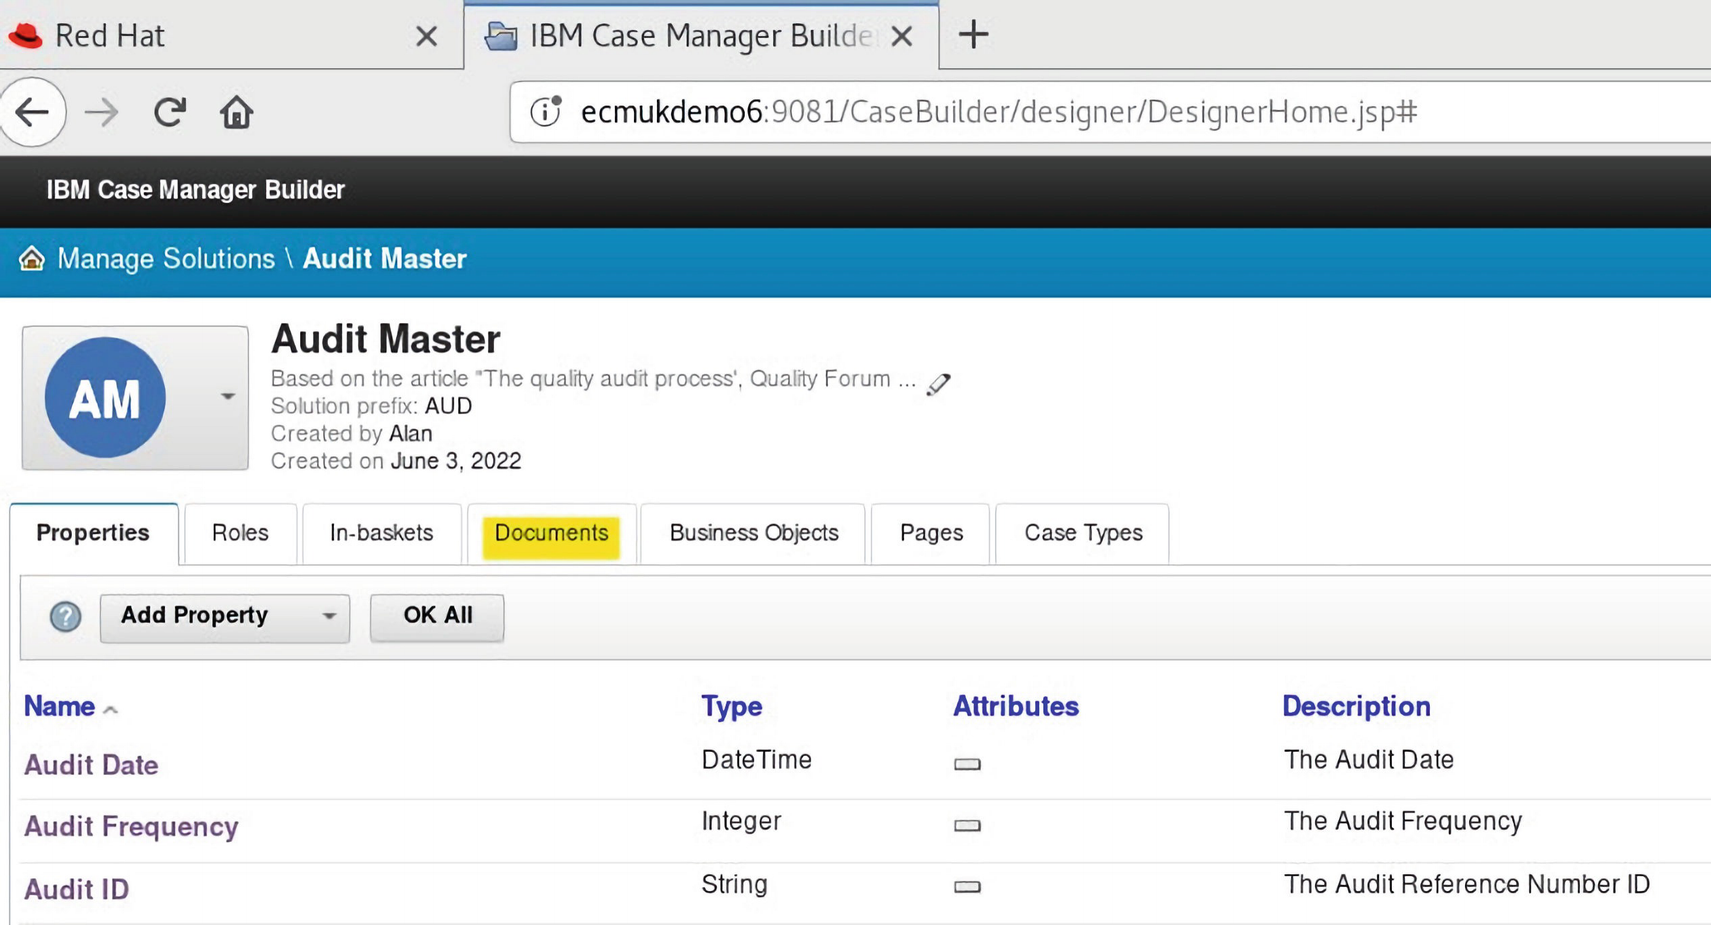
A screenshot of the I B M case manager builder opened in a browser. It highlights the document tab in the Audit master solution editor.
Select the Documents tab of the Audit Master Solution editor
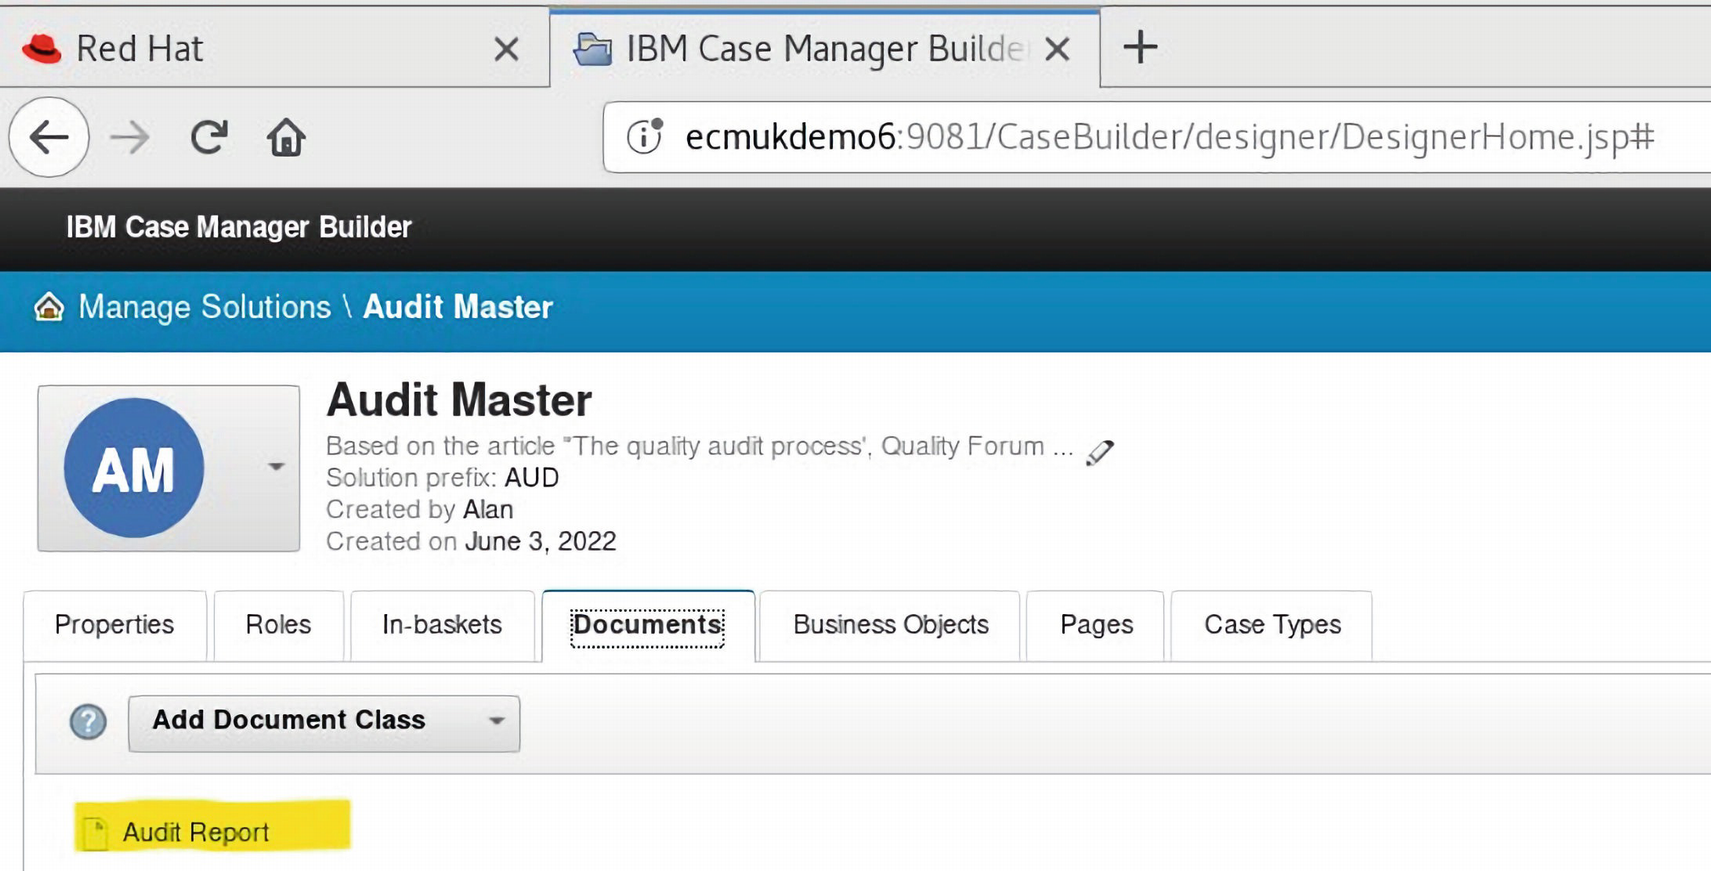
A screenshot of the Audit master solution editor opened in a web browser. It highlights the audit report under the button to add document class.
Select the Audit Report Document Class to update the properties
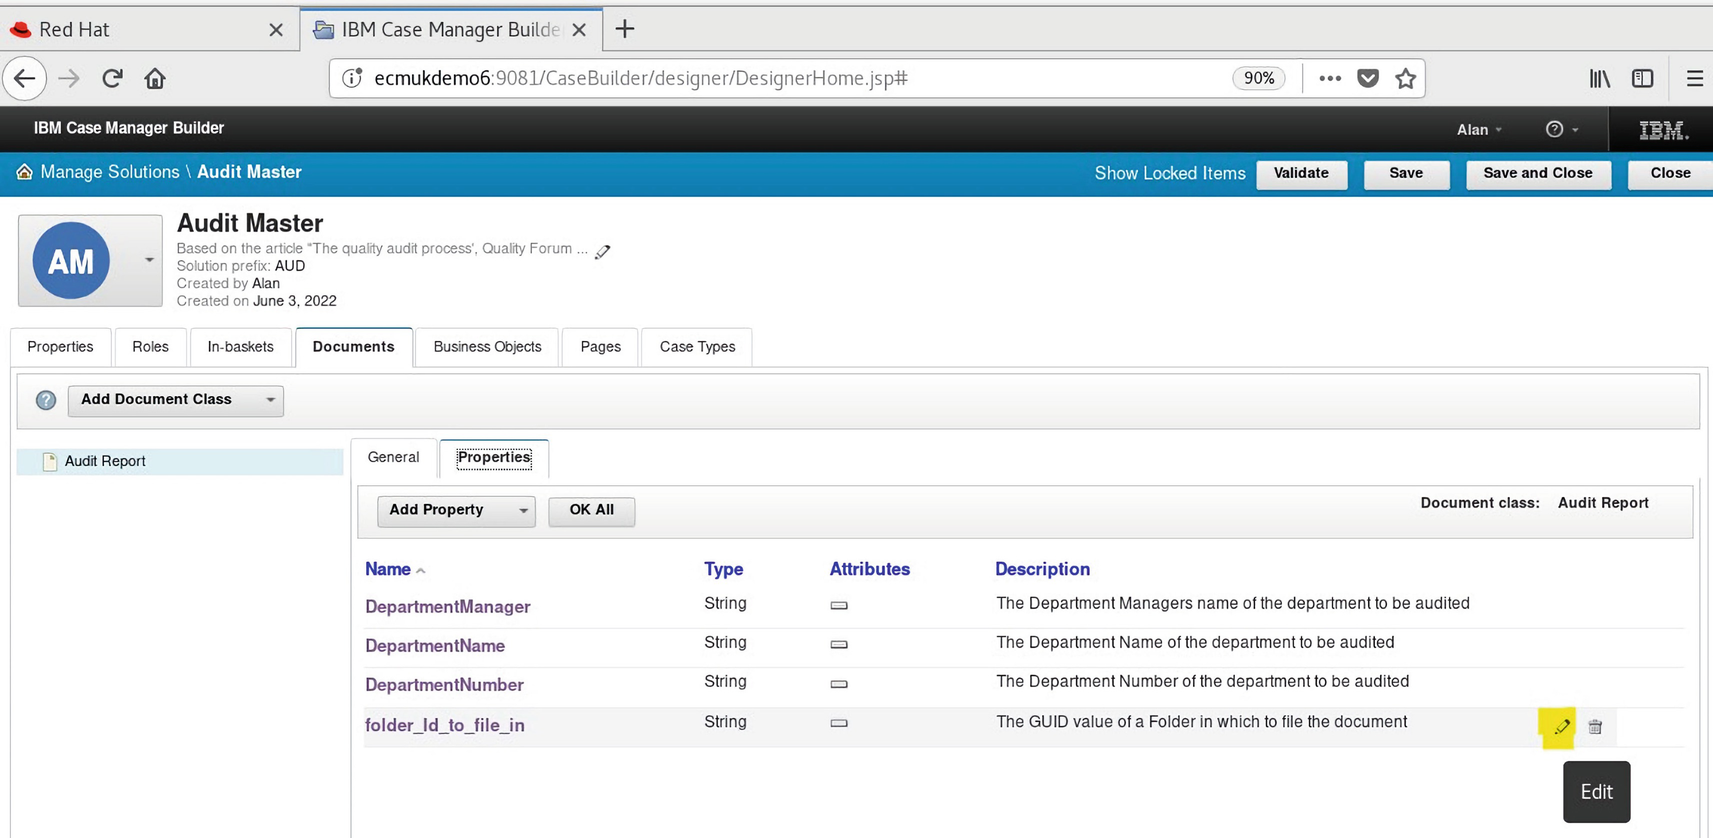
A screenshot of the Audit master editor opened in a web browser. It highlights the edit icon under the table consisting of the details of the name, type, attribute, and description of the audit report.
The folder_Id_to_file_in property of the Audit Report Document class is edited
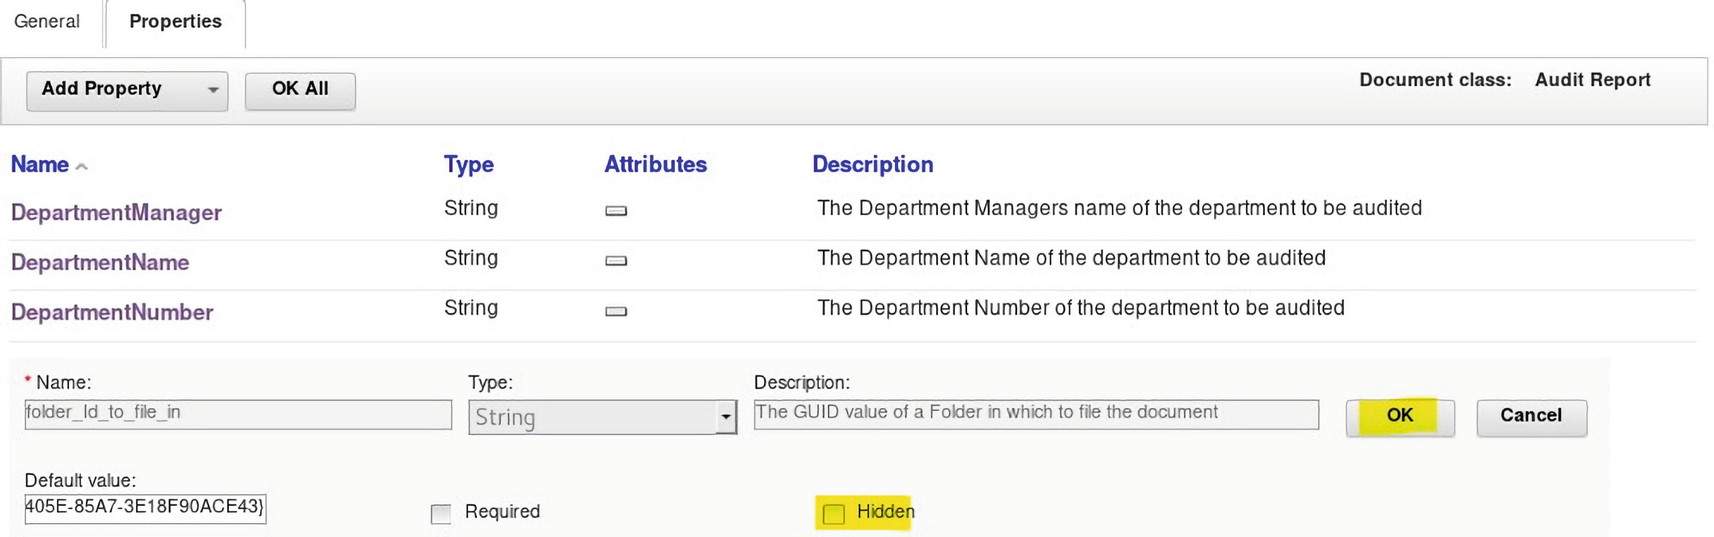
A screenshot of a table comprising the details of the name, type, attributes, and description of the audit report. It highlights the ok button and a checkbox alongside the text, hidden.
The Default value of the folder_id_to_file_in property is set to {896F3369-7AF8-405E-85A7-3E18F90ACE43}

A screenshot represents the buttons for the locked items naming, validate, save, save and close, and close. It highlights the save and close button.
The Audit Master Solution is updated with the Save and Close command button
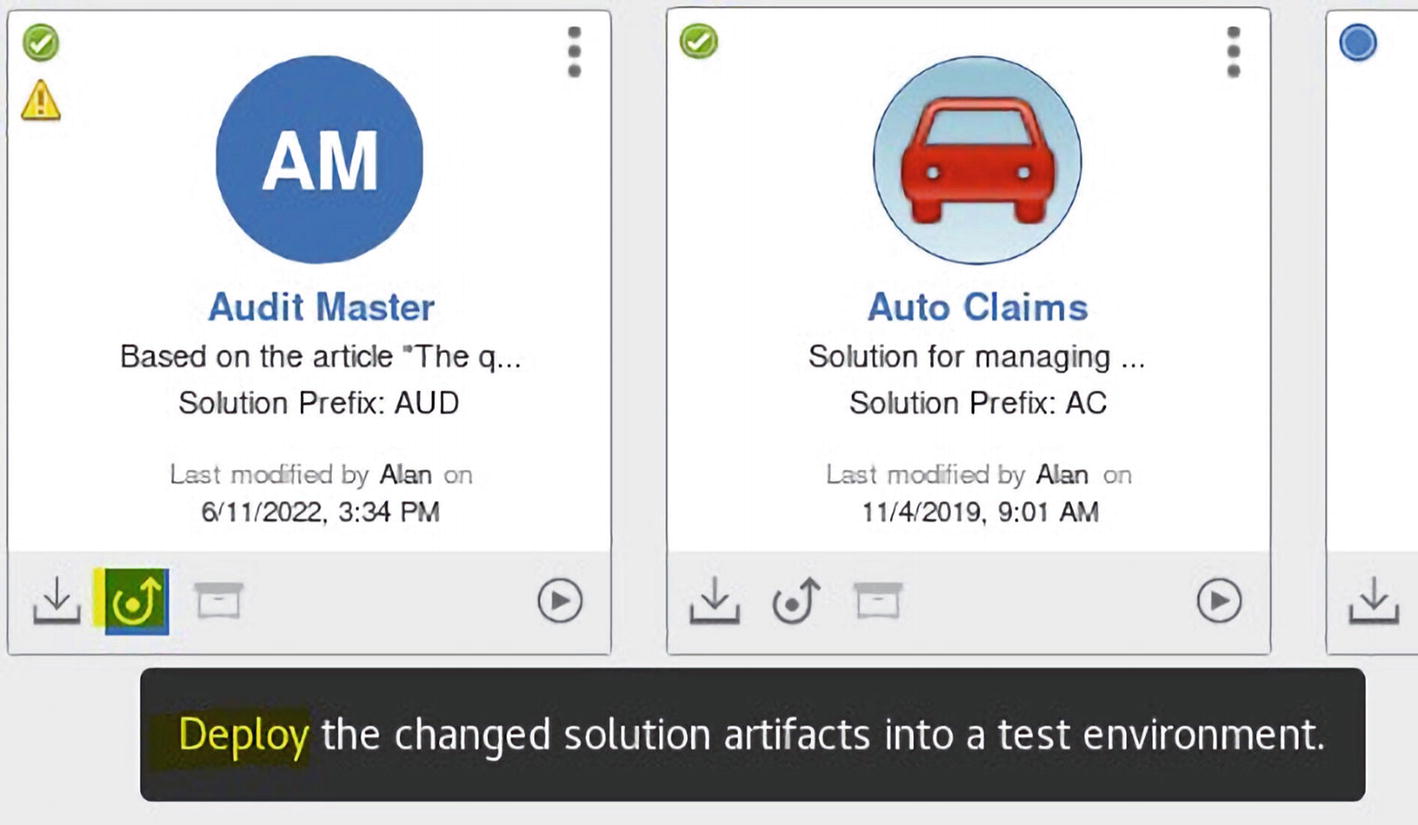
A screenshot represents 2 blocks titled Audit master and Auto claims. It highlights the deploy icon in the audit master. A box at the bottom reads the following, deploy the changed solution artifacts into a test environment.
The Deploy icon can be clicked to redeploy the solution we updated

A screenshot of a box titled confirmation. It comprises a table with the names of the solutions. It highlights the deploy button and a checked box beside the following text, commit my changes and make them available for deployment.
The Deploy command is used to redeploy the edited Audit Master solution
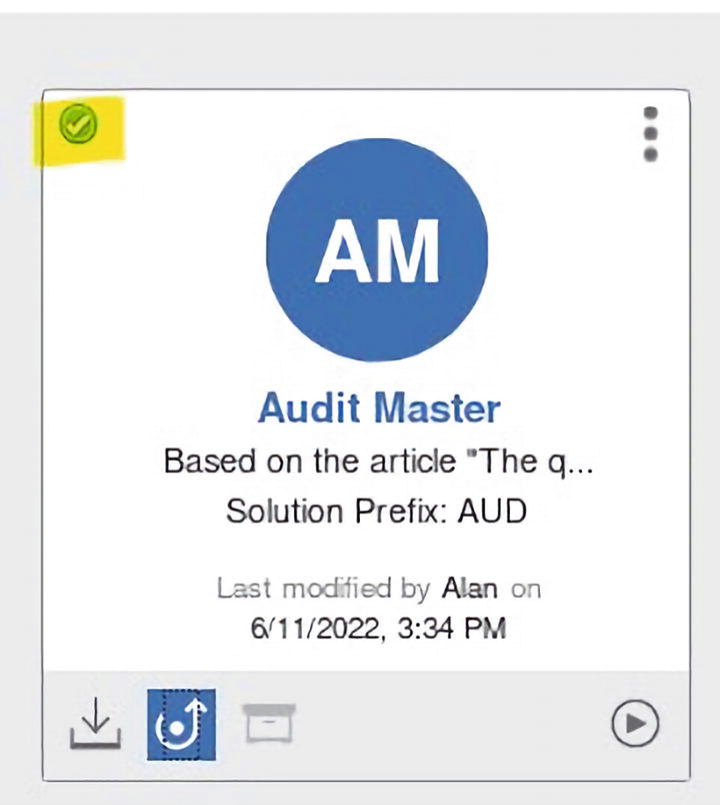
A screenshot of a box titled audit master along with the details about the modifier and modification date. It highlights a green tick mark at the top left corner.
The green tick icon highlighted shows the Audit Master solution is successfully deployed

A screenshot of I B M case manager opened in a browser. It represents the options under general and properties, It highlights the folder I D to file in, under the properties option.
The folder_Id_to_file_in property is now filled automatically with the default value
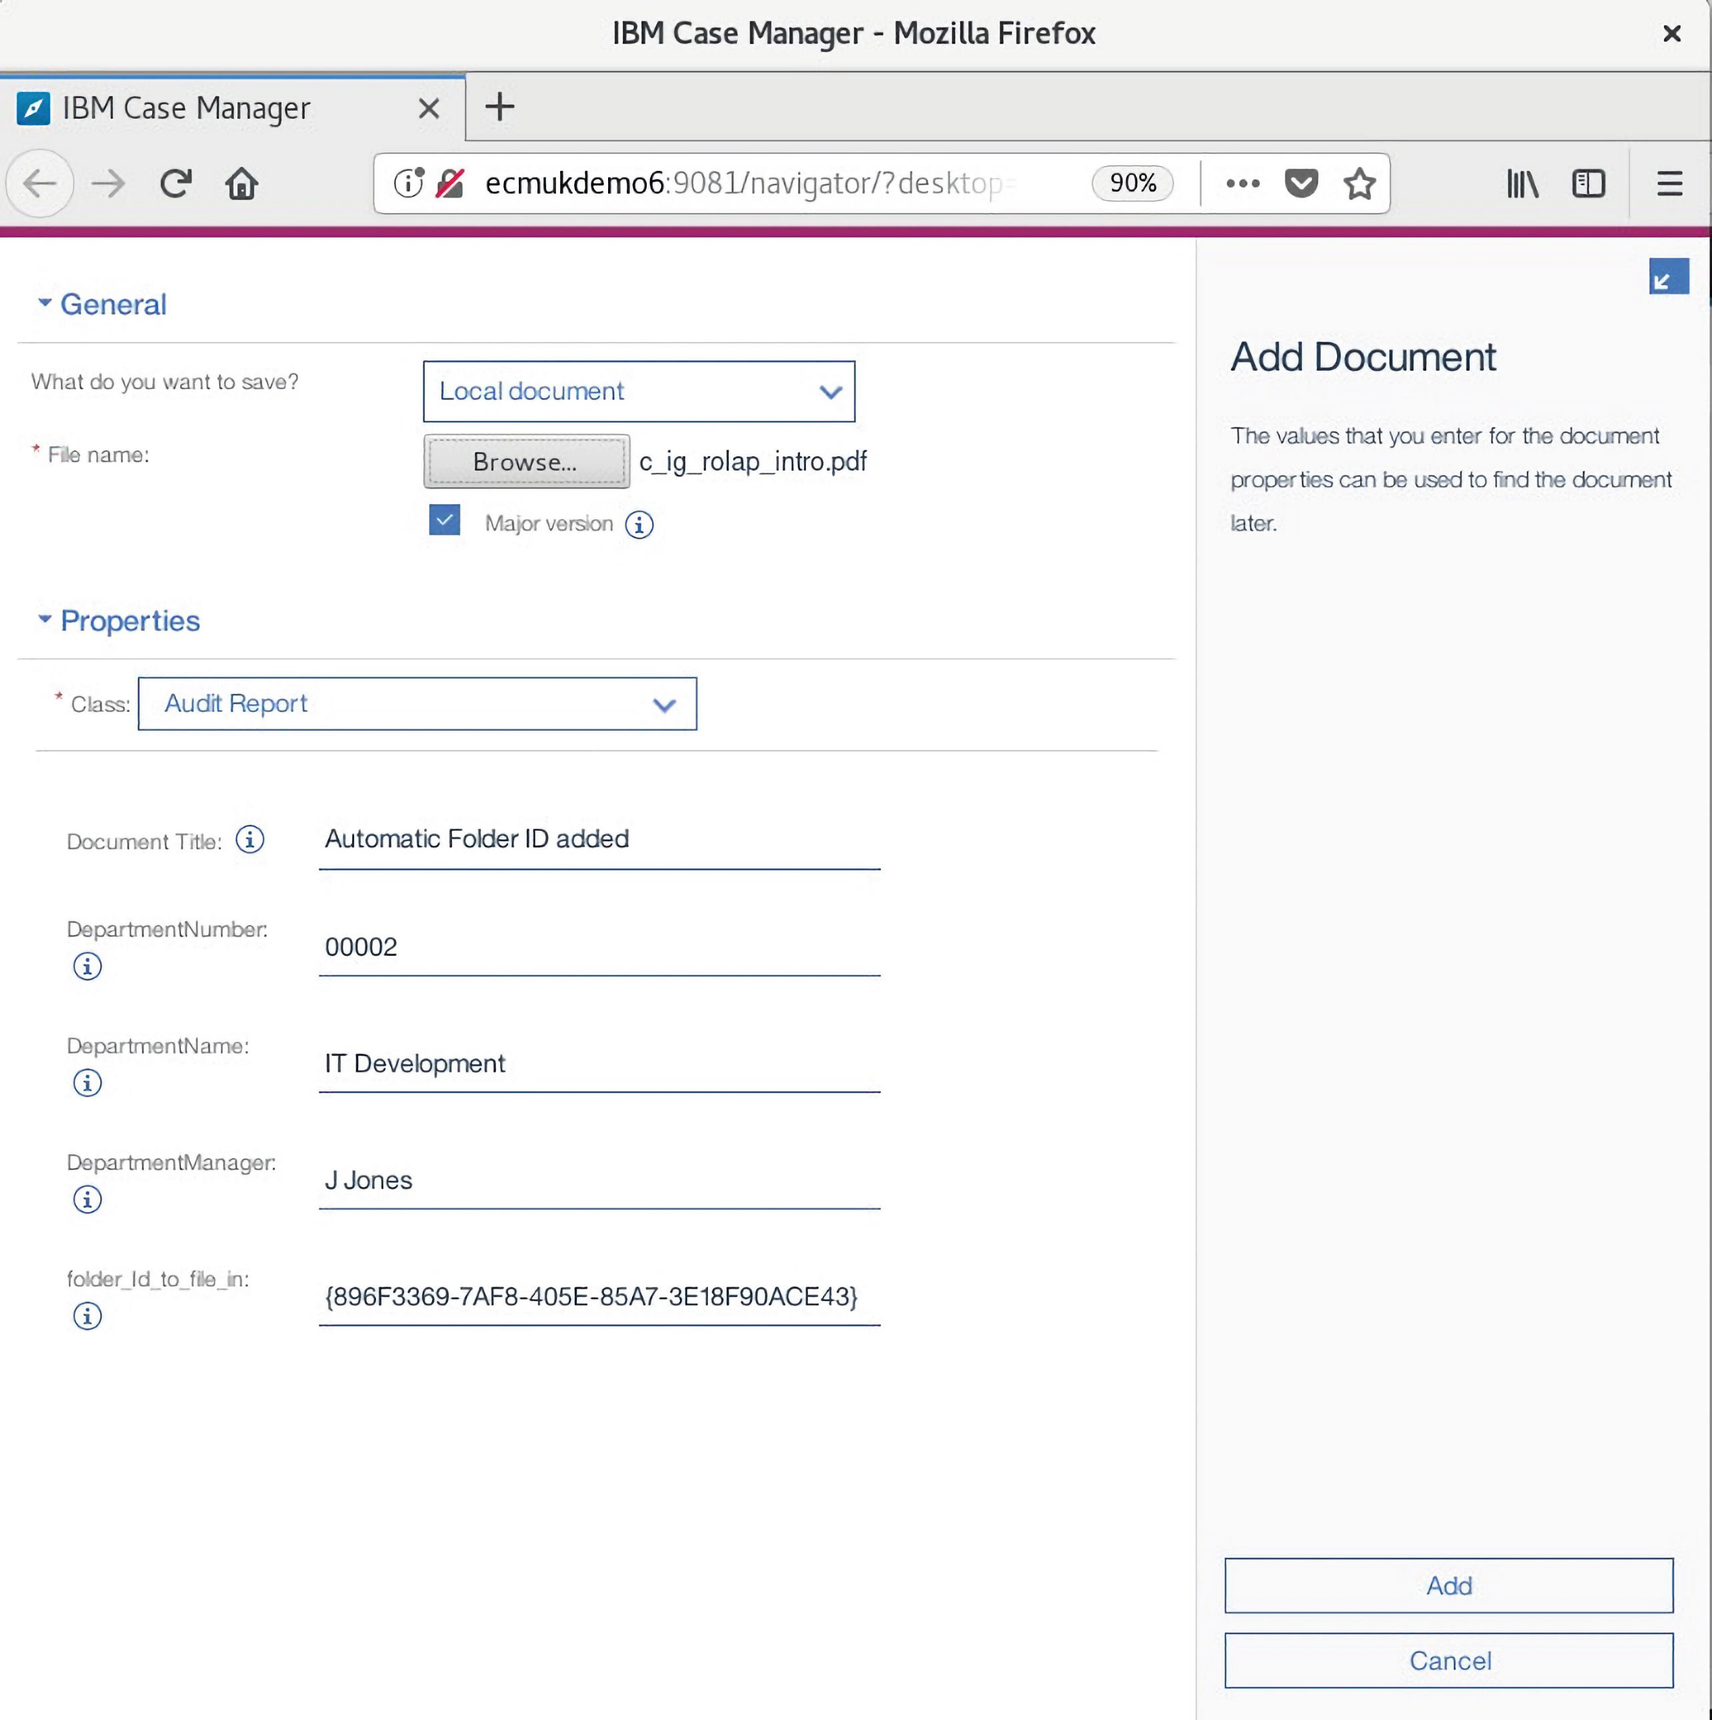
A screenshot of I B M case manager opened in a browser. It represents the filled details of the document title, department number, department name, department manager, and folder i d under the properties option.
A new Automatic Folder ID added Audit Report Document is added to test the Event Handler

A screenshot of the I B M case manager opened in a browser. It represents the details of a document under the case details with business objects tab. It highlights the save and close buttons at the top.
The saved document appears in the Audit Master case
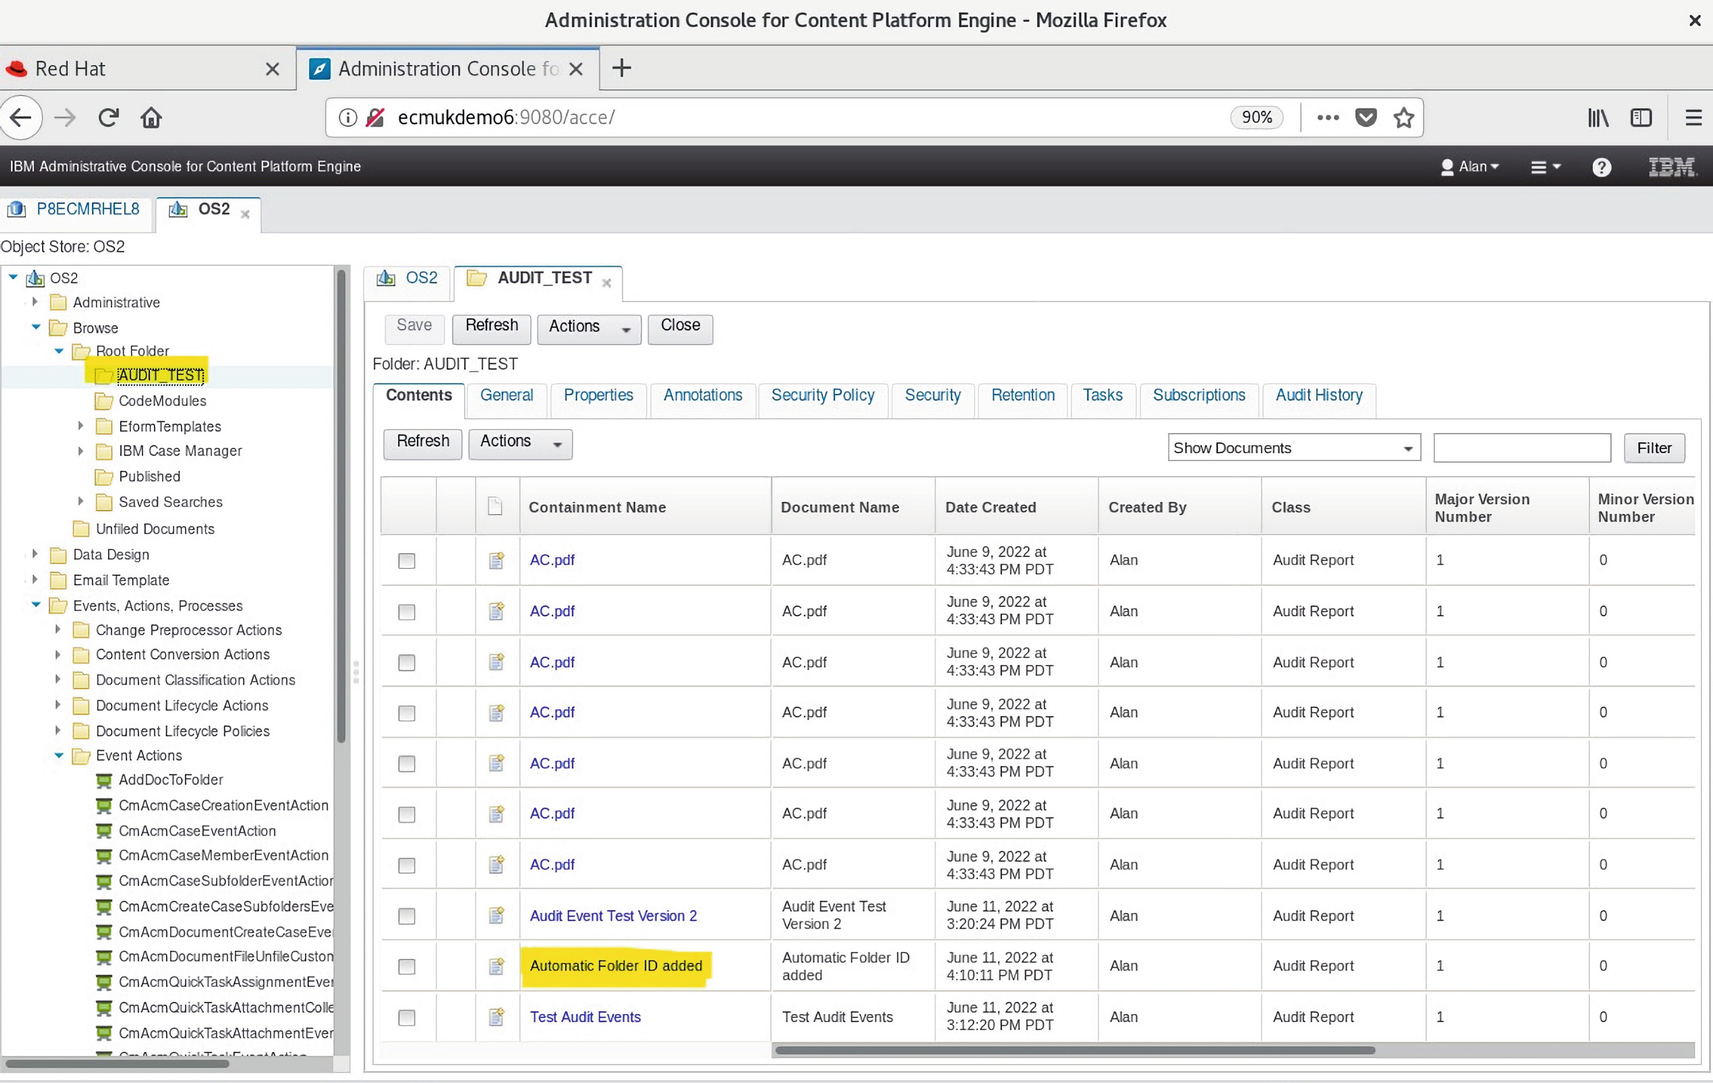
A screenshot of the I B M administrative console opened in a browser. It represents a table comprising the containment and document names, creation date, and version numbers under the audit test folder. It highlights a document naming, automatic folder I D added.
The Audit Report document is also found linked to the AUDIT_TEST folder
In summary, the Audit Report Document class Creation Event triggers the AddDocToFolder Java EventHandler, a Class in the fn_eventhandlers.jar (which is registered as a Code Module in the OS2 Object Store). This links the new Audit Report document of class type AUD_AuditReport to the AUDIT_TEST folder using the property AUD_folder_Id_to_file_in which contains the unique ID (GUID) of the AUDIT_TEST folder.
This functionality can then be used to automatically provide a second link to all the Audit Report case documents, which can then be viewed centrally in one Folder location.
Part 4 – The DbExecute Workflow Step for Calling Database Stored Procedures
One other integration we cover in this chapter is the DbExecute workflow step. This allows a Database Stored procedure to be invoked from an IBM Case Manager Workflow step. This is supported using the IBM FileNet P8 Process Designer tool. This tool is available as a .jar applet and also a standalone Java program version running on Windows as a client application linked to the IBM Case Manager server.
The IBM Auto-Claims Case Manager Solution Example
The following free download covers the example DB2 Stored Procedure for an Insurance Company, IBM Case Manager Auto Claims Solution:
https://doi.org/10.13140/RG.2.2.16987.52008

A screenshot represents a box with the following title. importing case manager solution auto claims example into the case manager. There are buttons to download and read the file at the bottom.
The free download Document web page for details of a DB2 Stored Procedure development
There are several points of integration with the IBM FileNet P8 Process Designer for building an IBM Case Manager workflow, shown in this section.
Methods of Displaying a Case Type Task Workflow

A screenshot of the audit master represents a context menu highlighting the option to open FileNet P 8 process designer.
The IBM Case Builder Solution display web page, with the link for FileNet P8 Process Designer
There is also a graphical view available of the same workflow as used in FileNet P8 Process Designer, which can be displayed in the IBM Case Builder web application tool as follows.

A screenshot of the I B M case manager builder opened in a browser. It represents the add case type button under the case types tab.
The Case Types tab is selected from the Audit Master solution IBM Case Builder view
- 1.
We then click the Audit Department Case type shown earlier to display the attributes of the Case Type as shown in Figure 2-137.
- 2.From here, we select the Tasks option from Audit Department Case Type menu options.
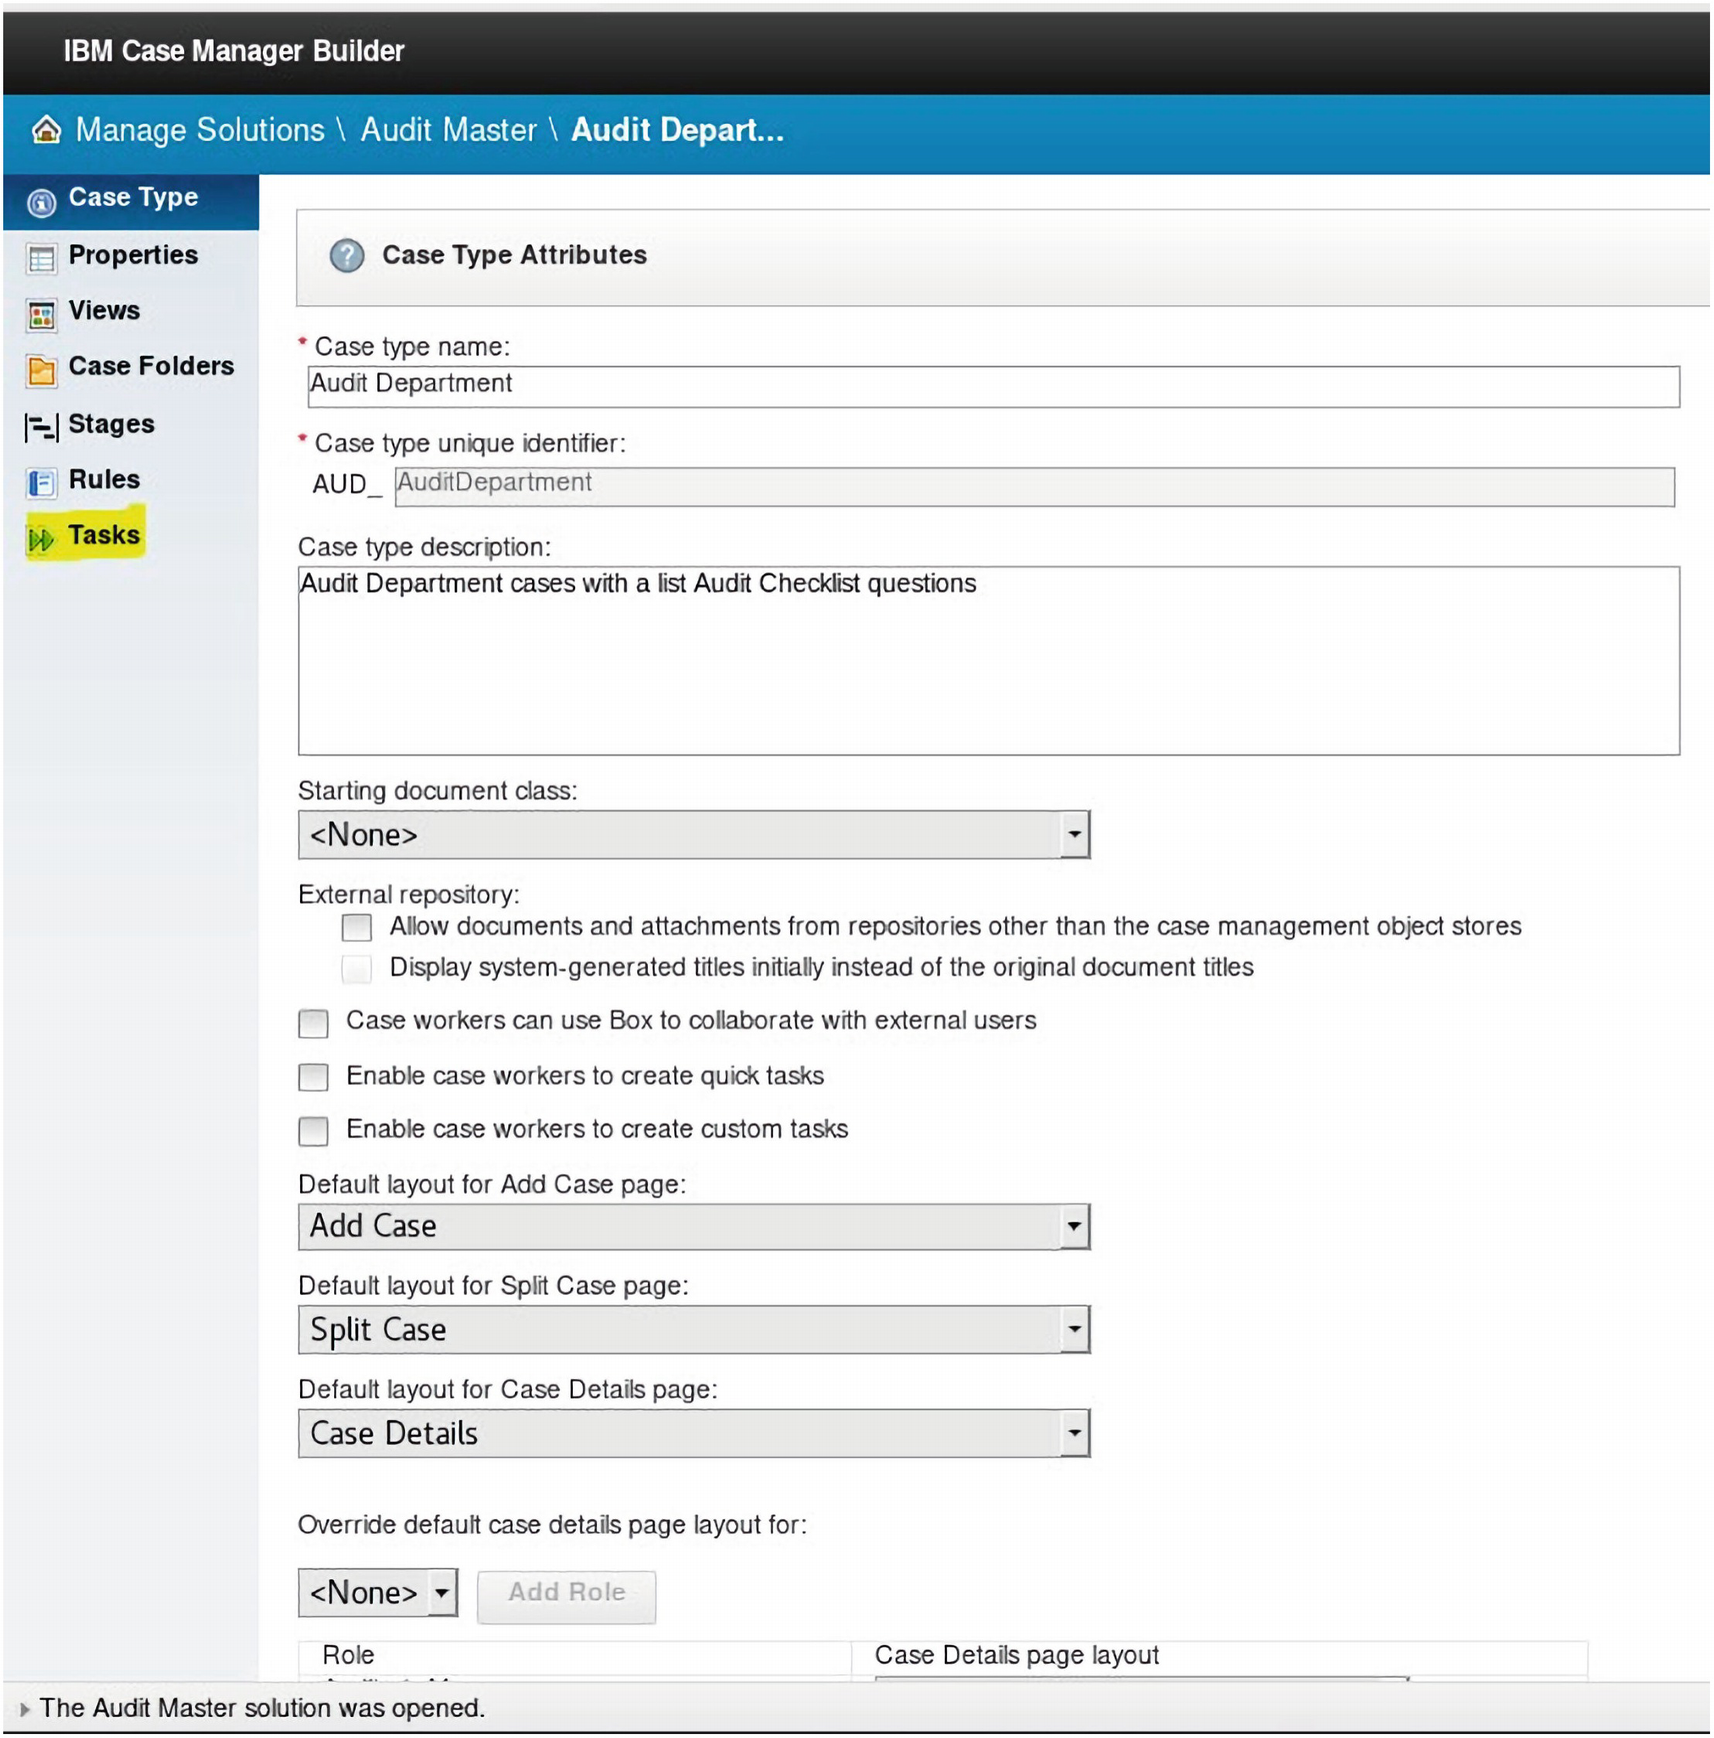
A screenshot of the I B M case manager builder opened in a browser. It represents a list of options under case type attributes. It highlights the tasks option under the case type in the left pane.
Figure 2-137The Audit Department type is double-clicked to access the Case Type attributes
The Figure 2-137 screen has a drop-down which allows a document loaded into the IBM OS2 Target Object Store to automatically invoke the Audit Master solution Audit Department task workflow, if we select a Starting document class from the drop-down shown earlier. For the moment, we will leave the default option, which is to start the Audit Department Task manually from each Case, when this is required.

A screenshot of the I B M case manager builder opened in a browser. It represents the options under the tasks menu. It highlights an icon under the required tasks section labeled, Open FileNet p 8 process designer.
The highlighted icon can be selected to launch the IBM FileNet P8 Process Designer applet
Now, we have two options to view the Workflow here. The first option, shown in Figure 2-138, launches the IBM FileNet P8 Process Designer as an embedded Java Applet. (But see later why this is rarely able to be used!)
The Case Builder Workflow Step Designer Application
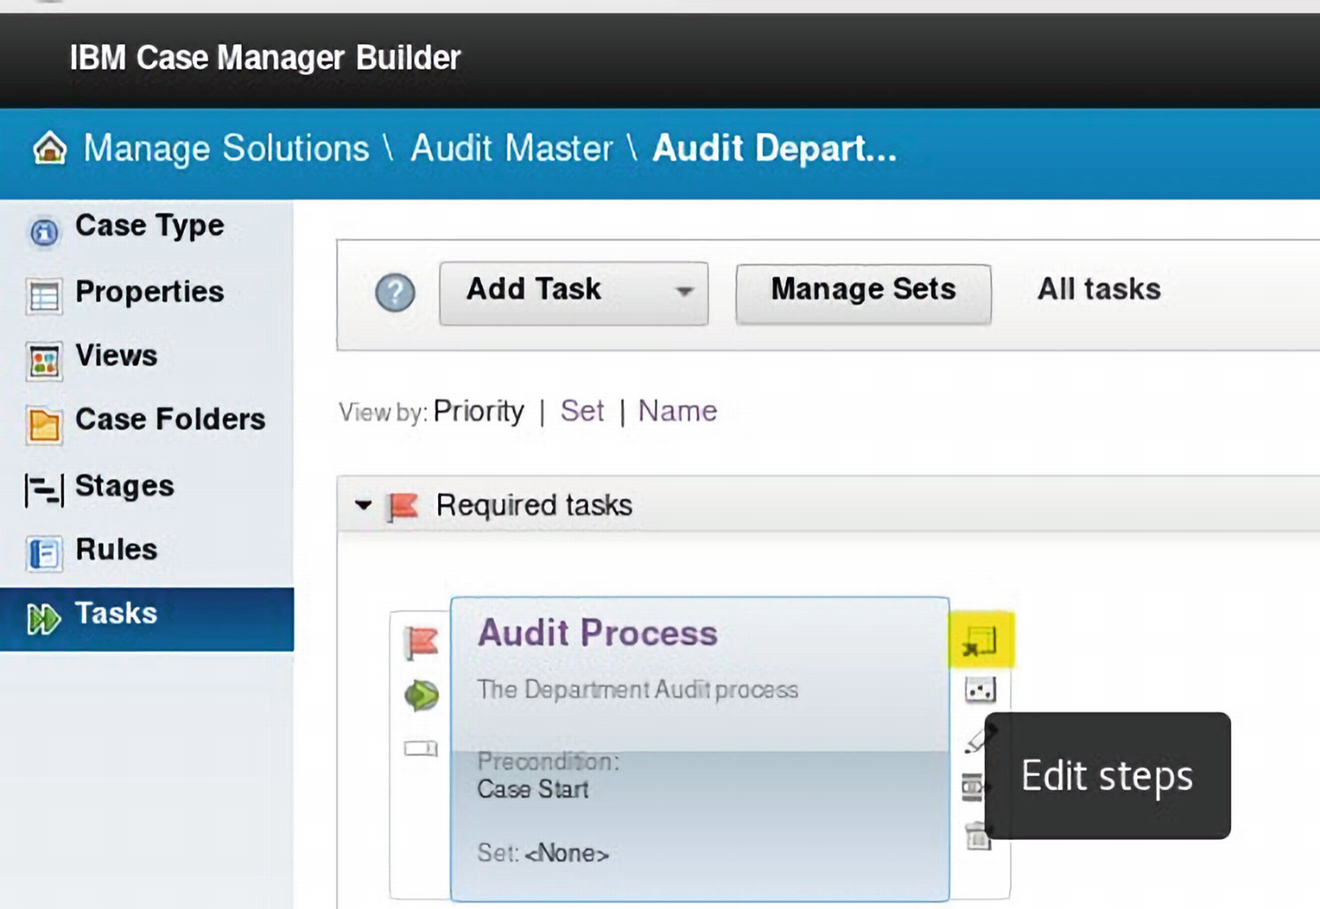
A screenshot of the I B M case manager builder represents the available options under the tasks menu. It highlights an icon under the required tasks section labeled, edit steps.
The Edit Workflow steps option can be selected using the highlighted icon

A screenshot of the I B M case manager builder represents the Step Designer page containing various options under the palette menu. A text at the bottom reads, drag and drop swim lanes into this workspace.
The Task Workflow Step Designer page is displayed using the Edit Steps icon
The Palette on the left-hand side of the screen, shown in Figure 2-140, of the Workflow Step Designer contains different types of Workflow step and Role Lanes which can be dragged and dropped using the mouse to the right-hand pane in the dragged lanes which are then defined for each Security Role.
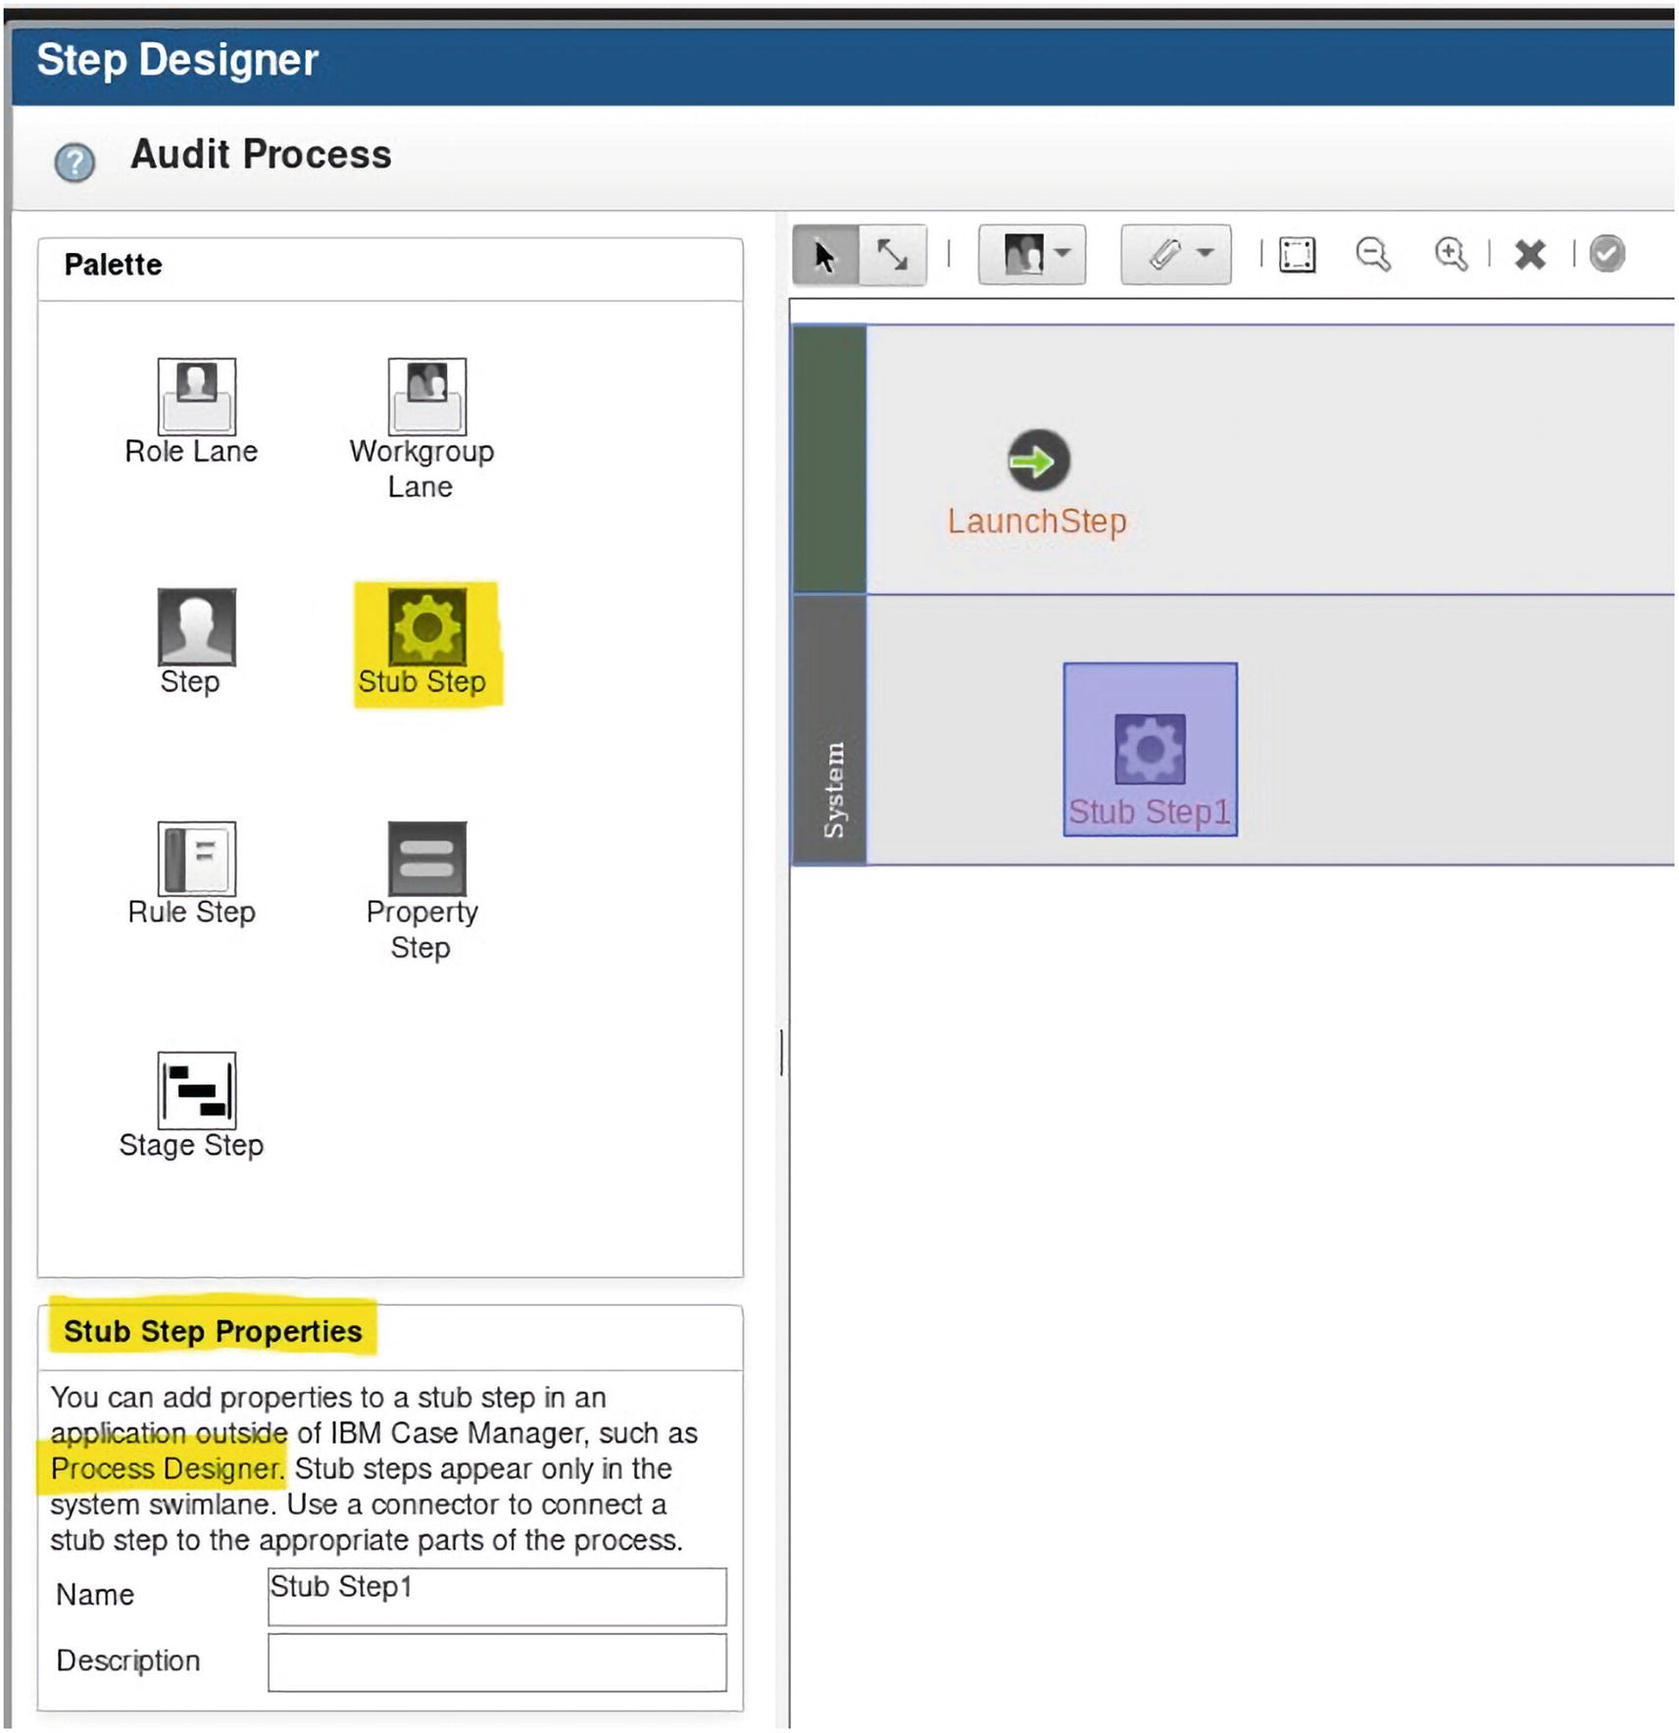
A screenshot of the I B M case manager builder represents the Step Designer page containing various options under the palette menu. It highlights the stub step option and the description of stub step properties.
The Stub Step1 is dragged into the System Lane
The Process Designer Plugin Applet in IBM Content Navigator
The next option for accessing the IBM FileNet P8 Process Designer is to configure the access from the IBM FileNet Content Navigator web application, using the IBM FileNet P8 Process Designer plugin applet.
This is accessed using the link from our IBM Content Navigator web application server, ecmukdemo6, using the URL:

A screenshot of the I B M content navigator page opened in a browser. It highlights the content navigator path in the address bar, and the user name, password, and login button on the page.
The login screen for the IBM Content Navigator web application
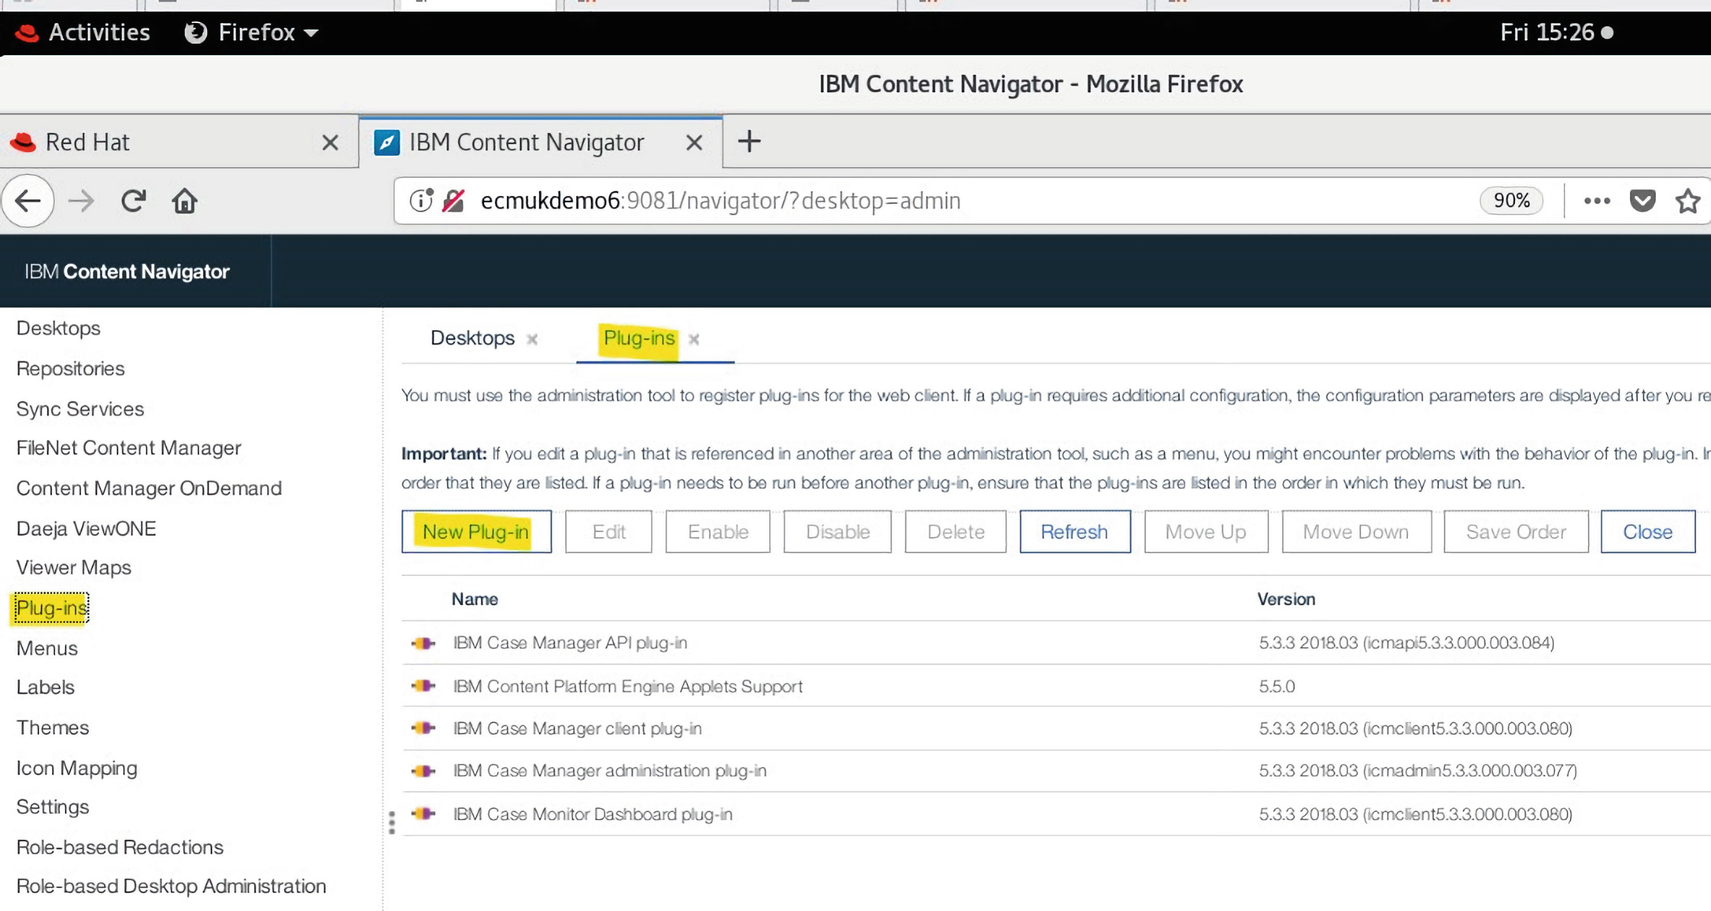
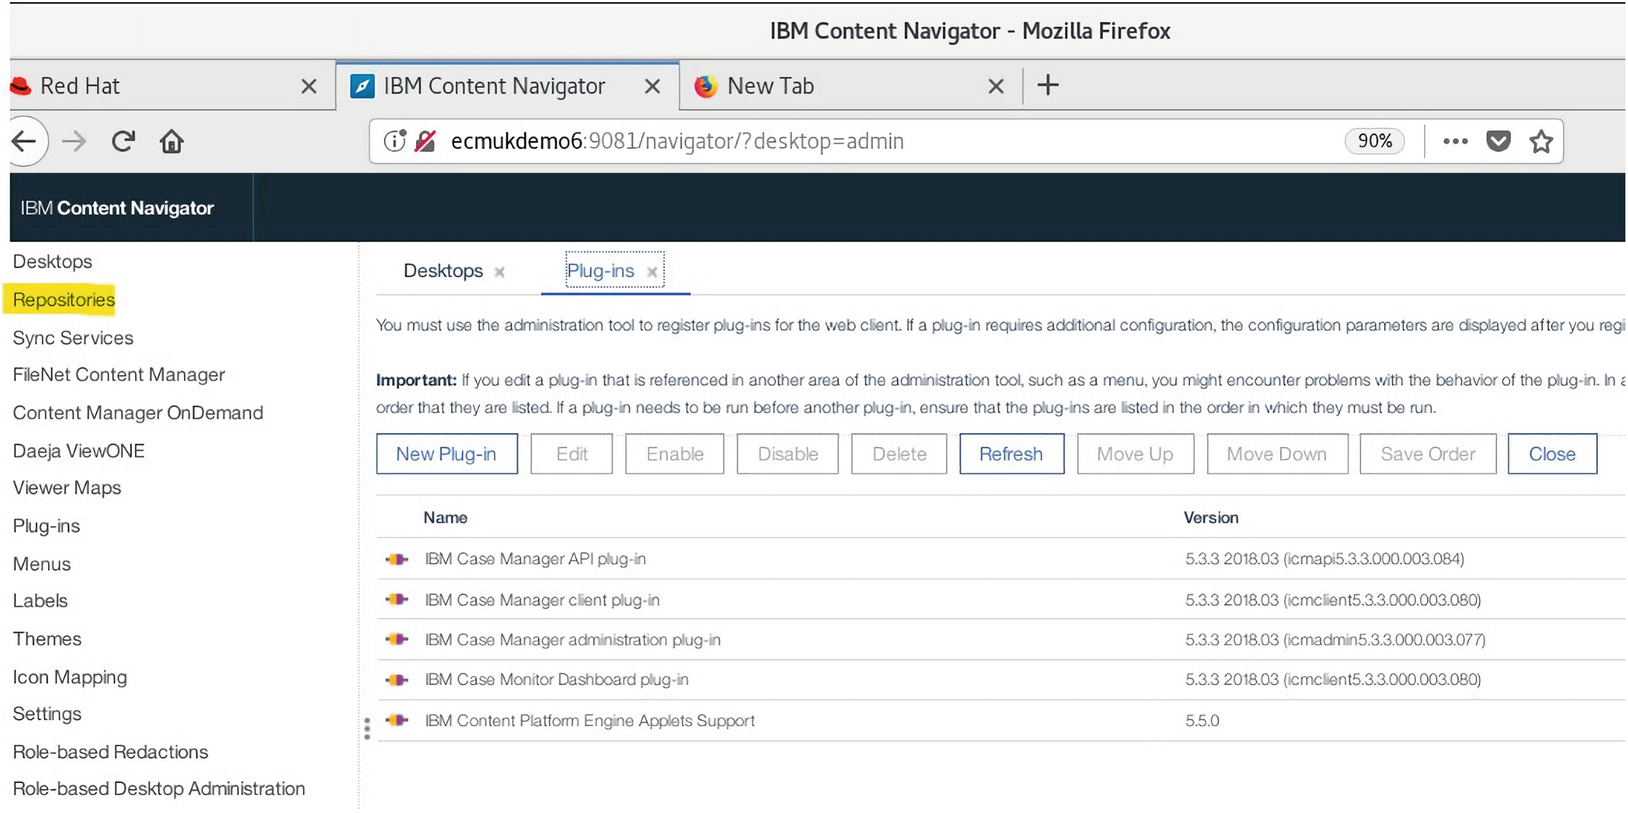
A screenshot of the I B M content navigator page. It highlights the plug-ins option in the left pane and the new plug-in button under the plug-ins tab on the main context page. A table contains the name and version of the plugins at the bottom.
The New Plug-in command is selected from the Plug-ins administration menu
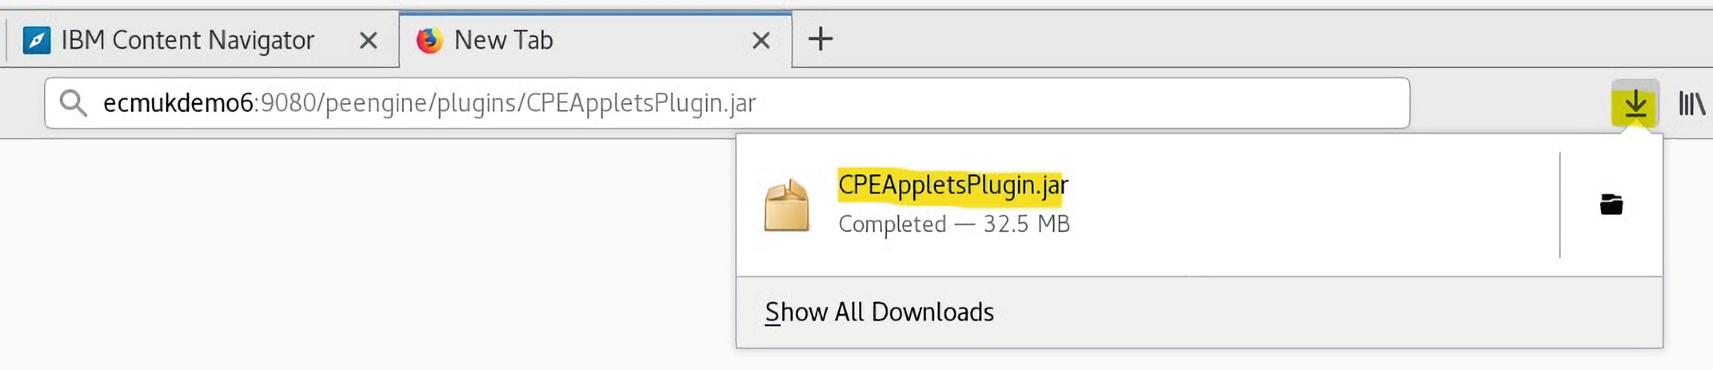
The Content Platform Engine CPEAppletsPlugin.jar file is available by downloading it from the installed Content Platform Engine server (ecmukdemo6) using the URL:

A screenshot of a new tab opened in the Mozilla Firefox browser. It highlights a file path in the address bar, along with the save file and ok buttons in a dialog box on the page.
The CPEAppletsPlugin.jar file is downloaded for access by the IBM Content Navigator admin
A screenshot represents the downloaded C P E applet plug-in file with the status and size of the file.
The Content Platform Engine CPEAppletsPlugin.jar file
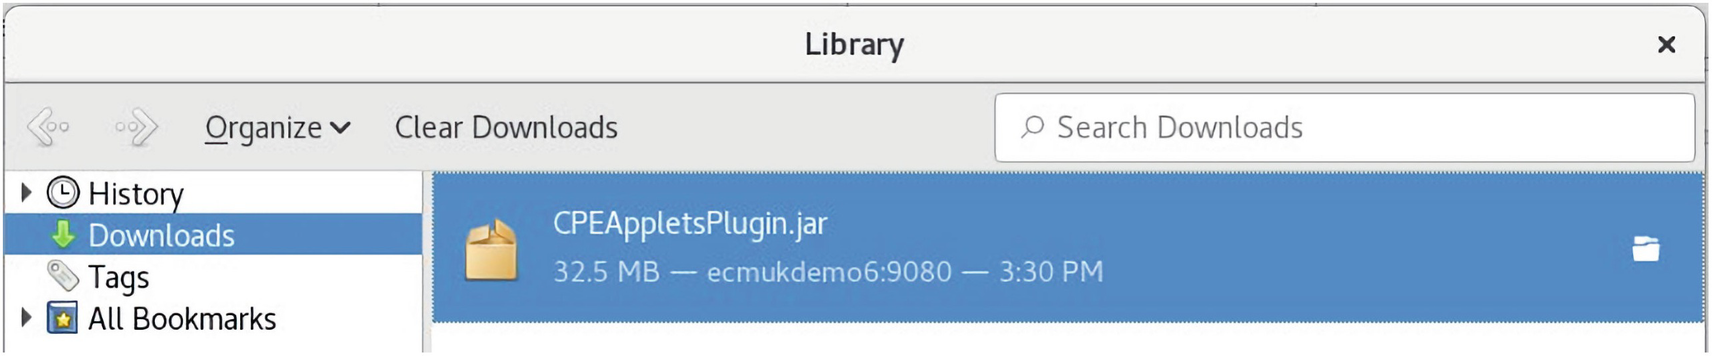
A screenshot represents the location of the downloaded C P E Applets plugin file in the library.
The CPEAppletsPlugin.jar file is downloaded to the /root/Downloads folder

A screenshot of the I B M content navigator highlights the jar file path for the C P E applets plug-in. It also highlights the load button alongside.
The Load command is clicked to import the /root/Downloads/CPEAppletsPlugin.jar file

A screenshot of the I B M content navigator represents the details of the I B M content platform engine applets support. it includes the name, version, actions, repository type, viewers, features, and layout details of the plug-in.
The details of the CPEAppletsPlugin.jar are displayed after loading
The CPEAppletsPlugin.jar security must be changed before loading as follows.

A text document presents the command to change the security.
The security is changed using the Linux command cmod 775 CPEAppletsPlugin.jar
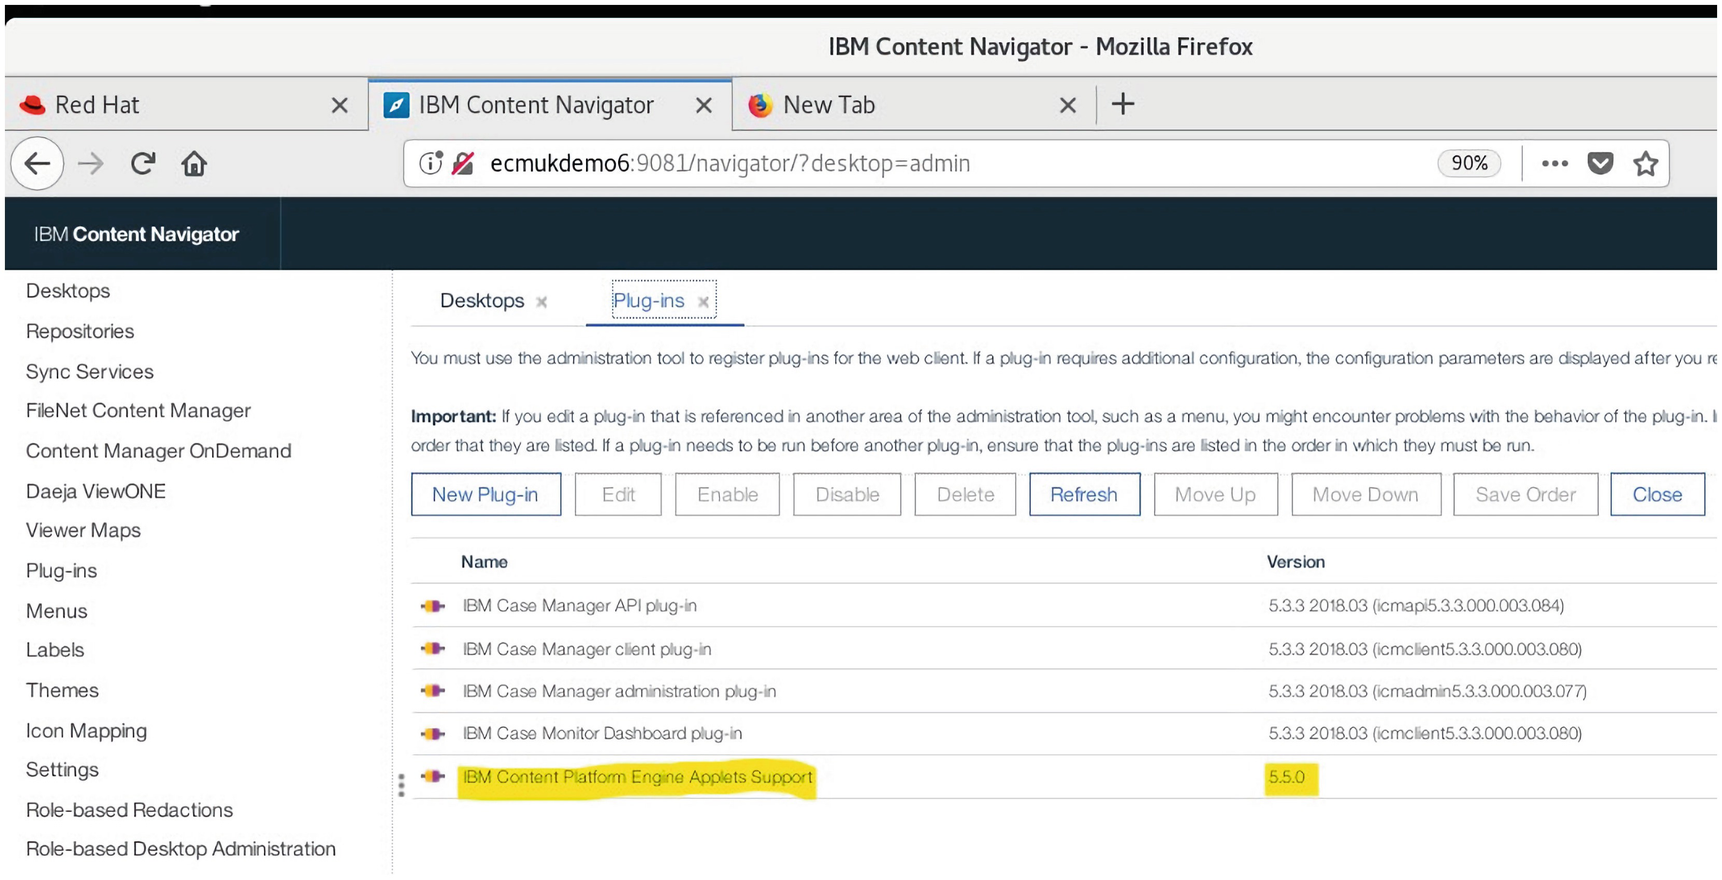
A screenshot of the I B M content navigator represents a table with the name and versions of the plug-ins. It highlights the I B M content platform engine applets support with version 5.5.0.
The IBM FileNet P8 Process Designer and Process Tracker Actions plugin
A screenshot of the I B M content navigator page highlights the repositories option in the left pane.
The Repositories (IBM FileNet Object Store) menu is selected
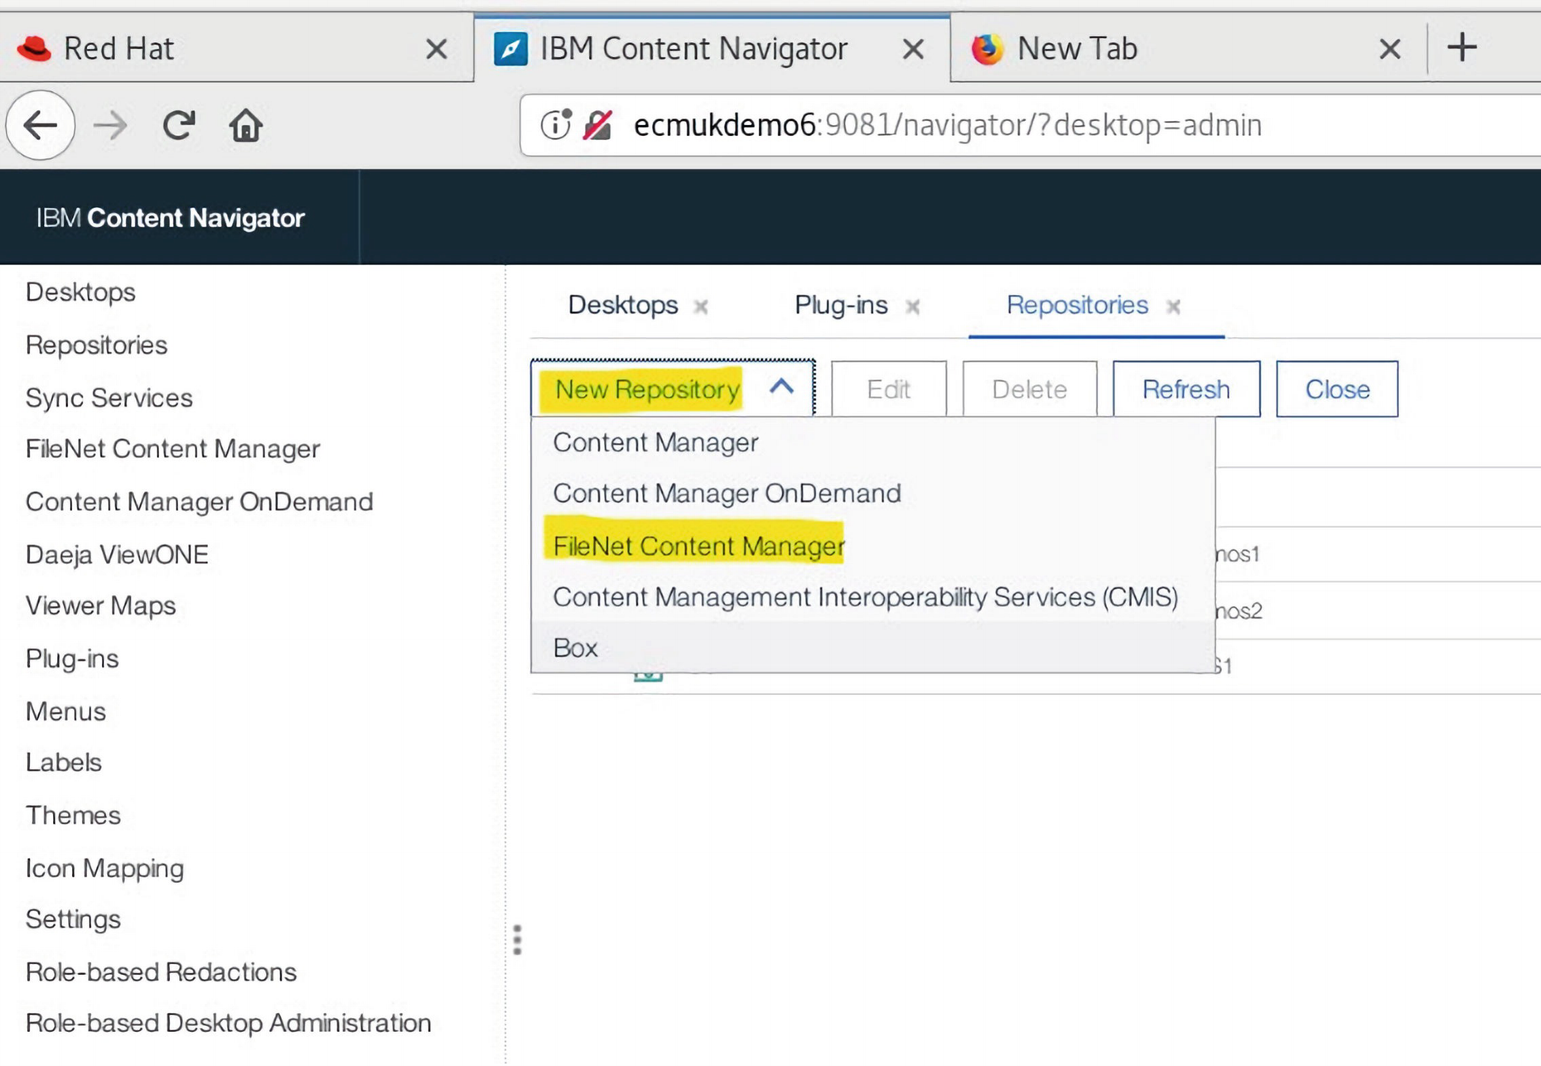
A screenshot of the I B M content navigator page highlights the FileNet content manager option under the context menu of the new repository tab.
The New Repository ➤ FileNet Content Manager menu option is selected
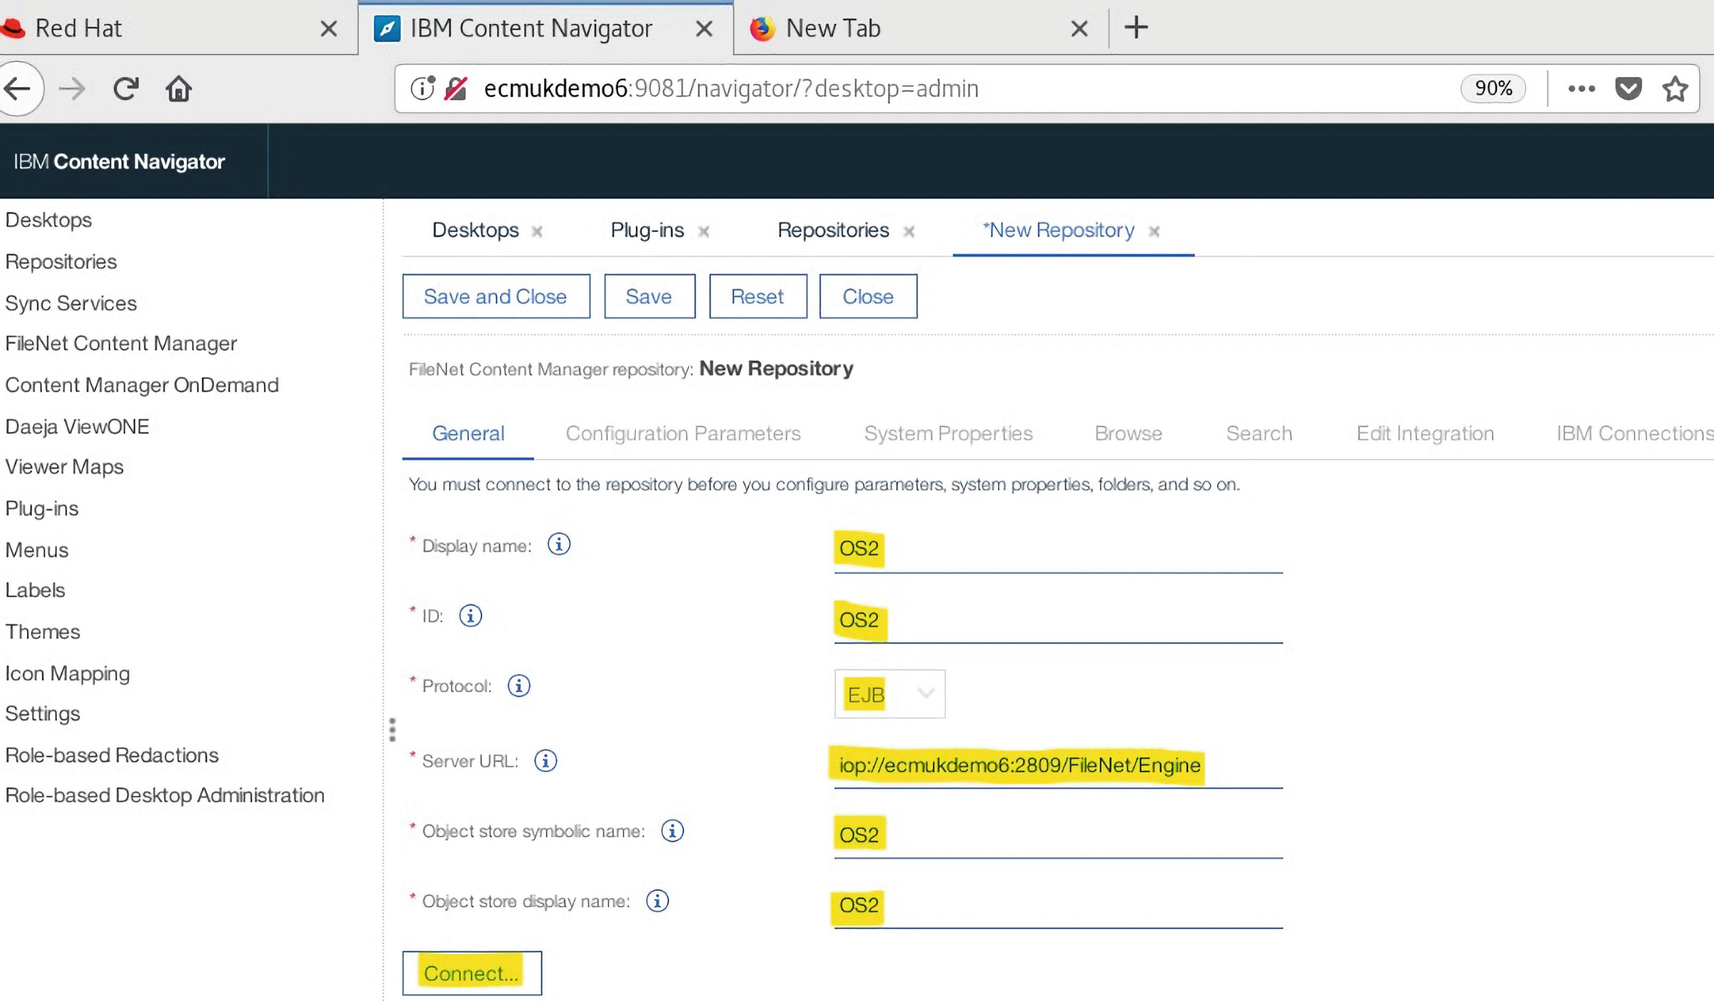
A screenshot of the I B M content navigator page highlights the general data of the new repository including, the name, I D, protocol, server U R L, and object store names along with the connect button at the end.
The new Repository connection parameters are filled out
The EJB connection string is used, iop://ecmukdemo6:2809/FileNet/Engine.
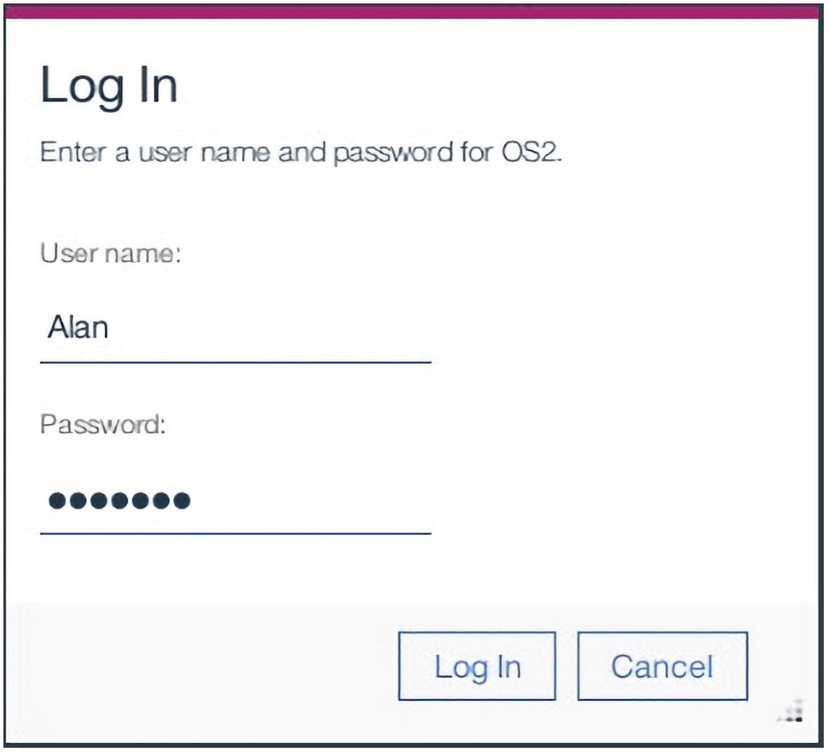
A screenshot of a login box with the filled-in details of the user name and password along with the buttons to log in and cancel at the bottom.
The login to OS2 is prompted for

A screenshot of the I B M content navigator page highlights the configuration parameters tab under the new repository option.
The tabs are all enabled, and we can now select the Configuration Parameters tab

A screenshot of the I B M content navigator page highlights the represent workflow definition class and a radio button labeled yes, under the configuration parameters.
The highlighted Display workflow definition class option is selected as Yes
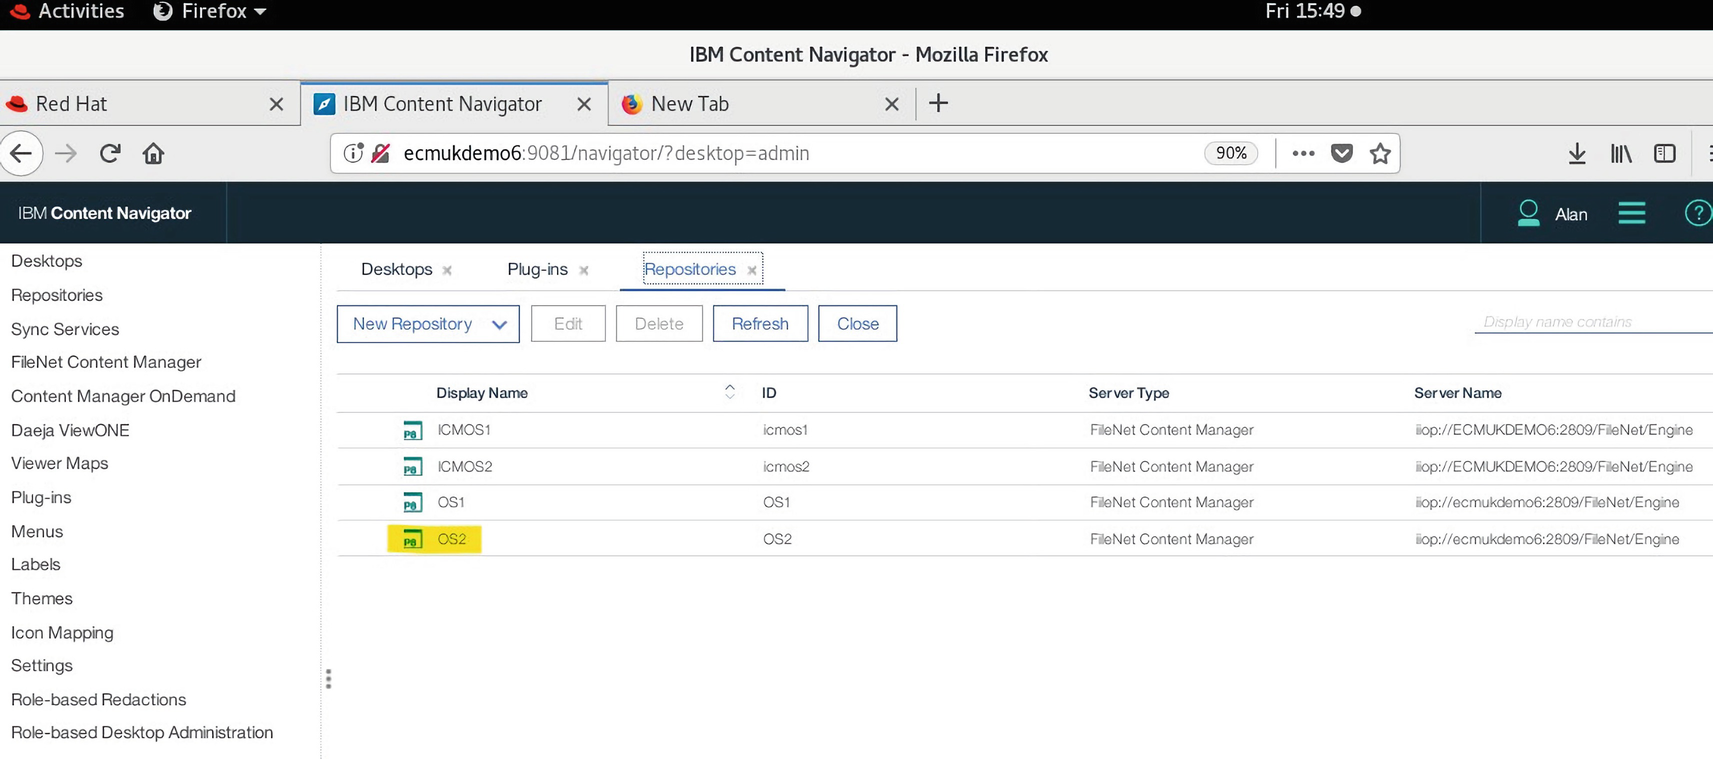
A screenshot of the I B M content navigator page highlights the O S 2 repository in the table containing the name, I D, server type, and server name of the repositories.
The OS2 repository is configured

A screenshot represents the selected default repository folder context menu under the menus tab. It highlights the copy button on the page.
The menu option named Default repository folder context menu is copied
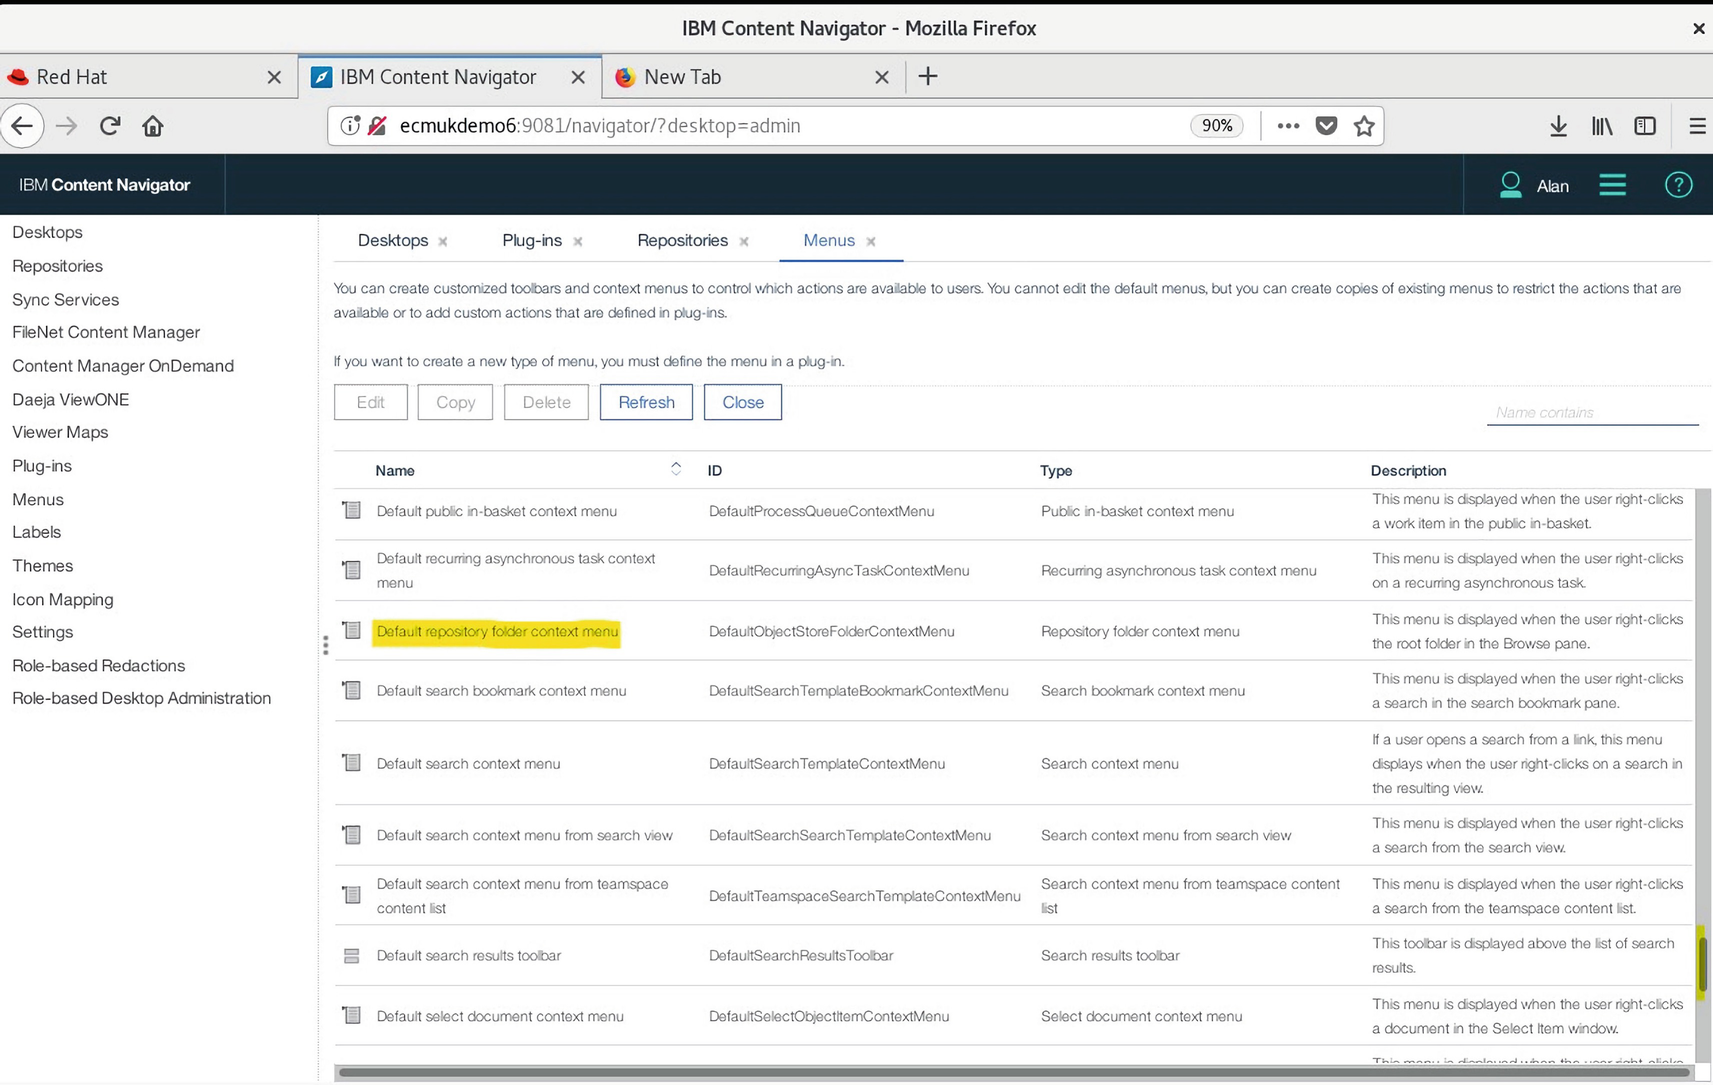
A screenshot of the I B M content navigator page represents a table with details of the name, I D, type, and description of the menus. It highlights the default repository folder context menu.
The highlighted menu template is copied for configuration

A screenshot of the I B M content navigator page represents the details about the name, I D, description, and the type of the new menu. It highlights 2 items named, open process designer and open process tracker.
The new Open Process Designer and Open Process Tracker menu items are added

A screenshot of the I B M content navigator page highlights the save and close button along with 2 items in the selected section naming, open process designer, and open process tracker, under the new menu tab.
The menu items are shown transferred to the copied menu item list
Configuring the DbExecute Connection

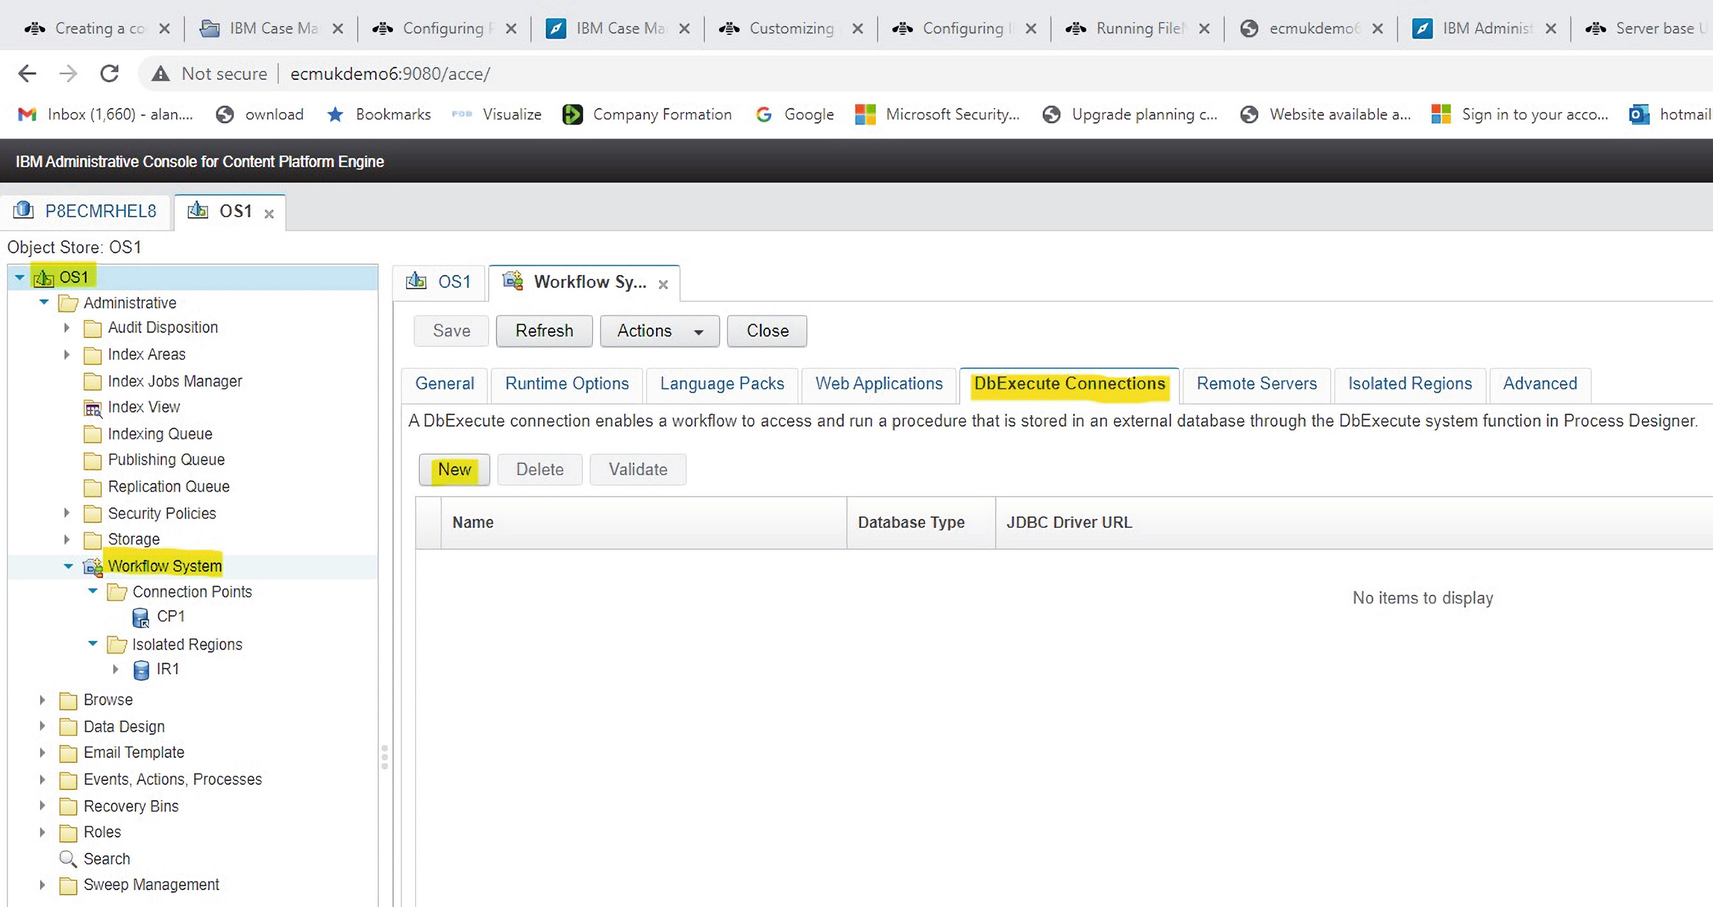
A screenshot highlights the workflow system on the left pane and D b Execute Connections and new tabs on the main content page at the right.
The DbExecute Connections tab on OS1 is selected, and the New command button is clicked
The Design Object Store OS1 does not have any DbExecute Connections.
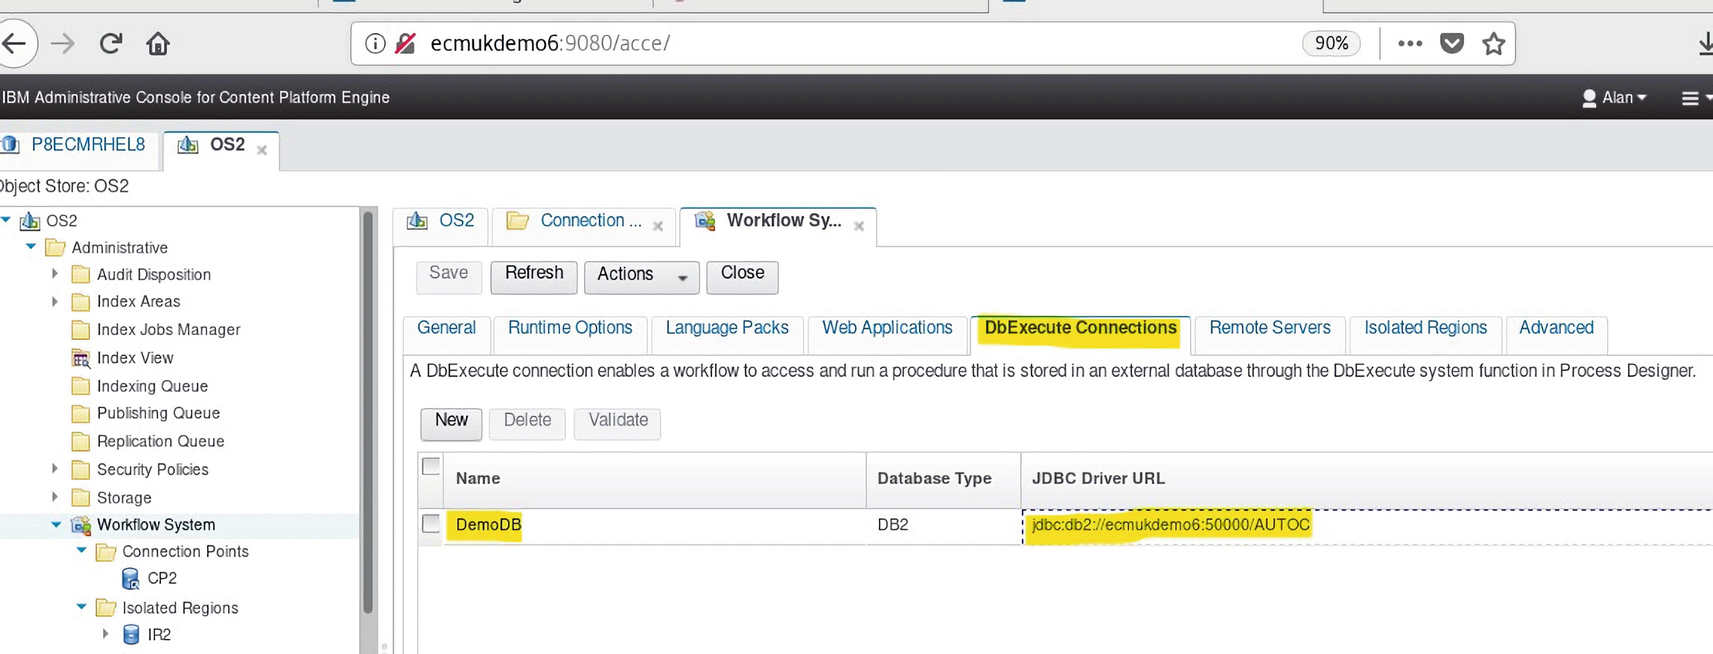
A screenshot represents a table with name, database type, and J D B C driver U R L under the D b Execute Connections tab. it highlights the demo D B and its driver U R L from the table.
The IBM Auto Insurance Claims example solution DbExecute connection

A screenshot represents the options to edit D b Execute connection with connection name, database type, database name, host, port, along with database user name, and database password.
The Edit DbExecute Connection for the Auto Claims Solution is displayed
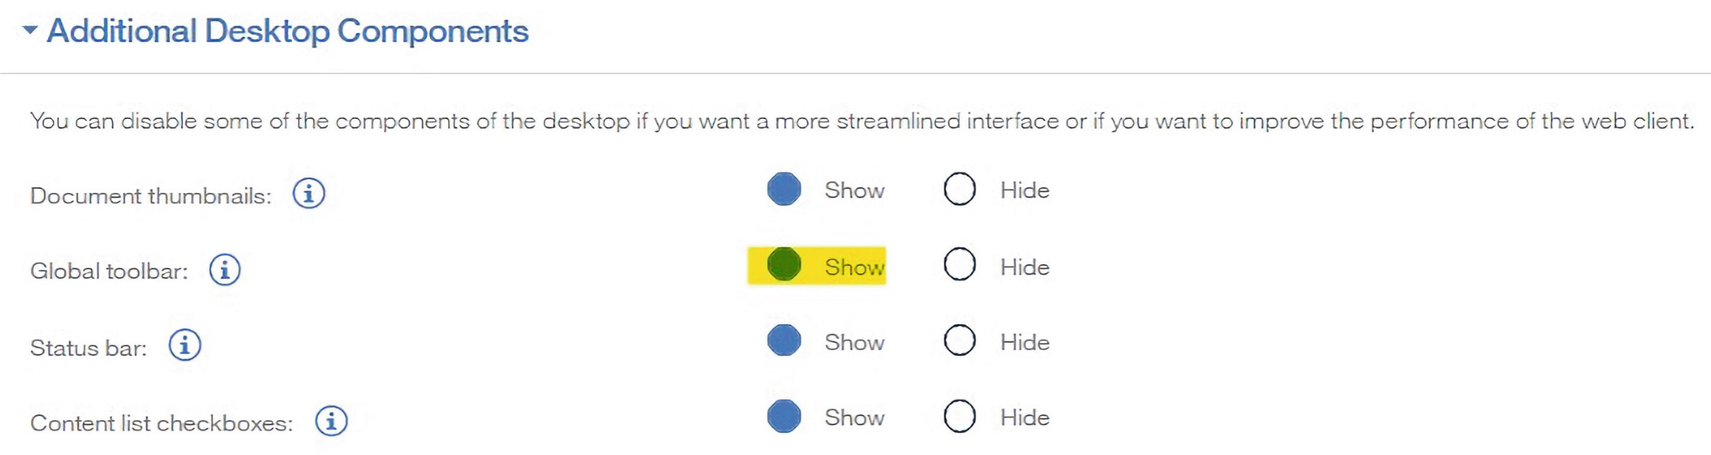
A screenshot represents the options under the additional desktop components. It highlights the represent radio button for the global toolbar.
The Global toolbar settings are changed to show the Process Designer plugin menu actions
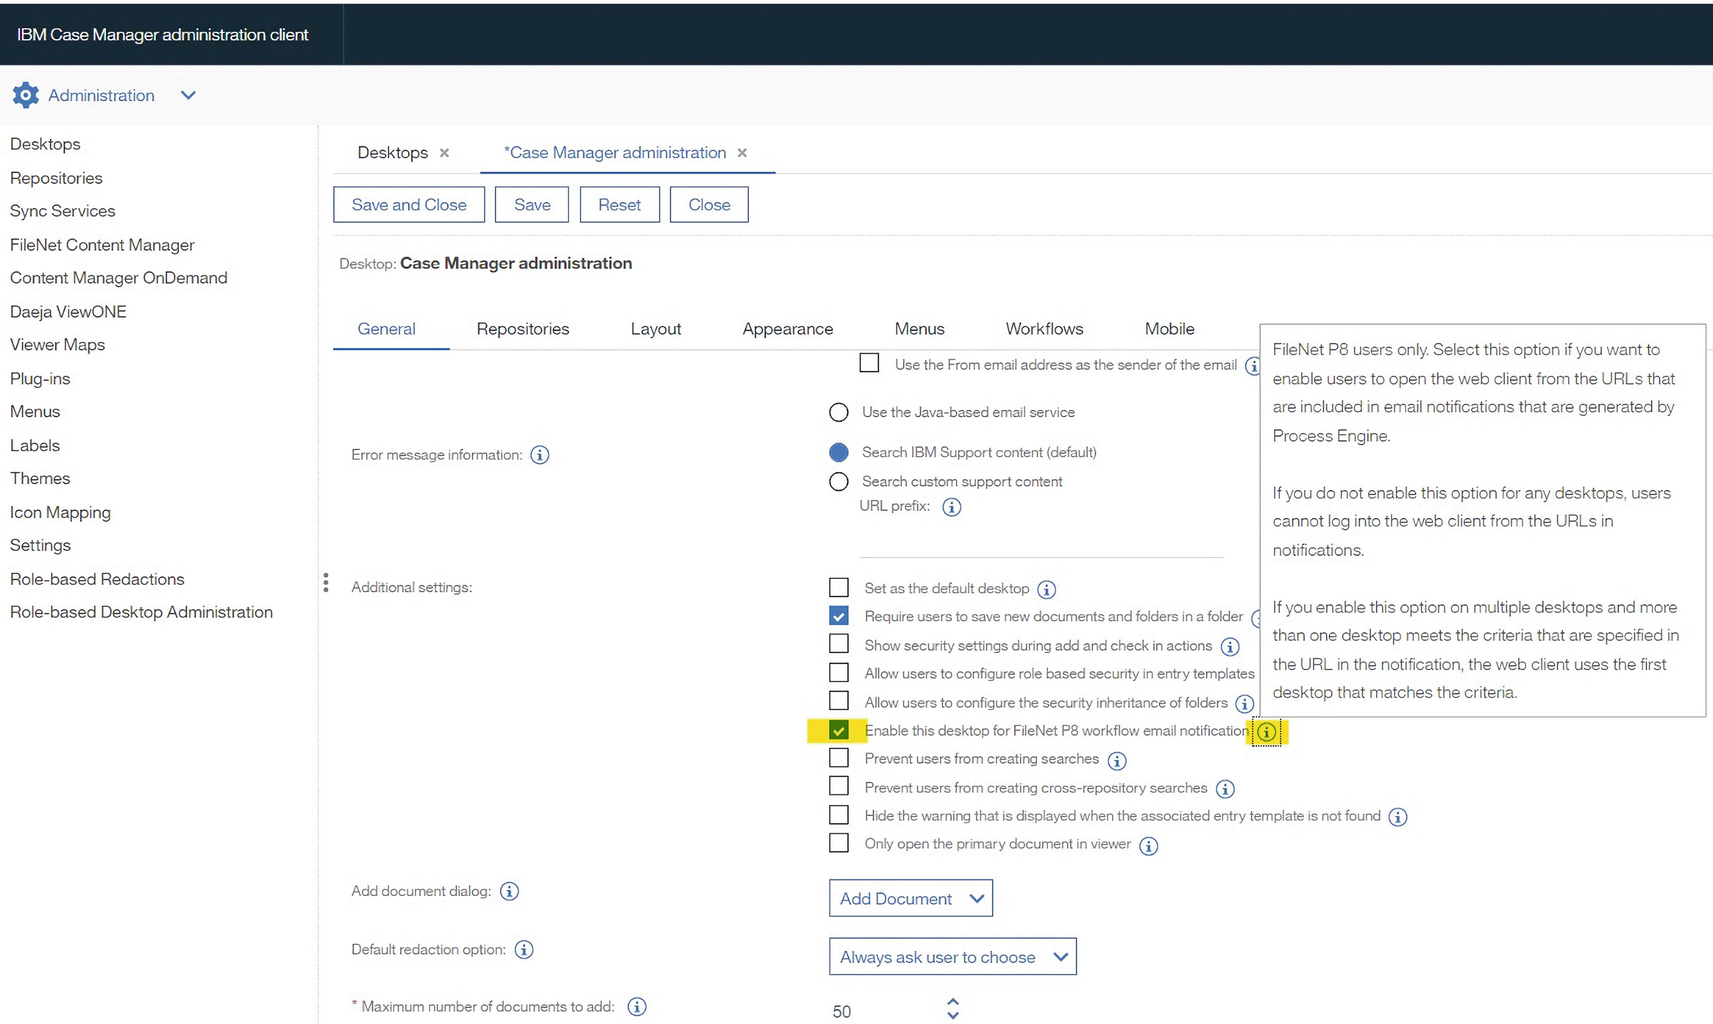
A screenshot of the I B M case manager administration client page highlights a checkbox beside the following text, enable the desktop for FileNet P B workflow email notification.
The option to enable the IBM Case Manager administration client desktop to display emails

A screenshot highlights a checkbox beside the following text, enable the desktop for FileNet P B workflow email notification. It represents the details of the item.
The details of the Information icon help for the option are displayed on mouse-over

A screenshot highlights the C P E Process Designer menu under the feature context menus of the process designer tab.
The Process Designer Desktop tab shows the CPE Process Designer menu we created
In Figure 2-168, the copy of the Repository folder context menu we made can be seen in the drop-down. We can now select our copy of this menu type for our IBM Content Navigator Desktop, which we named CPE Process Designer.
See the following web pages for details of running the Workflow Process Designer Applet in IBM Content Navigator:
For setting up IBM Case Manager for using the Process Designer:
Also, this has useful information:
www.ibm.com/docs/en/filenet-p8-platform/5.5.x?topic=workflows-running-filenet-process-designer
To register the IBM Content Navigator plugins, see
www.ibm.com/docs/en/filenet-p8-platform/5.5.x?topic=navigator-registering-process-applets-plug-in
Followed by this web page section:
www.ibm.com/docs/en/filenet-p8-platform/5.5.x?topic=navigator-configuring-process-designer
Part 5 – Standalone Process Designer Installation
In the current release of browsers, the embedded applet jar file used by the IBM FileNet Workflow Process Designer is often disabled by the browser (including on my systems!). So, this Part describes the installation and configuration required to install the Windows Client Standalone Process Designer, which is then used to add a DbExecute workflow step to the Audit Master Solution we created in Chapter 1.
References are as follows:
www.ibm.com/docs/en/filenet-p8-platform/5.2.1?topic=system-setting-dbexecute-connections
For viewing the error logs in FileNet, the following link is useful:
www.ibm.com/docs/en/filenet-p8-platform/5.5.x?topic=logging-viewing-filenet-p8-logs
We will install the IBM FileNet Process Engine Client tools using the Windows client installer for IBM Content Foundation, Content Platform Engine for Windows system, which can be downloaded from the IBM Software Catalog as a zip file, ICF_5.5.0_WINDOWS_ML.zip.

A screenshot highlights the 5.5.0 I C F C P E application file inside the I C F E 5.5.0 windows M L zip folder.
The unpacked ICF_5.5.0_WINDOWS_ML.zip software package
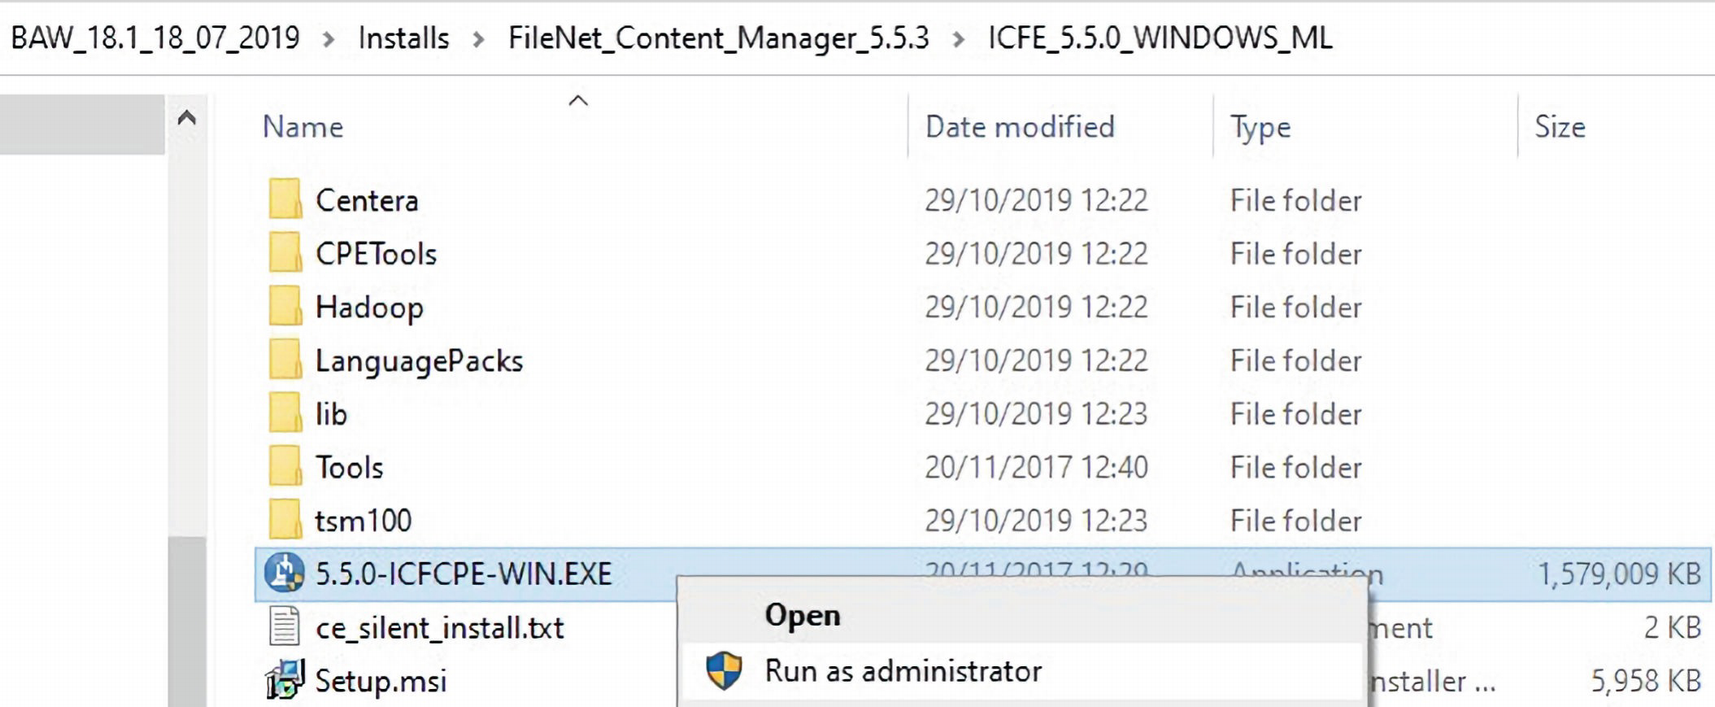
A screenshot represents the selected 5.5.0 I C F C P E WIN dot E X E application file with the options to open and run as administrator.
The 5.5.0-ICFCPE-WIN.EXE program is run as the Windows Administrator

A screenshot represents the progress status bar of the installation with 2 % progress.
The progress status bar of the installation. It can take several minutes to prepare the installation
After accepting the windows pop-up for the installer to use the Windows Administrator, we see the progress status bar shown in Figure 2-171.

A screenshot of a dialog box to install content platform engine. It represents the details under the introduction along with the next and cancel buttons at the bottom.
The initial installation window shows the version of the IBM Content Platform Engine

A screenshot of a dialog box to install content platform engine. It represents the details for the software license agreement, along with the buttons to go next, previous, and cancel.
The I Accept… option is selected, and click the Next command button
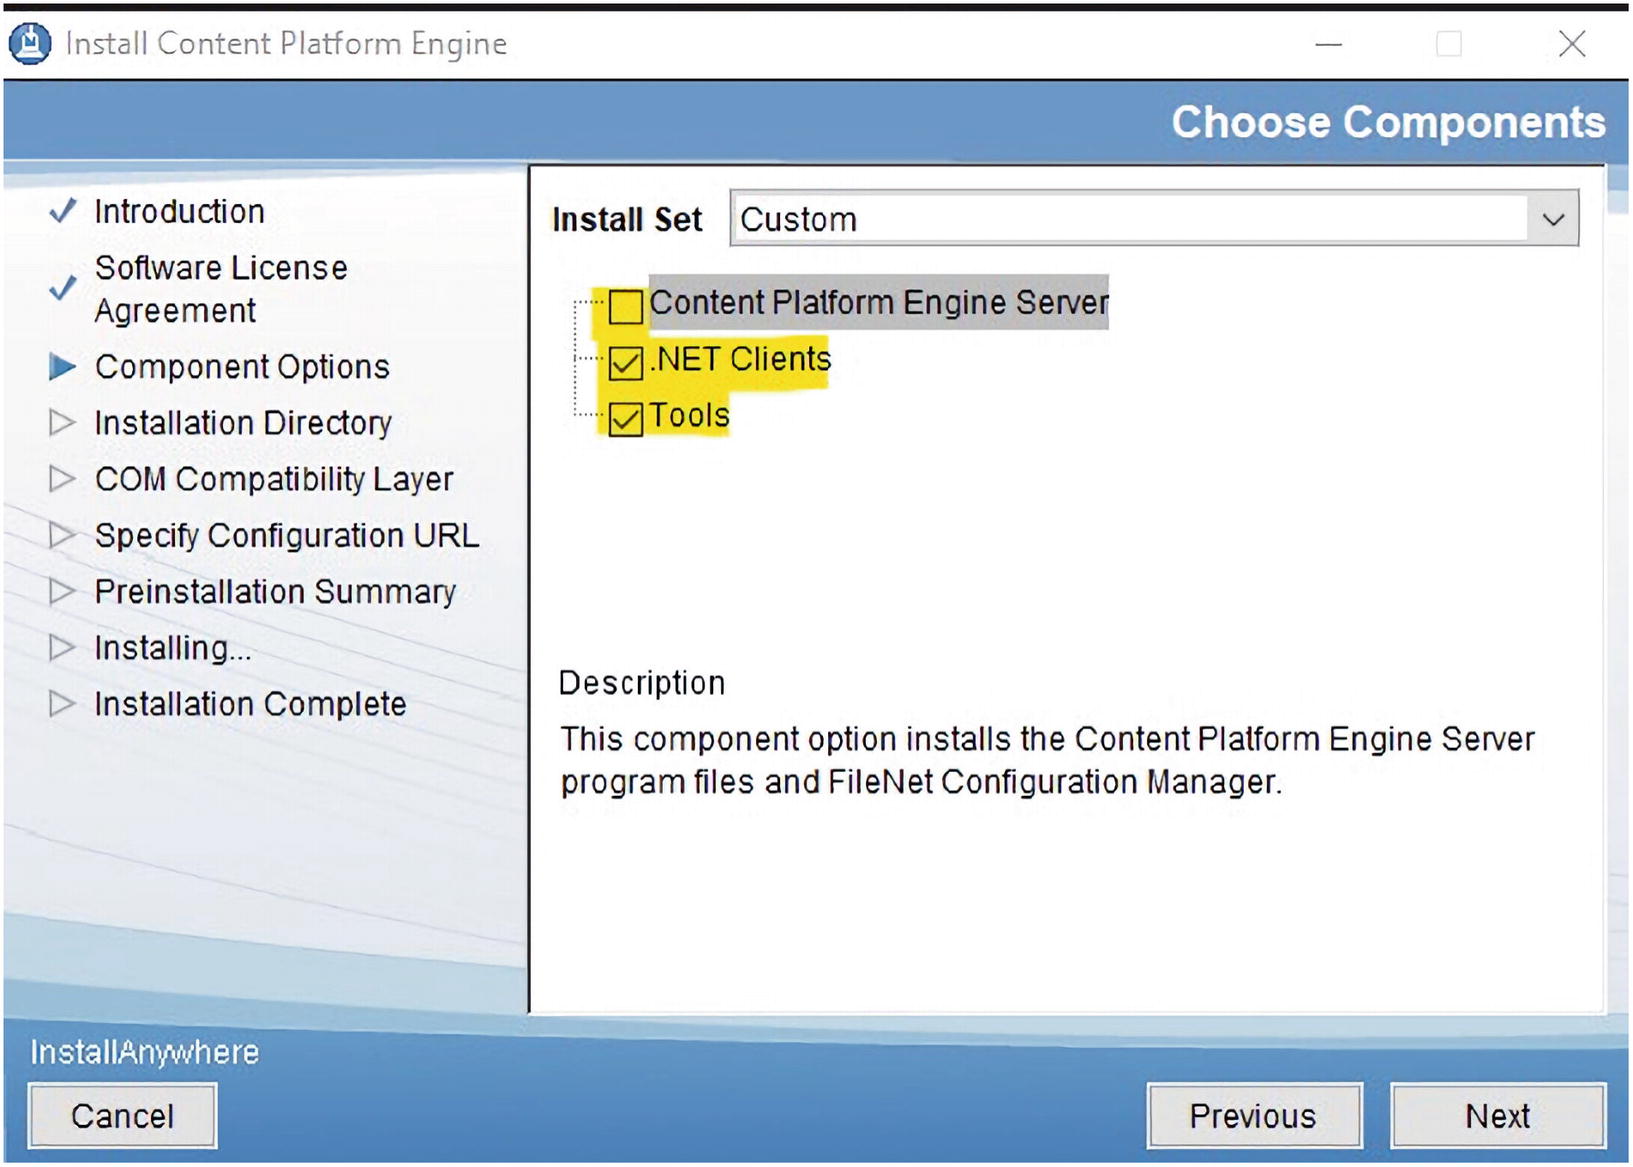
A screenshot of a dialog box to install content platform engine. It represents the options to choose components, along with the buttons to go next, previous, and cancel.
The installation option for the Content Platform Engine Server is deselected
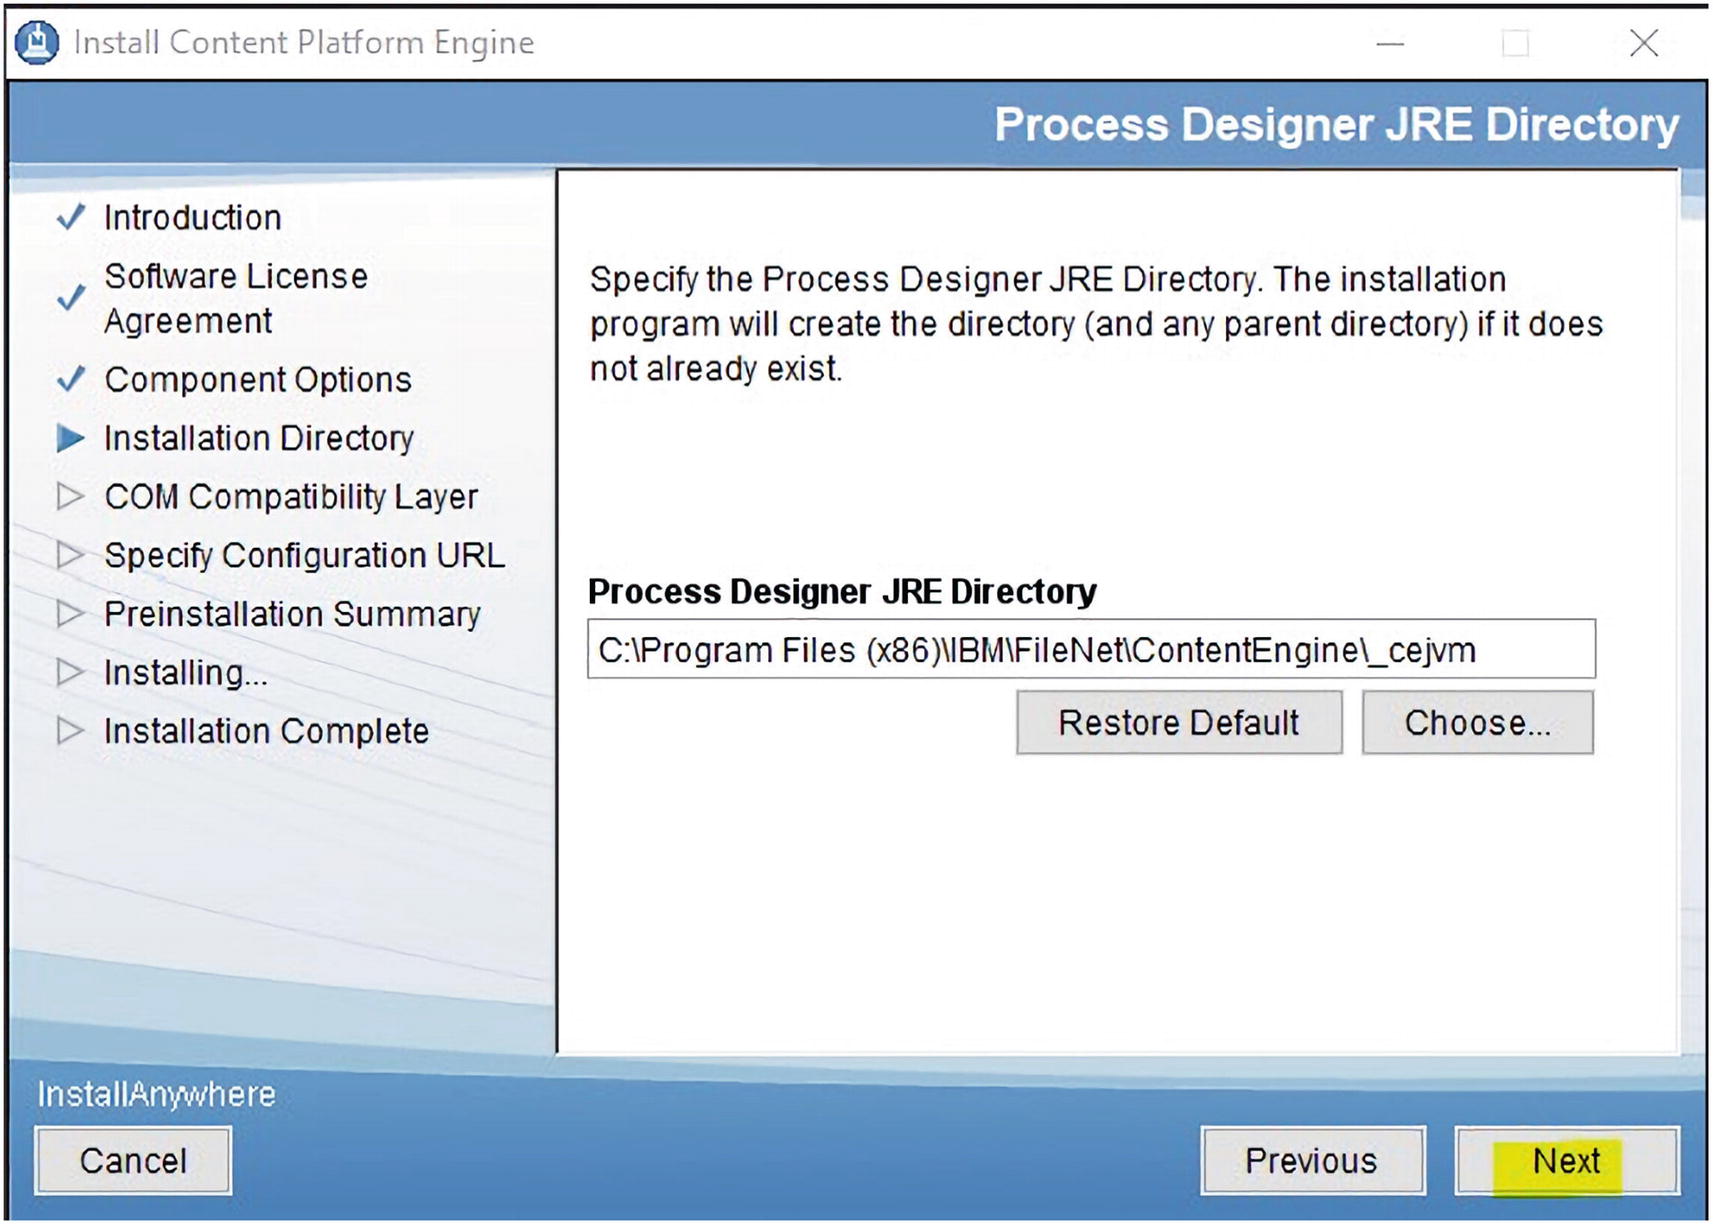
A screenshot of a dialog box to install content platform engine. It represents the path of the process designer J R E directory, along with the buttons to go next, previous, and cancel.
The Process Designer JRE Directory was left as the default (but see the following text!)
The preceding default path does not exist on our MS Windows client system, so we had to post-edit the Process Designer environment batch file later. Also, if a valid path is entered, you must ensure that it does not contain any spaces (so, use the DOS short form for a directory, e.g., “C:PROGRA~1…” rather than the “C:Program Files…” directory name).
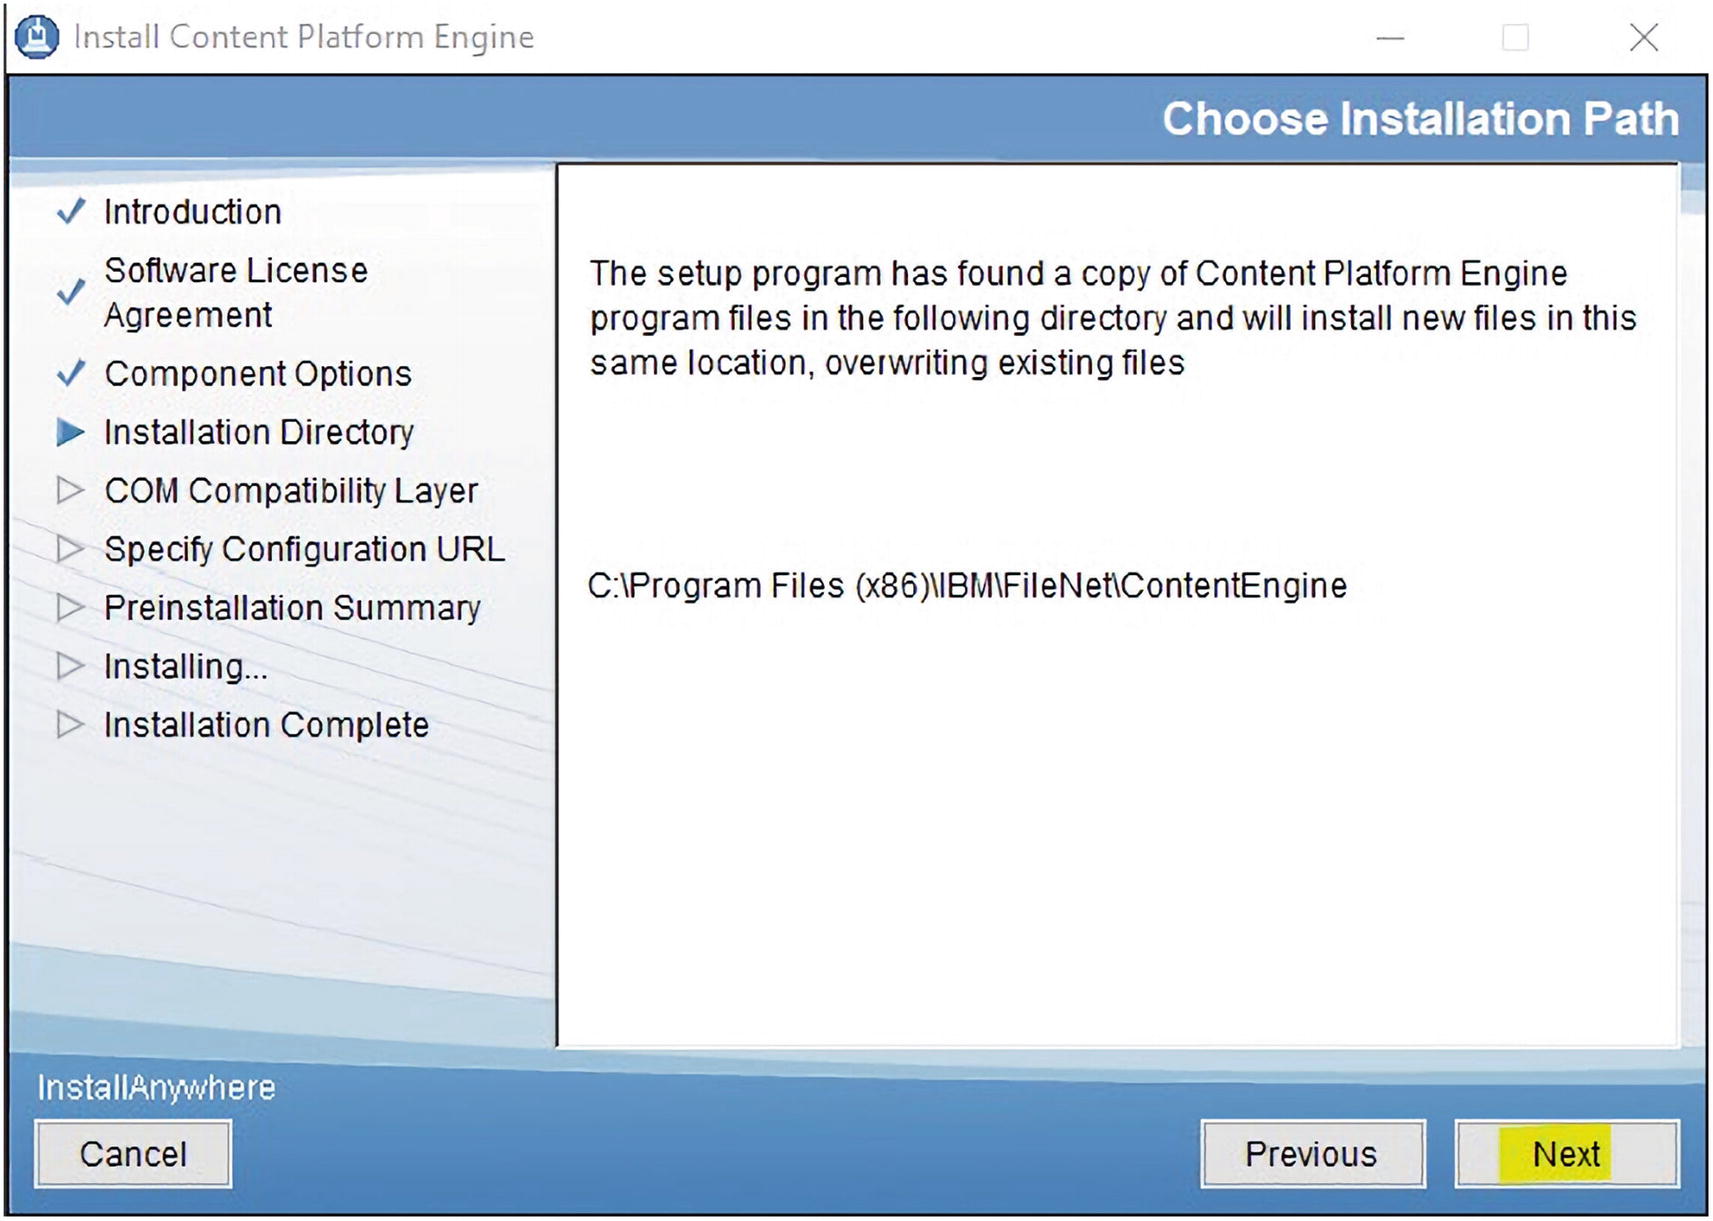
A screenshot of a dialog box to install content platform engine. It represents the option to choose the installation path, along with the buttons to go next, previous, and cancel. It highlights the next button.
The Next command is used after reading the information that we have an older version
We will be asked in the next installation screen to enter the IBM FileNet P8 Content Engine Service Definition SOAP WSDL URL link. This can be tested in a browser which can connect to the Linux ecmukdemo6 server (the Windows hosts file should have an entry for the IP address).
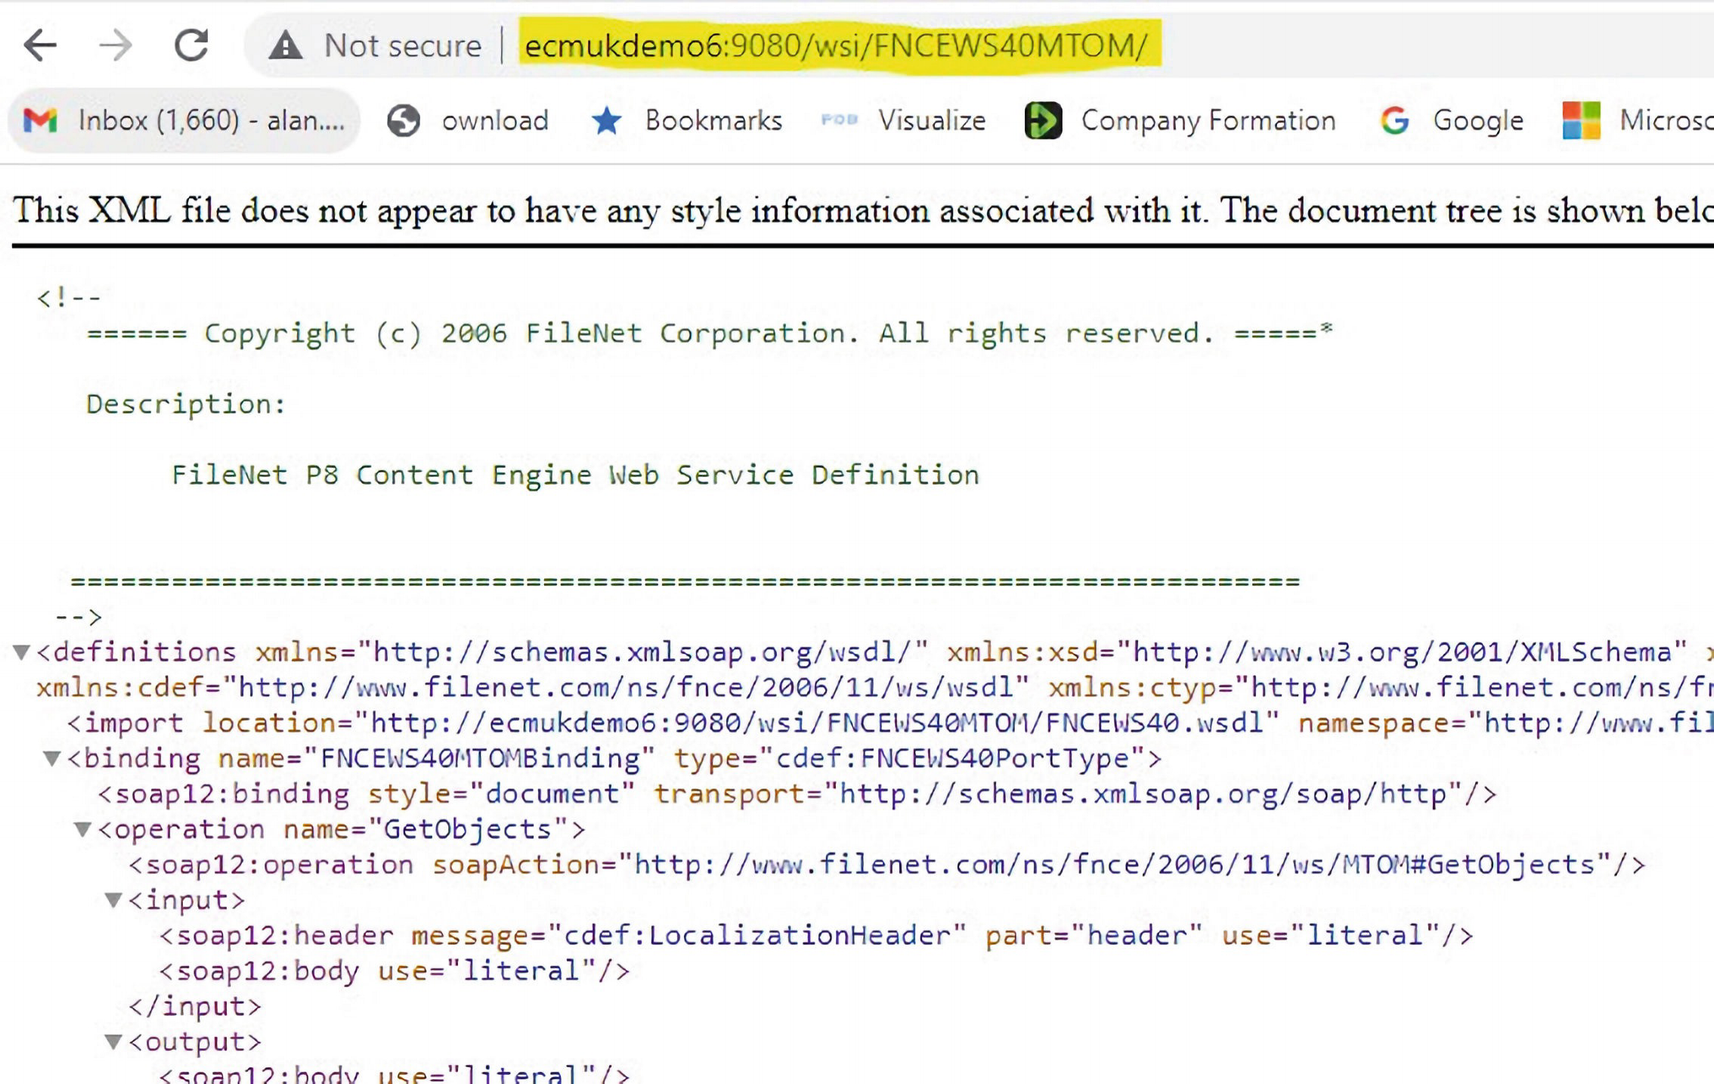
A screenshot of an X M L file opened in a web browser. It highlights its path in the address bar.
The output expected from a correctly configured SOAP URL link

A screenshot of a dialog box to install content platform engine. It represents the C C L server U R L under the dot net A P I com compatibility layer server, along with the buttons to go next, previous, and cancel.
The SOAP URL link used for the COM CCL API layer
The tested URL is entered in the screen in Figure 2-178.

A screenshot of a dialog box to install content platform engine. It represents the U R L used in W c m a p i config properties file, along with the buttons to go next, previous, and cancel. it highlights the next button.
The SOAP link is entered to be used in the WcmApiConfig.properties file

A screenshot of a dialog box to install content platform engine. It represents the pre-installation summary, along with the buttons to go previous and cancel. It highlights the install button.
The Install command button is clicked to start the installation

A screenshot of a dialog box represents the process of installing the content platform engine. There is an installation progress bar with a 14% progress at the bottom.
The installation progress status bar is shown
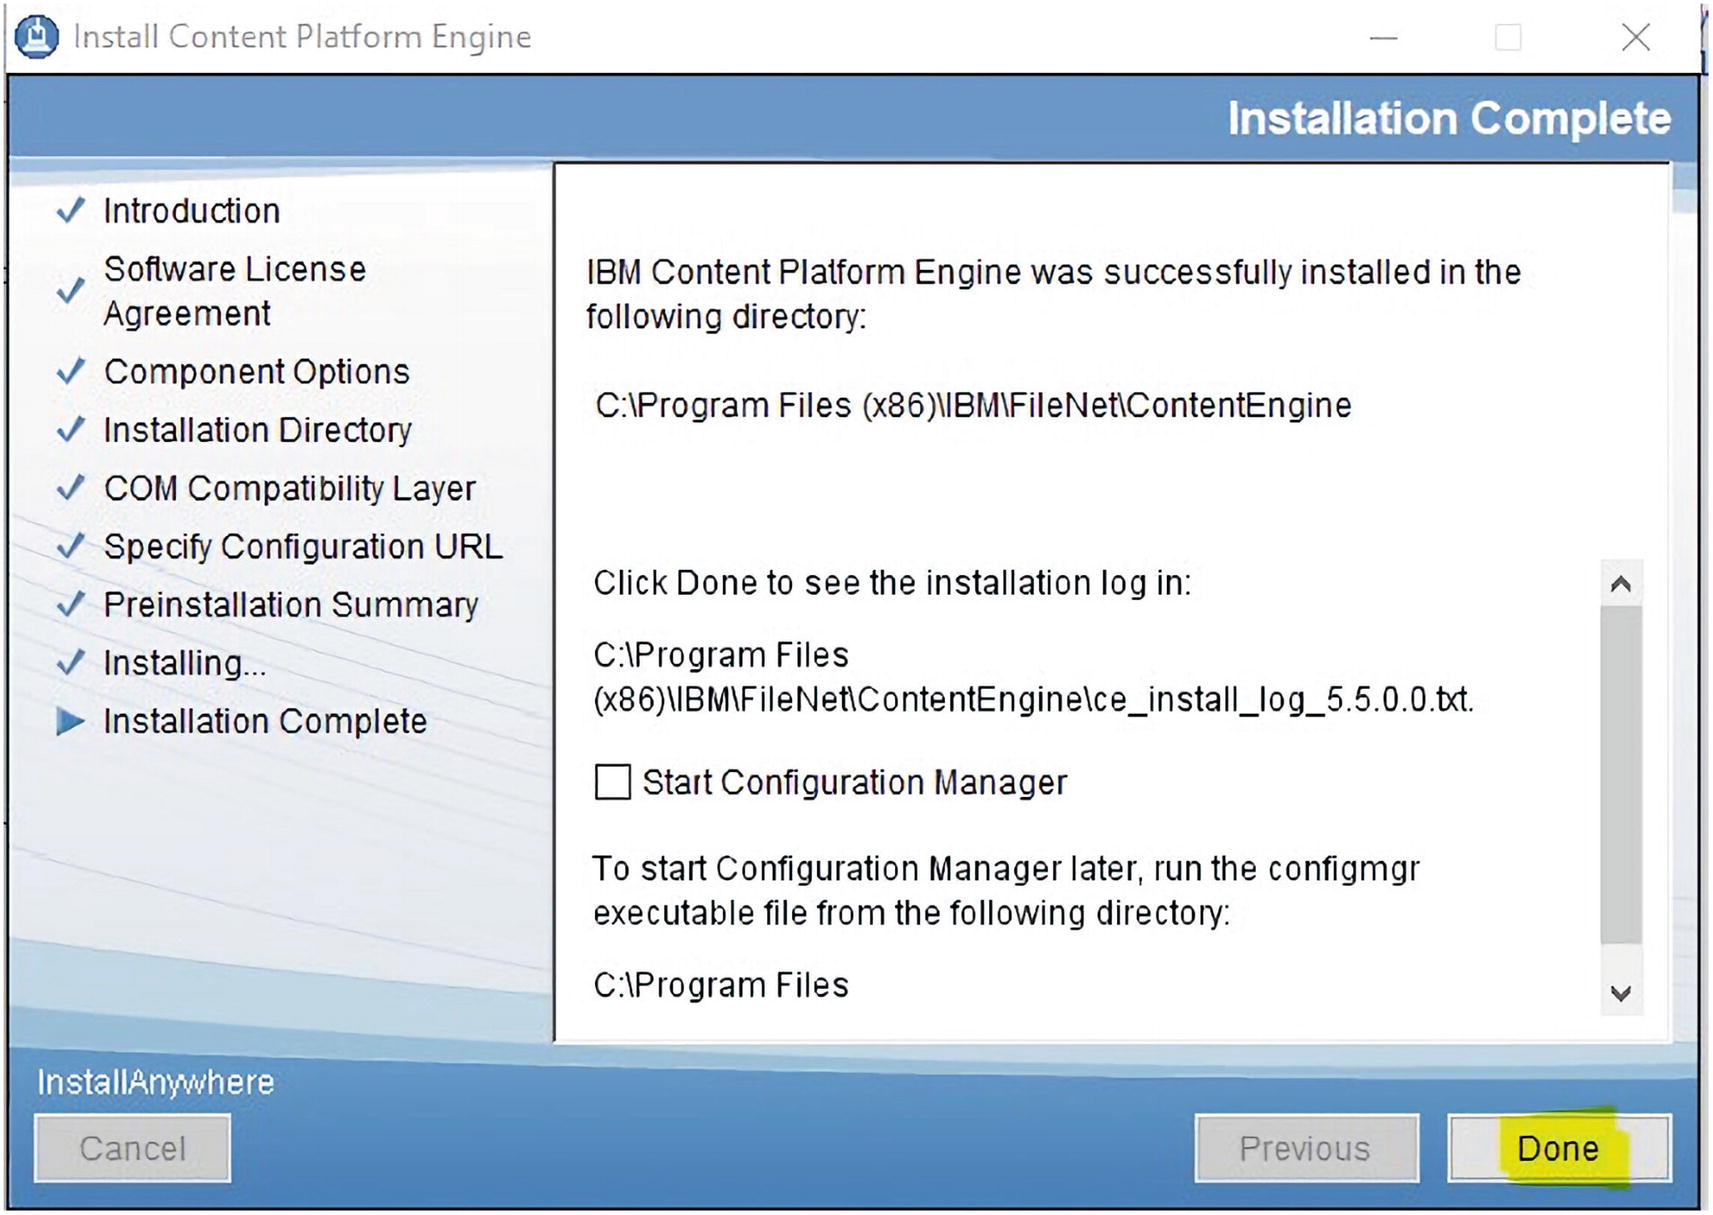
A screenshot of a dialog box indicates the completion of the installation of the content platform engine. It highlights a button labeled, done.
The Done command button is clicked to exit from the final installation screen
Fixing the Process Designer Shell Script Environment Variables

A screenshot illustrates the location of p e designer dot bat file inside the c drive. It highlights the file path and file name in the P E folder.
The location of the pedesigner.bat file which will launch the Standalone Process Designer

A screenshot of a set of commands in the command prompt. It represents the available files in the P E directory.
The launch of the pedesigner.bat shell script to load the Standalone Process Designer

A screenshot of a set of commands in the command prompt. It exhibits the command line including the connection point C P 1.
The correct command line including the Connection Point, CP1
Unfortunately, we have the JAVA_HOME Windows environment variable pointing at a JRE Classpath which does not exist.

A screenshot of a set of commands in the command prompt. It exhibits the following text, the system cannot find the path specified.
The system error message appears

A screenshot of a notepad containing a set of codes. It highlights the following text in it. fix for environment path spaces, P R O G R A 2.
The highlighted changes are made in the pedesigner.bat shell script
In Figure 2-187, we make changes to ensure there are no spaces in the classpath which we can achieve by using the DOS short form of the directory path for the top level c:Program Files (x86) directory, which has a DOS short form of c:PROGRA~2.
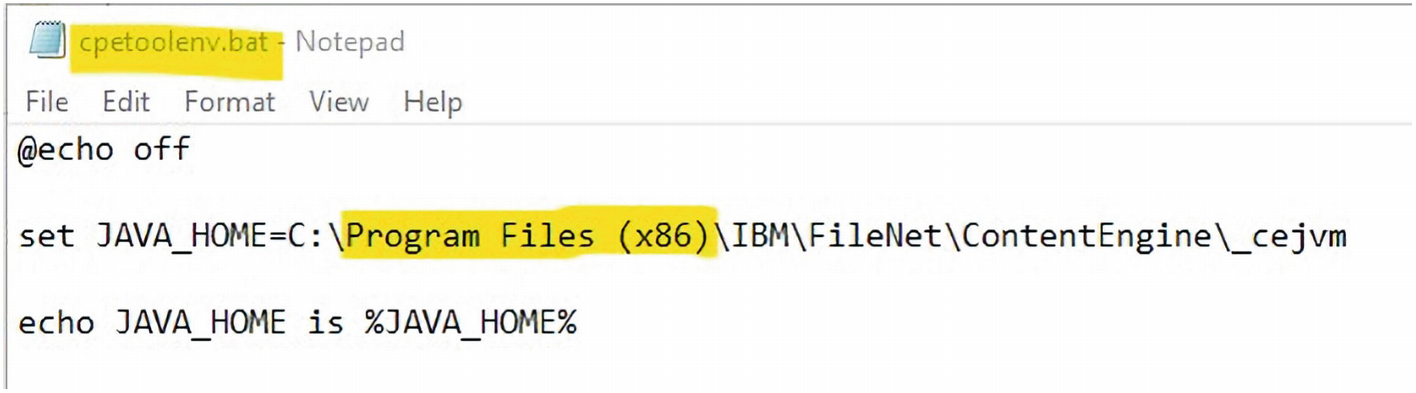
A screenshot of a notepad containing a set of codes. It highlights the file name, c p tool e n v dot bat, and the folder program file x 86 in the c drive.
The highlighted change is made in the cpetoolenv.bat shell script

A screenshot of the notepad containing a set of codes. It highlights the path of i b m underscore s d k 80 file in the C drive.
The updated cpetoolenv.bat file

A screenshot of the login box for the workflow system. It consists of the filled-in details of user name and password along with the buttons to log in cancel, and help.
The User Name and Password are entered, and the Log In command button is clicked

A screenshot represents the edit screen of the process designer application. An icon in the middle reads launch step. There is a list of workflow properties at the bottom of the screen.
The first edit screen of the Process Designer Java program
We can now load the Audit Department Task Workflow of our Audit Master Case Manager Solution.
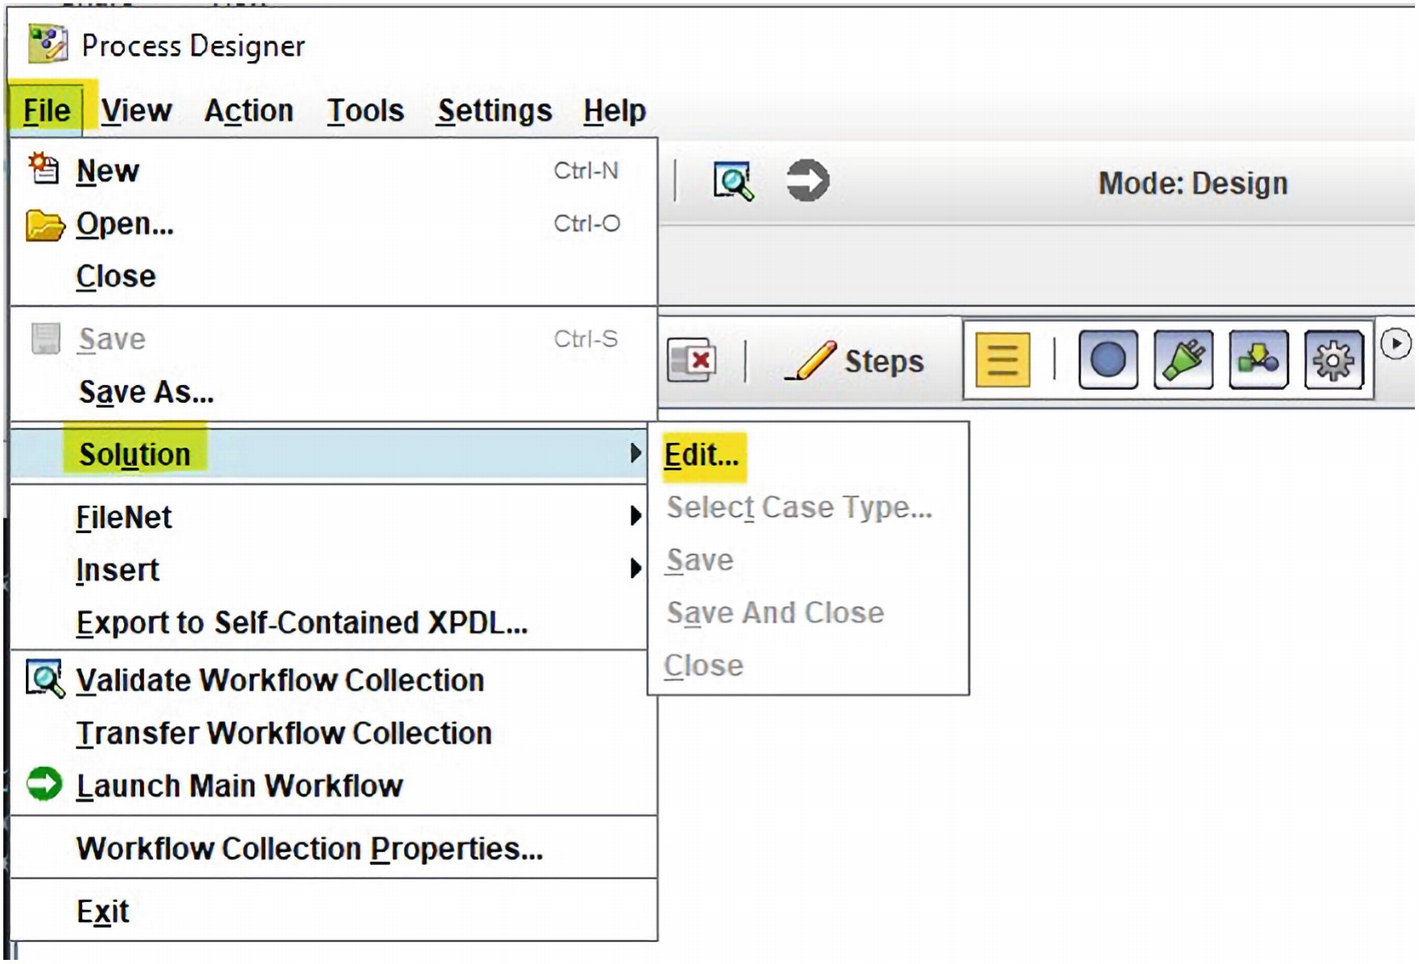
A screenshot represents the edit screen of the process designer application. It highlights the file tab with a popped-up context menu. It highlights the solution and edit options in the menu.
The menu option is selected to navigate to the Audit Master solution to edit the Task Workflow
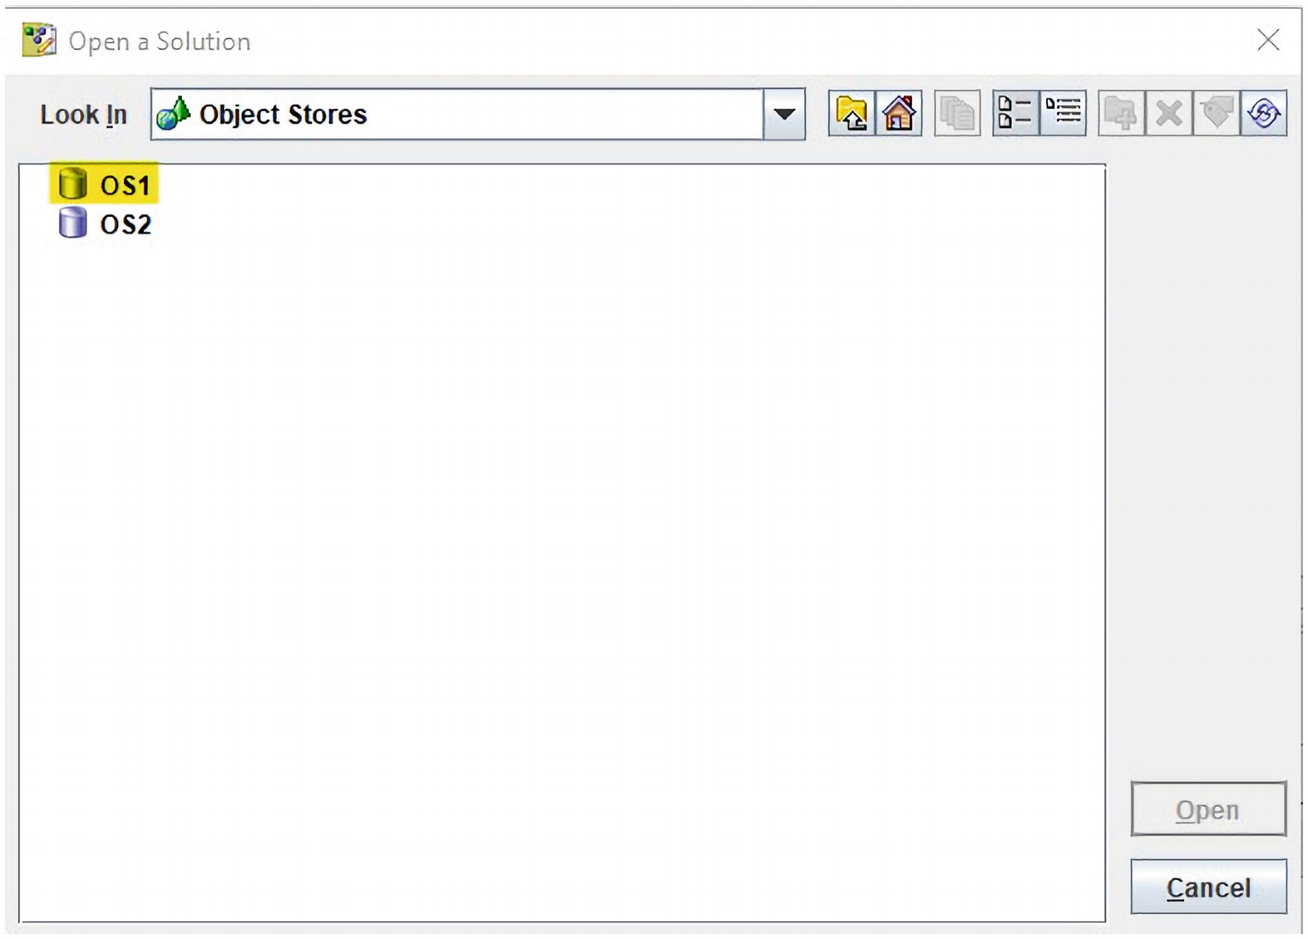
A screenshot illustrates the text, object stores, inside a textbox besides the look-in operation. It highlights O S 1 from the available object stores.
The Design Object Store, OS1, is selected

A screenshot represents the Audit Master folder is selected under the solutions in O S 1.
The path to the Audit Master solution is selected and opened
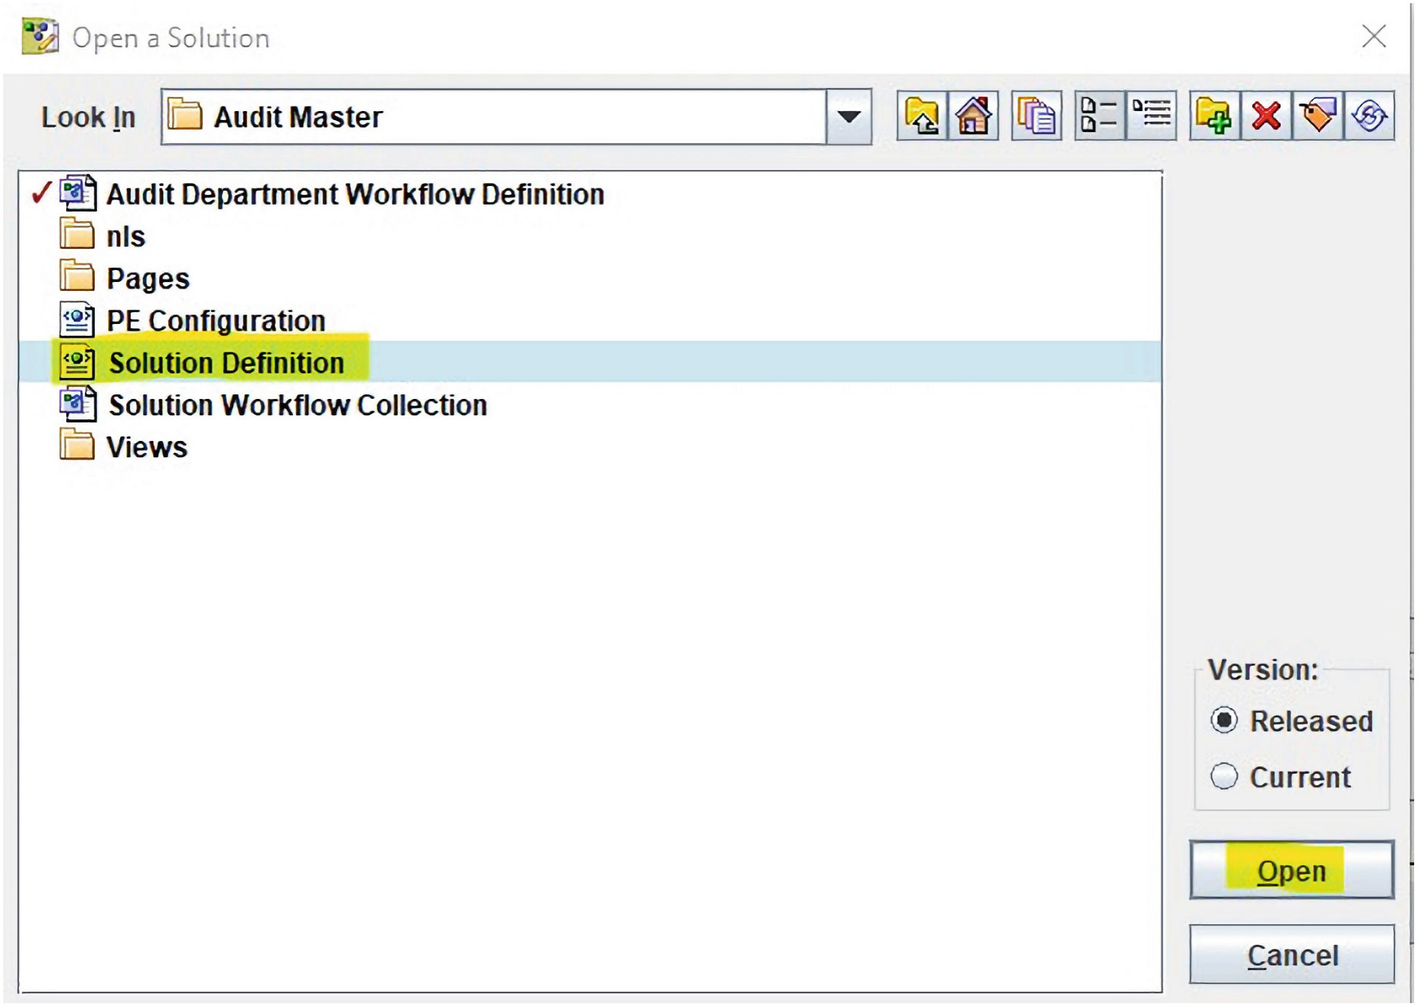
A screenshot highlights the solution definition under the audit department workflow definition along with the open button at the bottom right corner.
The Solution Definition file for the Audit Master solution is selected and Open clicked

A screenshot of the case type selection dialog box highlights the audit department. There are buttons to cancel and help at the bottom.
The Audit Department Case Type is selected
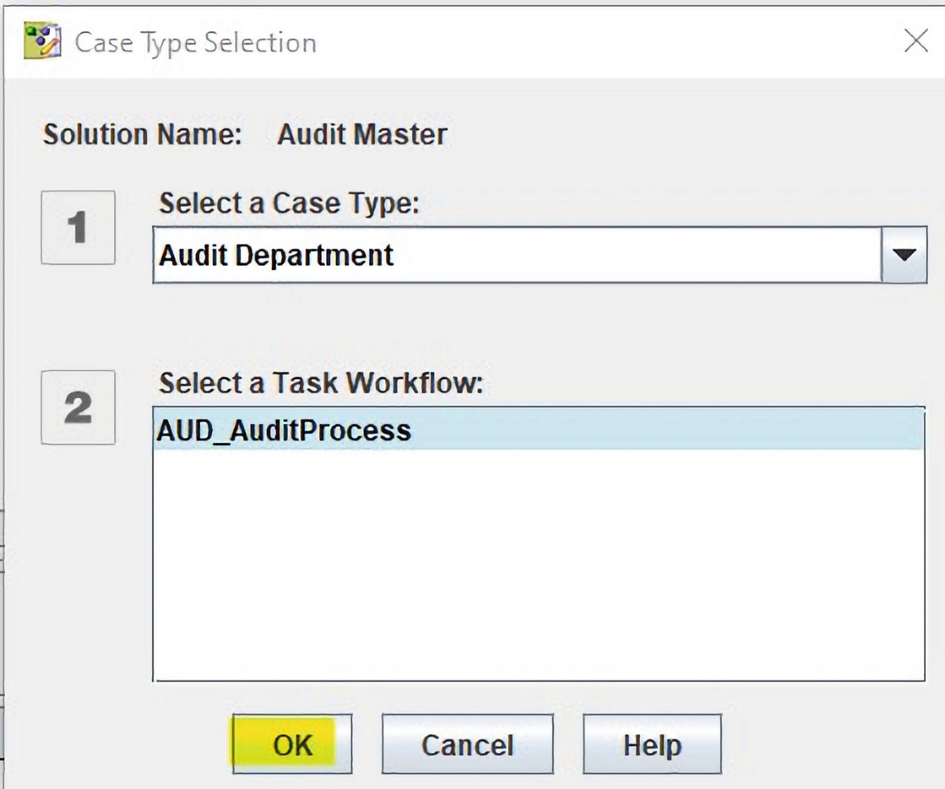
A screenshot of the case type selection dialog box represents the audit department under case type and audit process under task workflow. It highlights the ok button at the bottom.
The AUD_AuditProcess Task Workflow for the Audit Department Case Type is selected
We can now add the DbExecute Workflow step.
The DbExecute Workflow Step Addition
The following URL covers the system setup for DbExecute:
www.ibm.com/docs/en/filenet-p8-platform/5.2.1?topic=system-setting-dbexecute-connections
The following procedure is used in the IBM FileNet acce web application to configure the database JDBC link required by the Workflow DbExecute step. It defines the JDBC URL which allows the FileNet system to connect to a server database, by an administrator specifying a server name and port number and entering the required database name and logon details to access the Stored Procedure to be used.
Procedure to Configure a DbExecute Connection in the Content Engine Store
- 1.Access the DbExecute Connections tab in the administration console:
- a.
In the domain navigation pane, select the object store.
- b.
In the object store navigation pane, click Administrative ➤ Workflow System.
- c.
In the details pane, click the DbExecute Connections tab.
A screenshot of the I B M administrative console page highlights the workflow system under O S 1 in the left navigation pane and D b execute connections tab on the right side.
The DbExecute Connections in the Design Object Store
- 2.
Click New.
- 3.
Enter the connection information and database parameters.
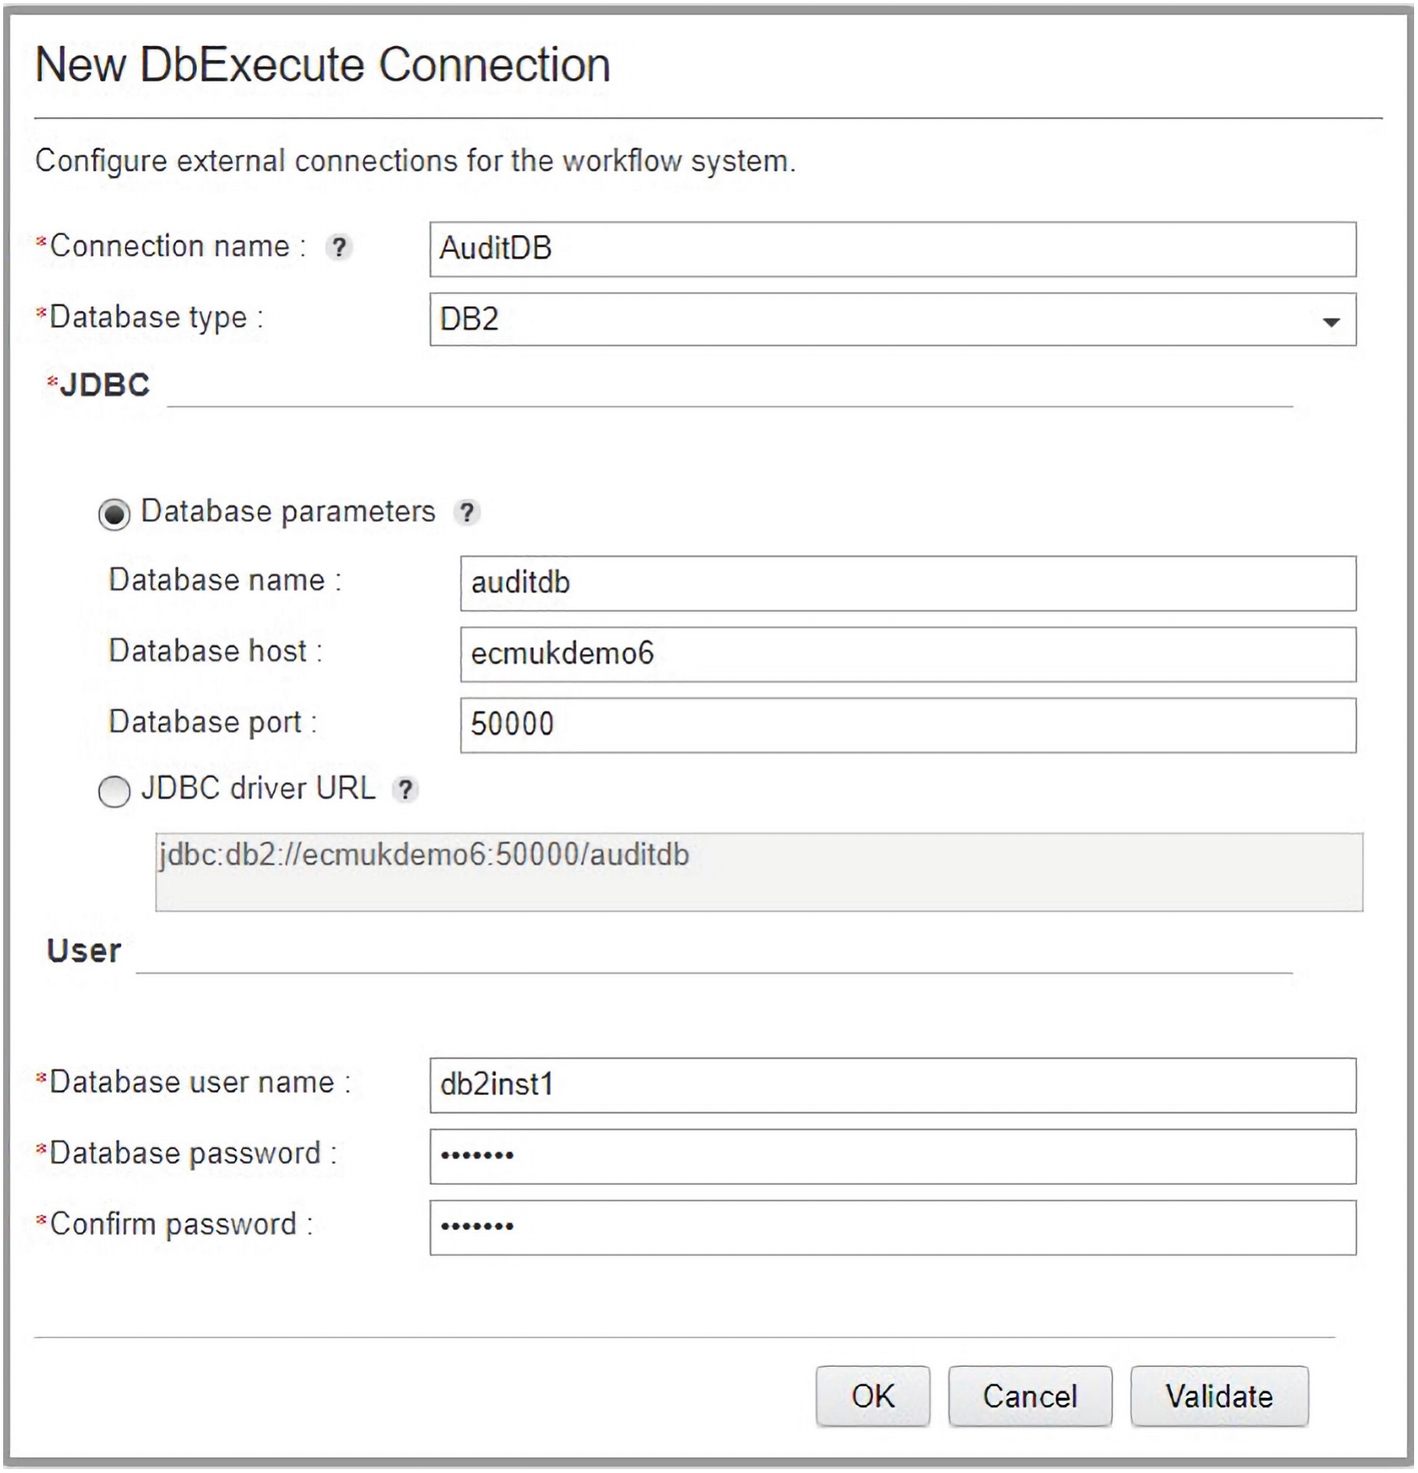
A screenshot of a form titled new d b execute connection. It contains the details of the connection name, database type, name, host, port, user name, and password. There are ok, cancel, and validate buttons at the bottom.
The AuditDB connection parameters are entered
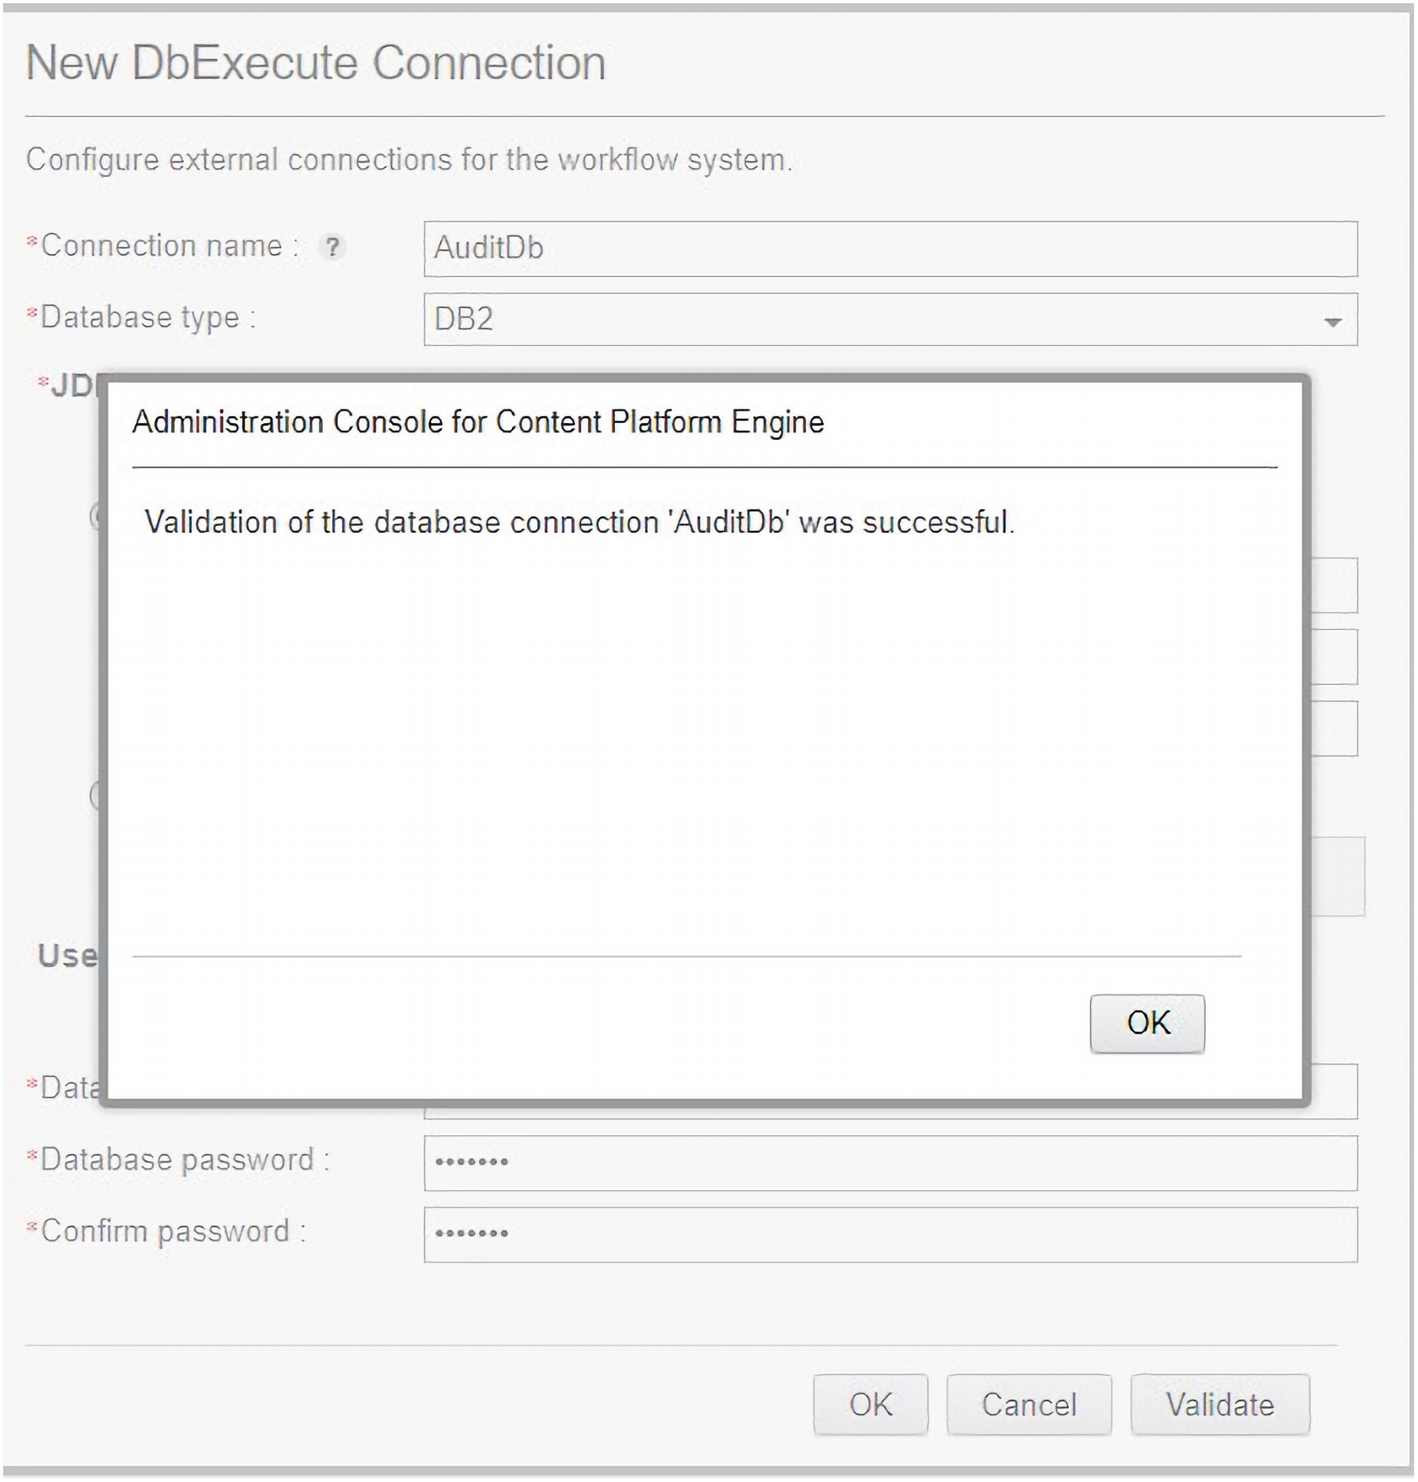
A screenshot of the new d b execute connection dialog box. It represents a pop-up text box with the following text, validation of the database connection audit d b was successful.
The status of the AuditDb connection is shown
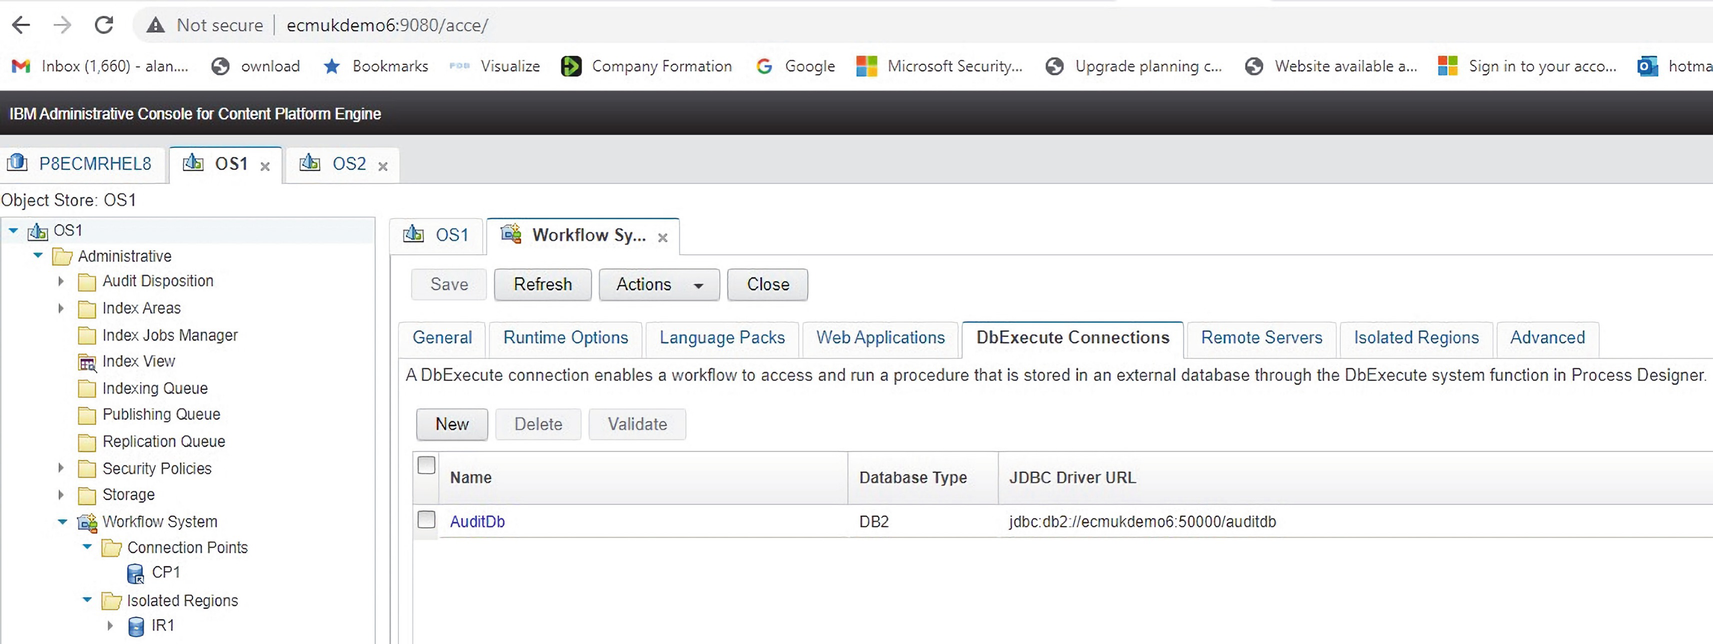
A screenshot represents the created audit d b file in the d b execute connection. There are buttons to save, refresh, action, and close at the top.
The AuditDb object is successfully created in the DbExecute Connections tab of OS1
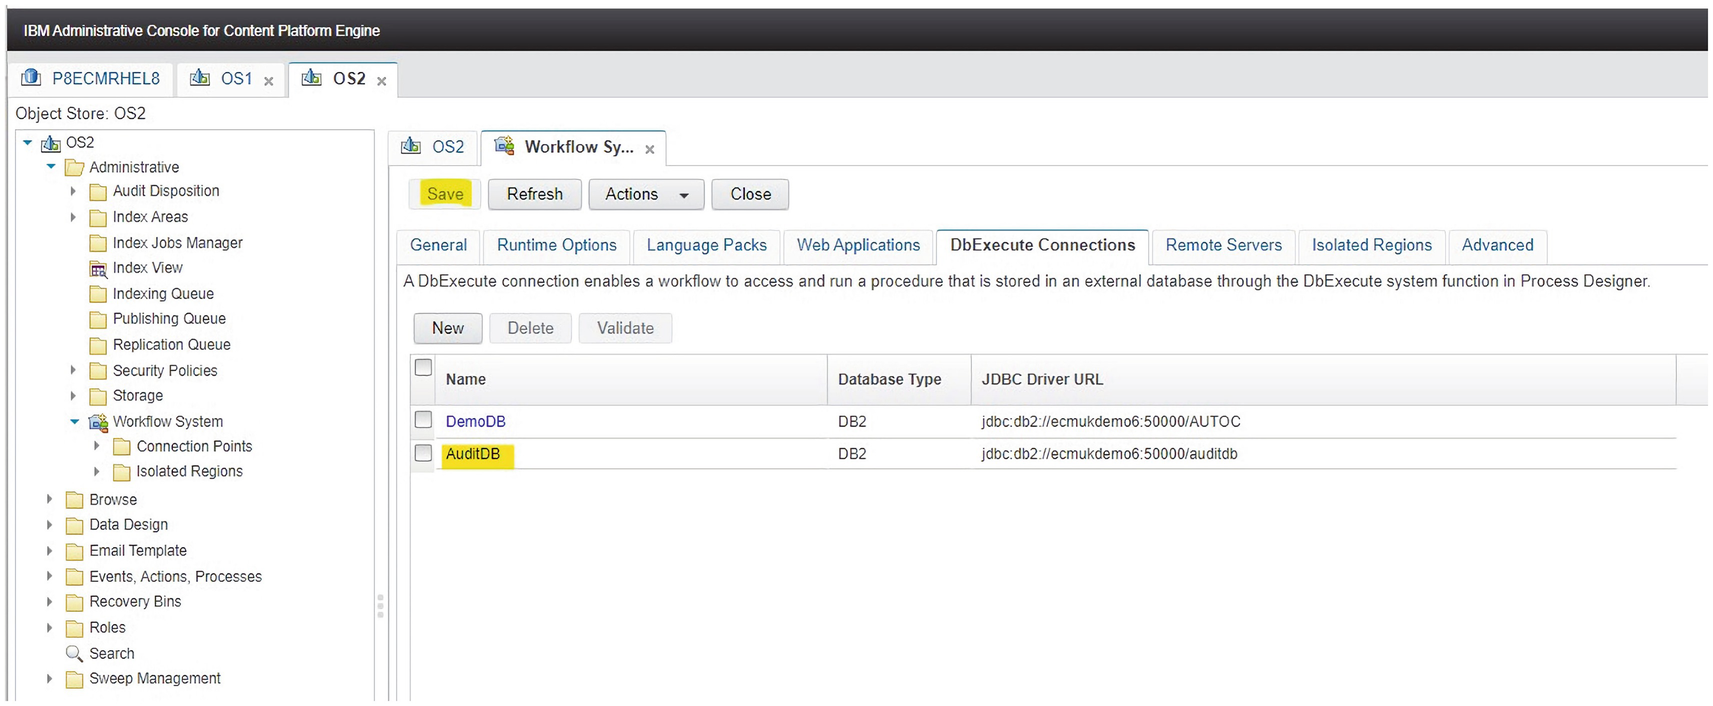
A screenshot represents the created audit d b file in the d b execute connections. It highlights the audit d b file and the save button.
The AuditDB object is successfully created in the DbExecute Connections tab of OS2
A screenshot represents a set of commands in a text box.
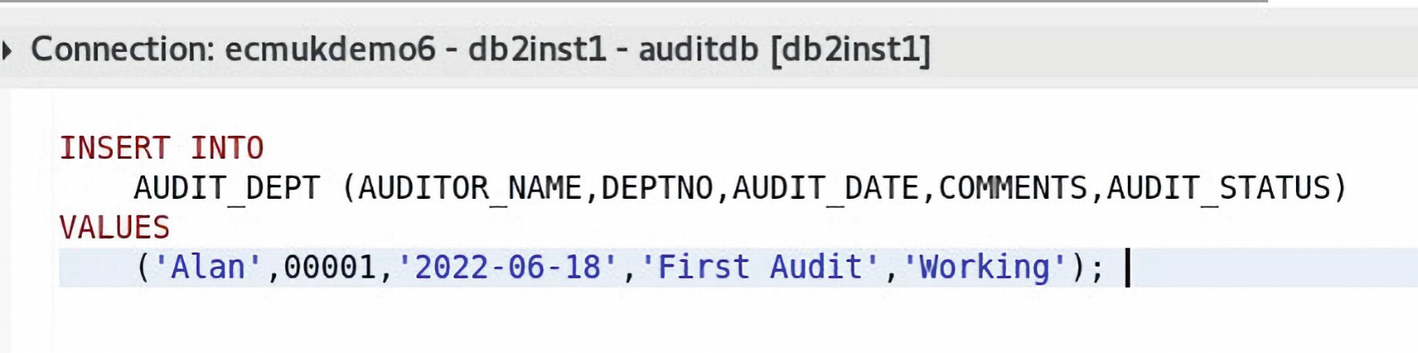
The IBM Data Studio is used to view and add test rows in the DB2 auditdb database
The DbExecute Stored Procedure SQL

A screenshot of a text editor represents a set of commands. It lists the procedure to add audit department.
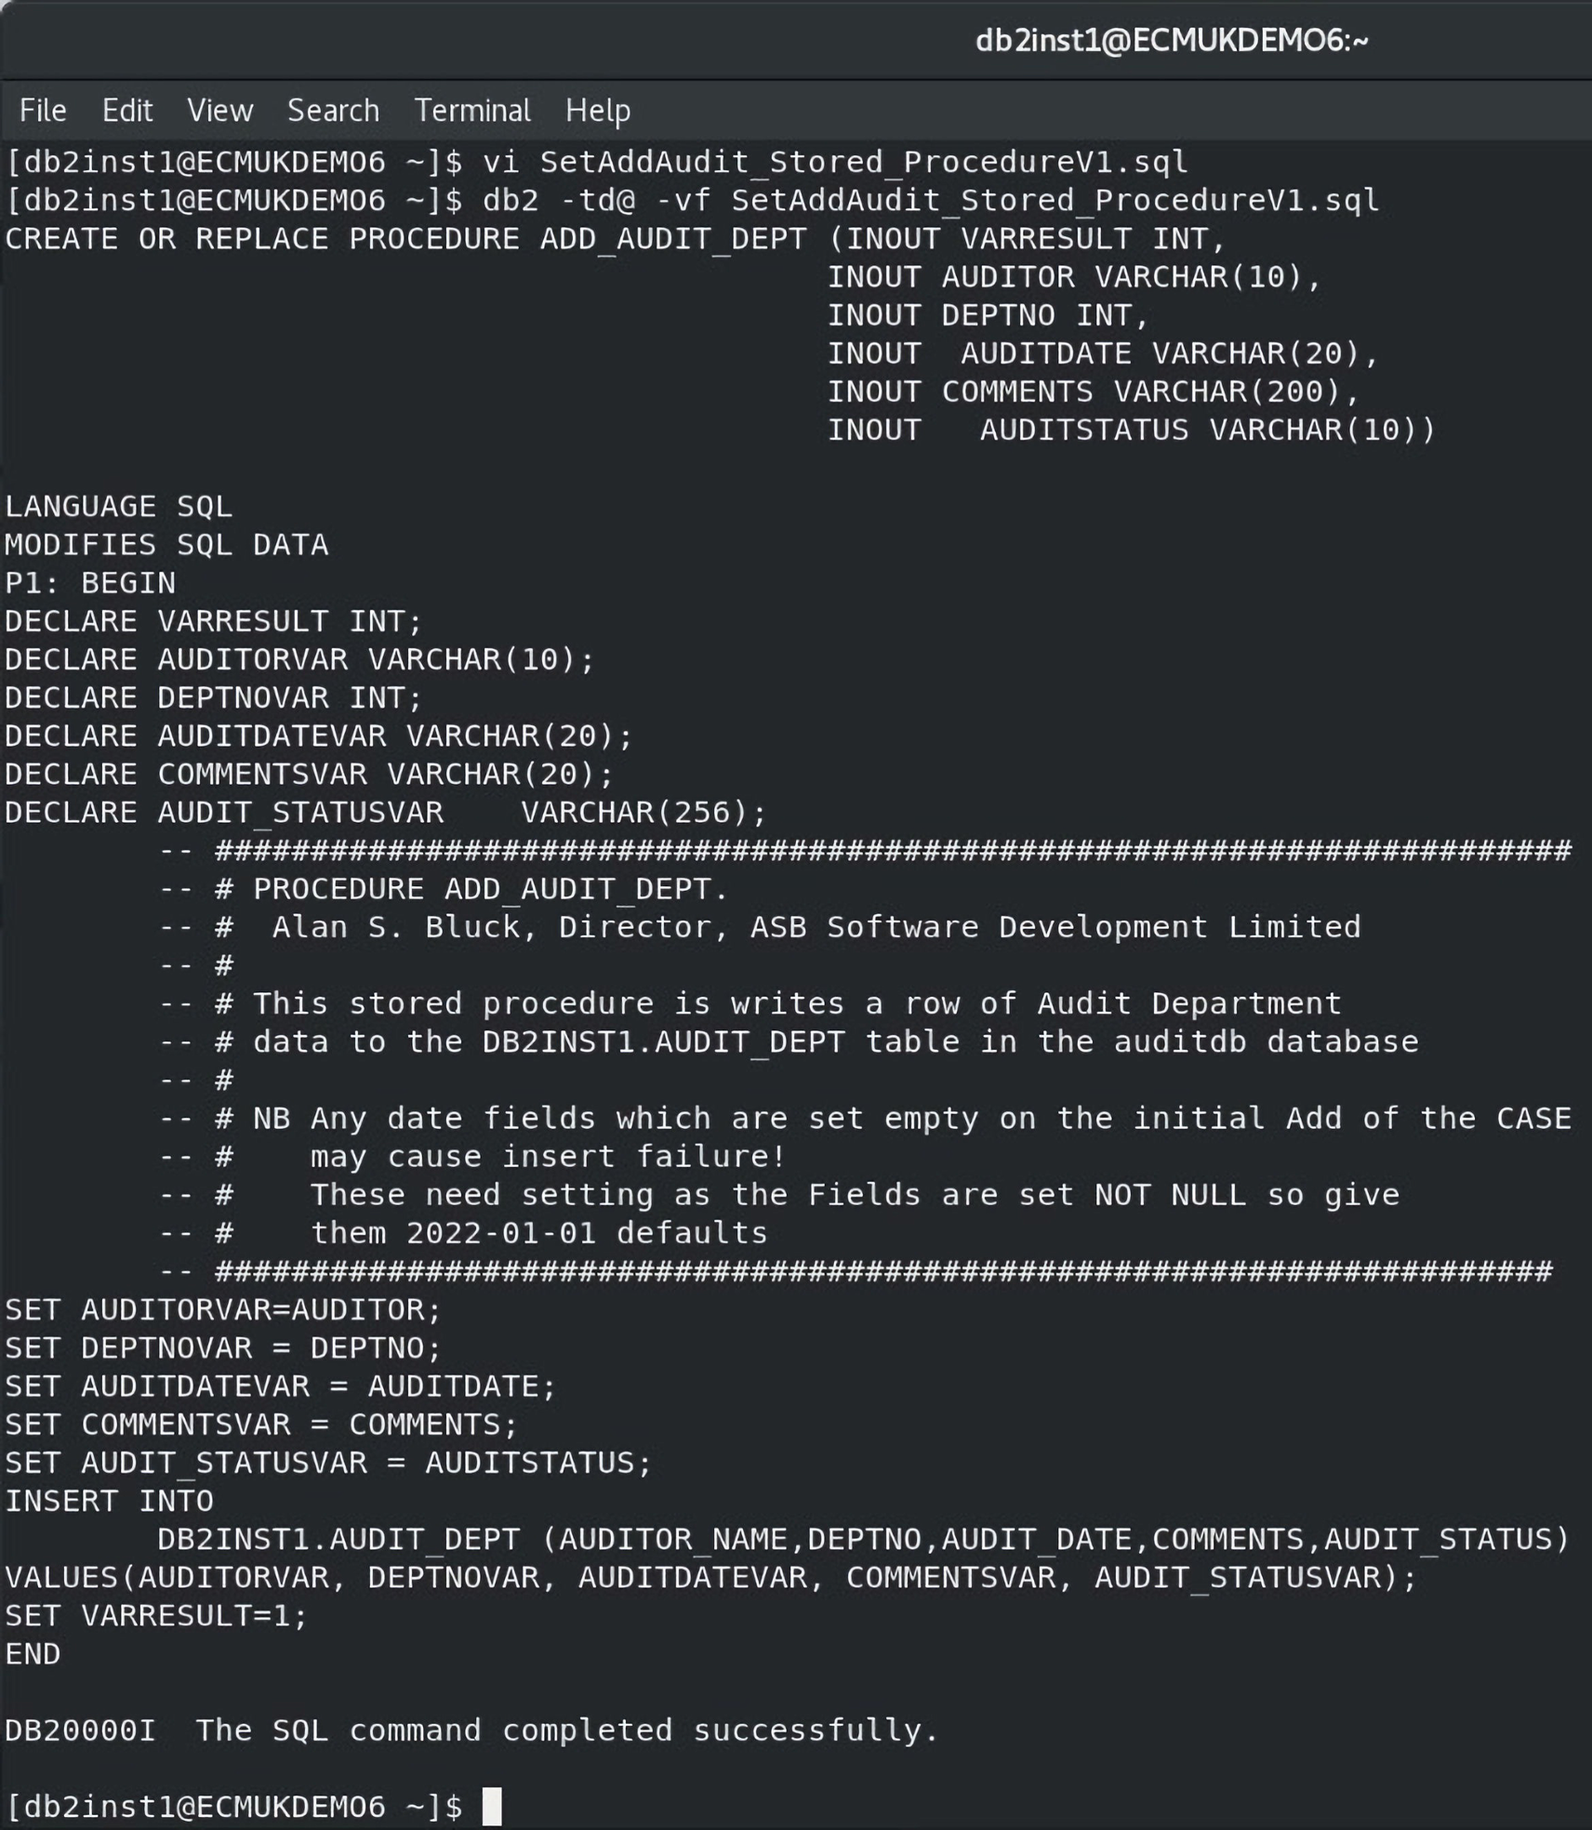
The Stored Procedure ADD_AUDIT_DEPT is edited in the file SetAddAudit_Stored_ProcedureV1.sql

A screenshot of a text editor represents the information regarding the database connection.
The stored procedure is created in the auditdb database, using the preceding db2 commands
A screenshot of a text editor represents a set of commands. A text at the bottom reads, the S Q L command completed successfully.
The install of the DB2INST1.AUDIT_DEPT stored procedure is successfully loaded into auditdb
See the following web page for the full DbExecute procedure steps:
www.ibm.com/docs/en/filenet-p8-platform/5.5.x?topic=activity-dbexecute-system-function
Configuring the Workflow for the DbExecute Step
We can now define the DbExecute system step for the workflow system using the installed Standalone Process Designer.
To create a new DbExecute connection, an XA and non-XA JDBC Datasource will need to be set up for the IBM FileNet WebSphere application server to enable access for the database.
See the link for a full description of an alternative JDBC DbExecute connection creation (on Page 51 of the document):
https://doi.org/10.13140/RG.2.2.16987.52008
“Importing Case Manager solution Auto Claims example into Case Manager 5.3.3 on RHEL 8.0” Document download:
ImportingCaseManagersolutionAutoClaimsexampleintoCaseManager5.3.3onRHEL8.0.docx
Procedure to Add the DbExecute System Step to the Task Workflow
- 1.From the General System Palette, use the mouse to drag a DbExecute step onto the workflow map.
A screenshot of the process designer application highlights the general system palette under the list of options for open palette window.
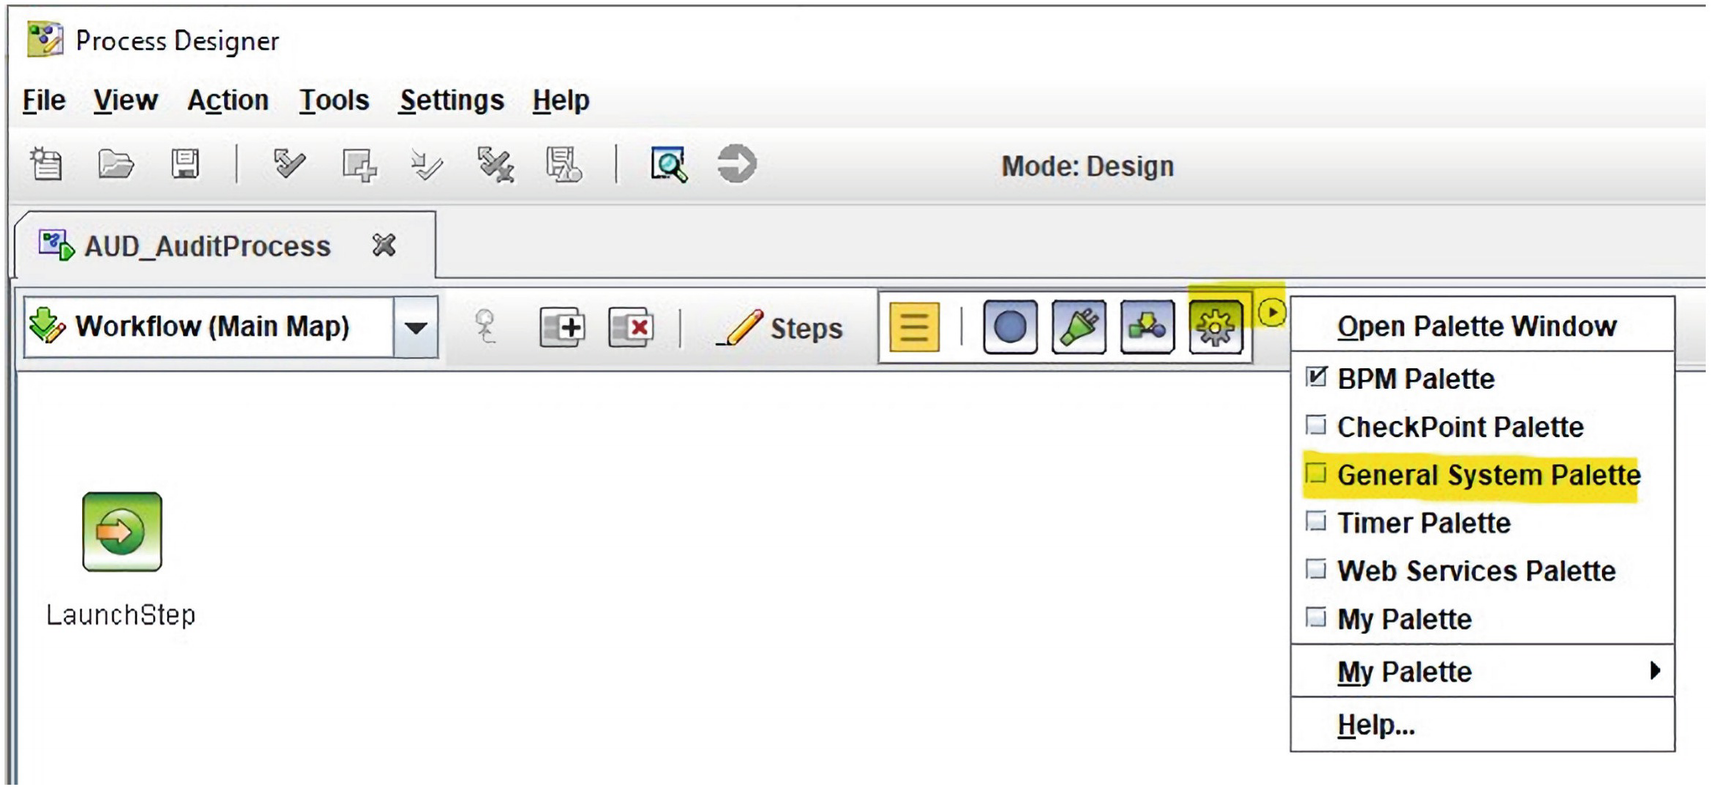
Figure 2-207The General System Palette window is ticked in Process Designer
A screenshot of the process designer application highlights the icon of d b execute work flow step.
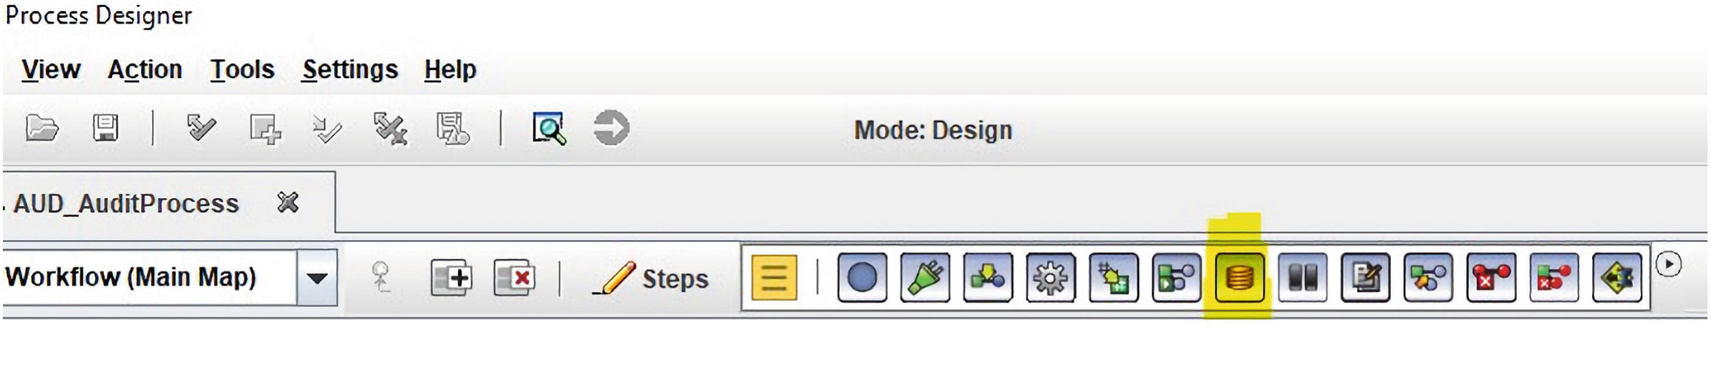
The DbExecute workflow step icon is as highlighted
- 2.
Enter the database name in the parameter window shown in Figure 2-209.
The name that is used to create a stored procedure is used to call it in the Workflow. Process Designer does not allow a Stored Procedure name to be entered with quotes for the DbExecute system step. See the link as follows for the full details:
www.ibm.com/docs/en/filenet-p8-platform/5.5.x?topic=activity-dbexecute-system-function
- 3.
Enter the name of the stored procedure to execute (ADD_AUDIT_DEPT).
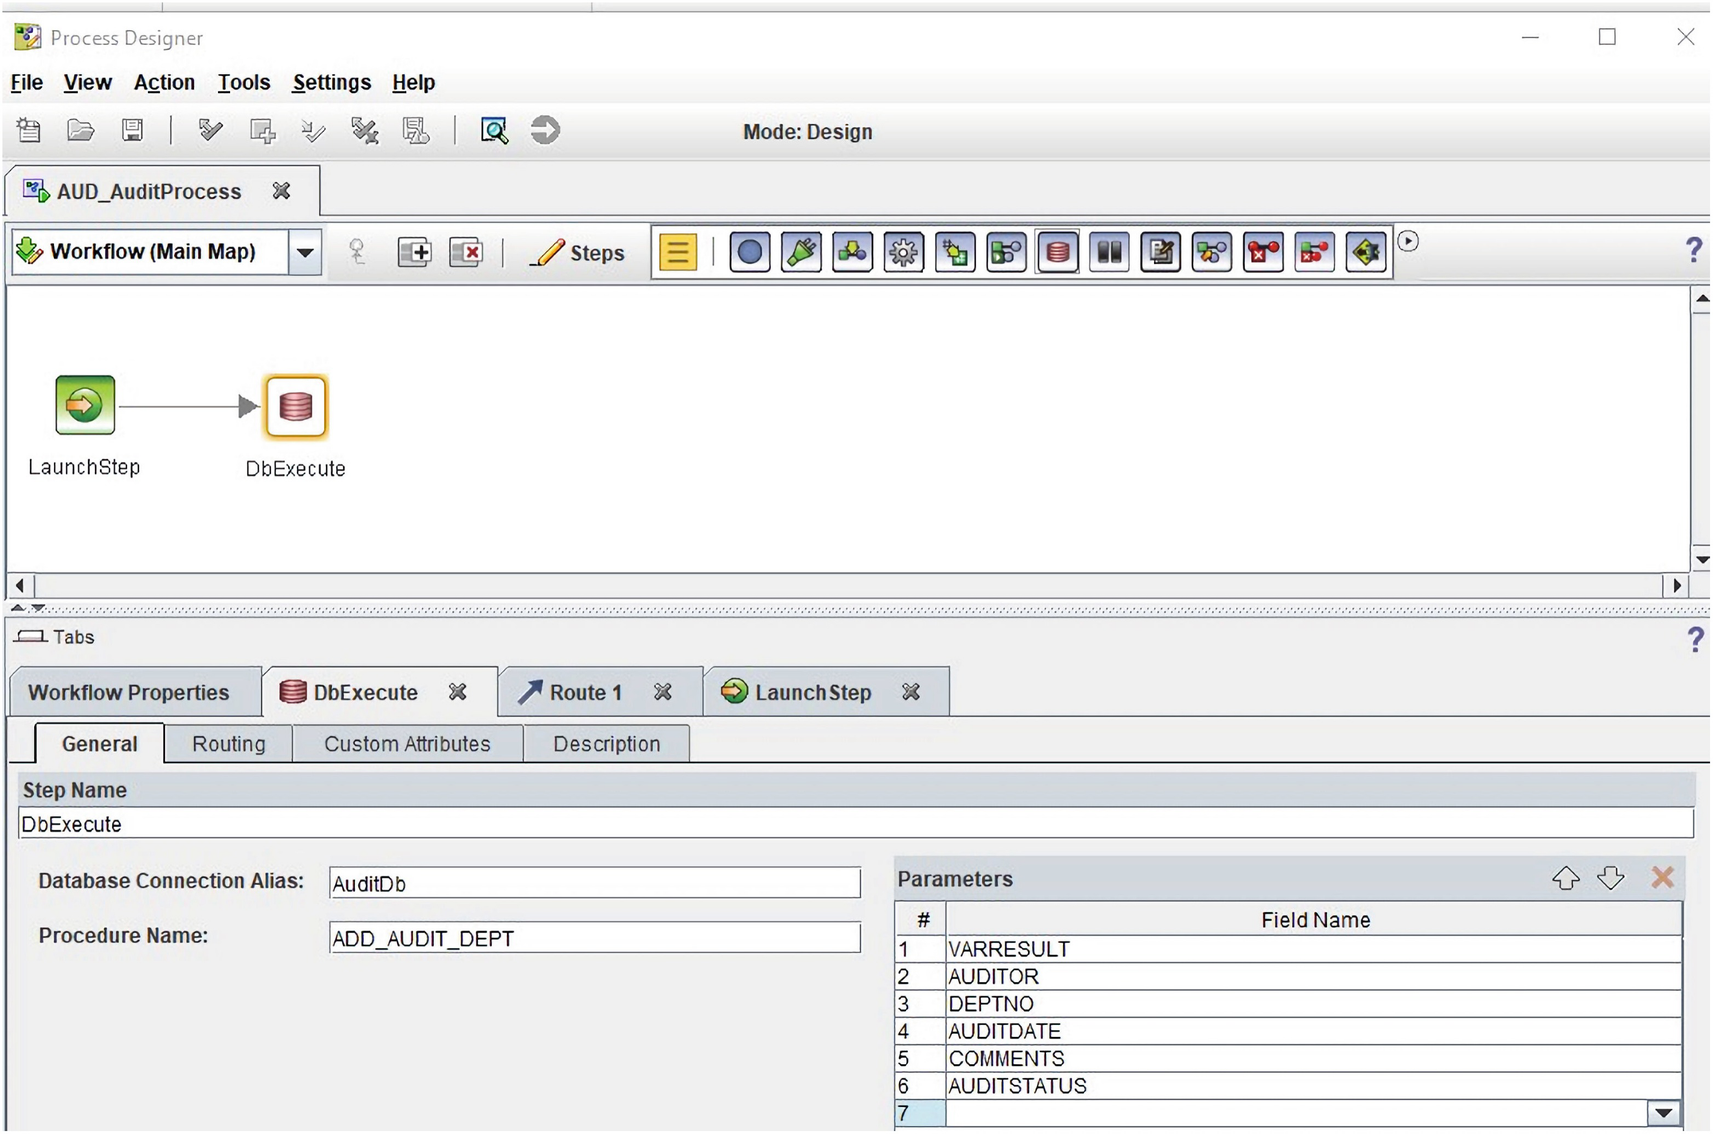
A screenshot of the process designer application represents an arrow mark from launch step to d b execute. The procedure name at the bottom reads, add underscore audit underscores D E P T.
The parameters for the ADD_AUDIT_DEPT Stored Procedure are entered

A screenshot of the process designer application represents a dialog box with a list of selected properties. It highlights the A U D underscore department name along with the ok, cancel, and help buttons.
The Case field properties are now selected for assigning to the Stored Procedure
- 4.The different supported databases for the DbExecute calls must have all of its parameters declared as follows:
out – SQL Server
in out – Oracle
inout – DB2
The preceding parameter types are set to allow the values to be maintained bidirectionally. This allows the updated values to reflect the stored values passed in as parameters to the stored procedure.
Designer Param Type | Oracle Param Type | SQL Server Param Type | DB2 Param Type |
|---|---|---|---|
String | varchar | Varchar | varchar |
Integer | number | Int | int |
Boolean | number | Bit | number |
Float | number | Float | float |
Time | date | Datetime | timestamp |
Stored Procedure Parameter Limitations
Arrays are not supported for Stored Procedure parameters.
If a Date/time, Integer, Boolean, or Float parameter is set to null by a stored procedure, an exception will be thrown.
Oracle | SQL Server | DB2 | |
|---|---|---|---|
Maximum number of parameters in procedure | 1024 | 1024 | 1024 |
String parameter maximum characters | 4000 | 4000 | 4000 |
Example SQL Table Creation for the DB2 Database
The Create Audit_Dept table SQL script
DbExecute Stored Procedure Installation
The ADD_AUDIT_DEPT Stored Procedure DB2 SQL script

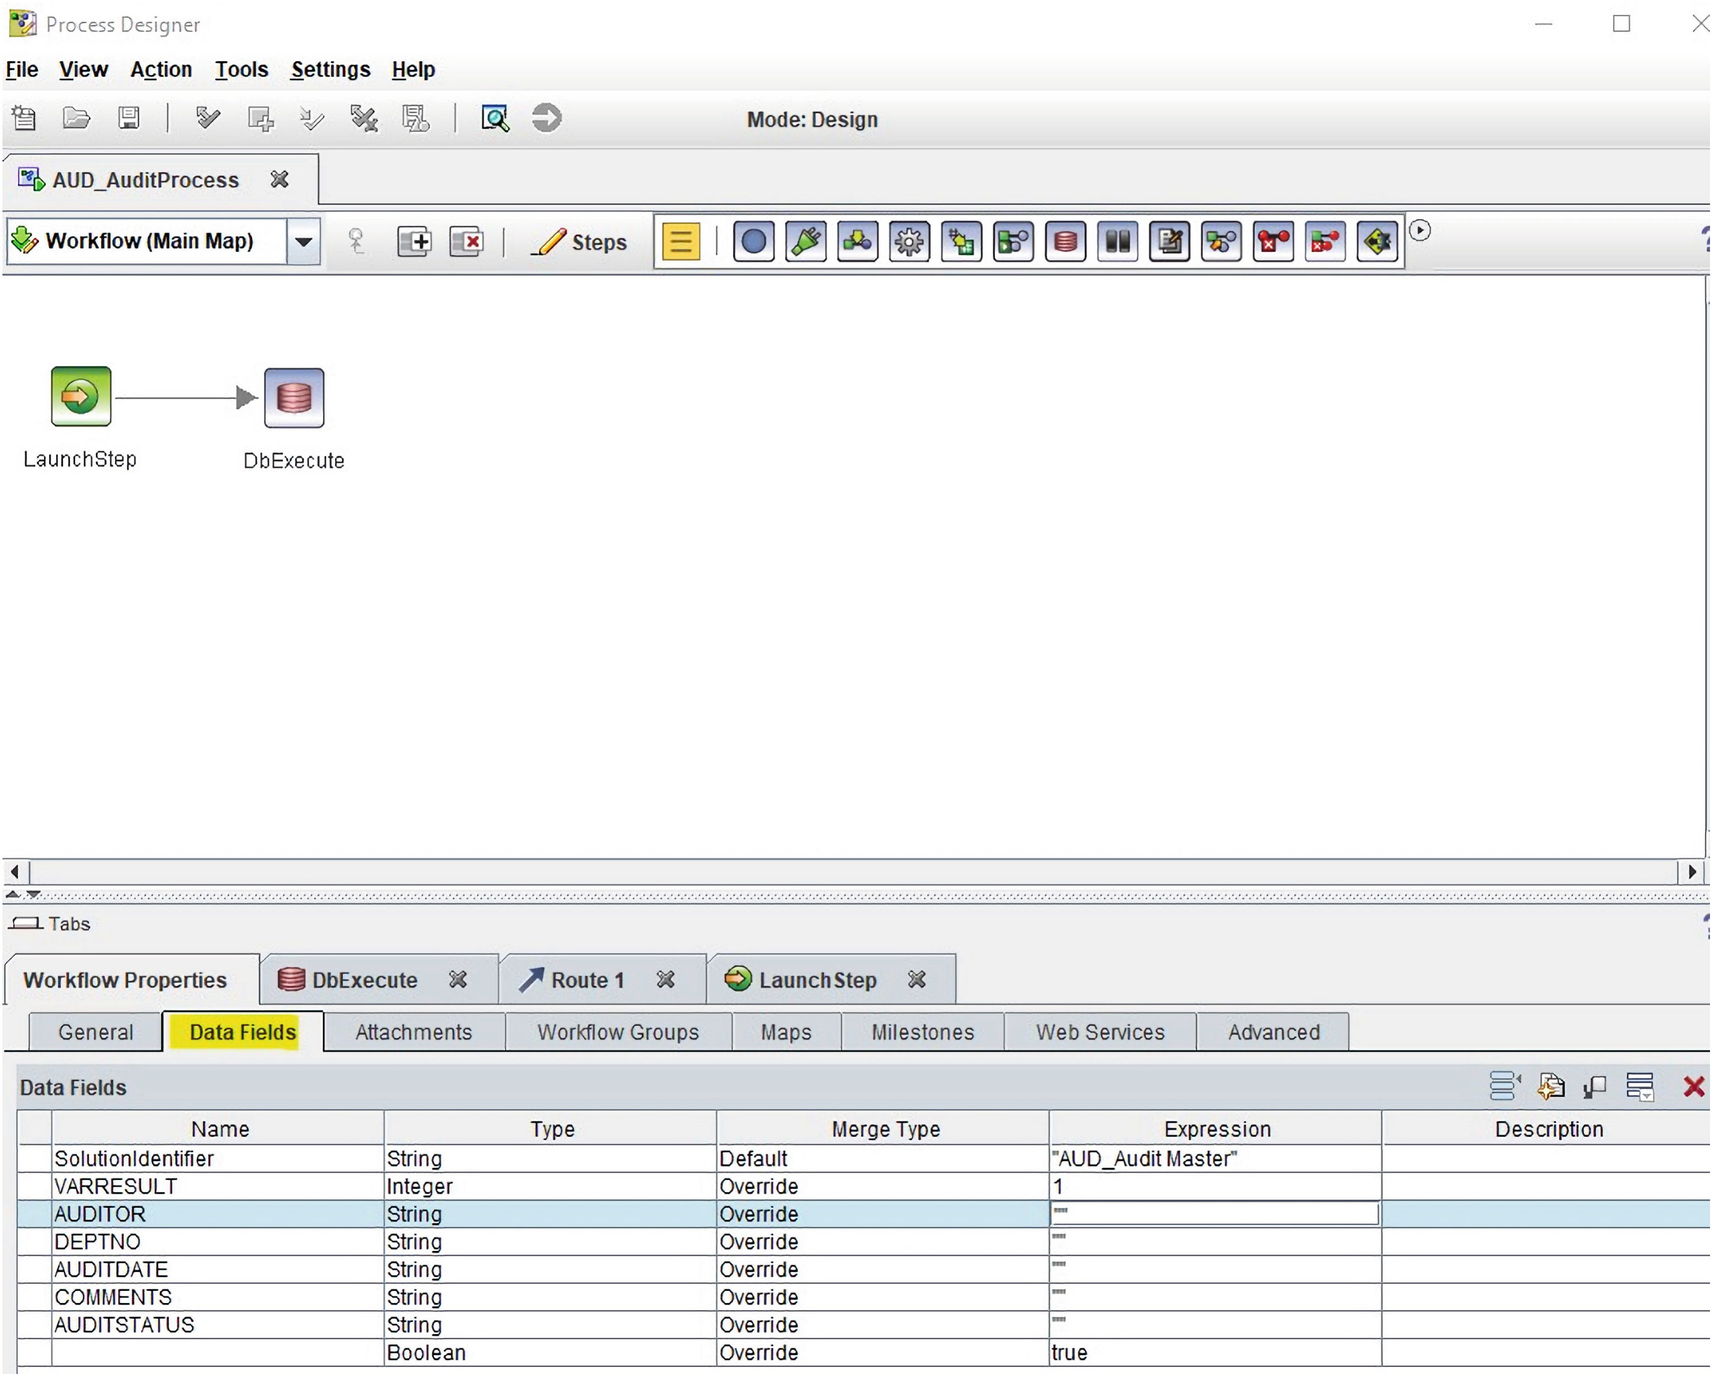
A screenshot of the process designer application represents a table at the bottom with the name, type, merge type, expression, and description of the data fields.
The Data Fields are set up in the Workflow Properties tab for the AUD_AuditProcess Workflow

A screenshot of the process designer application represents a table at the bottom with the name and expression of the field assignments.
The Workflow LaunchStep parameters are first set up with test data using local String constants

A screenshot of the expression builder highlighting the case task under the business object field, and A U D underscore auditor under the properties.
The Case Task Fields are selected for the Field Assignments

A screenshot of the project designer application represents a table at the bottom with the name and expressions of the field assignments. It highlights the department number in the table.
The Field Assignments are now populated from the Case Task Business Object values

A screenshot of the project designer application represents a table at the bottom with a list of field names. The step name at the left of the table reads d b execute and the procedure name reads, Add underscore audit underscore D E P T.
The six DbExecute Stored Procedure parameters are mapped to the Workflow Data Fields

A screenshot of the project designer application highlights the validate workflow under the action tab.
The Validate Workflow Action menu is selected to check for any syntax errors

A screenshot of the project designer application represents a table at the bottom with the name and expression of the field assignments. It highlights the department number.
The Field Assignments are updated to convert the Comments to add a date/time string

A screenshot of a popup screen reads the workflow validation was successful.
The Workflow validation test was completed successfully

A screenshot of the project designer application highlights the save and close option in the context menu of the solution under the file tab.
The Workflow(s) for the Solution are saved for testing
A screenshot of the audit master page highlights a triangle-shaped icon at the top left corner.
The IBM Case Builder has detected that the Audit Master solution has new changes
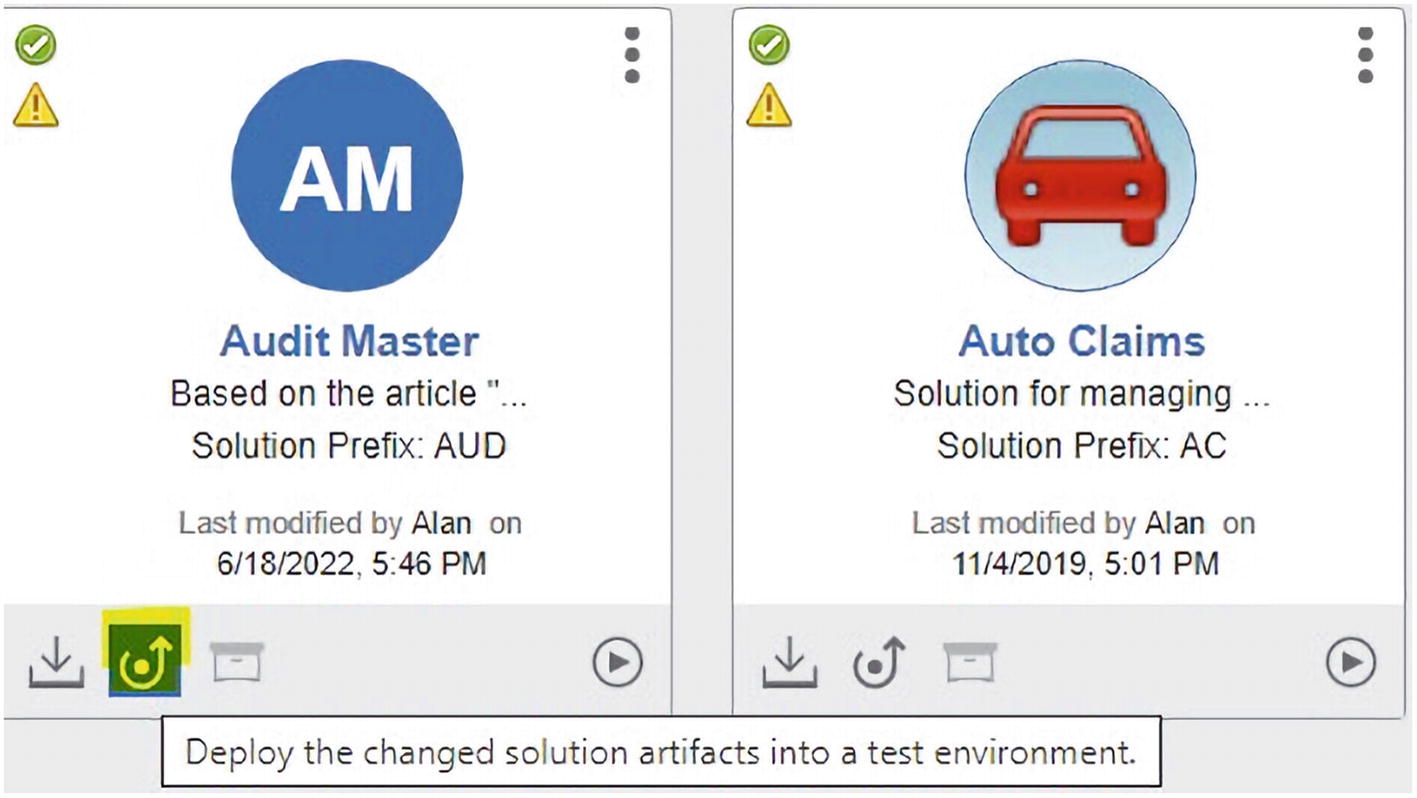
A screenshot of the audit master page highlights the deploy icon at the bottom indicating the following text, deploy the changed solution artifacts into a test environment.
The Deploy the changed solution icon is clicked
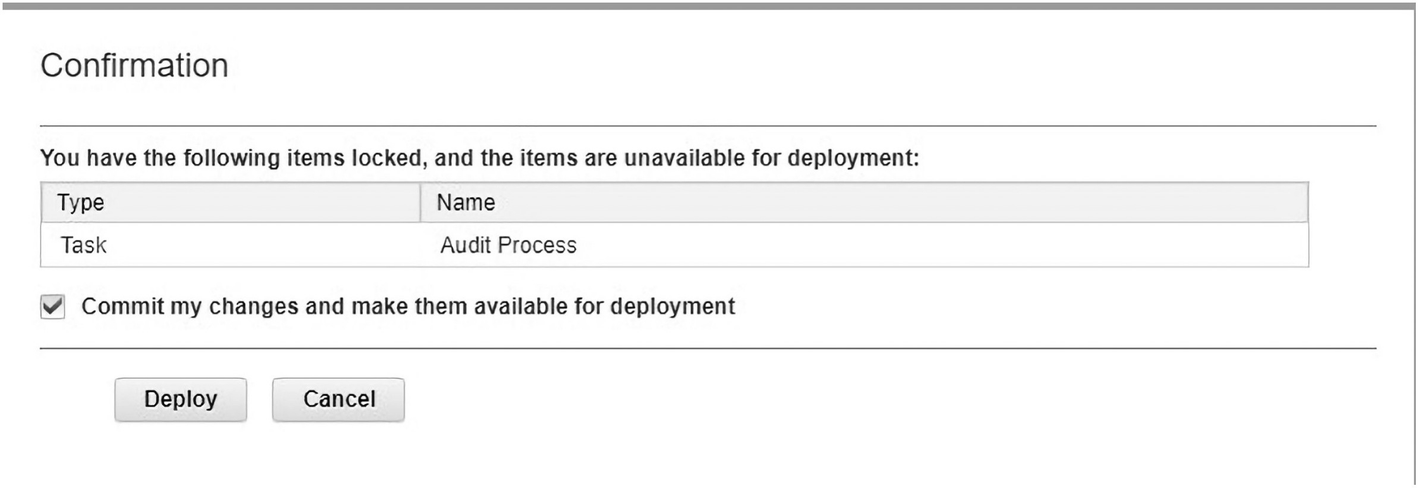
A screenshot of the pop-up page with a table containing the details about the type and name of the deploying item. Ther are two buttons at the bottom to deploy and cancel.
The Deploy pop-up window shows the Audit Process Task has changes

A screenshot of the text editor highlights a command to select an item from the database. It highlights the auditor's name, department number, audit date, comments, and audit status at the bottom.
The query from IBM Data Studio on the Linux server shows that there is a row in the table

A screenshot of the Audit master page which highlights an icon at the bottom indicating the following text, start the I B M case manager client to test the solution.
The icon to start the IBM Case Manager Client is selected from the IBM Case Builder
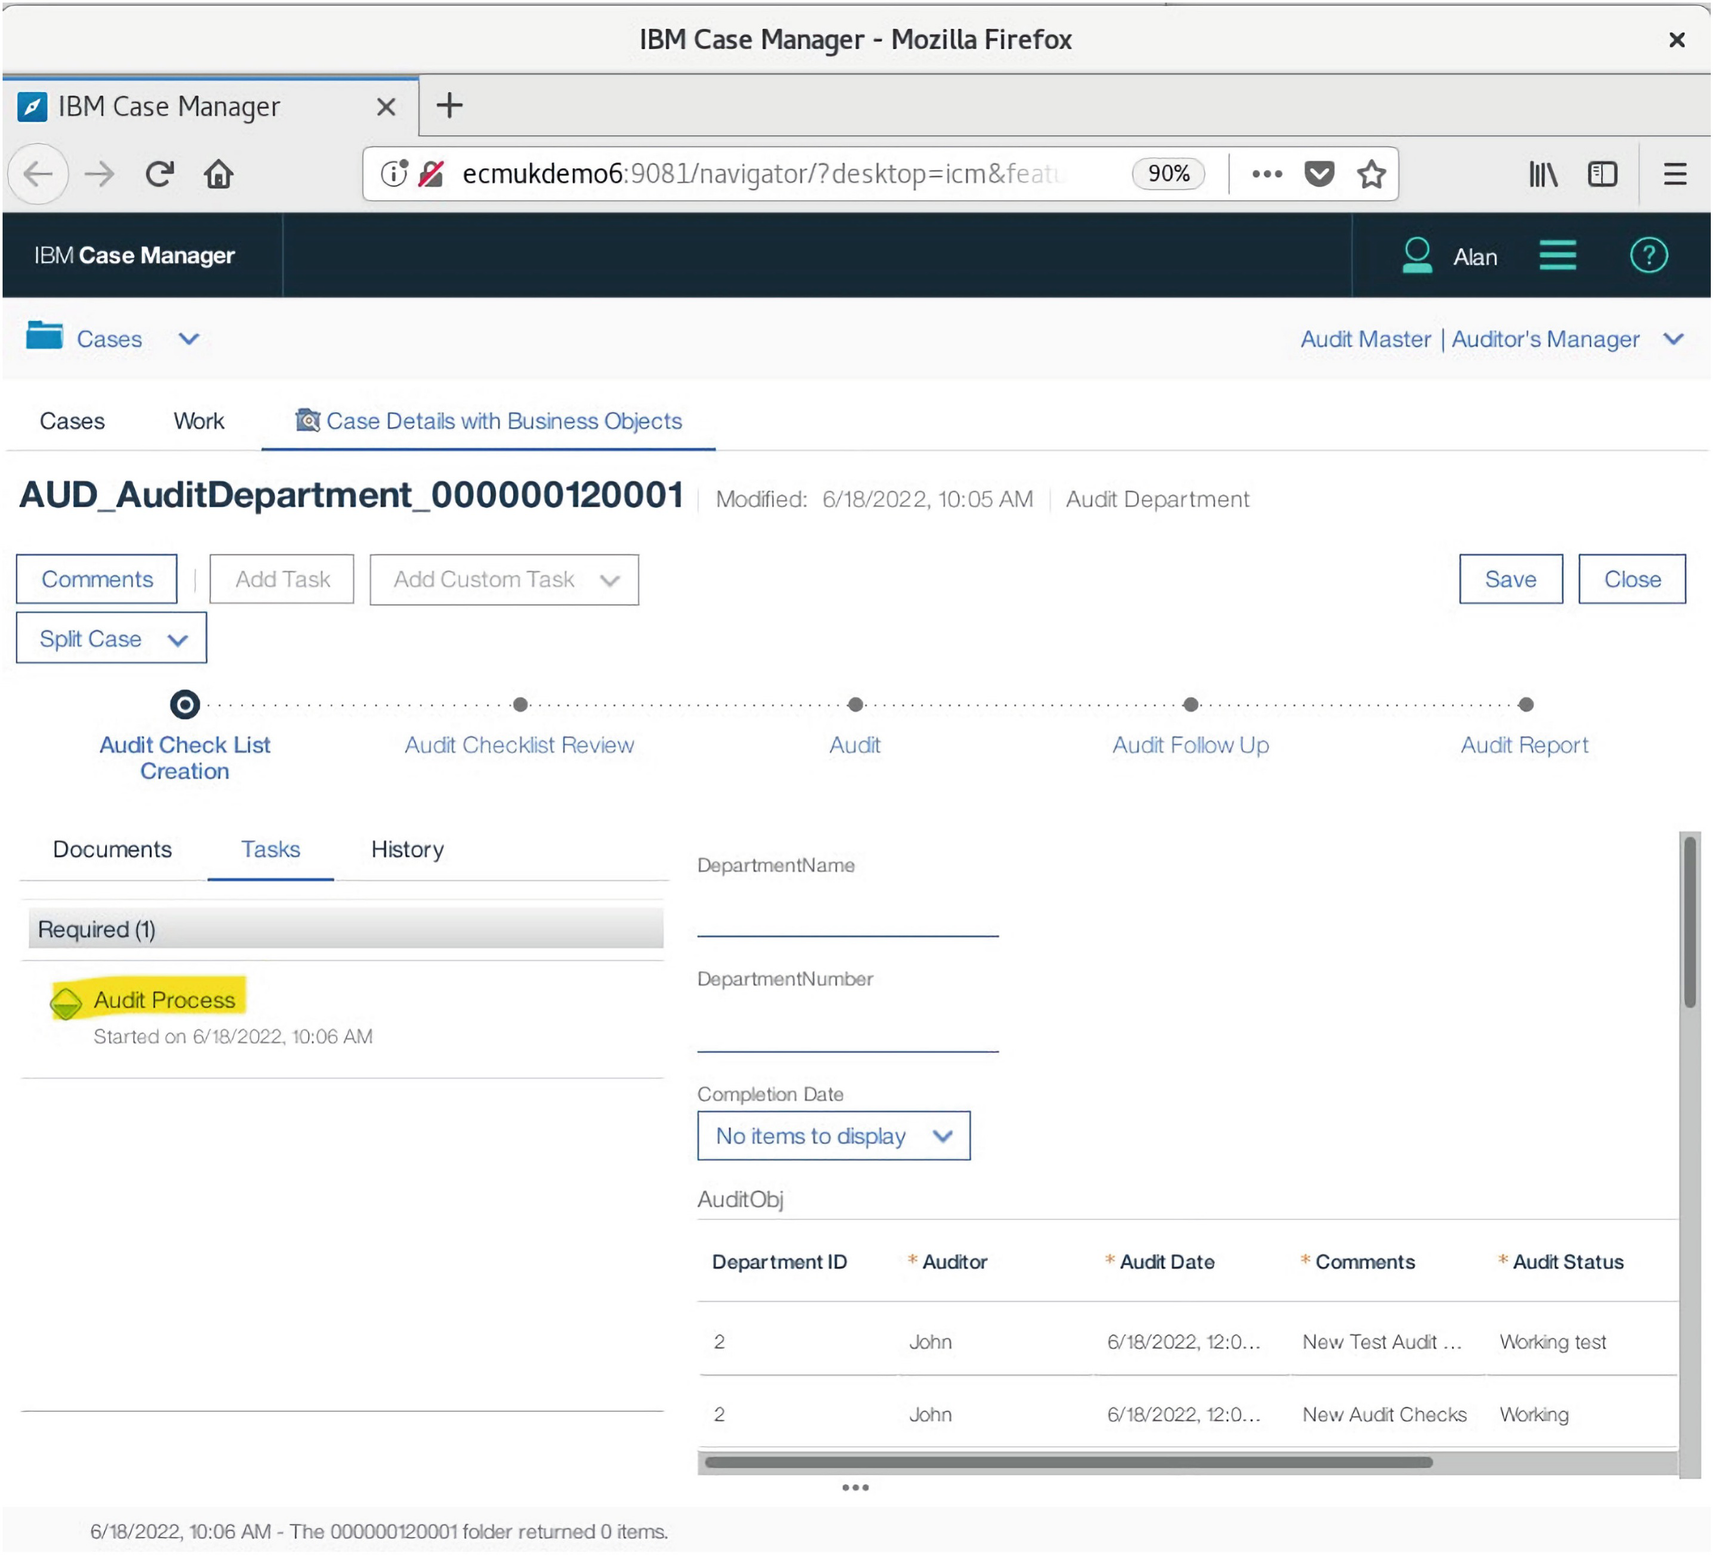
A screenshot of the I B M case manager page on a web browser. It highlights the required audit process at the bottom along with a table containing department I D, auditor, audit date, comments, and status.
The Audit Process Task is shown Started after selecting the manual Start link
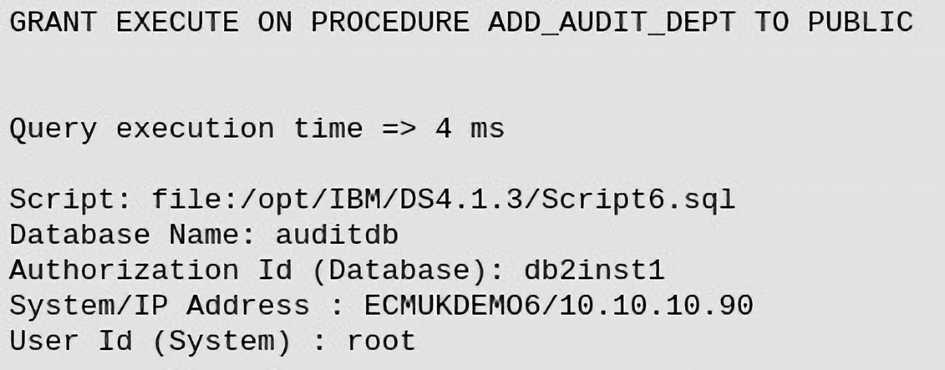
A text document represents some instructions to grant execution on the procedure to add the audit department to the public.
The Stored Procedure is required to have a GRANT on it to allow it to execute
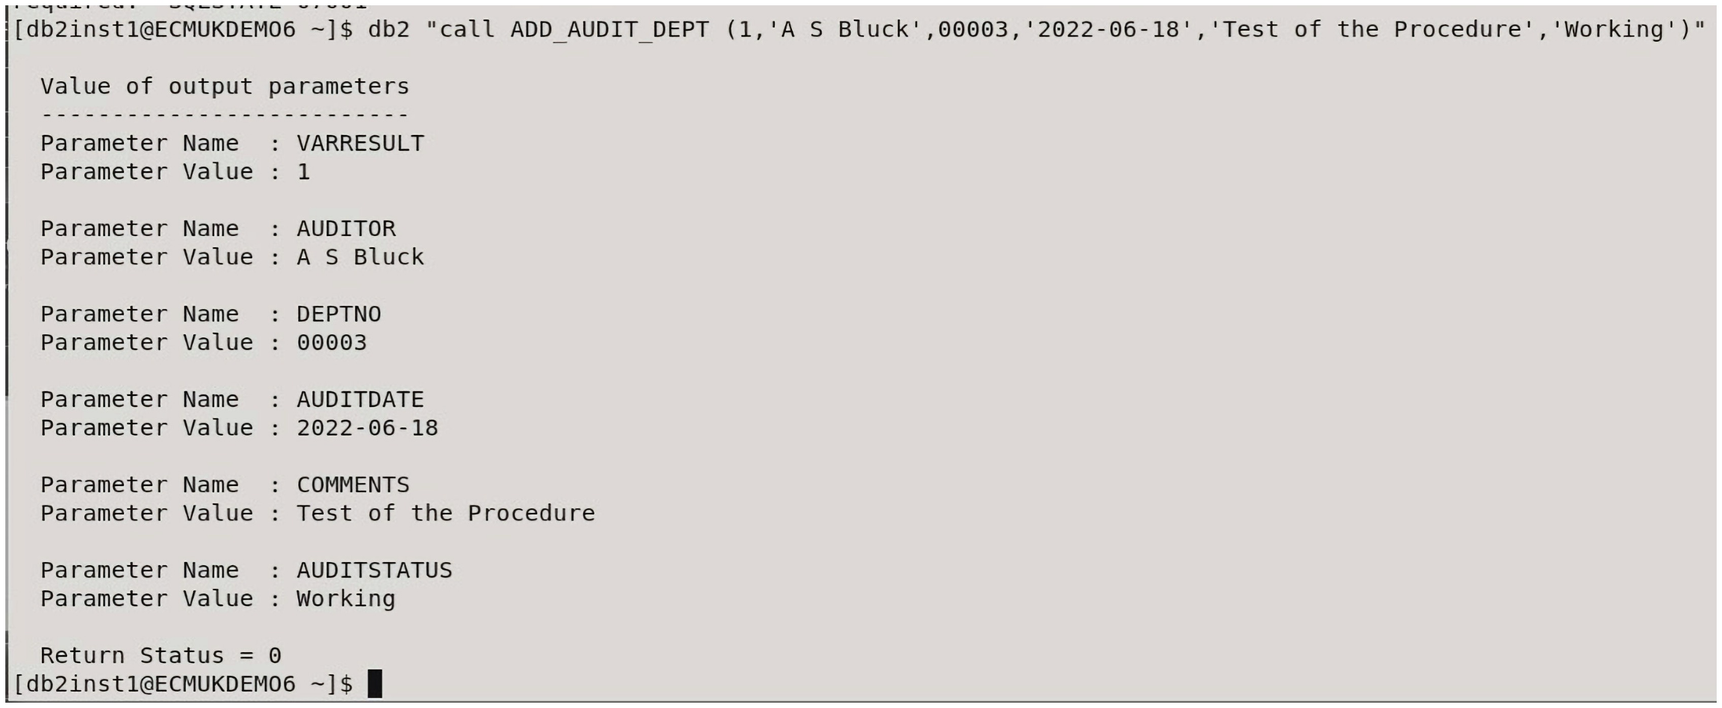
A text document represents the values of output parameters.
The Stored Procedure was tested using a db2 call to show that it would function correctly

A screenshot represents a table with the details of the auditor's name, department number, audit date, comments, and audit status of an audit department.
The row is added from the db2 call test for the ADD_AUDIT_DEPT stored procedure
A screenshot of the process designer application represents a table at the bottom containing the name, type, merge type, expression, and description of the data fields.
The Data Fields are configured in the Workflow

A screenshot of the process designer application represents a table at the bottom containing the name and expression of the field assignments. It highlights the comments in the table.
The Data Field Assignments from the LaunchStep are now set
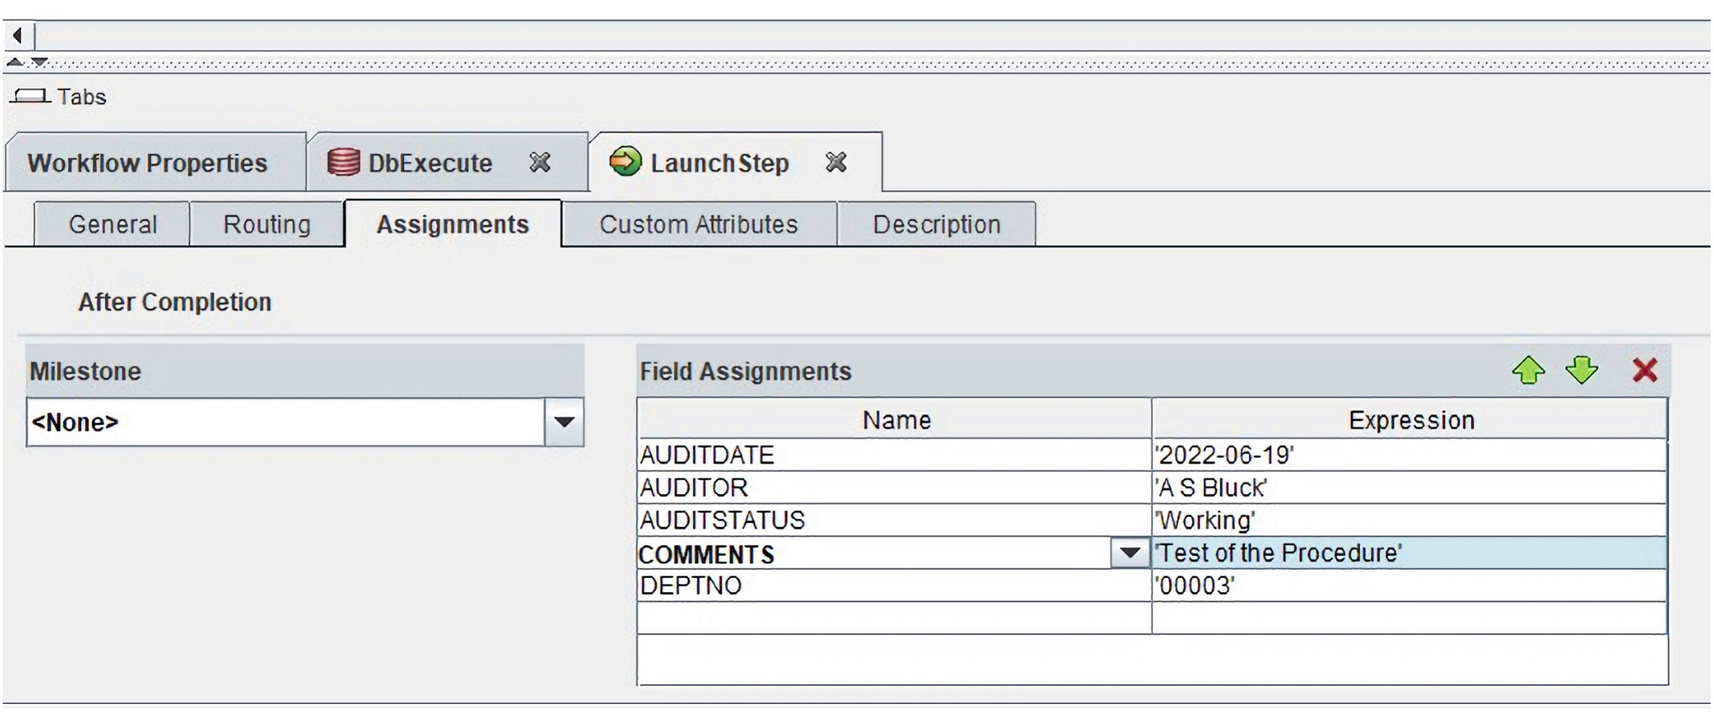
A screenshot of the process designer application represents a table containing the name and expression of the field assignments. It highlights a comment which reads, the test of the procedure.
The first test using hard-coded values for the parameters
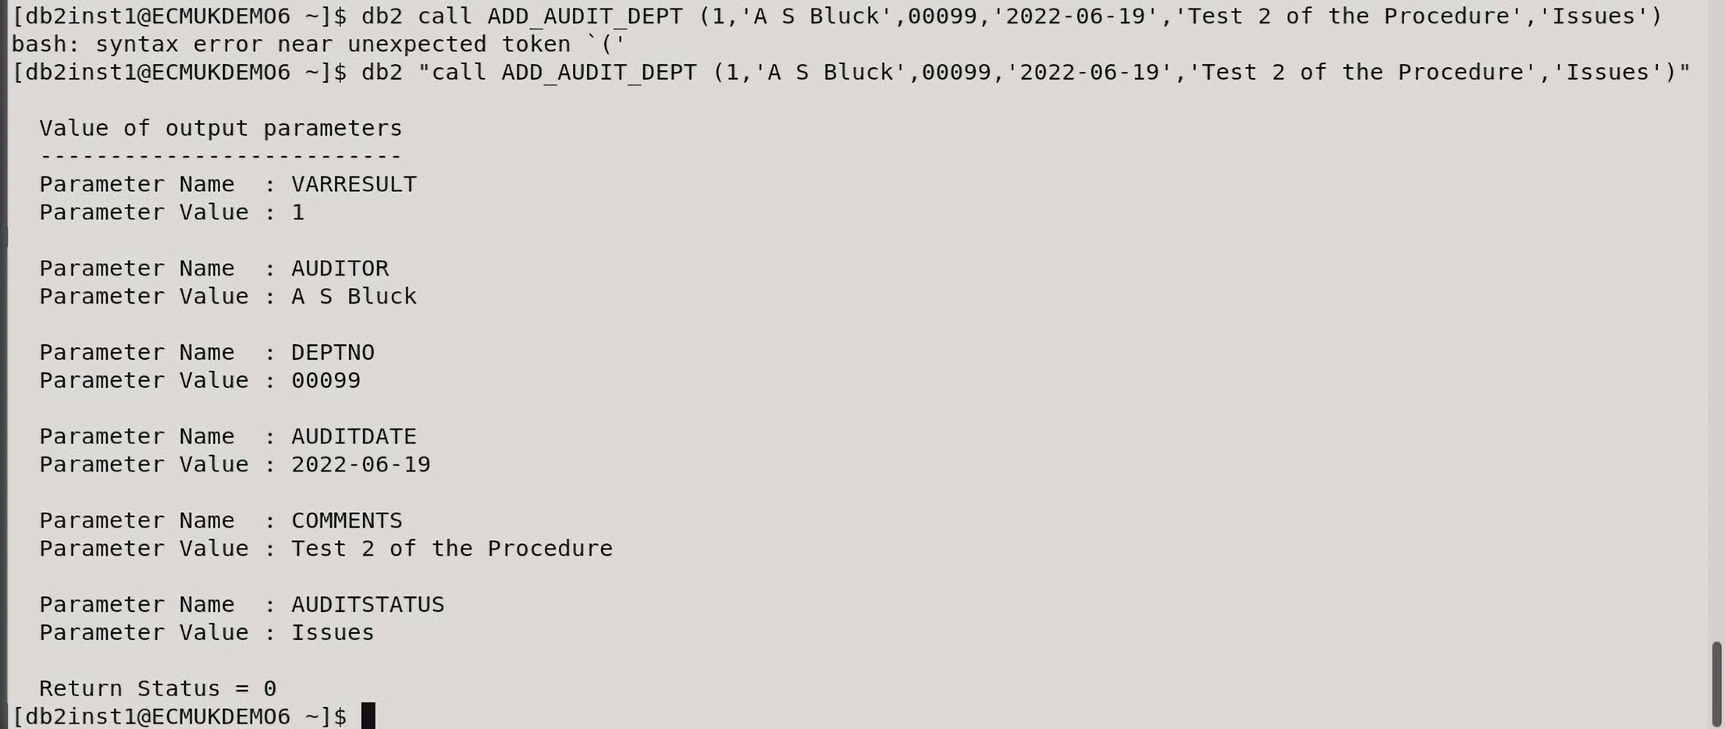
A screenshot of a text editor represents a list of values of output parameters.
The Stored Procedure call is retested after minor changes
In the preceding db2 call on the Linux server, the Stored Procedure call has to be surrounded by double quotes to be executed with the db2 command-line processor.
Testing on Different Database Platforms
If you want to compare SQL statements in different databases, a website called SQL Fiddle allows a developer to switch between different database providers.
It supports a drop-down for MySQL, PostgreSQL, MS SQL Server, and SQLite, which you can run test some SQL queries and the syntax against.
This is very useful if a database platform would take time to install and configure and you have time constraints. Using SQL Fiddle, you just create your database and can run the queries in the web-based application!
See the following link:
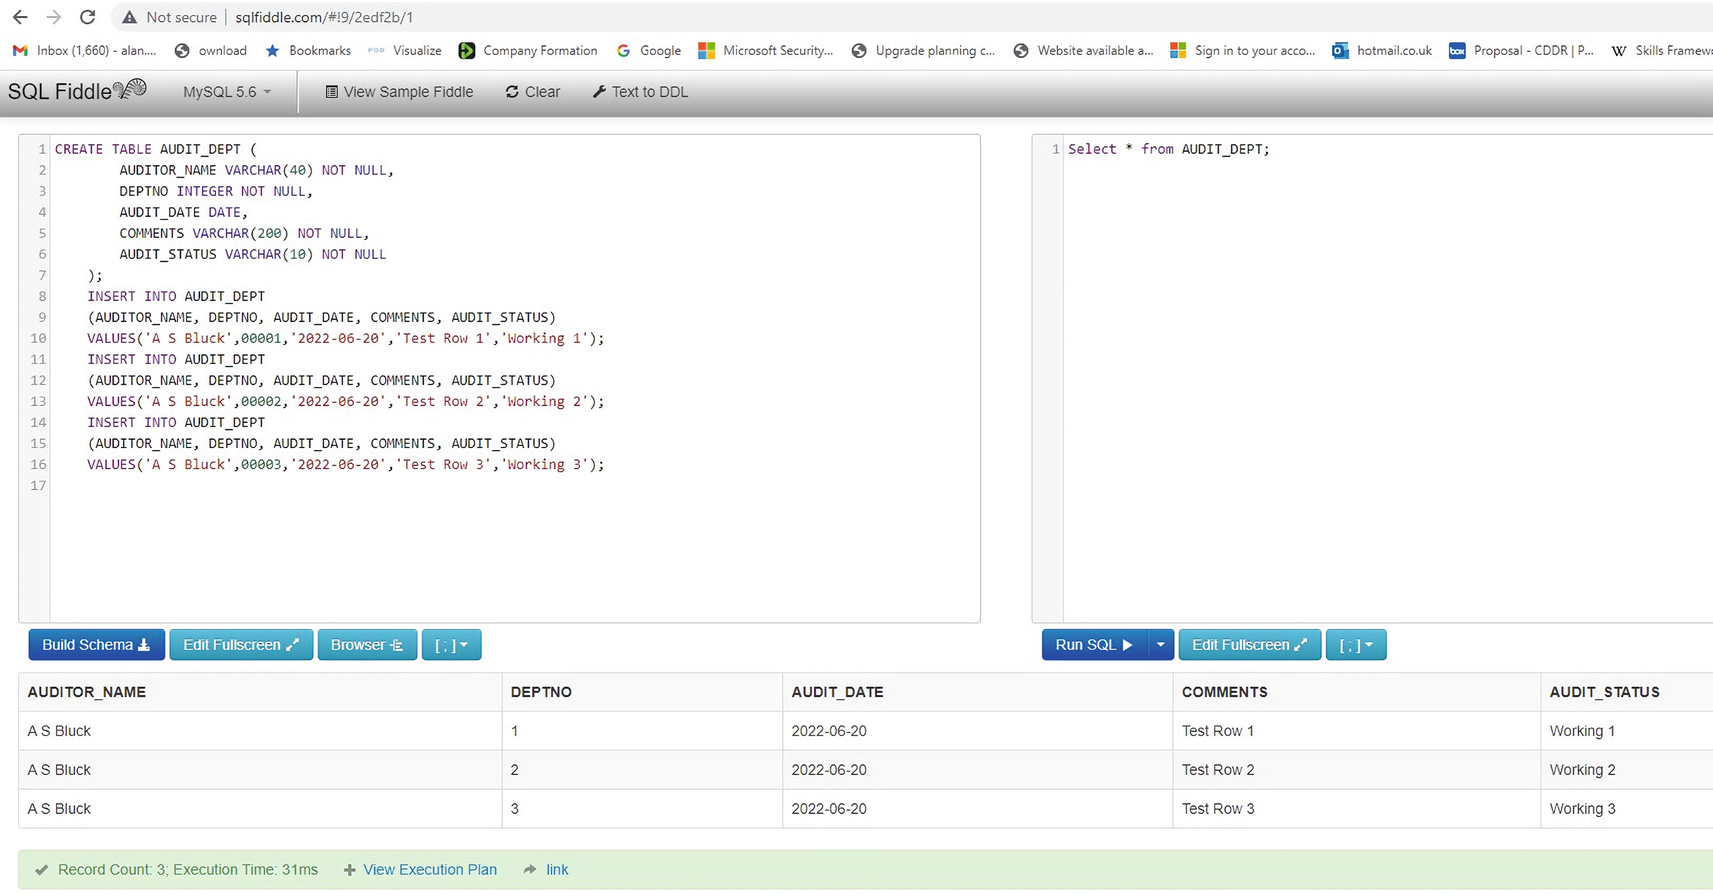
A screenshot of a web page of S Q L fiddle opened in a browser. It contains a set of codes in the text editor. There is a table at the bottom containing the details of the auditor's name, department number, audit date, comment, and audit status.
The sqlfiddle.com free web application SQL test environment
Oracle Version of the Stored Procedure SQL Code
The Oracle example stored procedure
MS SQL Server Version of the Stored Procedure SQL Code
The MS SQL Server example stored procedure
Chapter 2 Exercises
The following questions cover the functions using Code Module Events, IBM Process Designer, and DbExecute, which we covered in this chapter.
- 1.What IBM application would you use to confirm that the “CodeModules” folder exists?
- a)
The IBM Content Navigator
- b)
The IBM acce Administrative Console for Content Platform Engine
- c)
The IBM Case Builder
- d)
The IBM Process Designer
- 2.An IBM Stored Procedure String parameter for the Oracle Database system is limited to
- a)
64 characters
- b)
1333 characters
- c)
4000 characters
- d)
1024 characters
- 3.The IBM Standalone Process Designer Tool is initially installed using the program
- a)
cmd.exe
- b)
pedesigner.bat
- c)
5.5.0-ICFCPE-WIN.EXE
- d)
cpetoolenv.bat
- 4.The main purpose of a Workflow Subscription is
- a)
To enable the creation of a Folder Object
- b)
To enable the creation of a Document Object
- c)
To enable a workflow to be launched on the storage of a document
- d)
To enable a Case to be created in IBM Case Manager
- 1.
b) The IBM acce Administrative Console for Content Platform Engine
- 2.
c) 4000 characters
- 3.
c) 5.5.0-ICFCPE-WIN.EXE
- 4.
c) To enable a workflow to be launched on the storage of a document
- 1.
Describe what steps you would use to install a new Custom Event, given that you have been given a working fn_eventshandler.jar file and have been asked to configure an AddFolder Java Class Event Handler triggered on the creation of a new Folder.
- 2.
What databases does IBM Case Manager Workflow support and what types of Datasource are recommended to be configured to support a connection for use with DbExecute?
- 3.
What methods are used for resolving issues in the deployment of an IBM Case Manager Solution?
In Chapter 3, we will cover the use of the Java language to customize Workflow Components with the example development of a Java jar file for the IBM Java Messaging Service calls and its deployment for use in an IBM Case Manager Workflow.