This chapter describes an example development of a Java jar file for the IBM Java Messaging Service calls and its deployment for use in an IBM Case Manager Workflow. See https://doi.org/10.13140/RG.2.2.21708.16001.
For the installation steps required for IBM Case Manager 5.3.3, which are covered step by step in the following free ResearchGate documents, downloaded using the DOI URLs as follows:
entitled “Case Manager 5.3.3 Installation on RHEL 8.0 with Content Navigator 3.0.6”

A screenshot of the case manager 5.3.3 installation page contains preprint, P D F available, and download file P D F options with the date, D O I, project, and author's detail.
Download the IBM Case Manager Installation Document
This gives the downloaded document, entitled CaseManagerInstallationonRHEL8.0_V3.docx.
The Audit system is based on an article in the journal, Quality Forum, Volume 19 No. 3, September 1993. The Journal of the Institute of Quality Assurance. Pages 116–126. The Quality Audit Process, by Alan S. Bluck (https://www.researchgate.net/publication/334095565_Case_Manager_Solution_Development#fullTextFileCssontent).
This chapter includes the steps for the development of a prototype system component, with code working with a Test harness including the development of a process for deploying and testing an AUDOperations.jar CI (Component Integration) jar file for use in a Workflow system step.
The IBM MQ Series is installed on a Linux VMware and requires the latest Fix Packs. After installation, we describe the setup test queues and the configuration of a JNDI link using a Tivoli Directory Services LDAP for LDAP context lookup.
An IBM MQ server is an installation supporting one or more queue managers that provide message queuing services to one or more clients. All the IBM MQ objects, for example, queues, exist only on the queue manager server. The MQ client does not store any MQ Objects. An IBM MQ MQI client is available which allows an application running on one system server to communicate with a queue manager running on another system server.
During development, it was found that the com.ibm.mq.jms.MQQueue cannot be cast to javax.jms.QueueConnectionFactory.
Chapter Organization
This chapter contains the following six Parts:
Part 1 – Bill of Materials. This Part lists the prerequisite IBM Software components, including the IBM product code numbers, required to download the latest IBM MQ Series software components, used to test the Java JMS message service API calls. It also covers the installation of the downloaded software on a Red Hat Linux server.
Part 2 – Custom Operations Component Development. The Custom Operations Component is defined in the subscribed Workflow as a special Component Integrator step, which we will describe in this Part.
Part 3 – Creating a Non-privileged MQ User for a Client Application Connection. This Part describes a procedure to create a non-privileged user ID to be used for a client application which connects to the queue manager. Access is granted for the client application only to be able to use the channel it needs and the queue it needs by use of this user ID.
Part 4 – Second Run of the AUDOperationsTest.java JUnit for JMS Messaging. This Part covers the second run of the JUnit test, which is more successful. The console screen output shown in Figure 3-232 is from the Eclipse IDE JUnit run of the AUDOperationsTest.java Class.
This shows the transmission of a test message to the IBM MQ Connection Factory, AUDCF3 queue, and the retrieval of the ten Audit Documents in the output list from the Audit Master Case Manager solution, Target Object Store.
Part 5 – Building the AUDOperations.jar. This Part describes the method for exporting the Java program in the AUDOperations.jar file with the exposed methods we wish to call from our IBM Process Designer Workflow.
Part 6 – Transferring Workflow and Setting Up Workflow Subscriptions. In this Part, the Target Object store, OS2, is updated with a Workflow Definition document class (AUD_JMSMessage.pep file), which is used to run the Workflow we created, triggered by a new Audit Report document created in the Target Object store from an Audit Master solution Case Manager Audit Department Case. The acce web Administration console is used to create the required Workflow Subscription.
Part 1 – Bill of Materials
The following URL link describes the latest available IBM MQ Series 9.x downloads and provides links to the versions of IBM MQ available for download:
www.ibm.com/docs/en/ibm-mq/9.2?topic=roadmap-mq-downloads
The next link displays the available pdf documentation for IBM MQ:
www.ibm.com/docs/en/ibm-mq/9.2?topic=am-mq-92-pdf-files-product-documentation-program-directories
The hardware and software requirements for IBM MQ series are described at this URL link:
www.ibm.com/support/pages/node/318077
An overview of the installation procedure for IBM MQ 9.2 can be seen at this link:
www.ibm.com/docs/en/ibm-mq/9.2?topic=uninstalling-installing-mq-linux
The development of a Java JMS message queue for Linux, Windows, and IBM Cloud is described in the following link:
https://developer.ibm.com/tutorials/mq-develop-mq-jms/
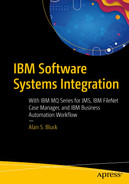
A screenshot of the product details window contains file name, platforms, languages, estimated download duration, file size, connection, download director, and H T T P transfer details.
Product details of the IBM MQ 9.2.4 Linux version including download times
The version and product code details for the installations are as follows:
IBM SDK, Java (TM) Technology Edition, Version 8 for Linux (CND18ML)
IBM MQ V9.2.5 Continuous Delivery Release for Windows 64-bit Multilingual (M0458ML)
IBM MQ V9.2.x Continuous Delivery Quick Start Guide (G014JML)

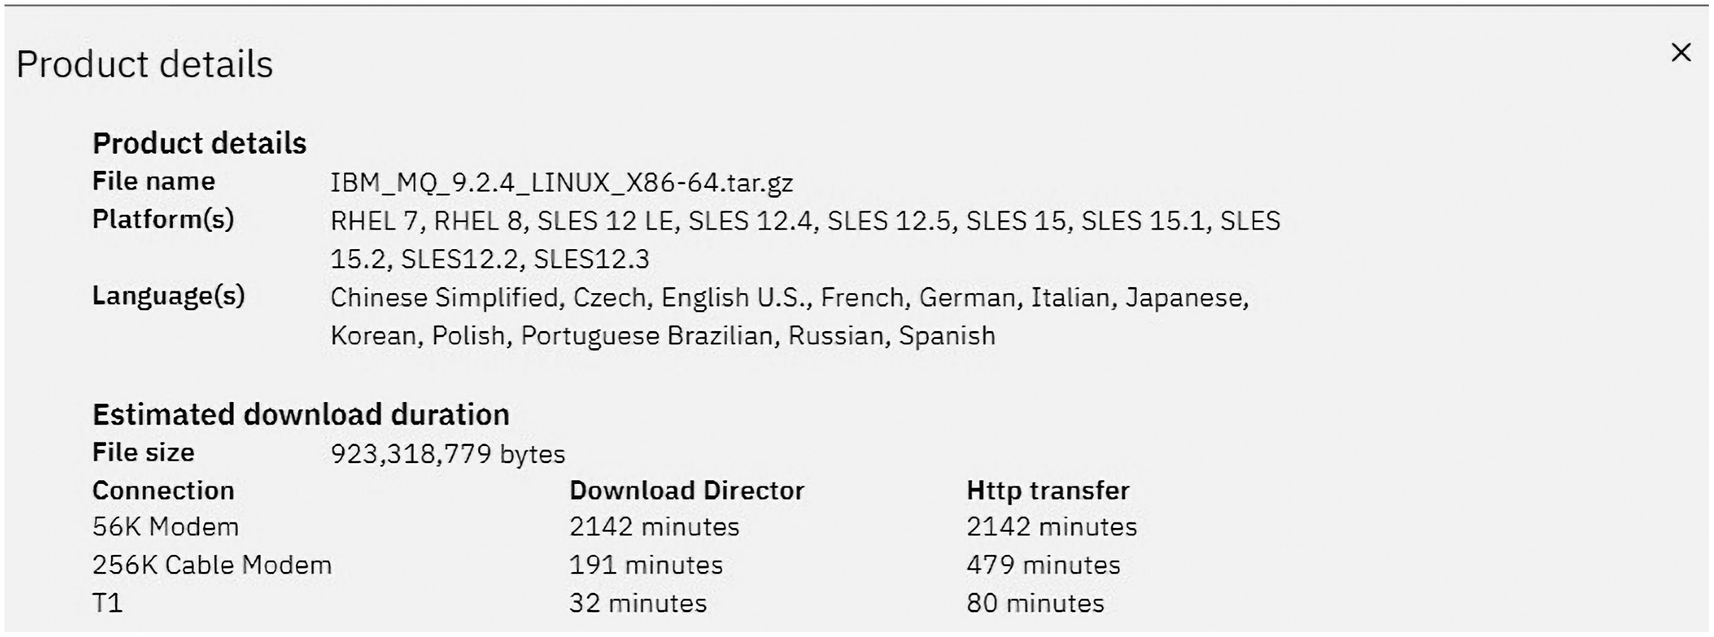
A screenshot of the product details page contains the I B M M Q V 9.2.5 installation packages with their view details, license agreement, download estimate, and e-assembly options with checkboxes. The first and last packages are highlighted.
Product details for the download of the IBM MQ V9.2.5 installation packages

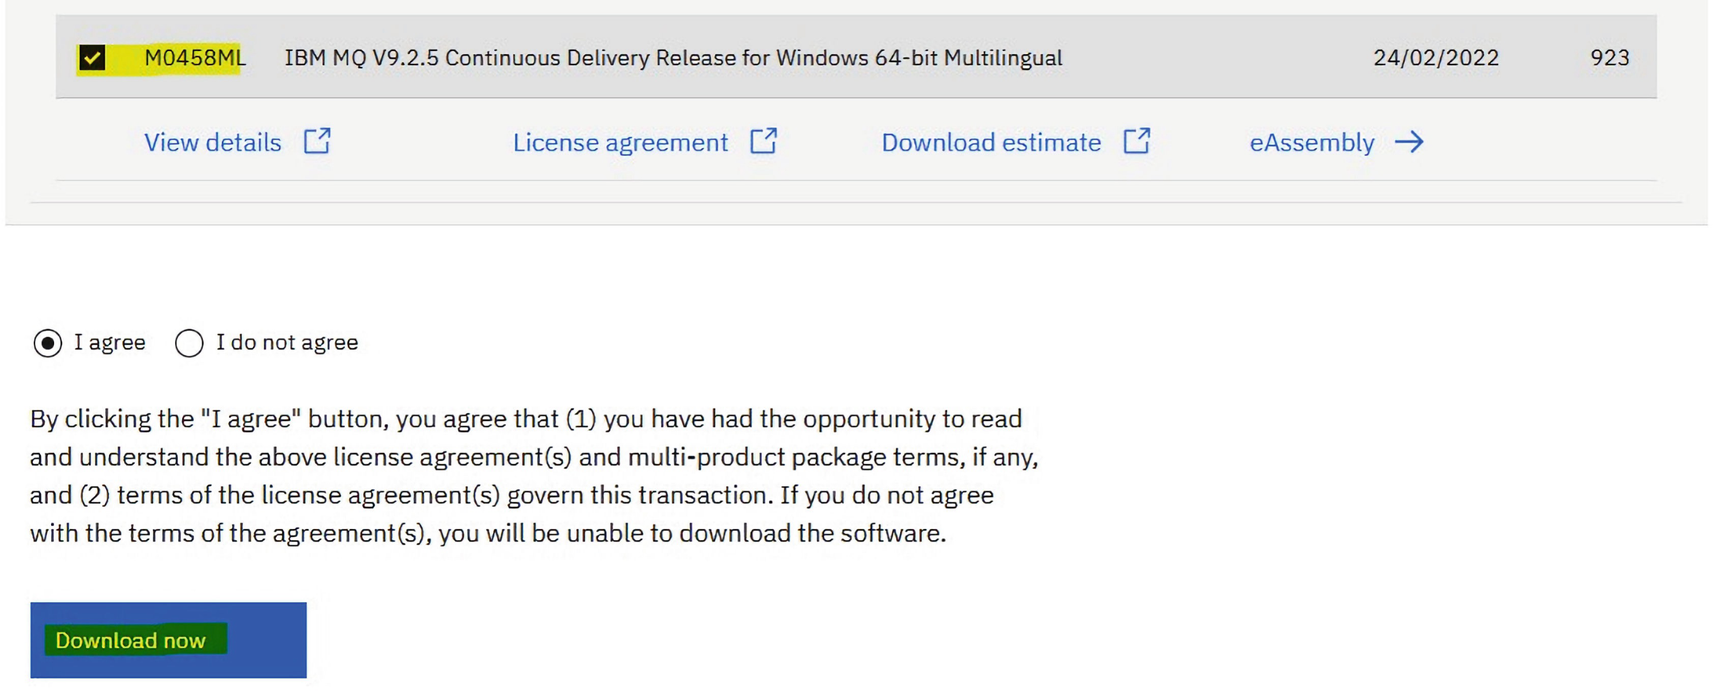
A screenshot of a dialog box containing I agree and I do not agree radio buttons with the terms and conditions given below. There is a download now option at the bottom.
The “I agree” radio button option is selected for the packages required

A screenshot of the I B M download director app window contains the download progress bar with details of the file location, size, total size, time remaining, connections, and options for pause, setup, details, and cancel.
The progress status bar window of IBM Download Director shows the download progress of the IBM_MQ_9.2.5_LINUX_X86-64.tar.gz

A screenshot of the details download director window contains the details of 2 files under state, date, size, and name with radio buttons for the current download and download history. There are options for details and refresh below them.
The details of the downloaded packages are displayed
A screenshot has 2 parts. The top part contains the view details, license agreement, download estimate, and e assembly options with the highlighted checkbox for I B M M Q V 9.2.5 Windows 64-bit file. The bottom part contains the I agree and I do not agree radio buttons with the terms and conditions and a download now option.
The Windows 64-bit version of IBM MQ V9.2.5 Continuous Delivery Release is selected for download
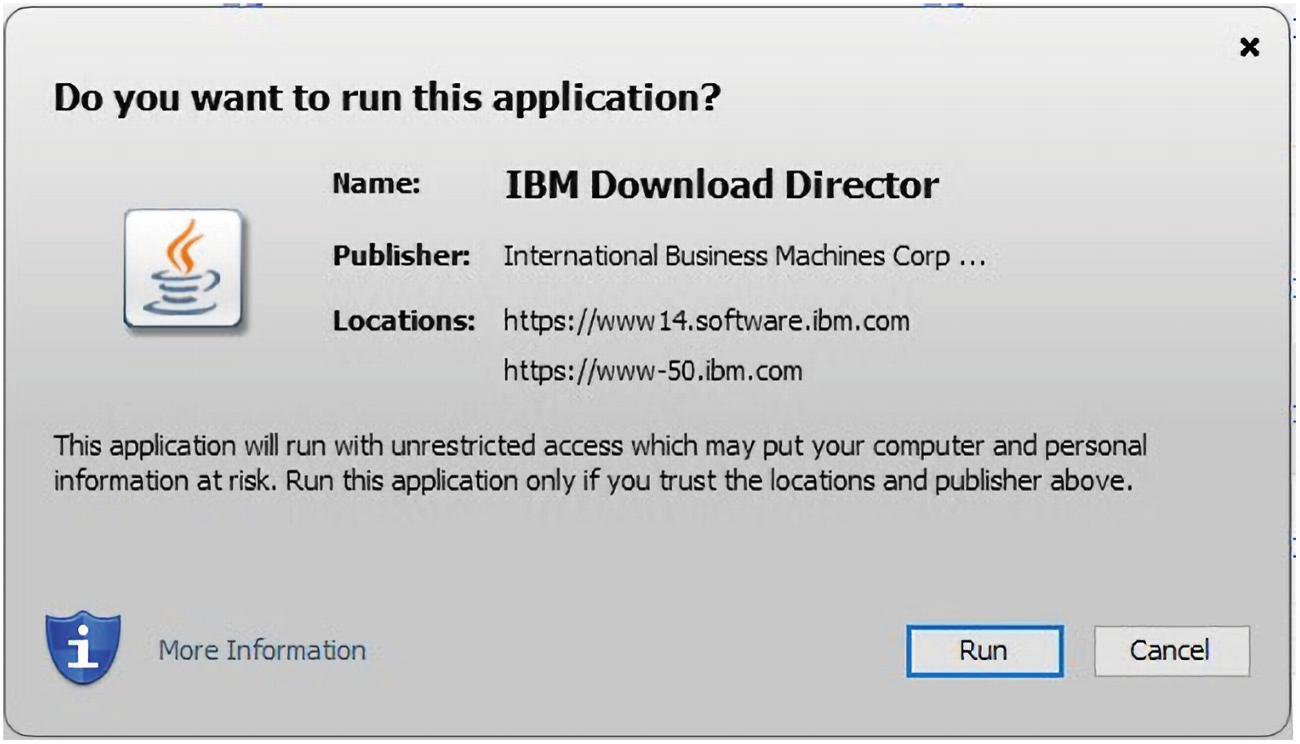
A screenshot of the do you want to run this application dialog box contains the name, publisher, and location details with the java applet icon on the left. The run and cancel buttons are given below.
The Download Director Java applet is run in a Firefox browser
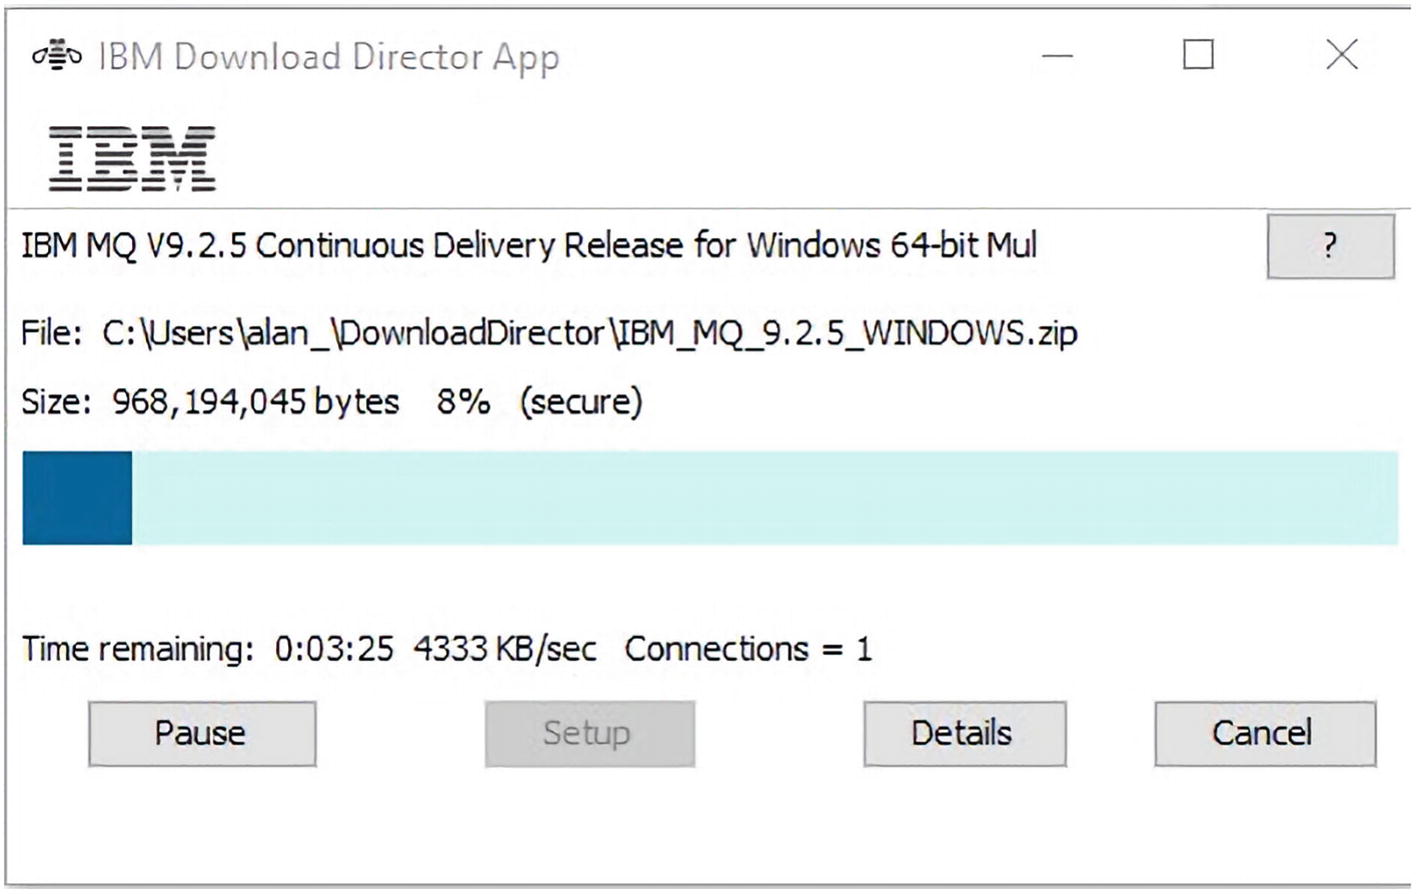
A screenshot of the I B M download director app window contains the download progress bar with details of the file location, size, time remaining, connections and options for pause, setup, details, and cancel.
The download status of the IBM_MQ_9.2.5_WINDOWS.zip file is shown

A screenshot of the details download director window contains the details of a file under state, date, size, and name with radio buttons for current download and download history. There are options for details and refresh below them.
The downloaded IBM_MQ_9.2.5_WINDOWS.zip installation file
- 1)First, we create the /home/IBM/MQ directory logged in as the root user:cd /homemkdir IBMcd IBMmkdir MQcd MQ
- 2)Copy the IBM_MQ_9.2.5_LINUX_X86-64.tar.gz file to the /home/IBM/MQ folder path created using wasadm on the ecmukdemo6 server:cp /mnt/hgfs/Installs/MQ/IBM_MQ_9.2.5_LINUX_X86-64.tar.gz .
- 3)The IBM MQ 9.2.5 installation is unpacked, and then we change to the MQServer subfolder:tar -zxvf IBM_MQ_9.2.5_LINUX_X86-64.tar.gzcd /home/IBM/MQM/MQServer
- 4)The license is registered using the following shell script:./mqlicense.sh -text_only
From IBM MQ 9.2.0, you have the option of accepting the license before or after installing the product. To accept the license before installing, run the mqlicense.sh script first.
Press Enter to continue viewing the license agreement, or enter “1” to accept the agreement, “2” to decline it, “3” to print it, “4” to read non-IBM terms, or “99” to go back to the previous screen.
1
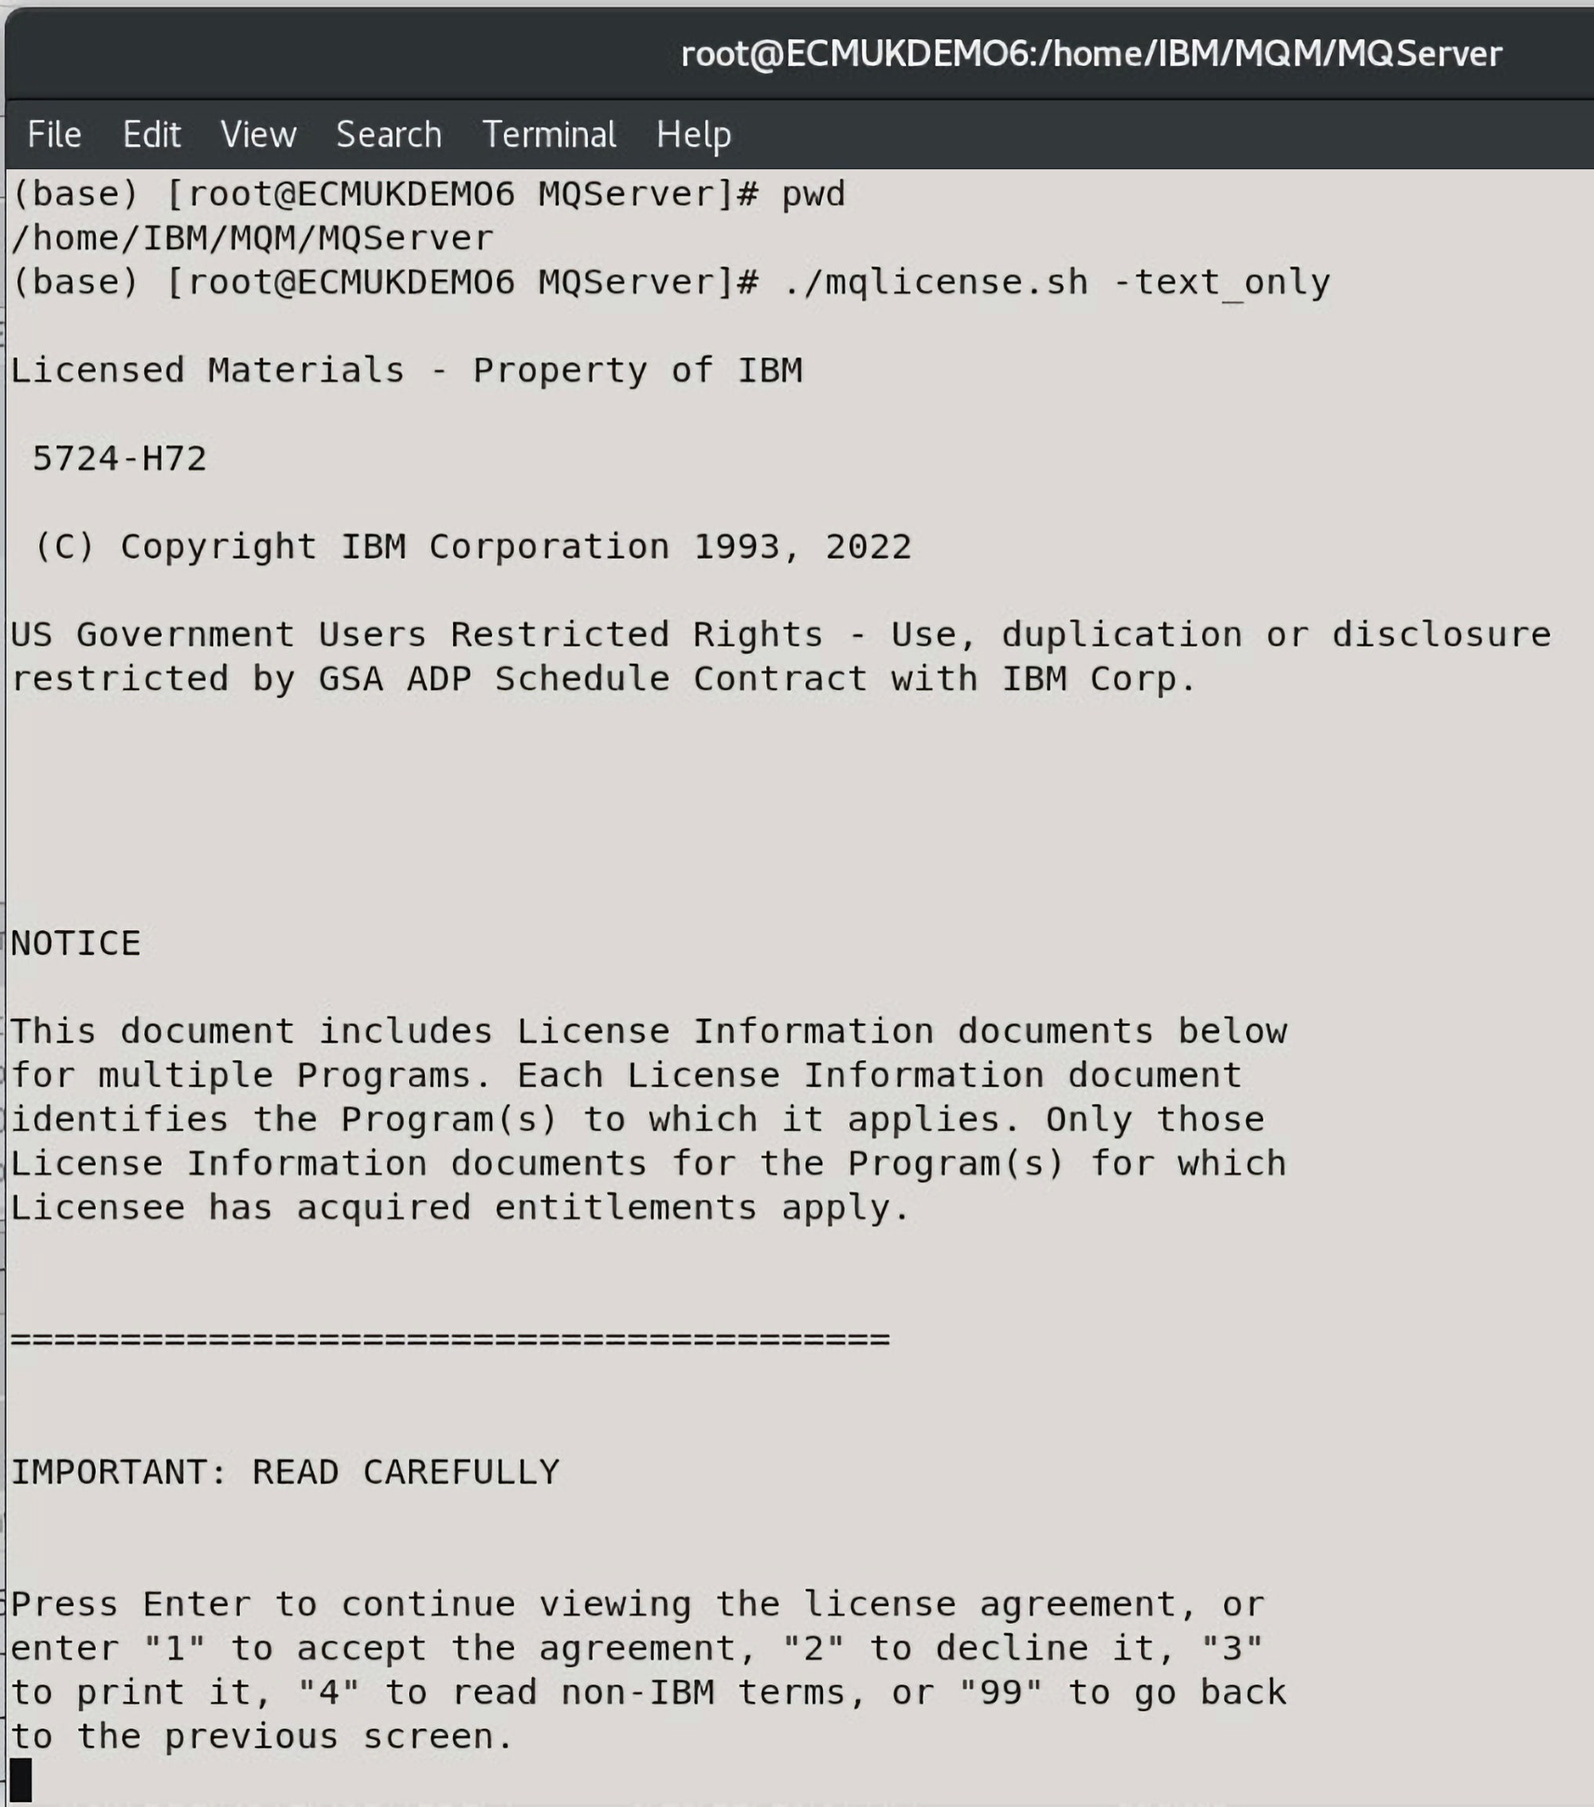
A screenshot of the root at M Q server window contains the server and licensed materials information with descriptions of notice and important read carefully.
The License shell script is run
- 5)The temporary environment variable used for installation is set as follows:mkdir /opt/IBM/software/mkdir /opt/IBM/software/tmpTMPDIR=/opt/IBM/software/tmp
- 6)
The rpm command is used to install the packages:
The preceding command causes the default directory path to be used.
The installation list of IBM MQ Series 9.2.5.0 components

A screenshot of a window contains the m q config settings information for system V semaphores, system V shared memory, system settings, and current user limits with their pass and fail status. It also has the descriptions of m q config below.
The current root User file limits are displayed as FAIL
The current root User limits need to be increased!
nofile (-Hn) 4096 files
and nofile (-Sn) 1024 files
These two limits need to be increased to 10240.
The root user limits can be changed as follows:
vi /root/.bashrc
ulimit -u unlimited
Also, the settings in /etc/security/limits.conf need to be edited.
Log in to the computer as the root user or as a user with sudo permissions.
Go to the /etc/security directory.
Open the limits.conf file for editing.
Save and close the file.

A cropped screenshot of a window contains the file details under domain, type, item, and value to fix the limits failure.
The /etc/security/limits.conf file is edited to fix the Limits FAIL
After changing the limits, the ecmukdemo6 system requires a reboot.
147 of 147 tasks have been completed successfully.

A cropped screenshot of a window gives the 147 of 147 tasks have been completed successfully, and Installation 1 set as the primary installation message for a file with various codes.
The /etc/security/limits.conf file is edited to fix the Limits FAIL
- 7)
env gives the following MQ-related environment variables.
The MQ-related environment variables
- 8)
Launch the MQ Explorer.

A cropped screenshot of a window has the codes that load the M Q explorer program.
The MQ Explorer program is loaded
- 9)
The MQ Explorer GUI is shown in Figure 3-16.

A screenshot of the I B M M Q explorer window has the welcome to M Q explorer message with its description on the right. The M Q explorer navigator panel on the left contains the I B M M Q parent folder with 5 sub-folders.
The IBM MQ Explorer GUI is displayed using ./MQExplorer
The message displayed in Figure 3-16:
With this installation, existing local queue managers are displayed automatically in the Navigator view. However, the current user is not a member of the 'mqm' group and is therefore not authorized to use MQ control commands. The user will not be able to perform local queue manager operations such as create, start, stop and delete. To add a remote queue manager, right-click ‘Queue Managers’, and select ‘Add Remote Queue Manager’.
- 10)
So, we must add wasadm as a member of the mqm group:
This must be done for the mqm user; otherwise, the wasadm Q Manager create will fail with an error message.
- 11)
Log out and then log back in as wasadm for the changes to take effect.

A screenshot of the log out root dialog box contains the cancel and log out options. The text above the options read, root will be logged out automatically in 60 seconds.
The Linux root user is logged out
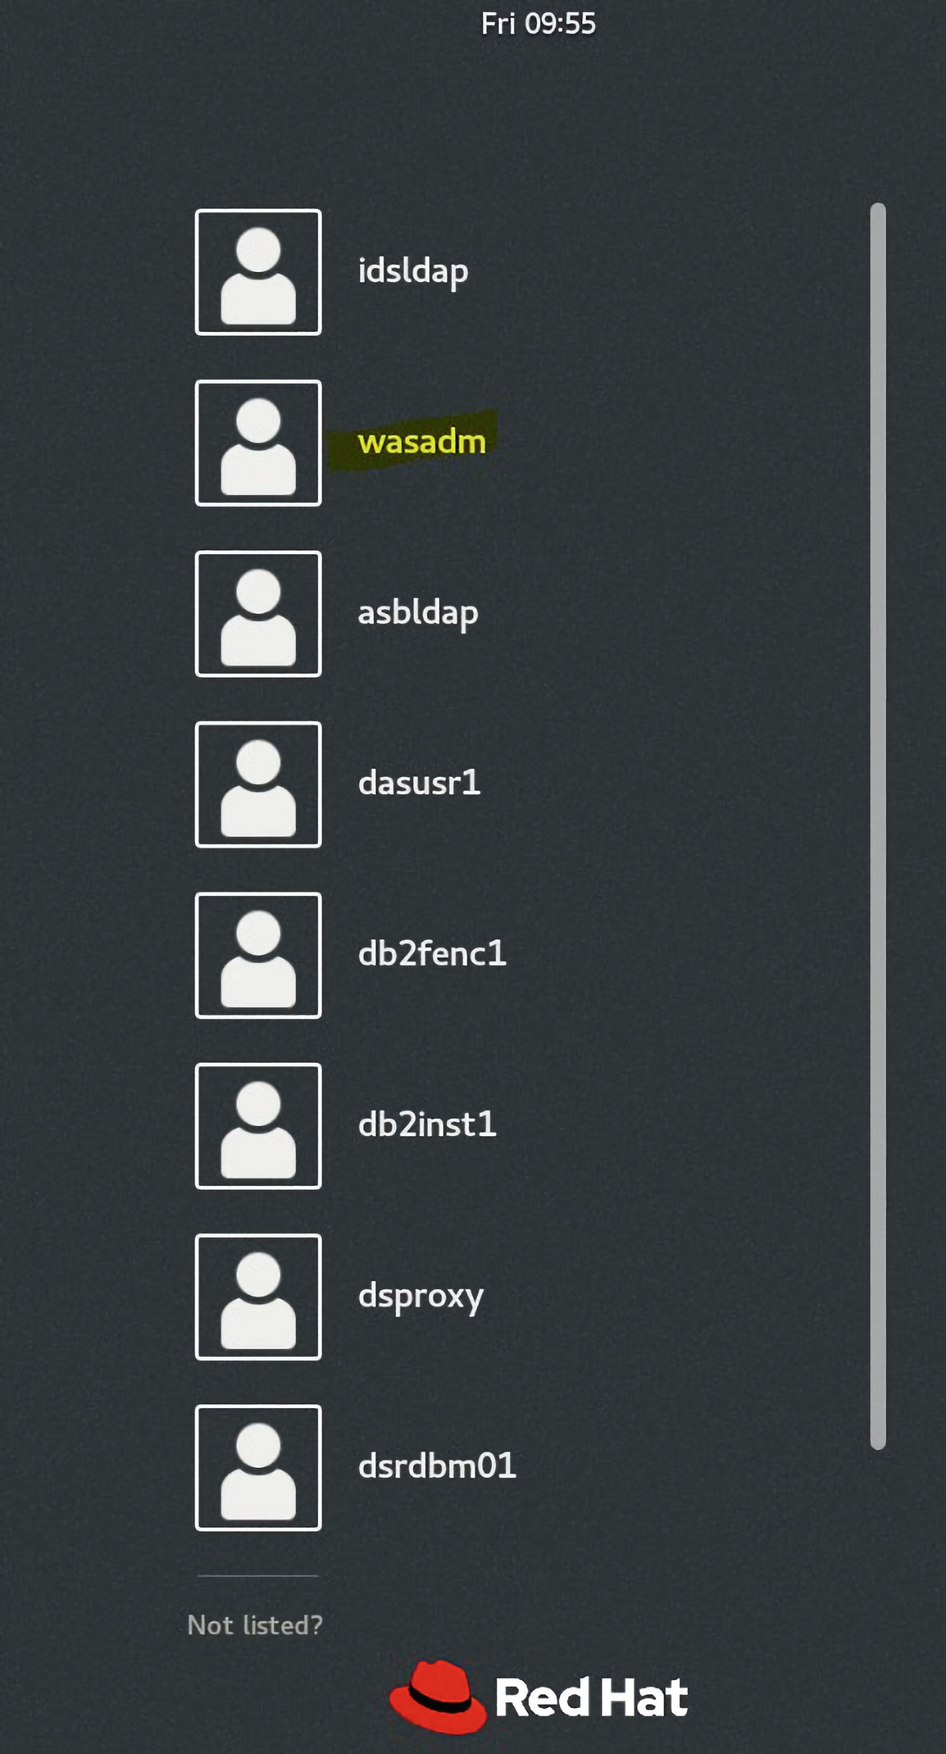
A screenshot of a window contains 8 user names with the not listed option and red hat logo at the bottom. The user name w a s a d m is highlighted.
The wasadm Linux user is selected for login

A screenshot of a window contains the entered password in asterisk marks for the user w a s a d. It has the option of cancel and sign in at the bottom.
The wasadm password is entered in the Linux Desktop
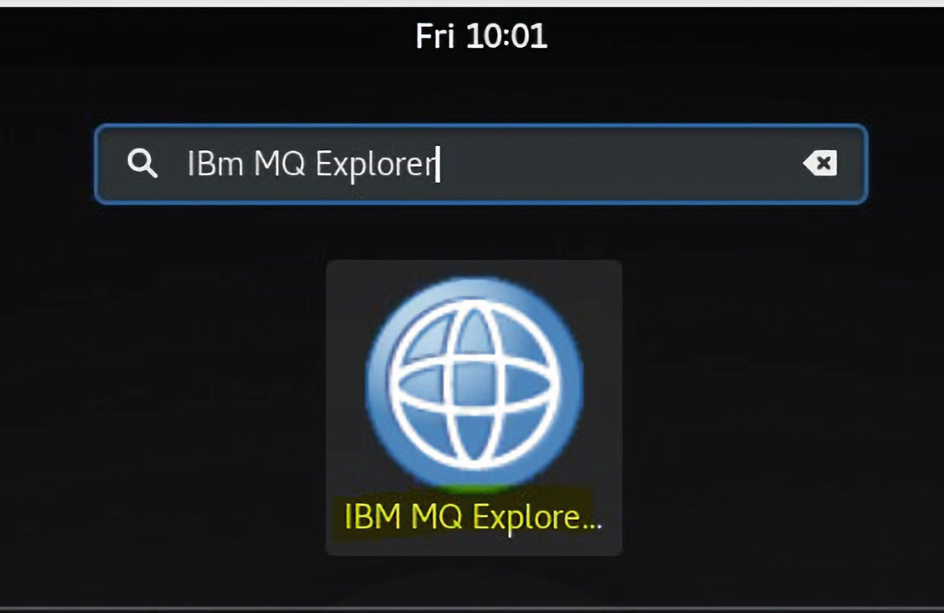
A screenshot of a window contains a search box with the text I B M M Q explorer and the I B M M Q explorer program icon highlighted below.
The IBM MQ Explorer 9.2.5 program icon to be clicked
A screenshot of the splash screen of I B M M Q version 9.2. It has an I B M logo on the top right, and the built on eclipse and java logos at the bottom.
The splash screen of the IBM MQ Series Version 9.2.5 Explorer
- 12)
Now displays:
A screenshot of the I B M M Q explorer window has the welcome to M Q explorer message with its description on the right. The M Q explorer navigator panel on the left contains the I B M M Q parent folder with 5 sub-folders.
The initial screen of the IBM MQ Series Version 9.2.5 Explorer
A cropped screenshot of the I B M M Q explorer window has the M Q explorer navigator panel with an options menu for the sub-folder queue manager. It has the new option in the options menu, and the queue manager option in the sub-menu highlighted.
A New local Queue Manager is created using the highlighted menus
- 13)
Create a Queue Manager.

A screenshot of the create queue manager window has the input boxes for queue manager name, default transmission queue, dead-letter queue, max handle unit, trigger interval, max uncommitted messages, and application group. The checkbox to make this the default queue manager is highlighted with options for back, next, cancel, and finish given below.
The wasadm Queue Manager is created with Group mqm
- 14)
Defaults are used for logging.

A screenshot of the create queue manager window has the input box for queue manager name with the radio buttons for use circular and linear logging, and options for log file size, log primary files, and log secondary files. The options for data and log paths and back, next, cancel, and finish are given below.
The Queue Manager Logging defaults are used, and Next> is clicked
- 15)
Click Next> and select Permit a standby instance (tick box) and remote admin by Create server-connection channel (tick box) to allow remote.

A screenshot of the create queue manager window has the input box for queue manager name with the checkboxes for start queue manager, multi-instance queue manager, and create server-connection channel highlighted. The options for automatic configuration and back, next, cancel, and finish are given below.
The required Queue Manager options are ticked as highlighted
From IBM MQ 9.2.0, you can configure your queue manager to automatically apply the contents of an MQSC script, or set of MQSC scripts, on every queue manager start. (This is also available from version 9.1.4 onward.)
(See www.ibm.com/docs/en/ibm-mq/9.2?topic=commands-automatic-configuration-from-mqsc-script-startup.)
The following link contains an example configuration:
- 16)
Click Next>.
A screenshot of the create queue manager window has the input box for queue manager name with the checkbox for create listener configured for T C P I P. The options for listen on port number and back, next, cancel, and finish are given below.
The Create listener configured for TCP/IP is ticked with port 1414
- 17)
Use the default port 1414 and click Next>.

A screenshot of the create queue manager window has the input box with the w a s a d m queue manager name and the checkboxes for auto-reconnect and automatically refresh information. The options for interval in seconds, apply default, and back, next, cancel, and finish are given below.
The wasadm Queue Manager reconnection settings are entered
- 18)
Use a default 15-second refresh interval, click Apply Default, and click Finish.
- 19)
Queue Manager is now created.

A screenshot of the I B M M Q explorer window has the queue managers' information for w a s a d m on the right. The M Q explorer navigator panel on the left has the queue manager sub-folder selected.
The newly created wasadm Queue Manager is now displayed
- 20)
Click the wasadm node to show the status of the Queues created.

A screenshot of the I B M M Q explorer window has the queue manager w a s a d m information on connection overview, status quick view, and properties quick view on the right. The platform and Unix are selected under properties quick view. And the M Q explorer navigator panel on the left has the w a s a d m node selected.
The status of the Queue Manager is displayed at the wasadm node
Notification of Successful Document Load into the FileNet Target Object Store OS2
JMS MQ Java Message from Content Object Store OS2, FileNet | |
|---|---|
An event will be created in FileNet to send a real-time MQ message to the Quality Audit Database system, auditdb, when a new Audit Report Task Workflow is created. This message will pass back the following metadata. Timestamps will be generated as part of the messaging service: | |
Field ID | Attributes |
Case ID | |
Department Id | |
AuditDate | CCYY-MM-DD-HH.MM.SSSSSS |
Audit Report Id | |
Preconditions | An Audit Report document has been successfully loaded and stored in the FileNet Target (OS2) Object Store. |
Postconditions | A message containing the relevant information to identify the Department and the Audit Report Document will be placed on MQ, and an email alert will be issued from the Workflow operation system step to the Department manager. |
Exceptions | If MQ messages fail due to Audit Case processing issues or MQ being unavailable, the load of any new documents may be paused for a limited time period until the root cause of the issues is identified. Controls will be implemented where necessary to prevent a flood of MQ messages causing performance issues where a larger than normal volume of documents is processed (i.e., from a backlog following a Document load failure). |
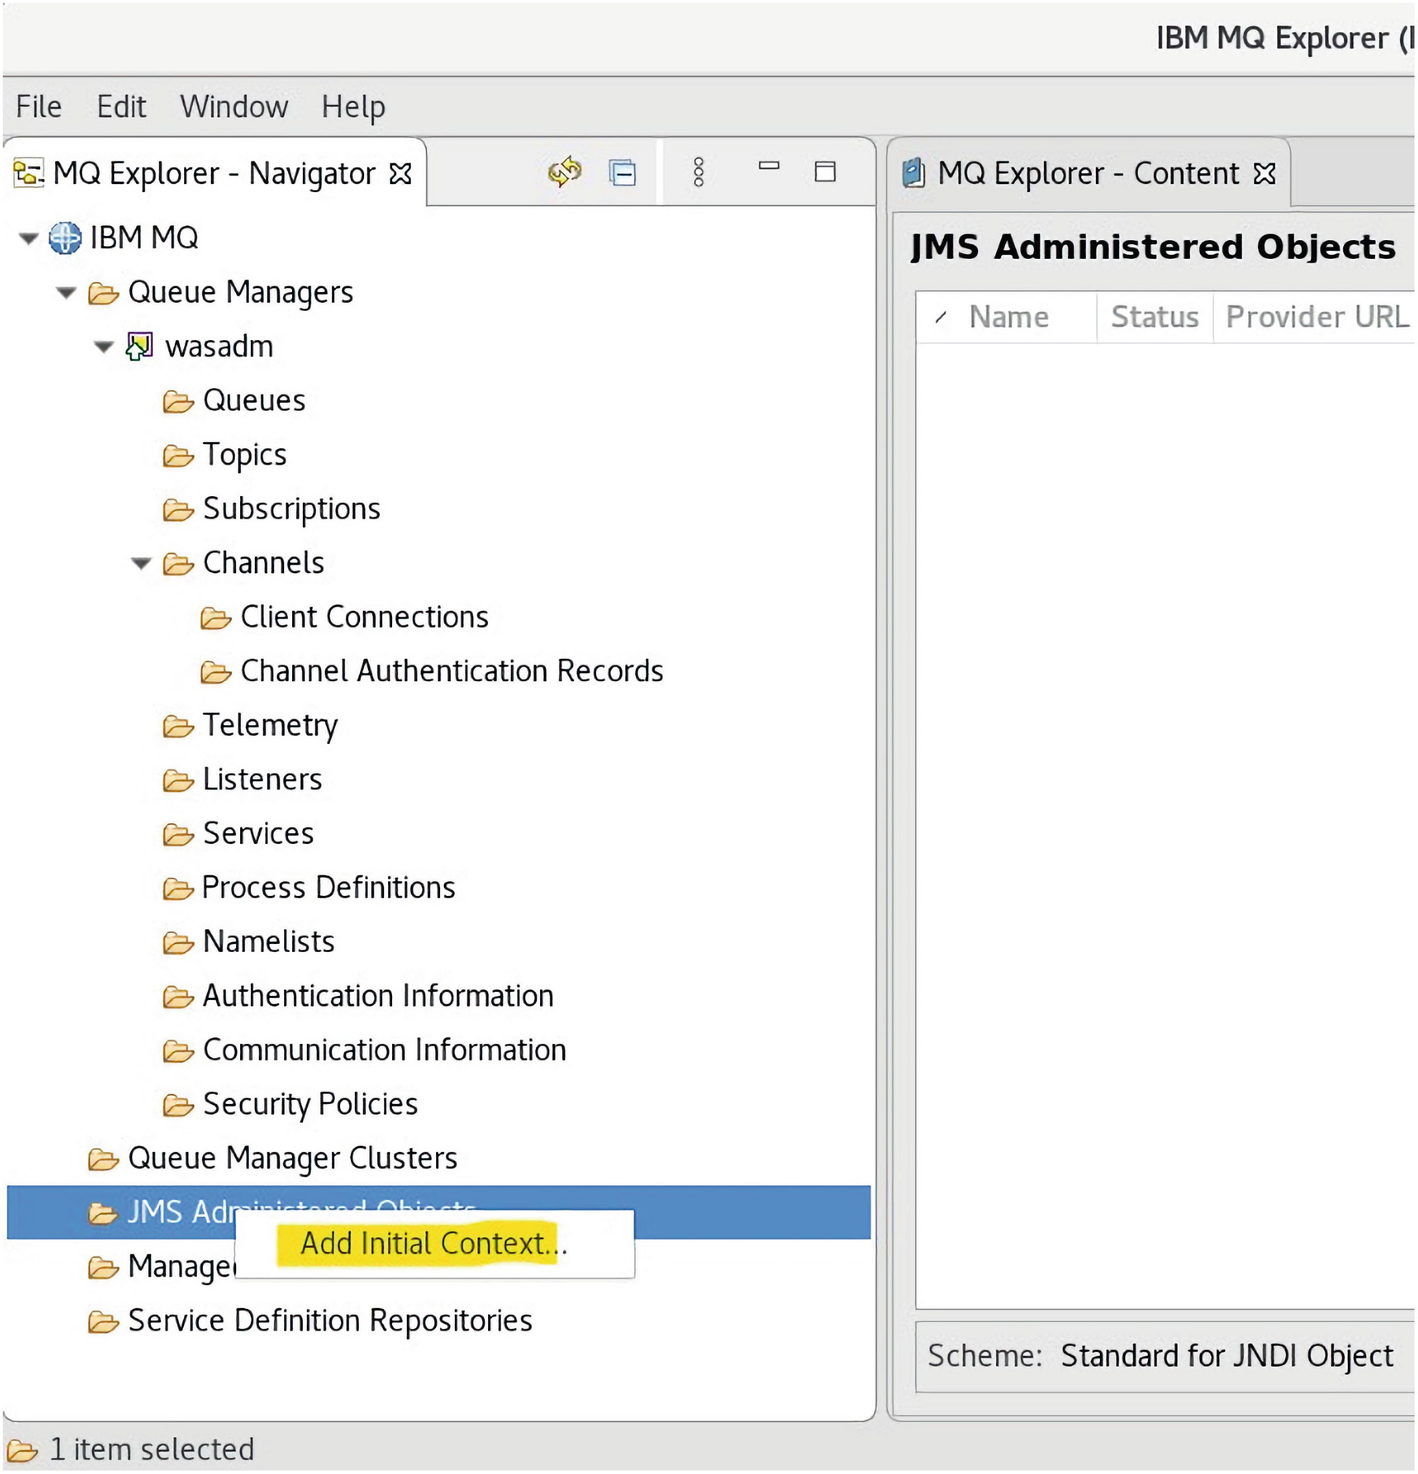
- 1.
Add initial JMS Context.

A cropped screenshot has the J M S administered objects folder selected on the left panel. It has the options menu with add initial context option highlighted.
The Initial JMS Content is added

A screenshot of the add initial context window has the connection details, with the where is the J N D I namespace located, radio buttons. The options for J N D I service provider, namespace location and back, next, cancel, and finish are given below.
The JNDI namespace is selected to be on the ecmukdemo6 LDAP server

A screenshot of the add initial context window has the security configuration details, with the J N D I service provider security drop-down menu. The options for back, next, cancel, and finish is given below.
The drop-down shows the types of security configuration available
None: The JNDI service provider does not require authentication. MQ Explorer connects to the initial context using anonymous authentication, and no security credentials are passed to the JNDI service provider.
Simple: The JNDI service provider requires simple authentication. MQ Explorer must pass the user-distinguished name and password to the JNDI service provider to connect to the initial context. (We select this option.)
CRAM MD5: The JNDI service provider requires CRAM-MD5 authentication. MQ Explorer must pass the MD5-encrypted password to the JNDI service provider to connect to the initial context.

A screenshot of the add initial context window has the user preferences details, with the context nickname input box and connect immediately, automatically reconnect checkboxes. The options for back, next, cancel, and finish are given below.
The option to Automatically reconnect to context on startup is ticked
Click the Finish command button.

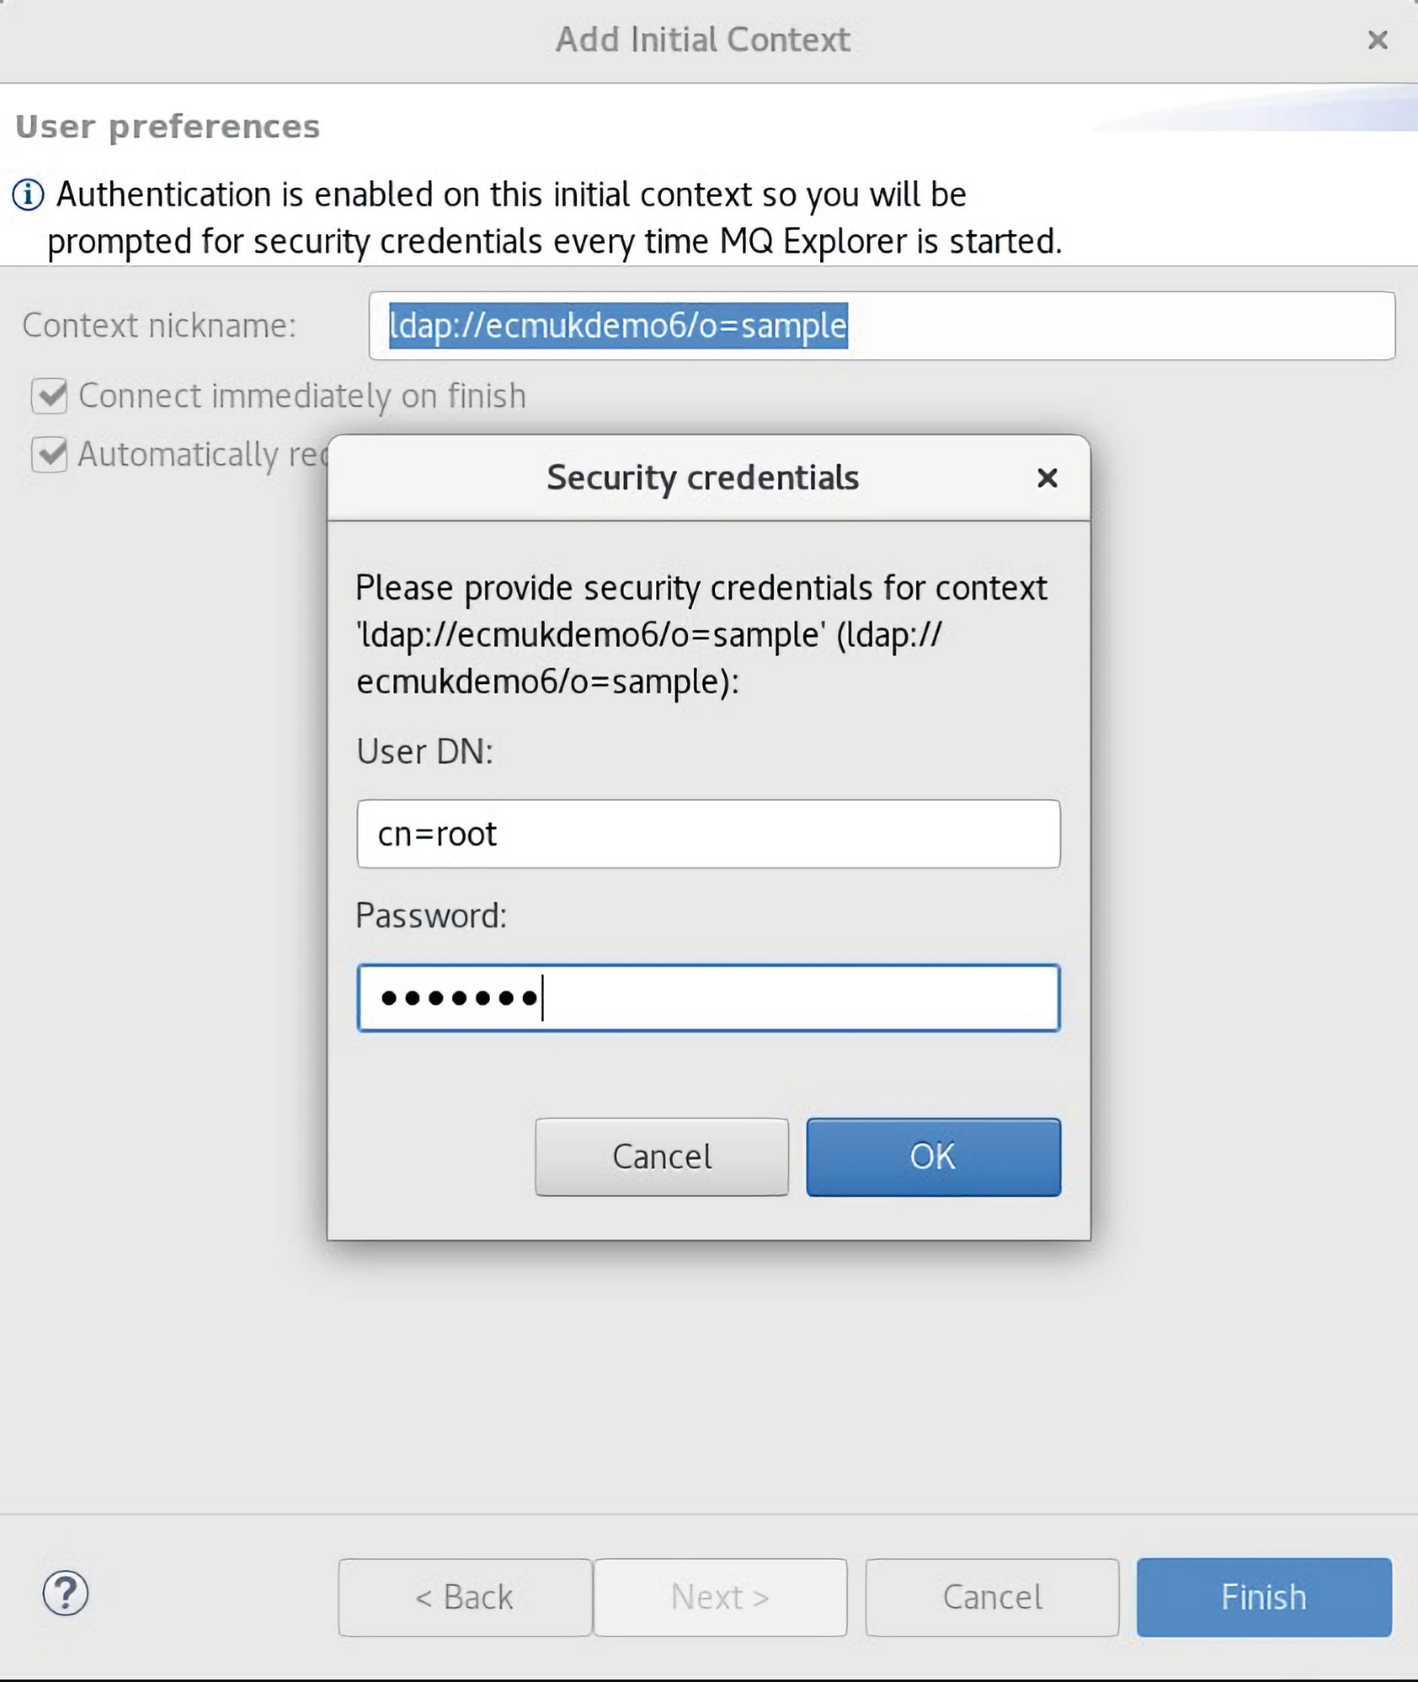
A screenshot of the security credentials dialog box in add initial context window has the input boxes for user D N and password. The options for cancel and O K are given below.
The LDAP administrative username and password are entered
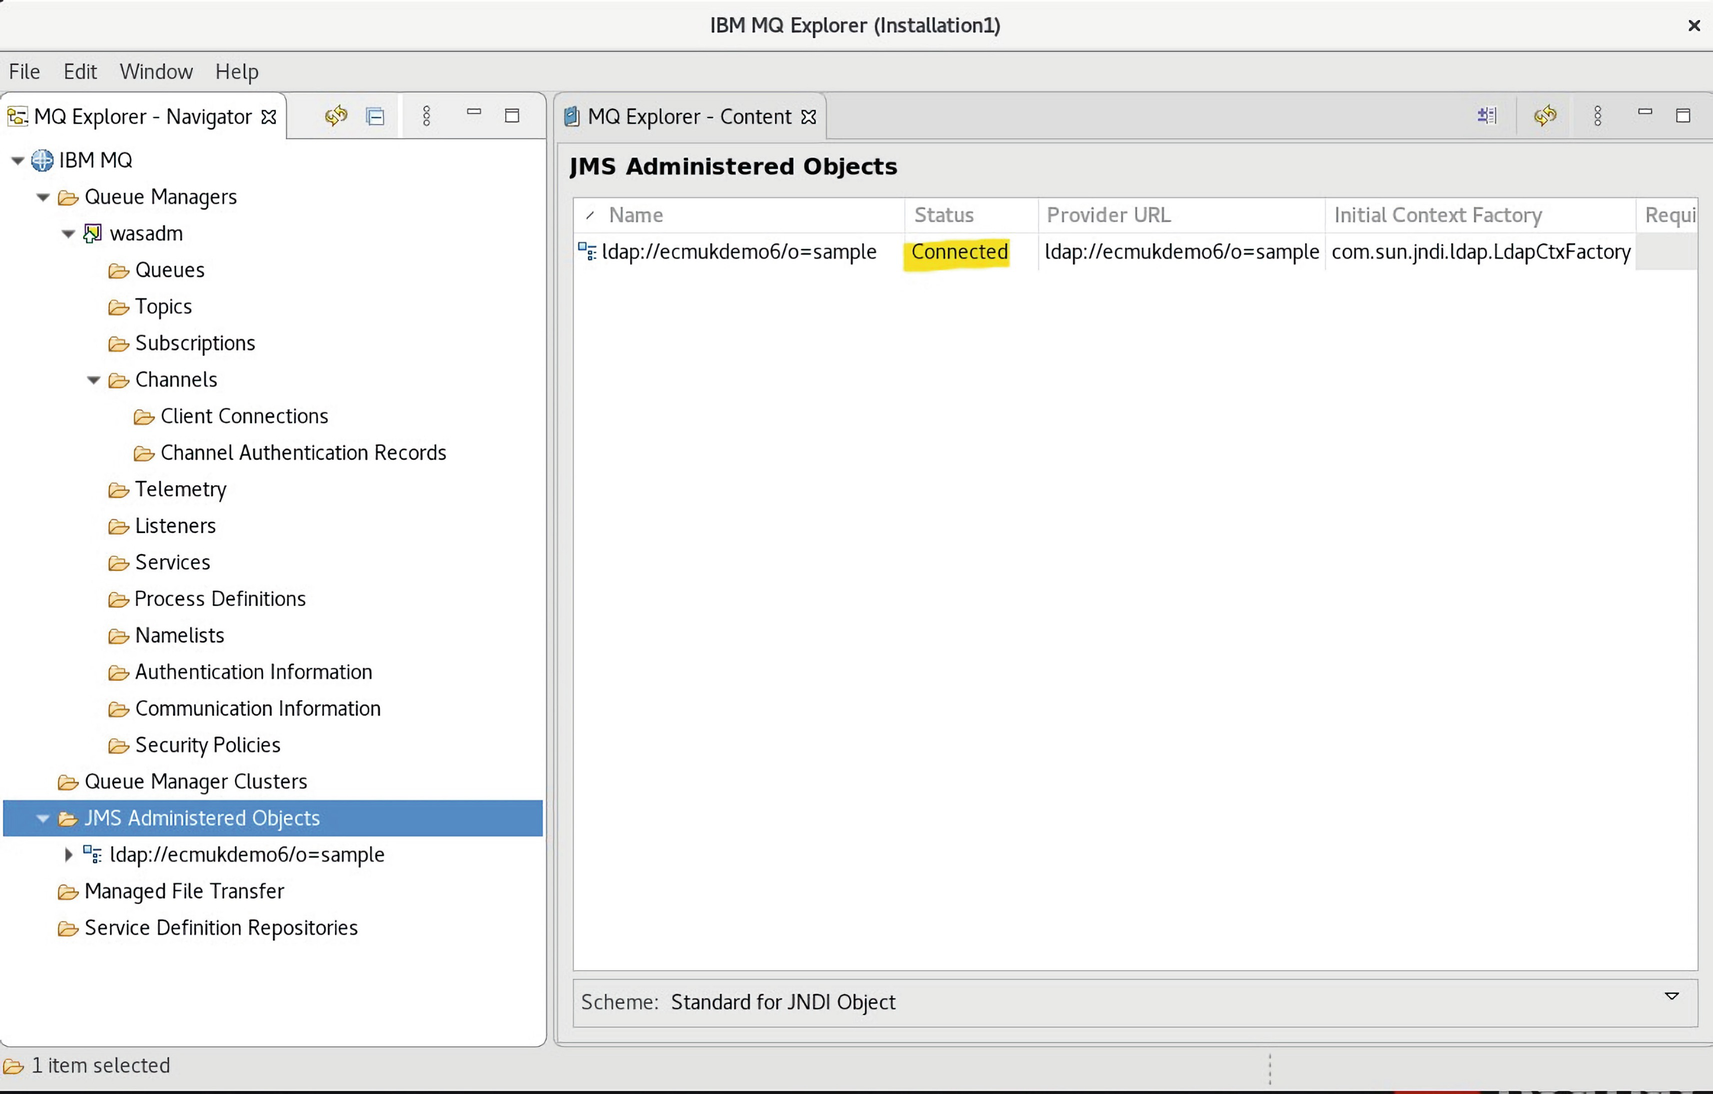
A screenshot of the I B M M Q explorer window has the J M S administered objects information on the right. The M Q explorer navigator panel on the left has the J M S administered objects sub-folder selected.
The status of the JMS LDAP Server Context is displayed as Connected
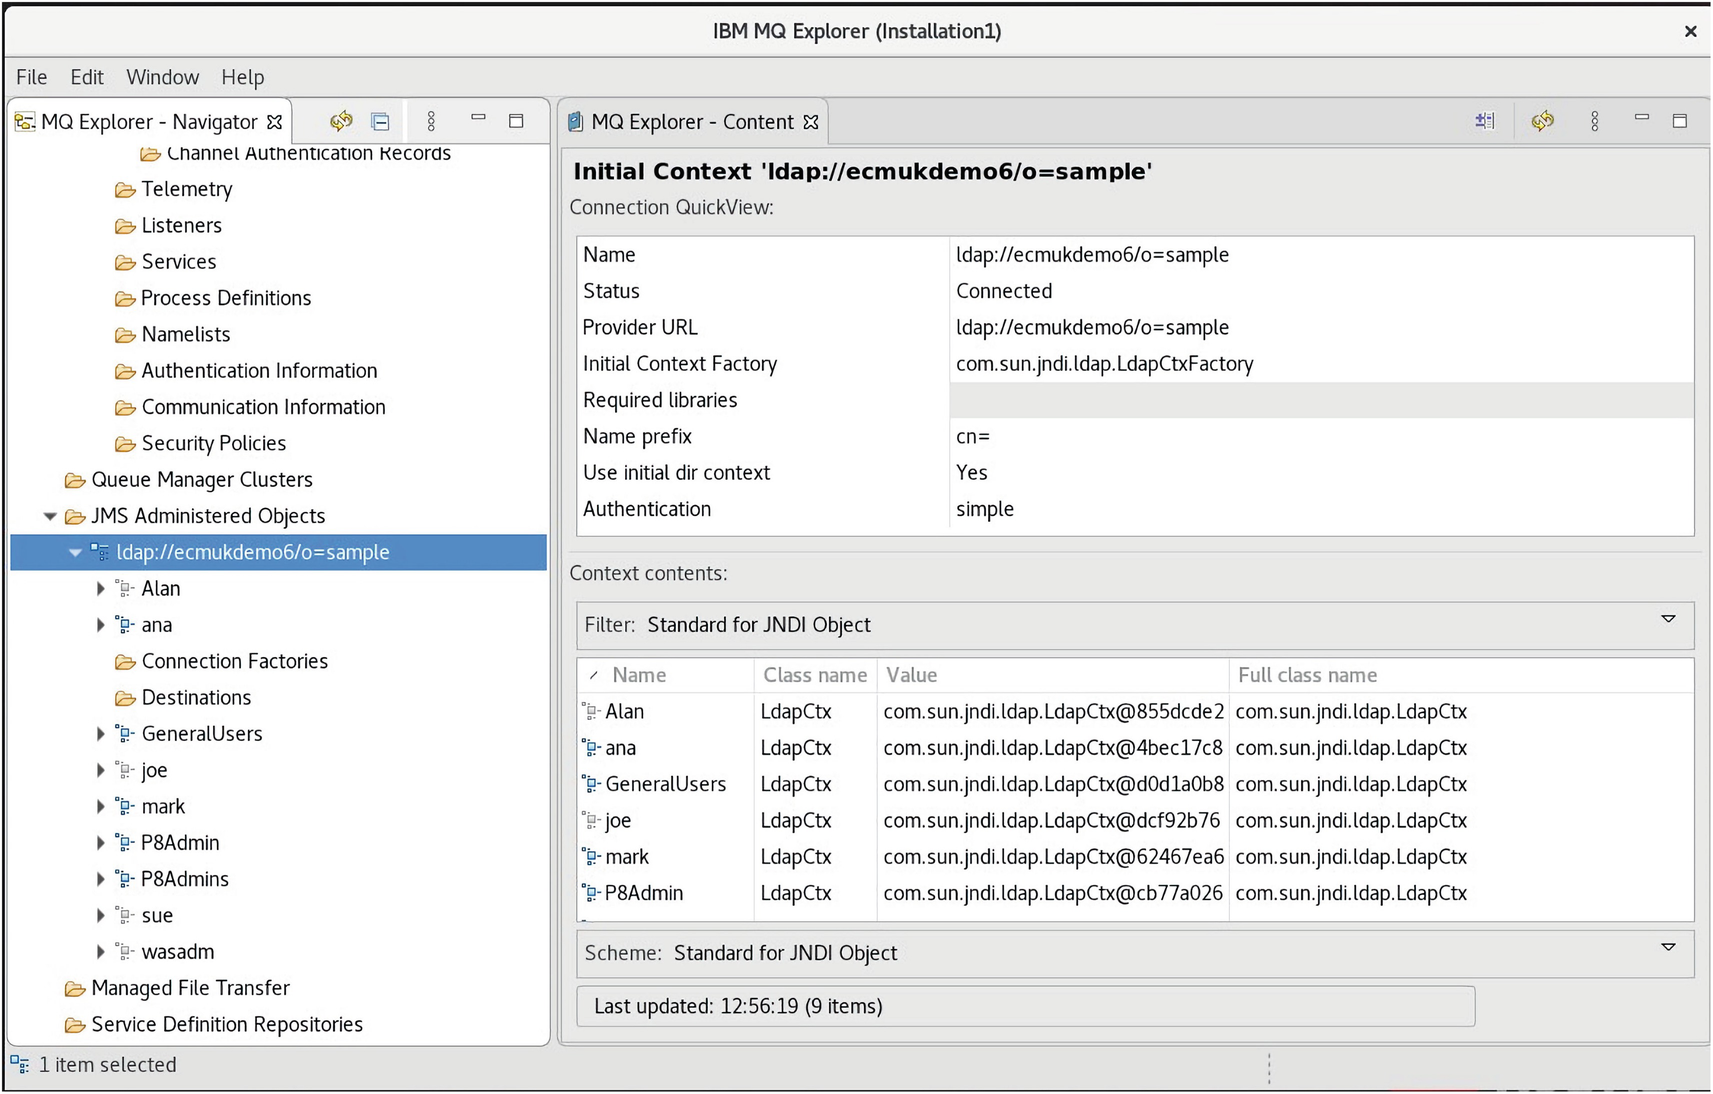
A screenshot of the I B M M Q explorer window has the M Q explorer content information for initial context on the right. The M Q explorer navigator panel on the left has the L D A P server U R L selected.
The opener for the LDAP server URL displays the Users and Groups
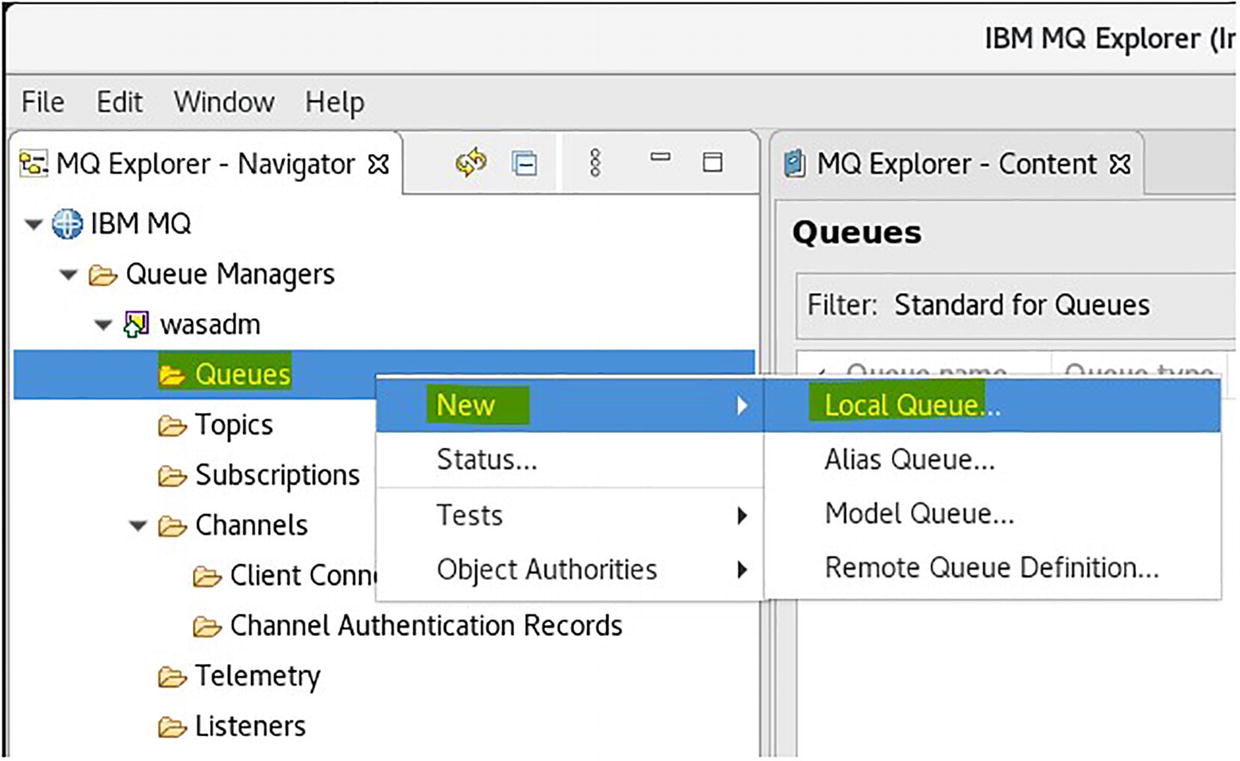
A cropped screenshot of the I B M M Q explorer window has the M Q explorer navigator panel with an options menu for the sub-folder Queues. It has the new option in the options menu, and the local queue option in the sub-menu highlighted.
The new AUDQAR Local Queue is created
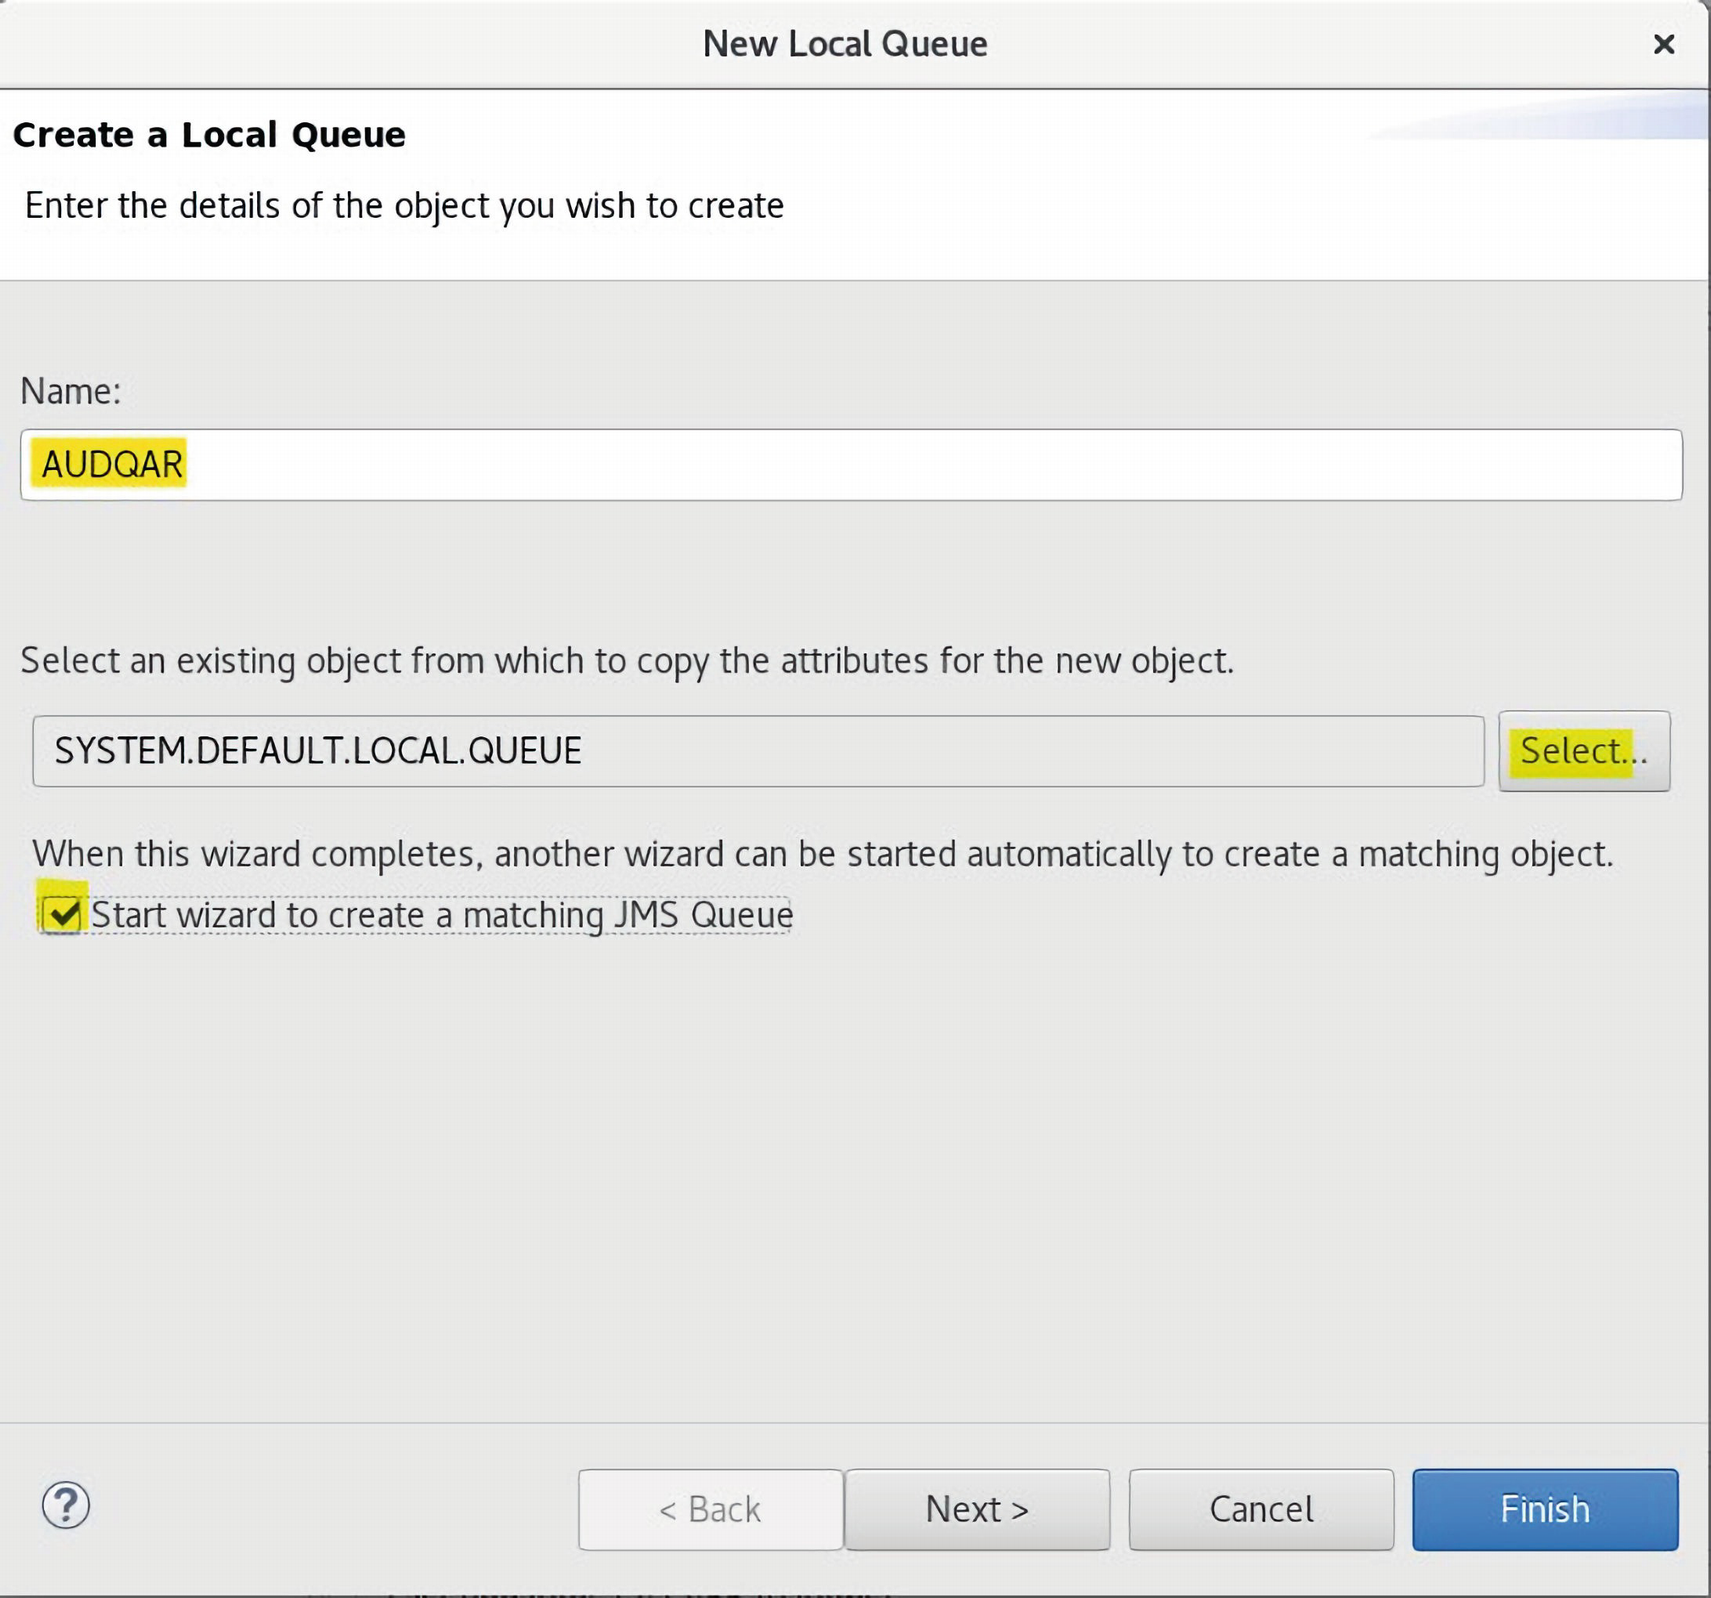
A screenshot of the new local queue window has the create a local queue detail, with the name input box, option to select an existing object, and a start wizard checkbox. The options for back, next, cancel, and finish is given below.
The new Local Queue is named AUDQAR and Finish clicked
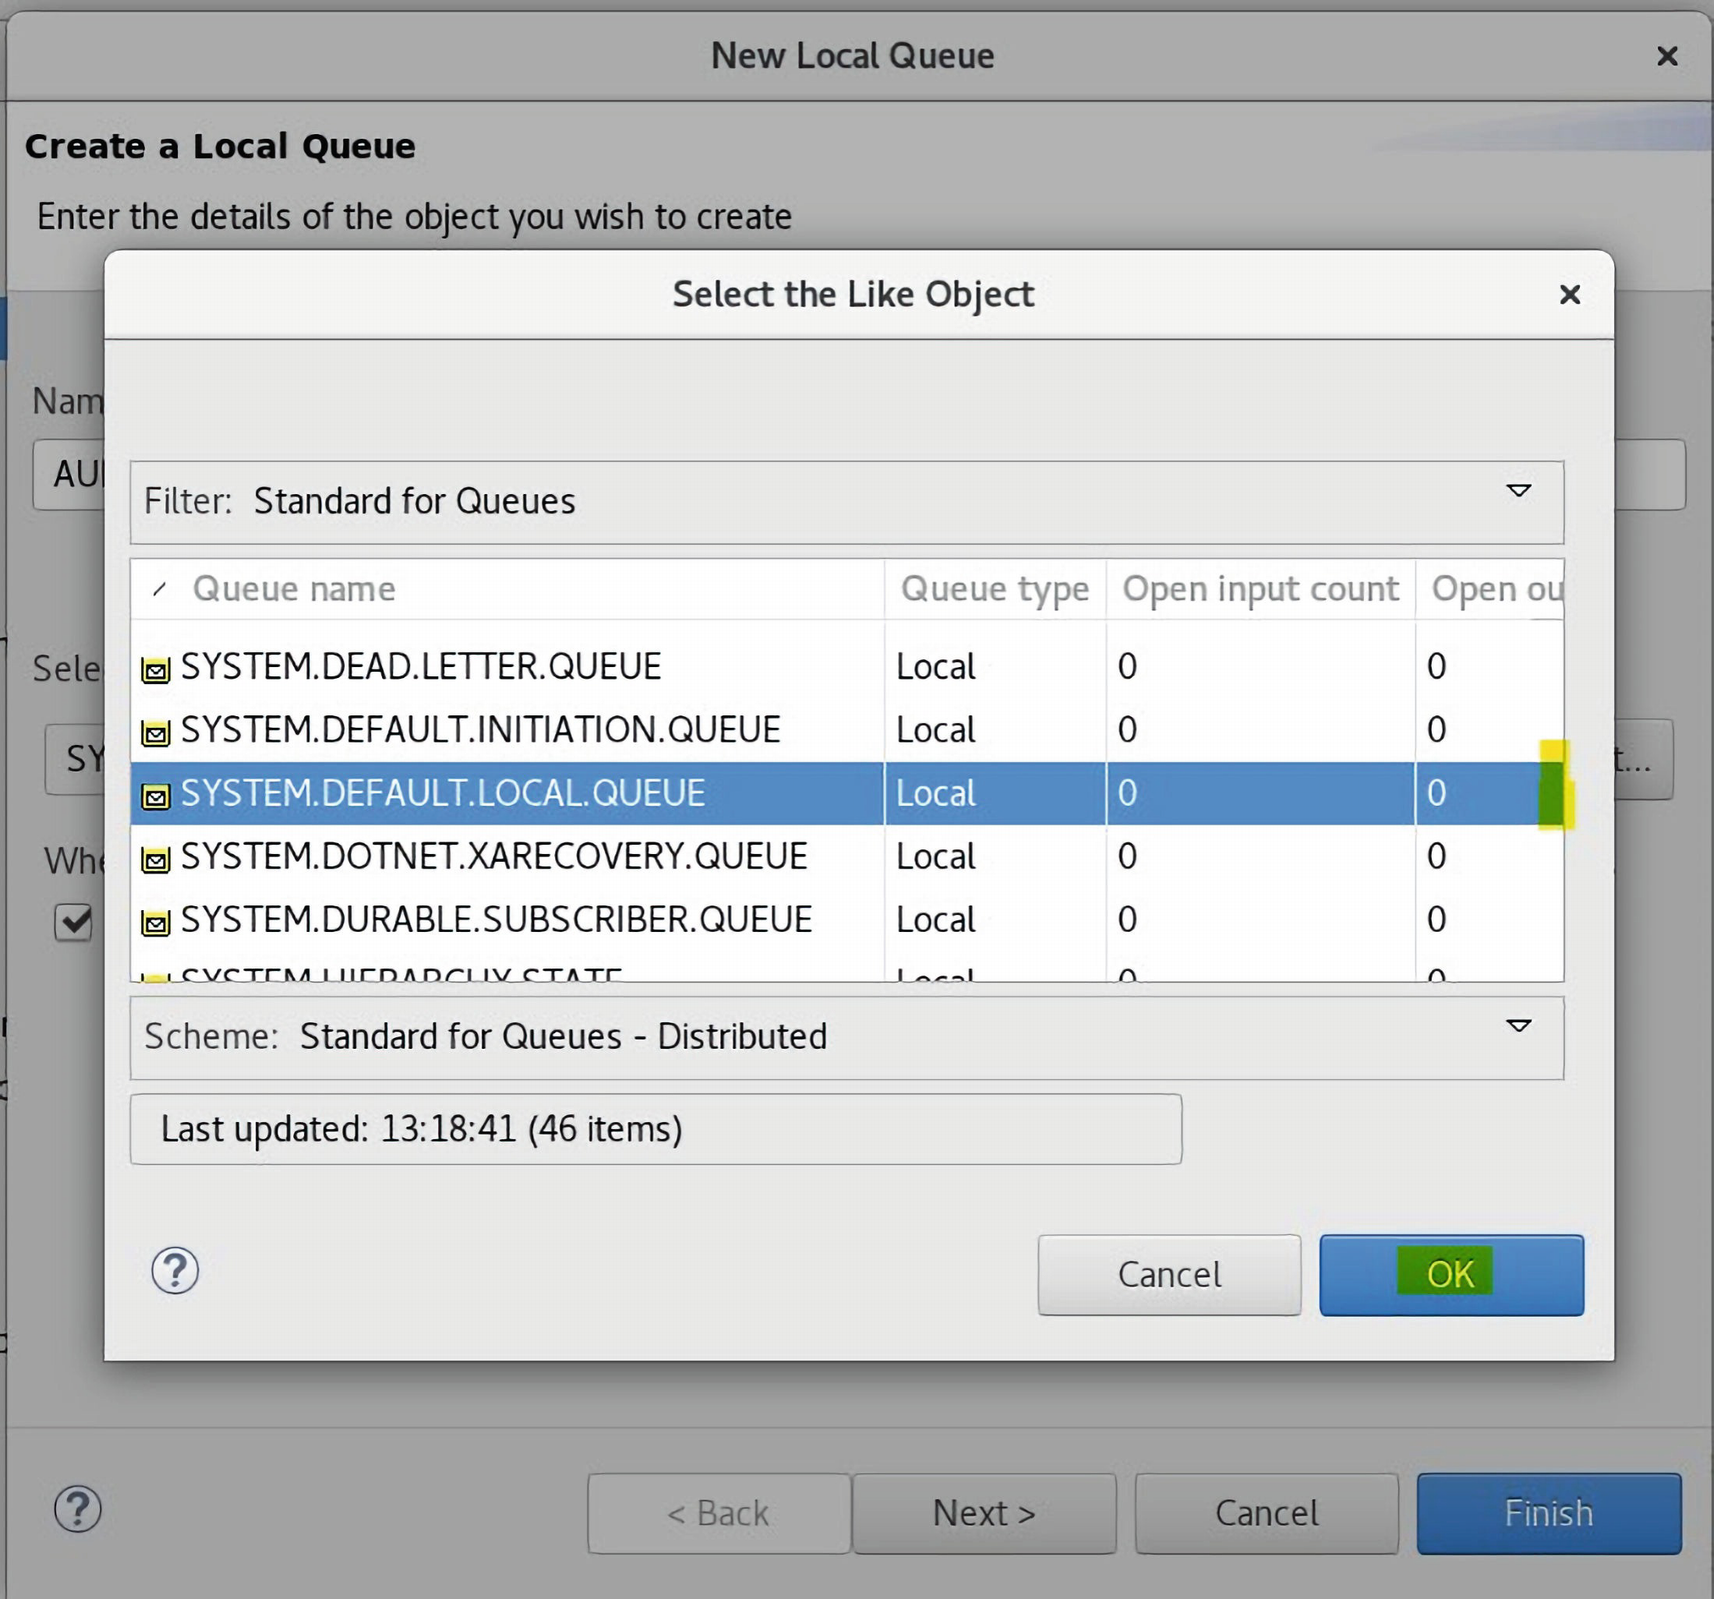
A screenshot of the select the like object dialog box in new local queue window has the filter and scheme option selected as standard for queues. The system default local queue under queue name is highlighted. And the options for cancel and O K are given below.
The SYSTEM.DEFAULT.LOCAL.QUEUE option is selected from the list
Click OK on SYSTEM.DEFAULT.LOCAL.QUEUE.

A screenshot of the new local queue window has the change properties detail, with the general option selected from the left panel. It has input boxes and options for queue name, type, description, put messages, get messages, default priority, default persistence, and scope. The options for back, next, cancel, and finish is given below.
Enter the Queue name and click Finish

A screenshot of the I B M M Q explorer dialog box in new local queue window gives the object was created successfully message. It has a checkbox for do not show success messages in future. The option for O K is given below.
The status of the Queue object creation is displayed

A screenshot of the new destination window has the new J M S queue detail, with the select box for J M S context. The options for back, next, cancel, and finish is given below.
The JMS Queue wizard requires the JMS Context to be selected
The JMS Queue wizard is invoked.
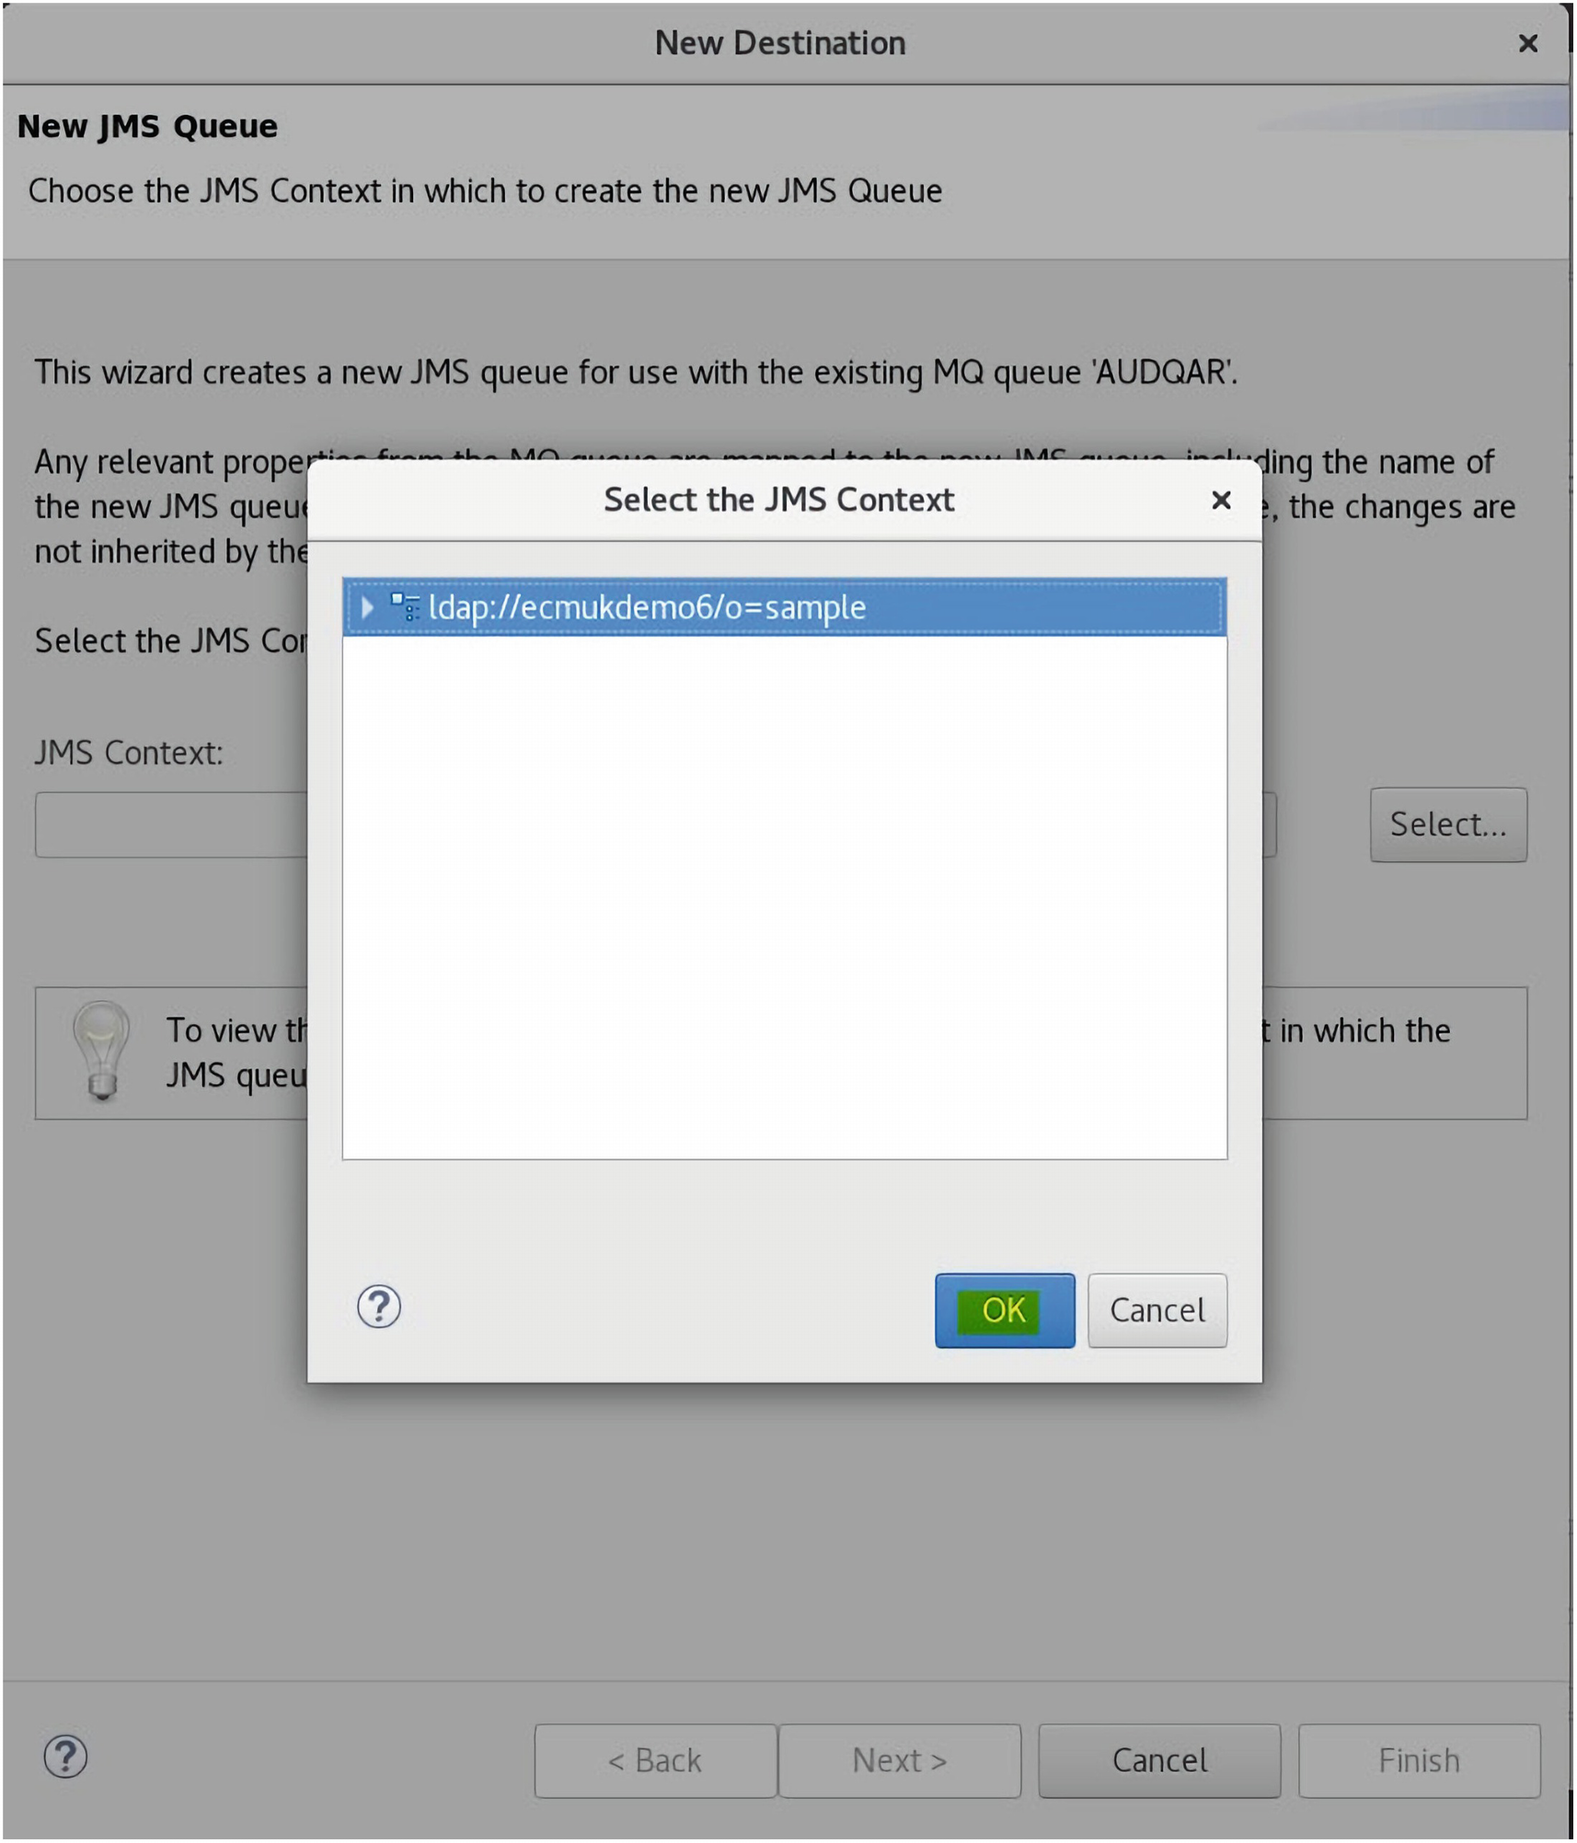
A screenshot of the select the J M S context dialog box in new destination window has an U R L selected. The options for O K and cancel are given below.
The LDAP server is highlighted; click OK

A screenshot of the new destination window has the new J M S queue detail, with an U R L in the select box for J M S context. The options for back, next, cancel, and finish is given below.
The JMS Context shows our LDAP server

A screenshot of the new destination window has the create a destination detail, with an input box and options for name, messaging provider, and type. The options for back, next, cancel, and finish is given below.
The Audit Queue Context Factory name is entered as AUDQCF; click Next
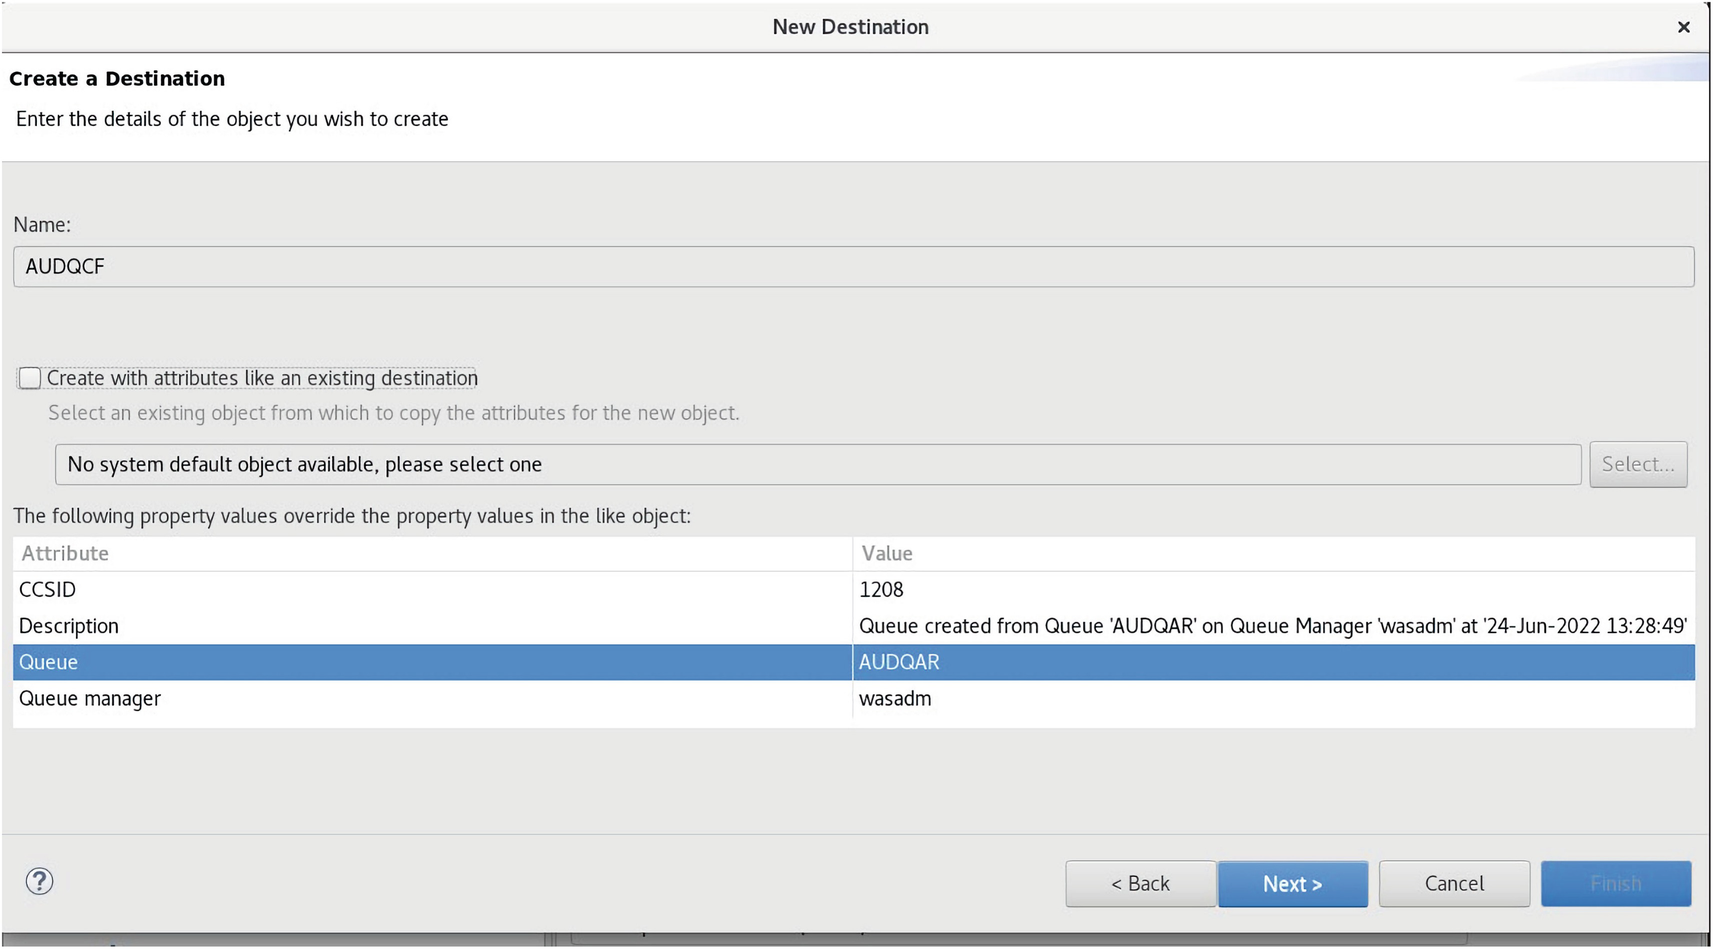
A screenshot of the new destination window has the create a destination detail, with an input box, checkbox, and options for name, create with attributes, and select an existing object. A property values table below has quea ue and A U D Q A R selected. The options for back, next, cancel, and finish are given below.
The AUDQCF queue name is displayed
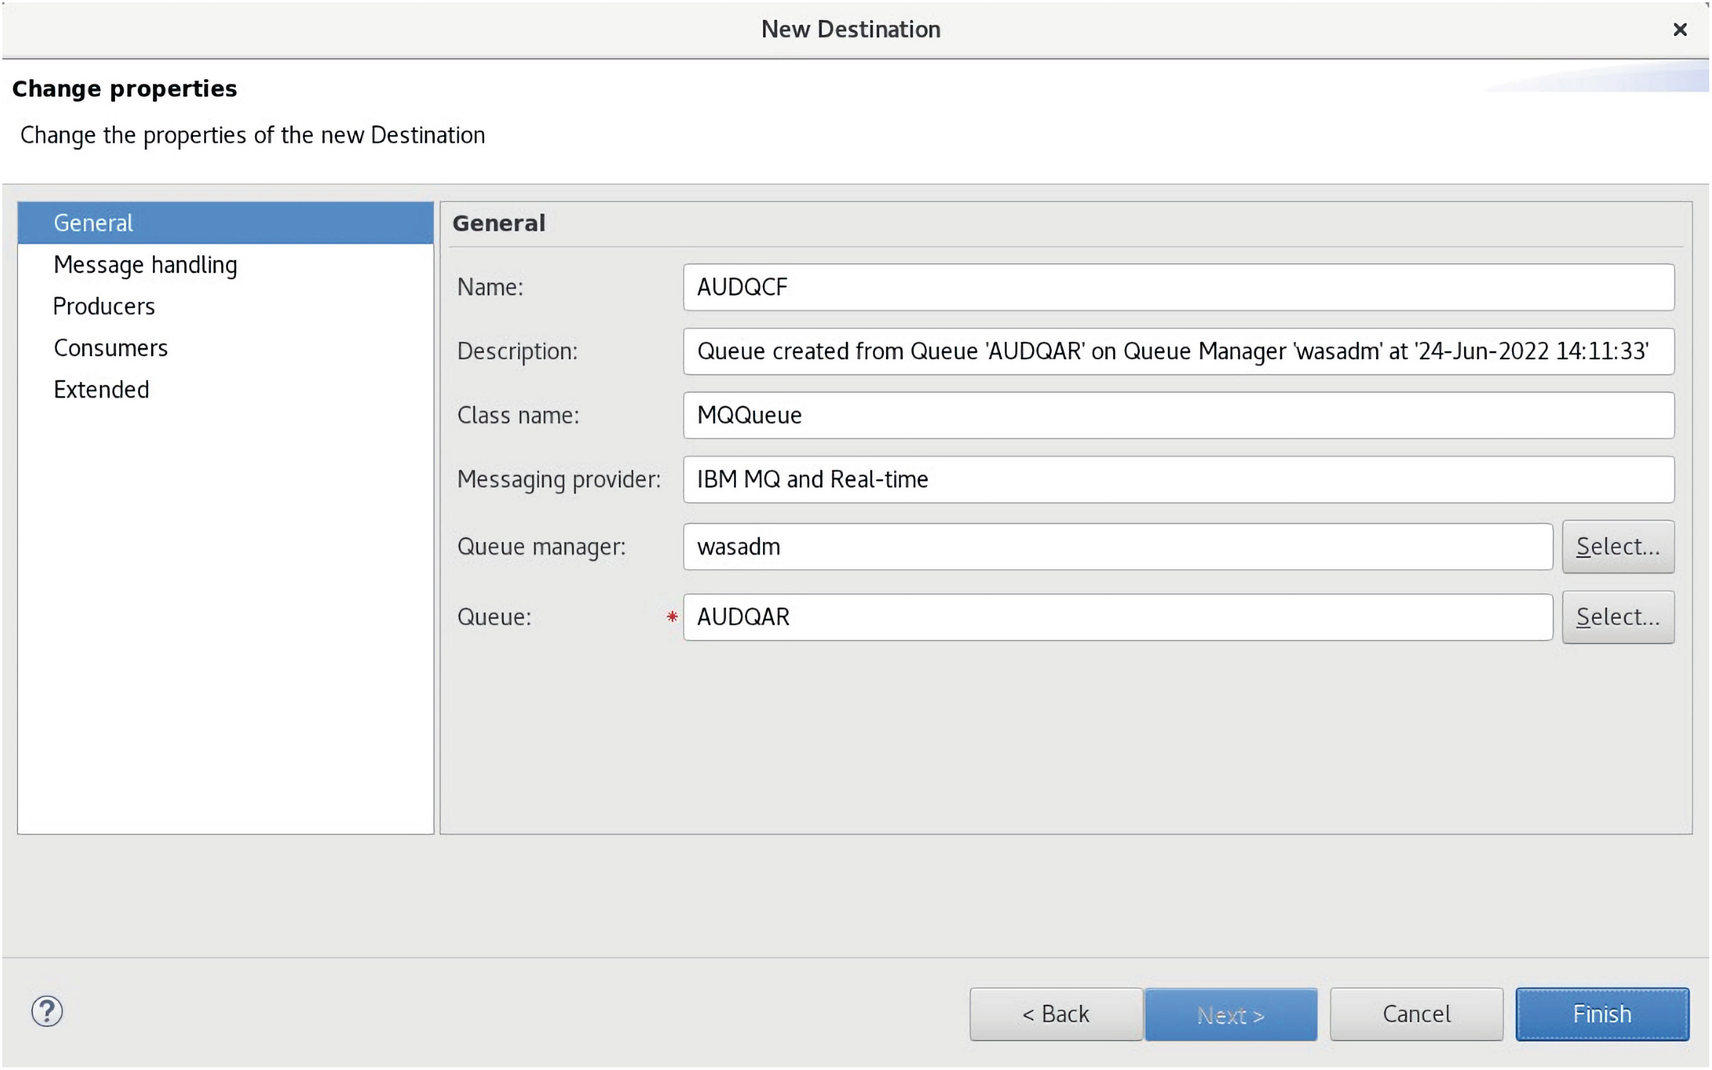
A screenshot of the new destination window has the change properties detail, with the general option selected from the left panel. It has input boxes and options for name, description, class name, messaging provider, queue manager, and queue. The options for back, next, cancel, and finish is given below.
The AUDQCF properties are displayed. Click Finish to create the JMS Queue
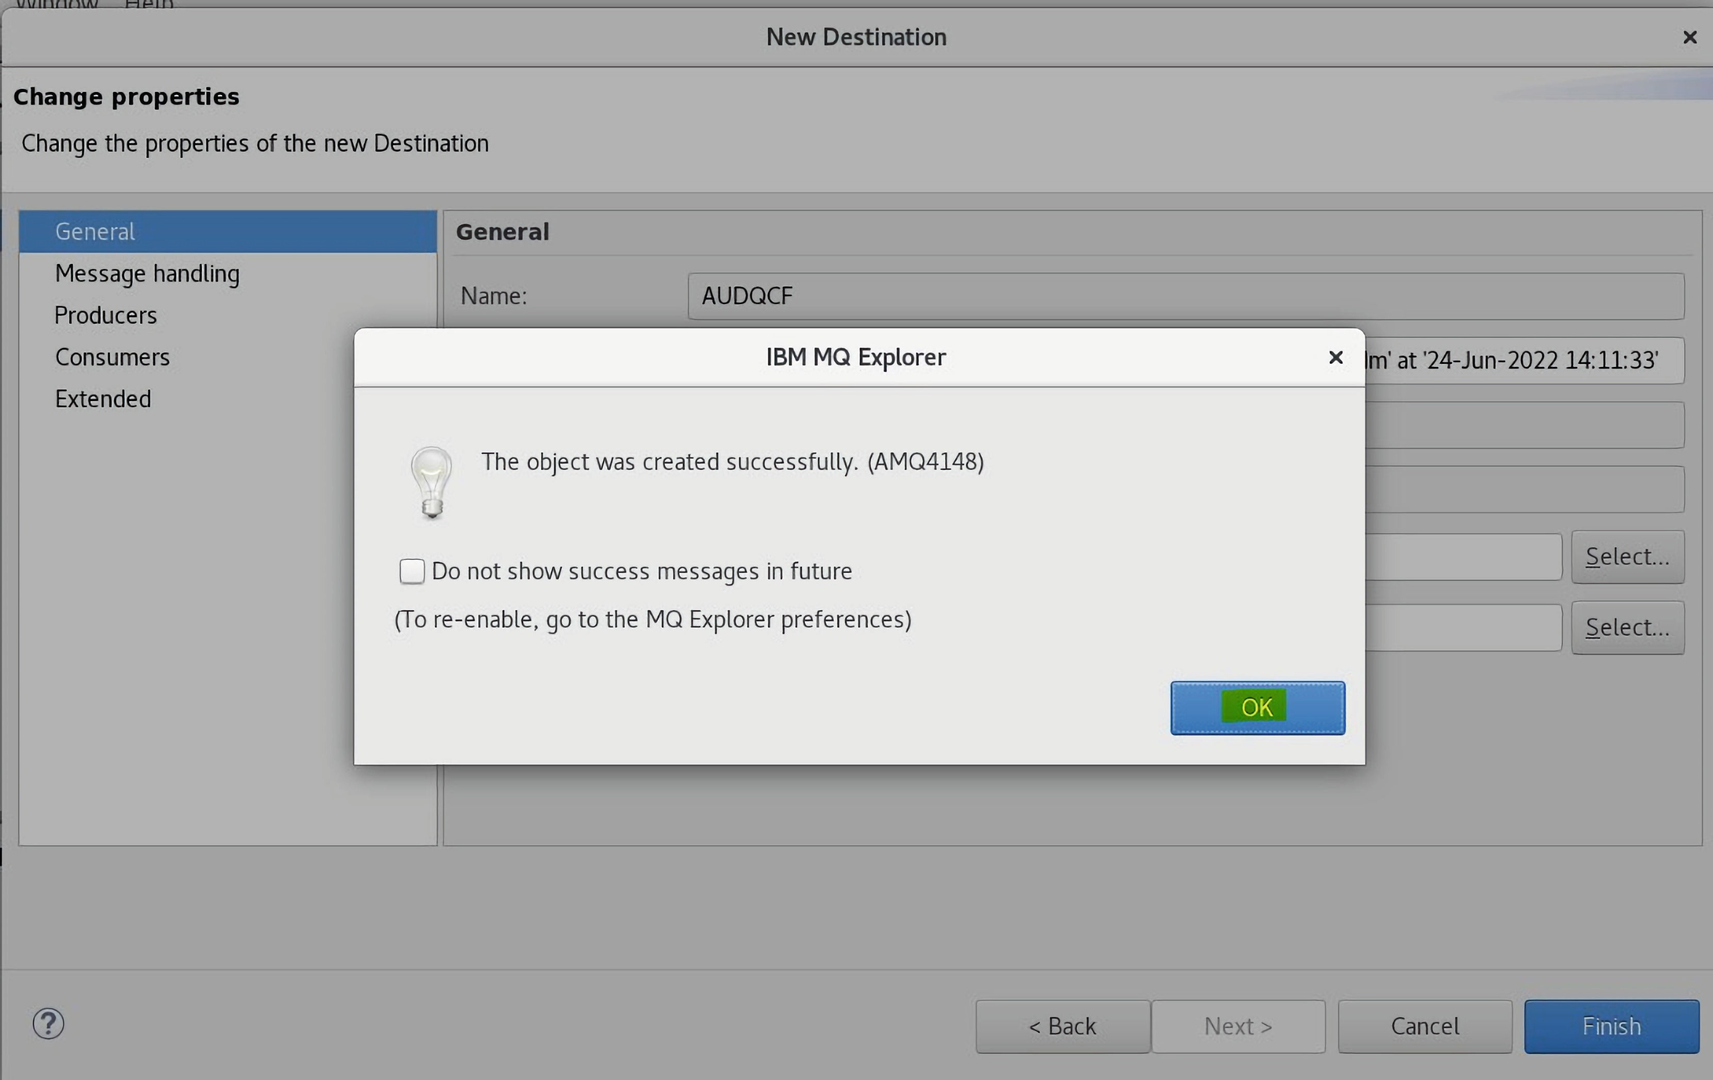
A screenshot of the I B M M Q explorer dialog box in new destination window gives the object was created successfully message. It has a checkbox for do not show success messages in future. The option for O K is given below.
The AUDQCF JMS Queue Context Factory queue status shows it was created
Click OK.

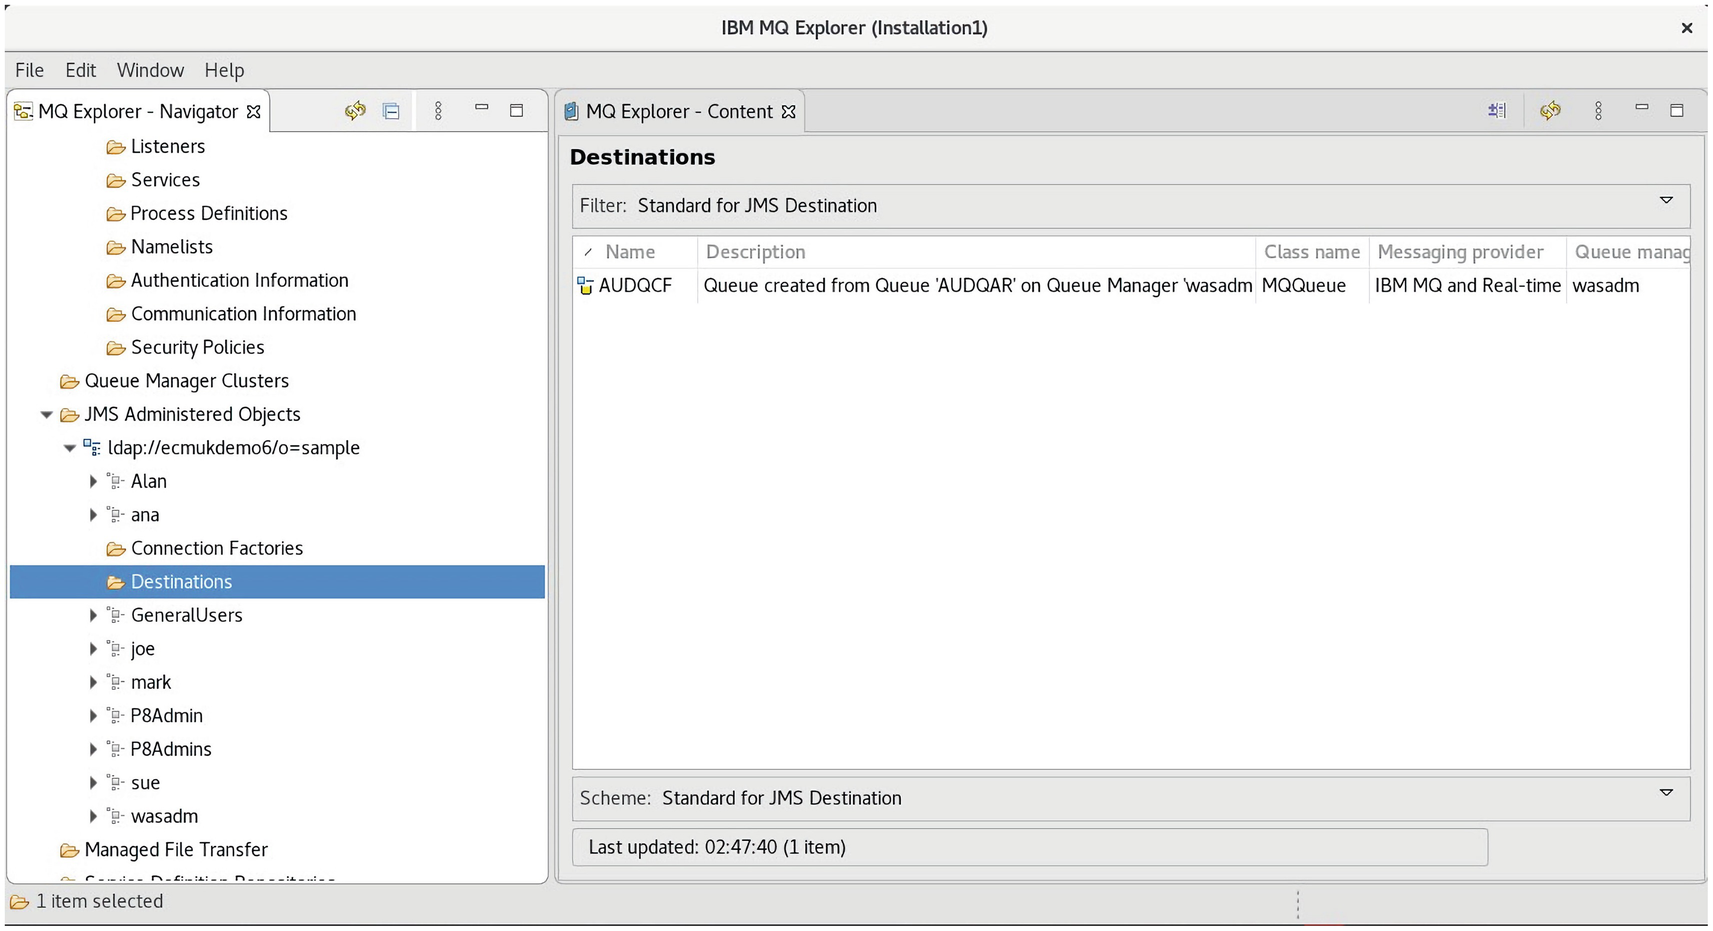
A screenshot of the I B M M Q explorer window has the M Q explorer content information for initial context on the right. The M Q explorer navigator panel on the left has the L D A P server U R L selected.
The AUDQCF queue is now visible as a JMS MQQueue class JNDI Object
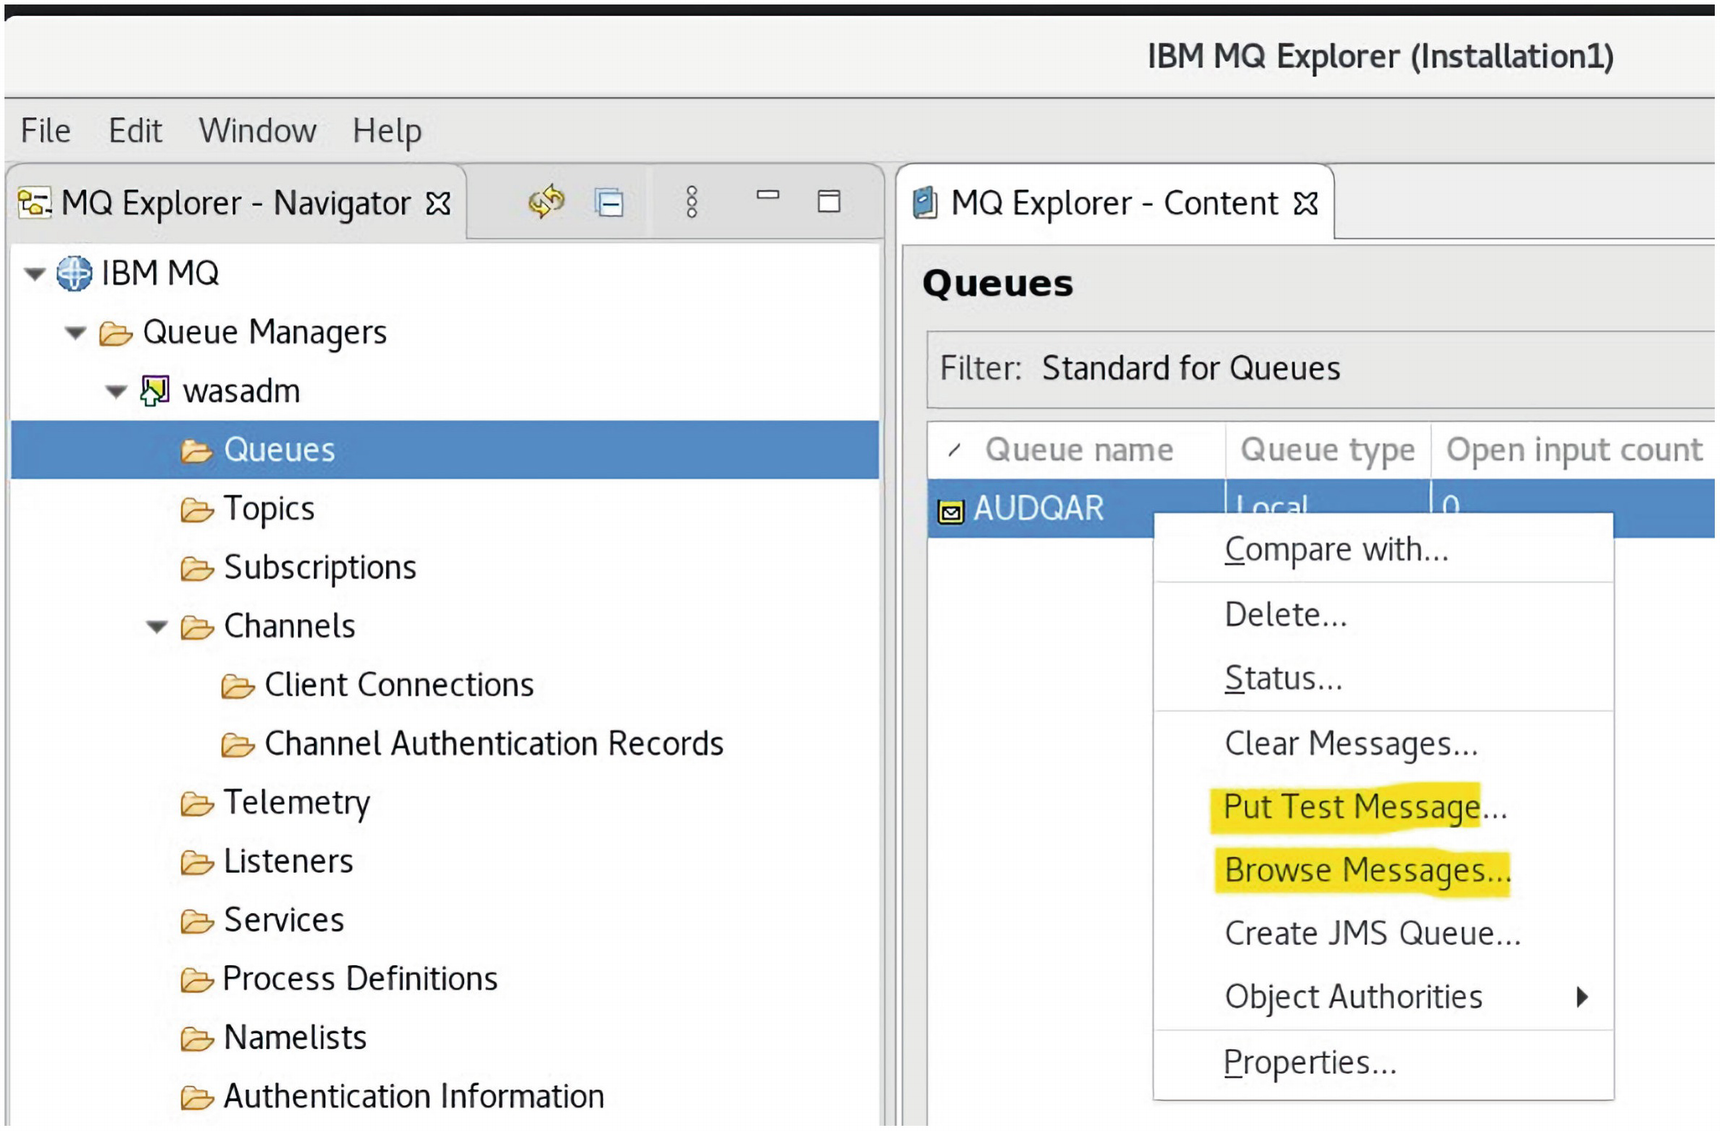
A cropped screenshot of the I B M M Q explorer window has the M Q explorer navigator panel on the left with the sub-folder Queues selected. The M Q explorer content tab on the right has the queues detail with the put test message and browse messages options from the options menu highlighted for A U D Q A R.
The AUDQAR Queue is tested using the highlighted menu options
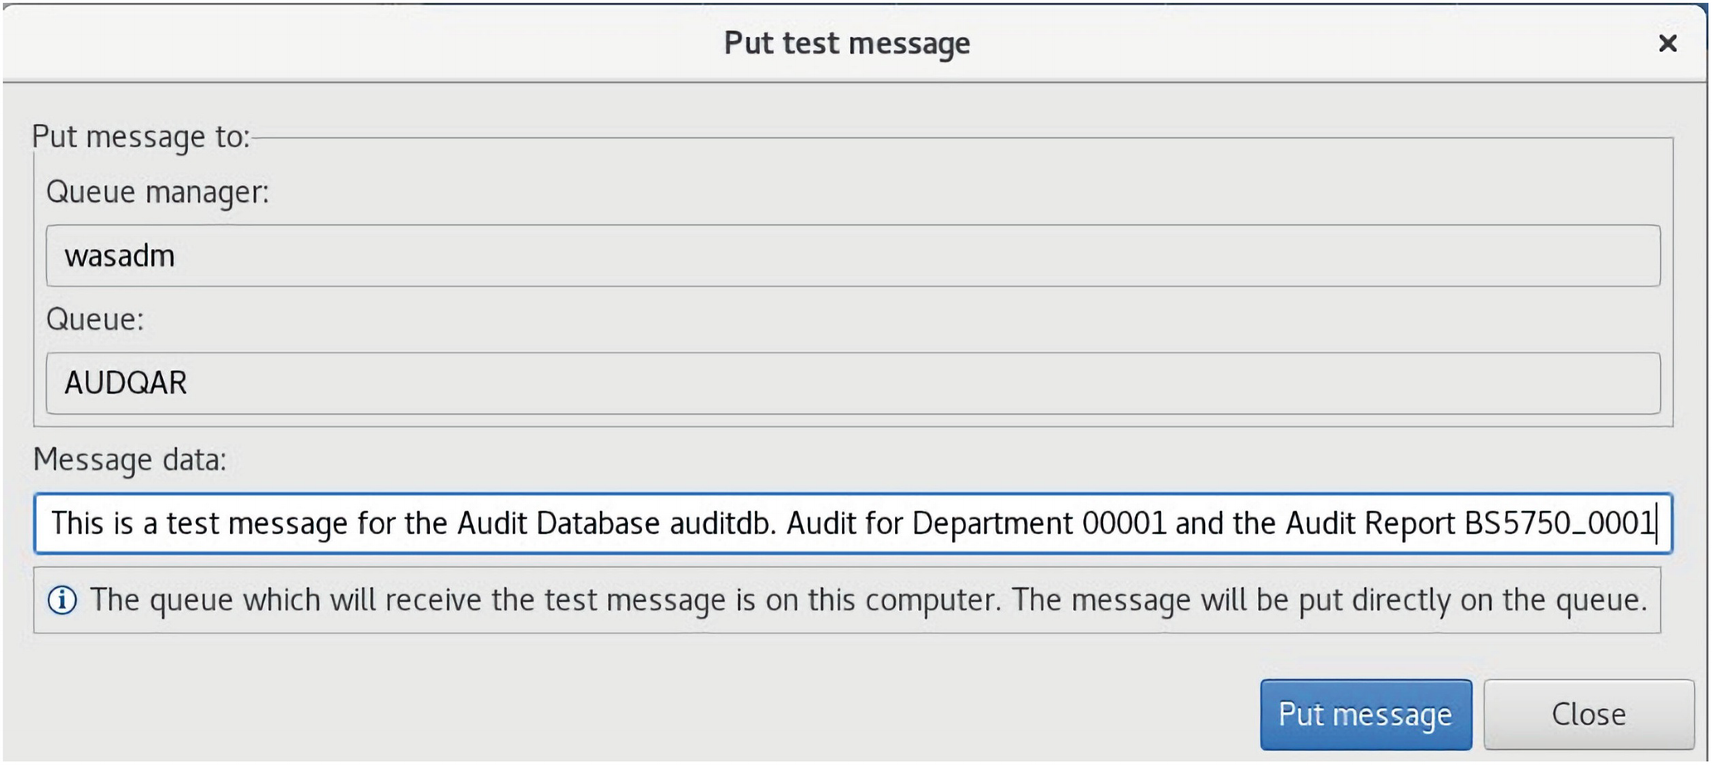
A screenshot of the put test message window has the input boxes detail for queue manager, queue, and message data. The options for put message and close are given below.
The test message is created and the Put message command clicked

A screenshot of the put test message window has the input boxes detail for queue manager, queue, and message data. The options for put message and close are given below.
The browse message shows the transferred test message
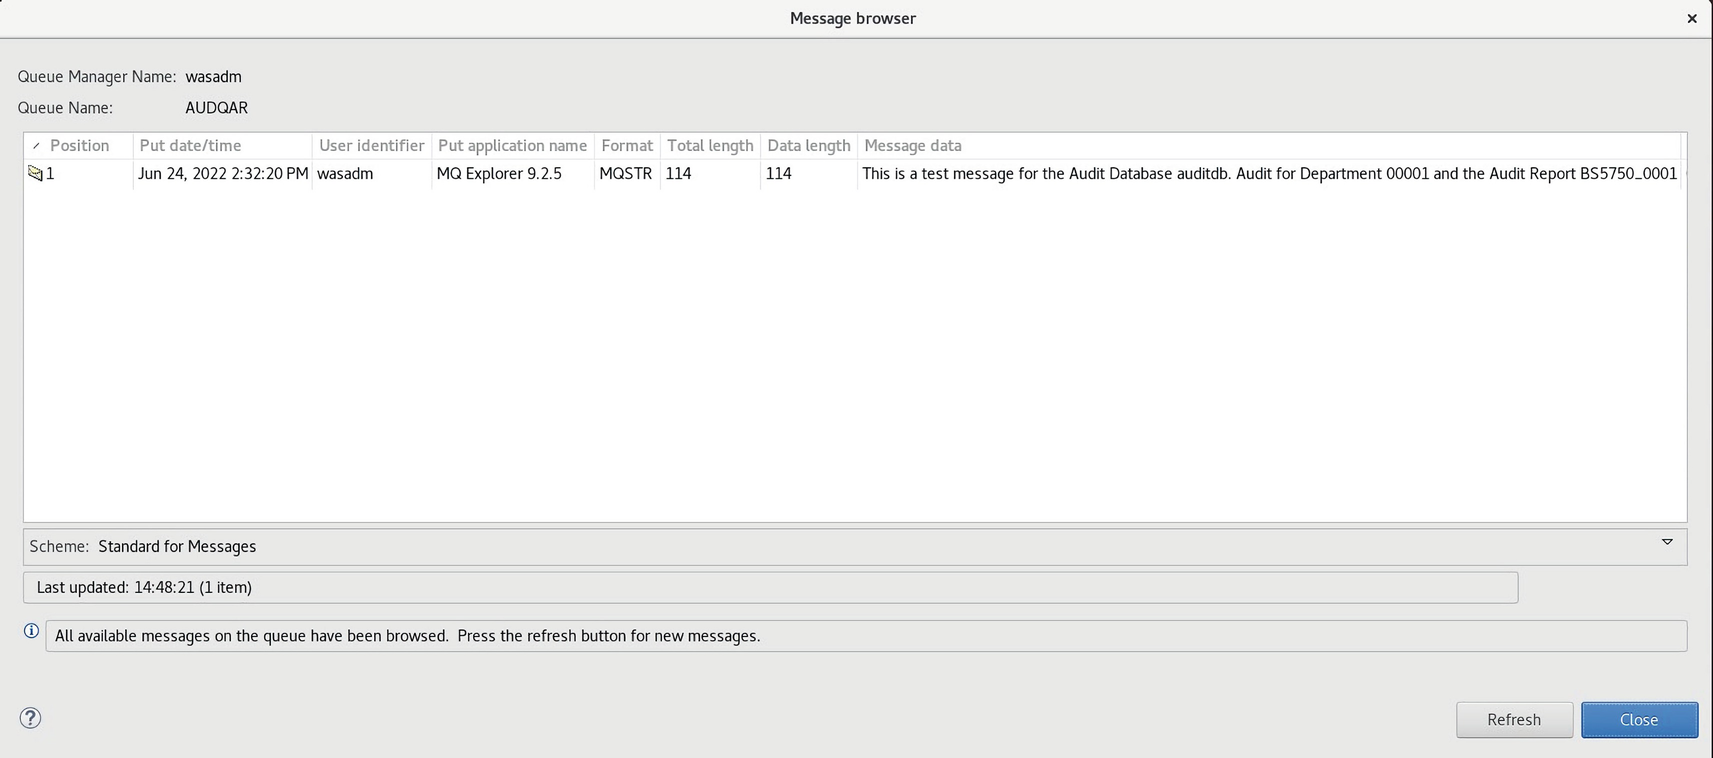
A screenshot of the message browser window has the queue manager name, queue name, and scheme with a table that has the first test message. The options for refresh and close are given below.
The first test message for the AUDQAR queue

A cropped screenshot of the message browser window has the options menu for the first test message. The option for properties from the menu is highlighted.
The Properties menu item is clicked to display the test message data from the AUDQAR queue

A screenshot of the message 1 properties window has data selected from the left panel. It has the input boxes detail for total length, data length, format, coded character set identifier, encoding, message data, and message data bytes. The option for close is given below.
The Data Property of Message 1 displays the expected put message data
The JMS MQ series queue is now set up ready to be processed.
The following link shows a simplified architecture diagram:
Part 2 – Custom Operations Component Development
A Workflow step can be used to call the sendJMSMessage Java method we develop, by using a Code Module .jar library imported as a CodeModule Document Class and then exposing this custom sendJMSMessage method by triggering the Workflow using a Workflow Subscription object, which can be linked to a Document Create Event object reference triggered on the creation of an Audit Report Document class.
The Custom Operations Component is defined in the subscribed Workflow as a special Component Integrator step, which we will describe in this Part.
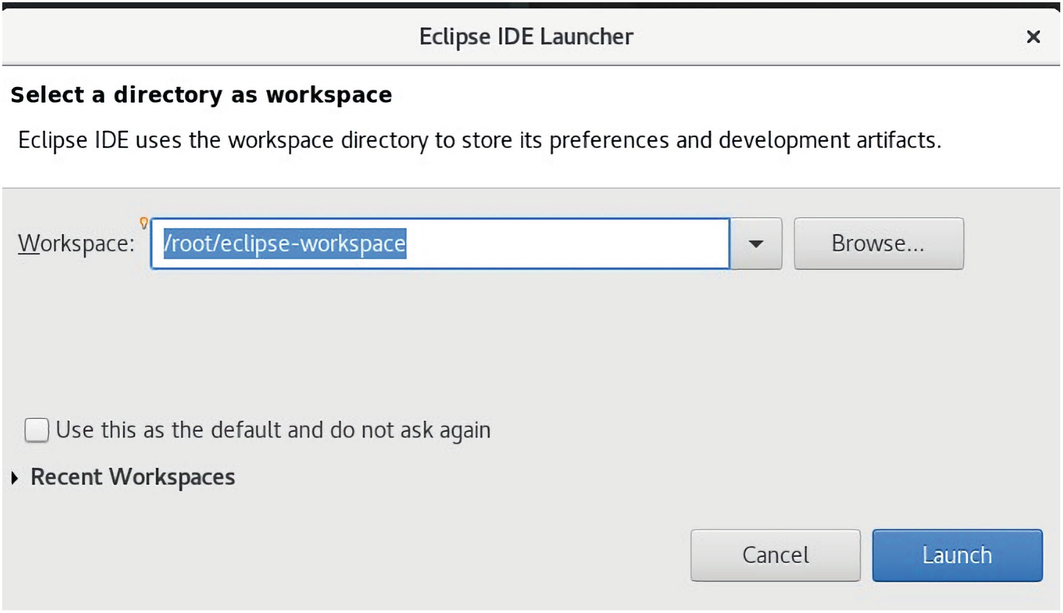
A screenshot of the eclipse I D E launcher window has the select a directory as workspace detail, with options for select a workspace and browse. A checkbox to use this as the default and do not ask again is given below with the options for cancel and launch.
The Eclipse Java IDE is launched with the default Workspace
There are a number of links to code examples which are the basis for the IBM Content Engine and Process Engine Workflow component steps, which can be found on GitHub:
https://github.com/ibm-ecm/ibm-content-platform-engine-samples
The following IBM License is displayed in the code samples I have used in this book:
The following DemoJava.zip download link contains the code for the core connection Java for links to the IBM MQ Series JMS Queues:
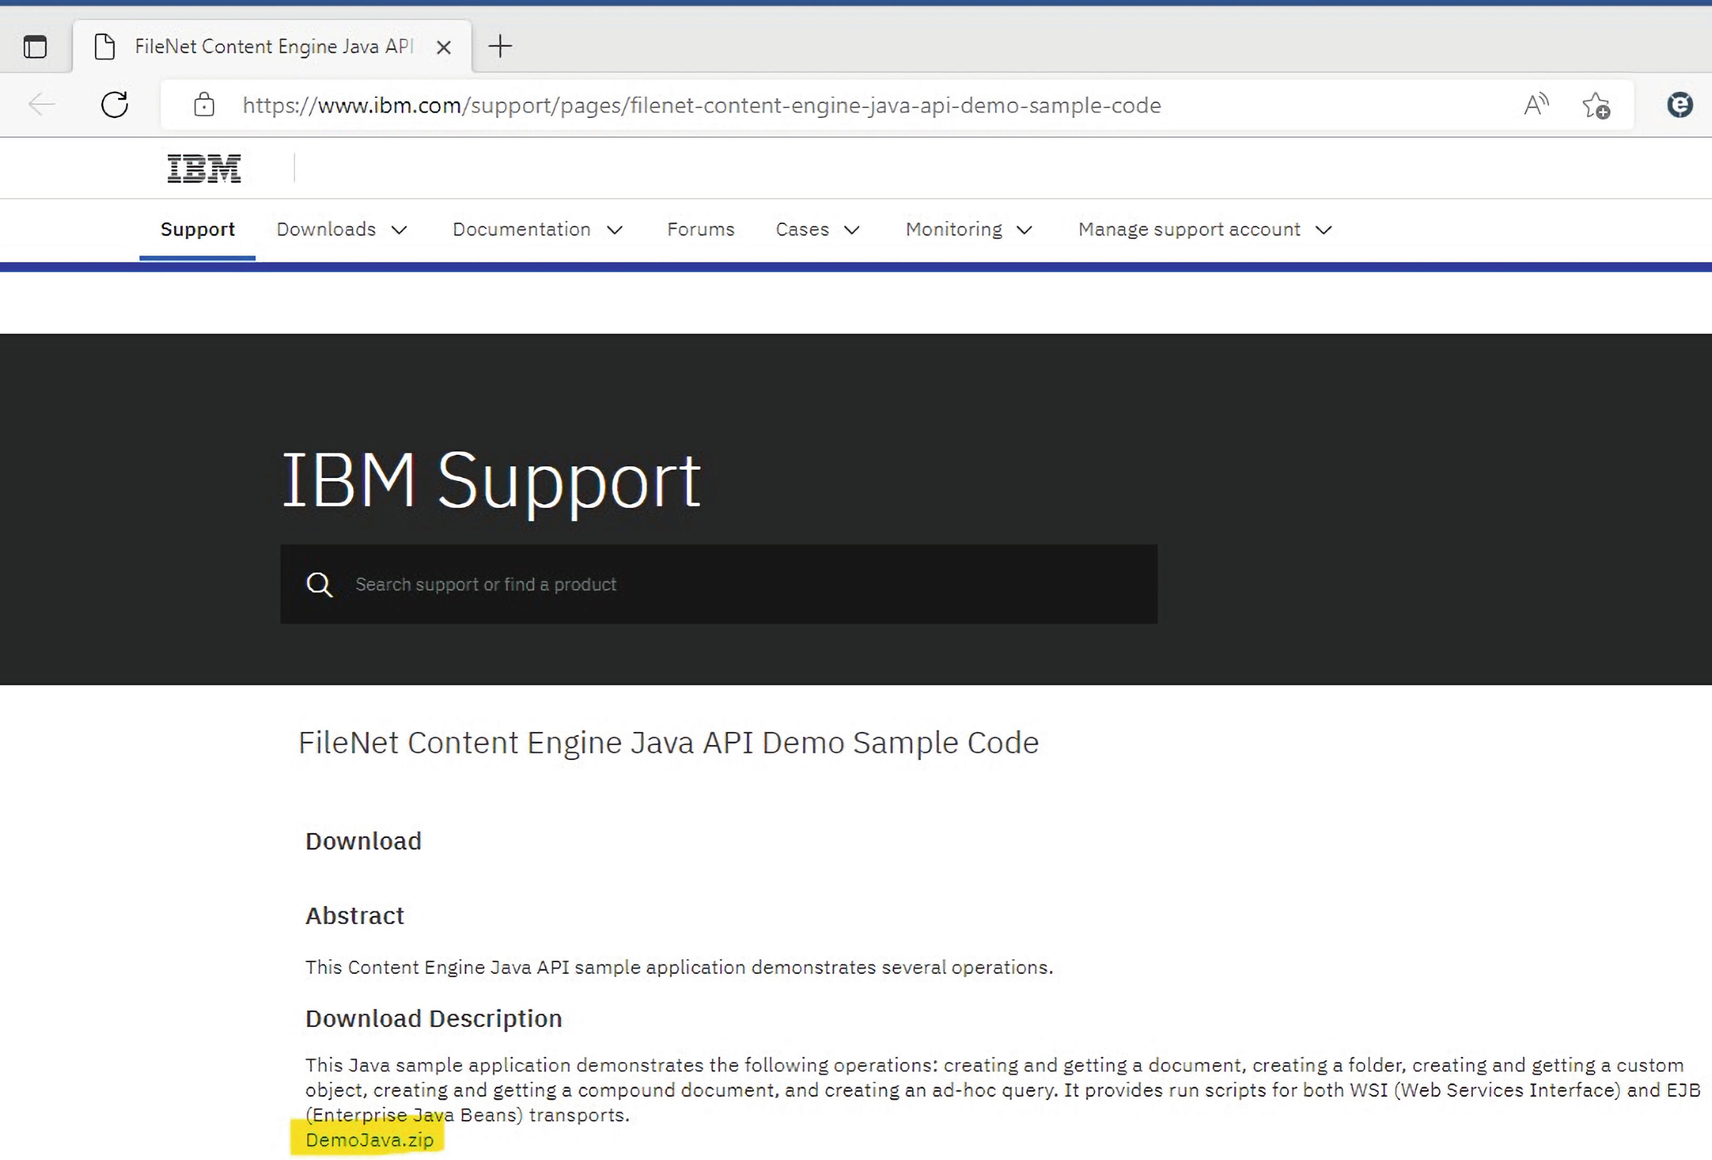
A screenshot of the I B M webpage has the I B M support tab for File Net Content Engine Java A P I Demo Sample Code with a search bar and descriptions for abstract and download. The file Demo Java dot zip is highlighted below.
The DemoJava.zip link highlighted downloads the sample Java

A screenshot of the contents of a folder has a Demo Java sub-folder, and the Demo Java dot zip file highlighted.
The example Java source code is unpacked to a DemoJava subfolder

A screenshot of the new java support window has the java settings detail, with source options, details options, a checkbox to allow output folders, and an option to browse default output folder. The options for back, next, cancel, and finish is given below.
The new AUD_CIOps project is created clicking Finish
See also Chapter 2, in the start of the section “Configuring Java Components for Content Engine Events,” to see the step-by step screenshots and procedure for creating a new Eclipse Java Project.
This Component Integrator code component is described in overview in the IBM Documentation:
www.ibm.com/docs/en/filenet-p8-platform/5.5.x?topic=tools-component-integrator
and in more detail with the following link:
“Developing Component Integrator-Based Work Performers – IBM Documentation”
The following IBM Technote has a link to a downloadable pdf document, which describes changes in the deployment for the Component Integrator Java libraries, into the Component Manager, which were introduced in the IBM FileNet P8 5.2 Component Manager version.
See www-01.ibm.com/support/docview.wss?uid=swg27043131.
From this downloaded pdf document, Migrating to the 5.2 Component Manager.pdf, it should be noted that the JAR files are added to the object store as a code module, as we described for the Event Handler Java library in Chapter 2. It is also recommended that either the JAR file is stored as a separate content element (since the code module is a versionable object, and JAR files can be added, removed, and updated as required), where the same code module Object can be used by more than one component queue, or, as IBM recommends, that the best practice is to use a separate code module for each component queue.
Creating the AUD_CIOps Java Project
The new Java Project is created as AUD_CIOps.
The specification for the AUDOperations Component Integrator code module
The code for the CELoginModule Class, working at FileNet P8 5.5.x, is listed at the following link:
www.ibm.com/docs/fr/filenet-p8-platform/5.5.x?topic=performers-celoginmodule-class
A Jar file is created to test the base compilation and functionality.
The AUDOperations.java code for the Component Integrator
Adding the Supporting Library JAR Files
- a)
First, we add the same IBM FileNet P8 API library .jar files to the Classpath as we added in Chapter 2. Additionally, we need to add the JMS Message library, javax.jms-api-2.0.1.jar, to the Eclipse IDE classpath.
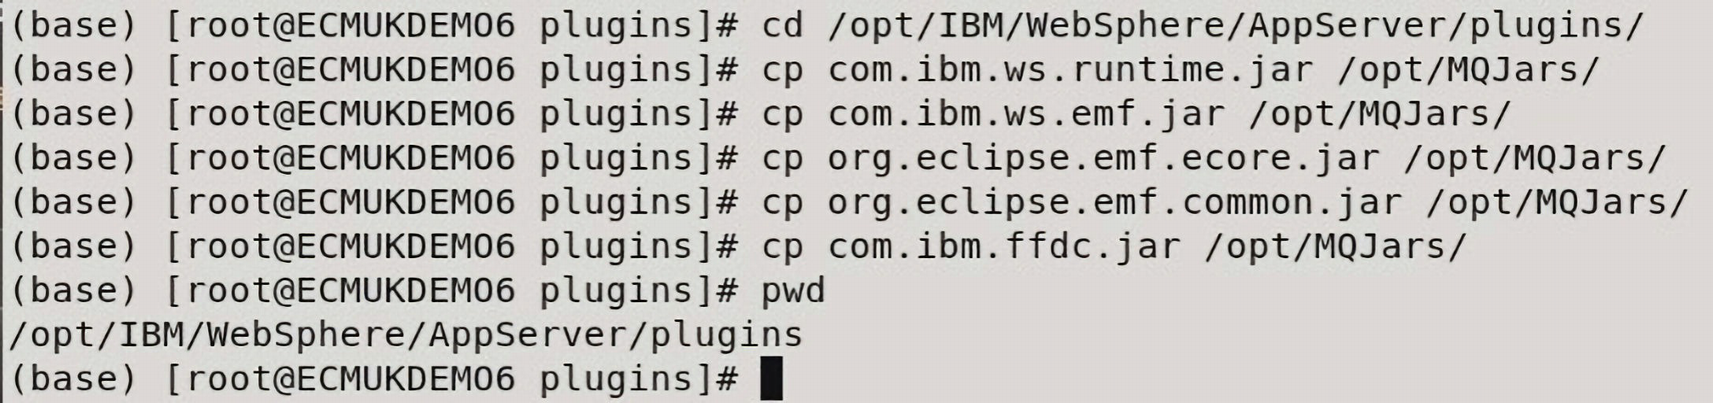
Create the MQJars folder for the jar files we need:(base) [root@ECMUKDEMO6 opt]# mkdir MQJars(base) [root@ECMUKDEMO6 opt]# cd MQJars(base) [root@ECMUKDEMO6 MQJars]# pwd/opt/MQJars - b)From the MQJars folder, download the com.ibm.mq.allclient.jar file by using curl:(base) [root@ECMUKDEMO6 MQJars]#curl -o com.ibm.mq.allclient-9.2.4.0.jar https://repo1.maven.org/maven2/com/ibm/mq/com.ibm.mq.allclient/9.2.4.0/com.ibm.mq.allclient-9.2.4.0.jar
- c)From the MQJars folder, download the JMS API file by using curl:curl -o javax.jms-api-2.0.1.jar https://repo1.maven.org/maven2/javax/jms/javax.jms-api/2.0.1/javax.jms-api-2.0.1.jar
- d)From the MQJars folder, download the JSON .jar file by using curl:curl -o json-20211205.jar https://repo1.maven.org/maven2/org/json/json/20211205/json-20211205.jar
- e)
Set the security on the /opt/MQJars and the contained .jar files:

A screenshot of a window has the dot jar files with its date and time and root codes.
The referenced JMS MQ message .jar files are downloaded
- f)
In the Eclipse project Classpath, we now add the preceding downloaded .jar files.
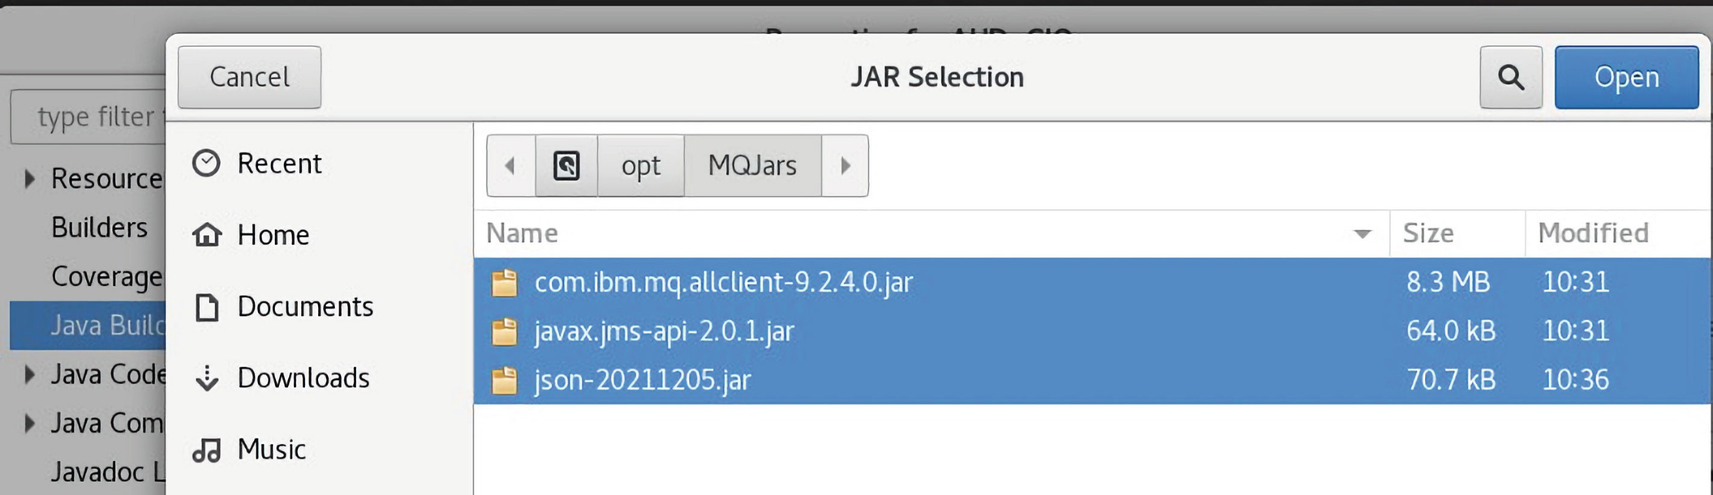
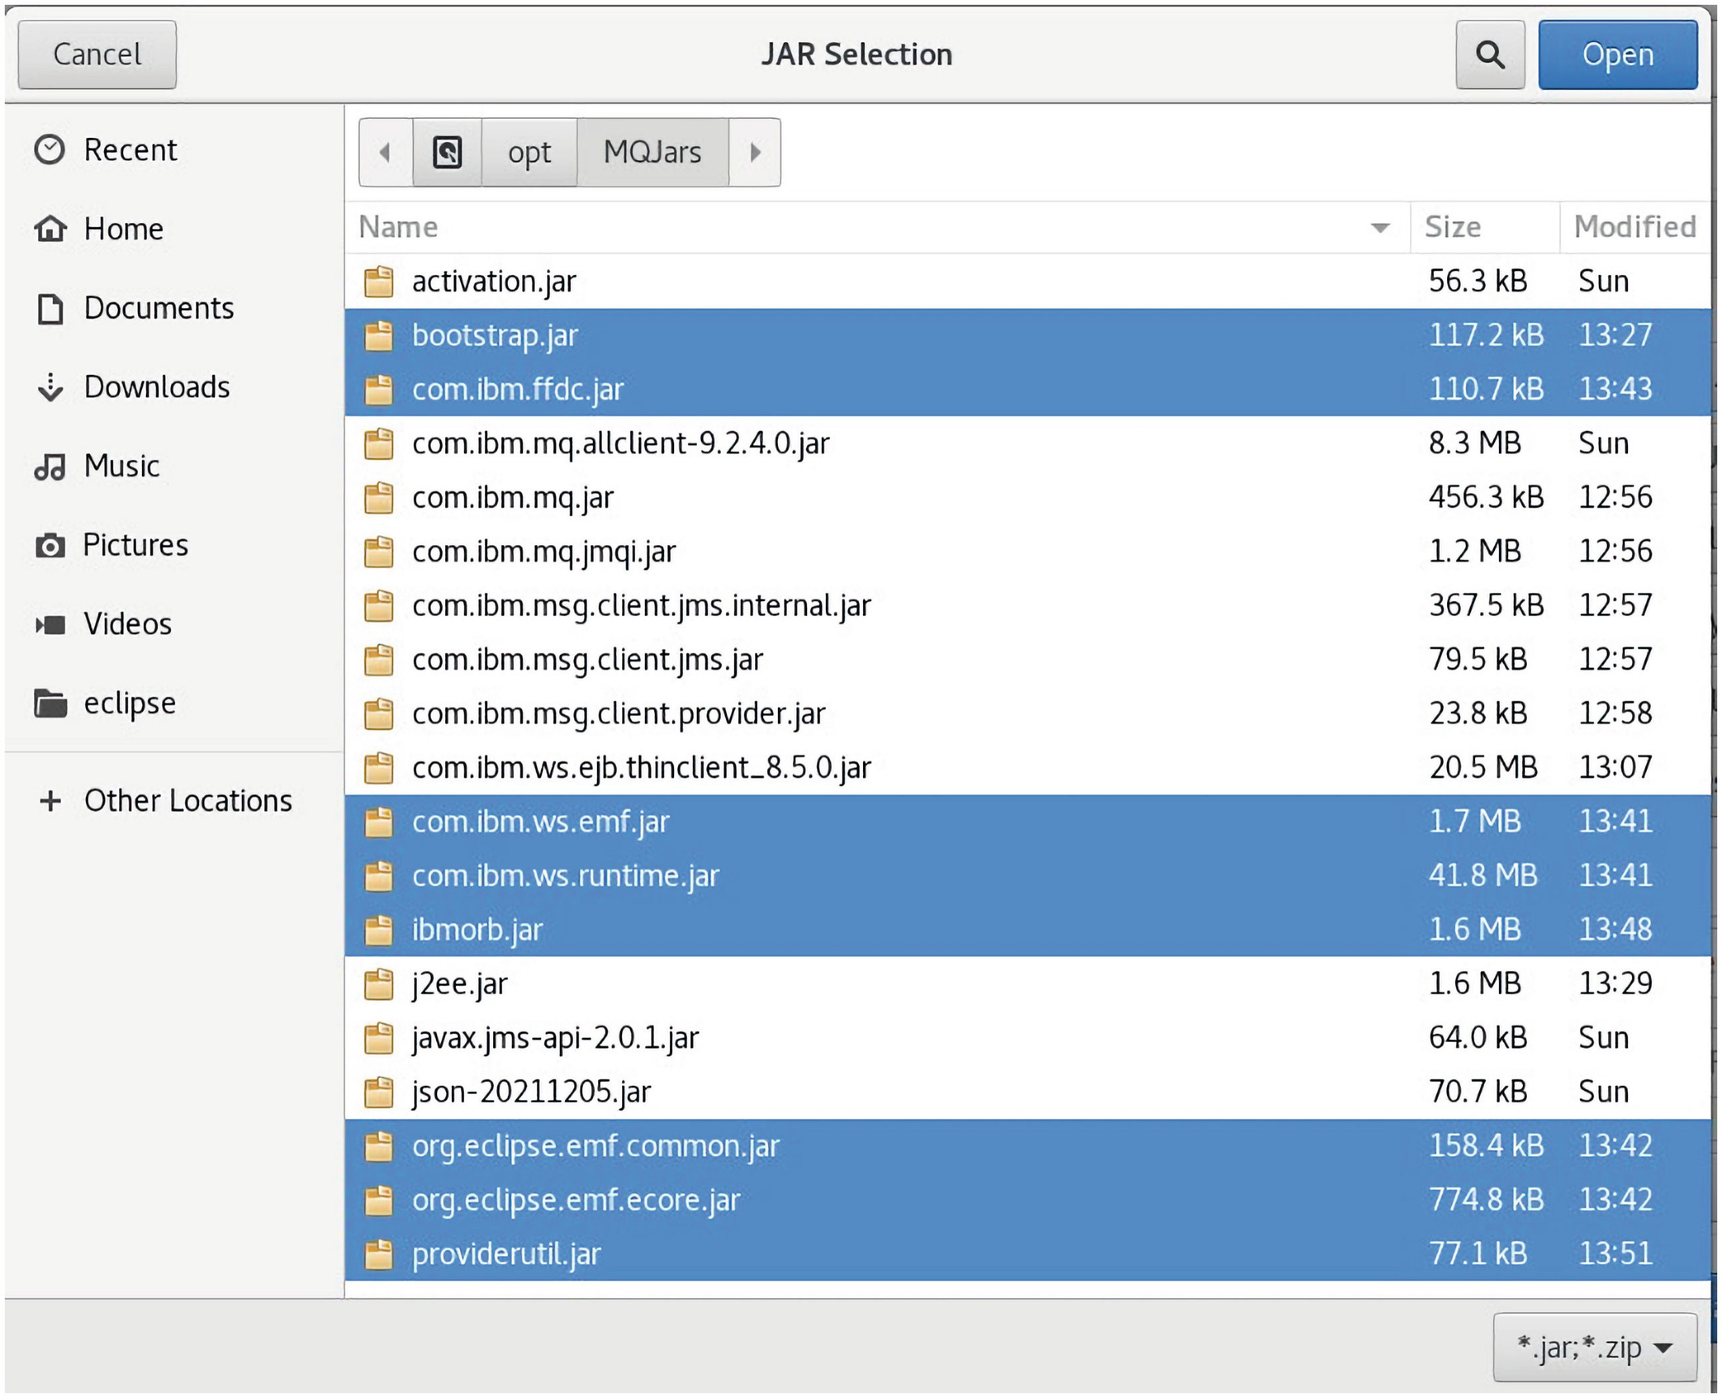
A screenshot of the jar selection dialog box has a panel for recent, home, documents, downloads, and music on the left. It has 3 dot jar files selected on the right. The options for cancel, search, and open are given at the top.
The copied JMS Java and IBM MQ libraries are placed in the Classpath
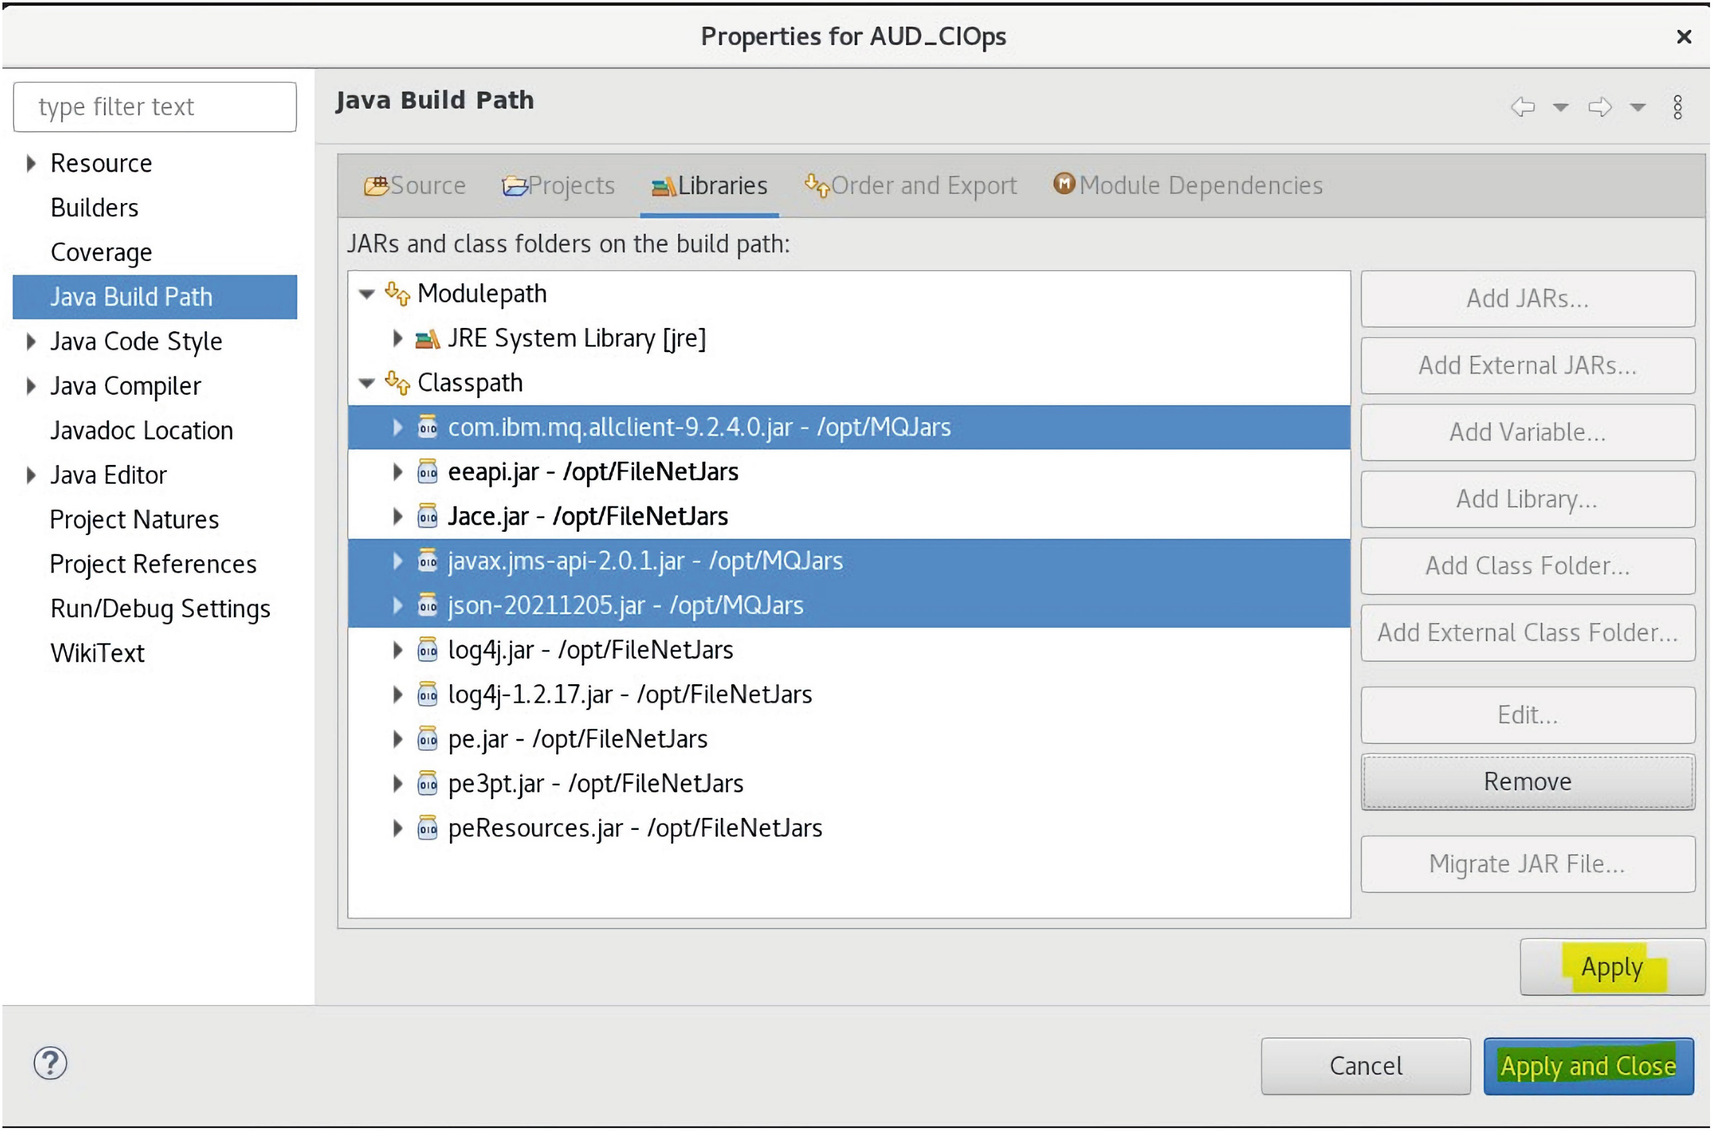
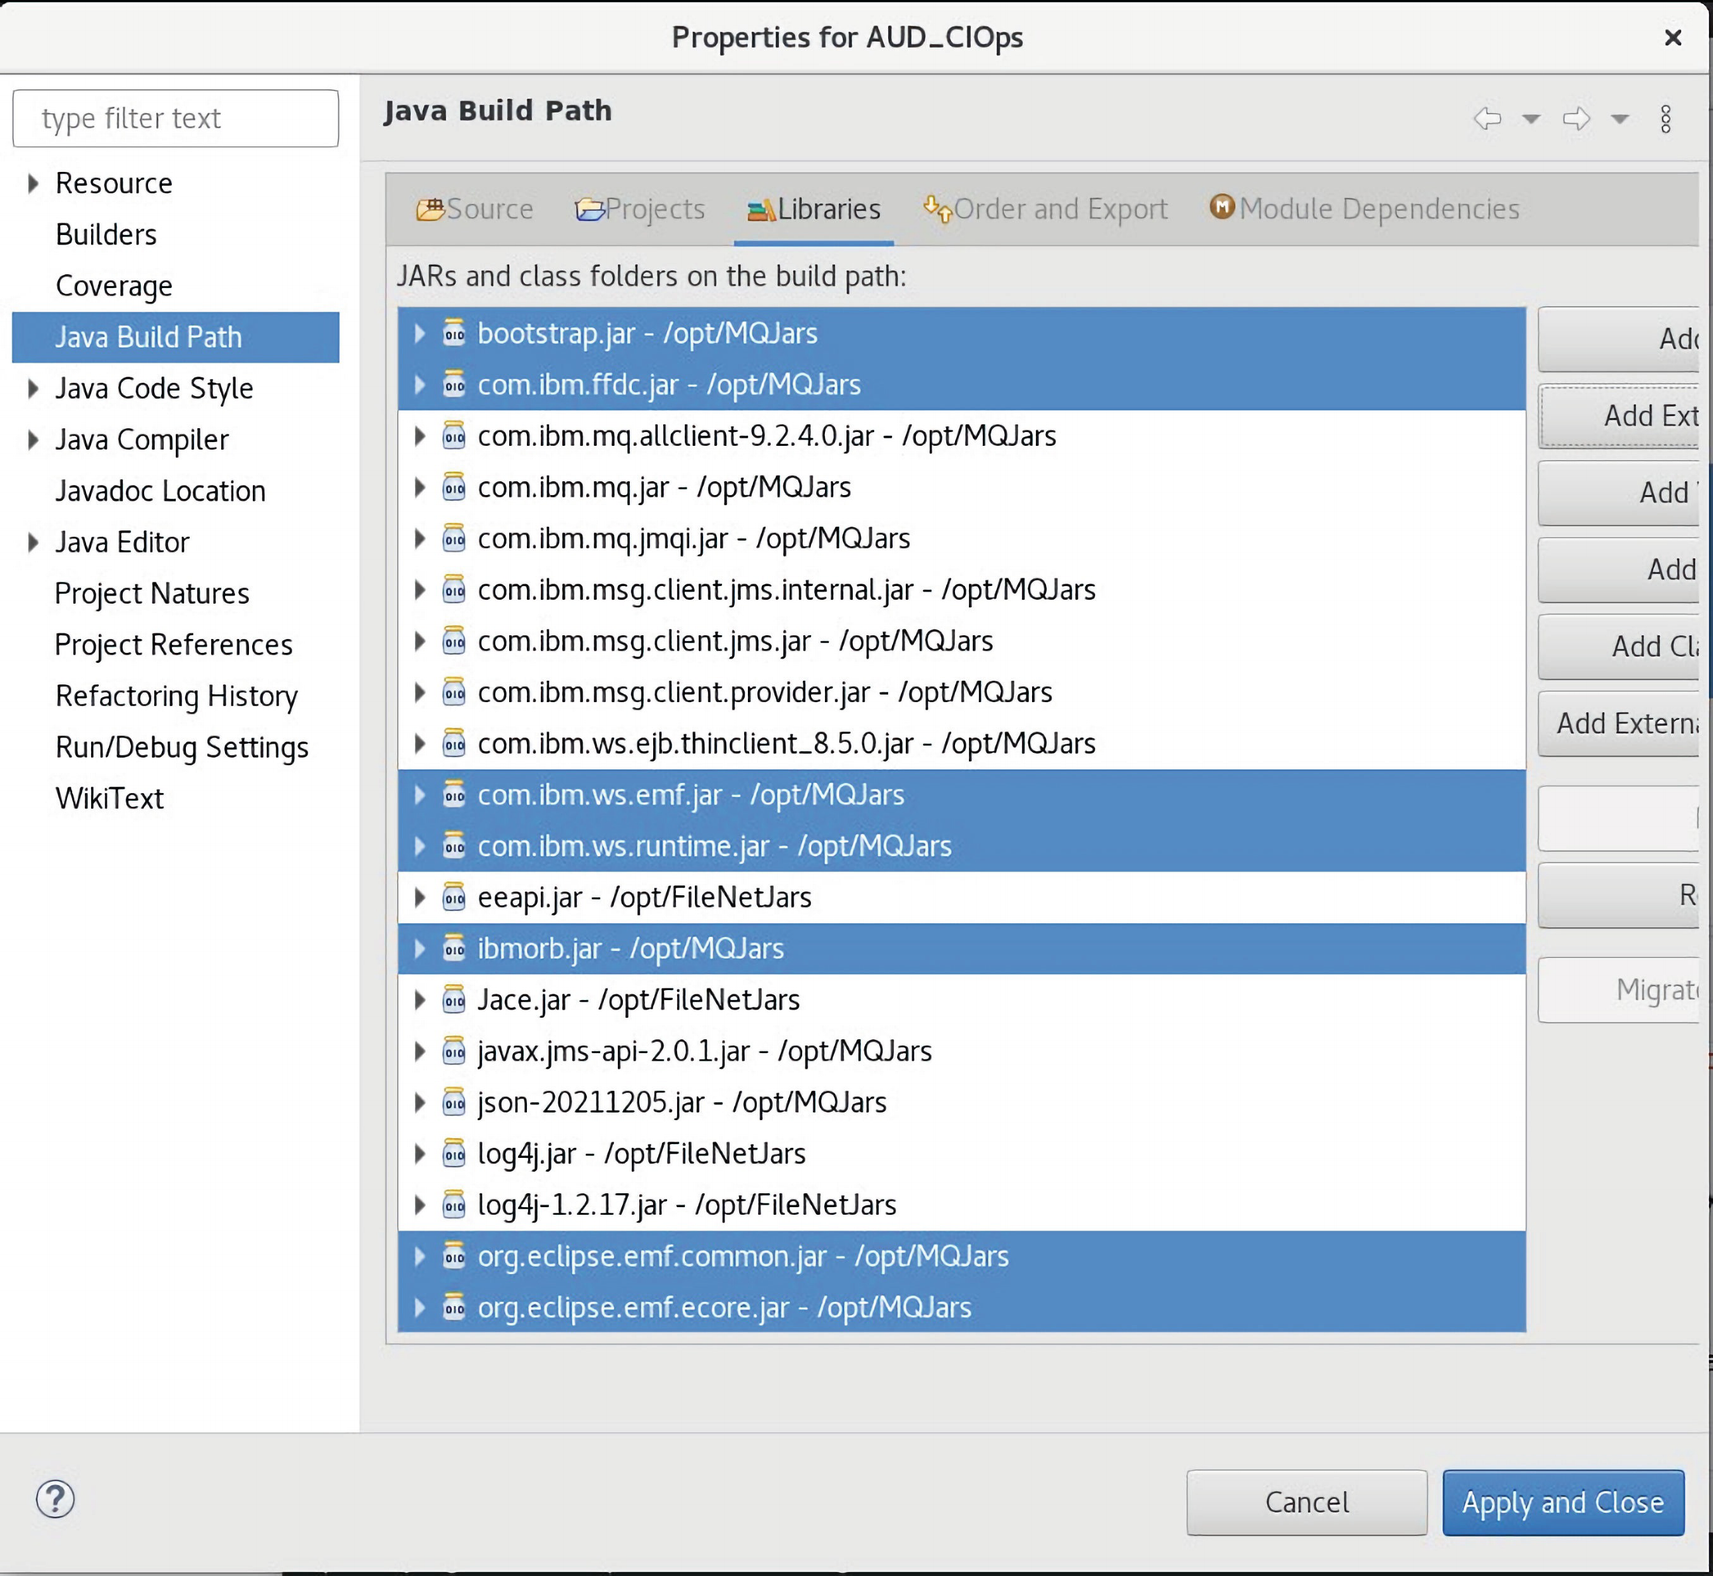
A screenshot of the properties for A U D C I O p s window has the java build path details. It has 3 dot jar files selected with options for apply, and apply and close highlighted below.
The Apply and Apply and Close update the Classpath
Installing the IBM JRE Java SDK 1.8
We also need to install and load the IBM JRE jre1.8.0.261 Java JRE library on Red Hat Linux 8.0, using the download URL:

A screenshot of the downloads list window has 4 files of different sizes. The first file of installable package under Linux on x 86 systems 64-bit is highlighted.
The link to the required IBM JRE 1.8.0.261 library
For Eclipse on Windows systems, the following URL link can be used.

A screenshot of a window has the dot bin file for I B M J R E highlighted with various root codes.
The downloaded IBM JRE is installed on the Linux VMware

A screenshot of the I B M 64-bit S D K for Linux v 8.0 window has the installation icon with options for language and O K. The language is selected as English.
The first install step is used to select the language from the drop-down
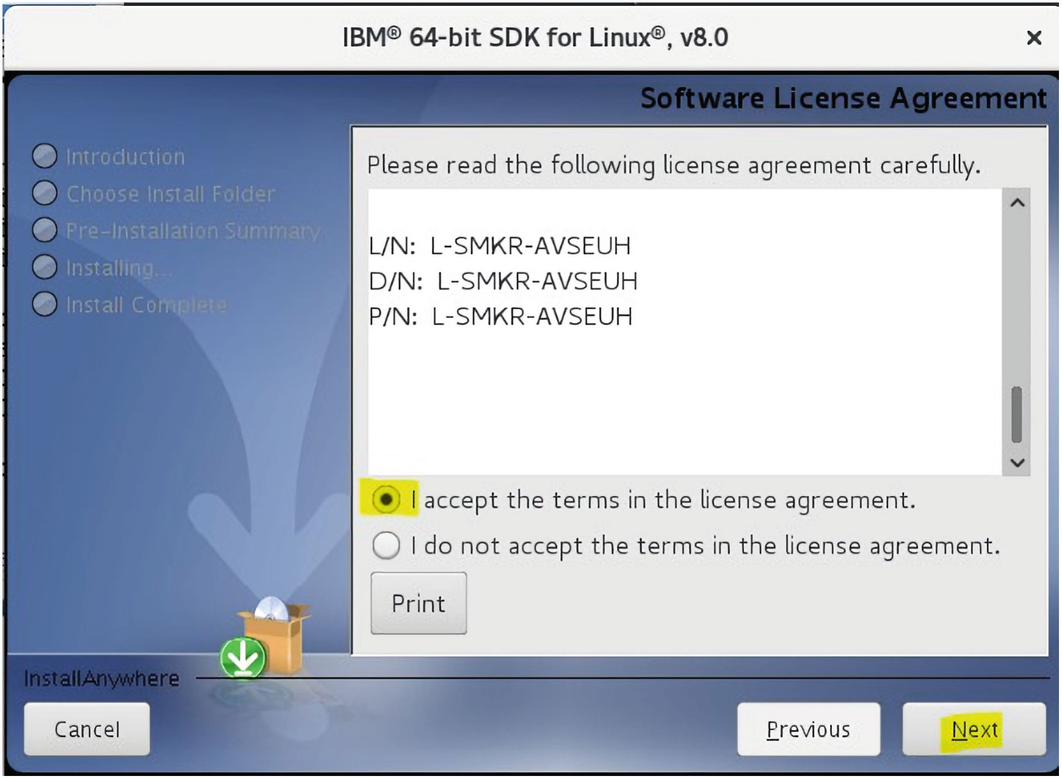
A screenshot of the I B M 64-bit S D K for Linux v 8.0 window has the software license installation detail, with the radio button for I accept the terms in the license agreement highlighted. The options for cancel, previous, and next are given below.
The “I accept the terms in the license agreement” is selected

A screenshot of the I B M 64-bit S D K for Linux v 8.0 window has the introduction detail given. The options for cancel, previous, and next are given below.
The first installation screen is displayed

A screenshot of the I B M 64-bit S D K for Linux v 8.0 window has the choose install folder detail, with an input box and options for restore default folder and choose, under where would you like to install. The options for cancel, previous, and next are given below.
The installation path is selected as highlighted; click Next>
Click Next on the Installation summary page (or you can cancel at this point).

A screenshot of the I B M 64-bit S D K for Linux v 8.0 window has the install complete detail with the location highlighted. The options for cancel, previous, and done are given below.
The Done command is clicked on the success pop-up window

A screenshot of the add J R E window has the J R E definition detail, with an input box and options for J R E home, J R E name, and default V M arguments. A list of J R E system libraries has a dot jar file selected with 8 options given on the right. The options for back, next, cancel, and finish is given below.
The JRE system libraries we installed are confirmed by clicking Finish
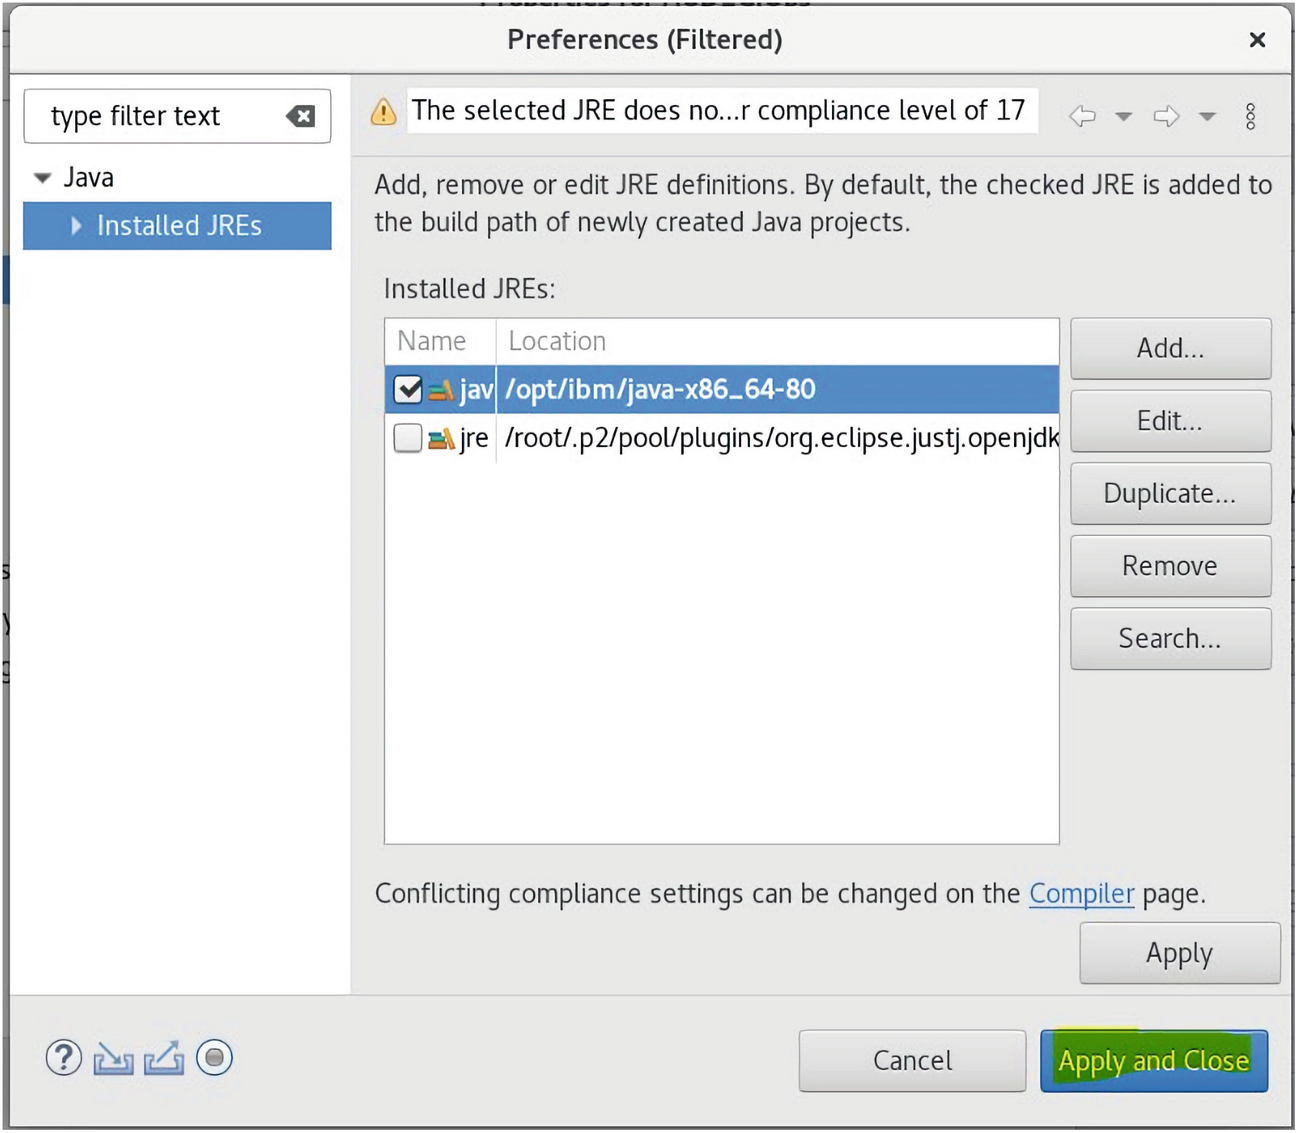
A screenshot of the preferences filtered window has the installed J R Es option selected on the left panel. It has the list of installed J R Es with the options for add, edit, duplicate, remove, search, and apply on the right. The checkbox for the first J R E is ticked and selected. And the options for cancel, and apply and close are given below.
The Apply and Close command is used to add the new JRE library
Next, we need to create a configuration.properties file to hold the required JMS Queue details.
Creating the configuration.properties File

A screenshot of the create new file window has the file detail, with the option to enter or select the parent folder and an input box for file name. S R C is selected from the parent folder list. The options for advanced, cancel, and finish are given below.
The configuration.properties file is created
The configuration.properties JUnit test file
Initially, this configuration.properties file was added to the project src folder, but we reference this from a package folder, so it was moved (dragged and dropped) to the com.ibm.filenet.ps.ciops.test subfolder under the src folder.
Creating the Test Java Package and Code
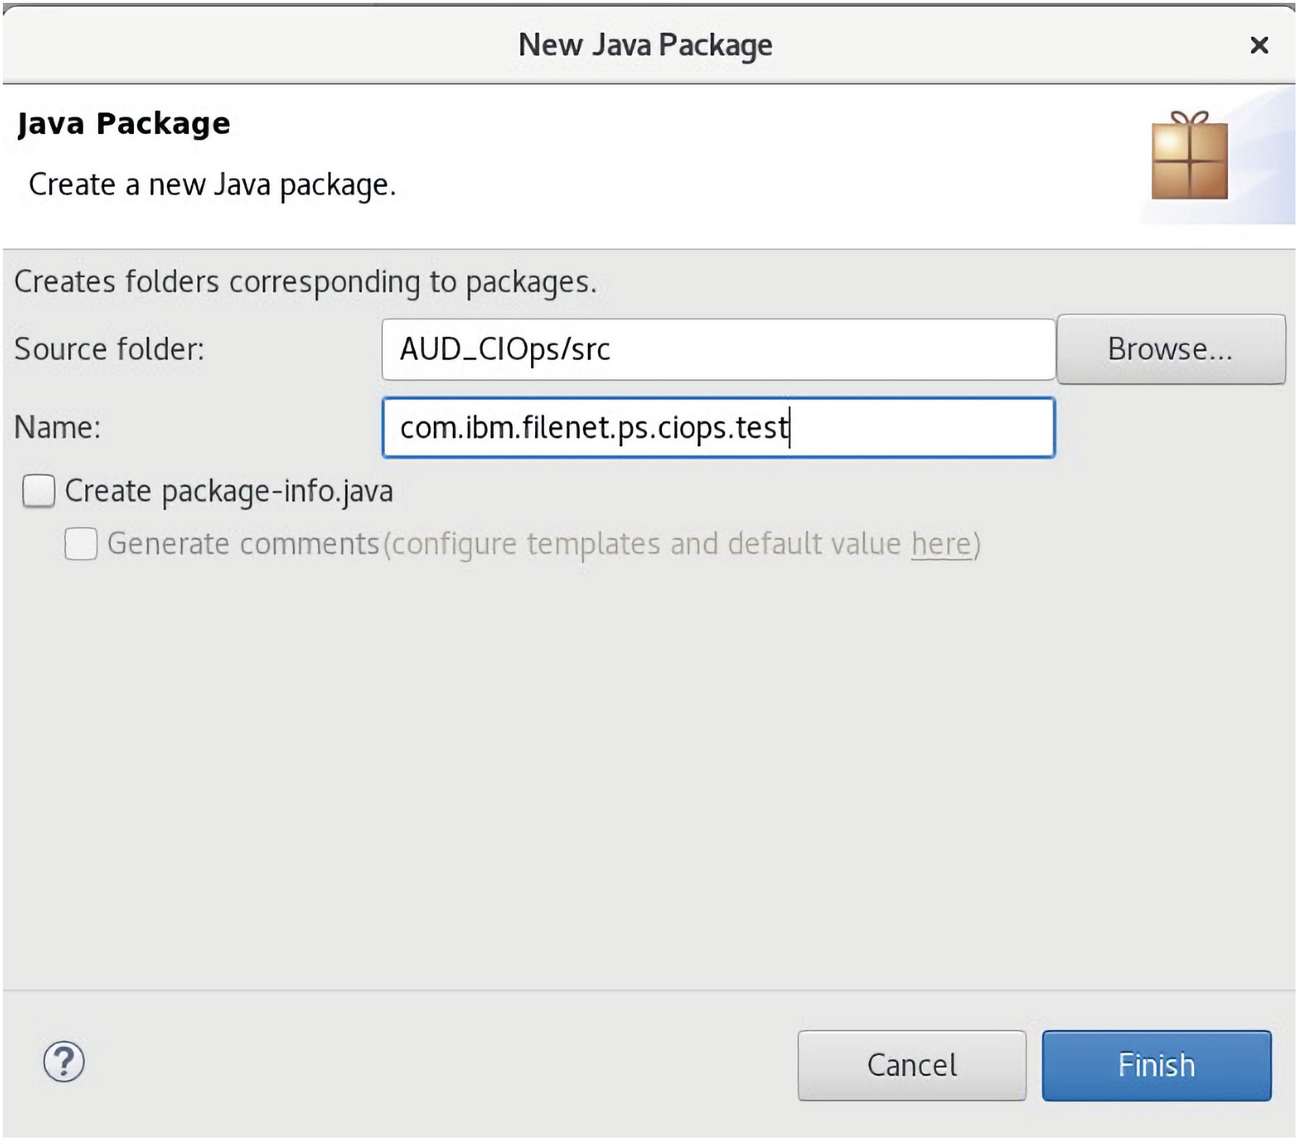
A screenshot of the new java package window has the java package detail, with the option to select the source folder and an input box for name. A checkbox to create package info dot java is below the name. The options for cancel and finish are given below.
The package for testing is created
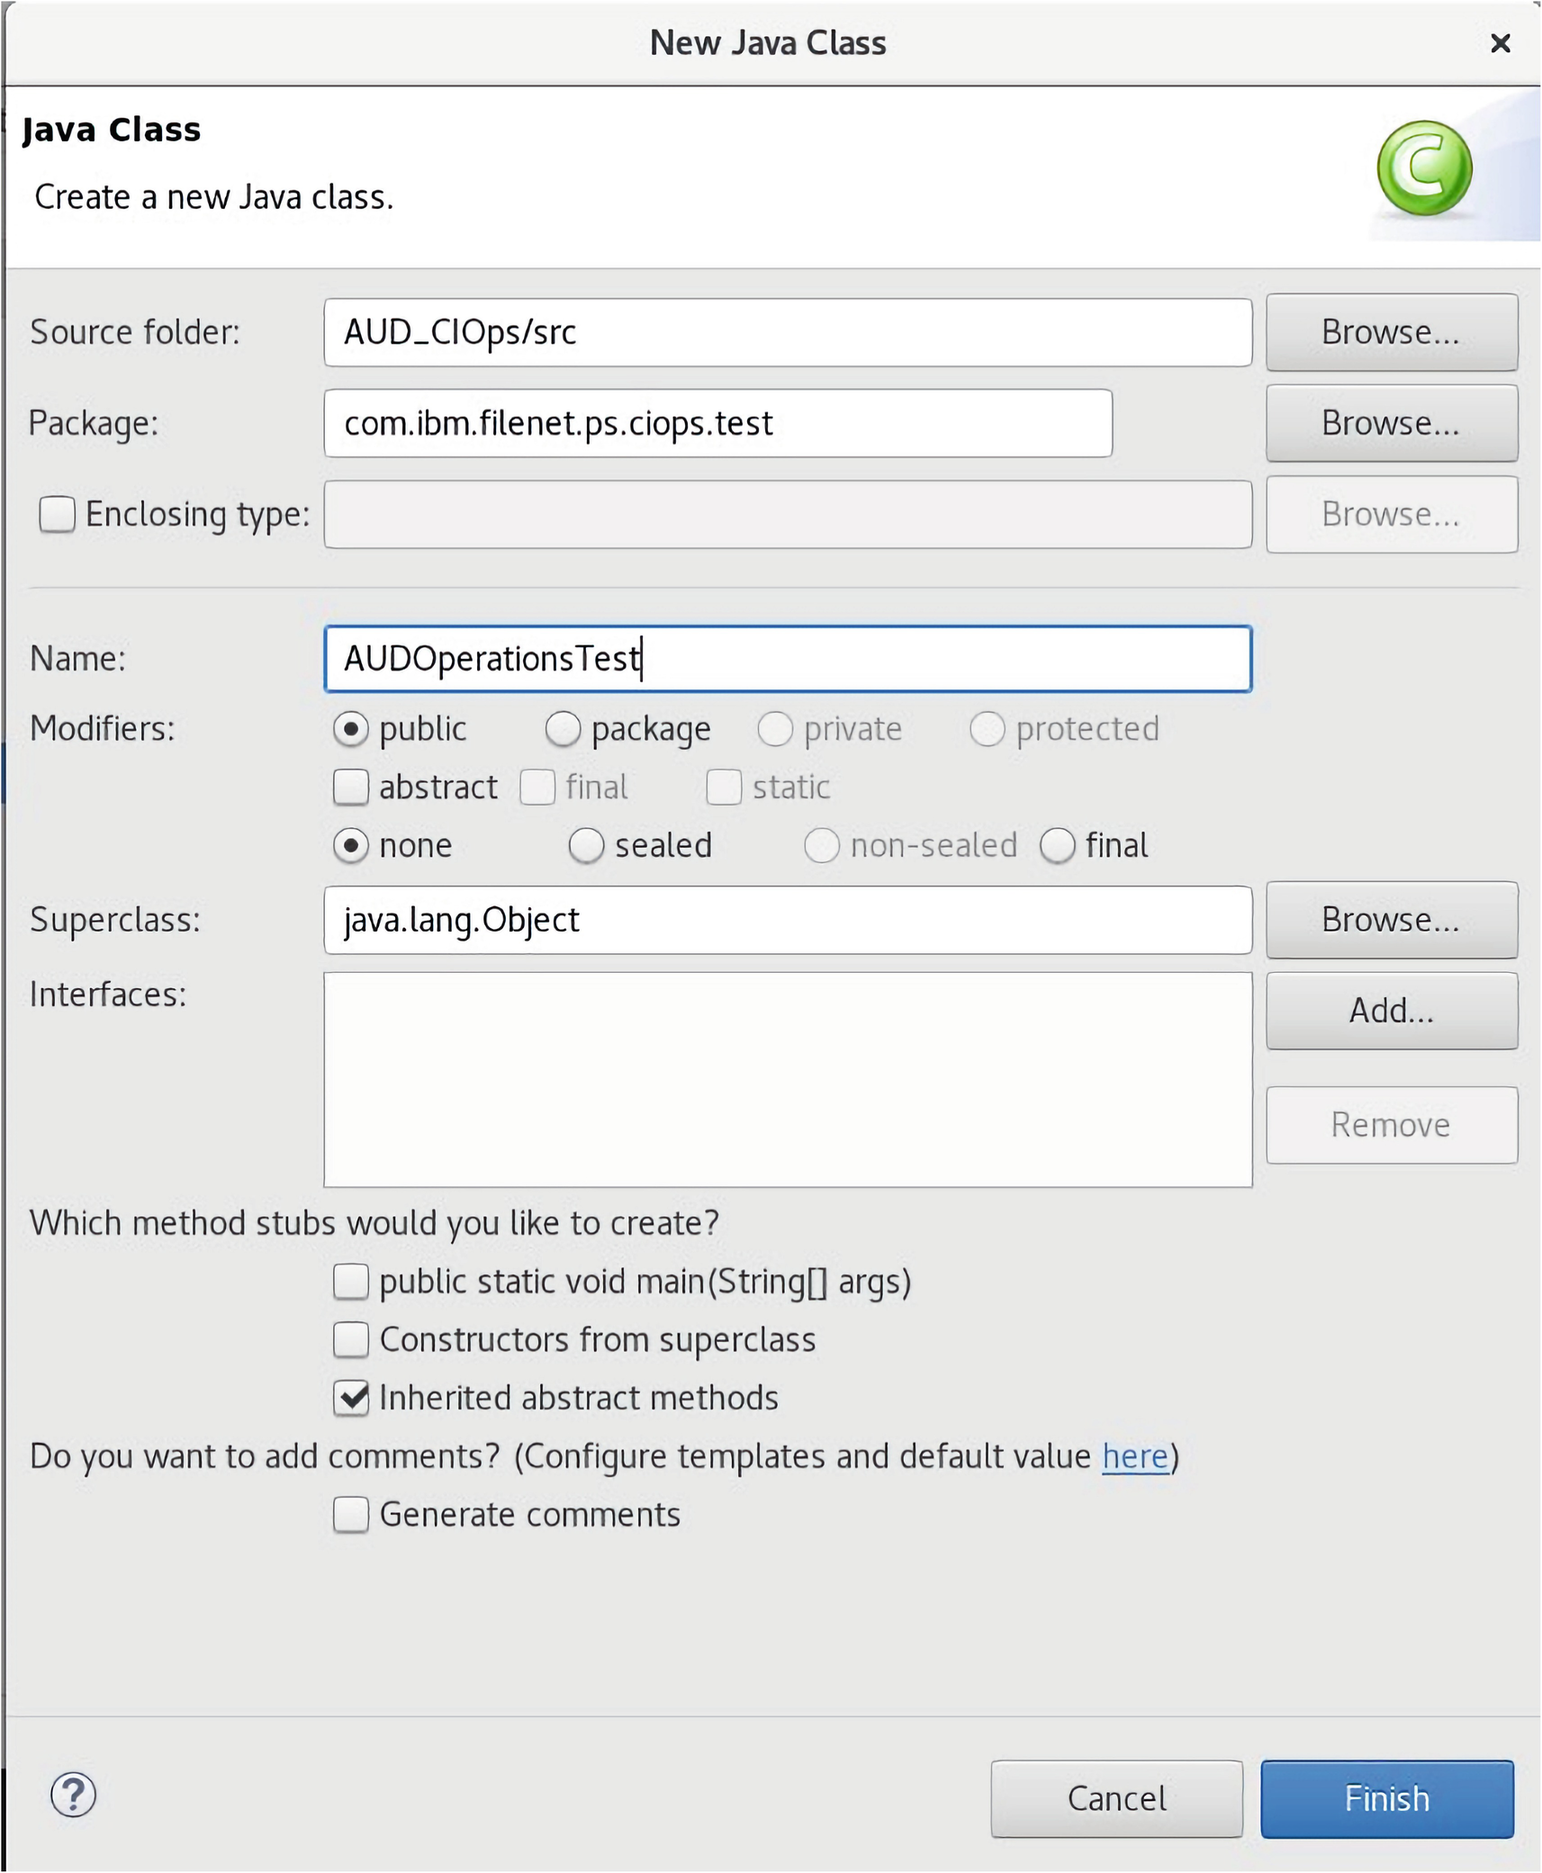
A screenshot of the new java class window has the java class detail, with the options and input boxes for source folder, package, name, modifiers, superclass, and interfaces. It also has checkboxes to create method stubs and generate comments. The options for cancel and finish are given below.
The AUDOperationsTest Java class is created
The AUDOperationsTest.java code used for JUnit testing
The comment //$NON-NLS-1$ at the end of some statements is the way to communicate to the compiler that UI messages should not be embedded as string literals, but rather sourced from a resource file (so that they can be translated or easily modified, etc.). Consequently, Eclipse can be configured to detect string literals, so that you don’t accidentally leave unexternalized UI strings in the code. Also, note that some strings, such as regular expressions, are not externalized.
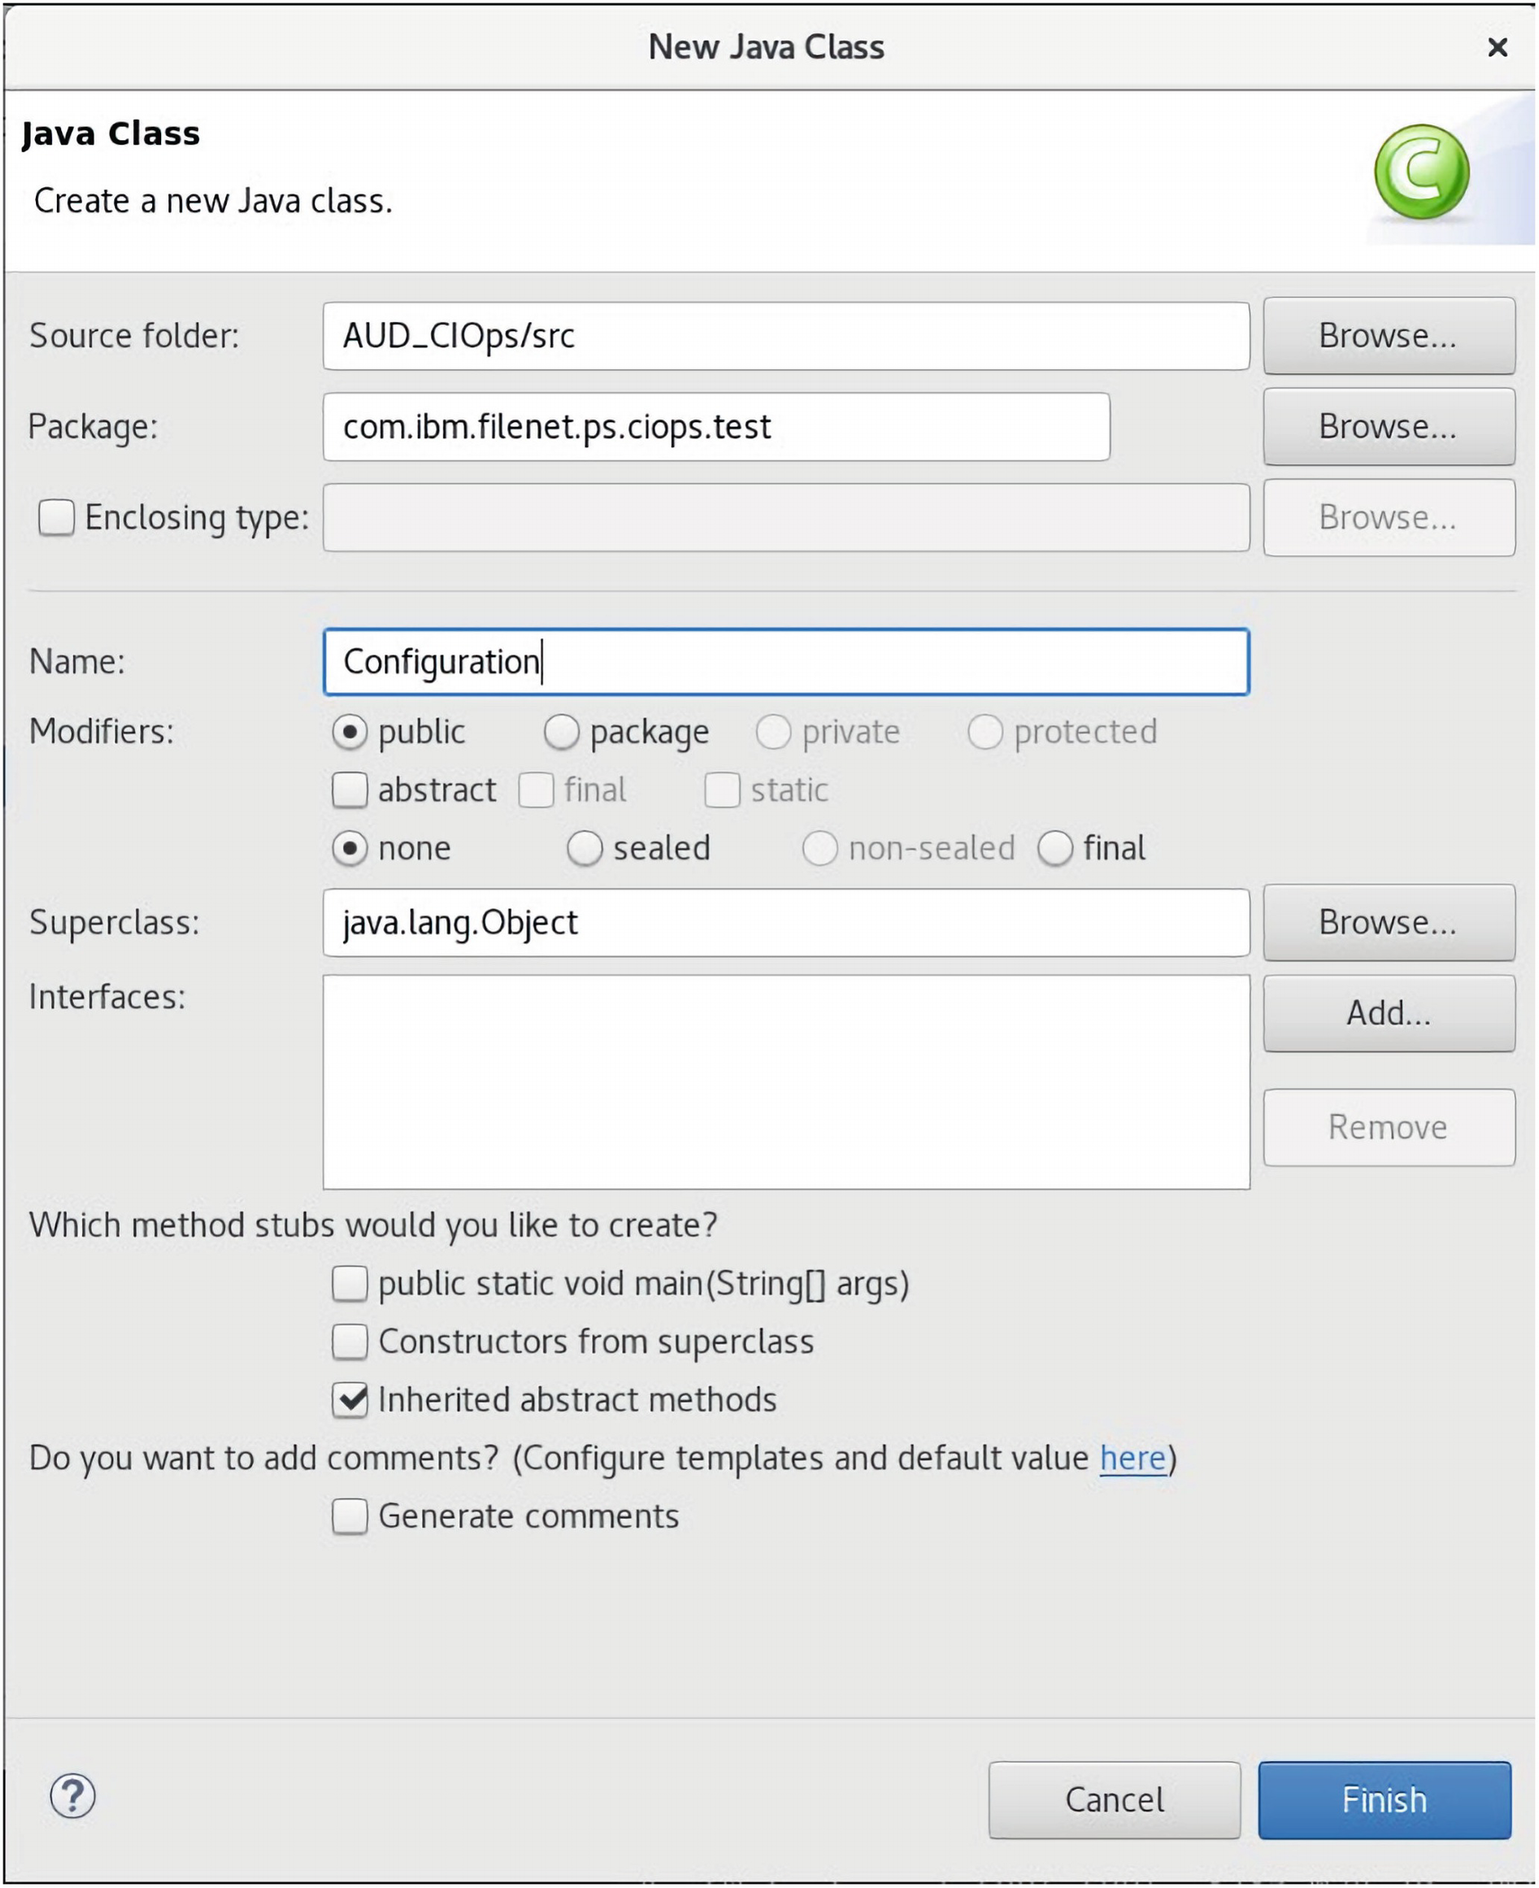
A screenshot of the new java class window has the Configuration java class detail, with the options and input boxes for source folder, package, name, modifiers, superclass, and interfaces. It also has checkboxes to create method stubs and generate comments. The options for cancel and finish are given below.
The Configuration Java class is created
The Configuration.java code file used to load the Configuration.properties
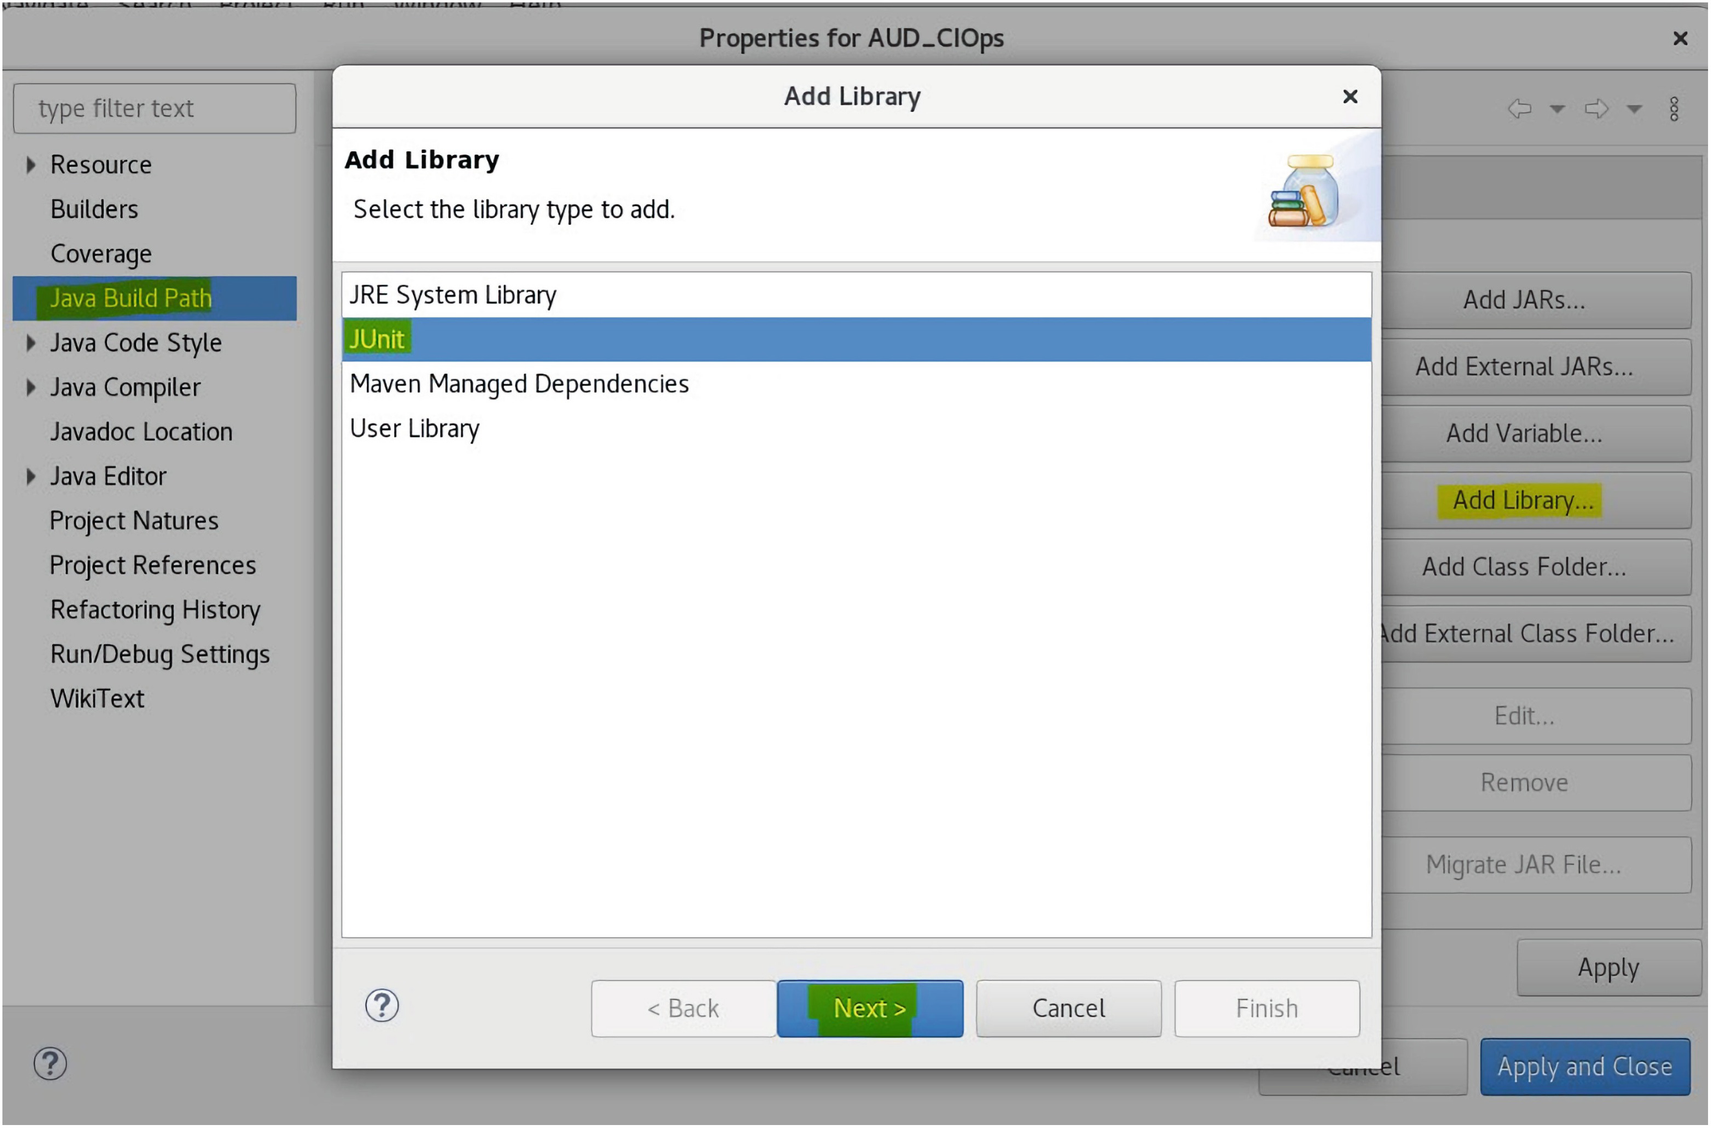
A screenshot of the add library dialog box in the properties for A U D C I O p s window has a list of 4 library types to add. The library type titled J unit is selected and highlighted. The options for back, next, cancel, and finish is given below.
The JUnit library is added for code testing support
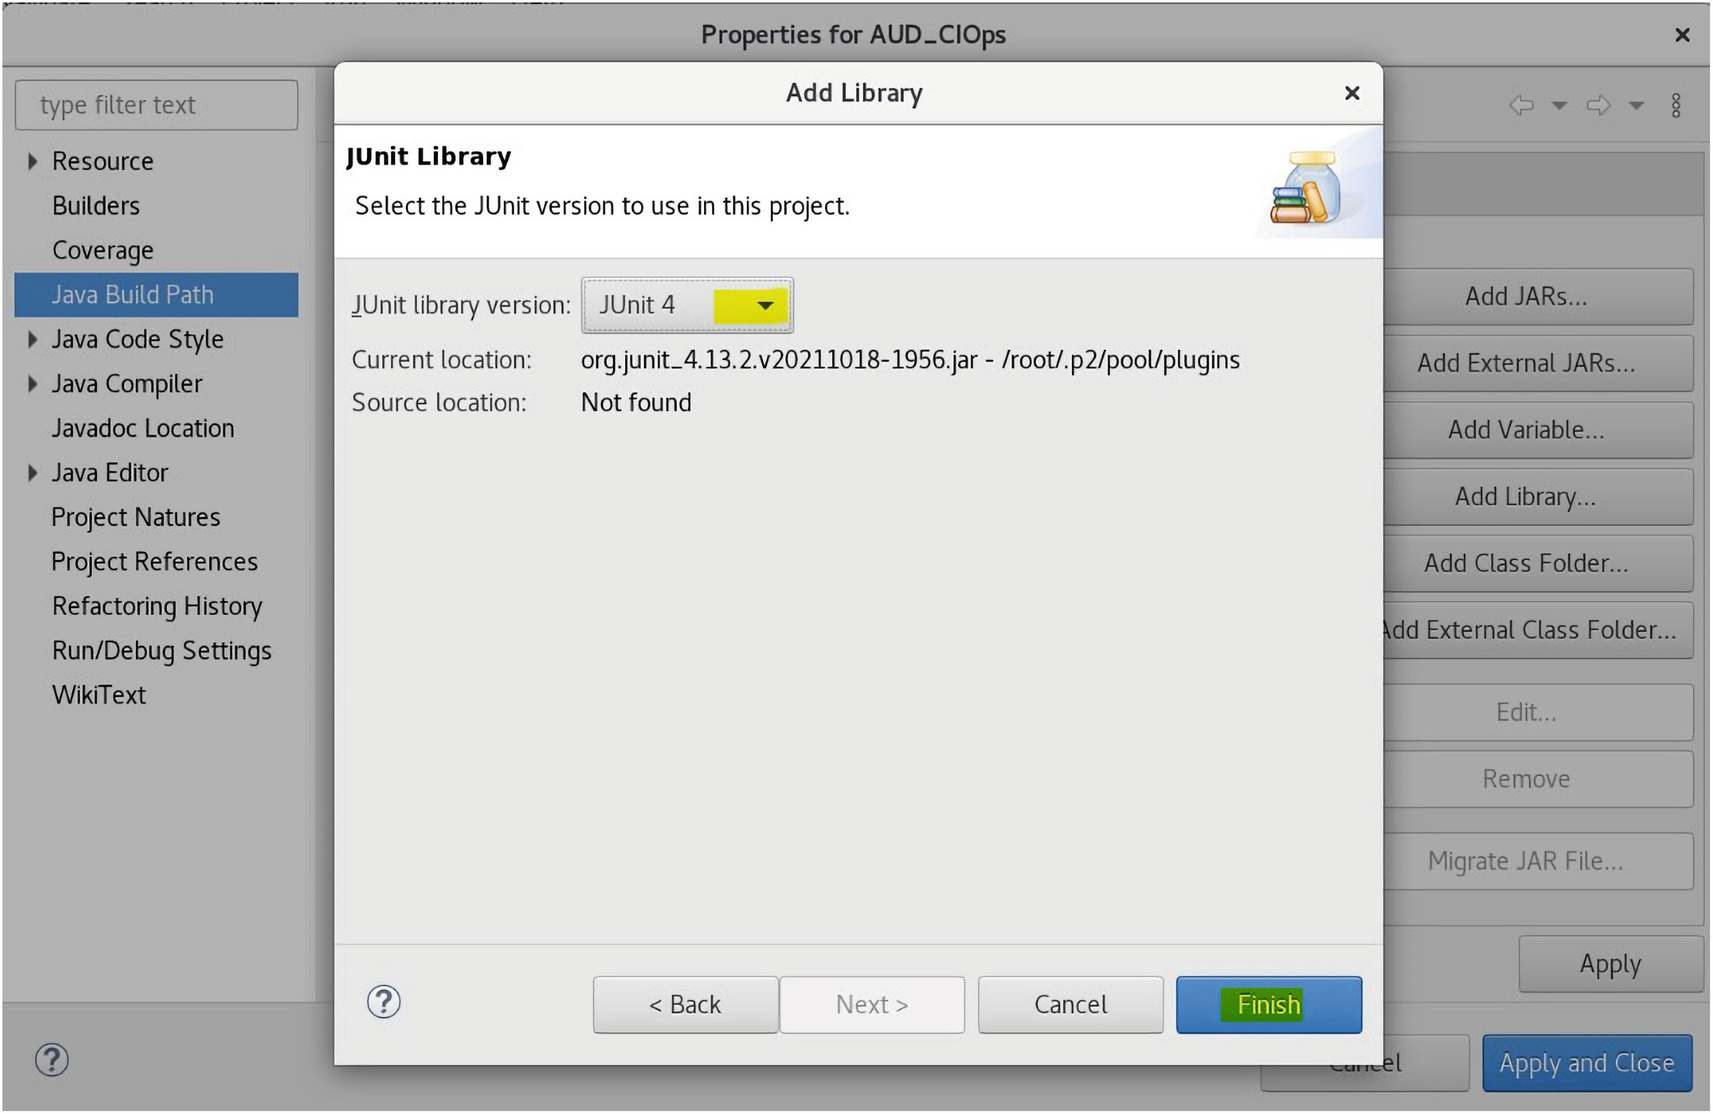
A screenshot of the add library dialog box in the properties for A U D C I O p s window has J unit library detail. The option for J unit library version 4 is highlighted. And the options for back, next, cancel, and finish is given below.
The JUnit 4 library is selected for the Classpath
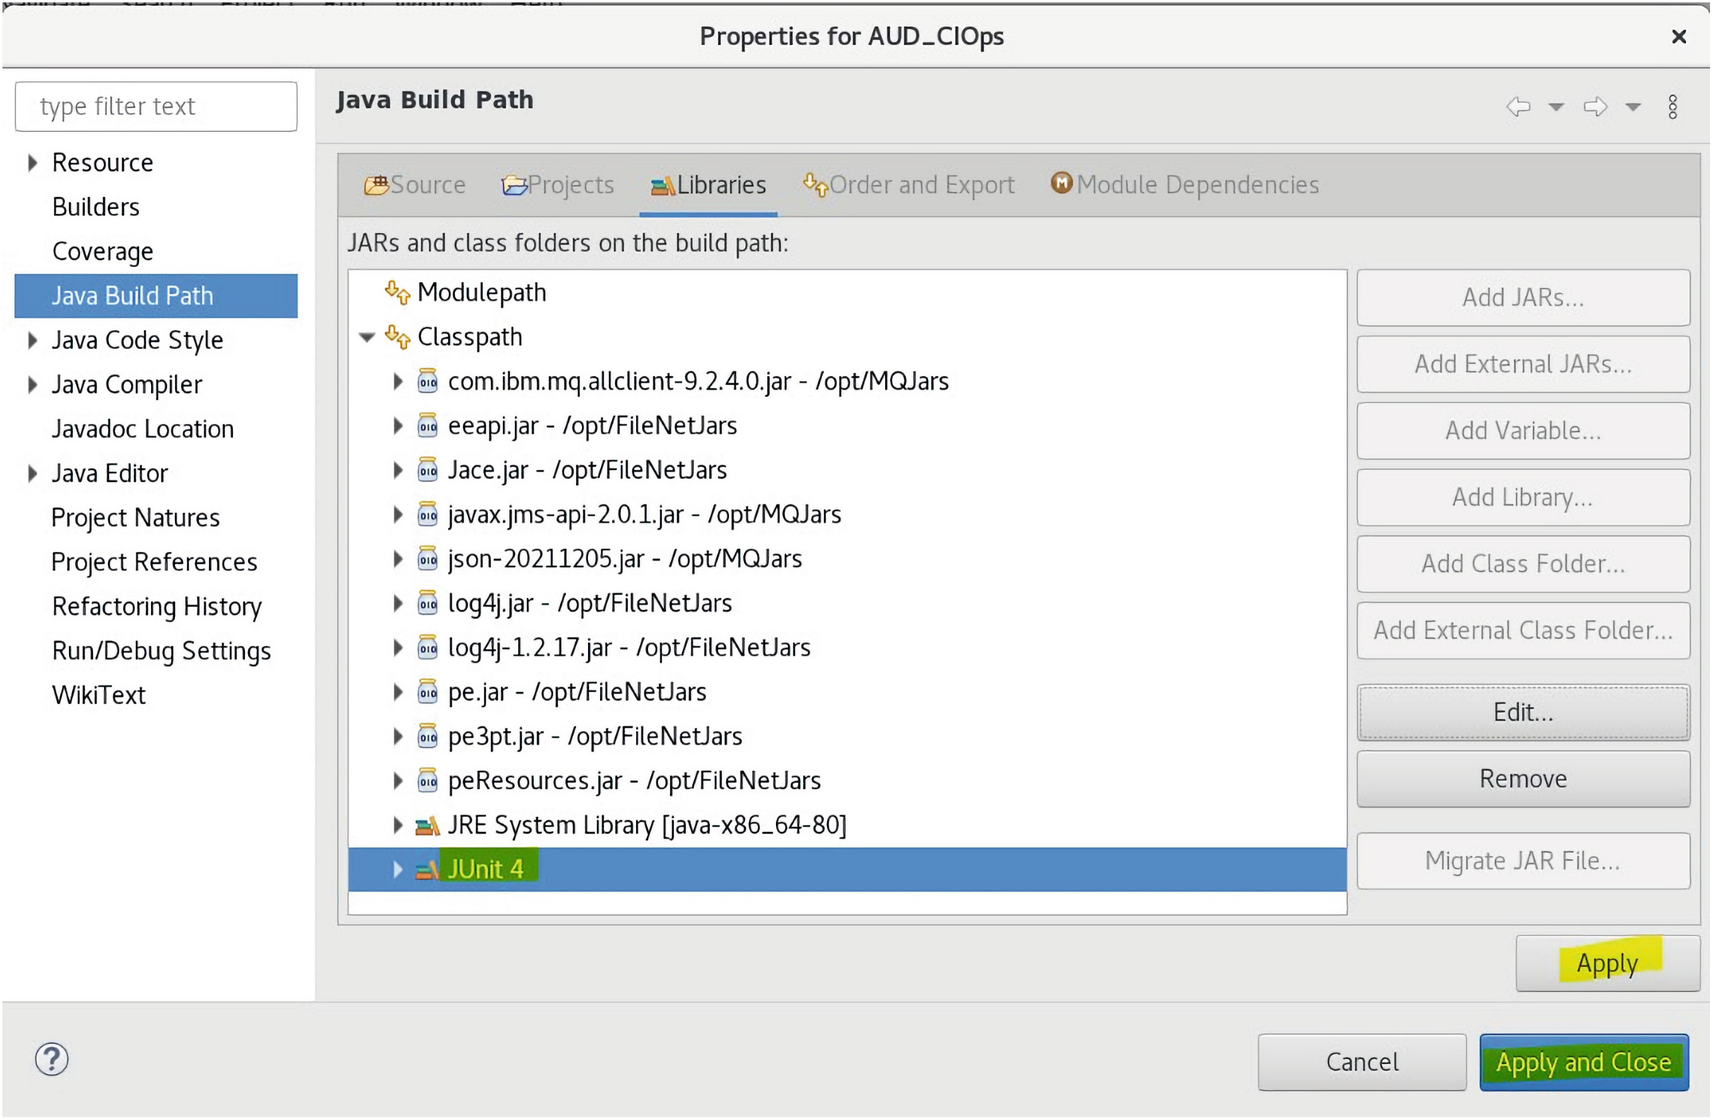
A screenshot of the properties for A U D C I O p s window has the java build path details. It has the J unit 4 selected with options for apply, and apply and close highlighted below.
The JUnit 4 library we selected is confirmed with the Apply and Apply and Close command buttons
Initial Error Fixes
- 1)First run of the JUnit test class, AUDOperationsTest, we getJVMCFRE003 bad major version; class=com/ibm/filenet/ps/ciops/test/AUDOperationsTest, offset=6
indicating that the compiled class JRE is different from the JVM version, so this was changed in the Eclipse project from 1.7 to 1.8.
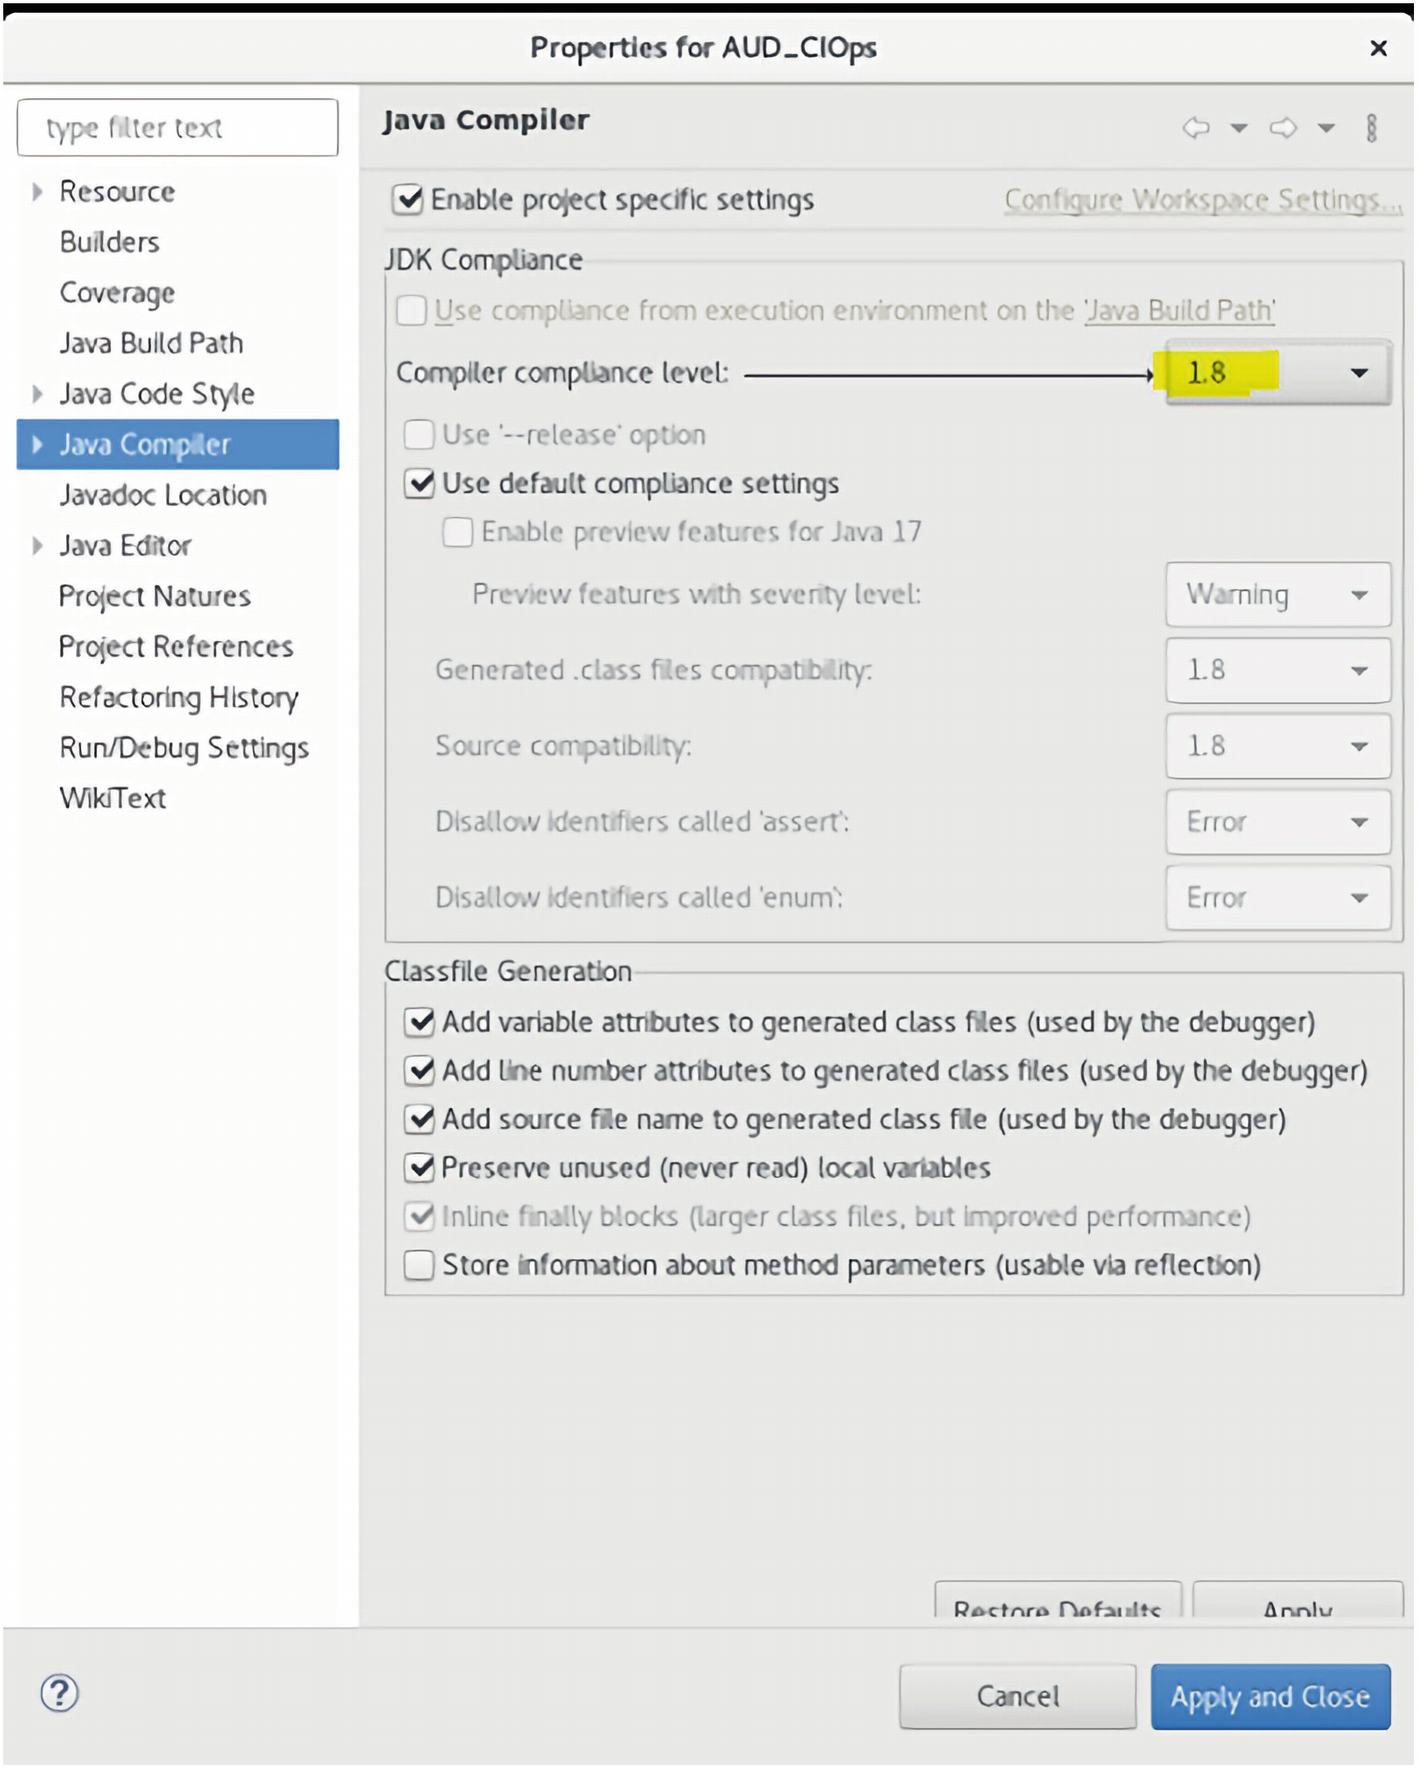
A screenshot of the properties for A U D C I O p s window has the java compiler details. It has the checkboxes to enable, use, add, and preserve project specific settings, default compliance settings, variable attributes, line number attributes, source file name, and unused local variables ticked. The option for compiler compliance level is highlighted as 1.8.
The Java Compiler is changed from Java version 1.7 to 1.8
The initial document we selected had a Title with spaces in the path, which gave the preceding E_OBJECT_NOT_FOUND FileNet error.
(/AUDIT_TEST/Audit Event Test Version 2 was used initially.)
We found that the code to retrieve a document requires a Document path which does not have the document title with spaces.
The updated Configuration.properties file
So, now we get the error indicating that the class com.ibm.mq.jms.MQQueue cannot be cast to javax.jms.ConnectionFactory.
There is an IBM Technote for this; see the link:
In summary, the ClassCastException occurs when a queue connection factory is defined as a WebSphere MQ Connection Factory instead of a WebSphere MQ Queue Connection Factory.
Define the queue connection factory as a WebSphere MQ Queue Connection Factory.
Use a javax.jms.ConnectionFactory object in the application code rather than a javax.jms.QueueConnectionFactory object.
Configuring the Ports and Library Jar Files for IBM MQ Series
The server Firewall is now updated to allow the MQ Series port 1414 to be opened.

A screenshot of a window has several I B M M Q dot jar files highlighted with various root codes.
The required IBM MQ reference .jars are found and copied
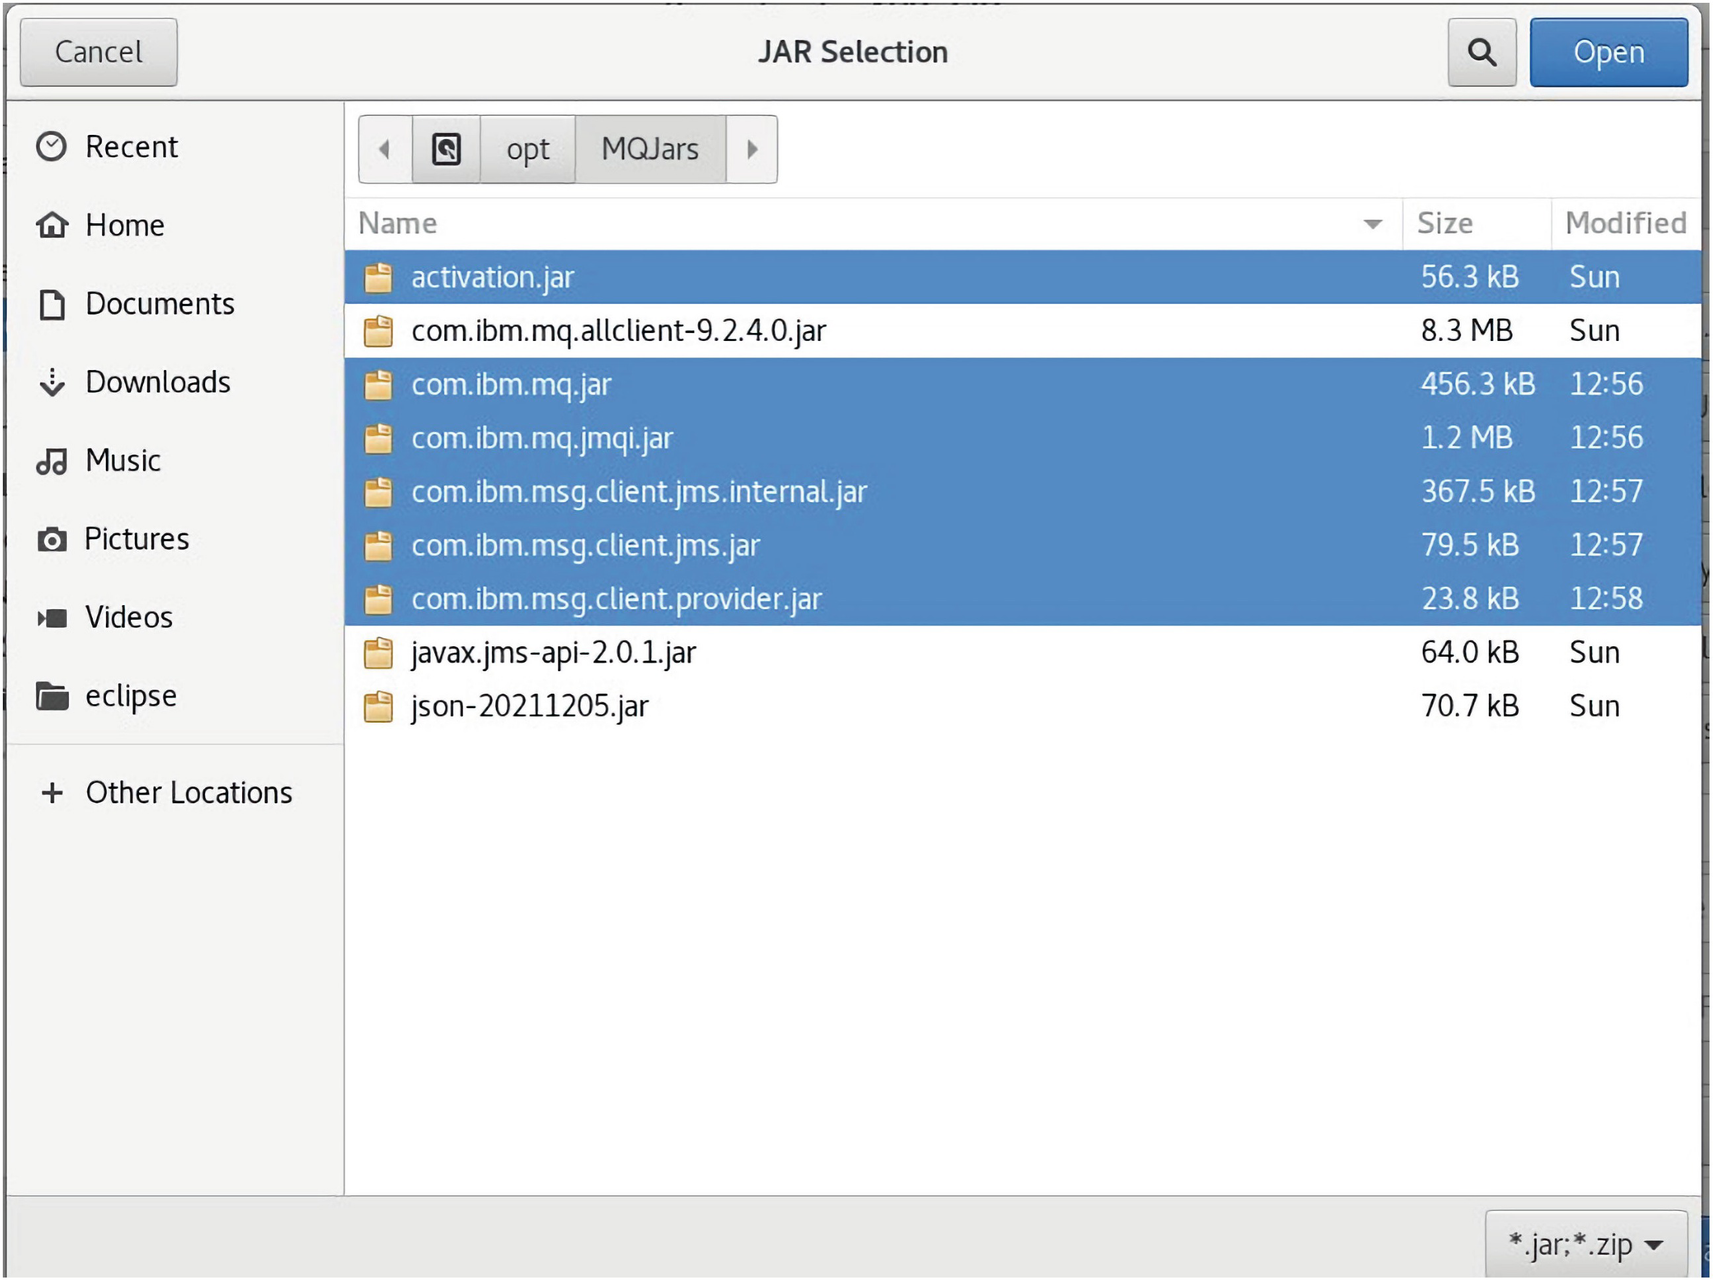
A screenshot of the jar selection window has a panel for recent, home, documents, downloads, music, pictures, videos, and eclipse on the left. It has 6 dot jar files selected on the right. The options for cancel, search, and open are given at the top.
The selected files are referenced

A screenshot of the properties for A U D C I O p s window has the java build path details. It has 6 dot jar files selected with options for apply, cancel, and apply and close given below.
The required IBM MQ jars are selected from the /opt/MQJars folder

A screenshot of a window has 3 dot jar files for I B M highlighted with various root codes.
The com.ibm.ws.ejb.thinclient_8.5.0.jar is copied to /opt/MQJars
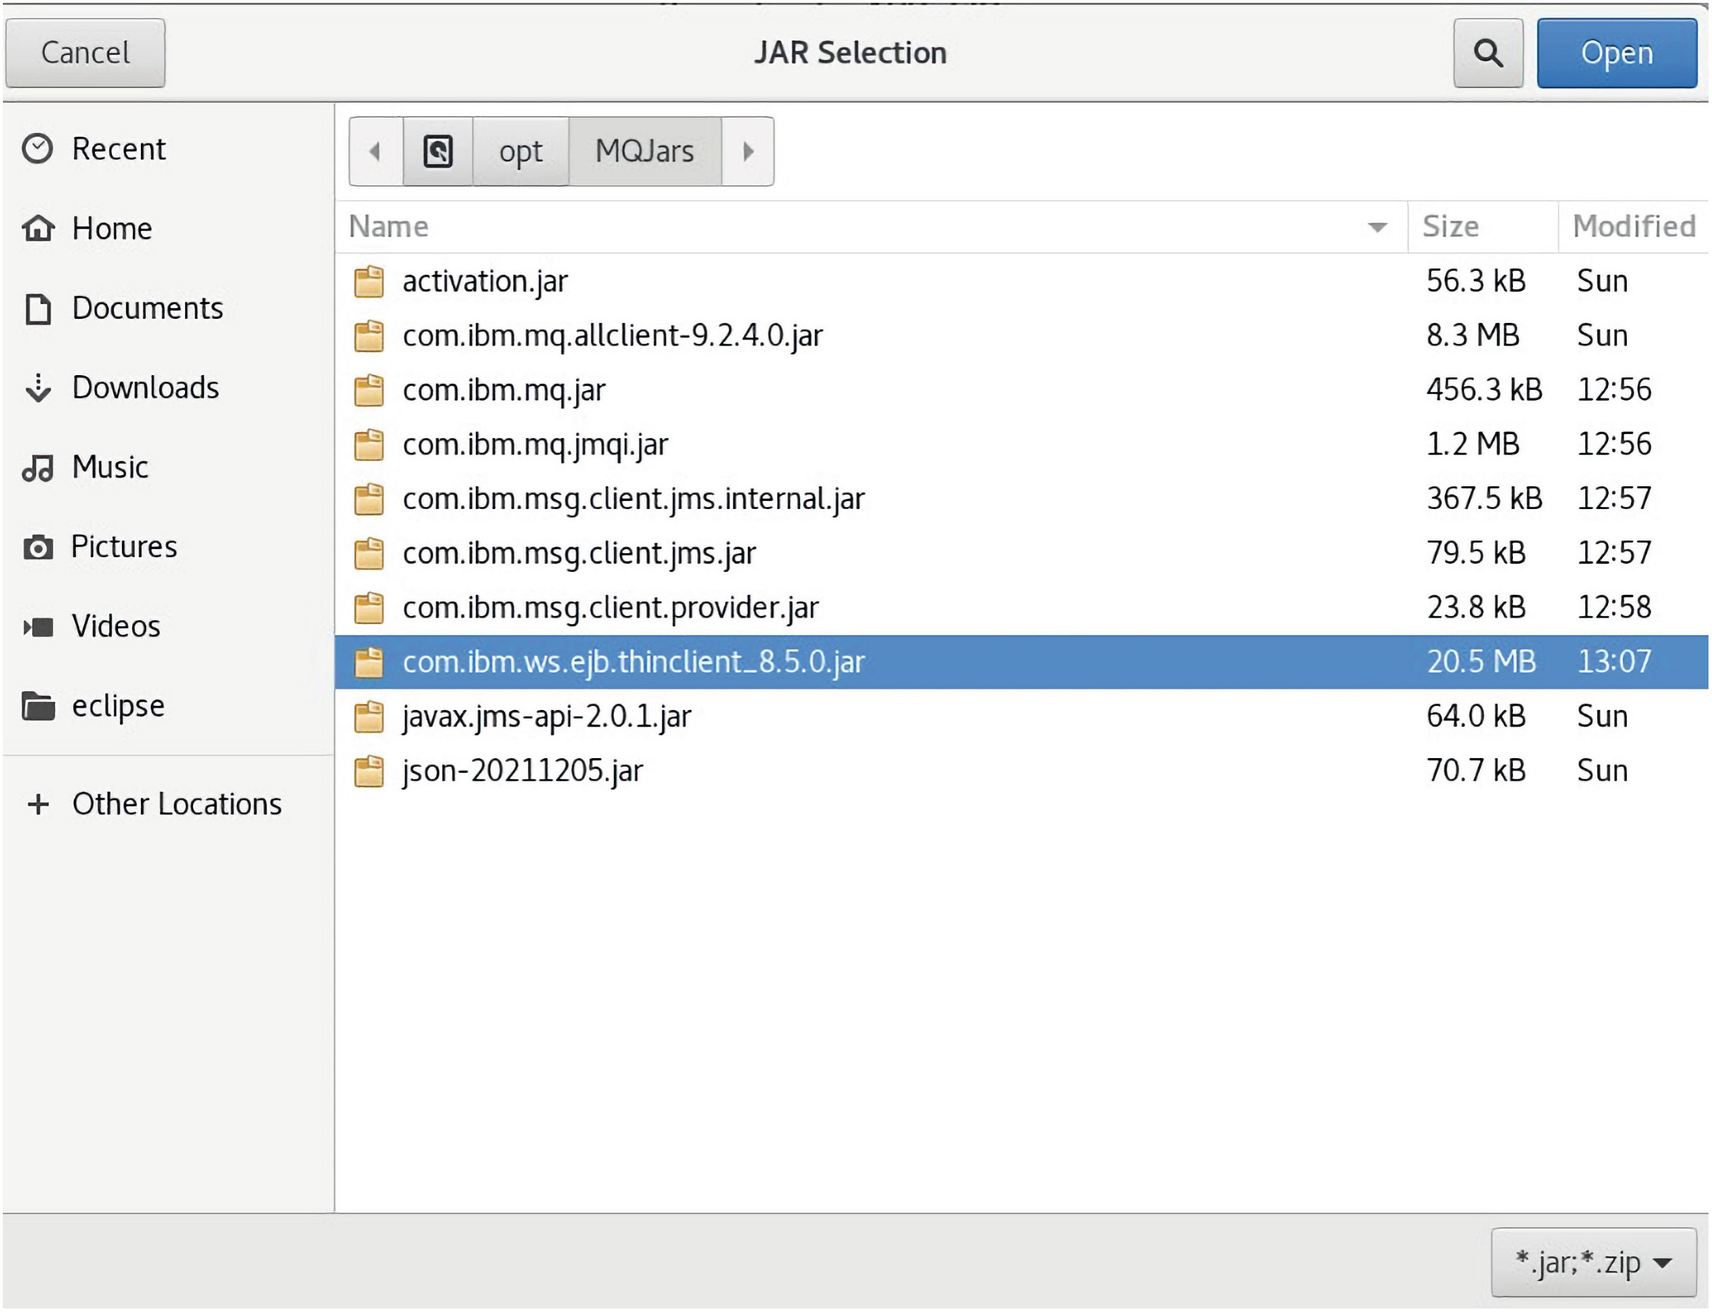
A screenshot of the jar selection window has a panel for recent, home, documents, downloads, music, pictures, videos, and eclipse on the left. It has a dot jar file selected on the right. The options for cancel, search, and open are given at the top.
The com.ibm.ws.ejb.thinclient_8.5.0.jar is loaded to Eclipse
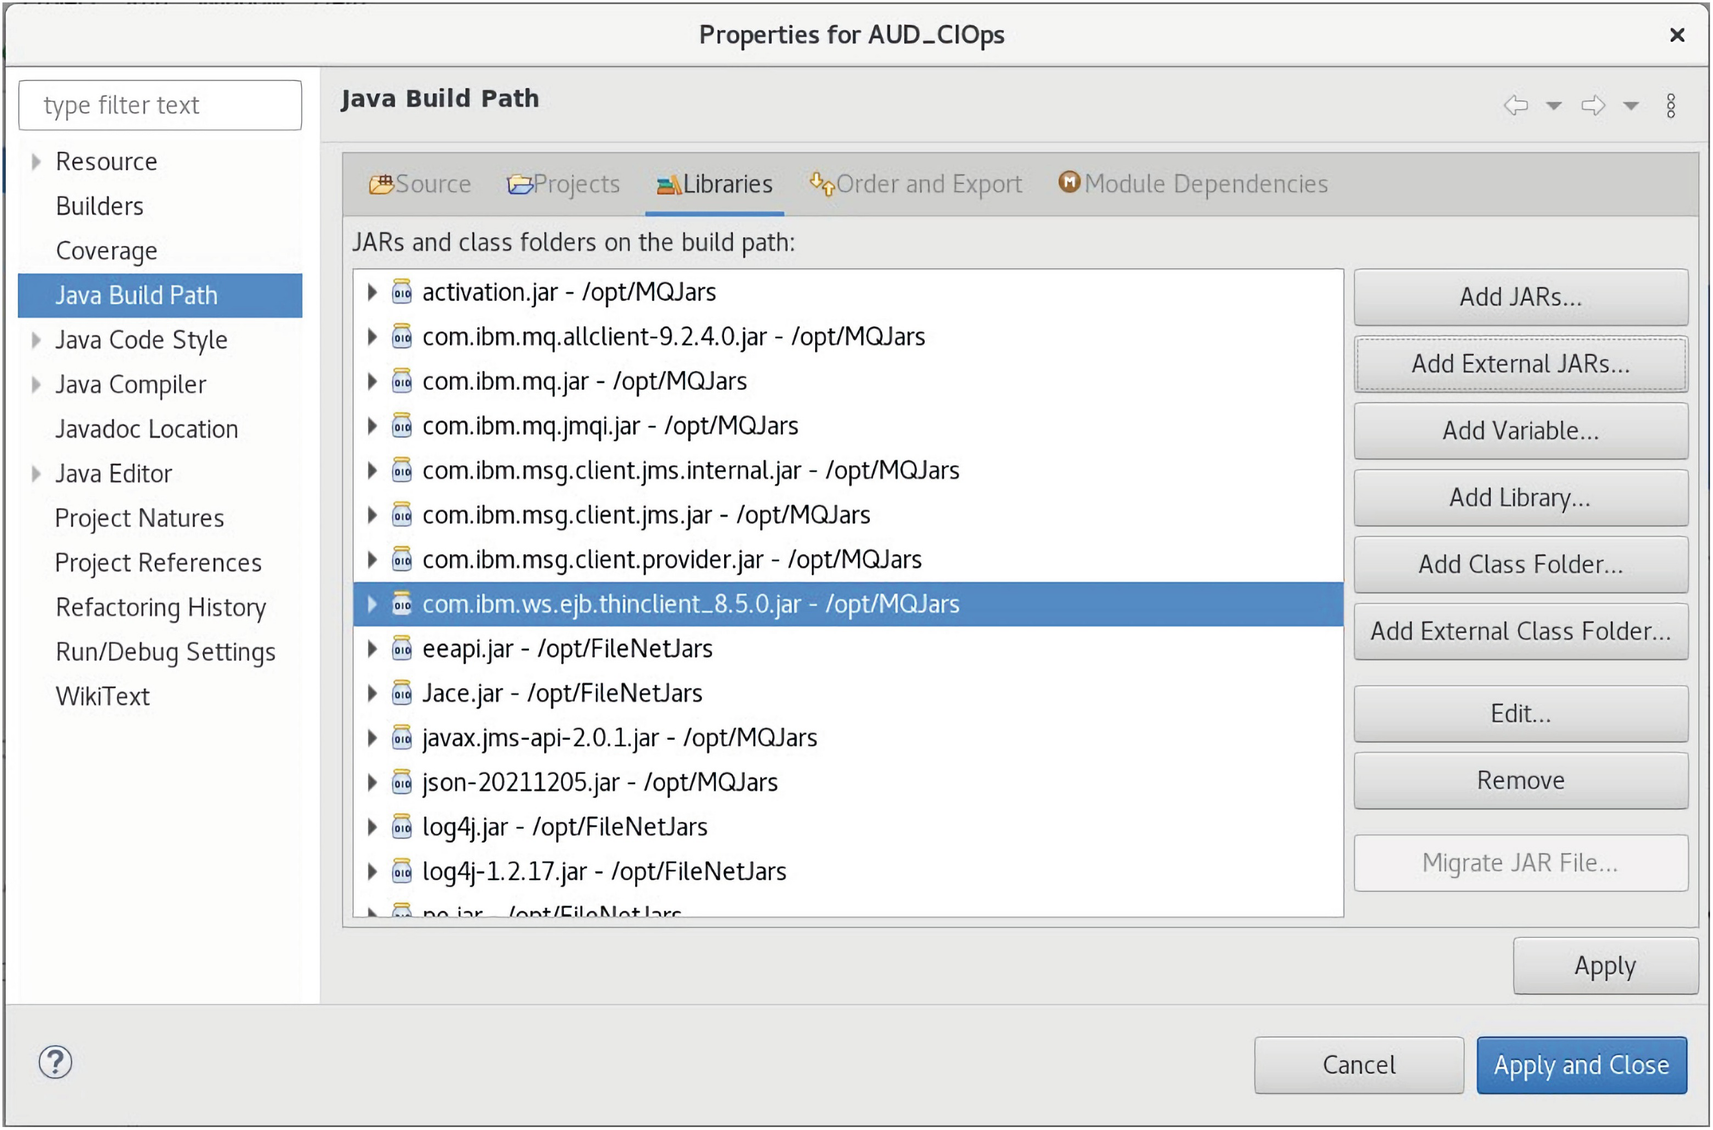
A screenshot of the properties for A U D C I O p s window has the java build path details. It has a dot jar file selected with options for apply, cancel, and apply and close given below.
The com.ibm.ws.ejb.thinclient_8.5.0.jar is added to the Classpath

A screenshot of a window has 2 dot jar files titled j 2 e e and bootstrap with various root codes.
The j2ee.jar and bootstrap.jar files are copied
A screenshot of a window has several dot jar files with various root codes and plugins.
The listed .jars are also copied

A screenshot of a window has a dot jar file titled i b m o r b with a plugin.
The ibmorb.jar is copied from the /opt/mqm/java/jre64/jre/lib folder
Added providerutil.jar from the path:

A screenshot of a window has a dot jar file titled provider u t i l with various plugins.
The providerutil.jar file is added to the /opt/MQJars folder
A screenshot of the jar selection window has a panel for recent, home, documents, downloads, music, pictures, videos, and eclipse on the left. It has 8 dot jar files selected on the right. The options for cancel, search, and open are given at the top.
The selected .jars from the /opt/MQJars are added to the Classpath
A screenshot of the properties for A U D C I O p s window has the java build path details. It has 7 dot jar files selected with options for cancel, and apply and close given below.
The listed .jars are added using the Apply and Close command
MQ Series Channel Security Settings
The security is set to provide limited access to the stored messages held in the MQ Series message queues.
Read additional information in
“Configuring and running simple JMS P2P and Pub/Sub applications in MQ 7.0, 7.1, 7.5 and 8.0”
www-01.ibm.com/support/docview.wss?uid=swg27023212&aid=1
(IBM Techdoc: 7023212)
See the IBM Technote:
www-01.ibm.com/support/docview.wss?uid=swg21138961
and
www-01.ibm.com/support/docview.wss?uid=swg21577137
The default value for the new feature introduced in 7.1, “Channel Authentication Records” (CHLAUTH), is ENABLED.

A screenshot of the run m q s c w a s a d m command window has the display queue manager details for q m g r c h l a u t h.
The runmqsc wasadm command is run as the mqm user
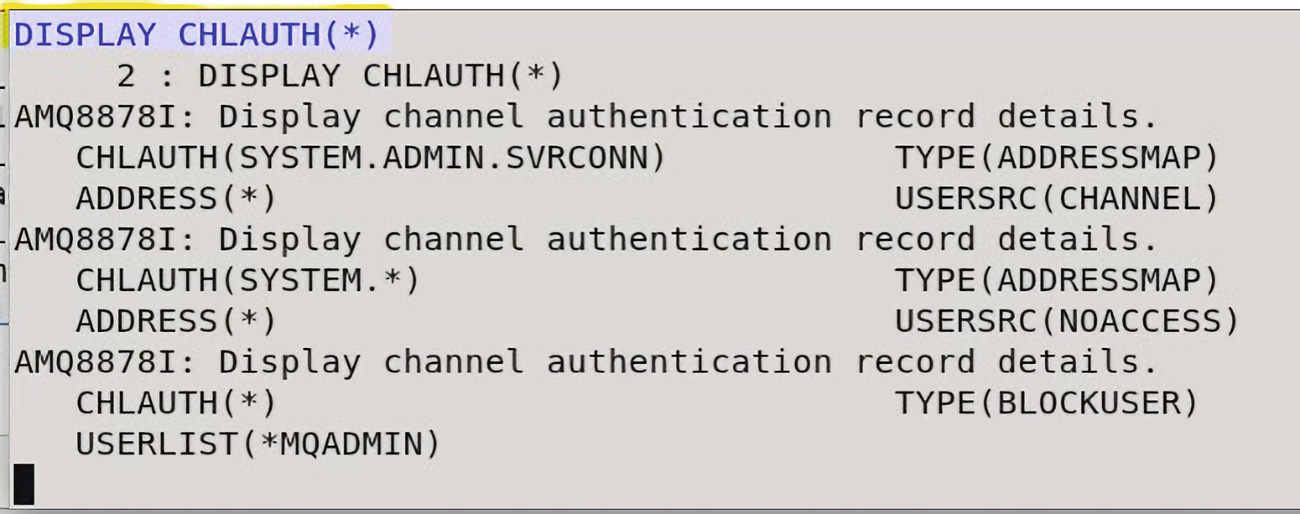
A screenshot of the display c h l a u t h command window has the display channel authentication record details with types for system admin, system, and m q admin.
The DISPLAY CHLAUTH(*) command is entered
The last record blocks all remote channel access to any MQ Administrator. The effect is that non-administrative users can still connect if suitably authorized to do so, but administrative connections and anonymous connections are disallowed regardless of any Object Authority Manager (OAM) authorization settings. This means that new queue managers in V7.1 are much more secure by default than in previous versions, but with the trade-off that administrative access must be explicitly defined.
1) If this is a production queue manager, then you could stop trying to use a userid that is an MQ Administrator and instead use a non-administrator userid to access the queue manager.
2) If you really want the MQ Administrator to be able to access the queue manager via client channels, you could do one of the following actions:
2a) You can add the following two Channel Authentication Records.
User ID blocking
The preceding rules apply to SYSTEM.ADMIN.SVRCONN which is used by the MQ Explorer.
It is not advisable to use SYSTEM.DEF.* channels for active connections. The system default channels are the objects from which all user-defined channels inherit properties. The recommended practice is that SYSTEM.DEF.* and SYSTEM.AUTO.* channels should NOT be configured to be usable.
2b) This is a variation of (2a) but allowing the MQ Administrator to only use a particular host.
Note Disabling CHLAUTH results in a policy that accepts administrative connections by default. The administrative effort to lock down administrative access with CHLAUTH(DISABLED) is much greater than to do so with CHLAUTH(ENABLED).
It is recommended to leave CHLAUTH(ENABLED) and use the other security features of MQ V9.2.x to authenticate administrator connections.
Create a CRL LDAP Authentication
See www.ibm.com/docs/en/ibm-mq/9.2?topic=manager-accessing-crls-arls-using-mq-explorer.
Certificate Revocation Lists (CRLs) also apply to Authority Revocation Lists (ARLs).
For the overview of the use of the CRL lists used for security, see
www.ibm.com/docs/en/ibm-mq/9.2?topic=users-working-revoked-certificates
- 1.
Ensure that you have started your queue manager.
- 2.
Right-click the Authentication Information folder and click New ➤ Authentication Information. In the property sheet that opens:
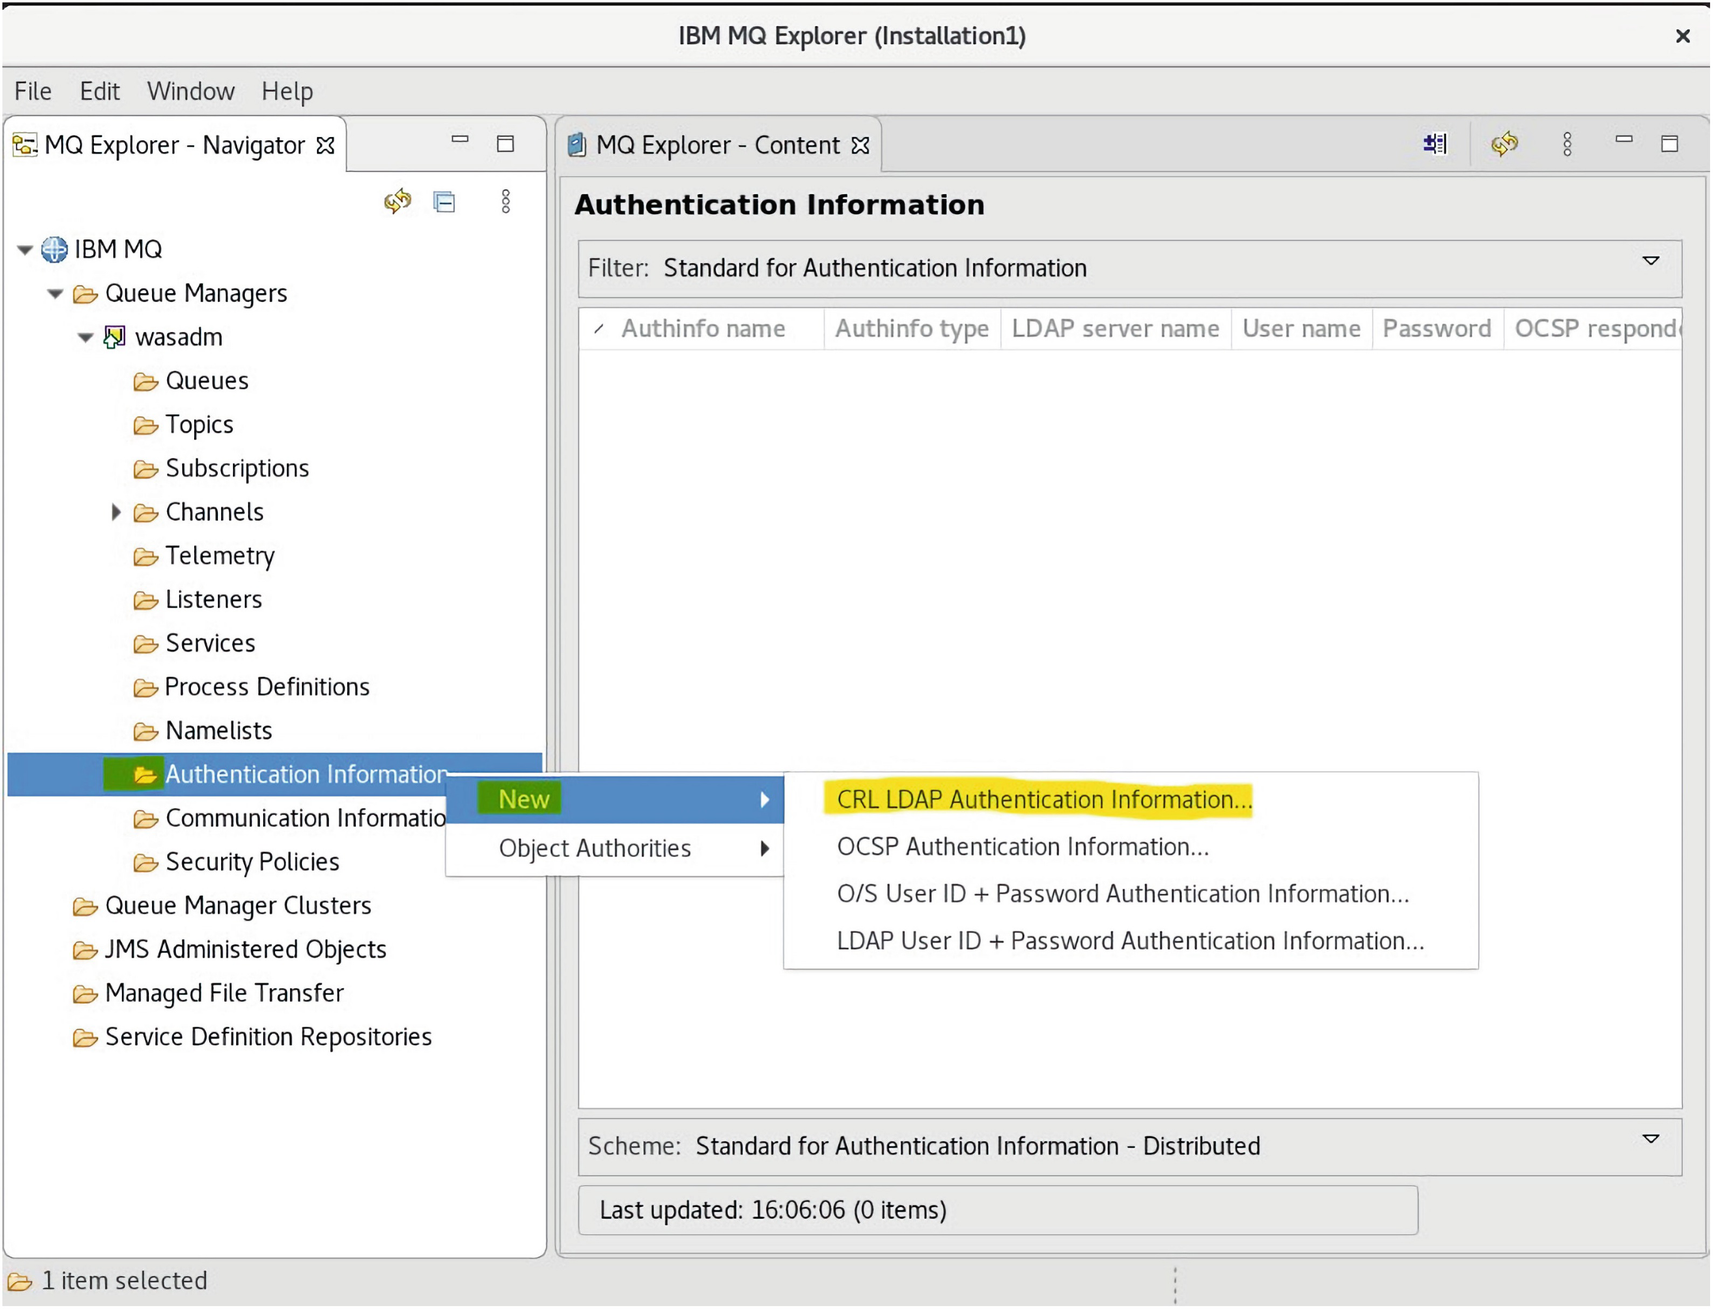
A screenshot of the I B M M Q explorer window has the M Q explorer content detail for authentication information on the right. The M Q explorer navigator panel on the left has the options menu with the options new and C R L L D A P authentication information highlighted for the Authentication Information sub-folder.
The MQ Explorer CRL LDAP Authentication Information menu is selected
- a.
On the first page, Create Authentication Information, enter a name for the CRL (LDAP) object.

A screenshot of the new C R L L D A P authentication information window has the create a C R L L D A P authentication information detail, with an input box and option for name and select an existing object. The options for back, next, cancel, and finish are given below.
The mquser1 User Name is entered for the CRL LDAP Authentication
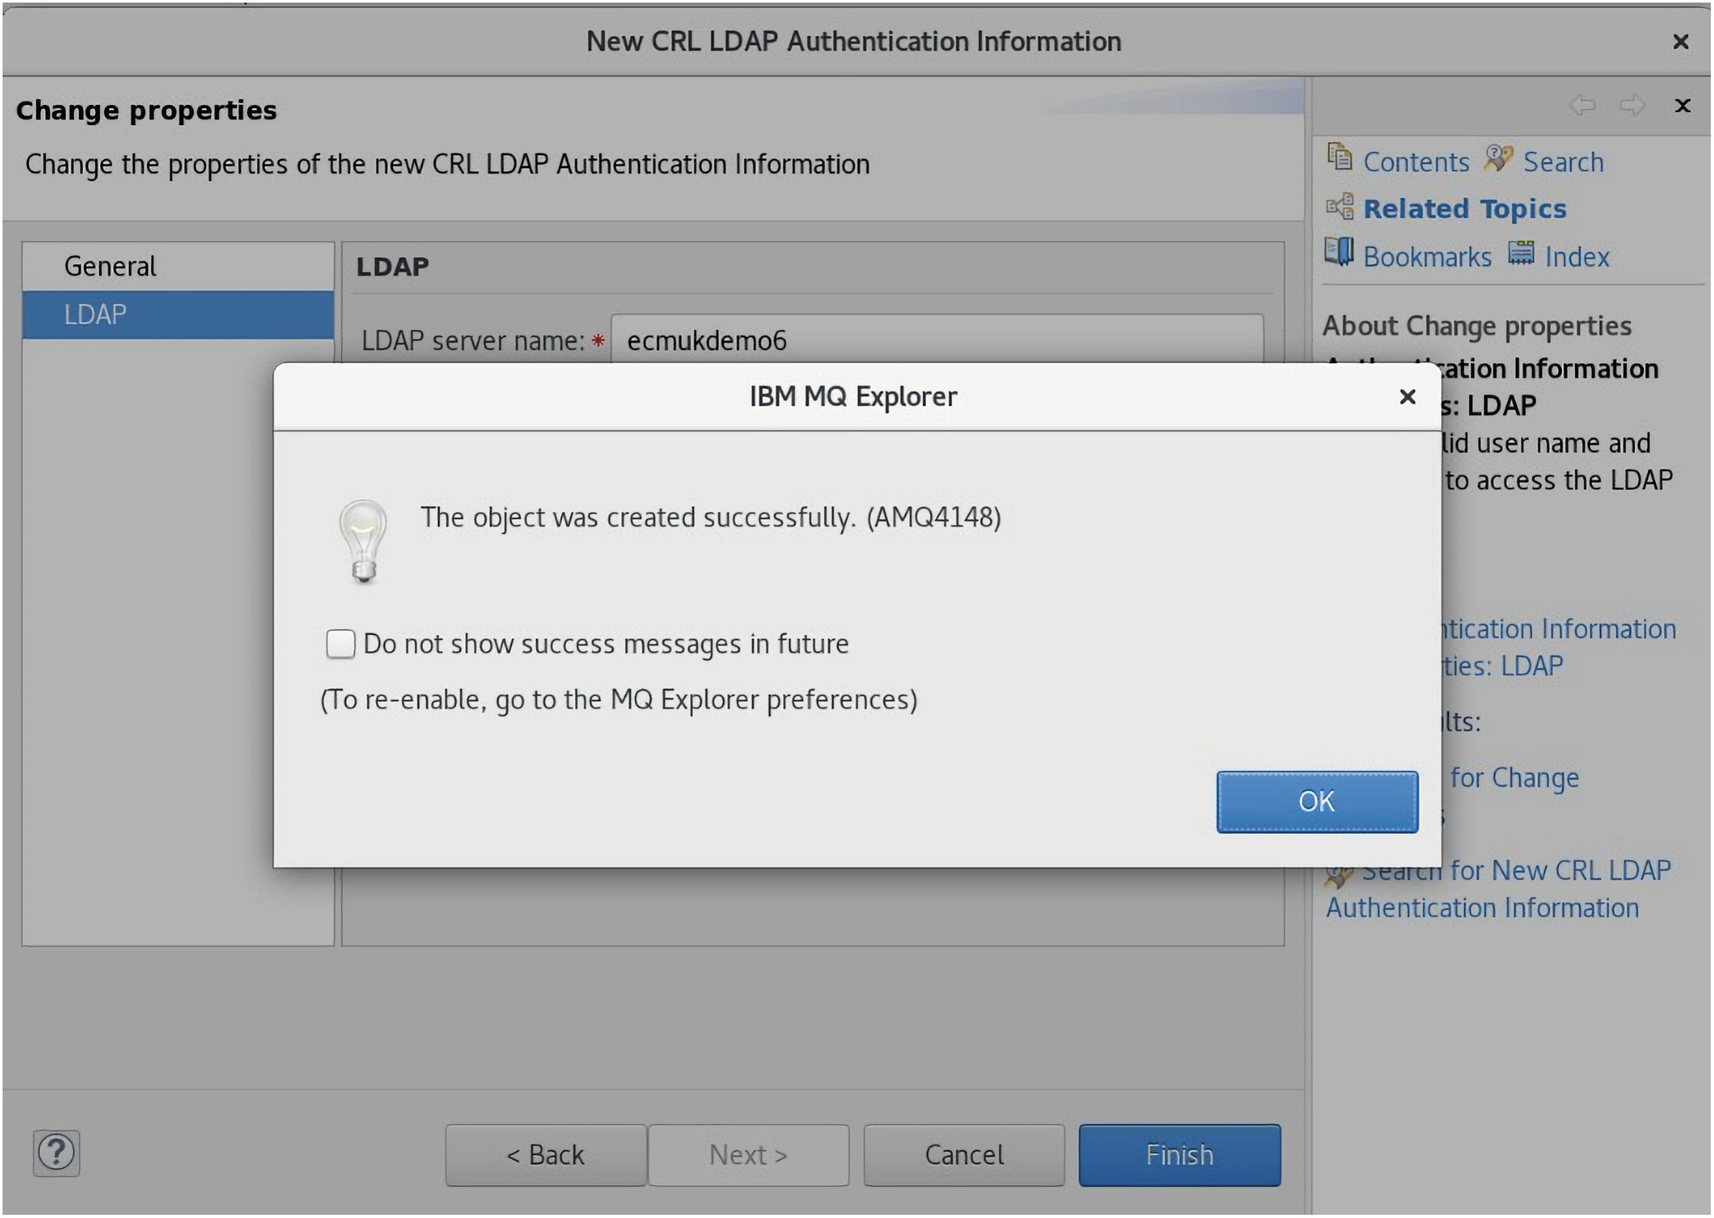
A screenshot of the I B M M Q explorer dialog box in new C R L L D A P authentication information window gives the object was created successfully message. It has a checkbox for do not show success messages in future. The option for O K is given below.
The success pop-up message is displayed to show the LDAP update
- b.
Enter the LDAP server name (ecmukdemo6) as either the network name or the IP address.
- c.
If the server requires login details, provide a user ID and, if necessary, a password. (This system used cn=root and filenet.)
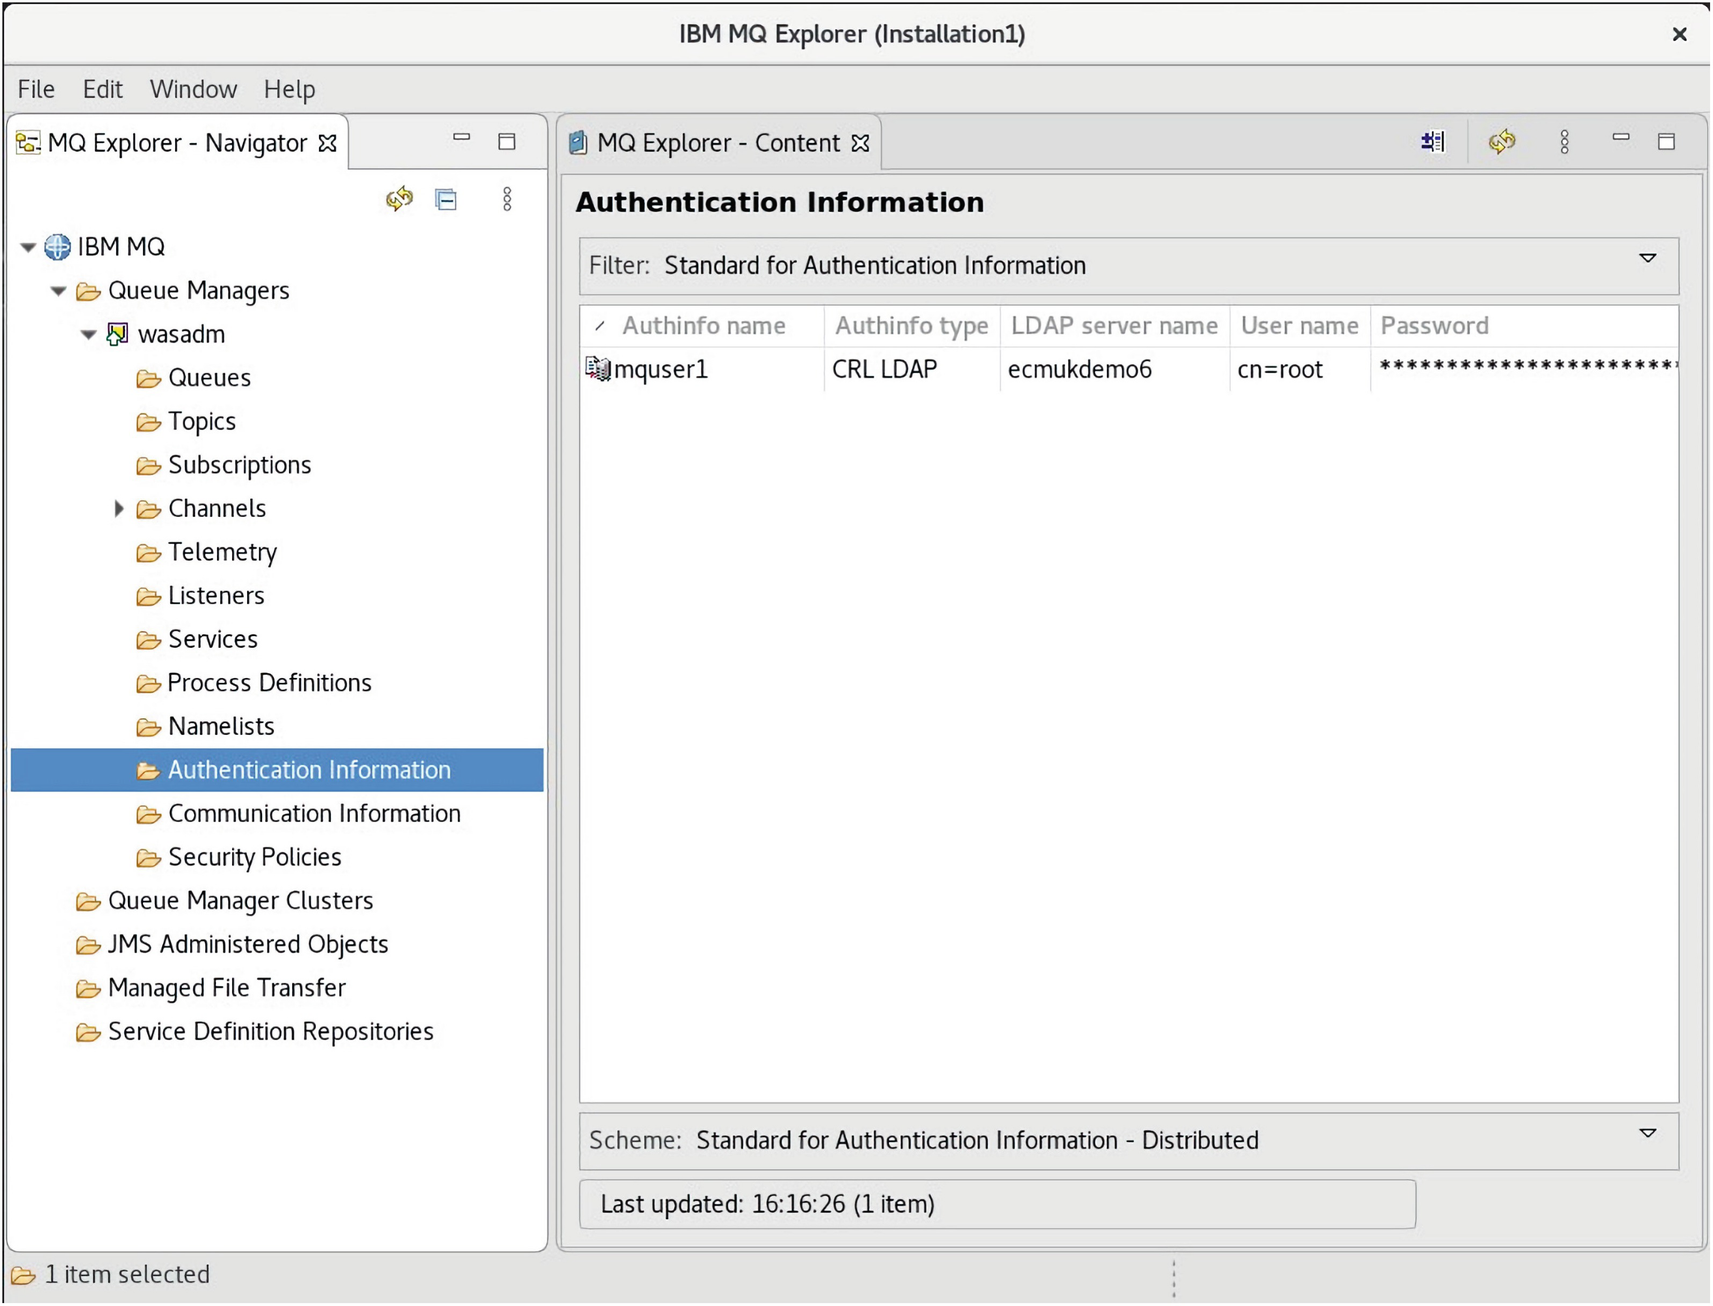
A screenshot of the I B M M Q explorer window has the M Q explorer content detail for authentication information on the right. The M Q explorer navigator panel on the left has the Authentication Information sub-folder selected.
The mquser1 Authentication name is added successfully
- 3.
Right-click the Namelists folder and click New ➤ Namelist. In the property sheet that opens:
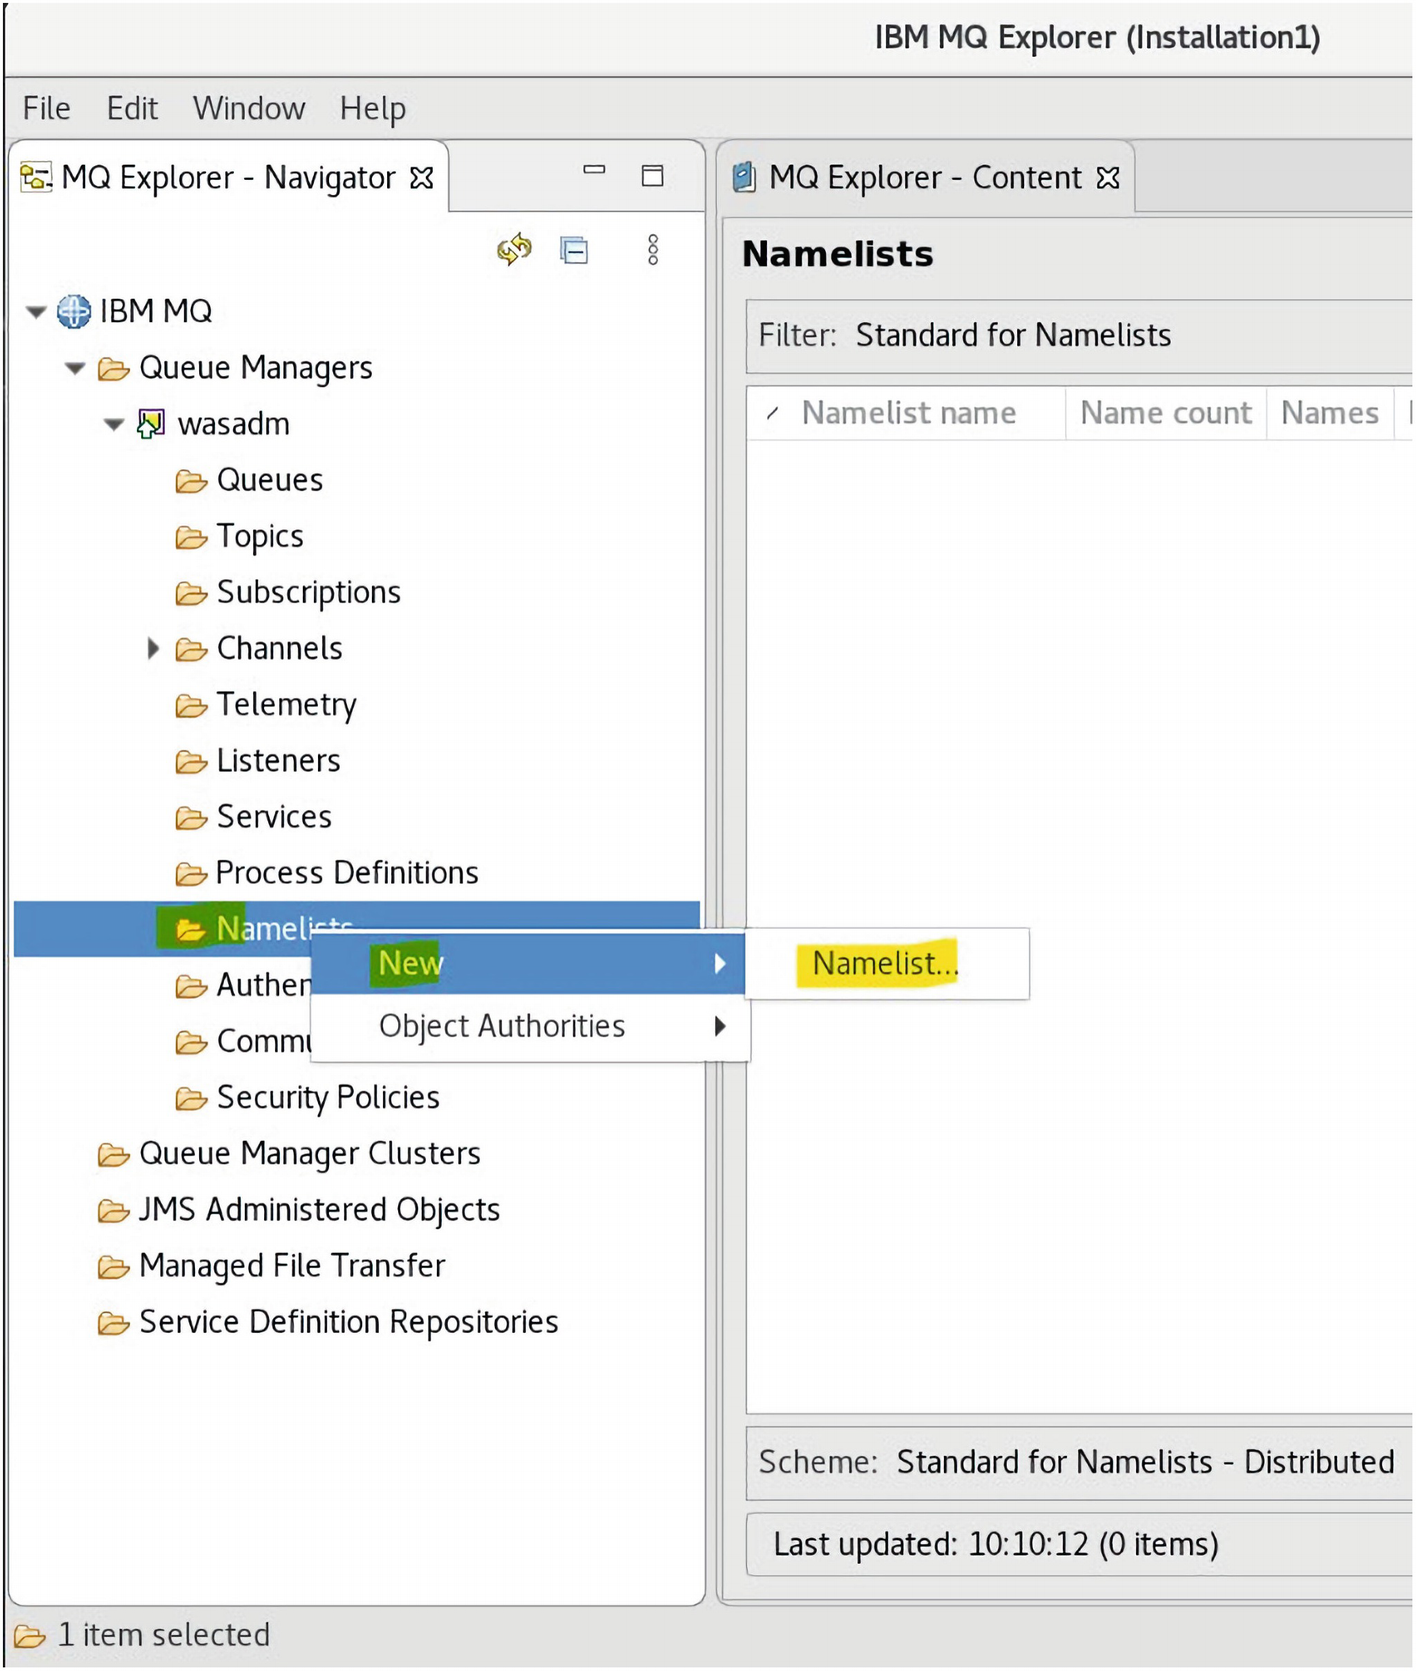
A cropped screenshot of the I B M M Q explorer window has the M Q explorer content pane for name lists on the right. The M Q explorer navigator panel on the left has the options menu with the options new and name list highlighted for the name lists sub-folder.
The New Namelist node menu is selected
- a.
Type a name for the Namelist (AUDNAMES).
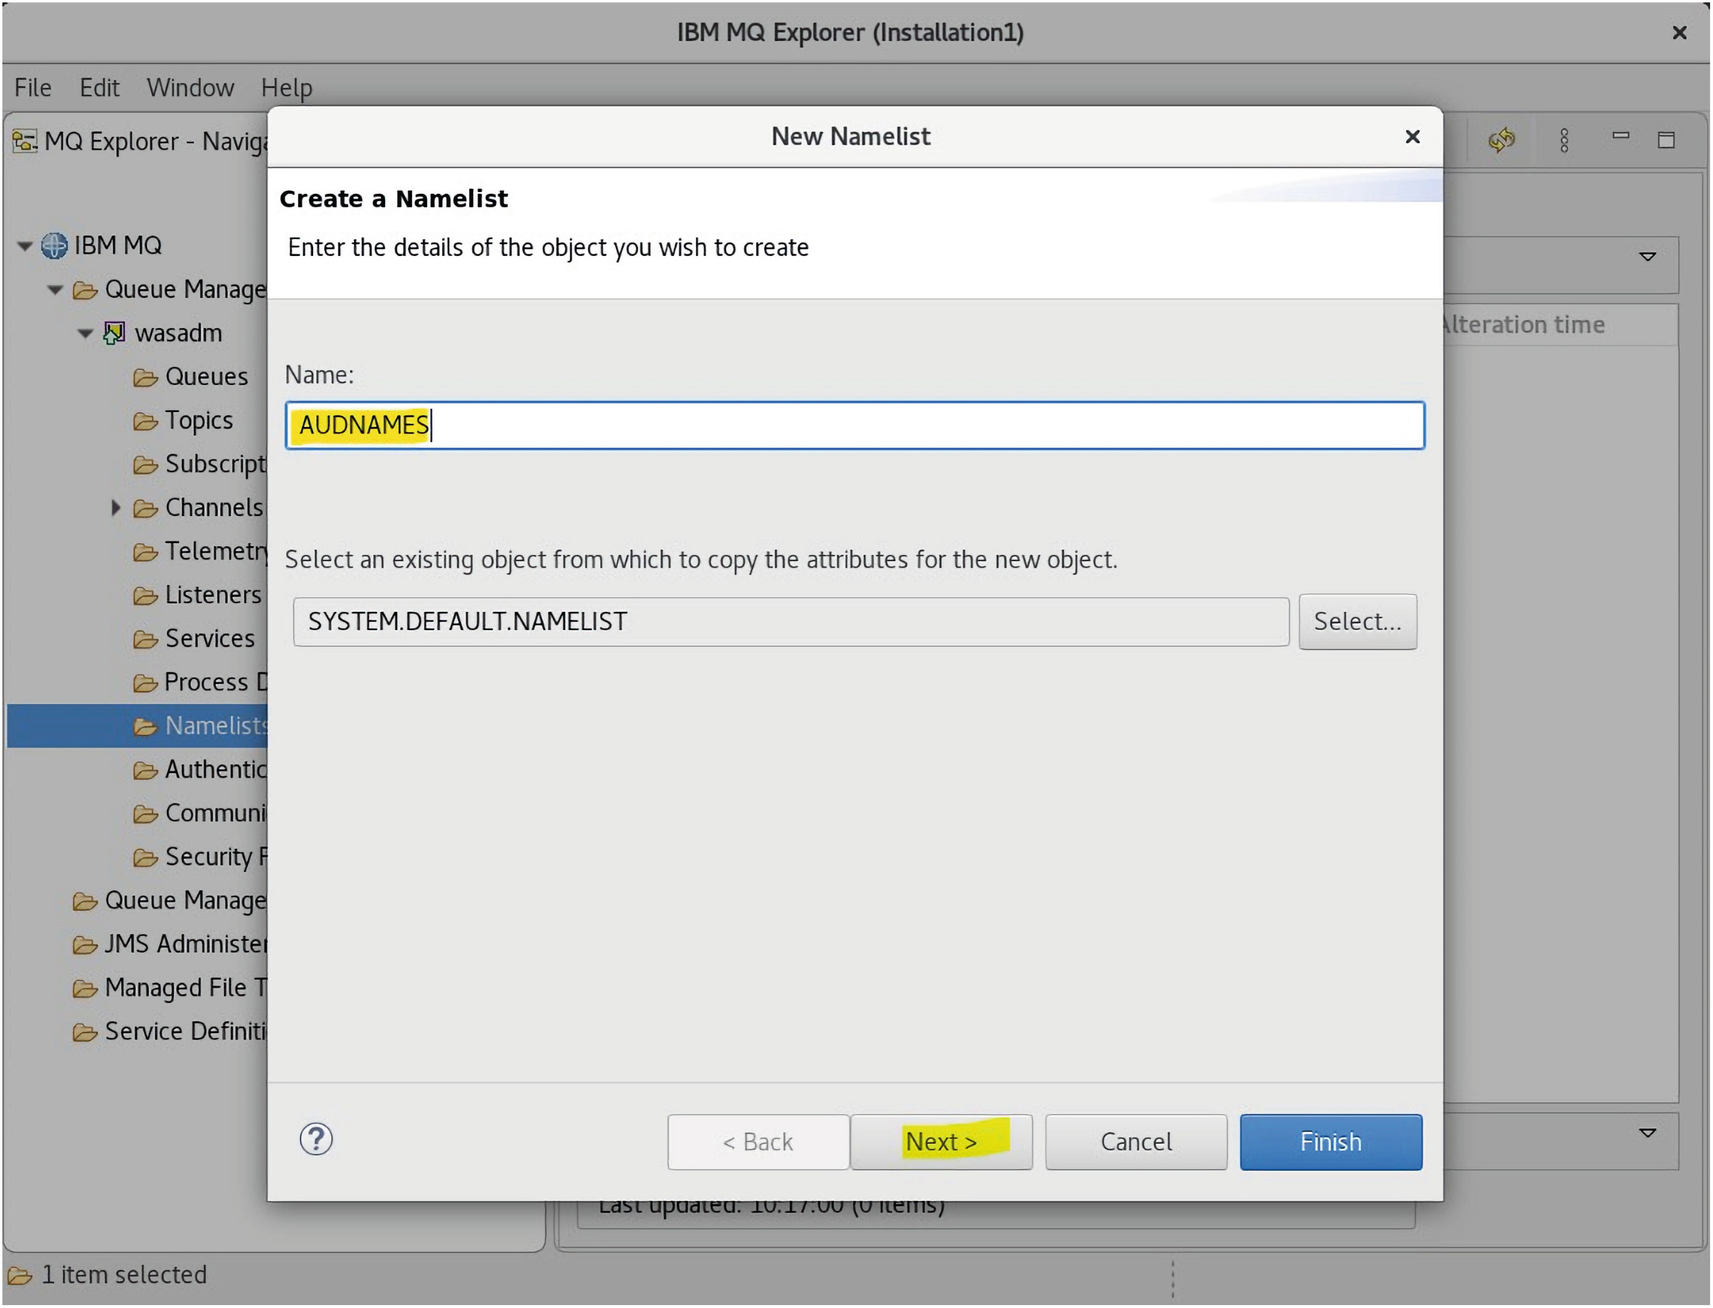
A screenshot of the new name list dialog box in the I B M M Q explorer window has the create a name list detail for A U D names, with an input box and option for a name and select an existing object. The options for back, next, cancel, and finish is given below.
The AUDNAMES list is added and Next clicked
- b.
Add the name of the CRL (LDAP) object (mquser1, from step 2a) to the list.
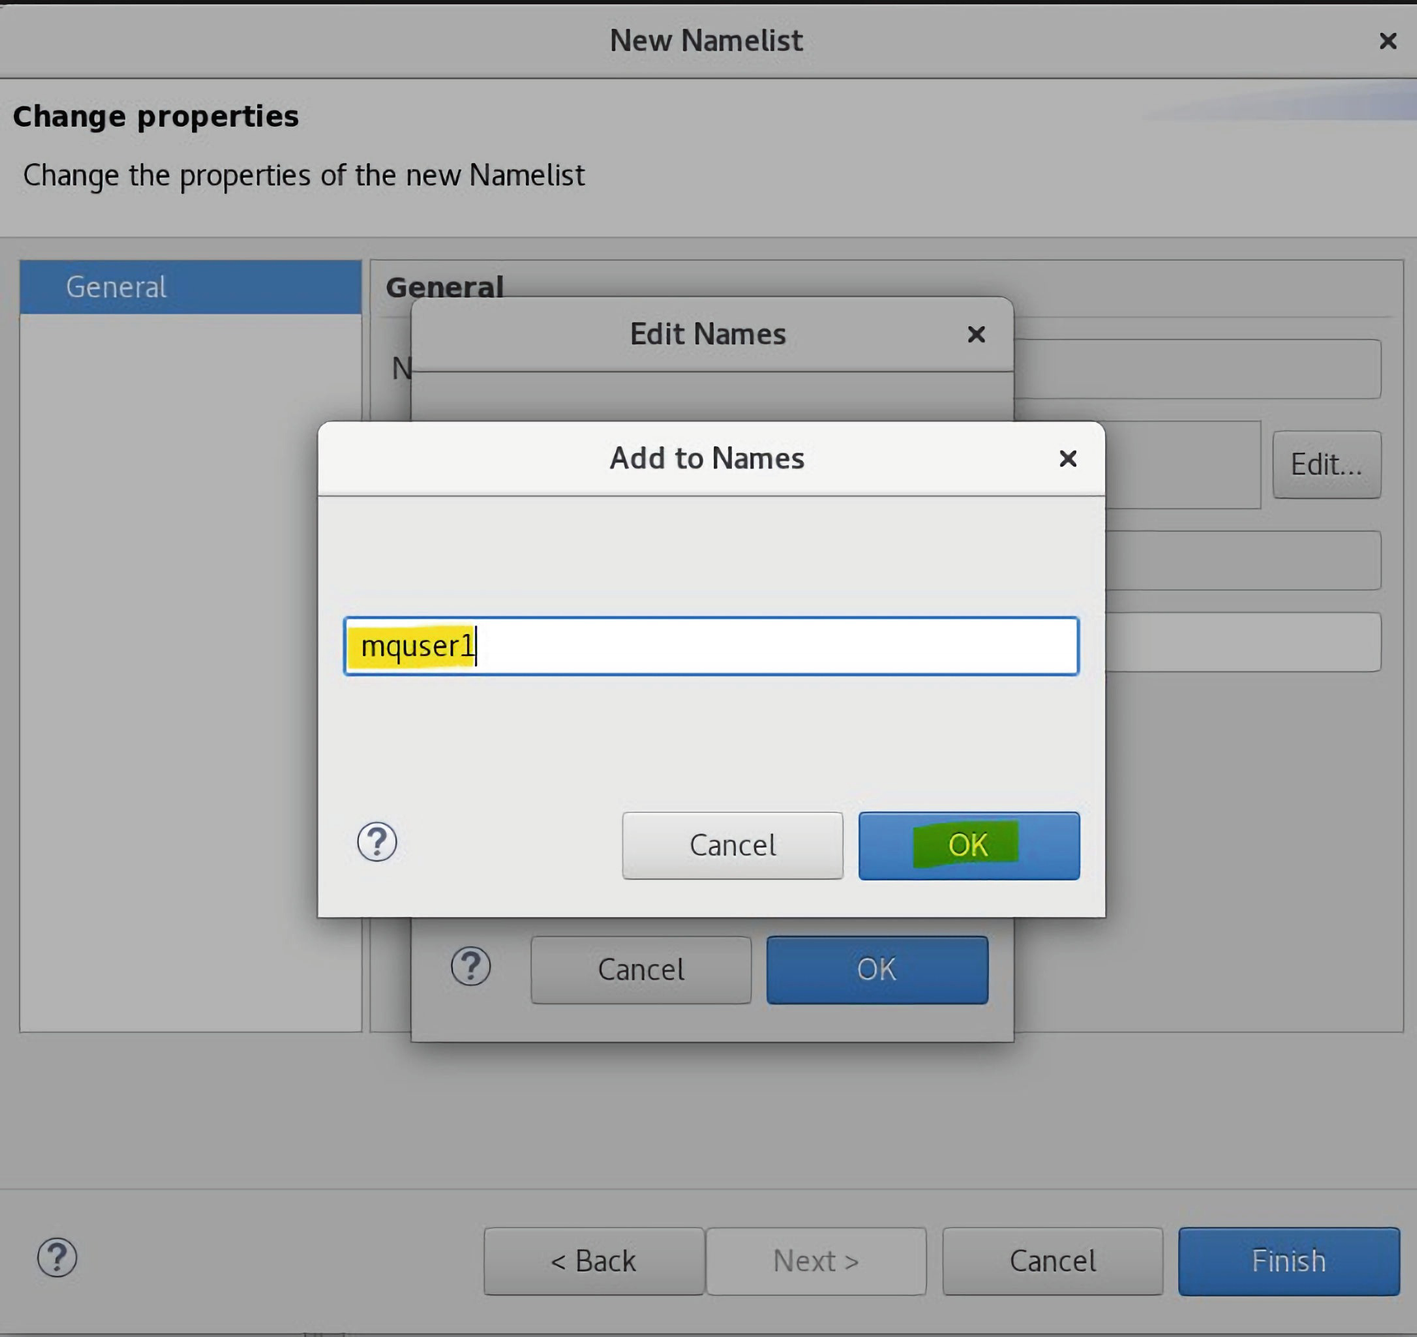
A screenshot of the add to names dialog box in new name list and edit names has the entry m q user 1 in the input box. The options for cancel and O K are given below.
The AUDNAMES Namelist has an entry of mquser1 added
- c.
Click OK.

A screenshot of the edit names dialog box in new namelist has the entry m q user 1 selected with the options add, edit, and remove below. The options for cancel and O K are given below.
The first name, mquser1, is added and the OK button clicked

A screenshot of the new namelist window has the change properties detail for A U D names, with input boxes and option for namelist name, names, name count, and description. The options for back, next, cancel, and finish is given below.
The AUDNAMES description is entered and the Finish button clicked
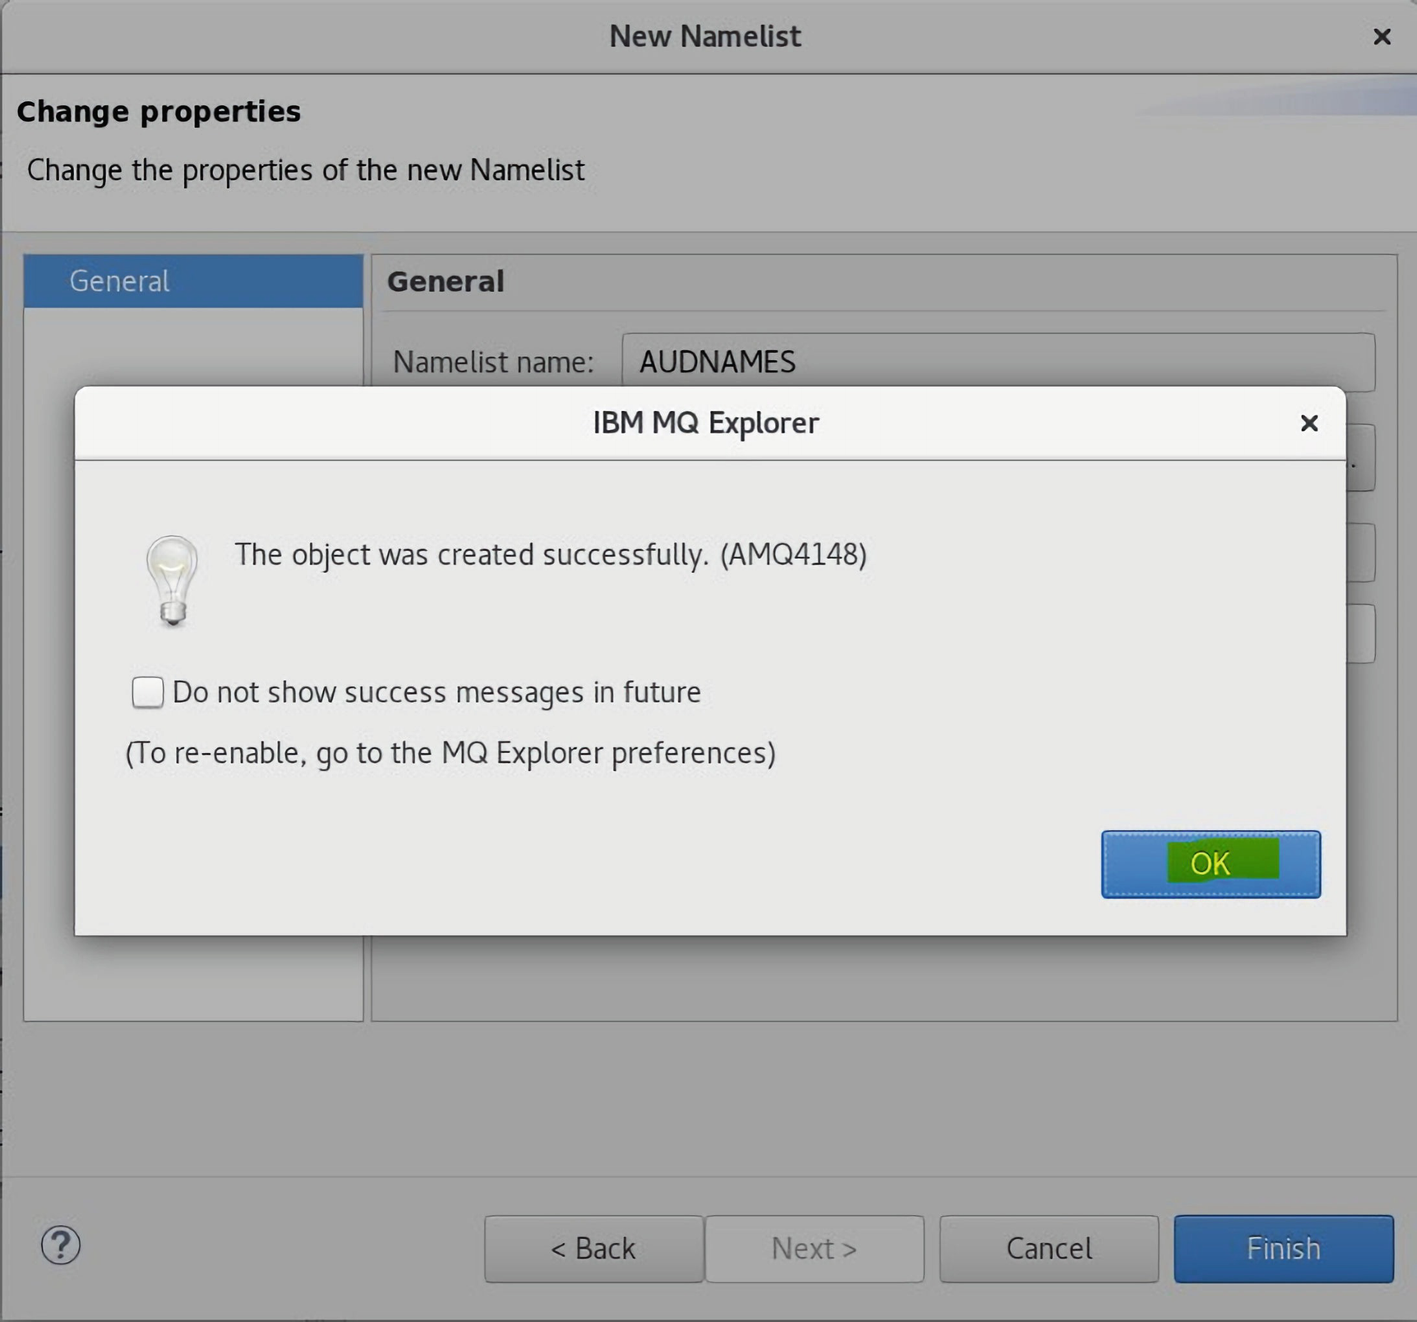
A screenshot of the I B M M Q explorer dialog box in new namelist window gives the object was created successfully message. It has a checkbox for do not show success messages in future. The option for O K is given below.
The success message is displayed, indicating the name is added
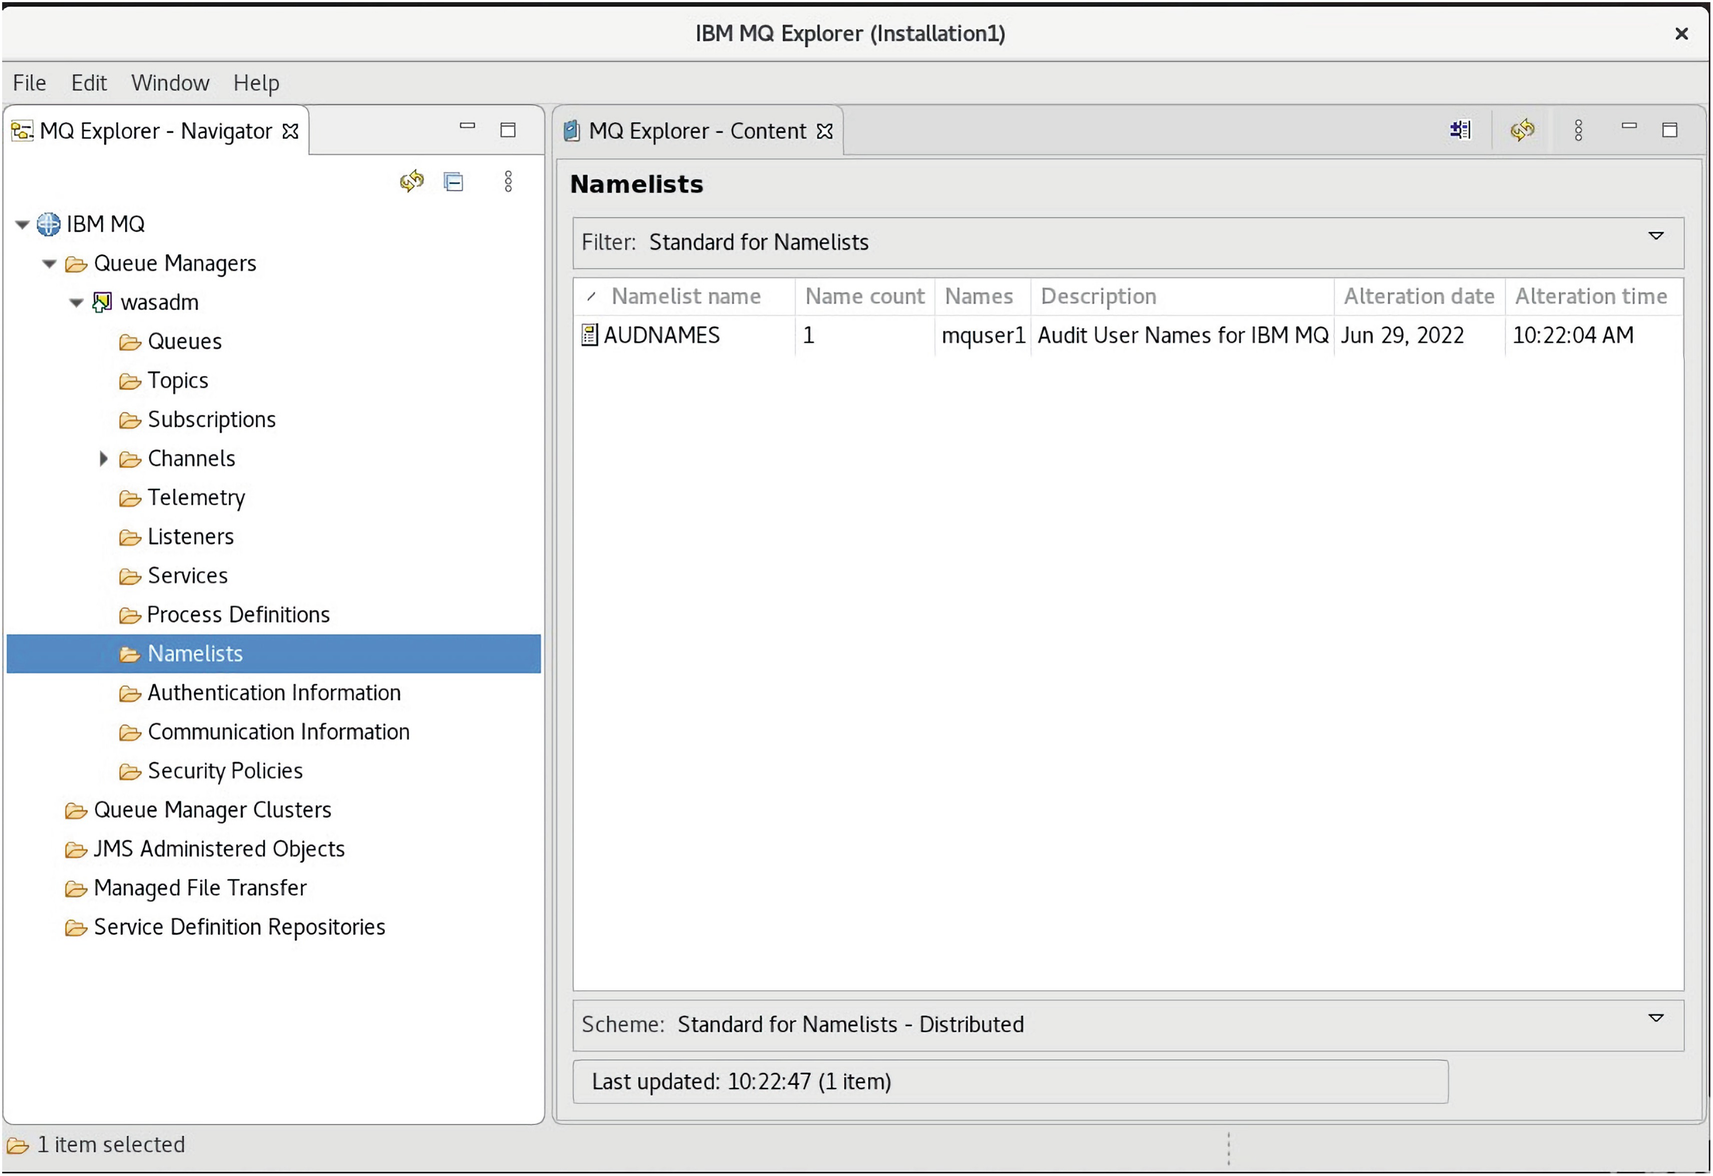
A screenshot of the I B M M Q explorer window has the M Q explorer content detail for namelists on the right. The M Q explorer navigator panel on the left has the namelists sub-folder selected.
The AUDNAMES Namelist shows the mquser1 name
- 4.
Right-click the queue manager, select Properties, and select the SSL page.

A cropped screenshot of the I B M M Q explorer window has the M Q explorer content with queue manager w a s a d m detail. The M Q explorer navigator panel on the left has the options menu with the option properties highlighted for the w a s a d m node.
The wasadm queue manager properties are selected

A screenshot of the w a s a d m properties window has the S S L detail, with input boxes and options for S S L key repository, cryptographic hardware, certificate validation policy, certificate label, and others. A checkbox for check certificates is highlighted for the revocation namelist A U D names. The options for cancel and O K are given below.
The SSL page is selected, and the check box highlighted is ticked
- a.
Select the Check certificates received by this queue manager against Certification Revocation Lists check box.
- b.
Type the name of the namelist (AUDNAMES from step 3a) in the CRL Namelist field.
Next, we need to create a New Client connection Channel, AUD.CLNTCONN.

A cropped screenshot of the I B M M Q explorer window has the M Q explorer content pane for client connections on the right. The M Q explorer navigator panel on the left has the options menu with the options new and client connection channel highlighted for the client connections sub-folder.
The New Client-connection Channel option is selected
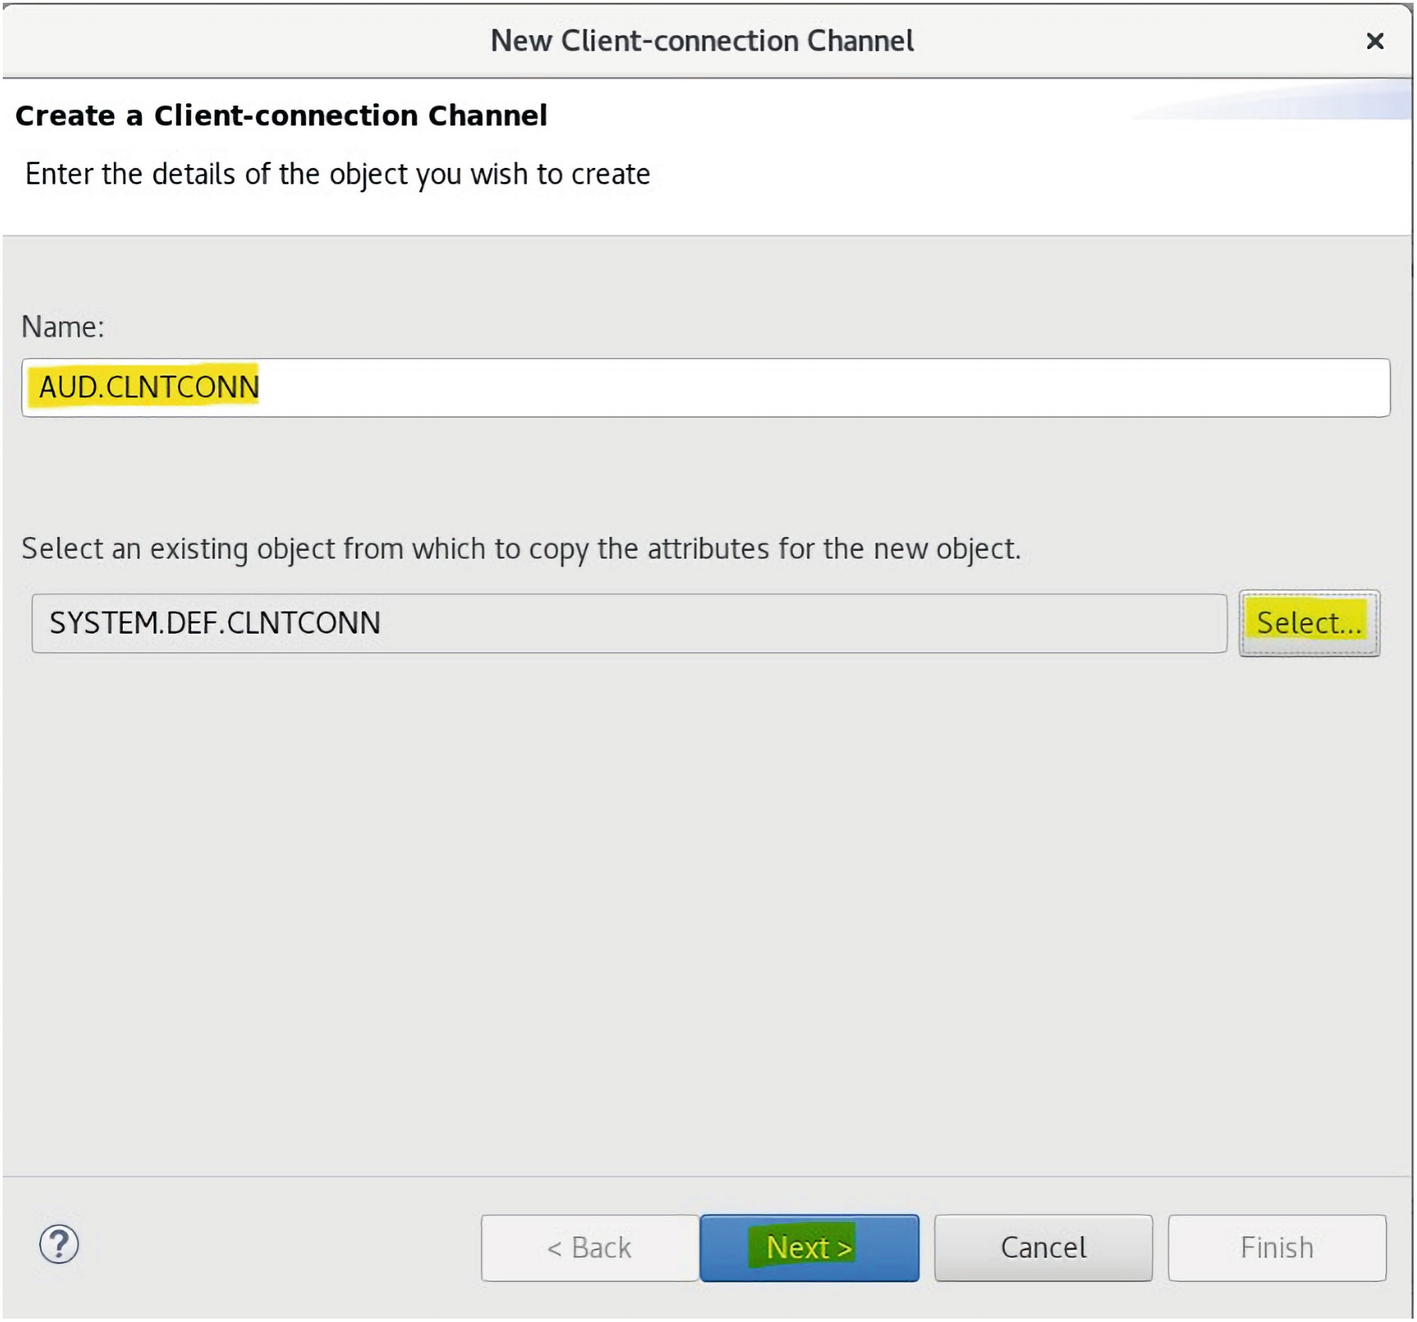
A screenshot of the new client connection channel window has the create a client connection channel detail for A U D dot C L N T C O N N, with an input box and option for name and select an existing object. The options for back, next, cancel, and finish is given below.
The AUD.CLNTCONN with the SYSTEM.DEF.CLNTCONN is created

A screenshot of a dialog box titled New client connection channel. The queue manager name, Description and connection name are highlighted.
The Queue Manager name and the Connection name are entered

A screenshot of a dialog box titled New client connection channel. Under the general tab, the hearbeat interval is set to 300. The default reconnection is set to yes.
The Default reconnection option is set to Yes from the drop-down
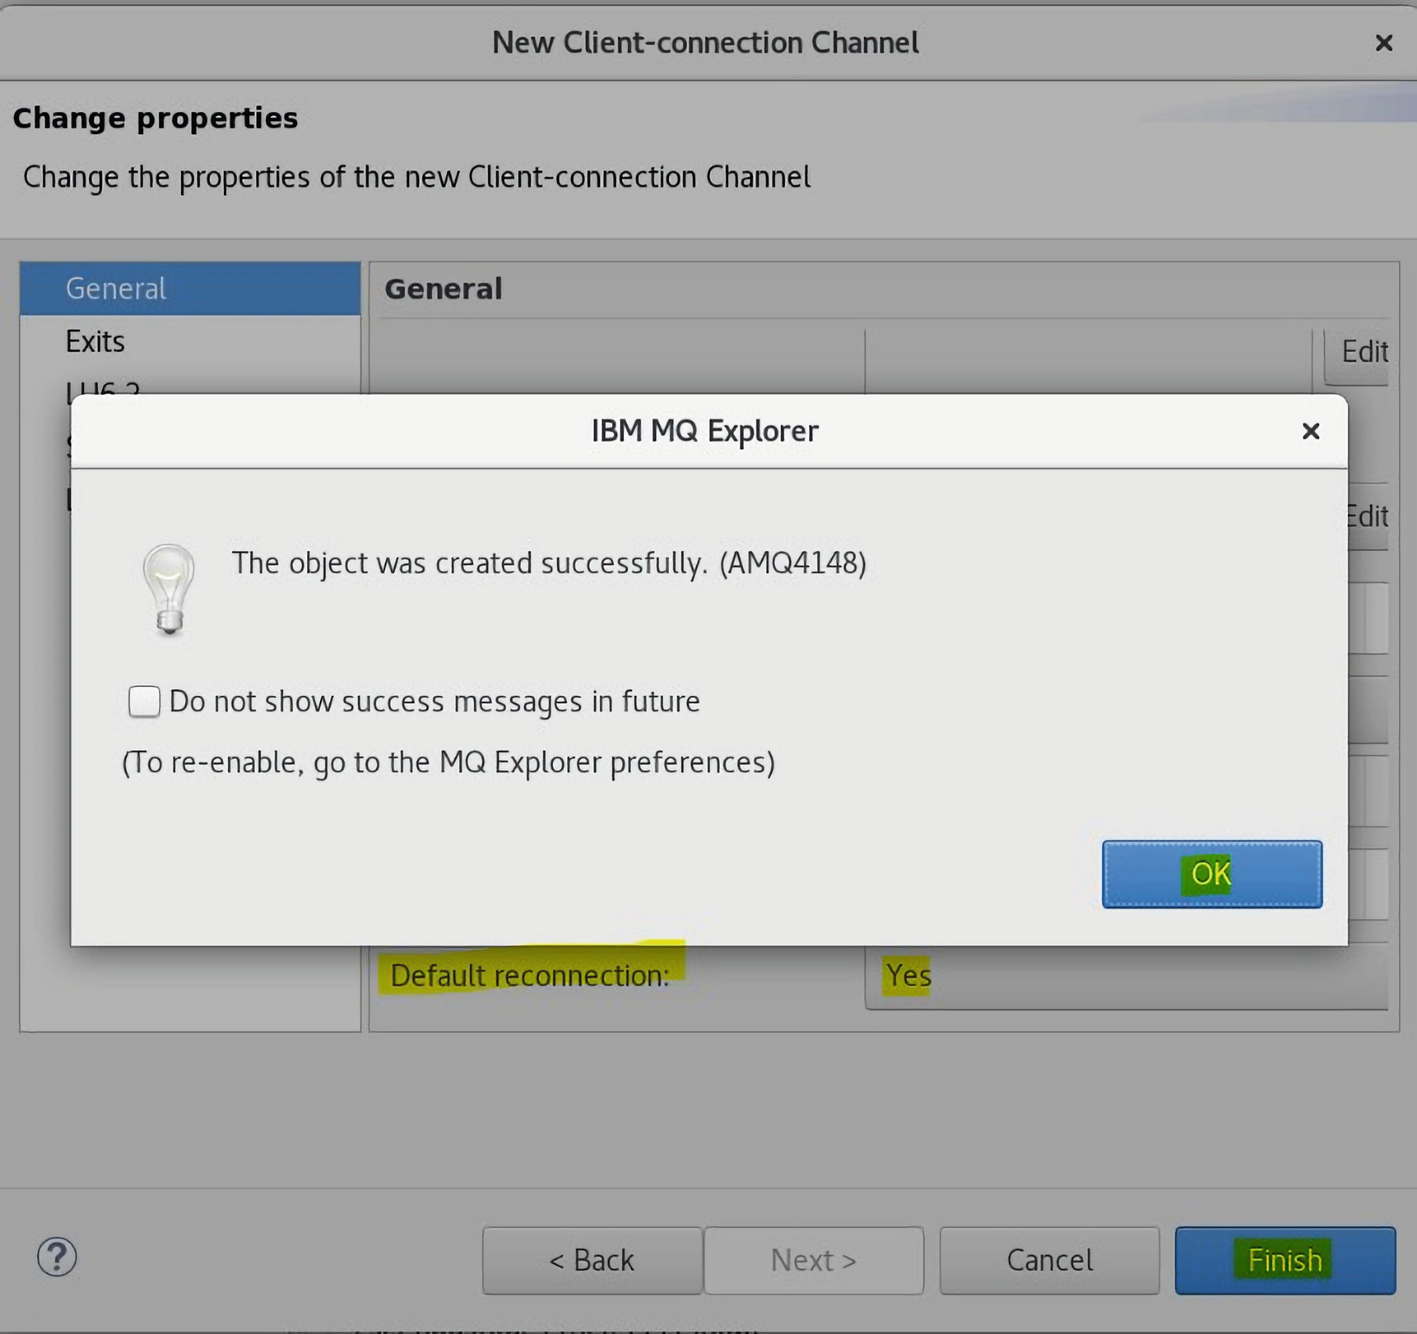
A screenshot of a dialog box titled I B M, M Q Explorer. Text reads the object was created successfully. The OK button is highlighted.
The Client Connection Channel AUD.CLNTCONN is created

A screenshot of a window titled I B M M Q explorer. The client connections tab have the subheadings channel name, channel type, queue manager name, and description.
The Client Connection Channel AUD.CLNTCONN
Part 3 – Creating a Non-privileged MQ User for a Client Application Connection
The instructions from this link were followed:
www-01.ibm.com/support/knowledgecenter/SSFKSJ_8.0.0/com.ibm.mq.dev.doc/q023960_.htm?lang=en
This procedure creates a non-privileged user ID to be used for a client application which connects to the queue manager. Access is granted for the client application only to be able to use the channel it needs and the queue it needs by use of this user ID.
Procedure
- 1.
Obtain a user ID on the system where the queue manager is running on (the server ecmukdemo6 in this example).
- 2.
For this task, this user ID must not be a privileged administrative user. This user ID will be the authority under which the client connection will run on the queue manager.
- 3.
Start a listener program with the following commands where
qmgr-name is the name of your queue manager.
nnnn is your chosen port number.
For UNIX and Windows systems:
channel-name is the name of your channel.
- 4.Create a channel authentication rule allowing only the IP address of your client system to use the channel by issuing the MQSC command:SET CHLAUTH(' channel-name ') TYPE(ADDRESSMAP) ADDRESS(' client-machine-IP-address ') +MCAUSER(' non-privileged-user-id ')In the command window:su - mqmrunmqsc wasadmSET CHLAUTH('SYSTEM.ADMIN.SVRCONN') TYPE(ADDRESSMAP) ADDRESS('10.10.10.90') MCAUSER('db2inst1')

A screenshot represents the d b 2 inst 1 user set as a non privileged user id with an I B M M Q channel authentication record set.
The db2inst1 user is set as a non-privileged user id

A screenshot represents the I B M M Q channel authentication record set with the quit command to exit.
Exit using the quit command
channel-name is the name of your channel.
client-machine-IP-address is the IP address of your client system.
If your sample client application is running on the same machine as the queue manager, then use an IP address of “127.0.0.1” if your application is going to connect using “localhost.” If several different client machines are going to connect in, you can use a pattern or a range instead of a single IP address. See www-01.ibm.com/support/knowledgecenter/SSFKSJ_8.0.0/com.ibm.mq.ref.adm.doc/q086080_.htm?lang=en-us (Generic IP addresses) for details.
non-privileged-user-id is the user ID you obtained in step 1.
- 5.
If your application uses the SYSTEM.DEFAULT.LOCAL.QUEUE, then this queue is already defined. If your application uses another queue, create it by issuing the MQSC command:
queue-name is the name of your queue.
- 6.
Grant access to connect to and inquire the queue manager:
For IBM i, UNIX, and Windows systems, issue the MQSC commands:
non-privileged-user-id is the user ID you obtained in step 1.
For IBM i, UNIX, and Windows systems, issue the MQSC commands:
SET AUTHREC PROFILE(‘ queue-name ‘) OBJTYPE(QUEUE) +
PRINCIPAL(‘ non-privileged-user-id ‘) AUTHADD(PUT, GET, INQ, BROWSE)
queue-name is the name of your queue.
non-privileged-user-id is the user ID you obtained in step 1.
- 7.If your application is a publish/subscribe application, that is, it makes use of topics, grant access to allow publishing and subscribing using your topic by the user ID to be used, by issuing the MQSC commands:
For IBM i, UNIX, and Windows systems, issue the MQSC commands:
non-privileged-user-id is the user ID you obtained in step 1.
This will give non-privileged-user-id access to any topic in the topic tree; alternatively, you can define a topic object using DEFINE TOPIC and grant accesses only to the part of the topic tree referenced by that topic object. See www-01.ibm.com/support/knowledgecenter/SSFKSJ_8.0.0/com.ibm.mq.sec.doc/q013980_.htm?lang=en-us (Controlling user access to topics) for details.
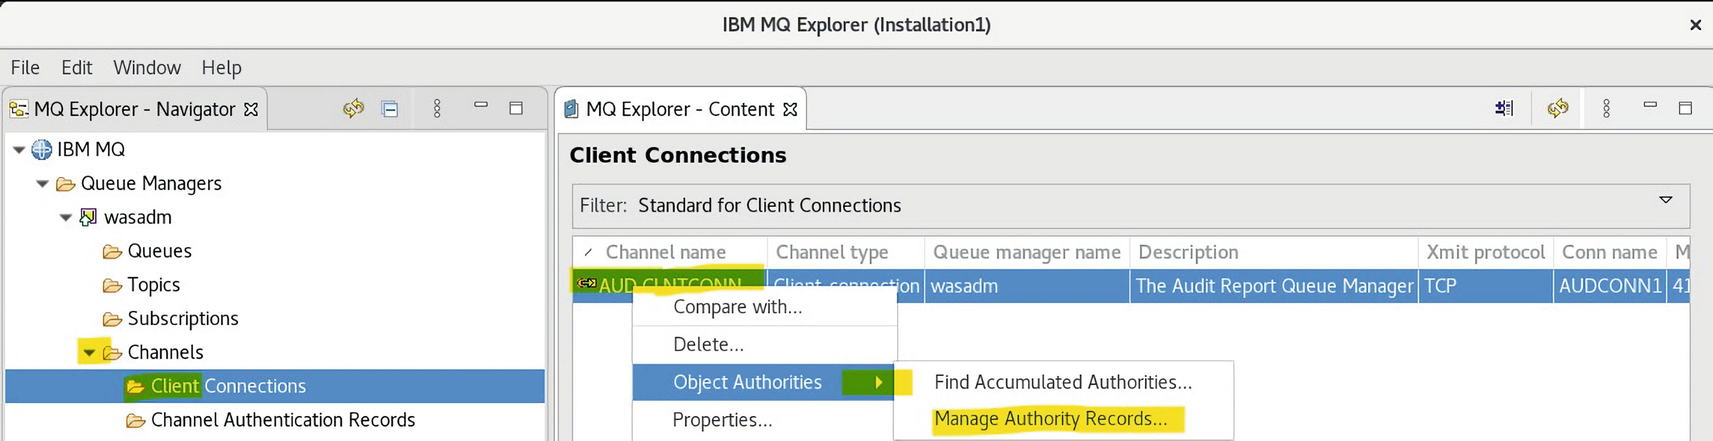
A screenshot of a window titled I B M M Q explorer. In the client conditions tab, manage authority records option under object authorities is highlighted.
The AUD.CLNTCONN Manage Authority Records option is selected

A screenshot of a dialog box titled w a s a d m manage authority records. The sub headings include specific profile folder, navigating authority records, and adding authority records.
The AUD.CLNTCONN Manage Authority Records option

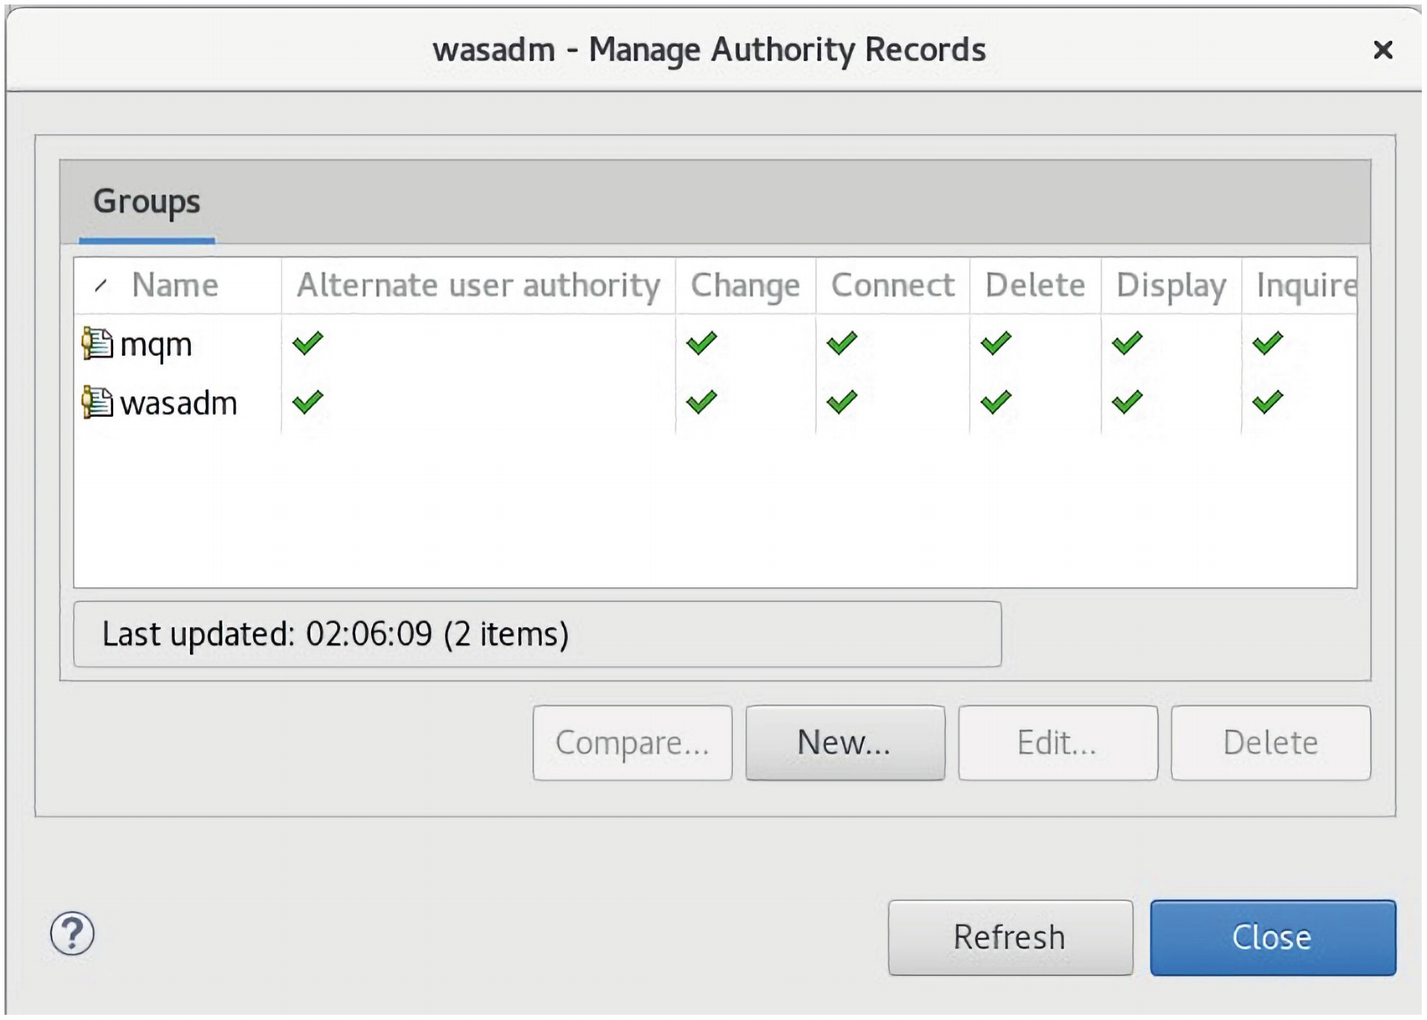
A screenshot of a dialog box titled w a s a d m manage authority records. The specific profile is highlighted. In the groups tab the headings include Name, change, delete and display.
The New command button is clicked

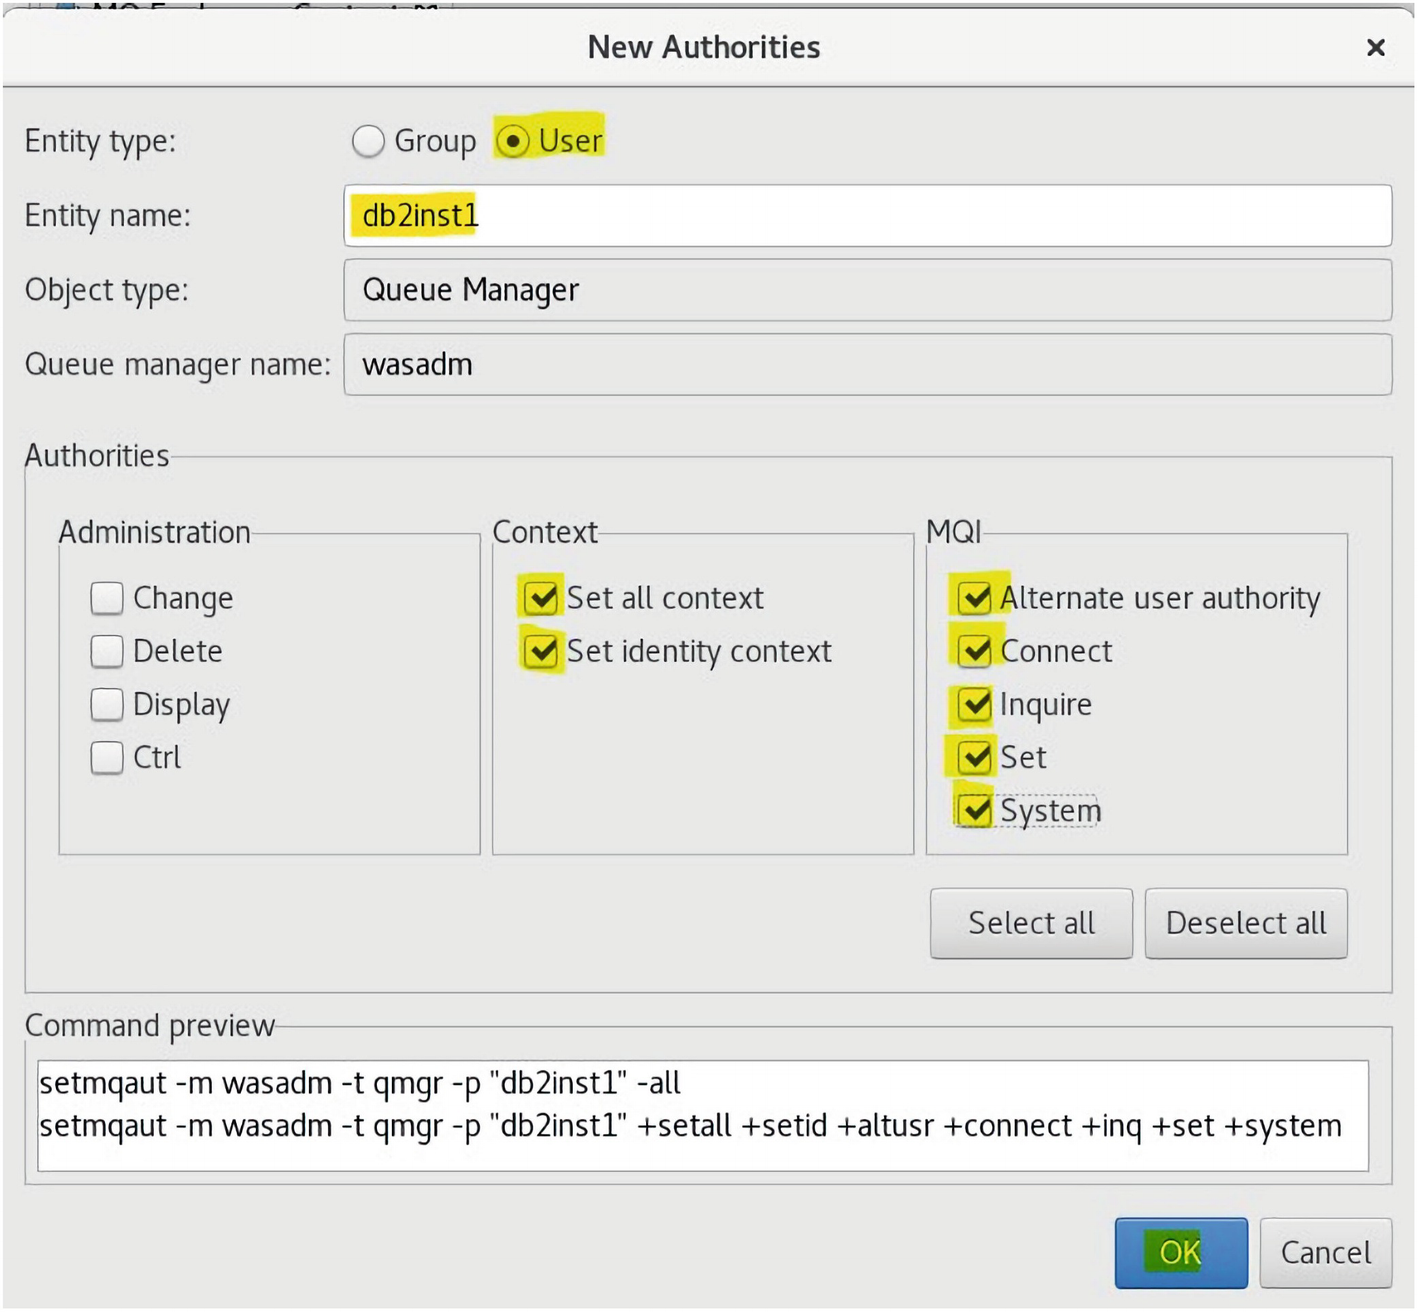
A screenshot of a dialog box titled New authorites. Entity type is set to User. The other options include entity name, object type, profile name, queue manage name, authorities, and ok button.
The db2inst1 user is added to the AUD.CLNTCONN profile
A command-line preview is shown in the New Authorities screen.
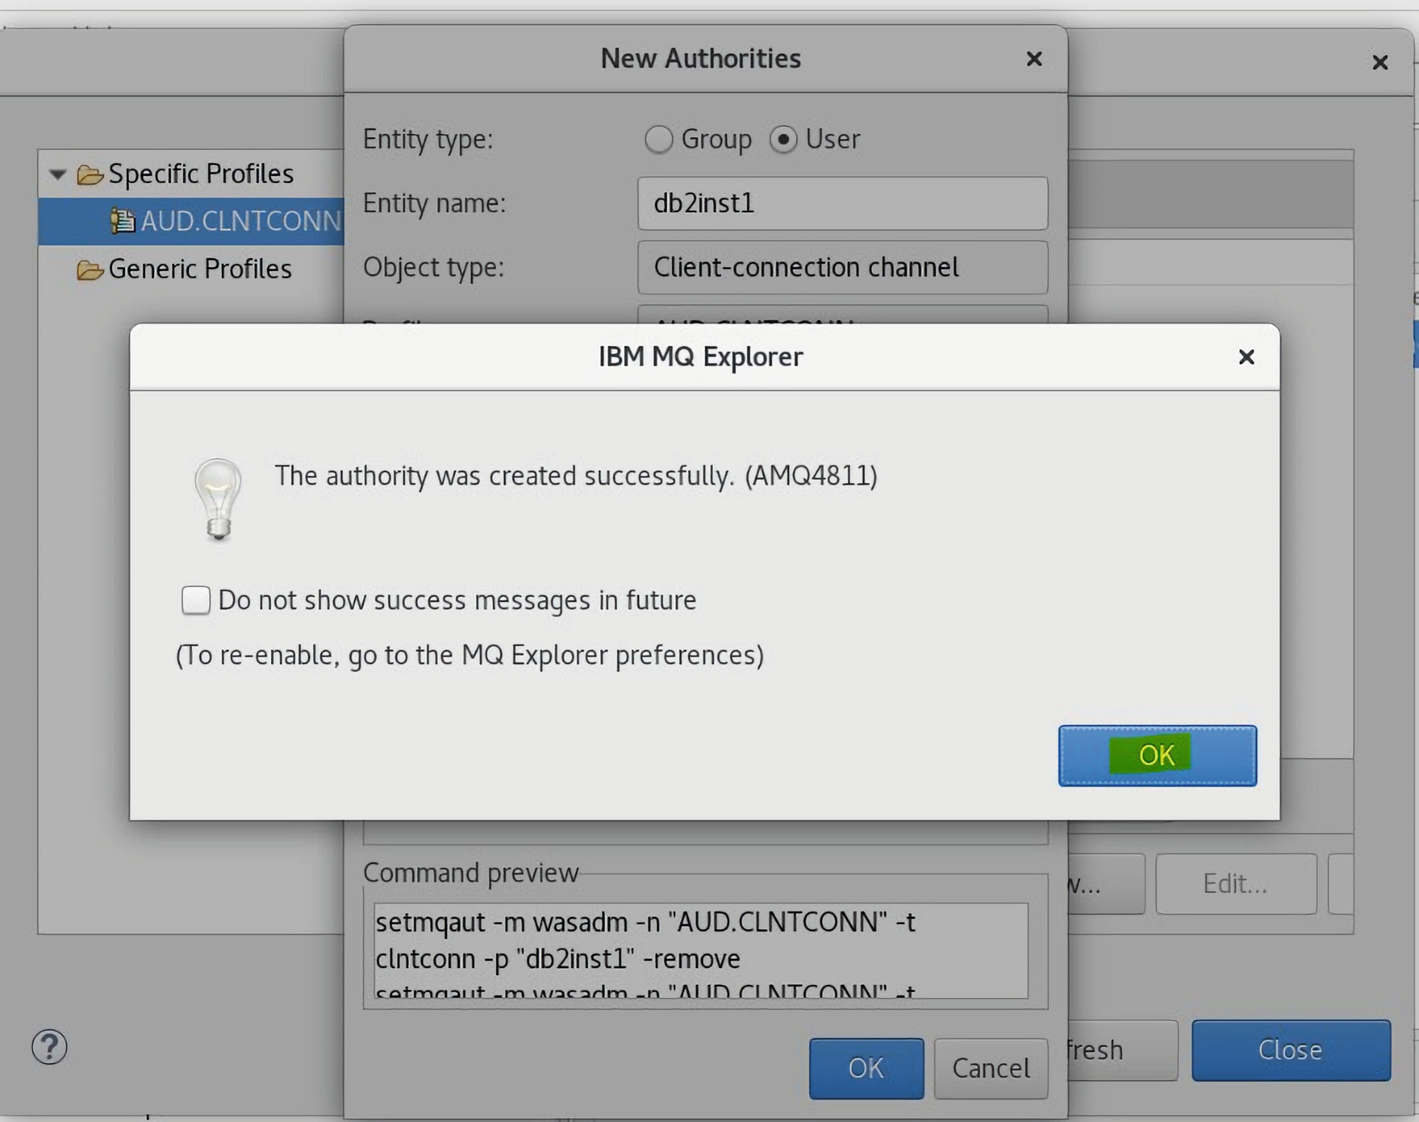
A screenshot of a dialog box titled I B M, M Q Explorer. Text reads the authority was created successfully. The OK button is highlighted.
The db2inst1 user is successfully added to the Client-connection channel
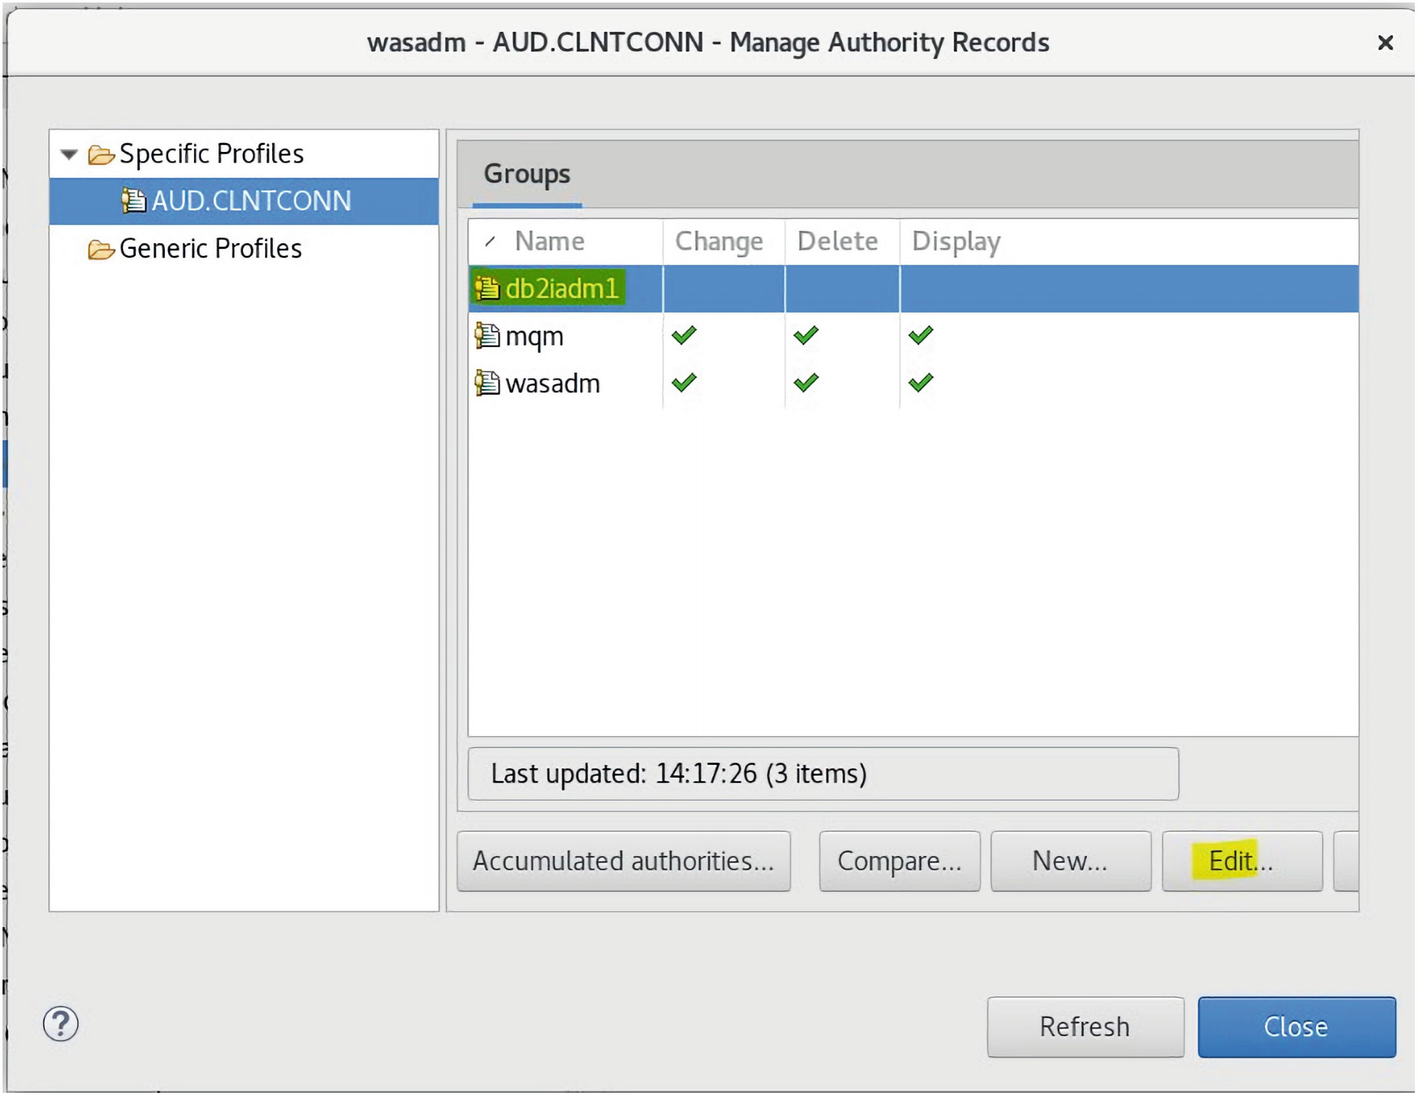
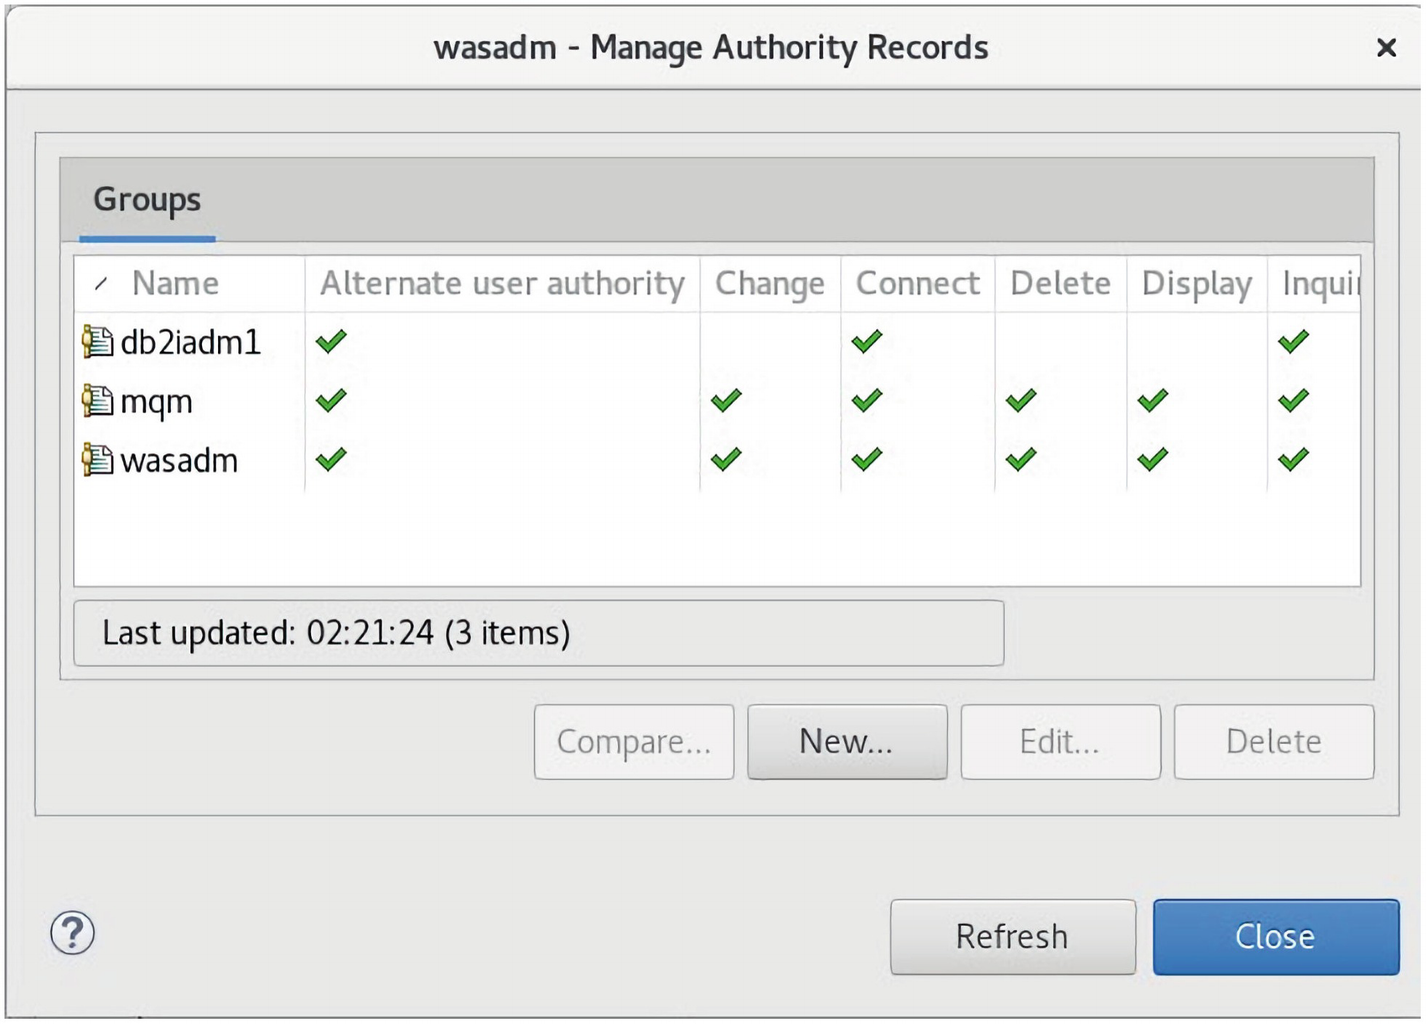
A screenshot of a dialog box titled w a s a d m manage authority records. Under the Groups tab, 4 columns are labelled name, change, delete and display. The edit button is highlighted.
The db2iadm1 group is edited to add the security access required for the Group
A screenshot of a dialog box titled edit authorities. The tick boxes of change, delete, and display, under administration, are highlighted.
The tick box is selected to give access as required

A screenshot of a dialog box titled New authorites. Under the Groups tab, the file names are d b 2 i a m d m 1, m q m, and w a s d m. All files have full security access to client application connection.
The db2iadm1 Group now has full security access

A screenshot represents the command run to give the user access to the A U D Q C F Queue.
The command is run to give the db2inst1 user access to the AUDQCF Queue

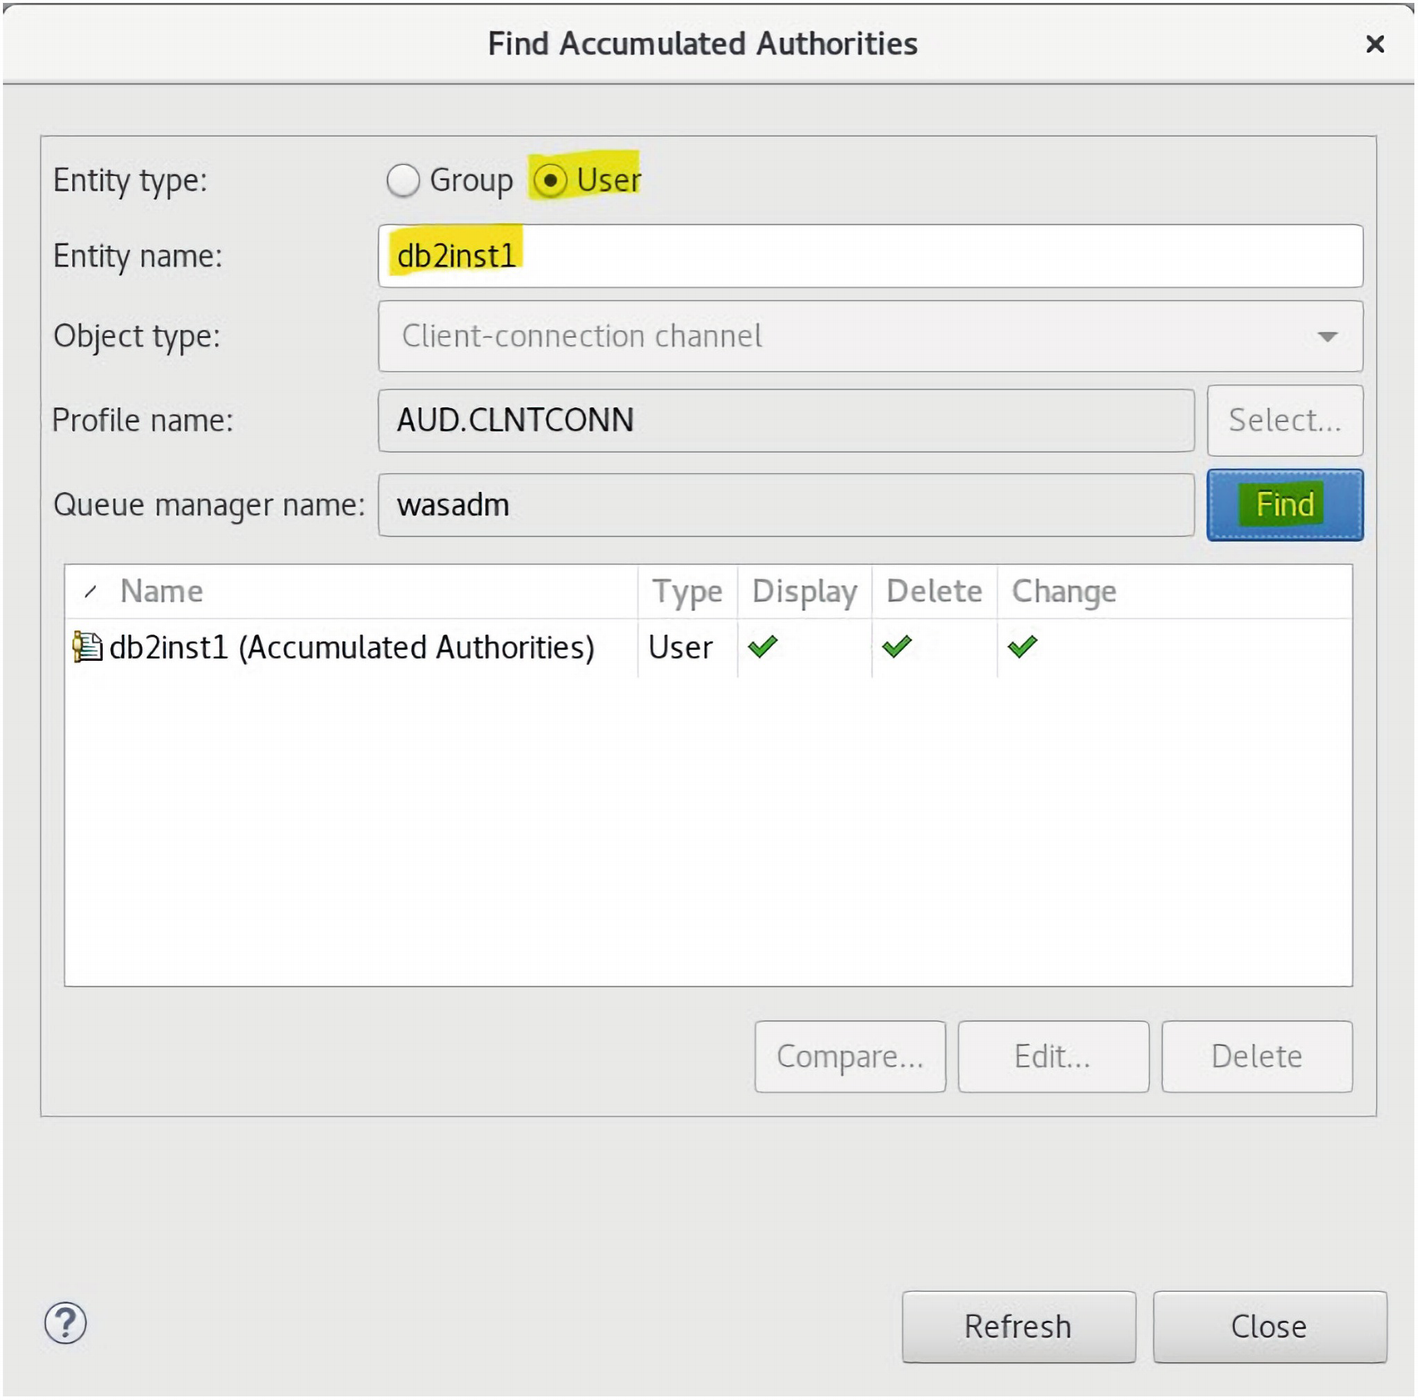
A screenshot of a window titled I B M M Q explorer. Under client connections, find accumulated authorities under object authorities is highlighted.
The Object Authorities ➤ Find Accumulated Authorities is selected
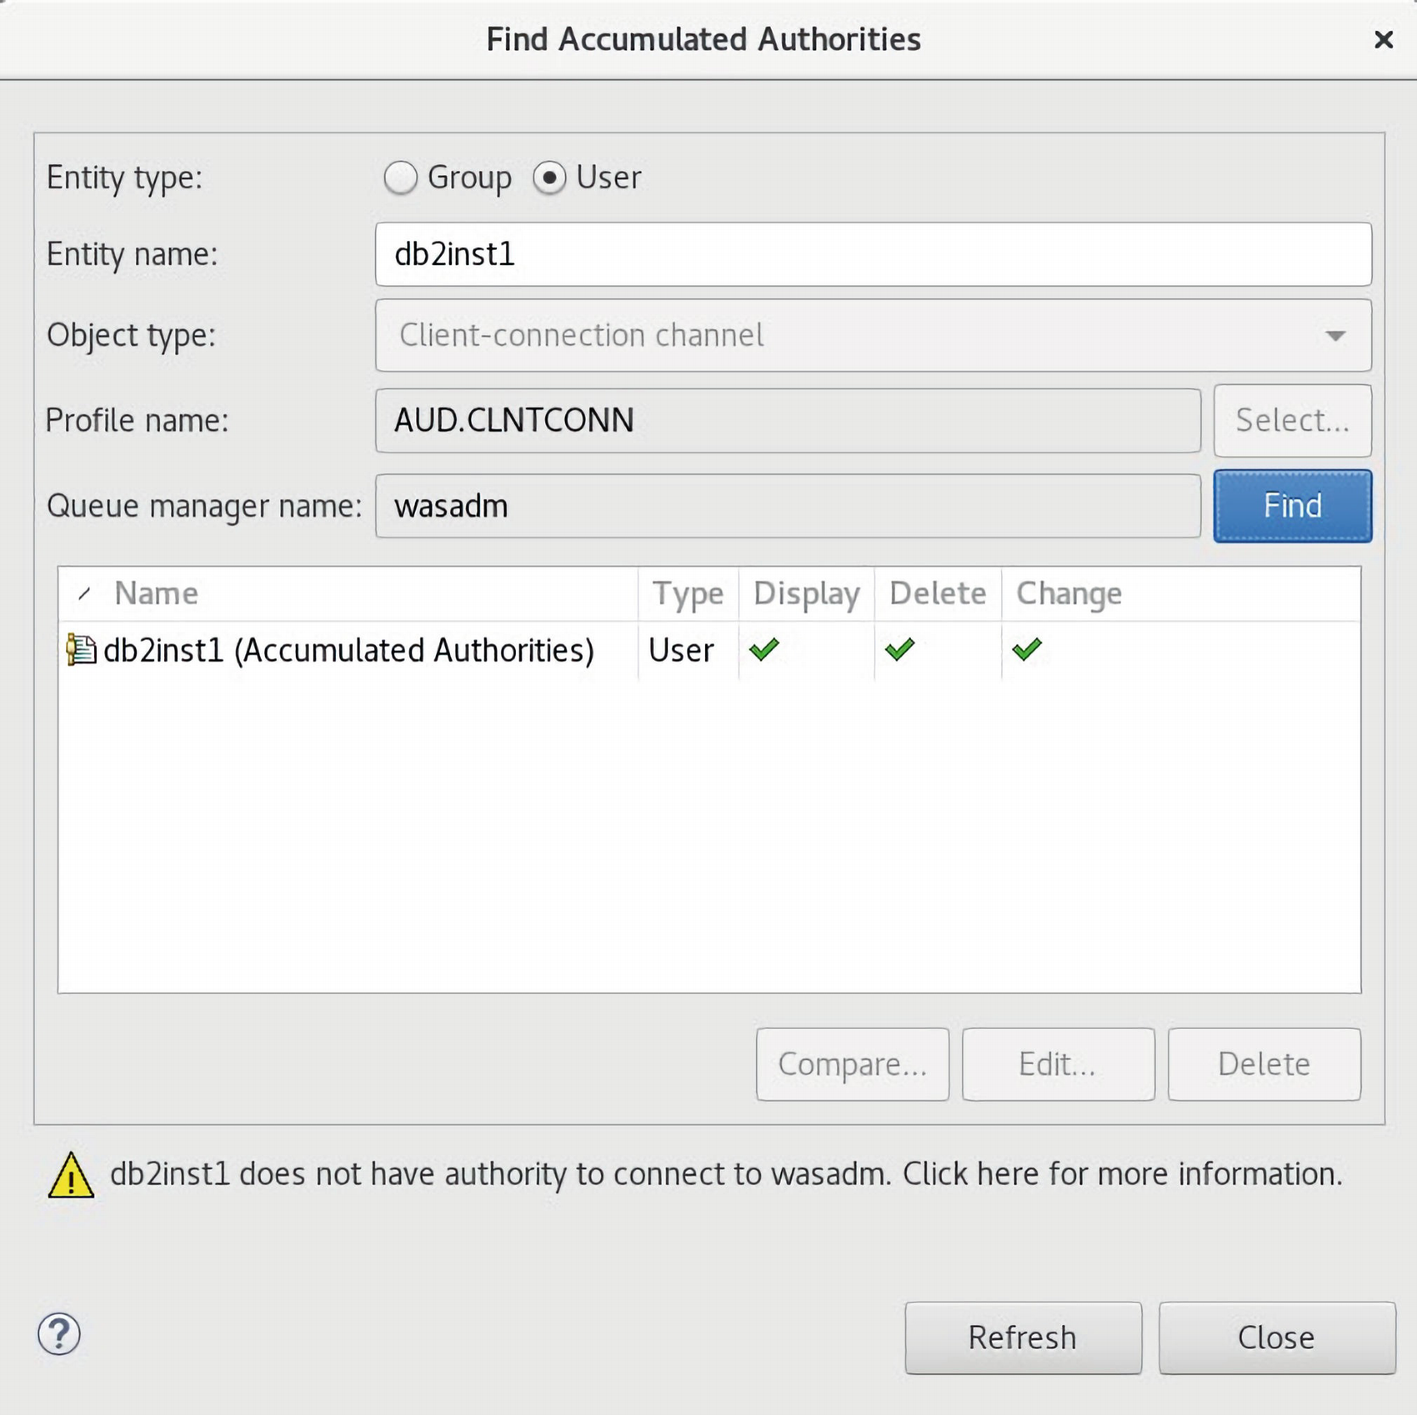
A screenshot of a dialog box titled find the accumulated authorities. It includes entity type, entity name, object type, profile name, queue manager name, and find button.
The db2inst1 user has no authority for Queue Manager
In the Navigator view, right-click the queue manager, then click Manage Authority Records. The Manage Authority Records dialog opens.
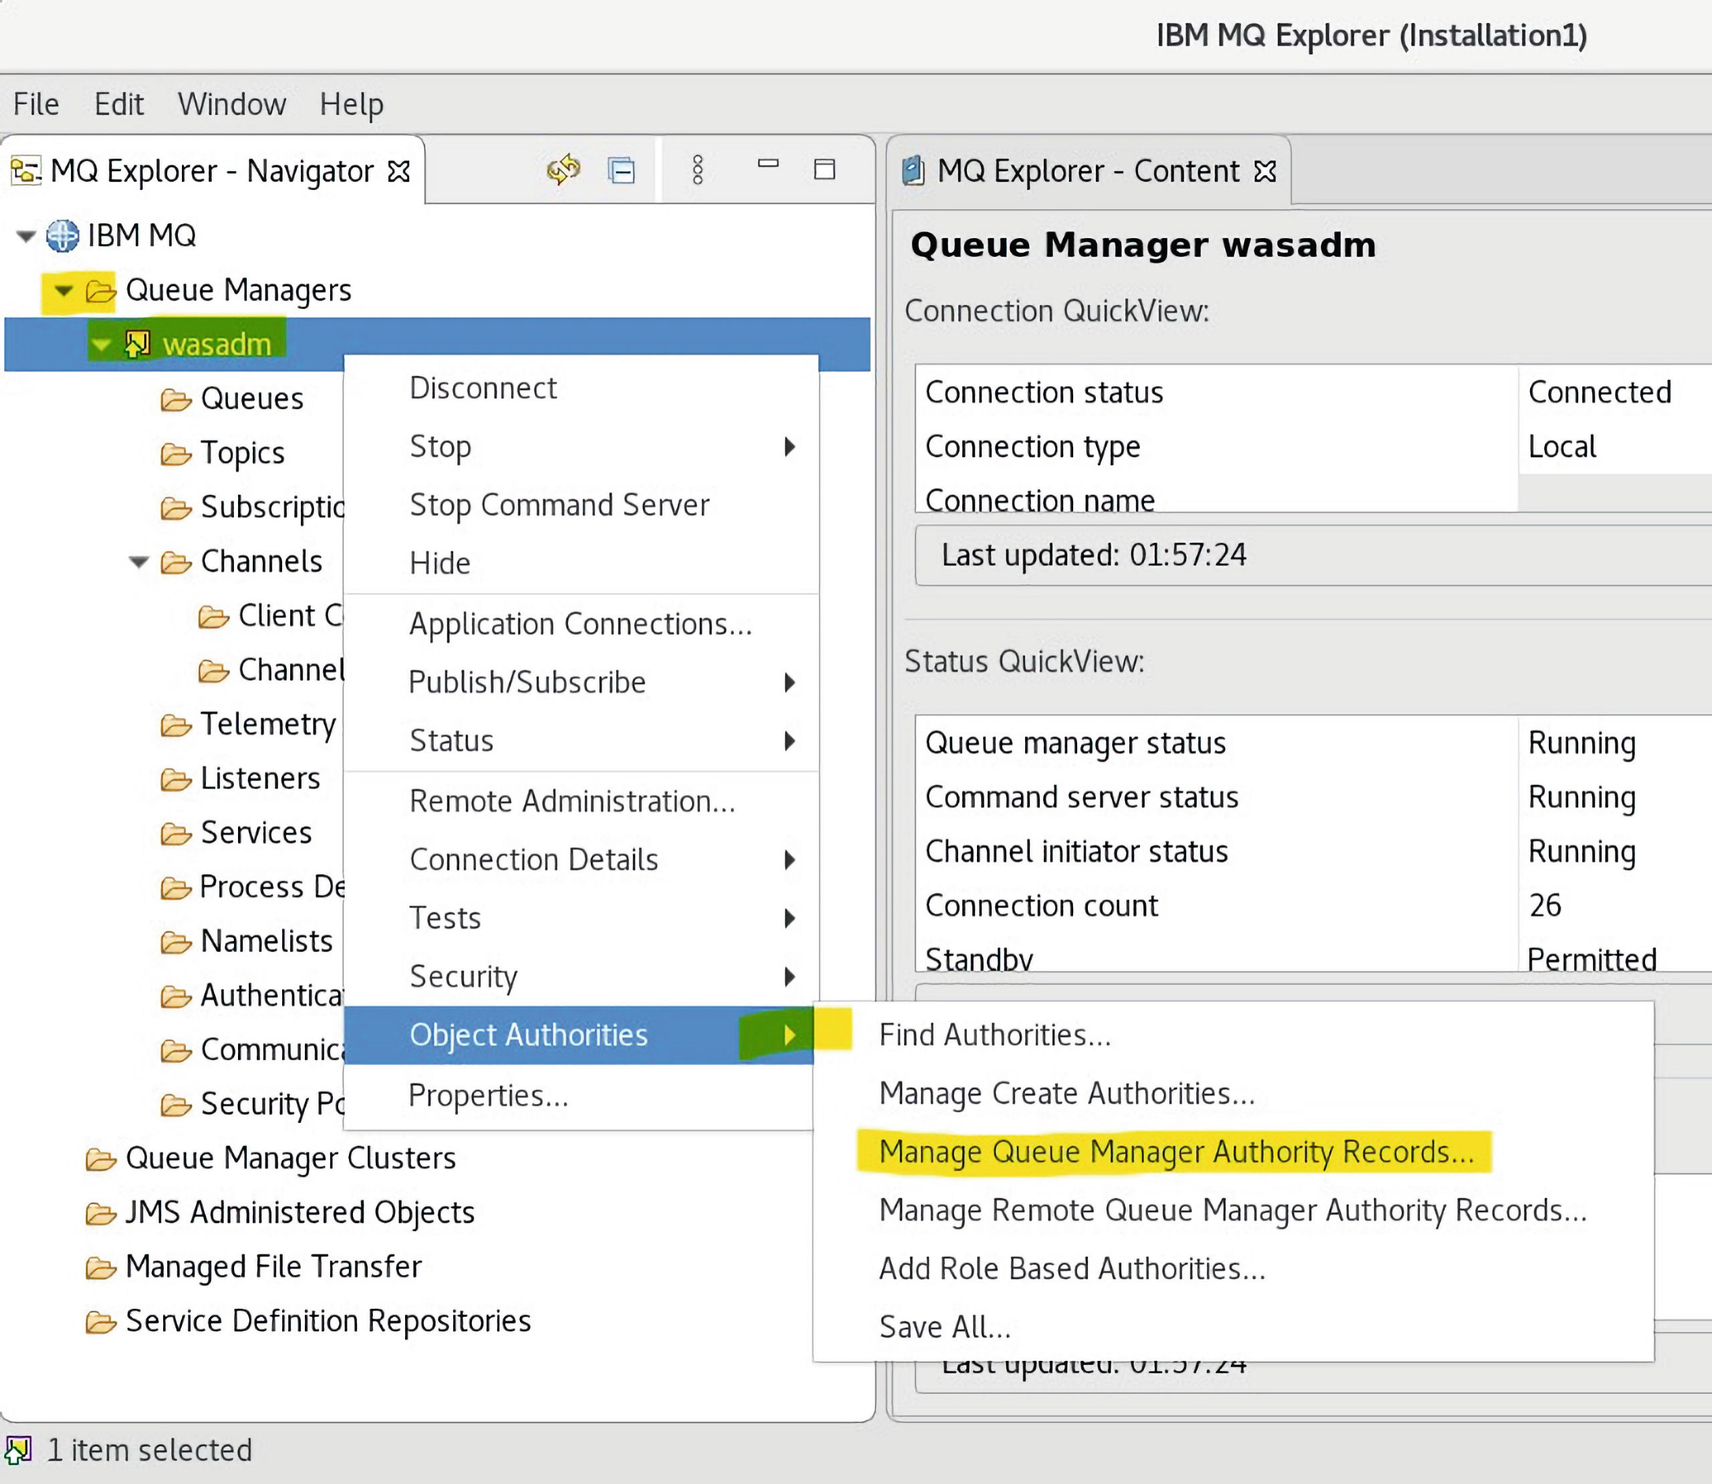
A screenshot of a window with w a s a d m queue manager authority client application, with w a s a d m, object authorities, and manage queue manager authority records highlighted.
The wasadm Queue Manager Authority records are edited
Highlight the record for the user or group to which you want to add the Connect authority, then click Edit…. The Edit Authorities dialog opens.
Select the Connect check box, then click OK.
A screenshot of a dialog box titled w a s a d m manage authority records. It includes groups with sub headings name, alternate user authority, change, connect, delete, display, inquire, and close buttons.
The New command is used to add the db2inst1 user
A screenshot of a dialog box represents the w a s a d m queue manager authority records, in which groups with name, alternate user authority, change, connect, delete, display, inquire, and close buttons are exhibited.
The security options for the db2inst1 user are added

A screenshot of a dialog box titled I B M, M Q Explorer. Text reads the authority was created successfully. The OK button is highlighted.
The authority for db2inst1 is successfully added
A screenshot of a dialog box titled w a s a d m manage authority records. It exhibits a group tab with name, alternate user authority, change, connect, delete, display, and close button.
The authority for the db2inst1 user’s group, db2iadm, can now be seen

A screenshot of a window titled I B M, M Q Explorer. It exhibits client connections tab with channel name, channel type, queue manager name, and description. Find accumulated authorities option is highlighted.
The Find Accumulated Authorities menu item is selected
A screenshot of a dialog box titled find accumulated authorities. The entity type, name, and find button are highlighted.
The db2inst1 user has security access on the AUD.CLNTCONN profile
A screenshot of a window titled I B M, M Q Explorer. The add initial context, under J M S administered objects is highlighted.
The Add Initial Context is selected on the right-mouse click
A screenshot of a dialog box titled Security credentials. It exhibits user D N, password, and OK button.
The ecmukdemo6 context is entered with the o=sample LDAP root
A screenshot of a window titled I B M, M Q Explorer. The Destination folder is highlighted on the left. The Destination tab exhibits name, description, class name, messaging provider, and so on.
The JMS referenced Queue, AUDQCF, is shown

A screenshot represents the I B M M Q authority record set to access the Base TOPIC.
The IBM MQ Authority record is set for db2inst1 to access the Base TOPIC
The user now has Connect access to the queue manager. When the user accesses the queue manager’s objects, the authorities that you have granted to the user take effect.
Listener Authorities

A screenshot of a window titled I B M, M Q Explorer. It exhibits the listener object security access is updated for the d b 2 inst 1 user.
The Listener object security access is updated for the db2inst1 user
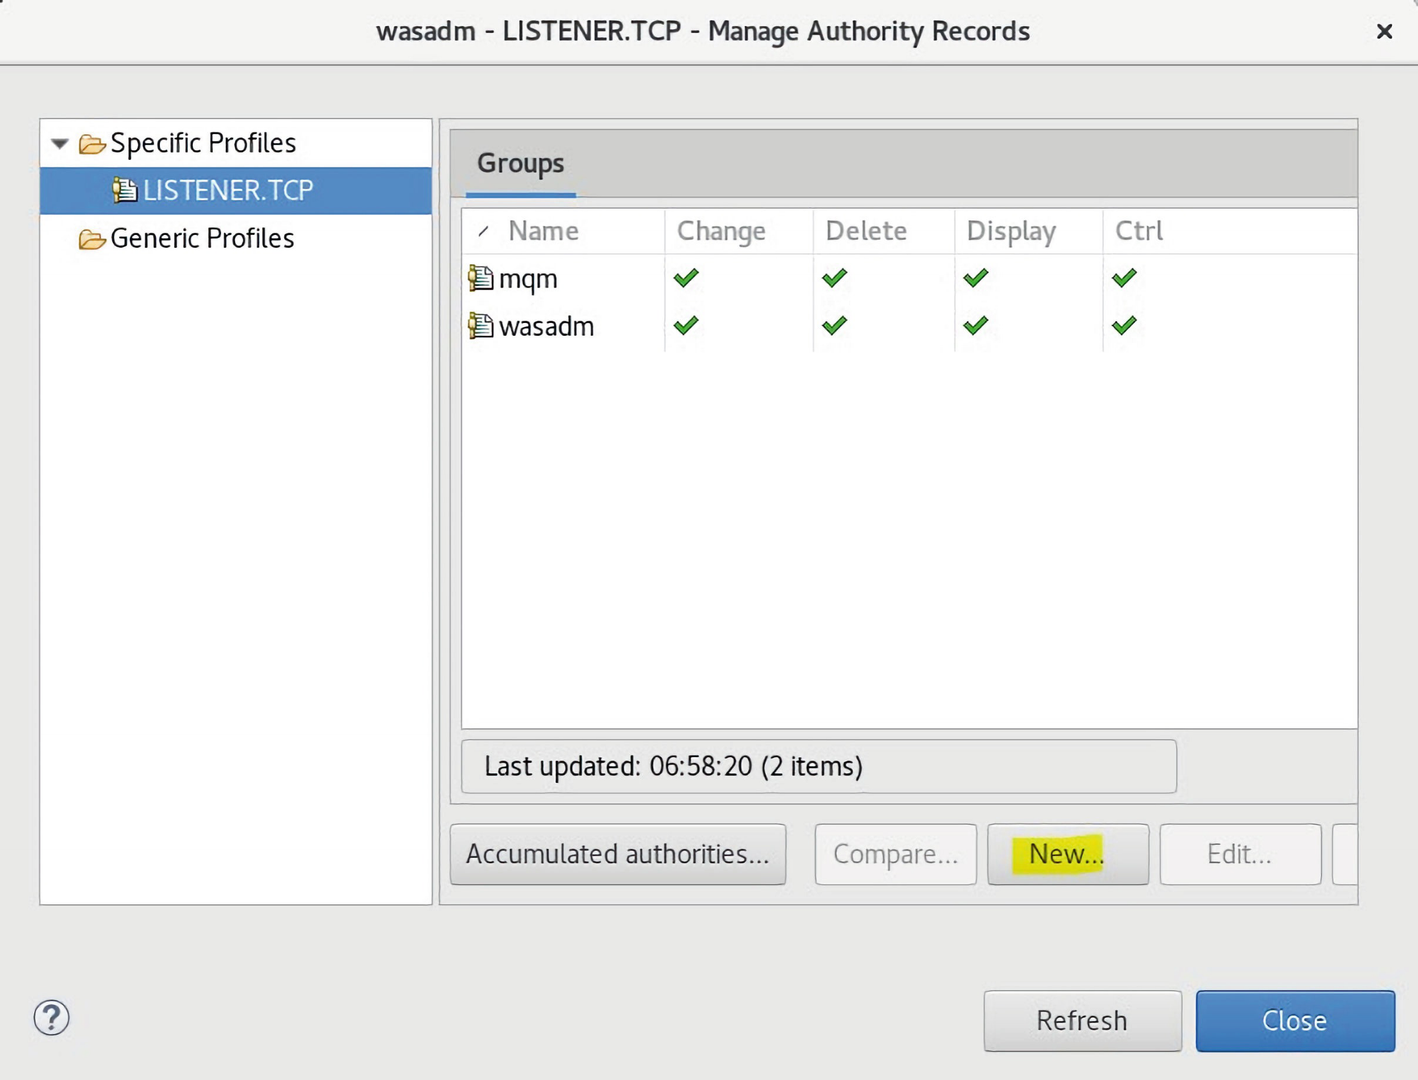
A screenshot of a dialog box titled L I S T E N E R T, C P. L I S T E N E R T, C P under specific profiles is highlighted.
The existing user authorities for the Listener, LISTENER.TCP, profile is displayed
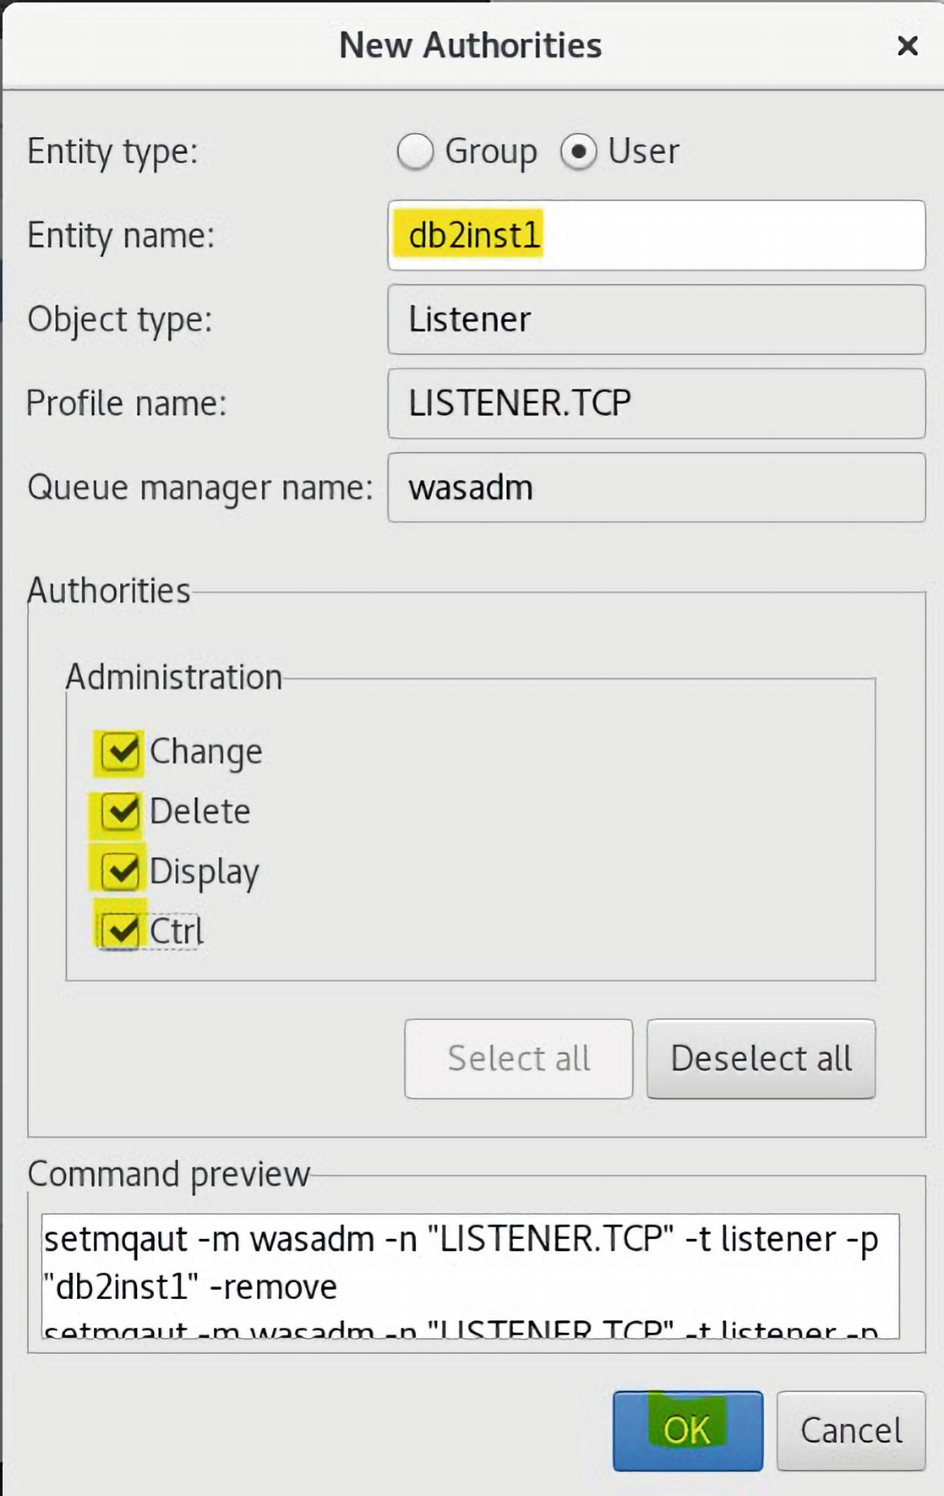
A screenshot of a dialog box titled New authorities. The entity name d b 2 inst 1 is highlighted. Under administration, the check boxes of change, delete, display and c t r l are highlighted.
The Listener Authorities are updated for the db2inst1 user

A screenshot of a dialog box titled I B M, M Q Explorer. Text reads the authority was created successfully. The OK button is highlighted.
The Listener Authorities are confirmed as updated

A screenshot of a dialog box titled L I S T E N E R T C P. d b 2 inst 1 under groups tab is highlighted
The updated LISTENER.TCP profile shows the new db2inst1 user’s group

A screenshot represents the queue manager channel authentication security system.
The Queue Manager Channel Authentication security system is enabled

A screenshot of a window titled I B M, M Q Explorer. Queue managers, w a s a d m, object authorities and manage create authorities are highlighted.
The menu option to Manage Create Authorities is selected

A screenshot of a dialog box titled manage create authorities. The new button is highlighted.
The New button is selected to create an entry for the db2inst1 user

A screenshot of a dialog box titled new authorities. It exhibits entity type, name, manager name, authorities list, and ok command.
The required entries are entered for the db2inst1 user for the security access

A screenshot of a dialog box titled I B M, M Q Explorer. Text reads the authority was created successfully. The OK button is highlighted.
The db2inst1 user security access updates are successfully added

A screenshot of a dialog box titled the w a s a d m manage create authorities. It exhibits names, queues, name lists, process definitions, channels, and client connections. d b 2 i a d m 1 is highlighted.
The db2iadm1 Group user is displayed
Create test for example MQ Main program REF:
Stopping and Starting the Queue Manager

A screenshot of a window titled I B M, M Q Explorer. The controlled option under stop is highlighted.
The wasadm Queue Manager is stopped
- 1.
End all the activity of queue managers associated with the WebSphere MQ installation.

A screenshot of a dialog box titled stop queue manager w a s a d m, the default option is selected to stop control.
The wasadm Queue manager default option is selected to stop Controlled
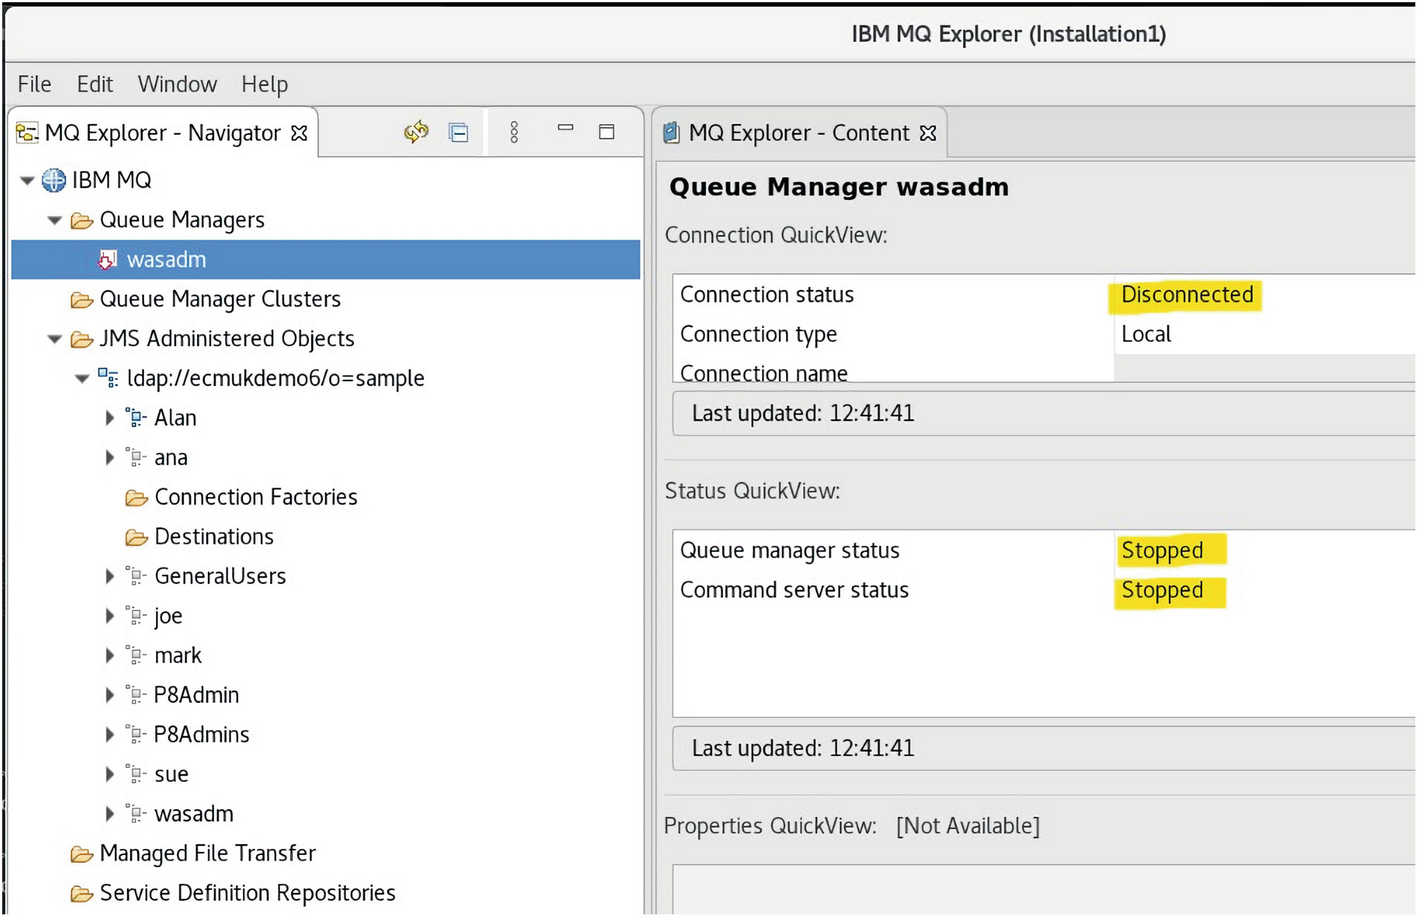
A screenshot of a window titled I B M, M Q Explorer. It represents the w a s a d m queue manager status with connection status as disconnected, queue manager status and command server status as stopped.
The wasadm Queue Manager status is shown
- a.
Run the dspmq command to list the state of all the queue managers on the system.

A screenshot represents the d s p m q o installation o status command that lists the state.
The dspmq -o installation -o status command lists the state
- b.
Run the MQSC command, DISPLAY LSSTATUS(*) STATUS, to list the status of listeners associated with a queue manager:

A screenshot presents the status of the w a s a d m queue is confirmed.
The status of the wasadm queue is confirmed
- c.
Stop any listeners associated with the queue managers, using the command:

A screenshot represents the listeners for the w a s a d m queue manager are stopped.
Any listeners for the wasadm Queue Manager are stopped

A screenshot represents the configuration settings that are checked, and it contains system V semaphores, shared memory, settings, and current user limits.
The configuration settings are checked
- a)
Restart the MQ wasadm Queue.

A screenshot represents the M Q explorer content. The start option under the w a s a d m is highlighted.
The wasadm Queue Manager is restarted

A screenshot of a dialog box titled start queue manager w a s a d m. The OK button is selected.
The Start Queue Manager for wasadm is confirmed by clicking OK

A screenshot of a window titled I B M, M Q Explorer. The active status of the restarted w a s a d m queue manager is exhibited.
The active status of the restarted wasadm Queue Manager is displayed
Creating a Client Channel for Messaging
A custom Client Channel can be created for messaging based on a standard SYSTEM.DEF.SERVER template Object type, as shown in this section.
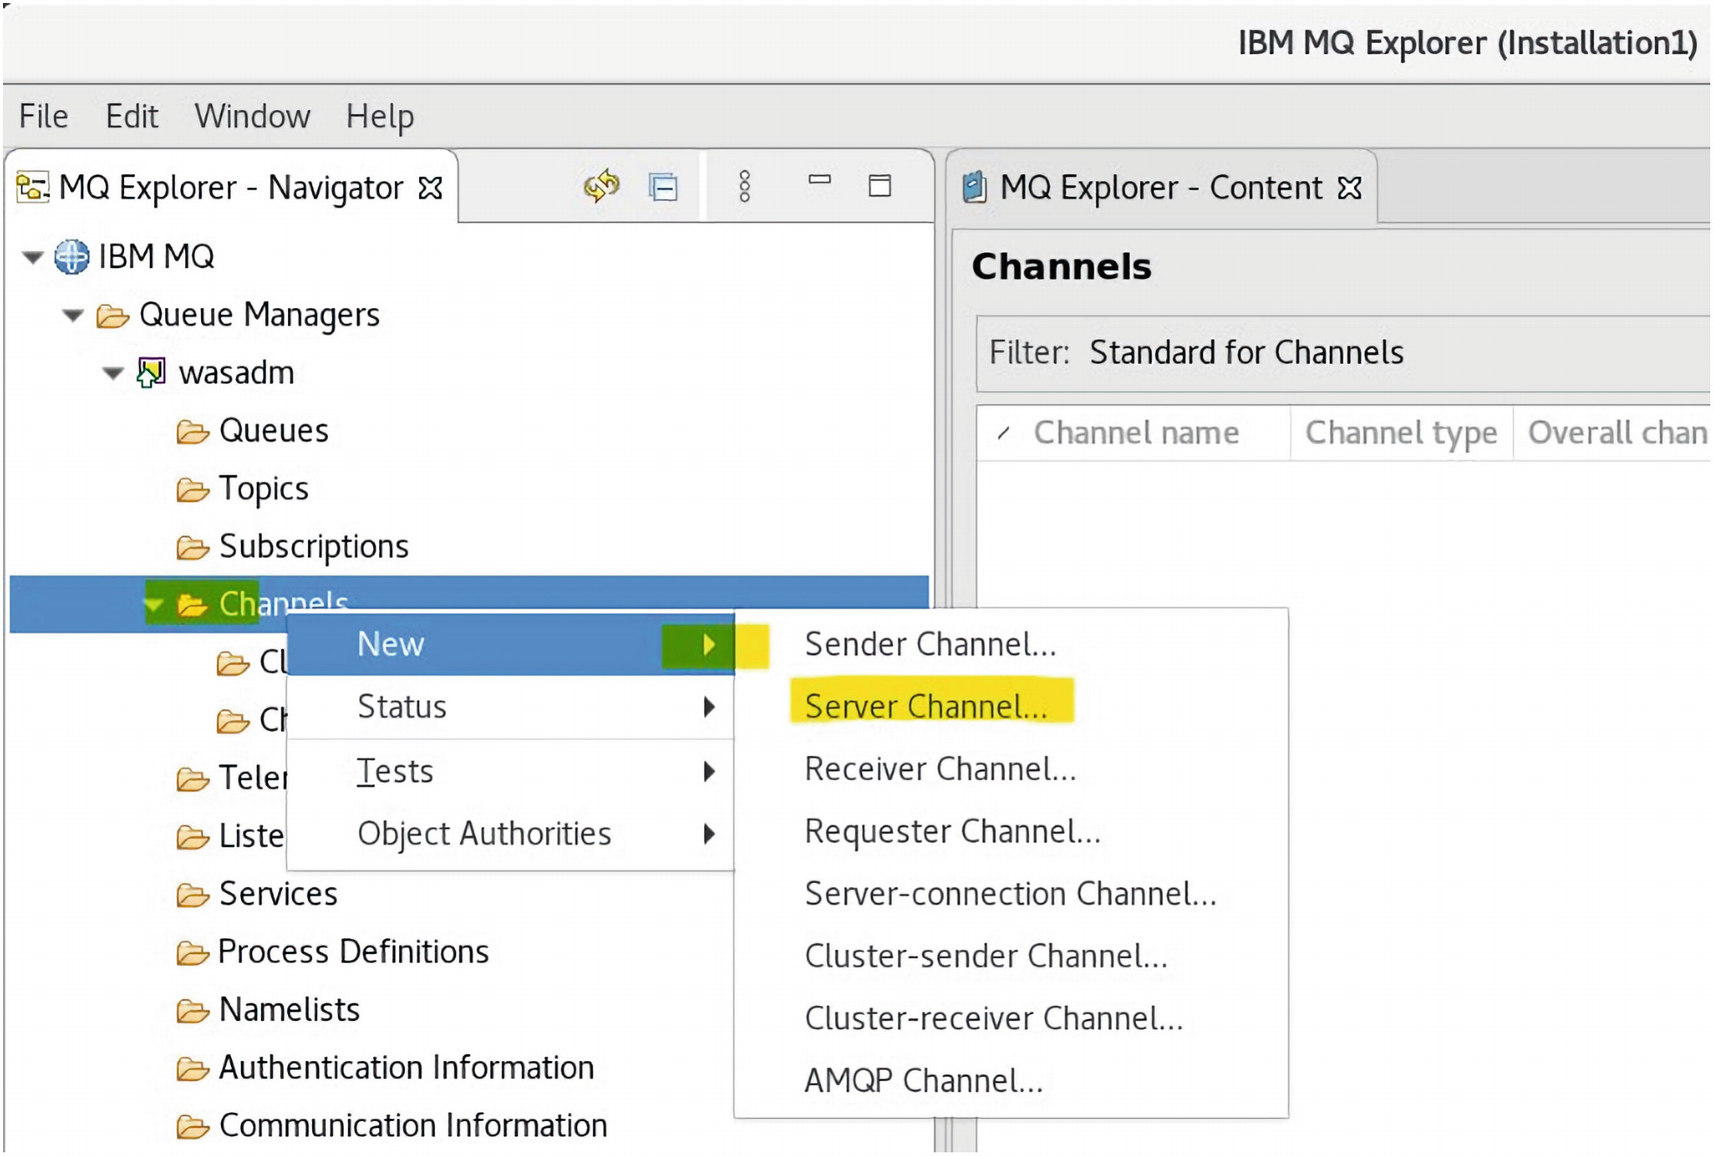
A screenshot of a window titled I B M, M Q Explorer. The server channel option under New is highlighted.
A new Server Channel is created as highlighted

A screenshot of a dialog box titled new server channel. The new client wasadm server channel is created. The next button is highlighted.
A new CLIENT.wasadm Server Channel is created and Next clicked
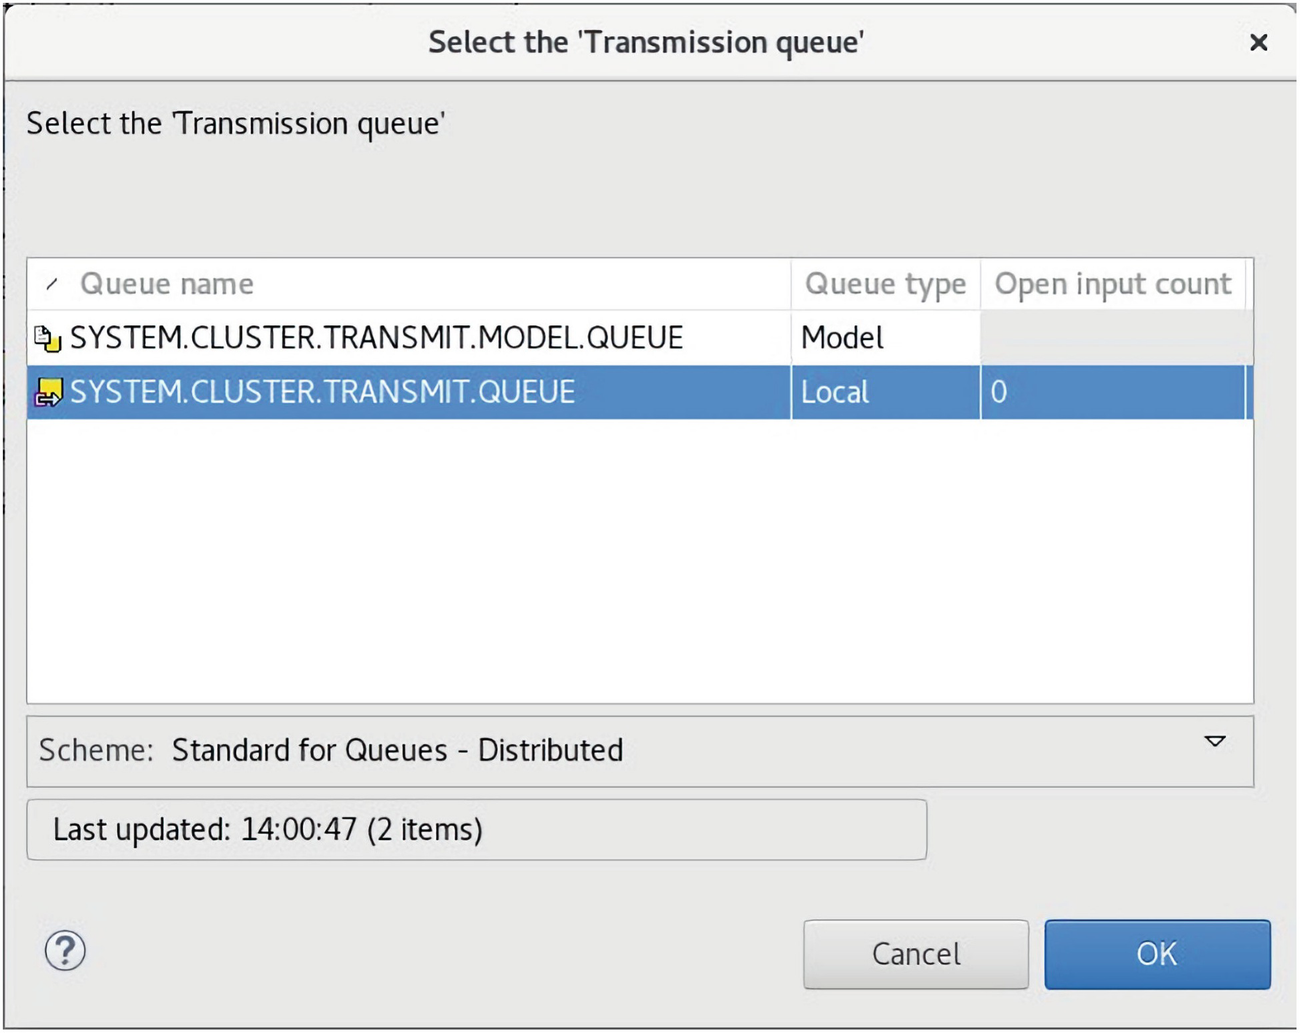
A screenshot of a dialog box titled select the transmission queue. System clutter transmission queue is selected.
The Local Transmission queue type is selected
Setting Up the Client on Linux
Set up the client component using the MQSERVER environment variable.
We need to find out the network name of the machine which hosts the queue manager (our example QM is called wasadm) from the system administrator.
Log in as the user who will be running the Express File Transfer, who must be a member of the mqm group. (On the ecmukdemo6 Linux server, this is wasadm.)
Open a command prompt.
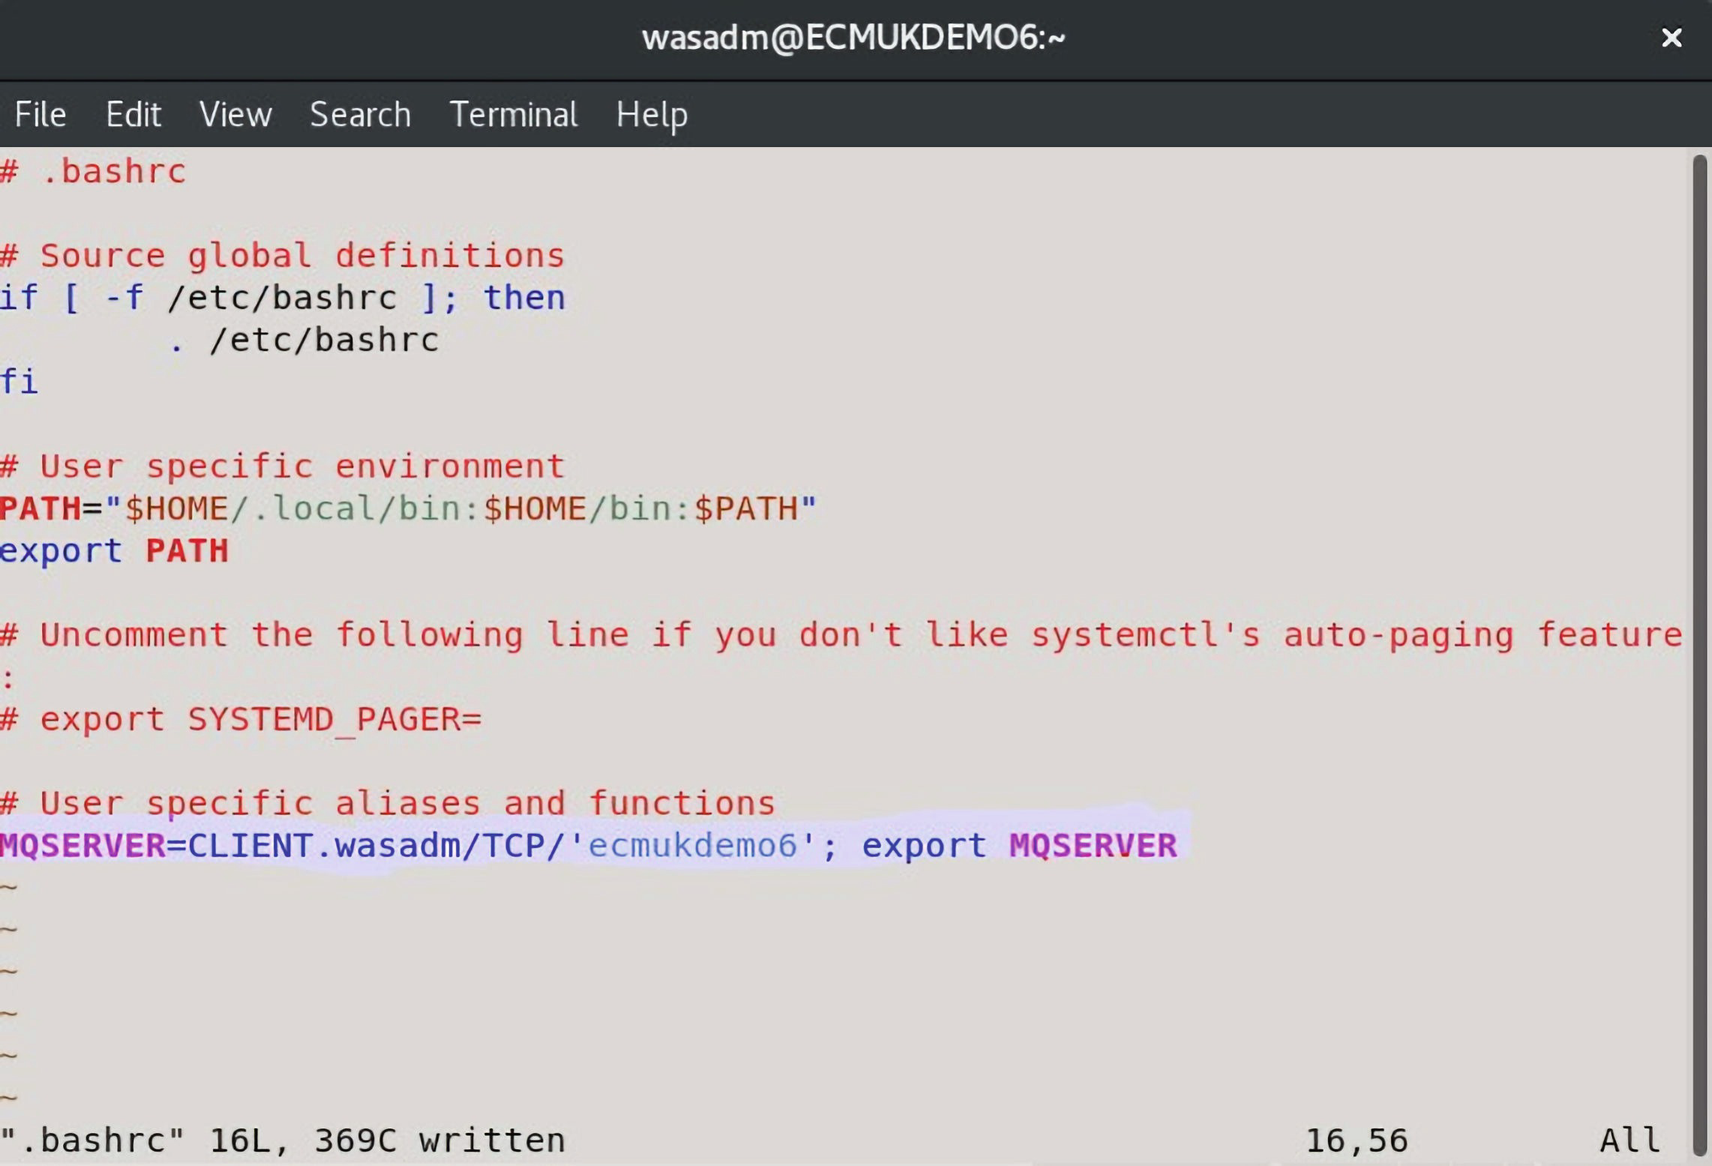
A screenshot represents the M Q S E R V E R environment variable that is set up.
The MQSERVER environment variable is set up
Replace hostname with the name (ecmukdemo6) that identifies the server machine on the network.
Close the command prompt.
Log out and log back in for the change to take effect.

A screenshot represents the M Q S E R V E R environment variable is checked, which contains the file, edit, view, search, terminal, and help options on the top.
The MQSERVER environment variable is checked
You have now set up the client and server components needed. The next task is to send a message from the client to the server queue manager wasadm.
Sending a Message from a Client to a Server
To send a message from the client to the server queue manager wasadm, which uses the remote queue definition AUDQAR:
Open a command prompt on the client and follow these steps:
Start the amqsputc sample program as follows.
Testing for Errors
The error "Dead-letter Queue attribute refers to a queue that does not exist (AUDD1) wasadm Queue Manager / General"
Remediation for Missing Dead-Letter Queue, AUDD1

A screenshot of a window titled I B M M Q explorer. The queues, new, local queue options are highlighted.
The Queues ➤ New ➤ Local Queue menu
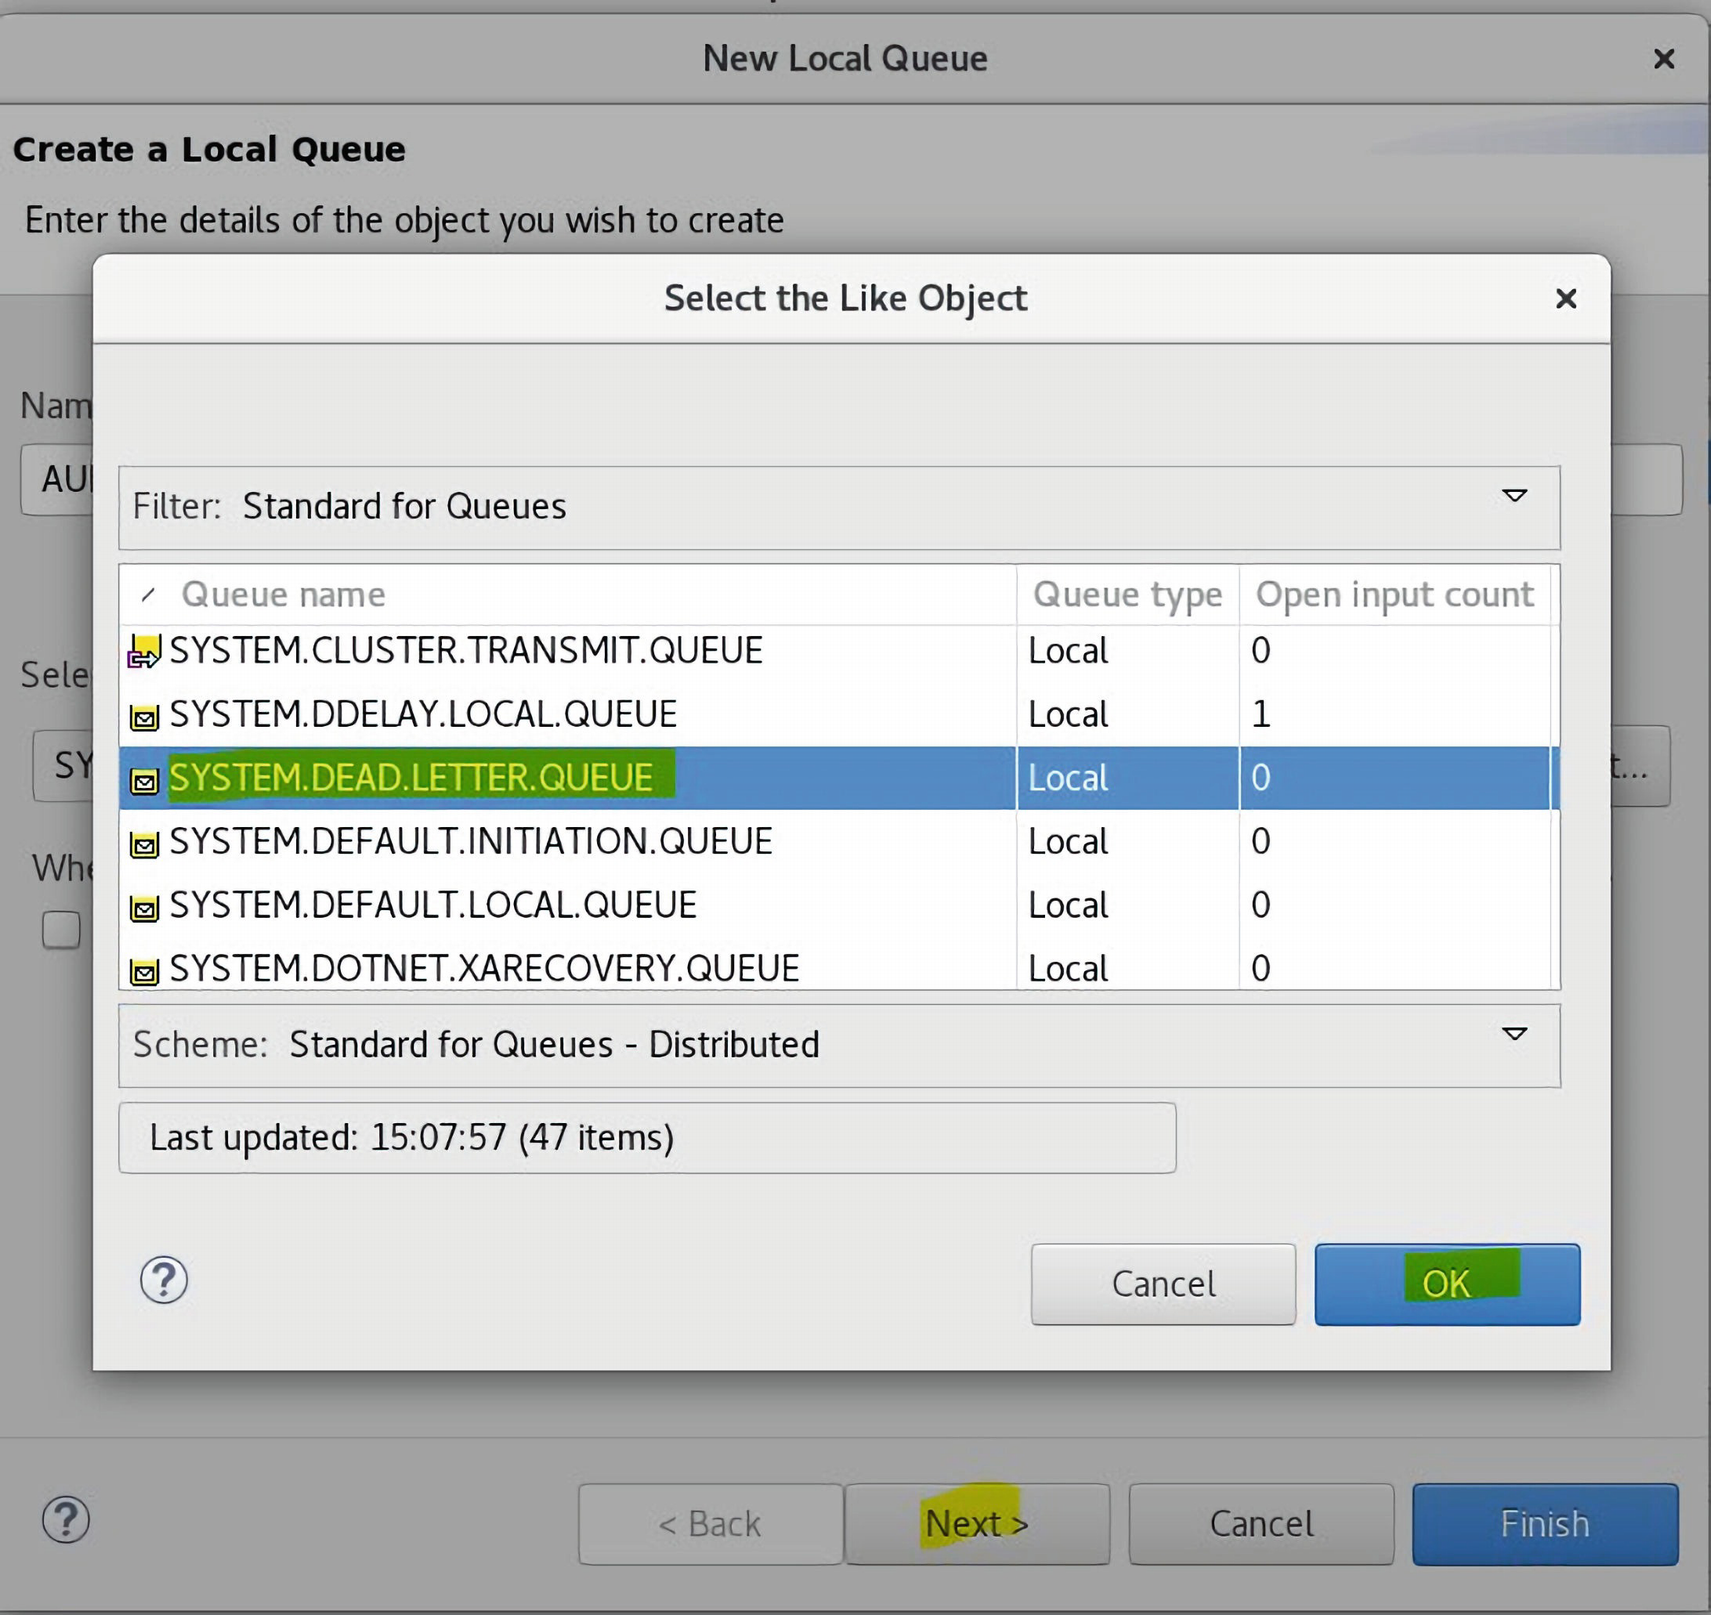
A screenshot of a dialog box titled select the like object. The SYSTEM DEAD LETTER QUEUE template object is selected.
The SYSTEM.DEAD.LETTER.QUEUE template Object is selected
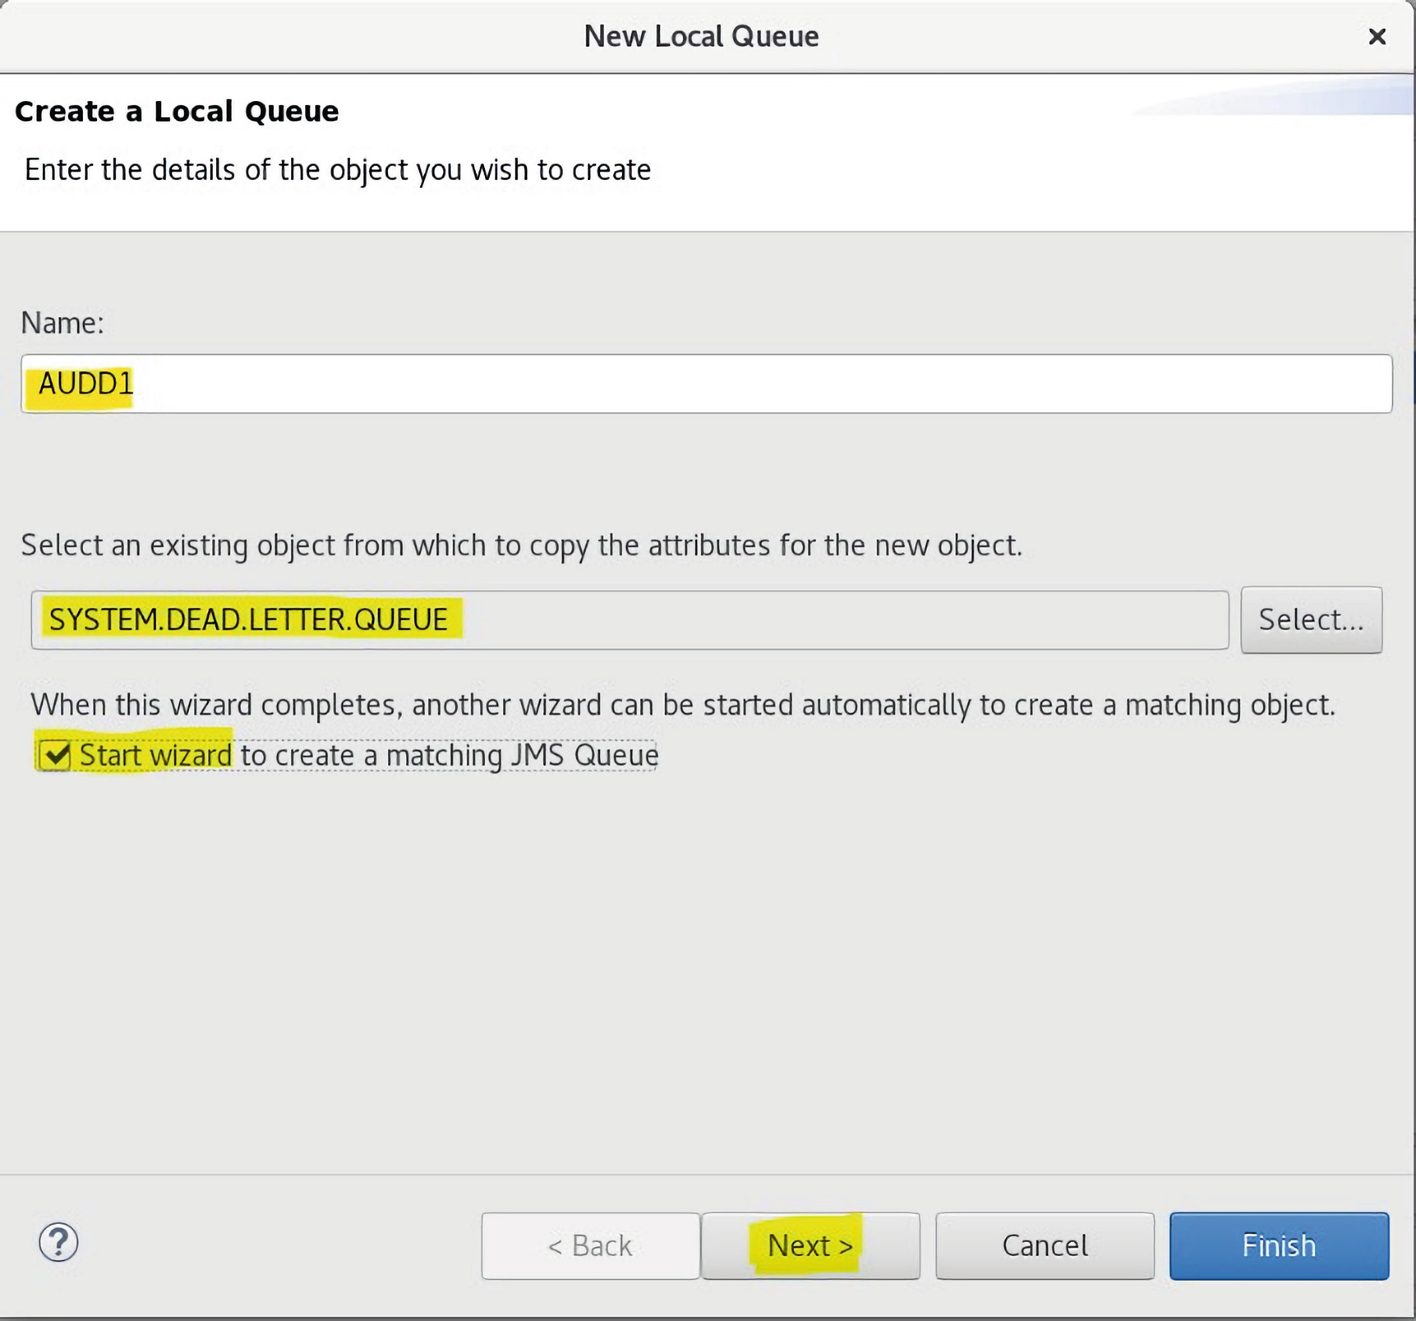
A screenshot of a dialog box titled new local queue. The start wizard to create a matching J M S queue tick box selected.
The Start wizard to create a matching JMS Queue tick box is selected
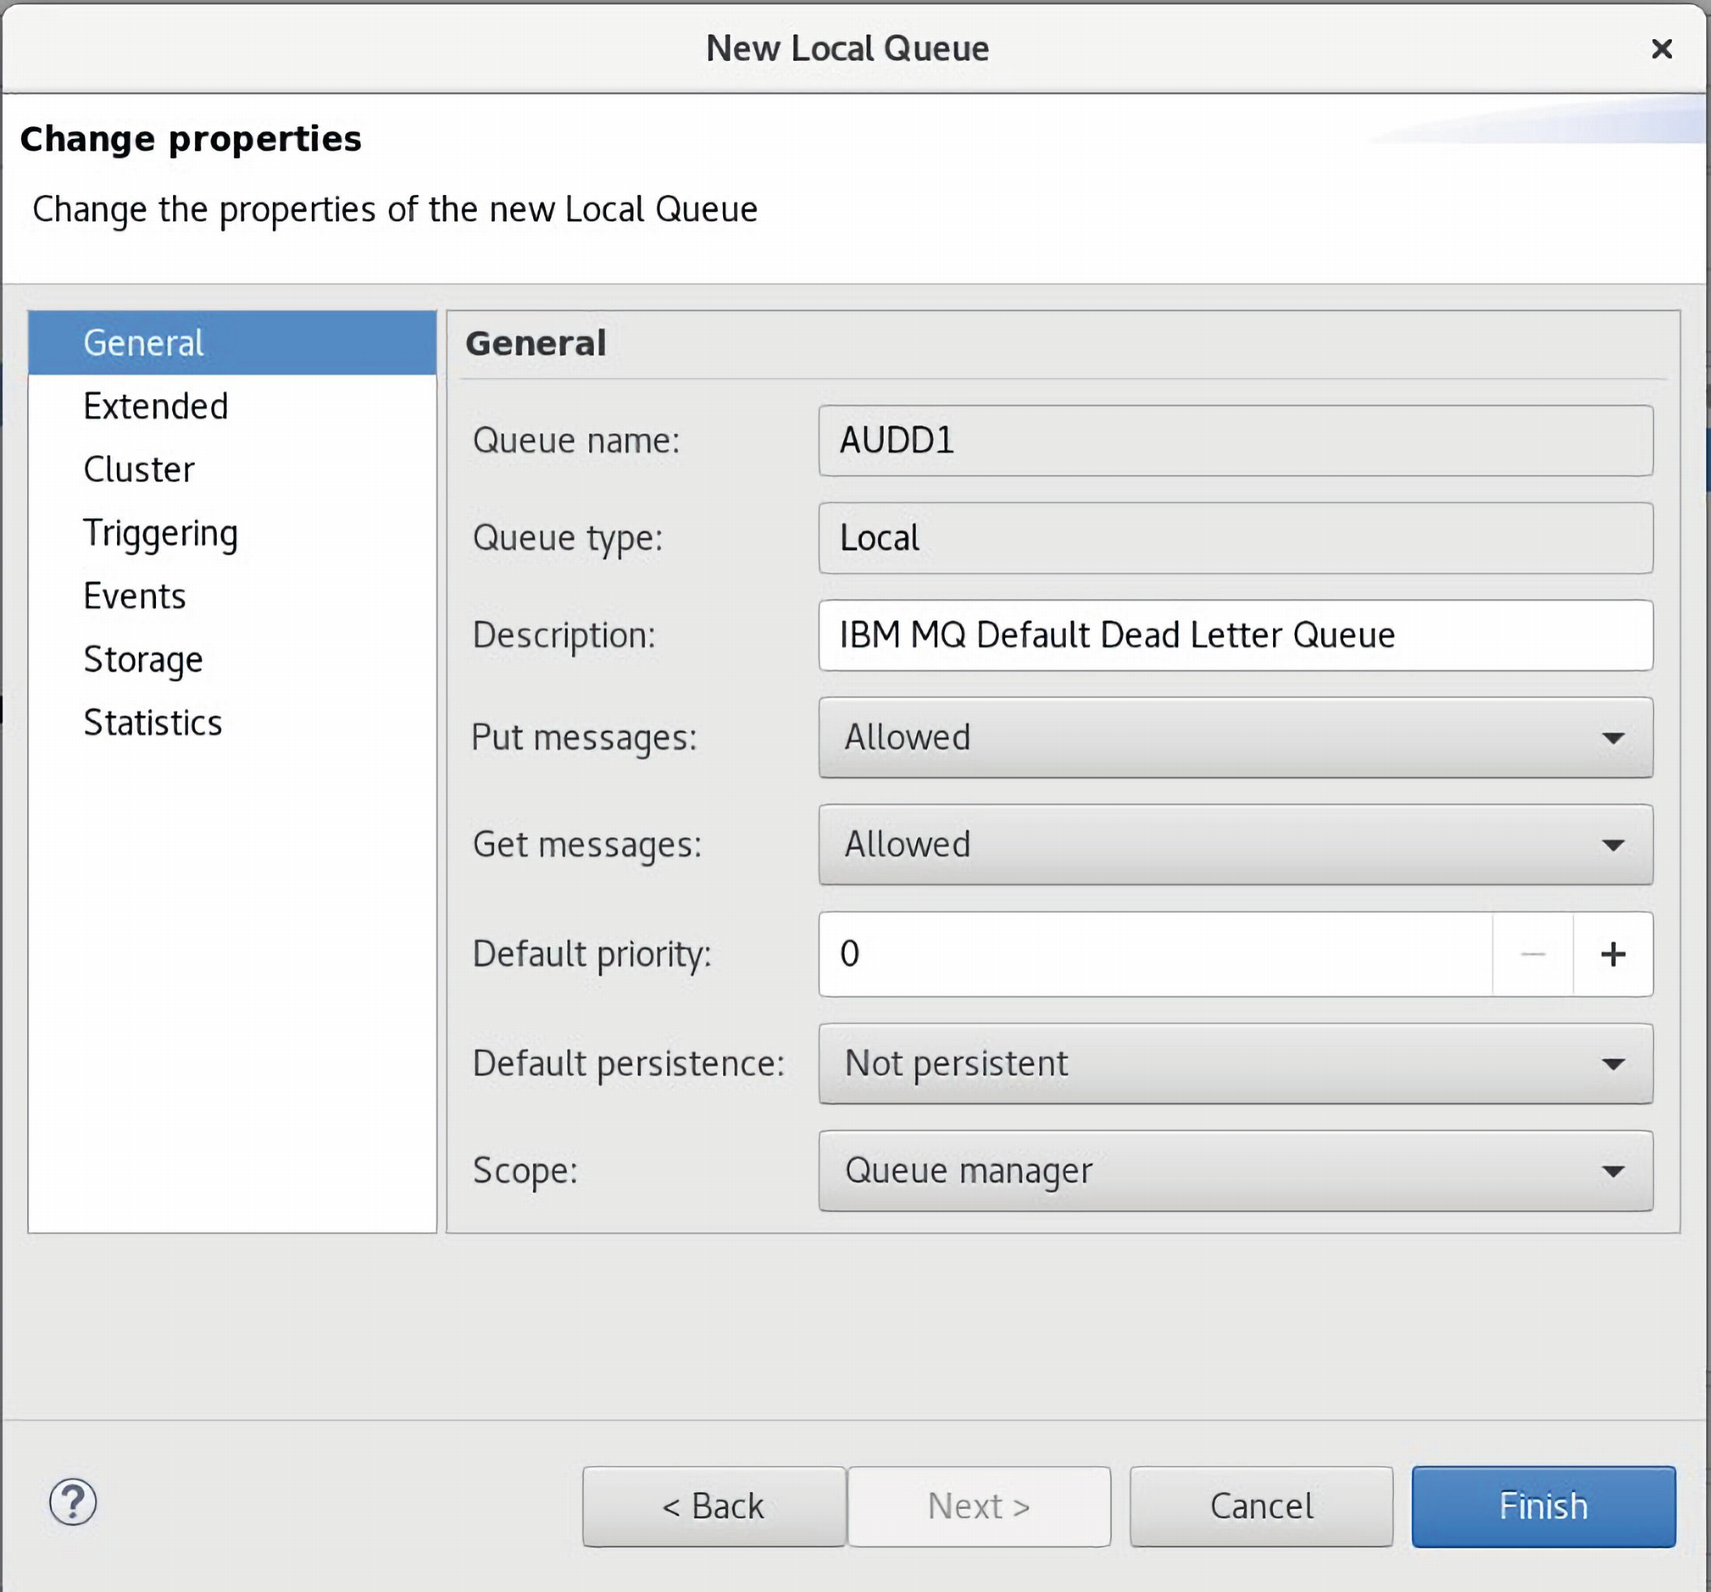
A screenshot of a dialog box titled new local queue. Under general tab, description and default priority are exhibited.
The Finish command button is clicked to create the Queue

A screenshot of a dialog box titled I B M, M Q Explorer. Text reads the object was created successfully. The OK button is highlighted.
The status of the Queue creation is displayed

A screenshot of a dialog box titled new destination. The select button next to J M S context is highlighted.
The wizard to create a new JMS queue matching the Dead-Letter Queue is launched
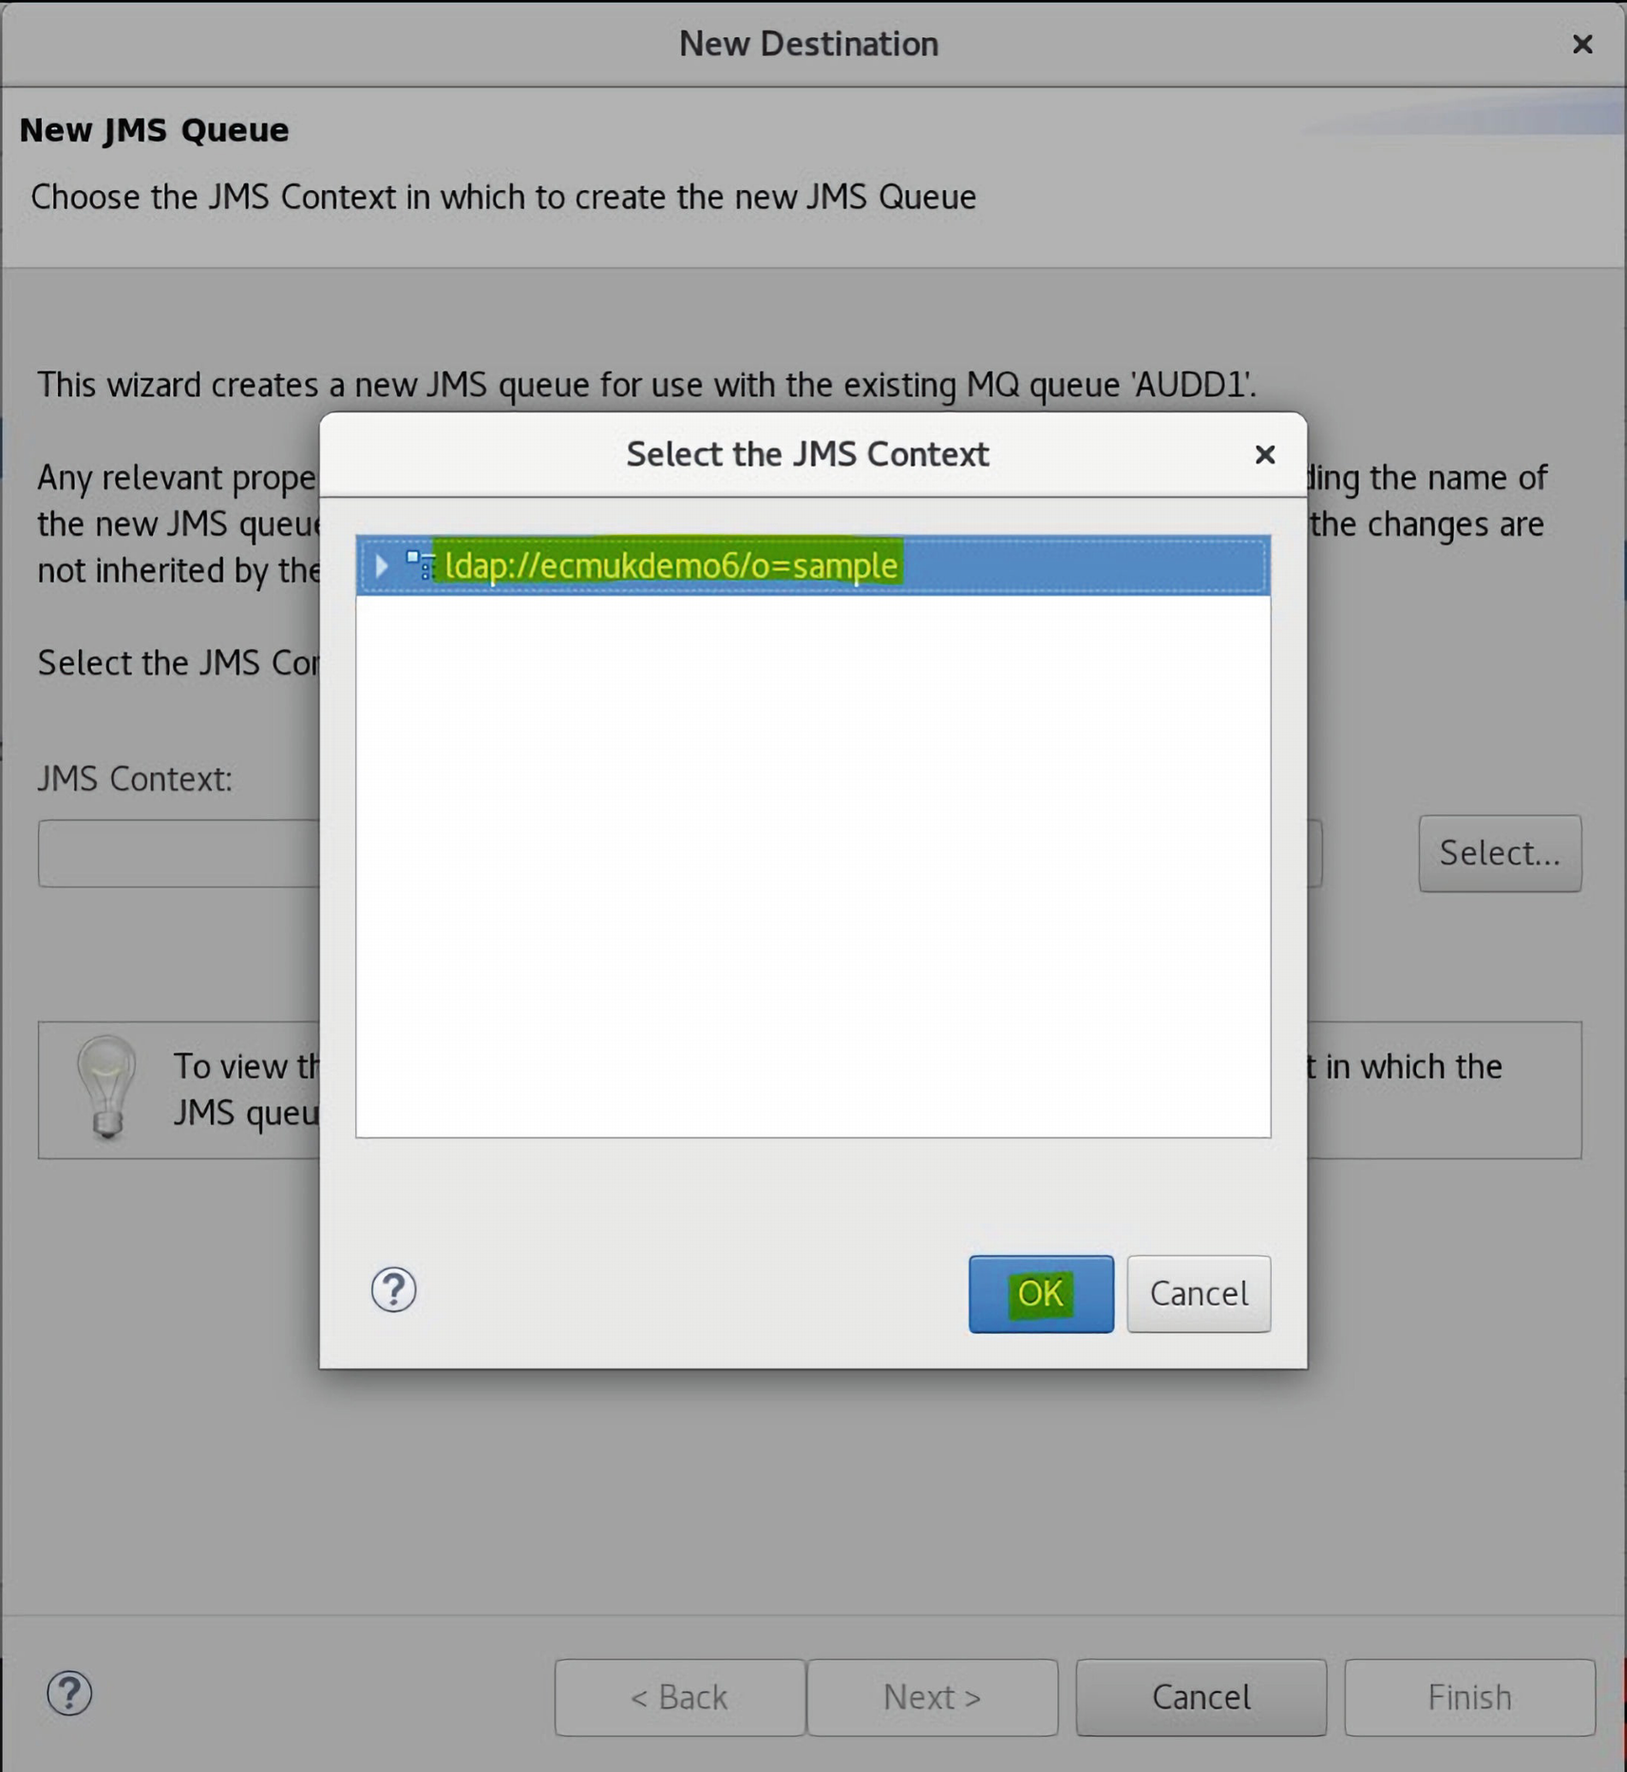
A screenshot of a dialog box titled select the J M S context box. The folder and the OK button is selected.
The LDAP server JMS Context is displayed
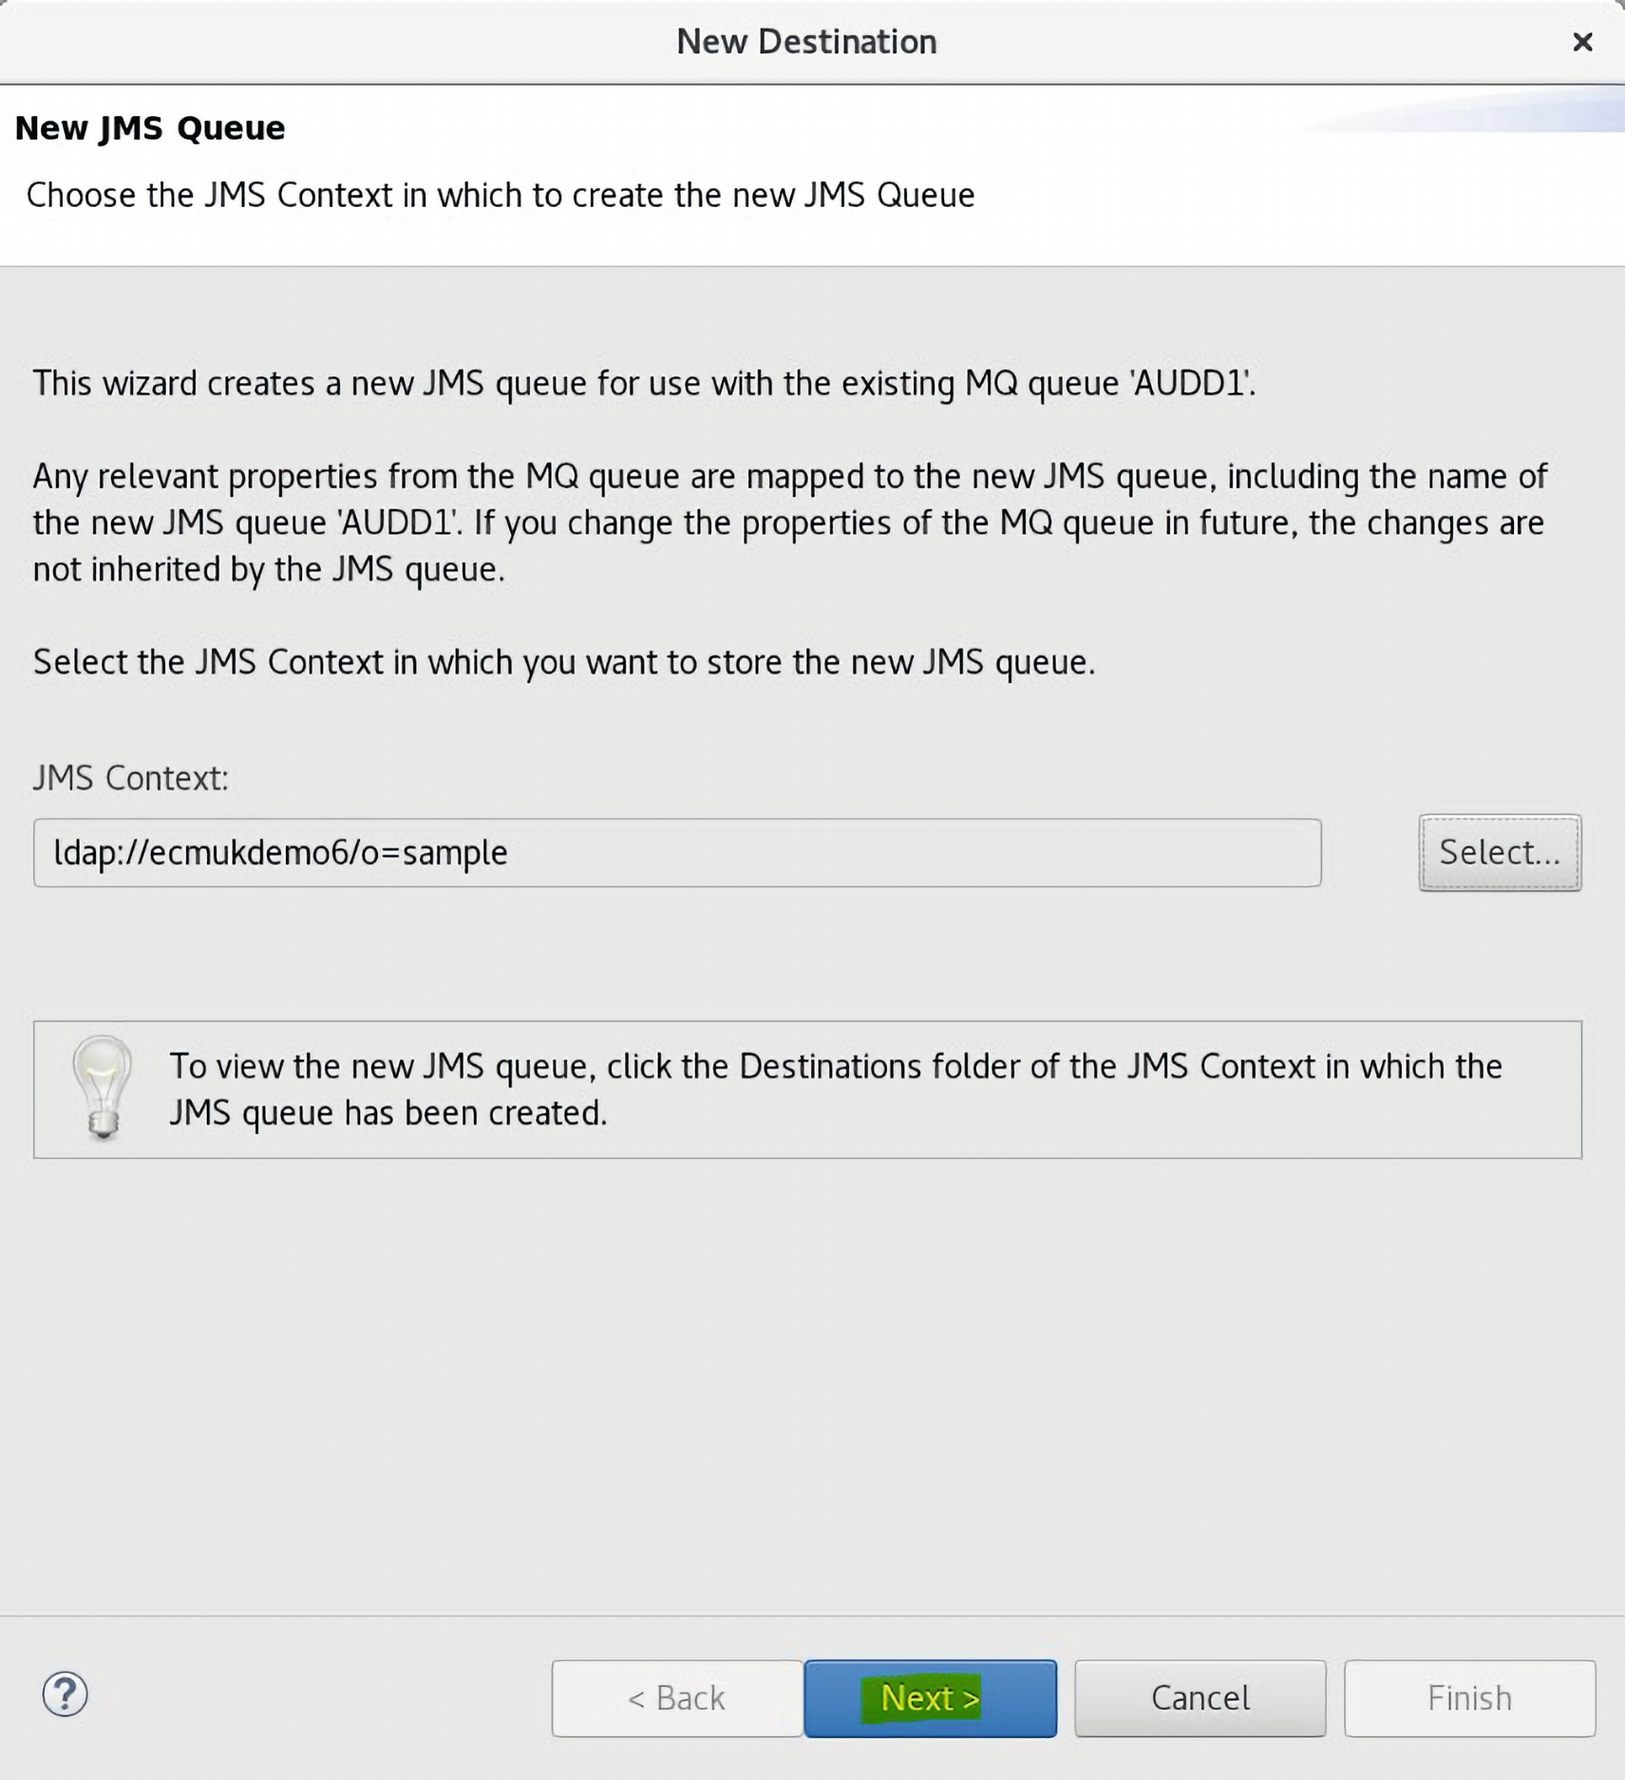
A screenshot of a dialog box titled new destination. It exhibits the J M S Context, the next button is highlighted.
The Next command is clicked to display the Destination JMS object

A screenshot of a dialog box titled select the like object. A U D Q C F and the OK button is highlighted.
The AUDQCF queue is displayed

A screenshot of a dialog box titled new destination. It exhibits the name A U D D 1, create with attributes like an existing destination A U D Q C F, and the select option is highlighted.
The Next> command is selected to match the AUDD1 Dead-Letter Queue
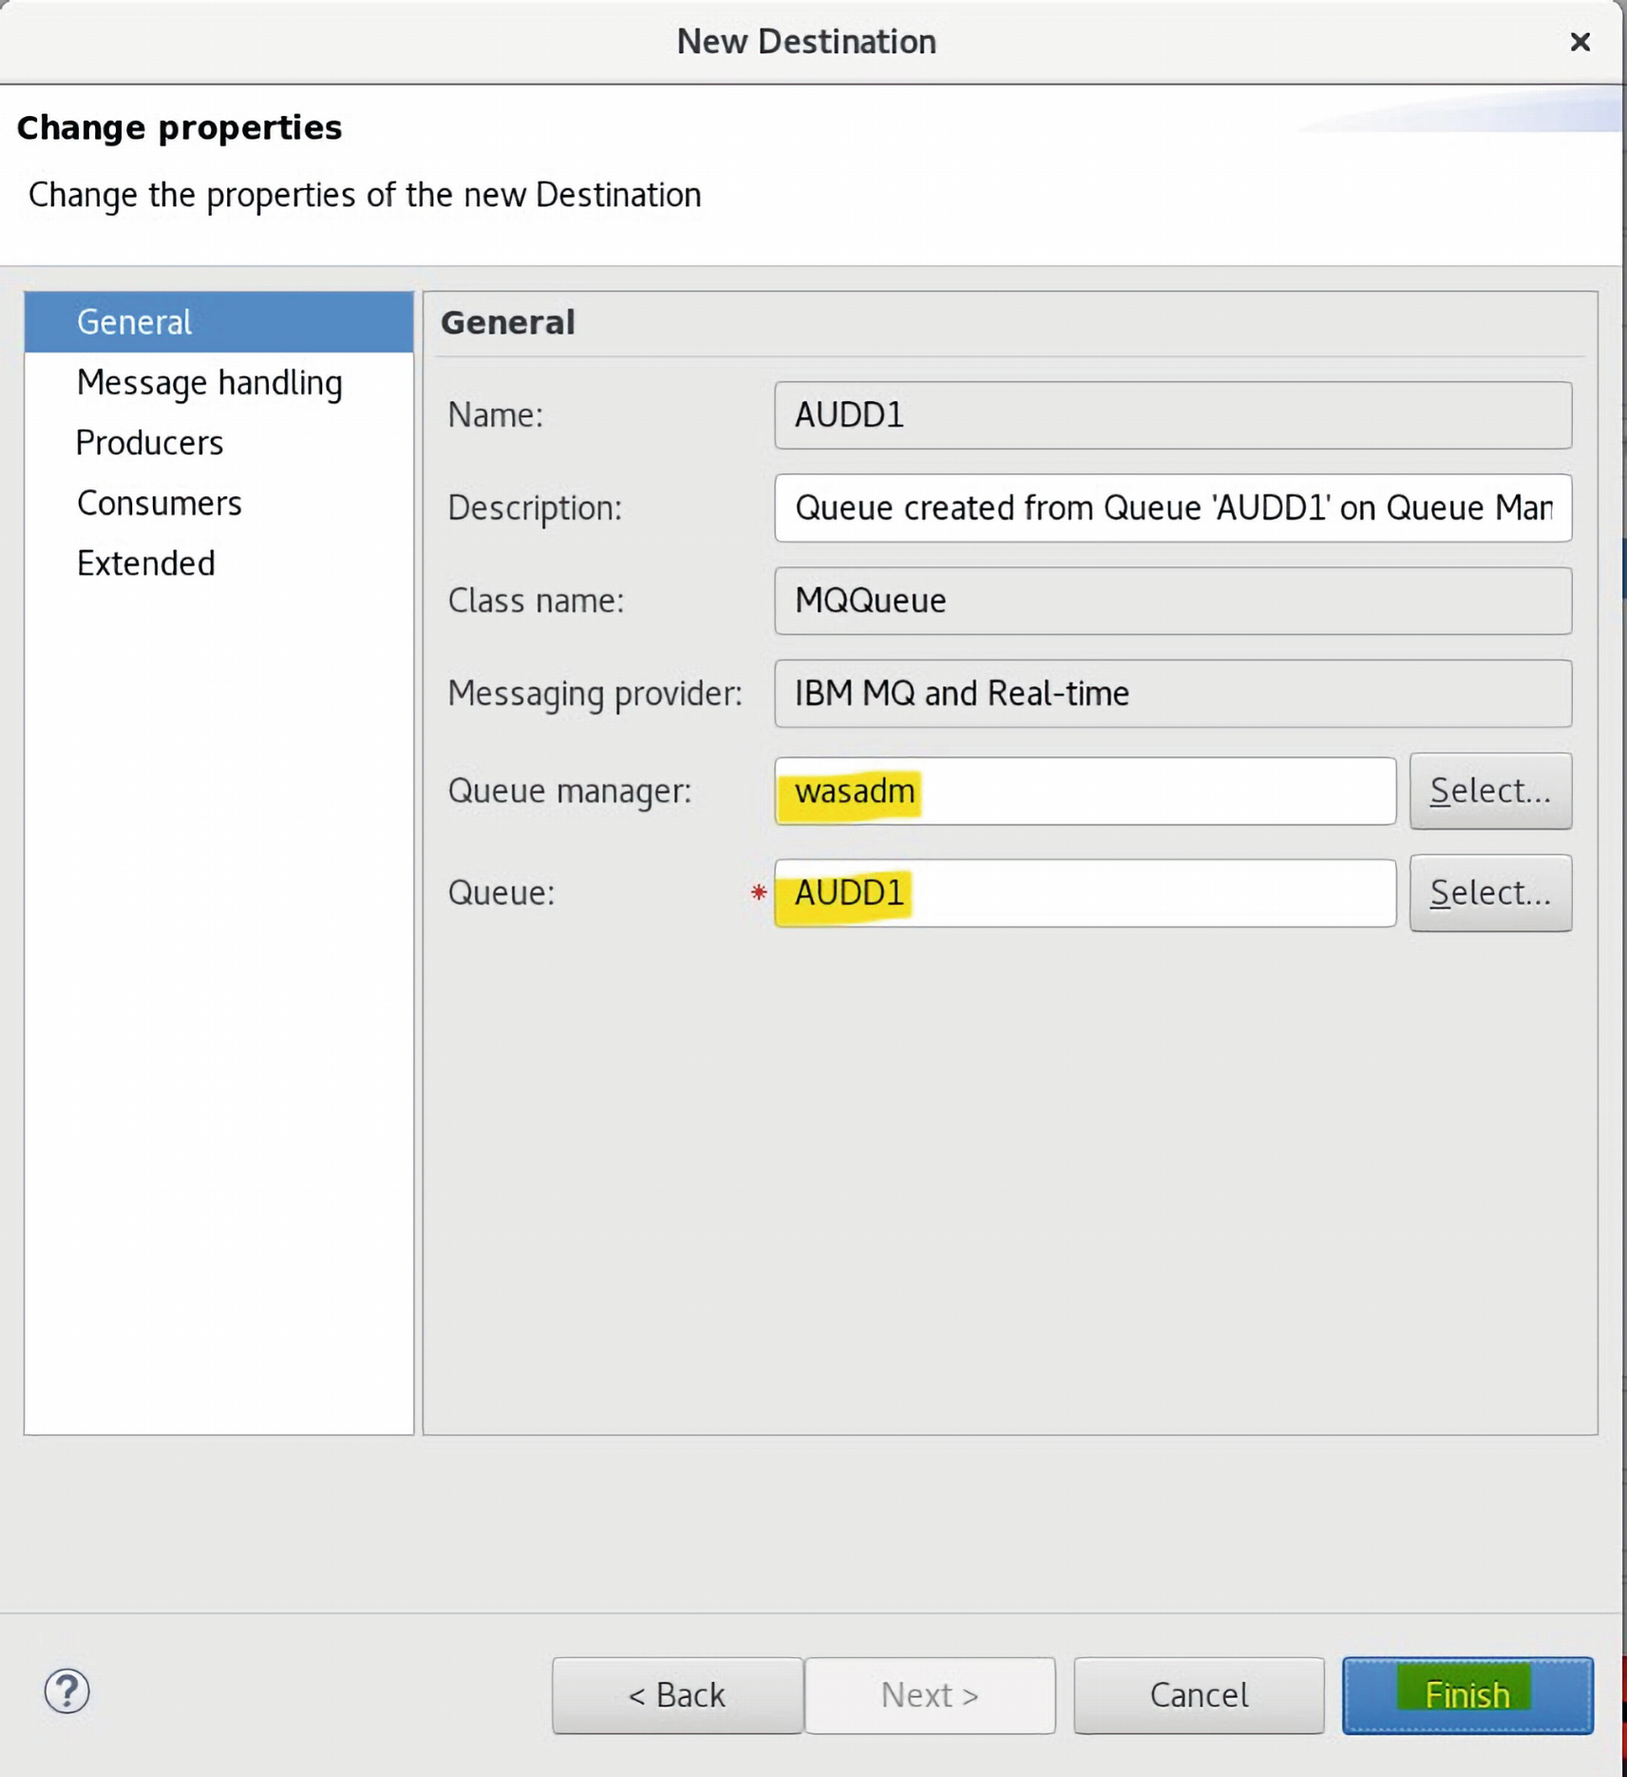
A screenshot of a dialog box titled new destination. The queue manager queue, and finish button are highlighted.
The Finish command is clicked to complete the JMS Queue link

A screenshot of a dialog box titled I B M, M Q Explorer. Text reads the object was created successfully. The OK button is highlighted.
The status of the JMS Queue creation command is displayed

A screenshot of a window titled I B M M Q explorer. It represents the new A U D D 1 dead letter queue in the exhibit.
The new AUDD1 Dead-Letter Queue is displayed

A screenshot represents the I B M M Q explorer, w a s a d m, tests, and queue manager w a s a d m, with run default tests highlighted.
The changes are tested, using the Tests ➤ Run Default Tests menu

A screenshot represents the M Q explorer content, description, object name, and category, with one of the file highlighted.
The Run Default Tests are conducted on the wasadm Queue Manager
Remediation for Missing Local Queue, AUDQ1

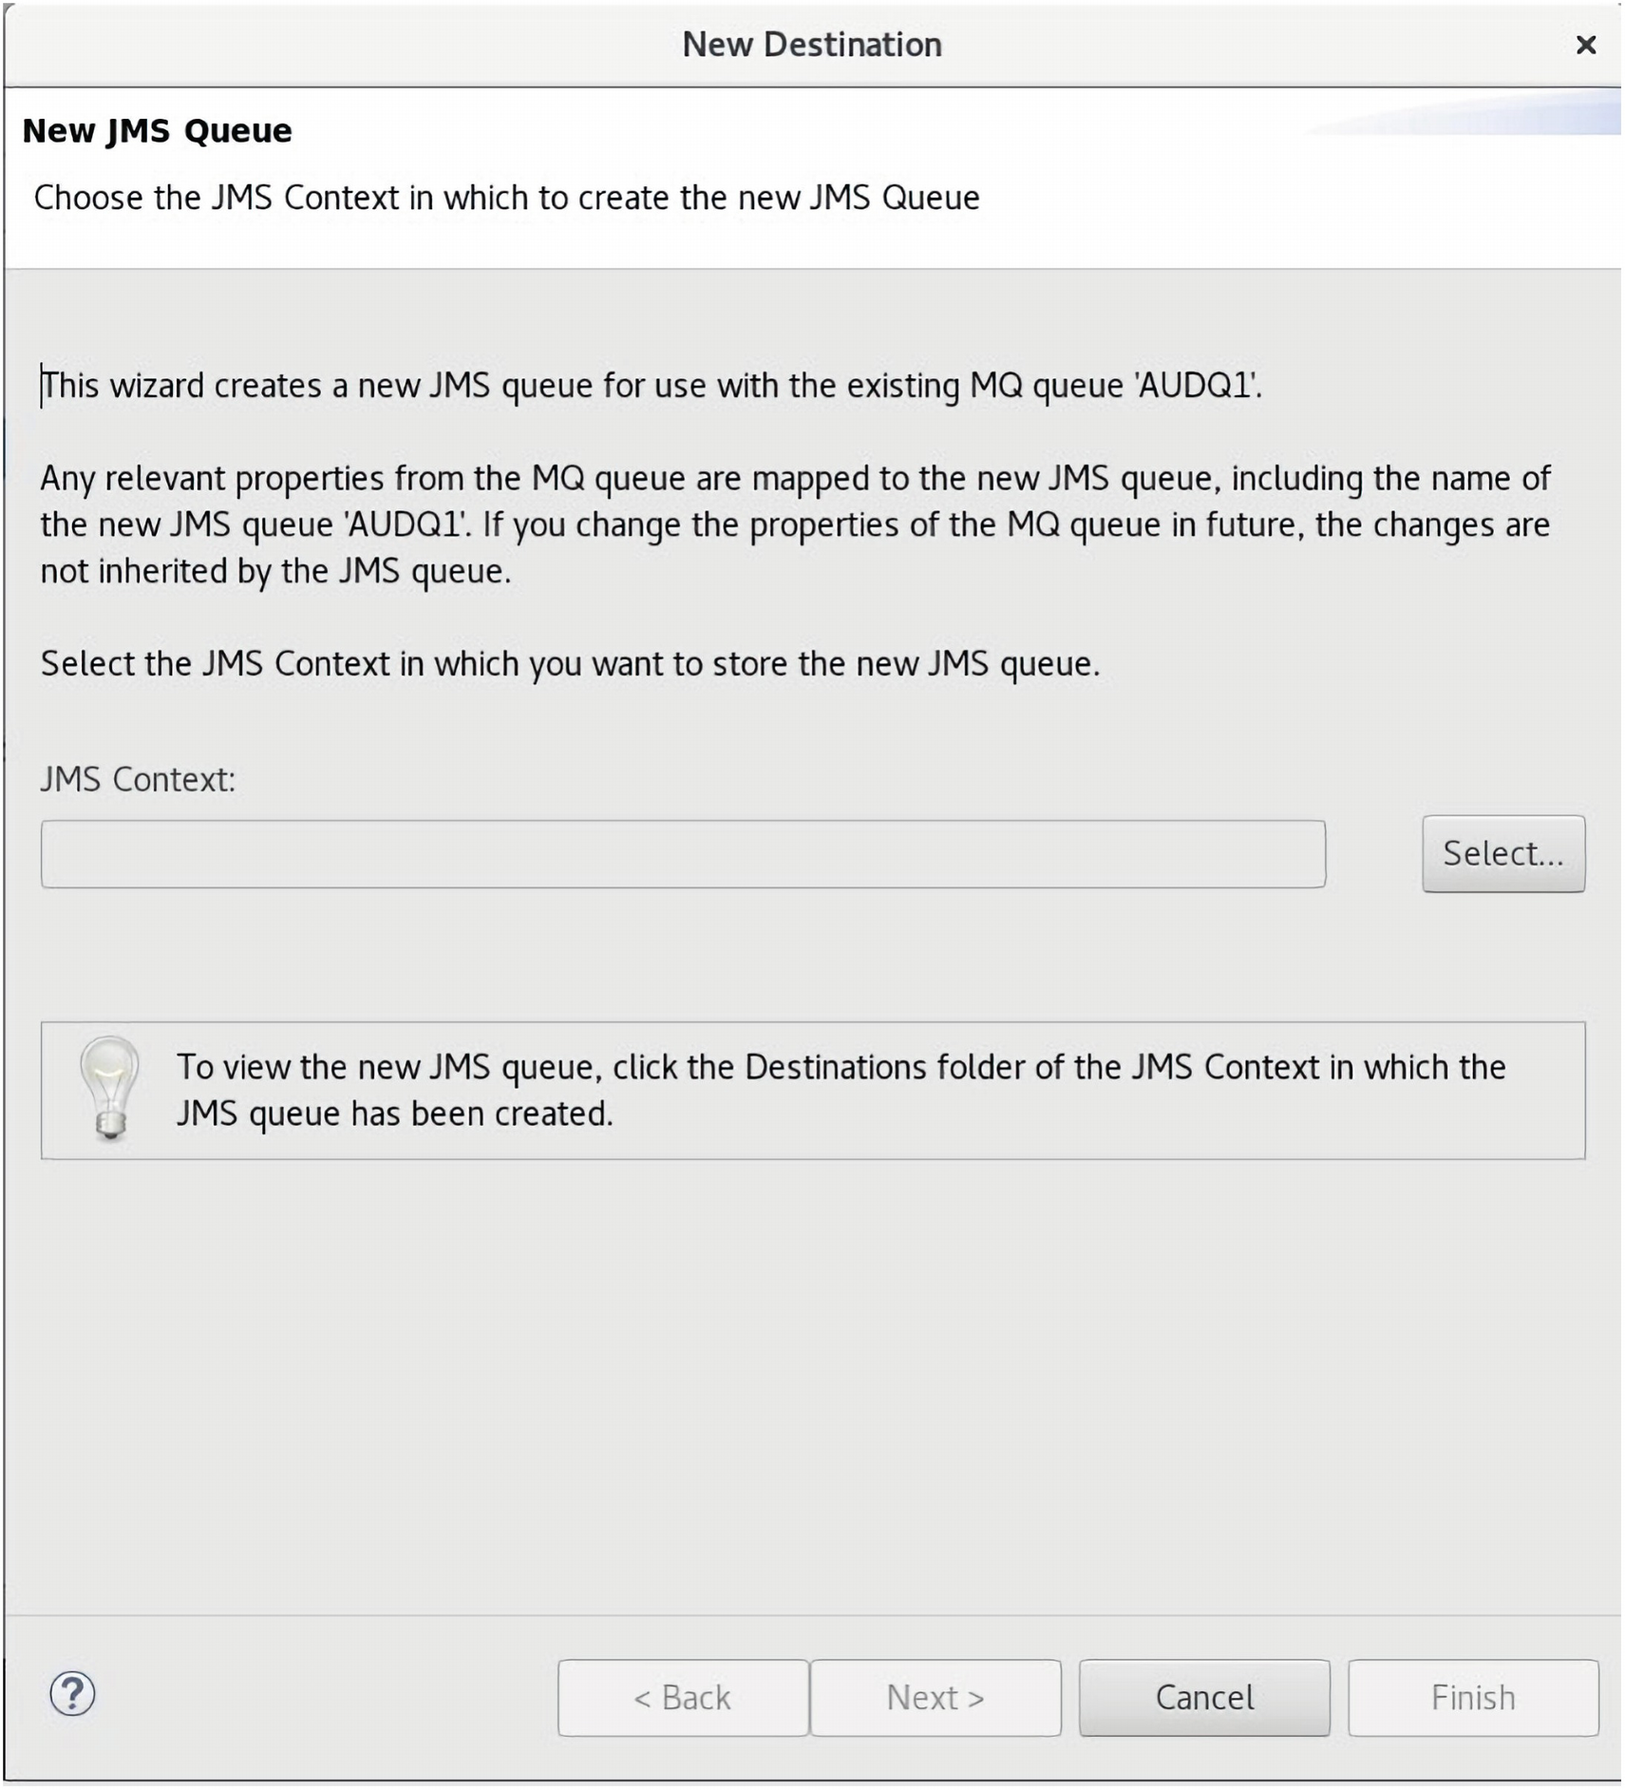
A screenshot of a window titled I B M M Q explorer. The new option is selected from the queue option. Local queue under the new option is highlighted.
The menu option to create a New Local Queue is selected using the right-mouse button click

A screenshot of a dialog box titled Select the like object. The required object type and the OK button is highlighted.
The drop-down list is scrolled down to select the required Object type

A screenshot of a dialog box titled new local queue. It exhibits create a local queue, name, start the wizard to create a matching J M S queue, and next is highlighted.
The tick box for JMS Queue creation is selected and Next> clicked

A screenshot of a dialog box titled new local queue. It exhibits queue name, type, description, default priority, and finish button.
The Finish command button is clicked
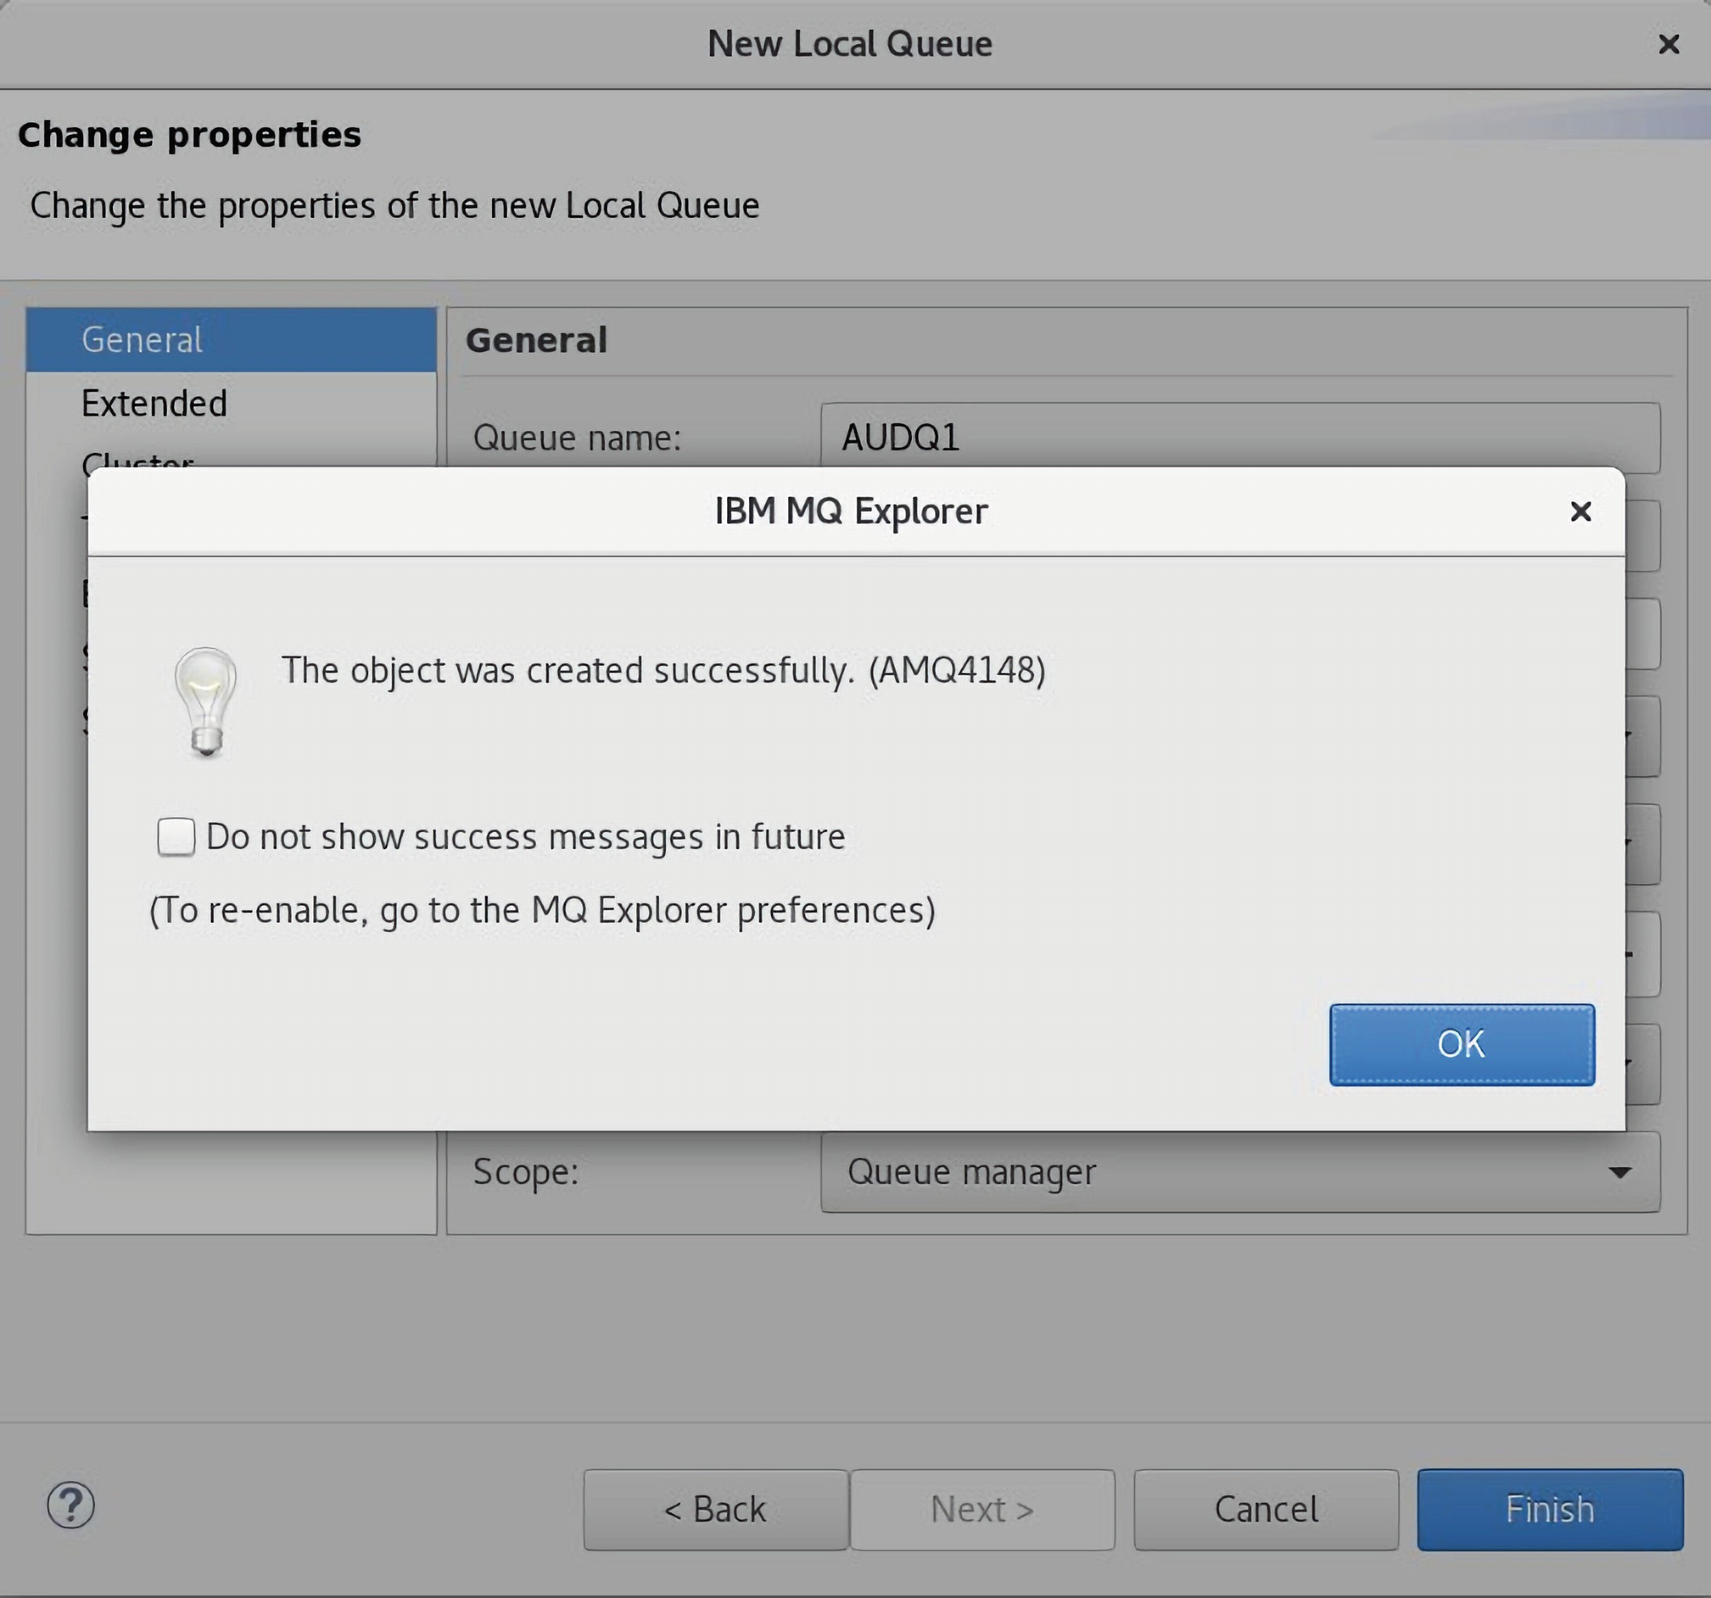
A screenshot of a dialog box titled I B M, M Q Explorer. Text reads the object was created successfully. The OK button is highlighted.
The OK command button is clicked which launches the New JMS Queue
A screenshot of a dialog box titled new destination. It exhibits new J M S queue, and space for J M S context to select the file.
The LDAP server JMS Context created earlier is shown for selection
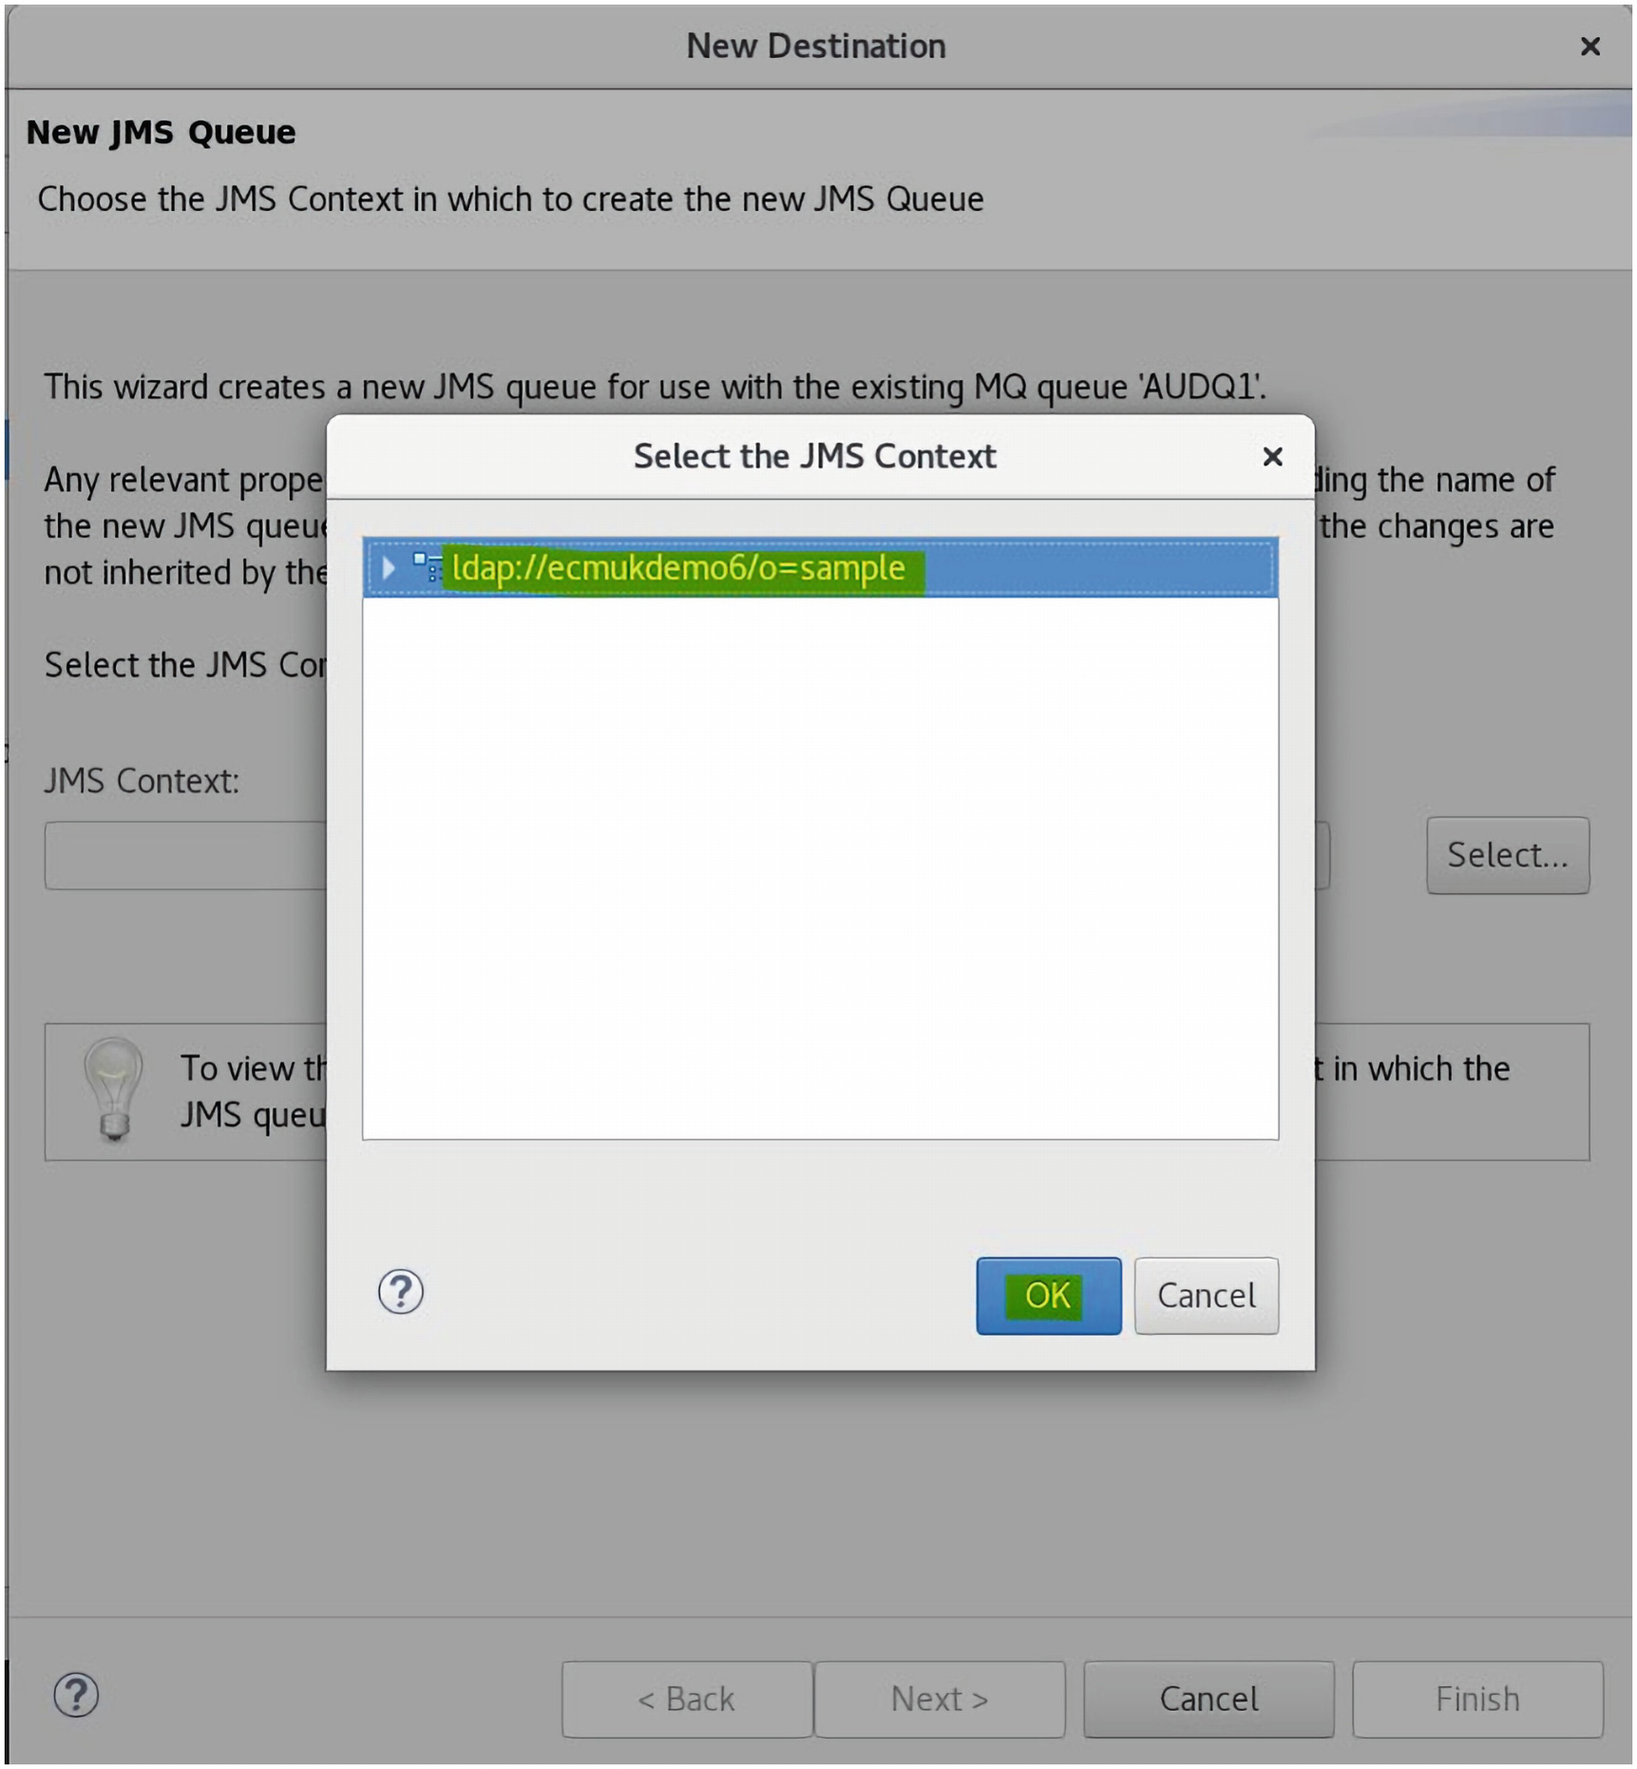
A screenshot of a dialog box titled select J M S queue context. A folder is selected and the OK button is highlighted.
The LDAP server, ecmukdemo6, URL is shown to be selected for JMS
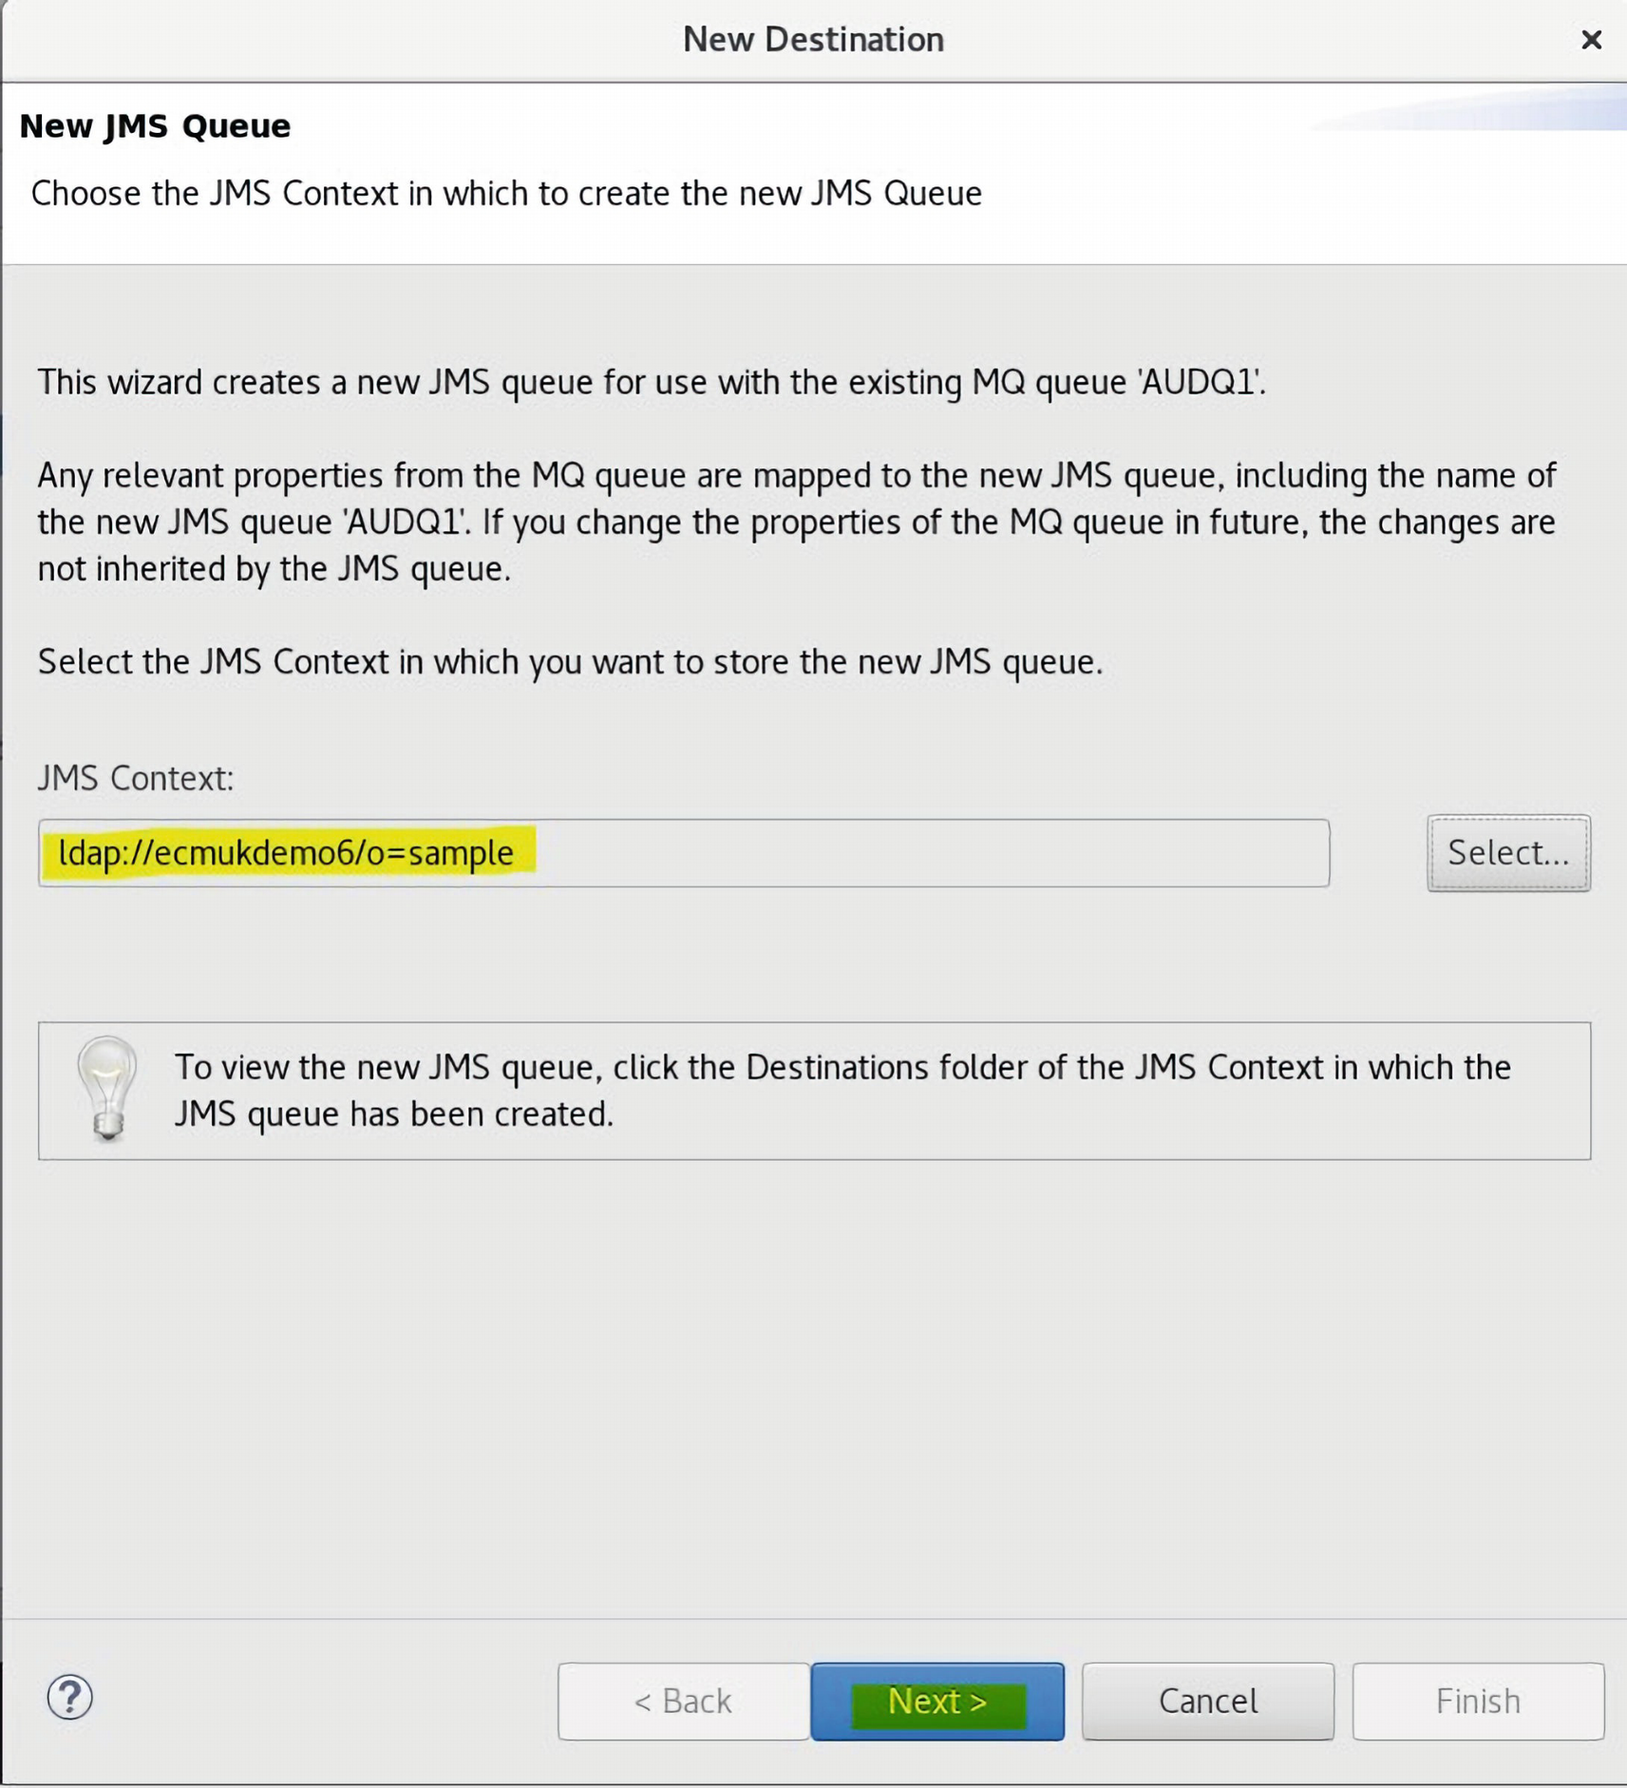
A screenshot of a dialog box titled new destination. The J M S context file and the next button are highlighted.
The Next command is used to start the creation of the new JMS queue
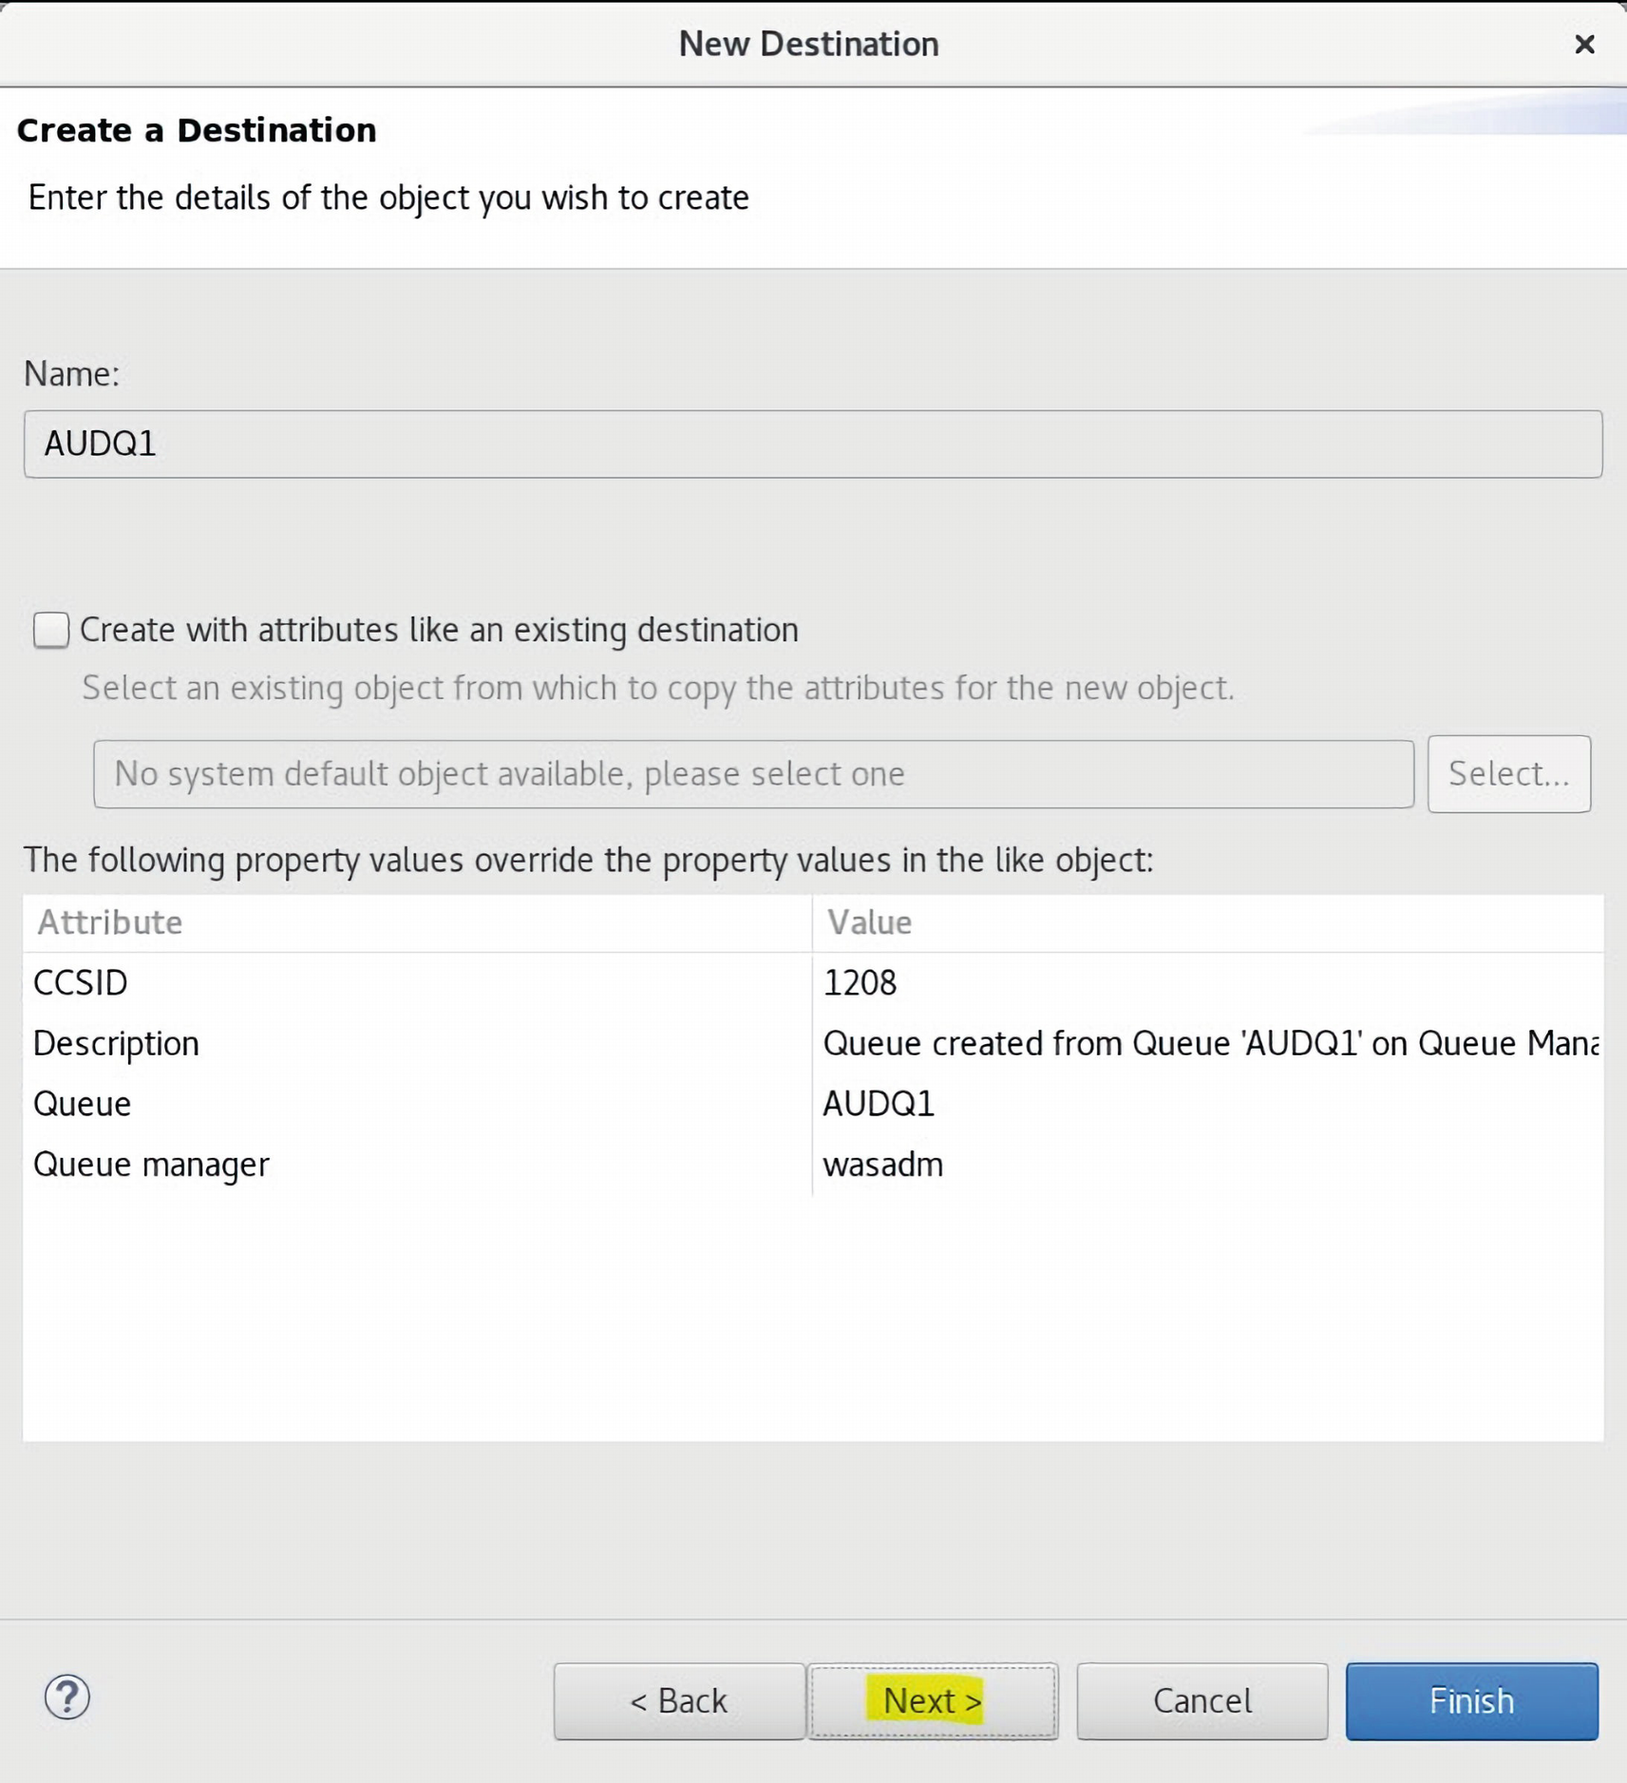
A screenshot of a dialog box titled new destination. It exhibits attributes, value, and next command finish button.
The details of the New AUDQ1 JMS Context Queue creation are displayed

A screenshot of a dialog box titled new destination. It exhibits the General tab with name, description, class name, queue, and finish button.
The Finish command is clicked

A screenshot of a window titled I B M M Q explorer. It exhibits the Queue tab with queue name, type, input count and output count.
The New AUDQ1 Queue which was created is displayed
Now we need to change the AUDQ1 to Transmission usage.
A screenshot represents the M Q explorer content, Properties under A U D Q 1 is highlighted.
The current Normal usage option property is changed to Transmission

A screenshot of a dialog box titled A U D Q 1 properties. It exhibits queue name, type, put message, get message, default persistence, scope, and usage is changed from normal to transmission.
The Usage is changed from Normal to Transmission

A screenshot represents the M Q explorer content, queue name A U D Q 1 is selected.
The AUDQ1 icon displays the type of Queue as Transmission

A screenshot of a window represents the wasadm queue manager properties selected.
The wasadm Queue Manager properties are selected
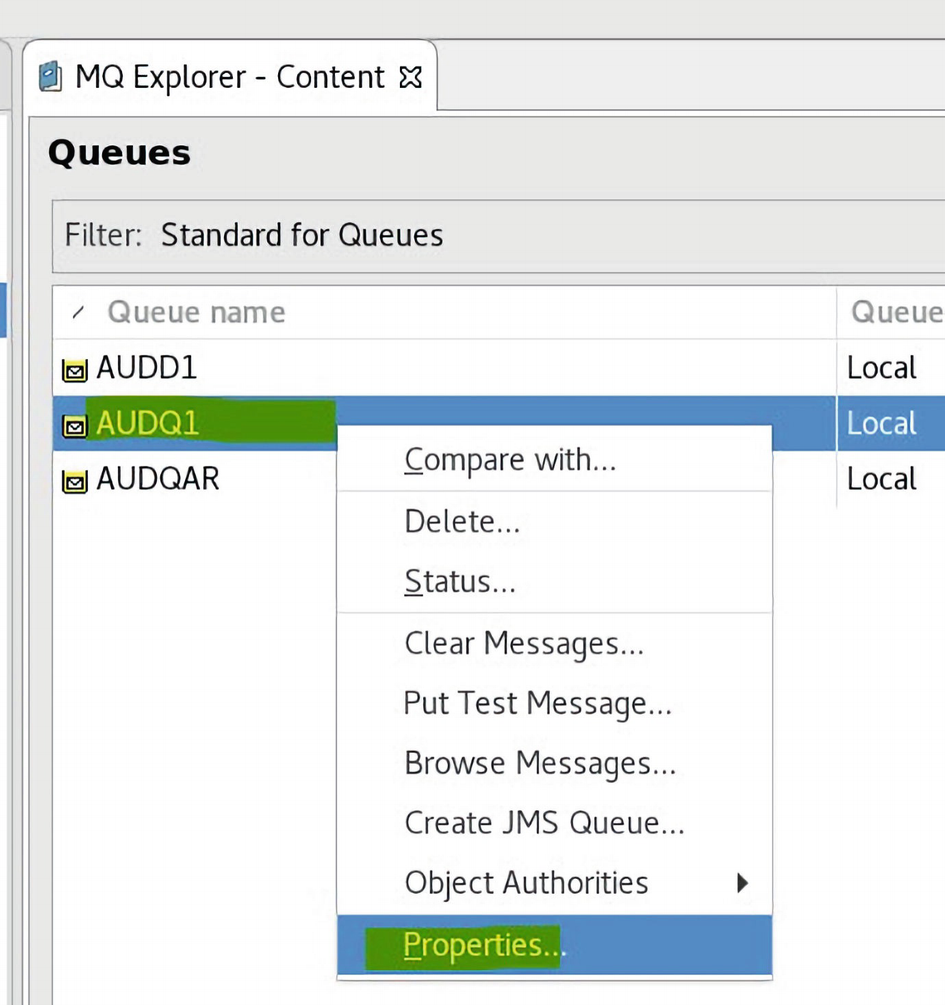
A screenshot of a dialog box titled select the default transmission queue. A U D Q 1 is selected.
The wasadm Queue Default transmission queue is set as AUDQ1
Error Log Location
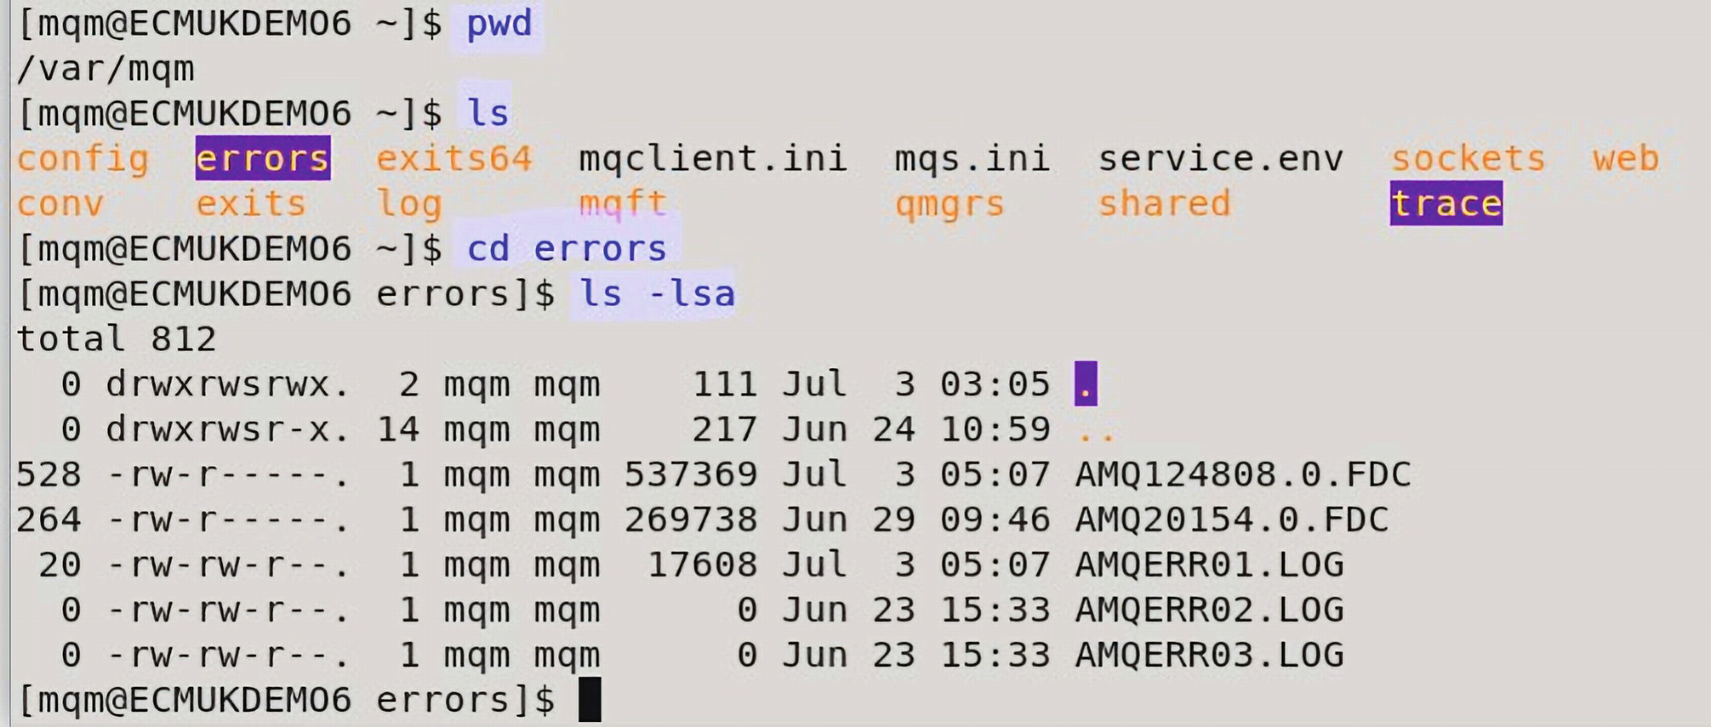
A screenshot represents the error logs found located in the errors subfolder.
The error logs are found located in the /var/mqm/errors subfolder
This was returned from the existing project.

A screenshot of a window titled I B M M Q explorer. The connection factory under New is highlighted.
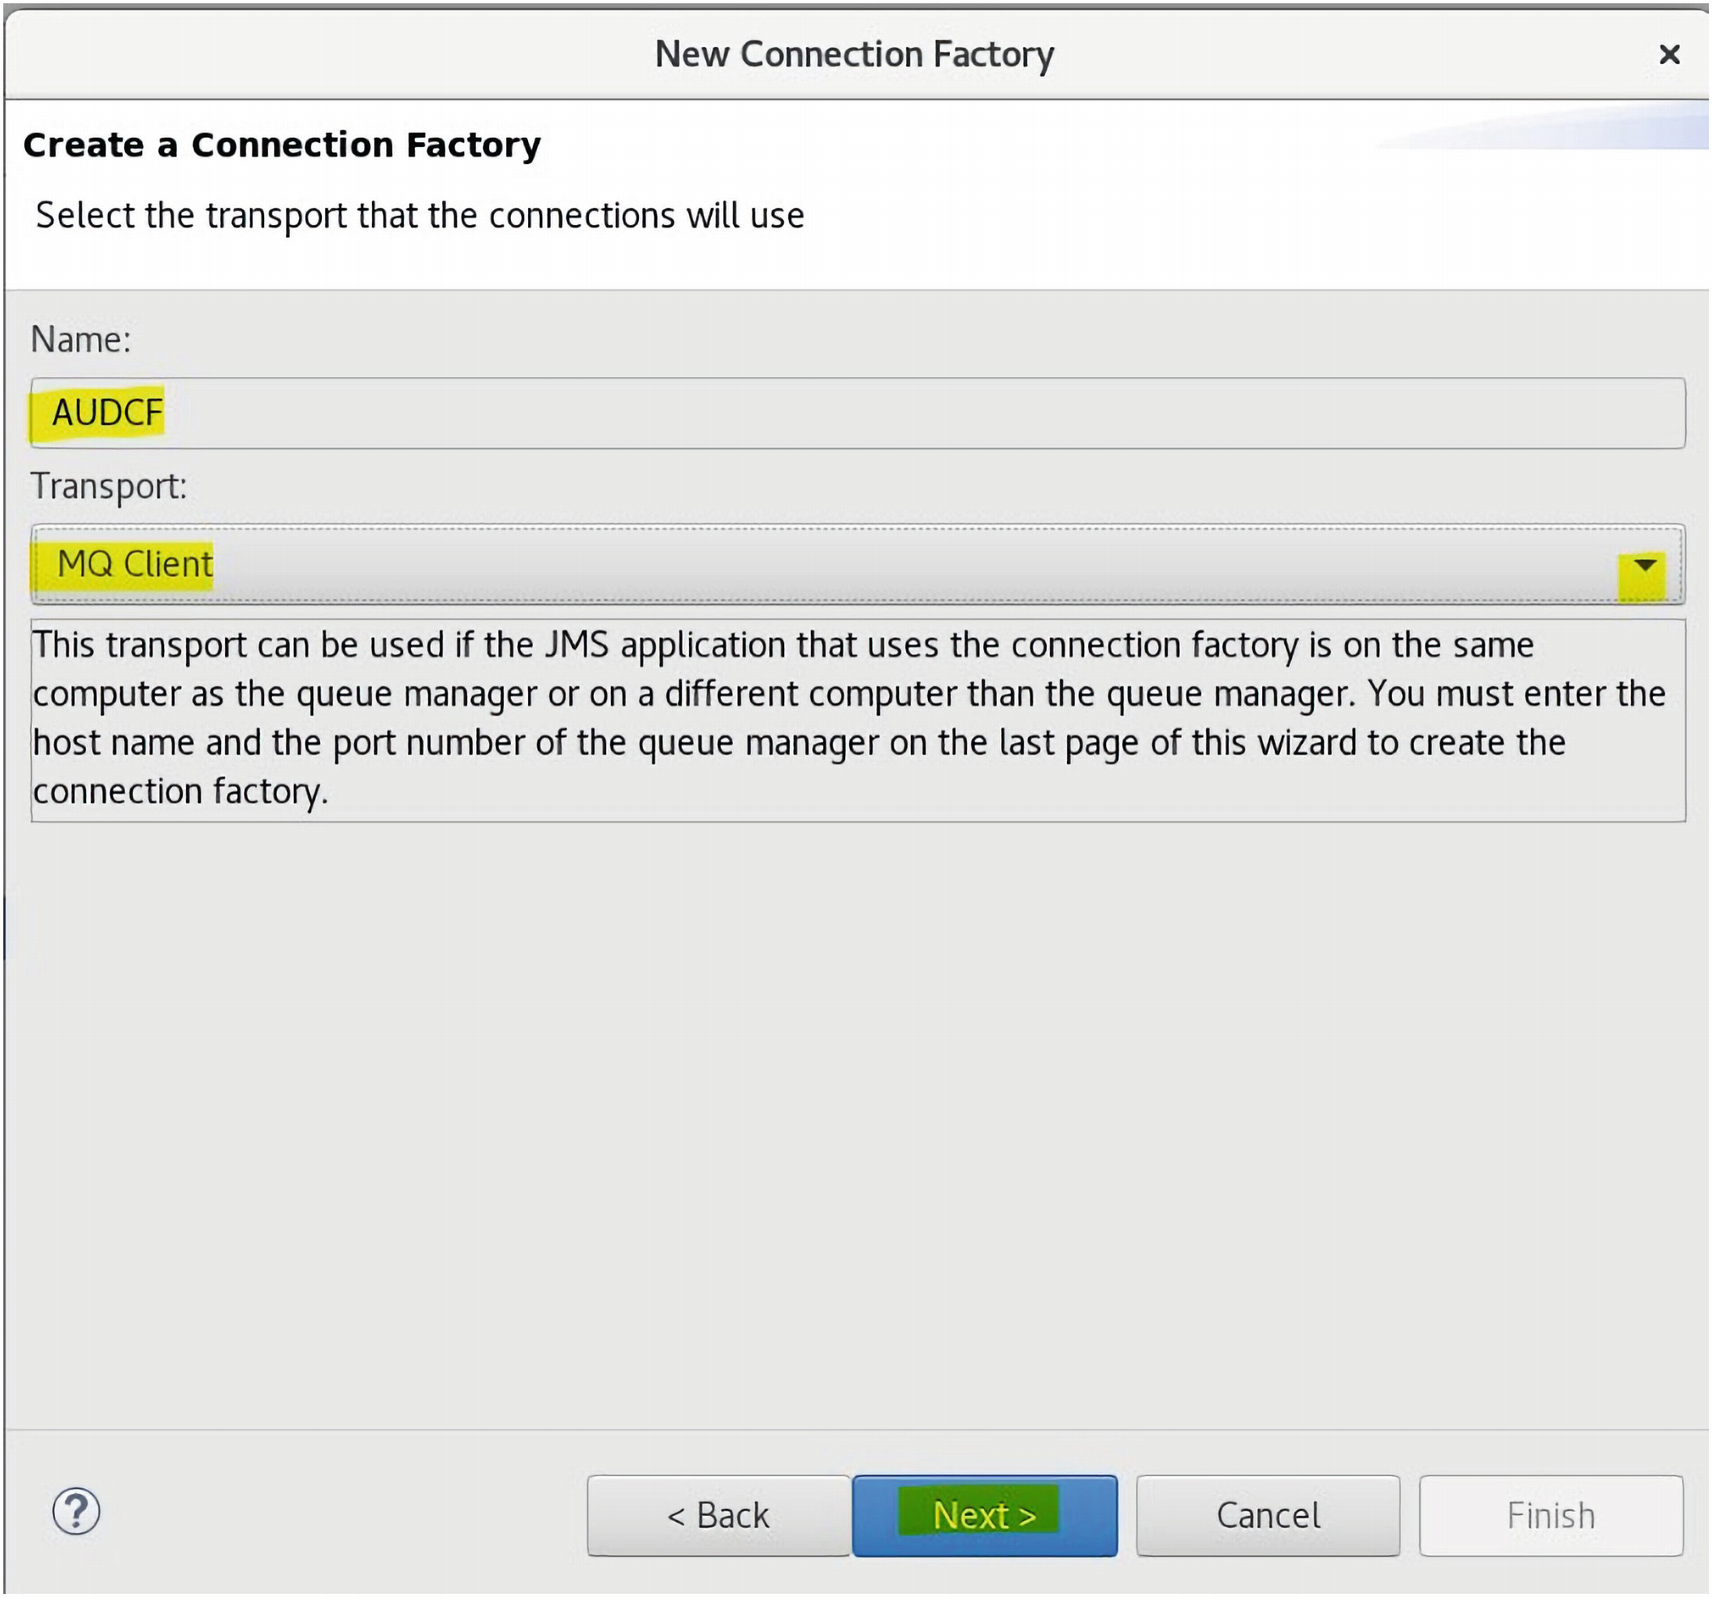
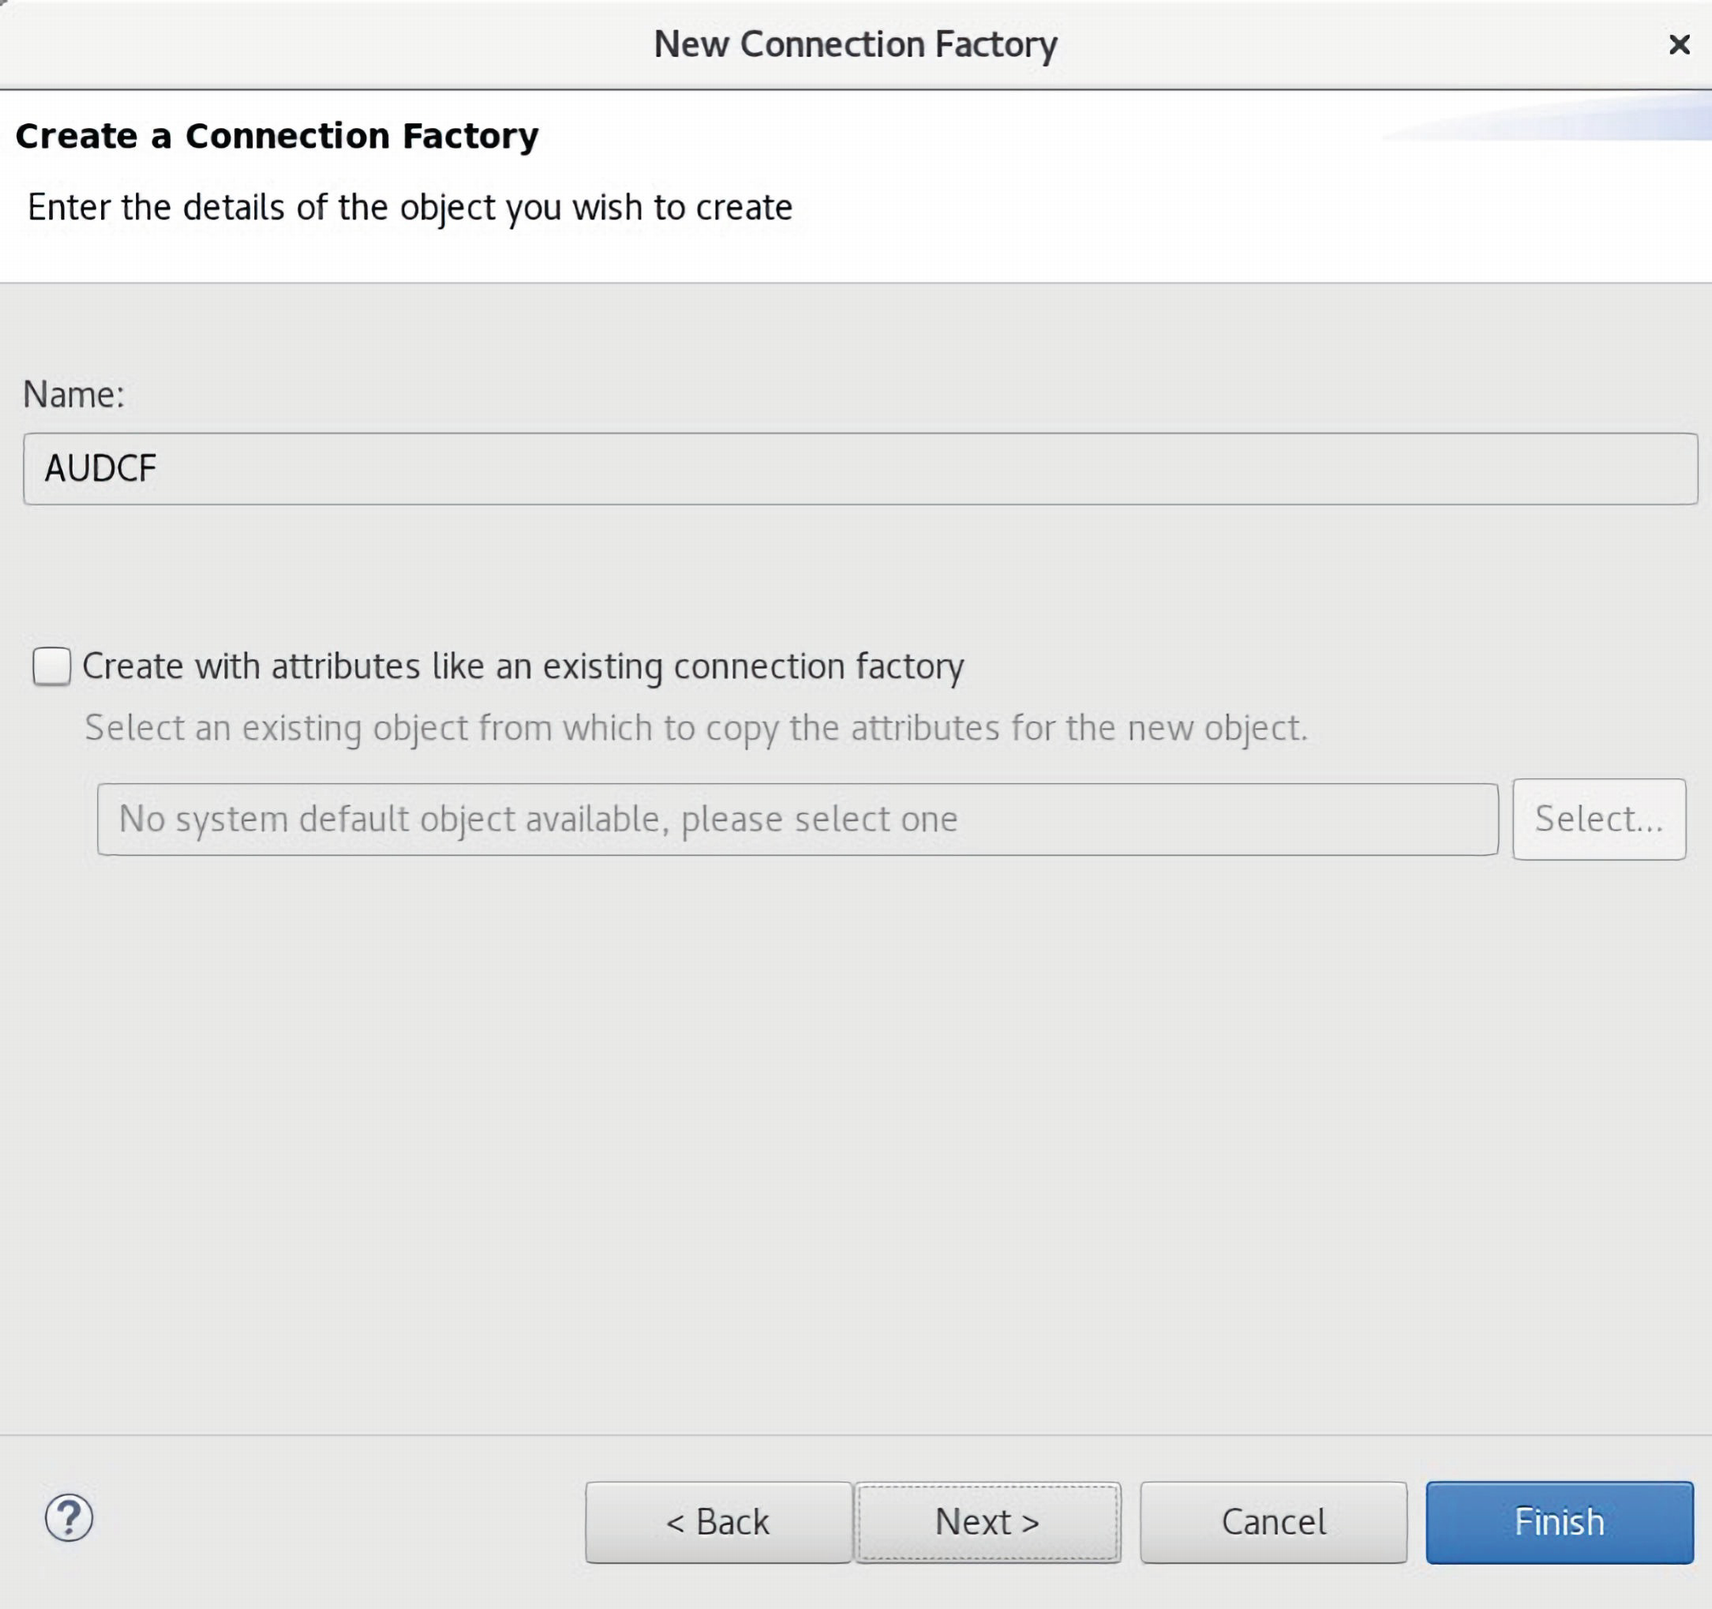
A new Connection Factory, AUDCF, is required

A screenshot of a dialog box titled New connection factory. A U D C F is entered as the name and highlighted. The next button is also highlighted.
A new Connection Factory name, AUDCF, is entered and Next clicked

A screenshot of a dialog box titled New connection factory. The name A U D C F, type connection factory, and next command are highlighted.
The Connection Factory download option is clicked
A screenshot of a dialog box titled New connection factory. The name A U D C F, transport M Q client and the next command are highlighted.
The Connection Factory option for Transport is selected as MQ Client
A screenshot of a dialog box titled New connection factory. The name A U D C F is selected. The finish button is highlighted.
The Next command button is selected to leave the defaults

A screenshot of a dialog box titled New connection factory. It exhibits name, description, class name, provider version, under the general tab and finish button.
The Description is added and a Provider Version selected as highlighted

A screenshot of a dialog box titled New connection factory. It exhibits base queue manager, broke queue manager, connection list, local address, connection tag and finish button.
The Connection options are entered

A screenshot of a dialog box titled New connection factory. It exhibits channels, client channel definition table U R L, header, message compression, and finish button.
The Finish command is used to create the AUDCF Queue
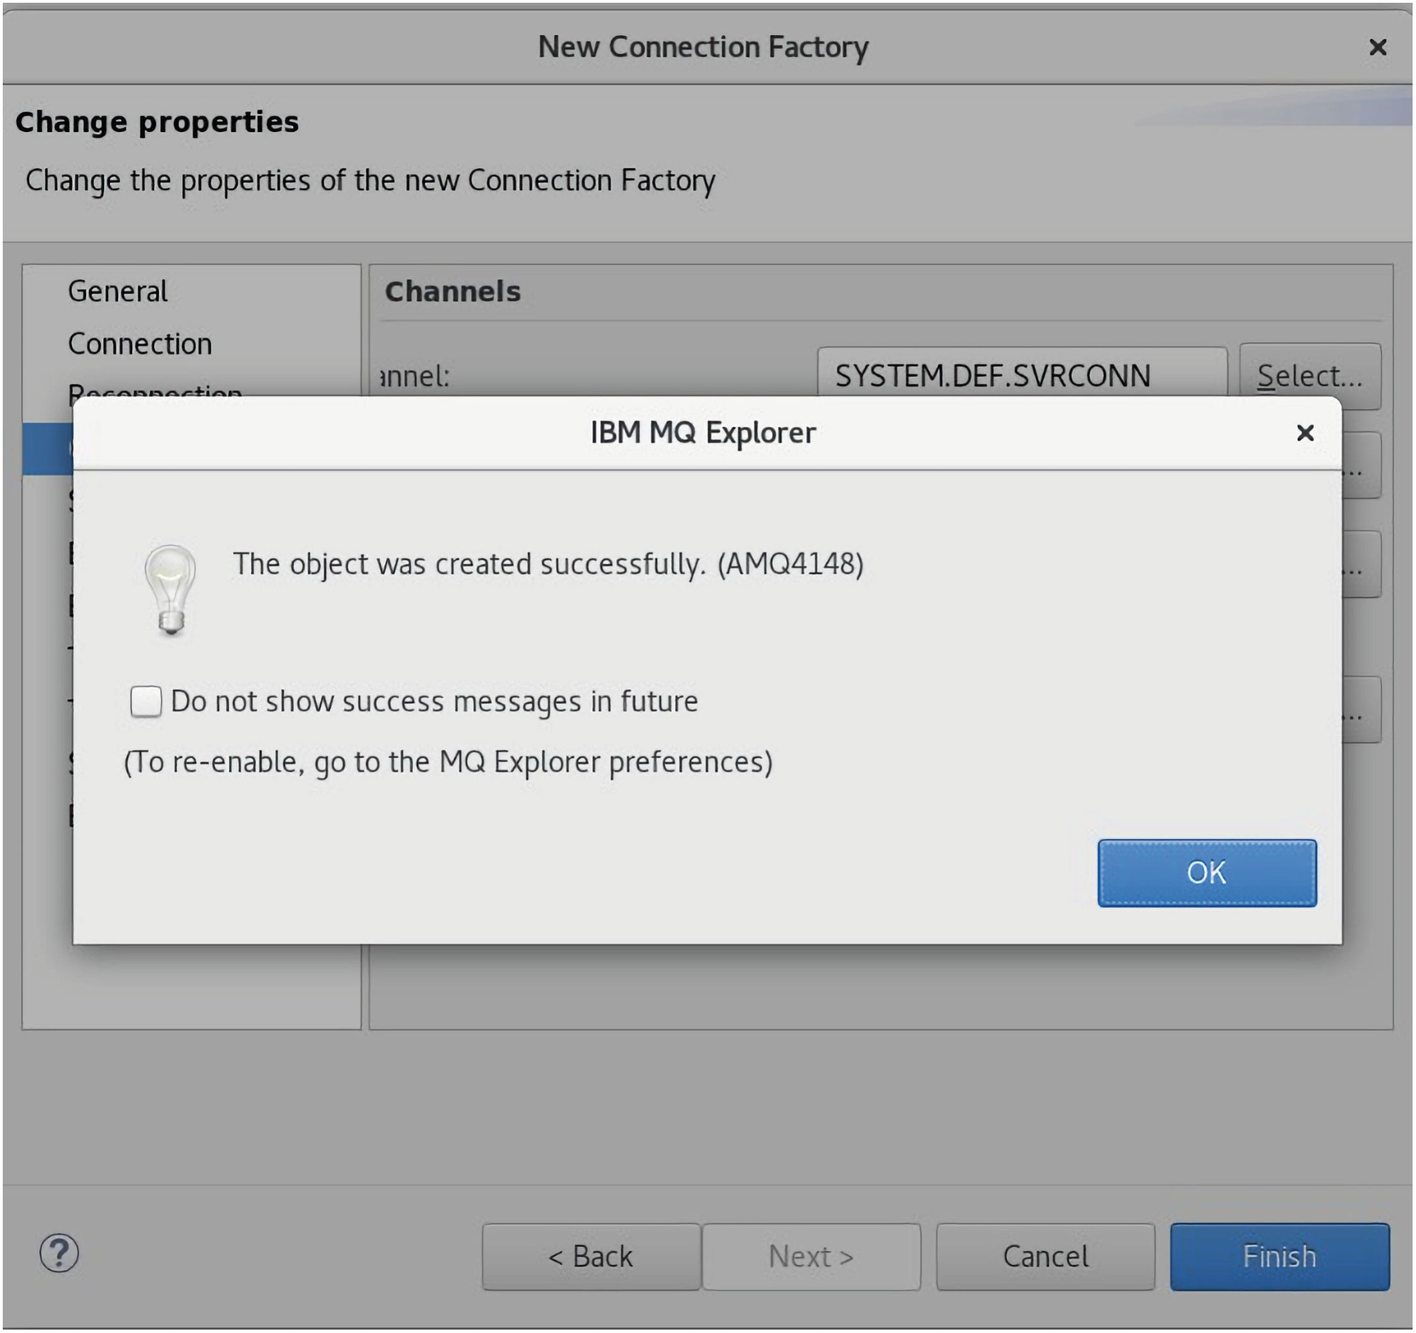
A screenshot of a dialog box titled I B M, M Q Explorer. Text reads the object was created successfully. The OK button is highlighted.
The success message window is displayed for the AUDCF Queue

A screenshot of a window titled I B M M Q explorer. Create J M S queue under A U D Q A R option in the Queues tab is highlighted.
The AUDQAR Queue is selected to create a JMS Queue

A screenshot of a dialog box titled New destination. It exhibits J M S context, and next button.
The JMS LDAP Context created earlier is linked to the AUDQAR Queue

A screenshot of a dialog box titled New destination. It exhibits create a destination, name, messaging provider, type, and next button.
The JMS Object is set with the name AUDQAR and Next> clicked

A screenshot of a dialog box titled New destination. Create with attributes like an existing destination is selected.
The Attributes to be created for the AUDQAR JMS entry are displayed
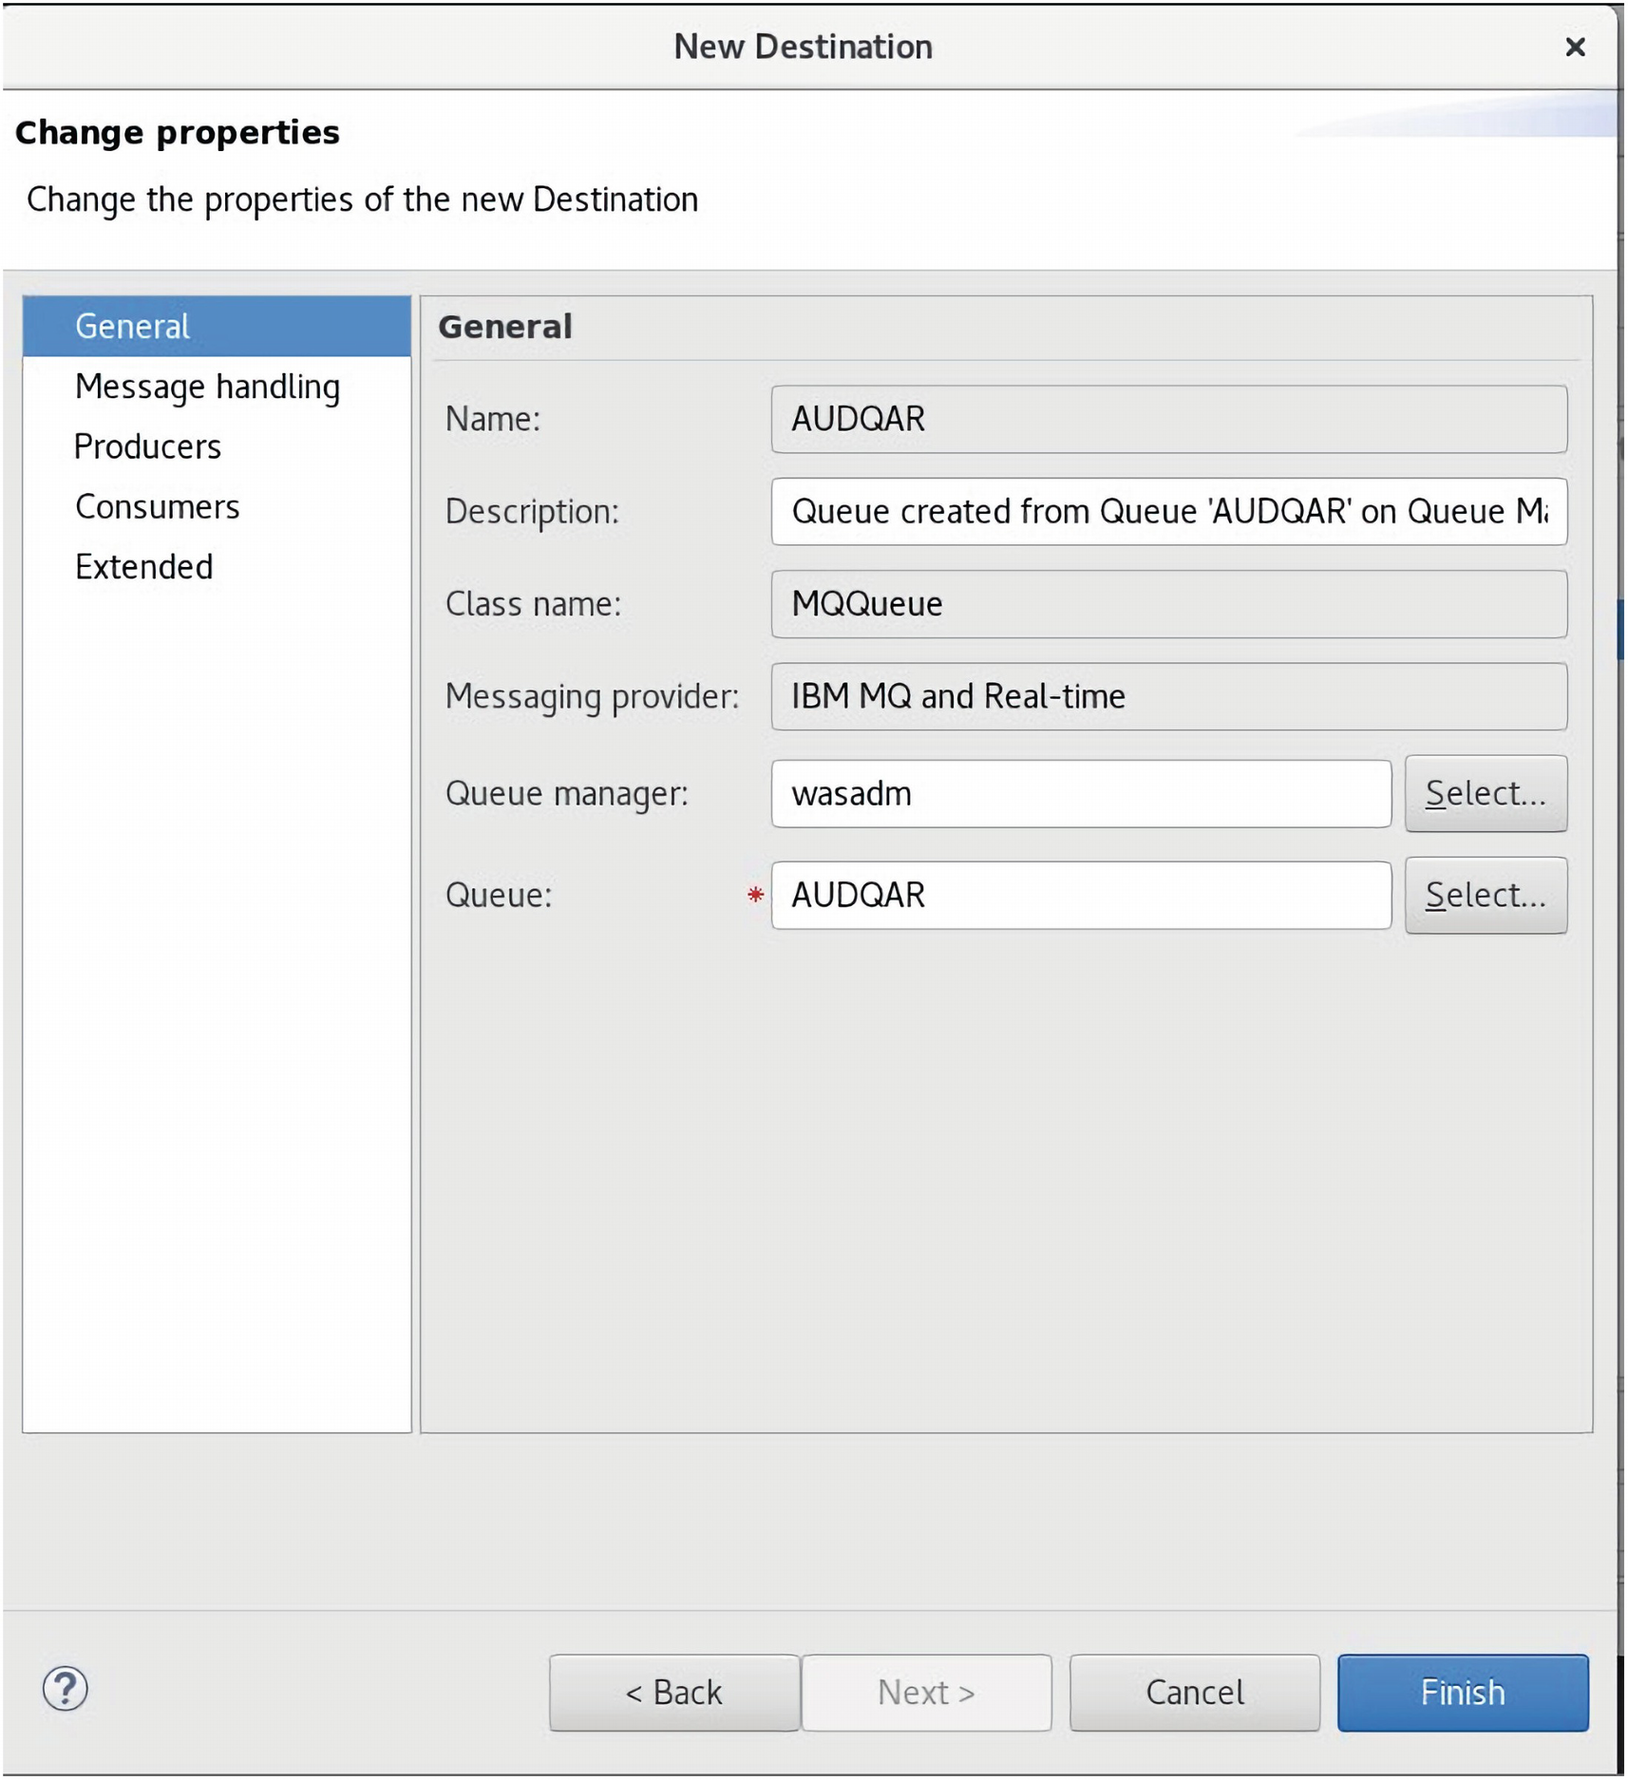
A screenshot of a dialog box titled New destination. It exhibits a general tab containing name, description, class name, messaging provider, queue, and finish button.
The Finish command is clicked to create the AUDQAR JMS Queue

A screenshot of a dialog box titled I B M, M Q Explorer. Text reads the object was created successfully. The OK button is highlighted.
The AUDQAR JMS Queue entry is shown as successfully created

A screenshot of a dialog box titled w a s a d m Find authorities. The profile name is set to A U D Q C F and the find button is highlighted.
The Find Accumulated Authorities are searched for the AUDQCF factory

A screenshot of a dialog box titled edit authorities. It includes entity type, name, object type, profile name, queue manager name, and authorities with an ok button.
The Edit Authorities attributes are all selected using the Select all button
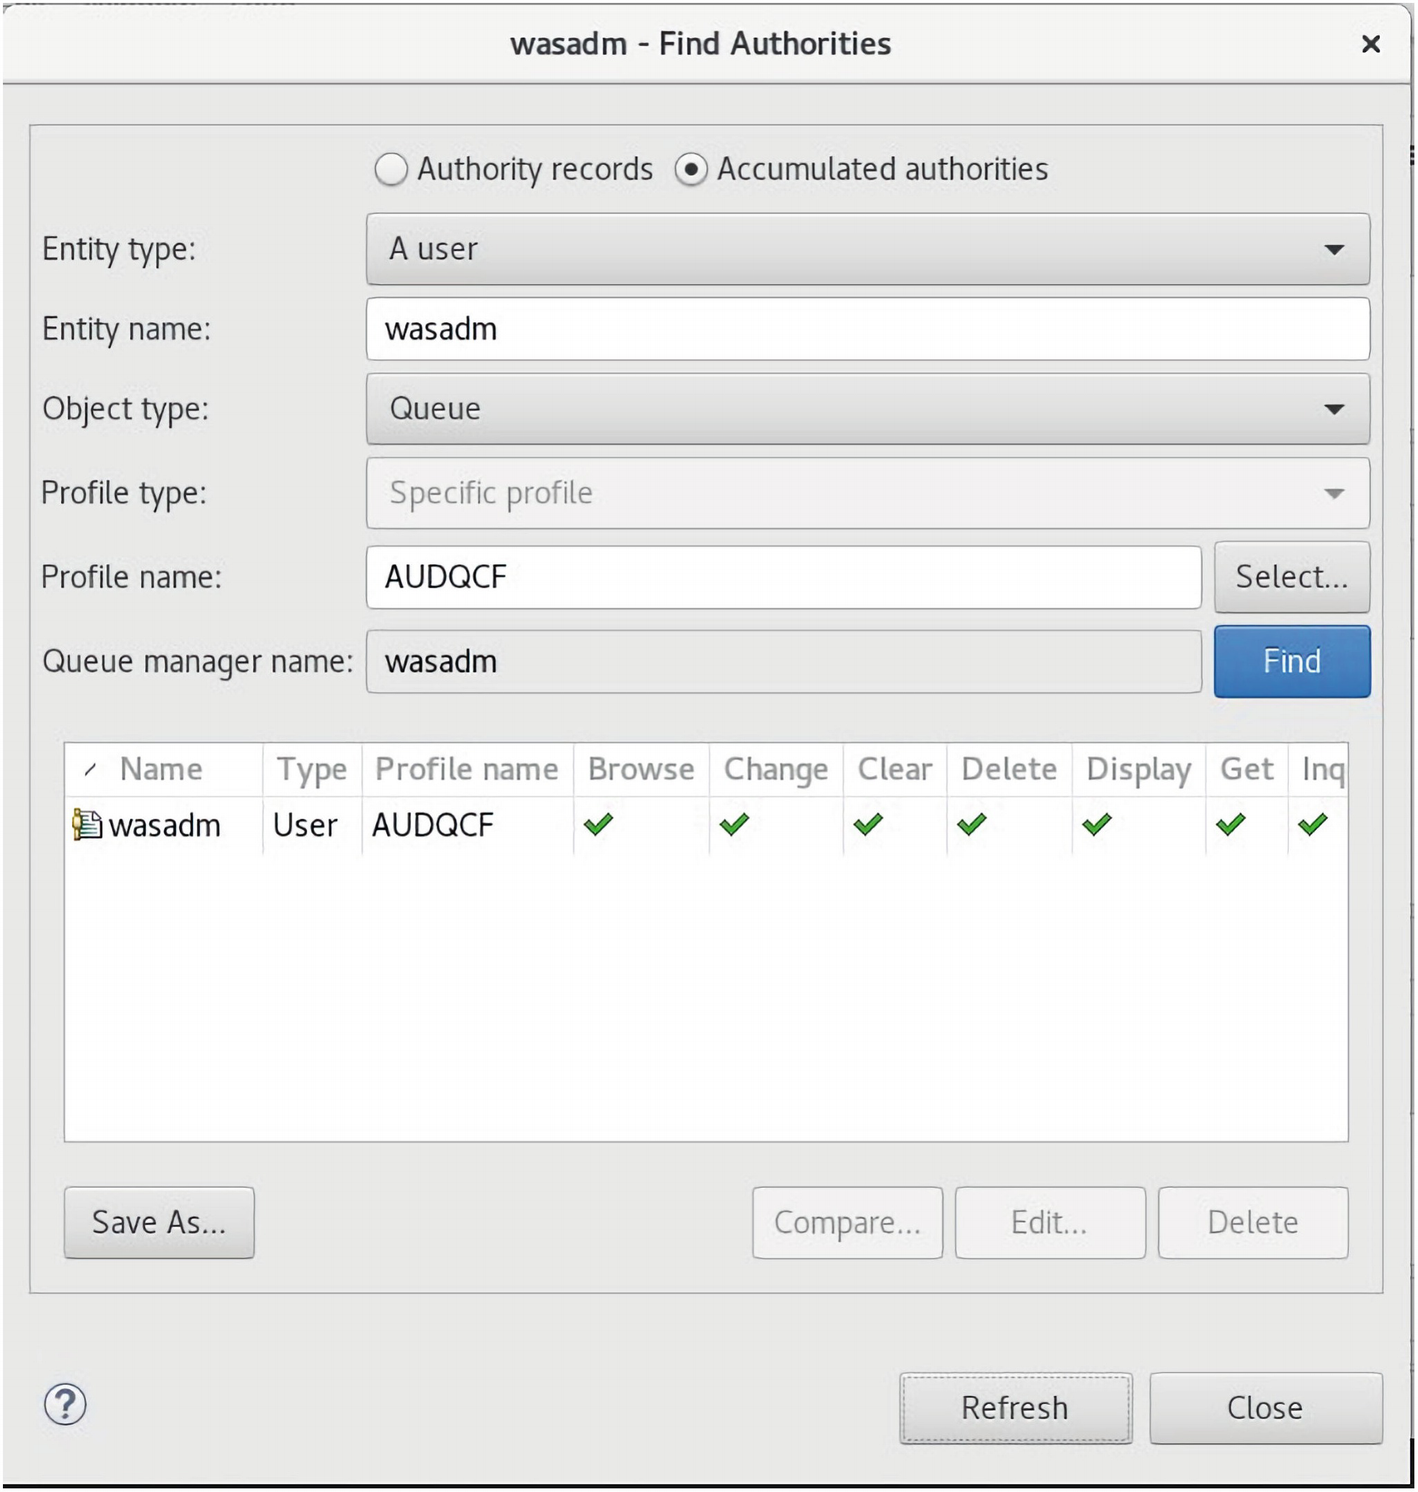
A screenshot of a dialog box titled w a s a d m Find authorities. It represents the w a s a d m user to have the full set of security options.
The wasadm user is shown to have the full set of security options

A screenshot represents the J M S Administratives objects. Connection factory under new option is highlighted.
The JMS Connection Factories New Connection Factory menu is clicked

A screenshot of a dialog box titled new connection factory, is set as A U D C F 3.
The name of the new Connection Factory is set as AUDCF3

A screenshot of a dialog box titled new connection factory. It represents the support X A transactions option.
The AUDCF3 Connection Factory is set without the Support XA Transactions option

A screenshot of a dialog box titled new connection factory. Connection factory attributes are exhibited.
The AUDCF3 Connection Factory attributes are displayed and Next> clicked

A screenshot of a dialog box titled new connection factory. It represents the A U D C F 3 connection factory defaults used.
The AUDCF3 Connection Factory defaults are used

A screenshot of a dialog box titled new connection factory. It represents base queue manager, broke queue manager, connection list, coded character set I D, local address, and connect options.
The Connection details are set

A screenshot of create queue manager with enter basic values. Oueue manager name A U D Q M, Default transmission queue A U D Q M T, and dead letter queue A U D Q M T D are highlighted. At the bottom of the page, next button is highlighted.
The AUDQM manager and Transmission and Dead-Letter Queue details are entered

A screenshot of queue manager for use circular logging. Log file size, primary files, and secondary files are labeled 4096, 3, 2, respectively. Data and log paths have use default paths checked and next tab is highlighted at the bottom.
The logging details are left as the defaults and Next> clicked

A screenshot of create queue manager and the manager name A U D Q M. Check box for create listener configured for T C P forward slash I P is checked. Below it listen on port number 1417 is labeled and finish tab at the bottom right is highlighted.
The Listener option is ticked for TCP/IP, and the port number is set to 1417

A screenshot of create queue manager for enter M Q explorer options. Checkboxs for autoreconnect, automatically refresh information shown for this queue manager are checked. At the bottom right finish tab is highlighted.
The autoreconnect and refresh options are set with 15-second default
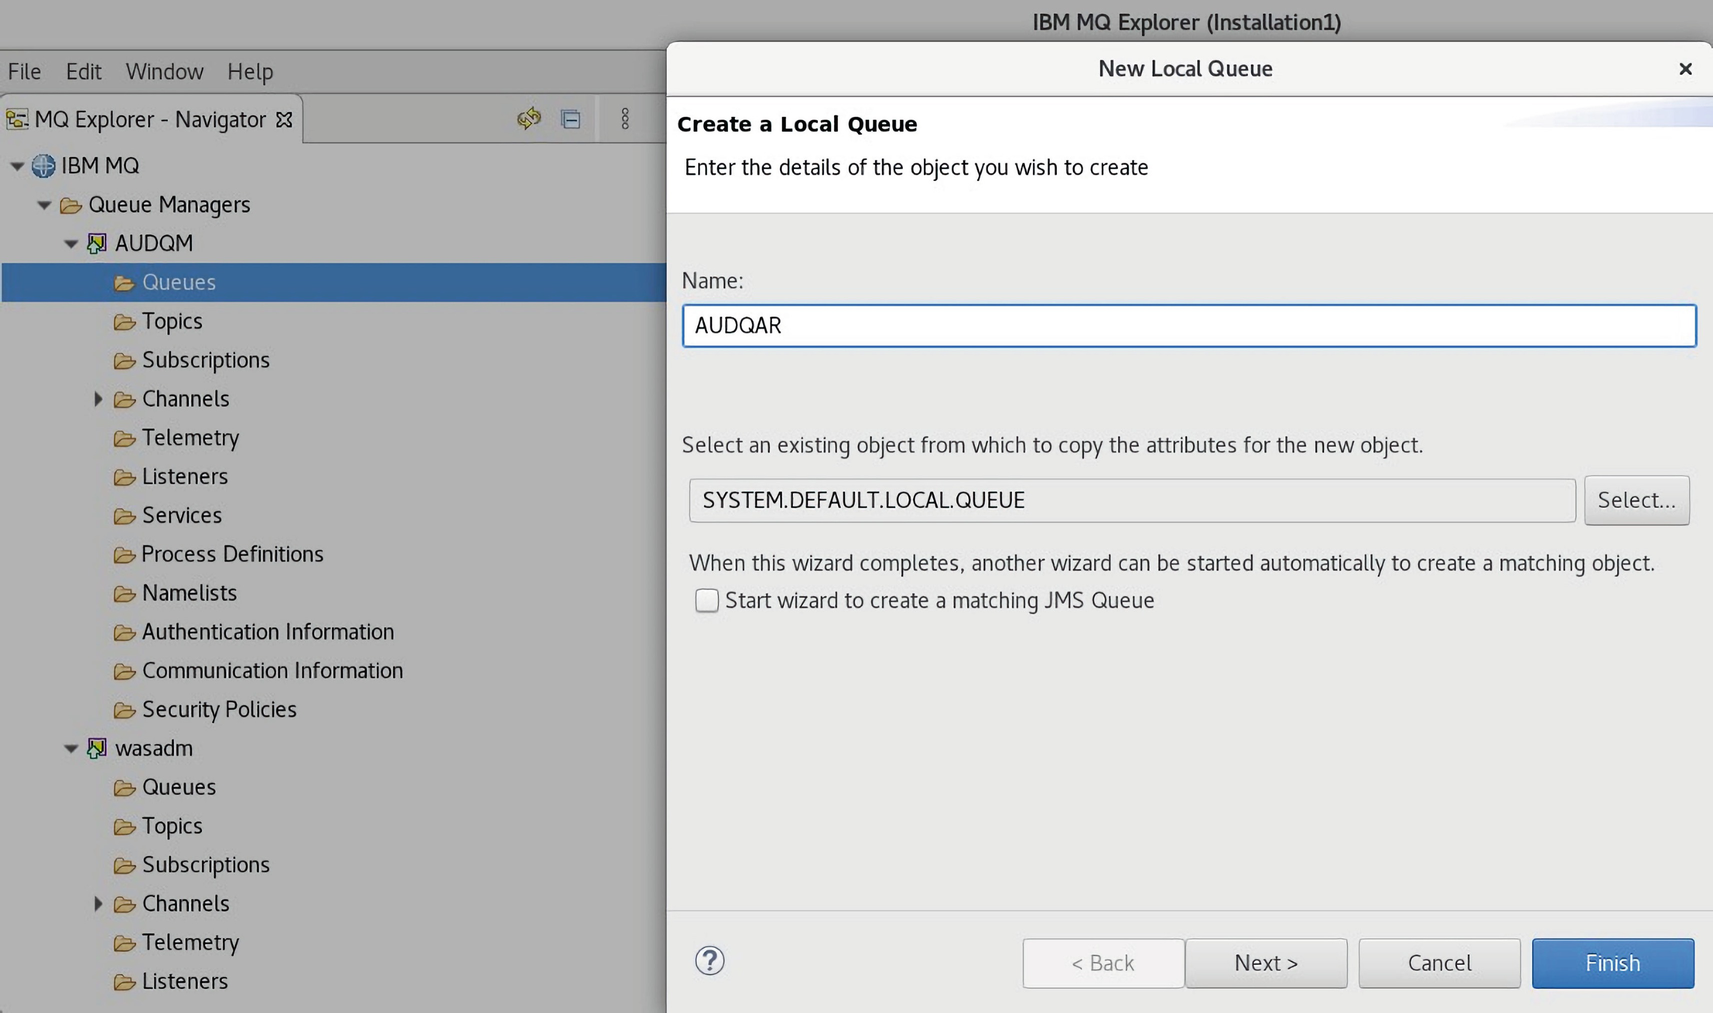
A screenshot of the queue window based on the system default local queue on the right with finish tab highlighted on the bottom right.
The attributes of the Queue are based on the default Local Queue
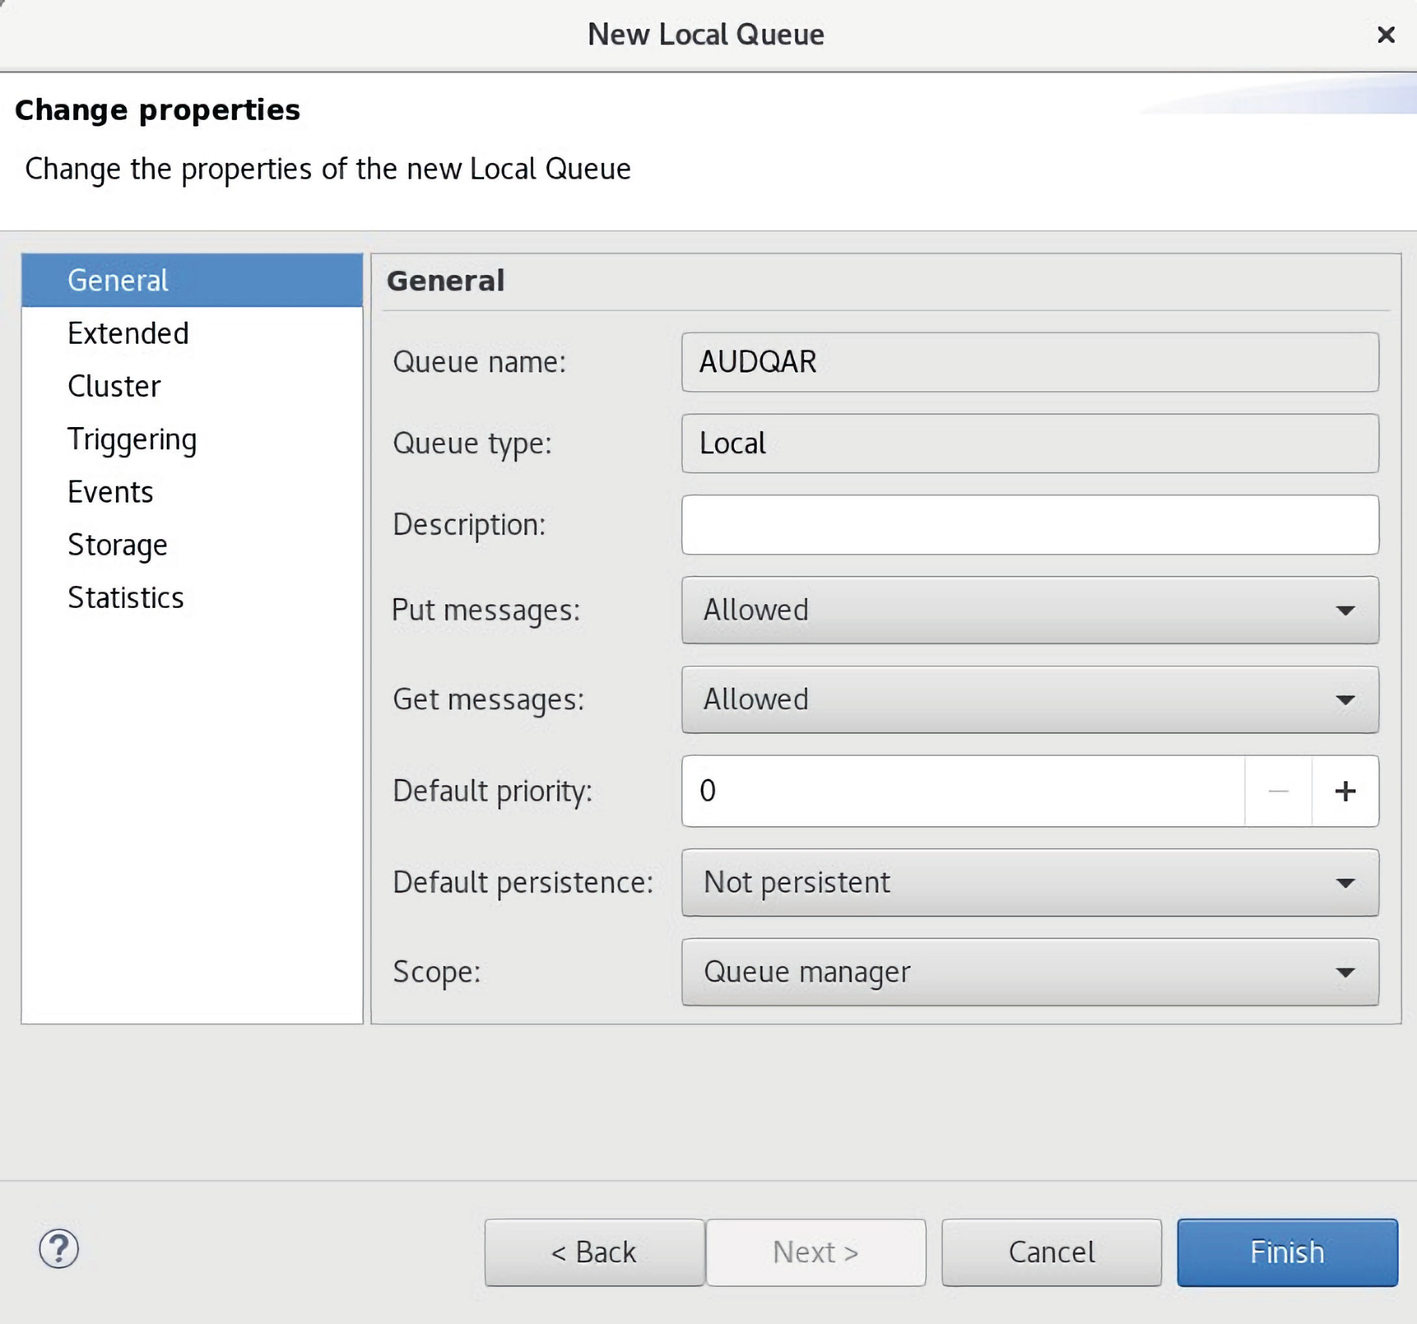
A screenshot of new local queue window to change the properties of the new local queue. General tab is highlighted with a panel on the right and the queue name is A U D Q A R. Finish tab is highlighted on the bottom right of the page.
The Finish command is used to create the AUDQAR Local Queue
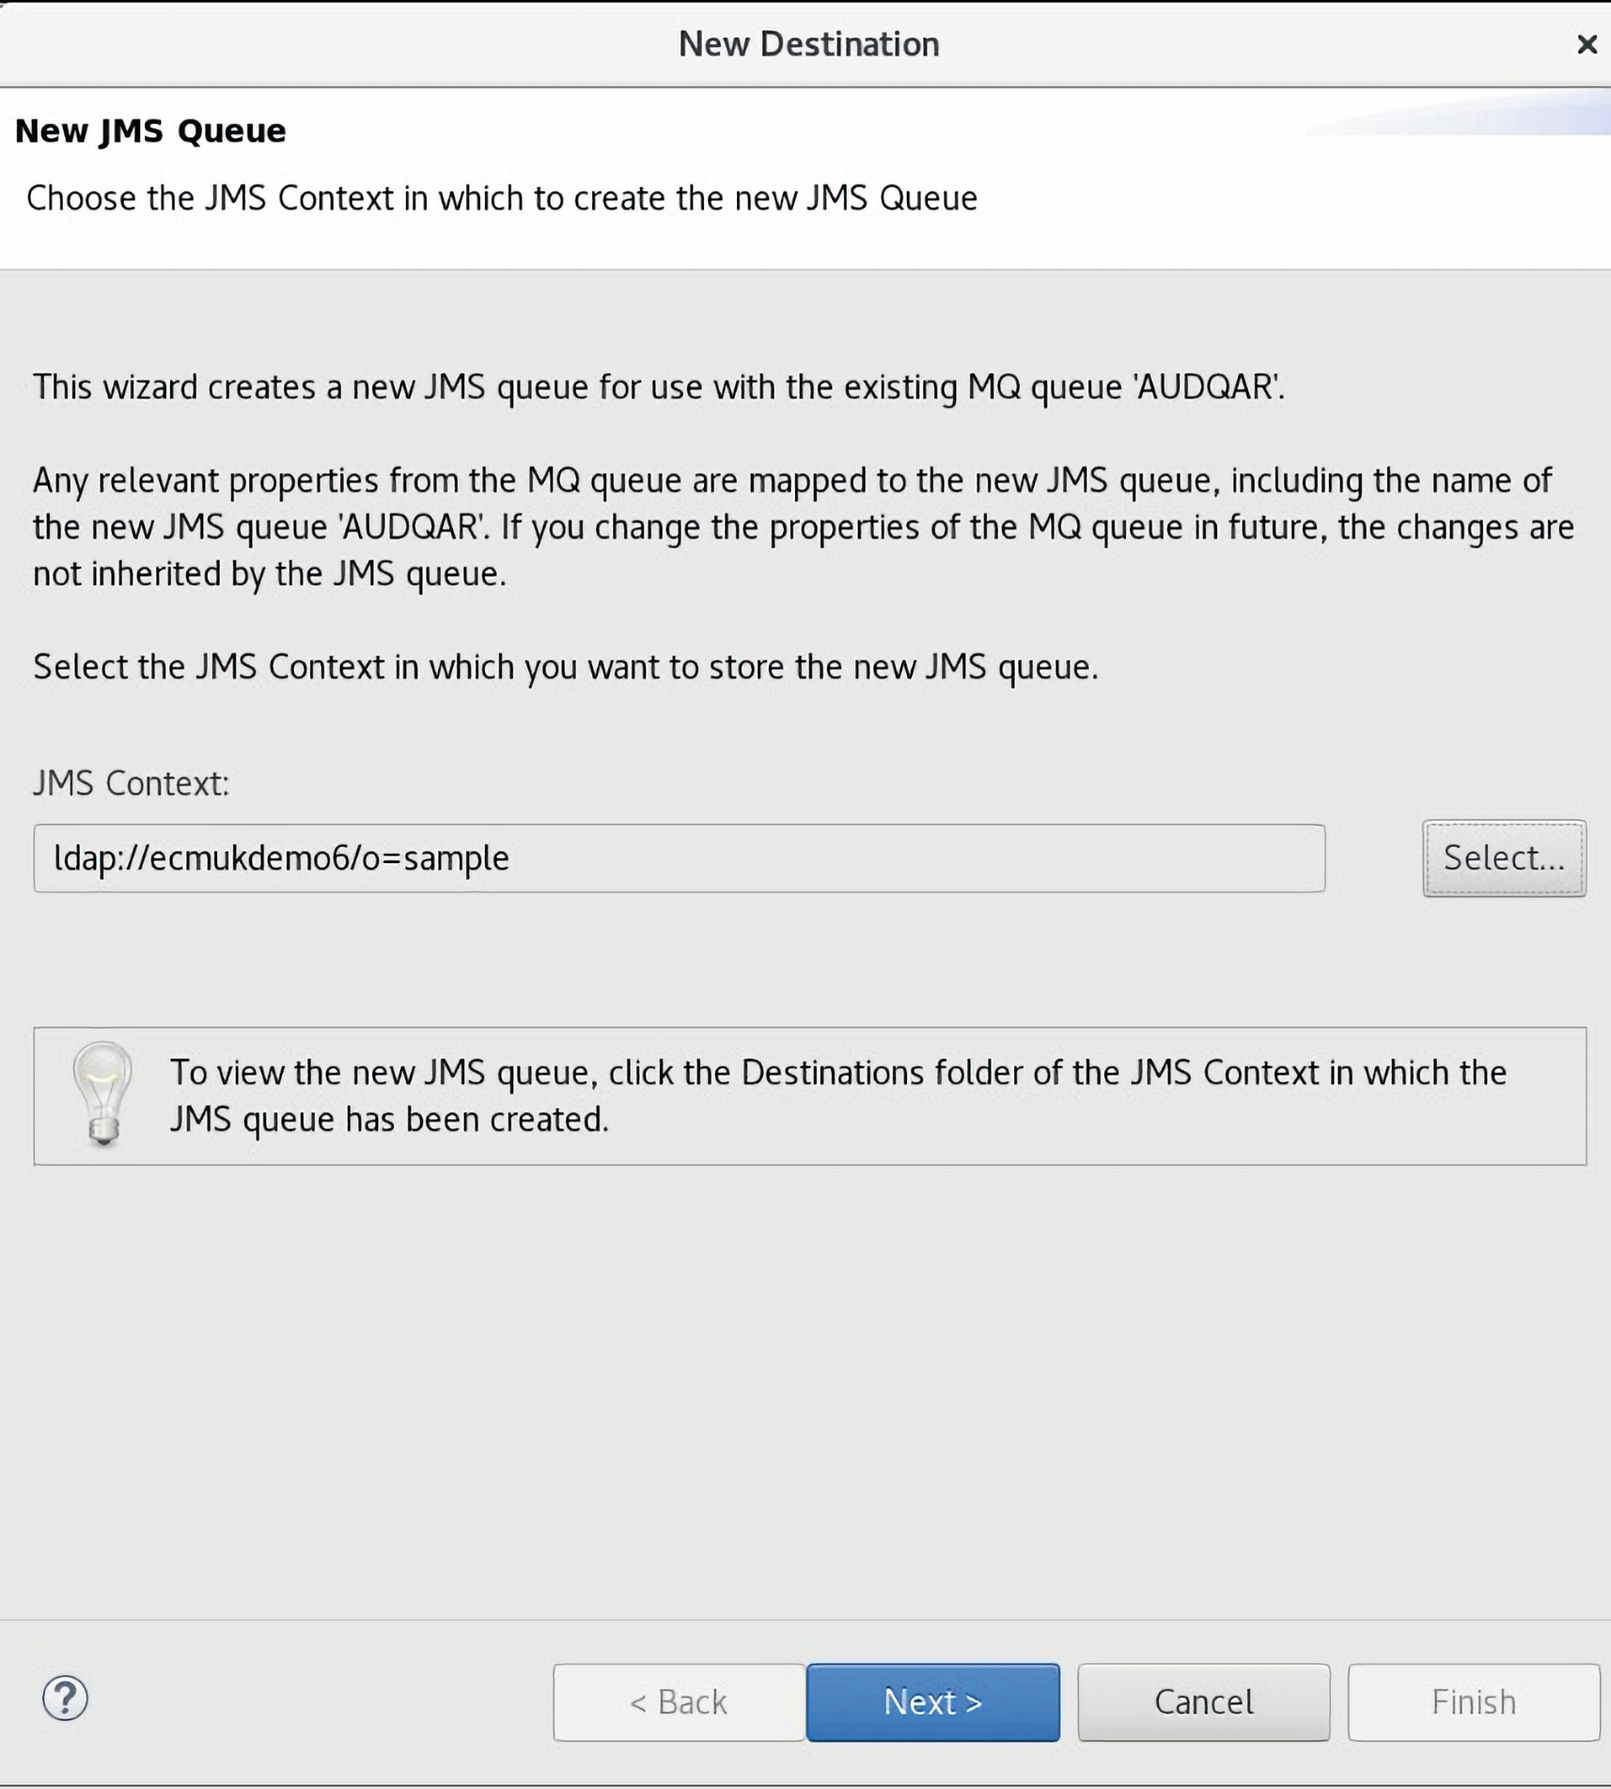
A screenshot of the new destination to choose the J M S context in which to create the new J M S queue. Tab for next is highlighted at the bottom of the page.
The JMS Queue Creation wizard is launched automatically for AUDQAR
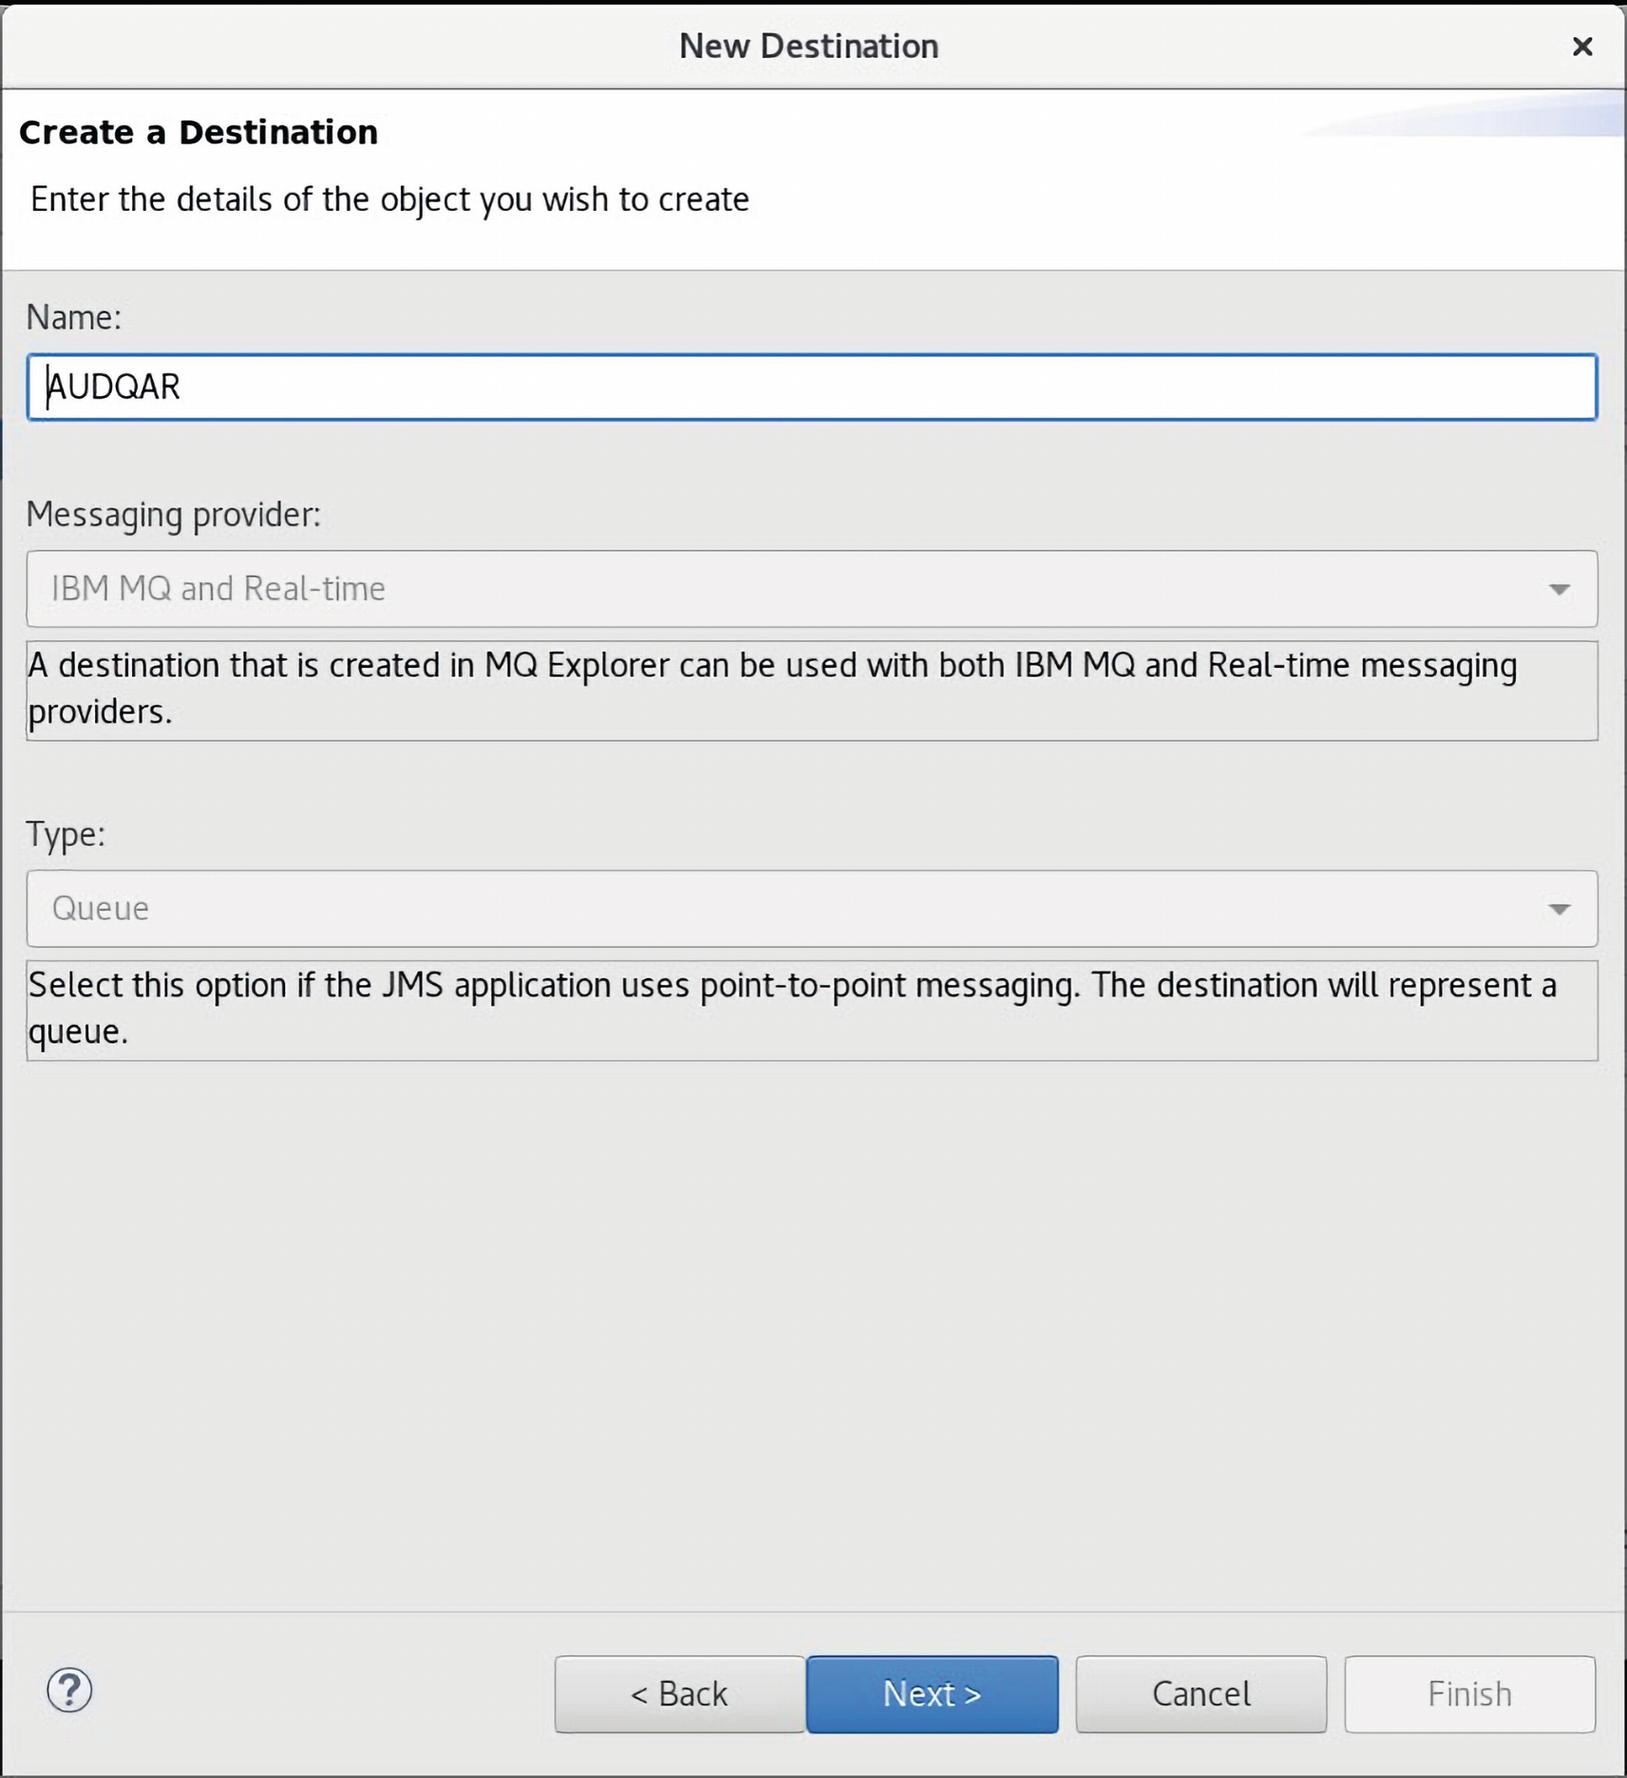
A screenshot of new destination to create a destination. Name A U D Q A R, messaging provider I B M M Q and real time, with a text box, Type queue with a text box below. Tab next is highlighted at the bottom of the page.
The JMS Queue name, AUDQAR, is left as for the Local Queue name
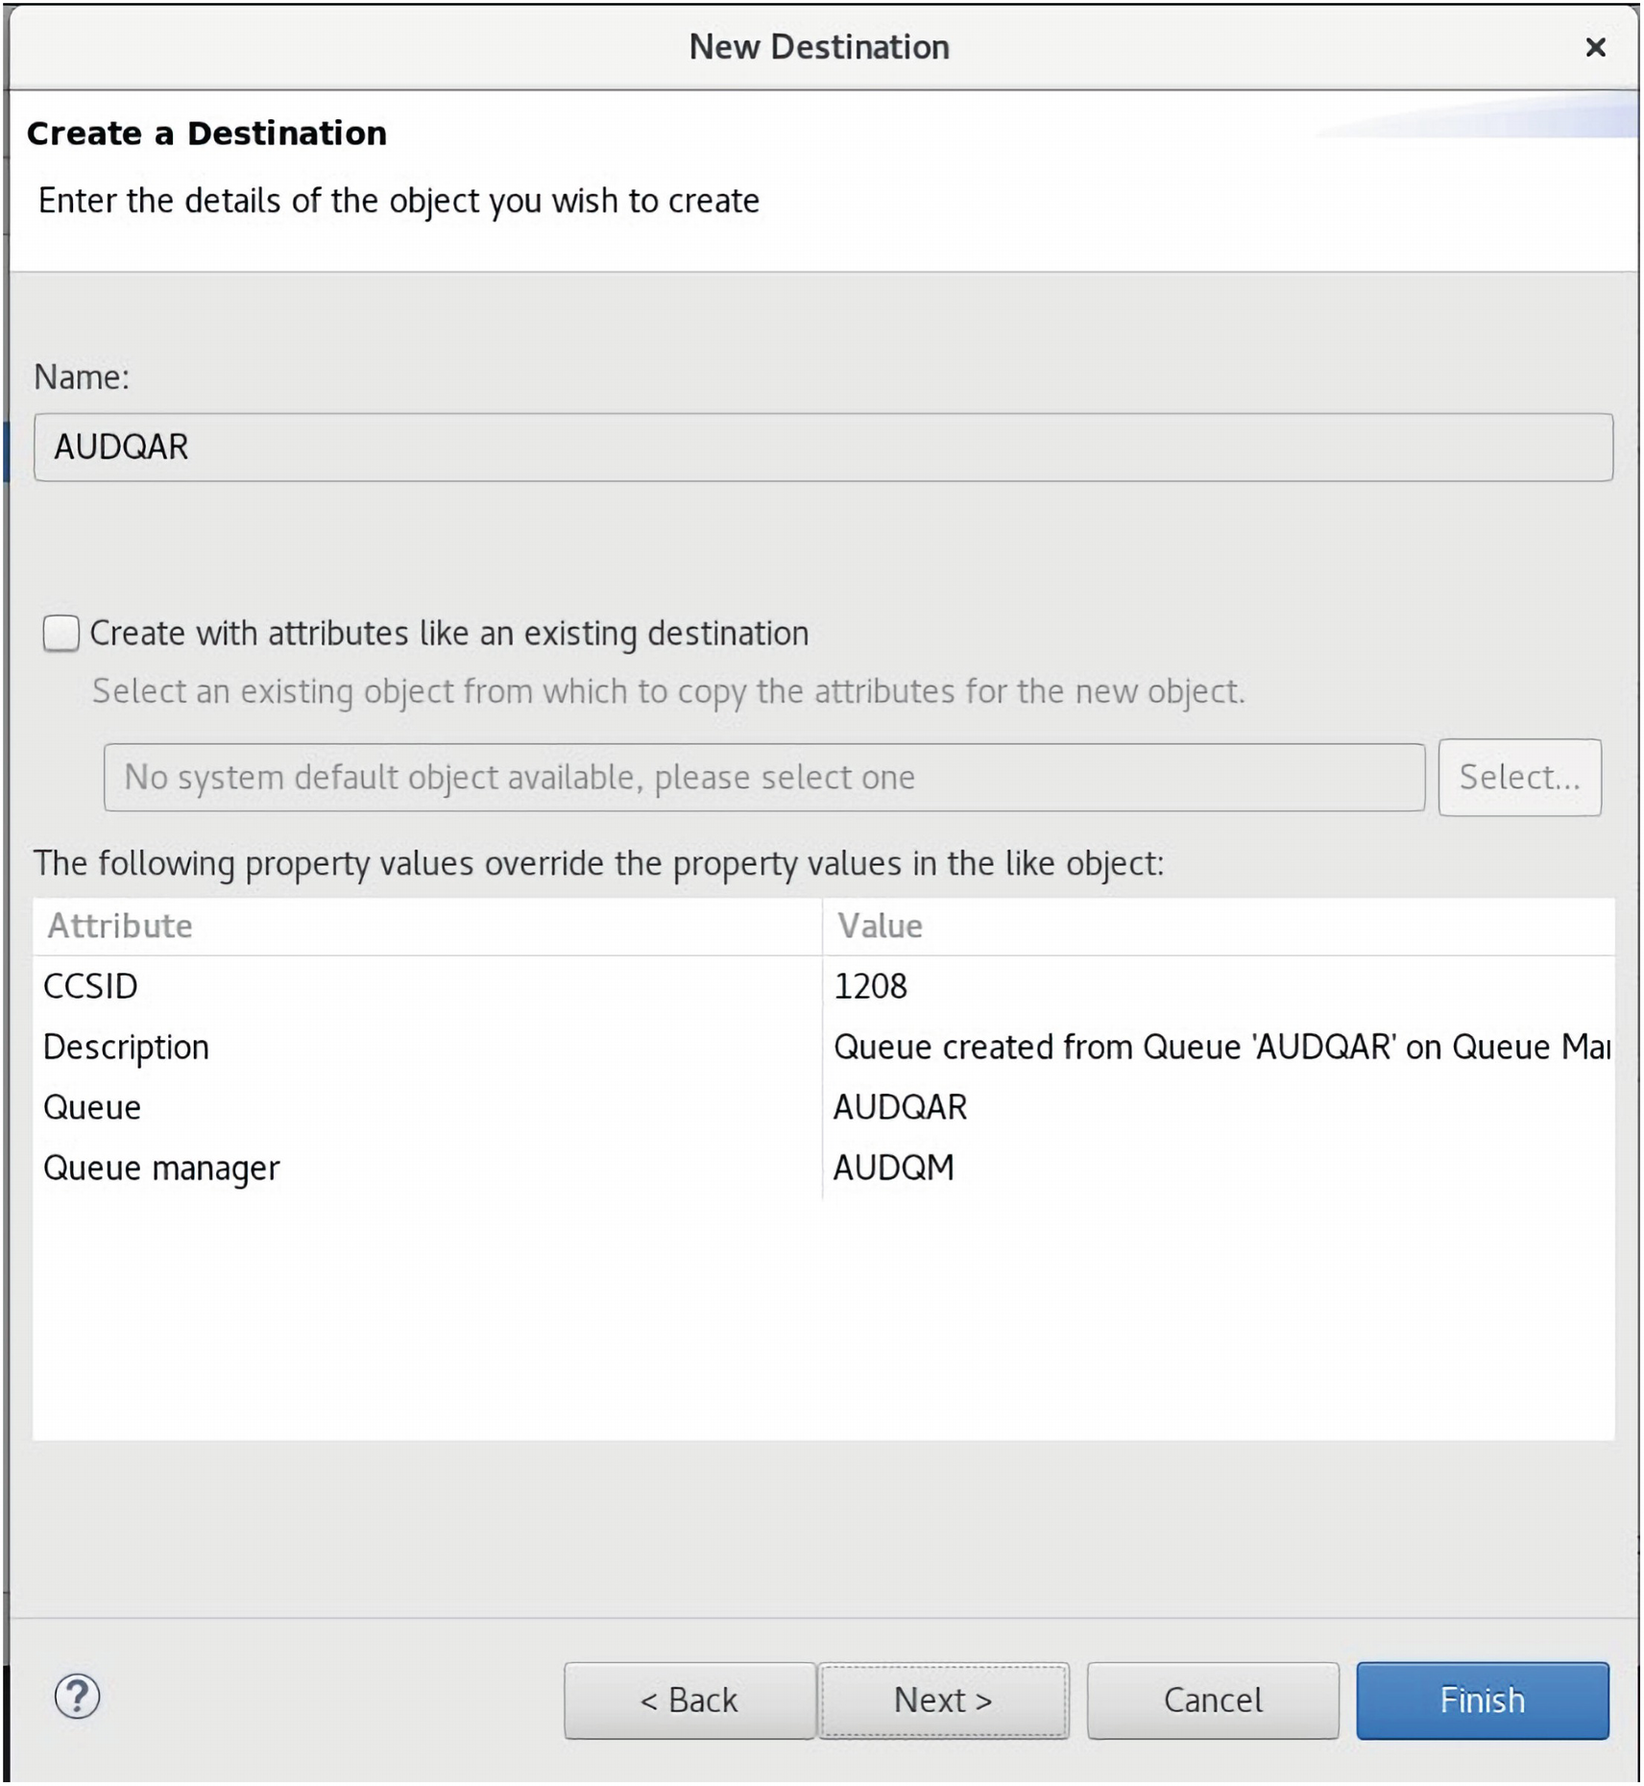
A screenshot of new destination window to create a destination. Name A U D Q A R with attributes and values are given. Finish button on the bottom right is highlighted.
The AUDQAR JMS Queue details are displayed for review
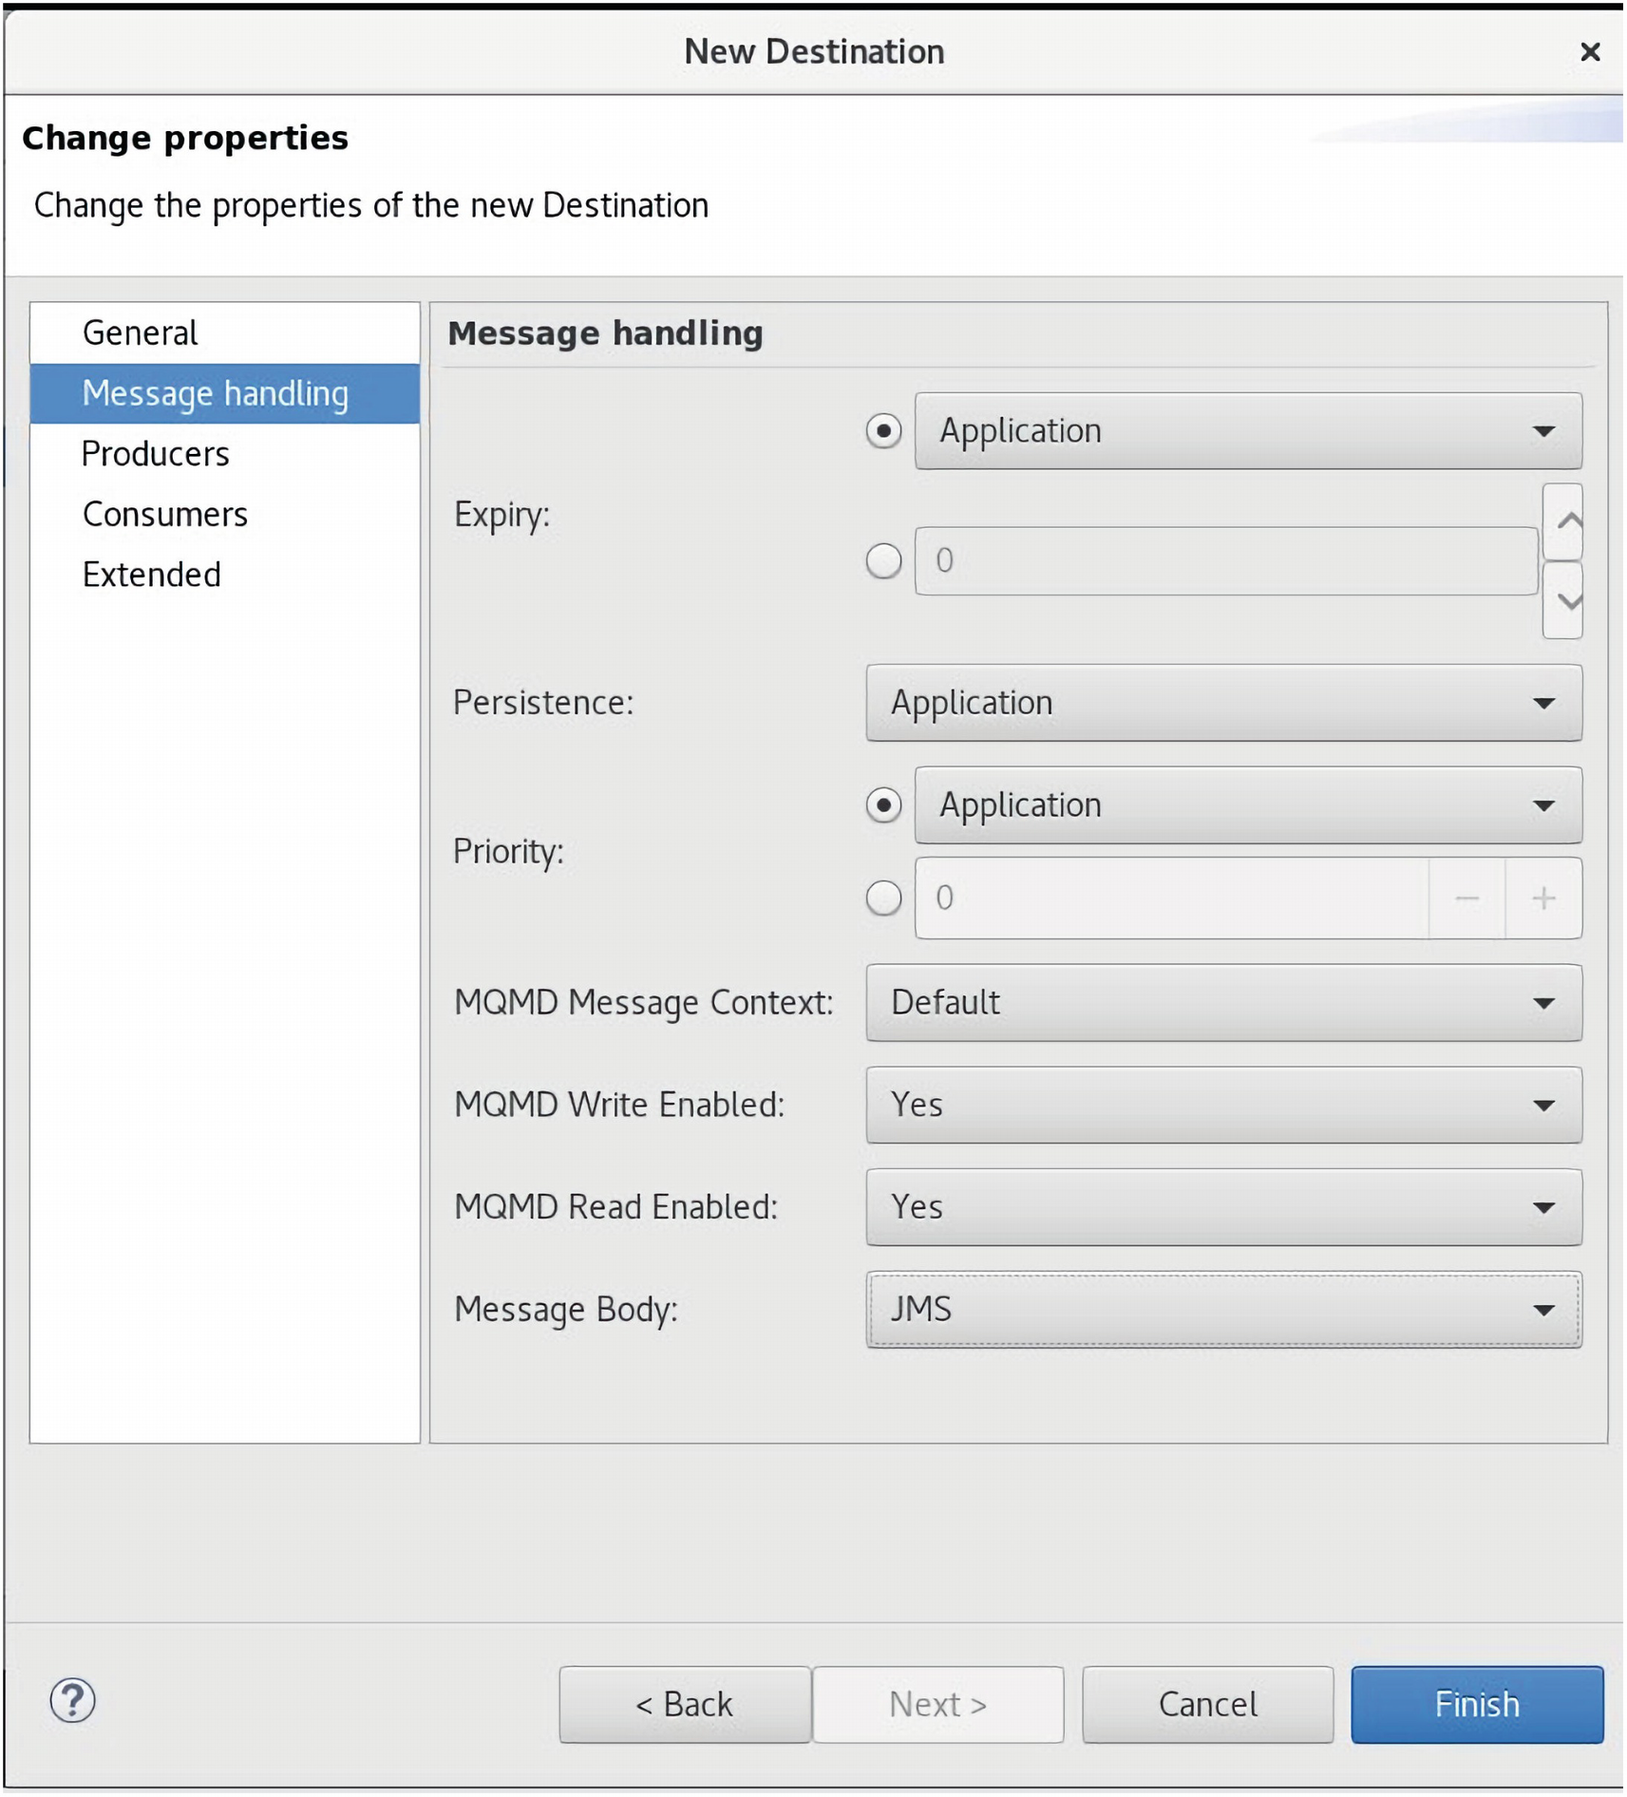
A screenshot of new destination to change the properties for message handling. Expiry, persistence, and priority tabs have application option selected. M Q M D context is default with read and write option enabled and the message body is J M S. Finish button on bottom right is highlighted.
The Message handling properties are set as shown and reviewed
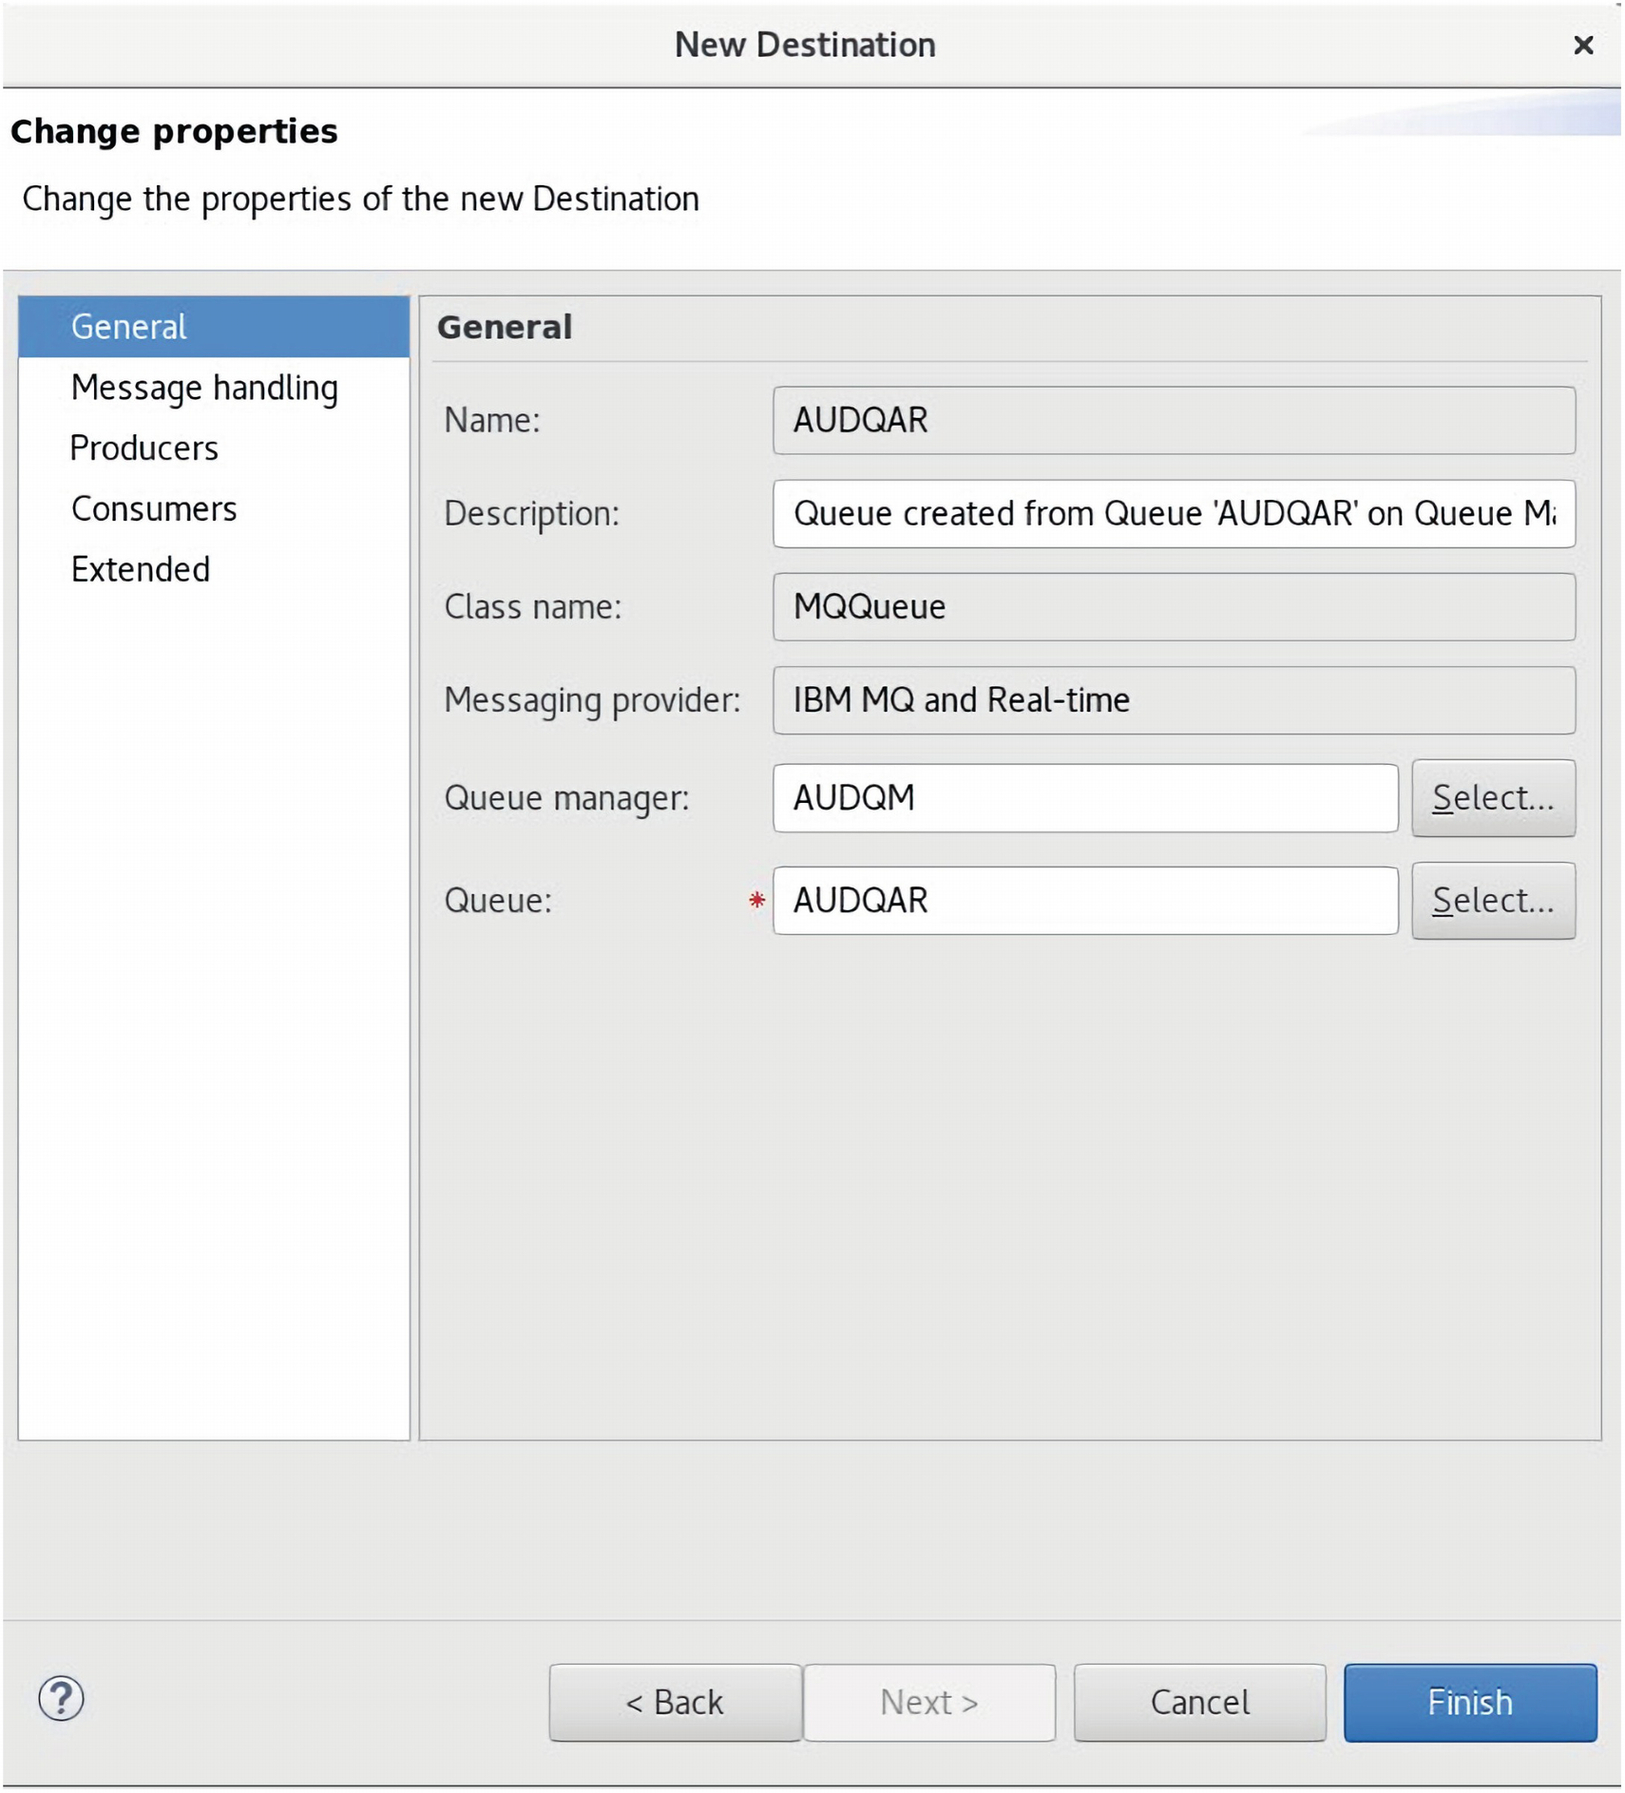
A screenshot of new destination window to change properties in general. The panel for general has tabs labeled name, description, class name, messaging provider, queue manager A U D Q M, and queue A U D Q A R. Finish button on the bottom right is highlighted.
The Queue Description is entered and Finish clicked to create AUDQAR

A screenshot of client connections panel on the right represents the S Y S T E M dot D E F dot C L N T dot C O N N client connection channel created.
The SYSTEM.DEF.CLNT.CONN Client Connection Channel is created
Part 4 – Second Run of the AUDOperationsTest.java JUnit for JMS Messaging
The second run of the JUnit test is more successful. The console screen output in Figure 3-232 is from the Eclipse IDE JUnit run of the AUDOperationsTest.java Class.

A screenshot of several commands starting from terminated A U D Operations test J Unit and ends at test audit events through lookup connection, create and start the connection, and create the session.
The Eclipse IDE Console Log output of the second JUnit test run
Code Now Updated As Follows for AUDOperations.java
The AUDOperations.java code is updated for rebuild and deployment
AUDOperations Rebuild and Deploy .jar: Final Prebuild Test
The JUnit test output after adding the log4j.xml and log4j.dtd files
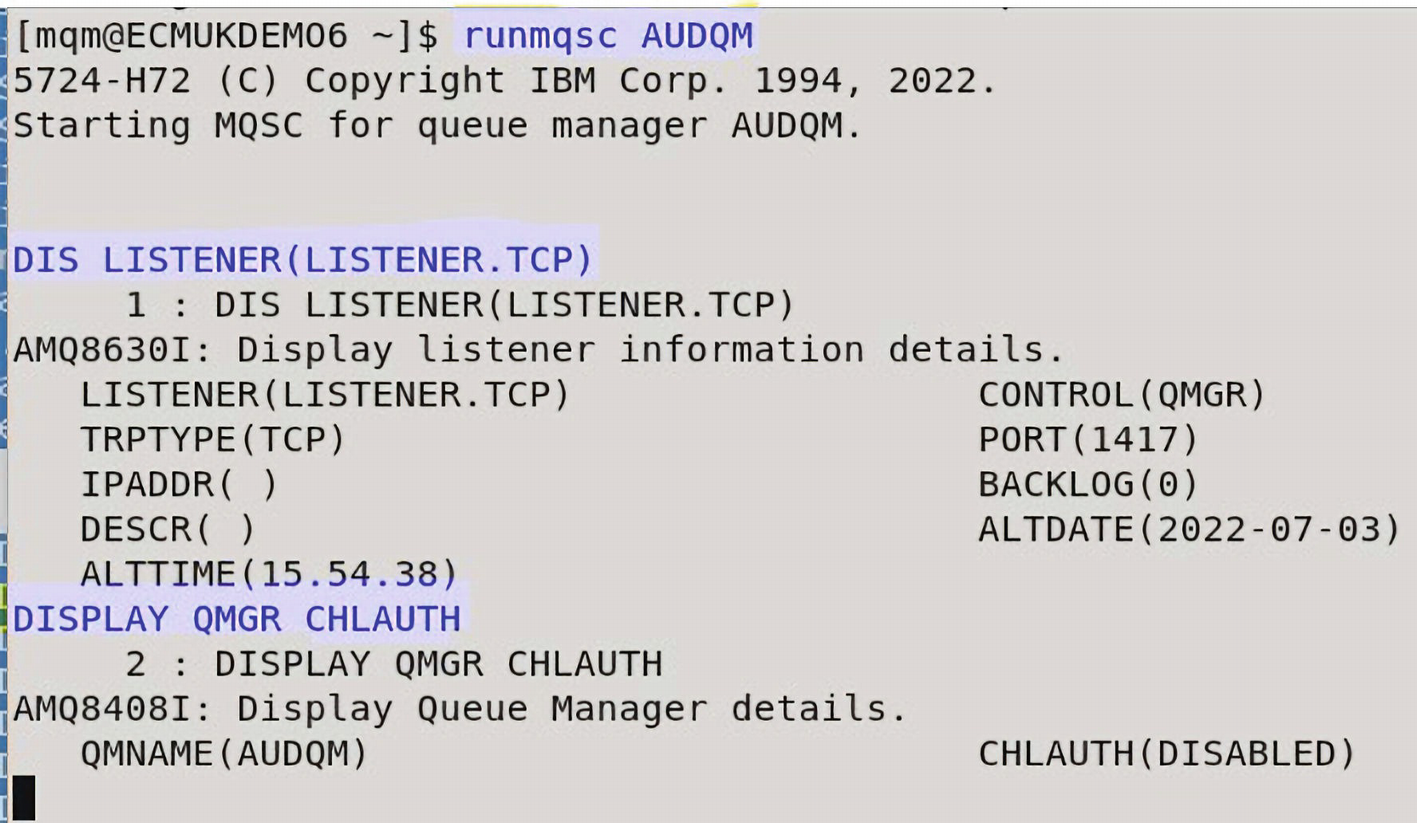
A screenshot of commands for starting M Q S C for queue manager A U D Q M. The highlighted commands are run m q s c A U D Q M, D I S LISTENER LISTENER . T C P, and DISPLAY Q M G R C H L A U T H.
The runmqsc command displays the details of AUDQM Queue Manager

A screenshot of A U D Operations test on the left and list of options on the right panel where run as is selected that further highlights the option of J u 1 unit test.
The AUDOperationsTest run for JUnit testing is run

A screenshot of message browser window with queue manager name A U D Q M, and queue name A U D Q A R. A table with 5 columns and 7 rows where row 7 is selected with further option properties selected. Close button on the bottom right is selected.
The results of the Test Run are displayed in the Properties of the Queue Entry (dated July 4, 2022)
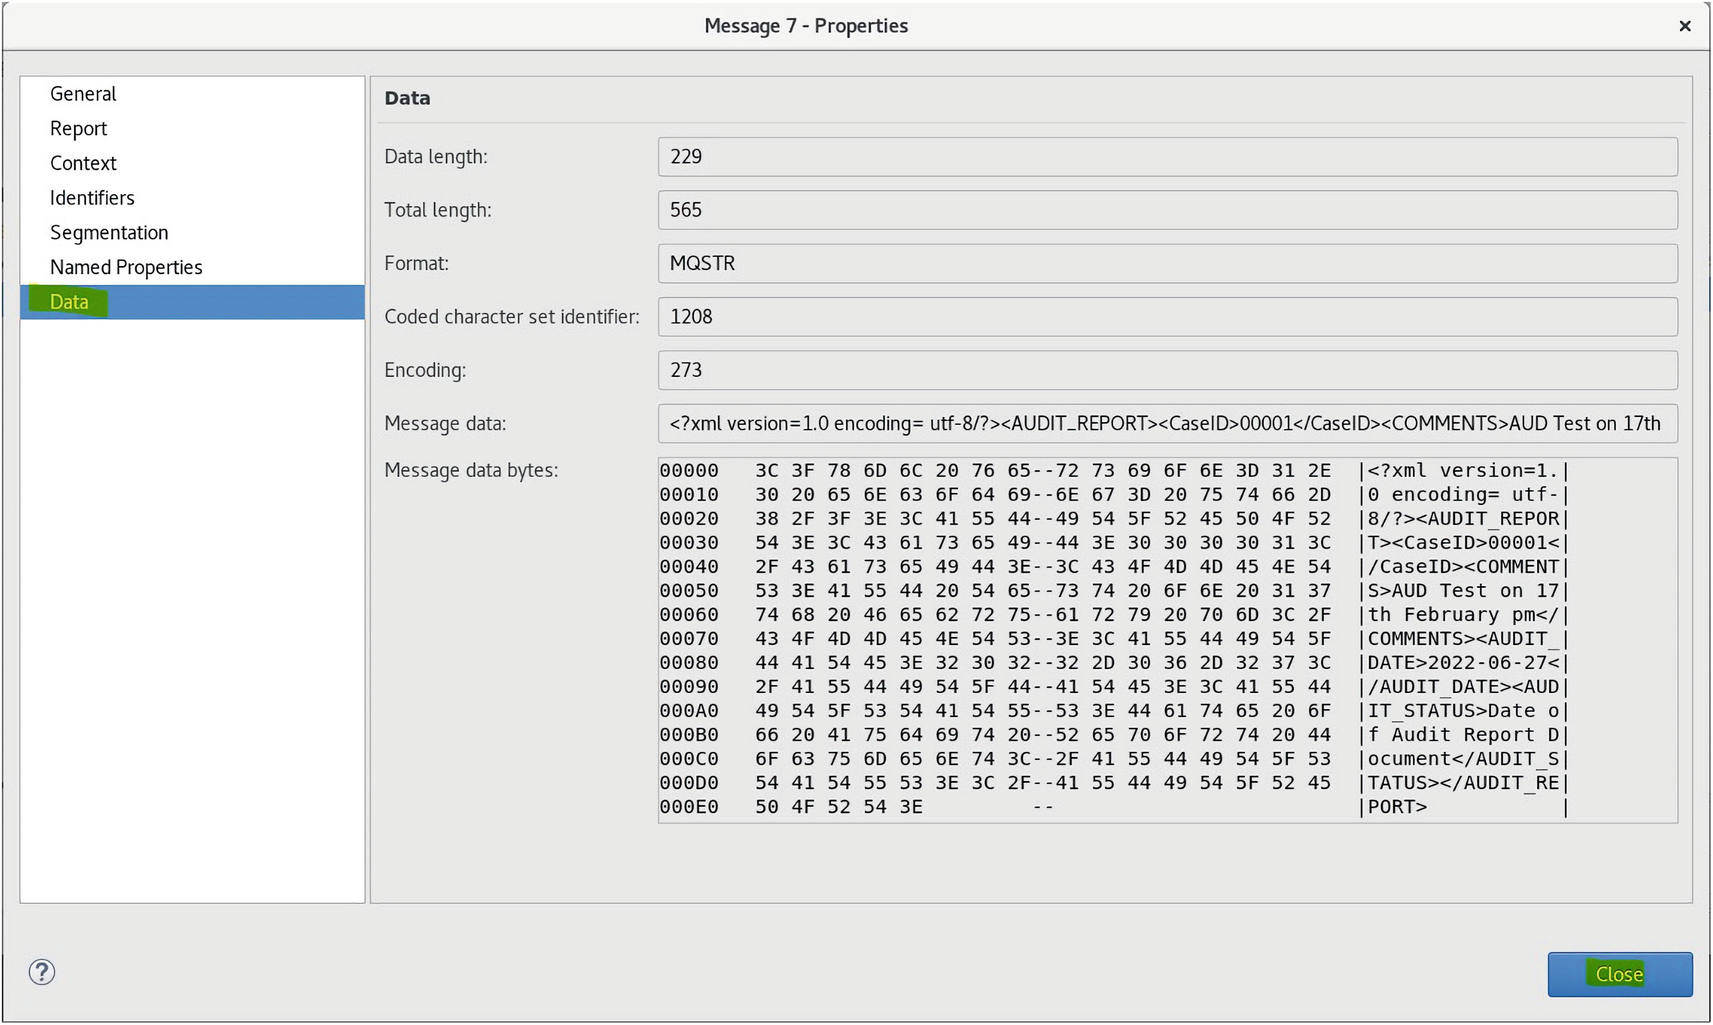
A screenshot of message 7 properties window with selected option data on the left panel. The right panel has properties of data length, format, encoding, data bytes. Close button is highlighted at the bottom right of the page."
The Data property of the Queue Entry shows the message from the Java
Part 5 – Building the AUDOperations.jar
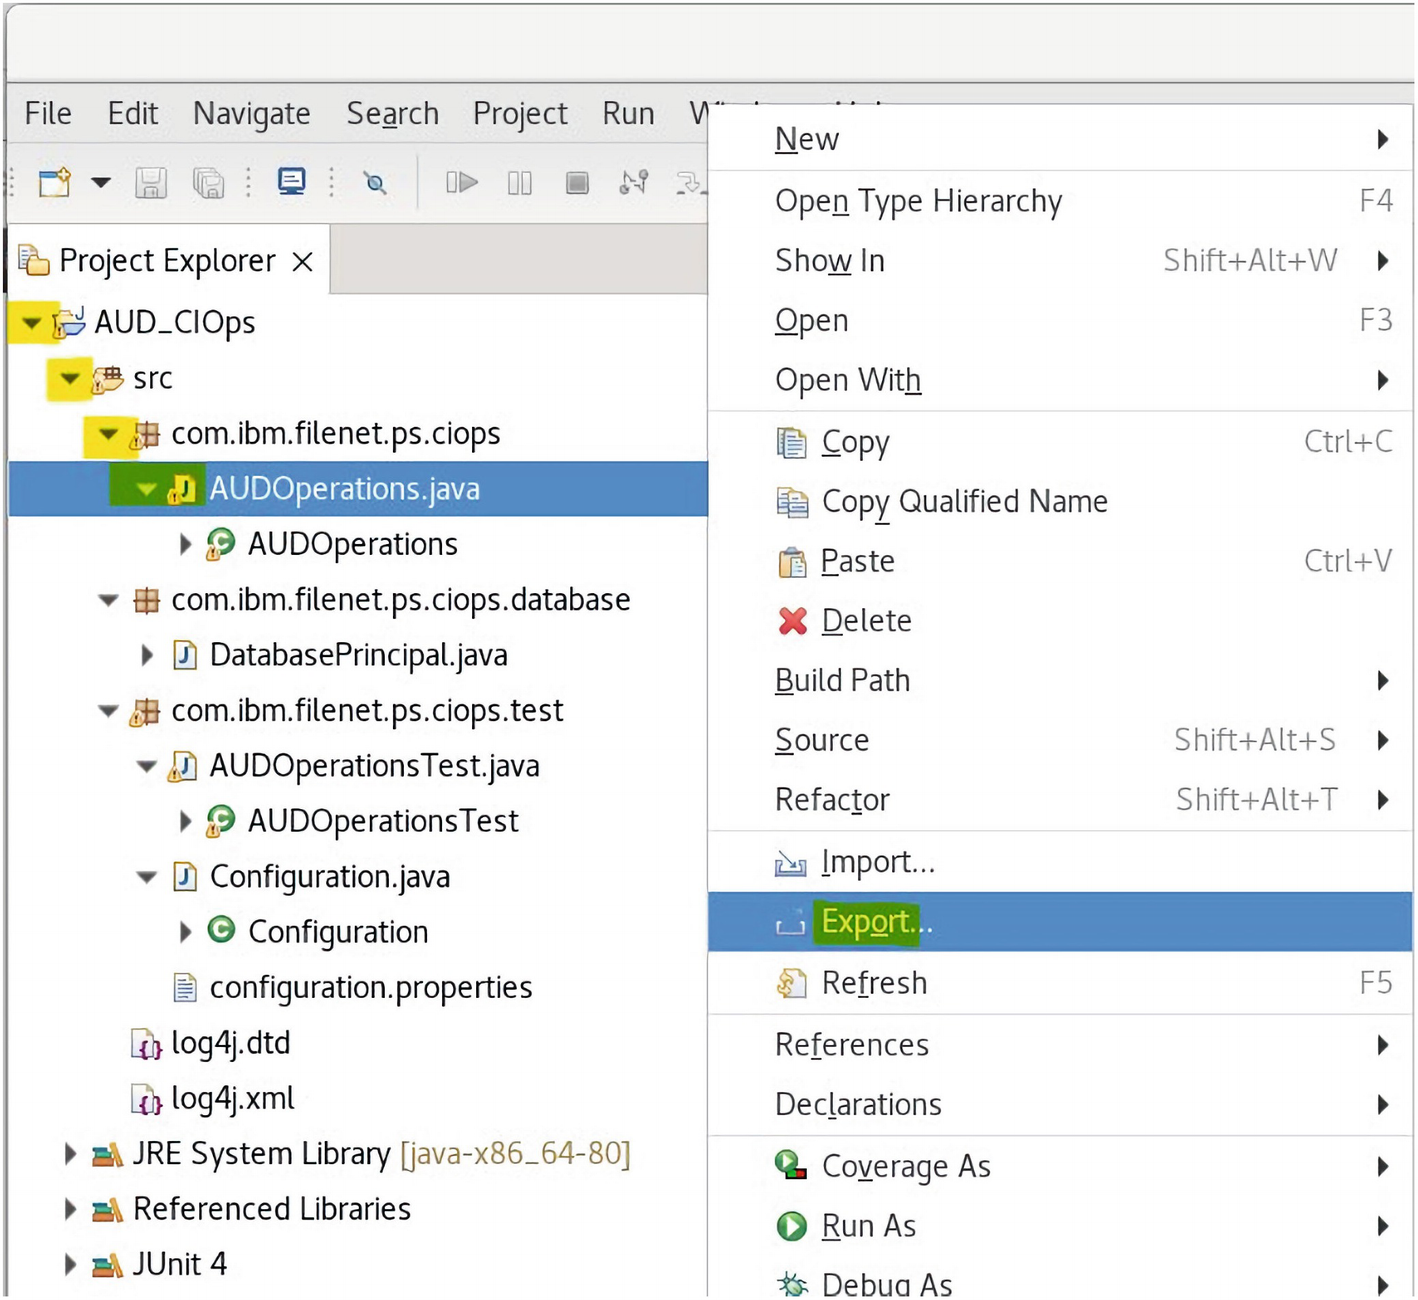
A screenshot of the A U D operations . Java selected on the left panel and export option selected on the right panel.
The AUDOperations.java is compiled and exported as a jar file

A screenshot of export window with select an export wizard list where J A R file is selected. Next button on the bottom of the page is selected.
The Eclipse IDE Java ➤ JAR file export wizard is selected
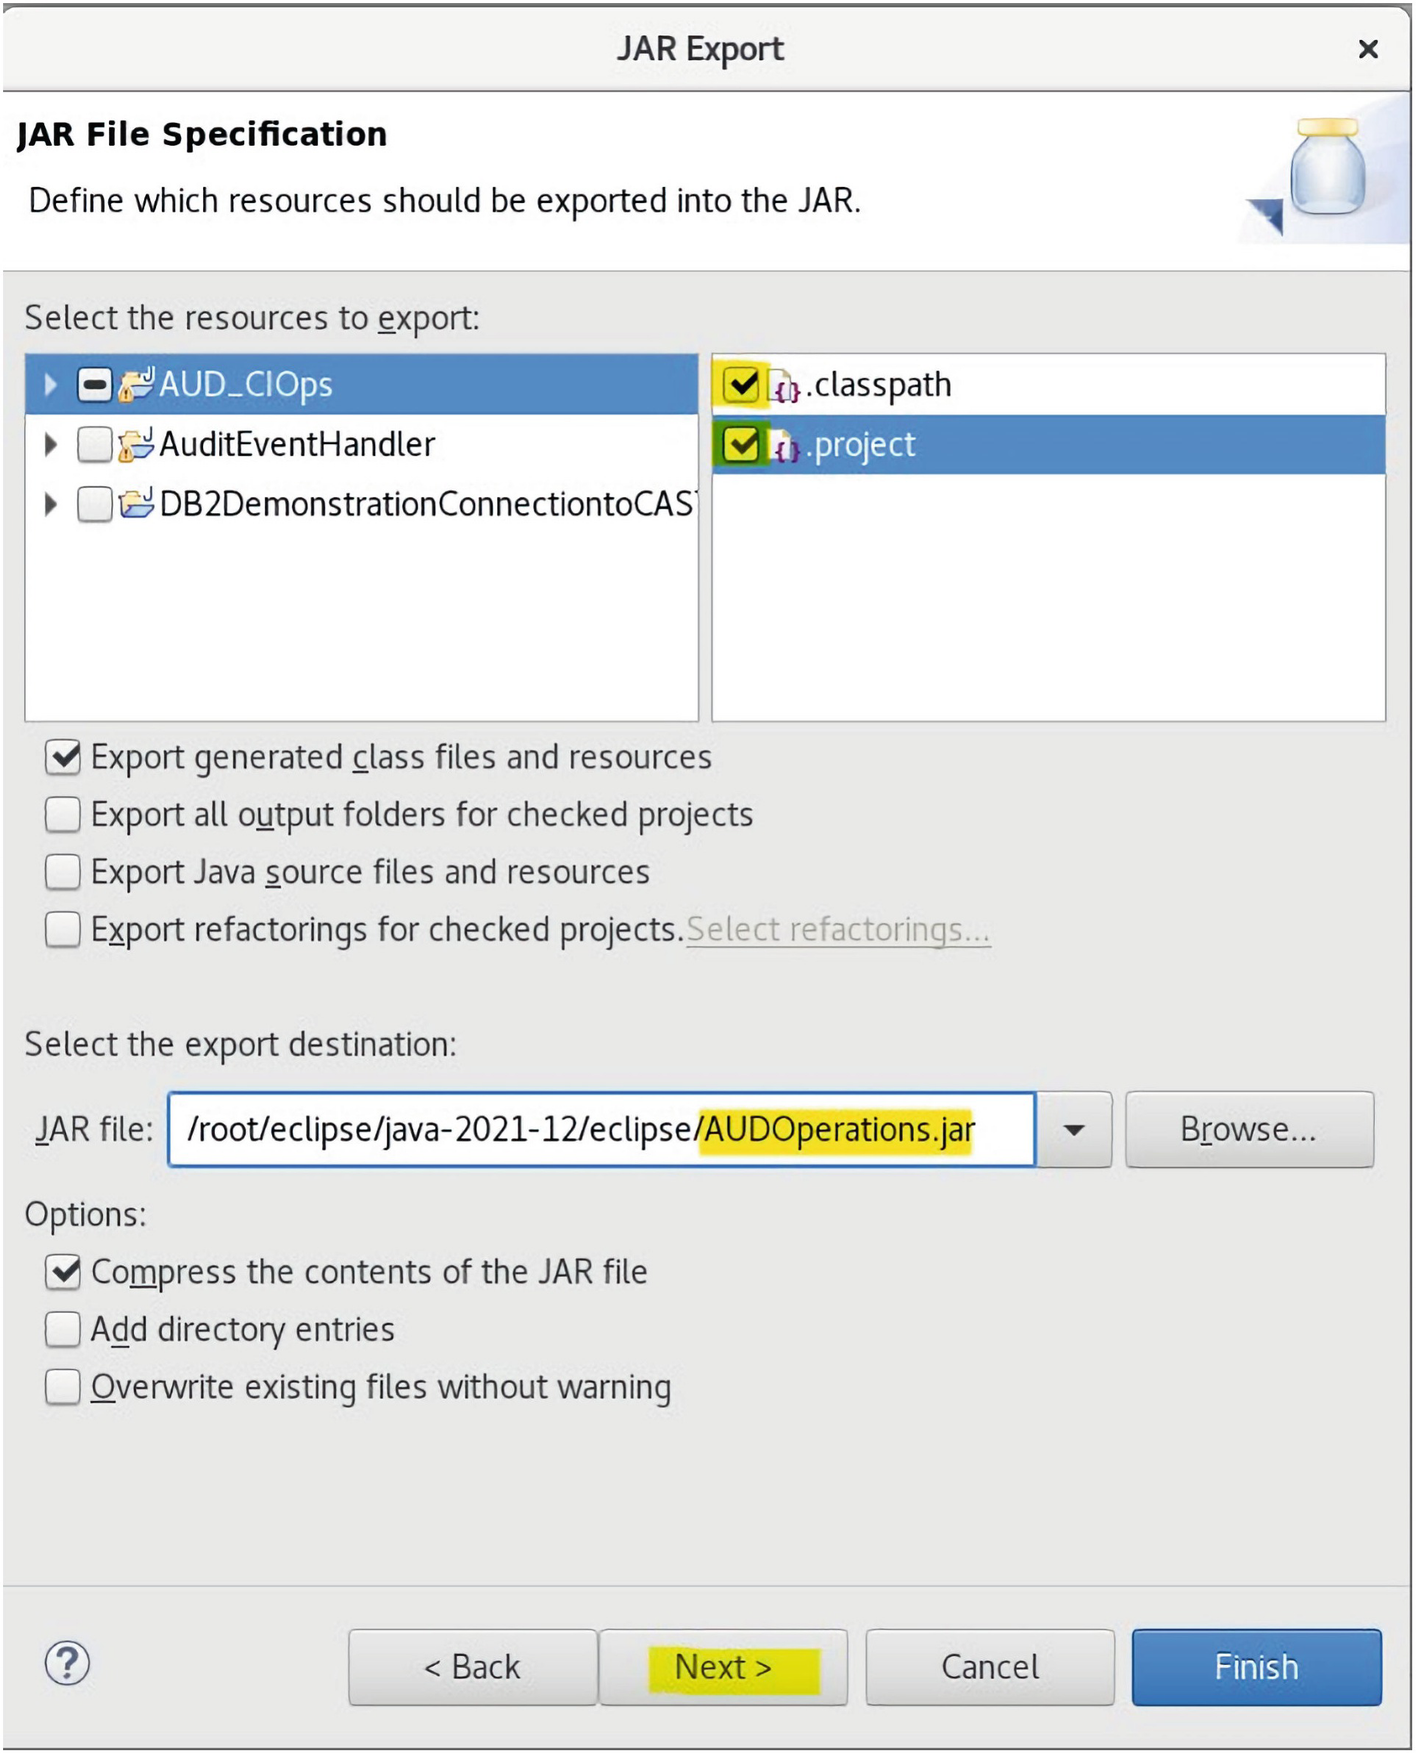
A screenshot of JAR export window with A U D underscore C I ops selected on the left panel and . project selected on the right. Export generated class files and resources and compress the contents of the JAR file options are ticked. At the bottom of the page next button is highlighted and finish button is selected.
The options for exporting the Java JAR file are selected
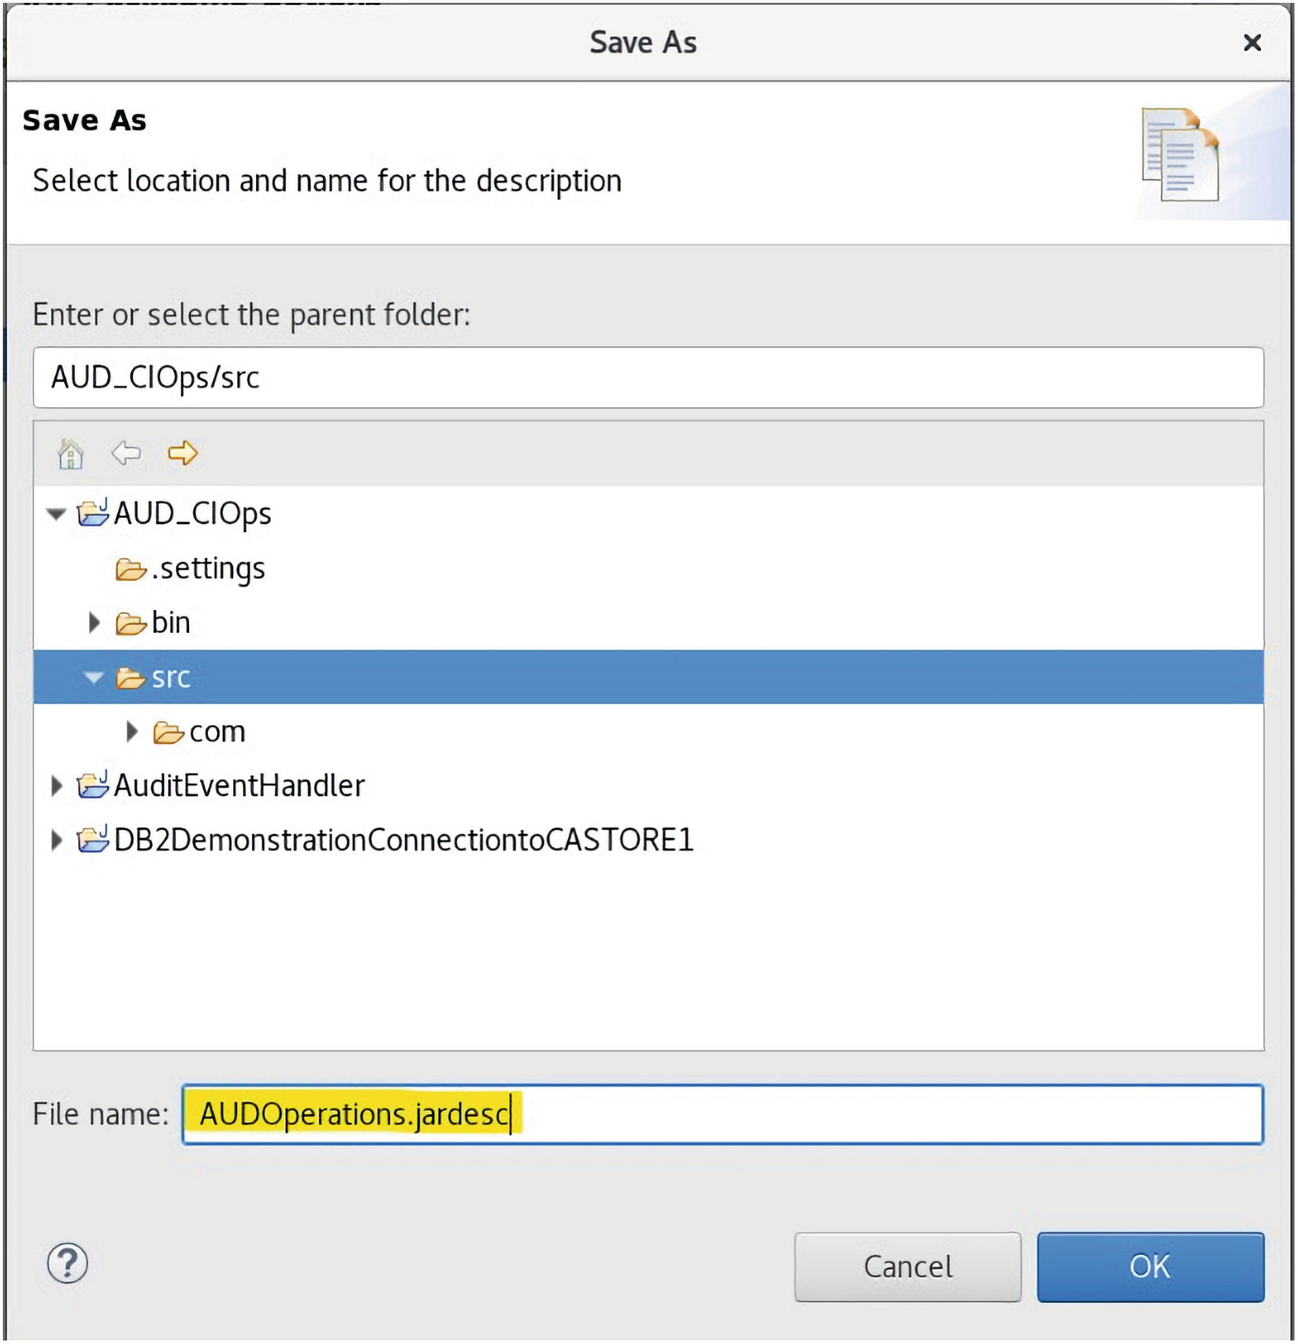
A screenshot of save as window with s r c option selected and file name A U D Operations . jar d e s c highlighted. Bottom of the page has option O K selected.
The AUDOperations.jardesc file is saved to the Project Source folder
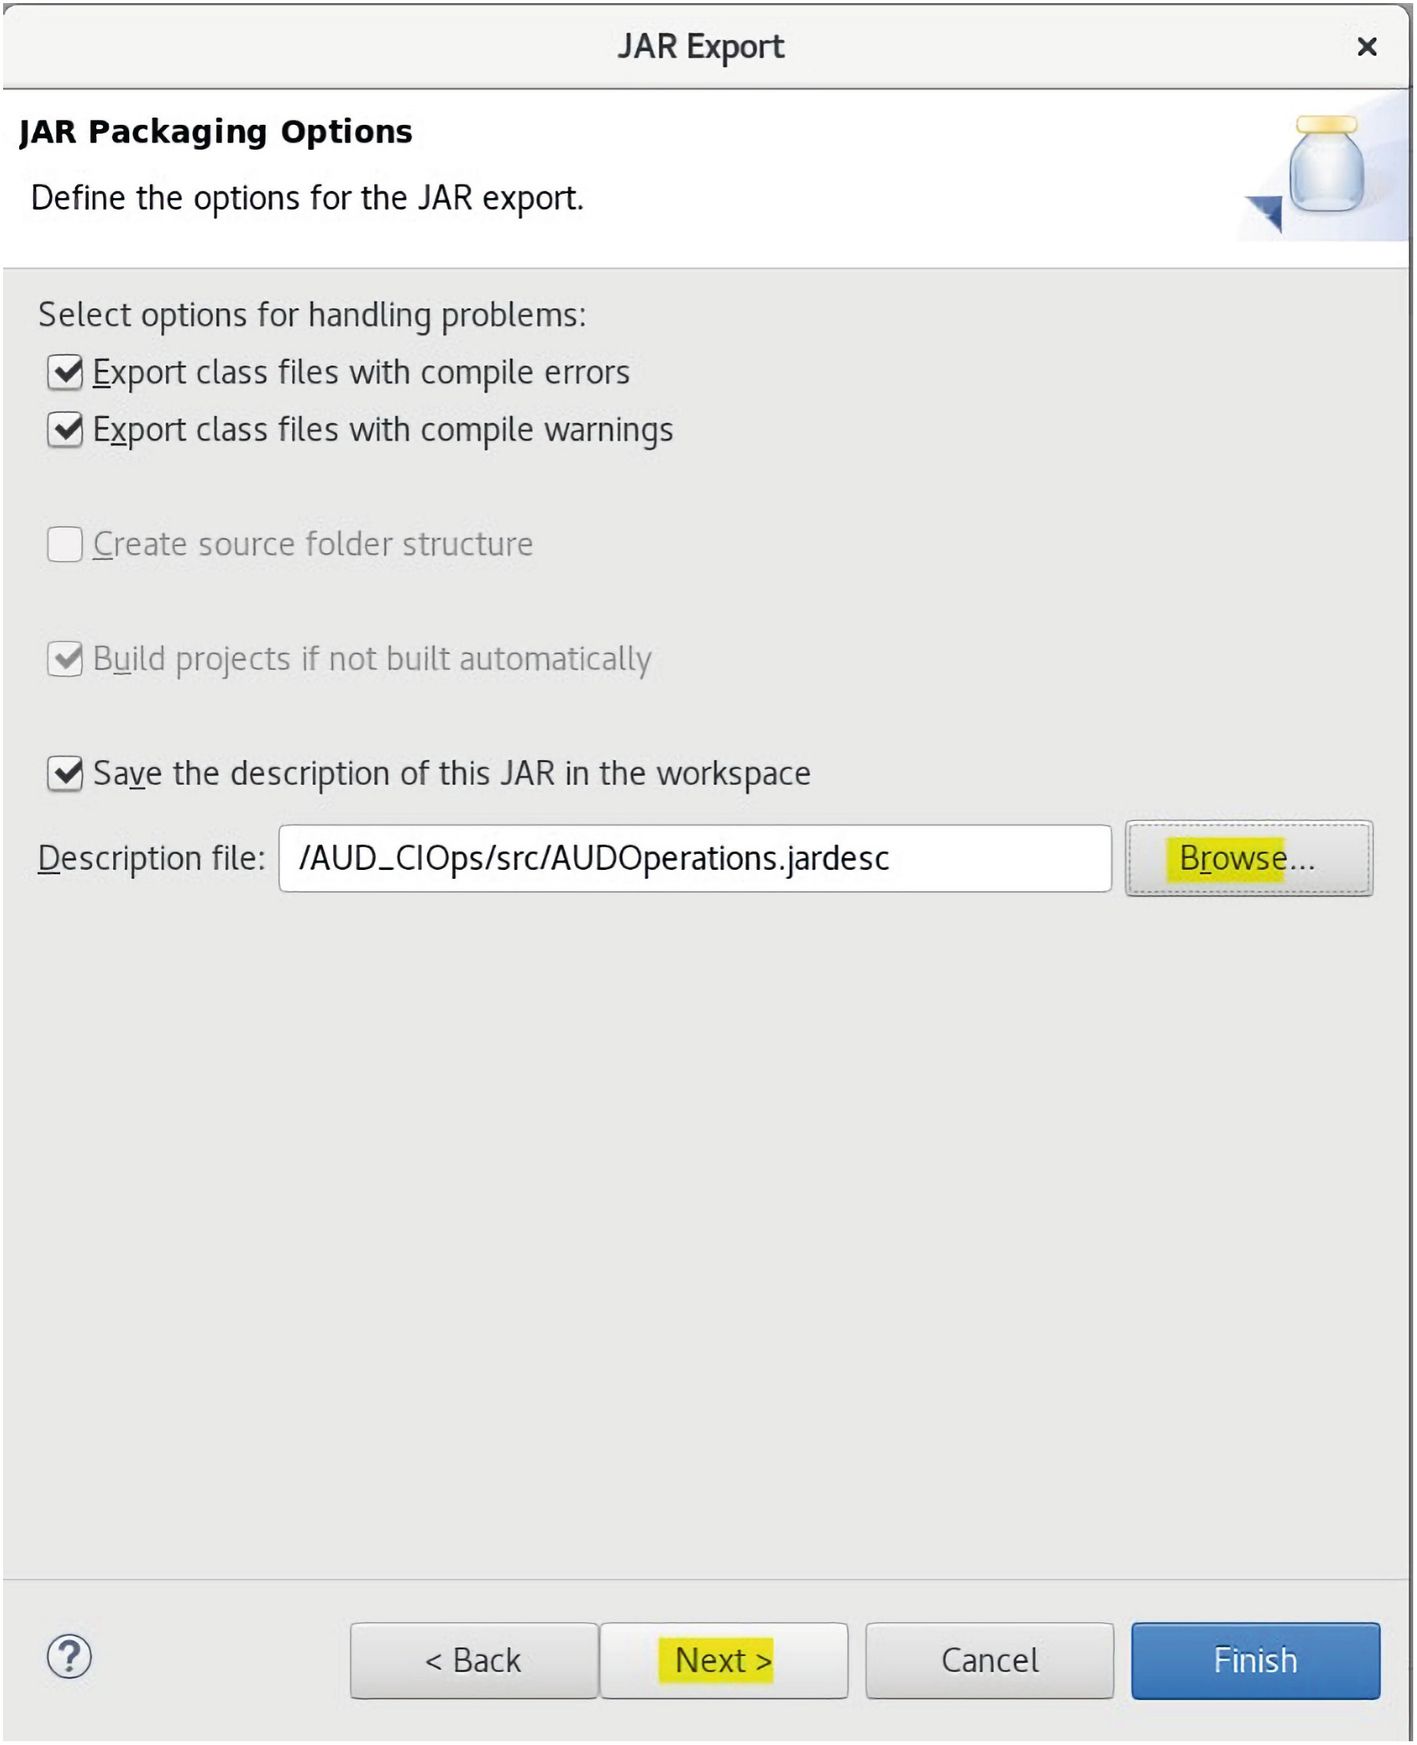
A screenshot of JAR export window with checked options for export class files with compile errors and warnings and save the description of this JAR in the workspace with highlighted browse button for the description file. At the bottom next tab is highlighted while the finish tab is selected.
The Browse command is used to select the path for the .jardesc file

A screenshot of JAR export window with the MANIFEST dot M F generation option selected and defined for save. At the bottom Finish button is highlighted and selected.
The MANIFEST.MF generation option is selected and defined for save

A screenshot of JAR export window with text JAR export finished with warnings. See details for additional information. Details button is highlighted while O K button is highlighted and selected.
The AUDOperations jar file is exported with compile warnings
The AUDOperations.jardesc file list
Rebuilding the AUDOperations.jar File
To rebuild the AUDOperations.jar file, we can make use of the AUDOperations.jardesc file we created.
Make a backup (if required) of the previous AUDOperations.jar first!
Right-click this AUDOperations.jardesc file in the Project area AUD_CIOPS and select Create Jar from the menu, then click Yes when prompted to overwrite the existing AUDOperations.jar file. (Click OK.)
Copy the compressed AUDOperations.jar file to the Installs folder for import as a System Component Integrator step.
The latest configuration.properties JUnit test file parameters
FileNet Workflow System Component AUDOperations.jar Deployment
- a)
Log in to the FileNet Administration Console for Content Engine (acce) web application configuration tool.

A screenshot of I B M administrative console for content platform engine log in page. The highlighted tabs are user name Alan and encrypted password. Log in tab is also highlighted with logo of I B M at its right.
The acce administration web application is logged in to
- b)
First, import the AUDOperations.jar file as a new Code Module.

A screenshot represents the selected actions, and a new document in the menu is selected on the code module tab.
Select the Actions ➤ New Document menu item on the CodeModules tab

A screenshot of the code module document class selected from the drop down and highlighted.
The Code Module Document Class is selected from the drop-down

A screenshot of the document title entered as A U D operations dot jar and class entered as code module and the next button is highlighted.
The Document title is entered as AUDOperations.jar and Next> clicked

A screenshot of chrome browser with several tabs open for I B M. The I B M administrative console for content platform engine is open with O S 2 panel on the left and new document on the irght with add button highlighted.
The Add button is clicked to add the AUDOperations.jar as content

A screenshot of chrome browser with installs text highlighted at the top and A U D Operations dot jar selected from the installs subfolder.
The AUDOperations.jar is selected from the Installs subfolder

A screenshot of add content element box with add content button highlighted.
The Add Content button is clicked to complete the Content addition
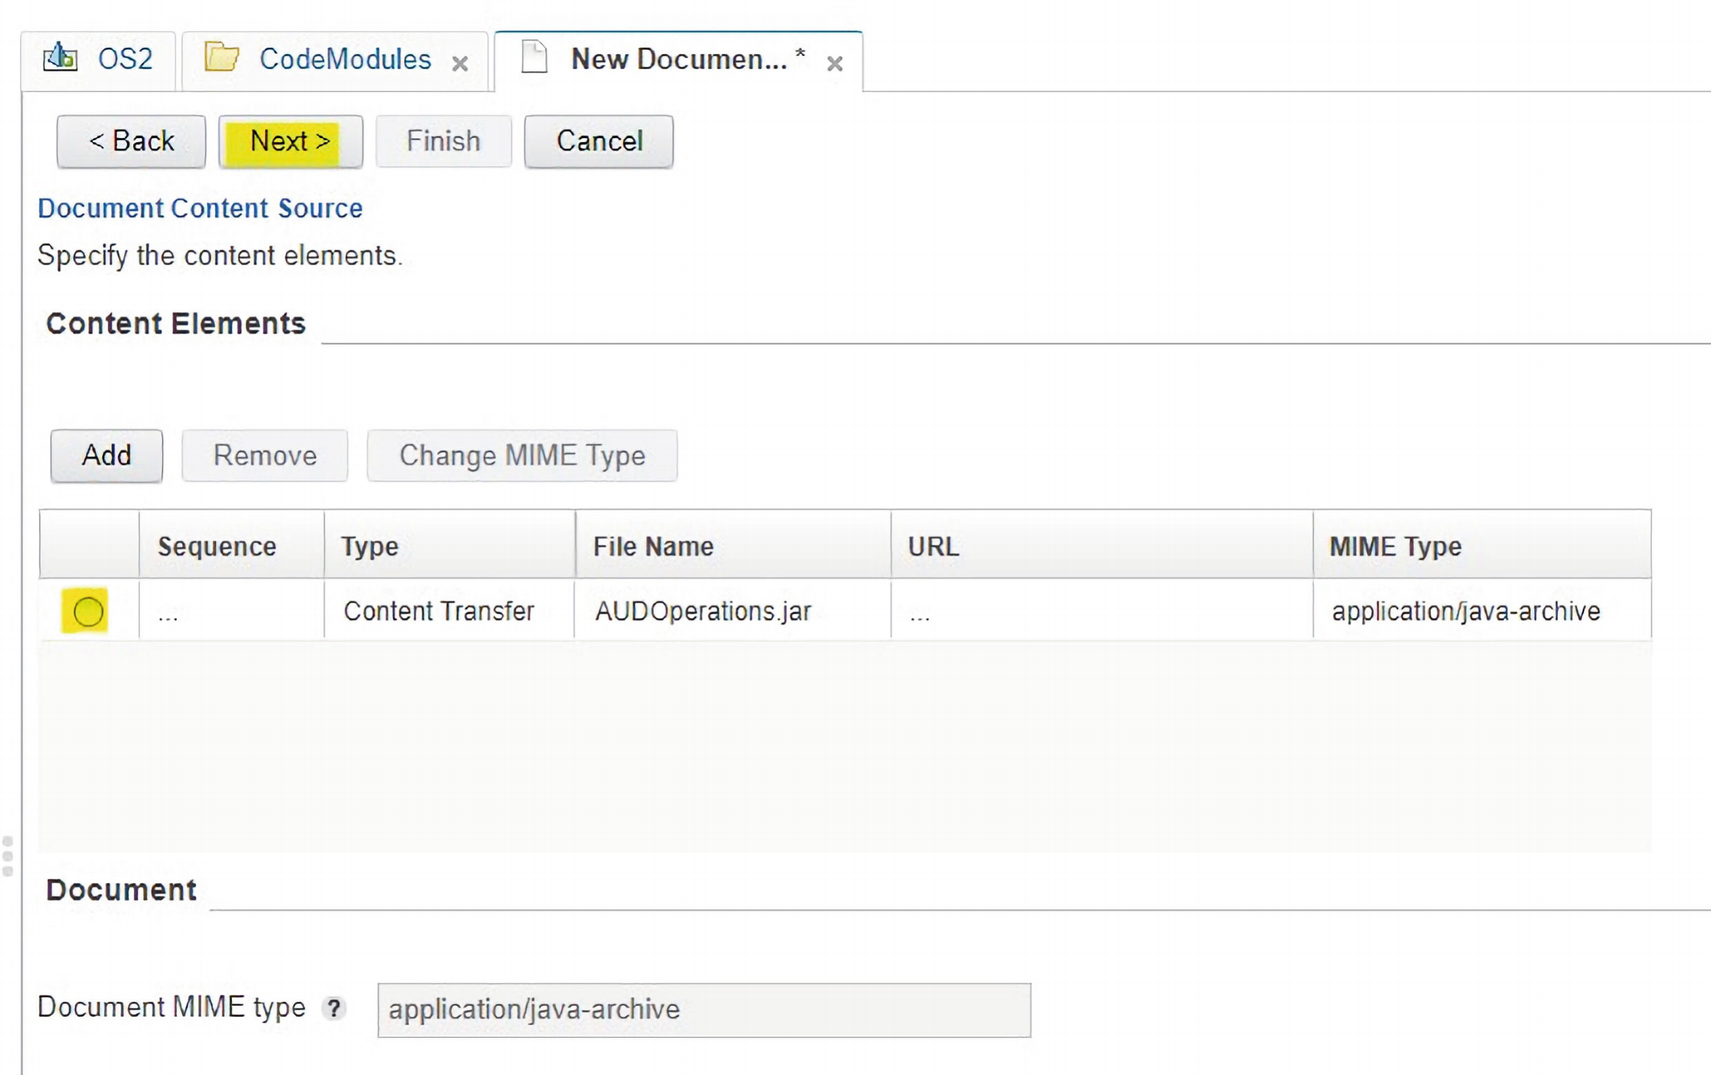
A screenshot of new document tab with next button highlighted and circle to check the box is highlighted under content elements section.
The Next> button is clicked after upload of the AUDOperations.jar

A screenshot of new document tab with next button highlighted. The table for object properties have 8 columns and several rows for the properties.
The Next> command button is clicked leaving all the default values

A screenshot of new document tab with next button highlighted. Under it document content and version have 3 options with square box for each.
The Next> command button is clicked leaving all the default values
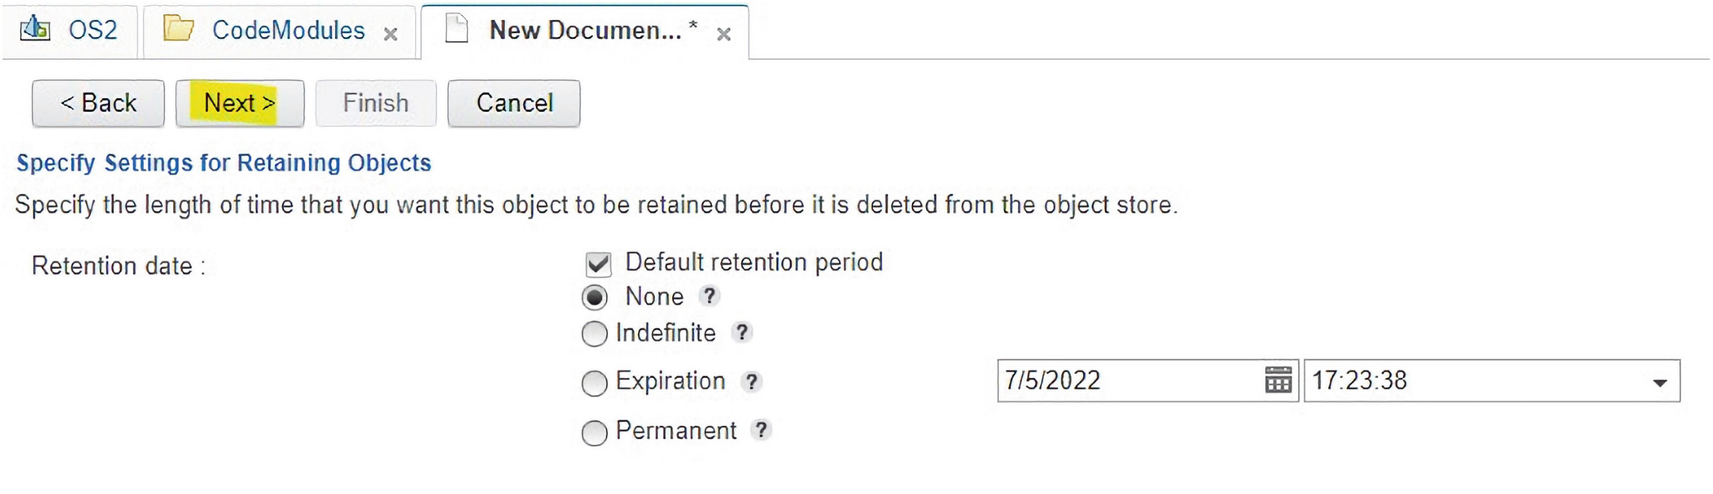
A screenshot of new document tab with next button highlighted. Under it specify settings for retaining objects have default retention period and none options selected for retention date.
The Next> command button is clicked leaving a Default retention period

A screenshot of new document tab for advanced features with next button highlighted. default database storage area is selected and highlighted from drop down for storage area.
The Default Database Storage Area is selected from the drop-down

A screenshot of new document tab for summary with finish button highlighted. Summary table has 2 columns of name and value, and several rows with parameters.
The summary of the parameters for creating the Code Module is shown
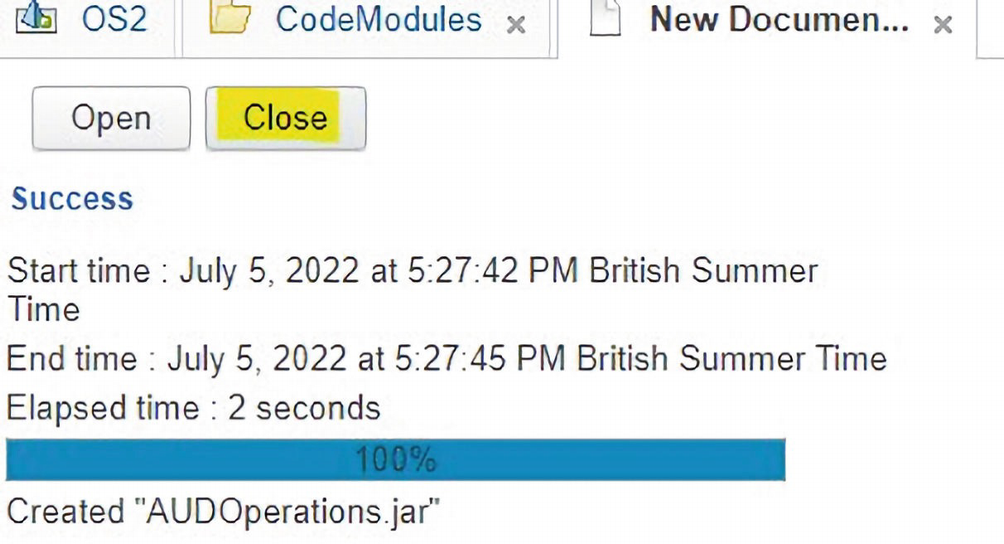
A screenshot of new document tab for A U D Operations dot jar code module created successfully with the close button highlighted.
The AUDOperations.jar Code Module is created successfully
- c)
Select the required Object Store Workflow System node as shown in Figure 3-258.

A screenshot of the workflow system node selected on the left panel and general tab of the workflow system open in the right panel.
The Workflow System node is selected
- a)
In the object store navigation pane, click the Administrative ➤ Workflow System ➤ Isolated Regions folder and click the isolated region that you want to modify.
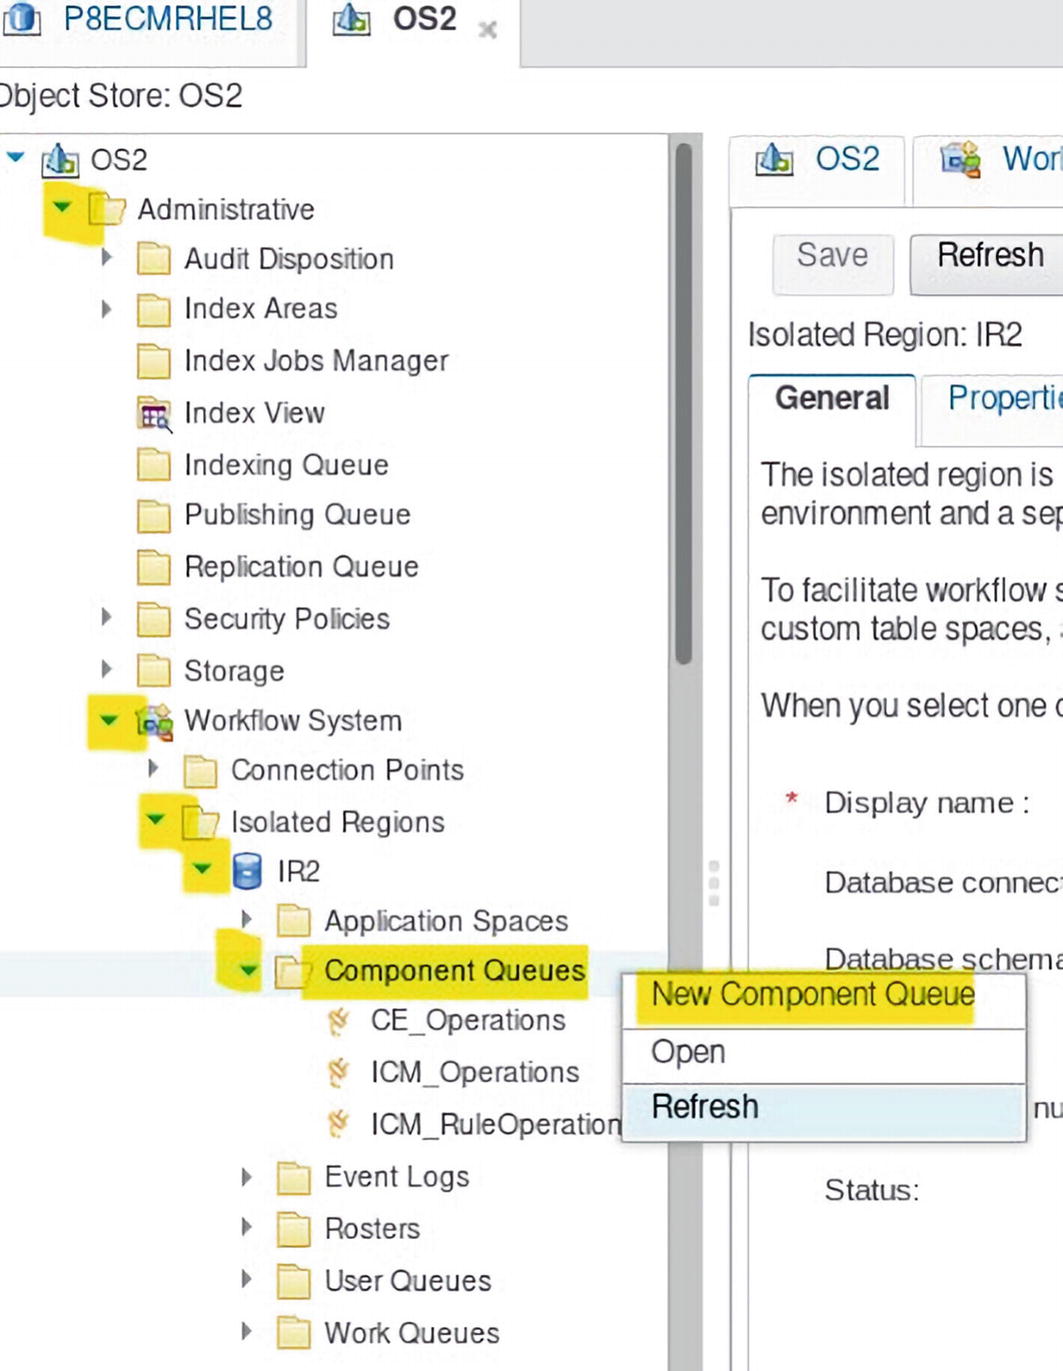
A screenshot represents the new component queue menu item selected in the component queue pane under workflow system pane.
The New Component Queue menu item is selected
- b)
Right-click the Component Queues folder and click New Component Queue.

A screenshot presents the component queue named A U D underscore operations to the workflow system queue folder.
The Component Queue is named AUD_Operations
- c)
The AUDOperations.jar Code Module we created earlier is loaded.
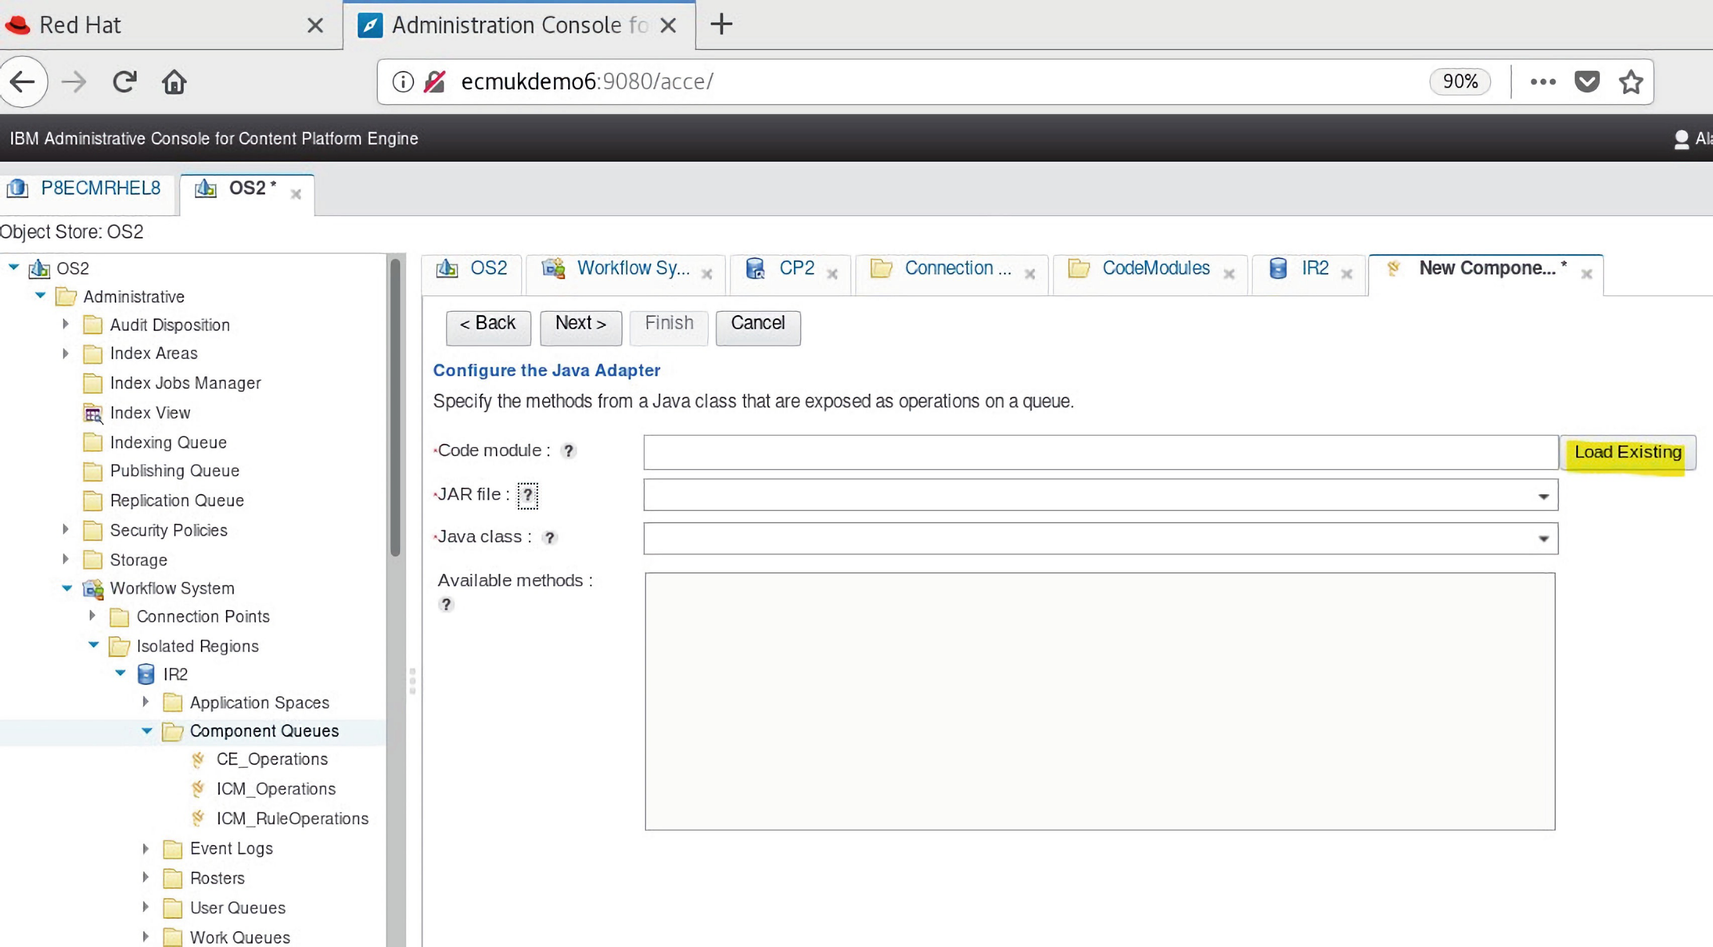
A screenshot of I B M administrative console for content platform Engine page with the load existing command button selected and highlighted.
The Load Existing command button is selected
- d)
Then, the AUDOperations.jar file Code Module we added earlier is selected.

A screenshot of select a code module box with code module name A U D operations . jar is highlighted and selected from the drop down.
The AUDOperations.jar Code Module is selected
- e)
Select the previously loaded AUD_Operations code module.
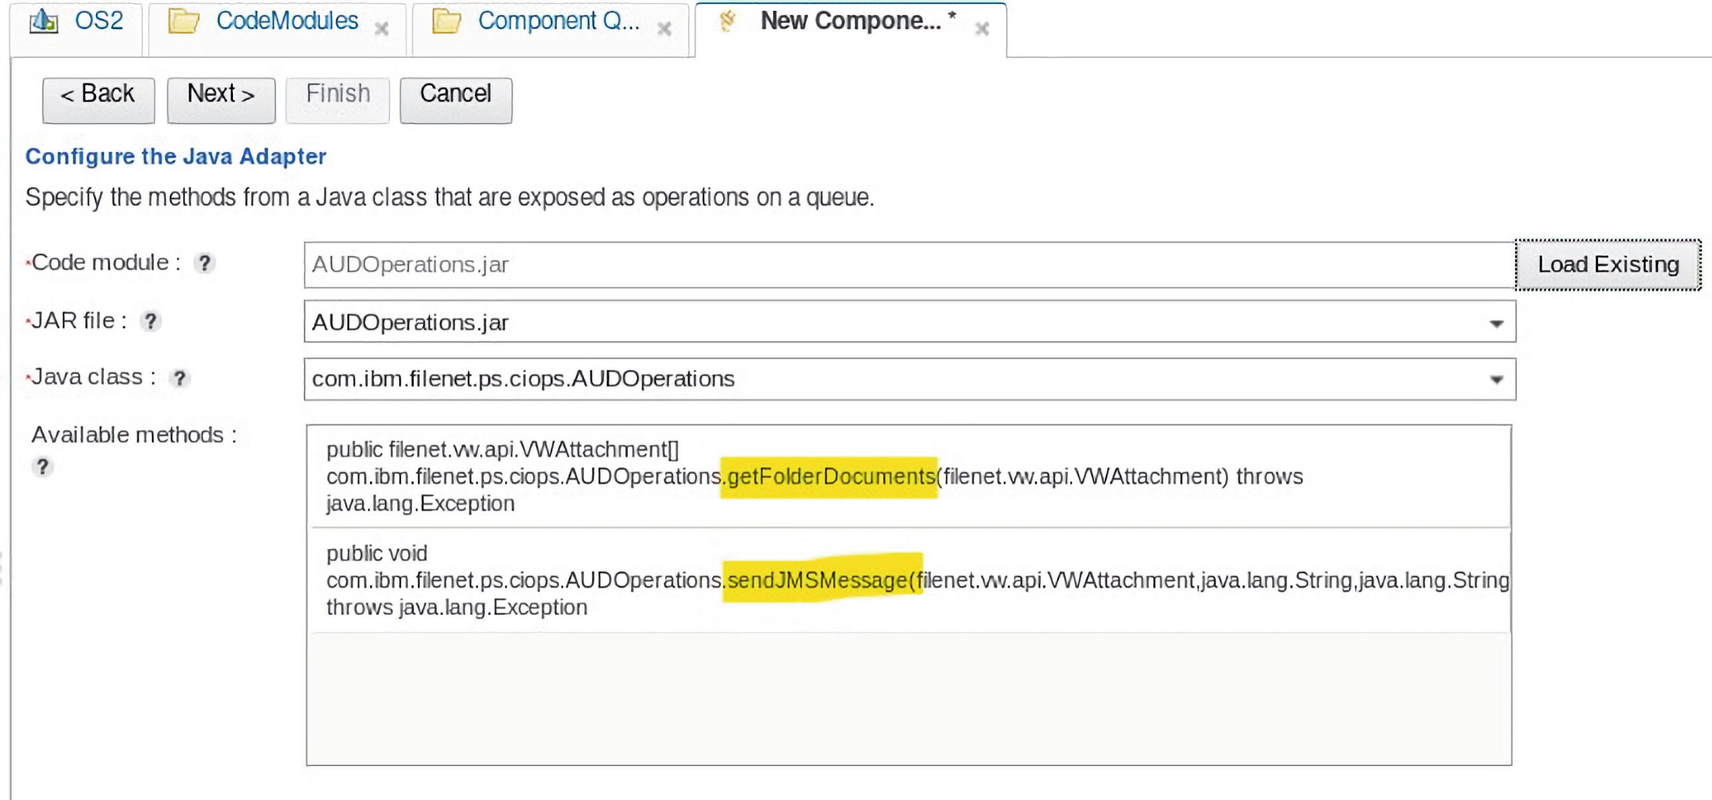
A screenshot represents the list of the available methods advertised as expected.
The Available methods list is shown as expected
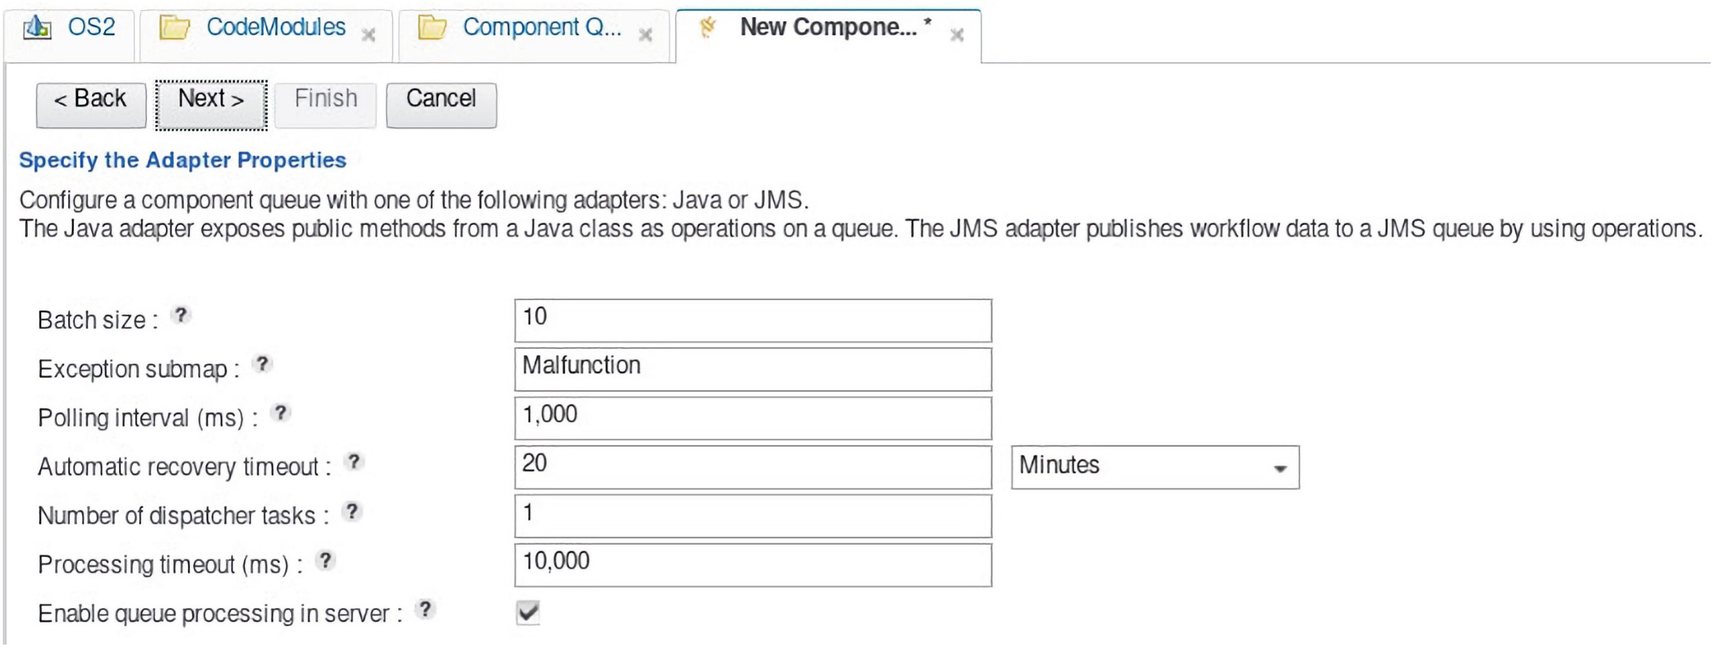
A screenshot of the adapter properties, which are advertised with the defaults used.
The Adapter Properties are shown and the defaults used

A screenshot of the new component tab advertised with the J A A S authentication prompts.
The New Component tab is displayed with JAAS authentication prompts

A screenshot of the finish command used to create the A U D underscore operations queue to the system configuration context with finish button highlighted.
The Finish command is used to create the AUD_Operations Queue
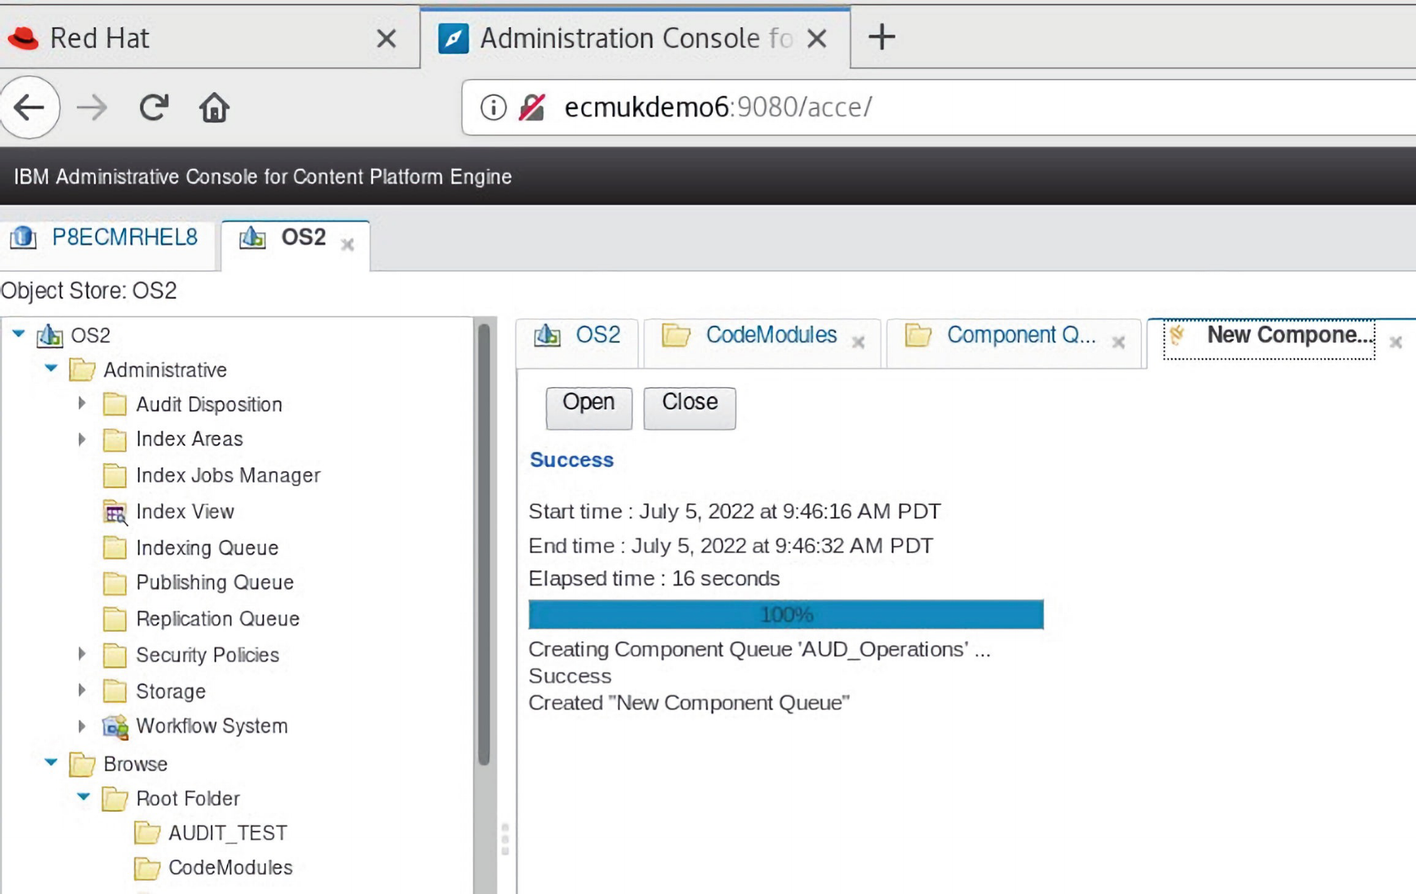
A screenshot of the A U D underscore operations queue that is advertised to be created successfully.
The AUD_Operations Queue is shown to be created successfully

A screenshot of the O S 2 panel on the left and component panel on the right with A U D underscore operations highlighted.
The AUD_Operations Component Queue is now available for use
The preceding steps were repeated for the OS1 Design Object Store.
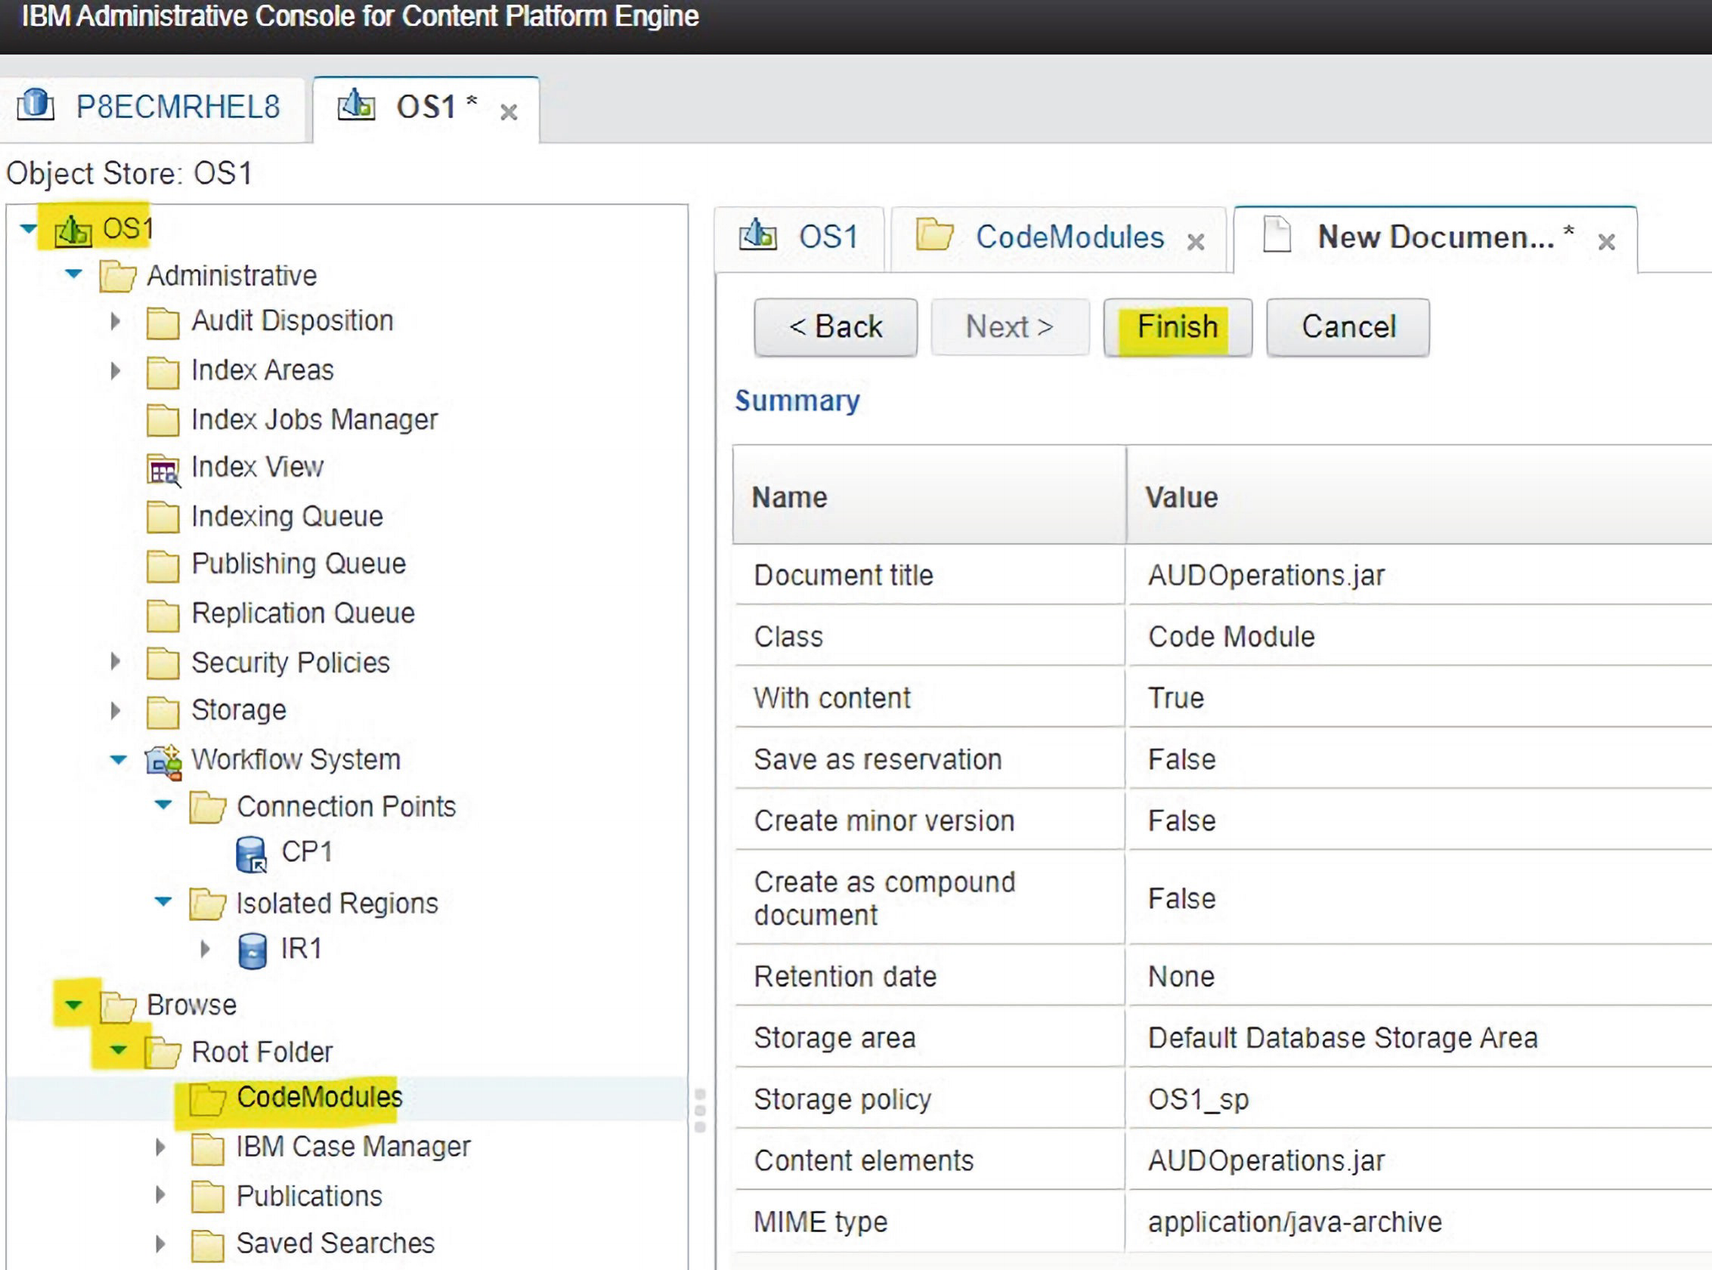
A screenshot of A U D Operations dot jar created in the O S 1 design object store with the code module and finish button highlighted.
The AUDOperations.jar is created in the OS1, Design Object Store

A screenshot of I B M administrative console for content platform engine with O S 1 panel on the left and successful creation of A U D Operations dot jar in the right panel.
The created AUDOperations.jar in the OS1 Design Object store
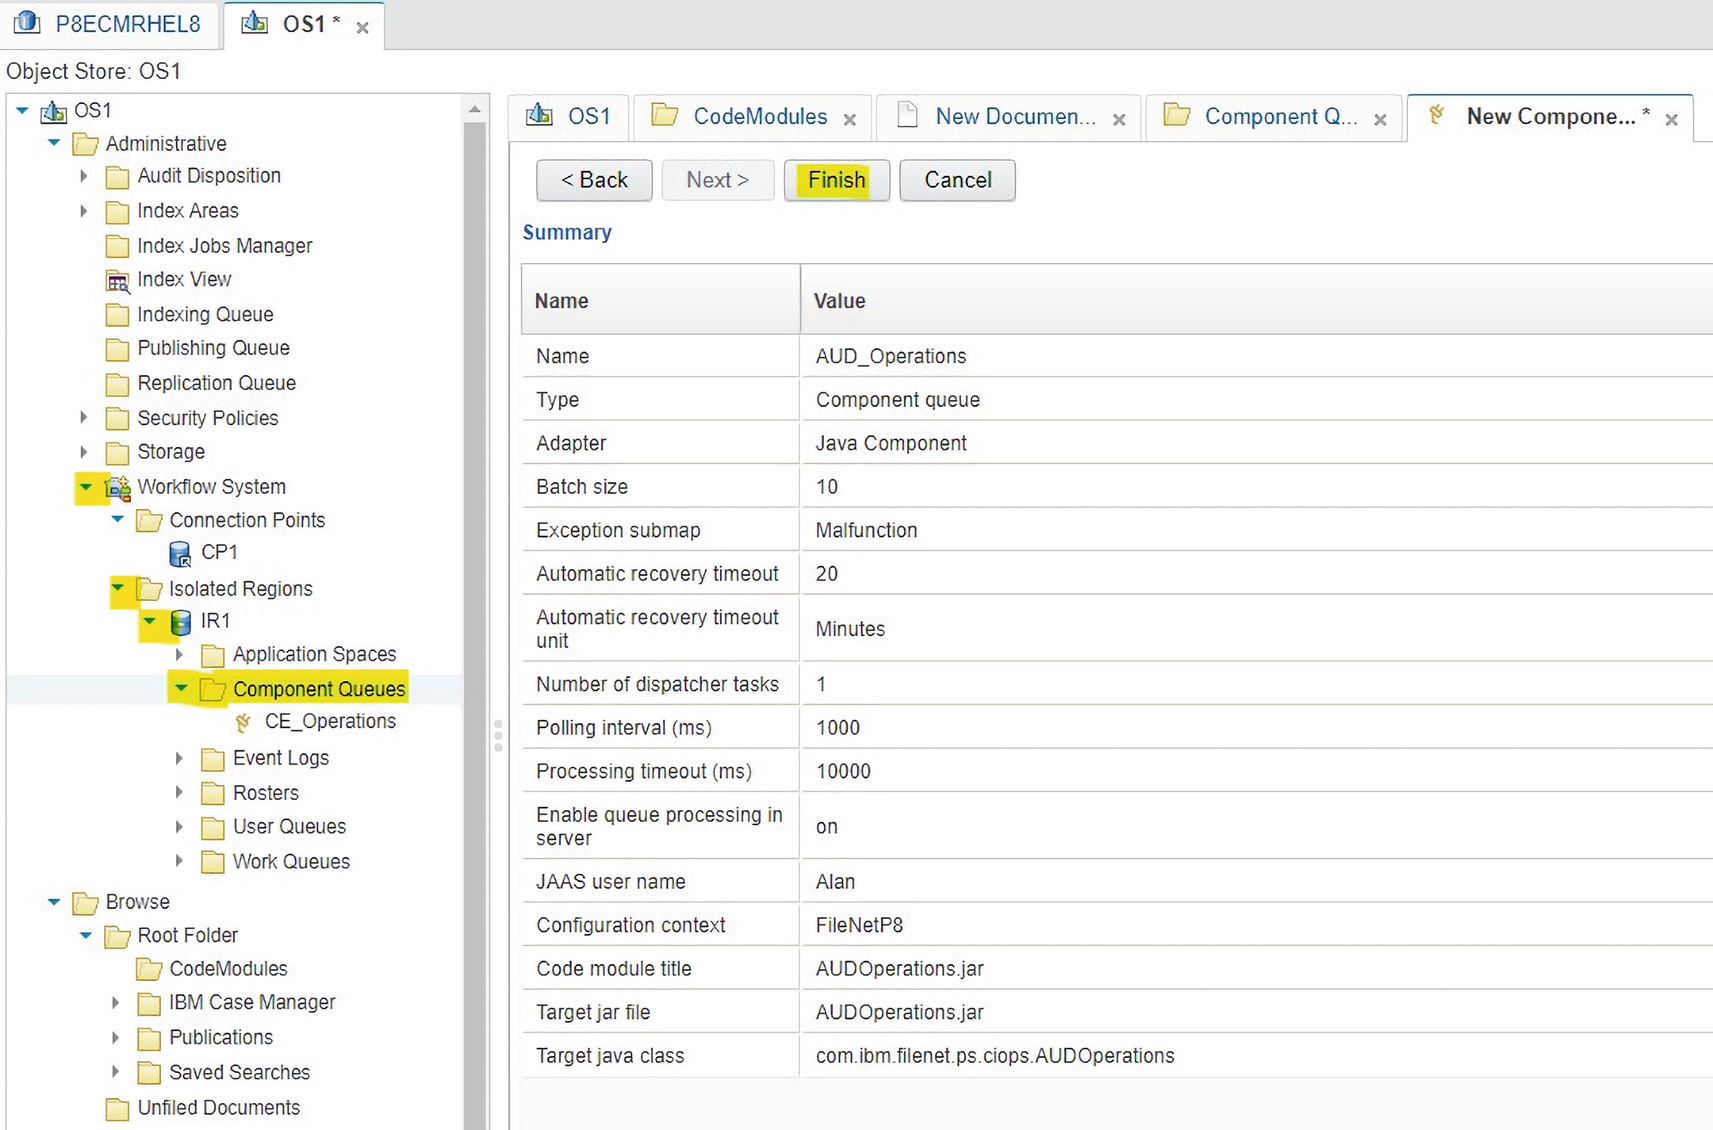
A screenshot represents the parameters for the A U D underscore operation component, where the finish button is highlighted.
The parameters for the AUD_Operations Component Queue

A screenshot of the O S 1 panel on the left and successful creation of the A U D operations component on the right panel.
The AUD_Operations Component Queue is created
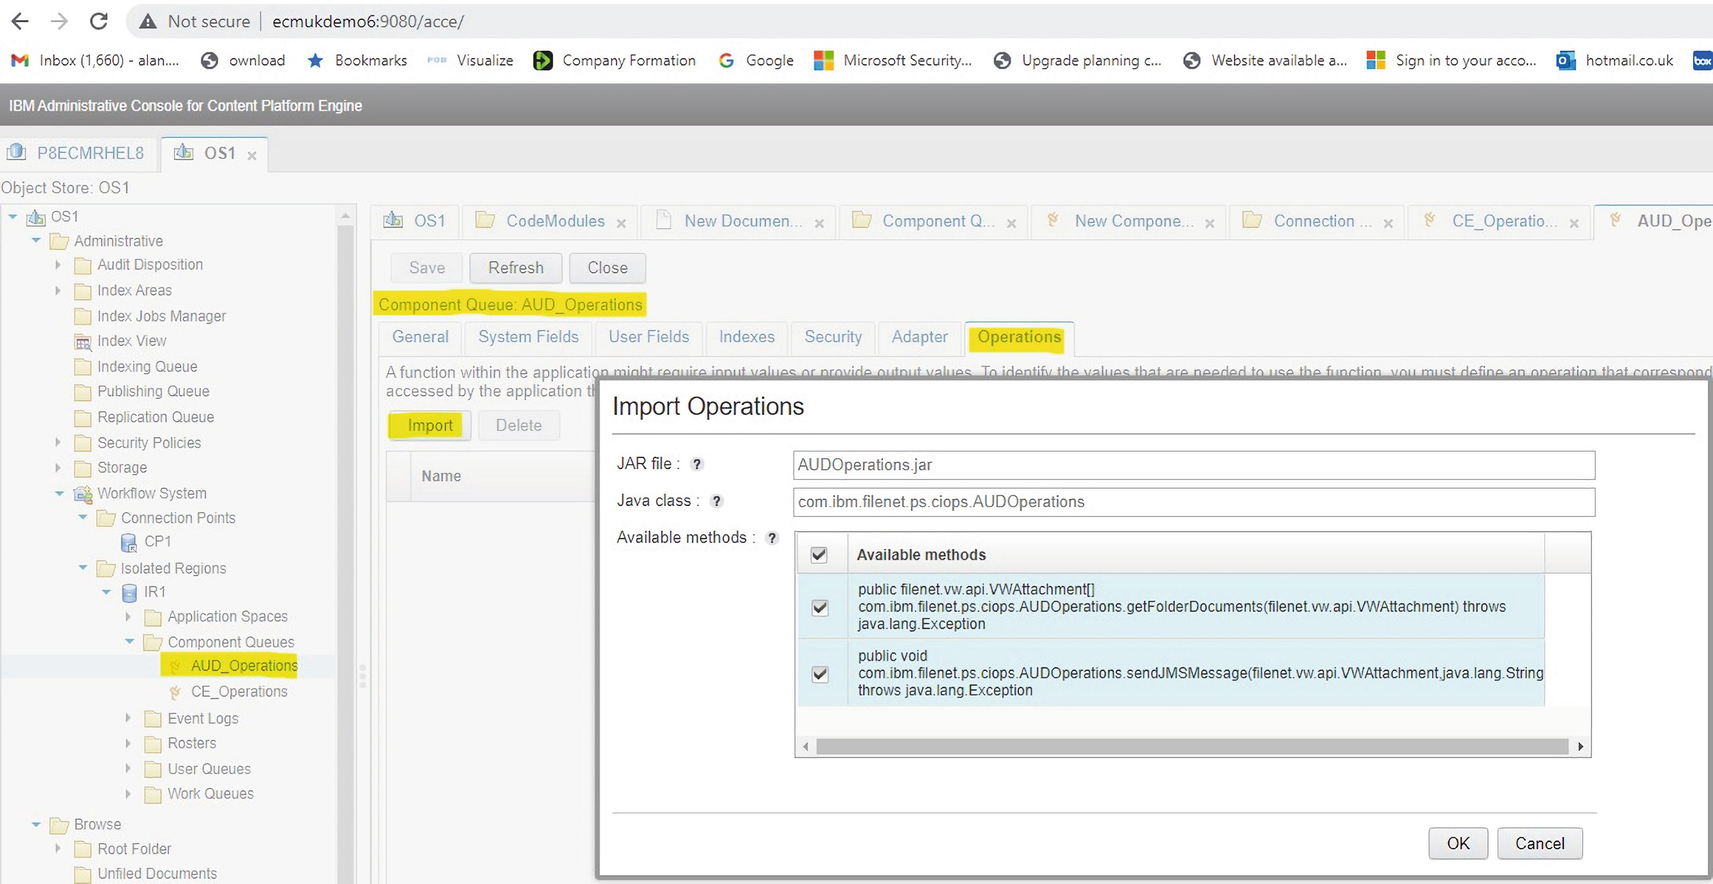
A screenshot of import operations box with options JAR file, Java class, and available methods with options selected.
The methods need to be exposed for use in the Workflow
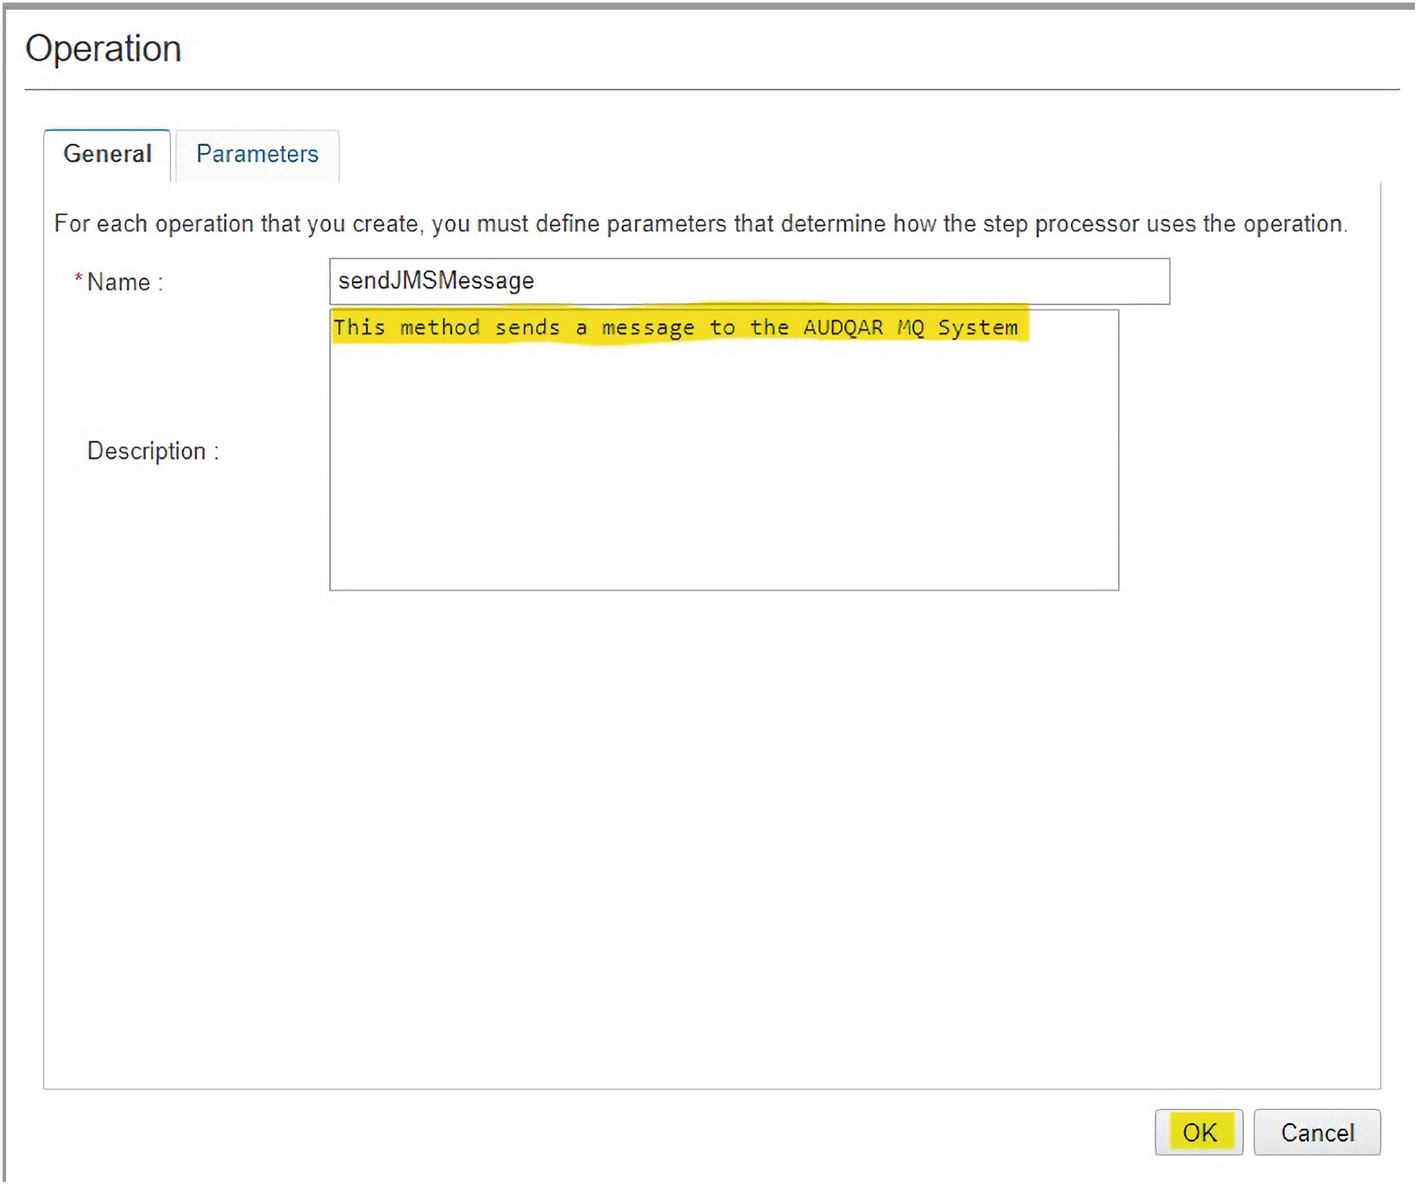
A screenshot of operation box with general tab selected. Name section has text send J M S message and description reads This method sends a message to the A U D Q A R M Q system which is highlighted. Bottom right has O K button highlighted.
The General tab is used to add the Description for the method
The sendJMSMessage method sends a message to the AUDQAR MQ System.
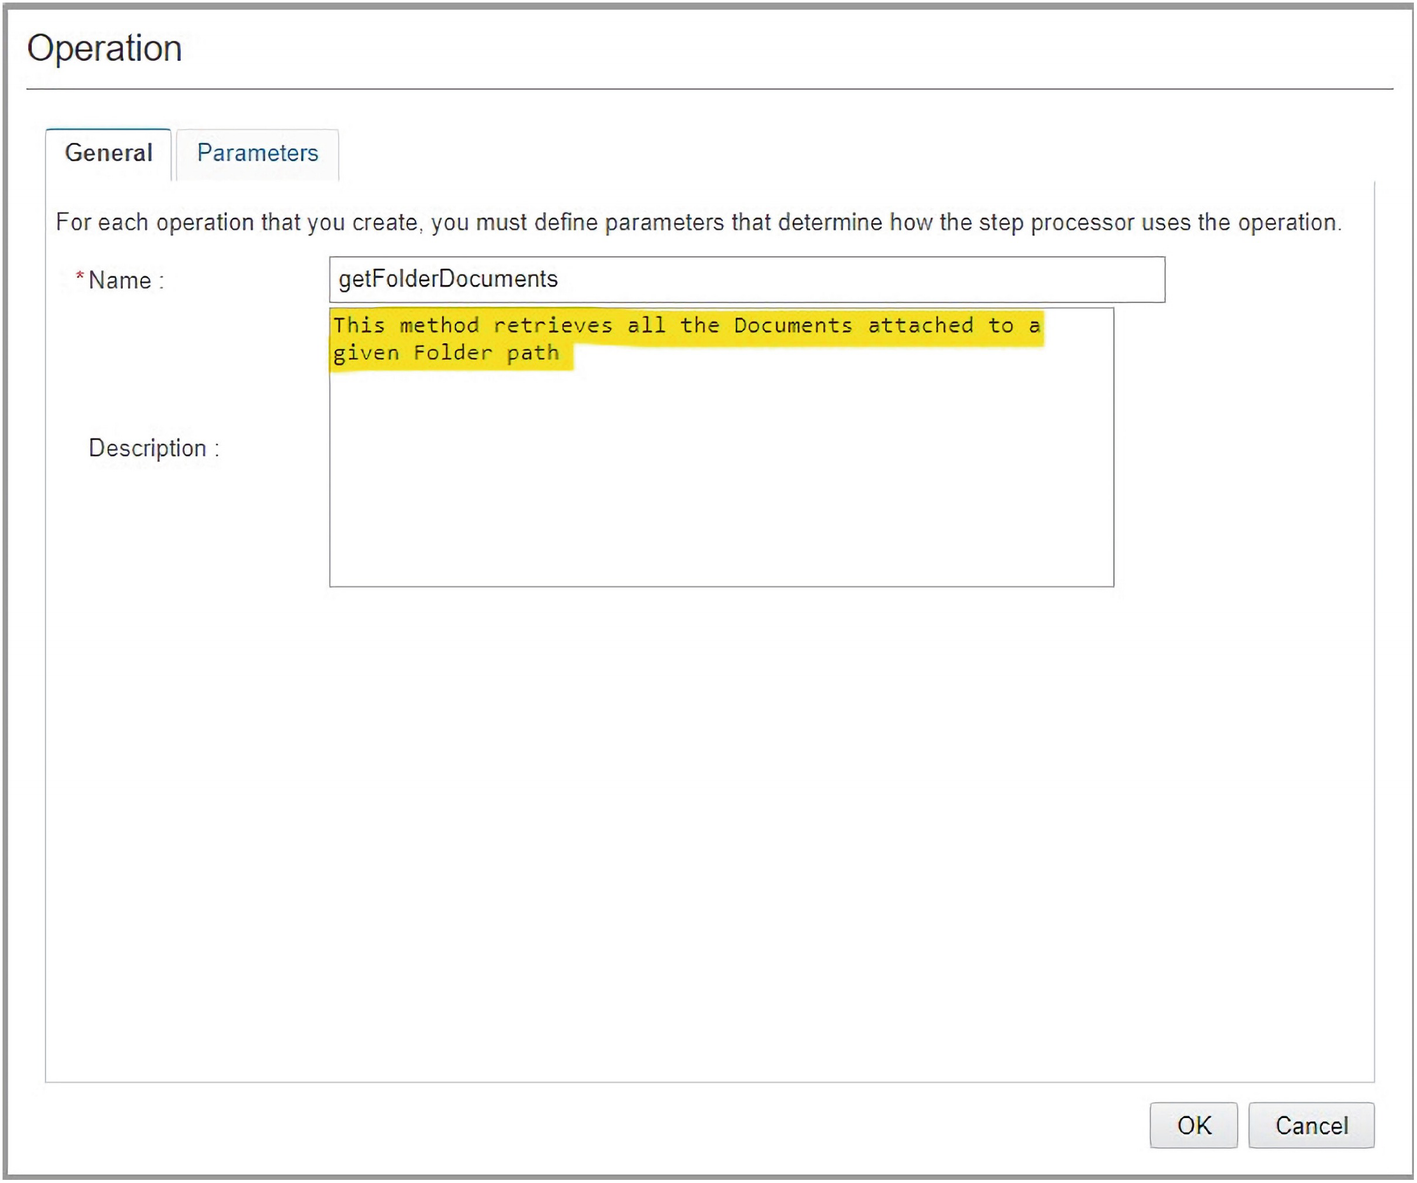
A screenshot of operation box with general tab selected. Name section has text get folder documents and description reads This method retrieves all the documents attached to a given folder path which is highlighted.
The description for the getFolderDocuments method is entered
Editing the Parameters
Next, the 15 parameters are edited with their names on the Parameters tab.
Because of the way in which these parameters are sorted, you might find it easier to keep track of the order by deleting all the template parameters and then adding them back one at a time since it is easy for the parameter order to be set mismatching the Java method argument call order.

A screenshot of operation box with parameters tab selected with 2 tabs for new and delete under it a table with 4 columns and several rows is given.
The 15 parameters of the sendJMSMessage method
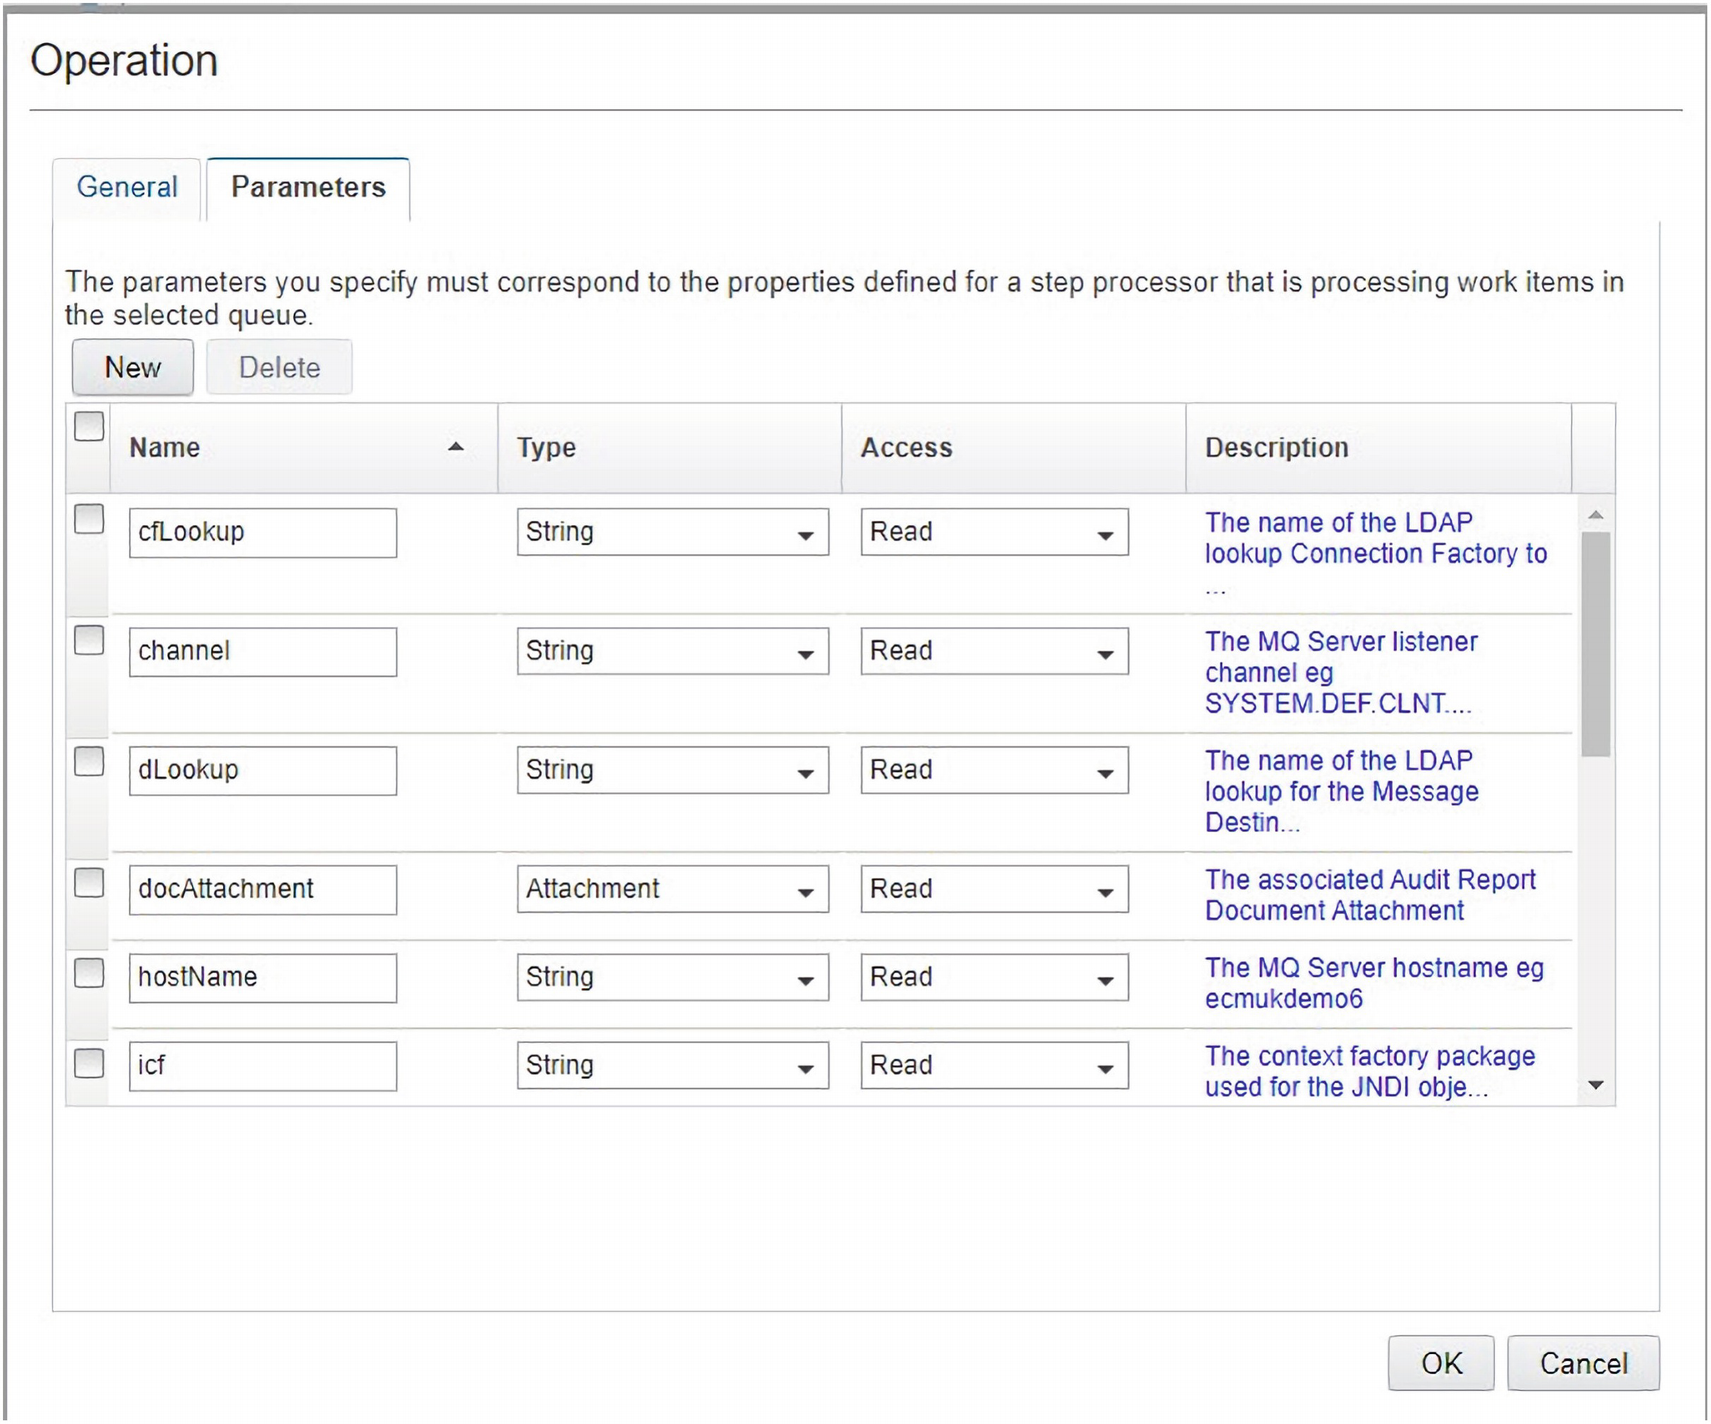
A screenshot of the first attempt at entering the parameters by overwriting the templates of the A U D Operations.jar file process.
The first attempt at entering the parameters by overwriting the templates
Checking the Deployment in Component Manager and Workflow
This loads a pop-up window prompting us for a Process Engine administrator login (see Chapter 2, Figure 2-190).
IBM Process Designer Component Queue Configuration
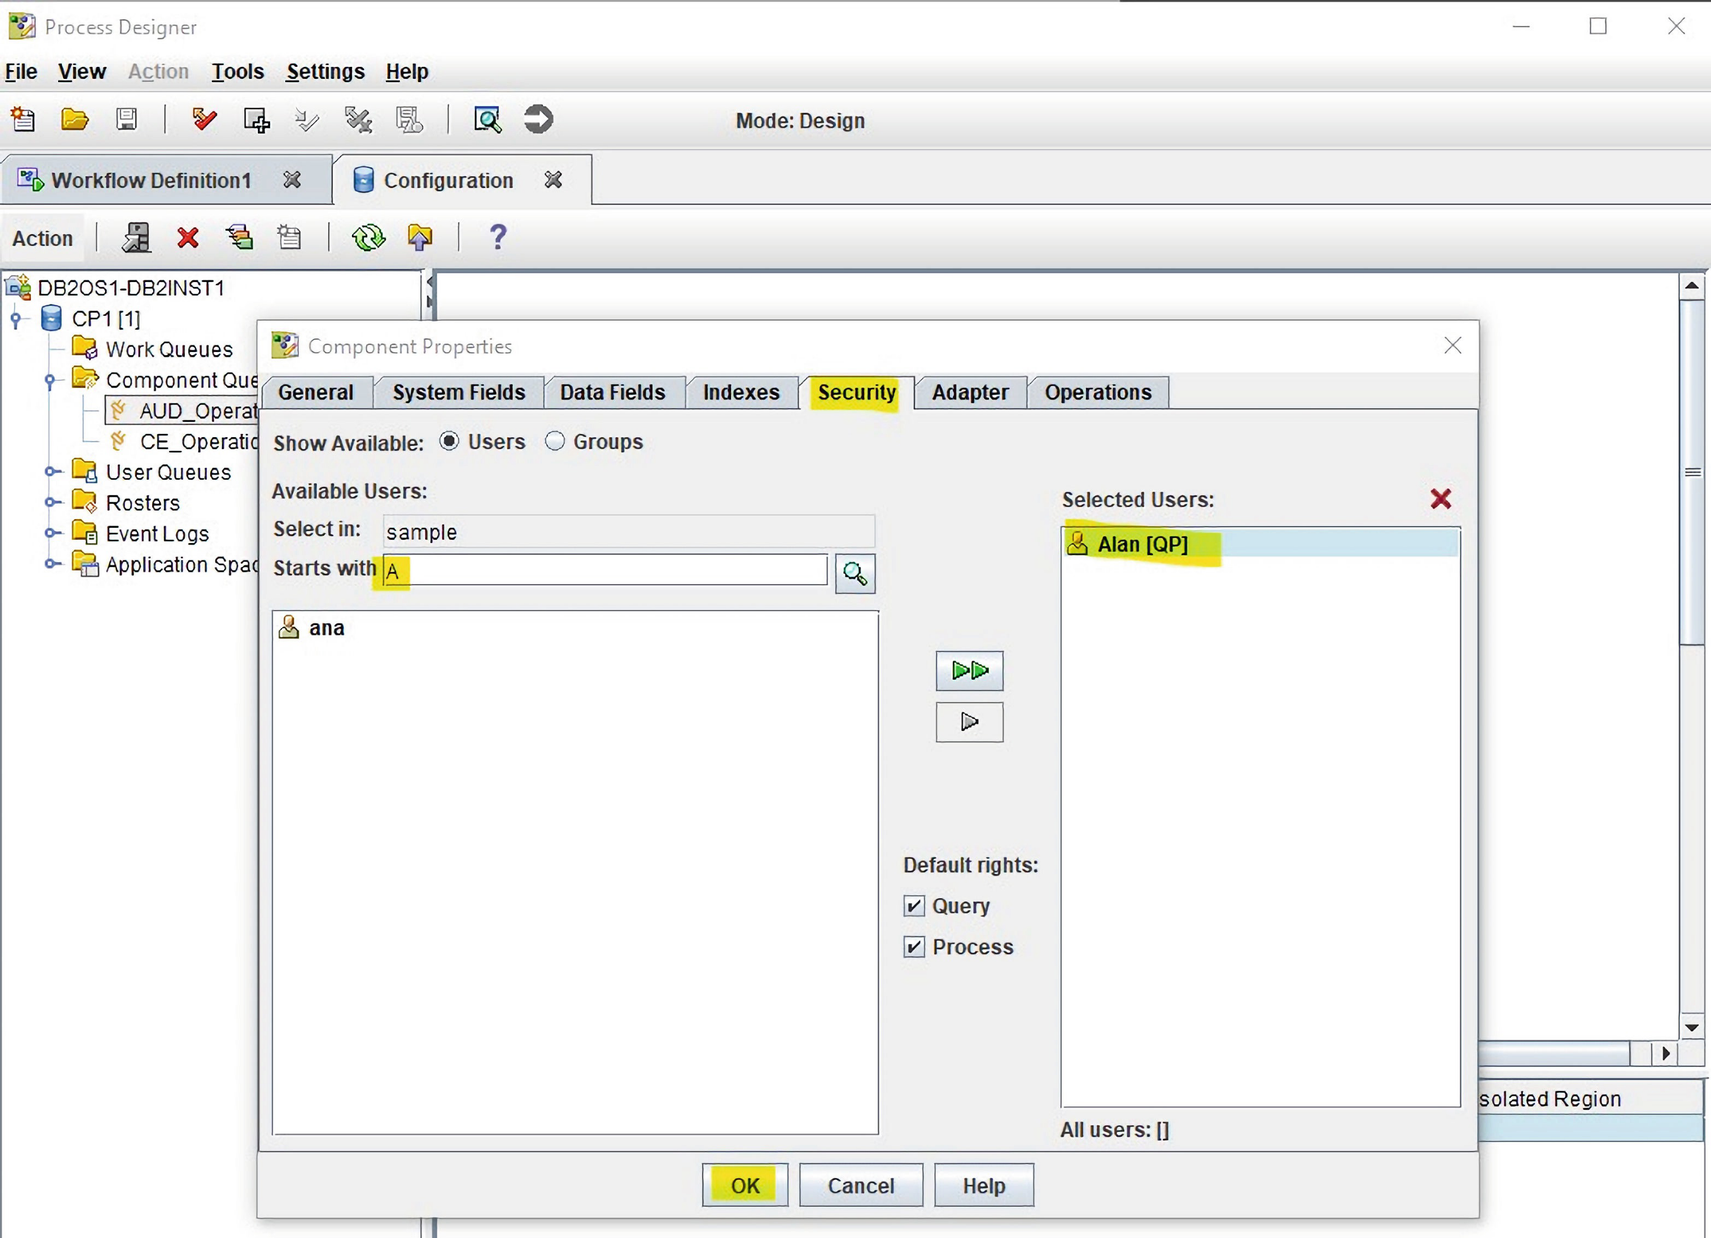
A screenshot of the configuration menu that launches the configuration tool, where the ok button is highlighted.
The View ➤ Configuration menu launches the Configuration tool

A screenshot of the highlighted icon in the action bar line that commits changes back to the object store component queue workflow system.
The highlighted icon on the Action bar line commits changes back to the Object Store Component Queue Workflow system

A screenshot of the list of queue properties to be updated is displayed with the closed button.
The list of Queue Properties to be updated is displayed

A screenshot of the A U D underscore operations queue created by right click the component queues node in the process designer configuration tool is advertised.
The AUD_Operations queue is created by right-clicking the Component Queues node in the Process Designer Configuration tool view
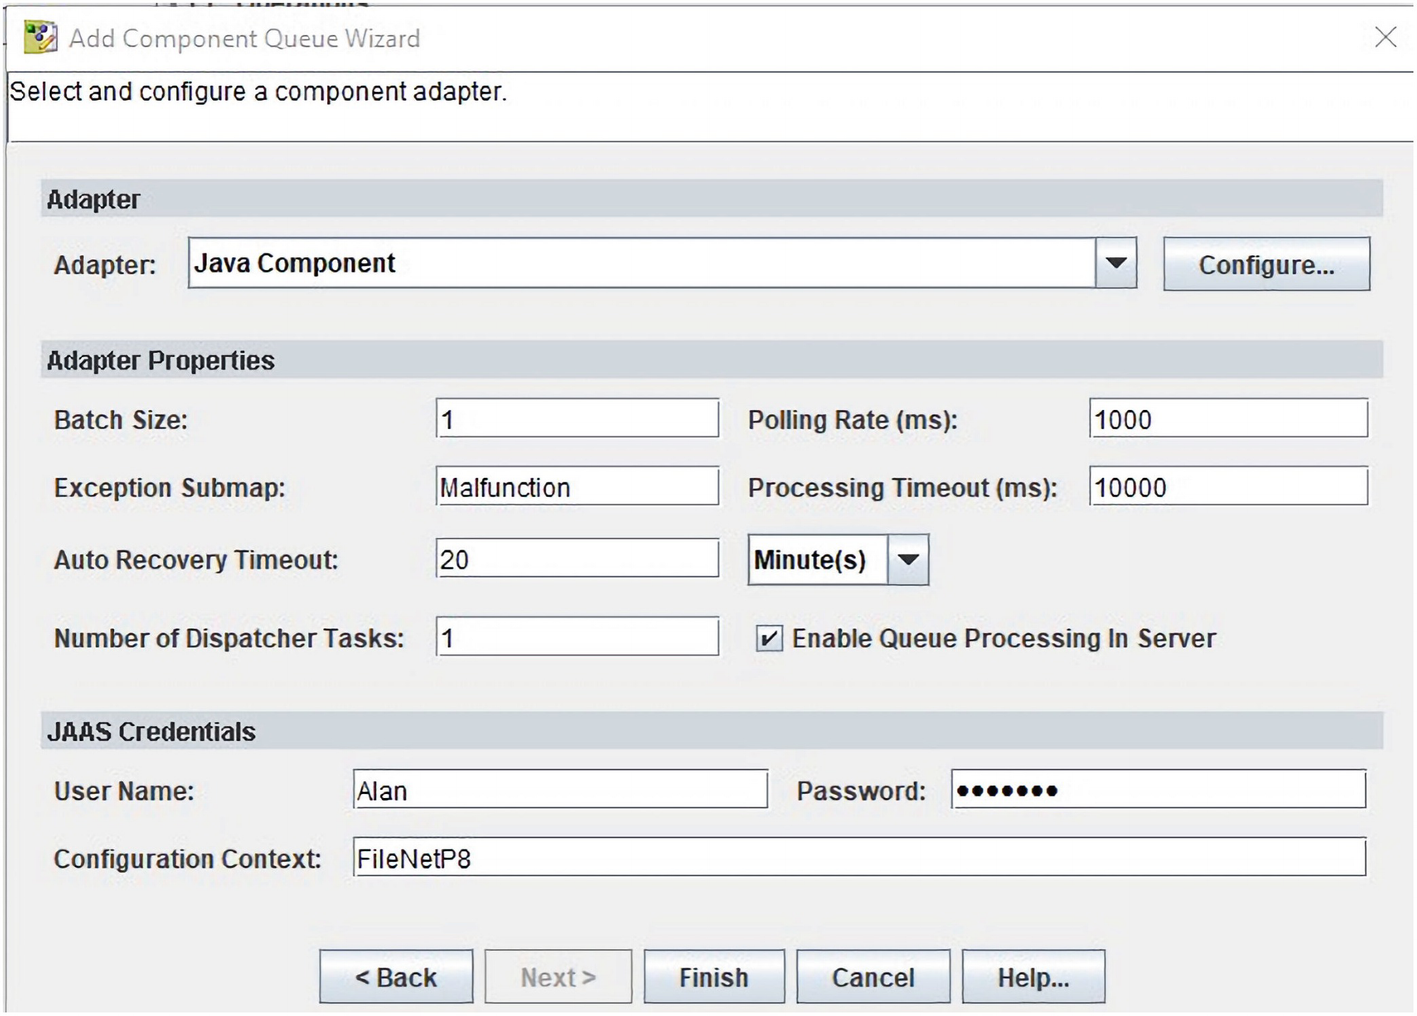
A screenshot of the security J A A S credentials entered for the A U D Operations dot jar file process.
The Security JAAS Credentials are entered

A screenshot of the code module selected highlighted icon in A U D operations dot jar file process.
The Code Module is selected using the highlighted icon

A screenshot of the A U D Operations dot jar file selected from the O S 1 design object.
The AUDOperations.jar file is selected from the OS1 Design Object store

A screenshot of the send J M S Message parameters are advertised in the A U D Operations dot jar file process.
The sendJMSMessage parameters are displayed

A screenshot of the component step that is dragged and dropped to the new workflow to the A U D Operations dot jar file process.
The Component step is dragged and dropped to the new Workflow

A screenshot of the highlighted icon selected to allow the selection of the required queue.
The highlighted icon is selected to allow selection of the required queue
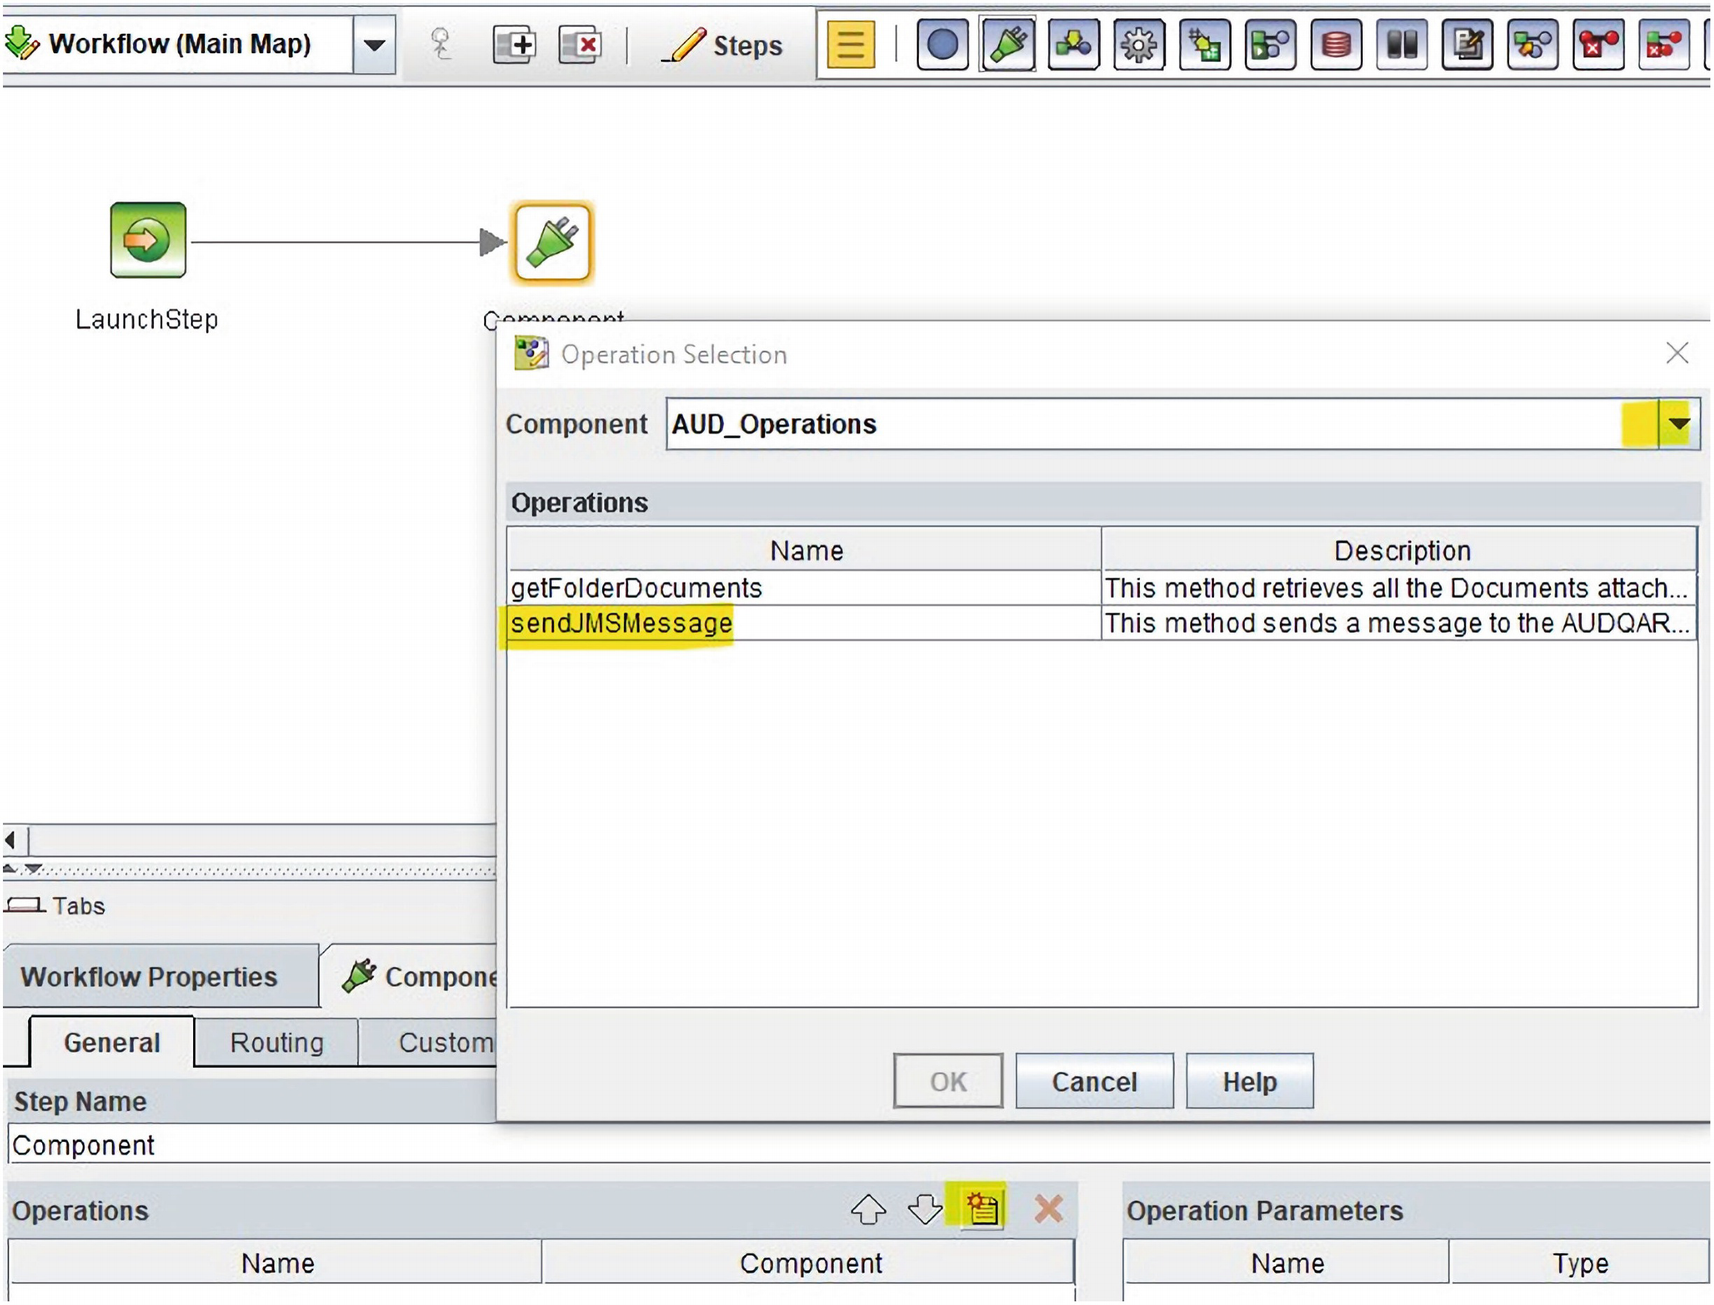
A screenshot of the send J M S message method clicked to load the call parameters to A U D underscore operations.
The sendJMSMessage method is clicked to load the call parameters

A screenshot of the expression values that can be filled with string values to A U D O operations dot jar.
The Expression values can be filled with String values

A screenshot of the right mouse click on the component node that is used to add additional java classes.
The right-mouse click on the Component node is used to add additional Java classes

A screenshot of commands for the required M Q series J M S message libraries is copied for installation.
The required MQ Series JMS message libraries are copied for installation
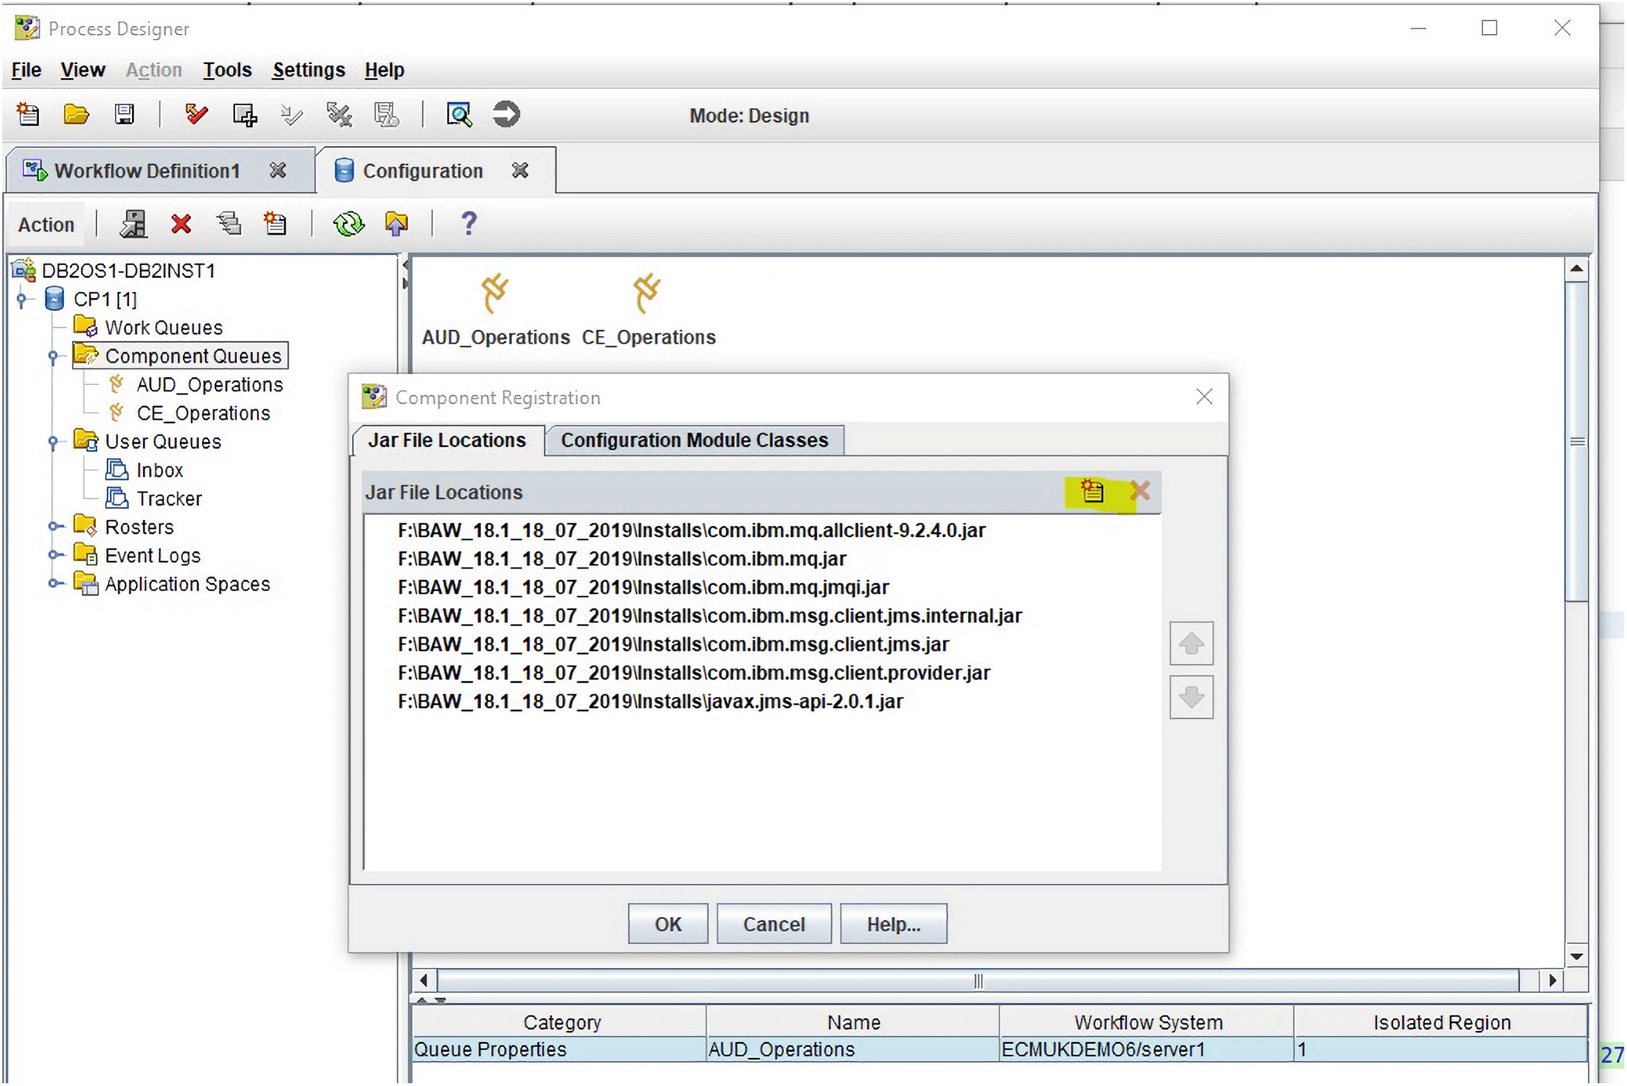
A screenshot of the required dot jar libraries imported from the install directory.
The required .jar libraries are imported from the Installs directory

A screenshot of the workflow saved as A U D underscore J M S message dot pep is selected and saved as A U D underscore J M S message. pep.
The workflow is saved as AUD_JMSMessage.pep

A screenshot of the changes to the A U D operations queue are committed and the continue button is highlighted.
The changes to the AUD_Operations queue are committed
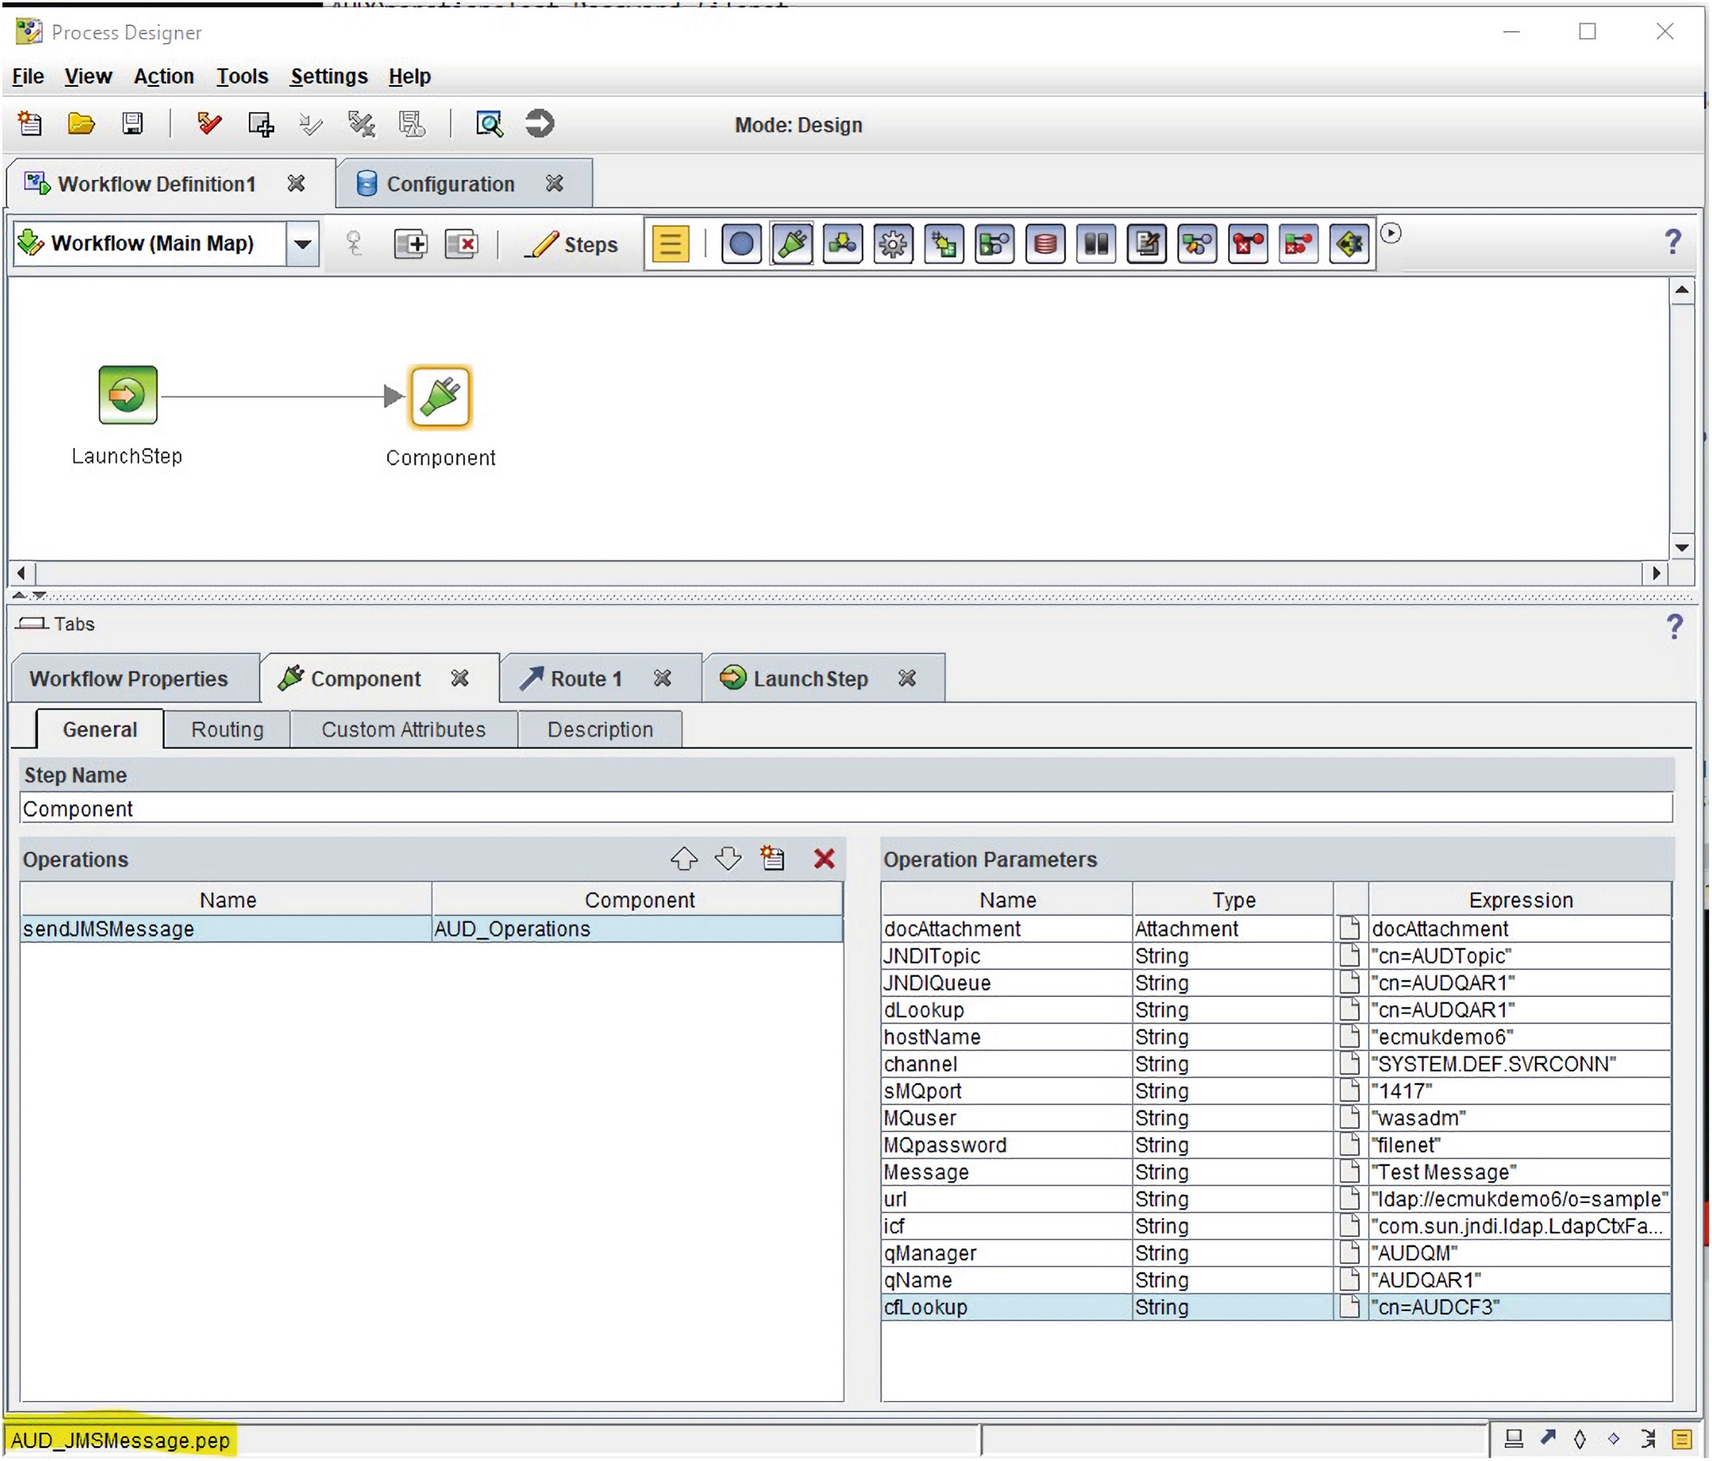
A screenshot of the A U D operations.jar file, where the order of the initial parameters is advertised to be incorrect.
The initial parameter order is shown to be incorrect!
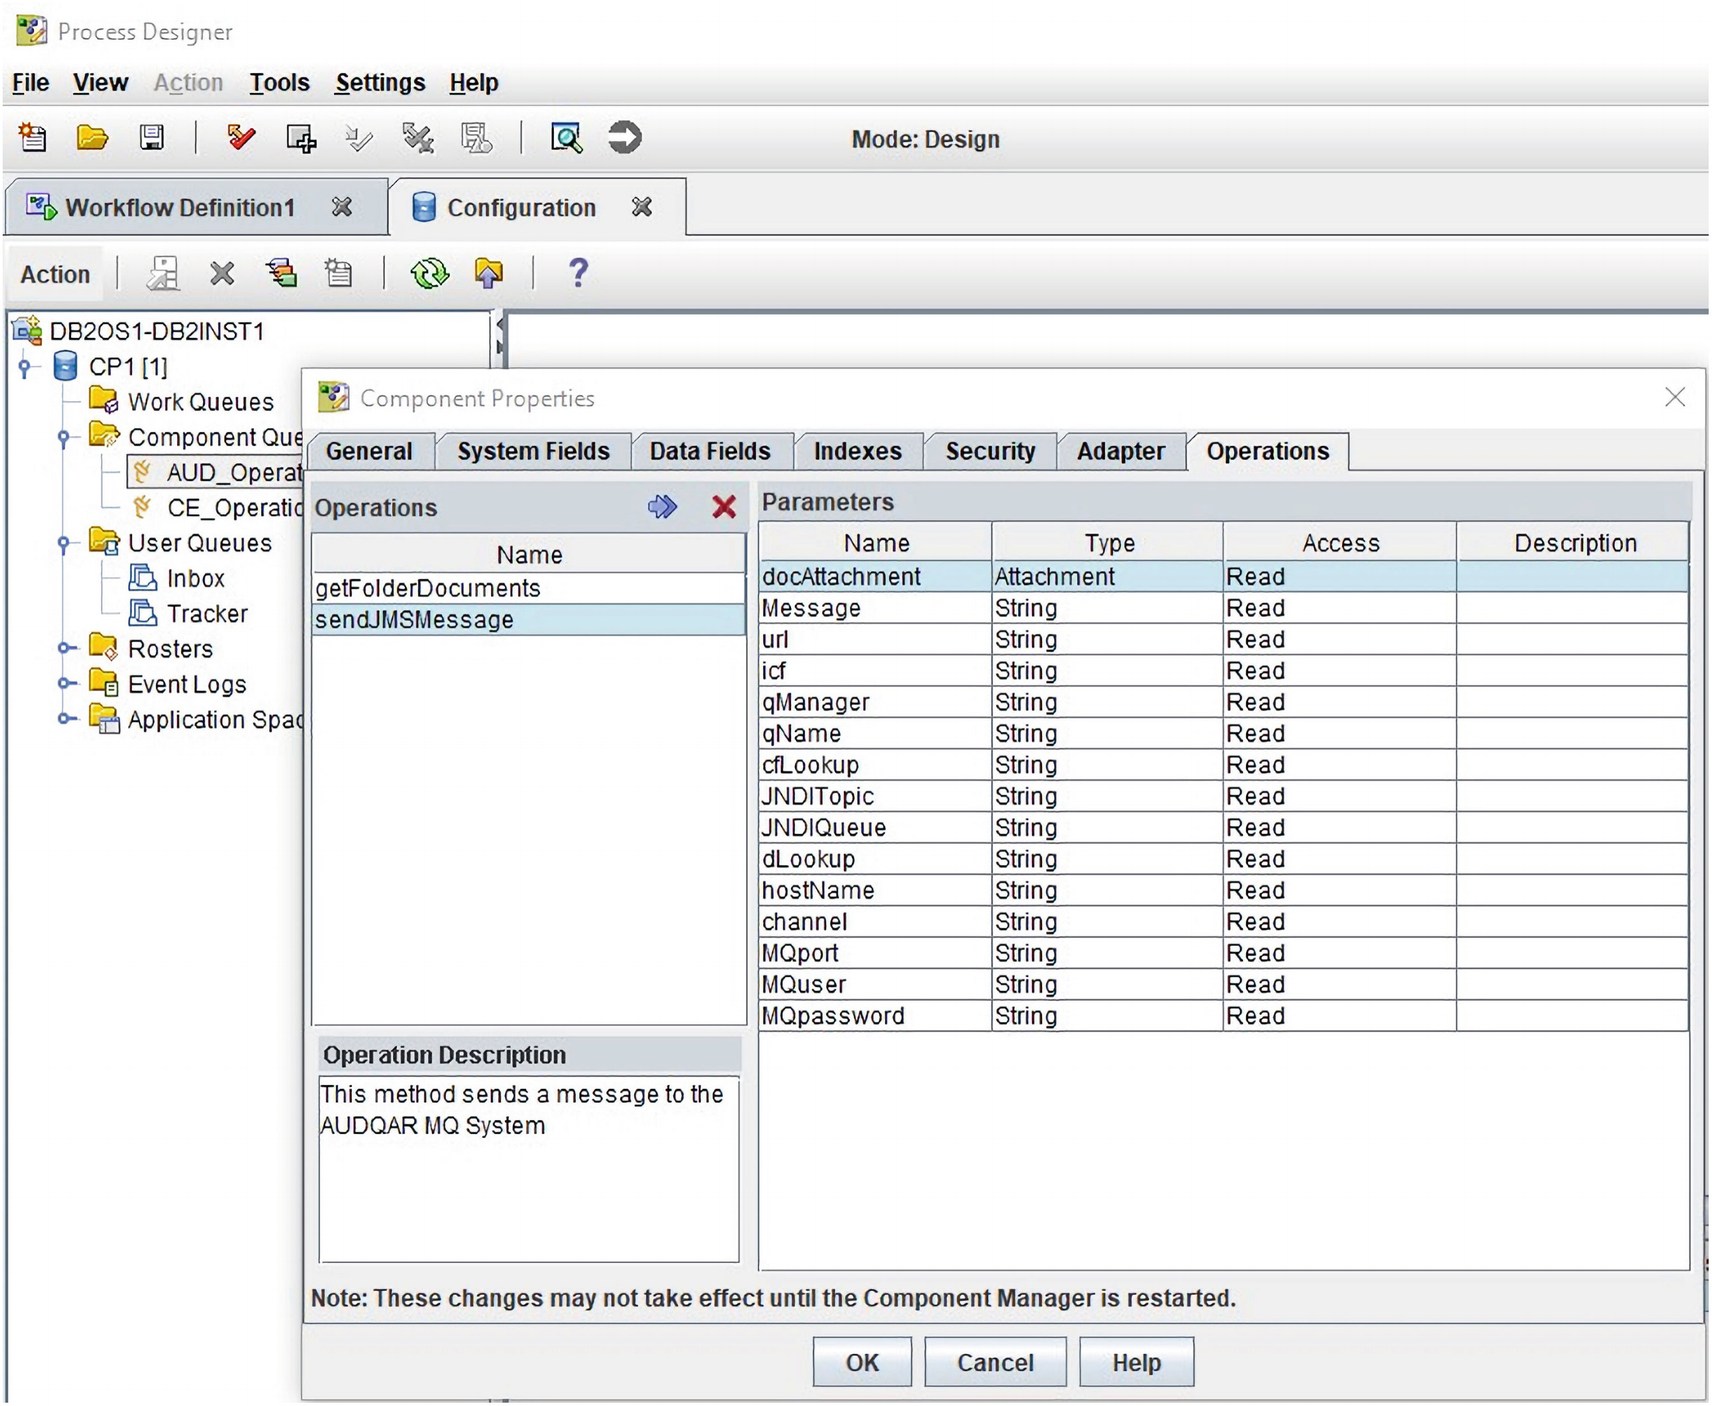
A screenshot of the A U D operations parameters that are reentered one at a time and with three buttons ok, cancel, and help.
The AUD_Operations parameters are reentered one at a time
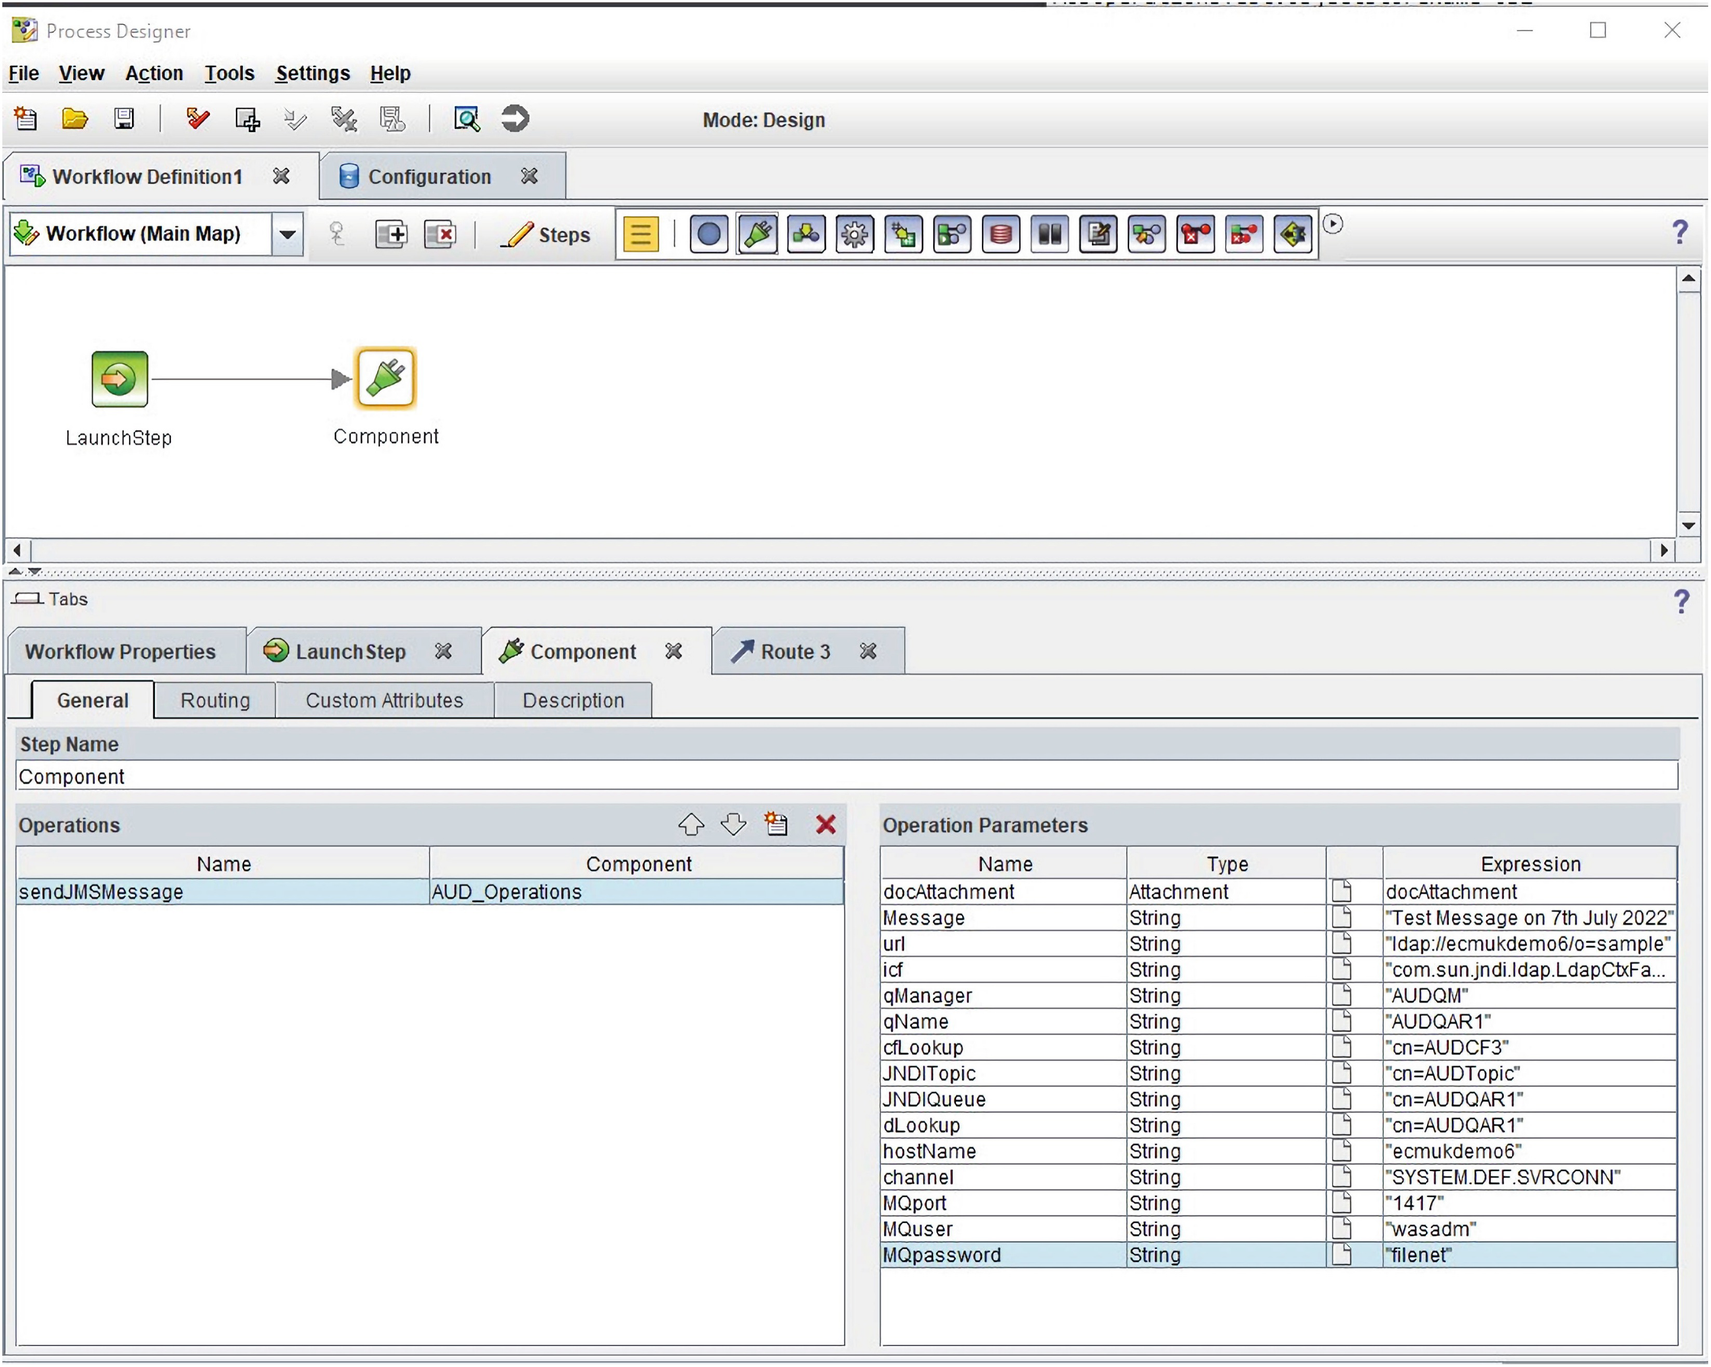
A screenshot of the launch step, component, where the component step parameters are now ordered correctly.
The Component step parameters are now ordered correctly
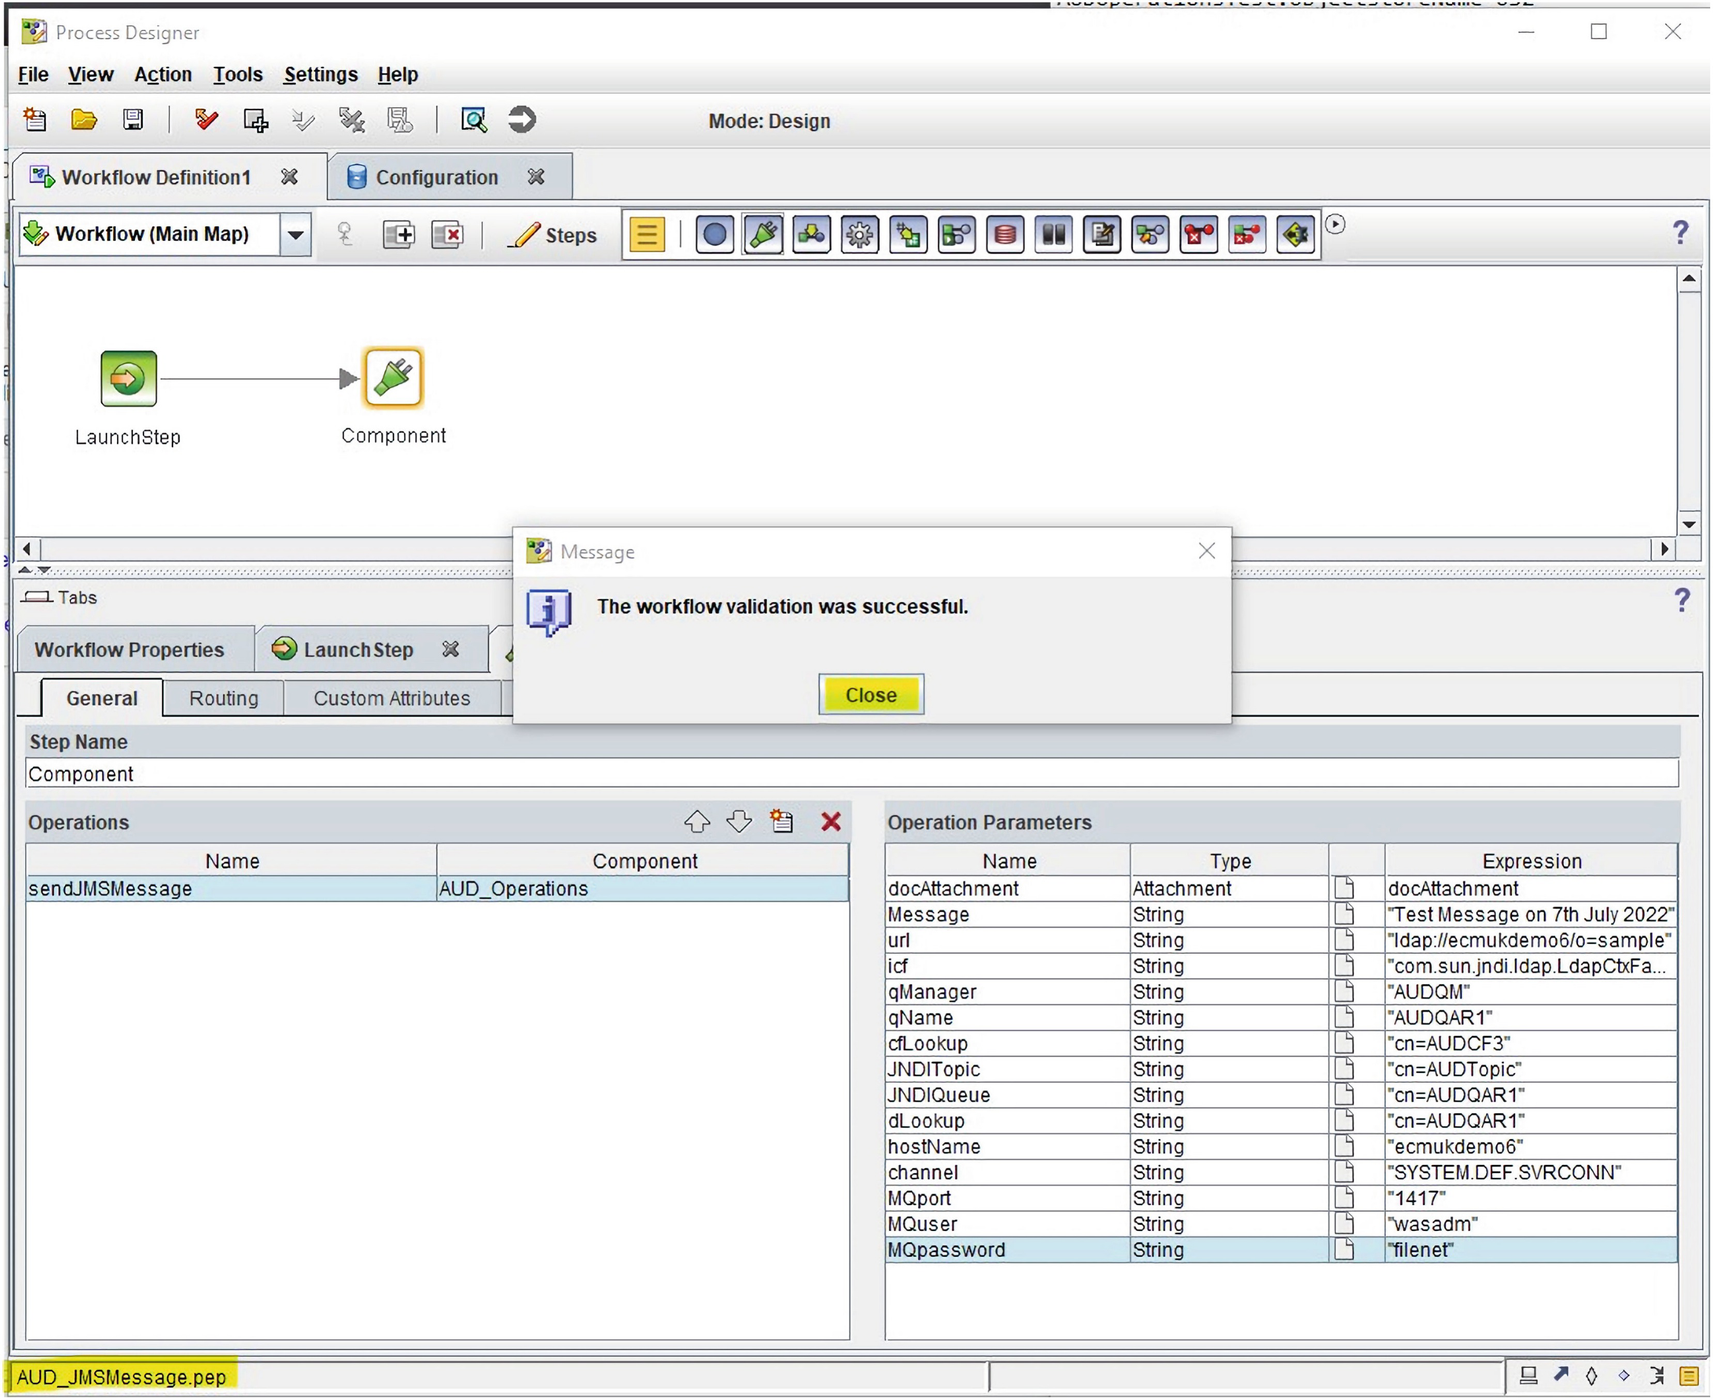
A screenshot of the workflow is validated and restored and a close button is highlighted.
The workflow is validated and resaved
It was discovered that the following original section of code (lines in red bold) caused Java reflection to fail in the import tool, so parameters were not exposed!
Part 6 – Transferring Workflow and Setting Up Workflow Subscriptions
Creating a Workflow Subscription on a New Audit Report Document Event
The Target Object store, OS2, with a Workflow Definition document class (AUD_JMSMessage.pep file) is used to run the Workflow we created, after a new Audit Report document is created in the Target Object store from an Audit Master solution Case Manager Audit Department Case.

A screenshot of the audit report class used for the basis of the new workflow subscription.
The Audit Report class is used for the basis of a new Workflow subscription
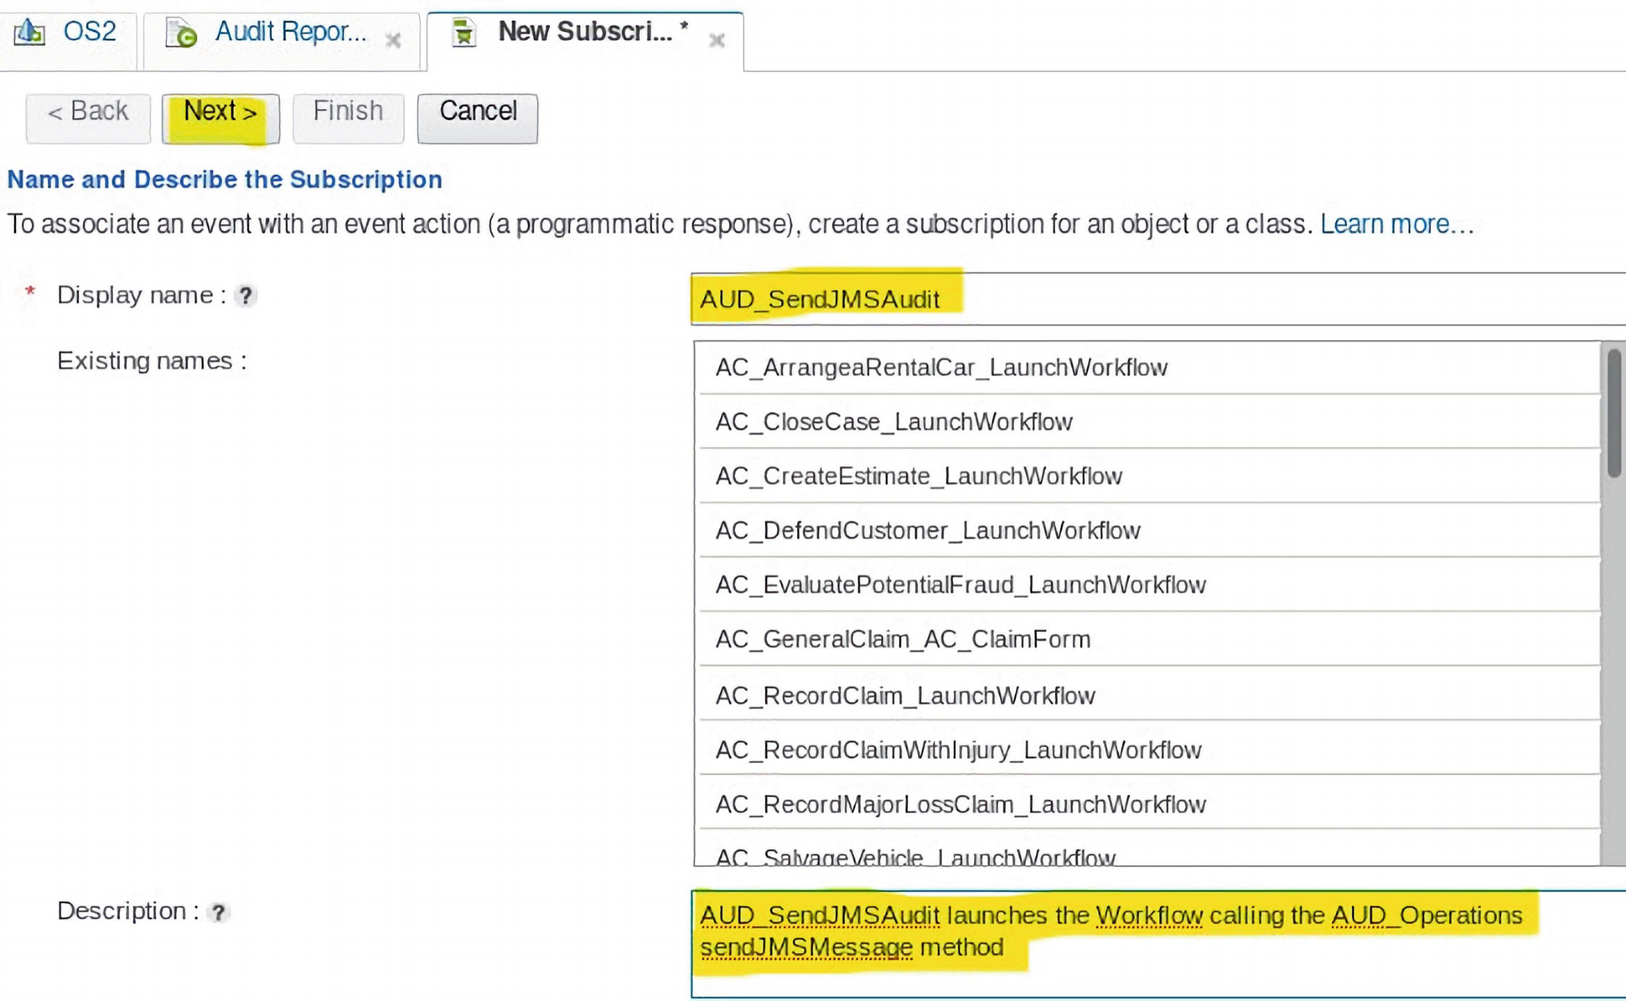
A screenshot of the A U D underscore send J M S audit subscription created to launch the workflow.
The AUD_SendJMSAudit subscription is created to launch the Workflow

A screenshot to create a workflow subscription must be ticked and with next button is highlighted.
The Create a workflow subscription must be ticked
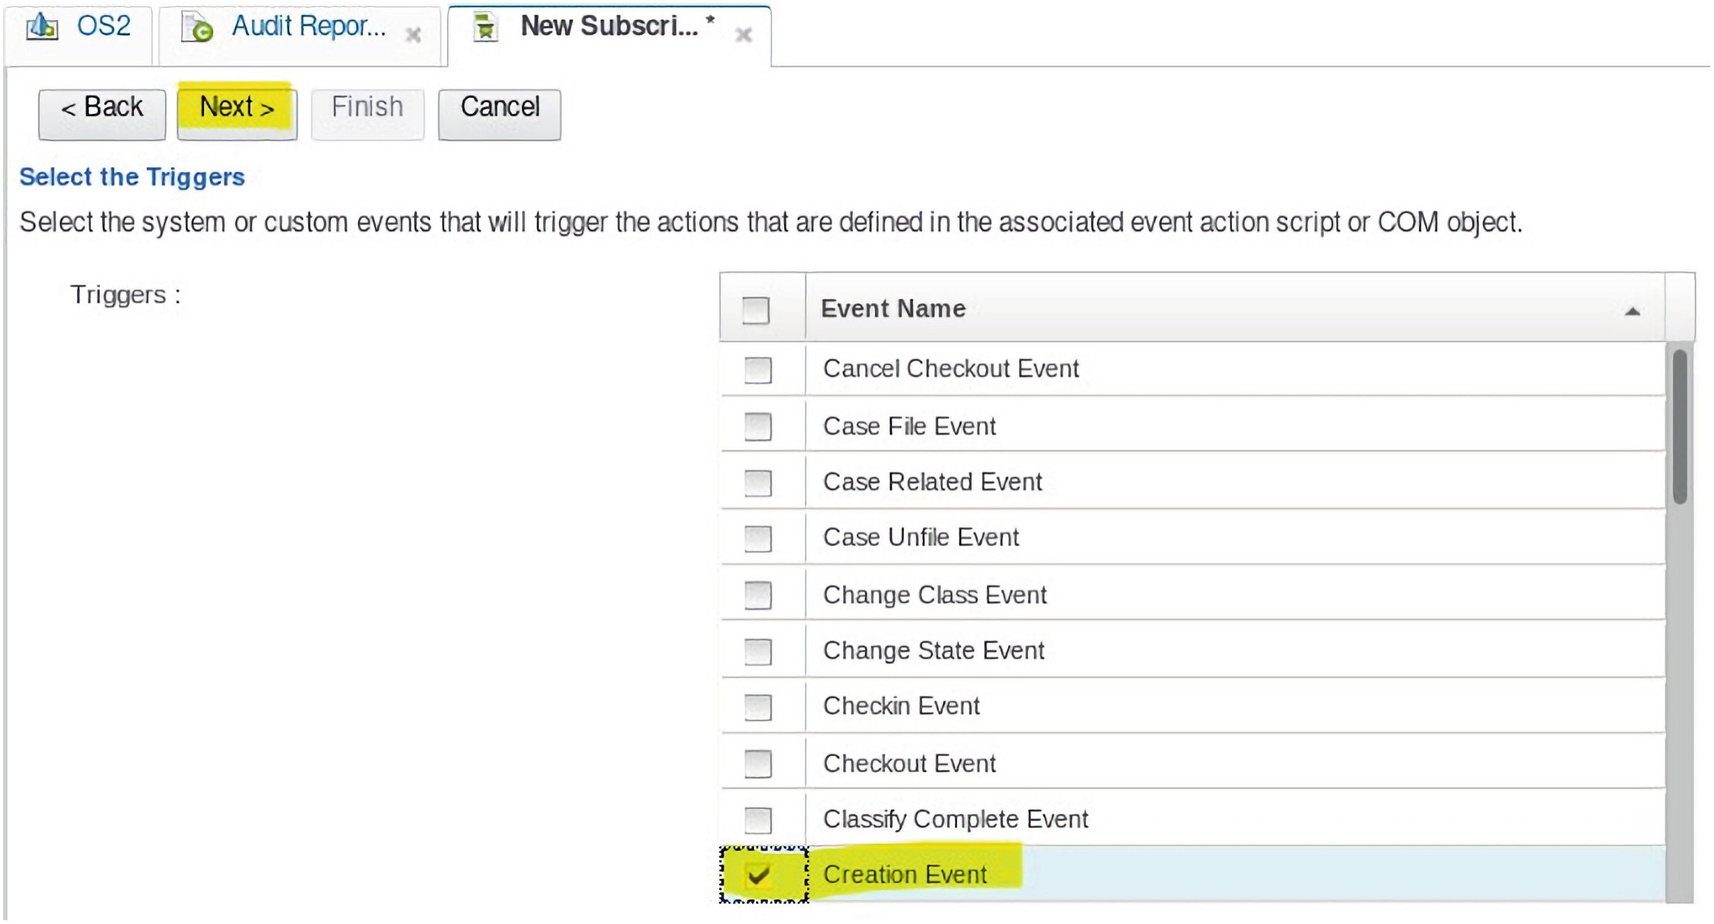
A screenshot of the creation event selected to trigger the workflow and the creation event is highlighted.
The Creation Event is selected to trigger the Workflow
Transferring the JMS Test Workflow to the Target Object Store
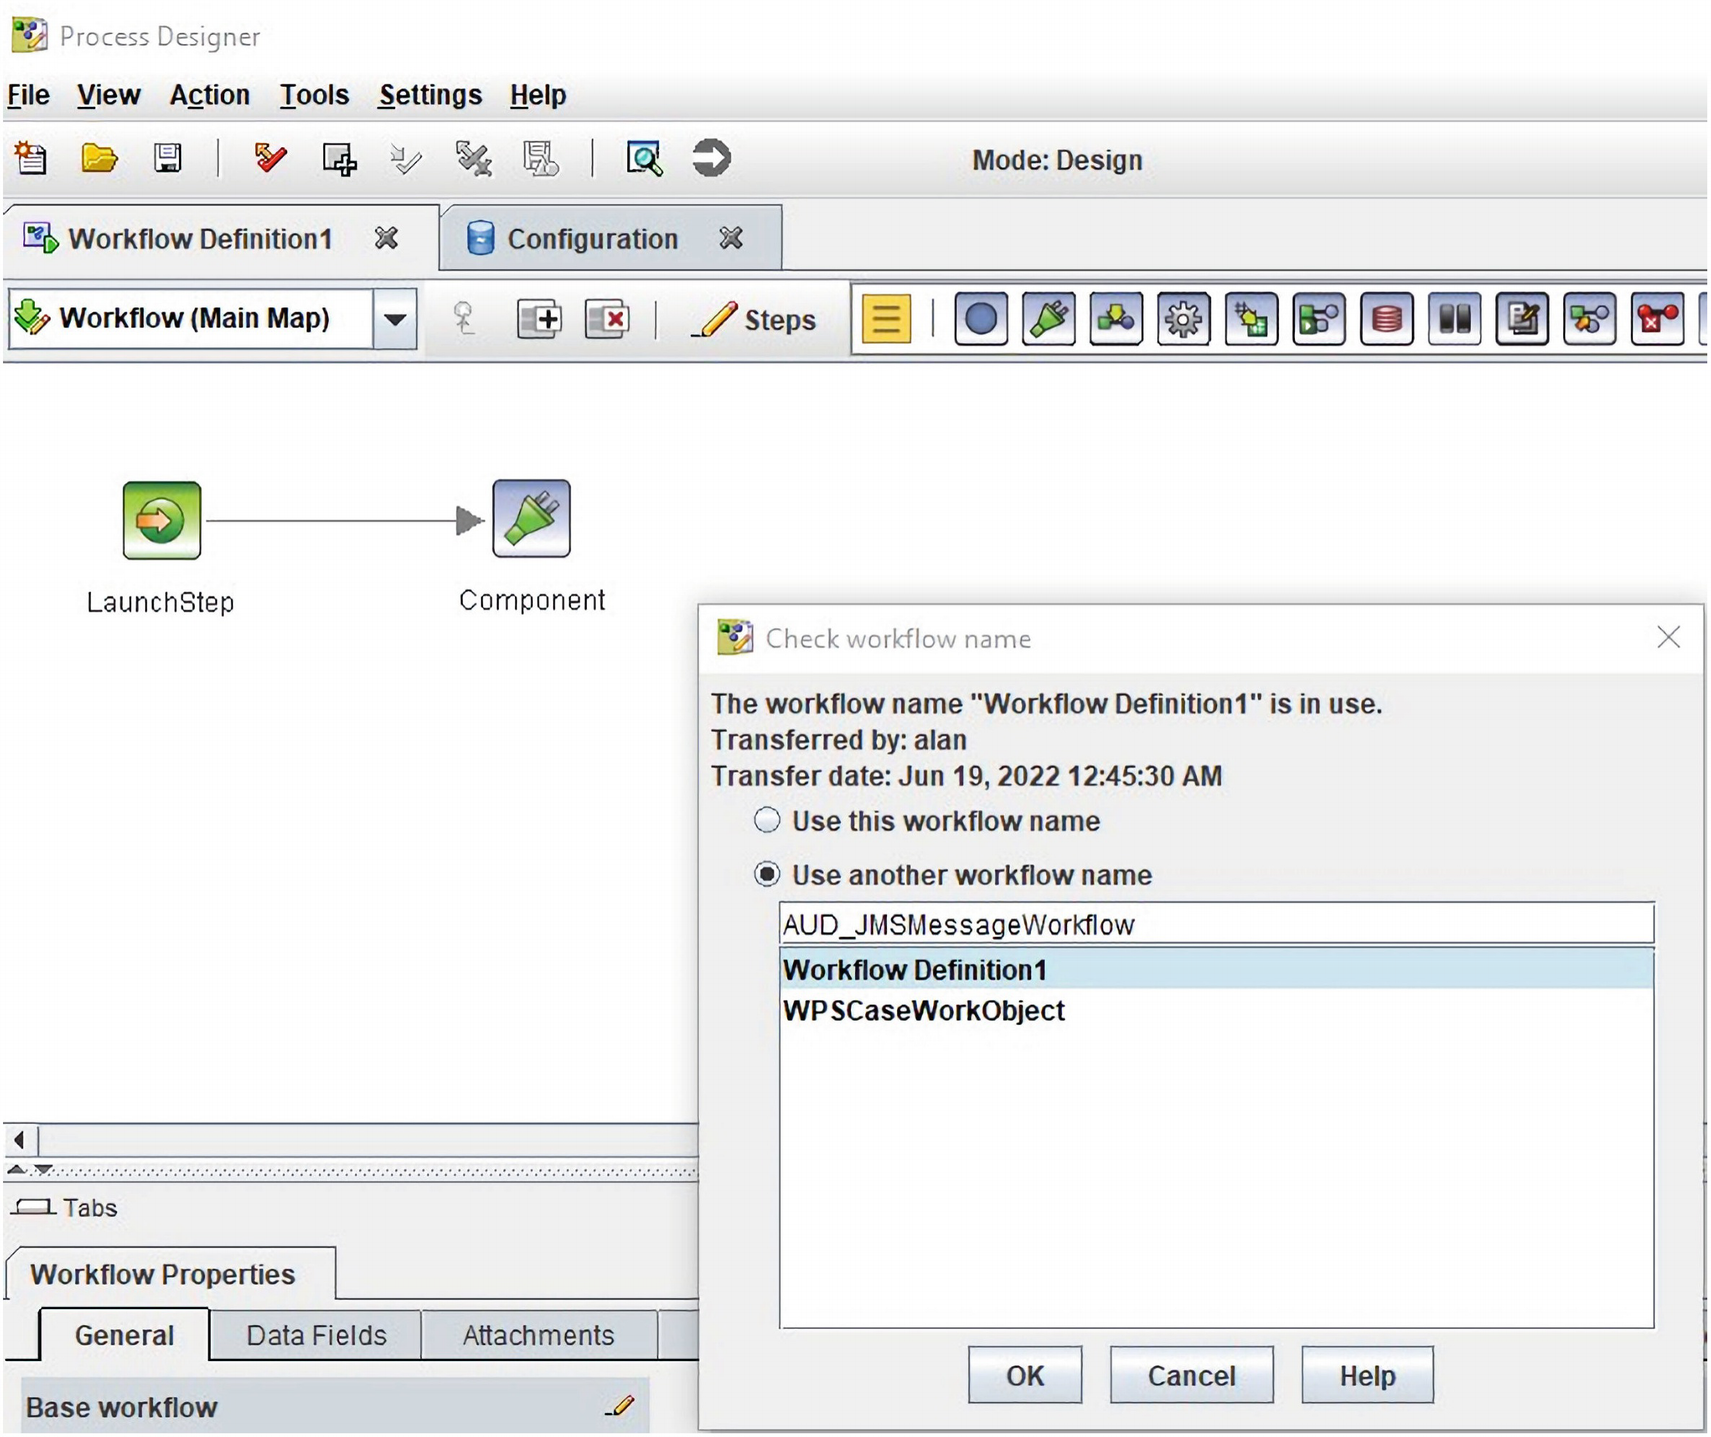
A screenshot of the J M S test workflow is transferred to the target object store and with ok, cancel, help buttons,
The JMS test workflow is transferred to the Target Object store

A screenshot of the launch step, a component with the transfer was successful and the close button is highlighted.
The status of the Workflow Transfer is displayed by the Process Designer
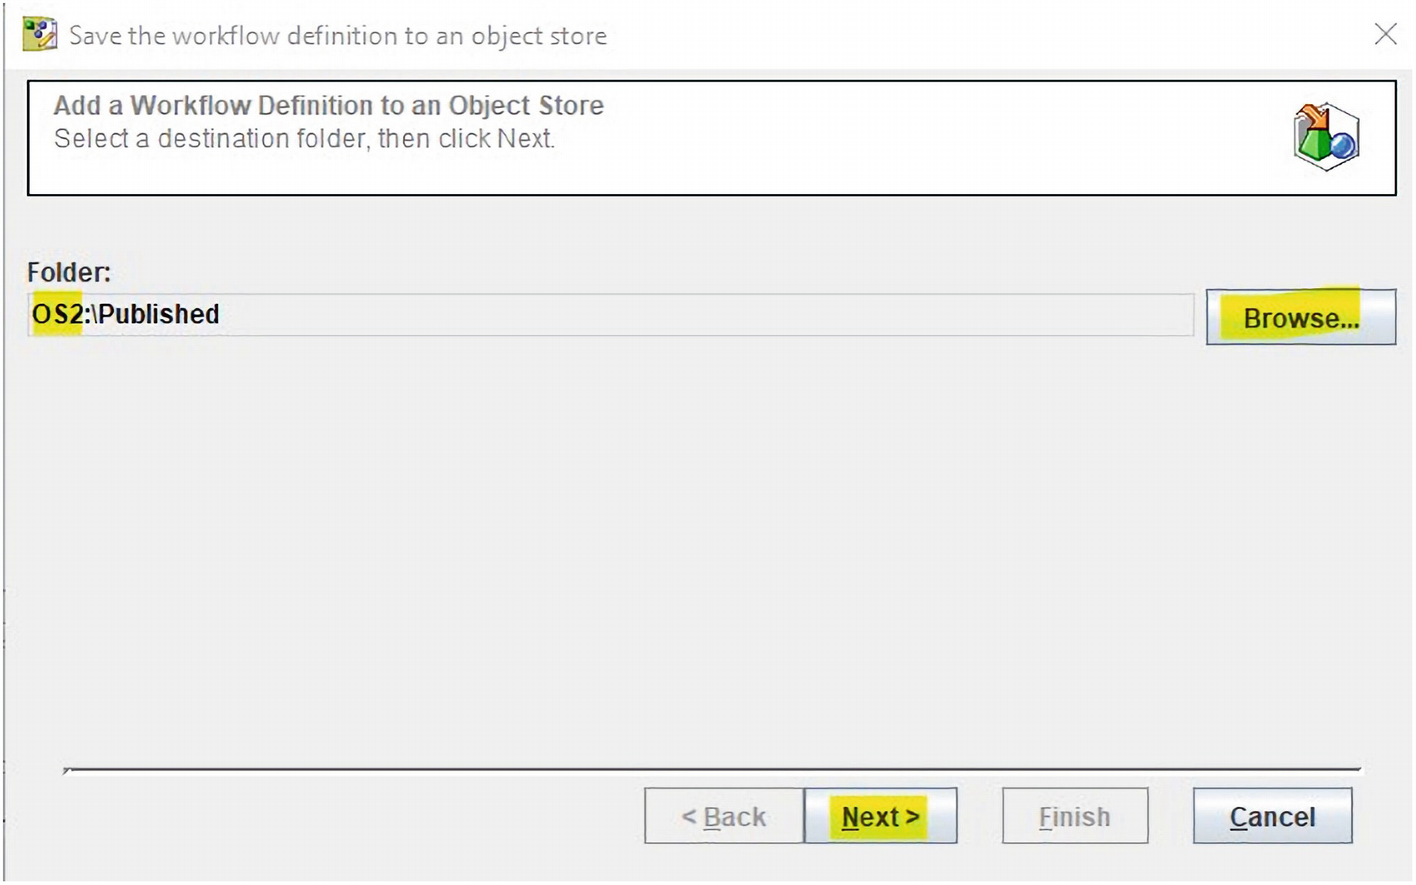
A screenshot of the O S 2 published folder used to save the workflow definition ad the next button is highlighted.
The OS2:Published folder is used to save the Workflow Definition

A screenshot of workflow definition 1 window with a pane of save the workflow definition to an object store in it. Document title in it is labeled A U D underscore J M S message workflow and highlighted. At the bottom next button is highlighted. "
The Workflow Definition is saved as AUD_JMSMessageWorkflow

A screenshot of the window for save the workflow definition to an object store. The screen has a table drawn and at the bottom finish button is highlighted.
The Security for the Workflow Definition is displayed. Click Finish to create it

A screenshot of process designer window with a box for check workflow name. In the box use this workflow name and O K are highlighted at the top and bottom, respectively.
The AUD_JMSMessageWorkflow is transferred to the Target Object Store

A screenshot of the new subscription tab with highlighted button for next. A U D underscore J M S message workflow is highlighted for the workflow definition.
The Workflow Event Action can now be selected with the transferred definition
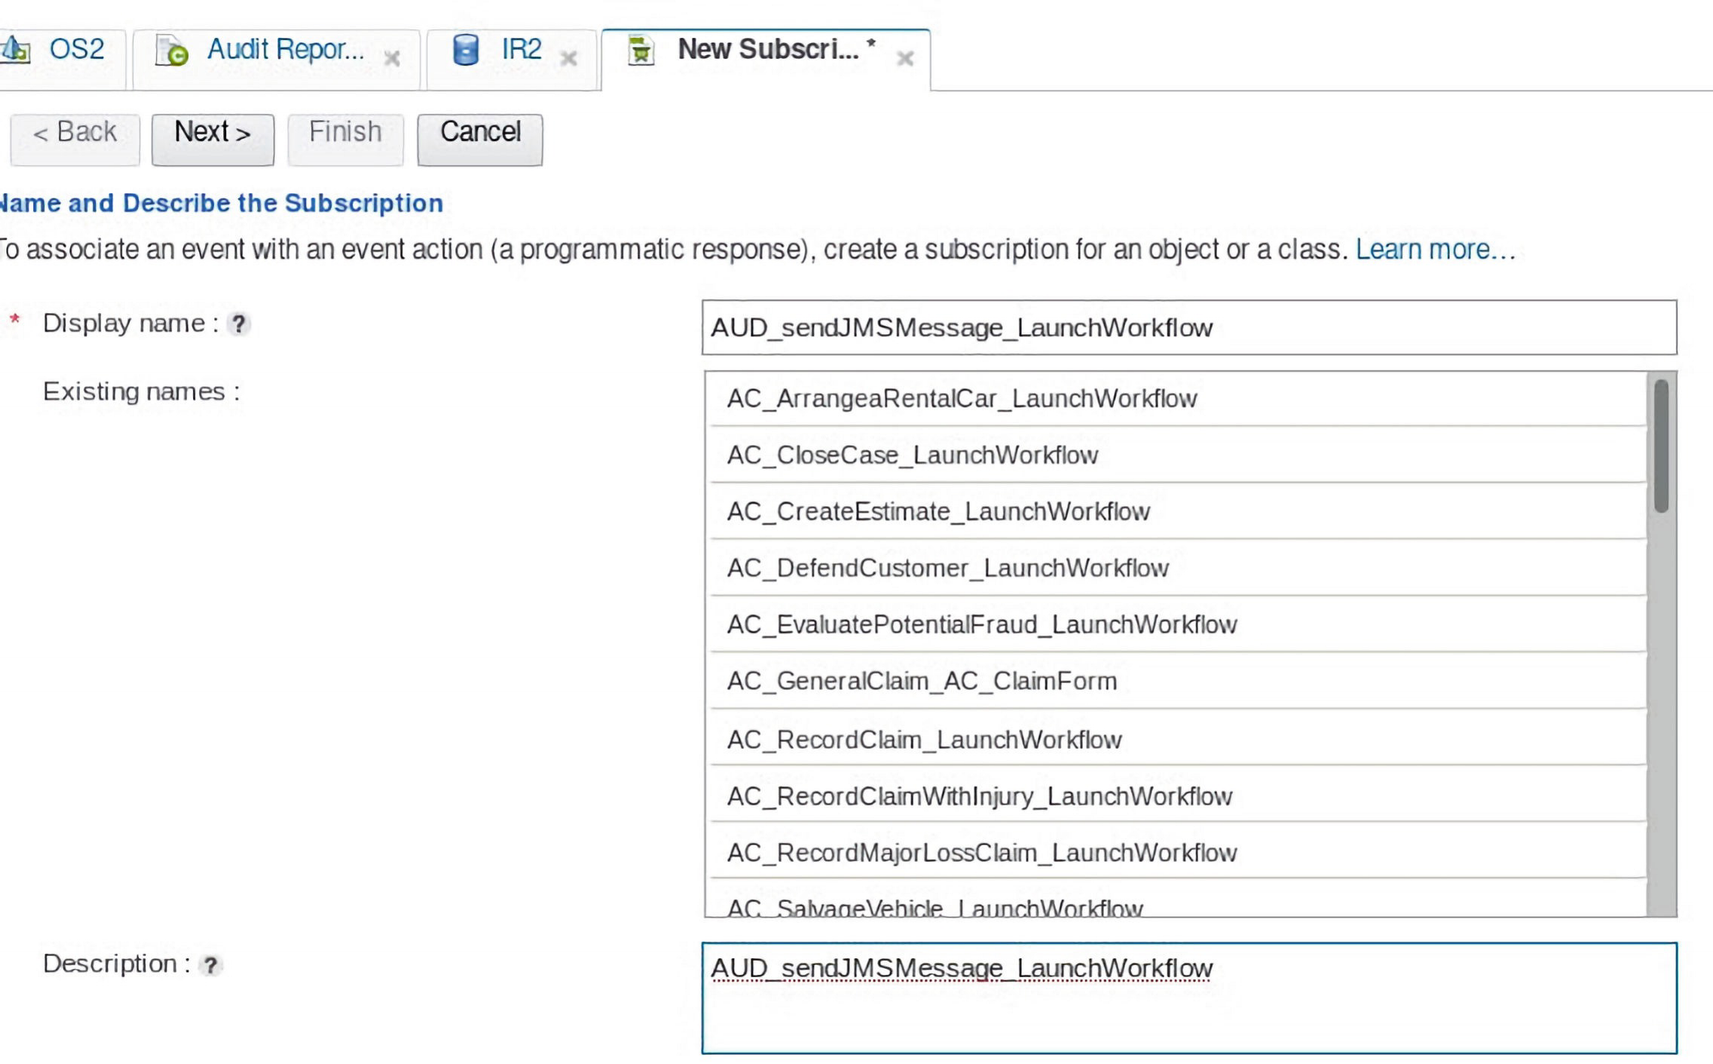
A screenshot of the A U D underscore send J M S M message to underscore launch workflow subscription name is entered.
The AUD_sendJMSMessage_LaunchWorkflow subscription name is entered
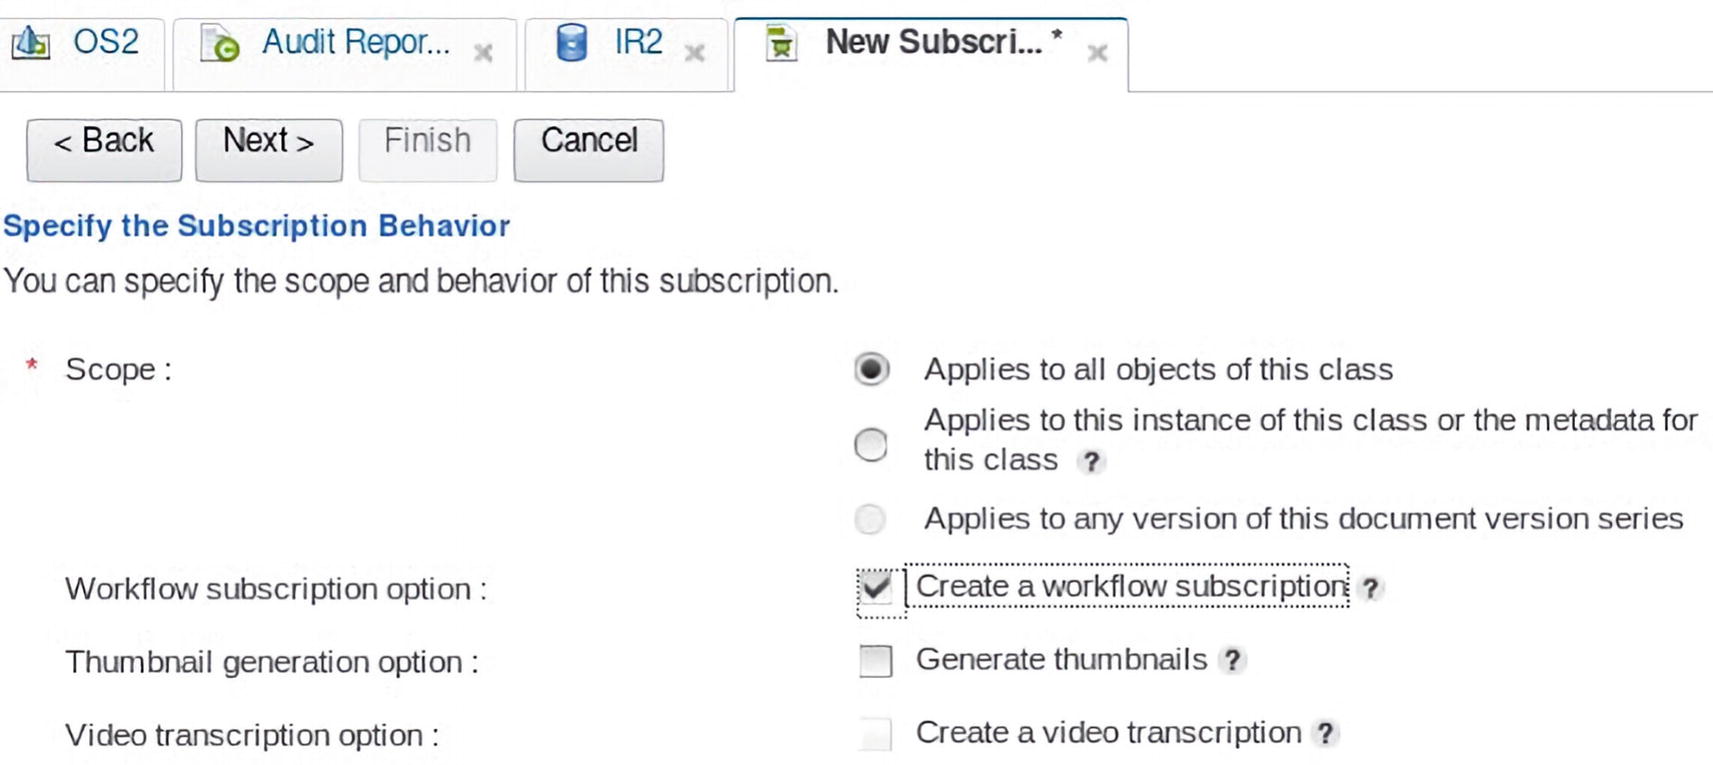
A screenshot of the new subscription tab where create a workflow subscription option is selected.
The Create a workflow subscription option is selected
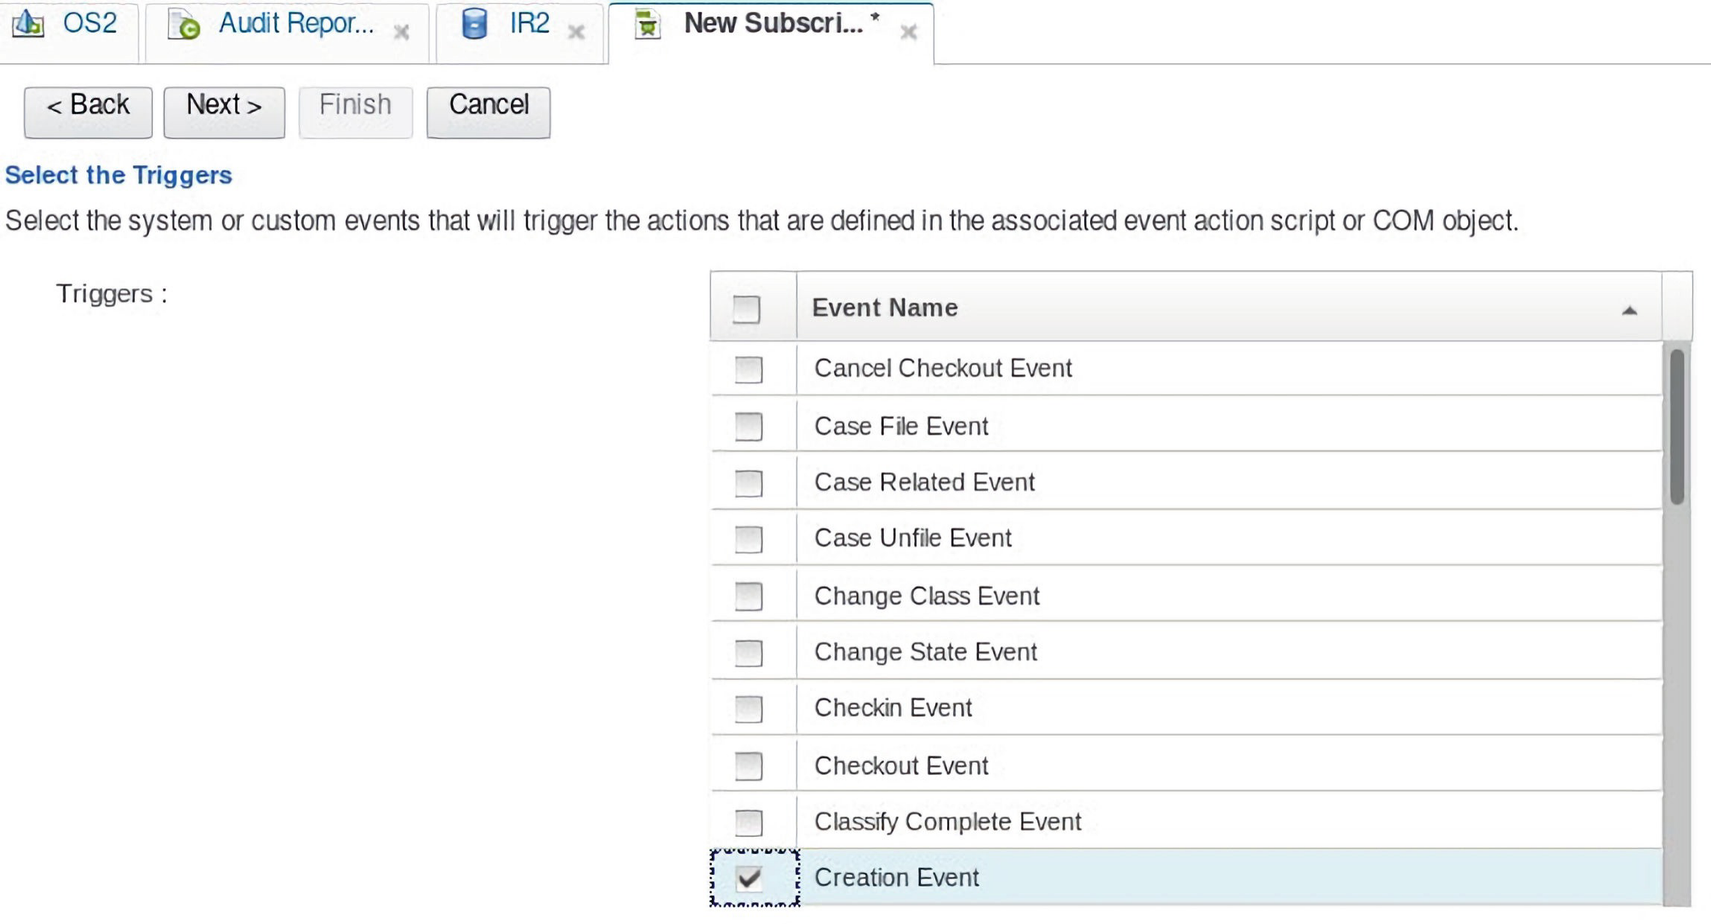
A screenshot of the new subscription tab where the creation event is selected.
The Creation Event is selected

A screenshot of the A U D underscore J S M message workflow selected from the drop down button is highlighted.
The AUD_JMSMessageWorkflow is selected from the drop-down and Next> clicked
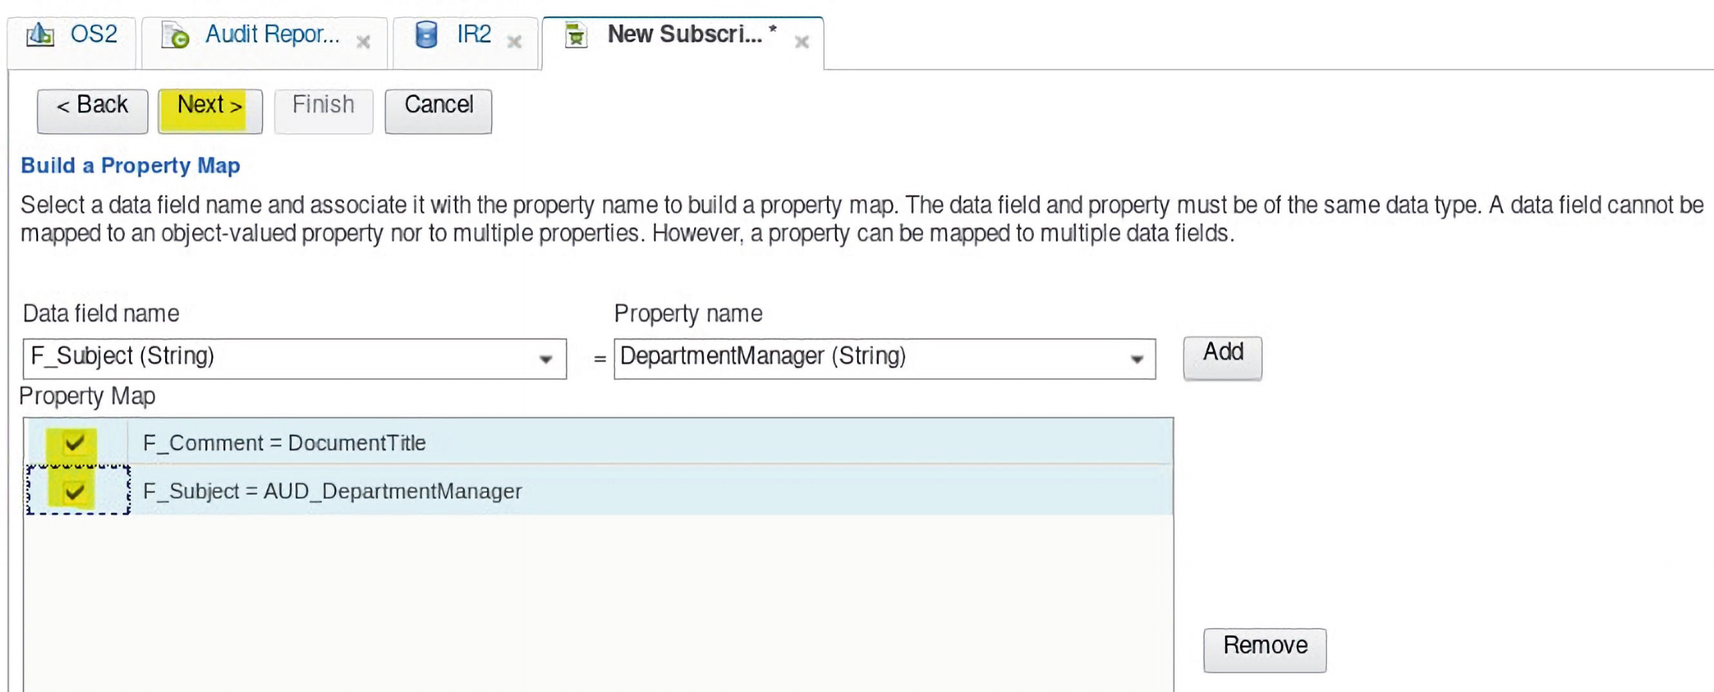
A screenshot of the workflow fields mapped to the audit report document class properties.
The Workflow Fields are mapped to the Audit Report Document class properties

A screenshot of the enable subscription flag property ticked with the back, next, cancel, and finish buttons.
The Enable this subscription flag property is ticked and Next> clicked

A screenshot of new subscription tab with highlighted button that reads finish. Under it a table for summary with 2 columns of name and value is given with several rows.
The parameters for creation of the Workflow Subscription are displayed
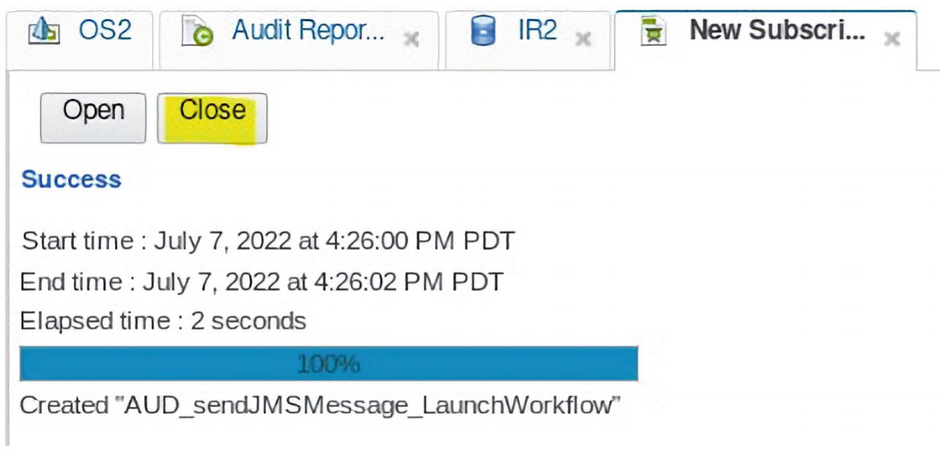
A screenshot of new subscription tab with highlighted button that reads close. Under it successful creation of A U D underscore send J M S message launch workflow has been given with its time data. "
The status of the Workflow subscription Object creation is shown
Testing the Updated Audit Master Solution
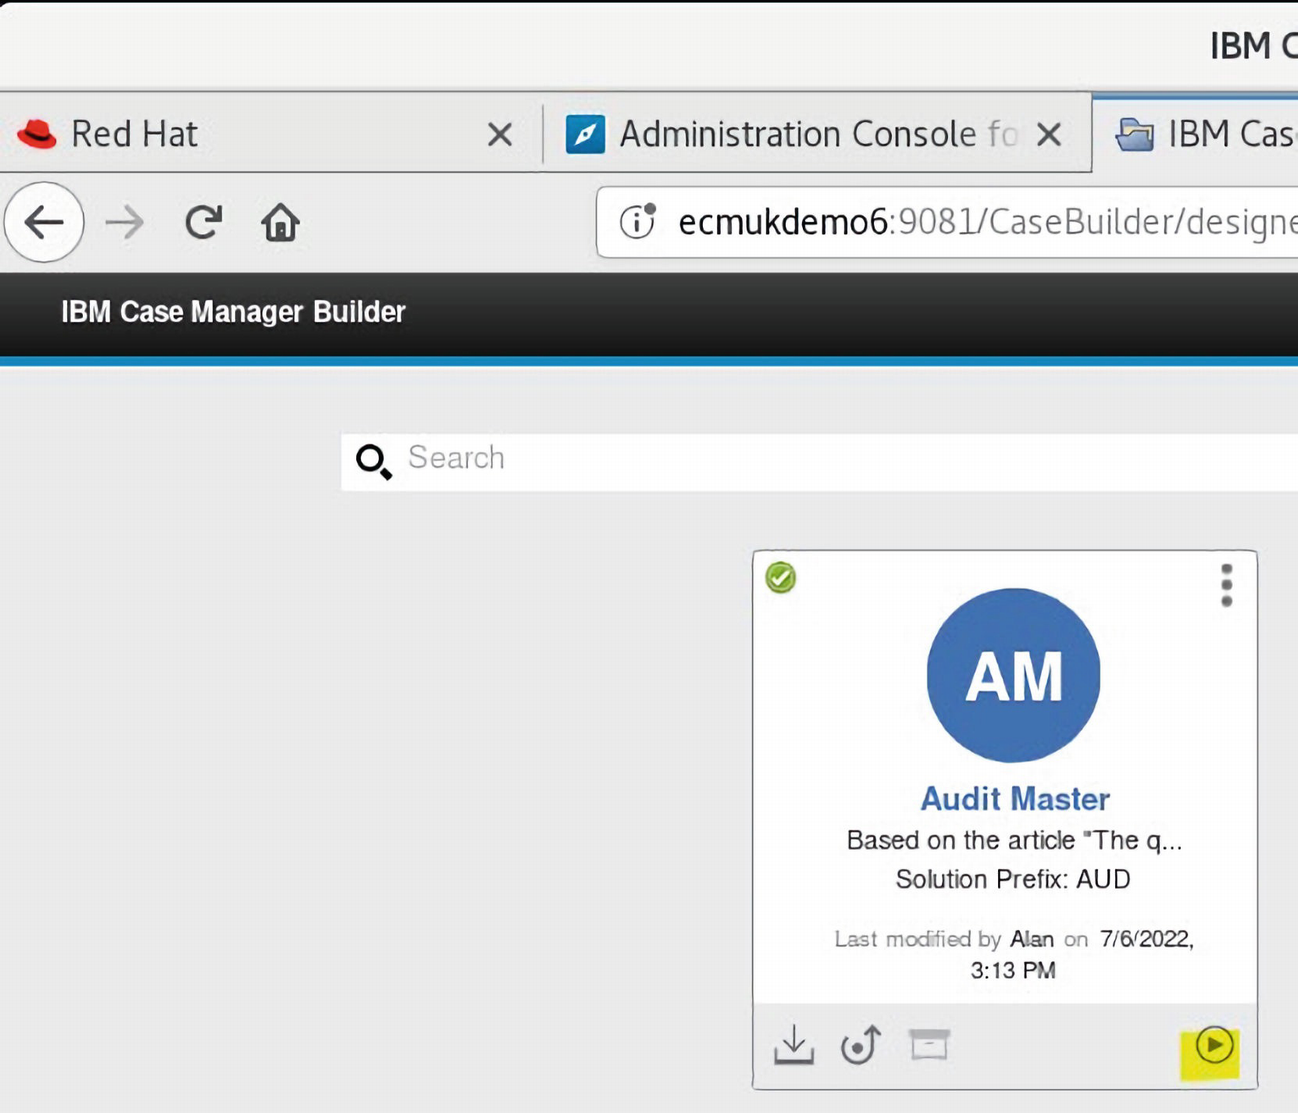
A screenshot of I B M case manager builder window with highlighted play button on the bottom right of a box that reads audit master. The box is under a search bar. "
The highlighted triangle icon is clicked to launch the IBM Case Manager

A screenshot of I B M case manager window with highlighted option audit department from drop down of add case under cases tab.
An Audit Department Case is added with the Case Manager Audit Solution

A screenshot of the I B M case manager for case details with business objects of the audit department. Under documents tab on the page add documents from local system is highlighted under drop down of add tab.
The Add Document from Local System Document add option is selected
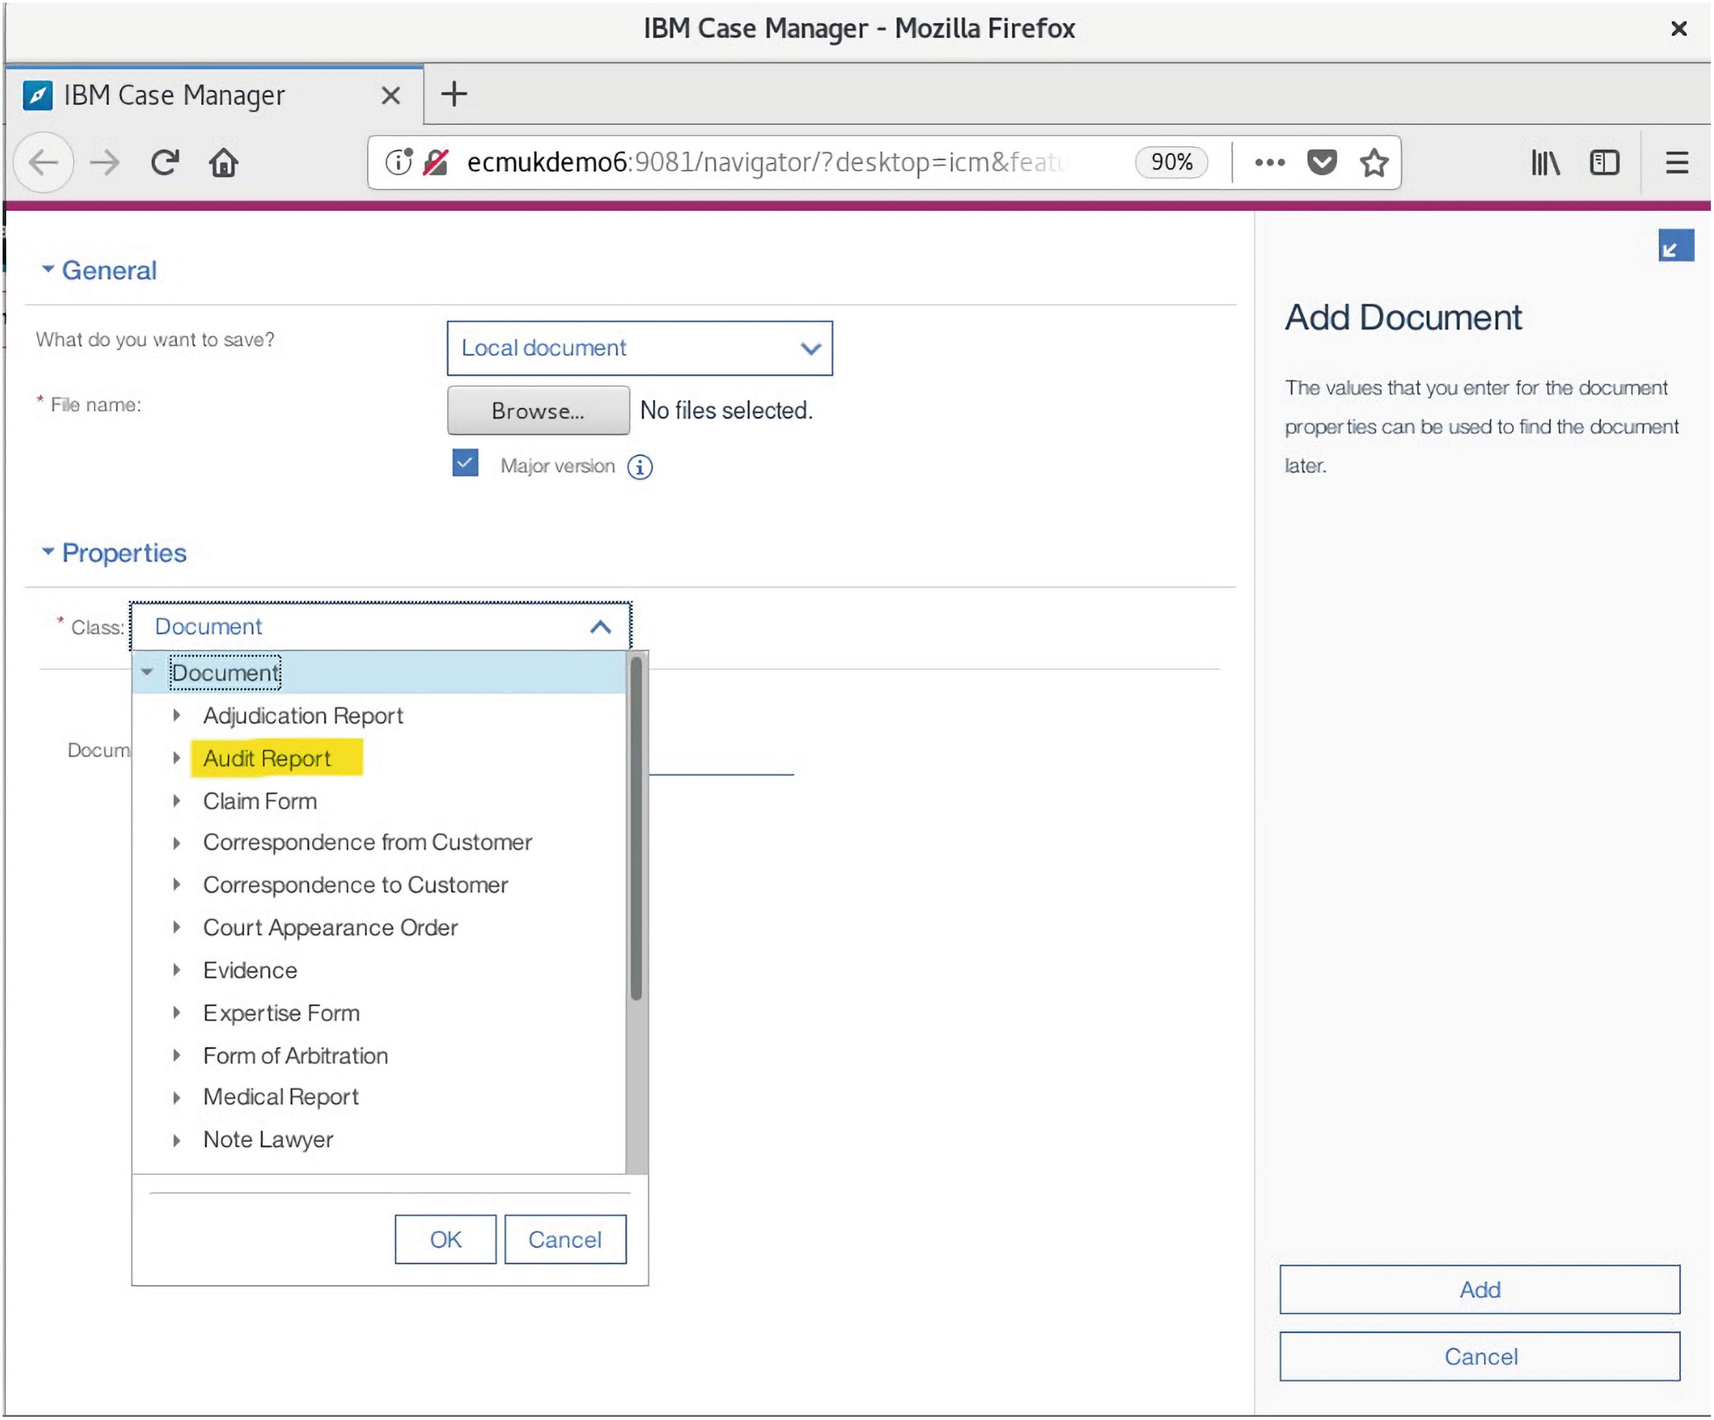
A screenshot of I B M case manager window with audit report document class selected and highlighted from the list under properties.
The Audit Report Document Class is selected from the list
A screenshot of I B M case manager where general and properties tabs have highlighted texts for the audit report.
The property details for the Audit Report Document are entered
A screenshot represents to add of the document in the audit report and the add button is highlighted.
The Add command button is used to create the Audit Report document
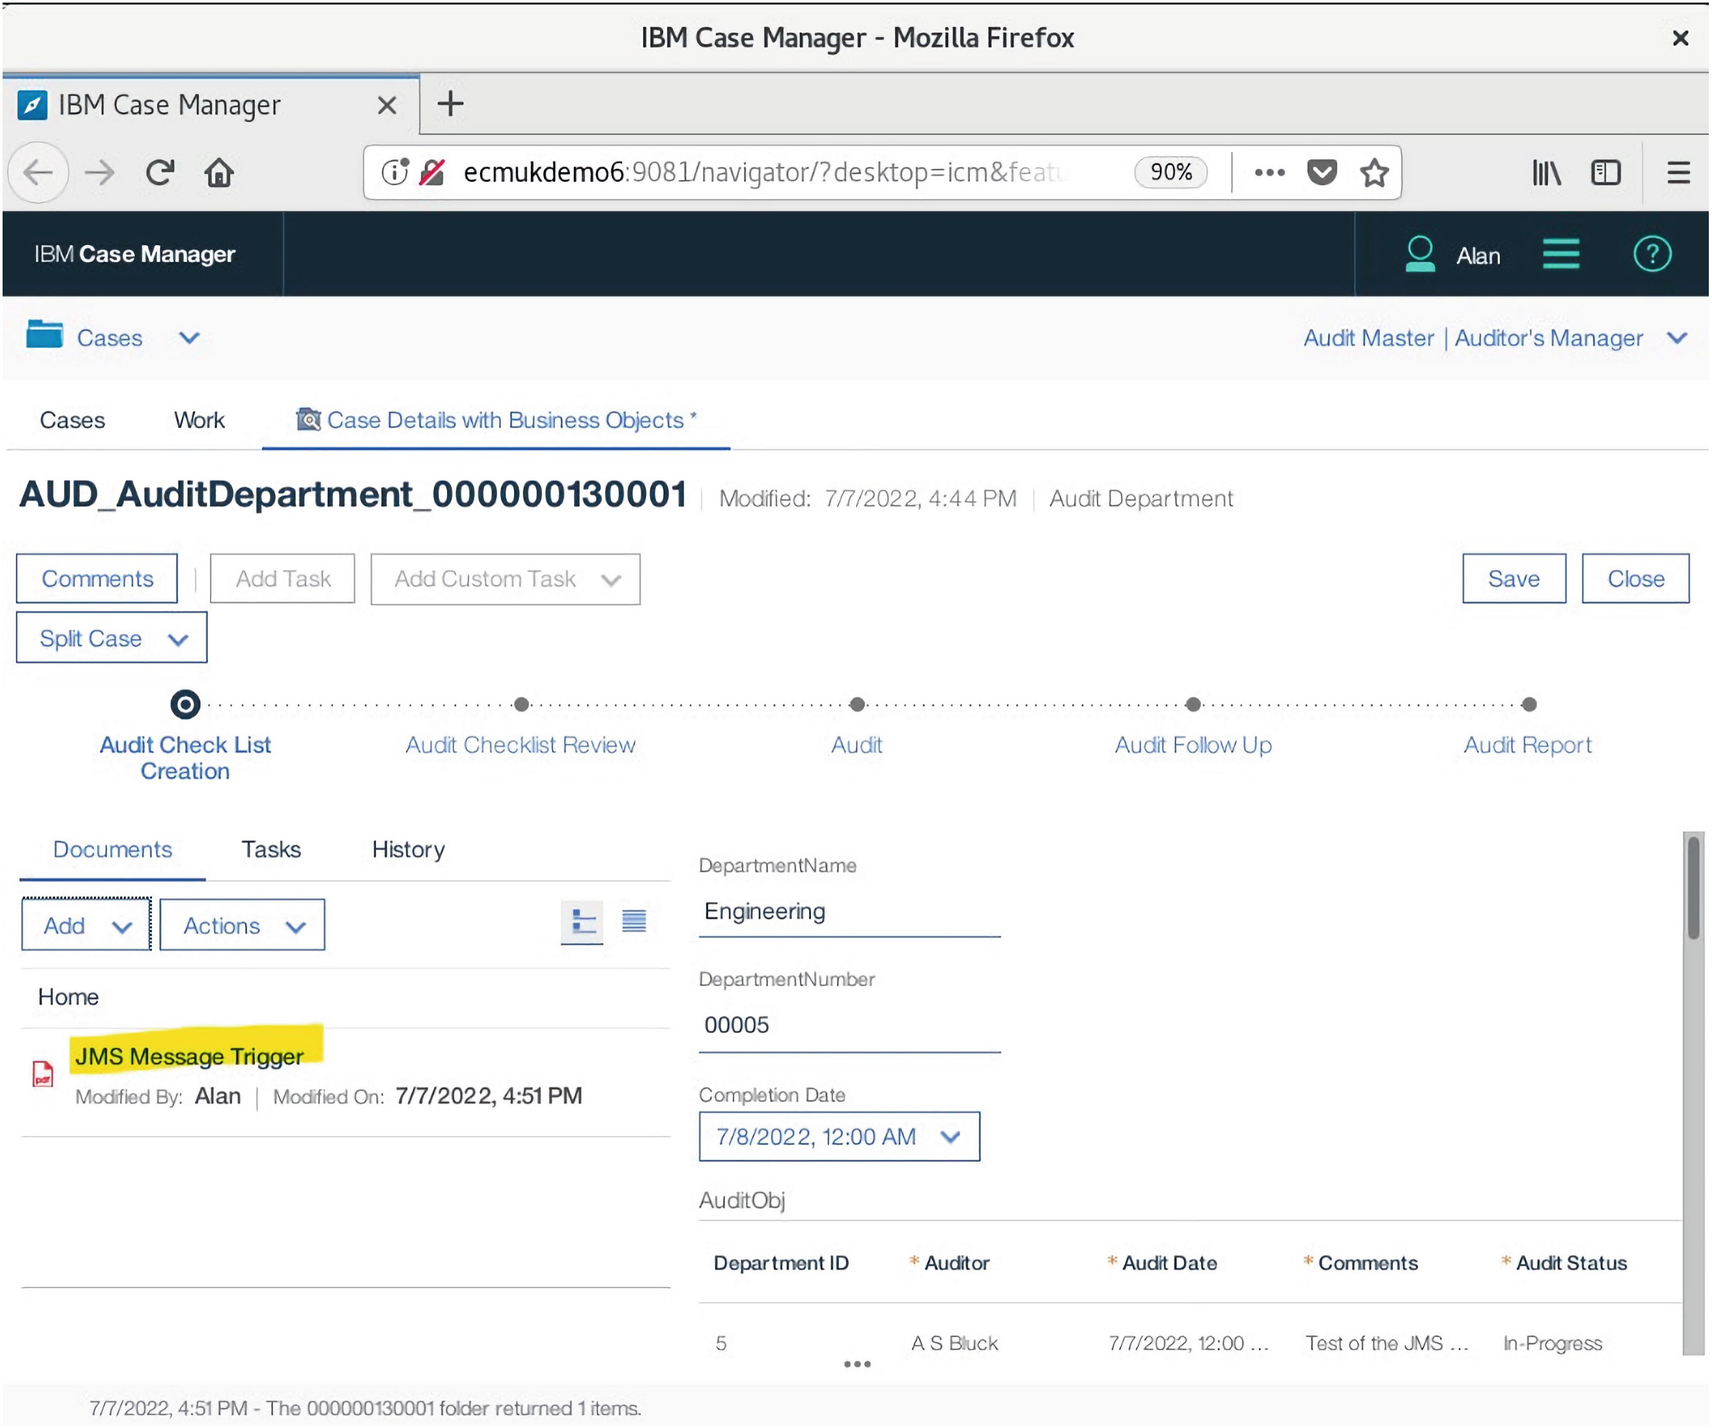
A screenshot of case details with business objects for audit department. The highlighted text is J M S message trigger under home section.
The new Document, JMS Message Trigger, is displayed in the Case

A screenshot of a message browser window with queue manager name A U D Q M and queue name A U D Q A R. A table below has 6 columns and 8 rows. July 7, 2022 and Web sphere M Q client for java is highlighted in the row 8 while the whole row is selected.
A new JMS message can be seen in the IBM MQ AUDQAR queue

A screenshot of message 8 properties with data option selected in the left panel and test message on 7th July 2022 is highlighted in the right panel.
The Message data from the Workflow JMS component call

A screenshot of process administrator with highlighted titles labeled, events, event log at the top. A table with 11 columns and 8 rows where F underscore operation i d, F underscore comment, and F underscore subject are selected.
The F_Comment and F_Subject fields are in the Workflow Events
Chapter 3 Exercises
The following questions relate to the sendJMSMessage Java Component Integrator method developed for use with the IBM Process Designer Workflow subscriptions and the Case Manager, Audit Master Solution, which we cover in this chapter.
- 1.What script would you run to accept the IBM MQ 9.2.x license before installation?
- a)
pedesigner.bat
- b)
cmd.exe
- c)
mqlicense.sh
- d)
amqsputc
- 2.
What is the solution if you get the following JMS Java message:
- a)
A queue connection factory must be defined as a WebSphere MQ Connection Factory.
- b)
A queue connection factory must be defined as a WebSphere MQ Queue Connection Factory.
- c)
Use a javax.jms.QueueConnectionFactory object.
- d)
Use the Java code: TextMessage outMessage = JMSsession.createTextMessage();
- 3.
What change do you need to make if you get the Java runtime error in Eclipse as follows:
- a)
Add the JMS Message library, javax.jms-api-2.0.1.jar, to the Eclipse IDE classpath.
- b)
Add two new lines to the /etc/security/limits.conf file; @root soft nofile 10240 and @root hard nofile 16384.
- c)
Change the JVM version in the Eclipse project from 1.7 to 1.8.
- d)
Add jars from the /opt/MQJars folder to the Eclipse Classpath.
- 4.
The main purpose of a Workflow Subscription is
- a)
To enable the creation of a Folder Object
- b)
To enable the creation of a Document Object
- c)
To enable a workflow to be launched on the storage of a document
- d)
To enable a Case to be created in IBM Case Manager
- 1.
c) mqlicense.sh
- 2.
b) A queue connection factory must be defined as a WebSphere MQ Queue Connection Factory.
- 3.
c) Change the JVM version in the Eclipse project from 1.7 to 1.8.
- 4.
c) To enable a workflow to be launched on the storage of a document
- 1.
Describe what steps you would use to install a new Component Integrator, given that you have been given a working AUDOperations.jar file and have been asked to configure a sendJMSMessage custom operations method call step in a Workflow.
- 2.
What security group(s) do you need to have to run the IBM MQ Explorer program and what commands would you need to run to use this from a Unix command window?
- 3.
What Java libraries would you install in an Eclipse IDE Classpath to develop a Component Integrator Java class and where would you find them?
In Chapter 4, we will cover the use of the Java language for the IBM FileNet Java API calls and the configuration required to replicate an IBM FileNet Document Management Object Store.