


Configuration
This chapter provides information about the postinstallation configuration of the IBM Spectrum Archive Enterprise Edition (IBM Spectrum Archive EE).
This chapter includes the following topics:
|
Note: In the lab setup for this book, we used a Red Hat-based Linux system. The screen captures within this chapter are based on the Version 1 Release 2 of the product. Even though the steps you perform are the same, you might see slightly different output responses on your screen depending on your currently used version and release of the product.
|
6.1 Configuration prerequisites
This section describes the tasks that must be completed before IBM Spectrum Archive EE is configured.
Ensure that the following prerequisites are met before IBM Spectrum Archive EE is configured. For more information, see 6.2, “Configuring IBM Spectrum Archive EE” on page 110.
•The Configuration worksheet is completed and available during the configuration process.
|
Tip: Table 6-1 on page 103, Table 6-2 on page 103, Table 6-3 on page 103, Table 6-4 on page 104, Table 6-5 on page 105, and Table 6-6 on page 105 provide a set of sample configuration worksheets. You can print and use these samples for your own purpose during your configuration of IBM Spectrum Archive EE.
|
•The key-based login with OpenSSH is configured.
•The Spectrum Scale system is prepared and ready for use on your Linux server system.
•The control paths (CP) to the TS3500 tape library logical libraries are configured and enabled. You need at least one CP per node.
|
Important: You can configure the TS3500 tape library for redundant CPs Control Path Failover feature (CPF). Other configuration steps must be performed with the IBM tape device driver for Linux (lin_tape) for this kind of configuration.
|
6.1.1 Configuration worksheet tables
Print Table 6-1 on page 103, Table 6-2 on page 103, Table 6-3 on page 103, Table 6-4 on page 104, Table 6-5 on page 105, and Table 6-6 on page 105 and use them as worksheets or as a template to create your own worksheets to record the information you must configure IBM Spectrum Archive EE.
For more information, see 6.1.2, “Obtaining configuration information” on page 106 and follow the steps to obtain the information that is required to complete your worksheet.
The information in the following tables is required to configure IBM Spectrum Archive EE. Complete Table 6-4 on page 104, Table 6-5 on page 105, and Table 6-6 on page 105 with the required information and refer to this information as necessary during the configuration process, as described in 6.2, “Configuring IBM Spectrum Archive EE” on page 110.
Table 6-1 on page 103, Table 6-2 on page 103, and Table 6-3 on page 103 show an example configuration worksheet with the parameters completed for the lab setup that was used to write this book.
Table 6-1 shows the file systems.
Table 6-1 Example IBM Spectrum Scale file systems
|
IBM Spectrum Scale file systems
|
|||
|
File system name
|
Mount point
|
Need space management?
(Yes or No)
|
Reserved for IBM Spectrum Archive EE?
(Yes or No)
|
|
gpfs
|
/ibm/glues
|
YES
|
YES
|
Table 6-2 shows the logical tape library.
Table 6-2 Example logical tape library
|
Logical Tape library
|
|||
|
Tape library information
|
|||
|
Tape library (L-Frame) Serial Number
|
78-A4274
|
||
|
Starting SCSI Element Address of the logical tape library for IBM Spectrum Archive EE (decimal and hex)1
|
1033dec = 409hex
|
||
|
Logical tape library serial number
(L-Frame S/N + “0” + SCSI starting element address in hex)
|
78A4274-0-409 = 78A42740409
|
||
|
Tape Drive information
|
|||
|
Drive Serial number
|
Assigned IBM Spectrum Scale node
|
CP?
(Yes or No)
|
Linux device name in the node
|
|
9A700M0029
|
htohru9
|
YES
|
/dev/IBMtape13
|
|
1068000073
|
htohru9
|
NO
|
/dev/IBMtape11
|
1 You can obtain the starting SCSI Element Address of the LFTS EE logical Library partition through the TS3500 Tape Library Specialist web interface. Click Library → Logical Libraries, select your IBM Spectrum Archive EE logical Library partition from the list and choose from the drop-down menu that is above Details, and click Go. The window that is shown in Figure 6-1 on page 104 opens, where you can find the associated starting SCSI element address.
Table 6-3 shows the nodes.
Table 6-3 Example IBM Spectrum Scale nodes
|
IBM Spectrum Scale nodes
|
|||
|
IBM Spectrum Scale node name
|
Installing IBM Spectrum Archive EE?
(Yes or No)
|
Tape drives assigned to this node
(Serial number)
|
CP enabled tape drive
(Serial number)
|
|
htohru9
|
YES
|
9A700M0029, 1068000073
|
9A700M0029
|
Figure 6-1 shows the window that you use to display the starting SCSI element address of a TS3500 logical library. You must record the decimal value (starting address) to calculate the associated logical library serial number, as shown in Table 6-2 on page 103. You can open this window if you check for the details for a specific logical library.
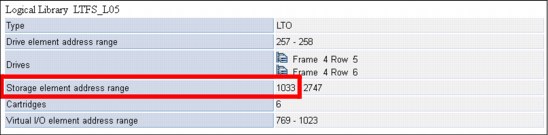
Figure 6-1 Obtain the starting SCSI element address of a TS3500 logical library
Table 6-4 shows a blank file systems worksheet.
Table 6-4 Example IBM Spectrum Scale file systems
|
IBM Spectrum Scale file systems
|
|||
|
File system name
|
Mount point
|
Need space management?
(Yes or No)
|
Reserved for IBM Spectrum Archive EE?
(Yes or No)
|
|
|
|
|
|
|
|
|
|
|
|
|
|
|
|
|
|
|
|
|
Table 6-5 shows a blank logical tape library worksheet.
Table 6-5 Example logical tape library
|
Logical Tape library
|
|||
|
Tape library information
|
|||
|
Tape library (L-Frame) Serial Number
|
|
||
|
Starting SCSI Element Address of the logical Tape Library for IBM Spectrum Archive EE (decimal and hex)
|
|
||
|
Logical tape library serial number
(L-Frame S/N + “0” + SCSI starting element address in hex)
|
|
||
|
Tape Drive information
|
|||
|
Drive Serial number
|
Assigned IBM Spectrum Scale node
|
CP?
(Yes or No)
|
Linux device name in the node
|
|
|
|
|
|
|
|
|
|
|
|
|
|
|
|
|
|
|
|
|
|
|
|
|
|
|
|
|
|
|
|
|
|
|
|
Table 6-6 shows a blank nodes worksheet.
Table 6-6 Example IBM Spectrum Scale nodes
|
IBM Spectrum Scale nodes
|
|||
|
IBM Spectrum Scale node name
|
Installing IBM Spectrum Archive EE?
(Yes or No)
|
Tape drives assigned to this node
(Serial number)
|
CP enabled tape drive
(Serial number)
|
|
|
|
|
|
|
|
|
|
|
|
|
|
|
|
|
|
|
|
|
6.1.2 Obtaining configuration information
To obtain the information about your environment that is required for configuring IBM Spectrum Archive EE, complete the following steps:
1. Log on to the operating system as a root user.
2. Start GPFS (if it is not started already) by running the following command (see Example 6-1 on page 107):
# mmstartup -a
3. Mount GPFS (if it is not already mounted) by running the following command (see Example 6-1 on page 107):
# mmmount all
4. Obtain a list of all GPFS file systems that exist in the IBM Spectrum Scale cluster by running the following command (see Example 6-1 on page 107):
# mmlsfs all
5. Go to the Configuration worksheet (provided in 6.1.3, “Configuring key-based login with OpenSSH” on page 108) and enter the list of file system names in the GPFS file systems table.
6. Plan the GPFS file system that was used to store IBM Spectrum Archive EE internal data. For more information, see 6.1.4, “Preparing the Spectrum Scale file system for Spectrum Archive EE” on page 108.
7. Go to the Configuration worksheet and enter the GPFS file system that is used to store IBM Spectrum Archive EE internal data into Table 6-1 on page 103.
8. Obtain a list of all IBM Spectrum Scale nodes in the IBM Spectrum Scale cluster by running the following command (see Example 6-1 on page 107):
# mmlsnode
9. Go to the Configuration worksheet and enter the list of IBM Spectrum Scale nodes and whether the IBM Spectrum Archive EE is installed on the node in Logical Tape Library table.
10. Obtain the logical library serial number, as described in the footnote of Table 6-2 on page 103. For more information and support, see the IBM TS3500 tape library IBM Knowledge Center at this website:
11. Go to the Configuration worksheet and enter the logical library serial number that was obtained in the previous step into the IBM Spectrum Scale nodes table.
12. Obtain a list of all tape drives in the logical library that you plan to use for the configuration of IBM Spectrum Archive EE. For more information, see 4.5.2, “Assigning tape drives to the IBM Spectrum Archive EE logical library” on page 78 and the IBM TS3500 tape library IBM Knowledge Center at this website:
13. Go to the Configuration worksheet and enter the tape drive serial numbers that were obtained through the previous step into the IBM Spectrum Scale nodes table.
14. Assign each drive to one of the IBM Spectrum Archive EE nodes that are listed in the Logical Library Table in the Configuration worksheet and add that information to the IBM Spectrum Scale nodes table.
15. Assign at least one CP to each of the IBM Spectrum Archive EE nodes and enter whether each drive is a CP drive in the IBM Spectrum Scale nodes section of the Configuration worksheet.
16. Go to the Configuration worksheet and update the Logical Tape Library table with the tape drive assignment and CP drive information by adding the drive serial numbers in the appropriate columns.
Keep the completed configuration worksheet available for reference during the configuration process. Example 6-1 shows how to obtain the information for the worksheet.
Example 6-1 Obtain the IBM Spectrum Scale required information for the configuration worksheet
[root@ltfs97 ~]# mmstartup -a
Fri Apr 5 14:02:32 JST 2013: mmstartup: Starting GPFS ...
htohru9.ltd.sdl: The GPFS subsystem is already active.
[root@ltfs97 ~]# mmmount all
Fri Apr 5 14:02:50 JST 2013: mmmount: Mounting file systems ...
[root@ltfs97 ~]# mmlsfs all
File system attributes for /dev/gpfs:
=====================================
flag value description
------------------- ------------------------ -----------------------------------
-f 8192 Minimum fragment size in bytes
-i 512 Inode size in bytes
-I 16384 Indirect block size in bytes
-m 1 Default number of metadata replicas
-M 2 Maximum number of metadata replicas
-r 1 Default number of data replicas
-R 2 Maximum number of data replicas
-j cluster Block allocation type
-D nfs4 File locking semantics in effect
-k all ACL semantics in effect
-n 1 Estimated number of nodes that will mount file system
-B 262144 Block size
-Q none Quotas enforced
none Default quotas enabled
--filesetdf No Fileset df enabled?
-V 13.23 (3.5.0.7) File system version
--create-time Tue Mar 26 17:06:14 2013 File system creation time
-u Yes Support for large LUNs?
-z Yes Is DMAPI enabled?
-L 4194304 Logfile size
-E Yes Exact mtime mount option
-S No Suppress atime mount option
-K whenpossible Strict replica allocation option
--fastea Yes Fast external attributes enabled?
--inode-limit 154112 Maximum number of inodes
-P system Disk storage pools in file system
-d ltfs97nsd Disks in file system
--perfileset-quota no Per-fileset quota enforcement
-A yes Automatic mount option
-o none Additional mount options
-T /ibm/glues Default mount point
--mount-priority 0 Mount priority
[root@ltfs97 ~]# mmlsnode
GPFS nodeset Node list
------------- -------------------------------------------------------
htohru9 htohru9
6.1.3 Configuring key-based login with OpenSSH
IBM Spectrum Archive EE uses the Secure Shell (SSH) protocol for secure file transfer and requires key-based login with OpenSSH for the root user.
To use key-based login with OpenSSH, it is necessary to generate SSH key files and append the public key file from each node (including the local node) to the authorized_keys file in the ~root/.ssh directory.
The following points must be considered:
•This procedure must be performed on all IBM Spectrum Archive EE nodes.
•After completing this task, a root user on any node in an IBM Spectrum Archive EE cluster can run any commands on any node remotely without providing the password for the root on the remote node. It is preferable that the cluster is built on a closed network. If the cluster is within a firewall, all ports can be opened. For more information, see 4.3.1, “Extracting binary rpm files from an installation package” on page 66 and l 4.3.2, “Installing, upgrading, or uninstalling IBM Spectrum Archive EE” on page 68.
To configure key-based login with OpenSSH, complete the following steps:
1. If the ~root/.ssh directory does not exist, create it by running the following command:
mkdir ~root/.ssh
2. If the root user does not have SSH keys, generate them by running the ssh-keygen command and entering CR at all prompts.
|
Important: You can verify whether the root user has a public key by locating the id_rsa and id_rsa.pub files under the /root/.ssh/ directory. If these files do not exist, you must generate them.
|
3. After the key is generated, copy the key to each server that requires a key-based login for OpenSSH by running the following command:
ssh-copy-id root@<server>
4. Repeat these steps on each IBM Spectrum Archive EE node.
6.1.4 Preparing the Spectrum Scale file system for Spectrum Archive EE
Complete this task to create and mount the Spectrum Scale file system before IBM Spectrum Archive EE is configured.
Before you make any system upgrades or major configuration changes to your GPFS or IBM Spectrum Scale cluster, review your GPFS or IBM Spectrum Scale documentation and consult IBM Spectrum Scale frequently asked question (FAQ) information that applies to your version of IBM Spectrum Scale. For more information about the IBM Spectrum Scale FAQ, see the Cluster products IBM Knowledge Center at this website:
Before you begin this procedure, ensure that the following prerequisites are met:
•IBM Spectrum Scale is installed on each of the IBM Spectrum Archive EE nodes.
•The IBM Spectrum Scale cluster is created and all of the IBM Spectrum Archive EE nodes belong to the cluster.
IBM Spectrum Archive EE requires space for the file metadata, which is stored in the LTFS metadata directory. The metadata directory can be stored in its own GPFS file system, or it can share the GPFS file system that is being space-managed with IBM Spectrum Archive EE.
The file system that is used for the LTFS metadata directory must be created and mounted before the IBM Spectrum Archive EE configuration is performed. The following requirements apply to the GPFS file system that is used for the LTFS metadata directory:
•The file system must be mounted and accessible from all of the IBM Spectrum Archive EE nodes in the cluster.
•The file system must be large enough to store the LTFS metadata directory. The default GPFS setting requires 262 KB (256 KiB) per file.
•The GPFS file system (or systems) that are space-managed with IBM Spectrum Archive EE must be DMAPI enabled.
To create and mount the GPFS file system, complete the following steps:
1. Create a network shared disk (NSD), if necessary, by running the following command. It is possible to share an existing NSD with another GPFS file system.
# mmcrnsd -F nsd.list -v no
<<nsd.list>>
%nsd: device=/dev/dm-3
nsd=nsd00
servers=ltfs01, ltfs02, ltfs03, ltfs04
usage=dataAndMetadata
2. Start the GPFS service (if it is not started already) by running the following command:
# mmstartup -a
3. Create the GPFS file system by running the following command. For more information about the file system name and mount point, see 6.1.1, “Configuration worksheet tables” on page 102.
# mmcrfs /dev/gpfs nsd00 -z yes -T /ibm/glues
In this example, /dev/gpfs is the file system name and /ibm/glues is the mount point. For a separate file system that is used only for the LTFS metadata directory, you do not need to use the -z option. Generally, if a GPFS file system is not intended to be IBM Spectrum Archive EE managed, it should not be DMAPI-enabled, so the -z option should not be specified. The preferred configuration is to have one file system with DMAPI-enabled.
4. Mount the GPFS file system by running the following command:
# mmmount gpfs -a
For more information about the mmmount command, see either of the following resources:
•General Parallel File System Version 4 Release 1.0.4 Advanced Administration Guide, SC23-7032-01
•IBM Spectrum Scale V4.2.1: Advanced Administration Guide, which is available at this website:
6.1.5 Enabling control paths in the logical library
As explained in 1.4, “IBM Spectrum Archive EE cluster configuration introduction” on page 13, each of the Spectrum Archive EE nodes must have its own control path in the logical library. For this reason, it is necessary to configure the required number of control paths in the tape library (within the tape drive assignment procedure; see 4.5.3, “Assigning the control path tape devices” on page 80). For more information, see the IBM TS3500 tape library IBM Knowledge Center.
To identify which tape drives should be enabled as control paths, see Table 6-5 on page 105 in the Spectrum Archive EE Configuration worksheet.
Enable the appropriate control paths through the TS3500 Tape Library Specialist web interface.
|
Important: If you want to set up multipathing (CPF) for the tape drives that are attached to the Spectrum Archive EE nodes, you must first configure the tape device driver lin_tape to enable control path failover. Follow the procedure in the IBM Tape Device Drivers Installation and User's Guide, GC27-2130 from the IBM Support portal.
|
6.2 Configuring IBM Spectrum Archive EE
The topics in this section describe how to use the ltfsee_config command to configure IBM Spectrum Archive EE in a single node or multiple node environment. Instructions for removing a node from a IBM Spectrum Archive EE configuration are also provided.
6.2.1 The ltfsee_config utility
Use the ltfsee_config command-line utility to configure the IBM Spectrum Archive EE for single node or multiple node environment. You must have root user authority to use this command. This command also can be used to check an existing IBM Spectrum Archive EE configuration. The utility operates in interactive mode and guides you step-by-step through the required information that you must provide.
|
Reminder: All of the command examples use the command without the full file path name because we added the IBM Spectrum Archive EE directory (/opt/ibm/ltfsee/bin) to the PATH variable.
|
The ltfsee_config command-line tool is shown in the following example and includes the following options:
ltfsee_config -m <mode> [options]
•-m
<mode> and [options] can be one of the following items:
– CLUSTER [-c]
Creates a IBM Spectrum Archive EE cluster environment and configures a user-selected IBM Spectrum Scale (GPFS) file systems to be managed by the IBM Spectrum Archive or used for its metadata. The user must run this command one time from one of the IBM Spectrum Archive nodes. Running the command a second time modifies the file systems settings of the existing cluster.
– ADD_CTRL_NODE [-g | -c]
Adds the local node as the control (MMM) node to a tape library in an existing IBM Spectrum Archive EE environment, and configures its drives and node group. There can be one control node per tape library.
– ADD_NODE [-g | -c]
Adds the local node (as a non-control node) to a tape library, and configure its drives and node group.
– SET_CTRL_NODE
Sets the local node, previously configured as a non-control node as the control node of its library.
– REMOVE_NODE [-N <node_id>] [-f]
Removes the node and the drives configured for that node from the existing configuration.
•Options:
– -c
Check and show the existing cluster or node configuration, without configuring or modifying it.
– -g
Assign the node to a node group that is selected or specified by user. If -g is not used, the node is added to the default node group, which is named G0 if it did not exist before.
– -N
Remove a non-local node by specifying its node ID. If -N is not used, the local node is removed.
– -f
Force node removal. If -f is not used, an attempt to remove a control node fails and the configuration remains unchanged. When a control node is removed by using -f, other nodes from the same library and the drives that are configured for those nodes are also removed. To avoid removing multiple nodes, consider first setting another configured non-control node from the same library as the control node (SET_CTRL_NODE).
6.2.2 Configuring a single node cluster
Before you begin this procedure, ensure that all of the tasks that are described in 6.1, “Configuration prerequisites” on page 102 are met. Figure 6-2 shows an illustration of a single-node configuration that is described in this section.

Figure 6-2 IBM Spectrum Archive single-node configuration
The steps in this section must be performed only on one node of a IBM Spectrum Archive EE cluster environment. If you plan to have only one IBM Spectrum Archive EE node at all, this is a so-called single-node cluster setup. If you plan to set up a multi-node cluster environment for IBM Spectrum Archive EE, this configuration mode must be performed once and only on a node of your choice of your cluster environment. All other nodes must be added. To do so, see 6.2.3, “Configuring a multiple-node cluster” on page 116.
To configure a single-node cluster for IBM Spectrum Archive EE, complete the following steps:
1. Log on to the operating system as a root user.
2. Start GPFS (if it is not already started) by running the following command:
# mmstartup -a
3. Mount the GPFS file system (if it is not already mounted) by running the following command:
# mmmount all
4. Start the IBM Spectrum Archive EE configuration utility with the -m CLUSTER option by running the following command and answer the prompted questions:
# ltfsee_config -m CLUSTER
Example 6-2 shows you the successful run of the ltfsee_config -m CLUSTER command during the initial IBM Spectrum Archive EE configuration on the lab setup that was used for this book.
Example 6-2 Run the ltfsee_config -m CLUSTER command
[root@ltfsml1 ~]# /opt/ibm/ltfsee/bin/ltfsee_config -m CLUSTER
CLUSTER mode starts .
## 1. Check whether the cluster is already created ##
Cluster is not configured, configuring the cluster.
## 2. Check prerequisite on cluster ##
Cluster name: ltfsml2-ltfsml1.tuc.stglabs.ibm.com
ID: 12003238441805965800
Successfully validated the prerequisites.
## 3. List file systems in the cluster ##
Retrieving IBM Spectrum Scale (GPFS) file systems...
** Select a file system for storing IBM Spectrum Archive Enterprise Edition configuration and internal data.
Input the corresponding number and press Enter
or press q followed by Enter to quit.
File system
1. /dev/gpfs Mount point(/ibm/gpfs) DMAPI(Yes)
q. Quit
Input number > 1
** Select file systems to configure for IBM Spectrum Scale (GPFS) file system for Space Management.
Input the corresponding numbers and press Enter
or press q followed by Enter to quit.
Press a followed by Enter to select all file systems.
Multiple file systems can be specified using comma or white space delimiters.
File system
1. /dev/gpfs Mount point(/ibm/gpfs)
a. Select all file systems
q. Quit
Input number > 1
## 4. Configure Space Management ##
Disabling unnecessary daemons...
Editing Space Management Client settings...
Restarting Space Management service...
Terminating dsmwatchd.............
Terminating dsmwatchd.............
Starting dsmmigfs.............................
Configured space management.
## 5. Add selected file systems to the Space Management ##
Added the selected file systems to the space management.
## 6. Store the file systems configuration and dispatch it to all nodes ##
Storing the file systems configuration...
Copying ltfsee_config.filesystem file...
Stored the cluster configuration and dispatched the configuration file.
## 7. Create metadata directories and configuration parameters file ##
Created metadata directories and configuration parameters file.
CLUSTER mode completed .
|
Important: During the first run of the ltfsee_config -m CLUSTER command, you see the following error:
No file system is DMAPI enabled.
At least one file system has to be DMAPI enabled to use IBM Spectrum Archive Enterprise Edition.
Enable DMAPI of more than one IBM Spectrum Scale (GPFS) file systems and try again.
Ensure that DMAPI is turned on correctly, as described in 6.1.4, “Preparing the Spectrum Scale file system for Spectrum Archive EE” on page 108. You can use the following command sequence to enable DMAPI support for your GPFS file system (here the GPFS file system name that is used is gpfs):
# mmumount gpfs
mmumount: Unmounting file systems ...
# mmchfs gpfs -z yes
# mmmount gpfs
mmmount: Mounting file systems ...
|
5. Run the IBM Spectrum Archive EE configuration utility by running the following command and answer the prompted questions:
# ltfsee_config -m ADD_CTRL_NODE
Example 6-3 shows the successful run of the ltfsee_config -m ADD_CTRL_NODE command during initial IBM Spectrum Archive EE configuration on the lab setup that was used for this book.
Example 6-3 Run the ltfsee_config -m ADD_CTRL_NODE command
[root@ltfsml1 ~]# /opt/ibm/ltfsee/bin/ltfsee_config -m ADD_CTRL_NODE
ADD_CTRL_NODE mode starts .
## 1. Check whether the cluster is already created ##
Cluster is already created and configuration file ltfsee_config.filesystem exists.
## 2. Check prerequisite on node ##
Successfully validated the prerequisites.
## 3. IBM Spectrum Scale (GPFS) Configuration for Performance Improvement ##
Setting worker1Threads=400
Setting dmapiWorkerThreads=64
Configured IBM Spectrum Scale (GPFS) performance related settings.
## 4. Configure Space Management ##
Disabling unnecessary daemons...
Editing Space Management Client settings...
Restarting Space Management service...
Terminating dsmwatchd.............
Terminating dsmwatchd.............
Starting dsmmigfs.............................
Configured space management.
## 5. Add this node to a tape library ##
Number of logical libraries with assigned control node: 0
Number of logical libraries available from this node: 1
Number of logical libraries available from this node and with assigned control node: 0
** Select the tape library from the following list
and input the corresponding number. Then, press Enter.
Model Serial Number
1. 3576-MTL 000001300228_LLC
q. Return to previous menu
Input Number > 1
Input Library Name (alpha numeric or underscore, max 16 characters) > lib_ltfsml1
Added this node (ltfsml1.tuc.stglabs.ibm.com, node id 2) to library lib_ltfsml1 as its control node.
## 6. Add this node to a node group ##
Added this node (ltfsml1.tuc.stglabs.ibm.com, node id 2) to node group G0.
## 7. Add drives to this node ##
** Select tape drives from the following list.
Input the corresponding numbers and press Enter
or press q followed by Enter to quit.
Multiple tape drives can be specified using comma or white space delimiters.
Model Serial Number
1. ULT3580-TD6 1013000655
2. ULT3580-TD6 1013000688
3. ULT3580-TD6 1013000694
a. Select all tape drives
q. Exit from this Menu
Input Number > a
Selected drives: 1013000655:1013000688:1013000694.
Added the selected drives to this node (ltfsml1.tuc.stglabs.ibm.com, node id 2).
## 8. Configure LE+ component ##
Creating mount point...
Mount point folder '/ltfs' exists.
Use this folder for the LE+ component mount point as LE+ component assumes this folder.
Configured LE+ component.
## 9. Enabling system log ##
Restarting rsyslog...
System log (rsyslog) is enabled for IBM Spectrum Archive Enterprise Edition.
ADD_CTRL_NODE mode completed .
To summarize, EE Node 1 must run ltfsee_config -m CLUSTER and ltfsee_config -m ADD_CTRL_NODE to complete this single-node configuration.
If you are configuring multiple nodes for IBM Spectrum Archive EE, continue to 6.2.3, “Configuring a multiple-node cluster” on page 116.
6.2.3 Configuring a multiple-node cluster
To add nodes to form a multiple-node cluster configuration after the first node is configured, complete this task. Figure 6-3 shows an illustration of a multiple-node cluster configuration that is described in this section.
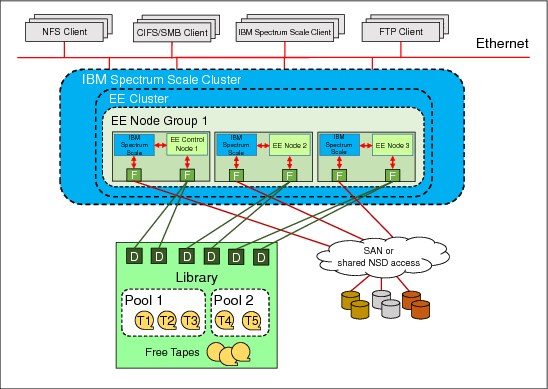
Figure 6-3 IBM Spectrum Archive multiple-node cluster configuration
Before configuring more nodes, ensure that all tasks that are described in 6.1, “Configuration prerequisites” on page 102 are completed and that the first node of the cluster environment is configured, as described in 6.2.2, “Configuring a single node cluster” on page 112.
To configure another node for a multi-node cluster setup for IBM Spectrum Archive EE, complete the following steps:
1. Log on to the operating system as a root user.
2. Start GPFS (if it is not already started) by running the following command:
# mmstartup -a
3. Mount the GPFS file system on all nodes in the IBM Spectrum Scale cluster (if it is not already mounted) by running the following command:
# mmmount all -a
4. Start the IBM Spectrum Archive EE configuration utility with the -m ADD_NODE option by running the following command and answer the prompted questions:
# /opt/ibm/ltfsee/bin/ltfsee_config -m ADD_NODE
|
Important: This step must be performed on all nodes except for the first node that was configured in 6.2.2, “Configuring a single node cluster” on page 112.
|
To summarize, you ran the following configuration options on EE Node 1 in 6.2.2, “Configuring a single node cluster” on page 112:
•ltfsee_config -m CLUSTER
•ltfsee_config -m ADD_CTRL_NODE
For each additional IBM Spectrum Archive node in EE Node Group 1, run the ltfsee_config -m ADD_NODE command. For example, in Figure 6-3 on page 116, you must run ltfsee_config -m ADD_NODE on both EE Node 2 and EE Node 3.
If you require multiple tape library attachments, go to 6.2.4, “Configuring a multiple-node cluster with two tape libraries” on page 117.
6.2.4 Configuring a multiple-node cluster with two tape libraries
Starting with IBM Spectrum Archive V1R2, IBM Spectrum Archive supports the Multiple Tape Library Attachment feature in a single IBM Spectrum Scale cluster. This feature allows for data replication to pools in separate libraries for more data resiliency, and allows for total capacity expansion beyond a single library limit.
The second tape library can be the same tape library model as the first tape library or can be a different tape library model. These two tape libraries can be connected to a IBM Spectrum Scale cluster in a single site or can be placed in the metro distance (less than 300 km) locations through IBM Spectrum Scale synchronous mirroring (stretched cluster).
For more information about synchronous mirroring by using IBM Spectrum Scale replication, see the following website:
|
Important: Stretched cluster is available for distances shorter than 300 km. For longer distances, the Active File Management (AFM) feature of IBM Spectrum Scale should be used with IBM Spectrum Archive, which is a near-future enhancement. The use of AFM is with two different IBM Spectrum Scale clusters with one instance of IBM Spectrum Archive at each site. More details will be available in a near-future update.
|
To add nodes to form a multiple-node cluster configuration with two tape libraries after the first node is configured, complete this task. Figure 6-4 shows an illustration of the configuration with two tape libraries.
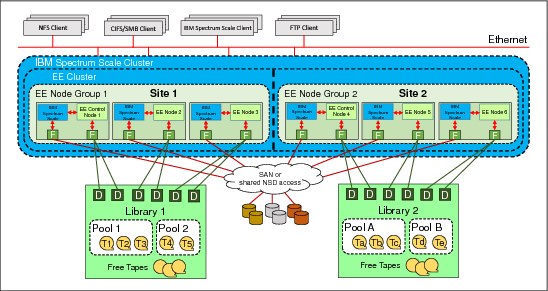
Figure 6-4 IBM Spectrum Archive multiple-node cluster configuration across two tape libraries
Before configuring more nodes, ensure that all tasks that are described in 6.1, “Configuration prerequisites” on page 102 are completed and that the first node of the cluster environment is configured, as described in 6.2.2, “Configuring a single node cluster” on page 112.
To configure the nodes at the other location for a multiple-node two-tape library cluster setup for IBM Spectrum Archive EE, complete the following steps:
1. Run the IBM Spectrum Archive EE configuration utility by running the following command and answer the prompted questions:
# /opt/ibm/ltfsee/bin/ltfsee_config -m ADD_CTRL_NODE
Using Figure 6-4 as an example, the ltfsee_config -m ADD_CTRL_NODE command is run on EE Node 4.
2. Run the IBM Spectrum Archive EE configuration utility on all the remaining EE nodes at the other location by running the following command and answer the prompted questions:
# /opt/ibm/ltfsee/bin/ltfsee_config -m ADD_NODE
Using Figure 6-4 as an example, the ltfsee_config -m ADD_NODE command is run on EE Node 5 and EE Node 6.
6.3 First-time start of IBM Spectrum Archive EE
To start IBM Spectrum Archive EE the first time, complete the following steps:
1. Identify the Linux device name for the logical tape library (IBM SCSI changer name) you plan to use and that you configured in 6.2.2, “Configuring a single node cluster” on page 112 or 6.2.3, “Configuring a multiple-node cluster” on page 116 by running the following command:
# cat /proc/scsi/IBMchanger*
2. Start the embedded LTFS system by running the following command:
# ltfs /ltfs -o changer_devname=/dev/IBMchangerX
X is the tape library changer that you want to use for IBM Spectrum Archive EE and identified in the previous step.
|
Important: This step must be run on every EE Node within the IBM Spectrum Scale cluster.
The embedded LTFS program’s mount point must always be the /ltfs directory.
|
3. Check that the following embedded, customized Tivoli Storage Manager for Space Management (HSM) client components are running:
# ps -ef|grep dsm
You should see three recall daemons running.
4. Start the IBM Spectrum Archive EE program by running the following command:
/opt/ibm/ltfsee/bin/ltfsee start
|
Important: If the ltfsee start command does not return after several minutes, it might be either because tapes are being unloaded or because the firewall is running. The firewall service must be disabled on the IBM Spectrum Archive EE nodes. For more information, see 4.3.2, “Installing, upgrading, or uninstalling IBM Spectrum Archive EE” on page 68.
|
You might be able to skip steps 1 and 3 the next time you start IBM Spectrum Archive EE because they are not functional-related, just informational.
Example 6-4 shows all of the steps and the output when IBM Spectrum Archive EE was started the first time. During the first start, you might discover a warning message, as shown in the following example:
The authenticity of host 'localhost (::1)' can't be established.
RSA key fingerprint is 8f:56:95:fe:9c:eb:37:7f:95:b1:21:b9:45:d6:91:6b.
Are you sure you want to continue connecting (yes/no)?
This is normal during the first start and you can easily continue by entering yes and pressing Enter.
Example 6-4 Start IBM Spectrum Archive EE the first time
[root@ltfsml1 ~]# ltfs /ltfs -o changer_devname=/dev/IBMchanger0
4d22 LTFS14000I LTFS starting, LTFS version 2.1.6.0 (9601), log level 2
4d22 LTFS14058I LTFS Format Specification version 2.2.0
4d22 LTFS14104I Launched by "ltfs /ltfs -o changer_devname=/dev/IBMchanger0"
4d22 LTFS14105I This binary is built for Linux (x86_64)
4d22 LTFS14106I GCC version is 4.8.3 20140911 (Red Hat 4.8.3-9)
4d22 LTFS17087I Kernel version: Linux version 3.10.0-229.el7.x86_64 ([email protected]) (gcc version 4.8.3 20140911 (Red Hat 4.8.3-7) (GCC) ) #1 SMP Thu Jan 29 18:37:38 EST 2015 i386
4d22 LTFS17089I Distribution: NAME="Red Hat Enterprise Linux Server"
4d22 LTFS17089I Distribution: Red Hat Enterprise Linux Server release 7.1 (Maipo)
4d22 LTFS17089I Distribution: Red Hat Enterprise Linux Server release 7.1 (Maipo)
4d22 LTFS14064I Sync type is "unmount"
4d22 LTFS17085I Plugin: Loading "ibmtape" driver
4d22 LTFS17085I Plugin: Loading "unified" iosched
4d22 LTFS17085I Plugin: Loading "ibmtape" changer
4d22 LTFS17085I Plugin: Loading "ondemand" dcache
4d22 LTFS17085I Plugin: Loading "memory" crepos
4d22 LTFS11593I LTFS starts with a product license version (20130412_2702)
4d22 LTFS12165I lin_tape version is 3.0.1
4d22 LTFS12118I Changer identification is '3576-MTL '
4d22 LTFS12162I Vendor ID is IBM
4d22 LTFS12159I Firmware revision is 641G
4d22 LTFS12160I Changer serial is 000001300228_LLC
4d22 LTFS12196I IOCTL: INQUIRY PAGE -1056947426 returns -20501 (generic 22) 000001300228_LLC
4d22 LTFS11578I Inactivating all drives (Skip to scan devices)
4d22 LTFS16500I Cartridge repository plugin is initialized (memory, /ibm/gpfs/.ltfsee/meta/000001300228_LLC)
4d22 LTFS11545I Rebuilding the cartridge inventory
4d22 LTFS11627I Getting Inventory - 000001300228_LLC
4d22 LTFS11629I Aqcuireing MoveLock - 000001300228_LLC
4d22 LTFS11630I Aqcuired Move Lock (5) - 000001300228_LLC
4d22 LTFS11628I Got Inventory - 000001300228_LLC
4d22 LTFS11666I Notify library status change : 1 => 2
4d22 LTFS11666I Notify library status change : 2 => 3
4d22 LTFS11666I Notify library status change : 3 => 4
4d22 LTFS11666I Notify library status change : 4 => 5
4d22 LTFS11666I Notify library status change : 5 => 6
4d22 LTFS11666I Notify library status change : 6 => 7
4d22 LTFS11666I Notify library status change : 7 => 8
4d22 LTFS11666I Notify library status change : 8 => 9
4d22 LTFS11666I Notify library status change : 9 => 10
4d22 LTFS11666I Notify library status change : 10 => 11
4d22 LTFS11666I Notify library status change : 11 => 12
4d22 LTFS11666I Notify library status change : 12 => 13
4d22 LTFS11666I Notify library status change : 13 => 14
4d22 LTFS11666I Notify library status change : 14 => 15
4d22 LTFS11666I Notify library status change : 15 => 16
4d22 LTFS11666I Notify library status change : 16 => 17
4d22 LTFS11666I Notify library status change : 17 => 18
4d22 LTFS11666I Notify library status change : 18 => 19
4d22 LTFS11666I Notify library status change : 19 => 20
4d22 LTFS11666I Notify library status change : 20 => 21
4d22 LTFS11666I Notify library status change : 21 => 22
4d22 LTFS11666I Notify library status change : 22 => 23
4d22 LTFS11666I Notify library status change : 23 => 24
4d22 LTFS11666I Notify library status change : 24 => 25
4d22 LTFS11666I Notify library status change : 25 => 26
4d22 LTFS11666I Notify library status change : 26 => 27
4d22 LTFS11666I Notify library status change : 27 => 28
4d22 LTFS11666I Notify library status change : 28 => 29
4d22 LTFS11666I Notify library status change : 29 => 30
4d22 LTFS11666I Notify library status change : 30 => 31
4d22 LTFS11666I Notify library status change : 31 => 32
4d22 LTFS11666I Notify library status change : 32 => 33
4d22 LTFS11666I Notify library status change : 33 => 34
4d22 LTFS11666I Notify library status change : 34 => 35
4d22 LTFS11666I Notify library status change : 35 => 36
4d22 LTFS11666I Notify library status change : 36 => 37
4d22 LTFS11666I Notify library status change : 37 => 38
4d22 LTFS11666I Notify library status change : 38 => 39
4d22 LTFS11666I Notify library status change : 39 => 40
4d22 LTFS11666I Notify library status change : 40 => 41
4d22 LTFS11666I Notify library status change : 41 => 42
4d22 LTFS11666I Notify library status change : 42 => 43
4d22 LTFS11666I Notify library status change : 43 => 44
4d22 LTFS11666I Notify library status change : 44 => 45
4d22 LTFS11666I Notify library status change : 45 => 46
4d22 LTFS11666I Notify library status change : 46 => 47
4d22 LTFS11666I Notify library status change : 47 => 48
4d22 LTFS11666I Notify library status change : 48 => 49
4d22 LTFS11666I Notify library status change : 49 => 50
4d22 LTFS11666I Notify library status change : 50 => 51
4d22 LTFS11666I Notify library status change : 51 => 52
4d22 LTFS11666I Notify library status change : 52 => 53
4d22 LTFS11666I Notify library status change : 53 => 54
4d22 LTFS11666I Notify library status change : 54 => 55
4d22 LTFS11666I Notify library status change : 55 => 56
4d22 LTFS11666I Notify library status change : 56 => 57
4d22 LTFS11666I Notify library status change : 57 => 58
4d22 LTFS11666I Notify library status change : 58 => 59
4d22 LTFS11666I Notify library status change : 59 => 60
4d22 LTFS11666I Notify library status change : 60 => 61
4d22 LTFS11666I Notify library status change : 61 => 62
4d22 LTFS11666I Notify library status change : 62 => 63
4d22 LTFS11666I Notify library status change : 63 => 64
4d22 LTFS11666I Notify library status change : 64 => 65
4d22 LTFS11666I Notify library status change : 65 => 66
4d22 LTFS11666I Notify library status change : 66 => 67
4d22 LTFS11666I Notify library status change : 67 => 68
4d22 LTFS11666I Notify library status change : 68 => 69
4d22 LTFS11666I Notify library status change : 69 => 70
4d22 LTFS11666I Notify library status change : 70 => 71
4d22 LTFS11666I Notify library status change : 71 => 72
4d22 LTFS11666I Notify library status change : 72 => 73
4d22 LTFS11666I Notify library status change : 73 => 74
4d22 LTFS11666I Notify library status change : 74 => 75
4d22 LTFS11666I Notify library status change : 75 => 76
4d22 LTFS11666I Notify library status change : 76 => 77
4d22 LTFS11666I Notify library status change : 77 => 78
4d22 LTFS11666I Notify library status change : 78 => 79
4d22 LTFS11666I Notify library status change : 79 => 80
4d22 LTFS11666I Notify library status change : 80 => 81
4d22 LTFS11666I Notify library status change : 81 => 82
4d22 LTFS11666I Notify library status change : 82 => 83
4d22 LTFS11666I Notify library status change : 83 => 84
4d22 LTFS11666I Notify library status change : 84 => 85
4d22 LTFS11666I Notify library status change : 85 => 86
4d22 LTFS11666I Notify library status change : 86 => 87
4d22 LTFS11666I Notify library status change : 87 => 88
4d22 LTFS11720I Built the cartridge inventory (0)
4d22 LTFS14708I LTFS admin server version 2 is starting on port 7600
4d22 LTFS14111I Initial setup completed successfully
4d22 LTFS14112I Invoke 'mount' command to check the result of final setup
4d22 LTFS14113I Specified mount point is listed if succeeded
[root@ltfsml1 ~]#
[root@ltfsml1 ~]# ps -ef | grep dsm
root 22982 1 0 10:41 ? 00:00:01 /opt/tivoli/tsm/client/hsm/bin/dsmwatchd nodetach
root 25338 1 0 10:41 ? 00:00:00 dsmrecalld
root 25359 25338 0 10:41 ? 00:00:02 dsmrecalld
root 25360 25338 0 10:41 ? 00:00:00 dsmrecalld
root 26318 23255 0 11:22 pts/2 00:00:00 grep --color=auto dsm
[root@ltfsml1 ~]# /opt/ibm/ltfsee/bin/ltfsee start
Library name: lib_ltfsml2, library id: 000001300228_LLA, control node (MMM) IP address: 9.11.121.227.
GLESM401I(00253): Loaded the global configuration.
GLESM402I(00264): Created the Global Resource Manager.
GLESM403I(00279): Fetched the node groups from the Global Resource Manager.
GLESM404I(00287): Detected the IP address of the MMM (9.11.121.227).
GLESM405I(00298): Configured the node group (G0).
GLESM406I(00307): Created the unassigned list of the library resources.
GLESL536I(00074): Started the Spectrum Archive EE service (MMM) for library lib_ltfsml2.
Library name: lib_ltfsml1, library id: 000001300228_LLC, control node (MMM) IP address: 9.11.121.122.
GLESM401I(00253): Loaded the global configuration.
GLESM402I(00264): Created the Global Resource Manager.
GLESM403I(00279): Fetched the node groups from the Global Resource Manager.
GLESM404I(00287): Detected the IP address of the MMM (9.11.121.122).
GLESM405I(00298): Configured the node group (G0).
GLESM406I(00307): Created the unassigned list of the library resources.
GLESL536I(00074): Started the Spectrum Archive EE service (MMM) for library lib_ltfsml1.
[root@ltfsml1 ~]#
Now, IBM Spectrum Archive EE is started and ready for basic usage. For further handling, managing, and operations of IBM Spectrum Archive EE (such as creating pools, adding and formatting tapes, and setting up migration policies), see Chapter 7, “Operations” on page 123.
..................Content has been hidden....................
You can't read the all page of ebook, please click here login for view all page.