

IBM Spectrum Archive Single Drive Edition
IBM Spectrum Archive Single Drive Edition (SDE) provides direct, intuitive, and graphical access to data stored in IBM tape drives. These drives include LTO Ultrium 8, M8, 7, 6, and 5 tape cartridges, as well as IBM 3592 tape cartridges with IBM TS1155, TS1150, or IBM TS1140 tape drives. IBM Spectrum Archive eliminates the need for additional tape management and software to access data. LTFS is the first file system that works with IBM System Storage tape technology to optimize ease of use and portability for open-systems tape storage.
|
Note: Throughout this chapter, the terms supported tape drives and supported tape media are used to represent the following tape drives and tape media. Unless otherwise noted, as of the published date of this book, IBM Spectrum Archive SDE supports IBM LTO Ultrium 8, 7, 6, or 5 tape drives, and IBM TS1155, TS1150, or TS1140 tape drives. The tape media that are supported are LTO Ultrium 8, M8, 7, 6, and 5, and 3592 JC, JB, JD, JK, and JL.
Refer to the IBM Spectrum Archive Single Drive Edition website to check for the latest tape drives and tape media:
|
IBM Spectrum Archive Single Drive Edition was announced when media partitioning capability became available as part of the LTO-5 tape drive technology. IBM created LTFS as a self-describing tape file system, which means implementing a true file system for tape. IBM Spectrum Archive SDE can write files directly to tape media by using operating system commands and without any additional application. The tape drive appears on the operating system as though it is a USB-attached disk drive. Data can be easily written by dragging and dropping files to or from a tape drive, making it practical and easy to use.
With the recent announcement of IBM Linear Tape-Option Ultrium 8 (LTO-8) specifications, tape storage again provides several advantages to clients over other forms of data storage. For example, tape storage now provides capacity up to 12 TB native capacity per tape cartridge in addition to reliability, portability, cost efficiency, and energy efficiency.
IBM Spectrum Archive SDE is available for Linux, Mac, and Microsoft Windows systems and is available for no extra fee from the IBM Fix Central website:
Refer to the IBM Spectrum Archive Single Drive Edition Knowledge Center for the current supported operating systems and hardware platforms:
The following topics are included:
2.1 Introduction to IBM Spectrum Archive SDE
LTFS is the first file system starting with LTO generation 5 and IBM TS1140 tape drives to set a new standard for ease of use and portability for open systems tape storage. With IBM Spectrum Archive SDE, accessing data that is stored on an IBM tape cartridge is as easy and intuitive as using a USB flash drive. Tapes are self-describing, and you can quickly recall any file from a tape without having to read the whole tape from beginning to end. Furthermore, any LTFS-capable system can read a tape that is created by any other LTFS-capable system (regardless of the operating system platform). Any LTFS-capable system can identify and retrieve the files that are stored on it. LTFS-capable systems have the following characteristics:
•Files and directories are displayed to you as a directory tree listing.
•More intuitive searches of cartridge and library content are now possible due to the addition of file tagging.
•Files can be moved to and from LTFS tape by using the familiar drag-and-drop metaphor common to many operating systems.
•Many applications that were written to use files on disk can now use files on tape without any modification.
•All standard File Open, Write, Read, Append, Delete, and Close functions are supported.
Archival data storage requirements are growing at over 60% annually. The LTFS format is an ideal option for long-term archiving of large files that need to be easily shared with others. This option is especially important because the LTO tape media that it uses are designed to have a 15-year to 30-year lifespan (depending on the number of read/write passes).
Industries that benefit from this tape file system are the banking, digital media, medical, geophysical, and entertainment industries. Many users in these industries use Linux or Macintosh systems, which are fully compatible with LTFS.
It is important to note that LTO Ultrium cartridges from earlier LTO generations (that is LTO-1 through LTO-4) are not partitionable and therefore cannot be used by LTFS. If LTO Ultrium 4 cartridges are used in an LTO Ultrium 5 drive to write data, the LTO-4 cartridge is treated like an unpartitioned LTO-5 cartridge. Even if an application can deal with partitions, it is not possible to partition the LTO-4 media that is mounted at an LTO Ultrium 5 drive. Similarly, Write Once Read Many (WORM) cartridges of any generation cannot be used by LTFS because they cannot be partitioned.
Although TS1140 tape drives are also supported by IBM Spectrum Archive SDE version 1.3.0 and later, for simplicity, only LTO tape drives are discussed.
Although IBM Spectrum Archive SDE presents the tape cartridge as a disk drive, remember that the underlying hardware is still a tape cartridge and is therefore sequential in nature. Tape does not allow random access. Data is always appended to the tape, and there is no overwriting of files. File deletions do not actually erase the data from tape but simply erase the pointers to the data. Although you can simultaneously copy two (or more) files to an LTFS tape with IBM Spectrum Archive SDE, you get better performance if you copy files sequentially.
To operate the tape file system, the following components are needed:
•Software in the form of an open source IBM Spectrum Archive SDE package
•Hardware, consisting of IBM supported tape drives and supported tape media
•Data structures that are created by IBM Spectrum Archive SDE on tape
Together, these components can handle a file system on LTO media as though it is a disk file system for accessing tape files, including the tape directory tree structures. The metadata of each cartridge, after it is mounted, is cached in server memory. Metadata operations, such as browsing the directory or searching for a file name, therefore do not require any tape movement and are quick.
2.1.1 Downloading IBM Spectrum Archive SDE
IBM Spectrum Archive SDE is distributed similarly to other IBM tape device drivers in that you can download it at no charge. For more information and a list of supported operating systems, see the following IBM Tape Storage Systems page:
IBM maintains the latest levels of tape-related IBM System Storage software, the tape device driver, the IBM Spectrum Archive SDE software package, and documentation at the Fix Central download portal:
To download the latest version of IBM Spectrum Archive SDE, complete these steps:
1. From the main Fix Central page, select the following options:
a. For Product Group, select System Storage.
b. For System Storage, select Tape systems.
c. For Tape systems, select Tape drivers and software.
d. For Tape drivers and software, select IBM Spectrum Archive Single Drive Edition (SDE).
e. For Platform, to download the latest version of IBM Spectrum Archive SDE, select the correct platform.
f. Click Continue.
2. In the next window, select the IBM Spectrum Archive SDE fix pack to download and click Continue. Alternatively, you can select any of the following options:
– IBM Knowledge Center URL:
– LTFS format specifications:
– IBM Spectrum Archive SDE Support Matrix
– Installation file
– Readme file
3. On the Download Options page, select the method that you want to use to download the IBM Spectrum Archive SDE and click Continue.
4. On the Terms and Conditions page, click I agree.
5. On the Download files page, click Download now.
2.1.2 Tape format compatibility
The Storage Networking Industry Association1 (SNIA) defines the LTFS Format Specification as a file system format separate from any implementation on data storage media. Using this format, data is stored in LTFS Volumes. An LTFS Volume holds data files and corresponding metadata to completely describe the directory and file structures stored on the volume.
The LTFS Format has these features:
•An LTFS Volume can be mounted and volume content accessed with full use of the data without the need to access other information sources.
•Data can be passed between sites and applications using only the information written to an LTFS Volume.
•Files can be written to, and read from, an LTFS Volume using standard POSIX file operations.
The LTFS Format is particularly suited to these usages:
•Data export and import.
•Data interchange and exchange.
•Direct file and partial file recall from sequential access media. Archival storage of files using a simplified, self-contained or “self-describing” format on sequential access media.
The LTFS Bulk Transfer standard defines a method by which a set of files, directories, and objects from a source system can be transferred to a destination system. The bulk transfer of large quantities of data is well suited for LTFS due to the economic and environmental characteristics of tape. Building on top of the LTFS format, a standardized method for transferring data is defined that provides many advantages.
The LTFS tape format version is updated from 2.2.0 to 2.4.0. For a PDF of the latest version, see the following LTFS Format Specification website:
|
Formatting media: The ltfsck utility checks and recovers media (2.7.3, “Checking or recovering a tape with the ltfsck command” on page 102). The mkltfs utility formats media (2.7.2, “Formatting a tape with the mkltfs command” on page 99). The ltfsck command in the older LTFS package cannot be used to check and recover a medium that is formatted to version 2. A medium that is formatted to version 2 cannot be converted to a 1.0 version format. By using the mkltfs command from a 1.0.x LTFS version, you can reformat the medium to a 1.0 format.
|
2.1.3 Recent enhancements
The following enhancements were made to IBM Spectrum Archive SDE version 2.4.0 since version 2.2.2:
•New hardware support
– IBM LTO8 tape drive support
•LTFS Format Specifications 2.4.0
– Special character handling
The following characters are now allowed for file names and extended attribute names: Colon “:”, U+0001 through U+001E (TAB, LF, and CR were previously accepted in prior format). Surrogate blocks, BOM, NULL character (U+0000), and characters that cannot be converted to UTF-16, UTF-8 or NFC normalization will continue to be rejected for file names and extended attribute names.
Special care is required for the colon “:” character on the Windows platform because the colon “:” character is not allowed. Any files created on Linux or Mac OS X that contains a colon will be encoded to allow Windows to display the file name. The colon “:” on Windows will be replaced with the percent encoded string for colon “:” which is %3A. For example, the file Testfile:1.txt on Linux will be shown as Testfile%3A1.txt on Windows.
– Permanent write error handling
To avoid “false positives” scenarios, the error handling for permanent write failures has been improved.
– Volume advisory locking
A new virtual extended attribute (VEA) called ltfs.volumeLockState has been introduced to change the cartridge’s advisory lock status:
unlocked (0): The volume may be modified.
locked (1): The volume cannot be modified other than to change the volume advisory lock state.
permlocked (2): The volume is permanently locked and cannot be modified in any way.
– Media pool MAM attribute
Two new virtual extended attributes (VEA) called ltfs.mediaPool.name and ltfs.mediaPool.additionalInfo have been introduced to write data only to the cartridge’s MAM field “MEDIA POOL”. The value of the MAM field “MEDIA POOL” is “NAME[INFO]” where NAME is the pool name (specified by ltfs.mediaPool.name) and INFO is the supplied additional information about the cartridge (specified by ltfs.mediaPool.additionalInfo).
2.2 Installation on Linux
The installation, implementation, and usage of IBM Spectrum Archive SDE are explained. This information is based on the documentation that is published in the IBM Spectrum Archive SDE section of IBM Knowledge Center:
2.2.1 Hardware and software requirements
The requirements for IBM Spectrum Archive SDE implementation are listed. At the time of writing this book, IBM Spectrum Archive SDE supports the following Linux operating systems and hardware platforms:
•Supported Linux operating systems (x86_64 and ppcle only):
– Red Hat Enterprise Linux 7.2 and 7.3
•Supported hardware:
– Compatible machine
– x86_64 or Power PC processor
– 1 GB available RAM for each 1,000,000 files to be stored on a particular tape
– The IBM Spectrum Archive supported tape drives support Fibre Channel (FC) host bus adapter (HBA)
– The IBM Spectrum Archive supported LTO tape drives support Serial-attached Small Computer System Interface (SCSI) (SAS) HBA
For more information about connectivity and configurations, see the IBM System Storage Interoperation Center (SSIC) website.
|
Readme file: The current information for IBM Spectrum Archive SDE supported hardware and software configurations and notices or limitations is in the IBM Spectrum Archive SDE program readme file.
|
2.2.2 Prerequisites
You need to install certain software before you install IBM Spectrum Archive SDE. IBM Spectrum Archive SDE requires the following software. All of these products, other than the tape device driver, are already installed if the latest service packs for your Linux version are installed:
•FUSE
– fuse
– fuse-libs
•libxml2
•libuuid
•libicu
•IBM Tape Device Driver for Linux (lin_tape)
•ITDT, although not a prerequisite, is invaluable in configuring IBM Spectrum Archive SDE and troubleshooting tape drive issues and needs to be installed.
To check whether FUSE is installed, run the following command:
# lsmod | grep fuse
Check its version by using this command:
# rpm -qa|grep fuse
If any of the modules are not listed, you must load them before you proceed with the IBM Spectrum Archive SDE installation. For more details, see 2.2.4, “Installation procedure” on page 30.
2.2.3 Installing the HBA and HBA device driver
To install the HBA and its device driver for the use of FC tape drives with IBM Spectrum Archive SDE, see the HBA manufacturer documentation. For more information about connectivity, configurations, and supported adapters, see the SSIC website:
2.2.4 Installation procedure
The procedure to install the IBM Spectrum Archive SDE program on a Linux system is explained in this section.
Installing FUSE
Complete the following steps to install the required software on a Linux system:
1. Log on as an administrator.
2. Run the following command to install the FUSE packages.
# yum install fuse fuse-libsInstalling the IBM Tape Device Driver
|
Linux: The installation of an IBM Tape Device Driver is required only for Linux.
|
Before you install the IBM Tape Device Driver for use with IBM Spectrum Archive SDE, complete the following tasks:
1. Connect the tape drive and HBA.
2. Power on the tape drive.
3. Power on the server.
4. Install the tape device driver:
a. Download the most recent version of the IBM Tape Device Driver from the IBM Fix Central portal (see also “Downloading IBM Spectrum Archive SDE” on page 26):
b. Download the IBM Tape Device Drivers Installation and User’s Guide from the IBM Support and Download site:
c. Follow the procedures in the IBM Tape Device Drivers Installation and User’s Guide (summarized) to install the IBM Tape Device Driver (Example 2-1).
Example 2-1 Procedure to install the IBM Tape Device Driver
# rpmbuild --rebuild lin_tape-1.74.0-1.src.rpm
# rpm -ivh /usr/src/packages/RPMS/x86_64/lin_tape-1.74.0-1.x86_64.rpm
Preparing... ########################################### [100%]
1:lin_tape ########################################### [100%]
Starting lin_tape: FATAL: module '/lib/modules/3.0.13-0.27-default/kernel/drivers/scsi/lin_tape.ko' is unsupported
Use --allow-unsupported or set allow_unsupported_modules to 1 in
/etc/modprobe.d/unsupported-modules
lin_tape loaded
# vi /etc/modprobe.d/unsupported-modules
# /etc/init.d/lin_tape restart
Shutting down lin_tape:
Starting lin_tape:
# cat /proc/scsi/IBM*
lin_tape version: 1.74.0
lin_tape major number: 251
lin_tape version: 1.74.0
lin_tape major number: 251
Attached Tape Devices:
Number model SN HBA SCSI FO Path
0 ULT3580-HH6 1068000264 MPT SAS Host 0:0:1:0 NA
Enabling the system log
Error information for IBM Spectrum Archive SDE operations is displayed on the terminal console. The level of error reporting is based on the log trace level. To set the log trace level, go to the IBM Spectrum Archive SDE section of IBM Knowledge Center topic for “setting log trace level”:
When the IBM Spectrum Archive SDE commands are used, error and trace information is recorded by using the system log mechanism. This mechanism is disabled by default. To enable the LTFS system log and locate more information about LTFS logs, follow these steps:
1. Log on to the operating system as root.
2. Edit the system log configuration file on any available editor to enable the system log. Apply the following edits, as shown in Example 2-2.
Example 2-2 System log configuration file
Add the following line to /etc/rsyslog.conf
:msg, contains, "LTFS" /var/log/ltfs.log
3. Enable the setting by restarting ryslog and issuing the following command:
systemctl restart rsyslog
4. Open the /etc/logrotate.d/syslog file on any available editor. Add or edit the lines shown in Example 2-3.
Example 2-3 Add or edit syslog file
/var/log/ltfs.log {
size 1M
rotate 4
missingok
compress
sharedscripts
postrotate
/bin/kill -HUP `cat /var/run/syslogd.pid 2> /dev/null` 2> /dev/null || true
/bin/kill -HUP `cat /var/run/rsyslogd.pid 2> /dev/null` 2> /dev/null || true
endscript
}
LTFS records and displays the following types of logs:
Error A message that indicates an unrecoverable error occurred or an operation unexpectedly failed
Warning A message that indicates an unexpected condition occurred, but the operation can continue
Information A message that provides more information about the current operation
Trace A message that provides information about debugging and troubleshooting
Installing IBM Spectrum Archive SDE
To install the IBM Spectrum Archive SDE program on a Linux system from a binary rpm file, complete the following steps from a Linux command prompt. The same procedure can be used for upgrading existing versions:
1. Log on as root.
2. If IBM Spectrum Archive SDE is already installed and mounted, unmount it by entering the following command (assuming /mnt/ltfs is the mounted directory):
# umount /mnt/ltfs
3. Run the following command to install a binary rpm file:
rpm -ivh ltfs-1.3.0.0-[revision]-[distribution].[arch].rpm
4. Optionally, run the following command to verify the current version of IBM Spectrum Archive SDE:
rpm -qa | grep ltfs
2.2.5 Uninstallation procedure
Complete the following steps to uninstall IBM Spectrum Archive SDE software on a Linux system.
|
Important: Eject media from the LTFS drives before you uninstall IBM Spectrum Archive SDE to avoid losing data in the cache.
|
Use these steps:
1. Log on as root.
2. If the IBM Spectrum Archive SDE program is already installed and the tape media is mounted, unmount the tape media by running the following command:
# umount /mnt/ltfs
3. Run the following command to remove the installed package:
# rpm -e ltfs-1.3.0.0-[revision]
4. Remove the mount point:
# rmdir /mnt/ltfs
2.3 Installation on Mac OS X
This installation, implementation, and usage of IBM Spectrum Archive SDE explanation is based on the documentation that is published at the IBM Spectrum Archive SDE section of IBM Knowledge Center:
2.3.1 Hardware and software requirements
The following system hardware and software requirements relate to IBM Spectrum Archive SDE. The current information for IBM Spectrum Archive SDE supported hardware and software configurations and notices or limitations is in the readme file of the software package.
IBM Spectrum Archive SDE supports the following Mac operating systems and hardware platforms:
•Supported Mac operating systems:
– Mac OS X 10.11 “El Capitan” (64-bit)
– Mac OS X 10.12 “Sierra” (64-bit)
•Supported hardware:
– Mac Pro (Intel)
– x86_64 processor
– 1 GB available RAM for each 1,000,000 files that are stored on a particular tape
– The IBM Spectrum Archive supported tape drives support FC HBAs
– The IBM Spectrum Archive supported LTO tape drives support SAS HBAs
For more information about connectivity and configurations, see the SSIC website:
|
Readme file: The current information for IBM Spectrum Archive SDE supported hardware and software configurations and notices or limitations is in the IBM Spectrum Archive SDE program readme file.
|
2.3.2 Prerequisites
You need to install this software before you install IBM Spectrum Archive SDE. IBM Spectrum Archive SDE has the following requirements:
•FUSE for OS X (included in the IBM Spectrum Archive SDE package)
•International Components for Unicode (ICU) Framework (included in the IBM Spectrum Archive SDE package)
•Xcode if you need to build an ICU Framework package or IBM Spectrum Archive SDE from its source code
2.3.3 Installing the HBA and HBA device driver
To install the HBA and its device driver to use FC tape drives with IBM Spectrum Archive SDE, see the documents that are provided by the HBA manufacturer. For more information about connectivity, configurations, and supported adapters, see the SSIC website:
2.3.4 Installation procedure
This section describes how to install the required software for IBM Spectrum Archive SDE on a Mac OS X system.
|
Administrator privileges: IBM Spectrum Archive SDE software and any prerequisites must be installed by an administrator.
|
Installing OSXFUSE
|
Tip: To help isolate problems, use the default log viewer of the operating system to sort and filter log entries.
|
Complete the following steps to install the required software on a Mac OS X system:
1. Log on as an administrator.
2. The OSXFUSE 2.3.9 Apple Disk Image file is included as part of the IBM Spectrum Archive SDE installation package. It can also be downloaded from http://osxfuse.github.com/ if required.
3. Mount the downloaded Apple Disk Image file (for example, OSXFUSE-2.5.2.dmg) by double-clicking the file.
4. Install the OSXFUSE package by double-clicking the OSXFUSE.pkg file in the mounted folder.
5. Follow the Installer utility instructions. To proceed with the installation, click Install OSXFUSE on the FUSE for OS X window, as shown in Figure 2-1.

Figure 2-1 OSXFUSE installation window

Figure 2-2 OSXFUSE Welcome window

Figure 2-3 OSXFUSE installation software license agreement
8. A pop-up window opens that prompts you to agree to the terms of the Software License Agreement. To continue the OSXFUSE installation process, click Agree, as shown in Figure 2-4, and then click Continue.

Figure 2-4 OSXFUSE installation software license agreement
9. The next window shows you the components of OSXFUSE 2.3.9 to be installed. Select the defaults and click Continue if you want to proceed with the installation. See Figure 2-5.

Figure 2-5 OSXFUSE installation package selection
10. The next window shows you the amount of disk space that is needed for the installation of OSXFUSE 2.3.9. Click Install if you want to proceed with the installation. See Figure 2-6.

Figure 2-6 OSXFUSE installation disk space requirements

Figure 2-7 OSXFUSE installation password prompt
12. After you click Install, the completion message of the OSXFUSE installation process appears. See Figure 2-8.

Figure 2-8 OSXFUSE installation completion
Installing the ICU Framework
Complete the following steps to install the required software on a Mac OS X system:
1. Log on as an administrator.
2. Mount the IBM Spectrum Archive SDE binary package Apple Disk Image file or source code by double-clicking it. For more information and procedures, see “Installation on Mac OS X” on page 33.
3. Install the ICU Framework package by double-clicking the ICU Framework-4.8.1.1.pkg file in the mounted folder. Figure 2-9 shows the Welcome to the ICU Framework Installer window. Click Continue to proceed with the ICU Framework installation steps.

Figure 2-9 ICU Framework installer
4. In the Software License Agreement window, read the software terms and then click Continue. See Figure 2-10 for reference.

Figure 2-10 ICU Framework software license agreement
5. A pop-up window opens that prompts you to agree to the Software License, as shown in Figure 2-11. If you want to proceed with the ICU Framework installation, click Agree.

Figure 2-11 ICU Framework software license agreement pop-up window

Figure 2-12 ICU Framework destination window

Figure 2-13 ICU Framework administrator password
8. After the installation completes, the installation completed message appears, as shown in Figure 2-14. Click Close.

Figure 2-14 ICU Framework installation complete
Enabling the system log
Enable the LTFS system log and locate more information about the LTFS logs on a Mac OS X system.
Error information for LTFS operations is displayed on the terminal console. The level of error reporting is based on the log trace level. To set the log trace level, go to the IBM Spectrum Archive SDE section of IBM Knowledge Center topic for “setting log trace level”:
When the ltfs command is used, error and trace information is recorded by using the system log mechanism. This mechanism is disabled by default. To enable the system log, complete the following steps:
1. Log on to the operating system as a root user.
2. Edit the system log configuration file on any available editor to enable the system log, and add the following line to /etc/syslog.conf:
user.* /var/log/userlog
3. Enable the setting by rebooting syslog and issuing the following command:
launchctl stop com.apple.syslog
4. Open the /etc/newsyslog.conf file in any available editor, and add or edit the following line:
/var/log/userlog 640 5 100 * J
Installing IBM Spectrum Archive SDE
Install the IBM Spectrum Archive SDE program on a Mac OS X system.
|
Administrator privileges: IBM Spectrum Archive SDE software and any prerequisites must be installed by an administrator.
|
Two types of rpm files can be downloaded from the following Fix Central website:
The following two types of rpm files can be downloaded:
•ltfs-1.3.0-[revision]-[platform].rpm
•ltfs-1.3.0-[revision].src.rpm
The ltfs-1.3.0-[revision]-[platform].rpm download is a binary rpm that is intended for general users who want to use IBM Spectrum Archive SDE on a supported operating system. To learn more about supported operating systems, see 2.3.1, “Hardware and software requirements” on page 33.
The ltfs-1.3.0-[revision].src.rpm download is intended for advanced users who want to build the binary rpm. The src.rpm file includes the source code files that do not depend on the platform. The binary rpm file can be built by following the procedure that is described in the IBM Spectrum Archive Single Drive Edition section of IBM Knowledge Center:
|
Important: The information that is contained in the readme and install files that are provided with the IBM Spectrum Archive SDE distribution package supersedes the information that is presented here, including the information in the IBM Spectrum Archive section of the IBM Knowledge Center:
|
Complete the following steps to install IBM Spectrum Archive SDE by using a binary package file:
1. Log on as an administrator.
2. If the IBM Spectrum Archive SDE program is already installed, and the tape medium is mounted, unmount it by issuing the following command:
umount /mnt/ltfs
3. Mount the IBM Spectrum Archive SDE binary package Disk Image file by double-clicking it. Follow the Installer utility instructions.
4. The Welcome page to the IBM Spectrum Archive SDE Installer is shown (Figure 2-15). To proceed with the installation, select Continue.

Figure 2-15 Linear Tape File System Single Drive Edition for Mac OSX installer
5. The next window displays the IBM Spectrum Archive SDE Software License Agreement terms (Figure 2-16).

Figure 2-16 IBM Spectrum Archive SDE for Mac OSX installer software license agreement
6. Read the Software License Agreement and select Continue. You are asked to select Disagree or Agree (Figure 2-17).

Figure 2-17 IBM Spectrum Archive SDE for Mac OSX license agreement question
7. By selecting Agree, you are asked to select a destination.

Figure 2-18 IBM Spectrum Archive SDE for Mac OSX installation window
9. In Figure 2-19, you are asked to enter a password. Type the password that is needed to access the server and click Install Software.

Figure 2-19 IBM Spectrum Archive SDE for Mac OSX password prompt
10. The next window shows that the installation is successful (Figure 2-20).

Figure 2-20 IBM Spectrum Archive SDE for Mac OSX installation successful window
11. Click Close.
12. As part of the installation process, the following symbolic links to LTFS are created in /usr/local/bin:
# sudo ln -sf /Library/Frameworks/LTFS.Framework/Versions/Current/usr/bin/ltfs ltfs
# sudo ln -sf /Library/Frameworks/LTFS.Framework/Versions/Current/usr/bin/mkltfs mkltfs
# sudo ln -sf /Library/Frameworks/LTFS.Framework/Versions/Current/usr/bin/ltfsck ltfsck
2.3.5 Uninstallation procedure
|
Important: Eject media from the IBM Spectrum Archive SDE drives before you uninstall IBM Spectrum Archive SDE to avoid losing data in the cache.
|
Complete the following steps to uninstall the IBM Spectrum Archive SDE software on a Mac OS X system:
1. Log on as an administrator.
2. Open a terminal window. If a tape medium is mounted, unmount it by issuing the following command:
# umount /mnt/ltfs
3. Issue the following command to change the directory to the /Library/Frameworks directory:
# cd /Library/Frameworks
4. Issue the following command to remove IBM Spectrum Archive SDE:
# sudo rm -rf LTFS.framework
5. Issue the following command to change the directory to the /usr/bin directory:
# cd /usr/bin
6. Issue the following commands in the order that is shown to remove the symbolic links to LTFS:
# sudo rm ltfs
# sudo rm mkltfs
# sudo rm ltfsck
7. Remove the mount point:
# rmdir /mnt/ltfs
2.4 Installation on Windows
The installation, implementation, and use of IBM Spectrum Archive SDE here is based on the documentation that is published in the IBM Spectrum Archive SDE section of IBM Knowledge Center:
2.4.1 Hardware and software requirements
At the time of writing this book, IBM Spectrum Archive SDE supports the following Windows operating system and hardware platforms:
•Supported Windows operating systems (64-bit only):
– Windows 8.1
– Windows 10 (Anniversary Update)
– Windows Server 2012 R2
– Windows Server 2016
•Supported hardware:
– x86_64 processor
– 1 GB available RAM for each 1,000,000 files that are stored on a particular tape
– The IBM Spectrum Archive supported tape drives support FC HBAs
– The IBM Spectrum Archive supported LTO tape drives support SAS HBAs
For more information about connectivity and configurations, see the SSIC website:
|
Readme file: The current information for IBM Spectrum Archive SDE supported hardware and software configurations and notices or limitations is in the IBM Spectrum Archive SDE program readme file.
|
2.4.2 Prerequisites
The software that you need to install before you install IBM Spectrum Archive SDE is listed. IBM Spectrum Archive SDE has the following requirements:
•Microsoft Visual C++ 2010 Redistributable Package (x86 or x64)
•Microsoft .NET Framework 4
|
Important: The current information for IBM Spectrum Archive SDE supported hardware and software configurations and notices or limitations is in the IBM Spectrum Archive SDE program readme file.
|
ITDT, although not a prerequisite, is invaluable in configuring IBM Spectrum Archive SDE and troubleshooting tape drive issues and needs to be installed, as well.
Unsupported Windows features
The Windows features, drivers, and commands that are not supported by IBM Spectrum Archive SDE are described:
•New Technology File System (NTFS)
NTFS features that are not supported by IBM Spectrum Archive SDE:
– Compression of files within a folder (IBM Spectrum Archive SDE uses the compression of the tape drive).
– Encrypted files and directories.
– Quota management.
– Reparse points.
– Defragmentation.
– Change journals to monitor file activity.
– Scanning of all files or directories that a security identifier owns.
– Access control lists. The Security tab is not displayed when the user views the file property by right-clicking and then selecting Properties.
– Alternate data streams. The Details tab is not available when the user views the file property by right-clicking and then selecting Properties.
– Shadow copies. The Previous Version tab is not displayed when the user views the file property by right-clicking and then selecting Properties.
– Opportunistic locks.
– Recycle bins.
– Short names.
– Audit and alarm events (as specified in access control lists).
– Windows sparse files application interfaces.
– Transactional NTFS (TxF).
– Guest user accounts.
•Network file and folder sharing
Support for this feature by IBM Spectrum Archive SDE varies depending on the operating system version.
IBM Spectrum Archive SDE on Windows 7 does not support network file and folder sharing even though Windows has a mechanism to support this feature. On Windows 7, the Sharing tab is not available when you view the file property by right-clicking and then selecting Properties.
|
Other versions:
•IBM Spectrum Archive SDE 1.3.0 supports network file and folder sharing for Windows Server 2008 R2.
•IBM Spectrum Archive SDE does not support Windows XP. However, users on Windows XP (and other Windows operating systems) can access IBM Spectrum Archive SDE as a client of Windows Server 2008 R2 through network file sharing.
|
•File system filter drivers
Although Windows has a mechanism to support file system filter drivers, IBM Spectrum Archive SDE Windows does not support their use. File system filter drivers cannot attach to IBM Spectrum Archive SDE by using the documented mechanisms or application interfaces.
•Native commands for a disk drive
IBM Spectrum Archive SDE does not support the following commands, which are shown with the associated error messages and the assumption that Q: is the IBM Spectrum Archive SDE drive in use:
– chkdsk
C:>chkdsk q:
Cannot open volume for direct access.
– format
C:>format q:
Insert new disk for drive Q:
and press ENTER when ready...
Error in IOCTL call.
– defrag
C:>defrag q:
Microsoft Disk Defragmenter
Copyright (c) 2007 Microsoft Corp.
The request is not supported. (0x80070032)
– recover
C:>recover q:
RECOVER on an entire volume is no longer supported.
To get equivalent functionality use CHKDSK.
– label
C:>label q:
Volume in drive Q: is LTFS
Volume label (11 characters, ENTER for none)? Newname
Cannot change label on this volume. The request is not supported.
2.4.3 Installing the HBA and HBA device driver
To install the HBA and its device driver for use by FC tape drives with IBM Spectrum Archive SDE, see the documents that are provided by the HBA manufacturer. For more information about connectivity, configurations, and supported adapters, see the SSIC website:
2.4.4 Installation procedure
The procedure to install the required software for IBM Spectrum Archive SDE on a Windows system is explained in this section.
|
Administrator privileges: IBM Spectrum Archive SDE software and any prerequisites must be installed by an administrator.
|
Installing the Microsoft Visual C++ 2010 Redistributable Package
The process to install the Microsoft Visual C++ 2010 Redistributable Package on a Windows system for IBM Spectrum Archive SDE is described in this section. If it is not installed, you are prompted to install it if you attempt the IBM Spectrum Archive SDE installation (Figure 2-21).

Figure 2-21 Visual Studio C++ warning
Complete the following steps to install the required software on a Windows system:
1. Log on as an administrator.
2. Go to the Microsoft Visual C++ 2010 Redistributable Package download site for the corresponding system type (x86 or x64). Download the following package from the Microsoft website:
http://search.microsoft.com/results.aspx?form=MSHOME&mkt=en-us&setlang=en-us&q=visual+c%2b%2b+redist
3. Double-click the package in Windows Explorer to display the User Account Control window.
4. Click Yes when the message “Do you want to allow the following program to make changes to this computer?” displays.
5. Follow the installation instructions for the program.
Installing Microsoft .NET Framework 4
Installing Microsoft .NET Framework 4 on a Windows system for IBM Spectrum Archive SDE is described in this section. If it is not installed, you are prompted to install it if you attempt the IBM Spectrum Archive SDE installation (Figure 2-22).

Figure 2-22 Microsoft .NET Framework warning
Complete the following steps to install the required software on a Windows system:
1. Log on as an administrator.
2. Go to the Microsoft .NET Framework 4 (Standalone Installer) download website:
3. Download the file to your local folder.
4. Double-click the file in Windows Explorer.
5. Click Yes when the message “Do you want to allow the following program to make changes to this computer?” displays.
6. Follow the installation instructions for the program.
Uninstalling IBM Tape device driver
IBM Spectrum Archive SDE version 1.3.0.2200 and later do not require the installation of the IBM Tape Device Driver. You see the following warning (Figure 2-23) if you attempt the IBM Spectrum Archive SDE installation.
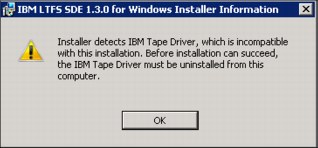
Figure 2-23 IBM Tape Driver warning
Before you uninstall the tape device driver, it is necessary to remove or disable the device within Windows. For more details, see the IBM Tape Device Drivers Installation and User’s Guide, GC27-2130-13. Run uninst.exe, which is included in the IBM Tape package, to uninstall it.
Installing IBM Spectrum Archive SDE
The procedure to install or upgrade IBM Spectrum Archive SDE on a Windows system from a .exe file is explained in this section. Three types of installers correspond to system types (32-bit and 64-bit operating systems), as explained here.
As an example, a program version is 1.3.0.2200 for a 64-bit operating system, and the installer file name is IBM_LTFS_SDE_1.3.0.2200_x64.exe. The installer for a 32-bit operating system can be installed only on a 32-bit operating system. Likewise, the installer for a 64-bit operating system can be installed only on a 64-bit operating system. If you attempt to install IBM Spectrum Archive SDE on the wrong operating system type, the installer displays a warning message and terminates.
Complete the following steps:
1. Log on as an administrator.
2. Open Windows Explorer and double-click the .exe file. A dialog box displays with a drop-down menu from which you can select a language for the installation. After you select a language, click OK (Figure 2-24).

Figure 2-24 IBM Spectrum Archive SDE for Windows language prompt
3. Click Next on the Welcome to the InstallShield Wizard for IBM Spectrum Archive SDE 1.3.0 for Windows window to display the Software License Agreement window (Figure 2-25).

Figure 2-25 IBM Spectrum Archive SDE for Windows Welcome window
4. Select I accept both the IBM and the non-IBM terms (Figure 2-26) and click Next. Select Read Non-IBM Terms (to open a non-IBM license agreement) and click Close.
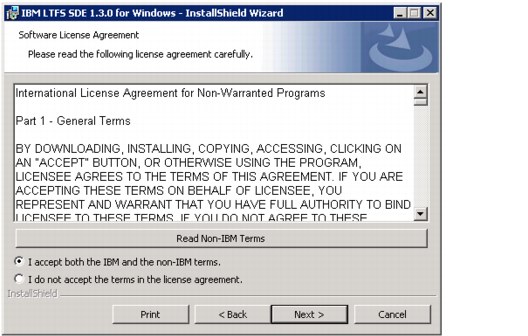
Figure 2-26 IBM Spectrum Archive SDE for Windows Software License Agreement

Figure 2-27 IBM Spectrum Archive SDE for Windows installation Destination Folder window
6. The Destination Folder wizard allows you to change the folder to install the program. The default destination folder is set to C:Program FilesIBMLTFS. If you want to change the default folder, click Change and select a new folder. Otherwise, click Next.

Figure 2-28 IBM Spectrum Archive SDE for Windows Ready to Install procedure
The Installing IBM Spectrum Archive SDE 1.3.0 for Windows window opens (Figure 2-29).

Figure 2-29 IBM Spectrum Archive SDE for Windows installing

Figure 2-30 IBM Spectrum Archive SDE for Windows installation complete
9. The final window (Figure 2-31) is a reminder to restart your computer before you use IBM Spectrum Archive SDE. Click Yes.

Figure 2-31 IBM Spectrum Archive SDE for Windows restart
2.4.5 Uninstallation procedure
|
Important: Eject media from the IBM Spectrum Archive SDE drives before you uninstall IBM Spectrum Archive SDE to avoid losing data in the cache.
|
Complete the following steps to uninstall IBM Spectrum Archive SDE software on a Windows system:
1. Log on as an administrator.
2. If a tape medium is mounted, unmount it by following these steps. Open Windows Explorer, right-click the LTFS drive icon to display a pop-up menu, and then select Eject.
3. From the desktop, click Start → All Programs → IBM → LTFS → Uninstall LTFS to open the Windows Installer program.
4. Click Yes when the message “Are you sure you want to uninstall this product?” displays.
5. Click Yes when the message “Do you want to allow the following program to make changes to this computer?” displays.
6. If the message “All media in the LTFS drives must be ejected before uninstalling LTFS program” displays, eject all media from all tape drives, and then try again. If this message does not display, proceed to step 7.
7. Click OK if either of the following messages displays:
– “The following applications should be closed before continuing the uninstall.”
– “The setup was unable to automatically close all required applications.”
8. Restart the system to completely remove the IBM Spectrum Archive SDE program from your operating system.
2.5 Managing IBM Spectrum Archive SDE
The management of IBM Spectrum Archive SDE on Linux, Mac OS X, and Windows systems is described in this section. Also, hints and tips to use IBM Spectrum Archive SDE are provided.
2.5.1 Managing IBM Spectrum Archive SDE for Linux
The use and management of IBM Spectrum Archive SDE on a Linux system are described.
Initial configuration
A typical initial configuration scenario for most users of IBM Spectrum Archive SDE for Linux is described in this section. Other topics provide information that relates to specific steps in a typical user scenario.
Before you start Linux, power on the tape drive so that the operating system can recognize the tape drive as a SCSI device.
Complete the following steps to configure IBM Spectrum Archive SDE:
1. Open a terminal session and log on as root.
2. Insert a tape cartridge into the tape drive.
3. Confirm the tape medium status by running the ltfsck command. This command checks whether an LTFS file system is on tape. For more detailed information about the ltfsck command, see 2.7, “Command reference” on page 95 and 2.7.3, “Checking or recovering a tape with the ltfsck command” on page 102.
Example 2-4 shows an example of the output that is produced by the ltfsck command that is used on an unformatted volume.
Example 2-4 IBM Spectrum Archive SDE for Linux checking status
ltfsck /dev/IBMtape0
LTFS16000I Starting ltfsck, LTFS version 1.3.0.0 (2200), log level 2
LTFS16088I Launched by “ltfsck /dev/IBMtape0”
LTFS16089I This binary is built for Linux (x86_64)
LTFS16090I GCC version is 4.3.4 [gcc-4_3-branch revision 152973]
LTFS17087I Kernel version: Linux version 3.0.13-0.27-default (geeko@buildhost) (gcc version 4.3.4 [gcc-4_3-branch revision 152973] (SUSE Linux) ) #1 SMP Wed Feb 15 13:33:49 UTC 2012 (d73692b) x86_64
LTFS17089I Distribution: SUSE Linux Enterprise Server 11 (x86_64)
LTFS17089I Distribution: LSB_VERSION="core-2.0-noarch:core-3.2-noarch:core-4.0-noarch:core-2.0-x86_64:core-3.2-x86_64:core-4.0-x86_64"
LTFS17085I Plugin: Loading "ibmtape" driver
LTFS12165I lin_tape version is 1.74.0
LTFS12158I Opening a device through ibmtape driver (/dev/IBMtape0)
LTFS12118I Drive identification is 'ULT3580-HH6 '
LTFS12162I Vendor ID is IBM
LTFS12159I Firmware revision is C9C1
LTFS12160I Drive serial is 1068000264
LTFS17160I Maximum device block size is 1048576
LTFS17157I Changing the drive setting to write-anywhere mode
LTFS16014I Checking LTFS file system on '/dev/IBMtape0'
LTFS12207I Logical block protection is disabled
LTFS17168E Cannot read volume: medium is not partitioned
LTFS16080E Cannot check volume (8)
LTFS12207I Logical block protection is disabled
4. If the medium is not yet formatted for LTFS, format it by using the mkltfs command as described in “Formatting media” on page 81. The LTFS format version is updated from 1.0 to 2.1.1. After a medium is formatted to the later version, it cannot be mounted on an older version of IBM Spectrum Archive SDE or converted to an older format without reformatting. If the media is already formatted for LTFS, skip to step 5.
|
This command overwrites the data: By running the mkltfs command to format the tape media, you overwrite the existing data on tape.
|
Example 2-5 IBM Spectrum Archive SDE for Linux starting LTFS
# mkdir /mnt/ltfs
# ltfs /ltfs -o devname=/dev/IBMtape0
58e0 LTFS14000I LTFS starting, LTFS version 2.4.0.0 (10015), log level 2
58e0 LTFS14058I LTFS Format Specification version 2.4.0
58e0 LTFS14104I Launched by “ltfs /ltfs -o devname=/dev/IBMtape0”
58e0 LTFS14105I This binary is built for Linux (x86_64)
58e0 LTFS14106I GCC version is 4.8.3 20140911 (Red Hat 4.8.3-9)
58e0 LTFS17087I Kernel version: Linux version 3.10.0-327.el7.x86_64 ([email protected]) (gcc version 4.8.3 20140911 (Red Hat 4.8.3-9) (GCC) ) #1 SMP Thu Oct 29 17:29:29 EDT 2015 i386
58e0 LTFS17089I Distribution: NAME=”Red Hat Enterprise Linux Server”
58e0 LTFS17089I Distribution: Red Hat Enterprise Linux Server release 7.2 (Maipo)
58e0 LTFS17089I Distribution: Red Hat Enterprise Linux Server release 7.2 (Maipo)
58e0 LTFS14063I Sync type is “time”, Sync time is 300 sec
58e0 LTFS17085I Plugin: Loading “lin_tape” tape backend
58e0 LTFS17085I Plugin: Loading “unified” iosched backend
58e0 LTFS14095I Set the tape device write-anywhere mode to avoid cartridge ejection
58e0 LTFS30416I lin_tape version is 3.0.20
58e0 LTFS30423I Opening a device through ibmtape driver (/dev/IBMtape0)
58e0 LTFS30428I Product ID is 'ULT3580-TD6 '
58e0 LTFS30429I Vendor ID is IBM
58e0 LTFS30432I Firmware revision is H990
58e0 LTFS30433I Drive serial is 1068005796
58e0 LTFS17160I Maximum device block size is 1048576
58e0 LTFS11330I Loading cartridge
58e0 LTFS30472I Logical block protection is disabled
58e0 LTFS11332I Load successful
58e0 LTFS17157I Changing the drive setting to write-anywhere mode
58e0 LTFS11005I Mounting the volume
58e0 LTFS30472I Logical block protection is disabled
58e0 LTFS17227I Tape attribute: Vendor = IBM
58e0 LTFS17227I Tape attribute: Application Name = LTFS
58e0 LTFS17227I Tape attribute: Application Version = 2.4.0.0
58e0 LTFS17227I Tape attribute: Medium Label = 1FD069L6
58e0 LTFS17228I Tape attribute: Text Localization ID = 0x81
58e0 LTFS17227I Tape attribute: Barcode = 1FD069
58e0 LTFS17227I Tape attribute: Application Format Version = 2.4.0
58e0 LTFS17228I Tape attribute: Volume Lock Status = 0x00
58e0 LTFS17227I Tape attribute: Media Pool name =
58e0 LTFS14111I Initial setup completed successfully
58e0 LTFS14112I Invoke 'mount' command to check the result of final setup
58e0 LTFS14113I Specified mount point is listed if succeeded
The ltfs command advanced help function (ltfs -a) lists all the additional command-line options. For more details, see 2.7, “Command reference” on page 95.
|
Important: Do not power off or disconnect the tape drive while the ltfs command is mounting a tape media.
|
6. You can now start writing and reading data to tape. For more hints, see “Further tasks” on page 59 and the IBM Spectrum Archive Single Drive Edition section of IBM Knowledge Center:
|
Do not use these special characters: To retain compatibility between multiple platforms, do not use the following characters when you create the names of LTFS files, directories, or extended attributes: * ? < > : " | /
Extended attributes are not always portable between applications and operating systems.
Note: The colon “:” character is an allowed character beginning with IBM Spectrum Archive SDE v2.4.0.
|
Consider the following four examples of typical user tasks. Example 2-6 shows an example of writing data to the /mnt/ltfs tape directory by using the command-line interface (CLI).
Example 2-6 IBM Spectrum Archive SDE for Linux copying files to tape
# mv *.jpg /mnt/ltfs
# ls -las /mnt/ltfs
total 2164
0 drwxrwxrwx 2 root root 0 Oct 4 09:37 .
4 drwxr-xr-x 3 root root 4096 Sep 28 16:10 ..
15 -rwxrwxrwx 1 root root 14344 Sep 24 14:32 file1.txt
715 -rwxrwxrwx 1 root root 731747 Oct 4 09:37 image1.jpg
715 -rwxrwxrwx 1 root root 731747 Oct 4 09:35 image2.jpg
715 -rwxrwxrwx 1 root root 731747 Oct 4 09:35 image3.jpg
Example 2-7 shows an example of renaming a file in the /mnt/ltfs tape directory by using the CLI.
Example 2-7 IBM Spectrum Archive SDE for Linux renaming files on tape
# mv /mnt/ltfs/image3.jpg /mnt/ltfs/image3.old
# ls -las /mnt/ltfs
total 2164
0 drwxrwxrwx 2 root root 0 Oct 4 09:48 .
4 drwxr-xr-x 3 root root 4096 Sep 28 16:10 ..
15 -rwxrwxrwx 1 root root 14344 Sep 24 14:32 file1.txt
715 -rwxrwxrwx 1 root root 731747 Oct 4 09:37 image1.jpg
715 -rwxrwxrwx 1 root root 731747 Oct 4 09:35 image2.jpg
715 -rwxrwxrwx 1 root root 731747 Oct 4 09:48 image3.old
Example 2-8 shows an example of deleting a file from the /mnt/ltfs tape directory by using the CLI.
Example 2-8 IBM Spectrum Archive SDE for Linux deleting a file from tape
# rm /mnt/ltfs/image3.jpg
# ls -las /mnt/ltfs
total 1449
0 drwxrwxrwx 2 root root 0 Oct 4 09:49 .
4 drwxr-xr-x 3 root root 4096 Sep 28 16:10 ..
15 -rwxrwxrwx 1 root root 14344 Sep 24 14:32 file1.txt
715 -rwxrwxrwx 1 root root 731747 Oct 4 09:37 image1.jpg
715 -rwxrwxrwx 1 root root 731747 Oct 4 09:35 image2.jpg
Example 2-9 shows an example of an application that uses the /mnt/ltfs tape directory.
Example 2-9 IBM Spectrum Archive SDE for Linux creating a tar file on tape
# tar -cvf /mnt/ltfs/images.tar /tmp/image4.jpg /tmp/image5.jpg
tmp/image4.jpg
tmp/image5.jpg
# ls -las /mnt/ltfs
total 2889
0 drwxrwxrwx 2 root root 0 Oct 4 09:50 .
4 drwxr-xr-x 3 root root 4096 Sep 28 16:10 ..
15 -rwxrwxrwx 1 root root 14344 Oct 4 09:47 file1.txt
715 -rwxrwxrwx 1 root root 731747 Oct 4 09:37 image1.jpg
715 -rwxrwxrwx 1 root root 731747 Oct 4 09:35 image2.jpg
1440 -rwxrwxrwx 1 root root 1474560 Oct 4 09:50 images.tar
7. Unmount the medium by entering the following command:
# umount /mnt/ltfs
In the Linux environment, the umount command requires administrator privileges. Linux users who do not have administrator privileges must use the fusermount -u command instead. When the command to unmount is issued, IBM Spectrum Archive SDE attempts to close the mounted medium by performing the following operations:
– Synchronizing cached data
– Writing the current index file (first to the data partition and finally to the index partition)
– Writing the consistency-related data to LTO cartridge memory
Shutting down the Linux operating system or tape drive without unmounting the medium can cause data loss or a consistency error. If the unmount operation fails, IBM Spectrum Archive SDE sends a fail message to the system log, exits immediately, and releases the device.
8. To eject a tape cartridge from a physical drive, IBM Spectrum Archive SDE first must be unmounted. After the tape medium is unmounted, press the Unload button on the front panel of the drive to eject the tape.
Further tasks
To check for media errors or to roll back, run ltfsck. To learn more about using the check and rollback functions, see “Checking and recovering media” on page 88 and “Rolling back media” on page 90.
To view a recent event log of error and warning messages, check the operating system logs. The log includes the level (error or warning), date and time, ID, and description. To learn more about error logs, see “Viewing details” on page 85. If no error or warning message displays for your problem, see the IBM Spectrum Archive Single Drive Edition section of IBM Knowledge Center:
Formatting media
You must format all media before it is used by IBM Spectrum Archive SDE.
|
Format version: The LTFS format version is updated from 1.0 to 2.1.1. After a medium is formatted to the later version, it cannot be mounted on an older version of IBM Spectrum Archive SDE or converted to an older format. For more information, see 2.1.2, “Tape format compatibility” on page 27.
|
You need to complete the steps in Example 2-10 to format a medium for IBM Spectrum Archive SDE.
Example 2-10 IBM Spectrum Archive SDE for Linux formatting a tape
mkltfs --device=/dev/IBMtape0 --tape-serial=D00346 --volume-name=D00346L5
LTFS15000I Starting mkltfs, LTFS version 1.3.0.0 (2200), log level 2
LTFS15041I Launched by “mkltfs --device=/dev/IBMtape0 --tape-serial=D00346 --volume-name=D00346L5 --force”
LTFS15042I This binary is built for Linux (x86_64)
LTFS15043I GCC version is 4.3.4 [gcc-4_3-branch revision 152973]
LTFS17087I Kernel version: Linux version 3.0.13-0.27-default (geeko@buildhost) (gcc version 4.3.4 [gcc-4_3-branch revision 152973] (SUSE Linux) ) #1 SMP Wed Feb 15 13:33:49 UTC 2012 (d73692b) x86_64
LTFS17089I Distribution: SUSE Linux Enterprise Server 11 (x86_64)
LTFS17089I Distribution: LSB_VERSION="core-2.0-noarch:core-3.2-noarch:core-4.0-noarch:core-2.0-x86_64:core-3.2-x86_64:core-4.0-x86_64"
LTFS15003I Formatting device '/dev/IBMtape0'
LTFS15004I LTFS volume blocksize: 524288
LTFS15005I Index partition placement policy: None
LTFS17085I Plugin: Loading “ibmtape” driver
LTFS12165I lin_tape version is 1.74.0
LTFS12158I Opening a device through ibmtape driver (/dev/IBMtape0)
LTFS12118I Drive identification is 'ULT3580-HH6 '
LTFS12162I Vendor ID is IBM
LTFS12159I Firmware revision is C9C1
LTFS12160I Drive serial is 1068000264
LTFS17160I Maximum device block size is 1048576
LTFS17157I Changing the drive setting to write-anywhere mode
LTFS15010I Creating data partition b on SCSI partition 1
LTFS15011I Creating index partition a on SCSI partition 0
LTFS12207I Logical block protection is disabled
LTFS17165I Resetting the medium's capacity proportion
LTFS11097I Partitioning the medium
LTFS11100I Writing label to partition b
LTFS11278I Writing index to partition b
LTFS11100I Writing label to partition a
LTFS11278I Writing index to partition a
LTFS15013I Volume UUID is: 73041760-27ba-4e0d-88e6-555c88c20e16
LTFS15019I Volume capacity is 1425 GB
LTFS12207I Logical block protection is disabled
LTFS15024I Medium formatted successfully
Simultaneous copy
It is possible to copy multiple files to tape simultaneously, although this method is not advised due to the sequential nature of tape.
Figure 2-32 shows how the extents from each file are interleaved on the tape as it is written to the data partition.

Figure 2-32 IBM Spectrum Archive SDE for Linux simultaneously writing files to tape
Checking and recovering media
The ltfsck utility verifies tape media consistency and, if necessary, recovers media from an inconsistent state.
When a tape is mounted, it is checked for consistency. If a consistency problem is found and can be recovered without the loss of data, the recovery is performed automatically. If you cannot perform the recovery without the loss of data, use ltfsck -f to locate the latest index and recover the tape from an inconsistent state. After the medium is recovered to a consistent state, ltfsck -l can be used to display a list of available rollback points. The ltfsck utility then can be used to recover the medium to its last good state. If ltfsck detects extra data after the final index in a partition, ltfsck deletes it. When the full recover option is specified, ltfsck saves the data that would be lost and corrects block information in the _ltfs_lostandfound directory.
When the ltfsck utility is run, it automatically removes invalid data from the end of the tape and recovers the tape to the last good state. IBM Spectrum Archive SDE appends the most recent changes to the end of the tape without overwriting the existing data. Additional ltfsck utility options can be initiated to save the invalid data or to list or recover consistency at a specific rollback point or date. Example 2-11 shows the typical output from the ltfsck command.
Example 2-11 IBM Spectrum Archive SDE for Linux checking a tape
# ltfsck /dev/IBMtape0
LTFS16000I Starting ltfsck, LTFS version 1.3.0.0 (2200), log level 2
LTFS16088I Launched by “ltfsck /dev/IBMtape0”
LTFS16089I This binary is built for Linux (x86_64)
LTFS16090I GCC version is 4.3.4 [gcc-4_3-branch revision 152973]
LTFS17087I Kernel version: Linux version 3.0.13-0.27-default (geeko@buildhost) (gcc version 4.3.4 [gcc-4_3-branch revision 152973] (SUSE Linux) ) #1 SMP Wed Feb 15 13:33:49 UTC 2012 (d73692b) x86_64
LTFS17089I Distribution: SUSE Linux Enterprise Server 11 (x86_64)
LTFS17089I Distribution: LSB_VERSION=”core-2.0-noarch:core-3.2-noarch:core-4.0-noarch:core-2.0-x86_64:core-3.2-x86_64:core-4.0-x86_64”
LTFS17085I Plugin: Loading “ibmtape” driver
LTFS12165I lin_tape version is 1.74.0
LTFS12158I Opening a device through ibmtape driver (/dev/IBMtape0)
LTFS12118I Drive identification is 'ULT3580-HH6 '
LTFS12162I Vendor ID is IBM
LTFS12159I Firmware revision is C9T5
LTFS12160I Drive serial is 1068000264
LTFS17160I Maximum device block size is 1048576
LTFS17157I Changing the drive setting to write-anywhere mode
LTFS16014I Checking LTFS file system on '/dev/IBMtape0'
LTFS12207I Logical block protection is disabled
LTFS16023I LTFS volume information:
LTFS16024I Volser (bar code) : D00201
LTFS16025I Volume UUID : da45d932-677c-48ef-8d27-aef1fac2d75e
LTFS16026I Format time : 2012-10-01 17:09:30.209659101 MST
LTFS16027I Block size : 524288
LTFS16028I Compression : Enabled
LTFS16029I Index partition : ID = a, SCSI Partition = 0
LTFS16030I Data partition : ID = b, SCSI Partition = 1
LTFS11005I Mounting the volume
LTFS12207I Logical block protection is disabled
LTFS11026I Performing a full medium consistency check
LTFS11233I Updating MAM coherency data
LTFS11034I Volume unmounted successfully
LTFS16022I Volume is consistent
LTFS12207I Logical block protection is disabled
Rolling back media
You can roll back LTFS media by using the ltfsck command. You can list generations for all indexes on the index partition of the medium. When one of the points is specified, the index is rolled back to that point.
To roll back an LTFS medium, follow these steps:
1. List the current generations of the index on the medium by using the ltfsck command as shown in Example 2-12.
Example 2-12 IBM Spectrum Archive SDE for Linux listing generations
# ltfsck -l /dev/IBMtape0
LTFS16000I Starting ltfsck, LTFS version 1.3.0.0 (2200), log level 2
LTFS16088I Launched by “ltfsck -l /dev/IBMtape0”
LTFS16089I This binary is built for Linux (x86_64)
LTFS16090I GCC version is 4.3.4 [gcc-4_3-branch revision 152973]
LTFS17087I Kernel version: Linux version 3.0.13-0.27-default (geeko@buildhost) (gcc version 4.3.4 [gcc-4_3-branch revision 152973] (SUSE Linux) ) #1 SMP Wed Feb 15 13:33:49 UTC 2012 (d73692b) x86_64
LTFS17089I Distribution: SUSE Linux Enterprise Server 11 (x86_64)
LTFS17089I Distribution: LSB_VERSION=”core-2.0-noarch:core-3.2-noarch:core-4.0-noarch:core-2.0-x86_64:core-3.2-x86_64:core-4.0-x86_64"
LTFS16084I List indexes in backward direction strategy
LTFS17085I Plugin: Loading “ibmtape” driver
LTFS12165I lin_tape version is 1.74.0
LTFS12158I Opening a device through ibmtape driver (/dev/IBMtape0)
LTFS12118I Drive identification is 'ULT3580-HH6 '
LTFS12162I Vendor ID is IBM
LTFS12159I Firmware revision is C9T5
LTFS12160I Drive serial is 1068000264
LTFS17160I Maximum device block size is 1048576
LTFS17157I Changing the drive setting to write-anywhere mode
LTFS16018I Listing LTFS file system rollback points on '/dev/IBMtape0'
LTFS12207I Logical block protection is disabled
LTFS16023I LTFS volume information:
LTFS16024I Volser (bar code) : D00201
LTFS16025I Volume UUID : da45d932-677c-48ef-8d27-aef1fac2d75e
LTFS16026I Format time : 2012-10-01 17:09:30.209659101 MST
LTFS16027I Block size : 524288
LTFS16028I Compression : Enabled
LTFS16029I Index partition : ID = a, SCSI Partition = 0
LTFS16030I Data partition : ID = b, SCSI Partition = 1
LTFS11005I Mounting the volume
LTFS12207I Logical block protection is disabled
Generation: Date Time Zone SelfPtr->BackPtr (Part, Pos)
(UTC Date UTC Time UTC)
Commit Message
-------------------------------------------------------------------------------
6: 2012-10-04 09:51:18.333071738 MST (0, 5)->(1, 33)
(2012-10-04 16:51:18.333071738 UTC)
No commit message
6: 2012-10-04 09:51:18.333071738 MST (1, 33)->(1, 27)
(2012-10-04 16:51:18.333071738 UTC)
No commit message
5: 2012-10-04 09:48:37.000085031 MST (1, 27)->(1, 23)
(2012-10-04 16:48:37.000085031 UTC)
No commit message
4: 2012-10-04 09:43:30.000174779 MST (1, 23)->(1, 18)
(2012-10-04 16:43:30.000174779 UTC)
No commit message
3: 2012-10-04 09:38:22.000107468 MST (1, 18)->(1, 9)
(2012-10-04 16:38:22.000107468 UTC)
No commit message
2: 2012-10-03 17:14:24.735644837 MST (1, 9)->(1, 5)
(2012-10-04 00:14:24.735644837 UTC)
No commit message
1: 2012-10-01 17:11:05.874285414 MST (1, 5) <<Initial Index>>
(2012-10-02 00:11:05.874285414 UTC)
No commit message
LTFS12207I Logical block protection is disabled
2. Decide to which date and time you want to roll back. In this example, we chose the generation 1 index.
Example 2-13 IBM Spectrum Archive SDE for Linux rolling back index
# ltfsck /dev/IBMtape0 -g 1 -r
LTFS16000I Starting ltfsck, LTFS version 1.3.0.0 (2200), log level 2
LTFS16088I Launched by “ltfsck -g 1 -r /dev/IBMtape0”
LTFS16089I This binary is built for Linux (x86_64)
LTFS16090I GCC version is 4.3.4 [gcc-4_3-branch revision 152973]
LTFS17087I Kernel version: Linux version 3.0.13-0.27-default (geeko@buildhost) (gcc version 4.3.4 [gcc-4_3-branch revision 152973] (SUSE Linux) ) #1 SMP Wed Feb 15 13:33:49 UTC 2012 (d73692b) x86_64
LTFS17089I Distribution: SUSE Linux Enterprise Server 11 (x86_64)
LTFS17089I Distribution: LSB_VERSION="core-2.0-noarch:core-3.2-noarch:core-4.0-noarch:core-2.0-x86_64:core-3.2-x86_64:core-4.0-x86_64"
LTFS16006I Rolling back to generation 1
LTFS17085I Plugin: Loading “ibmtape” driver
LTFS12165I lin_tape version is 1.74.0
LTFS12158I Opening a device through ibmtape driver (/dev/IBMtape0)
LTFS12118I Drive identification is 'ULT3580-HH6 '
LTFS12162I Vendor ID is IBM
LTFS12159I Firmware revision is C9T5
LTFS12160I Drive serial is 1068000264
LTFS17160I Maximum device block size is 1048576
LTFS17157I Changing the drive setting to write-anywhere mode
LTFS16015I Rolling back LTFS file system on '/dev/IBMtape0'
LTFS12207I Logical block protection is disabled
LTFS16023I LTFS volume information:
LTFS16024I Volser (bar code) : D00201
LTFS16025I Volume UUID : da45d932-677c-48ef-8d27-aef1fac2d75e
LTFS16026I Format time : 2012-10-01 17:09:30.209659101 MST
LTFS16027I Block size : 524288
LTFS16028I Compression : Enabled
LTFS16029I Index partition : ID = a, SCSI Partition = 0
LTFS16030I Data partition : ID = b, SCSI Partition = 1
LTFS11005I Mounting the volume
LTFS12207I Logical block protection is disabled
LTFS11034I Volume unmounted successfully
LTFS16082I Saving latest index to data partition to save history
LTFS16067I Rolling back based on the following index chain.
Generation: Date Time Zone SelfPtr->BackPtr (Part, Pos)
(UTC Date UTC Time UTC)
Commit Message
-------------------------------------------------------------------------------
1: 2012-10-01 17:11:05.874285414 MST (1, 5) <<Initial Index>>
(2012-10-02 00:11:05.874285414 UTC)
No commit message
LTFS16062I Roll back from the data partition
LTFS11005I Mounting the volume
LTFS12207I Logical block protection is disabled
LTFS11026I Performing a full medium consistency check
LTFS11233I Updating MAM coherency data
LTFS16086I Volume is rolled back successfully
LTFS12207I Logical block protection is disabled
Displaying version information
To display the IBM Spectrum Archive SDE version, run this command:
# ltfs -V
LTFS version 1.3.0.0 (2200)
LTFS Format Specification version 2.1.0
Changing attributes
In IBM Spectrum Archive SDE, only the write bit can be set or changed. Therefore, the following command makes a file on an LTFS tape read-only:
# chmod 555 filename
Enabling symbolic links
Beginning with version 1.3.0, IBM Spectrum Archive SDE supports symbolic links. A symbolic link (symlink) is used to create a reference to, or an alias for, another file. In addition, IBM Spectrum Archive SDE supports a feature called live link. Live link enables IBM Spectrum Archive SDE to follow the mount point and cartridge of the original target. Standard symbolic links are enabled by default but can also be set by using the -o symlink_type=posix option with the ltfs command. To enable live links, the -o symlink_type=live option can be specified.
Enabling logical block protection
Logical block protection (LBP) is a feature that validates data and identifies corrupted data. Beginning with version 1.3.0, it is possible to enable LBP between IBM Spectrum Archive SDE and supported tape drives. When LBP is enabled, all data that is read or written between the tape drives and IBM Spectrum Archive SDE is checked. An error displays if data corruption occurs. To enable LBP, the -o scsi_lbprotect=on option is specified with the ltfs command. The -o scsi_lbprotect=off option is used to disable LBP.
Enabling data-safe mode
Beginning with version 1.3.0, IBM Spectrum Archive SDE supports data-safe mode. Data-safe mode is a feature that protects user data by preventing data overwrite situations. When this feature is enabled, the tape drive issues an error after it receives a command to overwrite any data on the currently mounted volume. Data-safe mode is a drive-specific behavior and can be enabled each time that a tape is mounted. It can be disabled only when a tape is not mounted.
To enable or disable data-safe mode, the scsi_append_only_mode option is specified with the ltfs command. The scsi_append_only_mode=off option, which is the default setting, disables the feature. The scsi_append_only_mode=on option enables the feature. IBM Spectrum Archive SDE never enables data-safe mode unless the command-line option -o eject is specified.
2.5.2 Managing IBM Spectrum Archive SDE for Mac OS X
The use and management of IBM Spectrum Archive SDE on a Mac OS X system are described.
Initial configuration
A typical initial configuration scenario for most users of IBM Spectrum Archive SDE for Mac OS X is described in this section. Other topics that are referenced provide additional information that relates to specific steps in a typical user scenario. Before you start OS X, power on the tape drive so that the operating system can recognize the tape drive as a SCSI device.
Complete the following steps to configure IBM Spectrum Archive SDE:
1. Open a terminal session and log on as an administrator.
2. Insert a tape cartridge into the tape drive.
3. Confirm the tape medium status by running the ltfsck command. This command checks whether an LTFS file system is on tape. For more detailed information about the ltfsck command, see 2.7, “Command reference” on page 95 and 2.7.3, “Checking or recovering a tape with the ltfsck command” on page 102.
Example 2-14 shows an example of the output that is produced by the ltfsck command when used on an unformatted volume.
Example 2-14 IBM Spectrum Archive SDE for OSX checking status
# ltfsck 0
4. If the medium is not yet formatted for LTFS, format it by using the mkltfs command as described in “Formatting media” on page 81. The LTFS format version is updated from 1.0 to 2.1.1. After a medium is formatted to the later version, it cannot be mounted on an older version of IBM Spectrum Archive SDE or converted to an older format without reformatting. If the media is already formatted for IBM Spectrum Archive SDE, skip to step 5.
|
Overwritten data: Running the mkltfs command to format the tape media overwrites the existing data on tape.
|
Example 2-15 IBM Spectrum Archive SDE for OSX starting LTFS
# mkdir /mnt/ltfs
# ltfs /mnt/ltfs -o devname=0
The ltfs command advanced help function (ltfs -a) lists all the additional command-line options. For more details, see 2.7, “Command reference” on page 95.
|
Important: Do not power off or disconnect the tape drive while the ltfs command mounts a tape media.
|
6. You can now start writing and reading data to tape. For additional hints, see “Further tasks” on page 70 and the IBM Spectrum Archive Single Drive Edition section of IBM Knowledge Center:
|
Do not use these special characters: To retain compatibility between multiple platforms, do not use the following characters when you create the names of LTFS files, directories, or extended attributes: * ? < > : " | /
Extended attributes are not always portable between applications and operating systems.
Note: The colon “:” character is an allowed character beginning with IBM Spectrum Archive SDE v2.4.0.
|
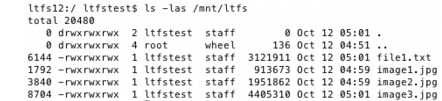
To access LTFS tape media, you can use a file manager, such as Finder for Mac OS X, as shown in Figure 2-33 (displaying an icon for the LTFS tape D00999L5). Or, you can use a command-line utility to access the files on a tape medium.
It can take time to browse the directory contents of LTFS by using the Finder. If “View as icon”, “View as list”, or “View as column” is selected, you can accelerate the Finder by setting the Icon preview to off.

Figure 2-33 Mac OSX Finder displaying LTFS tape
Consider the following examples of typical user tasks. Example 2-16 shows an example of writing data to the /mnt/ltfs tape directory by using the CLI.
Example 2-16 IBM Spectrum Archive SDE for OSX copying files to tape
# mv *.jpg /mnt/ltfs
Example 2-17 shows an example of renaming a file in the /mnt/ltfs tape directory by using the CLI.
Example 2-17 IBM Spectrum Archive SDE for OSX renaming files on tape
# mv /mnt/ltfs/image3.jpg /mnt/ltfs/image3.old

Example 2-18 shows an example of deleting a file from the /mnt/ltfs tape directory by using the CLI.
Example 2-18 IBM Spectrum Archive SDE for OSX deleting a file from tape
# rm /mnt/ltfs/image3.old
Example 2-19 shows an example of an application that uses the /mnt/ltfs tape directory.
Example 2-19 IBM Spectrum Archive SDE for OSX creating a tar file on tape
# tar -cvf /mnt/ltfs/images.tar /tmp/image4.jpg /tmp/image5.jpg
tmp/image4.jpg
tmp/image5.jpg
7. Unmount the medium by entering the following command:
# umount /mnt/ltfs
When the command to unmount is issued, IBM Spectrum Archive SDE attempts to close the mounted medium by performing the following operations:
– Synchronizing cached data
– Writing the current index file (first to the data partition and finally to the index partition)
– Writing the consistency-related data to the LTO cartridge memory
Shutting down the Mac OS X operating system or tape drive without unmounting the medium can cause data loss or a consistency error. If the unmount operation fails, IBM Spectrum Archive SDE sends a fail message to the system log, exits immediately, and releases the device.
8. To eject a tape cartridge from a physical drive, IBM Spectrum Archive SDE first must be unmounted. After the tape medium is unmounted, press the Unload button on the front panel of the drive to eject the tape.
Further tasks
To check for media errors or to roll back, run the ltfsck command. To learn more about using the check and rollback functions, see “Checking and recovering media” on page 72 and “Rolling back media” on page 73.
To view a recent event log of error and warning messages, check the operating system logs. The log includes the level (error or warning), date and time, ID, and description. If no error or warning message displays for your problem, see the IBM Spectrum Archive Single Drive Edition section of IBM Knowledge Center website:
Formatting media
You must format all media before use by IBM Spectrum Archive SDE.
|
Format version: The LTFS format version is updated from 1.0 to 2.1.1. After a medium is formatted to the later version, it cannot be mounted on an older version of IBM Spectrum Archive SDE or converted to an older format. For more information, see 2.1.2, “Tape format compatibility” on page 27.
|
You need to complete the following steps to format a medium for LTFS as shown in Example 2-20.
Example 2-20 IBM Spectrum Archive SDE for OSX formatting a tape
# mkltfs --device=0 --tape-serial=D00999 -volume-name=D00999L5 -f
Simultaneous copy
It is possible to copy multiple files to tape simultaneously, although it is not advised due to the sequential nature of tape.
Figure 2-34 shows three separate processes that copy files to tape at the same time.

Figure 2-34 IBM Spectrum Archive SDE for OSX simultaneously writing files to tape
Checking and recovering media
The ltfsck LTFS utility verifies tape media consistency and, if necessary, recovers media from an inconsistent state.
When a tape is mounted, it is checked for consistency. If a consistency problem is identified and can be recovered without the loss of data, the recovery is performed automatically. If you cannot perform the recovery without the loss of data, use the ltfsck -f command to locate the latest index and to recover the tape from an inconsistent state. After the medium is recovered to a consistent state, the ltfsck -l command can be used to display a list of available rollback points.
The ltfsck utility then can be used to recover the medium to its last good state. If the ltfsck utility detects extra data after the final index in a partition, the ltfsck utility deletes it. When the full recover option is specified, the ltfsck utility saves the data that would be lost and corrects block information in the _ltfs_lostandfound directory.
When the ltfsck utility is run, it automatically removes invalid data from the end of the tape and recovers the tape to the last good state. IBM Spectrum Archive SDE appends the most recent changes to the end of the tape without overwriting the existing data. Additional ltfsck utility options can be initiated to save the invalid data, or to list or recover consistency at a specific rollback point or date. Example 2-21 on page 72 is an example of typical output from the ltfsck command.
Example 2-21 IBM Spectrum Archive SDE for OSX checking a tape
ltfsck 0
Rolling back media
You can roll back LTFS media by using the ltfsck command. You can list the generations for all indexes on the index partition of the medium. When one of the points is specified, the index is rolled back to that point.
To roll back an LTFS medium, follow these steps:
1. List the current generations of the index on the medium by using the ltfsck command (Example 2-22).
Example 2-22 IBM Spectrum Archive SDE for OSX listing index generations
ltfsck -l 0
2. Decide to which date and time you want to roll back. In this example, we chose the generation 3 index.
Example 2-23 IBM Spectrum Archive SDE for OSX rolling back
# ltfsck -g 3 -r 0

The tape now contains the files that were in existence at the time of the generation 3 index. Example 2-24 shows the files before and after rolling back.
Example 2-24 Files on tapes before and after rolling back
Before rollback:

After rollback:
Displaying version information
To display the IBM Spectrum Archive SDE version, run this command:
# ltfs -V
LTFS version 1.3.0.0 (2200)
LTFS Format Specification version 2.1.0
Changing attributes
LTFS-formatted tape media have the following limitations:
•Only the write permission of a file or directory can be changed.
•The owner of a file or directory cannot be changed.
The following command makes a file on an LTFS tape read-only:
# chmod 555 filename
Enabling symbolic links
Beginning with version 1.3.0, IBM Spectrum Archive SDE supports symbolic links. A symbolic link (symlink) is used to create a reference to, or an alias for, another file. In addition, IBM Spectrum Archive SDE supports a feature called live link. Live link enables IBM Spectrum Archive SDE to follow the mount point and cartridge of the original target. Standard symbolic links are enabled by default but can also be set by using the -o symlink_type=posix option with the ltfs command. To enable live links, the -o symlink_type=live option can be specified.
Enabling logical block protection
Logical block protection (LBP) is a feature that validates data and identifies corrupted data. Beginning with version 1.3.0, it is possible to enable LBP between IBM Spectrum Archive SDE and supported tape drives. When LBP is enabled, all data that is read or written between the tape drives and IBM Spectrum Archive SDE is checked. An error displays if data corruption occurs. To enable LBP, the -o scsi_lbprotect=on option must be specified with the ltfs command. The -o scsi_lbprotect=off option is used to disable LBP.
Enabling data-safe mode
Beginning with version 1.3.0, IBM Spectrum Archive SDE supports data-safe mode. Data-safe mode is a feature that protects user data by preventing data overwrite situations. When this feature is enabled, the tape drive issues an error after it receives a command to overwrite any data on the currently mounted volume.
Data-safe mode is a drive-specific behavior and can be enabled each time that a tape is mounted. It can be disabled only when a tape is not mounted. To enable or disable data-safe mode, the scsi_append_only_mode option must be specified with the ltfs command. The scsi_append_only_mode=off option, which is the default, disables the feature. The scsi_append_only_mode=on option enables the feature. IBM Spectrum Archive SDE never enables data-safe mode unless the command-line option -o eject is specified.
2.5.3 Managing IBM Spectrum Archive SDE for Windows
This section describes the process to use and manage IBM Spectrum Archive SDE on a Windows system.
Initial configuration
A typical initial configuration scenario for most users of IBM Spectrum Archive SDE for Windows is summarized. Other topics provide additional information that relates to specific steps in a typical user scenario. Before you start Windows, power on the tape drive so that Windows can recognize the tape drive as a SCSI device.
Complete the following steps to configure IBM Spectrum Archive SDE:
1. From the desktop, click Start and then right-click Computer.
2. Select System Properties from the menu and then click Device Manager.
Right-click the root tree (computer name) and select Scan for hardware changes. IBM Spectrum Archive SDE now recognizes the tape drive as a new device. You can then use the IBM Spectrum Archive SDE Configuration panel to assign a new drive letter to the drive.
|
IBM Spectrum Archive SDE Configuration panel: With IBM Spectrum Archive SDE 1.2.1 and earlier on Windows 7, the IBM Spectrum Archive SDE Configuration panel opens automatically. With IBM Spectrum Archive SDE 1.2.5 and later, open the Configuration panel manually from the All Programs menu.
|
3. After you install IBM Spectrum Archive SDE for Windows, you need to assign a drive letter to an LTO tape drive to use the program. After a drive letter is assigned, no application other than IBM Spectrum Archive SDE can access the drive letter. You assign a drive letter to an LTFS tape drive by using the Configuration panel. In the Start menu, click All Programs → IBM → LTFS → Configuration as shown in Figure 2-35.

Figure 2-35 IBM Spectrum Archive SDE for Windows Start menu items
4. The Configuration panel in Figure 2-36 displays the following information:
– Drive Letter: Assigned or unassigned. The Drive Letter pop-up menu has three possible scenarios:
• Unassigned (blank)
• Assigned (with SCSI device address)
• Unchangeable (reserved by the system)
– Tape Drive: Details of port, bus number, target ID, logical unit number, and drive serial number (a 10-digit value)
– State: The current state of the LTFS drive

Figure 2-36 IBM Spectrum Archive SDE for Windows configuration panel
Select any unused drive letter in the same row as the tape drive that you want to use and click OK. In this example, we assigned drive L: to the tape drive 1.0.7.0 (serial number 00013B0130).
The panel that is shown in Figure 2-36 is the same panel for both Windows 7 and Windows Server 2008 R2. You can have multiple sessions with IBM Spectrum Archive SDE on Windows Server 2008 R2. For example, while you open the Configuration panel, another user can open another panel and configure another tape drive.
|
Important: For dual-path tape drives, be aware that IBM Spectrum Archive SDE does not support data path failover.
|
In a Windows 7 system, you see the Configuration panel display (Figure 2-36) when any of the following situations occur:
– The system restarts after you install IBM Spectrum Archive SDE.
After you install IBM Spectrum Archive SDE, restart the system to launch it. During the system startup, IBM Spectrum Archive SDE checks whether one or more LTFS tape drives are connected. The Configuration panel displays when a connection is detected.
– The system detects a new IBM Spectrum Archive SDE-supported device.
IBM Spectrum Archive SDE periodically checks the SCSI devices that are connected to the system. The Configuration panel displays when one or more IBM Spectrum Archive SDE-supported tape drives are detected.
If a medium is already mounted in the drive, its state is “In use.” Eject a medium first before you change or remove a drive letter. For more information, see Figure 2-37 on page 79. If a medium is not mounted, select the drive letter that you want to change or remove, then select another drive letter or a blank field and click OK.
5. Insert a tape cartridge into the tape drive. After the cartridge is recognized by IBM Spectrum Archive SDE, it is automatically loaded and the drive icon changes to IBM Spectrum Archive SDE. Under normal operating conditions, when a cartridge is loaded, the icon changes to indicate the status of the medium and possible user action. See Table 2-1.
Table 2-1 IBM Spectrum Archive SDE for Windows drive icons
|
Medium
|
Icon
|
Right-click menu options
|
|
The medium is not inserted.
|
 |
Properties is available. The Check and Rollback buttons are unavailable.
|
|
The medium is not ready. One of the following operations is running: load, format, check, rollback, or eject.
|
 |
Properties is available. The Check and Rollback buttons are unavailable.
|
|
The medium is inserted, but it is not an LTO supported medium.
|
 |
Eject and Properties are available. The Check and Rollback buttons are unavailable.
|
|
The LTFS-formatted medium is mounted.
|
 |
All options are available.
|
|
The write-protected LTFS-formatted medium is mounted.
|
 |
Eject and Properties are available. The Check and Rollback buttons are unavailable.
|
|
A write error occurred during the write operation. The LTFS-formatted medium is read-only and must be ejected and reinserted to write data.
|
 |
Eject and Properties are available. The Check and Rollback buttons are unavailable.
|
|
The LTO medium is inserted, but not formatted for IBM Spectrum Archive SDE.
|
|
Eject and Properties are available. The Check and Rollback buttons are unavailable.
|
|
The LTFS-formatted medium is inserted, but the data has inconsistencies. A check and recover operation is required to use the medium.
|
|
All options are available.
|
6. Confirm the tape medium status. If the medium is not yet formatted for LTFS, format it by using the Format menu option as described in “Formatting media” on page 81. The LTFS format version is updated from 1.0 to 2.1.1. After a medium is formatted to the later version, it cannot be mounted on an older version of IBM Spectrum Archive SDE or converted to an older format without reformatting.
7. You can now start writing and reading data to the tape. Optimize the access performance to large files, especially multimedia files, by using the folder refresh option. For additional hints, see “Further tasks” on page 80 and the IBM Spectrum Archive Single Drive Edition section of IBM Knowledge Center website:
|
Special characters: To maintain portability between multiple platforms, do not use the following characters when you create the names of the LTFS-formatted files, directories, or extended attributes: * ? < > : " | /
Note: The colon “:” character is an allowed character beginning with IBM Spectrum Archive SDE v2.4.0.
|
8. Eject the medium from the LTFS drive by using the Eject menu option.
|
Important: After a drive letter is assigned to a tape drive and an LTFS medium is loaded into the drive, all attempts to eject the medium by using the Eject button on the tape drive fail. The Eject panel is the only way to remove the medium from the drive.
|
Follow these steps:
a. Open Windows Explorer, right-click the LTFS drive icon to display a pop-up menu, and then select Eject as shown in Figure 2-37.

Figure 2-37 Eject menu
Figure 2-38 IBM Spectrum Archive SDE for Windows Eject Medium panel
c. A pop-up window (Figure 2-39) opens to indicate that ejecting the medium is still in progress. There is no message to indicate that the ejection of the medium is complete. However, the drive icon in Windows Explorer changes to indicate that there is no longer a tape in the drive.

Figure 2-39 IBM Spectrum Archive SDE for Windows Ejecting Medium panel
IBM Spectrum Archive SDE has a cache to store data in the main memory and to write it to the medium in a certain condition. Without flushing data in the cache, data is lost if the system or drive power turns off.
To protect data, it is important to eject the LTFS medium from the drive before you shut down the system. If shutdown is initiated while an LTFS medium is still in the drive, a warning message is displayed and you are returned to the Windows desktop.
While you use IBM Spectrum Archive SDE, any of the following actions can result in an unrecoverable state when you attempt to return to IBM Spectrum Archive SDE:
• Hibernation mode
• Forced shutdown
• Windows update
Further tasks
To check for media errors or to roll back, click Properties, then click Check or Roll back. To learn more about using the Check and Rollback panels, see “Checking and recovering media” on page 88 and “Rolling back media” on page 90.
To view a recent event log of error and warning messages, click Details on the Properties panel. The log includes the level (error or warning), date and time, ID, and description. The ID links to a message in the IBM Spectrum Archive SDE section of IBM Knowledge Center that provides an explanation and action to help solve the problem. To learn more about using the Properties panel, see “Viewing details” on page 85. If no error or warning message displays for your problem, see the IBM Spectrum Archive Single Drive Edition section of IBM Knowledge Center:
Formatting media
You must format all media for LTFS before you use it.
|
Format version 2.1.1: The LTFS format version is updated from 1.0 to 2.1.1. After a medium is formatted to the later version, it cannot be mounted on an older version of IBM Spectrum Archive SDE or converted to an older format. For more information, see 2.1.2, “Tape format compatibility” on page 27.
|
You need to complete the following steps to format a medium for LTFS:
1. Open Windows Explorer, right-click the LTFS drive to display a pop-up menu, and then select Format as shown in Figure 2-40.

Figure 2-40 Format menu option
2. Click OK when the Format Medium panel displays.
3. In the Tape Serial Number and Tape Volume Name fields (Figure 2-41), enter the tape serial number and tape volume name. Typically, the tape volume name matches the physical cartridge label. You also can eject the medium after you format it by selecting Eject the medium after formatting completes.

Figure 2-41 IBM Spectrum Archive SDE for Windows Format Medium panel
|
Important: The tape serial number is required to use six alphanumeric characters. Only uppercase alphabetical characters are acceptable. For example, “ABC123” is acceptable, but “abc123” is not.
To maintain portability between multiple platforms, the following characters cannot be used for volume names in LTFS: * ? < > : “ | /
|
4. Click Advanced options to display an Advanced Options window (shown in Figure 2-42). You can optionally specify which files can be stored in the index partition.

Figure 2-42 IBM Spectrum Archive SDE for Windows Advanced Options panel
The following formatting rules display:
Size Filter (numeric value):
Only files that are smaller than the size that is set in this field are stored in the index partition. Numeric values and byte size units from KiB (kibibyte) to GiB (gibibyte) can be set from the drop-down list. In this example, the size is set to 10 MiB.
Name Filter (for example, *.jpg *.png):
Only files with names that match the names in this field are stored in the index partition. A space needs to be inserted between two or more names. In this example, the file type is set to *.TXT.
|
Important: The name filter can only be set when the size filter is set. Both values are applied to filtered files.
|
You have the option of selecting the “Prevent policy update” check box. If this check box is selected, IBM Spectrum Archive SDE does not allow a change in the selected formatting data placement policy when a medium is mounted. The policy also applies when a medium is mounted on Linux and Mac OS X operating systems. To learn more about the --no-override option, see 2.7.2, “Formatting a tape with the mkltfs command” on page 99. After these fields are complete, click OK and the Format Medium panel is displayed again (Figure 2-43).

Figure 2-43 IBM Spectrum Archive SDE for Windows Format Medium panel
5. Click OK to continue formatting. See the progress indicator (Figure 2-44) to track the operation.

Figure 2-44 IBM Spectrum Archive SDE for Windows Formatting Medium panel
|
Important: You cannot access the medium while the format process is in progress. If you attempt to access it through file system calls, an error message is returned on the Windows desktop.
|
6. When formatted, the medium is ready for use by IBM Spectrum Archive SDE (Figure 2-45).

Figure 2-45 IBM Spectrum Archive SDE for Windows Medium Formatting Complete panel
Viewing details
You need to complete the following steps to view the tape details:
1. Open Windows Explorer, right-click the LTFS drive to display a drop-down menu, and then select Properties (Figure 2-46).

Figure 2-46 Properties menu option
2. A Properties panel displays (Figure 2-47).

Figure 2-47 IBM Spectrum Archive SDE for Windows media properties panel
The Properties panel displays the following information:
– Tape volume serial number
– Tape volume name
– Universally Unique Identifier (UUID)
– Used and free space (in binary units)
– Capacity (in binary units)
The Properties panel also displays the following options:
– Check
– Rollback
– Details
3. To check for media errors or to roll back, click Check or Rollback. For additional information, see “Checking and recovering media” on page 88.

Figure 2-48 IBM Spectrum Archive SDE for Windows media properties details panel
The Details window displays the following information:
– Configuration:
• IBM Spectrum Archive SDE version
• Drive ID
• Drive serial
• Drive firmware
– Recent event logs:
• Level (error or warning)
• Date and Time
• ID (a number that is assigned to a specific system error or warning message with a hyperlink to the IBM Spectrum Archive SDE section of IBM Knowledge Center)
• Description
|
Resource: If no error or warning message displays for your problem, see the IBM Spectrum Archive Single Drive Edition section of IBM Knowledge Center:
|
Simultaneous copy
It is possible to copy multiple files to tape simultaneously, although it is not advised due to the sequential nature of tape. Figure 2-49 shows multiple files that are written to tape at the same time. For an explanation of how the file extents are interleaved on tape, see “Simultaneous copy” on page 60. Figure 2-49 shows files that are being copied simultaneously in two separate sessions.

Figure 2-49 IBM Spectrum Archive SDE for Windows simultaneously writing files to tape
Checking and recovering media
You can check and recover LTFS media by using the Check panel.
|
Important: Directory and file data are stored in index files that specify their exact position and size. If the index file is inconsistent or does not match the data on the medium, IBM Spectrum Archive SDE cannot access it. However, iBM Spectrum Archive SDE can recover extra data blocks from which metadata is excluded from the index file. The recovered data is stored in the ltfslostandfound directory in the root directory. When the tape medium is mounted, the directory is viewable at the mount point.
|
Complete the following steps to check media consistency and to recover a medium:
1. Open Windows Explorer, right-click the LTFS drive to display a drop-down menu, and then select Properties. For more information, see “Viewing details” on page 85.

Figure 2-50 IBM Spectrum Archive SDE for Windows LTFS check and rollback panel
3. Click OK when the Check Medium panel displays or click Cancel to quit the operation. For more information about consistency checking, see “Checking or recovering a tape with the ltfsck command” on page 102. Figure 2-51 displays while the consistency check is run.

Figure 2-51 IBM Spectrum Archive SDE for Windows LTFS Checking Medium in progress
4. If the medium has inconsistencies, as much data as possible is recovered before the medium is automatically mounted. If an inconsistency in a file cannot be recovered, a message displays that directs you to the Rollback panel. For more information, see “Rolling back media” on page 90 for more information.

Figure 2-52 IBM Spectrum Archive SDE for Windows Check Medium Complete panel
Rolling back media
You can roll back LTFS media by using the Rollback panel. The Rollback panel lists generations for all indexes on the index partition of the medium. When one of the points is specified, the index is rolled back to that point.
To roll back an LTFS medium, follow these steps:
1. Open Windows Explorer, right-click the LTFS drive icon to display a drop-down menu, and then select Properties to display a Properties panel. To learn more about using the Properties panel, see the topic “Viewing details” on page 85.

Figure 2-53 IBM Spectrum Archive SDE for Windows Rollback Medium panel
3. Click OK when the Rollback Medium dialog box displays to continue the operation or click Cancel to quit the operation. Even if you click Cancel, it can take time to mount the medium again. See the Canceling Rollback progress indicator to track the operation. If you continue, see the Retrieving Rollback Generations progress indicator to track the operation. When the operation is complete, the Rollback Cartridge window displays the following information:
– Generations: A list of all generations that are contained on the medium
Generation numbers are created incrementally starting at 1. The generation number 1 indicates that the index is created when the medium is formatted. A new index is automatically created whenever data in the main memory cache is flushed to the medium.
– Date and time: A list of the date and time that an index is created
4. Data for the most recent generation can be removed from the medium by selecting Erase rollback generations more recent than the selected rollback generation. By removing this data, you can help optimize storage capacity because the erased area is used again by IBM Spectrum Archive SDE. Data newer than this generation cannot be recovered. When this option is not selected, any existing generation can be recovered even following a rollback operation. This option is equivalent to the -j or --erase-history command on Linux and Mac OS X operating systems. To learn more about using this command, see 2.7.3, “Checking or recovering a tape with the ltfsck command” on page 102.
5. Select one generation to which to roll back, then click OK. See the Rollback Cartridge progress indicator to track the operation. A Rollback Medium window (Figure 2-54) then displays with the selected generation highlighted.

Figure 2-54 IBM Spectrum Archive SDE for Windows Rollback Medium generation panel
6. You have the option of selecting the “Erase all rollback generations with a date and time later than the selected rollback generation” check box. Select the generation (point-in-time) to which you want to roll back and click OK to complete the procedure.
The medium is now rolled back to an earlier state. The index list is updated to include the most recent generation. IBM Spectrum Archive SDE currently has no means of searching a rollback generation for a specific file. However, you can view the underlying XML of the index (see 2.8.1, “Using the IBM LTFS Format Verifier” on page 105) and search for particular file names and their date and time stamps.
Displaying version information
You can check the current IBM Spectrum Archive SDE program version by using the Version panel. Complete the following steps:
1. From the desktop, click Start → All programs → IBM → LTFS → Version (Figure 2-55). Click the Version shortcut to display an “About the IBM Linear Tape File System Single Drive Edition” panel.

Figure 2-55 IBM Spectrum Archive SDE for Windows version information
2. Click OK to close the window.
Changing attributes
In IBM Spectrum Archive SDE, only the write bit can be set or changed. So, the following command makes a file on an LTFS tape read-only:
>attrib +r filename
Other file attributes, such as system, hidden, and archive, cannot be changed.
Extended attributes
A file can have multiple extended attributes. The maximum size of an extended attribute is
4 KB. Within Windows, there is no method of viewing extended attributes directly so a utility must be used to view or set them.
4 KB. Within Windows, there is no method of viewing extended attributes directly so a utility must be used to view or set them.
2.6 Troubleshooting
The process to troubleshoot the IBM Spectrum Archive SDE on Linux, Mac OS X, and Windows operating systems is described in this section. When IBM Spectrum Archive SDE detects a problem while it accesses the file system, IBM Spectrum Archive SDE automatically reports an IBM Spectrum Archive SDE-specific error message that leads you to the solution. Furthermore, all operating systems also save error messages in their system logs. To optimize service performance, it is advised that you enable the system log. Detailed steps are provided on the IBM Spectrum Archive SDE section of IBM Knowledge Center.
If a problem occurs with IBM Spectrum Archive SDE, follow these steps:
1. Check to determine whether the tape drive reports an error. If the tape drive has a problem, it reports an error character on a single-character display (SCD). When this error character displays, the IBM Spectrum Archive SDE does not work properly. To solve the problem efficiently, check the SCD first. If it displays any character, see the tape drive maintenance manual to find the solution.
2. Check for the most recent error message and the corresponding ID on the console.
3. Check for the options that are available on the IBM Spectrum Archive SDE section of IBM Knowledge Center to analyze problems.
4. If you cannot find any action to solve the problem, see the IBM Spectrum Archive SDE section of IBM Knowledge Center for additional suggestions about how to troubleshoot the problem.
Several typical issues that you might encounter and suggested solutions are listed.
2.6.1 Formatting errors
When you run the mkltfs command, the following error can occur:
LTFS15047E Medium is already formatted (0)
Solution
You need to specify the -f or --force option to format any tape medium that is already formatted for use by IBM Spectrum Archive SDE.
2.6.2 Errors starting IBM Spectrum Archive SDE
You might see this error:
fuse: bad mount point `/mnt/ltfss': No such file or directory
LTFS14094E Cannot get mount point (-1)
Solution
You mistyped the mount point for LTFS. If the directory does not exist, LTFS does not start.
2.6.3 IBM Tape Device Driver errors
You might encounter the following IBM Tape Device Driver errors.
mkltfs
When you run the mkltfs command, the following errors can occur:
LTFS12114E Cannot open device '/dev/IBMtape0' (16)
LTFS12012E Cannot open device: failed backend open call
LTFS15009E Cannot open device '/dev/IBMtape0' (-21711)
There are several possible reasons for these errors. Either a tape is in the process of mounting or dismounting. Or, these errors indicate a hardware problem or a problem with the lin_tape device driver in Linux.
Solution
A tape can be in the process of mounting or dismounting. Wait 1 minute and then rerun the mkltfs command. If that does not solve the problem, run the command:
/etc/init.d/lin_tape restart
If that does not fix the problem, a service representative needs to examine the tape drive.
ltfsck
When you run the ltfsck command, one of the following errors occurs:
•LTFS12158I Opening a device through ibmtape driver (/dev/IBMtape0)
•LTFS12113E /dev/IBMtape0: medium is already mounted or in use
•LTFS12012E Cannot open device: failed backend open call
•LTFS16011E Cannot open device '/dev/IBMtape0'
Solution
You cannot run the ltfsck command if a tape is mounted. Unmount the tape (for example, the umount /mnt/ltfs command) and try the ltfsck command again.
2.6.4 Tape drive errors
IBM Spectrum Archive SDE requires that the tape drive is turned on and physically connected to the computer before IBM Spectrum Archive SDE is started. The current state of the hardware within the operating system can be checked by using the following commands and utilities:
•Linux: The cat /proc/scsi/sg/device_strs command
•Mac OS X: Use the System Profiler tool
•Windows: Use the Device Manager tool
If the tape drive is not visible, check the cabling, power, and so on, rectify the issue, and then unmount and restart IBM Spectrum Archive SDE.
2.6.5 Tape volume errors
IBM Spectrum Archive SDE performs a check of the index of an LTFS tape volume each time that the LTFS tape volume is mounted. In the unlikely event that problems are encountered when the index is read, the mount operation fails and you are notified of the fault. The ltfsck utility (2.7.3, “Checking or recovering a tape with the ltfsck command” on page 102) is useful to help you solve these types of tape volume errors.
2.6.6 Unmount errors
If a process uses the current directory under the LTFS mount point, the unmount operation fails, and an error message displays that is similar to the following error message:
# umount /mnt/ltfs
umount: /mnt/ltfs: device busy
For example, if the current directory is changed to the LTFS mount point and the terminal window remains open, the unmount command fails. In this case, close the terminal window or use the cd command to change the directory.
If several people use IBM Spectrum Archive SDE, you can determine which user is using the LTFS mount point by using the fuser command option:
•Linux
# fuser -muv /mnt/ltfs
•Mac OS X
# fuser -cu /mnt/ltfs
2.7 Command reference
The IBM Spectrum Archive SDE application for Linux, Mac OS X, and Windows is managed by three main LTFS commands: ltfs, mkltfs, and ltfsck. In Windows, the three LTFS commands are invoked from within the graphical user interface (GUI) rather than directly through the command line.
2.7.1 Mounting a tape with the ltfs command
The ltfs command is the IBM Spectrum Archive SDE program, which is the main program of the three IBM Spectrum Archive SDE programs. It mounts tape media to the file system through the FUSE interface. By using this command, users can access tape media through POSIX system calls.
Enter the ltfs command from the command line to mount the media for use with IBM Spectrum Archive SDE. Table 2-2 lists the command to enter, depending on your operating system.
Table 2-2 Command-line entries for the ltfs command
|
Operating system
|
Command-line entry
|
|
Linux
|
mkdir /mnt/ltfs
ltfs -o devname=/dev/IBMtape0 /mnt/ltfs
|
|
Mac OS X
|
mkdir /mnt/ltfs
ltfs /mnt/ltfs -f -o devname=0
|
|
Windows
|
N/A
|
The ltfs command has the following command-line options:
usage: ltfs mountpoint [options]
The ltfs command has the following command-line general options:
-o opt,[opt...] Mount options
-h --help Print help
-V --version Print version
The ltfs command has the following command-line FUSE options:
-d -o debug Enable debug output (implies -f)
-f Foreground operation
-s Disable multithreaded operation
-o allow_other Allow access to other users
-o allow_root Allow access to root
-o auto_unmount Auto unmount on process termination
-o nonempty Allow mounts over non-empty file/dir
-o default_permissions
Enable permission checking by kernel
Enable permission checking by kernel
-o fsname=NAME Set file system name
-o subtype=NAME Set file system type
-o large_read Issue large read requests (2.4 only)
-o max_read=N Set maximum size of read requests
-o hard_remove Immediate removal (do not hide files)
-o use_ino Let file system set inode numbers
-o readdir_ino Try to fill in d_inoin readdir
-o direct_io Use direct I/O
-o kernel_cache Cache files in kernel
-o [no]auto_cache Enable caching based on modification times (off)
-o umask=M Set file permissions (octal)
-o uid=N Set file owner
-o gid=N Set file group
-o entry_timeout=T Cache timeout for names (1.0 second (1.0s))
-o negative_timeout=T
Cache timeout for deleted names (0.0s)
Cache timeout for deleted names (0.0s)
-o attr_timeout=T Cache timeout for attributes (1.0s)
-o ac_attr_timeout=T
Auto cache timeout for attributes (attr_timeout)
Auto cache timeout for attributes (attr_timeout)
-o noforget Never forget cached inodes
-o remember=T Remember cached inodes for T seconds (0s)
-o intr Allow requests to be interrupted
-o intr_signal=NUM Signal to send on interrupt (10)
-o modules=M1[:M2...]
Names of modules to push onto file system stack
Names of modules to push onto file system stack
-o max_write=N Set maximum size of write requests
-o max_readahead=N Set maximum read ahead
-o max_background=N Set number of maximum background requests
-o congestion_threshold=N
Set the congestion threshold of the kernel
Set the congestion threshold of the kernel
-o async_read Perform reads asynchronously (default)
-o sync_read Perform reads synchronously
-o atomic_o_trunc Enable atomic open+truncate support
-o big_writes Enable larger than 4kB writes
-o no_remote_lock Disable remote file locking
-o no_remote_flock Disable remote file locking (BSD)
-o no_remote_posix_lock
Disable remove file locking (POSIX)
Disable remove file locking (POSIX)
-o [no_]splice_write
Use splice to write to the fuse device
Use splice to write to the fuse device
-o [no_]splice_move Move data while splicing to the fuse device
-o [no_]splice_read Use splice to read from the fuse device
The ltfs command has the following command-line module options:
•[subdir]:
-o subdir=DIR Prepend this directory to all paths (mandatory)
-o [no]rellinks Transform absolute symlinks to relative
•[iconv]:
-o from_code=CHARSET
Original encoding of file names (default: UTF-8)
-o to_code=CHARSET New encoding of the file names (default: UTF-8)
The ltfs command has the following command-line LTFS options:
-o config_file=<file>
Configuration file (default: /etc/ltfs.conf)
Configuration file (default: /etc/ltfs.conf)
-o work_directory=<dir>
LTFS work directory (default: /tmp/ltfs)
LTFS work directory (default: /tmp/ltfs)
-o atime Update index if only access times changed
-o noatime Do not update index if only access times changed (default)
-o tape_backend=<name>
Tape back end to use (default: ibmtape)
Tape back end to use (default: ibmtape)
-o iosched_backend=<name>
I/O scheduler implementation to use (default: unified, use “none” to disable)
I/O scheduler implementation to use (default: unified, use “none” to disable)
-o KMI_backend=<name>
Key manager interface implementation to use (default: none, use “none” to disable)
-o umask=<mode> Override default permission mask (three octal digits, default: 000)
-o fmask=<mode> Override file permission mask (three octal digits, default: 000)
-o dmask=<mode> Override directory permission mask (three octal digits, default: 000)
-o min_pool_size=<num>
Minimum write cache pool size. Cache objects are 1 MB each (default: 25)
Minimum write cache pool size. Cache objects are 1 MB each (default: 25)
-o max_pool_size=<num>
Maximum write cache pool size. Cache objects are 1 MB each (default: 50)
Maximum write cache pool size. Cache objects are 1 MB each (default: 50)
-o rules=<rules> Rules for choosing files to write to the index partition.
The rule argument uses this syntax:
size=1M
size=1M/name=pattern
size=1M/name=pattern1:pattern2:pattern3
A file is written to the index partition if it is no larger than the specified size and it matches at least one of the name patterns (if specified). The size argument accepts K, M, and G suffixes. Name patterns might contain the special characters: question mark (?) (match any single character) and asterisk (*) (match zero or more characters).
-o quiet Disable informational messages (same as verbose=1)
-o trace Enable diagnostic output (same as verbose=3)
-o syslogtrace Enable diagnostic output to stderr and syslog (same as verbose=303)
-o fulltrace Enable full call tracing (same as verbose=4)
-o verbose=<num> Override output verbosity directly (default: 2)
-o eject Eject the cartridge after unmount
-o noeject Do not eject the cartridge after unmount (default)
-o sync_type=<type> Specify sync type (default: time@5)
<type> is specified in the following manner:
time@min: LTFS attempts to write an index each 'min' minutes. min must be a decimal number 1 - 140239377069472 (default: min=5)
close: LTFS attempts to write an index when a file is closed.
unmount: LTFS attempts to write an index when the medium is unmounted.
-o force_mount_no_eod
Skip EOD existence check when mounting (read-only mount)
-o device_list Show available tape devices
-o rollback_mount=<gen>
Attempt to mount on previous index generation (read-only mount)
-o release_device Clear device reservation (should be specified with -o devname
-o capture_index Capture latest index to work directory at unmount
-o scsi_append_only_mode=<on|off>
Set the tape device append-only mode (default=on)
-a Advanced help, including standard FUSE options
The ltfs command hand the following Key manager interface “flatfile” plug-in options:
-o kmi_dki_for_format=<DKi>
Data key identifier to format a cartridge
-o kmi_dk_list=FILE Data key
The ltfs command hand the following Key manager interface simple plug-in options:
-o kmi_dk=<DK> Data key
-o kmi_dki=<DKi> Data key identifier
-o kmi_dk_for_format=<DK>
Data key to format a cartridge
-o kmi_dki_for_format=<DKi>
Data key identifier to format a cartridge
-o kmi_dk_list=<DK>:<DKi>/<DK>:<DKi>/.../<DK>:<DKi>
Data key and data key identifier pairs’ list
To mount LTFS by a normal (nonroot) user, verify the following conditions:
•For Mac OS X: The user is logged on as an administrator.
•The user has write permission for the work directory (default of /tmp/ltfs).
•The user has write permission for the mount point.
•For Linux: Verify that the file mode of /usr/bin/fusermount is set to chmod 4755.
•For Linux: Verify that user_allow_other is added to the /etc/fuse.conf file.
2.7.2 Formatting a tape with the mkltfs command
The LTFS mkltfs utility is used to format tape media for use with IBM Spectrum Archive SDE. When the mkltfs utility is run on a scratch medium, it performs the following actions:
•Destroys all data on the media
•Creates two partitions on the media
•Creates a UUID for the media
•Writes empty index data in the LTFS format
Enter the mkltfs command on the operating system command line to format the media:
•For Linux, enter this command:
mkltfs --device /dev/IBMtape0 --force --tape-serial=DV1270 --volume-name=DV1270L6
•For Mac OS X, enter this command:
mkltfs --device 0 --force --tape-serial=DV1270 --volume-name=DV1270L6
•For Windows, enter this command:
mkltfs --device=1.0.7.0 --force --tape-serial=DV1270 --volume-name=DV1270L6
Example 2-25 shows the output of the mkltfs command when it is run on Windows 2008.
Example 2-25 Example of mkltfs output
LTFS9015W Setting the locale to 'en_US.UTF-8'. If this is wrong, please set the LANG environment variable before starting mkltfs.
LTFS15000I Starting mkltfs, LTFS version 1.3.0.0 (2200), log level 2
LTFS15041I Launched by "mkltfs --device=1.0.7.0 --force --tape-serial=DV1270 --volume-name=DV1270L6"
LTFS15042I This binary is built for Windows
LTFS15043I GCC version is 4.7.0 20111220 (experimental)
LTFS17087I Kernel version: Windows
LTFS15003I Formatting device '1.0.7.0'
LTFS15004I LTFS volume blocksize: 524288
LTFS15005I Index partition placement policy: None
LTFS17085I Plugin: Loading “scsilib” driver
LTFS62158I Opening a device through scsilib driver (33e680h)
LTFS62160I Drive serial is 00013B0130
LTFS17160I Maximum device block size is 1040384
LTFS17157I Changing the drive setting to write-anywhere mode
LTFS15010I Creating data partition b on SCSI partition 1
LTFS15011I Creating index partition a on SCSI partition 0
LTFS62207I Logical block protection is disabled
LTFS17165I Resetting the medium's capacity proportion
LTFS11097I Partitioning the medium
LTFS11100I Writing label to partition b
LTFS11278I Writing index to partition b
LTFS11100I Writing label to partition a
LTFS11278I Writing index to partition a
LTFS15013I Volume UUID is: ae23a7ff-1d27-4112-84d4-9aa8ebaa46db
LTFS15019I Volume capacity is 2408 GB
LTFS62207I Logical block protection is disabled
LTFS15024I Medium formatted successfully
The description of the -d <name> or --device=<name> option follows:
•For Linux, this name is the tape device name. The default for this field is /dev/IBMtape0.
•For Mac OS X, this name is the tape device enumerator. The default for this field is 0. The enumerator is generated sequentially starting with 0 and is automatically assigned to each tape device.
The following options are also available for the mkltfs command:
-d, --device=<name> Tape device (required)
-f, --force Force to format medium
-s, --tape-serial=<id>
Tape serial number (six alphanumeric ASCII characters)
Tape serial number (six alphanumeric ASCII characters)
-n, --volume-name=<name>
Tape volume name (empty by default)
-r, --rules=<rules> Rules for choosing files to write to the index partition
The syntax of the rule argument is:
size=1M
size=1M/name=pattern
size=1M/name=pattern1:pattern2:pattern3
A file is written to the index partition if it is no larger than the specified size and matches at least one of the name patterns (if specified). The size argument accepts K, M, and G suffixes. Name patterns might contain the special characters: question mark (?) (match any single character) and asterisk (*) (match zero or more characters).
--no-override Disallow mount-time data placement policy changes
-w, --wipe Restore the LTFS medium to an unpartitioned medium (format to an existing scratch medium)
-q, --quiet Suppress progress information and general messages
-t, --trace Enable function call tracing
--syslogtrace Enable diagnostic output to stderr and syslog
-V, --version Version information
-h, --help Help
-p, --advanced-help Full help, including advanced options
-i, --config=<file> Use the specified configuration file (default: ltfs/ltfs.conf)
-e, --backend=<name>
Use the specified tape device back end (default: scsilib)
Use the specified tape device back end (default: scsilib)
--kmi-backend=<name>
Use the specified key manager interface (kmi) back end (default: none)
Use the specified key manager interface (kmi) back end (default: none)
-b, --blocksize=<num>
Set the LTFS record size (default: 524288)
Set the LTFS record size (default: 524288)
-c, --no-compression
Disable compression on the volume
Disable compression on the volume
-k, --keep-capacity Keep the tape medium total capacity proportion
-x, --fulltrace Enable full function call tracing (slow)
The following options are the key manager interface simple plug-in options:
-o kmi_dk=<DK> Data key
-o kmi_dki=<DKi> Data key identifier
-o kmi_dk_for_format=<DK>
Data key to format a cartridge
-o kmi_dki_for_format=<DKi>
Data key identifier to format a cartridge
-o kmi_dk_list=<DK>:<DKi>/<DK>:<DKi>/.../<DK>:<DKi>
Data key and data key identifier pairs list
Example 2-26 is a usage example.
Example 2-26 Usage
mkltfs --device=2.0.0.0 --rules=”size=100K”
mkltfs --device=2.0.0.0 --rules=”size=1M/name=*.jpg”
mkltfs --device=2.0.0.0 --rules=”size=1M/name=*.jpg:*.png”
2.7.3 Checking or recovering a tape with the ltfsck command
The ltfsck utility is used to verify tape media consistency and, if necessary, recover the media from an inconsistent state. When a tape is mounted, the tape is checked for consistency problems.
If a consistency problem is identified and can be recovered without the loss of data, the recovery is performed automatically. If the recovery cannot be made without the loss of data, an automatic recovery is not performed. In this case, the ltfsck command or ltfsck -f command locates the latest index and recovers a medium in an inconsistent state. After the medium is recovered to a consistent state, you can use the ltfsck -l command to view a list of available rollback points. The ltfsck utility can then be initiated to recover the media to its last good state.
If the ltfsck utility detects extra data after the final index in a partition, it deletes the extra data automatically. When the full recover option is specified, the ltfsck utility saves the data that might be lost and corrects block information in the _ltfs_lostandfound directory.
When the ltfsck utility is run, it automatically removes invalid data from the end of the tape and recovers the tape to the last good state. You can initiate additional ltfsck utility options to save the invalid data or to list or recover consistency at a specific rollback point or date.
Enter the ltfsck command from the command line to verify the consistency of the LTFS formatted media. Table 4-6 lists the specific command to enter by operating system.
Table 2-3 Command-line examples for the ltfsck command
|
Operating system
|
Command-line entry
|
|
Linux
|
ltfsck /dev/IBMtape0
|
|
Mac OS X
|
ltfsck 0
|
|
Windows
|
ltfsck 1.0.7.0
|
The ltfsck command also has the following options:
Usage: ltfsck [options] filesys
filesys Device file for the tape drive
The following options are available:
-g, --generation=<generation>
Specify the generation to roll back
Specify the generation to roll back
-r, --rollback Roll back to the point that is specified by -g
-n, --no-rollback Do not roll back. Verify the point that is specified by -g (default)
-f, --full-recovery Recover extra data blocks into the _ltfs_lostandfound directory
-z, --deep-recovery Recover EOD missing cartridge
Some blocks might be erased, but recover to final unmount point with an index version of at least 2.0.0 or earlier.
(Must be used for a cartridge that cannot be recovered by a normal option.)
Example 2-27 Output of the ltfsck -I command
# ltfsck -l /dev/IBMtape0
LTFS16000I ltfsck starting, log level 2
LTFS16018I Listing rollback points of LTFS file system on '/dev/IBMtape0'
LTFS16023I LTFS volume information:
LTFS16024I Volser(Barcode) :
LTFS16025I Volume UUID : fdaeedda-5344-4155-a03a-9ca82b2f2e15
LTFS16026I Format Time : 2010-03-31 14:49:07.172792075 JST
LTFS16027I Block Size : 1048576
LTFS16028I Compression : Enabled
LTFS16029I Index Partition : ID = a, SCSI Partition = 1
LTFS16030I Data Partition : ID = b, SCSI Partition = 0
LTFS16077I Valid indexes:
Gen: Date ......... Time ...... Zone .. SelfPtr->BackPtr (Part, Pos)->(Part, Pos)
---------------------------------------------------------------------------------
1: 2010-03-31 14:50:08.800718541 JST (0, 5) <<Initial Index>>
2: 2010-03-31 14:55:53.988915408 JST (0, 9)->(0, 5)
3: 2010-03-31 14:57:38.755561251 JST (0, 13)->(0, 9)
4: 2010-03-31 14:59:24.992244674 JST (1, 5)->(0, 17)
4: 2010-03-31 14:59:24.992244674 JST (0, 17)->(0, 13)
The following options are available for the ltfsck -l command:
-m, --full-index-info
Display full index information (Effective only for -l option)
Display full index information (Effective only for -l option)
-v, --traverse=<strategy>
Set traverse mode for listing rollback points. Strategy must be forward or backward (default: backward)
Set traverse mode for listing rollback points. Strategy must be forward or backward (default: backward)
-j, --erase-history Erase history at rollback
-k, --keep-history Keep history at rollback (default)
-q, --quiet Suppress informational messages
-t, --trace Enable diagnostic output
--syslogtrace Enable diagnostic output to stderr and syslog
-h, --help Help
-p, --advanced-help Full help, including advanced options
-i, --config=<file> Use the specified configuration file (default: ltfs/ltfs.conf)
-e, --backend=<name>
Override the default tape device back end
Override the default tape device back end
--kmi-backend=<name>
Override the default key manager interface back end
Override the default key manager interface back end
-x, --fulltrace Enable full-function call tracing (slow)
--capture-index Capture index information to the current directory (-g is effective for this option)
The following options are the key manager interface simple plug-in options:
-o kmi_dk=<DK> Data key
-o kmi_dki=<DKi> Data key identifier
-o kmi_dk_for_format=<DK>
Data key to format a cartridge
Data key to format a cartridge
-o kmi_dki_for_format=<DKi>
Data key identifier to format a cartridge
Data key identifier to format a cartridge
-o kmi_dk_list=<DK>:<DKi>/<DK>:<DKi>/.../<DK>:<DKi>
Data key and data key identifier pairs list
Data key and data key identifier pairs list
Example 2-28 Output of the ltfsck command
# ltfsck /dev/IBMtape0
LTFS16000I Starting ltfsck, LTFS version 2.4.0.0 (10015), log level 2
LTFS16088I Launched by “ltfsck /dev/IBMtape0”
LTFS16089I This binary is built for Linux (x86_64)
LTFS16090I GCC version is 4.8.3 20140911 (Red Hat 4.8.3-9)
LTFS17087I Kernel version: Linux version 3.10.0-327.el7.x86_64 ([email protected]) (gcc version 4.8.3 20140911 (Red Hat 4.8.3-9) (GCC) ) #1 SMP Thu Oct 29 17:29:29 EDT 2015 i386
LTFS17089I Distribution: NAME=”Red Hat Enterprise Linux Server”
LTFS17089I Distribution: Red Hat Enterprise Linux Server release 7.2 (Maipo)
LTFS17089I Distribution: Red Hat Enterprise Linux Server release 7.2 (Maipo)
LTFS17085I Plugin: Loading “lin_tape” tape backend
LTFS30416I lin_tape version is 3.0.20
LTFS30423I Opening a device through ibmtape driver (/dev/IBMtape0)
LTFS30428I Product ID is 'ULT3580-TD6 '
LTFS30429I Vendor ID is IBM
LTFS30432I Firmware revision is H990
LTFS30433I Drive serial is 1068005796
LTFS17160I Maximum device block size is 1048576
LTFS11330I Loading cartridge
LTFS30472I Logical block protection is disabled
LTFS11332I Load successful
LTFS17157I Changing the drive setting to write-anywhere mode
LTFS16014I Checking LTFS file system on '/dev/IBMtape0'
LTFS30472I Logical block protection is disabled
LTFS16023I LTFS volume information:
LTFS16024I Volser (bar code) : 1FD069
LTFS16025I Volume UUID : 9c590503-82bf-4e1b-9b66-71c89cc5bcc5
LTFS16026I Format time : 2017-09-25 16:25:48.141842063 MST
LTFS16027I Block size : 524288
LTFS16028I Compression : Enabled
LTFS16029I Index partition : ID = a, SCSI Partition = 0
LTFS16030I Data partition : ID = b, SCSI Partition = 1
LTFS11005I Mounting the volume
LTFS30472I Logical block protection is disabled
LTFS11026I Performing a full medium consistency check
LTFS11233I Updating MAM coherency data
LTFS17227I Tape attribute: Vendor = IBM
LTFS17227I Tape attribute: Application Name = LTFS
LTFS17227I Tape attribute: Application Version = 2.4.0.0
LTFS17227I Tape attribute: Medium Label = 1FD069L6
LTFS17228I Tape attribute: Text Localization ID = 0x81
LTFS17227I Tape attribute: Barcode = 1FD069
LTFS17227I Tape attribute: Application Format Version = 2.4.0
LTFS17228I Tape attribute: Volume Lock Status = 0x00
LTFS17227I Tape attribute: Media Pool name =
LTFS11034I Volume unmounted successfully
LTFS16022I Volume is consistent
LTFS30472I Logical block protection is disabled
2.8 Tools
The following tools might be useful when you manage IBM Spectrum Archive SDE.
2.8.1 Using the IBM LTFS Format Verifier
This section describes how to download, install, and run the IBM Linear Tape File System (LTFS) Format Verifier (LFV) utility command (lfv) to verify media hardware and data compatibility.
Before you begin
Before installing the LTFS LFV, download the most recent version from the Fix Central website.
To download the most recent version of the LTFS LFV, complete the following steps:
1. Open the following URL in your web browser:
2. Click Product Group → System Storage.
3. Click Product Family → Tape systems.
4. Click Product Type → Tape drivers and software.
5. Click Product → Linear Tape File System (LTFS) Format Verifier.
6. Select your operating system from the Platform menu.
7. Click Continue.
8. Narrow the search of available downloads according to your criteria (this step can be skipped).
9. Click Continue to view the list of available downloads.
10. Select the version that you want to download.
11. To download the new version, follow the instructions on the Fix Central download page.
|
Latest levels: IBM maintains the latest levels of the LTFS LFV and information about using the tool and related documentation on the Fix Central website:
|
About this task
To install the LTFS LFV, complete the following steps:
1. Download lfvinst_<version>linuxx86_64 from this website:
2. To make lfvinst_<version><OS><arch> an executable file, run the following command:
chmod 700 lfvinst_<version><OS><arch>
3. To complete the installation, run the following command:
fvinst_<version><OS><arch>
Verifying media compatibility by using the IBM LTFS Format Verifier
This section describes how to verify media hardware and data compatibility by using the LTFS LFV utility command. This section also describes the options that can be used with this command.
|
Important: LTFS LFV is not shipped with IBM Spectrum Archive EE, but is available as a separate download.
|
To verify that media are compatible with LTFS, run lfv from the command line. Enter one of the following commands:
•For Linux systems where the IBM Tape Device Driver is installed, <target device> should be /dev/IBMtapeX, where X is the index of the tape device to use, as shown in the following example:
./lfv -f /dev/IBMtape1
•For Linux systems where no IBM Tape Device driver is installed, <target device> should be /dev/sgX, where X is the index for the tape device to use, as shown in the following example:
./lfv -f /dev/sg0
|
Important: The index for the target tape device in the previous examples is shown as 0. If you are unsure which index value to use, run the ./lfv -s command to scan for all attached tape devices.
|
The following lfv command options are available:
•-f <target device>
The target tape device on which verification is performed.
•-h
Displays help information.
•-l
Specifies the log file name. The default name is lfv.log.
•-ll [Errors|Warnings|Information|Debug]
Specifies the log level and the level of logging created. Errors is the default value.
•-lp
Specifies the log output directory. The default directory is ./output.
•-s
Scans the system for tape devices and prints results to the window. This option provides a list of the available devices and can help you identify which drive to use. This option provides the following information:
– Sequential number.
– Driver handle/device file name.
– Drive product name.
– Drive firmware revision.
– Drive serial number (S/N).
– Host (H), bus (B), Target ID (T), and LUN (L) physical address of the drive.
For example, information that is provided by this list appears as shown in the following example:
#0 /dev/IBMtape0 -[ULT3580-TD4]-[85V1] S/N:1300000388 H2-B0-T0-L0
#1 /dev/IBMtape1 -[ULT3580-HH5]-[A2SG] S/N:1068000051 H2-B0-T1-L0
•-v
Enables verbose verification information.
•-V --version
Displays the program version.
•-x
Specifies that the extended verification is performed. The extended verification analyzes the entire tape cartridge and can take up to three hours to complete. Quick verification is the default.
2.8.2 IBM Tape Diagnostic Tool
Although ITDT is normally used for tape library and tape drive diagnostics, it can also be used to read LTFS XML information from the partitions on tape. A complete discussion of all command-line options of ITDT is outside the scope of this Redbooks publication. However, a few examples of how to perform LTFS-related tasks by using ITDT are provided.
IBM maintains the latest levels of tape-related System Storage software, the tape device driver, the IBM Spectrum Archive SDE software package, and documentation on the internet. Use the Fix Central download portal:
To download the latest version of ITDT, follow these steps:
1. From the main Fix Central page, select the following options:
a. For Product Group, select System Storage.
b. For System Storage, select Tape systems.
c. For Tape systems, select Tape drivers and software.
d. For Tape drivers and software, select IBM Tape Diagnostic Tool (ITDT).
e. For Platform, to download all platforms of ITDT, select All.
f. Click Continue.
2. Narrow the search of available downloads according to your criteria.
3. Click Continue to view the list of available downloads.
4. Select the version that you want to download.
5. Follow the instructions on the Fix Central download page to download the new version.
|
Resource: IBM maintains the latest levels of the ITDT and information about using the tool and related documentation on the Fix Central website.
|
Viewing the tape label
The following itdt command (Example 2-29) lists the tape label of the currently mounted tape on tape drive 1.0.7.0 in Windows. The output is written to the file TapeLabel.txt.
Example 2-29 Viewing the tape label
# itdt -f 1 0 7 0 chgpart 0 read -d TapeLabel.txt
Changing to partition 0...
Initializing device...
Reading file from tape...
Opening destination file C:DownloadsPreReqITDTWindowsTapeLabel.txt...
Setting block size to variable...
Read complete, 1 records 80 total bytes read...
Transferrate 0.00 Mbytes/s...
Exit with code: 0
Viewing the latest generation of index
The following itdt command (Example 2-30) lists the XML schema for the last LTFS index of the currently mounted tape on tape drive 1.0.7.0 in Windows. The output is written to the file LastIndexPartition.xml.
Example 2-30 Viewing the latest generation of index
# itdt -f 1 0 7 0 chgpart 0 seod bsf 2 fsf 1 read -d LastIndexPartition0.xml
Changing to partition 0...
Spacing to end of data...
Backward spacing 2 filemarks...
Forward spacing filemark...
Initializing device...
Reading file from tape...
Opening destination file LastIndexPartition0.xml...
Setting block size to variable...
Read complete, 1 records 2781 total bytes read...
Transferrate 0.19 Mbytes/s...
Exit with code: 0
Listing records
The following itdt command (Example 2-31) lists the records and file marks in the data partition of the currently mounted tape on tape drive 1.0.7.0 in Windows.
Example 2-31 Listing records
# itdt -f 1 0 7 0 chgpart 1 list
Changing to partition 1...
Rewinding tape...
Setting block size to variable...
Scanning tape...
Record 1 Length 80
*** Filemark ***1 ***
Record 1 Length 489
*** Filemark ***2 ***
*** Filemark ***3 ***
Record 1 Length 981
*** Filemark ***4 ***
*** Filemark ***5 ***
Record 1 Length 1483
*** Filemark ***6 ***
Record 1 Length 7
*** Filemark ***7 ***
Record 1 Length 2044
*** Filemark ***8 ***
*** Filemark ***9 ***
Record 1 Length 2427
*** Filemark ***10 ***
Record 1 Length 524288
Record 2 Length 524288
Record 3 Length 350507
Record 4 Length 524288
Record 5 Length 524288
Record 6 Length 524288
Record 7 Length 524288
Record 8 Length 524288
Record 9 Length 524288
Record 10 Length 524288
Record 11 Length 524288
[etc]
Listing the partitions
The following itdt command (Example 2-32) lists the records and file marks in the data partition of the currently mounted tape (LTO-6) on tape drive 1.0.7.0 in Windows.
Example 2-32 Listing partitions
#itdt -f 1 0 7 0 qrypar
Querying tape partitioning...
Active Partition ............ 1
Max. Additional Partitions... 3
Additional Partitions defined 1
Partition 0 Size (Meg) ...... 36700
Partition 1 Size (Meg) ...... 2426400
Exit with code:
Copying an LTFS tape
The following itdt command () makes a copy of an LTFS tape from tape drive 1.0.7.0 to tape drive 1.0.8.0 (Example 2-33).
Example 2-33 Copying a tape
#itdt ltfsphcp 1.0.7.0 1.0.8.0
Command reference
The following command-line options are available:
Interactive mode: i tdt [-force-generic-dd] [-D file] [-C file] [-N config] [-LP path] [-L file] [-LL level] [-R path] [-h|--help]
The following options are available. They are not needed for normal program usage:
-force-generic-dd Use Generic device driver.
-D descriptor_file.blz
Use alternate descriptor file (default: ubv.blz).
Use alternate descriptor file (default: ubv.blz).
-C config_file.blz Use alternate config file (default: metrocfg.blz).
-N cli_config_name Use alternate CLI configuration (default: CLI_DEFAULT).
-LP logpath Use 'logpath' as logging path (default: output).
-L logfile Use 'logfile' for log messages (default: metro.log).
-LL Errors|Warnings|Information|Debug
Set log level (default: Error).
-R resultdir Use 'resultdir' as result file path (default: output).
-h|--help Display this help text.
-version Print the version number of ITDT.
Use this scripting mode: itdt [-f filename [-w mode] Subcommand [Subcommand ...]]
The options are described:
-f filename Device special file for the drive/changer, for example: /dev/rmt0 (IBM AIX®), /dev/rmt/0st (Sun), tape0 (Mac), /dev/rmt/0m (HP), /dev/IBMtape0 (Linux), and \. ape0 (Windows)
-w mode Open mode, by default, read/write. The valid modes are 1=Read/write, 2=Read only, 3=Write only, or 4=Append
These general subcommands are available:
allow Allow medium removal for tape or changer devices
devinfo Get device information
inquiry [Page] Perform an inquiry command
logpage Page Retrieve a log sense page
loop [Count] Loop subsequent commands
modepage Page Retrieve a mode sense page
prevent Prevent medium removal for tape or changer devices
print Text Print a text message to the console
qrypath Display device and path information
qryversion Display IBM device driver version
release Release the device
reqsense Request and display sense data
reserve Reserve the device
resetdrive Reset the device
scan [-o Formatstring]
Display the list of connected devices
sleep Seconds Sleep for the specified number of seconds
tur Perform a Test Unit Ready (TUR)
vpd Display the Vital Product Data (VPD)
The following medium changer subcommands are available:
audit [Address [Count]]
Initialize element status (optionally with range)
cartridgelocation [Slot [Count]]
Retrieve element status for cartridges
elementinfo Display element information for each element type
exchange Source Dest1 Dest2
Exchange cartridges between two locations
inventory [-i | -v Volid]
Read element status
move Source Dest Move cartridge
position Dest Position to an element
The following tape drive subcommands are available:
append Open the driver in append mode
bsf [Count] Backward space file marks
bsr [Count] Backward space records
chgpart Number [Blockid]
Change to partition with specified number and block ID
density Report density support
display "Message" Display message on the OSD of the drive
erase Erase tape
fdp Create fixed data partition
fdpl Create fixed data longitudinal partition
fsf [Count] Forward space file marks
fsr [Count] Forward space records
getparms Get drive/medium/driver parameters
idp pSize0 pSize1 [pSize2 pSize3]
Create initiator-defined wrap-wise partition
idpl pSize0 pSize1 [pSize2 pSize3]
Create initiator defined longitudinal partition
Create initiator defined longitudinal partition
list List the contents of a tape
load Load medium into drive
logsense Get all log sense pages
qrypos Query tape position
qrypar Query tape partitioning
qrytemp Query drive temperature
qrytemp Query drive temperature
read -d Destination [-c Count]
Read a file
rewind Rewind the tape
rmp Remove partitioning
rtest [-b Blocksize] [-c Count] [-r Repetition]
Perform a read test
rwtest [-b Blocksize] [-c Count] [-r Repetition]
Perform a Read/Write test
seod Space to end of data
setparm autoload [0|1]|autodump [0|1]|blocksize [0-65535]|buffering[0|1]| c apacity [0-100]|compression [0|1]|immediate [0|1]| readpastfilemark [0|1]|recordspacemode [1=SCSI|2=AIX]|sili [0|1]| simmim [0|1]|trace [0|1]|trailer [0|1]|volid [volume id]| volumelogging [0|1]|writeprotect [NONE|ASSO|PERS|WORM]| datasafemode [0|1]| skipsync [0|1]
Set drive/medium/tape parameter
setpos [Blockid] Set tape position
sdp [0|1|2|3] Create select data wrap-wise partition
sdpl [0|1] Create select data longitudinal partition
sync Synchronize/flush tape buffers
unload Unload medium from drive
weof [Count] Write file marks
write [-raw] -s Source
Write a file to tape
wtest [-b Blocksize] [-c Count] [-r Repetition]
Perform a write test
The following service aid subcommands are available:
dump Retrieve dumps, including force dump
ekmtest Test encryption key path/setup
encryption Report drive encryption state
ucode "Filename" Perform a firmware update
qrytcpip Query TCP/IP port parameter
settcpip "address"[/Subnet Mask Length]
Set TCP/IP port parameter
ltfsphcp source destination
Performs a physical copy of an LTFS-formatted cartridge
tapephcp source destination
Performs a physical cartridge copy
2.8.3 IBM LTFS Copy Tool
The IBM LTFS Copy Tool is a utility that can be used to efficiently transfer data to and from LTFS tapes.
The LTFS Copy Tool provides the following benefits:
•Ability to copy tape contents with optimum order
•Improved performance for reclamation and defragmentation of a tape medium
•Improved performance for retrieving files from an LTFS-formatted tape medium (when LTFS is built into the tape archive solution)
The IBM LTFS Copy Tool optimizes the performance of data transfers through multithreaded operations, memory or disk buffering, and multifile reads from tape that are ordered by location on the tape. These features are described in more detail.
Multithreaded operation
The IBM LTFS Copy Tool uses memory or disk buffering to transfer data, which enables the data to be transferred during a multithreaded operation. While the program that is running on a thread reads a file on the tape medium or disk to the memory or disk buffer, the program that is running on another thread writes data from the memory or disk buffer to the medium simultaneously. This mechanism improves the copy performance.
Reordering by location
The files on a tape medium allow sequential access only. If multiple files are copied without reordering, LTFS sequentially seeks files on the medium. For example, if the first file exists next to the second file, LTFS searches for the bottom of the second file and reads it, and then seeks back to the beginning of the first file. This seek operation drastically degrades the multifile copy performance of LTFS. By reordering by location, the LTFS Copy Tool reads the second file, and then reads the first file. This approach eliminates any unnecessary seek operations and improves the overall copy performance.
For more detailed information about this tool, see the IBM Spectrum Archive Single Drive Edition section of IBM Knowledge Center:
1 Storage Networking Industry Association (SNIA),
..................Content has been hidden....................
You can't read the all page of ebook, please click here login for view all page.