


System Display and Search Facility
This chapter describes the changes in the System Display and Search Facility (SDSF) in z/OS V2R2 and includes the following topics:
3.1 SDSF enhancements
The following SDSF enhancements are available in z/OS V2R2:
•JJE component elimination
•zIIP exploitation
•System command improvements
•UI enhancements
•JOB Display enhancements
•Batch parallelism new panels
•REXX enhancements
•Miscellaneous changes
Since z/OS V1R10, SDSF had a second component (JJExxxS) that included parts that required JES2 control blocks, such as LOG, non-RMF DA, and JES2 offset table. This configuration increased the complexity of SDSF installations.
Starting with z/OS V2R2, the need for a second JJExxxS component was eliminated. The SDSF V2R2 is installed as a single FMID; that is, HQX77A0. All JES data is now obtained via interfaces (such as the SSI) rather than by traversing JES2 control blocks.
3.1.1 Implementation and usage
SDSF is now required to be installed in the SMP/E BCP zone. The ServerPac option for SDSF SMP/E zone only was removed.
Also, the JES2 dependent feature JJE77xS was removed in SDSF V2R2. It was used to provide means for reassembling SDSF when JES2 macros were changed. SDSF no longer uses these macros, and reassembly is no longer necessary. As the reassembly is no longer necessary, UCLIN and reassembly sample jobs were deleted.
The following JJE77xS related data sets also are no longer necessary and can be removed when systems are moved to z/OS V2R2:
•ISF.SISFJCL1/ISF.AISFJCL1
•ISF.SISFMOD1/ISF.AISFMOD1
•ISF.SISFSRC1/ISF.AISFSRC1
The SISFMOD1 also must be removed from the linklist.
To support the JJE77xS data set removal, the ISFPARMS were moved from JJE77xS to HQX77A0. If you modify ISFPARMS, update your SMP/E apply job to specify the correct FMID. We suggest you use ISFPRMxx instead of ISFPARMS.
HASPINDX removal
HASPINDX was used to chronologically order JES2 syslog data sets, and it is no longer used in SDSF V2R2. The HASPINDX keywords are now obsolete and are ignored. Verify that your logon procedure or initial clist does not ALLOC FI(HASPINDX) because it is no longer used.
If you share the HASPINDX data set, you can delete it after all z/OS images are running V2R2.
3.2 zIIP use
Some SDSF activities can become CPU-intensive, depending on the activity that is performed and the amount of data that is involved. Performing a sort on SDSF panels with tens of thousands jobs can increase CPU usage. Now, SDSF uses zIIP processor to perform some CPU-intensive tasks.
There is no user action necessary to use zIIP on large sorts. SDSF determines whether the action is eligible for zIIP processing that is based on the number of entries to be sorted. A number of 1,000 entries or more is eligible for zIIP processing. If zIIP processor is not available, regular CPU processor is used.
3.3 System command improvements
The System Command Extension pop-up window provides a simple way to retrieve commands that were issued by the user. To access this panel, issue a slash from any SDSF panel.
The window was enhanced to provide a better user experience while increasing the number of saved commands and allowing grouping and commenting commands. In this section, we describe these features with examples and provide suggestions about how to use these enhancements to improve support activities.
3.3.1 Increasing the number of the saved slash commands
The number of 20 saved commands might not be helpful for users who constantly issue different slash commands. For this reason, the standard number of saved slash commands was increased to 50, which is the default value on z/OS V2R2. There is no user action necessary to use this feature.
If you must store more than 50 commands, you can define a data set and allocate it to ISFTABL on your logon procedure to increase the number of saved commands.
The ISFTABL data set must be a partitioned data set (PDS) or PDS-e with logical record of 80 bytes and record format FB. Each saved command uses up to 500 bytes of space. The default number of saved commands is 1,000, with a limit of 2,000.
Example 3-1 uses an IEFBR14 to allocate a sample ISFTABL data set. Define space attributes according to your needs.
Example 3-1 Define ISFTABL data set
//JOBD JOB TIME=NOLIMIT,REGION=0K,MSGCLASS=A,CLASS=A,NOTIFY=&SYSUID
//STEP1 EXEC PGM=IEFBR14
//ALOC DD DSN=KWRES08.ISFTABL,
// DISP=(,CATLG),SPACE=(TRK,(60,15,50)),RECFM=FB,
// LRECL=80,BLKSIZE=0
Migration and coexistence
If you have a mixed environment with previous z/OS releases, only the last 20 commands are available in these z/OS images. If a new command is issued from these LPARs and the 20th command is excluded from the list on all LPARs.
3.3.2 Grouping and viewing saved commands
With the increase of saved commands, it is necessary to provide a way to manage and use the saved commands. SDSF is enhanced to allow grouping commands to improve management and usability. Grouping is available by default and is optional. Any command that does not have a group name that is associated with it is considered ungrouped.
You can use grouping options to associate a set of commands that perform a similar function, or control the same application. Then, you can use the group name to display only the commands that are associated with that group. You can create multiple groups,
Figure 3-1 shows the system command panel that is used to define a command to JES2 group.

Figure 3-1 Define a command to JES2 group
|
Note: It is no longer necessary to submit the command to save it. You can press F10 to save the command without submitting it. Submitting the command also saves it on your list.
|
After the command is saved, you can use the Search field to display only the commands that are associated to this group. As shown in Figure 3-2, we used the keyword JES2 in the Search field to retrieve JES2 group commands only.

Figure 3-2 Display JES2 grouped commands only
Pressing F4 when the cursor is at the group or show options opens a pop-up window in which a list of all groups is defined for selection. Within this panel, option 1 is used for non-grouped commands, as shown in Figure 3-3.
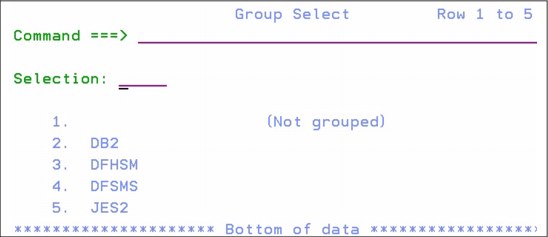
Figure 3-3 Display groups
Commands also can be deleted from a saved list. You can press F11 to clear these entries. A new pop-up panel prompts you to select between the 20 most recent commands, all commands, or to select the commands from a list, as shown in Figure 3-4.

Figure 3-4 Clear commands from display
We suggest that you create different groups for each type of commands. You can create a group that is named D-JES to store display JES commands, such as the commands that described in Chapter 1, “JES2” on page 1. You can also create groups for other applications or purposes, such as ‘stop-applx’, and save all commands that are required to correctly stop application X.
We also encourage you to include comments to your commands. The steps to include these comments are described next.
Migration and coexistence
Slash commands that are saved on early systems are considered ungrouped when processed by V2R2 system. Ungrouped commands on V2R2 system visible to early systems.
3.3.3 Including comments to saved commands
In addition to increasing the number of saved commands and grouping and searching commands, SDSF now also gives you the ability to include comments to your saved commands. This function can be useful to collect more information when a command is retrieved from the saved list.
The comments about saved commands are displayed when the command is retrieved for use. The comment is not displayed on syslog or the user log when the command is issued. You can use comments and groups to create a more meaningful view of groups and commands and improve commands management.
In addition to main panel, the comments are displayed in detailed pop-up panels, which is described next.
Detailed pop-up panel
The main commands panel lists only the last few commands that were issued by the user, even if a larger limit of save commands are allowed or if ISFTABL is allocated and in use by users. The new details pop-up panel allows users to see all saved commands with a group and comments while enabling sort options for ease of use.
To access the Details pop-up panel, press F6 from the system commands extension panel. All of your saved commands are shown and are sorted by group name. Ungrouped commands are displayed first.
To change the sort option, press F5 to sort by Group, F6 to sort by Command, or F10 to sort by last used. Figure 3-5 shows the Details pop-up panel as sorted by last used commands. The group name information and command comment also is displayed in this panel.

Figure 3-5 System Command Extension: Details panel
To select a command for processing, enter the command number in the selection option, and press Ctrl+Enter. You are returned to the System Commands Extension panel, with the required command ready for submission, as shown in Figure 3-6.

Figure 3-6 System Command Extension panel
We encourage you to include comments with your commands to improve command management and usage.
Migration and coexistence
The Details pop-up menu is not available in lower-level releases. In a mixed environment, this option is available on z/OS V2R2 images only.
New action bar options
The system commands extension panel also provides users a menu option to control system commands panel. There are three options available: Edit, Options, and Help.
Edit
The Edit option can be used to clear unused commands from your saved list. When the Clear option is selected, a pop-up panel prompts you for the clear action to take. This panel is the same panel from the F11 option.
From this panel, you can select the following options:
•Recent matching the value for Show
This option deletes the 20 most recent commands that match the values set on system commands main window.
•All matching the value for Show
This option deletes all of the commands that match the values set on system commands main window.
•From list
Open a list of commands that match the selection criteria. Place the number of the command that you want to delete and press Ctrl+Enter.
Figure 3-7 shows the Select Clear Option panel.

Figure 3-7 Select Clear Option panel
|
Warning: There is no confirmation panel to delete the entries beyond this panel. Be sure that you want to delete the commands before proceeding from the Select Clear Option panel.
|
Options
From the Options menu, you can control the following system commands:
•Set wait response to ON|OFF
This option sets the WAIT response to ON or OFF.
•Set Store Commands in ISPF Profile at Exit to ON|OFF
Sets this ON|OFF to enable or disable saving issued commands.
•Set Store Limit Warning to ON|OFF
A warning limit notifies you when the limit of saved commands is reached. New commands remove the oldest commands from the list.
Help
Help options provide information about the system commands panel and list system commands manuals on option 2.
3.4 UI enhancements
Starting in z/OS V2R2, many user interfaces enhancements were included. These new options provide you with the means to control your queues and performing commands against multiple entries.
The new features and some examples are described next.
3.4.1 Line shortcut command
Before z/OS V2R2, performing tasks, such as changing job Class of multiple jobs, was time-consuming and required that the user to change the value job-by-job on SDSF panels. Now, such tasks can be performed for multiple jobs from command line, which can significantly reduce the time that is spent to perform repetitive operations.
On the command line, you can specify the line number (or up to three ranges of line numbers) followed by an action to issue against multiple rows. Some examples are shown in Example 3-2.
Example 3-2 Shortcut commands
2 D -> issues the Display action against the second row
1-5 P -> issues the Purge action against rows 1 to 5
1-3 6-10 14 C -> issues the Cancel action against rows 1 to 3, 6 to 10, and 14

All commands that are issued from the NP column also can be issued from the command line. Multiple actions cannot be performed on the same command. For instance, you cannot select the second output for view and purge it by using the same command.
The value on SET CONFIRM is accepted and only one confirmation is requested for each range. The rows do not have to be on-screen for the command to work and the row number starts on the first entry displayed. For more information about row numbers, see “SET ROWNUM command” on page 47.
You can also type over the value of a column, when allowed. Example 3-3 shows two commands that are used to change the job priority to 13, and job class to B of the second row in the panel.
Example 3-3 Changing job priority and job class
2 PRTY=13
2 C=B
3.4.2 SET ROWNUM command
The new SET ROWNUM command can be used to enable row numbering on SDSF panels. The row number column appears between the NP column and the fixed field and remains fixed when scrolling left and right.
The column title is ####, with a width of at least four characters (or more where necessary). These numbers are the row numbers that are used online shortcut command.
NP column width
In previous z/OS V2R2 releases, the NP column was a fixed width for each display (often four), with a + action that expanded the column to a larger fixed width (usually six).
In this release, the NP column can be expanded to a specified width by using the +nn action, where nn is a value 4 - 20. This value is temporary and is reset by using the RESET command or leaving the display. Use the ARRANGE command to expand the NP column and save the configuration, as shown in the following example:
ARRANGE NP 9
The NP width also can be set via the ARRANGE pop-up panel. Each column has its own width. The values are saved in ISPF profile. To open the pop-up panel, click VIEW → ARRANGE option, or run the ARRANGE ? command, as shown in Example 3-4.
Example 3-4 Output of Arrange ? command
Arrange Row 1 to 8 of 55
Command ===>
To move a column, select with / (// for a block), then type A
(after) or B (before). Special function keys:
F5/17=Refresh list F11/23=Clear input F6/18=Default order
NP width 15
Column Width Description
StepName 8
ProcStep 8
JobID 8
Owner 8
C 8
Pos 3
DP 2
PGN 3 Not shown in goal mode
3.4.3 Browse locate data set action
Starting in z/OS V2R2, you can browse a specific data set number for a job directly from DA, I, ST, O, H, and JS panels.
Use the Sn action to begin the browse action at the data set that is specified by n. It allows you browse the sysout at the beginning of a specified data set where n represents the data set number of the job. A negative value S-n can be specified to reference an offset from the bottom, as shown in Example 3-5.
Example 3-5 Browse locate data sample
S5 –> positions to the fifth data set
S-2 -> positions to the next-to-last data set
You can use it with line shortcut commands. If you want to browse the third data set of jobs on rows 1 to 3, you can run the 1-3 S3 command.
To browse the jobs that are associated with rows 3 - 5 and positions to the last data set in the job, run the 3-5 S-1 command.
3.5 Job displays
The ability to display job information in a concise and meaningful way is important for deciding the actions that are based on a job status, return code, or allocations.
The SDSF enhancements that provide extended display capabilities are described next.
3.5.1 Job step panel
Easy access to job step completion code enables the possibility of taking quick actions upon job failure, or corrective actions while the job is still running.
Starting in z/OS V2R2, SDSF now provides a job step display to consolidate step completion information in a single display, which reduces the time that is spent on searching the required information. This new panel features information about step completion code, abend reason, elapsed time, CPU time, and so on.
To access the job step panel, you can issue a JS next to the job name that you want to check. This action is valid in panels I, ST, O, H, and DA.
This new panel uses new EVENTLOG data set information that is stored by JES2. For more information about EVENTLOG and how to enable or disable it, see 1.3, “EVENTLOG” on page 16.
The amount of information that is available on job step data depends on the EVENTLOG data that is captured. If it is being suppressed, only the data from STEPDATA is retrieved. Otherwise, more data from SMFSTEP is also used. This feature is available for JES2 only.
Table 3-1 lists the new columns of the Job Step display.
Table 3-1 Job Step display
|
Columns that are displayed when STEPDATA is found
|
||||
|
STEPNAME
|
ProcStep
|
Pgm-Name
|
Step-CC
|
AbendRsn
|
|
StepNum
|
SysName
|
Step-Begin
|
Step-End
|
|
|
Columns that are displayed when SMF data is available for that job
|
||||
|
Elapsed
|
CPU-Time
|
SRB-Time
|
EXCP-Cnt
|
Conn
|
|
Serv
|
Workload
|
Page
|
Swap
|
VIO
|
|
Swaps
|
Region
|
Rgn-Used
|
MemLimit
|
Mlim-Used
|
|
zIIP-Time
|
zICP-Time
|
zIIP-NTime
|
HiCPU%
|
HiCPUPgm
|
Example 3-6 shows the job display panel for a specific job.
Example 3-6 Sample job step completion display
Display Filter View Print Options Search Help
-------------------------------------------------------------------------------
SDSF JOB STEP DISPLAY - JOB JOBA (JOB00629) SMF DATA SET DISPLAYED
COMMAND INPUT ===> SCROLL ===> CSR
NP #### STEPNAME U-Time SRB-Time EXCP-Cnt Conn Serv Workload Pa
1 STEP1 :00:00.00 0:00:00.00 56 0:00:00.00 3525 SYSTEM
2 STEP2 :00:00.00 0:00:00.00 55 0:00:00.00 3331 SYSTEM
From this window, you can interact with job steps by using S, SB, SE (Browse) actions, and X (Print) actions. These actions are processed only to data sets that are associated with the selected step. A ? can be used to view the list of data sets that are associated with the step, and SJ displays the entire job JCL.
3.5.2 Job detail displays
The following new secondary panels were added to provide more information about resources that are used by a job:
•JD (Job Device): Devices and pseudo-devices that are owned or allocated by a job.
•JM (Job Memory): Memory usage by subpool or key.
•JY (Job Delay): Job-related delays.
Job Device panel
By using the Job Device panel, you see information about devices that are used by a job. You display this panel by using the JD action character on the DA, I, INIT, NS (for NETSERV address spaces), and ST panels. The ASID, ASIDX, and SYSNAME columns are added to displays in which they were absent.
The rows on JD secondary panel are generated for the following components:
•Active allocations (data sets or devices)
•CF connections
•Connections to remote IP addresses
•Listens on local IP ports
The Type column features one of the following values:
•DD (DD name)
Columns include:
– Seq
– DataSetName
– Volser
– Unit
– Lrecl
– RecFm
– Blksize
– EXCPCt
•CF (CF name)
Columns include:
– StrName
– Volser
– Policy
– Status
•IP (TCP/IP Server name)
Columns include:
– IPAddr
– Port
– Status
– BytesIn
– BytesOut
– Start-Time
– Last-Time
– Stack
– Resource-ID
– ApplData
You can use the information that is provided by the job device panel to ensure that the allocations are correct, display CF structure, XCF policy, IP connection information, and so on.

Figure 3-8 Job Device Detail display (DD rows)

Figure 3-9 Job Device Detail display (CF rows)

Figure 3-10 Job Device Detail display (IP rows)
The following actions are available in Job Device panel. They actions are display actions and vary by row type:
•DD
No actions defined.
•CF:
– Display actions are different forms of D XCF command
– DC (Display CF) – Displays the CF by using D XCF command
– DS (Display Structure) – Displays the structure by using D XCF
– DP (Display Policy) – Displays the policy by using D XCF
•IP:
– Display actions are different forms of D TCPIP command
– DA (Display All): D TCPIP,stack,N,ALL,IPP=
– DN (Display Conn): D TCPIP,stack,N,CO,APPLDATA,IPP=
– DB (Display Byte info): D TCPIP,stack,N,BYTE,IDLETIME,IPA=
– DR (Display Route): D TCPIP,stack,N,ROUTE,IPA=
Job Memory panel
This panel is accessible via the JM action from panels where individual rows represent (or can represent) an active address space: DA, I, INIT, NS (for NETSERV address spaces), and ST panels.
Rows on JM secondary panel are generated for the following components:
•Each subpool or key combination for which memory is allocated
•64-bit private storage (by key)
•64-bit common storage that is owned by address space (by key)
•CSA and SQA that is owned by address space (if CSA tracking is active)
An example of the Job Memory panel is shown in Figure 3-11 on page 53.

Figure 3-11 Job Memory panel
You can use this panel to help identify the best memory allocation for certain jobs and tasks or to indicate programs in error.
Job Delay panel
This panel is accessible via the JY action from DA panel.
Rows on JY secondary panel are generated for the following components:
•Current delay information reported by WLM
•All delays for latest interval as reported via RMF
Because this panel uses RMF information, it is not available from non-RMF version of DA. The Job Delay panel is shown in Figure 3-12.

Figure 3-12 Job Delay panel
Installation and usage
The JD, JM, and JY actions are protected by the following SAF profiles:
•In JESSPOOL class
For jobs that are known to JES, actions are protected by sysname.userid.jobname.jobid profile. The READ access is required.
•In SDSF class
Each panel has its own profile and READ access is required:
– JD: ISFDISP.DEVICES.userid.jobname
– JM: ISFDISP.STORAGE.userid.jobname
– JY: ISFDISP.DELAY.userid.jobname
Access is allowed if either profile allows it.
3.5.3 Snapshot command
A new SNAPSHOT command was added to capture the contents of a tabular display into a browse or edit session. All columns are captured, including the columns that are not displayed on-screen.
You can use the PRINT command (from SDSF Browse) or the COPY (from ISPF Edit) command to move the captured data to a more permanent location. The following data is captured:
•Rows and column data that is in the same order as on the display
•Column widths are maximized to prevent data loss and numeric scaling
The following syntax is used:
SNAP [S|SB|SE]
Use the following SET SNAP command to specify the default:
SET SNAP [S|SB|SE|?]
Where:
•S: Uses SDSF Browse to view data
•SB: Uses ISPF Browse to view data (requires ISPF)
•SE: Uses ISPF Edit to view data (requires ISPF)
•?: Opens pop-up panel to enter choice
A SNAP command output example from SDSF browse is shown in Figure 3-13 on page 55.
|
Display Filter View Print Options Search Help
------------------------------------------------------------------------------
SDSF OUTPUT DISPLAY *SNAP LINE 0 COLUMNS 02- 81
COMMAND INPUT ===> SCROLL ===> CSR
********************************* TOP OF DATA *********************************
JOBNAME JobID Owner Prty Queue C Pos SAff ASys S
KWRES03 TSU06709 KWRES03 15 EXECUTION SC75 SC75
KWRES05 TSU06911 KWRES05 15 EXECUTION SC74 SC74
KWRES07 TSU06914 KWRES07 15 EXECUTION SC74 SC74
KWRES06 TSU06922 KWRES06 15 EXECUTION SC74 SC74
JOB1 JOB06852 KWRES05 1 PRINT A 120
JOBA JOB06851 KWRES05 1 PRINT A 121
JOBD JOB06853 KWRES05 1 PRINT A 122
JOBB JOB06854 KWRES05 1 PRINT A 123
KWRES07 TSU06858 KWRES07 1 PRINT 126
KWRES05 TSU06567 KWRES05 1 PRINT 159
WAKIHSM1 JOB06913 KWRES05 1 PRINT A 179
KWRES07 TSU06859 KWRES07 1 PRINT 182
WAKIHSM1 JOB06919 KWRES05 1 PRINT A 183
WAKIHSM1 JOB06920 KWRES05 1 PRINT A 184
WAKIHSM1 JOB06921 KWRES05 1 PRINT A 185
IDCAMS JOB06923 KWRES06 1 PRINT A 186
JAQUE JOB06924 KWRES06 1 PRINT A 187
WAKIHSM1 JOB06925 KWRES05 1 PRINT A 188
******************************** BOTTOM OF DATA *******************************
|
Figure 3-13 SNAP output SDSF browse display
Figure 3-14 shows a SNAP command output example from an ISPF edit.
|
SDSF EDIT *SNAP Columns 00001 00072
Command ===> Scroll ===> CSR
****** ***************************** Top of Data *****************************
==MSG> -Warning- The UNDO command is not available until you change
==MSG> your edit profile using the command RECOVERY ON.
000001 JOBNAME JobID Owner Prty Queue C Pos SAff AS
000002 KWRES03 TSU06709 KWRES03 15 EXECUTION SC75 SC
000003 KWRES05 TSU06911 KWRES05 15 EXECUTION SC74 SC
000004 KWRES07 TSU06914 KWRES07 15 EXECUTION SC74 SC
000005 KWRES06 TSU06922 KWRES06 15 EXECUTION SC74 SC
000006 JOB1 JOB06852 KWRES05 1 PRINT A 120
000007 JOBA JOB06851 KWRES05 1 PRINT A 121
000008 JOBD JOB06853 KWRES05 1 PRINT A 122
000009 JOBB JOB06854 KWRES05 1 PRINT A 123
000010 KWRES07 TSU06858 KWRES07 1 PRINT 126
000011 KWRES05 TSU06567 KWRES05 1 PRINT 159
000012 WAKIHSM1 JOB06913 KWRES05 1 PRINT A 179
000013 KWRES07 TSU06859 KWRES07 1 PRINT 182
000014 WAKIHSM1 JOB06919 KWRES05 1 PRINT A 183
000015 WAKIHSM1 JOB06920 KWRES05 1 PRINT A 184
000016 WAKIHSM1 JOB06921 KWRES05 1 PRINT A 185
000017 IDCAMS JOB06923 KWRES06 1 PRINT A 186
000018 JAQUE JOB06924 KWRES06 1 PRINT A 187
000019 WAKIHSM1 JOB06925 KWRES05 1 PRINT A 188
000020 WAKIHSM1 JOB06926 KWRES05 1 PRINT A 189
****** **************************** Bottom of Data ***************************
|
Figure 3-14 SNAP output ISPF edit display
3.6 Batch parallelism
In z/OS V2R2, the JES2 adds support for dependent job control and job groups, which is called batch parallelism. Two new panels were added on SDSF for users to manage the new functions.
For more information about how to implement JOBGROUPs on your system, see 1.2, “JOBGROUP” on page 2.
3.6.1 Job Group panel
The job group panel allows you to view and control your JOBGROUPs. This panel contains information about JOBGROUP name, ID, owner, status, system affinity, scheduling environment, and so on. This panel is the only panel where it is possible to see JOBGROUPs via SDSF. The other method to display this information is by issuing JES2 commands, as described in Chapter 1, “JES2” on page 1.
You can call the primary JG panel on the SDSF main panel, as shown in Figure 3-15 on page 57.
|
HQX77A0 ----------------- SDSF PRIMARY OPTION MENU ------------------------
COMMAND INPUT ===> SCROLL ===> CSR
DA Active users INIT Initiators
I Input queue PR Printers
O Output queue PUN Punches
H Held output queue RDR Readers
ST Status of jobs LINE Lines
JG Job groups NODE Nodes
SO Spool offload
LOG System log SP Spool volumes
SR System requests NS Network servers
MAS Members in the MAS NC Network connections
JC Job classes
SE Scheduling environments RM Resource monitor
RES WLM resources CK Health checker
ENC Enclaves
PS Processes ULOG User session log
END Exit SDSF
|
Figure 3-15 Job groups option
A SAF profile was created to protect the job group panel. It is protected by ISFCMD.DSP.JGROUP.jesx profile in SDSF class. READ access is required. The profile is included by default when ISFPARMS specifies GROUP AUTH(ALL), GROUP AUTH(ALLOPER) or GROUP AUTH(ALLUSER) or includes JG in AUTH list.
From the job group panel, you can issue JES action commands against JOBGROUPs. The commands A, C, CP, D, H, P, S, X, and ? are available for use. New commands were introduced to provide JOBGROUP specific actions. The following new actions are available:
•DE
Display the jobs in the JOBGROUP that encountered an error.
•DJ
Display jobs that are associated with a JOBGROUP.
•DL
Display JOBGROUP information. This command includes information about creation time, spool usage, and so on.
•DN
Display network. Shows information about jobs in error, jobs that belong to JOBGROUP, concurrent jobs, and job dependency. This action is an alias for $D GROUP(xxxx),SUMMARY command.
•DP
Display dependency, including job predecessors and concurrent jobs.
•JP
Job dependency. Provides a table that is based output for dependent and concurrent jobs.
•ST
Access to ST panel. This action displays the jobs from the JOBGROUP, including the jobs that are not yet submitted. To see the job names, ensure that your OWNER and PREFIX settings meet job attributes.
The job group display is shown in Figure 3-16.

Figure 3-16 Job group display
The job status display from the JOBGROUP display is shown in Figure 3-17.

Figure 3-17 Status display from JG display
3.6.2 Job dependency panel
The job dependency panel displays the following information:
•For a selected JOBGROUP, all of the dependency within the group.
•For a selected job:
– Jobs that have dependencies
– Jobs that have dependencies on it
A job dependency display is shown in Figure 3-18.

Figure 3-18 Job dependency display
The Job Dependency panel can be accessed with the JP action character from the JG panel. The Job Dependency display is shown in Figure 3-19 and Figure 3-20 on page 60.
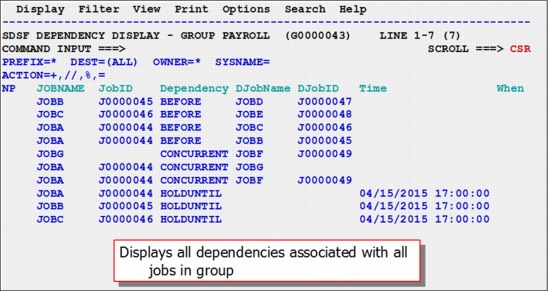
Figure 3-19 Dependency display from JG

Figure 3-20 Select command
3.7 REXX enhancements
The following new enhancements are available in IBM System Rexx:
•A new RGEN command is available to create custom samples that are based on current context. It can be tailored by using current settings, such as PREFIX, OWNER, and FILTER values.
•There is a new % prefix character that allows Rexx execs to be run as an action against a row.
The RGEN commands provide better examples to get started writing Rexx execs. Common tasks can be more easily performed by creating custom Rexx actions.
3.7.1 RGEN command
The RGEN command generates a REXX exec for the current panel and displays it with ISPF Edit. The exec includes the statements that you need to add the SDSF host command environment and to access the current panel, and special variables for tasks, such as filtering.
The exec also might include suggested logic for more functions. The generated exec is displayed by using ISPF Edit.
You can use RGEN for the following tasks:
•Display the tabular panel (DA, ST, PR, JDS, and so on) or log panel (SYSLOG, OPERLOG, and ULOG) with which you want to work.
•Issue the RGEN command from the command line. SDSF generates the appropriate exec and displays it by using ISPF Edit. The display includes special temporary lines that are visible in ISPF Edit but are not included in the exec. To remove those lines, use the RESET command.
•Copy the exec to a data set by using the CREATE command. Copying the exec before you begin making any updates ensures that none of your changes are lost.
•Modify the exec to suit your needs.
3.8 Miscellaneous changes
The following enhancements are available for z/OS V2R2:
•JES3 OUTDISP support:
– The OUTDISP columns on O and H are enabled for JES3, but you cannot type over them.
– A new OUTDISP column on JDS display was added and can be typed over.
•JES2 Dynamic checkpoint tuning:
– The HOLD and DORMANCY columns on MAS panel cannot be typed over when dynamic checkpoint tuning is used (MASDEF CYCLEMGT=AUTO). However, the columns are still displayed and show values that are used internally.
For more information about JES2 Dynamic checkpoint tuning, see 1.7.4, “JES2 checkpoint tuning” on page 27.
– There is a MAS display title line indicator when it is in effect.
•The user ID is included in the enclave display.
..................Content has been hidden....................
You can't read the all page of ebook, please click here login for view all page.