


Secure File Transfer Protocol
System administrators can implement security precautions to protect data being transferred from one network device to another. Rules can be applied to client devices, server devices, applications platforms, and network firewalls to administer the security policies of the organization. This chapter focuses on the security measures that can be applied to the z/OS FTP client and server applications.
The tasks, examples, and references in this chapter are based on the FTP chapter in
IBM z/OS V2R2 Communications Server TCP/IP Implementation Volume 2: Standard Applications, SG24-8361, where basic, non-secure FTP scenarios are described. The assumption here is that you already have FTP clients and servers in your environment.
IBM z/OS V2R2 Communications Server TCP/IP Implementation Volume 2: Standard Applications, SG24-8361, where basic, non-secure FTP scenarios are described. The assumption here is that you already have FTP clients and servers in your environment.
This chapter includes the following topics:
17.1 Conceptual overview of FTP security
Security exposures can exist in the FTP environment, so it is imperative to analyze and correct them using available tools. The FTP application relies on the use of an external security manager, such as RACF, for certain levels of security. The client and server environments provide built-in security functions for additional security. We identify a few of the common security exposures and tools that can be used to address the issues. The major emphasis is on Secure Sockets Layer/Transport Layer Security (SSL/TLS) and Application Transparent Transport Layer Security (AT-TLS) features supported by the z/OS FTP application.
This section features the following topics:
•How FTP works
•How FTP security can be applied
17.1.1 FTP security overview
In this book, we define the term secure FTP by using the following statements:
•FTP data transmissions can be secured by requiring the client to connect to the server indirectly by passing through an FTP SOCKS proxy server that can control the connections and provide an extra level of security itself on the path toward the final destination server.
•FTP clients can allow or require server authentication whereby the server identifies itself to the client by passing a digital certificate to the client, which verifies the certificate against pre-established criteria. Any data exchanged between the client and server can then be encrypted using encryption keys established at connection time.
•FTP servers can allow or require the same server authentication process. Data encryption is usually the intent of this process, although not always required.
•FTP servers can require client authentication whereby the client identifies itself to the server by passing a digital certificate to the server who verifies the certificate against pre-established criteria. The certificate information can be used by the server to provide secure application logons on behalf of the client, thus avoiding the exchanges of user ID and password in clear text.
|
Tip: This list of statements does not fully define secure FTP. However, because of the focus of this chapter, we limit our definition to these statements.
|
17.1.2 How FTP security works
SOCKS proxy protocols enable an FTP client to access a remote FTP server, protected by a blocking mechanism, that is otherwise unreachable. The client does not have direct network access to the final destination server, but the intermediate (proxy) server does have the necessary access. Therefore the client, having access to the proxy server, can connect to the proxy by using a special SOCKS protocol, pass through the proxy, and thereby gain access to the intended final destination.
Clients and servers can identify (authenticate) each other by using digital certificates, and can encrypt data exchanges by using encryption keys obtained from these certificates.
In addition to native TLS support, the FTP server and client can use AT-TLS to manage TLS security. TLS managed by AT-TLS (TLSMECHANISM ATTLS) supports more security functions than TLS managed natively by the FTP (TLSMECHANISM FTP). Be aware of the following AT-TLS capabilities and requirements when planning the preferred AT-TLS support for FTP:
•Specify the label of the certificate to be used for authentication instead of using the default.
•Support SSL session key refresh.
•Support SSL sysplex session ID caching.
•Trace decrypted SSL data for FTP in a data trace.
•Receive more detailed diagnostic messages in syslogd.
•There are no restrictions for the FTP ATTLS function.
•Policy agent must be active for FTP ATTLS to work.
•TLS security defined natively to FTP will continue to be available in addition to AT-TLS.
17.1.3 How FTP security can be applied
FTP security can be applied by implementing restricted access to FTP servers with firewalls, and then requiring the use of a SOCKS proxy server to control client access to the intended destination server.
Digital certificates can be used for client and server authentication and to enable the use of data encryption.
If you already have TLS implemented for an existing instance of the FTP server, it is easy to migrate from TLS to AT-TLS support. AT-TLS support is implemented by moving most of the TLS definitions from the FTP server’s FTP.DATA file into the policy agent’s AT-TLS configuration profile section. The FTP server is defined as an AT-TLS controlling application to the policy agent, and can retain its control of the secure relationship with the client. The AT-TLS implementation provides more flexibility and functionality than basic TLS, and is therefore the preferred method of implementing digital certificate support for the FTP server. The IBM Configuration Assistant GUI is used to create the appropriate policy agent statements for AT-TLS.
17.2 FTP client with SOCKS proxy protocol
In this section, we describe the configuration changes that are necessary to add SOCKS server support to the base FTP client that we introduced in IBM z/OS V2R2 Communications Server TCP/IP Implementation Volume 2: Standard Applications, SG24-8361. This section includes the following topics:
•Description of the SOCKS proxy protocol
•Configuration of the SOCKS proxy protocol
•Activation and verification of the SOCKS proxy FTP
17.2.1 SOCKS proxy protocol overview
An FTP client can be permitted to access an FTP server either directly, or it can be required to access the server indirectly by passing through a SOCKS proxy server to get to the FTP server. If the FTP client must pass through a SOCKS proxy, the client must use the SOCKS protocol to successfully navigate through the proxy server. The client must be able to determine which servers it must contact using the SOCKS protocol. These servers are specified in a SOCKS configuration file that the client reads to make this determination. The SOCKSCONFIGFILE statement in the client’s FTP.DATA file is used to point the client to the configuration file where these servers are identified.
Dependencies
Consider the following dependencies:
•The SOCKS protocol is supported for IPv4 only, not IPv6.
•The SOCKSCONFIGFILE is applicable to the client only: the server ignores the statement.
•If the SOCKSCONFIGFILE is not present in the client’s FTP.DATA file, the client does not use SOCKS to contact any servers.
•The configuration file can be an HFS file or an MVS data set.
Using the FTP client with SOCKS allows users to contact FTP servers that are protected by a SOCKS firewall that are otherwise unreachable.
17.2.2 Configuration of SOCKS proxy protocol
To configure the client for SOCKS support, complete the following tasks:
1. Configure the SOCKS configuration file.
2. Add the SOCKSCONFIGFILE statement to FTP.DATA.
Configuring the SOCKS configuration file
The configuration file can be an HFS file or an MVS data set. You can code DIRECT or SOCKD statements in the configuration file. A DIRECT statement instructs the FTP client to access the FTP server without using SOCKS. A SOCKD statement directs the client to use SOCKS protocols and the specified SOCKS server to access the FTP server.
The order of statements in the SOCKS configuration is important. The client searches the statements in the order they are coded in the file. The first statement that matches the identification of the target FTP server is applied. Code statements that apply to specific FTP servers first, and a general statement for all other servers last.
Use the DIRECT statement to instruct the FTP client not to use SOCKS for the destinations that are included in the DIRECT statement.
Use the SOCKD statement to instruct the FTP client to use a SOCKS server for the destinations that are included in the SOCKD statement.
The statements in the file use the following syntax:
DIRECT ftp_server_ipaddr/number_of_subnetmask_bits
SOCKD @=proxy_server_ipaddr ftp_server_ipaddr/number_of_subnetmask_bits
Example 17-1 shows configuration statements.
Example 17-1 SOCKS configuration file, TCPIPB.TCPPARMS(FTPSOCKS)
1 SOCKD @=10.1.100.201 172.14.0.0/16
2 DIRECT 10.0.0.0/8
3 DIRECT 127.0.0.1/32
4 DIRECT 0.0.0.0 0.0.0.0
The numbers in Example 17-1 correspond to the following information:
1. Use SOCKS protocol to connect to the proxy server at 10.1.100.201 to pass through to any destination FTP servers in the subnet of 172.14.x.x.
2. Access all FTP servers within the 10.x.x.x network directly (no SOCKS protocol).
3. Access the local loopback address directly with no SOCKS protocol.
4. Access all other FTP servers directly that are not mentioned here.
For more information about the use of the statement parameters, see z/OS Communications Server: IP Configuration Reference, SC27-3651.
Adding the SOCKSCONFIGFILE statement to FTP.DATA
The FTP client uses configuration information in the SOCKS configuration file to determine whether to access a given IPv4 FTP server directly or through a SOCKS server. The name of the SOCKS configuration file is specified by coding the SOCKSCONFIGFILE statement in the client’s FTP.DATA file, as shown in the following examples:
SOCKSCONFIGFILE /etc/ftpsocks.conf
SOCKSCONFIGFILE ‘TCPIPB.TCPPARMS(FTPSOCKS)’
17.2.3 Activating and verifying the SOCKS proxy FTP
To use SOCKS proxy protocol with your FTP client, complete the following steps:
1. Prepare the client to use the updated FTP.DATA file.
2. Execute the FTP client with SOCKS enabled.
3. Verify client log messages are as expected.
Preparing the client to use the updated FTP.DATA file
Allocate the FTP.DATA file to the TSO client as shown in the following example:
alloc ddn(sysftpd) dsn(‘tcpipb.tcpparms(ftpcb31)’) shr
Allocate the FTP.DATA file to the batch job client as shown in the following example:
//SYSFTPD DD DSN=TCPIPB.TCPPARMS(FTPCB31),DISP=SHR
Executing the FTP client with SOCKS enabled
Connect to an FTP server in the protected network. The SOCKS server should be used to get there as shown in the following for example:
FTP 172.14.1.20
Connect to your local loopback address and you should connect directly without SOCKS assistance as shown in the following for example:
FTP 127.0.0.1
Verifying client log messages are as expected
The expected client connection and login messages should be observed. If connecting to the proxy server, supply the appropriate user ID and password at the proxy server device. When connecting to the final destination FTP server, supply the user ID and password at that device.
17.3 FTP with native TLS support
In this section, we describe the security parameters to be added to the basic FTP design that was described in IBM z/OS V2R2 Communications Server TCP/IP Implementation Volume 2: Standard Applications, SG24-8361, to enable native TLS. We need to enable various RACF profiles and then authenticate and encrypt the FTP sessions.
Both the FTP server and client in the z/OS Communications Server support TLS and Kerberos security. We show the use of TLS. FTP can also be made secure with z/OS Communications Server AT-TLS or IP Security (IPSec). This section describes only the TLS security built into FTP.
For more information about securing FTP using AT-TLS, see 17.4, “FTP with AT-TLS security support” on page 771. AT-TLS. IPSec also are described in their respective chapters in this book.
|
FTP versus sftp: This section focuses on implementing SSL/TLS in FTP. The SSL/TLS implementation of FTP is known as secure FTP and invokes security in z/OS Communications Server using z/OS System SSL. It is based upon the following extensions to the base FTP RFC 959:
•RFC 2246, “The TLS Protocol Version 1”
•Internet draft RFC, “On Securing FTP with TLS (draft 05)”
•RFC 2228, “FTP Security Extensions”
•RFC 4217, “Securing FTP with TLS“
You need to understand the difference between secure FTP and the OpenShell procedure known as sftp. The sftp procedure operates over an encrypted Secure Shell (SSH) transport and does not use FTP protocols as described in RFC959 and its related RFCs.
|
This section contains the following topics:
17.3.1 FTP native TLS security overview
We now expand on our base FTP server (introduced in IBM z/OS V2R2 Communications Server TCP/IP Implementation Volume 2: Standard Applications, SG24-8361) and add more security options. We set up the secure FTP server on one LPAR, and use a third-party FTP client and a z/OS client to demonstrate the secure FTP session.
Implicit versus explicit TLS connections
An implicit TLS connection is one in which the client connects to a nonstandard port (port 990) and immediately performs TLS negotiation. An explicit TLS connection is one where the client connects to the standard FTP server port (21) and issues a command (AUTH) indicating that TLS should be enabled. In our implementation of secure FTP, we demonstrate the use of both implicit and explicit TLS. See 17.3.6, “Implicit secure TLS login” on page 763 for information about how to implement an implicit TLS connection.
Dependencies
There are multiple dependencies, beginning with an appropriate understanding of the type of security that is acceptable to a particular business site, and ending with software and hardware prerequisites.
With TLS, SSLv2 is not supported.
Basic security audit information
Is TLS the appropriate security mechanism, or must another security mechanism be considered? The response to this question depends on the types and numbers of clients and servers, the types of file transfers that need to be invoked, the types of encryption algorithms that need to be used, and so on. Many of these issues are described in standard product publications and in Chapter 3, “Certificate management in z/OS” on page 37.
When creating the certificates for the FTP server or the FTP client, the following same considerations apply that apply to native TLS support for FTP:
•Does a shared key ring provide enough security for the environment?
•Does a shared site certificate for the server suffice, or is the granularity of individual server certificates more suitable?
•Is there any requirement for client certificates? If so, must these be available to individual clients or can a group of clients share a certificate for authentication purposes?
•How many and what type of certificates are necessary? How is certificate management to be handled? Is it important to engage a well known certificate authority to produce and manage certificates. Can the installation be its own certificate authority?
Software and hardware prerequisites
If FTP TLS is the appropriate security mechanism for an installation, an SAF environment must be available for necessary security authorizations. An FTP server that is already functioning in a non-secure mode should be available as a basis for the new security work with FTP. A decision should have been made about the type of hardware assists or cryptographic adapters necessary to ensure that service level agreements on performance can be met.
In addition to the FTP.DATA statements required for the basic FTP setup, FTP with security requires a key ring database with at least one certificate and additional statements in FTP.DATA. The server certificate for FTP must be the default certificate on the key ring.
FTP with security provides a safer environment for the transmission of data. It provides user authentication, encryption, and data integrity checking.
Considerations
The use of security requires more configuration and requires management of key rings. The use of TLS also adds overhead to the FTP transfer and requires an FTP client that supports TLS.
|
Important: Native TLS with FTP relies on the existence of a default certificate in a key ring. It cannot retrieve specific certificates by certificate label.
AT-TLS supports certificate labels, or can continue to use a default certificate in the absence of a certificate label specification.
|
FTP with TLS supports the following TLS standards that are built on top of RFC 2246, “The TLS Protocol Version 1” and RFC 2228, “FTP Security Extensions”:
•The DRAFT protocols defined with Internet draft RFC, “On Securing FTP with TLS (draft 05)”
•The RFC 4217 protocols defined with RFC 4217, “Securing FTP with TLS“
RFC 4217 removes some of the restrictions that the Internet DRAFT imposes on FTP negotiations. In 17.3, “FTP with native TLS support” on page 726, we test with both the DRAFT version of TLS and the RFC 4217 version of TLS.
17.3.2 Configuring FTP native TLS security
To start FTP with TLS, first complete all of the implementation tasks for both client and server that are described in IBM z/OS V2R2 Communications Server TCP/IP Implementation Volume 2: Standard Applications, SG24-8361.
We create a server certificate, which might be a self-signed server certificate, a personal server, or a site certificate that has been signed by a certificate authority. The client needs access to a key ring on the client’s system and can optionally even employ a client certificate for client authentication.
We need one or more key rings into which we can store the certificates for both client and server. Then we make changes to the FTP.DATA file for the server and optionally to the z/OS client. Finally, we need to permit the user ID of the z/OS FTP server and the z/OS FTP client to the appropriate RACF classes.
We tested the following scenarios with FTP and native TLS security:
•z/OS client to z/OS server:
– We verified that the z/OS FTP client on TCPIPB still worked as expected when TLS was enabled at the server but not invoked by the client.
– We verified that the client operated as desired when TLS was enabled and invoked.
We tested with both TLSRFCLEVEL DRAFT and TLSRFCLEVEL 4217.
•Workstation client to z/OS server:
– We verified that the workstation client still worked as expected when TLS was enabled at the server but not invoked by the client.
– We verified that the client operated as desired when TLS was enabled and invoked.
We tested with both TLSRFCLEVEL DRAFT and TLSRFCLEVEL 4217.
To set up FTP server TLS support, complete the following tasks:
1. Create key ring and certificates and update RACF permissions.
Creating key ring and certificates and updating RACF permissions
Generally, you should use a digital certificate that is signed by a professional certificate authority (CA). However, to demonstrate the security features of FTP we created a self-signed CA certificate and then used it to sign our shared SITE certificate.
This approach enabled us to be our own, internal CA. The commands can be executed from ISPF option 6, but because we wanted to keep a record of our security commands, we preferred to submit them from a batch job. See Chapter 3, “Certificate management in z/OS” on page 37 for the details about setting up a shared ring, an internal CA certificate, and a shared SITE certificate with batch jobs.
Our shared SITE certificate is to be used by several servers and clients, including our FTP server. The FTP server is associated with the OMVS segment and user ID of TCPIP. In addition, we want the shared key ring on which the self-signed CA certificate and the server SITE certificate reside to be owned by the same user ID, TCPIP.
We completed the following RACF tasks to set up the key ring and certificates:
•Create a shared key ring
•Generate a RACF CA certificate
•Generate a RACF SITE certificate
•Connect both certificates to the shared key ring
•Permit access to the private key of the shared SITE certificate in the key ring
•Permit access to LIST (retrieve) the certificates
•Permit access to the shared key ring
•Export the CA certificate to a flat file for prepopulating client devices
•Summary of shared key ring environment for FTP
Creating a shared key ring
Certain RACF classes must be active before rings and certificates are added with the RACDCERT command, as shown in the following example:
SETROPTS CLASSACT(DIGTCERT)
SETROPTS CLASSACT(DIGTRING)
Create the shared key ring, refresh the relevant classes, and list the rings associated with the user ID of TCPIP, as shown in the following example:
RACDCERT ID(TCPIP) ADDRING(SharedRing1)
SETROPTS RACLIST(DIGTCERT) REFRESH
SETROPTS RACLIST(DIGTRING) REFRESH
RACDCERT LISTRING(*) ID(TCPIP)
Generating a RACF CA certificate
The default for the life of a certificate is one year. We executed the first RACDCERT command to assign an expiration date of 01 November 2014, as shown in Example 17-2. You might want to change the time frame in which the certificate is to be valid. After the certificate creation, refresh the facility and list the generated CA certificate.
Example 17-2 Using RADCERT to assign an expiration date
RACDCERT CERTAUTH GENCERT -
SUBJECTSDN( O('IBM CORPORATION') -
OU('ITSO CERTIFICATE AUTHORITY') -
C('US')) -
NOTBEFORE(DATE(2010-11-01)) - 1
NOTAFTER(DATE(2014-11-01)) - 1
KEYUSAGE(CERTSIGN) -
WITHLABEL('CS ITSO CA1') 2
SETROPTS RACLIST(DIGTCERT) REFRESH
RACDCERT CERTAUTH LIST(LABEL('CS ITSO CA1'))
The numbers in Example 17-2 on page 729 correspond to the following information:
1. Define time frame for this certificate
2. Specify the label for the certificate as CS ITSO CA1.
Generating a RACF SITE certificate
A USER certificate is associated with a user ID and can be used only by a single process: server process or client process. A SITE certificate is also associated with a user ID, but it can be shared among several users: servers, clients, or both. A shared SITE certificate might be considered a security exposure because it is not distinctly associated with a single process.
|
Tip: If your enterprise needs more stringent security controls than a shared site certificate offers, use separate USER certificates for each server and client. You should create an environment that meets your organization’s requirements.
|
Example 17-3 shows the set of RACF commands that we executed to create a shared SITE certificate for our implementation of FTP. Notice that the SITE certificate is signed with the CA certificate just created.
Example 17-3 Creating a shared SITE certificate
RACDCERT SITE GENCERT -
SUBJECTSDN(CN('ITSO.IBM.COM') -
O('IBM CORPORATION') -
OU('ITSO Shared Site') -
C('US')) -
NOTBEFORE(DATE(2010-11-01)) - 1
NOTAFTER(DATE(2014-11-01)) - 1
WITHLABEL('CS ITSO SharedSite1') -
SIGNWITH(CERTAUTH LABEL('CS ITSO CA1') 2
RACDCERT SITE LIST(LABEL('CS ITSO SharedSite1'))
The numbers in Example 17-3 correspond to the following information:
1. Define time frame for this certificate.
2. Sign with CA certificate ‘CS ITSO CA1’.
Connecting both certificates to the shared key ring
Execute the RACF commands that are shown in Example 17-4 to connect the two certificates to the shared key ring.
Example 17-4 Connecting two certificates to the shared key ring
RACDCERT ID(TCPIP) -
CONNECT(CERTAUTH LABEL('CS ITSO CA1') RING(SharedRing1) -
USAGE(CERTAUTH))
RACDCERT ID(TCPIP) -
CONNECT(SITE LABEL('CS ITSO SharedSite1') RING(SharedRing1) -
USAGE(PERSONAL) -
DEFAULT)
SETROPTS RACLIST(DIGTCERT) REFRESH
SETROPTS RACLIST(DIGTRING) REFRESH
RACDCERT LISTRING(*) ID(TCPIP)
|
Important: The USAGE parameter for a SITE certificate must specify USAGE(PERSONAL). The default is USAGE(SITE), which renders the certificate useless.
|
Permitting access to private key of shared SITE certificate in key ring
Every user, whether server or client, requires access to the private key of the shared SITE certificate. These commands provide that access to the relevant users. First, we permit the user ID associated with the server and client procedures (TCPIP). Then, we permit access by the general users, CS06, who can FTP into the FTP server, as shown in the following examples:
PERMIT IRR.DIGTCERT.GENCERT CLASS(FACILITY) ID(TCPIP) ACCESS(CONTROL)
PERMIT IRR.DIGTCERT.GENCERT CLASS(FACILITY) ID(CS06) ACCESS(CONTROL)
SETROPTS RACLIST(FACILITY) REFRESH
SETROPTS RACLIST(DIGTCERT) REFRESH
Permitting access to LIST (retrieve) the certificates
To access a certificate authority (CA) or site certificate, the user (server or client) must have control access to the IRR.DIGTCERT.LIST resource in the FACILITY class, as shown in the following example:
PERMIT IRR.DIGTCERT.LIST CLASS(FACILITY) ID(TCPIP) ACCESS(CONTROL)
PERMIT IRR.DIGTCERT.LIST CLASS(FACILITY) ID(CS06) ACCESS(CONTROL)
SETROPTS RACLIST(FACILITY) REFRESH
SETROPTS RACLIST(DIGTCERT) REFRESH
Permitting access to the shared key ring
The shared key ring in our environment is the repository for the CA certificate and the server SITE certificate. FTP clients also need a key ring to maintain certificate authority certificates and to store client certificates required if the server enforces client authentication.
In our sample scenarios, we are using the same shared key ring for z/OS clients and z/OS servers. Therefore, both groups of participants in the FTP protocols need access to the shared ring.
Owners of a key ring need READ access to it. Non-owners of a key ring need UPDATE access to it. The FTP procedure is owned by the user ID TCPIP. z/OS TSO or UNIX FTP clients are associated with different user IDs, like CS06. Therefore, we executed the following commands to provide the appropriate authorizations to the FTP server:
PERMIT IRR.DIGTCERT.LISTRING CLASS(FACILITY) ID(TCPIP) ACCESS(READ)
PERMIT IRR.DIGTCERT.LISTRING CLASS(FACILITY) ID(CS06) ACCESS(UPDATE)
SETROPTS RACLIST(FACILITY) REFRESH
SETROPTS RACLIST(DIGTCERT) REFRESH
Exporting the CA certificate to a flat file for prepopulating client devices
Most vendors of client software (TN3270, FTP, and so on) usually prepopulate their client key rings with well-known certificate authority certificates. However, the CA certificate that we are using to sign all of our other SITE certificates and server certificates is a self-signed CA certificate, and client devices will not initially have a copy of it. We must EXPORT it from RACF to an MVS flat file in preparation for sending it to the clients. This is usually accomplished using FTP.
|
Tip: To avoid this step, consider having a well-known certificate authority sign your SITE and Server certificates. You are not responsible for acquiring or sending copies of their CA certificates to your clients. The client devices and their software should already have copies of these public CA certificates. If not, they have the responsibility of acquiring them directly from the certificate authority.
|
RACF provides several formats in which to export the certificate and its keys. The format chosen will be dictated by how the client and server use the certificate and the requirements of the level of TLS used by the negotiation process. For more information about the available formats and why each is used, see z/OS Security Server RACF Security Administrator’s Guide, SA22-7683 and z/OS Security Server RACF Command Language Reference, SA22-7687. We used the following export command:
RACDCERT CERTAUTH EXPORT(LABEL('CS ITSO CA1')) -
FORMAT(CERTB64) DSN('TCPIP.ITSO.CACERT')
For our scenario, we chose format CERTB64 to export our CA certificate as a single certificate with only the public key included. Clients that require a copy of our certificate to be prepopulated into their key ring can import this copy and mark it as a trusted CA certificate. Using this format, we do not compromise the integrity of this certificate’s private key.
Summary of shared key ring environment for FTP
Figure 17-1 shows how the z/OS FTP client and the z/OS FTP server will use the certificates we just created in the shared RACF key ring.

Figure 17-1 The shared key ring for FTP client and server
The server accesses the SITE certificate and any CA certificates that were involved in the signing of the SITE certificate when it had to identify itself to the client during the SSL negotiation process. A CA might use a root certificate and one or more intermediate certificates to sign another certificate. Likewise, the client needs access to the CA certificate (one or more) that has signed the FTP server’s SITE certificate.
Optionally, the server can request client authentication. In this case the client will send its certificate signed by a trusted certificate authority to the server. The client certificate can be stored in the same key ring as that of the CA certificate.
The shared key ring is only available on nodes that share the same RACF database. If our client is a workstation, then there is no shared key ring. Instead, the workstation has a key ring separate from that of the z/OS server node.
Updating the FTP.DATA for the server
We added several statements to the server FTP.DATA to provide for additional security. Most of the statements are documented in “Security options” of the hlq.SEZAINST(FTSDATA) member. Others are documented in z/OS Communications Server: IP Configuration Reference, SC27-3651.
Example 17-5 shows the extra statements that we added to our FTP.DATA data set to enable security.
Example 17-5 Added statements in FTP.DATA to enable TLS security
1 EXTENSIONS AUTH_TLS
2 TLSMECHANISM FTP
3 KEYRING TCPIP/SharedRing1
4 CIPHERSUITE SSL_RC4_MD5_EX ; 03
4 CIPHERSUITE SSL_RC4_MD5 ; 04
4 CIPHERSUITE SSL_3DES_SHA ; 0A
4 CIPHERSUITE SSL_DES_SHA ; 09
4 CIPHERSUITE SSL_NULL_MD5 ; 01
4 CIPHERSUITE SSL_NULL_SHA ; 02
5 SECURE_FTP ALLOWED
6 SECURE_CTRLCONN PRIVATE
7 SECURE_DATACONN CLEAR
8 TLSTIMEOUT 100
9 TLSRFCLEVEL DRAFT
The numbers in Example 17-5 correspond to the following information:
1. Enables TLS with an EXTENSIONS AUTH_TLS statement.
2. Indicates native FTP TLS support (not AT-TLS)
|
Unsupported: With FTP TLS, SSLv2 is not supported.
|
3. Adds a KEYRING statement to identify the owner and name of the key ring file. By default, the owner ID is the user ID associated with the FTP server started task. In our case, the key ring is owned by the user ID TCPIP. It is not necessary to place the user ID in front of the label name of the key ring. However, it is good practice to do so in case other FTP server procedures not owned by TCPIP use this FTP.DATA file as a model.
4. Adds a CIPHERSUITE statement for each encryption algorithm desired. The order in which they are coded here determines the order (priority) in which they are negotiated with the client.
5. Adds a SECURE_FTP ALLOWED statement to allow for, but not require, TLS clients. In this fashion, the same FTP port can be used for non-TLS connections or for TLS connections, depending on the nature of the client request. If your implementation requires the use of TLS for every connection (not optional), then code SECURE_FTP REQUIRED instead.
6. Adds a SECURE_CTRLCONN PRIVATE statement. This statement is ignored unless the client requests a secure connection. Generally, code SECURE_CTRLCONN PRIVATE if the TLS mechanism is enabled because the control connection carries user IDs and passwords. It is common practice to protect the user ID and the password even if the data connection need not be secure.
7. Adds a SECURE_DATACONN CLEAR statement to allow the client to determine whether data traffic really needs encryption. Encryption carries a performance price and might not be necessary for every data transfer.
8. Takes the default of 100 on TLSTIMEOUT or code it. This specifies the maximum time between full TLS handshakes.
9. Adds a default TLSRFCLEVEL DRAFT. This indicates that the FTP TLS protocol is following the draft RFC named “On Securing FTP with TLS - revision 05”. It explains how to use RFC 2228 commands to implement TLS security.
17.3.3 Activate and verify FTP server without security
We enable the FTP server for TLS security, but the client does not request security. We do this to verify that the selected clients still work as expected with the revised FTP server.
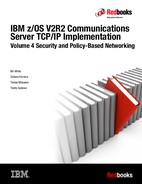
The scenario we describe first is shown in Figure 17-2.
Figure 17-2 FTP Client connection to server: no security
The following methods can be used to verify that the FTP server has started and is working correctly:
•Verify the non-TLS z/OS client can connect to the server
•Use a workstation client to verify the FTP server
Checking FTP server job log messages
First, we stop the current FTP server at TCPIPD and restart it while pointing to the FTP.DATA file that has been reconfigured for TLS, as shown in the following example:
•p ftpdd1
•s ftpdd
Our FTP procedure is copied after hlq.TCPPARMS(FTPSPROC) and begins, as shown in Example 17-6.
Example 17-6 FTP procedure without _BPX_JOBNAME specified
//FTPDD PROC MODULE='FTPD',PARMS='',
// TCPDATA=DATAD&SYSCLONE.,FTPDATA=FTPSECD
//FTPD EXEC PGM=&MODULE,REGION=0M,TIME=NOLIMIT,
// PARM=('POSIX(ON) ALL31(ON)',
// 'ENVAR("_BPXK_SETIBMOPT_TRANSPORT=TCPIPD"',
// '"TZ=EST5EDT4")/&PARMS')
//**********************************************************
Look for message EZY2702I on the system console. Example 17-7 shows the EZY2702I message we received shortly after FTP was started.
Example 17-7 EZY2702I message received on successful startup of FTP
EZY2702I Server-FTP: Initialization completed at 11:14:06 on 08/02/11.
Example 17-8 shows that the FTP server has initialized in an address space named FTPDD1 and that it is owned by user ID TCPIP.
Example 17-8 D OMVS,A=ALL: FTPDD1 as a UNIX Address Space
D OMVS,A=ALL
BPXO070I 11.15.10 DISPLAY OMVS 263
OMVS 000F ACTIVE OMVS=(3A)
USER JOBNAME ASID PID PPID STATE START CT_SECS
TCPIP FTPDD1 0055 33816660 1 1FI----- 11.14.06 .0
LATCHWAITPID= 0 CMD=FTPD
Verifying the non-TLS z/OS client can connect to the server
To verify that the FTP server was functional, we used an FTP client on another TCPIP, TCPIPB, that was not TLS-enabled. Our FTP server at TCPIPD was set up with TLS as optional (SECURE_FTP ALLOWED).
Example 17-9 on page 736 shows the output of our FTP client on TCPIPB after we connected to our FTP server. We did not invoke TLS in the client FTP.DATA file, and we did not invoke TLS with a parameter on the ftp command itself. Therefore, the connection we tested was not running with TLS.
From ISPF, Option 6, we entered the client command at TCPIPB on LPAR A13. TCPIPB is running in a CINET environment. Therefore, we needed to designate appropriate stack affinity for the FTP client, as shown in the following example:
ftp 10.1.1.40 (TCP TCPIPB
Example 17-9 shows the resulting output, prior to signing on with the user ID and password.
Example 17-9 FTP from one z/OS system to another z/OS system
EZA1450I IBM FTP CS V1R13
EZA1466I FTP: using TCPIPB
EZA1554I Connecting to: 10.1.1.40 port: 21.
220-FTPDD1 IBM FTP CS V1R13 at wtsc33.ITSO.IBM.COM, 11:39:32 on 2011-08-02.
220 Connection will close if idle for more than 5 minutes.
EZA1459I NAME (10.1.1.40:CS03):
Displaying system job tasks for control and data connections
After we log in, but prior to entering the user ID and password, we see output at TCPIPD (see Example 17-10) from the D OMVS,A=ALL command that shows that we have address space 0029, which has been forked off to represent the client control connection to the server. At this point the client connection in address space (ASID of 0029) is still running under the security context of TCPIP because the user ID and password have not been entered. The JOBNAME of the client name has been forked off as FTPDD5.
Example 17-10 OMVS address spaces and connection IDs for FTP control connections
D OMVS,A=ALL
BPXO070I 11.26.30 DISPLAY OMVS 295
OMVS 000F ACTIVE OMVS=(3A)
USER JOBNAME ASID PID PPID STATE START CT_SECS
......
TCPIP FTPDD1 0055 33816660 1 1F------ 11.14.06 .0
LATCHWAITPID= 0 CMD=FTPD
.....
TCPIP FTPDD5 0029 67371161 33816660 1FI----- 11.39.32 .0
LATCHWAITPID= 0 CMD=FTPD
D TCPIP,TCPIPD,N,CONN
FTPDD1 00000030 LISTEN
LOCAL SOCKET: ::..21
FOREIGN SOCKET: ::..0
FTPDD1 00000082 ESTBLSH
LOCAL SOCKET: ::FFFF:10.1.1.40..21
FOREIGN SOCKET: ::FFFF:10.1.1.20..1032
At TCPIPD in Example 17-10, you also see for this connection that the output of the D TCPIP,TCPIPD,N,CONN netstat command. Jobname FTPDD1 shows two connections: one on port 21 in a listen state that represents the listener task, and one established connection between local port 21 and 10.1.1.20 that represents the established connection for our client.
At the client, TCPIPB, we next enter the user ID and password for our client user, as shown in Example 17-11.
Example 17-11 Entering user ID and password after initial connection
EZA1450I IBM FTP CS V1R13
EZA1466I FTP: using TCPIPB
EZA1554I Connecting to: 10.1.1.40 port: 21.
220-FTPDD1 IBM FTP CS V1R13 at wtsc33.ITSO.IBM.COM, 11:39:32 on 2011-08-02.
220 Connection will close if idle for more than 5 minutes.
EZA1459I NAME (10.1.1.40:CS03):
EZA1701I >>> USER CS03
331 Send password please.
EZA1789I PASSWORD:
EZA1701I >>> PASS
230 CS03 is logged on. Working directory is "CS03.".
EZA1460I Command:
Example 17-12 shows the output after our user, CS03, has initially established a connection and entered a user ID and password.
Example 17-12 Change to security context of control connection
D OMVS,A=ALL
BPXO070I 11.40.16 DISPLAY OMVS 302
OMVS 000F ACTIVE OMVS=(3A)
USER JOBNAME ASID PID PPID STATE START CT_SECS
TCPIP FTPDD1 0055 33816660 1 1FI----- 11.14.06 .0
LATCHWAITPID= 0 CMD=FTPD
CS03 a CS03 b 0029 67371161 33816660 1FI----- 11.39.32 .0
LATCHWAITPID= 0 CMD=/usr/sbin/ftpdns 2137233224
Notice in Example 17-12 that address space 29 is now running under the security context of CS03 (a) and no longer under that of the superuser TCPIP. The JOBNAME has also changed to that of the user: CS03 (b). In this version of the FTP server JCL, we did not specify _BPX_JOBNAME as an environment variable, as you see in Example 17-6 on page 735.
Our user, CS03, enters the client subcommand stat to verify the parameters under which the FTP server is operating. The FTP server is using the draft level of the FTP code. See a in Example 17-13.
Example 17-13 Client command, STAT, shows operating parameters of server
EZA1701I >>> STAT
211-Server FTP talking to host ::ffff:10.1.1.20, port 1033
211-User: CS03 Working directory: CS03.
211-The control connection has transferred 110 bytes
211-There is no current data connection.
211-The next data connection will be actively opened
211-to host ::ffff:10.1.1.20, port 1033,
....
211-TLS security is supported at the DRAFT level a
Example 17-14 shows output at TCPIPD from the D TCPIP,TCPIPD,N,CONN command after we logged onto the FTP server from TCPIPB. Jobname FTPDD1 shows two connections: one connection on port 21 in a listen state that represents the listener task, and one established connection between local port 21 and 10.1.1.20 that represents the established connection for our client.
Example 17-14 Control port connections: listening socket and client connection
D TCPIP,TCPIPD,N,CONN
USER ID CONN STATE
FTPDD1 00000030 LISTEN
LOCAL SOCKET: ::..21
FOREIGN SOCKET: ::..0
FTPDD1 0000022F ESTBLSH
LOCAL SOCKET: ::FFFF:10.1.1.40..21
FOREIGN SOCKET: ::FFFF:10.1.1.20..1033
Next, we want the server to open the data connection between client and server. The FTP client at TCPIPB enters a dir command to request a directory listing. This creates a forked task for the client at TCPIPD, which is visible after a connection display at TCPIPD is executed (see Example 17-15).
Example 17-15 FTP data connection opened
D TCPIP,TCPIPD,N,CONN
USER ID CONN STATE
CS03 00000244 FINWT2
LOCAL SOCKET: ::FFFF:10.1.1.40..20
FOREIGN SOCKET: ::FFFF:10.1.1.20..1034
FTPDD1 00000030 LISTEN
LOCAL SOCKET: ::..21
FOREIGN SOCKET: ::..0
FTPDD1 0000022F ESTBLSH
LOCAL SOCKET: ::FFFF:10.1.1.40..21
FOREIGN SOCKET: ::FFFF:10.1.1.20..1033
FTP started with _BPX_JOBNAME
We want to show how the displays would change if we started the FTP procedure with the Language Environment variable of _BPX_JOBNAME (see the JCL a in Example 17-16).
Example 17-16 _BPX_JOBNAME Environment Variable setting
//FTPDD PROC MODULE='FTPD',PARMS='',
// TCPDATA=DATAD&SYSCLONE.,FTPDATA=FTPSTLS
//FTPD EXEC PGM=&MODULE,REGION=0M,TIME=NOLIMIT,
// PARM=('POSIX(ON) ALL31(ON)',
// 'ENVAR("_BPXK_SETIBMOPT_TRANSPORT=TCPIPD"',
// '"_BPX_JOBNAME=FTPDDDD"', a
// '"TZ=EST5EDT4")/&PARMS')
//* PARM=('POSIX(ON) ALL31(ON)',
When our user at TCPIPB connects to the FTP server at TCPIPD (but before signing in), the display of the address space yields the output that is in Example 17-17.
Example 17-17 Output from DA when FTP Server is started with _BPX_JOBNAME
NP JOBNAME StepName ProcStep JobID Owner C Pos DP Real Paging SIO
b FTPDD3 STEP1 STC08636 TCPIP c LO FF 724 0.00 0.00
FTPDD1 STEP1 STC08035 TCPIP LO FF 721 0.00 0.00
You see at b in Example 17-17 that the user address space has a jobname of FTPDD3 and it is still associated with the security context of user ID TCPIP c. The netstat conn command displays the listening connection and the established connection to the server at FTPDD1 in Example 17-18.
Example 17-18 FTP listening and established socket connections
USER ID CONN STATE
FTPDD1 00000254 LISTEN
LOCAL SOCKET: ::..21
FOREIGN SOCKET: ::..0
FTPDD1 00000267 ESTBLSH
LOCAL SOCKET: ::FFFF:10.1.1.40..21
FOREIGN SOCKET: ::FFFF:10.1.1.20..1036
Our user at TCPIPB logs in, at which point the security context of the user connection changes from TCPIP to the user’s ID of CS03 (e in Example 17-19). The jobname of the user’s address space changes to FTPDDD. The name is what we coded for the _BPX_JOBNAME environment variable.
Example 17-19 DA output: Change of security context when user logs in
NP JOBNAME StepName ProcStep JobID Owner C Pos DP Real Paging SIO
d FTPDDDD STEP1 STC08636 CS03 e LO FF 847 0.00 14.45
FTPDD1 STEP1 STC08035 TCPIP LO FF 721 0.00 0.00
The output from the netstat conn display, when the FTP server opens a data connection at port 20 for the user, shows that the user’s address space for the data connection remains the constant name of FTPDDDD (f in Example 17-20).
Example 17-20 Data connection for user: Address space name
FTPDDDD 00000285 FINWT2 f
LOCAL SOCKET: ::FFFF:10.1.1.40..20
FOREIGN SOCKET: ::FFFF:10.1.1.20..1037
FTPDD1 00000254 LISTEN
LOCAL SOCKET: ::..21
FOREIGN SOCKET: ::..0
FTPDD1 00000267 ESTBLSH
LOCAL SOCKET: ::FFFF:10.1.1.40..21
FOREIGN SOCKET: ::FFFF:10.1.1.20..1036
Many installations find it useful to have a similar job name for all FTP forked tasks because it helps with job accounting routines, WLM service class assignments, and isolation of syslogd messages. With _BPX_JOBNAME, the data connection for each FTP logged-in user remains the jobname of bpxjobnamex, instead of the jobname of its user ID.
Using a workstation client to verify the FTP server
We now know that the z/OS client at TCPIPB can perform a successful FTP connection to TCPIPD. We need to verify that the non-SSL workstation FTP client can also connect to TCPIPD even though we have enabled certain security parameters in the FTP.DATA file of procedure FTPDD.
We tested with the FTP client on a Windows workstation and had no difficulties connecting to FTPDD at TCPIPD. However, we also needed to test standard FTP with the GUI workstation client that we planned to use for testing TLS in a later step. We chose to use FileZilla, an open source TLS-enabled FTP client that is available at the following location:
Figure 17-3 shows our scenario.

Figure 17-3 Workstation client FTP to z/OS FTP: No security
FileZilla can be configured for secure or non-secure FTP. After installing the package on our workstation, we used the File menu for FileZilla to open the Site Manager window. In this window, we then created a site for the standard FTP, as shown in Figure 17-4.

Figure 17-4 FileZilla: Basic FTP client configuration
We clicked Connect on the FileZilla window and opened both a control and data connection with the FTPDD server at TCPIPD. The results are shown in Figure 17-5.

Figure 17-5 Successful FTP from FileZilla into TCPIPD
17.3.4 Activate and verify FTP server with TLS security: Internet draft protocols
This section describes how to enable the FTP server for TLS security and allow the client to request secure connections through the command line options. The Internet draft RFC, “On Securing FTP with TLS (draft 05)”, represents the original TLS version introduced with the z/OS Communications Server FTP server and client. The eleven revisions of the draft since revision 05 added many enhancements that are included in RFC 4217. For now, we test TLS at the TLS Internet draft level. We test FTP TLS at the RFC 4217 level later in “Using a TLS-enabled workstation client to verify server TLS (RFC 4217)” on page 760.
The following tasks (as described in “Creating key ring and certificates and updating RACF permissions” on page 729 and “Updating the FTP.DATA for the server” on page 733) are already completed:
This section explains how to complete the following tasks:
•Use a TLS-enabled z/OS client to verify server TLS (Internet draft)
•Use a TLS-enabled workstation client to verify server TLS (Draft)
Using a TLS-enabled z/OS client to verify server TLS (Internet draft)
We now allow the clients to request secured communication with the server FTPDD, as shown in Figure 17-6.

Figure 17-6 z/OS Client to FTP server: TLS Security
To set up TLS-enabled FTP session, we must specify which key ring is used for both server and client FTP.DATA. Recall that the key ring is used to store the certificates of the signing authority (the certificate authority) and server certificates. It is also used to store client certificates that might be necessary for client authentication.
The name of the key ring can only be specified in the client FTP.DATA file. We are sharing the ring with all servers at this site. The ring we defined is owned by the user ID TCPIP and is named SharedRing1. It is stored in a RACF repository. We copy the sample for a client FTP.DATA (‘hlq.SEZAINST(FTCDATA) into our TCPIPB.TCPPARMS data set and rename it to FTPCB31.
Review the security options in the sample file and edit the client FTP.DATA file, as shown in Example 17-21.
Example 17-21 Client FTP.DATA file changes
; ---------------------------------------------------------------------
; 7. Security options
; ---------------------------------------------------------------------
;SECURE_MECHANISM TLS a ; GSSAPI (Kerberos) or TLS
;SECURE_FTP ALLOWED ; Authentication indicator
;SECURE_CTRLCONN CLEAR ; Minimum level of security for
;SECURE_DATACONN CLEAR ; Minimum level of security for
;SECURE_HOSTNAME OPTIONAL ; Authentication of hostname in
;SECURE_PBSZ 16384 ; Kerberos maximum size of the
; Name of a ciphersuite that can be passed to the partner during
; the TLS handshake.
;CIPHERSUITE SSL_NULL_MD5 ; 01 b
;CIPHERSUITE SSL_NULL_SHA ; 02
;CIPHERSUITE SSL_RC4_MD5_EX ; 03
;CIPHERSUITE SSL_RC4_MD5 ; 04
;CIPHERSUITE SSL_RC4_SHA ; 05
;CIPHERSUITE SSL_RC2_MD5_EX ; 06
;CIPHERSUITE SSL_DES_SHA ; 09
;CIPHERSUITE SSL_3DES_SHA ; 0A
;CIPHERSUITE SSL_AES_128_SHA ; 2F
;CIPHERSUITE SSL_AES_256_SHA ; 35
KEYRING TCPIP/SharedRing1 c
;KEYRING *AUTH*/* d
;TLSTIMEOUT 100 ; Maximum time limit between full
;SECUREIMPLICITZOS TRUE ; Specify whether client will
; ---------------------------------------------------------------------
In Example 17-21, we commented out the parameters that specify the type of security that we want (SECURE_), shown at a. These parameters, like the request for TLS or the request for a private data connection, can be specified on the ftp command itself. We have also left the CIPHERSUITES commented out at b, because during the TLS negotiation with the server, the intersection of the default CIPHERSUITES from the client and the defined CIPHERSUITES at the server results in a list of cipher suites that will work for both client and server. The order in which the ciphers are coded in the server determines the order of negotiation. The first matching cipher that both the client and server support is chosen for the connection.
Review the KEYRING designation, which is shown at c. When we coded the key ring for the server, we used the syntax KEYRING TCPIP/SharedRing1. Coding TCPIP/ in front of the key ring name allows multiple users to share the key ring which is owned by user TCPIP. You can also use the coding as KEYRING *AUTH*/* as shown at d. This is a special case where RACF permits the client to specify a virtual key ring instead of a real one. Certain conditions must exist in order for the specification of a virtual key ring to be accepted. See the information about virtual key rings in z/OS Security Server RACF Security Administrator’s Guide, SA22-7683.
Now that we have added the designation for the client’s key ring to the client FTP.DATA file and referenced it with the -f parameter on the ftp command (see the following example), we can execute the command again to establish the secure connection, as shown in Example 17-22 on page 745:
ftp -p tcpipb -f "//'TCPIPB.TCPPARMS(FTPCB31)'" -a TLS 10.1.1.40
This command uses the following parameters:
-f Used to point to the FTP.DATA file. You must specify the FTP client FTP.DATA, which contains the KEYRING definition, when setting up the TLS-enabled FTP session.
-a TLS Specifies that the client requests secured communication with the server FTPDD. When SECURE_FTP REQUIRED is defined in FTP server’s FTP.DATA, use -a TLS in the ftp login command. Otherwise, login fails with the following message:
534 Server requires authentication before USER command
534 Server requires authentication before USER command
An alternate method to request TLS secure login is to specify SECURE_MECHANISM TLS in the FTP client’s FTP.DATA.
When TLSPORT portnum operand is defined in FTP client’s FTP.DATA, do not use -a TLS in the ftp login command. Otherwise, the following message is issued because you specified the -a parameter while trying to connect to the secure port:
EZA2892I Secure port 21 does not allow the -a or -r start parameter
EZA2892I Secure port 21 does not allow the -a or -r start parameter
Example 17-22 Establishing a secure connection using a specific FTP.DATA file
ftp -p tcpipb -f "//'TCPIPB.TCPPARMS(FTPCB31)'" -a TLS 10.1.1.40
EZY2640I Using 'TCPIPB.TCPPARMS(FTPCB31)' for local site configuration paramete
rs.
EZA1450I IBM FTP CS V1R13
EZA1466I FTP: using TCPIPB
EZA1554I Connecting to: 10.1.1.40 port: 21.
220-FTPDD1 IBM FTP CS V1R13 at wtsc33.ITSO.IBM.COM, 15:00:07 on 2011-08-02.
220 Connection will close if idle for more than 5 minutes.
EZA1701I >>> AUTH TLS
234 Security environment established - ready for negotiation
EZA2895I Authentication negotiation succeeded
EZA1459I NAME (10.1.1.40:CS03):
EZA1701I >>> USER CS03
331 Send password please.
EZA1789I PASSWORD:
EZA1701I >>> PASS
230 CS03 is logged on. Working directory is "CS03.".
EZA1460I Command:
After issuing the ftp login command, Example 17-22 shows that the negotiation succeeded.
Next, we entered the status subcommand from the client to verify that we truly had a TLS connection, as shown in Example 17-23.
Example 17-23 FTP client messages
status
EZA1701I >>> STAT
211-Server FTP talking to host ::ffff:10.1.1.20, port 1033
211-User: CS03 Working directory: CS03.
211-The control connection has transferred 182 bytes
211-There is no current data connection.
211-The next data connection will be actively opened
211-to host ::ffff:10.1.1.20, port 1033, ....................................................................Lines Deleted
211-Authentication type: TLS a
211-Control protection level: Private b
211-Data protection level: Clear c
211-TLS security is supported at the DRAFT level d
....................................................................Lines Deleted
211 *** end of status ***
Command:
In Example 17-23 on page 745, the connection has successfully negotiated TLS with the server (a). The control connection has been designated as private (b). The data protection level is clear (c). TLS is operating at the DRAFT level (d).
After logging in on the encrypted control connection, we transmit a file from client to server in the unsecured data connection as shown in Example 17-24.
Example 17-24 File transfer over data connection in the clear
get 'cs03.output' out1
>>> PORT 10,1,1,20,4,70
200 Port request OK.
>>> RETR 'cs03.output'
125 Sending data set CS03.OUTPUT
250 Transfer completed successfully.
31583 bytes transferred in 0.030 seconds. Transfer rate 1052.77 Kbytes/sec.
|
Tip: If SECURE_DATACONN is defined as PRIVATE or SAFE in FTP server FTP.DATA, it always asks for securing the data transfer. If SECURE_DATACONN is defined as CLEAR in the FTP client, a user will see following error message when they try to transfer data:
425-Server requires protected data connection,
425-Can't open data connection.
|
Now, we want to transmit a file and secure the transfer with encryption and integrity checking. Therefore, we need to enter the command to change the data connection to a private, encrypted one by entering the subcommand private. The command protect private can accomplish the same action.
Example 17-25 shows setting the data connection encryption option to private and then transferring the file.
Example 17-25 Setting the data connection encryption option to private
private
>>> PBSZ 0
200 Protection buffer size accepted
>>> PROT P
200 Data connection protection set to private
Data connection protection is private
Command:
get 'cs03.output' out2
>>> PORT 10,1,1,20,4,71
200 Port request OK.
>>> RETR 'cs03.output'
125 Sending data set CS03.OUTPUT
250 Transfer completed successfully.
31583 bytes transferred in 0.040 seconds. Transfer rate 789.57 Kbytes/sec.
The status subcommand (stat) from the client shows that the data connection is indeed private, as shown in Example 17-26.
Example 17-26 STAT shows the Data protection level set to Private
211-Authentication type: TLS
211-Control protection level: Private
211-Data protection level: Private
211-TLS security is supported at the DRAFT level
Now, we reset the data connection to clear, as shown in Example 17-27.
Example 17-27 Setting the data protection level back to clear
protect clear
>>> PROT C
200 Data connection protection set to clear
Data connection protection is clear
Command:
Debug tracing for FTP
When you set up the TLS-enabled FTP session for the first time, you might have the FTP login fail, and you cannot find a reason in FTP server log, syslogd log, or system log. So, you can turn on client logging and tracing at the client side and enable tracing at the server side. This section describes how to use trace to debug problems.
In our scenario, we had a login issue when we requested the TLS secure login for the first time (see Example 17-28).
Example 17-28 Error message for FTP from one z/OS system to another z/OS system requesting TLS
ftp -p tcpipb -f "//'TCPIPB.TCPPARMS(FTPCB31)'" -a TLS 10.1.1.40
EZY2640I Using 'TCPIPB.TCPPARMS(FTPCB31)' for local site configuration paramete
rs.
EZA1450I IBM FTP CS V1R13
EZA1466I FTP: using TCPIPB
EZA1554I Connecting to: 10.1.1.40 port: 21.
220-FTPDD1 IBM FTP CS V1R13 at wtsc33.itso.ibm.com, 15:18:26 on 2011-08-02.
220 Connection will close if idle for more than 5 minutes.
EZA2897I Authentication negotiation failed
EZA1459I NAME (10.1.1.40:CS03):
You can enable the trace in FTP client by editing the FTP client’s FTP.DATA file, as shown in Example 17-29.
Example 17-29 Turn on the DEBUG option in client FTP.DATA
TCPIPB.TCPPARMS(FTPCB31)
DEBUG SEC 1
DEBUG SOC(2) 2
The numbers in Example 17-29 on page 747 correspond to the following information:
1. DEBUG SEC shows the processing of the security functions such as TLS and GSSAPI negotiations.
2. DEBUG SOC(n) shows details of the processing during the setup of the interface between the FTP application and the network and details of the actual amounts of data that are processed.
You can also use -d or trace in the ftp login command. The resulting trace activity at the client (as shown in Example 17-30) helps to show the issue.
Example 17-30 Enable tracing in the client
ftp -p tcpipb -f "//'TCPIPB.TCPPARMS(FTPCB31)'" -a TLS 10.1.1.40 (trace 1
EZA1554I Connecting to: 10.1.1.40 port: 21.
220-FTPDD1 IBM FTP CS V1R13 at wtsc33.itso.ibm.com, 15:20:04 on 2011-08-02.
220 Connection will close if idle for more than 5 minutes.
GU4945 ftpSetApplData: entered
FC0459 ftpAuth: TLS init failed with rc = 202 (Error detected while opening th
e certificate database)
EZA2897I Authentication negotiation failed
GV0520 seq_stat_file(2): lrecl=0 recfm=0 blksize=0 mode=1
CZ1582 rnetrc:(3) file CS03.NETRC does not exist
EZA1459I NAME (10.1.1.40:CS03):
Example 17-30 uses trace in the ftp command (1) to turn on the FTP client trace. As the trace shows, the key ring name used was incorrect in the FTP client’s FTP.DATA file, so the certificate database could not be opened. So, authentication negotiation failed 2. After correcting the key ring name, we can log in to the FTP server successfully.
Example 17-31 shows the trace for a successful login with the encryption algorithm.
Example 17-31 Debug trace for a successful TLS-enabled FTP login
ftp -p tcpipb -f "//'TCPIPB.TCPPARMS(FTPCB31)'" -a TLS 10.1.1.40 (trace
EZA1554I Connecting to: 10.1.1.40 port: 21.
220-FTPDD1 IBM FTP CS V1R13 at wtsc33.itso.ibm.com, 15:24:08 on 2011-08-02.
220 Connection will close if idle for more than 5 minutes.
GU4945 ftpSetApplData: entered
EZA1701I >>> AUTH TLS
234 Security environment established - ready for negotiation
EZA2895I Authentication negotiation succeeded
GU4945 ftpSetApplData: entered
GV0520 seq_stat_file(2): lrecl=0 recfm=0 blksize=0 mode=1
CZ1582 rnetrc:(3) file CS03.NETRC does not exist
EZA1459I NAME (10.1.1.40:CS03):
We can also turn on the trace at the server side by using the modify command for debugging at the system console, as shown at a in Example 17-32.
Example 17-32 Enabling tracing at the FTP server
F FTPDD1,DEBUG=ALL a
EZYFT82I ACTIVE SERVER TRACES - FLO CMD PAR INT ACC UTL SEC FSC(1)
SOC(1) JES SQL
After the data is collected, you turn off the trace by using the following steps:
•In the FTP server site, issue the F FTPDD1,DEBUG=NONE command.
•In the FTP client site, comment out the DEBUG statements in the FTP.DATA file.
Using a TLS-enabled workstation client to verify server TLS (Draft)
To verify that our FTP server supports TLS with a non-z/OS client platform, we needed a non-z/OS FTP client that supports TLS. FileZilla, which we used in non-TLS mode, does support TLS. Therefore we continued to use it, and configure it for TLS support. FileZilla is an open source TLS-enabled FTP client that is available at this website:
Figure 17-7 shows our scenario with the separate key rings.

Figure 17-7 Using a Client key ring separate from the Server key ring
The FileZilla client needs a key ring in which to store the certificate authority certificates and any server certificates it might want to receive. It cannot share the RACF key ring with the server. However, FileZilla does not include a key management utility. It is necessary to use the Microsoft Management Console (MMC) to create the key ring for FileZilla.
Creating a key ring and managing the certificate at Windows for FileZilla
To create the key ring, complete the following steps:
1. Use FTP to copy the exported certificate authority certificate in ASCII into the workstation from which you are planning to run FileZilla. Receive the file as ITSOCACERT.cer. This is the certificate that you exported into an MVS data set in “Exporting the CA certificate to a flat file for prepopulating client devices” on page 731.
The certificate label is CS ITSO CA1 and in our examples was stored as TCPIP.ITSO.CACERT.
2. From the Windows Start menu, select Run.
3. Enter mmc in the Open field. Click OK to start the MMC.
4. In the Console 1 window, click File from the menu bar. From the menu, click Add/Remove Snap-in.
5. In the Add/Remove Snap-in window, click Add.
6. In the Add Standalone Snap-in window, select Certificates and click Add.
7. In the Certificates Snap-in window, select Computer account and click Next.
8. Select Local computer and click Finish.
9. Click Close in the Add Standalone Snap-in window.
10. Click OK.
11. In the MMC window, click the plus sign (+) next to Certificates (Local Computer) to show the list of available tasks.
12. Right-click Trusted Root Certification Authorities and choose All Tasks from the menu. Choose Import from the next menu.
13. Click Browse and specify the Trusted Root CA file name that you imported into the workstation. In our case we downloaded this file in ASCII and renamed it to ITSOCACERT.cer. Click Next.
14. Specify that you are placing the certificate “in the following store.”
15. Click Finish. You should receive a message that the import was successful.
16. Double-click the certificates and browse through the list of CA certificates to find the one you just imported. It is represented by the ou name that you assigned to it when you created it with the racdcert certauth command. The one that we created was identified by ou('ITSO CERTIFICATE AUTHORITY'). For more information, see “Generating a RACF CA certificate” on page 729.
FileZilla configuration for TLS
Figure 17-8 shows the configuration settings needed to connect to the TLS-enabled secure FTP server.

Figure 17-8 Configuration of FileZilla to connect to our TLS-enabled secure FTP server
Observe that in the Servertype menu, we selected FTPES - FTP over explicit TLS/SSL. We complete the other fields and click Connect.
Next, the AUTH flow from the client that is requesting a TLS connection displays, as shown in Figure 17-9.
The first time FileZilla uses the certificate, it asks for confirmation to accept or reject the unknown certificate that it receives from the server, as shown in Figure 17-9. Click OK to accept the certificate.

Figure 17-9 Client AUTH TLS flow and certificate confirmation window
In our scenario, we had confirmation that FileZilla connected to our secure FTP server. We received messages that indicated that the TLS/SSL connection was established and that the data connection protection was set to private (PROT P), as shown in Figure 17-10.

Figure 17-10 Confirmation that FileZilla connected to our system using TLS
17.3.5 Activate and verify FTP server with TLS security: RFC4217 protocols
Now that the Internet draft version of FTP TLS is enabled in both a z/OS-to-z/OS environment and in a workstation-to-z/OS environment (as described in 17.3.4, “Activate and verify FTP server with TLS security: Internet draft protocols” on page 742), we enable z/OS at the RFC 4217 level and test again. The following tasks (described in “Creating key ring and certificates and updating RACF permissions” on page 729 and “Updating the FTP.DATA for the server” on page 733) are completed already:
This section explains the following other tasks:
Use a TLS-enabled z/OS client to verify server TLS (RFC 4217)
We now enable the z/OS client at the RFC 4217 level. This permits the client to enable or disable security on the control connection through the ccc command or its equivalent, cprotect clear. With the Internet draft, the client cannot change the nature of the control connection after the control connection has been negotiated as private. With the Draft level, the data connection can always be manipulated from the client side if the server agreed with the client request.
Our first step is to change the z/OS FTP server and the z/OS FTP client to conform to RFC 4217. We change the TLSRFCLEVEL statement in the server FTP.DATA that is shown in Example 17-33.
Example 17-33 Setting TLSRFCLEVEL
EXTENSIONS AUTH_TLS
TLSMECHANISM FTP
KEYRING TCPIP/SharedRing1
CIPHERSUITE SSL_3DES_SHA ; 0A
CIPHERSUITE SSL_DES_SHA ; 09
CIPHERSUITE SSL_NULL_MD5 ; 01
CIPHERSUITE SSL_NULL_SHA ; 02
CIPHERSUITE SSL_RC4_MD5_EX ; 03
CIPHERSUITE SSL_RC4_MD5 ; 04
SECURE_FTP ALLOWED
SECURE_CTRLCONN PRIVATE
SECURE_DATACONN CLEAR
TLSTIMEOUT 100
a TLSRFCLEVEL RFC4217
In this example, TLSRFCLEVEL (a) in TCPIPD.TCPPARMS(FTPSECD) is changed from DRAFT to RFC4217.
Next, Example 17-34 shows the change of the TLSRFCLEVEL for the z/OS client on TCPIPB in TCPIPB.TCPPARMS(FTPCB31) a to reflect the RFC 4217 level.
Example 17-34 FTP.DATA for the client at TLSRFCLEVEL RFC4217
;***********************************************************************
; ---------------------------------------------------------------------
; 7. Security options
; ---------------------------------------------------------------------
;SECURE_MECHANISM GSSAPI ; Name of the security mechanism
;SECURE_FTP ALLOWED ; Authentication indicator
;SECURE_CTRLCONN CLEAR ; Minimum level of security for
;SECURE_DATACONN CLEAR ; Minimum level of security for
;SECURE_HOSTNAME OPTIONAL ; Authentication of hostname in
;SECURE_PBSZ 16384 ; Kerberos maximum size of the
TLSRFCLEVEL RFC4217 a
;CIPHERSUITE SSL_NULL_MD5 ; 01
;CIPHERSUITE SSL_NULL_SHA ; 02
;CIPHERSUITE SSL_RC4_MD5_EX ; 03
;CIPHERSUITE SSL_RC4_MD5 ; 04
;CIPHERSUITE SSL_RC4_SHA ; 05
;CIPHERSUITE SSL_RC2_MD5_EX ; 06
;CIPHERSUITE SSL_DES_SHA ; 09
;CIPHERSUITE SSL_3DES_SHA ; 0A
;CIPHERSUITE SSL_AES_128_SHA ; 2F
;CIPHERSUITE SSL_AES_256_SHA ; 35
KEYRING TCPIP/SharedRing1 ; Name of the keyring for TLS
;EYRING *AUTH*/* ; Name of the keyring for TLS
;TLSTIMEOUT 100 ; Maximum time limit between full
;SECUREIMPLICITZOS TRUE ; Specify whether client will
We restart the FTP server (FTPDD) at TCPIPD. From ISPF, Option 6, at TCPIPB, we enter the ftp client command. TCPIPB is running in a CINET environment. Therefore we needed to establish stack affinity to the desired stack for the FTP. We use the -a parameter to request a TLS connection and the -f parameter to use the correct client FTP.DATA file:
ftp 10.1.1.40 -a TLS -f "//'TCPIPB.TCPPARMS(FTPCB31)'" (TCP TCPIPB
Example 17-35 shows that the connection succeeds.
Example 17-35 TCPIPB FTP client view of the connection at the RFC 4217 level
ftp 10.1.1.40 -a TLS -f "//'TCPIPB.TCPPARMS(FTPCB31)'" (TCP TCPIPB
EZY2640I Using 'TCPIPB.TCPPARMS(FTPCB31)' for local site configuration parameters.
EZA1450I IBM FTP CS V1R13
EZA1466I FTP: using TCPIPB
EZA1554I Connecting to: 10.1.1.40 port: 21.
220-FTPDD1 IBM FTP CS V1R13 at wtsc33.itso.ibm.com, 16:28:36 on 2011-08-02.
220 Connection will close if idle for more than 5 minutes.
EZA1701I >>> AUTH TLS
234 Security environment established - ready for negotiation
EZA2895I Authentication negotiation succeeded
EZA1459I NAME (10.1.1.40:CS03):
EZA1701I >>> USER CS03
331 Send password please.
EZA1789I PASSWORD:
EZA1701I >>> PASS
230 CS03 is logged on. Working directory is "CS03.".
EZA1460I Command:
stat
EZA1701I >>> STAT
211-Server FTP talking to host ::ffff:10.1.1.20, port 1042
....................................................................Lines Deleted
211-Authentication type: TLS
211-Control protection level: Private
211-Data protection level: Clear
211-TLS security is supported at the RFC4217 level
....................................................................Lines Deleted
211 *** end of status ***
The server is operating under the protocols of RFC 4217 (a). If you miss the server’s 211 response about the TLS support level, you can query for the level with the stat (tlsrfclevel command, as in Figure 17-11.
|
EZA1460I Command:
stat (tlsrfclevel
EZA1701I >>> XSTA (tlsrfclevel
211-TLS security is supported at the RFC4217 level a
211 *** end of status ***
|
Figure 17-11 Querying server TLSRFCLevel support
You also can investigate the RFC level at the client with the locstat tlsrfclevel command, as shown in Figure 17-12.
|
EZA1460I Command:
locstat tlsrfclevel
EZA2916I local site variable TLSRFClevel is set to RFC4217 a
|
Figure 17-12 Querying client TLSRFCLevel support
From an OEM client, you could enter quote xsta (tlsrfclevel to do the same thing. Note that you must use the interpreted version of the command (xsta) when you execute the command in this fashion.
|
EZA1460I Command:
locsite tlsrfclevel=draft
EZA1460I Command:
locstat tlsrfclevel
EZA2916I local site variable TLSRFClevel is set to DRAFT
EZA1460I Command:
|
Figure 17-13 Using LOCSITE client command to set the TLSRFCLEVEL
The status command output that is shown in Figure 17-14 shows that the server is also operating under RFC 4217. In addition, it shows the protection levels for the control connection and the data connection.
|
211-Authentication type: TLS
211-Control protection level: Private
211-Data protection level: Clear
211-TLS security is supported at the RFC4217 level
211-Server site variable READVB is set to LE
211-Port of Entry resource class for IPv4 clients is: TERMINAL
211-Record format FB, Lrecl: 128, Blocksize: 6144
211-Server site variable EATTR is set to SYSTEM
211-Server site variable DSNTYPE is set to SYSTEM
211-Server site variable LISTSUBDIR is set to TRUE
211-Server site variable LISTLEVEL is set to 0
211 *** end of status ***
EZA1460I Command:
|
Figure 17-14 Output from status command: FTP server operating parameters
Next we need to see if we can change the control protection level from Private to Clear, one of the capabilities of RFC 4217. Figure 17-15 shows how to use the client command ccc to perform this task. There is an equivalent command: cprotect clear.
When TLSRFCLEVEL DRAFT is configured, these subcommands (ccc and cprotect clear) are not allowed during a TLS session. As shown in Figure 17-15, we connect to the server with the -a TLS specification as before and use ccc command (1) to set control connection protection as clear (2).
|
EZA1460I Command:
ccc
EZA1701I >>> CCC 1
200 CCC command successful
EZA2905I Control connection protection is clear
EZA1460I Command:
status
EZA1701I >>> STAT
211-Server FTP talking to host ::ffff:10.1.1.20, port 1042
.................................................................Lines Deleted
211-Authentication type: TLS
211-Control protection level: Clear 2
211-Data protection level: Clear
211-TLS security is supported at the RFC4217 level
.................................................................Lines Deleted
211 *** end of status ***
EZA1460I Command:
|
Figure 17-15 Clearing the control connection: ccc
After you clear the control connection, you cannot alter the state of the data connection. Therefore, if you want a protected data connection and a clear control connection, the data connection state must be protected before issuing the ccc command.
Next, as shown in Figure 17-16, we reset the control connection to private with the auth tls command (1). When we attempt the ccc command again (2), we are told that we must enter user ID and password again (3). RFC 2228, upon which RFC 4217 is built, specifies that after an auth command is issued to change a previous state, the user must reauthorize. This is why we were required to enter our user ID and password again.
|
EZA1460I Command:
auth tls 1
EZA1701I >>> AUTH TLS
234 Security environment established - ready for negotiation
EZA2895I Authentication negotiation succeeded
EZA1460I Command:
status
EZA1701I >>> STAT
..................................................................Lines Deleted
211-Authentication type: TLS
211-Control protection level: Private
211-Data protection level: Clear
211-TLS security is supported at the RFC4217 level
..................................................................Lines Deleted
211 *** end of status ***
EZA1460I Command:
ccc 2
EZA1701I >>> CCC
530 You must first login with USER and PASS. 3
EZA2904I Cannot set protection level to clear
EZA2905I Control connection protection is private
EZA1460I Command:
user cs03
EZA1701I >>> USER cs03
331 Send password please.
EZA1789I PASSWORD:
EZA1701I >>> PASS
230 CS03 is logged on. Working directory is "CS03.".
EZA1460I Command:
ccc
EZA1701I >>> CCC
200 CCC command successful
EZA2905I Control connection protection is clear
EZA1460I Command:
|
Figure 17-16 Protecting the control connection and clearing it again: auth tls and ccc
We next test a non-secure connection to the FTP server from the same client, as shown in Figure 17-17 on page 759. We want to determine whether we are able to convert an unprotected connection into a secure one with the auth tls command if we are operating at the RFC 4217 support level. We use FTP to connect to the server by using the following command:
ftp 10.1.1.40 -f "//'TCPIPB.TCPPARMS(FTPCB31)'" (TCP TCPIPB
|
..................................................................Lines Deleted
EZA1450I IBM FTP CS V1R13
EZA1466I FTP: using TCPIPB
EZA1554I Connecting to: 10.1.1.40 port: 21.
220-FTPDD1 IBM FTP CS V1R13 at wtsc33.itso.ibm.com, 16:44:41 on 2011-08-02.
220 Connection will close if idle for more than 5 minutes.
EZA1459I NAME (10.1.1.40:CS03):
EZA1701I >>> USER CS03 a
331 Send password please.
EZA1701I >>> PASS
230 CS03 is logged on. Working directory is "CS03.".
EZA1460I Command:
stat (tlsrfclevel
EZA1701I >>> XSTA (tlsrfclevel
211-TLS security is supported at the RFC4217 level b
211 *** end of status ***
EZA1460I Command:
status
EZA1701I >>> STAT
211-Server FTP talking to host ::ffff:10.1.1.20, port 1135
211-User: CS03 Working directory: CS03.
211-The control connection has transferred 209 bytes
..................................................................Lines Deleted
211-Authentication type: None c
211-TLS security is supported at the RFC4217 level
..................................................................Lines Deleted
|
Figure 17-17 An FTP connection without protection
In Figure 17-17 at a, note that the auth tls command does not flow because we did not invoke it and did not include it in the client FTP.DATA file. Observe at b that the server supports RFC 4217. You can verify at c that this connection has been established with no authentication mechanism in place.
When we now issue the auth tls command, as shown in Figure 17-18, our negotiation fails. This is expected behavior because System SSL cannot support this activity because the FTP daemon changes identity when the user logs in.
|
EZA1460I Command:
auth tls
EZA1701I >>> AUTH TLS
234 Security environment established - ready for negotiation
EZA2897I Authentication negotiation failed
EZA1460I Command:
|
Figure 17-18 Negotiation fails: an initially clear control connection cannot be set to private
Using a TLS-enabled workstation client to verify server TLS (RFC 4217)
We now use FileZilla to test the TLS-enabled server operating with RFC 4217 protocols.
We are testing with the same certificate authority (CA) certificate and do not need to use MMC again to establish the key ring that FileZilla needs, as we did in “FileZilla configuration for TLS” on page 751. The configuration for FileZilla is the same one we set up in “Using a TLS-enabled workstation client to verify server TLS (Draft)” on page 749.
We connected the FTP client to the server at TCPIPD successfully. Click Server → Enter custom command. We enter stat to confirm the use of the TLS protocols, as shown in Figure 17-19.

Figure 17-19 FileZilla stat command output
We then use the Server menu to enter the prot c command to obtain a clear data connection. The results are shown in Figure 17-20.
Figure 17-20 Results of client entering port c to clear the data connection
Although FileZilla sends the ccc command, it cannot support a clear control connection. Therefore the connection is terminated. Figure 17-21 shows the connection failure.

Figure 17-21 Entry of ccc command by the FileZilla client
|
Suggestion: Unless both the client and the server are RFC 4217-compliant, the advanced functions, like ccc, cannot be used on the connection without experiencing a disconnect or other unpredictable occurrence.
Although a z/OS server that is running with RFC 4217 can still communicate with downlevel clients using standard TLS protocols, use the DRAFT level unless you are certain that your FTP clients also support the RFC 4217 level, or that your clients will refrain from executing commands like ccc or even REIN, which we have not tested here.
|
17.3.6 Implicit secure TLS login
z/OS FTP supports TLS security for FTP sessions based on Revision 5 of On Securing FTP with TLS. This document describes the implicit method for securing an FTP session with TLS. Connections to port 990 are assumed to be secure, and no AUTH command is needed.
The requirement to implicitly secure the session with FTP port 990 was removed from later drafts and from RFC4217. Nonetheless, FTP platforms use secure FTP sessions with TLS, so certain FTP platforms implement implicit TLS security. This section describes implicitly secure TLS FTP sessions.
|
Note: Starting the FTP server on port 990 is not recommended because not all secure FTP clients will be able to connect to it. Instead, the FTP server can provide equivalent support on a different port by specifying the following statements in the FTP.DATA file:
EXTENSIONS AUTH_TLS
SECURE_FTP REQUIRED
SECURE_CTRLCONN PRIVATE
SECURE_DATACONN PRIVATE
See APAR II13516 for more information.
|
Security handshake sequence
The current z/OS FTP server supports implicit TLS logins, both for z/OS FTP clients and non-z/OS client. The z/OS FTP server can drive the security handshake before or after sending the first 220 reply to client. This is controlled by the SECUREIMPLICITZOS operand in the FTP server FTP.DATA file.
When SECUREIMPLICITZOS is set to TRUE, the z/OS FTP server default, the server expects the security handshake after it sends reply 220 to the client. Figure 17-22 shows the z/OS FTP client to z/OS FTP server implicit login process.

Figure 17-22 z/OS FTP client implicit login with SECUREIMPLICITZOS TRUE
The following process is used:
1. The client connects to the TLSPORT. This example uses the default TLSPORT 990.
2. The z/OS FTP daemon accepts the incoming connection and sends the first reply to the client. Then the client receives this reply.
3. The FTP client and server perform the security handshake. When the security handshake is complete, the connection is secured.
The details of the TLS handshake are handled by the System SSL element of z/OS. The handshake is a sequence of records that are exchanged between the client and server to negotiate exactly how the connection is encrypted from among the different TLS encoding schemes that are available to the client and server.
When SECUREIMPLICITZOS is set to FALSE, the z/OS FTP server uses the same method as other non-z/OS servers and expects the security handshake before it sends reply 220 to the non-z/OS client. Figure 17-23 shows how non-z/OS FTP clients implicitly log in to the z/OS FTP server.

Figure 17-23 Non-z/OS FTP client implicit login with SECUREIMPLICITZOS FALSE
This following process is used:
1. The client connects to the TLSPORT. This example uses the default TLSPORT 990.
2. The FTP server accepts the incoming connection, and then FTP client and server drive the security handshake,
3. After the security handshake is complete, the FTP server sends reply 220 to the client. The client receives this reply, and the session is established.
Configuring z/OS FTP server for implicit TLS login
Next, we enable the z/OS FTP server to listen to port 990 and set up related parameters for an implicit TLS login. See IBM z/OS Communications Server TCP/IP Implementation Volume 2: Standard Applications, SG24-7997 for detailed FTP server implementation steps.
We use TCPIPD in system SC33 to demonstrate the configuration and verification for the scenario. The first step is to add PORT 990 to the TCPIP stack profile, as shown in Example 17-36.
Example 17-36 PORT statement in TCPIPD.TCPPARMS(PROFD33)
PORT
989 TCP * NOAUTOLOG ; FTP data port
990 TCP FTPDD1 ; FTP control port
The /etc/services definition must be changed for the FTP server (see Example 17-37).
Example 17-37 /etc/services definition
ftp 990/tcp
Then, FTP.DATA in the FTP server must be updated (see Example 17-38).
Example 17-38 Server FTP.DATA to define implicit TLS login
; ---------------------------------------------------------------------
; 7. Security options
; ---------------------------------------------------------------------
;EXTENSIONS AUTH_TLS 1
TLSMECHANISM FTP 2
KEYRING TCPIP/SharedRing1 3
;SECURE_LOGIN NO_CLIENT_AUTH
;SECURE_PASSWORD REQUIRED
;SECURE_PASSWORD_KERBEROS REQUIRED
;SECURE_FTP ALLOWED 1
;SECURE_CTRLCONN PRIVATE 1
;SECURE_DATACONN CLEAR 1
;SECURE_PBSZ 16384
CIPHERSUITE SSL_RC4_MD5_EX ; 03
CIPHERSUITE SSL_RC4_MD5 ; 04
CIPHERSUITE SSL_3DES_SHA ; 0A
CIPHERSUITE SSL_DES_SHA ; 09
CIPHERSUITE SSL_NULL_MD5 ; 01
CIPHERSUITE SSL_NULL_SHA ; 02
;CIPHERSUITE SSL_RC4_SHA ; 05
;CIPHERSUITE SSL_RC2_MD5_EX ; 06
;CIPHERSUITE SSL_AES_128_SHA ; 2F
;CIPHERSUITE SSL_AES_256_SHA ; 35
TLSTIMEOUT 100
TLSRFCLEVEL RFC4217 4
TLSPORT 990 5
SECUREIMPLICITZOS FALSE 6
The numbers in Example 17-38 correspond to the following information:
1. All parameters that are used by explicit TLS login are commented out.
2. Indicates native FTP TLS support (not AT-TLS).
3. Adds a KEYRING statement to identify the owner and name of the key ring file.
4. Adds TLSRECLEVEL for RFC 4217.
5. Takes the default of 990 on TLSPORT to set the secure port on which the FTP server implicitly protects the FTP session with TLS. You can select a different secure port for implicit secure FTP sessions using this statement.
6. Adds SECUREIMPLICITZOS FALSE to specify that server drives the security handshake before sending the first reply. This supports implicitly secured logins for non-z/OS clients and z/OS FTP client which have the same SECUREIMPLICITZOS FALSE configuration.
|
Tip: You must specify the same TLSPORT in FTP client and server. Problems with implicit TLS logins to the z/OS FTP server are usually because of a failure to synchronize the client and server configured values for TLSPORT and SECUREIMPLICITZOS.
|
In the client’s FTP.DATA, the same parameters as the FTP server should be specified as shown in Example 17-39.
Example 17-39 Client FTP.DATA to define implicit TLS login
; ---------------------------------------------------------------------
; 7. Security options
; ---------------------------------------------------------------------
TLSRFCLEVEL RFC4217
KEYRING TCPIP/SharedRing1
SECUREIMPLICITZOS FALSE
TLSPORT 990
Implicit TLS login verification scenario
Now, we test the implicit TLS login by showing the following scenarios:
z/OS FTP client implicit TLS login
Based on our configuration, we used port 990 to implicitly log in to the z/OS FTP server, as shown in Figure 17-24.
|
ftp -p tcpipb -f "//'TCPIPB.TCPPARMS(FTPCB31)'" 10.1.1.40 990 1
..................................................................Lines Deleted
EZY2640I Using 'TCPIPB.TCPPARMS(FTPCB31)' for local site configuration paramete
rs.
EZA1450I IBM FTP CS V1R13
EZA1466I FTP: using TCPIPB
EZA1554I Connecting to: 10.1.1.40 port: 990.
EZA2895I Authentication negotiation succeeded 2
EZA2919I Session starts with protection on the data connection 2
220-FTPDD1 IBM FTP CS V1R13 at wtsc33.itso.ibm.com, 17:43:36 on 2011-08-02.
220 Connection will close if idle for more than 5 minutes.
EZA1459I NAME (10.1.1.40:CS03):
EZA1701I >>> USER CS03
331 Send password please.
EZA1789I PASSWORD:
EZA1701I >>> PASS
230 CS03 is logged on. Working directory is "CS03.".
Command:
locstat tlsrfclevel 3
local site variable TLSRFClevel is set to RFC4217
Command:
stat 4
..................................................................Lines Deleted 211-Authentication type: TLS
211-Control protection level: Private
211-Data protection level: Private
211-TLS security is supported at the RFC4217 level
..................................................................Lines Deleted
|
Figure 17-24 z/OS client implicit TLS login scenario
The numbers in Figure 17-24 on page 766 correspond to the following information:
1. The command that we used to log in to the z/OS FTP server. Note that we specify port 990 and leave out the -a TLS parameter to request the implicit TLS login.
2. Authentication negotiation is accomplished automatically, and the session is secure.
3. The locstat tlsrfclevel command shows that the TLS RFC level is set to RFC4217 as we defined in the configuration.
4. The stat command shows all the secure options for this connection. We used TLS authentication and both control and data connections with the private level.
The netstat command output shows that the FTP daemon is listening on port 990 (1) as shown in Figure 17-25.
|
D TCPIP,TCPIPD,N,CONN,PORT=990
USER ID CONN STATE
FTPDD1 00000973 ESTBLSH
LOCAL SOCKET: ::FFFF:10.1.1.40..990
FOREIGN SOCKET: ::FFFF:10.1.1.20..1053
FTPDD1 0000097D LISTEN
LOCAL SOCKET: ::..990 1
FOREIGN SOCKET: ::..0
2 OF 2 RECORDS DISPLAYED
|
Figure 17-25 The netstat command output for implicit TLS connection
In addition, the netstat command also shows the connections when data transfers. By default, z/OS FTP server uses port 989 for data connection 2, as shown in Figure 17-26.
|
D TCPIP,TCPIPD,N,CONN
USER ID CONN STATE
FTPDDDD3 000009B3 FINWT2
LOCAL SOCKET: ::FFFF:10.1.1.40..989 2
FOREIGN SOCKET: ::FFFF:10.1.1.20..1055
FTPDD1 0000099A LISTEN
LOCAL SOCKET: ::..990
FOREIGN SOCKET: ::..0
FTPDD1 000009AB ESTBLSH
LOCAL SOCKET: ::FFFF:10.1.1.40..990
FOREIGN SOCKET: ::FFFF:10.1.1.20..1053
|
Figure 17-26 netstat command output for data connection with implicit TLS connection
Now, we change the SECUREIMPLICITZOS statement to TRUE in the FTP client FTP.DATA file, and retest as shown in Figure 17-27.
|
ftp -p tcpipb -f "//'TCPIPB.TCPPARMS(FTPCB31)'" 10.1.1.40 990
EZY2640I Using 'TCPIPB.TCPPARMS(FTPCB31)' for local site configuration paramete
rs.
EZA1450I IBM FTP CS V1R13
EZA1466I FTP: using TCPIPB
EZA1554I Connecting to: 10.1.1.40 port: 990.
....
EZA2589E Connection to server interrupted or timed out. Waiting for reply
EZA1721W Server not responding, closing connection.
EZA1460I Command:
|
Figure 17-27 z/OS client implicit TLS login with mismatching SECUREIMPLICITZOS
In this case, the FTP connection times out. When using SECUREIMPLICITZOS FALSE in the z/OS FTP server, FTP server expects the security handshake before it sends the first reply to the client. However, in the client site, the z/OS FTP client expects the security handshake to occur after it receives the first reply from the server, based on the SECUREIMPLICITZOS TRUE parameter. So, in our scenario, the connection timed out because of the operand mismatch in the FTP client and server.
Non-z/OS FTP client implicit TLS login
To support non-z/OS FTP client implicit TLS login to z/OS FTP server, we must define SECUREIMPLICITZOS FALSE in the FTP server FTP.DATA file. With this parameter, the z/OS FTP server expects the security handshake before it sends the first reply to the client, which is the same method that non-z/OS clients use for security handshake.
We continued to use FileZilla for the testing, and configure FileZilla for implicit TLS support. We tested with the same certificate authority certificate and did not need to use MMC again to establish the key ring that FileZilla needs.
Figure 17-28 shows the FileZilla configuration for implicit TLS. Observe that in the Servertype menu, we selected FTPS - FTP over implicit TLS/SSL. Because we used the standard implicit port (990), we did not need to specify the port number. You must specify the port number if you are not using the default 990 port for implicit login.

Figure 17-28 FileZilla configuration for implicit TLS
Click Connect. The connecting messages that are shown in Figure 17-29 display. FileZilla uses the default port 990 to establish the implicit TLS connection as shown at a. The connection is established with TLS security (b), and the data connection protection is set to private (c).
|
Status:.Connecting to 10.1.1.40:990... a
Status:.Connection established, initializing TLS... b
Status:.Verifying certificate...
Status:.TLS/SSL connection established, waiting for welcome message...
Response:.220-FTPDD1 IBM FTP CS V1R13 at wtsc33.itso.ibm.com, 18:03:34 on 2011-08-02.
Response:.220 Connection will close if idle for more than 5 minutes.
Command:.USER cs03
Response:.331 Send password please.
Command:.PASS ****
Response:.230 CS03 is logged on. Working directory is "CS03.".
Command:.SYST
Response:.215 MVS is the operating system of this server. FTP Server is running
Command:.FEAT
Response:.211- Extensions supported
Response:. AUTH TLS
Response:. PBSZ
Response:. PROT
Response:.211 End
Command:.PBSZ 0
Response:.200 Protection buffer size accepted
Command:.PROT P
Response:.200 Data connection protection set to private c
Status:.Connected
|
Figure 17-29 FileZilla implicit TLS login to z/OS FTP server
Now, we change SECUREIMPLICITZOS from FALSE to TRUE. After restarting the z/OS FTP server, we tried to use FileZilla for an implicit TLS login to the server and received the message that is shown in Figure 17-30. We received the error messages because the FTP server and client did not use the same convention for securing the connection implicitly. The client and server deadlocked and, eventually, the connection timed out.
|
Status: Connecting to 10.1.1.40:990...
Status: Connection established, initializing TLS...
Error: Connection timed out
Error: Could not connect to server
Status: Waiting to retry...
|
Figure 17-30 FileZilla implicit TLS login error message
Tips
Consider the following tips for using the implicit TLS login method:
•If the client and server are on z/OS FTP, use the TLSPORT statement in FTP.DATA to configure the same TLSPORT for the client and server.
•If the client and server are on z/OS FTP, use the SECUREIMPLICITZOS statement in FTP.DATA to set the same value in the client and server.
•You can obtain the most flexibility at the server by configuring SECUREIMPLICITZOS as FALSE, because it supports both non-z/OS FTP and z/OS FTP clients that have the same SECUREIMPLICITZOS configured.
•You might need to configure SECUREIMPLICITZOS as TRUE in the FTP server for compatibility with other z/OS images prior to V1R12.
17.4 FTP with AT-TLS security support
This section includes the following topics:
An invaluable resource for implementing FTP with AT-TLS is z/OS Communications Server: IP Configuration Guide, SC27-3650. Always see it for additional detail or for clarification of the individual implementation steps.
17.4.1 FTP AT-TLS support overview
|
Tip: For information about AT-TLS in general, consult Chapter 12, “Application Transparent Transport Layer Security” on page 551.
|
The FTP client and server can be configured to use AT-TLS to support TLS connections.
The following types of AT-TLS applications are available:
•Applications that are not aware of using AT-TLS because they require no code changes to the application.
•Applications that are aware of AT-TLS and can query the TCPIP stack but cannot control it or affect the choices that AT-TLS makes.
•Applications that are AT-TLS controlling, meaning that the application starts and stops security on the connection, through the AT-TLS mechanism.
FTP belongs to the third category: it is a controlling AT-TLS application that requires the ApplicationControlled On statement in the AT-TLS policy. The FTP protocol relies on two connections: the control connection and the data connection. Therefore, for AT-TLS, FTP must also be defined with the SecondaryMap On statement in the policy file.
Dependencies of AT-TLS
You must have an appropriate understanding of the type of security that is acceptable to a particular business site, and be aware of the software and hardware prerequisites. In fact, the dependencies we present for native TLS (in 17.3, “FTP with native TLS support” on page 726) also apply to AT-TLS. We urge you to review those dependencies in that section.
Additional dependencies for AT-TLS exist because it is implemented as part of policy-based networking. AT-TLS for FTP relies on the definition of AT-TLS policies that policy agent downloads into the TCP/IP stack where they are enforced. It also relies on FTP configuration changes in the server and in the client. Finally, because it is invoking TLS protocols, AT-TLS requires at least a server x.509 certificate and key, possibly together with a certificate from a signing authority (a certificate authority certificate). Depending on a site’s requirements, a client certificate for client authentication might be necessary.
SSLv2 is possible with AT-TLS, but it is disabled by default in the AT-TLS policy.
|
Suggestion: Do not implement with SSLv2, even though it is permitted. You should turn on SSLv2 only if you must support connections with older applications that do not support the more secure protocols of SSLv3 or TLSv1.
|
Benefits of using AT-TLS
Just as with native TLS, FTP with AT-TLS security provides a more secure environment for the transmission of data. It provides user authentication, encryption, and data integrity checking. AT-TLS has considerable advantages over standard TLS/SSL for the FTP environment. AT-TLS can exploit the following items:
•Certificate labels, thus eliminating the need to rely only on the presence of a default certificate in a key ring. Key ring administration is simplified because many certificates can reside in the key ring.
•Session key refresh during the lifetime of a session, reducing the possibility of a key compromise.
•Certificate revocation lists (CRLs) that are maintained in LDAP servers.
If you implement AT-TLS, the security policies can be placed under the control of a centralized policy server, also known as a Distributed Policy Server. This subject is the topic of Chapter 5, “Centralized policy server” on page 153.
Considerations for AT-TLS
Just as with native TLS in FTP, the use of AT-TLS security requires more configuration and requires management of key rings. Keep in mind that a native SSL or TLS client can communicate with a server that has been implemented with AT-TLS. Likewise, an AT-TLS client can communicate with a server that is implemented with native TLS. The underlying TLS protocols are the same in either case.
|
Important: Although native TLS with FTP relies on the existence of a default certificate in a key ring, AT-TLS imposes no such requirement. AT-TLS supports certificate labels, or can continue to use a default certificate in the absence of a certificate label specification. This can simplify the administrative burden of maintaining multiple key rings because one key ring can be used to hold a certificate authority certificate, a default certificate, and many others that are referenced with their label names.
|
17.4.2 Configuring FTP AT-TLS support
It is always good practice to begin with a tested FTP client and server that work without security definitions. The tasks for a basic FTP server and client are described in IBM z/OS Communications Server TCP/IP Implementation Volume 2: Standard Applications, SG24-7997.
We also need to create a server certificate in the server LPAR. The server certificate might be a self-signed server certificates, or it might be a personal or site certificate that has been signed by a certificate authority. We need one or more key rings into which we can store the certificates.
For AT-TLS, we make changes to the FTP.DATA file for the server and optionally, to the z/OS client. Finally, we need to permit the user ID of the FTP server to the appropriate RACF classes.
We tested the following scenarios with FTP and AT-TLS security:
•z/OS client to z/OS server
We verified that the standard z/OS TLS client requesting TLS worked as expected when AT-TLS was enabled at the server. We also verified that a z/OS AT-TLS client at TCPIPB could establish connections to the AT-TLS FTP server at TCPIPD.
•Workstation client to z/OS server
We verified that the workstation client invoking standard TLS could operate with the FTP server configured for AT-TLS on the TCPIPD stack.
Complete the following tasks to set up FTP server TLS support:
1. Create key ring and certificates for AT-TLS.
2. Update the FTP.DATA for the server for AT-TLS.
3. Create the policy agent procedure and build the FTP AT-TLS policy.
4. Update the TCP/IP stack for AT-TLS.
5. TCP/IP stack changes.
6. Optional: Create certificates for client authentication.
7. Optional: Update the client’s TCP/IP stack to support AT-TLS if using it with the client.
Creating key ring and certificates for AT-TLS
In “Creating key ring and certificates and updating RACF permissions” on page 729, we configured a shared key ring and a certificate authority certificate together with a shared server SITE certificate for use with TLS. Here we are using the same key ring and certificates to test our AT-TLS scenarios.
Updating the FTP.DATA for the server for AT-TLS
The FTP server at startup needs to request AT-TLS capability. In the TLS scenarios, we defined or defaulted TLSMECHANISM FTP. With AT-TLS, this statement needs to be changed to TLSMECHANISM ATTLS. The same configuration statement is valid for the FTP client in its FTP.DATA file if the client chooses not to specify the value in the FTP request itself. There is a sample of the server FTP.DATA file in hlq.SEZAINST(FTPSDATA).
A sample of the server’s security section in the FTP.DATA file when AT-TLS is being used is shown in Example 17-40. Note the reference to TLSMECHANISM ATTLS at a. Note also that many of the security definitions are commented out (b). The security statements that are commented out apply to native TLS. With AT-TLS, the definitions that are not required in the server FTP.DATA file move into the AT-TLS policy configuration file. If the definitions remain in the server FTP.DATA file, they are ignored when TLSMECHANISM ATTLS is coded.
Example 17-40 FTP.DATA for AT-TLS implementation
1 EXTENSIONS AUTH_TLS
2 TLSMECHANISM ATTLS a
3 ;;KEYRING TCPIP/SharedRing1 b
4 ;;CIPHERSUITE SSL_RC4_MD5_EX ; 03 b
4 ;;CIPHERSUITE SSL_RC4_MD5 ; 04 b
4 ;;CIPHERSUITE SSL_3DES_SHA ; 0A b
4 ;;CIPHERSUITE SSL_DES_SHA ; 09 b
4 ;;CIPHERSUITE SSL_NULL_MD5 ; 01 b
4 ;;CIPHERSUITE SSL_NULL_SHA ; 02 b
5 SECURE_FTP ALLOWED
6 SECURE_CTRLCONN PRIVATE
7 SECURE_DATACONN CLEAR
8 ;;TLSTIMEOUT 100 b
9 TLSRFCLEVEL DRAFT
We examine each statement in Example 17-40 on page 773 to understand what exactly should be in the server FTP.DATA file for AT-TLS, and what should be defined instead in the AT-TLS policy. This look at individual parameters helps you understand how to configure a completely new secure FTP server and also how to migrate from an existing TLS server to an AT-TLS server.
The numbers in Example 17-40 on page 773 correspond to the following information:
1. Enable a secure server with TLS by coding EXTENSIONS AUTH_TLS.
2. Indicate ATTLS support (not native FTP TLS support)
3. (and b) The KEYRING statement that identifies the location of our key ring file is commented out. The key ring definition must move to the AT-TLS policy file.
4. (and b) The CIPHERSUITE statements identifying each desired encryption algorithm are commented out. They also move to the AT-TLS policy file.
5. Add (or leave) a SECURE_FTP ALLOWED statement to allow for, but not require, TLS clients. In this fashion, the same FTP port can be used for non-secure or secure connections.
6. Add (or leave) a SECURE_CTRLCONN PRIVATE statement. This statement is ignored unless the client requests a secure connection. We suggest coding SECURE_CTRLCONN PRIVATE if the TLS mechanism is enabled, because the control connection carries user IDs and passwords. It is common practice to protect the user ID and the password even if the data connection need not be secure.
7. Add (or leave) a SECURE_DATACONN CLEAR statement to allow the client to determine whether data traffic really needs encryption. Encryption carries a performance price and might not be necessary for every data transfer.
8. (and b) The TLSTIMEOUT statement moves to the AT-TLS policy file and is thus commented out in the FTP.DATA file. This specifies the maximum time between full TLS handshakes.
9. Add or default TLSRFCLEVEL DRAFT. Alternatively, you can specify TLSRFCLEVEL RFC4217. DRAFT indicates that the FTP TLS protocol is following the draft RFC named “On Securing FTP with TLS - revision 05”. RFC4217 indicates that the FTP TLS protocol is following RFC 4217, “Securing FTP with TLS.” Both explain how to use RFC 2228 commands to implement TLS security. See “Considerations” on page 727 and 17.3.5, “Activate and verify FTP server with TLS security: RFC4217 protocols” on page 753 for a description of the significance of the DRAFT versus RFC4217 specifications.
Creating the policy agent procedure and build the FTP AT-TLS policy
This section includes the following topics:
Policy agent procedure
There are many ways to code the procedure explained in the sample file in hlq.SEZAINST(PAGENT).
For more information about setting up the PAGENT procedure for policy agent, see Chapter 4, “Policy agent” on page 95.
We structured our PAGENT procedure as shown in Example 17-41. This structure ensures that the STDENV data set for the Language Environment was allocated with a Variable format, as is required by Language Environment.
Example 17-41 Sample PAGENT procedure
//PAGENT PROC
//PAGENT EXEC PGM=PAGENT,REGION=0K,TIME=NOLIMIT,
// PARM='POSIX(ON) ALL31(ON) ENVAR("_CEE_ENVFILE=DD:STDENV")/
// -l SYSLOGD'
//STDENV DD PATH='/etc/pagent.sc&SYSCLONE..env',PATHOPTS=(ORDONLY)
//SYSPRINT DD SYSOUT=*
//SYSOUT DD SYSOUT=*
//CEEDUMP DD SYSOUT=*,DCB=(RECFM=FB,LRECL=132,BLKSIZE=132)
PAGENT standard environment variable file
The Language Environment file, which is in a data set with Record Format V and is referenced in the procedure, is shown in Example 17-42.
Example 17-42 Policy agent environment variable file
LIBPATH=/usr/lib:.
PAGENT_CONFIG_FILE=/SC33/etc/pagent.sc33.conf
PAGENT_LOG_FILE=SYSLOGD
TZ=EST5EDT
|
Tip: The specification of the configuration file in the JCL overrides the PAGENT_CONFIG_FILE definition in the Language Environment file.
|
Policy agent configuration files
Example 17-43 shows the main configuration file that we built in the zFS.
Example 17-43 Main PAGENT configuration file
# *****************************************************************
# /etc/pagent.sc33.conf in SC33
# *****************************************************************
LogLevel 15
TcpImage TCPIPD /etc/pagent.sc33.tcpipd.conf FLUSH PURGE 600
We modeled the main file after the samples file in /usr/lpp/tcpip/samples/pagent.conf. Our TCPIMAGE file for TCPIPD is shown in Example 17-44.
Example 17-44 Image configuration file for stack TCPIPD
# This file /etc/pagent.sc33.tcpipd.conf contains #
# image statements for TCP/IP stack tcpipd in z/OS image sc33
####################################################################
# A policy for FTPDD1 for AT-TLS support #
####################################################################
TTLSConfig /etc/cfgasst/v1r13/SC33/TCPIPD/tlsPol_FTP_Server
Our TCP/IP AT-TLS policy file is the one we are going to create using the IBM Configuration Assistant in the next steps. For more information, see “Using the IBM Configuration Assistant to create an FTP server AT-TLS policy” on page 778.
After testing it thoroughly, we merge it with the other AT-TLS policies by using the IBM Configuration Assistant tools, thus creating one “master” AT-TLS policy file for TCPIPD. Then, we move the merged file into the /etc directory of the zFS and rename it to the shop standard (/etc/pagent.sc33.tcpipd.ttls.ftp.policy).
AT-TLS policy for z/OS FTP server and z/OS FTP client
Consider the following important aspects when you define a policy for an FTP server or client, as described in z/OS Communications Server: IP Configuration Guide, SC27-3650:
•FTP server:
– Requires the ApplicationControlled On statement in the AT-TLS policy.
This parameter allows FTP to start and stop TLS security on a connection.
– Requires the SecondaryMap On statement in the AT-TLS policy.
This parameter enables active or passive data connections to use the same policy that is in place for the control connection. You do not need to code any additional TTLSRule statements for the data connections.
– Requires the Direction parameter with the value Inbound on the TTLSRule statement for the FTP server
– If the SECURE_LOGIN statement is coded in FTP.DATA with the parameters REQUIRED or VERIFY_USER, then the HandshakeRole parameter value must be ServerWithClientAuth.
•FTP client:
– Requires the HandshakeRole parameter with the value Client to be coded on the TTLSEnvironmentAction statement.
– Requires the Direction parameter with the value Outbound on the TTLSRule statement for the FTP client.
|
Guideline: The FTP server and client do not support SSLv2 when using TLSMECHANISM ATTLS. AT-TLS defaults to disabling SSLv2. SSLv2 should not be enabled in AT-TLS unless explicitly required by a remote system.
If SSLv2 is required by a remote system, use a specific TTLSRule statement for the remote system that points to a TTLSConnectionAction statement enabling SSLv2.
|
You have a few choices about how to build an AT-TLS policy. One is to create the policy file manually. Another is to use the IBM Configuration Assistant for z/OS Communications Server.
If you choose to create the policy file manually you can code it “from scratch” or you can use the AT-TLS sample provided in /usr/lpp/tcpip/samples/pagent_TTLS.conf of the zFS or HFS file system on z/OS.
After you become familiar with the parameters and keywords of a policy file, it can be simple to manipulate one created manually. However, if you are not familiar with the syntax, it can be daunting, as shown in the excerpt from pagent_TTLS.conf shown in Example 17-45 on page 777.
Example 17-45 FTP Server AT-TLS rules and actions
1TTLSRule Secure_Ftpd
{
LocalPortRange 21
Direction Inbound
TTLSGroupActionRef grp_Production a
TTLSEnvironmentActionRef Secure_Ftpd_Env b
}
# Common Production Group that all Rules use
2TTLSGroupAction grp_Production a
{
TTLSEnabled On
Trace 2 # Log Errors to syslogd
}
# Environment Shared by all secure FTP server connections.
3TTLSEnvironmentAction Secure_Ftpd_Env b
{
HandshakeRole Server c
TTLSKeyRingParms d
{
Keyring FTPDsafkeyring # The keyring must be owned by the FTP server
}
TTLSEnvironmentAdvancedParms
{
ApplicationControlled On e
SecondaryMap On # include data connections f
SSLV2 On # Allow SSLv2 connections (Default is Off) g
SSLV3 On # Allow SSLv3 connections (Default is On ) g
TLSV1 On # Allow TLSv2 connections (Default is On ) g
}
}
Example 17-45 shows the following major sections for the AT-TLS policy rule:
1. The TTLSrule rule named Secure_ftpd references two items:
– TTLSGroupActionRef named grp_Production (a)
– TTLSEnvironmentActionRef named Secure_Ftpd_Env (b)
2. Defines a common TTLSGroupAction named Grp_Production. This is the group action that is referenced in the TTLSrule (a).
3. Defines the specific Actions for the FTP environment. It is the TTLSEnvironmentAction named Secure_Ftpd_Env.
– This is the environment action that is referenced in the TTLSrule (b).
– This environment action contains three types of definitions: the handshake role (c), the key ring parameters (d), and the advanced parameters e, f, and g.
After looking at Example 17-45 with its complex syntax, you can appreciate why we prefer to use the Configuration Assistant GUI to define our AT-TLS policies. Not only does it produce a flat file like the one in the sample, but it performs a “health check” that warns of logic errors that you might have introduced into the policy.
Using the IBM Configuration Assistant to create an FTP server AT-TLS policy
For more information about using z/OSMF Configuration Assistant, see 4.4, “Configuration Assistant for z/OS Communications Server” on page 119.
To create an FTP server AT-TLS policy, complete the following steps:
1. In the Configuration Assistant (Home) panel (see Figure 17-31), you can create a backing store file by selecting Open → Tools → Manage Backing Store → Action → New → Create a New Backing Store and entering the name of your backing store file. (We named ours FTP_TTLS.) Then, click OK.

Figure 17-31 Create New Backing Store File Panel
2. The Current Backing Store panel shows the default system group. At the top of the panel is shown the TCP/IP technologies that can be configured. Select the technology that is named AT-TLS.
3. Create the definition for the z/OS system. Click Add a new z/OS Image. Enter the z/OS image information and click OK, as shown in Figure 17-32.

Figure 17-32 New z/OS image information
4. In the Proceed to the Next Step message panel, click Yes. Then, in the New TCP/IP Stack: Information panel, you must continue with configuration you need to add a TCP/IP stack to the new z/OS system image. Click OK. The name and description of the TCP/IP stack information, as shown in Figure 17-33.

Figure 17-33 Providing the name and description of the stack
5. The information panel opens in which you continue with the configuration. Click Proceed to add connectivity rules to the TCP/IP stack. Scroll through the available Connectivity Rules until you find Default_FTP_Server. Select this rule and click Select Action → Enable Rule, as shown in Figure 17-34.

Figure 17-34 Enable AT-TLS
6. The status of the AT-TLS technology changes from Disabled to Enabled. To modify this rule for our environment, we selected Default_FTP_Server and click Select Action → Modify, as shown in Figure 17-35.

Figure 17-35 Modify AT-TLS policy
7. We take the defaults for the Traffic tab. The Role tab values cannot be changed. Select the Key Ring tab and enter the key ring name, as shown in Figure 17-36. We also can specify a certificate label from the key ring here (rather than use the default), if required.

Figure 17-36 Enter key ring name
8. We take the defaults of All_IP_Addresses for the Data Endpoints. Click the Security Level tab and select AT-TLS_Silver as shown in Figure 17-37 on page 782. For our example, we were satisfied with the Silver Level of encryption. However, you might consider creating security levels to reflect what is realistic for your environment.
|
Suggestion: You can build your own Security Level with the IBM Configuration Assistant. Keep in mind that certain encryption algorithms have export restrictions. Furthermore, encryption algorithms can create performance issues, depending on the type of cryptographic hardware that is available on the platform with which you are working.
Therefore, you might want to resequence the Security Level contents, and add or subtract the encryption levels in the IBM supplied Security Levels to accommodate your particular situation. The IBM Configuration Assistant allows you to create new Security Levels for your own purposes.
|

Figure 17-37 Select a security level of AT-TLS_Silver
9. Click the Advanced tab and click Advanced. Select the Tuning tab and change the AT-TLS handshake timeout value to 60 (see Figure 17-38). This value is not as high as we allowed for native TLS for FTP (100 seconds), but it is still a sizeable number. Click OK.

Figure 17-38 Increase handshake timeout
10. In the Connectivity Rules for System Image, TCPIP stack menu, Click close to return to AT-TLS Current Backing Store panel (see Figure 17-39). The navigation tree shows that the z/OS image and TCPIP stack is now complete; you can install the configuration files. Click action and select Install Configuration Files.

Figure 17-39 AT-TLS perspective image complete
11. Select the AT-TLS Policy and click Select Action → Show Configuration File to see the policy details that have been created by z/OSMF Configuration Assistant. Our details are shown in Example 17-46.
Example 17-46 FTP-TLS policy details
##
## AT-TLS Policy Agent Configuration file for:
## Image: SC33
## Stack: TCPIPD
##
## Created by the IBM Configuration Assistant for z/OS Communications Server
## Version 2 Release 2
## Backing Store = FTP_TTLS
## Install History:
##
## TLS default rules: Default_FTP-Server|
## End TLS default rules
##
## End of Configuration Assistant information
TTLSRule Default_FTP-Server~1
{
LocalAddr ALL
RemoteAddr ALL
LocalPortRangeRef portR1
RemotePortRangeRef portR2
Direction Inbound
Priority 255
TTLSGroupActionRef gAct1~FTP-Server
TTLSEnvironmentActionRef eAct1~FTP-Server
}
TTLSGroupAction gAct1~FTP-Server
{
TTLSEnabled On
}
TTLSEnvironmentAction eAct1~FTP-Server
{
HandshakeRole Server
EnvironmentUserInstance 0
TTLSKeyringParmsRef keyR1
TTLSCipherParmsRef cipher1~AT-TLS__Silver
TTLSEnvironmentAdvancedParmsRef eAdv1~FTP-Server
}
TTLSEnvironmentAdvancedParms eAdv1~FTP-Server
{
SSLv3 On
ApplicationControlled On
HandshakeTimeout 60
SecondaryMap On
}
TTLSKeyringParms keyR1
{
Keyring TCPIP/SharedRing1
}
TTLSCipherParms cipher1~AT-TLS__Silver
{
V3CipherSuites TLS_RSA_WITH_DES_CBC_SHA
V3CipherSuites TLS_RSA_WITH_3DES_EDE_CBC_SHA
V3CipherSuites TLS_RSA_WITH_AES_128_CBC_SHA
}
PortRange portR1
{
Port 21
}
PortRange portR2
{
Port 1024-65535
} 
12. Click Close. Then, click Select Action → Install. Because z/OSMF Configuration Assistant runs on image SC33, we select Save to disk (see Figure 17-40). In your environment, you might need to use FTP to send the AT-TLS policy to the correct image. We add a meaningful suffix to the default Install file name field (as shown in the following example), and then click Go.
/etc/cfgasst/v1r13/SC33/TCPIPD/tlsPol_FTP_Server

Figure 17-40 Install File
13. When the save is complete, click Close. You can optionally enter a comment for the policy file’s history log. Click OK → Close.
Before continuing, remember that you can use more than one method to create an FTP policy rule. However, important details are inserted into the traffic descriptor for the FTP server behind the GUI panels. Therefore, select Traffic Descriptors, as shown in Figure 17-41 on page 786 and highlight the FTP-Server traffic descriptor object. Click Select Action → View Details.

Figure 17-41 Traffic descriptors
The details are displayed, as shown in Figure 17-42.

Figure 17-42 Viewing a traffic descriptor for the FTP server
Our configuration specifies that we use the default certificate in the key ring file. If we want to exploit the full functionality of AT-TLS, we might choose to populate a key ring with many certificates and then to provide a certificate label for a certificate that is not the default.
In our example, the FTP server is also set to Application Controlled. You might recall from a description of AT-TLS for FTP that this server is indeed an application-controlled server for AT-TLS.
Secondary Map is enabled for the FTP server, which is required because a data connection must be associated with the control connection. With Secondary Map On, the data connections have the same policy as the control connection. In this case, it is unnecessary to code any additional TTLSRule statement for the data connection because the FTP protocol itself negotiates the security level for the data connection.
Also notice that the SSL handshake timeout is set to 10 seconds. This value differs greatly from the SSL time-out default of 100 seconds for standard FTP TLS. We changed this value in our AT-TLS rule’s advanced settings to 60 seconds.
|
Important: If you are migrating from native TLS to AT-TLS, you probably want to consider changing the handshake timeout value to approximate what it was under native TLS to avoid any surprises. Be aware of the situation to establish appropriate TLSTIMEOUT values for your installation.
|
Updating the TCP/IP stack for AT-TLS
This section describes the setup tasks to be performed in preparing the TCP/IP stack for AT-TLS support.
TCP/IP stack initialization access control
When AT-TLS is enabled and before policy agent itself initializes, there is a window of time in which applications or users could open sockets on the stack without being subjected to any kind of security controls. For this reason, there is a RACF resource called EZB.INITSTACK.sysname.tcpname that can be defined to limit access to the stack until the policy agent has finished initializing.
|
Important: User IDs that are permitted to this resource can open sockets prior to PAGENT initialization. Those who are not permitted to this resource experience failures until PAGENT finishes initializing.
|
The INITSTACK SAF profile definition and sample permission statement are included in the hlq.SEZAINST(EZARACF) member and are shown in Example 17-47.
Example 17-47 Sample RACF INITSTACK permissions
SETROPTS CLASSACT(SERVAUTH)
SETROPTS RACLIST (SERVAUTH)
SETROPTS GENERIC (SERVAUTH)
RDEFINE SERVAUTH EZB.INITSTACK.sysname.tcpprocname UACC(NONE)
PERMIT EZB.INITSTACK.sysname.tcpprocname -
CLASS(SERVAUTH) ID(*) ACCESS(READ) -
WHEN(PROGRAM(PAGENT,EZAPAGEN)
SETROPTS GENERIC(SERVAUTH) REFRESH
SETROPTS RACLIST(SERVAUTH) REFRESH
SETROPTS WHEN(PROGRAM) REFRESH
We defined this profile for all the system names and TCP/IP stacks in our installation.
|
Important: User IDs that are not permitted to this resource will not be able to open sockets on this stack until the TTLS policy is installed. When the resource is not defined, no stack access is permitted until policy agent finishes initializing.
|
Example 17-48 on page 788 shows the details for adding authorization for two of the TCP/IP stacks in the installation: for TCPIPD (a) in LPAR A18 (SC33), and for TCPIPB (b) in LPAR A13 (SC31).
Example 17-48 Set up TTLS stack initialization access control for SC31 and SC33
SETROPTS CLASSACT(SERVAUTH)
SETROPTS RACLIST (SERVAUTH)
SETROPTS GENERIC (SERVAUTH)
RDEFINE SERVAUTH EZB.INITSTACK.SC33.TCPIPD UACC(NONE) a
PERMIT EZB.INITSTACK.SC33.TCPIPD CLASS(SERVAUTH) ID(*) c -
ACCESS(READ) WHEN(PROGRAM(PAGENT,EZAPAGEN))
RDEFINE SERVAUTH EZB.INITSTACK.SC31.TCPIPB UACC(NONE) b
PERMIT EZB.INITSTACK.SC31.TCPIPB CLASS(SERVAUTH) ID(*) c -
ACCESS(READ) WHEN(PROGRAM(PAGENT,EZAPAGEN))
SETROPTS GENERIC(SERVAUTH) REFRESH
SETROPTS RACLIST(SERVAUTH) REFRESH
SETROPTS WHEN(PROGRAM) REFRESH
We permitted access for any user IDs that might be associated with the running program PAGENT, also known as EZAPAGEN (c). The process of establishing stack initialization access control is described in hlq.SEZAINST(EZARACF) and in Chapter 12, “Application Transparent Transport Layer Security” on page 551.
Initialization access control for other IP services
A helpful approach is to permit the EZB.INITSTACK.sysname.tcpname RACF profile to other IP services, such as OMPROUTE and SNMP. In a normal installation, these daemons are started by the TCP/IP stack when it starts. However, when AT-TLS is enabled and before the policy agent itself initializes, these applications cannot open sockets, and you will see RACF error messages, as shown in Example 17-49.
Example 17-49 Error message before policy agent initialized
*EZZ4248E TCPIPD WAITING FOR PAGENT TTLS POLICY 1
...
S OMPD
...
ICH408I USER(OMVSKERN) GROUP(OMVSGRP ) NAME(####################) 581
EZB.INITSTACK.SC33.TCPIPD CL(SERVAUTH) 2
INSUFFICIENT ACCESS AUTHORITY
ACCESS INTENT(READ ) ACCESS ALLOWED(NONE )
...
EZZ7805I OMPD EXITING ABNORMALLY - RC(11) 2
$HASP395 OMPD ENDED
The numbers in Example 17-49 correspond to the following information:
1. A window of time when there is no AT-TLS policy in effect that can represent a security exposure.
2. OMPRoute cannot run because it was not authorized to EZB.INITSTACK.SC33.TCPIPD.
The inability to open sockets is not necessarily a problem. When PAGENT with the AT-TLS policy starts, the messages will stop, and the failed processes that are waiting will continue to initialize. However, if you want to avoid these messages, consider adding RACF definitions, at least for OMPROUTE and the SNMP subagent.
If you decide you want to authorize the other programs, you can do so by authorizing their user IDs to the SERVAUTH profile, as shown in Example 17-50.
Example 17-50 Stack initialization access for OMPROUTE, TN3270, SNMP
SETROPTS CLASSACT(SERVAUTH)
SETROPTS RACLIST (SERVAUTH)
SETROPTS GENERIC (SERVAUTH)
PERMIT EZB.INITSTACK.SC33.TCPIPD CLASS(SERVAUTH) ID(OMVSKERN,IBMUSER,TCPIP) -
ACCESS(READ)) a
PERMIT EZB.INITSTACK.SC31.TCPIPB CLASS(SERVAUTH) ID(OMVSKERN,IBMUSER,TCPIP) -
ACCESS(READ)) a
SETROPTS GENERIC(SERVAUTH) REFRESH
SETROPTS RACLIST(SERVAUTH) REFRESH
In our example, we are concerned with the processes that are associated with the user IDs OMVSKERN, IBMUSER, and TCPIP. Note how we omitted the WHENPROGRAM specification (a) on the RACF PERMIT command.
TCP/IP stack changes
To activate AT-TLS, the TTLS parameter must be added to the TCPCONFIG profile config statement as shown in Example 17-51.
Example 17-51 Profile statement to enable AT-TLS
TCPCONFIG TTLS
When AT-TLS is enabled in this fashion and a newly established connection is first used, the TCP layer of the stack searches for a matching AT-TLS policy installed from the policy agent. If no policy is found, the connection is made without the AT-TLS involvement.
|
Important: Do not insert this change into the TCP/IP profile before you have made the necessary RACF authorizations for INITSTACK processing. Otherwise, until PAGENT has fully initialized, any servers or users that attempt to open sockets on the TCP/IP stack will be denied access unless their associated user IDs are authorized to the INITSTACK SERVAUTH profile.
|
17.4.3 Activating and verifying FTP AT-TLS support
This section describes the activation and startup validation of the FTP AT-TLS environment and includes the following topics:
Starting TCP/IP enabled for AT-TLS
First we start the TCPIPD stack that has been enabled for AT-TLS. We started TCPIPD in LPAR A18 and received the messages shown in Example 17-52.
Example 17-52 Sample symptoms when SAF INITSTACK permissions are not set

S TCPIPD
..
*EZZ4248E TCPIPD WAITING FOR PAGENT TTLS POLICY 1
EZZ4202I Z/OS UNIX - TCP/IP CONNECTION ESTABLISHED FOR TCPIPD
EZB6473I TCP/IP STACK FUNCTIONS INITIALIZATION COMPLETE.
EZAIN11I ALL TCPIP SERVICES FOR PROC TCPIPD ARE AVAILABLE.
..
EZZ8100I OMPD SUBAGENT STARTING
EZZ7898I OMPD INITIALIZATION COMPLETE 3
...
EZZ4250I AT-TLS SERVICES ARE AVAILABLE FOR TCPIPD 2
EZZ8771I PAGENT CONFIG POLICY PROCESSING COMPLETE FOR TCPIPD : QOS
EZZ8771I PAGENT CONFIG POLICY PROCESSING COMPLETE FOR TCPIPD : TTLS
EZZ8771I PAGENT CONFIG POLICY PROCESSING COMPLETE FOR TCPIPD : ROUTING
IAZ0511I NETSRV1 Server Port number could not be resolved, DEFAULT
assumed: 175
EZZ8452I PAGENT READY FOR REMOTE CLIENT CONNECTIONS ON POLICY SERVER
EZD1576I PAGENT IS READY FOR SERVICES CONNECTION REQUESTS
....
The numbers in Example 17-52 on page 790 correspond to the following information:
1. TCP/IP is waiting for PAGENT start. There is a window of time when there is no AT-TLS policy in effect that can represent a security exposure.
2. PAGENT starts, and AT-TLS is enabled.
3. Because we permit the EZB.INITSTACK.sysname.tcpname RACF profile to the user who OMPD, our OMPROUTE procedure, is running under, OMPD can start prior to the initialization of PAGENT.
Initializing PAGENT with AT-TLS policies
The PAGENT startup messages that are shown in Example 17-53 show that more policies are loaded, and not just our AT-TLS policies.
Example 17-53 PAGENT initialization loads the policies
S PAGENT
. . . .
$HASP373 PAGENT STARTED
EZZ8431I PAGENT STARTING
EZZ8432I PAGENT INITIALIZATION COMPLETE
IAZ0511I NETSRV1 Server Port number could not be resolved, DEFAULT
assumed: 175
EZZ8771I PAGENT CONFIG POLICY PROCESSING COMPLETE FOR TCPIPD : QOS
EZD1133I IKE STATUS FOR STACK TCPIPD IS ACTIVE WITHOUT IPSECURITY
SUPPORT
EZZ8771I PAGENT CONFIG POLICY PROCESSING COMPLETE FOR TCPIPD : TTLS
EZZ8771I PAGENT CONFIG POLICY PROCESSING COMPLETE FOR TCPIPD : ROUTING
EZZ8771I PAGENT CONFIG POLICY PROCESSING COMPLETE FOR TCPIPE : IPSEC
EZZ8452I PAGENT READY FOR REMOTE CLIENT CONNECTIONS ON POLICY SERVER
EZD1576I PAGENT IS READY FOR SERVICES CONNECTION REQUESTS
We want to examine whether the AT-TLS policies that loaded are really ours. We move to the UNIX System Services environment from TSO by using the following command:
tso omvs
We want to run the pasearch command, which was already authorized to us by RACF. From the UNIX shell we entered the command with the -t option to examine only the AT-TLS policies (see Example 17-54). We redirected the output to a file in our user directory, as shown in the following example:
pasearch -t > myttlspolicies
Example 17-54 Executing pasearch -t from UNIX System Services
. . .
CS02 @ SC33:/u/cs02>pasearch -t > myttlspolicies
CS02 @ SC33:/u/cs02>
The file to which we redirected the output from the pasearch command now shows the loaded AT-TLS policies. We defined these policies with IBM Configuration Assistant, as shown in Example 17-55.
Example 17-55 pasearch output from UNIX System Services
TCP/IP pasearch CS V1R13 Image Name: TCPIPD
Date: 08/03/2011 Time: 08:26:39
TTLS Instance Id: 1312374380
policyRule: Default_FTP-Server~1 a
Rule Type: TTLS
Version: 3 Status: Active
Weight: 255 ForLoadDist: False
Priority: 255 Sequence Actions: Don't Care
No. Policy Action: 3 b
policyAction: gAct1~FTP-Server c
ActionType: TTLS Group
Action Sequence: 0
policyAction: eAct1~FTP-Server d
ActionType: TTLS Environment
Action Sequence: 0
policyAction: cAct1~FTP-Server e
ActionType: TTLS Connection
Action Sequence: 0
Time Periods:
Day of Month Mask:
First to Last: 1111111111111111111111111111111
Last to First: 1111111111111111111111111111111
Month of Yr Mask: 111111111111
Day of Week Mask: 1111111 (Sunday - Saturday)
Start Date Time: None
End Date Time: None
Fr TimeOfDay: 00:00 To TimeOfDay: 24:00
Fr TimeOfDay UTC: 04:00 To TimeOfDay UTC: 04:00
TimeZone: Local
TTLS Condition Summary: NegativeIndicator: Off
Local Address:
FromAddr: All
ToAddr: All
Remote Address:
FromAddr: All
ToAddr: All
LocalPortFrom: 21 LocalPortTo: 21
RemotePortFrom: 1024 RemotePortTo: 65535
JobName: UserId:
ServiceDirection: Inbound
Policy created: Wed Aug 3 08:26:20 2011
Policy updated: Wed Aug 3 08:26:20 2011
TTLS Action: gAct1~FTP-Server c
Version: 3
Status: Active
Scope: Group c1
TTLSEnabled: On
CtraceClearText: Off
Trace: 2
FIPS140: Off
TTLSGroupAdvancedParms:
SecondaryMap: Off
SyslogFacility: Daemon
Policy created: Wed Aug 3 08:26:20 2011
Policy updated: Wed Aug 3 08:26:20 2011
TTLS Action: eAct1~FTP-Server d
Version: 3
Status: Active
Scope: Environment d1
HandshakeRole: Server
TTLSKeyringParms:
Keyring: TCPIP/SharedRing1
TTLSEnvironmentAdvancedParms:
SSLv2: Off
SSLv3: On
TLSv1: On
TLSv1.1: On
ApplicationControlled: Off
HandshakeTimeout: 10
ClientAuthType: Required
ResetCipherTimer: 0
TruncatedHMAC: Off
CertValidationMode: Any
ServerMaxSSLFragment: Off
ClientMaxSSLFragment: Off
ServerHandshakeSNI: Off
ClientHandshakeSNI: Off
EnvironmentUserInstance: 0
Policy created: Wed Aug 3 08:26:20 2011
Policy updated: Wed Aug 3 08:26:20 2011
TTLS Action: cAct1~FTP-Server e
Version: 3
Status: Active
Scope: Connection e1
HandshakeRole: Server
CtraceClearText: Off
Trace: 2
TTLSConnectionAdvancedParms:
SecondaryMap: On
ApplicationControlled: On
HandshakeTimeout: 60
TTLSCipherParms:
v3CipherSuites:
09 TLS_RSA_WITH_DES_CBC_SHA
0A TLS_RSA_WITH_3DES_EDE_CBC_SHA
2F TLS_RSA_WITH_AES_128_CBC_SHA
Policy created: Wed Aug 3 08:26:20 2011
Policy updated: Wed Aug 3 08:26:20 2011
Notice how the pasearch formatting of policies is much more understandable than a review of the actual policy file. The reusable objects from the actual policy file that was produced now appear inline with the policy itself when the pasearch command is executed. It is thus much easier to view the logic of the policy with the pasearch output.
The rule (a) references three actions (b). The names of the actions on the rule at c, d, and e point to the action definitions themselves, also indicated with c, d, and e in Example 17-55 on page 791.
However, note that there is only one Group Action (c1), although the other actions (Environment d1 and Connection e1) are, in fact, part of the Group Action. You see the entire contents of the rule and the entire contents of the actions.
The following methods can be used to see the results of pasearch without entering the UNIX shell:
•Use the EZACMD System REXX command to issue pasearch from the z/OS console, TSO or NetView. For more information about using EZACMD, see 2.6.5, “EZACMD console command security” on page 29 and also the following resources:
– Section 8.7, “MVS console support for selected TCP/IP commands” in IBM z/OS V2R2 Communications Server TCP/IP Implementation Volume 1: Base Functions, Connectivity, and Routing, SG24-8360
– z/OS Communications Server: IP System Administrator’s Commands, SC27-3661
•A REXX exec (see Example 17-56) that can be invoked from TSO or NetView to execute the pasearch command or any other UNIX command for you.
Example 17-56 REXX exec: From TSO issue “unixcmd pasearch”
/* REXX */
parse arg input
parse var input number mycmd
if datatype(number,'N') then
maxlines = number
else do
maxlines = 9999
mycmd = input
end
if syscalls('ON') >3 then do
say 'Unable to establish the SYSCALL environment'
return
end
environment.0 = 2;
environment.1 = "PATH=/bin:/usr/sbin"
environment.2 = "LIBPATH=/lib:/usr/lib"
call bpxwunix mycmd,,stdout.,stderr.,environment.
outlines = 0
if stdout.0 > 0 then do i=1 to stdout.0
if i > maxlines then do
x=maxlines
parm='MAX output lines ('||x||') reached'
parm=parm||' - report truncated'
say parm
leave
end
say stdout.i
outlines = outlines + 1
end
if stderr.0 > 0 then do i=1 to stderr.0
if i > maxlines-outlines then do
x=maxlines
parm='MAX output lines ('||x||') reached'
parm=parm||' - report truncated'
say parm
leave
end
say stderr.i
end
exit 0
If you do not want to create a REXX exec to execute from TSO or from NetView, you can still learn about AT-TLS policy with the netstat command. In Example 17-57, we run the netstat command with the ttls option.
Example 17-57 Sample NETSTAT TTLS command output
D TCPIP,TCPIPD,N,TTLS
TTLSGRPACTION GROUP ID CONNS
GACT1~FTP-SERVER 00000002 0
1 OF 1 RECORDS DISPLAYED
END OF THE REPORT
You see the name of a Group Action that is in our file. There are other variations of the netstat ttls command that we ran after we started FTP and connected some sessions.
Analyzing the FTPD daemon records in syslogd log
After starting the FTP server and having FTP connections in place, view what the syslog daemon log indicates about the FTP startup and the client’s login by using TLS.
The syslog daemon isolation that we set up for the FTP procedure named FTPDD collects messages in the /var/syslog/%Y/%m/%d/ftpd.log file. Browsing the log file covering the current date from the UNIX shell (as shown in Example 17-58 on page 795), we see that the FTP server was successfully set up with security, and that the AUTH TLS commands are allowed to flow with AT-TLS enabled.
Example 17-58 Syslogd output for the FTP server and the client login
DM1136 ..localsite values -------------------------
..
DM1317 ..security mechanism values ---------------- a
DM1319 ....SECURE_FTP................A
DM1321 ....SECURE_LOGIN..............N
DM1323 ....SECURE_PASSWORD...........R
DM1325 ....SECURE_PASSWORD_KERBEROS..R
DM1327 ....SECURE_CTRLCONN...........P
DM1329 ....SECURE_DATACONN...........C
DM1331 ....SECURE_PBSZ...............16384
DM1333 ....KEYRING...................
DM1335 ....CIPHERSUITE...............
DM1337 ....TLSPORT...................990
DM1339 ....TLSTIMEOUT................100
DM1345 ....TLSRFCLEVEL...............DRAFT
DM1349 ....TLSMECHANISM..............ATTLS
DM1352 ....securePort................FALSE
DM1355 ....secureImplictiZos.........TRUE
..
DM1549 main: daemon's code page is: IBM-1047
DM1552 main: daemon's locale is: C
DM1564 main: environment variable: TZ=EST5EDT4
DM1564 main: environment variable: _BPXK_SETIBMOPT_TRANSPORT=TCPIPD b
DM1564 main: environment variable: _BPX_JOBNAME=FTPDDDD
DM1564 main: environment variable: _EDC_ADD_ERRNO2=1
EZY2700I Using port FTP control (21)
..
SD0438 accept_client: accept()
SD0505 accept_client: accepted client on socket 8
SD1677 handle_client_socket: entered for socket 8
SD1899 handle_client_socket: new session for ::ffff:10.1.1.20 port 1057 c
SD1160 spawn_ftps: entered
SD0372 accept_client: prepare to accept another client
SD0391 accept_client: calling selectex for socket 7
SD1180 spawn_ftps: my pid is 33816668 and my parent's is 67371091
GU4900 initADcontainer: entered
GU4921 initSIOCSAPPLDATAInput: entered
GU4945 ftpSetApplData: entered
BU0936 good_morning: entered
EZYFS50I ID=FTPDD100000 CONN starts Client IPaddr=::ffff:10.1.1.20 hostname=wtsc31.itso.ibm.com
SD0781 setup_new_pgm: entered
SD0927 setup_new_pgm: msgcat->_name = /usr/lib/nls/msg/C/ftpdmsg.cat
SD1112 setup_new_pgm: issuing execv
GU1137 chkVerRel: system information for SC33: z/OS version 1 release 13 (2817)
PR0308 parse_cmd: entered
SR1232 get_command: UTF8_on = 0
PR0490 parse_cmd: >>> AUTH TLS
FR0186 auth: entered with mechname TLS
FR2827 ftpAuthAttls: Query AT-TLS state for socket
FR2878 ftpAuthAttls: AT-TLS policy set as application controlled.
FU1367 TTLSRule: Default_FTP-Server~1
FU1373 TTLSGroupAction: gAct1~FTP-Server
FU1379 TTLSEnvironmentAction: eAct1~FTP-Server
FU1386 TTLSConnectionACtion: cAct1~FTP-Server
SR3397 reply: --> 234 Security environment established - ready for negotiation
FR2557 authClientAttls: Start TLS handshake
FR2588 authClientAttls: FIPS140 not enabled
FR2606 authClientAttls: Using TLSv1 protocol
FR2620 authClientAttls: SSL cipher: 09
FR2683 getUseridAttls: no client certificate available
EZYFS54I ID=FTPDD100000 SECURE OK Mechanism=TLS
GU4945 ftpSetApplData: entered
SR1232 get_command: UTF8_on = 0
PR0490 parse_cmd: >>> USER cs03
RA2225 user: username = CS03, authusername =
SR3397 reply: --> 331 Send password please.
GU4945 ftpSetApplData: entered
SR1232 get_command: UTF8_on = 0
PR0495 parse_cmd: >>> PASS ******
Note that a in Example 17-58 on page 795 shows the security parameters set in the FTP.DATA file. At b, this FTP server has established stack affinity to the TCPIPD stack. And at c, the client IP address is that of the TCPIPB TSO client at 10.1.3.21. Examine the output from the netstat ttls command in Example 17-59; d shows that we have one connection active to AT-TLS.
Example 17-59 Netstat TTLS connections
D TCPIP,TCPIPD,N,TTLS
TTLSGRPACTION GROUP ID CONNS
GACT1~FTP-SERVER 00000002 1 d
1 OF 1 RECORDS DISPLAYED
END OF THE REPORT
Example 17-60 shows the details of the Action Group that is active.
Example 17-60 Netstat TTLS Action Group information
D TCPIP,TCPIPD,N,TTLS,GROUP,DETAIL
TTLSGRPACTION: GACT1~FTP-SERVER
GROUPID: 00000002
TASKS: 4 GROUPCONNS: 1
WORKQELEMENTS: 0 SYSLOGQELEMENTS: 0
ENV: EACT1~FTP-SERVER ENVCONNS: 1
1 OF 1 RECORDS DISPLAYED
END OF THE REPORT
Example 17-61 displays the connection ID of an FTP connection using a standard netstat conn command. From this command, you can obtain the connection ID for the FTP connection (a). Then you can use netstat ttls command to display the TTLS information for this particular connection (b).
Example 17-61 Specific connection information for an ATTLS connection
D TCPIP,TCPIPD,N,CONN,PORT=21
USER ID CONN STATE
FTPDD1 00000125 ESTBLSH a
LOCAL SOCKET: ::FFFF:10.1.1.40..21
FOREIGN SOCKET: ::FFFF:10.1.1.20..1059
FTPDD1 00000020 LISTEN
LOCAL SOCKET: ::..21
FOREIGN SOCKET: ::..0
2 OF 2 RECORDS DISPLAYED
END OF THE REPORT
D TCPIP,TCPIPD,N,TTLS,CONN=125,DETAIL b
CONNID: 00000125
JOBNAME: FTPDD1
LOCALSOCKET: ::FFFF:10.1.1.40..21
REMOTESOCKET: ::FFFF:10.1.1.20..1059
SECLEVEL: TLS VERSION 1
CIPHER: 09 TLS_RSA_WITH_DES_CBC_SHA
CERTUSERID: N/A
MAPTYPE: PRIMARY
FIPS140: OFF
TTLSRULE: DEFAULT_FTP-SERVER~1
PRIORITY: 255
LOCALADDR: ALL
LOCALPORT: 21
REMOTEADDR: ALL
REMOTEPORTFROM: 1024 REMOTEPORTTO: 65535
DIRECTION: INBOUND
TTLSGRPACTION: GACT1~FTP-SERVER
GROUPID: 00000002
TTLSENABLED: ON
CTRACECLEARTEXT: OFF
TRACE: 2
SYSLOGFACILITY: DAEMON
SECONDARYMAP: OFF
FIPS140: OFF
TTLSENVACTION: EACT1~FTP-SERVER
ENVIRONMENTUSERINSTANCE: 0
HANDSHAKEROLE: SERVER
KEYRING: TCPIP/SHAREDRING1
SSLV2: OFF
SSLV3: ON
TLSV1: ON
TLSV1.1: ON
RESETCIPHERTIMER: 0
APPLICATIONCONTROLLED: OFF
HANDSHAKETIMEOUT: 10
TRUNCATEDHMAC: OFF
CLIENTMAXSSLFRAGMENT: OFF
SERVERMAXSSLFRAGMENT: OFF
CLIENTHANDSHAKESNI: OFF
SERVERHANDSHAKESNI: OFF
CLIENTAUTHTYPE: REQUIRED
CERTVALIDATIONMODE: ANY
TTLSCONNACTION: CACT1~FTP-SERVER
HANDSHAKEROLE: SERVER
V3CIPHERSUITES: 09 TLS_RSA_WITH_DES_CBC_SHA
0A TLS_RSA_WITH_3DES_EDE_CBC_SHA
2F TLS_RSA_WITH_AES_128_CBC_SHA
CTRACECLEARTEXT: OFF
TRACE: 2
APPLICATIONCONTROLLED: ON
HANDSHAKETIMEOUT: 60
SECONDARYMAP: ON
1 OF 1 RECORDS DISPLAYED
END OF THE REPORT
17.5 Migrating from native FTP TLS to FTP AT-TLS
This section describes migrating from the native FTP TLS environment to the FTP ATTLS environment.
17.5.1 Migrating policies to a new release of z/OS Communications Server
Migration can be accomplished by moving from either a flat policy file or a policy file generated by the z/OSMF Configuration Assistant.
Migrating from an existing flat policy file
If you already have an existing flat policy file from a previous release, you can continue to use it. Simply add the new AT-TLS policy to the suite of policies already defined.
Migrating from an existing IBM Configuration Assistant policy file
If you already have an existing backing store policy file from a previous release, you can migrate it to the current IBM Configuration Assistant for z/OS Communications Server. For details, see 4.6.2, “Migrating backing store files to z/OSMF Configuration Assistant” on page 145. Then, simply add the new AT-TLS policy to the suite of policies already defined.
17.5.2 Details on migrating from TLS to AT-TLS
Migrating from native FTP TLS to FTP with AT-TLS can be simple. Consider the following items:
What to do with existing key rings and certificates during migration
If you already have a functioning FTP with TLS, you can continue to use the same key ring and certificates to implement FTP with AT-TLS.
What to do with the FTP.DATA files during migration
You can also continue to use the same server FTP.DATA and client FTP.DATA by simply changing or adding one parameter: TLSMECHANISM ATTLS. Three existing types of parameters in the TLS FTP.DATA can be moved into an AT-TLS policy file. If you choose not to remove them, they will be superseded by what is coded in the AT-TLS policy file anyway.
Table 17-1 lists which statements must migrate to the policy agent file.
Table 17-1 Migrating to AT-TLS: Statements that move to the AT-TLS policy file
|
FTP.DATA
statement
|
AT-TLS statement
|
Location of AT-TLS policy statement
|
|
|
Keyring
|
Keyring
|
TTLSEnvironmentAction → TTLSKeyRingParms
|
|
|
CipherSuite
|
V3CipherSuite
|
TTLSEnvironmentAction → TTLSCipherParms
|
|
|
TlsTimeout
|
GSK_V3_Session_Timeout
|
TTLSEnvironmentAction → TTLSGskAdvancedParms
|
|
Table 17-2 shows how the cipher specifications are slightly different if you choose to migrate them from your existing TLS FTP.DATA file into a TTLS policy file. If you edit the policy files manually, you need to know the AT-TLS values. If you use the IBM Configuration Assistant, the values are easier to select using the GUI.
Table 17-2 Cipher Suite names and values
|
Cipher Suite cipher
|
V3CipherSuite value
|
Hex value
|
|
SSL_DES_SHA
|
TLS_RSA_WITH_DES_CBC_SHA
|
09
|
|
SSL_3DES_SHA
|
TLS_RSA_WITH_3DES_EDE_CBC_SHA
|
0A
|
|
SSL_NULL_MD5
|
TLS_RSA_WITH_NULL_MD5
|
01
|
|
SSL_NULL_SHA
|
TLS_RSA_WITH_NULL_SHA
|
02
|
|
SSL_RC2_MD5_EX
|
TLS_RSA_EXPORT_WITH_RC2_CBC_40_MD5
|
06
|
|
SSL_RC4_MD5
|
TLS_RSA_WITH_RC4_128_MD5
|
04
|
|
SSL_RC4_MD5_EX
|
TLS_RSA_EXPORT_WITH_RC4_40_MD5
|
03
|
|
SSL_AES_128_SHA
|
TLS_RSA_WITH_AES_128_CBC_SHA
|
2F
|
|
SSL_AES_256_SHA
|
TLS_RSA_WITH_AES_256_CBC_SHA
|
35
|
Defining AT-TLS instead of native TLS
Define the AT-TLS policy using the IBM Configuration Assistant for z/OS Communications Server. Then, by using the pasearch command or scanning the ASCII policy file, compare the output values from AT-TLS with what you were operating with under native TLS to ensure that you have truly implemented the AT-TLS environment to resemble as closely as possible the old tuning and operating values.
New procedures that are necessary for migration
For AT-TLS, you need a functioning policy agent. For information about how to complete this task, see Chapter 4, “Policy agent” on page 95.
Changes to security that are required for migration
The authorizations that are already in place for key ring access and certificate and key processing are still valid for AT-TLS. For more information, see “Creating key ring and certificates and updating RACF permissions” on page 729.
Policy agent requires additional RACF authorizations, as do the users who need access to the PAGENT commands like pasearch. For information about how to complete this task, see Chapter 4, “Policy agent” on page 95.
Special authorizations in the SERVAUTH facility class are required to enable the stack and its associated servers and users to access the stack after AT-TLS is enabled, but before completed PAGENT initialization. Therefore, you must add these authorizations, as described in Chapter 12, “Application Transparent Transport Layer Security” on page 551, or for more information, see “TCP/IP stack initialization access control” on page 787.
Changes to the TCP/IP stack that are required for migration
To activate AT-TLS, the TTLS parameter must be added to the TCPCONFIG profile config statement. For more information, see “TCP/IP stack changes” on page 789.
|
Important: Do not insert this change into the TCP/IP profile before you have made the necessary RACF authorizations for INITSTACK processing.
Otherwise, any servers or users that attempt to open sockets on the TCP/IP stack prior to the completion of PAGENT initialization will be denied access unless their associated user IDs are authorized to the INITSTACK SERVAUTH profiles.
|
17.6 FTP TLS and AT-TLS problem determination
The most important tool for problem determination is a running SYSLOG daemon, preferably with syslogd message isolation in effect. Without a SYSLOG daemon, messages are buried in console logs or sometimes not recorded at all, thus severely reducing your effectiveness in solving problems.
The second most important tool for problem determination is access to z/OS Communications Server: IP Diagnosis Guide, GC31-8782. It contains detailed chapters that include common problem diagnosis, steps for taking traces, and so on.
In case of a server issue, first check the console and syslogd for error messages. For more information and for references to alternative publications within the z/OS family, see the following resources:
•z/OS Communications Server: IP Messages Volume 1 (EZA), SC31-8783
•z/OS Communications Server: IP Messages Volume 3 (EZY), SC31-8785
•z/OS Communications Server: IP Messages Volume 4 (EZZ, SNM), SC31-8786
Look for the error codes and return codes and consult the IP messages volumes mentioned here. You might also have to consult UNIX System Services publications and z/OS Integrated Security Services publications for specialized error codes, such as those for Language Environment and SSL.
Scan the syslogd files for OBJERR messages if PAGENT problems are occurring. OBJERR errors usually point to logic or syntax errors in policy files.
If no problem can be identified from messages, enable a trace in any of the following ways:
•Specify the keyword TRACE as a PARMS parameter on the FTPD catalogued procedure.
•Set trace or debug options in the appropriate FTP.DATA file.
•Issue a MODIFY <ftpprocname> command to enable trace or debug.
•Request a trace or debug at client connect time.
•Request a server trace or debug from within the client connection by entering the appropriate SITE command.
For more information about how to work with traces for FTP, see the following publications:
•z/OS Communications Server: IP System Administrator’s Commands, SC27-3661
•z/OS Communications Server: IP Diagnosis Guide, GC31-8782
For more information about the TLS/SSL error codes that are also documented in the SSL Programmer’s Guide, see z/OS Communications Server: IP Diagnosis Guide, GC31-8782. These error codes give discrete explanations of violations of SSL protocols and are useful in determining what types of errors are occurring on the TLS/SSL connection.
An invaluable tool is “Diagnosing File Transfer Protocol (FTP) Problems” in z/OS Communications Server: IP Diagnosis Guide, GC31-8782.
17.7 More information
For more information about FTP security, see the following resources:
•z/OS Communications Server: IP Configuration Guide, SC27-3650
•z/OS Communications Server: IP Configuration Reference, SC27-3651
•z/OS Communications Server: IP Diagnosis Guide, GC31-8782
•z/OS Communications Server: IP User’s Guide and Commands, SC27-3662
•FTP is defined by RFC 959, RFC 2228, Internet draft RFC, “On Securing FTP with TLS (draft 05),” and RFC 4217.
|
Tip: For more information about security considerations that affect specific servers or components, see z/OS Communications Server: IP Configuration Guide, SC27-3650.
|
..................Content has been hidden....................
You can't read the all page of ebook, please click here login for view all page.