Chapter 5. Federated Identity
As Keystone progressed with new features and functionality, one of the most sought-after features was support for federated identity: giving administrators the ability to leverage their existing federated identity solution, allowing users to use their own credentials and to leverage existing single sign-on capabilities. One of the key benefits of this approach is that users can exist in an identity store that is not owned or accessible by Keystone, reducing the logic of maintaining user credentials, or supporting a single type of corporate backend (LDAP and not AD). It also allows Keystone to concentrate on authorization and how to better serve OpenStack services.
A brief overview of the terminology used in this chapter:
- Identity Provider (IdP)
-
A trusted provider of identity information. This may be backed by LDAP, SQL, AD, or Mongo. The identity provider is able to construct user attributes into Assertions or Claims.
- Service Provider (SP)
-
A service that consumes identity information. In our case, Keystone will be the service provider. Many web applications that utilize single sign-on are examples of service providers.
- SAML
-
An XML-based standard approach to federated identity. The resultant document that contains user attributes is called an Assertion.
- OpenID Connect
-
A newer standard approach to federated identity. Leverages OAuth 2.0, and ditches XML in favor of JSON. The resultant information about the user is called a Claim.
- Assertions and Claims
-
A standard method of representing information and attributes about a user. An identity provider may issue Assertions or Claims, based on the standard they use, for service providers to consume.
5.1 Approach to Federation
In this section we discuss how existing technology can be leveraged and Keystone-specific resources that need to be created.
5.1.1 Leveraging Existing Technology
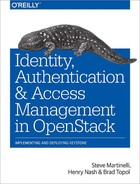
Keystone’s approach to Federation was based on its decision to run Keystone under the Apache HTTP Server (httpd). Since Apache (and other HTTP servers) is the recommended way to run Keystone, it made sense to architect a solution that allowed Keystone to leverage existing Apache plugins and modules that handle different federation standards for it. For instance, if you intend to use a SAML identity provider, then mod_shib or mod_auth_mellon are available plugins; if you intend to use an OpenID Connect identity provider, then mod_auth_openidc is available. This approach makes Keystone a service provider that is protocol agnostic, since the web server plugins will handle the logic of interacting with the identity provider. The result of a correct setup is that once a user successfully authenticates with their identity provider, Keystone is able to see user attributes as HTTP request environment variables.
One of the difficulties with this approach, and so many of the federated identity standards, is that they are primarily designed to be used in an Internet browser. The reason for this is that any form of authentication can be used, password, two-factor, certificate, etc., so long as the browser can support it and handle the inherent redirects that come with browser-based authentication, then all is good. The issue with using this approach for OpenStack is that so many users of OpenStack interact with their cloud through a command line interface (CLI). Within the standards, there are various levels of support for a non-browser-based flow, but these are often not as user friendly, and may even be disabled or unsupported by the identity provider.
5.1.2 Keystone-Specific Federation Concepts
In order to have a full federated identity solution, the Keystone team needed to create a new set of APIs, and resources stored in their own backends. These APIs are intended to allow cloud administrators to add trusted identity providers, specify which protocols the identity providers will support, and create mappings to allow translating user attributes to keystone concepts that model the external identity providers and protocols they will be consuming.
Identity Provider
Keystone now has an Identity Provider resource, which is served through the following API: /OS-FEDERATION/identity_providers. This endpoint allows a cloud administrator to create, delete, update, retrieve, and list identity providers. Each entry is meant to map to an external identity provider that will be trusted to send assertions or claims about an external user. Note that identity provider names are guaranteed to be globally unique in an OpenStack deployment.
Protocol
Keystone now has a Protocol resource, which is served at the following API: /OS-FEDERATION/identity_providers/{idp_id}/protocols. This endpoint allows a cloud administrator to create, delete, update, retrieve, and list protocols per identity provider. A protocol has only a name and reference to the mapping that will be used (more on that later). The reasoning behind setting the protocol per identity provider is that an external identity provider may support more than one type of federated authentication, so we must allow an identity provider to have multiple protocols as well. The protocols are meant to mirror the federated identity standard that is being used. Common values for protocol names are saml2 (for SAML) and oidc (for OpenID Connect).
Mapping
Mappings are the lynchpin to federated identity in Keystone. A mapping resource has now been created and served at the following API: /OS-FEDERATION/mappings. This endpoint allows a cloud administrator to create, delete, update, retrieve, and list mappings. A mapping is specified when creating a protocol that an identity provider supports. The actual contents of a mapping is a set of rules that will be evaluated when a Claim or Assertion is seen by Keystone. These rules will vary greatly between deployments, and depend on the attributes issued by the identity provider and how much access the cloud administrator wants to give to federated users.
5.2 Translating User Attributes to Keystone Concepts
Now that identity providers, protocols, and mappings have been briefly covered, in this section we discuss what assertions about the incoming user look like, how the mapping engine evaluates these assertions, and the rules used by the mapping engine. Let’s start by showing an OpenID Connect Claim and a SAML assertion, and how each will have its content transformed into HTTP headers by the web server plugins.
5.2.1 OpenID Connect Claims
An OpenID Connect claim represents information about a user in JSON. There are a number of required fields and values, such as the issuer, the subject, when the claim was issued, and when it will expire. The following is an example OpenID Connect claim after a user has authenticated with an OpenID Connect Identity Provider.
{
    "nonce": "9c2b51b0ef3849828d6fedc8019eae2b",
    "sub": "[email protected]",
    "at_hash": "RC3QNVOT1h31ofNyFlQskQ",
    "iss": "https://localhost:8020/oidc/v10/providers/OP",
    "uniqueSecurityName": "[email protected],c=ca...es,o=ibm.com",
    "realmName": "w3",
    "groupIds": [
        "cn=SWG_Canada,ou=memberlist,ou=ibmgroups,o=ibm.com",
        "cn=Toronto_Lab_VPN,ou=memberlist,ou=ibmgroups,o=ibm.com",
        "cn=IBM Regular Employees Canada,ou=memberlist,ou=ibmgroups,o=ibm.com"
    ],
    "exp": 1395358515,
    "iat": 1395354915,
    "aud": "rp"
}
Looking at the claim above, we can see various fields specific to the authenticated user and the identity provider. The Issuer (iss) represents the Identity Provider that issued the claim, the Subject (sub) represents the user that authenticated, and most importantly we have the groupIds. Note that sub and iss (and nonce, exp, iat, and aud) are required to exist, as per the OpenID Connect specification. The specification also allows for identity providers to add extra fields; in this case, our Identity Provider was backed by our internal bluepages LDAP, and added groupIds; this field represents a list of group CNs the user is a member of. How does this look to Keystone?
HTTP_OIDC_ISS="https://localhost:8020/oidc/v10/providers/OP"
HTTP_OIDC_SUB=”[email protected]”
HTTP_GROUP_IDS="cn=SWG_Canada,ou=memberlist,ou=ibmgroups,o=ibm.com;
                cn=Toronto_Lab_VPN,ou=memberlist,ou=ibmgroups,o=ibm.com;
                cn=IBM Regular Employees Canada,ou=memberlist,ou=ibmgroups,
                o=ibm.com"
The above is a representation of how the claims are seen by Keystone. Each claim will be transformed into an HTTP header and placed in the request back to Keystone. Most of these are straight translations, but in the case of a list of groups, it is common to see either commas or semicolons used to separate the items in the list.
5.2.2 SAML Assertions
A SAML assertion is an XML representation of an authenticated user. Similar to OpenID Connect, there are a number of required fields pertaining to the issuer, the subject, their authorization on the identity provider, and when the assertion was made. The following is a significantly simplified example SAML assertion that was generated after a user has authenticated with an SAML Identity Provider.
<saml2:Assertion IssueInstant="2014-06-11T13:05:28.891Z">
    <saml2:Issuer>
        https://bluepages.ibm.com
    </saml2:Issuer>
    <saml:AttributeStatement>
        <saml2:Attribute Name="UserName">
             <saml2:AttributeValue>[email protected]</saml2:AttributeValue>
        </saml2:Attribute>
        <saml:Attribute Name="Role">
            <saml:AttributeValue>IBM Regular Employ...anada</saml:AttributeValue>
        </saml:Attribute>
        <saml:Attribute Name="Role">
            <saml:AttributeValue>SWG Canada</saml:AttributeValue>
        </saml:Attribute>
        <saml:Attribute Name="Role">
            <saml:AttributeValue>Toronto Lab VPN</saml:AttributeValue>
        </saml:Attribute>
    </saml:AttributeStatement>
</saml2:Assertion>
Looking at the assertion above, we can see various fields specific to the authenticated user and identity provider. The main portion of the assertion we are interested in are the Attributes in the AttributeStatement section. This indicates the level of authorization the user has on that identity provider. These field values will be used to construct an effective mapping. How does this look to Keystone?
HTTP_ISSUSER="https://bluepages.ibm.com"
HTTP_USERNAME=”[email protected]”
HTTP_ROLE="IBM Regular Employees Canada;SWG Canada;Toronto Lab VPN"
Similar to the example above, the information that is returned to Keystone should have a very similar structure when SAML is used as opposed to OpenID Connect; this demonstrates a Keystone protocol-agnostic approach to federating identities.
5.2.3 The Mapping Engine
Another detail about Keystone’s approach to federation is that users coming from identity providers are ephemeral, meaning they will not exist or be stored anywhere on a Keystone database. This decision was made because, if users were to be added or removed, then the databases would need to be updated accordingly, rendering our goal (to eliminate user management in Keystone) moot. The impact of this decision is that the individual ephemeral users will not have a sense of authorization on the cloud, since we would not be able to assign the user a role or a project. To address this issue, mappings were created to convey a sense of where these external entities belong in a Keystone cloud.
The goal of a mapping is to give the ephemeral user just enough authorization in the cloud to perform a task, and also to ensure we have enough data about the user to populate token details, and create auditable information. To accomplish this task, the Keystone team decided to leverage User Groups that are already present in the Identity backend, since groups may have role assignments. Using the information in the claim or assertion, a Keystone administrator should be able to create a mapping that will give the ephemeral user access to a specific part of the cloud.
The overall concept of the input and output of the mapping rules can be seen below.

Figure 5-1. Assertions as HTTP headers are sent to the mapping engine with the mapping rules for the identity provider and protocol, and the result is enough information to include in a token.
On the left-hand side of the figure are the HTTP request environment variables, as seen by Keystone; additional examples of these environment variables can be seen in the previous section. Using the mapping rules associated with a specific identity provider and protocol, we are able to determine suitable groups to give the user membership to, and also determine a suitable username and user ID to populate the resulting token and any auditable events.
5.2.4 Mapping Rules
In this section, we will discuss how the user attributes, represented as HTTP requests headers, can be translated into Keystone concepts. To accomplish this, we select a mapping that contains a set of rules that will be invoked when requests come from a specific identity provider.
So let’s say we are an administrator at Acme Inc., and we want to use cloud resources at IBM. When authenticated with our external identity provider, the following user attributes are returned, represented by HTTP headers:
HTTP_ISSUSER="https://acmepages.acme.com"
HTTP_USERNAME=”topol”
HTTP_FULL_NAME=”Brad Topol”
HTTP_EMAIL=”[email protected]”
HTTP_ROLE="Acme IT Dept; IT Administrators; Regular Employees; Non-Contractors"
So, when the cloud administrator at IBM is creating a mapping, what should it look like for users authenticating from Acme Inc.? The answer depends on just how much access the cloud administrator wants to give! Mapping rules are made up of a local and remote section; the local section represents the Keystone resource the users will be mapped to, and the remote section represents the user attributes in the HTTP header. Below is a sample mapping that can be used to federate user identities from Acme to Keystone.
{
    "rules": [
        {
            "local": [
                "user": {
                    "name": "{0}"
                }
            ],
            "remote": [
                {
                    "type": "HTTP_USERNAME"
                }
            ]
        },
        {
            "local": [
                {
                    "group": {
                        "name": "acme_federated_users",
                        "domain": {
                            "name": "acme_private_cloud"
                        }
                    }
                }
            ],
            "remote": [
                {
                    "type": "HTTP_ROLE",
                    "any_one_of": [
                        "Acme IT Dept",
                        "IT Administrators"
                    ]
                }
            ]
        }
    ]
}
Different mapping rules can be used to accomplish the same goal. Below is another example of how we can federate user identities from Acme to Keystone.
{
    "rules": [
        {
           "local": [
                {
                    "user": {
                        "name": "{0}"
                    },
                    "groups": {
                        "name": "{1}",
                        "domain": {
                            "id": "0cd5e9"
                        }
                    }
                }
            ],
            "remote": [
                {
                    "type": "HTTP_USERNAME"
                },
                {
                    "type": "HTTP_ROLES",
                    "blacklist": [
                        "Regular Employees”,
                        “Contractors"
                    ]
                }
            ]
        }
    ]
}
Assuming Keystone receives the user attributes in HTTP headers (like the example above), what would happen if the first mapping was used? In this case, a Keystone token will be generated with Brad’s username (topol); if no ID is specified, then it’ll use a URL-safe version of the username. Furthermore, the Keystone token will include a list of groups Brad is successfully matched with, which includes the group ID for the Keystone group “acme_federated_users” in the domain “acme_private_cloud”. Brad matched the criteria for mapping into that group since he has any of the roles: “Acme IT Dept” and “IT Administrator.” Note that the term any_one_of is important here, since it means that as long as a single match occurs, the user has met the criteria.
In the second example, we reuse the same rule for choosing the user’s name and ID. The changes are in how the groups are processed. In this example, the local section attempts to use a direct lookup (using the {0} value initiates a direct lookup) for all incoming values in the HTTP_ROLES list. The only catch is that the group names listed in the blacklist are not looked up.
5.3 Authentication Flow: What’s It Look Like?
Now that we’ve got all the background, what does the full authentication flow look like? We will go through all the steps that are performed in a federated authentication request in this section. Note that to initiate an authentication request, the Apache module used must protect a specific path. We recommend the path be in the following style:
GET/POST /OS-FEDERATION/identity_providers/{identity_provider}
         /protocols/{protocol}/auth
This allows each identity provider to have a separate authentication flow per supported protocol, and gives Keystone enough information to find a mapping to be used for the combination.
Federated authentication flow:
- A user accesses the protected URL above, which triggers the apache module (
mod_shibin this case) to redirect the user to authenticate with the external identity provider (through a web page or otherwise). - Once the user has authenticated with their identity provider, the identity provider returns user attributes (as a SAML assertion or OpenID Connect claim) to the Apache plugin. The Apache module then transforms the user attributes into HTTP request headers and passes them along to Keystone.
- Keystone then determines which mapping to use, based on the identity provider and protocol, invokes the mapping engine, and, if there is enough information to construct a token (user information and group IDs), then an unscoped token is issued!
- (Not included in the diagram) The user can then use the unscoped token to look up the projects they are allowed to access and request a scoped token for that project, using their federated unscoped token.
5.4 Single Sign-On
One of the most demanded features in OpenStack was to support single sign-on access. Configuring Keystone for federating identities does not imply that Keystone will have single sign-on support automatically. This is problematic because Horizon maintains the “login” page for OpenStack and runs as a separate process. To solve this issue, the Keystone and Horizon teams worked together to create a solution whereby Keystone and Horizon are able to communicate and trust each other. The result is that end users will see a familiar login page, which is important for branding. But most importantly, Keystone does not see any sensitive user information (passwords), as was the case in the SQL and LDAP-based backends.
To enable this option in Horizon, certain options need to be enabled in Horizon’s configuration file. These options and more details about this work will be further highlighted in “5.6 A Practical Guide to Setting Up SSO with Google”, including screenshots. For this section, we will simply outline the steps pointing out where the differences happen when compared to the previous flow.
Single Sign-On Flow
- A user hits the Horizon landing page. Upon loading the page, the user is given a list of methods to authenticate. This list will include a method to authenticate by username and password for service accounts, but also includes methods for authenticating by their protocol, or identity provider and protocol, depending on how Horizon is set up.
- Once the user has selected a federation flow, a redirect to the external identity provider is made, and the user is redirected to their single sign-on page.
- At this point, the steps remain the same. The user attributes are sent from the identity provider to Keystone, and the mapping engine is invoked and returns a token.
- Where the process differs is what Keystone does with the token: it must post back the token ID to Horizon. This is done using JavaScript.
- Once Horizon has the token, it creates an unscoped client session and the user is logged in.

5.5 A Practical Guide to Federating Identities for IBM WebSphere Liberty and Bluepages
In this guide, we will reuse the Bluepages LDAP server as our identity store. However, we will also use WebSphere Liberty as our Identity provider, since it has capabilities to act as an OpenID Connect provider.
5.5.1 Download, Install, and Configure IBM WebSphere Liberty
To proceed with this section, adding WebSphere Liberty to your environment is necessary. IBM’s WebSphere Liberty runtime and its extensions are available for free. To download the runtime, navigate to https://developer.ibm.com/wasdev/downloads/liberty-profile-using-non-eclipse-environments/.
Once the jar files have been installed, we need to use the built-in feature manager to install the OpenID Connect Server feature.
$ ./wlp/bin/featureManager install openidConnectServer-1.0
Before we configure WebSphere Liberty to run as an OpenID Connect provider, we need to create a server.
$ ./wlp/bin/server create oauthServer
We can now configure the server to point to the Bluepages LDAP backend. The following is an example configuration in ./wlp/usr/servers/oauthServer/server.xml.
<server>
    <featureManager>
        <feature>openidConnectServer-1.0</feature>
        <feature>ssl-1.0</feature>
        <feature>appSecurity-2.0</feature>
        <feature>servlet-3.0</feature>
    </featureManager>

    <ldapRegistry id="bluepages" realm="w3" host="bluepages.ibm.com" port="389"
                ignoreCase="true" baseDN="o=ibm.com"
                ldapType="IBM Tivoli Directory Server" >
        <idsFilters
                 userFilter="(&(emailAddress=%v)(objectclass=person))"
                 groupFilter="(&(cn=%v)(objectclass=groupOfUniqueNames))"
                 userIdMap="*:emailAddress"
                 groupIdMap="*:cn"
                 groupMemberIdMap="groupOfUniqueNames:uniquemember" />
    </ldapRegistry>

    <keyStore id="defaultKeyStore" password="insecurePass"/>
    <httpEndpoint host="localhost" httpPort="9080" httpsPort="9443"
                  id="defaultHttpEndpoint"/>

    <oauth-roles>
        <authenticated>
            <special-subject type="ALL_AUTHENTICATED_USERS" />
        </authenticated>
    </oauth-roles>

    <openidConnectProvider id="OP" oauthProviderRef="Oauth" />

    <oauthProvider id="Oauth" >
        <localStore>
            <client name="rp" secret="LDo8LTor"
                displayname="rp"
                introspectTokens="true"
                redirect="https://localhost:9443/oauthclient/redirect.jsp"
                scope="openid profile email phone address"
                preAuthorizedScope="openid profile"
                enabled="true"/>
        </localStore>
    </oauthProvider>
</server>
The configuration above does the following:
- Using the
ldapRegistryoption, we point it to our Bluepages LDAP with a user and group filter, not unlike the ones we would provide for Keystone. - The
oauthProvideroption specifies the OAuth client ID and client secret. These arerpandLDo8LTor, respectively. It also specifies which port the process is run on. In this case it’s 9443. - We’re disabling SSL for now in the
keyStoreoption to make things easy to test.
Endpoints are specified in Liberty’s documentation, but we’ll outline them here briefly:
- The token endpoint is:
/oidc/endpoint/OP/token - The introspection endpoint is:
/oidc/endpoint/OP/introspect
Now let’s start the server to test if the configuration is valid.
$ ./wlp/bin/server start oauthServer
We can quickly check to see if we can authenticate with the OpenID Connect Provider by providing our own username and password and the client ID and secret. The output should be an access token.
$ curl -k -H "Content-Type: application/x-www-form-urlencoded;charset=UTF-8" -d
  "grant_type=password&client_id=rp&client_secret=LDo8LTor&username=stevemar%40ca
   .ibm.com&password=mySecretPassword&scope=profile" https://localhost:9443/oidc/
   endpoint/OP/token

{
  "access_token":"kjDVDz7vyUp4maswQbeoaHjN42WFXNSMdBkos1VJ",
  "token_type":"Bearer",
  "expires_in":7200,
  "scope":"profile",
  "refresh_token":"1tqvETSuEo9oiBBCbsabjfY0W1fyvbpH5rTTf3i6979BEsDOp4"
}
Optionally, we can immediately retrieve an OpenID Connect. We can exchange the access token for an OpenID Connect claim, which contains information about the authenticated user, via the introspection endpoint. To do this we supply the client ID and secret and our newly acquired access token.
$ curl -k --user rp:LDo8LTor
  https://localhost:9443/oidc/endpoint/OP/introspect?token=kjDVDz7vyUp4maswQbeoaH
  jN42WFXNSMdBkos1VJ

{
  "exp":"1433979091514600",
  "realmName":"w3",
  "sub":"[email protected]",
  "scope":"profile",
  "grant_type":"resource_owner"
  "uniqueSecurityName":"uid=123456789,c=ca,ou=bluepages,o=ibm.com"
  "active":"true",
  "client_id":"rp",
  "token_type":"Bearer"
  "iat":"1433979091511000"
  "groupIds":"[cn=IBM_Regular_Empl...Canada,ou=memberlist,ou=ibmgroups,o=ibm.com,
               cn=SWG_Canada,ou=memberlist,ou=ibmgroups,o=ibm.com,
               cn=Toronto_Lab_VPN,ou=memberlist,ou=ibmgroups,o=ibm.com]"
}
5.5.2 Configuring Keystone to Use OpenID Connect
Now we must configure Keystone to be able to use the new OpenID Connect provider we created. We have to modify Keystone’s configuration file to enable federated authentication, create the identity provider, protocol, and mapping in Keystone, and lastly we must protect a specific URL to trigger the authentication.
The first (and essential) step in configuring Keystone to use OpenID Connect is to install the Apache Httpd plugin mod_auth_openidc. Several packages are available at https://github.com/pingidentity/mod_auth_openidc/releases.
$ sudo apt-get install libjansson4 libhiredis0.10 libcurl3
$ sudo dpkg -i libapache2-mod-auth-openidc_1.8.3-1_amd64.deb
Next, we must update /etc/keystone/keystone.conf to support OpenID Connect as an authentication mechanism. In the [auth] section set the following:
methods = external,password,token,oidc
oidc = keystone.auth.plugins.mapped.Mapped
In the [federation] section set the following:
remote_id_attribute = HTTP_OIDC_ISS
We also need to update Keystone’s virtual host file and add in new OpenID Connect entries to /etc/apache2/sites-available/keystone.conf. The new settings are highlighted below.
LoadModule auth_openidc_module /usr/lib/apache2/modules/mod_auth_openidc.so

<VirtualHost *:5000>
    ...
    SetEnv HTTP_OIDC_ISS bluepages
    OIDCOAuthIntrospectionEndpoint "https://localhost:9443/oidc/
                                   endpoint/OP/introspect"
    OIDCOAuthIntrospectionTokenParamName token
    OIDCOAuthRemoteUserClaim sub
    OIDCOAuthClientID rp
    OIDCOAuthClientSecret LDo8LTor
    OIDCOAuthSSLValidateServer Off
    OIDCClaimDelimiter ";"
    OIDCClaimPrefix "OIDC-"

    <LocationMatch "/v3/OS-FEDERATION/identity_providers/bluepages/
                    protocols/oidc/.*?">
      Authtype oauth20
      Require valid-user
      LogLevel debug
    </LocationMatch>
</VirtualHost>
We are essentially setting the protected URL, in the LocationMatch header, and setting various OpenID Connect properties.
Now that we’ve updated Keystone’s configuration file and virtual host file, we need to create a local Keystone group so that users authenticating via federation can be mapped into that group. In this case, we create a group called federated_users with the role of member on the project demo.
$ openstack group create federated_users
$ openstack role add member --group federated_users --project demo
Before we create the identity provider, protocol, and mapping entries in Keystone, we can create a file that contains the mapping so as to make our CLI interactions easier. Create the file mapping.json, and remember to update the contents of the local section with the correct ID from the previous command.
 [
    {
        "local": [
            {
                "group": {
                    "id": "26daaf649d6a46b998f631da79759230"
                }
            }
        ],
        "remote": [
            {
                "type": "HTTP_OIDC_GROUPIDS",
                "any_one_of": [
                    "cn=SWG_Canada*"
                ],
                "regex": true
            }
        ]
    }
]
The result of this mapping will be that any user that is a member of the LDAP group SWG_Canada will be placed into the Keystone group federated_users.
The last step is to tie all the pieces together and create the Keystone federation resources; let’s create the identity provider, the mapping, and the protocol.
$ openstack identity provider create bluepages --remote-id bluepages
$ openstack mapping create ibm_mapping --rules mapping.json
$ openstack federation protocol create oidc --identity-provider bluepages
  --mapping ibm_mapping
5.5.3 Testing It All Out
Using the Python-keystoneclient library, we can create a session that uses the OpenID Connect auth plugin. We will create a sample file that can be run to create an unscoped token. We’ll call the file test_oidc.py.
from keystoneclient.contrib.auth.v3 import oidc
from keystoneclient import session

AUTH_URL = 'http://localhost:5000/v3'
IDENTITY_PROVIDER = 'bluepages'
PROTOCOL = 'oidc'
USER_NAME = '[email protected]'
PASSWORD = 'boogabooga'
CLIENT_ID = 'rp'
CLIENT_SECRET = 'LDo8LTor'
ACCESS_TOKEN_ENDPOINT = 'https://localhost:9443/oidc/endpoint/OP/token'

def main():
    oidc_plugin = oidc.OidcPassword(
        AUTH_URL,
        IDENTITY_PROVIDER,
        PROTOCOL,
        username=USER_NAME,
        password=PASSWORD,
        client_id=CLIENT_ID,
        client_secret=CLIENT_SECRET,
        access_token_endpoint=ACCESS_TOKEN_ENDPOINT)
    s = session.Session(verify=False)
    access_info = oidc_plugin.get_unscoped_auth_ref(s)
    print(access_info)

if __name__ == '__main__':
    main()
When ran, the output will be an unscoped Keystone token that contains information about the federated user and the groups they have access to:
$ python test_oidc.py
{
  u'extras': {},
  u'methods': [u'oidc'],
  u'version': 'v3',
  u'audit_ids': [u'F4FbnLlaQ_SsU4xrD_jE7w'],
  u'issued_at': u'2015-06-11T07:36:00.337835Z',
  u'auth_token': '87c736b04338482a94cf951ee0798a76',
  u'expires_at': u'2015-06-11T08:36:00.337487Z',
  u'user': {
    u'OS-FEDERATION': {
      u'identity_provider': {u'id': u'bluepages'},
      u'protocol': {u'id': u'oidc'},
      u'groups': [{u'id': u'26daaf649d6a46b998f631da79759230'}]
      },
    u'domain': {u'id': u'Federated', u'name': u'Federated'},
    u'id': u'stevemar%40ca.ibm.com',
    u'name': u'[email protected]'
  }
}
5.6 A Practical Guide to Setting Up SSO with Google
In this guide, we will discuss how to set up Keystone and Horizon to allow for single sign-on. In this case, use Google as the Identity Provider and allow users with valid Google accounts to federate into our Keystone deployment.
5.6.1 Configure Keystone to Use OpenID Connect
Similar to “5.5.2 Configuring Keystone to Use OpenID Connect”, we need to configure Keystone to use an OpenID Connect provider. First, we install the Apache Httpd plugin mod_auth_openidc. Several packages are available at https://github.com/pingidentity/mod_auth_openidc/releases.
$ sudo apt-get install libjansson4 libhiredis0.10 libcurl3
$ sudo dpkg -i libapache2-mod-auth-openidc_1.8.3-1_amd64.deb
Next, we must update /etc/keystone/keystone.conf to support OpenID Connect as an authentication mechanism. In the [auth] section set the following:
methods = external,password,token,oidc
oidc = keystone.auth.plugins.mapped.Mapped
In the [federation] section, we must set a list of trusted dashboards, which is the fully qualified domain name of the host that is running Horizon.
remote_id_attribute = HTTP_OIDC_ISS
trusted_dashboard = http://sso-demo.test.ibmcloud.com/auth/websso/
We also need to update Keystone’s virtual host file and add in new OpenID Connect entries to /etc/apache2/sites-available/keystone.conf. The new settings are highlighted below.
LoadModule auth_openidc_module /usr/lib/apache2/modules/mod_auth_openidc.so

<VirtualHost *:5000>
    ...
    OIDCClaimPrefix "OIDC-"
    OIDCResponseType "id_token"
    OIDCScope "openid email profile"
    OIDCProviderMetadataURL "https://accounts.google.com/.well-known/
                             openid-configuration"
    OIDCClientID "78026256901-9oice6ionj19voicnrii2lfl86a1i4rp.apps.
                  googleusercontent.com"
    OIDCClientSecret d6TiBYA3qQUuzlR91Q-YzpJA
    OIDCCryptoPassphrase openstack
    OIDCRedirectURI "http://sso-demo.test.ibmcloud.com:5000/v3/auth/
                     OS-FEDERATION/websso/oidc/redirect"

    <Location ~ "/v3/auth/OS-FEDERATION/websso/oidc">
      AuthType openid-connect
      Require valid-user
      LogLevel debug
    </Location>
</VirtualHost>
We are essentially setting the protected redirect URL, in the LocationMatch header, and setting various OpenID Connect properties. Note that the OIDCClientID and OIDCClientSecret come from a Google developer project.
Now that we’ve updated Keystone’s configuration file and virtual host file, we need to create a local Keystone group so users authenticating via federation can be mapped into that group. In this case, we create a group called federated_users with the role of member on the project demo.
$ openstack group create federated_users
$ openstack role add member --group federated_users --project demo
Before we create the identity provider, protocol, and mapping entries in Keystone, we can create a file that contains the mapping so as to make our CLI interactions easier. Create the file mapping.json, and remember to update the contents of the local section with the correct ID from the previous command.
 [
    {
        "local": [
            {
                "group": {
                    "id": "4e48b0c139c94cf088a665d919ee10f1"
                }
            }
        ],
        "remote": [
            {
                "type": "HTTP_OIDC_ISS",
                "any_one_of": [
                    "https://accounts.google.com"
                ]
            }
        ]
    }
]
The result of this mapping will be that any user that comes from Google, essentially having the issuer set to http://accounts.google.com, will be placed into the Keystone group federated_users.
The last step is to tie all the pieces together and create the Keystone federation resources. Let’s create the identity provider, the mapping, and the protocol.
$ openstack identity provider create google
  --remote-id https://accounts.google.com
$ openstack mapping create google_mapping --rules mapping.json
$ openstack federation protocol create oidc --identity-provider
  google --mapping google_mapping
We must also copy the sso_callback_template.html file to /etc/keystone/. This is simply a small script that posts an unscoped token back to Horizon. It is necessary since the original location of Horizon is lost in all the redirects. The script itself may be overridden by the deployer. What is provided by Keystone is the minimum needed.
/$ cp /opt/stack/keystone/etc/sso_callback_template.html /etc/keystone
5.6.2 Configure Horizon for Single Sign-On
The last step is to set a few values in Horizon’s configuration file, located at horizon/openstack_dashboard/local/local_settings.py.
OPENSTACK_KEYSTONE_URL = "http://sso-demo.test.ibmcloud.com:5000/v3”
OPENSTACK_API_VERSIONS = {
     "identity": 3
}
WEBSSO_ENABLED = True
WEBSSO_CHOICES = (
  ("credentials", _("Keystone Credentials")),
  ("oidc", _("OpenID Connect"))
)
WEBSSO_INITIAL_CHOICE = "credentials"
The OPENSTACK_KEYSTONE_URL and OPENSTACK_KEYSTONE_URL options are not specific to implementing single sign-on, but are necessary to be changed to point to v3 of the Identity API. These values indicate the authentication URL to use for Keystone and which version to use.
The WebSSO options are fairly straightforward, with WEBSSO_ENABLED being the main option to enable single sign-on, and WEBSSO_CHOICES being the contents of a drop-down menu. The contents of WEBSSO_CHOICES are broken up into the federation protocol name and the name the user will see on the Horizon landing page. The term credentials is a reserved keyword and should be added to the list to allow service and admin accounts stored in SQL to authenticate. Finally, the option WEBSSO_INITIAL_CHOICE sets the default value of the drop-down menu the user selects.
Once completed, restart Apache to update both Keystone and Horizon.
$ sudo service apache2 restart
Congratulations! That is the complete guide to configuring both Keystone and Horizon to use single sign-on. In the next subsection, we will step through a visual guide that shows the flow from a user’s perspective.
5.6.3 Let’s See It with Screenshots!
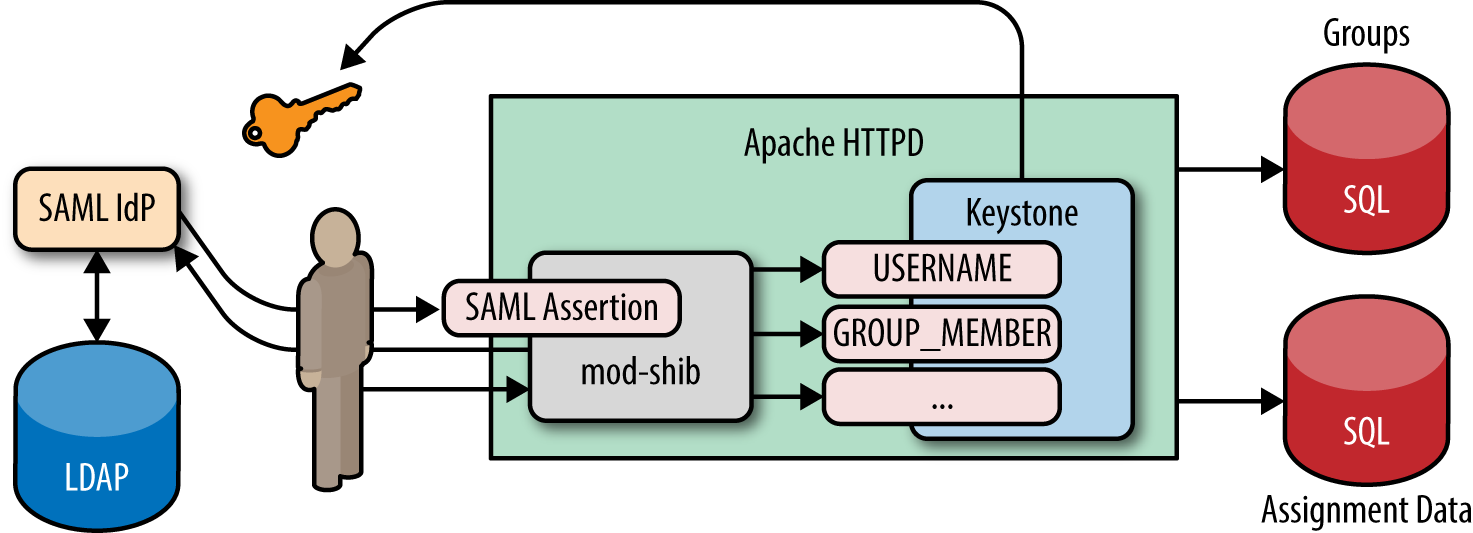
Step 1: We hit the Horizon landing page, with Keystone Credentials selected as the default authentication method. We are still able to authenticate with a username and password of a user in SQL or LDAP.
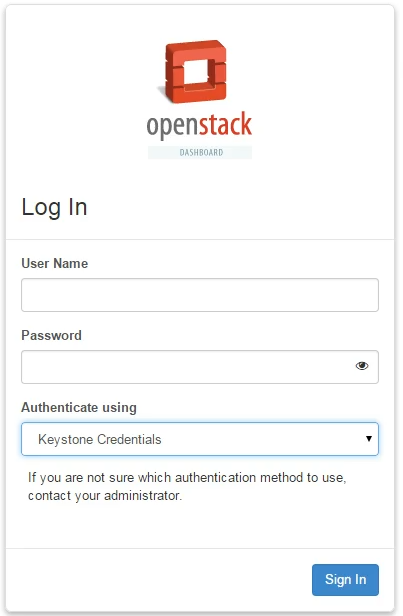
Step 2: We proceed by selecting the drop-down menu and choosing the OpenID Connect option. This will cause the username and password fields to be removed. Let’s go ahead and opt to Sign In.
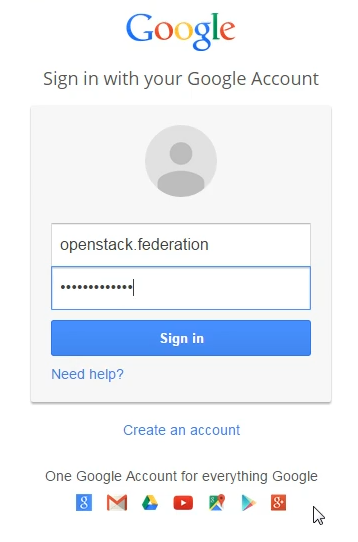
Step 3: Assuming Keystone and Horizon are properly configured, we should be redirected to a Google-branded sign in page. Simply authenticate with Google with your usual username and password, even if multi-factor authentication is enabled—it doesn’t matter, as long as you can authenticate. The Apache modules will be able to read the incoming OpenID Connect claim and set user attributes as HTTP headers.
Step 4: Once Keystone invokes the correct mapping engine and returns a token back to Horizon, the user should be able to log in to view and perform tasks as normal.

5.7 Tips, Common Pitfalls, and Troubleshooting
Ensure All Libraries Are Installed
Similar to LDAP, the federation capabilities of Keystone require extra dependencies that are not installed by default. This includes the Python library pysaml2 and the package xmlsec1. To install these on Ubuntu, use the following commands:
$ sudo pip install pysaml2
$ sudo apt-get install xmlsec1
Known Limitations of Social Media Logins
In our earlier example of authenticating via OpenID Connect and a command line, we were leveraging the “Resource Owner Password Credential” flow of the OpenID Connect specification. In our example of WebSphere Liberty acting as an Identity Provider, that particular flow is enabled. Most social media logins will disable this flow, since they do not want their users to enter passwords into a non-branded or trusted medium.
Using SAML from the Command Line
Users are able to authenticate via SAML using the command line as well as a browser. The Identity Provider must be configured to expose the Enhanced Client or Proxy (ECP) flow of the SAML specification. Keystone has supported this mode of authentication since the Icehouse release.