
I come here not to bury img, but to praise it.
Well, mostly.
Historically, I like img just fine. It’s refreshingly uncomplicated, on the surface: it fires off a request for the file in its src attribute, renders the contents of that file, and provides assistive technologies with an alternative narration. It does so quickly, efficiently, and seamlessly. For most of the web’s life, that’s all img has ever had to do—and thanks to years and years of browsers competing on rendering performance, it keeps getting better at it.
But there’s a fine line between “reliable” and “stubborn,” and I’ve known img to come down on both sides of it.
Though I admit to inadvertently hedging my bets a little by contributing to the jQuery Mobile Project—a framework originally dedicated to helping produce “mobile sites”—I’ve always come down squarely in the responsive web design (RWD) camp. For me, the appeal of RWD wasn’t in building a layout that adapted to any viewport—though I do still think that’s pretty cool. The real appeal was in finding a technique that could adapt to the unknown-unknowns. RWD felt—and still feels—like a logical and ongoing extension of the web’s strengths: resilience, flexibility, and unpredictability.
That said, I would like to call attention to one thing that m-dot sites (dedicated mobile versions of sites, usually found at a URL beginning with the letter m followed by a dot) did have over responsively designed websites, back in the day: specially tailored assets.
Tailoring Assets
In a responsive layout, just setting a max-width: 100% in your CSS ensures that your images will always look right—but it also means using image sources that are at least as large as the largest size at which they’ll be displayed. If an image is meant to be displayed anywhere from 300 pixels wide to 2000 pixels wide, that same 2000-pixel-wide image is getting served up to users in all contexts. A user on a small, low-resolution display gets saddled with all of the bandwidth costs of massive, high-resolution images, but ends up with none of the benefits. A high-resolution image on a low-resolution display looks like any other low-resolution image; it just costs more to transfer and takes longer to appear.
Even beyond optimization, it wasn’t uncommon to show or hide entire blocks of content, depending on the current viewport size, during those early days of RWD. Though the practice became less common as we collectively got the hang of working responsively, img came with unique concerns when serving disparate content across breakpoints: our markup was likely to be parsed long before our CSS, so an img would have no way of knowing whether it would be displayed at the current viewport size. Even an img (or its container) set to display: none would trigger a request, by design. More bandwidth wasted, with no user-facing benefit.
Our earliest attempts
I am fortunate enough to have played a tiny part in the history of RWD, having worked alongside Filament Group and Ethan Marcotte on the Boston Globe website back in 2011.
It was, by any measure, a project with weight. The Globe website redesign gave us an opportunity to prove that responsive web design was not only a viable approach to development, but that it could scale beyond the “it might be fine for a personal blog” trope—it could work for a massive news organization’s website. It’s hard to imagine that idea has ever needed proving, looking back on it now, but this was a time when standalone m-dot sites were widely considered a best practice.
While working on the Globe, we tried developing a means of delivering larger images to devices with larger screens, beginning with the philosophy that the technique should err on the side of mobile: start with a mobile-sized and -formatted image, then swap that with a larger version depending on the user’s screen size. This way, if anything should break down, we’re still erring on the side of caution. A smaller—but still perfectly representative—image.
The key to this was getting the screen’s width in JavaScript, in the head of the document, and relaying that information to the server in time to defer requests for images farther down the page. At the time, that JavaScript would be executed prior to any requests in body being made; we used that script to set a cookie about the user’s viewport size, which would be carried along with those img requests on the same page load. A bit of server-side scripting would read the cookie and determine which asset to send in response.
It worked well, but it was squarely in the realm of “clever hack”—that parsing behavior wasn’t explicitly defined in any specifications. And in the end, as even the cleverest hacks are wont to do, it broke.
Believe it or not, that was good news.
Prefetching—or “speculative preparsing”—is a huge part of what makes browsers feel fast: before we can even see the page, the browser starts requesting assets so they’re closer to “ready” by the time the page appears. Around the time the Globe’s site launched, several major browsers made changes to the way they handled prefetching. Part of those changes meant that an image source might be requested before we had a chance to apply any of our custom logic.
Now, when browsers compete on performance, users win—those improvements to speculative preparsing were great news for performance, improving load times by as much as 20 percent. But there was a disconnect here—the fastest request is the one that never gets made. Good ol’ reliable img was single-mindedly requesting the contents of its src faster than ever, but often the contents of those requests were inefficient from the outset, no matter how quickly the browser managed to request, parse, and render them—the assets were bigger than they’d ever need to be. The harm was being done over the wire.
So we set out to find a new hack. What followed was a sordid tale of noscript tags and dynamically injected base tags, of document.write and eval—of rendering all of our page’s markup in a head element, to break preparsing altogether.
For some of you, the preceding lines will require no explanation, and for that you have my sincerest condolences. For everyone else: know that it was the stuff of scary developer campfire stories (or, I guess, scary GIF-of-a-campfire stories). Messy, hard-to-maintain hacks all the way down, relying entirely on undocumented, unreliable browser quirks.
Worse than those means, though, were the ends: none of it really worked. We were always left with compromises we’d be foisting on a whole swath of users—wasted requests for some, blurry images for others. It was a problem we simply couldn’t solve with sufficiently clever JavaScript; even if we had been able to, it would’ve meant working around browser-level optimizations rather than taking advantage of them. We were trying to subvert browsers’ improvements, rather than work with them. Nothing felt like the way forward.
We began hashing out ideas for a native solution: if HTML5 offered us a way to solve this, what would that way look like?
A native solution
What began in a shared text file eventually evolved into one of the first and largest of the W3C’s Community Groups—places where developers could build consensus and offer feedback on evolving specifications. Under the banner of the “Responsive Images Community Group,” we—well, at the risk of ruining the dramatic narrative, we argued on mailing lists.
One such email, from Bruce Lawson, proposed a markup pattern for delivering context-appropriate images that fell in line with the existing rich-media elements in HTML5—like the video tag—even borrowing the media attribute. He called it picture; image was already taken as an ancient alias of img, after all.
What made this proposal special was the way it used our reliable old friend img. Rather than a standalone element, picture came to exist as a wrapper—and a decision engine—for an inner img element:
<picture>
<source …>
<img src="source.jpg" alt="…">
</picture>
That img inside picture would give us an incredibly powerful fallback pattern—it wouldn’t be the sort of standard where we have to wait for browser support to catch up before we could make use of it. Browsers that didn’t understand picture and its source elements would ignore it and still render the inner img. Browsers that did understand picture could use criteria attached to source elements to tell the inner img which source file to request.
Most important of all, though, it meant we didn’t have to recreate all of the features of img on a brand-new element: because picture didn’t render anything in and of itself, we’d still be leaning on the performance and accessibility features of that img.
This made a lot of sense to us, so we took it to the Web Hypertext Application Technology Working Group (WHATWG), one of the two groups responsible for the ongoing development of HTML.
If you’ve been in the industry for a few years, this part of the story may sound a little familiar. Some of you may have caught whispers of a fight between the WHATWG’s srcset and the picture element put forth by a scrappy band of web-standards rebels and their handsome, charismatic, and endlessly humble Chair. Some of you read the various calls to arms, or donated when we raised funds to hire Yoav Weiss to work full-time on native implementations. Some of you have RICG T-shirts, which—I don’t mind saying—were rad.
A lot of dust needed to settle, and when it finally did, we found ourselves with more than just one new element; edge cases begat use cases, and we discovered that picture alone wouldn’t be enough to suit all of the image needs of our increasingly complex responsive layouts. We got an entire suite of enhancements to the img element as well: native options for dealing with high-resolution displays, with the size of an image in a layout, with alternate image formats—things we had never been able to do natively, prior to that point.
The Four Use Cases
Ultimately, those years of experimenting, prototyping, iterating, and arguing with each other impassioned discourse on various mailing lists gave us four mix-and-match use cases—four key problems with image delivery that any proposed solution (or solutions) must solve to be considered viable.
In sum, the term “responsive images” refers to any combination of the following use cases:
- Art direction: requesting visually distinct source files at specific viewport sizes.
- Image types: requesting new image formats with responsible fallbacks.
- Display density: requesting image sources appropriate for high-density displays only when necessary.
- Flexible images: providing the browser with information about a set of image sources and how they’ll be used in a page’s layout, so it can make the most appropriate request for a user’s browsing context.
Let’s take a closer look at each of these use cases.
Art direction
The art-direction use case comes into play whenever
- you want to specify alternate versions of an image for different viewport sizes,
- you need explicit control over what sources appear when, or
- you need different cropping and zooming to best represent the subject of an image.
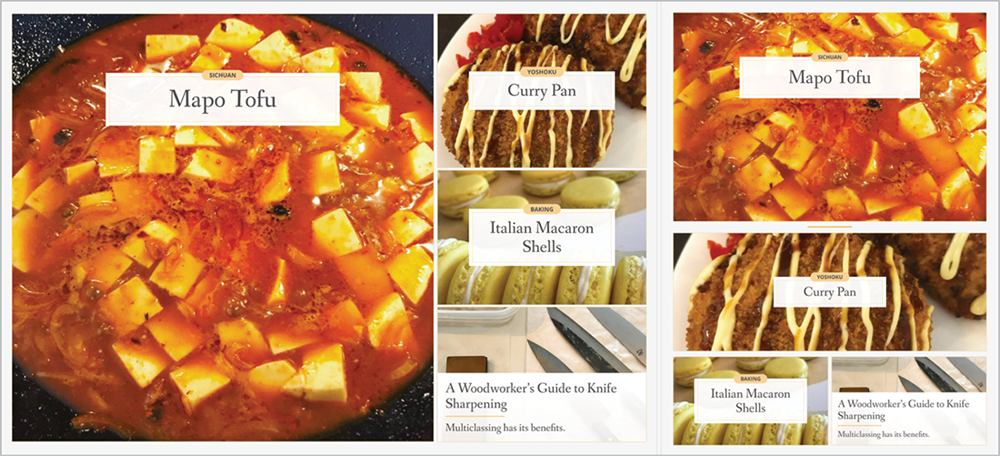
At any viewport size, the subjects of these images are the same—though their proportions may change across layout breakpoints (Fig 2.1). This sort of “cropping” can be achieved through CSS, certainly—but will still leave a user requesting hundreds of kilobytes of an image they might never end up seeing.
The markup for the picture element follows a precedent already set by HTML5’s audio and video elements: a wrapper element containing source elements, each of which has an attribute defining the conditions for the use of that source (media) and the asset—or set of assets—to request if that condition is met (srcset):
<picture>
<source media="(min-width: 800px)" srcset="pic-big.jpg">
<source media="(min-width: 400px)" srcset="pic-med.jpg">
<img src="small.jpg" alt="Cubes of tofu simmering in a fiery red sauce.">
</picture>
It’s worth mentioning here that art direction does not apply to radically different image sources. A good rule of thumb is that you should be able to describe all of your sources with a single alt attribute—not least of all because you’ll have to.
Similar to the pattern established by video, the picture element contains fallback content: an inner img. If the picture element isn’t recognized by the user’s browser, it’s ignored. Its associated source elements are similarly discarded, since the browser doesn’t have any context for them. That inner img element will be recognized, though—and rendered.
In addition to providing a robust built-in fallback pattern, img is the heart of the picture element in browsers that do support it. Rather than having picture recreate all of the accessibility features and performance optimizations of img—and adding a huge barrier to support for both browsers and assistive technologies alike—the picture element doesn’t actually render anything on its own. Instead, it acts as a decision engine for the inner img element, telling it what to render.
The first source with a media attribute that matches the viewport size will be the one selected. There’s precedent for this: the video element uses source elements, with media attributes, in the exact same way.
If we’re using min-width media queries, we want to have our largest sources first, as illustrated in the example above. When we’re using max-width media queries, we want to make sure our smallest sources come first:
<picture>
<source media="(max-width: 400px)" srcset="pic-med.jpg">
<source media="(max-width: 800px)" srcset="pic-big.jpg">
<img src="small.jpg" alt="Cubes of tofu simmering in a fiery red sauce.">
</picture>
We’ll always want to specify the inner img last in the source order—it serves as our default source if picture is unsupported, or if none of our source elements match their media attribute criteria.
Image types
The image types use case isn’t concerned with viewport size or resolution—it’s concerned with the image formats supported by the user’s browser. It allows us to use the single-request fallback pattern already built into picture so we can serve alternate image formats in smarter ways.
One of the most common suggestions we’d hear from people just joining the responsive-images conversation was that we “just” needed a new format—a single image containing all of the different sources we could possibly need. The browser then would only request the appropriate part of that source file—and, in a vacuum, it’s hard to argue with the logic.
But to make this happen, we would need to not only invent that new format, but also invent a reliable way to serve it to users with browsers that supported it, and invent a way for browsers to know which specific byte range of the file to load without requesting the entire “package” of images. The last bit would likely mean throwing together a new protocol for the web to run on. That was usually about the end of those threads.
It did get us thinking, though: one of the less impossible stumbling blocks to the introduction of any new format would be to serve it responsibly. A new image format can’t have a fallback pattern in and of itself—if the browser doesn’t recognize a file at all, it can’t take advantage of a baked-in fallback pattern.
At the time, the best solutions all involved requesting and transferring the new image file before determining whether to throw it away and load a fallback:
<img src="image.svg"
data-fallback="image.png"
onerror="this.src=this.getAttribute(‘data-fallback’); this.onerror=null;"
alt="…">
We were using this approach to contend with spotty browser support for SVG years before formats like WebP caught on. With this pattern, the request for image.svg would still be made in every browser. Once a browser had the file, it could figure out whether or not it was capable of rendering it. Browsers that couldn’t render the SVG would throw an error. That error would trigger a line of JavaScript that did two things: first, it copied the contents of the data-fallback attribute into the src attribute, triggering a new request and rendering the PNG instead. Then, the script overwrote itself, to prevent any further errors from creating a loop if the fallback couldn’t be rendered for any reason.
If it sounds a little convoluted, well, that’s because it was—but when it came to making these decisions on the front end, approaches like this one were the only game in town.
But with picture, we were already inventing a decision engine—one explicitly designed to let us avoid redundant requests. Granted, that decision-making could never be completely automated—short of us telling the browser about a source file, there’s no way for it to recognize a format it doesn’t support without requesting it. We still need to provide the browser with information about the file so it can decide whether or not to make a request in the first place.
We can do that by using a type attribute on one of our source elements. In that attribute, we provide the Media Type (formerly MIME type) of the source. These can look a little arcane, but they all follow a predictable type/subtype format. For example, the Media Type for a PNG is image/png; for a WebP, it’s image/webp.
With this syntax in place, we tell the browser to disregard a source unless it recognizes the contents of a type attribute:
<picture>
<source type="image/webp" srcset="pic.webp">
<img src="pic.png" alt="…">
</picture>
That code, for instance, ensures that any browser that supports WebP will get the WebP source, while every other browser will get the PNG (Fig 2.2).

One request; no wasted bandwidth. And this is forward-thinking: as newer and more efficient file formats come along, they’ll come with Media Types of their own, and we’ll be able to take advantage of them thanks to picture—no scripts, no server-side dependencies. Just good ol’ img doing what it does best, with a little help from us.
Display density
The display density use case is about serving image sources that are appropriate to the hardware resolution of a device’s screen—ensuring that only devices with high-resolution displays receive image sources large enough to look sharp, without passing that same bandwidth cost along to users with lower-resolution displays.
This determination hinges on a user’s device pixel ratio (DPR). DPR is calculated by dividing a viewport’s CSS pixels by the device’s actual screen resolution, to get the number of real-world hardware pixels that make up a device’s display.
For example, @media(width: 320px) will match on both an original, non-Retina iPhone and a Retina iPhone 5s—they both have a “normalized” viewport size of 320 × 568 CSS pixels. The actual resolution of the 5s screen is twice as high as that of the original iPhone, though: 640 × 1136. So, the original iPhone has a DPR of 1, while the Retina iPhone has a DPR of 2.
Likewise, the Samsung Galaxy S4 has a 1080 × 1920 display—but has a viewport of 360 × 640 CSS pixels. Because the Galaxy S4’s actual resolution is three times higher than that of its resolution in CSS, it has a DPR of 3.
You can test this for yourself by opening the developer console of your browser and entering the following:
> window.devicePixelRatio
<- 2
In any browsing context, an img with a width of 100px set via width attribute or CSS will occupy the same amount of the viewport—a normalized, CSS-pixel width of 100px. But in the devices with a DPR greater than 1, the rendered image has the potential to look sharper due to the resolution of the screen itself. In order to do so, the image being rendered has to have a natural width of at least 200 pixels. Once scaled down to fit in a 100-pixel space, that 200-pixel image source is rendered with double the pixel density. It won’t look any different on a display with a DPR of 1, since that display can’t make use of the increased density of the image. On a display with a DPR of 2, however, it’ll look nice and sharp.
Once you’ve got the hang of DPR as a concept, the actual syntax that governs serving low-resolution versus high-resolution image sources is pretty straightforward:
<img src="sd.gif" srcset="hd.jpg 2x" alt="…">
This x syntax inside the srcset attribute acts as a suggestion to the browser, pointing out the source most appropriate to the real-world pixel density of the user’s display. I say “suggestion” deliberately—but we’ll get to that in a bit.
You’ll notice that we also used this new attribute—srcset—inside the picture element, because this syntax can be used on those source elements as well:
<picture>
<source media="(min-width: 60em)" srcset="big.jpg 1x, big-hd.jpg 2x">
<source media="(min-width: 25em)" srcset="med.jpg 1x, med-hd.jpg 2x">
<img src="small.jpg" srcset="small-hd.jpg 2x" alt="…">
</picture>
That’s a lot of syntax, but before you panic: know that I’ve never actually needed to use this approach on a project. Not because there isn’t an appeal to tailoring image assets to both viewport size and density—but because there’s a much easier way. Weirder, maybe, but ultimately much easier: sizes.
Flexible images
So, we have a couple of options for explicit control over sources—and we’ll need that sometimes, for sure. But in most cases, we want what we’ve always wanted in a responsive layout: an image that stretches to fit a viewport of any size, the way an img element with a single, gigantic source image would—we just want it to be more performant.
The flexible-images use case refers to these situations exactly—situations where we don’t need explicit control over which source is shown when. The sizes syntax allows us to provide the browser with a couple of sources and some information about them, after which it completely takes the wheel and requests a single source. It’s similar to the type attribute in that we’re providing the browser with information about image sources up front, but different in that the browser uses a much fuzzier set of rules for determining what to do with that information.
Before we get into that syntax and how it works, a caveat: what we’re going to cover here is a peek behind the curtain at the way the browser uses these attributes to make its decisions—it’s not math you’ll ever need to do. Fortunately, the nature of the math will be familiar to anyone working on a responsive layout: it ultimately comes down to “target divided by context,” the same way we’d size an element in CSS.
But still, if you’re as math-averse as I am, take heart: this syntax is strictly declarative. The sizes attribute is shorthand for “here is the size of the rendered image in the layout,” and the srcset attribute is shorthand for “here are the source files, and here are their inherent widths.”
So, envision a 1600 × 1200-pixel image uploaded to a CMS, which then generates two more resized versions of that same image on the server: one that is 400 pixels wide, and another that is 800 pixels wide. These sources are identical in appearance, naturally, apart from their dimensions (Fig 2.3).
 Fig 2.3: These image sources are identical apart from their dimensions, which remain proportional.
The sizes attribute specifies the space the image will occupy in our layout—not the size of the user’s viewport, as with media queries. After all, the size of the user’s viewport doesn’t really tell us anything about how an image is meant to be displayed, and that’s how we want this decision to be made. Sizing an image meant to occupy 25 percent of a layout based on the width of the user’s viewport would leave us with a much larger image source than the user will need (Fig 2.4).

Let’s assume a fairly common instance: a “hero” image, up at the top of a page, occupying a space that spans the entire viewport (Fig 2.5). (It makes for easier math, for the sake of discussion.)
<img
sizes="100vw"
srcset="small.jpg 400w, medium.jpg 800w, large.jpg 1600w"
src="fallback.jpg"
alt="…">
In this markup, we’re saying explicitly that the space the image occupies in the layout has a width of 100vw—100 percent of the viewport width.

100vw.If we’re looking at this markup on a device with a 320-pixel-wide viewport, 100 percent of that is, predictably enough, 320 pixels. That’s our context. The browser takes that value—320px—and divides all the image-source sizes against it:
- Our smallest image has an inherent size of 400 pixels, so: 400 ÷ 320 = 1.25.
- Our medium image is 800 pixels wide: 800 ÷ 320 = 2.5.
- Our largest image is 1600 pixels wide: 1600 ÷ 320 = 5.
Those final calculations (1.25, 2.5, and 5) are, functionally-speaking, devicePixelRatio options—meaning that the browser is left with a set of source options that are specific to the user’s viewport size. On a 320-pixel-wide viewport, sizes="100vw" is functionally equivalent to us writing out the following:
<img src="small.jpg 1.25x, medium.jpg 2.5x, large.jpg 5x" alt="…">
On a device with a devicePixelRatio of 2, the browser would likely choose medium.jpg—the closest match to 2x while erring on the side of not serving the user a blurry image. On a device with a devicePixelRatio of 1, the browser would likely serve us small.jpg.
If we were to visit a page using that same sizes/srcset syntax, with a viewport 640 pixels wide, the result of all that math would be completely different: 100vw is now 640px. When we divide our sources’ widths against that, we get .625, 1.25, and 2.5. Those newly calculated values would be functionally equivalent to us writing this:
<img srcset="small.jpg .625x, medium.jpg 1.25x, large.jpg 2.5x" alt="…">
On a 640-pixel-wide viewport, our smallest image source will never match; that source is too small for any 640-pixel-wide viewport. Instead, medium.jpg will be chosen on 1x devices, and large.jpg will match on 2x devices.
If that all makes sense on your first read-through, you’re in better shape than I was the first time I tried to make sense of it—and I helped write the spec. But it’s important to keep in mind that we didn’t have to think any of this math through when we wrote that markup: we only had to know our source files, their sizes, and the amount of space the image would occupy in the page.
You can probably already see where that adds up to a more common use case than the explicit breakpoints of picture when we’re just looking to optimize requests.
Handling breakpoints
There’s a little more potential for complication, even when we’re just passing information along to the browser and letting it drive our responsive image decisions: a full-width hero image isn’t the least common use of an img, but there’s a much better chance that the space our image occupies in a layout is going to change across our layout’s breakpoints.
In that case, we need to pass a little more detail along to the browser—and since the size of the image is going to change based on the media queries we’re using in our CSS, we’ll use media queries here as well.
Let’s imagine our hero image occupies 100 percent of the layout—but that layout has a max-width of 1200px (Fig 2.6).

If we only used sizes="100vw" here, a user visiting the page with a 2000-pixel-wide viewport would get an image source appropriate for rendering at 2000 pixels wide. So, instead, we’ll use sizes to tell the browser the following: on viewports up to 1200 pixels, this will occupy 100 percent of the viewport. On viewports at or above 1200 pixels, this image will occupy a space exactly 1200 pixels wide:
<img
sizes="(min-width: 1200px) 1200px, 100vw"
srcset="small.jpg 400w, medium.jpg 800w, large.jpg 1600w, x-large.jpg 2400w"
src="fallback.jpg"
alt="…">
Let’s break that value down step by step:
(min-width: 1200px)we know well enough; in CSS, it means “the following applies on viewports wider than 1200 pixels,” and that’s what it means here.- The
1200pxthat follows is the size of the space our image will occupy on viewports larger than 1200 pixles:1200pxof the viewport. - The
100vw, preceded by a comma, isn’t scoped to any media query—and again, just like styles in our CSS that aren’t scoped to a media query, these apply unless that(min-width: 1200px)criteria is met.
Now, it’s important to keep in mind that these values are first match—if (min-width: 1200px) doesn’t match, the browser moves on to the next comma-separated value.
Let’s add additional conditions to our sizes attribute above and step through them the way a browser would:
sizes="(min-width: 1200px) 1200px, (min-width: 800px) 80vw, 100vw"
- For a 600-pixel viewport, the browser asks: “Does
(min-width: 1200px)match? No, moving on. Does(min-width: 800px)match? No, moving on. No qualifier. This image will occupy100vw.” - For an 850-pixel viewport, the browser asks: “Does
(min-width: 1200px)match? No, moving on. Does(min-width: 800px)match? Yes. This image will occupy80vw.” - For a 1400-pixel viewport, the browser asks: “Does
(min-width: 1200px)match? Yes. This image will occupy a space that is1200pxwide.”
Now, if we had accidentally written that attribute the other way around, we’d have problems. An unqualified sizes value—one without a media query—is always going to match, at any viewport size. Once the browser encounters it, it throws the rest of the sizes attribute away:
sizes="100vw, (min-width: 800px) 80vw, (min-width: 1200px) 1200px"
- For a 600-pixel viewport, the browser says: “No qualifier. This image will occupy
100vw.” - For an 850-pixel viewport, the browser says: “No qualifier. This image will occupy
100vw.” - For a 1400-pixel viewport, the browser says: “No qualifier. This image will occupy
100vw.”
If we had put the (min-width: 800px) qualifier before (min-width: 1200px), we’d run into the same sort of problem. A viewport smaller than 800 pixels wouldn’t qualify for the values scoped to either (min-width: 800px) or (min-width: 1200px), naturally. But a viewport wider than 1200 pixels is also going to match (min-width: 800px)—if we put that first, the browser stops there:
sizes="(min-width: 800px) 80vw, (min-width: 1200px) 1200px, 100vw"
- For a 600-pixel viewport, the browser asks: “Does
(min-width: 800px)match? No, moving on. Does(min-width: 1200px)match? No, moving on. No qualifier. This image will occupy100vw.” - For an 850-pixel viewport, the browser asks: “Does
(min-width: 800px)match? Yes. This image will occupy80vw.” - For a 1400-pixel viewport, the browser asks: “Does
(min-width: 800px)match? Yes. This image will occupy80vw.”
min-width versus max-width
When we use min-width media queries in a stylesheet, our unqualified styles represent our first breakpoint. We then override them with our smallest media query’s styles, then override those with the next breakpoint up, and so on. Our unqualified styles apply on viewports smaller than the scope of our media queries.
We do the opposite when we use max-width media queries in a stylesheet: our first max-width media query is our first breakpoint, and we go upward from there. Our unqualified styles apply on viewports larger than the scope of our media queries.
Just like our CSS, max-width media queries in sizes will work the same way:
sizes="(max-width: 720px) 100vw, (max-width: 1250px) 80vw, 1500px"
- For a 600-pixel viewport, the browser asks: “Does
(max-width: 720px)match? Yes. This image will occupy100vw.” - For an 850-pixel viewport, the browser asks: “Does
(max-width: 720px)match? No, moving on. Does(max-width: 1250px)match? Yes. This image will occupy80vw.” - For a 1400-pixel viewport, the browser asks: “Does
(max-width: 720px)match? No, moving on. Does(max-width: 1250px)match? No, moving on. No qualifier. This image will occupy1500px.”
Now, I wouldn’t fault you for asking why any of this is happening in an attribute at all. Markup feels like a strange place to encounter media queries, let alone write them—and presumably, the browser knows everything it needs to know about our layout on account of, you know, rendering our layout.
But at the time the browser initiates requests for images, it has no other information about the site—it may not have made requests for external stylesheets yet, or had a chance to apply them. Waiting until a page is fully rendered would mean introducing huge delays in requesting image sources—and once loaded, those images could then change the layout, causing a need for recalculation, and new requests for sources, and so on unto infinity.
In terms of srcset/sizes, we can safely say that the browser only knows a few things when it parses our markup and starts making external requests: the contents of that markup, the size of the viewport, and the pixel density of the display.
I wouldn’t blame you for feeling a little wired after all that. These attributes pack an incredible amount of information into precious few characters. Once you learn the rules of srcset and sizes, though, you don’t actually have to think much about how the browser makes decisions with those attributes. As a matter of fact, we can’t know how the browser makes its decisions, given all this information. Believe it or not, that’s by design—in fact, it might be the most exciting feature of responsive images.
The “explicitly vague” source-selection algorithm
You may have noticed that all of the responsive image solutions we’ve discussed only tangentially address the original problem we aimed to solve: serving bandwidth-appropriate assets to users.
From a syntax standpoint, telling the browser “use this source on a high-resolution display” or “here’s some information, pick the right one for this viewport” is relatively easy—but knowing when a user wants high-resolution images is impossible. If I’m on a top-of-the-line MacBook but tethered to my phone’s internet connection, using shaky airplane WiFi, or browsing the web by way of a metered connection, I might want to opt out of high-resolution image sources, regardless of my screen’s capabilities.
These syntaxes can ensure that we’re serving image assets more efficiently, but they can’t do anything to address bandwidth concerns directly—and not for lack of trying. Members of the RICG and beyond spent a lot of time talking through how we could tailor assets to a user’s bandwidth and what kind of syntax might make the most sense for that, revisiting the subject over and over. A server-side solution could give us an assumption based on the device, but a mobile device can be on anything from EDGE to WiFi.
We came up with what seemed like a perfectly sensible solution: a bandwidth media query. And after our initial excitement wore off, well—we came to hate our own idea.
We quickly realized we couldn’t possibly ensure a consistent browsing experience for the user this way. Within the scope of a single project, sure—we could maintain a consistent bandwidth-based “breakpoint” for things like high-density images. But across the web, the browsing experience would be wildly inconsistent. Where I set that bandwidth breakpoint is different from where others might set it—a user could end up with high-resolution images on one site and low-resolution images on the next.
Worse still, we’d be making all of this optional: one more thing to test, one more thing to go wrong, one more thing for us developers to keep in mind—or to forget. In cases where that media query was omitted, or set too high, the web would still feel broken to end users—slow and inconsiderate about bandwidth usage. On other pages, the web would look broken: unaware of the compromise being made on their behalf, a user would only know that they were seeing grainy images on their high-density display—something that wouldn’t be the case on sites that set their bandwidth breakpoint a little higher.
There’s a technical problem, too. Media queries feel like the right fit for bandwidth considerations, seeing as they’re already designed to respond to client-side concerns—viewport height and width, device orientation, hardware features like ambient light level, and OS-level accessibility settings. But media queries are designed to respond to changes on the client side, and bandwidth can be unpredictable.
For example, when a user first lands on a page, they might qualify for our high-resolution images, then have their bandwidth drop off as they go through a tunnel. Now we have to send them low-resolution images, because that media query told the browser to listen for client-side bandwidth changes. As their connection speeds back up, we have to send them the high-resolution images again.
The only way to work around this would be to change the expected behavior of media queries from a guarantee (“if the viewport is smaller than 600 pixels, this will happen”) to a potentiality (“if the viewport is smaller than 600 pixels, this may or may not happen”). That guarantee was the very thing that made media queries a natural fit for the art-direction use case: the source element that matches the media attribute we specify is the one that has to be used, full stop. Otherwise, we might end up with an image source that’s inappropriate for the current layout.
But srcset is a syntax that’s brand-new to the web, with no expected behaviors to redefine. So, the HTML5 specification defines srcset as a set of candidates. Any and all decisions about their use are left up to the browser, due to a critical feature of the selection algorithm encoded in the specification: once all the math has been done, and the sources and their descriptors have been sorted, the browser is free to do whatever it wants.
The syntaxes certainly seem declarative, but in practice, we’re saying, “here is a source visually appropriate for devices with a devicePixelRatio of 2”—not “here is the source to use on devices with a devicePixelRatio of 2.” The difference is slight in print, but huge in implication: nothing we include in srcset is a command, only a candidate.
That lack of explicit control can sound a little scary at face value, but srcset—using either the devicePixelRatio or sizes syntaxes—ultimately comes down to requesting one from a list of identical-looking sources. Because of that, there’s very little room for an experience to seem broken, regardless of the decisions made by the browser.
By acting as a list of suggestions, srcset allows browsers to introduce user settings like “always give me low-res images”—something mobile Chrome’s “data saver” mode does today. It paves the way for settings like “give me high-res images as bandwidth permits”—instead of instructing browsers to frantically respond to changes in bandwidth from one site to another, the browser can take an average across a given time frame or browsing session. Instead of developers drawing the line between delivering high- or low-resolution assets, with each of us landing in different places, those decisions can be made by the user, not for them.
It also means there’s room for the browser to get creative—for example, in some browsers, an img or source marked up with the srcset/sizes syntax will never fire a request for a smaller source than the user already has in their browser’s cache. After all, what would be the point in making a new request for a source with smaller dimensions, when the browser already has an identical-looking image that works for those viewport sizes? If the user scales their viewport up to the point where a new image is needed, that request will still get made—we want things to look seamless for them, after all, and upscaling a too-small image would look wrong.
The fact that we can’t know for certain how srcset/sizes will behave to the end user? That’s this use case’s strongest feature.
Mixing and Matching
There’s one last aspect of the four responsive-image use cases I want to go over: combining them. We touched on it briefly early on, with picture using srcset’s devicePixelRatio syntax on its source elements to provide both art direction and sources tailored to a user’s display density.
Any and all of the four use cases can be used in concert:
<picture>
<source
media="(min-width: 1280px)"
sizes="50vw"
srcset="nomad-wide-200.webp 200w,
nomad-wide-400.webp 400w,
nomad-wide-800.webp 800w,
nomad-wide-1200.webp 1200w,
nomad-wide-1600.webp 1600w,
nomad-wide-2000.webp 2000w"
type="image/webp">
<source
sizes="(min-width: 640px) 60vw, 100vw"
srcset="nomad-crop-200.webp 200w,
nomad-crop-400.webp 400w,
nomad-crop-800.webp 800w,
nomad-crop-1200.webp 1200w,
nomad-crop-1600.webp 1600w,
nomad-crop-2000.webp 2000w"
type="image/webp">
<source
media="(min-width: 1280px)"
sizes="50vw"
srcset="nomad-wide-200.jpg 200w,
nomad-wide-400.jpg 400w,
nomad-wide-800.jpg 800w,
nomad-wide-1200.jpg 1200w,
nomad-wide-1600.jpg 1800w,
nomad-wide-2000.jpg 2000w">
<img
src="nomad-crop-400.jpg" alt="An orange-coated shiba inu in the snow."
sizes="(min-width: 640px) 60vw, 100vw"
srcset="nomad-crop-200.jpg 200w,
nomad-crop-400.jpg 400w,
nomad-crop-800.jpg 800w,
nomad-crop-1200.jpg 1200w,
nomad-crop-1600.jpg 1600w,
nomad-crop-2000.jpg 2000w">
</picture>
This monster of markup tells the browser:
- Using
type, determine whether to use thesourceelements that reference WebP or standard JPEG images. - Within each branch of that decision, use
mediaas the selection criterion for each art-directedsource. - Once the final
sourcehas been selected, choose from a list of candidate sources inside thesrcsetattribute, withsizesdescribing the space the image will occupy within that range of viewport sizes. - If none of the
sourceelements apply due to the current viewport size and/or browser’s WebP support, render the innerimgas-is, usingsrcset/sizes. - If none of the responsive-image markup patterns are supported by the user’s browser, render the
srcof the innerimgelement. - If the user is navigating by way of assistive technologies, narrate “an orange-coated shiba inu in the snow.”
Now, I can say with some certainty that you’ll never need to do this—I know I’ve never even come close. srcset/sizes on a single img is generally all I need, with only the occasional picture interlude.
I say all this to point out how much has changed in just a few short years: from a single method of showing a single image source, with no opportunity to apply any conditional logic, to an incredible number of mix-and-match options for smarter asset delivery, with all of the performance, accessibility, and reliability of our old friend img.
With so many options at our disposal—and with even the most common single use case being a little unintuitive—I wouldn’t blame you for feeling a bit rattled. I certainly was, seeing the code snippet above for the very first time: not only would I be stuck using all of this in my day-to-day work, but I would know exactly whom to blame for such a sprawling syntax: me.
How I Learned to Stop Worrying and Love Responsive Images
I’ve mentioned a few times that some of these syntaxes aren’t for us, so much as they’re for computers. They’re terse by necessity—that much was apparent early on in the specification process. Anything we might have done to make these syntaxes a little less dense—and more easily parsed by us humans—could have made them more complex for a browser to parse. Adding complexity to a parser translates to more potential for bugs, or for unintentional differences in behavior from one browser to another.
But as much as that density feels like a syntactical weakness when we’re rooting through all this markup by hand, it reveals itself to be a strength in practice: a syntax more easily read by machines is a syntax more easily written by them.
Creating alternate cuts of an image, outside of manual art direction, is a task that content management systems (CMS) have been handling for us since time immemorial—you’d be hard-pressed to find a mainstream CMS that doesn’t offer something in the way of “thumbnails” generated from uploaded images, whether natively or via plugin. It isn’t much of a stretch to imagine that pattern extended just a little further, allowing the CMS to generate all of the images we could want to populate a srcset attribute, and—knowing all of the sizes it was told to generate—the syntax to match.
WordPress was one of the earliest adopters of native responsive-images markup, starting in version 4.4, and it does exactly that:
A new default intermediate size, medium_large, has been added to better take advantage of responsive image support. The new size is 768px wide by default, with no height limit, and can be used like any other size available in WordPress. As it is a standard size, it will only be generated when new images are uploaded or sizes are regenerated with third party plugins.
Whether via CMS, a task runner like Grunt or Gulp, or even a third-party service like Cloudinary, srcset is a relatively simple case for automation.
sizes is a little harder. Since it should refer to the displayed size of the image, it doesn’t lend itself well to defaults.
Now, this doesn’t mean sizes doesn’t have a default behavior. If that attribute is left empty, or omitted altogether, the browser will assume a sizes value of 100vw, in order to err on the side of excessively large images rather than images that could appear distorted. This doesn’t prevent potential visual issues, though: by telling the browser than an image is meant to occupy 100 percent of the available viewport width, the browser will attempt to use it as the image’s natural width. Unless acted on by CSS—using a maximum width on either the img or its container—that image could be scaled beyond its source’s maximum size.
This led to a default sizes attribute in the WordPress implementation:
(max-width: {{image-width}}px) 100vw, {{image-width}}px
In other words: “100vw, up to a viewport width equal to the width of the uploaded image; beyond that, a fixed width equal to the image’s natural width.” This ensures that the behavior of the img more or less matches the behavior of an img with a src pointing at the uploaded image. And, of course, the WordPress team provided an API hook that allows authors to supply their own sizes attributes within their templates.
That would still mean writing that attribute by hand, but tools have popped up to abstract that away, and with an efficiency we could never match by hand: the RespImageLint project, for example, provides you with a bookmarklet that vets your sizes attributes for accuracy and efficiency, and provides suggestions for potential improvements. Even as steeped as I am in this topic, I never leave home without it.
On a personal site, I recently encountered the following situation: I had written, manually, what I thought to be a perfectly respectable sizes attribute, based on a little back-of-napkin math, performed by my perfectly average human brain:
(min-width: 1480px) 935px, (min-width: 800px) 64vw, 98vw
Close enough, I figured. A pass through RespImgLint, however, resulted in the following:
(min-width: 1560px) calc(-1.25vw + 358px), (min-width: 760px) calc(21.03vw + 14px), (min-width: 500px) 47.5vw, 97.22vw
That’s math I could never have hoped to reason through, considering the degree to which I struggle when it comes time to calculate a tip. But by simulating the resizing of a browser window and calculating the precise space each img element occupies in a page’s layout at each viewport size, RespImageLint suggests an incredibly tailored sizes attribute—which, in terms of asset delivery, would no doubt be just a hair more efficient than mine. And with countless users loading countless pages, a kilobyte here or there can certainly add up.
But that’s not the entire appeal for me. See, by not writing these attributes by hand—by using a tool like RespImgLint to generate a hyper-optimized sizes value, plus a task runner or CMS to generate alternate image cuts and a corresponding srcset value, and with a template engine to bind it all together for me—I barely have to think about responsive images at all these days.
They’re no less important, of course. I still get to provide users with an experience that feels tailored, in a completely invisible way—they’ll never know what responsive-image use cases I sought to address for them, or how I went about doing it. Nothing will look any different from any other site they’ve encountered over the years: their images will look as sharp as their display (and their eyes) will allow. Those images will be sized the way our layouts dictate—the way users have come to expect from a well-crafted website.
But our sites will feel faster. And as these techniques propagate more and more, the web itself will feel faster, with no cost to the people using it—no drawbacks, no compromises, no hacks, and no grainy images.