I never metaphor I couldn’t mix. | ||
| --Common pun | ||
We have spent a lot of time and effort preparing for this expedition, and we are finally ready to venture into SMB territory. It can be a treacherous journey, though, so before we push ahead we should re-check our equipment.
✓ Test Server
If you are going to start testing, you have to have something at which to fling packets. When choosing a test server, keep in mind that SMB has grown and changed and evolved and adapted and mutated over the years. You want a server that can be configured to meet your testing needs. Samba, of course, is highly configurable. If you know your way around the Windows Registry, you may have luck with those systems as well. In particular, you probably want to avoid strong password encryption during the initial stages. Handling authentication is a big chunk of work, and it is best to try and reduce the number of simultaneous problems to a manageable few.
Repetitive Terminology Redundancy Notification Alert

The SMB server software running on a file server node is known as the “File Server Service,” or just “Server Service.”
When running on top of NBT, the Server Service always registers a NetBIOS name composed of the Machine Name and, of course, a suffix value of 0x20. The Machine Name is typically — but not necessarily — the same as the DNS host name.
✓ Test Client
The next thing you will want is a packet flinger — that is, a working client. You need this for testing and to compare behavior when debugging your own client. Samba offers the
smbclientutility, and jCIFS comes with a variety of example programs. Windows systems all have SMB support built-in. That’s quite a selection from which to choose.
✓ Sniffer
Always your best friend. A good packet analyzer — one with a lot of builtin knowledge of SMB — will be your trusted guide through the SMB jungle.
✓ Documentation
When exploring NBT we relied upon RFC 1001 and RFC 1002 as if they were ancient maps, drawn on cracked and drying parchment, handed down to us by those who had gone before. In the wilds of SMB territory, we will count on the SNIA CIFS Technical Reference as our primary resource. The old X/Open SMB specification and the SMB/CIFS documentation available from Microsoft’s FTP server will also come in handy. For the sake of efficiency, from here on out we will be a bit less formal and refer to the SNIA doc as “the SNIA doc,” and the X/Open doc as “the X/Open doc.”
Yet Another Tasty Terminology Treat Alert
As we have explained, “SMB” is the Server Message Block protocol. It is also true that “an SMB” is a message. In order to implement SMB, one must learn to send and receive SMBs.
Got that?
Keep in mind that the goal of our first trip into the wilds of SMB-land is to become familiar with the terrain and to study SMBs in their natural habitat, so we can learn about their anatomy and behavior. We are not ready yet for a detailed study of SMB innards. That will come later.
We need to capture a few SMBs to see what they look like up close. That means it’s time to take a look at the wire and see what’s there to be seen. Fire up your protocol analyzer, and then your SMB client. If you can configure your test server to allow anonymous connections (no username, no password) it will simplify things at this stage. If you can’t, then things won’t run quite as they are shown below. Don’t worry, it will be close enough.
For this example, we will use the Exists.java program that comes with jCIFS. It is a very simple utility that does nothing more than verify the existence of the object specified by the given SMB URL string, like so:

The above shows that we were able to access the HOME share on node SMEDLEY. A similar test can be performed using Samba’s smbclient, or with the NET USE command under Windows:[1]
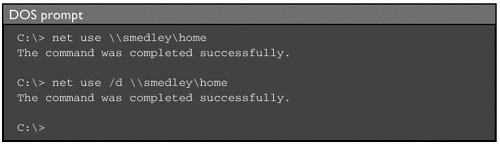
These simple commands will generate the packets we want to capture and study. Stop your sniffer and take a look at the trace. You should see a chain of events similar to the following:
No. Source   Destination      Protocol Info
--- -------  ---------------  -------- -----------------------------
  1 Marika   255.255.255.255  NBNS     Name query
  2 Smedley  Marika           NBNS     Name query response
  3 Marika   Smedley          TCP      34102 > netbios-ssn [SYN]
  4 Smedley  Marika           TCP      netbios-ssn > 34102 [SYN, ACK]
  5 Marika   Smedley          TCP      34102 > netbios-ssn [ACK]
  6 Marika   Smedley          NBSS     Session request
  7 Smedley  Marika           NBSS     Positive session response
  8 Marika   Smedley          TCP      34102 > netbios-ssn [ACK]
  9 Marika   Smedley          SMB      Negotiate Protocol Request
 10 Smedley  Marika           SMB      Negotiate Protocol Response
 11 Marika   Smedley          SMB      Session Setup AndX Request
 12 Smedley  Marika           SMB      Session Setup AndX Response
 13 Marika   Smedley          TCP      34102 > netbios-ssn [FIN, ACK]
 14 Smedley  Marika           TCP      netbios-ssn > 34102 [FIN, ACK]
 15 Marika   Smedley          TCP      34102 > netbios-ssn [ACK]
The above is edited output from an Ethereal capture.[2] The packets were generated using the jCIFS Exists utility, as described above. In this case jCIFS was talking to an old Windows 95 system, but any SMB server should produce the same or similar results.
The trace is reasonably simple. The first thing that node MARIKA does is send a broadcast NBT Name query to find node SMEDLEY, and SMEDLEY responds. Packets 3, 4, and 5 show the TCP session being created. (Note that netbios-ssn is the descriptive name given to port 139.) Packets 6 and 7 are the NBT SESSION REQUEST/SESSION RESPONSE exchange, and packet 8 is an ACK message, which is just TCP taking care of its business.
Packets 9 and 10 are what we want. These are our first SMBs.
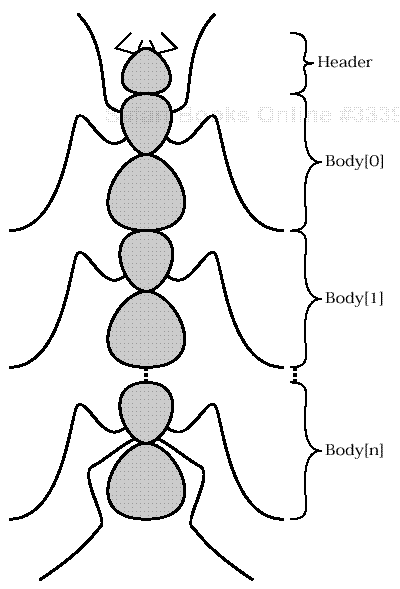
Figure 11.1 provides an overview of SMB gross anatomy. It shows that SMBs are composed of three basic parts:
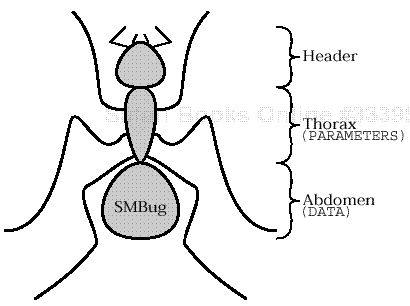
SMB messages are composed of three basic parts: the header, the parameters, and the data.
Figure 11.1. SMB gross anatomy
the Header,
the Parameter Block, and
the Data Block.
Either or both of the latter two segments may be vestigial (size == 0) in some specimens.
Starting at the top, the SMB header is arranged like so:
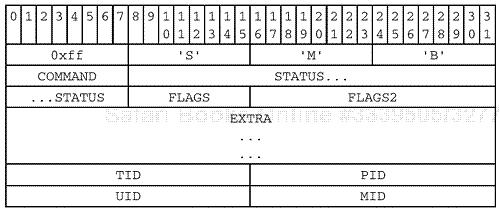
We can also dissect the header using the simple syntax presented previously:
SMB_HEADER
  {
  PROTOCOL  = "xffSMB"
  COMMAND   = <SMB Command code (one byte)>
  STATUS    = <Status code>
  FLAGS     = <Old flags>
  FLAGS2    = <New flags>
  EXTRA     = <Sometimes used for additional data>
  TID       = <Tree ID>
  PID       = <Process ID>
  UID       = <User ID>
  MID       = <Multiplex ID>
  }
We now have a pair of perspectives on the header structure. Time for some good, old-fashioned descriptive text.
The PROTOCOL and COMMAND fields
The SMB header starts off easily enough. The first four bytes are the protocol identifier string, which always has the same value, “
xffSMB”. It’s not particularly clear[3] why this is included in the SMBs but there it is, and it’s in all of them.The next byte is the
COMMANDfield, which tells us what kind of SMB we are looking at. In theNEGOTIATE PROTOCOLmessages captured above, theCOMMANDfield has a value of0x72(akaSMB_COM_NEGOTIATE). The SNIA doc has a list of the available command codes. That list is probably complete, but this is SMB we are talking about, so you never know...
The STATUS field
Now things start to get surreally interesting.
DOS and OS/2 use 16-bit error codes, grouped into classes. To accommodate these codes, the
STATUSfield is subdivided like so:
Windows NT introduced a new set of 32-bit error codes, known as NT_STATUS codes. These use the entire status field to hold the
NT_Statusvalue:
With two error code formats from which to choose, the client and server must confer to decide which set will be used. How that is done will be explained later on. Error code handling is a large-sized topic with extra sauce.
Look around the Web for a copy of a document called
COREP.TXT.[4] This is probably the earliest SMB documentation that is also easy to find. InCOREP.TXT, you can see that the original SMB header layout reserved fifteen bytes following the error code field. Those 15 bytes have, over time, been carved up for a variety of uses.The first formerly-reserved byte is now known as the
FLAGSfield. The bits of theFLAGSfield are used to modify the interpretation of the SMB. For example, the highest-order bit is used to indicate whether the SMB is a request (0) or a response (1).Following the
FLAGSfield is the two-byteFLAGS2field. This set of bits is used to indicate the use of newer features, such as the 32-bit NT_STATUS error codes.
The EXTRA field
The
EXTRAfield takes up most of the remaining formerly-reserved bytes. It contains two subfields, as shown below: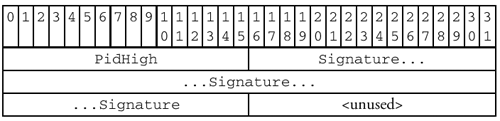
The
PidHighsubfield is used to accommodate systems that have 32-bit Process IDs. The original SMB header format only had room for 16-bit PIDs (in thePIDfield, described further on).The 8-byte
Signaturesubfield is for SMB message signing, which uses cryptography to protect against a variety of attacks that might be tried by badguys hoping to gain unauthorized access to SMB shares.When not in use, these fields must be filled with zeros.
TID, PID, UID, and MID
The “Tree ID.” In SMB, a share name typically represents a directory or subdirectory tree on the server. The SMB used to open a share is called a “Tree Connect” because it allows the client to connect to the shared [sub]directory tree. That’s where the name comes from. The
TIDfield is used to identify connections to shares once they have been established.
The “Process ID.” This value is set by the client, and is intended as an identifier for the process sending the SMB request. The most important thing to note regarding the
PIDis that file locking and access modes are maintained relative to the value in this field.The
PIDis 16 bits wide, but it can be extended to 32 bits using theEXTRA.PidHighfield described earlier.
The “User ID.” This is also known as a
VUID(Virtual User ID). It is assigned by the server after the user has authenticated and is valid until the user logs off. It does not need to be the user’s actual User ID on the server system. Think of it as a session token assigned to a successful logon.
The “Multiplex ID.” This is used by the client to keep track of multiple outstanding requests. The server must echo back the
MIDand thePIDprovided in the client request. The client can use those values to make sure that the reply is matched up to the correct request.
The
TIDand[V] UIDare assigned and managed by the server, while thePIDandMIDare assigned by the client. It is important to note that the values in these fields do not necessarily have any meaning outside of the SMB connection. ThePID, for example, does not need to be the actual ID of the client process. The client and server assign values to these fields in order to keep track of context, and that’s all.
In the middle of the SMB message are two fields labeled WordCount and Words[]. For our purposes, we will identify these two fields as being the SMB_PARAMETERS block, which looks like this:

SMB_PARAMETERS
  {
  WordCount         = <Number of words in the Words array>
  Words[WordCount]  = <SMB parameters; varies with SMB command>
  }
The Words field is simply a block of data that is 2 × WordCount bytes in length. Perhaps at one time the intention was that it would contain only two-byte values (a quick look at COREP.TXT suggests that this is the case). In practice, all sorts of stuff is thrown in there.
Each SMB message type (species?) has a different record structure that is carried in the Words block. Think of that structure as representing the parameters passed to a function (the function identified by the SMB command code listed in the header).
Following the SMB_PARAMETERS is another block of data, the content of which also varies in structure on a per-SMB basis:

SMB_DATA
  {
  ByteCount        = <Number of bytes in the Bytes field>
  Bytes[ByteCount] = <Contents varies with SMB command>
  }
The Bytes field holds the data to be manipulated. For example, it may contain the data retrieved in response to a READ operation, or the data to be written by a WRITE operation. In many cases, though, the SMB_DATA block is just another record structure with several subfields. Through time, SMB has evolved lazily and any functional distinction that may have separated the Parameter and Data blocks has been blurred.
Note that the SMB_DATA.ByteCount field is an unsigned short, while the SMB_PARAMETERS.WordCount field is an unsigned byte. That means that the SMB_PARAMETERS.Words block is limited in length to 510 bytes (2 × 255), while SMB_DATA.Bytes may be as much as 65535 bytes in length. If you add all that up, and then add in the SMB_PARAMETERS.WordCount field, the SMB_DATA.ByteCount field, and the size of the header, you will find that the whole thing fits easily into the 217 – 1 bytes made available in the NBT SESSION MESSAGE header.
Now that we have an overview of the structure of SMB messages, we can take a closer look at our live specimen. Remember packets 9 and 10 from the capture we made earlier? They show a NEGOTIATE PROTOCOL exchange. Let’s get out the tweezers, the pocket knife, and dad’s hammer and see what’s inside.
NEGOTIATE_PROTOCOL_REQUEST
  {
  SMB_HEADER
    {
    PROTOCOL  = "xffSMB"
    COMMAND   = SMB_COM_NEGOTIATE (0x72)
    STATUS
      {
      ErrorClass = 0x00   (Success)
      ErrorCode  = 0x0000 (No Error)
      }
    FLAGS     = 0x18 (Pathnames are case-insensitive)
    FLAGS2    = 0x8001 (Unicode and long filename support)
    EXTRA
      {
      PidHigh    = 0x0000
      Signature  = 0 (all bytes zero filled)
      }
    TID       = 0 (Not yet known)
    PID       = <Client Process ID>
    UID       = 0 (Not yet known)
    MID       = 2 (often 0 or 1, but varies per OS)
    }
  SMB_PARAMETERS
    {
    WordCount = 0
    Words     = <empty>
    }
  SMB_DATA
    {
    ByteCount = 12
    Bytes
      {
      BufferFormat = 0x02 (Dialect)
      Name         = "NT LM 0.12" (nul terminated)
      }
    }
  }
The breakdown of packet 9 shows the SMB NEGOTIATE PROTOCOL REQUEST as sent by the jCIFS Exists utility. Other clients will use slightly different values, but they are all variations on the same theme. Some features worth noting:
The
COMMANDfield has a value of0x72(SMB_COM_NEGOTIATE). That’s how we know that this is aNEGOTIATE PROTOCOLmessage. We also know that it is aREQUESTrather than aRESPONSEbecause the highest-order bit in theFLAGSfield has a value of zero (0).The
STATUSfield is all zeros at this point because we haven’t yet done anything to cause an error. Also, the error messages are presented in the older DOS format. This is because jCIFS is indicating, via a bit in theFLAGS2field, that it is using the DOS format. We’ll dig into those bits later on.Several fields (the
EXTRA.Signature, theTID, and theUID, to name a few) contain zeros. The content of these fields has not yet been determined, and they may or may not be filled in later on. It all depends upon the types of SMB requests that are issued. Stay tuned.In this particular SMB the Parameter block is empty and all of the useful information is being carried in the Data block. In contrast, the response packet from the server (packet 10) makes use of both the Parameter and Data blocks (assuming that there are no errors). See for yourself by looking at the
NEGOTIATE PROTOCOL RESPONSEin your capture.
The Data block in the request contains the list of protocols that the client is able to speak. jCIFS only knows one dialect, so only one name is listed in the message above. As you can see, jCIFS implements the “NT LM 0.12” dialect (the most recent and widely supported as of this writing). Other clients, such as Samba’s smbclient, support a longer list of dialects.
In the trace given above, Ethereal has identified packets 11 and 12 as being a SESSION SETUP ANDX exchange.[5] The term “ANDX” at the end of the names indicates that these messages belong to a curious class of creatures known as “AndX messages.” SMB AndX messages are actually several SMBs combined into a single symbiotic packet as shown in Figure 11.2. It is an efficient mutation.
AndX SMBs combine several SMB messages into one. Only one header is used, but each parameter block contains information identifying the next AndX body segment.
Figure 11.2. AndX SMBs
AndX messages work something like a linked list. Each Parameter block in an AndX message begins with the following structure:

The AndXCommand field provides the SMB command code for the next AndX block in the list (not the current one). The AndXOffset contains the byte index, relative to the start of the SMB header, of that next AndX block — think of it as a pointer. Since the AndXOffset value is independent of the SMB_PARAMETERS.WordCount and SMB_DATA.ByteCount values, it is possible to provide padding between the AndX blocks as shown in Figure 11.3.

The AndXOffset value in each AndX parameter block gives the offset (relative to the start of the SMB) of the next AndX block. The AndXOffset of the last AndX block has a value of zero (0).
Figure 11.3. AndX SMB chaining
Now that we have a general idea of what an SMB AndX message looks like we are ready to dissect packet 11. It looks like this:
SESSION_SETUP_ANDX_REQUEST
  {
  SMB_HEADER
    {
    PROTOCOL  = "xffSMB"
    COMMAND   = SMB_COM_SESSION_SETUP_ANDX (0x73)
    STATUS
      {
      ErrorClass = 0x00   (Success)
      ErrorCode  = 0x0000 (No Error)
      }
    FLAGS     = 0x18 (Pathnames are case-insensitive)
    FLAGS2    = 0x0001 (Long filename support)
    EXTRA
      {
      PidHigh    = 0x0000
      Signature  = 0 (all bytes zero filled)
      }
    TID       = 0 (Not yet known)
    PID       = <Client Process ID>
    UID       = 0 (Not yet known)
    MID       = 2 (often 0 or 1, but varies per OS)
    }
  ANDX_BLOCK[0] (Session Setup AndX Request)
    {
    SMB_PARAMETERS
      {
      WordCount     = 13
      AndXCommand   = SMB_COM_TREE_CONNECT_ANDX (0x75)
      AndXOffset    = 79
      MaxBufferSize = 1300
      MaxMpxCount   = 2
      VcNumber      = 1
      SessionKey    = 0
      CaseInsensitivePasswordLength = 0
      CaseSensitivePasswordLength   = 0
      Capabilities  = 0x00000014
      }
    SMB_DATA
      {
      ByteCount     = 20
      AccountName   = "GUEST"
      PrimaryDomain = "?"
      NativeOS      = "Linux"
      NativeLanMan  = "jCIFS"
      }
    }
  ANDX_BLOCK[1] (Tree Connect AndX Request)
    {
    SMB_PARAMETERS
      {
      WordCount       = 4
      AndXCommand     = SMB_COM_NONE (0xFF)
      AndXOffset      = 0
      Flags           = 0x0000
      PasswordLength  = 1
      }
    SMB_DATA
      {
      ByteCount       = 22
      Password        = ""
      Path            = "\SMEDLEYHOME"
      Service         = "?????"  (yes, really)
      }
    }
  }
There is a lot of information in that message, but we are not yet ready to dig into the details. There is just too much to cover all of it at once. Our goals right now are simply to highlight the workings of the AndX blocks, and to provide a glimpse inside the SESSION SETUP ANDX and TREE CONNECT ANDX sub-messages so that we will have something to talk about later on.
The block labeled ANDX_BLOCK[0] is the body of the SESSION SETUP REQUEST, and ANDX_BLOCK[1] contains the TREE CONNECT REQUEST. Note that the AndXCommand field in the final AndX block is given a value of 0xFF. This, in addition to the zero offset in the AndXOffset field, indicates the end of the AndX list.
SMB conversations start after the session has been established via the transport layer. As a rule, the client always speaks first. Clients send requests, servers respond, and that’s the way SMB is supposed to work. This is a hard-and-fast rule which means, of course, that there is an exception. Fortunately, we can (and will) put off talking about that exception until we talk about Opportunistic Locks (OpLocks).
The NEGOTIATE PROTOCOL REQUEST/RESPONSE is always the first SMB exchange in the conversation. The client and server need to know what language to speak before they can say anything else. This is also a hard-and-fast rule, but there are no exceptions (which is an exception to the rule that all hard-and-fast rules have exceptions).
Once the dialect has been selected, the next formality is to establish an SMB session using the SMB SESSION SETUP REQUEST message. We keep running into terminology twists, and here we have yet another. The SMB SESSION SETUP exchange sets up an SMB session within the NBT or naked TCP session.
Huh?
Well, yes, that’s confusing. The problem is that we are talking about two different kinds of sessions here.
There is the network session built at layer 5 of the OSI model, on top of the transport layer.
There is the user logon session.
Ah, there’s a clue! The SESSION SETUP is used to perform authentication and establish a user session with the server.[6] A quick look at the SESSION SETUP ANDX REQUEST block in the packet above shows that the Exists utility did in fact send a username — the name “GUEST”, passed via the AccountName field — to the server.
Once the user session is established, the client may try to connect to a share using a TREE CONNECT SMB. It is a hard-and-fast rule that TREE CONNECT SMBs must follow the SESSION SETUP. There is an exception to this as well, which we will cover when we get to share-mode vs. user-mode authentication.
Figure 11.4 shows the right way to start an SMB conversation. Combining the SESSION SETUP ANDX and TREE CONNECT ANDX SMBs into a single AndX message is optional (jCIFS’ Exists does, but Samba’s smbclient doesn’t). Once the conversation has been initiated using the above sequence, the client is free to improvise.
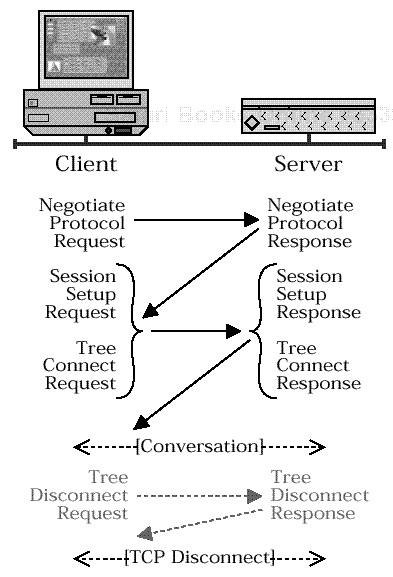
The client makes requests (some of which may be batched in AndX messages) and the server responds. The jCIFS Exists utility sends a NEGOTIATE PROTOCOL REQUEST followed by batched SESSION SETUP plus TREE CONNECT AndX requests. The TREE DISCONNECT exchange at the end is optional. When the client closes the session at the transport layer, all resources are released.
Figure 11.4. A simple SMB conversation
There is another small detail you may have noticed while studying the captured SMB packets — or perhaps you remember this from one of the Alert boxes in the NBT section: SMBs are written using little-endian byte order. If your target platform is big-endian, or if you want your code to be portable to big-endian systems, you will need to be able to handle the conversion between host and SMB byte order.
The htonl(), htons(), ntohl(), and ntohs() functions won’t help us here. They convert between host and network byte order. We need to be able to convert between host and SMB order (and SMB order is definitely not the same as network order).
So, to solve the problem, we need a little bit of code, which is presented here mostly to get it out of the way so that we won’t have to bother with it when we are dealing with more complex issues. The functions in Listing 11.1 read short and long integer values directly from incoming message buffers and write them directly to outgoing message buffers.
Example 11.1. Reading and writing integer values
ushort smb_GetShort( uchar *src, int offset )
  /* ---------------------------------------------------- **
   * Read a short integer converting it to host byte
   * order from a byte array in SMB byte order.
   * ---------------------------------------------------- **
   */
  {
  ushort tmp;

  /* Low order byte is first in the buffer. */
  tmp  = (ushort)(src[offset]);

  /* High order byte is next in the buffer. */
  tmp |= ( (ushort)(src[offset+1]) << 8 );

  return( tmp );
  } /* smb_GetShort */

void smb_SetShort( uchar *dst, int offset, ushort val )
  /* ---------------------------------------------------- **
   * Write a short integer in host byte order to the
   * buffer in SMB byte order.
   * ---------------------------------------------------- **
   */
  {
  /* Low order byte first. */
  dst[offset]   = (uchar)(val & 0xFF);

  /* High order byte next. */
  dst[offset+1] = (uchar)((val >> 8) & 0xFF);
  } /* smb_SetShort */

ulong smb_GetLong( uchar *src, int offset )
  /* ---------------------------------------------------- **
   * Read a long integer converting it to host byte order
   * from a byte array in SMB byte order.
   * ---------------------------------------------------- **
   */
  {
  ulong tmp;

  tmp  = (ulong)(src[offset]);
  tmp |= ( (ulong)(src[offset+1]) << 8 );
  tmp |= ( (ulong)(src[offset+2]) << 16 );
  tmp |= ( (ulong)(src[offset+3]) << 24 );
  return( tmp );
  } /* smb_GetLong */

void smb_SetLong( uchar *dst, int offset, ulong val )
  /* ---------------------------------------------------- **
   * Write a long integer in host byte order to the
   * buffer in SMB byte order.
   * ---------------------------------------------------- **
   */
  {
  dst[offset]   = (uchar)(val & 0xFF);
  dst[offset+1] = (uchar)((val >> 8) & 0xFF);
  dst[offset+2] = (uchar)((val >> 16) & 0xFF);
  dst[offset+3] = (uchar)((val >> 24) & 0xFF);
  } /* smb_SetLong */
Our field trip into SMB territory is now over. We have covered a lot of ground, collected samples, and taken a look at SMBs in the wild. Our next step will be doing the lab work — studying our specimens under a microscope. It is time to take a break, relax, and reflect on what we have learned so far.
In the next section we will go back over the SMB header in a lot more detail with the goal of explaining some of the key concepts that we have only touched on so far. You will probably want to be well rested and in a good mood for that.
[1] When working with the NET USE command, it is important to remember to close the connection to the server using the /d command-line option. Type NET HELP at the DOS prompt for more information.
[2] The original was much more detailed and interesting. It had to be edited so that it would fit on the page, and because all those details can be distracting.
[3] ...to me.
[4] The first place to look is Microsoft’s CIFS FTP site: ftp://ftp.microsoft.com/developr/drg/CIFS/. The COREP.TXT file is formatted for printing on an old-style dot-matrix printer, which makes it look a little goofy in places (e.g. bold font is accomplished by typing a character, then backspacing, then re-typing the same character). The same content is available in an alternate format in the file SMB-CORE.PS. See the References section.
[5] Ethereal version 0.9.3 will report the name of the last AndX Command in the chain, rather than the first. This was fixed somewhere between 0.9.3 and 0.9.6. The trick with Ethereal is to update early and often.
[6] We are dealing with a vague definition here. According to the SNIA doc, the SESSION SETUP is meant to “set up” the session created by the NEGOTIATE PROTOCOL, which also makes some sort of sense. Thing is, there may be multiple SESSION SETUP exchanges following the NEGOTIATE PROTOCOL, meaning multiple SMB user sessions per NBT or naked TCP transport session. The waters are muddy.