
Chapter 4: Azure Arc Enabled SQL Server
In this chapter, we'll explore the hybrid management capabilities offered by Azure Arc for SQL servers. We will onboard on-premises SQL Server virtual machines to Azure Arc to understand the process in detail and perform management and security assessments for SQL Server. This will give us a good kickstart in understanding Azure Arc enabled data services and how Azure Arc automates database management tasks for management at scale.
We'll be covering the following topics:
- Introducing Azure Arc enabled SQL Server
- Supported management scenarios
- Preparing on-premises machines for Azure Arc enabled SQL Server
- Onboarding SQL servers to Azure Arc
- Managing SQL servers with Azure Arc
Technical requirements
To follow this chapter, you need to have an active Azure subscription, preferably with owner rights at the subscription level, though rights at the resource group level will also work.
You can get a trial at https://azure.microsoft.com/en-in/free/ if you do not have an Azure subscription already.
Please be sure to complete the Building a lab pre-requisite for Azure Arc section from Chapter 1, Azure Arc Overview, before starting the lab exercises documented in this chapter.
Check out the following link to see the Code in Action video:
Introducing Azure Arc enabled SQL Server
Azure Arc enabled SQL Server extends Azure Arc enabled servers' capabilities to Microsoft SQL Server instances hosted on-premises or any other cloud platforms. Azure Arc enabled SQL Server can be secured using Azure SQL advanced data security capabilities, which are the same capabilities available for Microsoft's PaaS SQL DB offering known as Azure SQL Database.
Azure Arc manages SQL Server using the same connected machine agent used for Azure Arc enabled servers management scenarios for its operations, thus it is part of the Azure Arc enabled servers umbrella.
Azure Arc enabled SQL Server is still in preview. Preview services are not recommended for production usage.
Supported environments
Azure Arc enabled SQL Server supports Microsoft SQL Server software running on both Windows and Linux. Since it requires the same connected machine agent used for Azure Arc enabled servers for its functionality, your server must meet the requirements outlined in Chapter 2, Azure Arc Enabled Servers, in the Supported scenarios section.
Azure Arc enabled SQL Server supports Microsoft SQL Server 2012 or higher versions running on the Windows or Linux operating systems supported by Azure Arc enabled servers.
This section describes the support matrix at the time of writing this book. Please be sure to check the Microsoft documentation (https://docs.microsoft.com/en-us/sql/sql-server/azure-arc/overview?view=sql-server-ver15) to review the latest updates. Let's look at individual requirements in detail in order to understand them better.
Network requirements
Azure Arc enabled SQL Server does not have any additional network-specific requirements apart from the connected machine agent network requirements specified in Chapter 2, Azure Arc Enabled Servers.
Permissions requirements
You need to have admin privileges (root privileges in the case of Linux) to install Azure Arc components on your servers.
You will need onboarding rights as described in Chapter 2, Azure Arc Enabled Servers. In addition to onboarding servers to Azure Arc, you will need an Azure account with the following permissions at least:
- Microsoft.AzureArcData/sqlServerInstances/read
- Microsoft.AzureArcData/sqlServerInstances/write
- Microsoft.HybridCompute/machines/read
- Microsoft.HybridCompute/machines/write
- Microsoft.GuestConfiguration/guestConfigurationAssignments/read
It is recommended to create a dedicated service principal specifically for onboarding SQL servers to Azure Arc. Please refer to Chapter 2, Azure Arc Enabled Servers, for detailed steps on creating a Service Principal Name (SPN).
ARM resource provider requirements
You will need to register a few ARM resources before you can start using the Azure Arc enabled SQL Server service. You will need contributor rights at least on the subscription level to be able to register resource providers.
Azure Arc uses the following resource providers for managing SQL servers:
- Microsoft.AzureArcData
- Microsoft.HybridCompute (required for Azure Arc enabled servers)
- Microsoft.GuestConfiguration (required for Azure Arc enabled servers)
Please refer to Chapter 2, Azure Arc Enabled Servers, for steps on enabling resource providers. Meeting the given requirements will help you in the smooth installation of this lab exercise and avoid hitting roadblocks. With this, let's move along and read more about supported scenarios for the management of SQL servers.
Supported management scenarios
Azure Arc helps SQL Server management by providing advanced configuration assessment and protection services, allowing you to secure your on-prem databases using the same tools and technologies you will use to secure your cloud databases in Azure. Let's take a look at the two supported scenarios available at the time of writing this book:
- Environment health assessment: An SQL Server assessment, powered by Azure Log Analytics. It assesses your SQL Server and database against various parameters from an environment health perspective. Assessment includes the validation of configurations and the health status against parameters across various categories such as the following:
- Assessment Quality: To ensure that all SQL server instances and databases are included in the assessment
- Security and Compliance
- Availability and Business Continuity
- Performance and Scalability
- Upgrade, Migration, and Deployment
- Operations and Monitoring
- Change and Configuration Management
- Business/IT Alignment
In addition to the assessment, it will provide your recommended mitigation steps and the criticality of issues discovered in your environment.
- Advanced data security: Advanced data security monitors your non-Azure SQL servers and databases against vulnerabilities, threats, and attacks. It is powered by Azure Security Center, Log Analytics, and Azure Sentinel. Advanced data security keeps your data in SQL Server secure and notifies you in the event of any suspicious activity.
At the time of writing, it only supports these two use cases, however, this list is expected to grow over time. Please be sure to check Microsoft documentation (https://docs.microsoft.com/en-us/sql/sql-server/azure-arc/overview?view=sql-server-ver15) for the latest information.
Understanding how it works
Azure Arc enabled SQL Server works on the top of Azure Arc enabled servers' technologies, that is, each Azure Arc enabled SQL Server also creates an Azure Arc enabled server instance and allows you to use the Azure Arc enabled server's management capabilities.
In order to enable the SQL environment health assessment and advanced data security, Azure Arc enabled servers uses the following Azure technologies:
- Log Analytics Workspace and Microsoft Monitoring Agent (MMA): To retrieve and store the Windows/Linux and SQL logs and matrices.
- SQL Health Assessment: To assess the environment health and provide recommendations. It is powered by the Log Analytics workspace solution.
- Azure Security Center along with Azure Sentinel: To provide advanced data security assessment and monitoring capabilities.
This means you must have MMA, a Log Analytics workspace, and Security Center enabled for Azure Arc enabled SQL Server capabilities. Now that we understand how it works, let's prepare our lab machines to explore these scenarios.
Preparing on-premises machines for Azure Arc enabled SQL Server
This book is designed to be a blend of knowledge and being hands-on, that is, you will see a lot of implementation steps and example deployments. In order to prepare for that, please follow the steps from Chapter 1, Azure Arc Overview, to prepare your Azure accounts in advance.
In this section, we'll create the required Azure infrastructure to simulate the on-prem (on-premises) environments for Azure Arc enabled SQL servers. If you have an on-prem infrastructure, you may use that as well, rather than hosting everything in Azure.
Creating a SQL Server VM in Hyper-V
We will be creating a virtual machine on the Hyper-V server created in Chapter 1, Azure Arc Overview. This VM will be used later in this chapter to onboard to Azure Arc.
For this demonstration, we will create a single VM on a Hyper-V host running the Windows OS and SQL Server 2019 on top of it. Deploying a nested VM in the Hyper-V server is currently out of scope for this book, hence, follow the instructions from the Microsoft documentation link that follows:
You will need to deploy the nested VM using the Windows VHD file from Chapter 2, Azure Arc Enabled Servers, and then install SQL server 2019 and SSMS (SQL Server Management Studio).
You can download SQL Server 2019 file from the official website at the following link: https://www.microsoft.com/en-us/download/details.aspx?id=100809
Next, create the Windows Server 2019 VM with the NestedSwitch Network Adapter configured so that our nested VMs have internet connectivity as shown in the following screenshot:

Figure 4.1 – NestedSwitch
Next, we shall download and restore a sample database (AdventureWorks) from Microsoft's official link given here for testing purposes:
So far, we have deployed a SQL server running on a nested virtual machine in our Hyper-V infrastructure. This helped us in understanding the prerequisite for the lab we will be performing from here on. Optionally you could choose to use their on-premises infrastructure, if available, to perform these steps and later onboard the SQL servers to Azure Arc. Now we will move ahead and see how we can onboard these VMs as Azure Arc enabled SQL servers and manage them using the Azure portal.
Onboarding SQL Server instances to Azure Arc
Onboarding SQL servers to Azure Arc is similar to Azure Arc enabled servers, covered in Chapter 2, Azure Arc Enabled Servers. The Azure portal provides an onboarding script that can be used to onboard an individual server or multiple servers in an unattended fashion.
Please refer to Chapter 2, Azure Arc Enabled Servers, the Onboard Windows and Linux machines section, to learn more about the onboarding of Windows or Linux servers hosting SQL server to Azure Arc.
Let's take a look at how you can get an Azure Arc enabled SQL Server onboarding script from the Azure portal.
Generate a SQL onboarding script using the Azure portal
In this section, we will use the Azure portal to generate the onboarding script. You need to take the following steps:
- Log in to the Azure portal at the following link: https://portal.azure.com.
- Search for Arc and select SQL Server - Azure Arc as shown in the following screenshot:

Figure 4.2 – Azure Arc search
- Click + New. Review the Prerequisites and click on Next: Server details as can be seen on the following screen:
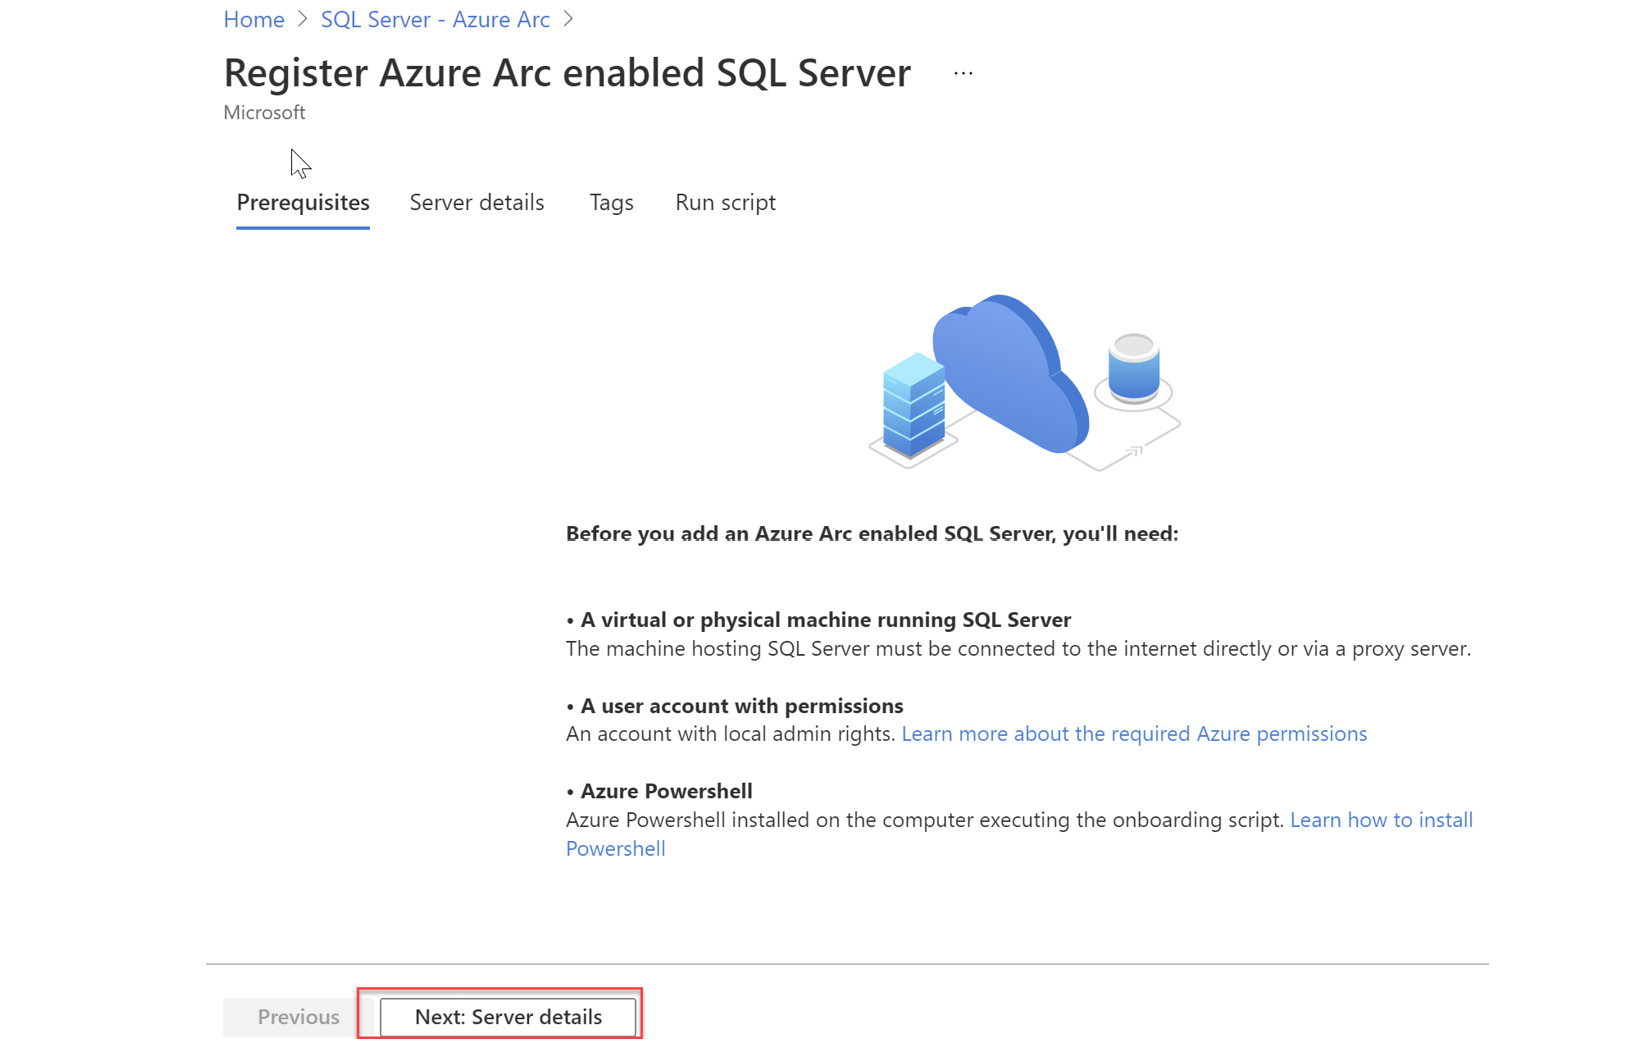
Figure 4.3 – Prerequisites info selection server details
- On the Server details page, you need to provide basic information about how you want to manage your SQL servers. These options appear in Figure 4.4 as follows:
- Subscription * and Resource group *: Every Arc enabled server is a resource in Azure. Please select the resource group where you want the Azure Arc enabled servers resource to live.
- Region *: The Azure region to store your server's metadata and other settings.
- Operating system *: Windows or Linux as per your SQL Server instance.
- Proxy server URL: If your server environment does not have direct internet connectivity, please specify the proxy server URL to let the connected machine agent communicate with Azure through a proxy. Please leave it blank for this demo lab environment as servers can directly communicate with the internet:
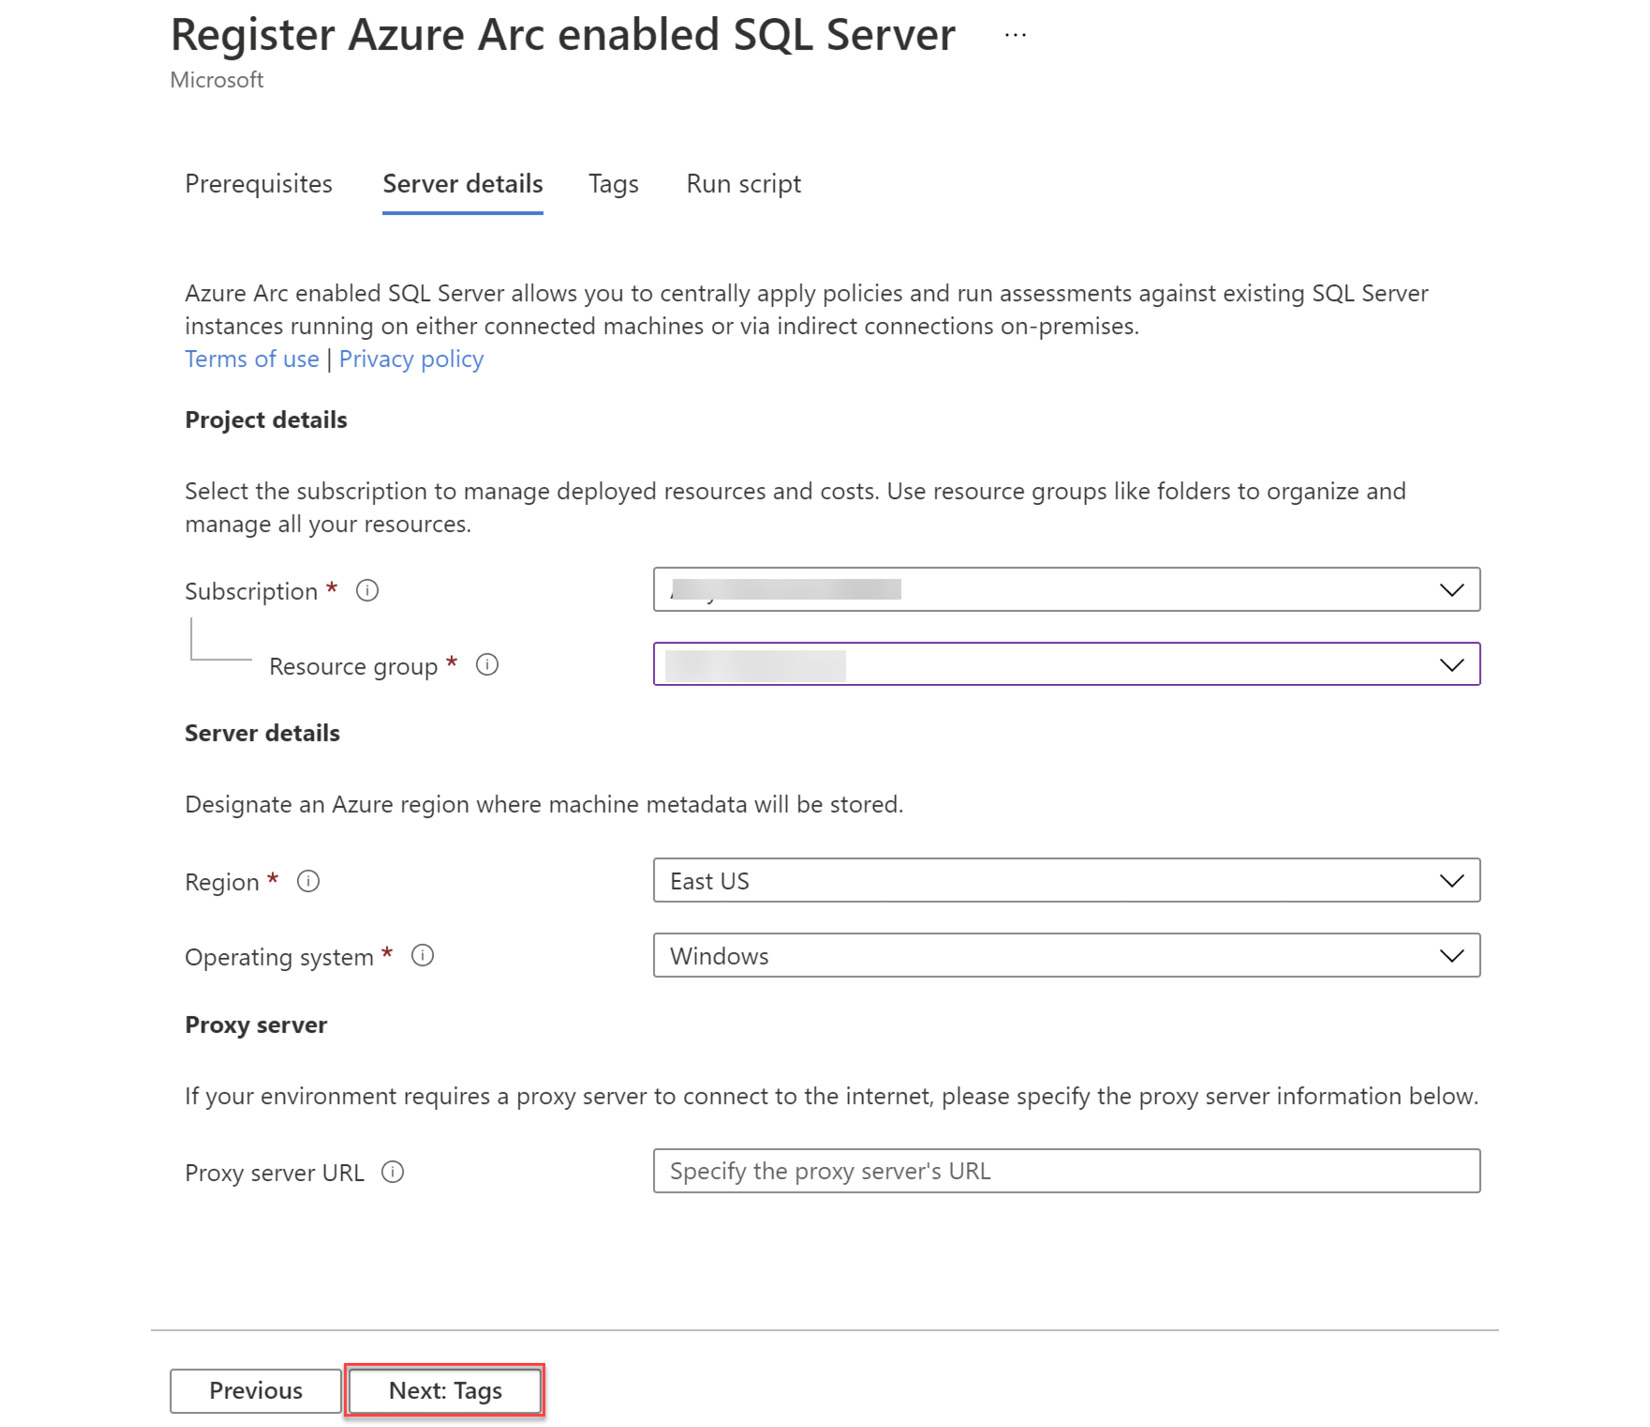
Figure 4.4 – Add SQL Server wizard
- Next, you have to specify the Tags as shown in Figure 4.5, if any, and click Next: Run script, and then download the script as shown in Figure 4.6 using the Download button at the bottom of the screenshot.
The following screenshot includes some of the common and recommended tags:

Figure 4.5 – Add Azure Tags
- Now you will copy the PowerShell script and save it in a local file. You will need to execute this script on your SQL Server machines to complete the onboarding:
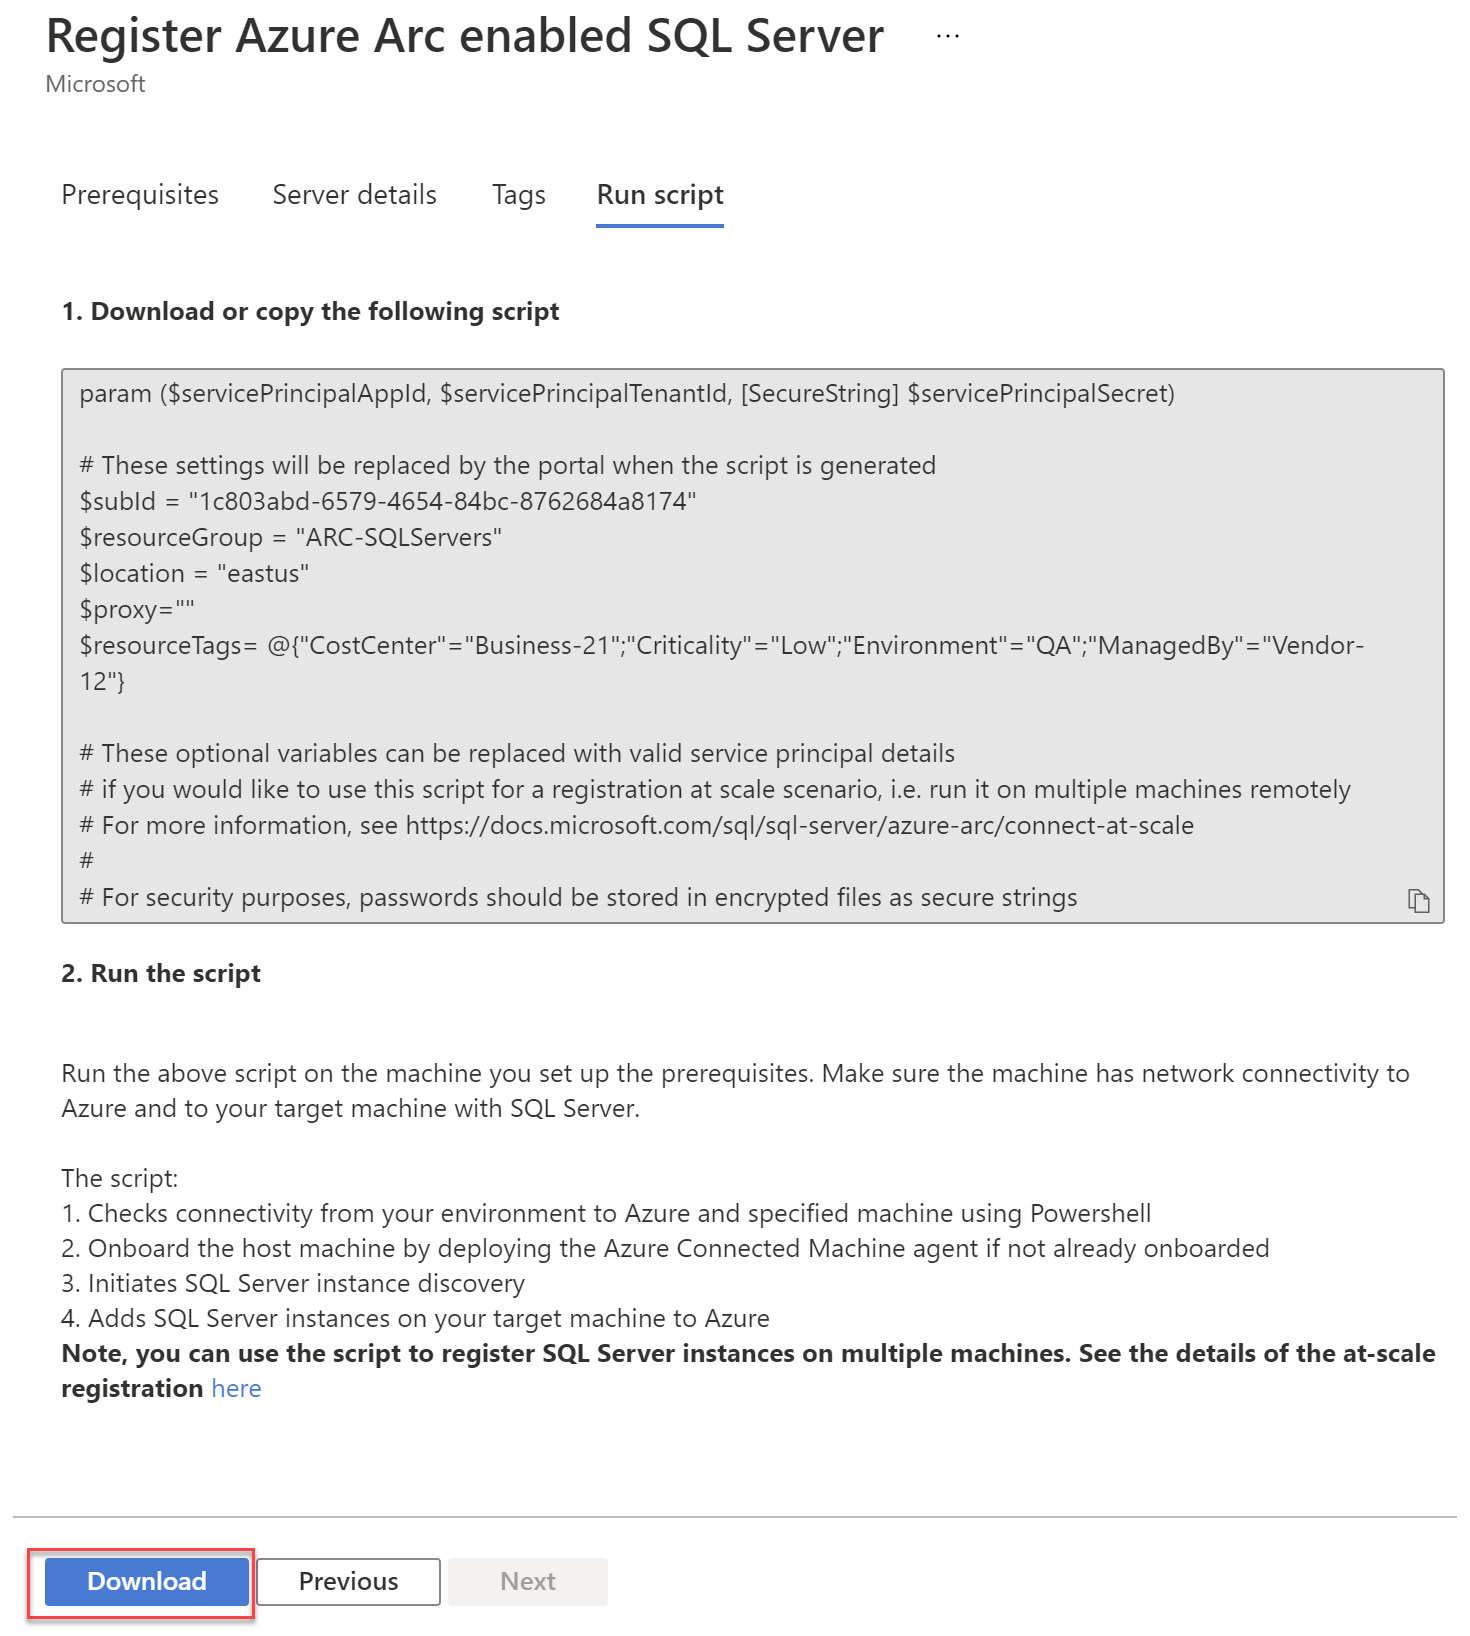
Figure 4.6 – Download the script
At this point, we can run this script on our Windows machine hosting SQL Server.
Onboarding SQL Server running on Windows
We will use the PowerShell script generated in the previous section to onboard SQL Server. You will need an account with administrator rights to complete the following exercise:
- First, you need to log in to your Hyper-V Host via Remote Desktop Protocol (RDP).
- Launch the test Windows VM named windows-vm through Hyper-V Manager.
- Launch an elevated (run as admin) PowerShell console.
- Execute the Windows onboarding script downloaded from the previous section.
The script will prompt you to install the Az PowerShell module and dependencies. Please accept the installation of these dependencies. Once the agent is installed, the PowerShell session will prompt you to log in to the Azure portal. Please copy the device login code and authenticate through your preferred browser.
- Upon successful onboarding, you will see the message in the log stating SQL Server – Azure Arc resource: <“Server Name”>created, as can be seen on the following screen:

Figure 4.7 – Successful onboarding message
- Navigate to Azure portal | SQL Server - Azure Arc. You should now see a machine listed there with the hostname of your Windows machine:
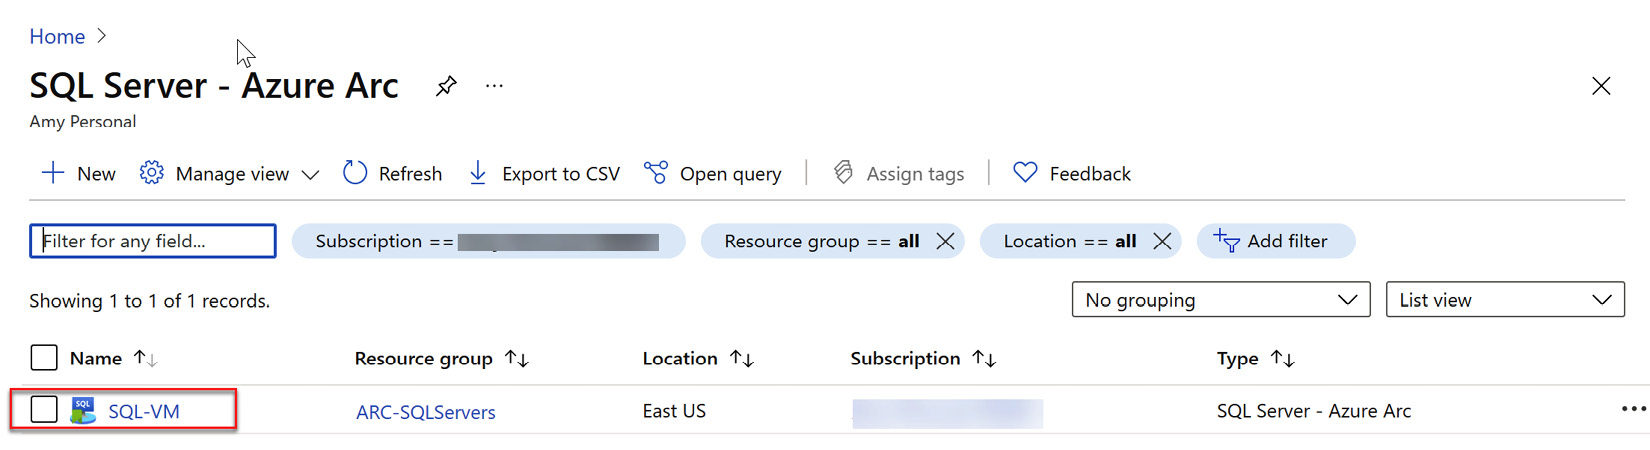
Figure 4.8 – Onboarded Windows Server
Congratulations, you have successfully onboarded a non-Azure SQL server running on Windows to Azure Arc.
Onboarding a Linux-based SQL Server process is like this. You need to select Linux as the operating system and generate a bash script. You can execute the bash script on a server running SQL Server and it will onboard the server and SQL to Azure Arc.
Since Azure Arc enabled SQL Server works on the same connected machine agent, it also onboards the server to Azure Arc enabled servers. You should be able to see this server in Azure Portal | Servers - Azure Arc as well.
In this section, we learned what the best practices are to onboard our on-prem Windows and Linux machine, one at a time following a manual methodology. In the upcoming section, we will learn about how to onboard multiple such machines at scale.
Onboarding SQL servers at scale
Onboarding SQL servers at scale is done like how we onboard Windows or Linux machines at scale. You will need to create a service principal with the required permissions and use the same onboarding script while providing the service principal credentials. Please check the Onboarding servers at scale section in Chapter 2, Azure Arc Enabled Servers, for more details.
At the end of this section, we have learned how to prepare our SQL servers and later how to onboard the server so that it is finally manageable from the Azure portal. We saw our SQL server onboarded on the Azure Arc management pane, and finally, we revised the onboarding at scale from Chapter 2, Azure Arc Enabled Servers.
Managing SQL Servers with Azure Arc
In this section, we will configure the SQL server assessment and advanced data security with Azure Arc.
Reviewing connected SQL Server state in the Azure portal
In the previous section, we onboarded a Windows Server 2019 based virtual machine hosting SQL Server 2019, which was running on Hyper-V to Azure Arc. Let's explore the management options available to us in the Azure portal for this connected server by taking the following steps:
- Log in to the Azure portal and navigate to SQL Servers - Azure Arc.
- Select your newly onboarded SQL Server.
- On the Overview blade, you will be able to see the current status of your Arc enabled server. The status displays if the server is currently Connected or Disconnected or in an unknown/error state, as you can see on the following screen:

Figure 4.9 – Connected status of the Azure Arc server
- In the Settings pane, you will see the Environment Health pane and Properties page.
- In the Security pane, you will have the ability to configure Advanced data security.
You can use Azure role-based access control, tags, and activity logs similar to any Azure resource to build an effective governance, auditing, and management strategy. In later sections, we will look at the environment health assessment and data security.
Configuring SQL Server assessment
Azure SQL Server assessment inventories your SQL Server instances and databases and provides insights into your SQL Server health and security posture. You can use this assessment to ensure that all your SQL servers are following the standard best practices irrespective of their hosting location.
This assessment is powered by Azure Log Analytics. In order to assess, we must install MMA in our servers and enable SQL assessment. Please refer to Chapter 2, Azure Arc Enabled Servers, for instructions on installing MMA.
Let's enable SQL Server assessment for your newly onboarded SQL server in Azure Arc using the following steps:
- First, log in to the Azure portal and navigate to SQL Servers - Azure Arc.
- Select your newly onboarded SQL Server and click on Environment Health.
- You must have the MMA installed on the server to configure the assessment. If you do not have the MMA agent installed already, please refer to Chapter 2, Azure Arc Enabled Servers, for detailed instructions.
- If you have a domain environment, you can provide a managed service account for Azure Arc to automatically configure SQL assessment, otherwise, you can choose Domain user account as shown in the following screenshot and download the script to configure SQL Server assessment:
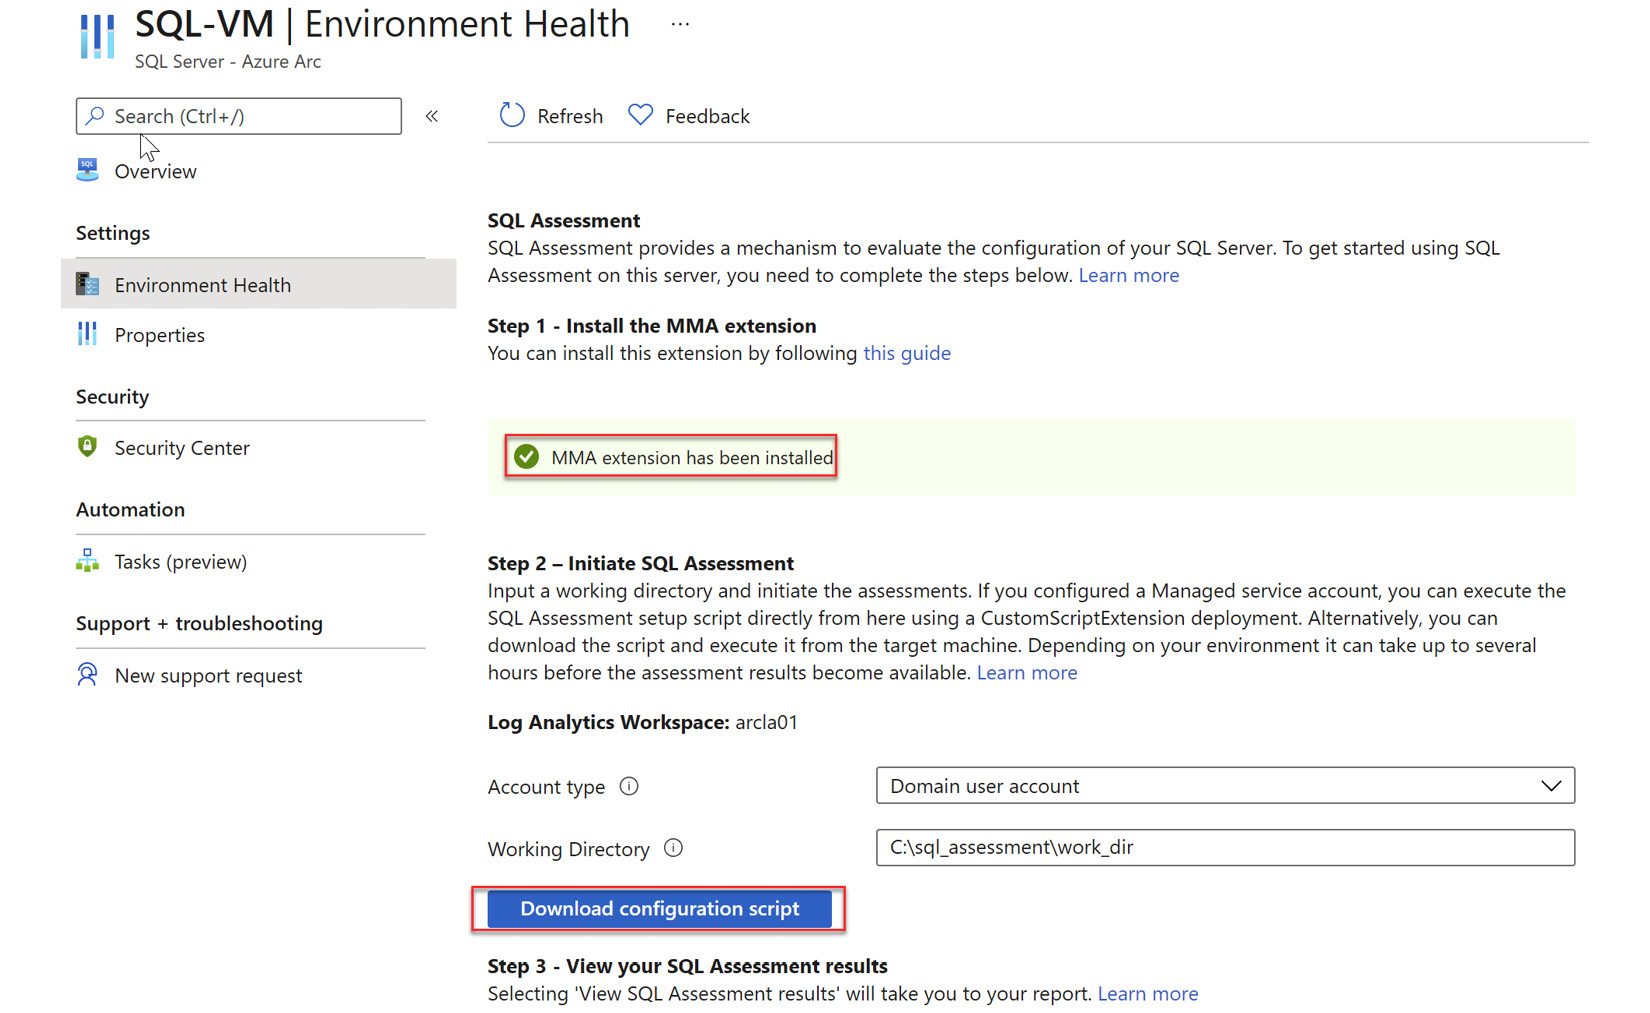
Figure 4.10 – Download configuration script
- Once the script is downloaded, please execute this script on the Hyper-V VM hosting your SQL Server.
- Upon executing, you will be asked to specify a username and password to create the SQL Assessment scheduled task. Please specify a domain or local username that has administrator rights on the system and SQL Server.
- This script created a task in your task scheduler. As shown in Figure 4.12, you can find it in Computer Management | Task Scheduler | Task Scheduler Library | Microsoft | Operations Management Suite | Assessments | SQLAssessment:

Figure 4.11 – Task Scheduler view
- By default, the script runs once every week. You can modify the task if you want the assessment to run at different times and frequencies. If you want to run an ad-hoc assessment, you can right-click on the task and run it manually.
- You should be able to see the assessment results within an hour of running the script successfully. Once assessment data is available, you will see the option to view the assessment results as shown at the bottom of the following screen:
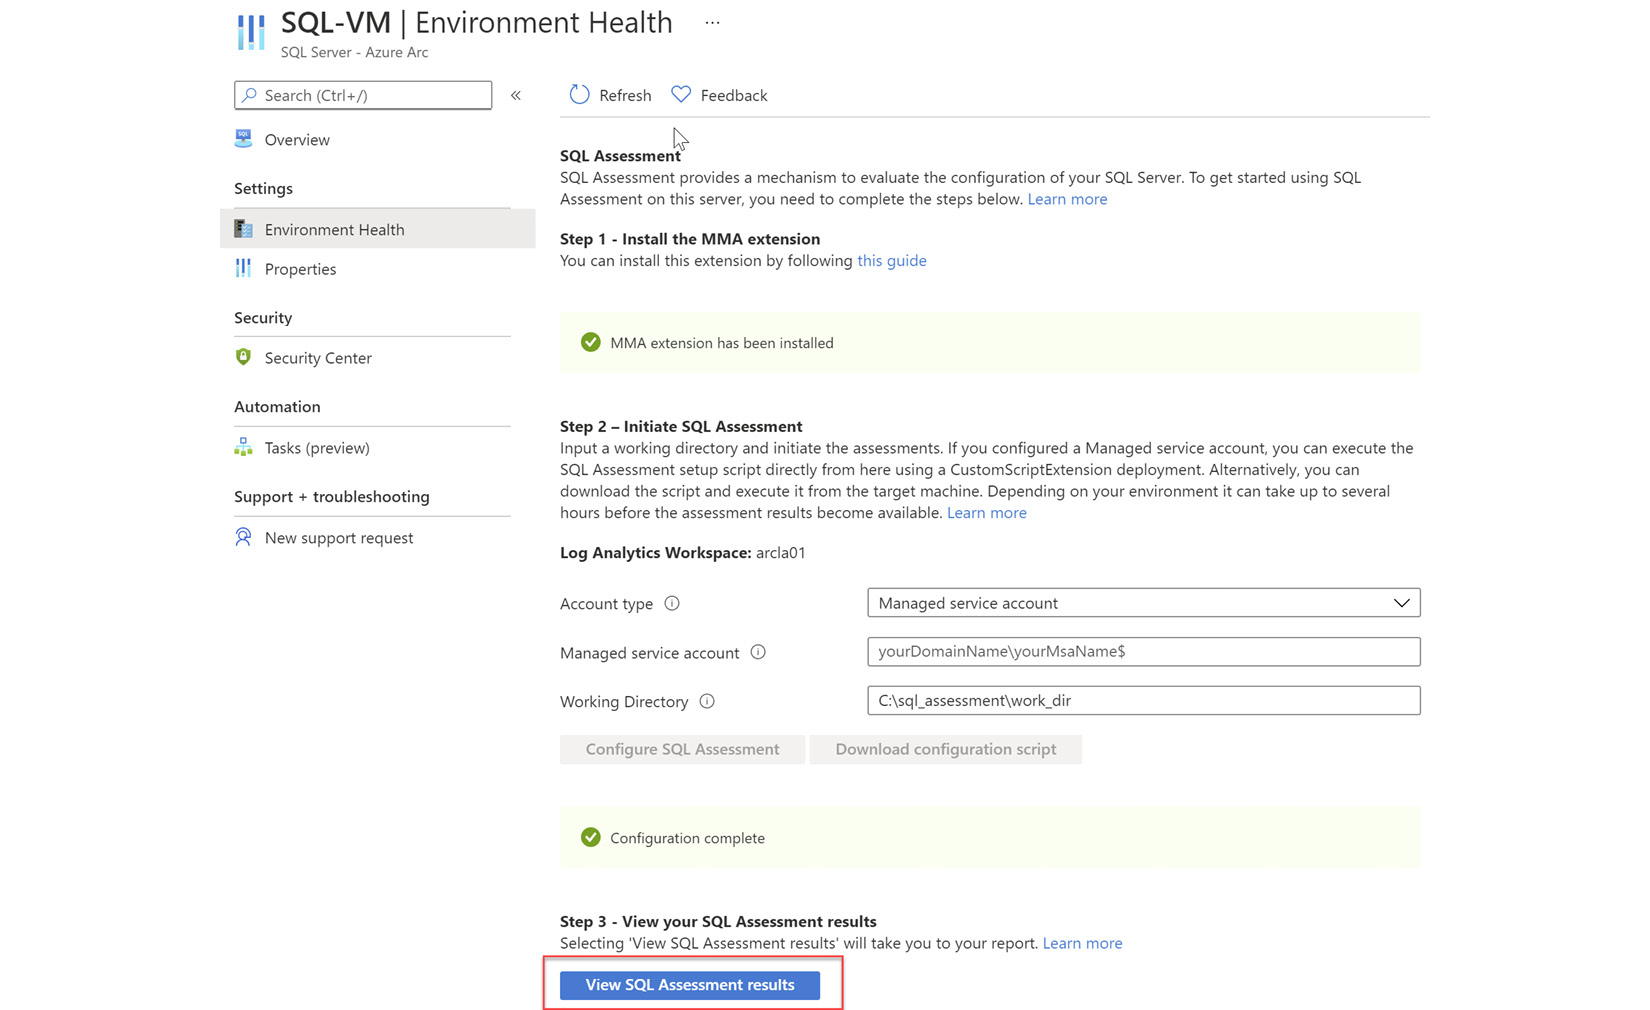
Figure 4.12 – SQL health assessment
- In the assessment result, you will see the recommendations and overall score with respect to the health of your environments as shown here:
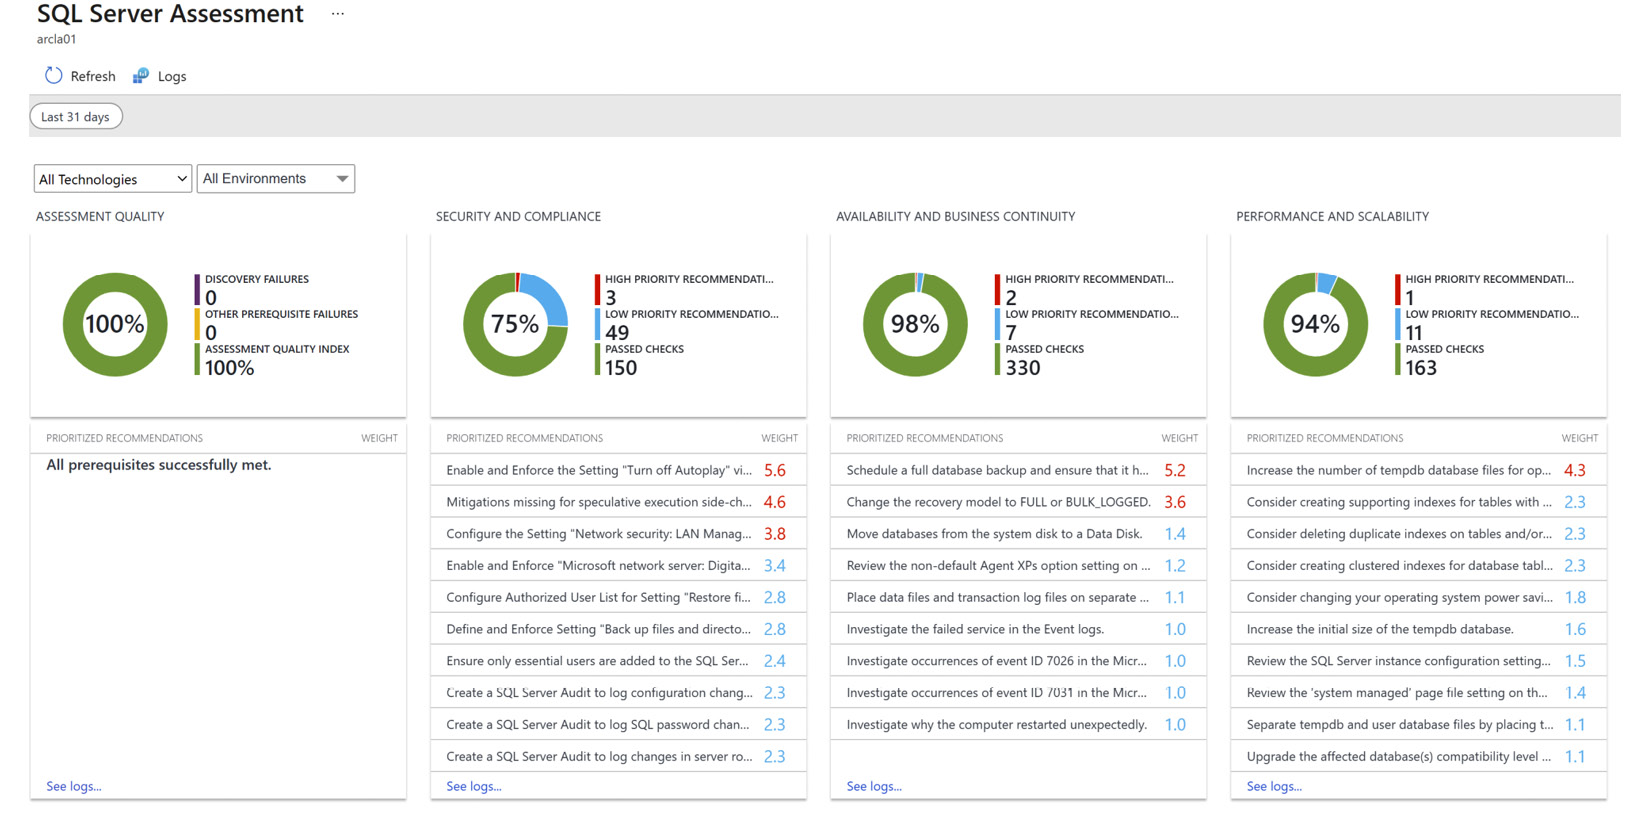
Figure 4.13 – SQL health assessment view
- You can click on any of the recommendations, and it will give you detailed insights and mitigation steps as seen here:

Figure 4.14 – Focused health view
You have now completed the environment health assessment of your Azure Arc enabled SQL Server. Let's continue and look at how we can secure our SQL Server infrastructure.
Configuring SQL Server advanced data security
In this section, we will explore the advanced data security capabilities of Azure Arc enabled SQL Server. Advanced data security is powered by Azure Security Center. Azure Security Center leverages MMA and a Log Analytics workspace to retrieve and store the logs generated in your on-prem SQL machines.
In this example, we will configure Azure Security Center to protect our Azure Arc enabled SQL Server. Let's take the following steps:
- Navigate to the Azure portal | Security Center.
- Select Pricing & settings and click on your subscription as can be seen in the following screenshot:
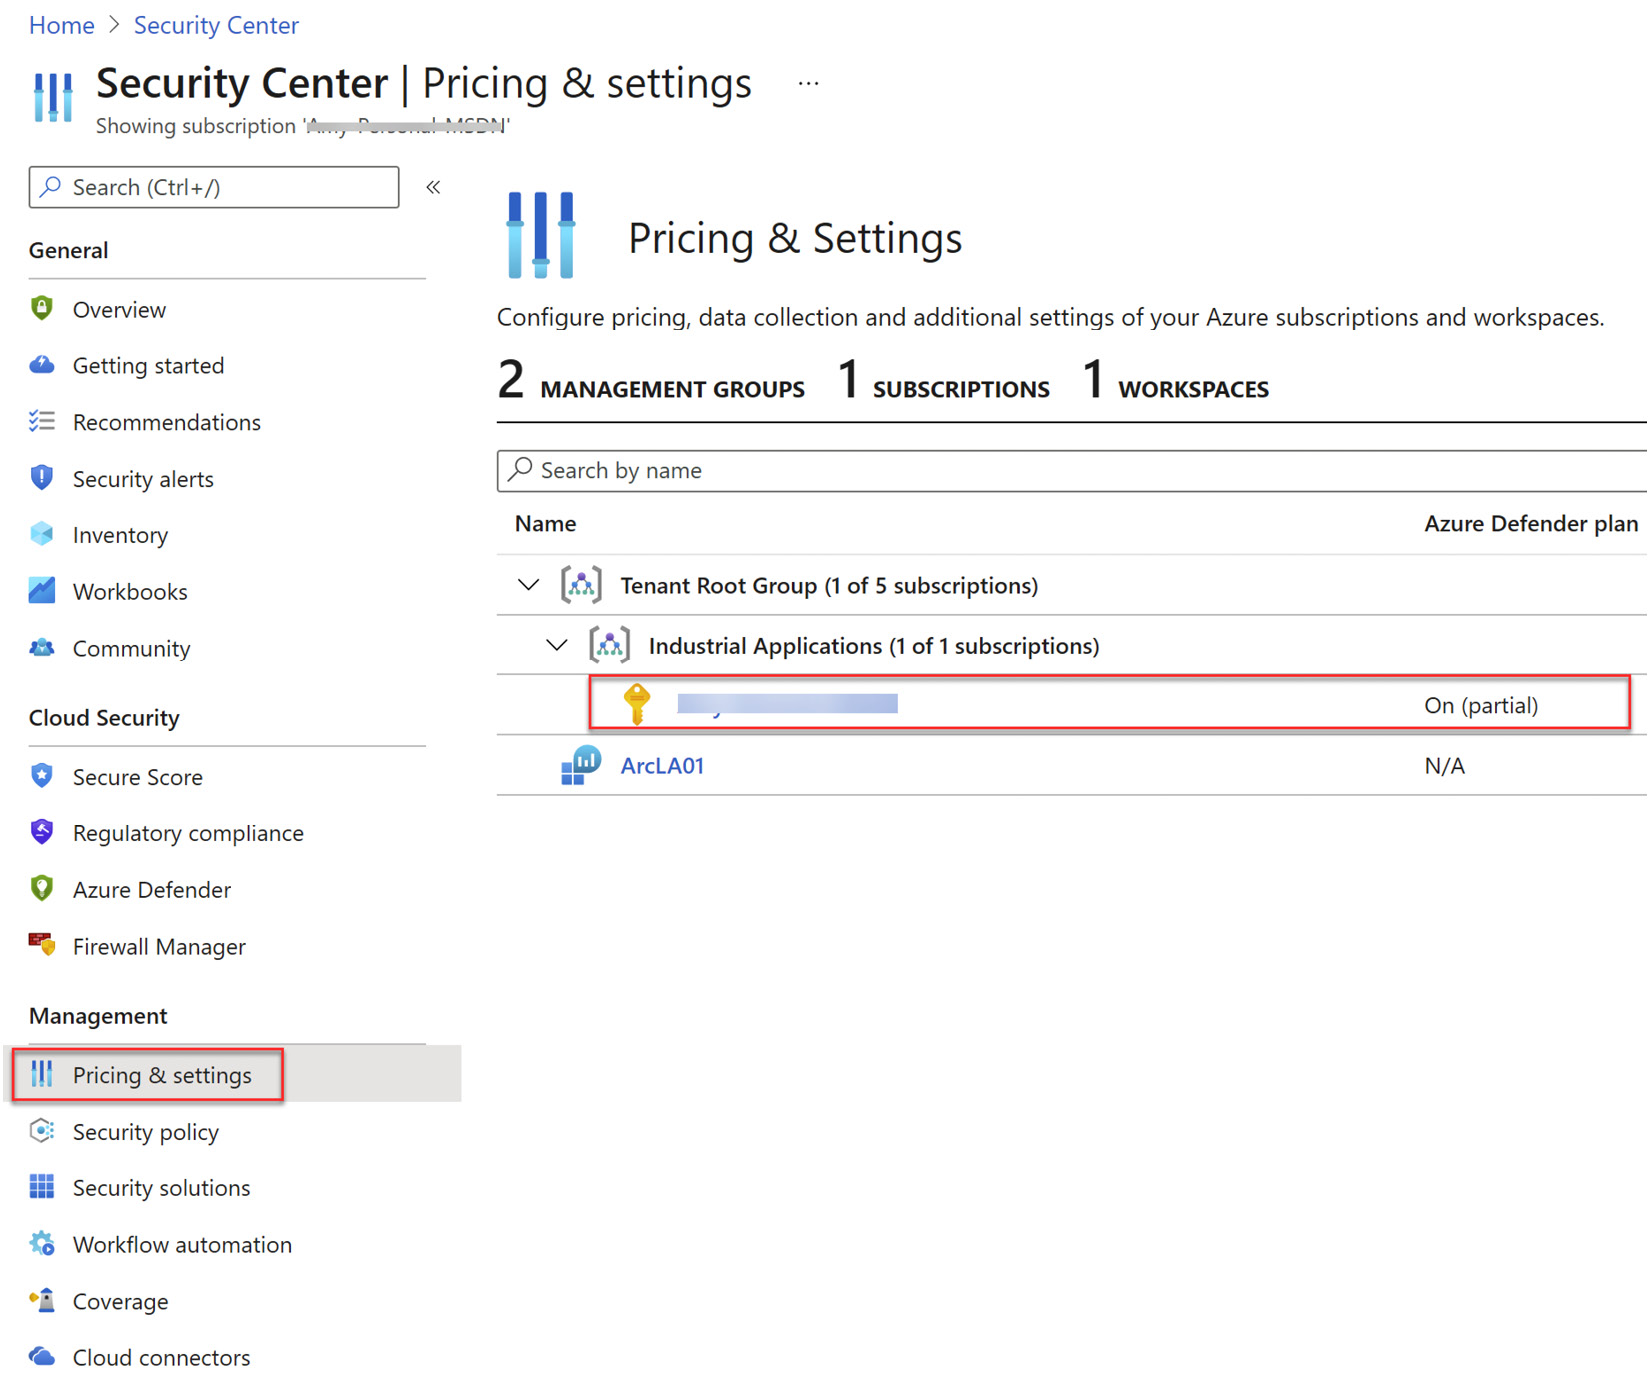
Figure 4.15 – Pricing & Settings view
- Please ensure that you have Azure Defender on set for the subscription as you can see here:
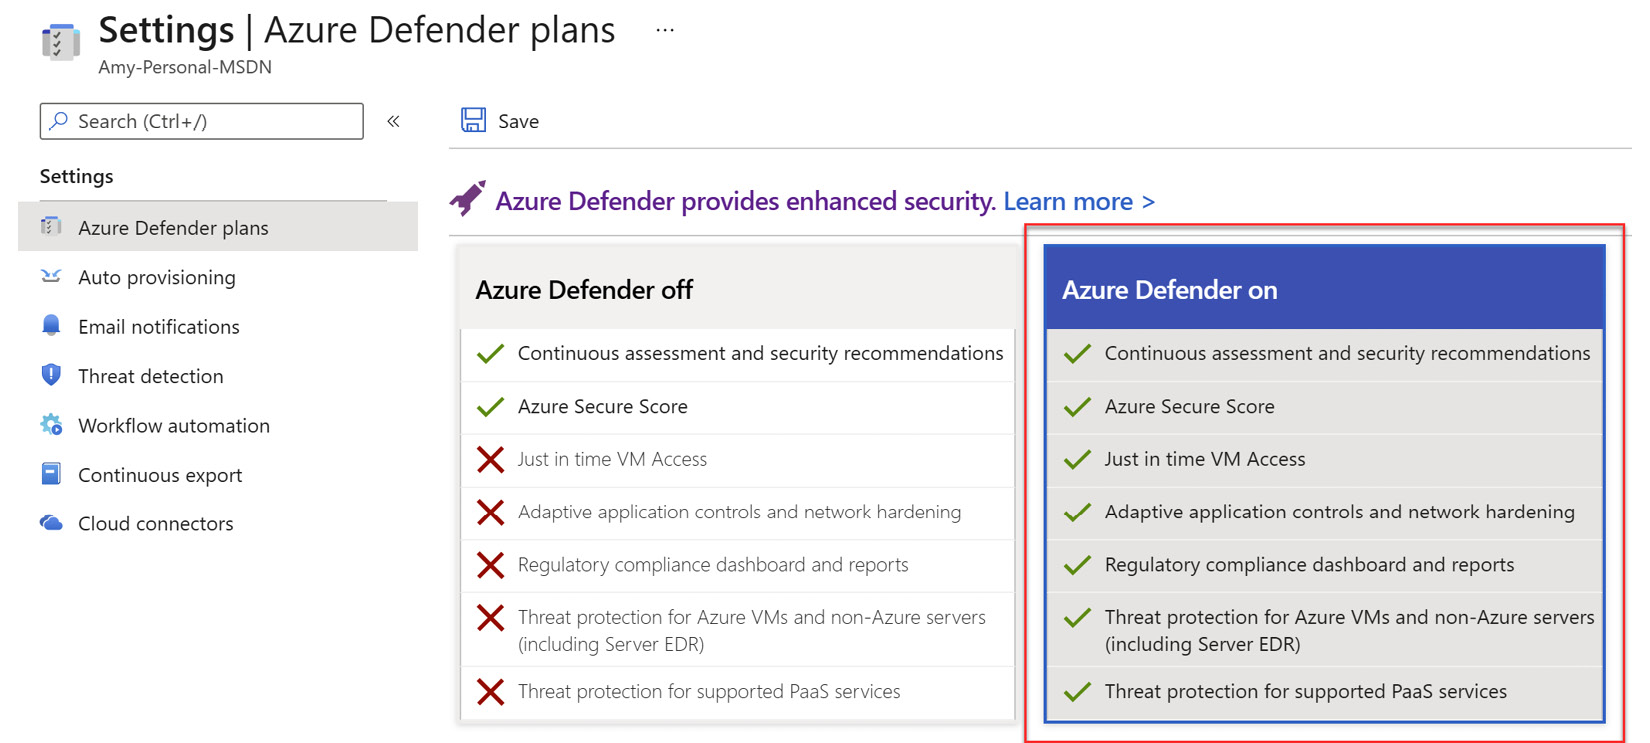
Figure 4.16 – Azure Defender plans
- Once Azure Defender is turned on, please enable protection for Servers, and SQL servers on machines is also turned on for your subscription as can be seen in Figure 4.7. It is recommended to enable protection for all services to secure all your current and future resources through Azure Security Center. Please click Save for the settings to take effect:
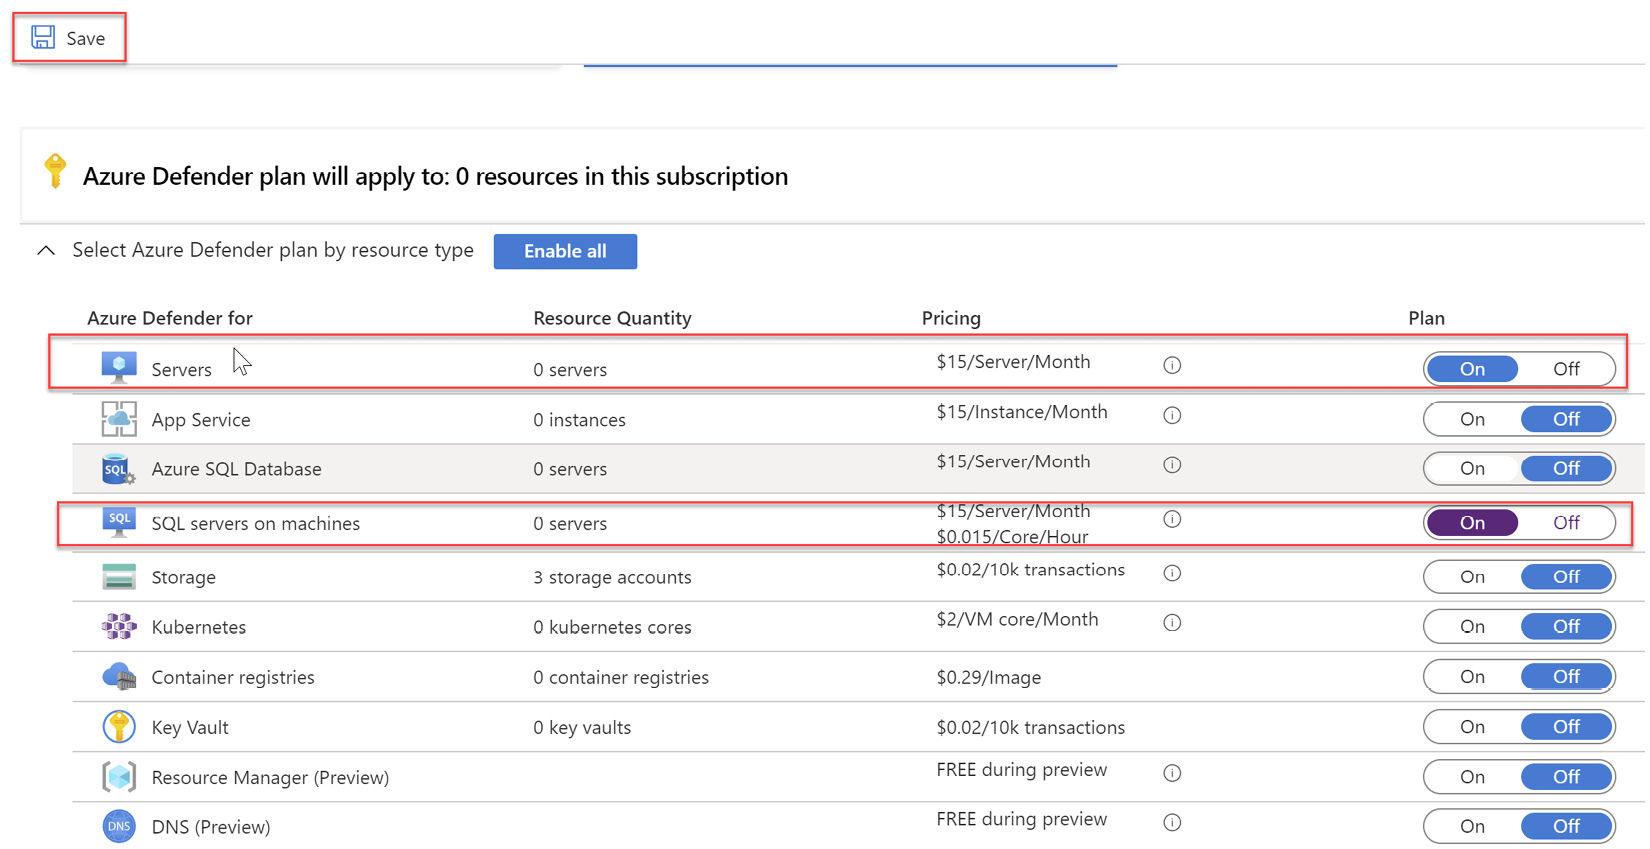
Figure 4.17 – Protection enabled for Servers and SQL servers on machines
- Now, please navigate back and select the Log Analytics workspace used for your Azure Arc enabled SQL Server monitoring and assessment. Please repeat the steps to turn on Defender at the Log Analytics level as well. Please save the settings for it to take effect as shown here:
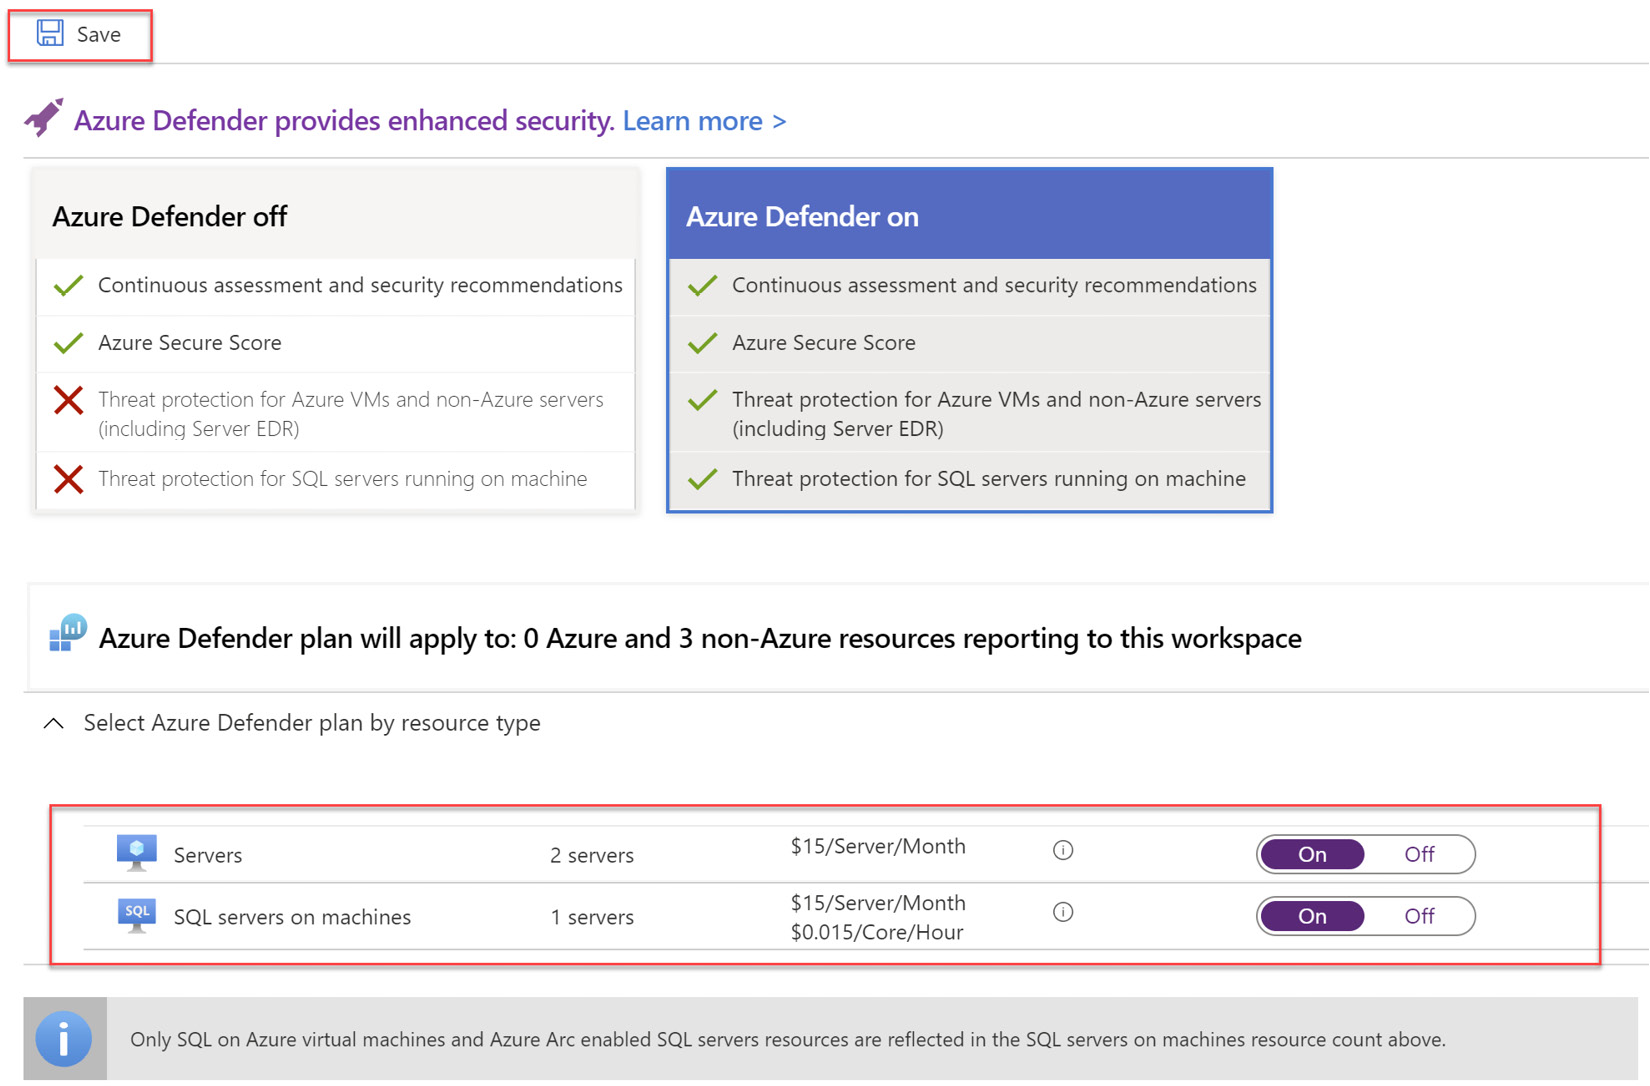
Figure 4.18 – Save protection settings
You have now enabled Azure Security Center protection for your Azure Arc enabled servers and SQL servers. It may take up to an hour for the Security Center to start showing the recommendations. Let's take a look at how it reflects in Azure Arc as follows:
- Log in to the Azure portal and navigate to SQL Servers - Azure Arc.
- Select your newly onboarded SQL Server and click on Security Center.
- This will show you Recommendations and Security incidents and alerts on this page, as you can see in Figure 4.19. You can also use Security Center to dig deep into recommendations and alerts:

Figure 4.19 – Security recommendations view for SQL Server
- If you do not see any recommendations here, please wait and try after some time. It may take up to an hour for the data to show up on this page. Optionally, you can also verify that your server is protected by navigating to Security Center | Inventory. Your server must be listed here.
Azure Security Center is a comprehensive tool for securing your SQL databases. In this section, you enabled Security Center for your Arc enabled databases.
Summary
In this chapter, we expanded our knowledge of Azure Arc enabled servers to include additional management capabilities for Microsoft SQL Server hosted on Windows or Linux machines running outside Azure. We looked at how we can onboard SQL servers running outside Azure with Azure Arc. We enabled the SQL health assessment for our on-prem databases and reviewed the recommendations. Later, we enabled advanced data security with Azure Security Center and looked at several recommendations provided by Azure Security Center.
The skills attained in this chapter will be useful in getting started with databases on the cloud while using your on-premises Database Administration (DBA) skills.
In the next chapter, we will continue with Azure Arc enabled data services and explore deploying and managing PostgreSQL databases through Azure Arc.