Chapter 15: Developing Solutions that Use Cosmos DB Storage
In the previous chapter, we covered the last part of the Implementing Solutions for Apps objective by learning how to implement authentication for web apps, APIs, and more.
In this chapter, we will be introducing the final objective: Implementing and Managing Data Platforms. We are going to cover what a NoSQL database is, learn about the features of Azure's NoSQL offering known as Cosmos DB, and then develop a solution that uses it.
We are also going to learn how to create, read, update, and delete data by using the appropriate APIs, how to set the appropriate consistency level for operations, understand the different partition schemes, and implement a multi-region replica of our database.
The following topics will be covered in this chapter:
- Understanding the differences between NoSQL and SQL
- Understanding Cosmos DB
- Creating, reading, updating, and deleting data by using the appropriate APIs
- Understanding partitioning schemes
- Setting the appropriate consistency level for operations
- Creating replicas
Let's get started!
Technical requirements
This chapter's examples will use Visual Studio 2019 (https://visualstudio.microsoft.com/vs/).
The source code for our sample application can be downloaded from https://github.com/PacktPublishing/Microsoft-Azure-Architect-Technologies-Exam-Guide-AZ-303/tree/master/Ch15.
Understanding the differences between NoSQL and SQL
Azure Cosmos DB is a NoSQL database, so to get the best value from Cosmos DB, we need to understand what NoSQL is and how it differs from traditional SQL databases.
SQL databases are built around the concept of tables, and within each table, you have rows of data split into cells. Each cell contains an individual piece of data within a record, and each row is an entire record.
A key difference from SQL databases is that the table and cell definition, known as the schema, must be defined before you can enter data into it. So, if you want to store a customer record containing a name and address, first, you need to create a table with each of the columns defined for each data type, such as the first name, address line, city, country, and so on.
Traditionally, SQL tables are built so that they're relational. This means that rather than having large records containing all the required information, you split the records into multiple tables and then join them as part of a query. For example, you could store core personal information such as a user's first and last name in one table, but their address details in another table, with a link in each record to join the related tables together.
In a similar fashion, data elements that need to be consistent across records, such as a Category, would be defined in a separate table, with a CategoryId link in the person record rather than the category itself.
The following screenshot shows an example of how this might look:

Figure 15.1 – Example relational table
Relational tables can also have one-to-many relationships – this means that rather than linking a single address record to a person, you can link multiple address records. They can be used to store separate addresses for billing and shipping, for example.
One of the benefits of a relational table is that any change that's made to a category name, for example, would automatically be reflected across all person records as they only store a link to the category ID, not the data itself.
NoSQL databases, as the name suggests, do not follow these patterns. NoSQL databases store data as JSON documents, which are hierarchical in structure. This means that related information, such as an address, can be stored alongside the main person record but is embedded as a child object, as opposed to being part of a flat structure. Embedding data can also be used for multiple related records; for example, multiple addresses can be stored within the main person record too.
With this in mind, a typical NoSQL JSON document might look like this:
{
"id": "001",
"firstName": "Brett",
"surname": "Hargreaves",
"category": "Active",
"addresses": [
{
"type": "billing",
"street": "999 Letsbe Avenue",
"city": "London"
},
{
"type": "shipping",
"street": "20 Docklands Road",
"city": "London"
}
]
}
For certain scenarios, NoSQL databases can perform much faster than their SQL counterparts. However, one of the biggest benefits is that you can easily mix the records of completely different schemas.
For example, a container, which is synonymous to a table, might contain the following records – and this would be perfectly valid:
[
{
"id": "001",
"firstName": "Brett",
"Surname": "Hargreaves",
"category": "Active",
},
{
"id": "002",
"firstName": "Sjoukje",
"Surname": "Zaal",
"profession": "CTO",
},
{
"id": "003",
"title": "Microsoft Azure Architect Technologies: Exam Guide AZ303",
"publisher": "Packt Publishing",
}
]
Now that you have an understanding of NoSQL, we will investigate Azure's implementation of a NoSQL database – Cosmos DB.
Understanding Cosmos DB
Cosmos DB storage is the premium offering for Azure Table storage. It's a multi-model and globally distributed database service that is designed to horizontally scale and replicate your data to any number of Azure regions. By replicating and scaling the data, Cosmos DB can guarantee low latency, high availability, and high performance anywhere in the world. You can replicate or scale data easily inside the Azure portal by selecting from the available regions on the map.
This high availability and low latency makes Cosmos DB most suitable for mobile applications, games, and applications that need to be globally distributed. The Azure portal also uses Cosmos DB for data storage. Cosmos DB is completely schemaless, and you can use a number of existing APIs with available SDKs to communicate with it. So, if you are using a specific API for your data and you want to move your data to Cosmos DB, all you need to do is change the connection string inside your application and the data will be stored in Cosmos DB automatically.
Cosmos DB offers the following key benefits:
- Turnkey global distribution: With Cosmos DB, you can build highly responsive and highly available applications that scale globally. All data is transparently replicated to the regions where your users are, which means they can interact with a replica of the data that is closest to them. Azure regions can easily be added and removed. Data will then seamlessly replicate to the selected regions without any downtime of the application.
- Always on: Cosmos DB provides a SLA with 99.99% high availability for both reads and writes. To ensure that your application is designed to fail over in case of regional disasters, Cosmos DB allows you to invoke regional failover using the Azure portal, or programmatically.
- Worldwide elastic scalability of throughput and storage: Elastic scalability to both reads and writes is offered by Cosmos DB. By using a single API call, you can elastically scale up from thousands to hundreds of millions of requests per second around the globe, and you only pay for the throughput and storage you need.
- No schema or index management: With Cosmos DB, you don't have to deal with schema or index management, which is a painful process for globally distributed apps. Without schema and index management, there is also no downtime for applications while migrating schemas. Cosmos DB automatically indexes all data and serves queries fast.
- Secured by default: All the data in Cosmos DB is encrypted at rest and in motion. Cosmos DB also provides row-level authorization.
Cosmos DB supports the following APIs for storing and interacting with your data:
- SQL API: With the SQL API, you can use SQL queries as a JSON query language against the dataset inside Cosmos DB. Because Cosmos DB is schemaless, it provides autoindexing of the JSON documents. Data is stored on SSD drives for low latency and is lock-free, so you can create real-time queries for your data. Cosmos DB also supports writing stored procedures, triggers, and user-defined functions (UDFs) in JavaScript, and it supports Atomicity, Consistency, Isolation, Durability (ACID) transactions inside a collection.
- MongoDB API: MongoDB is an open source document database that provides high performance, high availability, and automatic scaling by default. Using it inside Cosmos DB provides automatic sharding, indexing, replication, and encryption of your data on top of this. MongoDB also provides an aggregation pipeline that can be used to filter and transform the data in multiple stages. It also supports creating a full-text index, and you can integrate it easily with Azure Search and other Azure services as well.
- Gremlin (Graph) API: The Gremlin API is part of the Apache TinkerPop project, which is an open source graph computing framework. A graph is a way of storing objects (nodes) based on relationships. Each object can have multiple relationships with other objects. You can interact with the data using JavaScript.
- Table API: The Azure Table API can be used for applications that have been written for using Azure Table storage but need the additional Cosmos DB features, such as global distribution, automatic indexing, low latency, and high throughput.
- Cassandra API: The Cassandra API can be used for applications that have been written for Apache Cassandra. Apache Cassandra is an open source distributed NoSQL database that offers scalability and high availability. Cosmos DB offers no operations management, SLA, and automatic indexing on top of this.
In the future, new APIs will be added to Cosmos DB as well.
In the next section, we are going to create, read, update, and delete data using the appropriate APIs.
Creating, reading, updating, and deleting data using the appropriate APIs
Before we can create, read, update, and delete data using the APIs, first, we need to create a Cosmos DB in Azure. We will do this in the following subsection.
Creating a Cosmos DB
You can create a Cosmos DB using the Azure portal, PowerShell, the CLI, or ARM templates. In this demonstration, we are going to create a Cosmos DB server, database, and container from the Azure portal. To do this, perform the following steps:
- Navigate to the Azure portal by going to https://portal.azure.com.
- Click Create a resource, type Azure Cosmos DB into the search bar, and create a new database server.
- Add the following values:
a) Subscription: Pick a subscription.
b) Resource group: Create a new one and call it PacktCosmosResourceGroup.
c) Account name: packtsqlapi.
d) API: Core (SQL).
e) Notebooks (preview): Off.
f) Location: East US.
g) Capacity mode: Provisioned throughput.
h) Apply Free Tier Discount: Apply (this is only available for one Cosmos DB per subscription).
i) Account Type: Non-Production.
j) Geo-Redundancy: Disable.
k) Multi-region Writes: Disable.
- Click Review + create and then Create.
- Once the deployment has finished, open the resource. Quickstart is automatically opened and is where you can let Azure automatically create a database and a container, and then download a sample app in the language of your choice:

Figure 15.2 – Creating a sample application directly from the Azure portal
- You can also create your database and container using the Data Explorer. Click Data Explorer in the left menu. From the top menu, click New container. In the Add container blade, add the following values:
a) Database id: PacktToDoList
b) Throughput: 400 (provisioning the throughput at the database level means the throughput will be shared across all containers)
c) Container id: Items
d) Partition Key: /category
- Click OK.
In this demonstration, we created a database server, a database, and a container from the Azure portal. In the next section, we are going to create an application that creates a database and container programmatically. Then, we will create, read, update, and delete data using the Cosmos DB APIs.
Creating the sample application
In this second part of the demonstration, we are going to create the sample application. For this, we are going to create a new console application in Visual Studio 2019. First, we will connect to our Cosmos DB account.
Connecting to our Cosmos DB account
The first step is to connect to the Cosmos DB account that we created in the previous section, as follows:
- Open Visual Studio and create a new Console App (.NET) project.
- Name the project PacktCosmosApp.
- Right-click your project in the Solution Explorer window and select Manage NuGet packages.
- Select Browse, search for Microsoft.Azure.Cosmos, and install the package.
- Open Program.cs and replace the references with the following:
using System;
using System.Threading.Tasks;
using System.Configuration;
using System.Collections.Generic;
using System.Net;
using Microsoft.Azure.Cosmos;
- Add the following variables to the Program.cs method:
// Azure Cosmos DB endpoint.
private static readonly string EndpointUri = "<your endpoint here>";
// Primary key for the Azure Cosmos account.
private static readonly string PrimaryKey = "<your primary key>";
// The Cosmos client instance
private CosmosClient cosmosClient;
// The database we will create
private Database database;
// The container we will create.
private Container container;
// The name of the database and container we will create
private string databaseId = "FamilyDatabase";
private string containerId = "FamilyContainer";
- Now, go back to the Azure portal. Navigate to the Cosmos DB that we created in the previous step and under Settings, select Keys. Copy both keys:
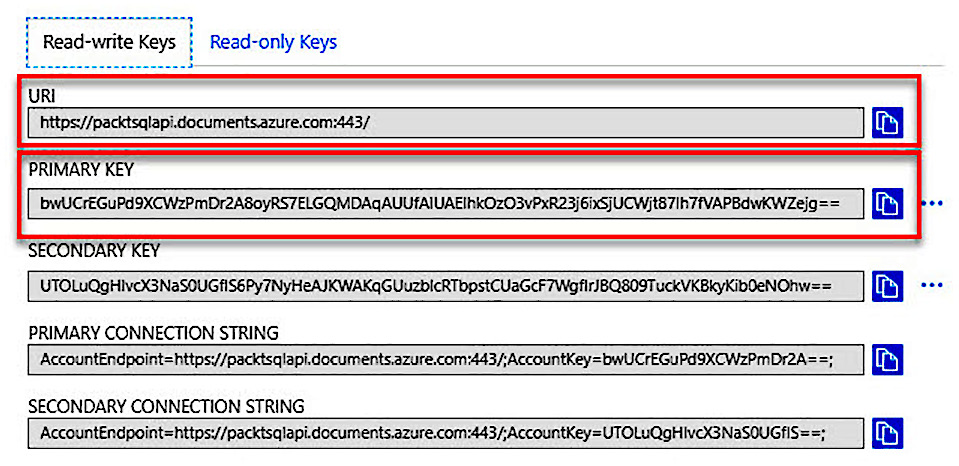
Figure 15.3 – Cosmos DB keys
- In Program.cs, replace <your endpoint here> with the URI that you copied. Then, replace <your primary key> with the primary key you just copied.
Replace the Main() method with the following:
public static async Task Main(string[] args)
{
}
- Below the Main method, add a new asynchronous task called GetStartedDemoAsync, which instantiates our new CosmosClient. We use GetStartedDemoAsync as the entry point that calls methods that operate on Azure Cosmos DB resources:
public async Task GetStartedDemoAsync()
{
// Create a new instance of the Cosmos Client
this.cosmosClient = new CosmosClient(EndpointUri, PrimaryKey);
}
- Add the following code to run the GetStartedDemoAsync synchronous task from your Main method:
public static async Task Main(string[] args)
{
try
{
Console.WriteLine("Beginning operations... ");
Program p = new Program();
await p.GetStartedDemoAsync();
}
catch (CosmosException de)
{
Exception baseException = de.GetBaseException();
Console.WriteLine("{0} error occurred: {1}", de.StatusCode, de);
}
catch (Exception e)
{
Console.WriteLine("Error: {0}", e);
}
finally
{
Console.WriteLine("End of demo, press any key to exit.");
Console.ReadKey();
}
}
Now, if you run the application, the console will display a message stating End of demo, press any key to exit. This means that the application has successfully connected to the Cosmos DB account.
Now that we've successfully connected to the Cosmos DB account, we can create a new database.
Creating a new database
To create a new database, perform the following steps:
- Now, we can create a database. Copy and paste the CreateDatabaseAsync method below your GetStartedDemoAsync method:
private async Task CreateDatabaseAsync()
{
// Create a new database
this.database = await this.cosmosClient.CreateDatabaseIfNotExistsAsync(databaseId);
Console.WriteLine("Created Database: {0} ", this.database.Id);
}
- In the GetStartedDemoAsync method, add the line of code for calling the CreateDatabaseAsync method. The method will now look as follows:
public async Task GetStartedDemoAsync()
{
// Create a new instance of the Cosmos Client
this.cosmosClient = new CosmosClient(EndpointUri, PrimaryKey);
//ADD THIS PART TO YOUR CODE
await this.CreateDatabaseAsync();
}
- Run the application. You will see that the database has been created.
In the next section, we will create the container.
Creating a container
To create the container, do the following:
- Copy and paste the CreateContainerAsync method below your CreateDatabaseAsync method. CreateContainerAsync will create a new container with the FamilyContainer ID, if it doesn't already exist, by using the ID specified in the containerId field that's been partitioned by the LastName property:
private async Task CreateContainerAsync()
{
// Create a new container
this.container = await this.database.CreateContainerIfNotExistsAsync(containerId, "/LastName");
Console.WriteLine("Created Container: {0} ", this.container.Id);
}
- In the GetStartedDemoAsync method, add the line of code for calling the CreateContainerAsync method. The method will now look as follows:
public async Task GetStartedDemoAsync()
{
// Create a new instance of the Cosmos Client
this.cosmosClient = new CosmosClient(EndpointUri, PrimaryKey);
await this.CreateDatabaseAsync();
//ADD THIS PART TO YOUR CODE
await this.CreateContainerAsync();
}
- You can now run the application again. You will see that the container has been created.
In the next section, we are going to add items to the container.
Adding items to the container
In this section, we are going to add items to the container using the API. First, we need to create a Family class that represents the objects that we are going to store in the container. You can create an item using the CreateItemAsync method. When you use the SQL API, items are created and stored as documents. These documents are user-defined arbitrary JSON content. You can then insert an item into your Azure Cosmos container.
Besides the Family class, we will also add some subclasses, such as Parent, Child, Pet, and Address, which are used in the Family class. To do this, perform the following steps:
- Add a new class to the project and call it Family.cs:
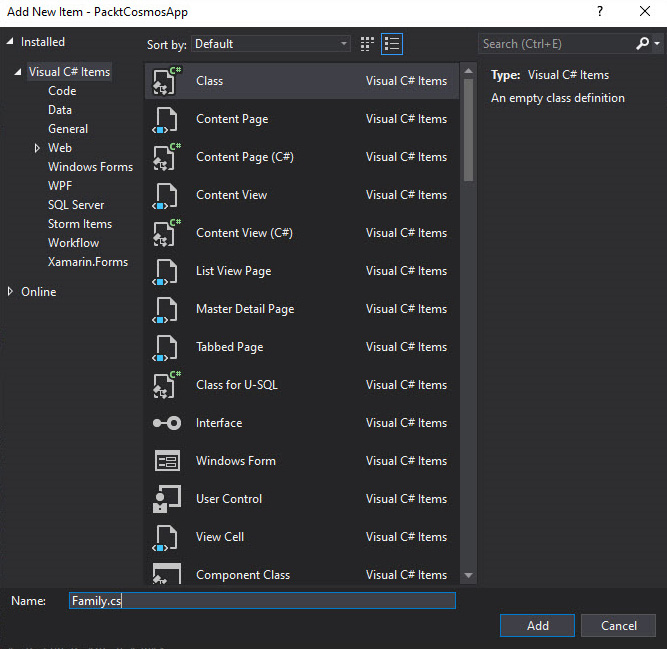
Figure 15.4 – Creating a new class
- Click Add.
- Replace the references with the following (you should be prompted to install the NuGet package for this; if not, open the NuGet package manager and add it manually):
using Newtonsoft.Json;
- Then, add the following code to create the Family class:
public class Family
{
[JsonProperty(PropertyName = "id")]
public string Id { get; set; }
public string LastName { get; set; }
public Parent[] Parents { get; set; }
public Child[] Children { get; set; }
public Address Address { get; set; }
public bool IsRegistered { get; set; }
public override string ToString()
{
return JsonConvert.SerializeObject(this);
}
}
- Now, we can create the Parent class below the Family class:
public class Parent
{
public string FamilyName { get; set; }
public string FirstName { get; set; }
}
- Next, create the Child class below the Parent class:
public class Child
{
public string FamilyName { get; set; }
public string FirstName { get; set; }
public string Gender { get; set; }
public int Grade { get; set; }
public Pet[] Pets { get; set; }
}
- Next, create the Pet class below the Child class:
public class Pet
{
public string GivenName { get; set; }
}
- Lastly, create the Address class below the Pet class:
public class Address
{
public string State { get; set; }
public string County { get; set; }
public string City { get; set; }
}
- In Program.cs, add the AddItemsToContainerAsync method after your CreateContainerAsync method and create the first Family item:
private async Task AddItemsToContainerAsync()
{
// Create a family object for the Zaal family
Family ZaalFamily = new Family
{
Id = "Zaal.1",
LastName = "Zaal",
Parents = new Parent[]
{
new Parent { FirstName = "Thomas" },
new Parent { FirstName = "Sjoukje" }
},
Children = new Child[]
{
new Child
{
FirstName = "Molly",
Gender = "female",
Grade = 5,
Pets = new Pet[]
{
new Pet { GivenName = "Fluffy" }
}
}
},
Address = new Address { State = "WA", County = "King", City = "Seattle" },
IsRegistered = false
};
- Then, below item, add the code for adding item to container:
try
{
// Read the item to see if it exists.
ItemResponse<Family> zaalFamilyResponse = await this.container.ReadItemAsync<Family>(ZaalFamily.Id, new PartitionKey(ZaalFamily.LastName));
Console.WriteLine("Item in database with id: {0} already exists ", zaalFamilyResponse.Resource.Id);
}
catch (CosmosException ex) when (ex.StatusCode == HttpStatusCode.NotFound)
{
// Create an item in the container representing the Zaal family. Note we provide the value of the partition key for this item, which is "Zaal"
ItemResponse<Family> zaalFamilyResponse = await this.container.CreateItemAsync<Family>(ZaalFamily, new PartitionKey(ZaalFamily.LastName));
// Note that after creating the item, we can access the body of the item with the Resource property off the ItemResponse. We can also access the RequestCharge property to see the amount of RUs consumed on this request.
Console.WriteLine("Created item in database with id: {0} Operation consumed {1} RUs. ", zaalFamilyResponse.Resource.Id, zaalFamilyResponse.RequestCharge);
}
- For the second Family item, underneath the previous code (in the same method), add the following:
// Create a family object for the PacktPub family
Family PacktPubFamily = new Family
{
Id = "PacktPub.1",
LastName = "PacktPub",
Parents = new Parent[]
{
new Parent { FamilyName = "PacktPub", FirstName = "Robin" },
new Parent { FamilyName = "Zaal", FirstName = "Sjoukje" }
},
- Add children to Family:
Children = new Child[]
{
new Child
{
FamilyName = "Merriam",
FirstName = "Jesse",
Gender = "female",
Grade = 8,
Pets = new Pet[]
{
new Pet { GivenName = "Goofy" },
new Pet { GivenName = "Shadow" }
}
},
new Child
{
FamilyName = "Miller",
FirstName = "Lisa",
Gender = "female",
Grade = 1
}
},
Address = new Address { State = "NY", County = "Manhattan", City = "NY" },
IsRegistered = true
};
- Then, below item, add the code for adding item to container again:
try
{
// Read the item to see if it exists
ItemResponse<Family> packtPubFamilyResponse = await this.container.ReadItemAsync<Family>(PacktPubFamily.Id, new PartitionKey(PacktPubFamily.LastName));
Console.WriteLine("Item in database with id: {0} already exists ", packtPubFamilyResponse.Resource.Id);
}
catch (CosmosException ex) when (ex.StatusCode == HttpStatusCode.NotFound)
{
// Create an item in the container representing the Wakefield family. Note we provide the value of the partition key for this item, which is "PacktPub"
ItemResponse<Family> packtPubFamilyResponse = await this.container.CreateItemAsync<Family>(PacktPubFamily, new PartitionKey(PacktPubFamily.LastName));
// Note that after creating the item, we can access the body of the item with the Resource property off the ItemResponse. We can also access the RequestCharge property to see the amount of RUs consumed on this request.
Console.WriteLine("Created item in database with id: {0} Operation consumed {1} RUs. ", packtPubFamilyResponse.Resource.Id, packtPubFamilyResponse.RequestCharge);
}
- Finally, we need to call AddItemsToContainerAsync in the GetStartedDemoAsync method again:
public async Task GetStartedDemoAsync()
{
// Create a new instance of the Cosmos Client
this.cosmosClient = new CosmosClient(EndpointUri, PrimaryKey);
await this.CreateDatabaseAsync();
await this.CreateContainerAsync();
//ADD THIS PART TO YOUR CODE
await this.AddItemsToContainerAsync();
}
- Now, run the application again. The items will be added to the container.
In this section, we added some items to the container. In the next section, we will query the resources.
Querying Azure Cosmos DB resources
In this part of the demonstration, we are going to query the resources. Azure Cosmos DB supports rich queries against JSON documents stored in each container. The following code will show you how to run a query against the items that we stored in the container in the previous section.
To do this, perform the following steps:
- Copy and paste the QueryItemsAsync method after your AddItemsToContainerAsync method:
private async Task QueryItemsAsync()
{
var sqlQueryText = "SELECT * FROM c WHERE c.LastName = 'Zaal'";
Console.WriteLine("Running query: {0} ", sqlQueryText);
QueryDefinition queryDefinition = new QueryDefinition(sqlQueryText);
FeedIterator<Family> queryResultSetIterator = this.container.GetItemQueryIterator<Family>(queryDefinition);
List<Family> families = new List<Family>();
while (queryResultSetIterator.HasMoreResults)
{
FeedResponse<Family> currentResultSet = await queryResultSetIterator.ReadNextAsync();
foreach (Family family in currentResultSet)
{
families.Add(family);
Console.WriteLine(" Read {0} ", family);
}
}
}
- Add a call to QueryItemsAsync in the GetStartedDemoAsync method:
public async Task GetStartedDemoAsync()
{
// Create a new instance of the Cosmos Client
this.cosmosClient = new CosmosClient(EndpointUri, PrimaryKey);
await this.CreateDatabaseAsync();
await this.CreateContainerAsync();
await this.AddItemsToContainerAsync();
//ADD THIS PART TO YOUR CODE
await this.QueryItemsAsync();
}
- Run the application; you will see the query results displayed in the console.
With that, we have created a query to retrieve the data from the container. In the next section, we are going to update a Family item.
Updating a JSON item
In this part of the demonstration, we are going to update a Family item. To do this, add the following code:
- Copy and paste the ReplaceFamilyItemAsync method after your QueryItemsAsync method:
private async Task ReplaceFamilyItemAsync()
{
ItemResponse<Family> PacktPubFamilyResponse = await this.container.ReadItemAsync<Family>("PacktPub.1", new PartitionKey("PacktPub"));
var itemBody = PacktPubFamilyResponse.Resource;
// update registration status from false to true
itemBody.IsRegistered = true;
// update grade of child
itemBody.Children[0].Grade = 6;
// replace the item with the updated content
PacktPubFamilyResponse = await this.container.ReplaceItemAsync<Family>(itemBody, itemBody.Id, new PartitionKey(itemBody.LastName));
Console.WriteLine("Updated Family [{0},{1}]. Body is now: {2} ", itemBody.LastName, itemBody.Id, PacktPubFamilyResponse.Resource);
}
- Then, add a call to ReplaceFamilyItemAsync in the GetStartedDemoAsync method:
public async Task GetStartedDemoAsync()
{
// Create a new instance of the Cosmos Client
this.cosmosClient = new CosmosClient(EndpointUri, PrimaryKey);
await this.CreateDatabaseAsync();
await this.CreateContainerAsync();
await this.AddItemsToContainerAsync();
await this.QueryItemsAsync();
//ADD THIS PART TO YOUR CODE
await this.ReplaceFamilyItemAsync();
}
- Run the application; you will see that the Family item is being updated.
In this part of the demonstration, we updated an item in the container. In the next section, we will delete an item from the container.
Deleting an item
To delete a Family item, perform the following steps:
- Add the DeleteFamilyItemAsync method after the ReplaceFamilyItemAsync method:
private async Task DeleteFamilyItemAsync()
{
var partitionKeyValue = "Zaal";
var familyId = "Zaal.1";
// Delete an item. Note we must provide the partition key value and id of the item to delete
_ = await this.container.DeleteItemAsync<Family>(familyId, new PartitionKey(partitionKeyValue));
Console.WriteLine("Deleted Family [{0},{1}] ", partitionKeyValue, familyId);
}
- Then, add a call to DeleteFamilyItemAsync in the GetStartedDemoAsync method:
public async Task GetStartedDemoAsync()
{
// Create a new instance of the Cosmos Client
this.cosmosClient = new CosmosClient(EndpointUri, PrimaryKey);
await this.CreateDatabaseAsync();
await this.CreateContainerAsync();
await this.AddItemsToContainerAsync();
await this.QueryItemsAsync();
await this.ReplaceFamilyItemAsync();
//ADD THIS PART TO YOUR CODE
await this.DeleteFamilyItemAsync();
}
- Run the application; you will see that the item has been deleted.
In this demonstration, we created a Cosmos DB server, database, and container. We also added data to the container, ran a query on the data, updated the data, and then deleted the data.
In the next section, we are going to cover partitioning schemes.
Understanding partitioning schemes
To meet the performance needs of your application, Azure Cosmos DB uses partitioning to scale individual containers in a database. Cosmos DB partitions in a way that the items are divided into distinct subsets called logical partitions. These are formed based on the value of the partition key that is added to each item in the container. All of the items that are in a logical partition have the same partition key. Each item in a container has an item ID (which is unique within the logical partition). To create the item's index, the partition key and the item ID are combined. This uniquely identifies the item.
Tip
If you look at our sample application from the previous section, you will see that the partition key and item ID have been combined.
Besides logical partitions, Azure Cosmos DB also has physical partitions:
- Logical partitions: A set of items that have the same partition key is called a logical partition. For instance, if you have a container that stores items that all contain a Product property, you can use this as the partition key. Logical partitions are then formed by groups that have the same values, such as Books, Videos, Movies, and Music. Containers are the fundamental units of scalability in Azure Cosmos DB. Data that is added to the container, together with the throughput (see the next section) that is provisioned on the container, is automatically (horizontally) partitioned across a set of logical partitions based on the partition key.
- Physical partitions: Internally, one or more logical partitions are mapped to a physical partition. This partition consists of a set of replicas, also called a replica set. Each replica set is hosting an instance of the Azure Cosmos DB engine. It makes the data that is stored inside the physical partition highly available, consistent, and durable. The maximum amount of request units (RUs) and storage is supported by the physical partition.
The following chart shows how logical partitions are mapped to physical partitions that are distributed globally over multiple regions:
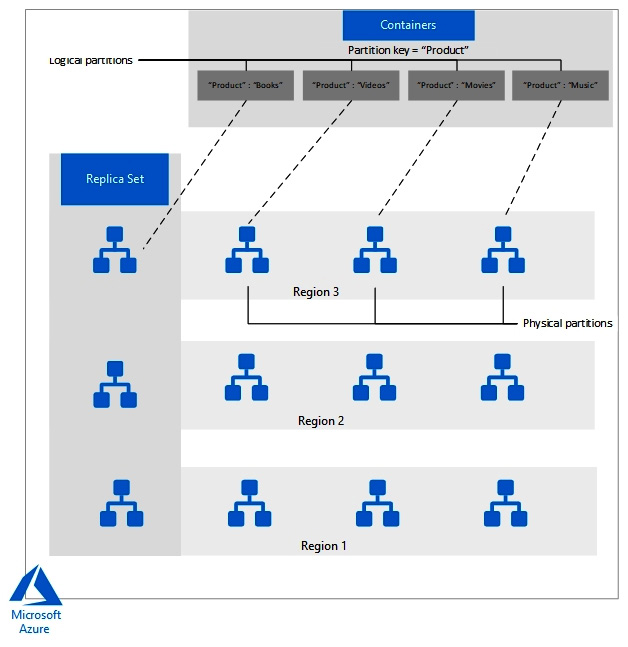
Figure 15.5 – Partitioning in Azure Cosmos DB
In the next section, we are going to cover how to set the appropriate consistency level for operations.
Setting the appropriate consistency level for operations
When you use distributed databases that rely on high availability and low latency, you can choose between two different extreme consistency models: strong consistency and eventual consistency. The former is the standard for data programmability, but this will result in reduced availability during failures and higher latency. The latter offers higher availability and better performance, but makes it much harder to program applications.
Azure Cosmos DB offers more choices between the two extreme consistency models. Strong consistency and eventual consistency are at two different ends of the spectrum. This can help developers make a more precise choice with respect to high availability and performance. Azure Cosmos DB offers five consistency models, known as strong, bounded staleness, session, consistent prefix, and eventual consistency:
- Strong: Strong consistency is the easiest model to understand. The most recent committed version of an item is returned when the data is read. A partial or uncommitted write is never returned to the client. This will give a lot of overhead because every instance needs to be updated with the latest version of the data, which has a huge price in terms of the latency and throughput of the data.
- Bounded staleness: This is a compromise that trades delays for strong consistency. This model doesn't guarantee that all the observers have the same data at the same time. Instead, it allows a lag of 5 seconds (100 operations).
- Session: This is the default level for newly created databases and collections. It is half as expensive as strong consistency and it offers good performance and availability. It ensures that everything that is written in the current session is also available for reading. Anything else will be accurate, but delayed.
- Consistent prefix: With this level, updates that are returned contain accurate data for a certain point in time, but won't necessarily be current.
- Eventual: There's no ordering guarantee for how long it will take to synchronise (like the consistent prefix) and the updates aren't guaranteed to come in order. When there are no further writes, the replicas will eventually be updated.
Tip
For more information on how to choose the right consistency level for the different APIs that Azure Cosmos DB has to offer, please refer to the article at https://docs.microsoft.com/en-us/azure/cosmos-db/consistency-levels-choosing.
The key lesson from this section is that you can control how fast data is replicated around all regions to best support your application requirements. In the next and final section, we will learn how to implement and place our database replicas.
Creating replicas
Azure Cosmos DB is a globally distributed database, and it works by placing replicas of your data in the regions where you need them. In the previous section, we learned how to control the consistency of those replicas. In this section, we will create a replica of our database and set that consistency level. Follow these steps:
- Navigate to the Azure portal by going to https://portal.azure.com.
- In the search bar, search for and then select Cosmos DB.
- Select the Cosmos DB instance you created.
- On the left-hand menu, under Settings, click Replicate Globally.
- On the right, under Configure regions, set Multi-region writes to Enable.
- On the right, under Configure regions, click + Add Region, as shown in the following screenshot:

Figure 15.6 – Adding Cosmos DB replication regions
- A drop-down list will appear under the regions. Here, select West US.
- Click OK.
- West UK will now appear under the regions list. Click Save at the top of the screen.
The replication process may take some time to complete. When it does, you will be able to see your new replica on the map in a darker colored pin. By default, the replica will use Session Consistency. To change this, perform the following steps:
- Still in the Cosmos DB blade, from the left-hand menu, click Default Consistency.
- Along the top, you will see the five different consistency options. Select a new option; for example, Strong.
- For each option, you will see an animation showing the differences between them. With Strong, all regions are consistent at the same time.
- Click Eventual. The animation will change to show that some regions take longer to become consistent. Once you have selected your preferred option, click Save.
The following screenshot shows an example of this:
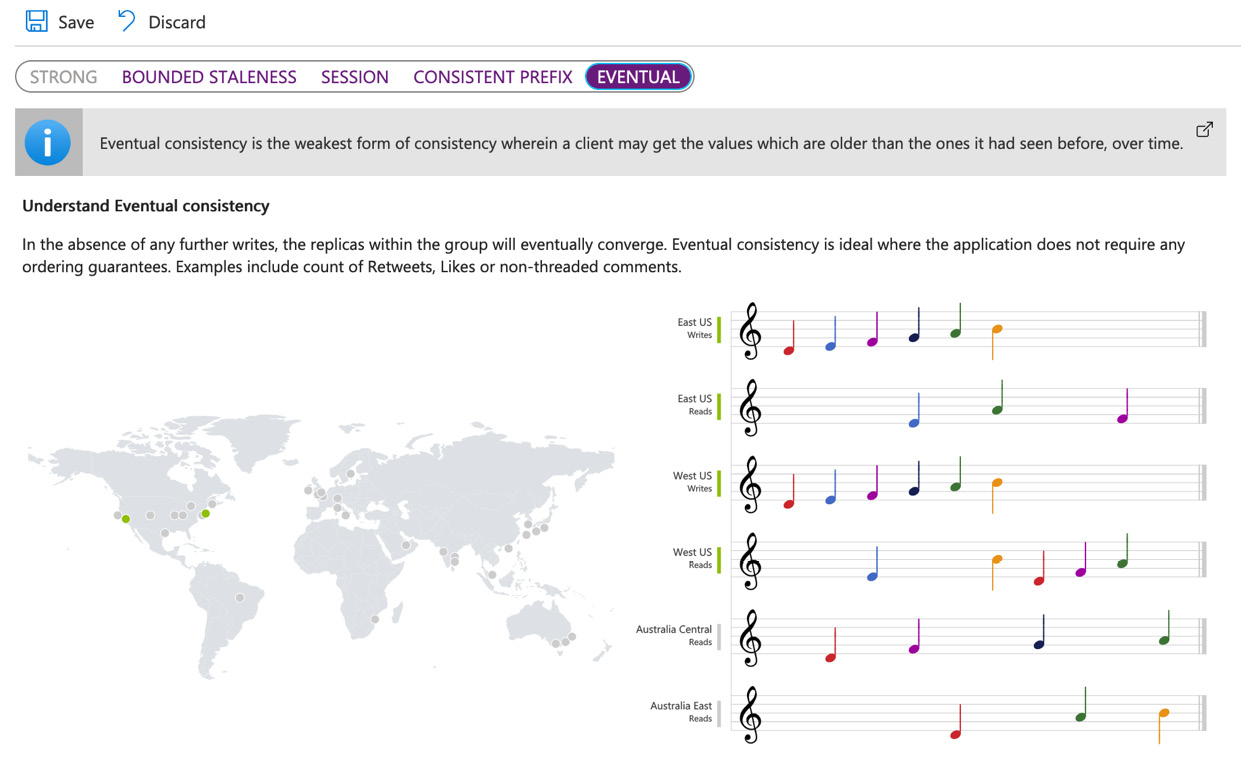
Figure 15.7 – Replica consistency
As we have seen, Cosmos DB is a powerful, fully managed, and fully resilient NoSQL option that provides many options that can be uniquely tailored to your requirements.
Summary
In this chapter, we've learned about Azure's NoSQL offering, known as Cosmos DB, what the differences are between SQL and NoSQL, and how to build a simple solution.
We then covered how to use the different APIs from Visual Studio to create databases, containers, data, and more. We also covered the partition schemes and the different consistency levels that are provided for Azure Cosmos DB.
Finally, we walked through enabling a multi-region replication and configuring its consistency.
In the next chapter, we will continue with this objective by learning how to develop solutions that use a relational database.
Questions
Answer the following questions to test your knowledge of the information in this chapter. You can find the answers in the Assessments section at the end of this book:
- You can only create a Cosmos DB using the Azure portal, PowerShell, or the CLI.
a) True
b) False
- Azure Cosmos DB offers two different consistency models.
a) True
b) False
- A horizontal partition is used to distribute the data over different Azure Cosmos DB instances.
a) True
b) False
Further reading
Check out the following links for more information about the topics that were covered in this chapter:
- Azure Cosmos DB documentation: https://docs.microsoft.com/en-us/azure/cosmos-db/
- Getting started with SQL queries: https://docs.microsoft.com/en-us/azure/cosmos-db/sql-query-getting-started
- Request Units in Azure Cosmos DB: https://docs.microsoft.com/en-us/azure/cosmos-db/request-units
- Getting Behind the 9-Ball: Cosmos DB Consistency Levels Explained: https:// blog.jeremylikness.com/blog/2018-03-23_getting-behind-the-9ball-cosmosdb-consistency-levels/