
With the use of caching, we allow NetScaler to store frequently accessed objects in its cache area, which uses the RAM of the appliance as storage. Note that the MPX utilizes the SSD drive as the cache drive. This allows NetScaler to serve clients directly without requiring a trip to the backend servers. This offloads the backend servers and improves the overall performance of the services.
Now, caching is not something new; it is used everywhere. Most of the common web browsers have some sort of a local cache; many of the ISP vendors also have some sort of caching involved for frequently accessed services. Also, it is important to note that this feature requires a license in place, either a NetScaler Platinum license, or an add-on to Enterprise. Note that the caching feature is available only when using the HTTP protocol, and it can cache the following two types of data content:
Before we process any configuration, we first need to enable the caching feature. This can either be done via the GUI by right-clicking on Integrated Caching under Optimization and enabling this feature, or by using the following CLI command:
Enable ns feature IC
Before we do any other configuration, we also need to define some of the global settings for caching. This can be done under Optimization | Integrated Caching | Change Cache Settings. After we have enabled integrated caching, the default value for memory usage limit is set to 0, which means that NetScaler will not cache anything. Therefore, we need to put a value here. The maximum value that we can set is half of the memory available on the appliance. After we have put a value here, we can leave the rest of the settings at their default values and continue with the creation of a policy.
The caching feature consists of the following:
- A policy
- An action
- A content group
In the policy, we define an expression (rule) that needs to be evaluated, and then an action that defines what to do with the data defined in the rule, for example, to cache the objects or not. Then, we need to define a content group. This is where NetScaler is going to store the cached data for the objects.
As an example, let us set up a basic caching policy that caches PDF files. Then, we are going to bind that policy to a load-balanced service.
First, we need to create a content group. This can be done by going to Optimization | Integrated Caching | Content | Groups and clicking on Add. Here, we enter the name of the content group, for example, PDF group, define an expiration timer (60 seconds), then go into the Memory pane, and define that NetScaler does not have to cache if the file is over 5,000 KB. By adding these parameters, we allow cached content to live in the content group for 60 seconds before it expires, and then be removed from the content group. We also define that NetScaler is not going to cache objects larger than 5 MB. We can leave the rest of the settings at their default values.
If you wish to know more about the different parameters in the content group, you can view the eDocs article at http://support.citrix.com/proddocs/topic/ns-optimization-10-map/ns-IC-setbasiccntgrp-tsk.html.
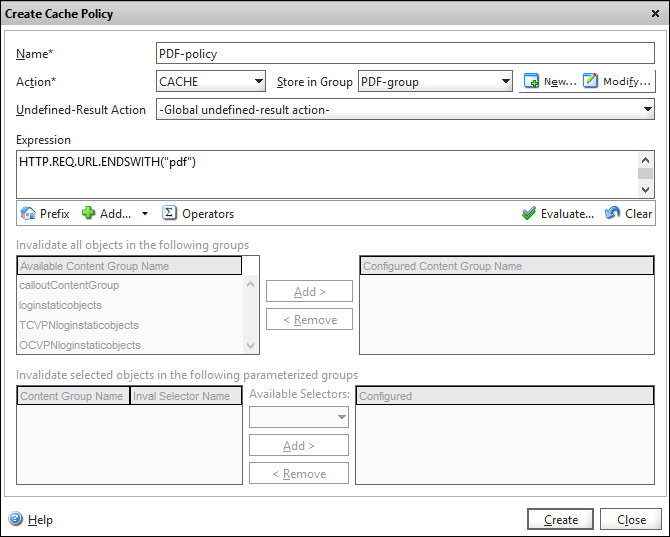
Now that we have created a content group, we can create a policy. Go to Policies and click on Add. Now, we need to define an expression that only includes PDF files, attach an action, and configure where NetScaler is going to store the files. Give the policy a name, choose CACHE as the action, change Store in Group, and choose the content group that was created earlier.
In the Expressions field, type the expression HTTP.REQ.URL.ENDSWITH("pdf"). This expression allows NetScaler to cache all objects where the URL ends with pdf. We could also use the HTTP.REQ.URL.CONTAINS("pdf") expression if we had pages containing links to PDF reports.
If you wish to combine multiple expressions in a policy, you can see the example at http://support.citrix.com/proddocs/topic/ns-optimization-10-map/ns-IC-configcacheobjectandstats-tsk.html. After we have added the expression, the window looks like the following screenshot:
Lastly, click on Create. Now that we have created the policy, we have to bind it to the vServer for which we want caching enabled. Go to the Integrated Caching menu and open Cache Policy Manager. Go to LB Virtual Server and choose the load-balanced vServer we wish to bind it to. Then, click on Insert Policy and choose the newly created policy. Click on Apply Changes and close the window.
We have now created a caching policy and attached it to a vServer, which has a PDF document available. When the first client connects to the vServer and tries to get the content, NetScaler will place it in the cache.
This can be viewed under Integrated Caching | Statistics, as shown in the following screenshot:

As it is the first connection, we will see a miss and one cached object. If we go to Integrated Caching | View Cache Objects, we can see what data is stored in the cache. We can also see that the PDF file is stored in the content group we defined earlier, as shown in the following screenshot:

As we can see from the statistics, when a new client connects, it will be served from the cache directly.

A new client will be allowed to get data from the cache as long as the content it is trying to access has not expired. If we open an object from within View Cache Objects, we can see how much time an object has before it gets expired.
After we have created a caching policy, there are some settings we can do in order to fine-tune the configuration and improve the performance of this feature.
One problem with caching is when multiple users try to access the same data simultaneously and NetScaler is not finished with downloading the object into the cache. This leaves the cache in a state where multiple users are directed to the backend servers instead of the cache.
There are some changes we need to make to ensure that clients do not bypass the cache. They are explained as follows:
- Prefetch: This allows NetScaler to refresh the content before the object expires.
- Flash Cache: When a large number of users try to access the same content, NetScaler sends only one connection to the backend server, and all subsequent requests are queued up. A single response is used to respond to all the users.
Both of these settings can be configured in the content group, which stores the cached objects. We can do this by opening a content group, and going to Others | Flash Crowd | Prefetch. Here, we can define both of these values within the group. Under Prefetch, we have to define how often NetScaler should evaluate the objects in the cache and check the expiration, and define how often it should refresh the cache. In the same pane, we can also see the active flash cache.
There are of course other configurations that we can set to improve the caching mechanism. By default, when we set up a cache policy, it will cache everything that is picked up by the rule.
If we have multiple load-balanced services and we have caching enabled, the cache space will fill up quickly. There are of course some web services that are more frequently accessed than others, so we do not want the less-accessed resources to fill up the cache space. We can attach a rule that defines the minimum number of requests to a server before the caching rule gets enabled. In this way we can make sure that the most active web services get better usage of the cache. This configuration can be set under Content Group | Memory | Do Not Cache, if the hits are less. The number here is again dependent on the amount of traffic going towards the different web services. If you are unsure about the amount of traffic going to the different vServers and services, you can use CLI commands.
For services, the following CLI command is used:
Stat service servicename
For vServers, the following CLI command is used:
Stat lb vserver vservername
This gives you a general idea of where to set the hit rate of objects that have been fetched from the cache.
It is important to note that you can use the compression feature with the caching feature. This enables NetScaler to send compressed data from the cache to the clients that support compression.
If you want to see a graphical overview of the policies and their statistics for a vServer, you can check the visualizer feature. This can be done by right-clicking on a vServer in the NetScaler GUI and choosing Visualizer. This can be seen in the following screenshot:
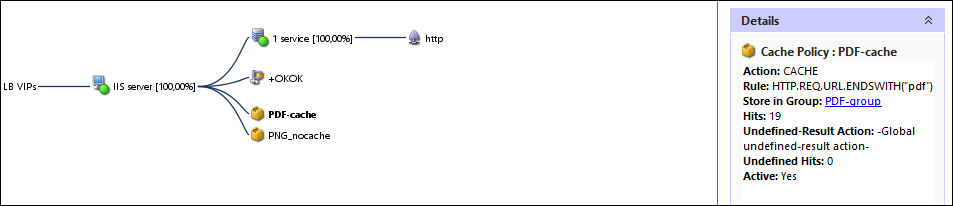
Here, we can choose filters based upon what we want to display in the GUI. If we choose Caching and Compression from the top pane, we can see what policies are attached to the vServer. Also, we can view statistics for a policy by marking it. This is a good way to see what policies are actually attached to a vServer and what its statistics are.