
Chapter 2. Incident Identification and Categorization
Now you understand the terminology as well as some of the problems your organization can face with the types of people who may be after your resources. You can start gathering information to sort the wheat from the chaff, as it were, meaning you are looking to skim the incidents from the events and perform some triage. You need to make determinations as to what should be done about the incident—does it require additional work or can it be closed? What is the criticality of it, meaning what systems or data may be impacted by the incident? Since an incident by definition is an adverse event, all incidents should be addressed in some way. But some incidents are going to be more urgent than others.
To start responding to incidents, you first need some data to determine when the event happened, along with additional data that can answer the question as to whether an event is really an incident, rather than something completely pedestrian. There are a number of things to consider when you are thinking about inputs to this process. You can look at logs, which nearly all devices generate, and you can also look at how you handle those logs. Of course, just gathering the logs is not enough. You need a way to generate actionable information based on the logs. For this, you need some way to correlate log information to apply some intelligence (ideally automated) the data you’ve gathered.
And just having the data is not enough, either. You need a way to determine what category the data falls into. This may be done in part by simple prioritization based on impact to the organization or data. It should also be looked at from the perspective of what is happening. You need context to be able to identify how urgently you should respond. That’s not simply having information about what assets are involved. You may also want to consider what the attacker is doing. If attackers are starting to send data out of your systems, you should probably respond more urgently than if they are just jiggling some doorknobs, for instance.
Gathering Information
Visibility is an essential element of incident response. It’s often overlooked because too often, people think about the investigation aspect of incident response rather than all the preparation. The preparation should take up the vast majority of time you spend in incident response. The more time you spend preparing, the less time you will have to spend actually responding. Part of this preparation is just in making sure you have the data you will need to respond. Even better, this data is also used for detection and alerting. If you do this part right, by identifying and collecting valuable sources of data, you will have not only ensured you have what you need when a response is necessary, but you will also have the data you need to alert you when something bad has happened.
Once you have collected your logs, you need to be doing something with them. Unfortunately, just leaving those logs on endpoints isn’t a great idea. Attackers, after all, will have access to those endpoints and can manipulate the logs. This can include deleting all log traces of their first accesses to the system, making it much harder to identify the first entry point. Again, it’s not about just knowing when they got in, though there is value to that; instead, it’s about piecing together the bigger picture. When you perform an investigation (and we’ll get into this later), you should be looking at building a timeline so you know more or less in what order systems were compromised. This helps you be certain you have them all. Since logs are timestamped, their data is essential to timelines. This means you need an uncorrupted place to store that log data.
Beyond just storing the logs, which is nice when the responders show up, you should be doing something useful with them. Otherwise, they sit on a system somewhere collecting bit rot. You can correlate actions that appear to be related across multiple systems. When you start seeing a lot of a specific type of activity, you may want to alert on that activity. This of course assumes you have someone paying attention to the alert when it happens (and it will happen). These specific activities you are looking for are called indicators of compromise (IoCs). These signatures (essentially) across your environment are a harbinger that something bad either is happening or is about to happen. One way to correlate and alert on all this data is to use a security information and event management (SIEM) system. However, no matter what you end up using, it all starts with the logs.
Log Sources
Logs are tragically overlooked. For the longest time, many people considered them a way of cluttering up disk space. This was far more problematic on older systems (with their smaller disk space), before log rotation and offloading became common. Back then, a system could crash because the disk was full of logs and the system was unable to continue to function. Today, disk space is cheap enough and logs are finally getting their due, so people are creating log policies that identify log data that has to be captured and how long that log data should be stored.
Every system, including network devices, has a way of logging if there is any intelligence in the device at all. This includes your home wireless access point/router/switch device. If you look at its management interface, you may see a place where you can review logs. (This isn’t guaranteed; some WiFi devices are essentially managed devices that don’t want you touching too many things. Google’s home WiFi solution is like this.) In general, devices will log. Endpoints like desktops, laptops, and servers will be the most common devices in any environment. If you use Windows systems, you may be familiar with the Event Viewer. This is how you look at logs on a Windows system, most commonly. If you are unfamiliar with it, you can see the Event Viewer in Figure 2-1.

Figure 2-1. Event Viewer
These logs are stored in a proprietary format developed by Microsoft. They are very rich log sources, including essential data like the event identifier (ID), which is a numeric value identifying all logs that share the same description. For instance, every time the Software Protection service starts, for whatever reason, including system boots, the event generated will have the event ID 16384. Each instance will have a different time, but the description and the event ID will always be the same. This makes sorting and searching for events easier, because you are looking for event IDs that are generally documented and known. The format Microsoft event logs are stored in is binary in nature, but they are generally kept in the eXtensible Markup Language (XML) format. The Event Viewer even shows you the XML for each event.
On Unix/Linux systems, the log format is very different. Logs on Unix/Linux systems were standardized on a logging subsystem that was originally developed for the sendmail Simple Mail Transport Protocol (SMTP) server. This logging subsystem, together with the protocol that accompanies it, is called “syslog”; this is generally used for logs on Unix-like operating systems, including Linux. The syslog format is text-based and doesn’t break out metadata in the same way that Microsoft event logs do. Here, you can see some sample syslog entries from a Linux system:
+Aug  3 23:21:29 ashdashley systemd[4972]: Reached target
    Timers.
Aug  3 23:21:29 ashdashley systemd[4972]: Listening on GnuPG
    cryptographic agent (ssh-agent emulation).
Aug  3 23:21:29 ashdashley systemd[4972]: Listening on GnuPG
    cryptographic agent and passphrase cache (restricted).
Aug  3 23:21:29 ashdashley systemd[4972]: Listening on GnuPG
    network certificate management daemon.
Aug  3 23:21:29 ashdashley systemd[4972]: Reached target
    Sockets.
Aug  3 23:21:29 ashdashley systemd[4972]: Reached target Paths.
Aug  3 23:21:29 ashdashley systemd[4972]: Reached target
    Basic System.
Aug  3 23:21:29 ashdashley systemd[4972]: Reached target
    Default.
Aug  3 23:21:29 ashdashley systemd[4972]: Startup finished
    in 33ms.
Aug  3 23:21:29 ashdashley systemd[1]: Started User Manager
    for UID 1000.+
The first part of the log is the date and time. This is the date and time each entry was created, using whatever time zone the system is configured for (and there is no indication as to time zone in the log entry). Any time zone normalization would have to be done after the fact, knowing the time zone the system was configured for. After the date and time is the name of the system. This is the configured hostname on the system, which is not related directly to the domain name system (DNS). It’s a name stored statically in a file in the /etc directory.
After the hostname comes the process name, meaning the name of the executable that became a process once it was executed and entered memory. This is followed, in square brackets, by the process identifier (ID). This numeric value is used by the operating system (OS) to identify the process, since numeric values are far easier to handle and manipulate for the OS than a text string. After the process information is the actual log message. This is a text value, generally, that is generated wholly by the application or service. Interpreting it is often straightforward, as in the case of the last entry, which indicates the User Manager was started for the user with the ID of 1000.
Since the log entries are entirely written by the application developers, you are entirely at their mercy for some of the entries. If you are intimately familiar with the application, you may be able to easily read the entry. This is not always the case, however, as some application or service developers can write logs for their own use without regard to whether someone else could easily interpret them. For our purposes, this is fine since the events we would likely look for will be easy to understand.
One source for the log entries we are mostly going to be concerned with is the authorization logs. This logfile will often have the name auth and be stored in the /var/log directory with all the other syslog files. Unlike Microsoft’s logs, where system logs are stored in a small number of files, based on whether the entry is related to application, system, or security, syslog log files are based on facility and are configured for each syslog server. This means they may be named something different on different systems and in fact may not be logged at all. Syslog defines different facilities to group related logs together. In addition to facilities, syslog defines severities to identify the criticality of the log entry. The severity is used to determine the disposition of each log entry, including whether it gets logged at all. The facility is used to identify where the log entry will go. You can see here a file listing of the /var/log directory, showing all the logs in there:
+kilroy@ashdashley:~$ ls -la /var/log
total 1804
drwxrwxr-x  10 root
            syslog            4096 Aug  3 06:25 .
drwxr-xr-x  13 root
   root              4096 Feb 14 09:52 ..
-rw-r--r--   1 root
   root             25295 Aug  1 02:27 alternatives.log
drwxr-xr-x   2 root
   root              4096 Aug  3 23:21 apt
-rw-r-----   1 syslog
   adm              43870 Aug  3 23:22 auth.log
-rw-r--r--   1 root
   root             56751 Feb 14 09:50 bootstrap.log
-rw-rw----   1 root
   utmp               384 Jul 31 21:08 btmp
-rw-r--r--   1 syslog
   adm             272019 Aug  1 02:59 cloud-init.log
-rw-r--r--   1 root
   root             15029 Aug  1 02:59 cloud-init-output.log
drwxr-xr-x   2 root
   root              4096 Jan 16  2019 dist-upgrade
-rw-r--r--   1 root
   root            596108 Aug  3 23:21 dpkg.log
-rw-r--r--   1 root
   root             32032 Aug  1 02:23 faillog
drwxr-xr-x   2 root
   root              4096 Jul 31 21:05 installer
drwxr-sr-x+  3 root
   systemd-journal   4096 Jul 31 21:06 journal
-rw-r-----   1 syslog
   adm             409314 Aug  1 02:59 kern.log
drwxr-xr-x   2 landscape
   landscape         4096 Jul 31 21:08 landscape
-rw-rw-r--   1 root
   utmp            292292 Aug  3 23:21 lastlog
drwxr-xr-x   2 root
   root              4096 Nov 23  2018 lxd
drwxr-xr-x   2 root
   root              4096 May 14 08:25 openvpn
-rw-r-----   1 syslog
   adm               4943 Aug  3 23:21 syslog
-rw-r-----   1 syslog
   adm               5222 Aug  3 06:25 syslog.1
-rw-r-----   1 syslog
   adm             286409 Aug  2 06:25 syslog.2.gz
-rw-------   1 root
   root             64064 Aug  1 02:23 tallylog
-rw-r-----   1 syslog
   adm              13327 Aug  1 02:50 ufw.log
drwxr-x---   2 root
   adm               4096 Aug  1 06:42 unattended-upgrades
-rw-rw-r--   1 root
   utmp             12672 Aug  3 23:21 wtmp+
Of course, not all logs on Linux systems are handled by syslog, just as not all logs on Windows systems are necessarily handled by the Windows logging facility. You may find application-specific logs on either OS. A common application that doesn’t use the system logging is web servers like the one developed by Apache. It handles logs itself, though they are generally stored in the /var/log directory on a Linux system.
What you see in this example are a couple of lightly used systems, so the logs are not that lengthy. Additionally, on the Linux system, log rotation has been enabled. This compresses logs after a certain time, creating a new, empty file to send log entries to. If you have a system that creates a lot of logs, you could end up with too much used disk space, even if you compress the logs. This is why having a system to aggregate logs to is helpful.
Log Aggregation
We used to call this a central loghost, but the problem has become so much bigger than just centralizing logs. Log aggregation today is about not only collecting logs, but also storing them in such a way that they aren’t just sitting flat on a disk. If they do this, you can go pore over these logs to your heart’s content, but they won’t be especially useful. For logs to be truly useful, you must be able to search and organize them. Fortunately, there are a lot of tools that can be used for log aggregation. One that is used fairly commonly is Splunk. The fully commercial version includes a lot of capability, but there’s also Splunk Light, which can be used for demonstration purposes; this is what we’ll be doing here.
Splunk, as with other log aggregators, is capable of ingesting any number of log sources. You can feed it files from the system it is installed on, and you can also enable listeners. One thing Splunk can do is act as a syslog listener, meaning you can forward syslog messages from any device that generates syslog messages to Splunk and those log messages will be archived. In Figure 2-2 you can see the Splunk web interface page where you configure a data source to be a TCP listener on port 514 (which is the syslog port). By default, syslog will use User Datagram Protocol (UDP), but as there’s a chance UDP messages can be lost, it’s better to use TCP and just configure the forwarding host to use TCP to send messages.
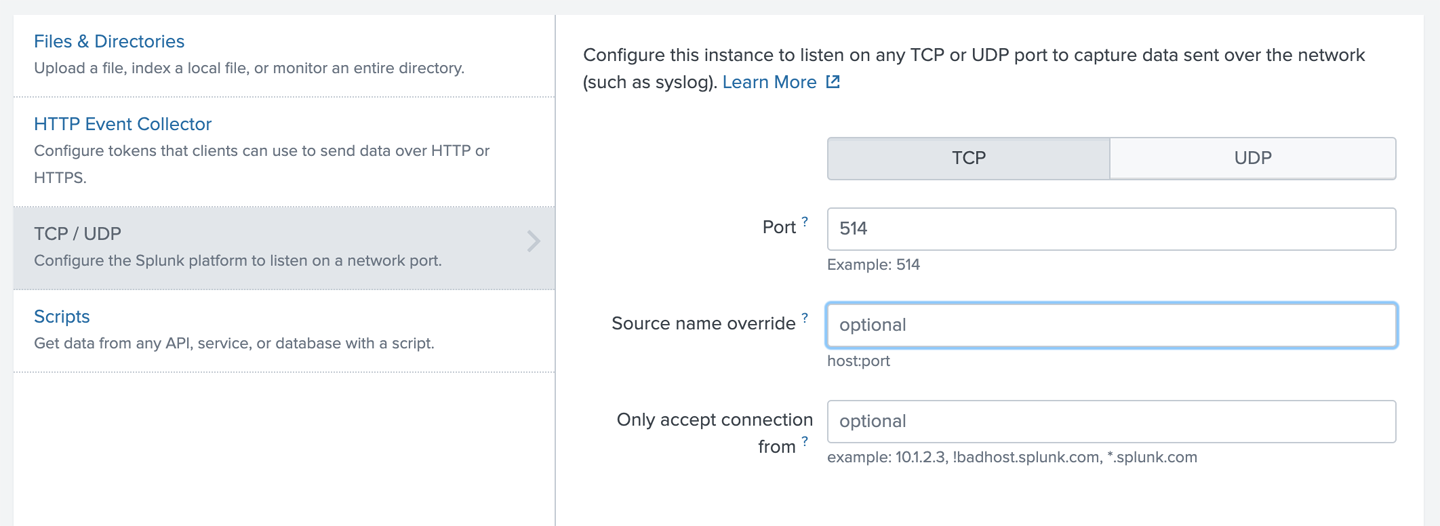
Figure 2-2. Splunk data source
As mentioned earlier, one important function of a log aggregator is its ability to sort and filter. You don’t want to be scrolling through multiple hundreds of pages of logs trying to find the entry you are looking for. You want to be able to search entries stored in the database. Ideally, the entries are stored in a database, which means they are indexed and easily searchable, as well as orderable. This means you should be able to reorganize log entries and search results in any way that makes sense, based on what you are looking for. You may want everything in time order, which is fine, but you might also want data ordered by host rather than time. Figure 2-3 shows results from a search in Splunk.

Figure 2-3. Splunk search results
These are basic capabilities, of course, but ones any log aggregator you use should have. Just having the logs is helpful when it comes to performing an investigation, but you probably don’t want to wait for the FBI to tell you they have a group they are investigating and they believe your systems have been compromised before you do something. Having information ahead of time is really useful. For this, we need a whole different kind of technology.
Security Information and Event Management
A security information and event management (SIEM) system isn’t really all that different from the log aggregator we were already talking about. This is because log aggregators are sometimes the building blocks for a SIEM. If you want to manage security information, you need to be able to take it in, after all, and that means, in part, ingesting and storing logs. So, log aggregation platforms like Splunk and the Elastic Stack (formerly ELK Stack) are sometimes used as a SIEM, once additional functionality is layered on top of these pieces of software.
Because the set of functionality that comes with a SIEM isn’t exactly standardized, some SIEMs are more feature-rich than others. Figure 2-4 shows the AlienVault Open Source Security Information Management (OSSIM) in an early stage of setup. This is an open source SIEM that will perform a number of functions for you, mostly using other open source software. As an example, you can configure one interface to monitor networks. To do this, OSSIM can use Snort and Suricata along with a set of community network intrusion detection rules. OSSIM can also, as you can see along the lefthand side of Figure 2-4, monitor host-based intrusion detection agents that are installed on systems in the environment.
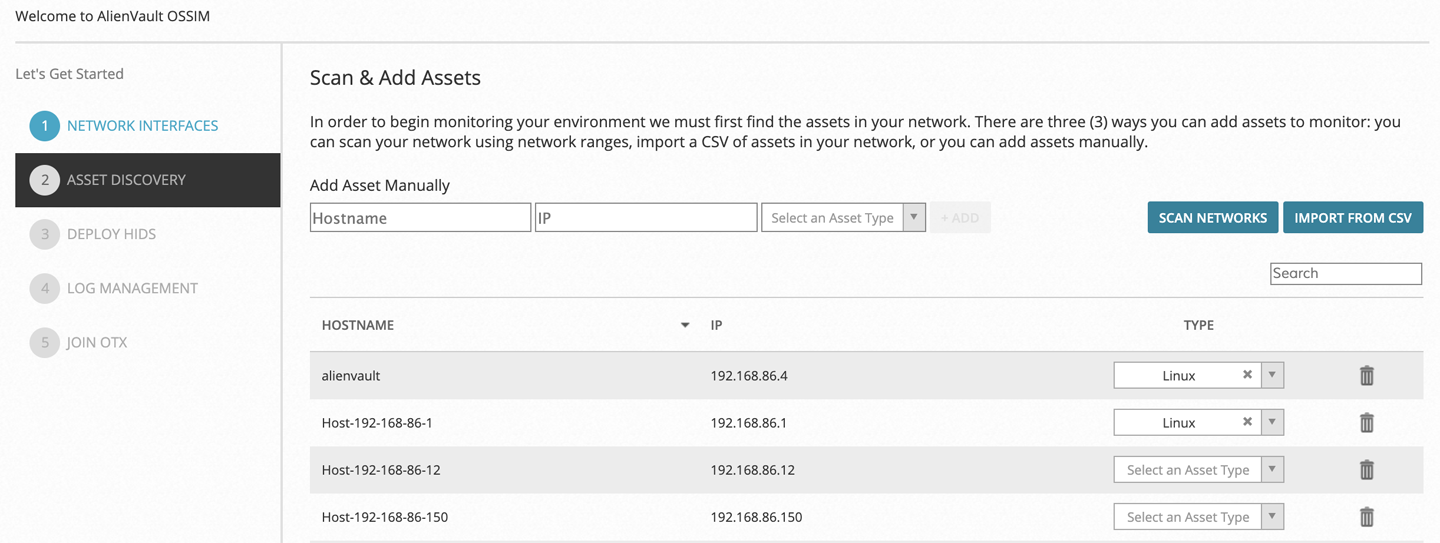
Figure 2-4. OSSIM configuration
In addition to log management and intrusion-detection monitoring, OSSIM can take in threat information from AlienVault’s Open Threat Exchange (OTX). With this information you can view new threats all in one place, as well as whether they are being seen in your environment.
Once you find new threats using OTX (or ThreatConnect or another threat intelligence service), you can develop the IoCs mentioned earlier. Once you have an IoC, you can use it to search for instances of that indicator across your SIEM, to see if the threat has materialized in your environment. This is the value of the SIEM—having all of your security information in one place so you can search for indicators across all sources at once. You can use it to quickly correlate indicators; which are usually complex because they are hitting different elements across systems. The faster you can do this searching and correlation, the better positioned you are to quickly respond to isolate the attacker. The sooner you can isolate, the sooner you can get them out of your environment.
Categorizing Attacks
The goal of incident response is to enable the organization to address an adverse situation and restore operations to normal. That should be the intention of all incident response activities. When we categorize attacks, we don’t do it just for a simple taxonomic reason. We are looking to understand the type of attack it is, and, most importantly, what stage the attacker is in. This is important for a couple of reasons. First, it can help gauge the priority of the response. An attacker identified long after they have gained initial entry is going to be of far more concern than one who is just starting to rattle doorknobs. The first attacker is going to get more resources from us than the second attacker because we’ll need to fully understand how far into our environment they are. The second attacker we’ll watch, and probably try to restrict their access, but they are of far less concern.
The same holds true when it comes to identifying the attacker. More and more, you’ll read news stories about advanced persistent threat (APT) groups. These adversary groups, like those from North Korea, for instance, get an APT number. This is not just so we can have a name for them: it’s because each of these groups have a specific signature, because they use a unique set of tactics, techniques, and procedures (TTPs). Additionally, they are each working toward some specific object or goal. One APT group may look for intellectual property, while another may want credit card numbers. Once you know who the adversary is, you can start to narrow the search for them in your environment. If you know it’s an APT that looks for credit card information, you’ll concentrate more resources around any system or network that carries credit card data.
It is useful to have models to refer to when responding to an incident, so you can have a better sense of what the attacker is doing and where in their process they are. Because of that, we’ll look at three different approaches to identifying what an attacker is doing. The first is a very pragmatic approach, based on years of watching what adversaries do. The second follows a military approach and uses military terminology. The last one was developed by intrusion analysts and uses a visual representation to determine how different aspects of an incident relate to one another.
Attack Life Cycle
We’ll start with the one that makes the most sense to me (mostly for this reason). One reason it makes such sense to me is that it’s honestly the way attackers have worked for as long as there have been people breaking into systems with specific intents. If you go back to break-ins from the late ’70s and early ’80s and read about what those people did, you will hear them describe, in very similar accounts, the attack life cycle. So, let’s take a look at the attack life cycle in a little detail. Figure 2-5 shows a back-of-the-napkin sketch of the process.

Figure 2-5. Attack life cycle
The first step is initial reconnaissance by the attacker, where, for instance, APT groups identify you as a target. Traditionally, we as a security industry have said this is where ping sweeps and port scans and open source intelligence gathering occurs. In reality, it’s probably as much about simply identifying that you, as an entity, have something the attacker wants. This may be a specific set of intellectual property that will help with a state-sponsored industry or it may be that you collect credit card data and the attacker is really just looking for an easy revenue stream. Either way, initial recon is done, because you likely haven’t been targeted at random.
Once the recon is complete comes the initial foothold. This generally comes as a result of a social engineering attack like a phishing email. Current estimates from various sources, both formal and informal, suggest about 90% of current breaches result from a social engineering attack. Once the attacker is in your environment, they will be looking to make sure they can stay there. Though you are likely well aware of what this sort of attack may look like, Figure 2-6 shows an example. You can see in the URL revealed by hovering over the clickable image that if you click you will not be sent to Amazon.

Figure 2-6. Social engineering attack
Once that link is clicked, there is a good chance you will then have an infected system. The system of the first person to click becomes the beachhead from which additional attacks will be launched. This step is called “establishing a foothold.” The attacker now has a place to work from; a desk, as it were. This is where they start looking for their object, the reason they bothered to set up shop to begin with, which is different for each attacker. Most organizations try to implement the principle of least privilege, which means users don’t have administrative privileges on their own system. The problem is that there are too many things the attacker will want to do that require administrative privileges.
In order to collect passwords from memory, for instance, or maintain persistence on a system (meaning they can keep getting in any time they want), they have to escalate privileges. With elevated privileges, they can then add users, wipe logfiles, install services, change registry keys, and perform many other functions they wouldn’t have been able to do with normal user permissions.
Lateral movement
Your system is not the only one attackers want access to, of course. Even if you have complete run of the whole network, they will want to move around to determine what else may be in there. They don’t know what other systems may have information or accounts they can make use of. This is why a cycle starts here, and what distinguishes the attack life cycle from other models. It recognizes that attackers are in the environment to stay and they need access to a lot of systems to remain in the environment. Getting system access isn’t always about the information they can get to. The more systems they have ownership over, the less likely their access will be removed. One system may be offline, wiped, or have the remote access program erased. When the attacker owns hundreds of systems, it’s far less likely they will lose access.
The cycle here looks much like the initial part of the life cycle. The attacker will perform recon to look for additional systems they can get access to. This may involve gaining access to the Active Directory details so they can pull the entire list of systems in the environment. It may involve grabbing passwords from memory that can be used on other systems. When you are in an environment with centralized authentication, any user account will give you access to another system because users are likely trusted on any system that has been added to the domain.
Once the next system has been targeted, the attacker is going to move to that system. Again, they may use credentials they have gathered from the existing system. Depending on how good the overall administration hygiene is, the attacker may have been able to grab administrative credentials from one compromised system, which would allow them to create a user on the domain that could then be used to authenticate to multiple systems. There are many different ways they can authenticate to other systems, including misusing the Kerberos ticketing system used to grant access without actually passing usernames and passwords through the network.
Persistence
Once the attacker has access to another system, they maintain access there with some form of persistence so they can keep getting into that system across reboots. During all of this, they have likely been collecting as much information as they can get their hands on. They may continue to cycle through the loop of looking for more systems, getting access to them, persisting their access to them, stealing data, and then finding the next system. At some point, they need to get the data off of your systems and to their own. That’s called completing the mission. However, it’s not generally a single event. It’s more likely to be an event that keeps happening over and over as more data is gathered over time.
There are many advantages to a model like the attack life cycle. You can look at each step and determine what you have in place to deter the attacker. Perhaps more importantly, you can look at each of the stages and identify what you have in place to detect what an attacker would be doing. The more detection capability you have in the early stages, the less likely the attacker will get to the later stages because you can catch them early and hopefully get them out before they get to the point that they are removing, or exfiltrating, data from your network.
Cyber Kill Chain
The cyber kill chain was developed by Lockheed Martin and it is informed by a military mindset. A kill chain is a way of modeling steps an adversary takes in attacking you. The cyber kill chain takes that same mindset and applies it to the digital, rather than kinetic, realm. There are some similarities between the cyber kill chain and the attack life cycle. To me, the biggest advantage to the attack life cycle over the kill chain is that the attack life cycle includes the loop in the middle, which is founded in the real world. The attack life cycle is also, to my mind, more actionable than the cyber kill chain.
However, we have different models because different people will view the same problem in different ways. There are seven stages to the cyber kill chain. Figure 2-7 shows a diagram from the US Senate Committee on Commerce, Science, and Transportation that provides details about the seven phases.

Figure 2-7. Cyber kill chain
The reconnaissance is the same between the kill chain and the attack life cycle. Where the kill chain is different from the attack life cycle is the perspective provided. The kill chain is from the attacker’s viewpoint. So when we switch the perspective, we start talking about what the attacker is doing. Actually, even though reconnaissance is in both models, it’s different in the kill chain. The attacker in the kill chain is looking for exploits to identified vulnerabilities. This is what they take from the reconnaissance stage into the weaponization stage. They have identified a vulnerability and they are going to either find or create an exploit against that vulnerability.
Once they have their “weapon,” meaning payload, they deliver it. This may be through email, a website, or even a physical delivery mechanism like a USB stick that includes the malware or rogue program. The assumption is that once the weapon has been delivered, the vulnerability will be exploited. There is nothing in the kill chain about ensuring the weapon gets detonated so the vulnerability is exploited. The exploitation stage appears to be described as a passive action. It just happens. Exploiting the system can then ensure malware is installed, which should give the attacker remote access. This is done through a command-and-control (C2) network of systems.
Finally, the attacker has accomplished their goal. They have access to the systems. They can send commands to those systems and retrieve any desired data from the system. They can also make use of the system in an organized manner, such as being part of a botnet used to generate large-scale denial of service attacks. These attacks can be sold to anyone who has a grudge but doesn’t have the resources to launch the attacks themselves.
If you think about the attack life cycle as being from the standpoint of the victim—the organization that can defend and detect—and the kill chain as being from the standpoint of the attacker, you may find some use for both of them.
Diamond Model
What the attacker does and how it impacts a system environment is not the only way of modeling for incident response. The attack life cycle takes a broad look at the complete time an attacker is in the environment. The cyber kill chain looks at what an attacker goes through to access an environment. At some point along the way, though, there is an event. This may be noticed or not, but either way there is an event. The diamond model represents that particular event and takes it apart into component elements. You can see how the diamond model is put together in Figure 2-8.
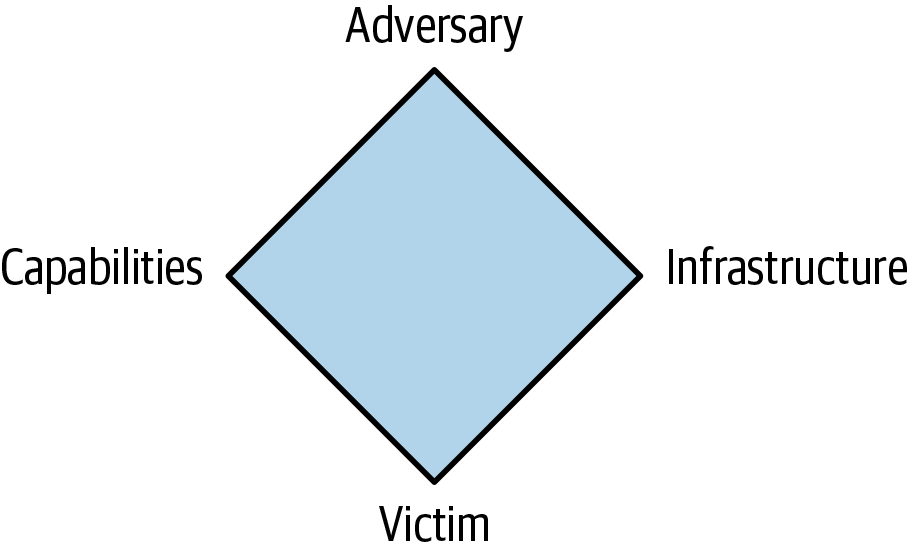
Figure 2-8. Diamond model
Each event includes the adversary, infrastructure, victim, and capabilities. The adversary is the attacker and everything that may be known about that attacker—email addresses, handles, phone numbers, or any other identifiable information. The infrastructure includes any IP addresses the adversary is coming from. Infrastructure may also include domain names or email addresses, since those are resources the attacker is making use of. A domain name is something an attacker will obtain in order to be able to use fully qualified domain names (FQDNs), so what the victim is directed at is more durable since the IP addresses may belong to a victim and need to be changed.
The victim is whatever persona was targeted. This may include IP addresses and email addresses. A social engineering attack will have an email address as the victim. A technical attack, like one against a Java application server, for instance, will have an IP address, or multiple IP addresses, as the victim. Finally, the capability is whatever means the attacker is using to target the victim. This may include malware, exploits, any tool sets the attacker is using, or even stolen certificates used to make a rogue website look legitimate.
All together, these things make up an event. The reason this is a diamond, though, is because it’s not just a list of properties. The different properties interact with each other. In the example just previous, for instance, a stolen certificate can be used along with a domain name. This is a capability married with infrastructure. These two together can be used to convince a victim of the legitimacy of the site so the attack is more likely to be successful.
Ultimately, the diamond model is most likely to be used for intelligence gathering. This means you may find these properties used in any intelligence feed, including ThreatConnect. Being able to identify all of these properties provides actionable intelligence because they become IoCs you can search for in your own environment.
Having a framework to build your incident response around is helpful. This should include priority definitions as well as different categories. You should also be sure to consider where the attacker is in their attack, whether you are using the cyber kill chain or the attack life cycle. This identification will help guide your response. Of course, using threat intelligence can also help guide your investigation, and we’ll be talking about that in the next chapter.