
8
Pro Tips and Tricks for Inkscapers
This chapter is a collection of tips and tricks. It is based on working every day on real-life design projects with Inkscape. These are tricks that did not fit into any of the projects we have presented but are crucial if you want to become an Inkscape power user. These methods can help you become more effective and resilient and hopefully answer questions that you still have after reading this book.
Also, these methods are mentioned as alternatives in other parts of this book, so if you are here looking for those tricks, please read on!
In this chapter, we’re going to cover the following main topics:
- Practicing with the basic tools
- Praise for path effects
- Inkscape as an XML editor
- Overcoming the CMYK color barrier in Inkscape
- Working faster with custom templates
- What to do if Inkscape crashes
Practicing the basic tools but looking further
It is almost a cliché to state this, but the old saying is true: practice makes perfect. This is the first pro tip for you as a fellow Inkscape user.
You first have to understand the basic tools of Inkscape and use them regularly before getting into clones, extensions, filters, and other tricks. You can only utilize these properly if you know your tools. Practice with the Inkscape tools and learn the fundamentals of vector graphics. Learn the basics before overwhelming yourself with the rest.
So, what are those basic tools and methods that are worth knowing and practicing?
Here is a very short list of what you should know when using Inkscape:
- Creating and transforming simple objects
- The usage of colors, gradients, and blur
- Working with paths and using Boolean operations
- Layers and groups for organizing
- Understanding clipping and masking
These were the basics, and after that, you can move on to more complex tools and methods. If there is something you are not familiar with from the preceding list, take your time, get to know that part, and practice. As you know, this book is about specific projects and not introducing each tool to the user one by one.
We started with simple projects and worked our way toward the more complex ones. The goal is not to regulate the way you learn. The goal is to help you better understand vector graphics.
Looking beyond the basics
Until now, all the previous chapters shared examples of real-life projects. These projects were all about building the basic tools of Inkscape into a logical workflow to create a logo, an icon set, or a website design.
Knowing the basics is important, but you still need to look further. Be open to learning new tricks and looking into new solutions to problems. Only this will make your work of higher quality and more efficient.
In this chapter, there will be no step-by-step projects to follow, just tips and very short examples of using some of the less commonly used tools in Inkscape and using Inkscape in uncommon ways.
Praise for path effects
After practicing the basics, you will work faster and will be able to create original work in Inkscape. But a lot of times you need to be faster, or the work is more complex, and you start to look for semi-automatic solutions. One of the best tools that can help you in these situations is Live Path Effects (LPEs).
LPEs are effects that you can apply to any selected path. Whenever the original path is modified, the effects change with the path in real time – hence the name.
LPEs can make your work faster and easier, and they are a lot of fun to use. My suggestion is to play and experiment with LPEs and find the ones that work for you. You will find different effects to be useful for different projects.
Using a simple path effect – Bend
To bend a shape in Inkscape manually, you need to change the path node by node with the Node tool. It is not an easy task; you have to select and move the nodes around and have a good idea about what your end goal is.
This is where the Bend effect can come into the picture, helping you to stretch and bend shapes with ease. It is a great path effect to try first since it is very easy to use and understand.
Let’s give it a try now:
- To start, you will need a path. It can be a simple circle turned into a path, a random shape drawn with the Pencil tool, or something you drew earlier following the projects of this book. Draw anything, but if you want to follow my example, use the cloud shape we created in Chapter 3, Modular Icon Set Design with the Power of Vector, while designing the cloud icons.
- Now click on Path | Path Effects in the top menu. This will open the Path Effects tab on the sidebar.
- Select the path you want to apply the effect to, and click the + button at the bottom of the Path Effects tab. The Live Path Effect Selector window will pop up, showing an array of the available path effects to choose from. This first time, choose Bend.
- As you can see in the Path Effects tab, this applied the Bend effect to the path.

Figure 8.1 – The Path Effects tab
- On the path itself, seemingly nothing changed. But if you select the Edit on-canvas icon, which is the first icon option in the Bend path line, you will be able to bend the whole path by curving the new spine path with the Node editor tool.
- Create different curves to see how the original path reacts and changes. You can even duplicate the path and change the amount of bend creating different objects from the same path.
This effect can make vector graphics even more versatile. Draw a character and easily bend its leg, distort many leaves of a tree to seem more unique, or create your own crazy text effects.
The most important thing is: LPEs are non-destructive. Using them for editing does not modify the path permanently. You can remove them with the minus icon as easily as you added them to the path. The original path will always be intact.
Take the clouds in Figure 8.2 for example; remove the path effect, and all of the paths will pop back to the original shape.

Figure 8.2 – The original cloud path and more versions of it with the Bend effect
However, if you want to make your changes permanent without applying LPE, you can do that too.
Just select the shape and turn it into a path by selecting Path | Object to Path, or pressing Shift + Ctrl + C. What this does is apply the changes you created to the shape and turn it into a new path. The original path will be lost, but the new one will be there without an active path effect.
What do you gain by using this method? A simple path might use fewer resources without active path effects applied, thus making Inkscape more stable when working with your file. Also, the changes will be there even if the file is opened in another vector editor, and they will look the same as intended.
An important tip about LPEs
Path effects are great, but when applied to complex shapes with hundreds of nodes (or groups with several objects) they can use a lot of resources. Save often to avoid losing your work if Inkscape crashes. If that happens, check out the section in this chapter titled What to do if Inkscape crashes.
Although LPEs are path effects, you can apply them to groups of objects as well! This means you can bend, distort, or modify a group of objects as one with a path effect, even if the elements in the group are not all paths! You can try this now with the Bend effect, or with the Perspective effect next.
The Perspective effect
LPEs are very effective and can really help your work. Our second example, the Perspective path effect, can also spare a lot of headaches. It is much easier to draw something in frontal view and then modify it into perspective than drawing it straight on without a reference.
This path effect is simply great for drawing houses and cityscape backgrounds or applying illustrations to surfaces that are not perfectly facing the view.
Since LPEs work on groups, too, let’s try the Perspective path effect on a group first. You might create a group of a few objects to try now or use anything you have created with this book so far: an icon, the logo, or any illustration.
Note
If you are through Chapter 4, Create Detailed Illustrations with Inkscape, and looking for an alternative solution to fit the image on the laptop screen, here it is!
If you want to try it on something real, try it with the complex illustration from Chapter 4, Create Detailed Illustrations with Inkscape! This is the example we will use now.
- To start, open the complex illustration you created earlier, and select the group with the lady on the screen. We used a different method in Chapter 4, Create Detailed Illustrations with Inkscape, but the Perspective effect works even better!
- Select the group with the flat image of the lady and add the path effect by selecting Path | Path Effect in the top menu.
- Click the + icon at the bottom of the Path Effect tab.
- This time choose the Perspective/Envelope effect from the Live Path Effect Selector popup. Seemingly nothing happens, but on the Path Effect tab, you can see that the Perspective effect was added to the effect list.
- Still selecting the group, switch to the Node editor tool, and notice how a rectangle with four nodes at the corners appears around the group. See Figure 8.3 for reference!
- Move the four nodes around to create the Perspective effect. In this case, we have it relatively easy. All you need to do is match the four corner nodes to the corners of the screen of the laptop.

Figure 8.3 – The Perspective path effect applied to the group to create a screen
That’s it, it is easy! Apply the Perspective path effect and set the corners. If you need to be very precise in a future project, you might set the X and Y coordinates of the four handles that define the Perspective effect.
There are many more path effects
The Bend effect and the Perspective/Envelope effect are just two of the useful path effects that you might utilize in Inkscape. There are more LPEs that we will not mention now since this book is not about trying all the tools. You have to do that yourself; use them and experiment with all the different effects.
There are many more, but here are a few I use regularly:
- Pattern along path: With this, you can use single shapes to create a repeated pattern along any path. Think further than dotted lines; you can create linear patterns of anything to enhance your vector illustrations. Use this effect with your own paths pasted from the clipboard, and create footsteps, chains, zips, and so on.
- Power stroke: This effect is there to help you create really energetic strokes that are great for illustrations and line artwork. You can manipulate the shape and thickness of the strokes after they are drawn, allowing you to use really dynamic strokes, almost like using a brush.
- Corners: This effect lets you add rounded corners to rectangles and polygons, and it is a great help – I use it to round the pointy corners of stars or set different corners for buttons or other UI elements.
- Envelope deformation and Lattice deformation: These effects are quite similar to each other. In a way, they combine the Perspective and the Bend effects, allowing you to modify a path or a group even more fluidly. They are great for creating waves or patterns on clothes or flags.
- Tiling: This is the latest great addition to the LPE library. Introduced in Inkscape 1.2, the Tiling LPE can help you create tiled patterns from a single selected path. It can be rotated, scaled, or mirrored, you can set the gap between the objects and, of course, randomize your tile pattern if you want to. This is a great automation when you need to create intricately tiled backgrounds for pattern design or for illustration purposes.
In summary, LPEs are fun and useful. Check them out and try using them in your Inkscape projects. Find your favorites and use those in your daily workflow.
My list of favorites is always changing according to the project I am currently working on. My favorite LPE is always the one that can help me be creative in the fastest and most simple way possible.
In this section, you learned about a few useful LPEs and how to use them. In the next section, we will focus on the XML-based tricks you can use to work even faster in Inkscape.
Using Inkscape as an XML editor
This book is all about design projects and creating vector graphics in Inkscape, but sometimes you can do a bit more and use the SVG format to your advantage! SVG is an open standard format, which means you can look into it and, with a bit of work, understand it.
It uses the XML format to describe vector graphics, so you can modify SVG files even with a simple text editor. Don’t be alarmed; the goal is not to build SVG graphics from scratch via XML! That would be counterproductive; that is still the job of Inkscape.
In this part of the chapter, I simply want to share a few tricks where the XML editing capabilities of Inkscape can be at your service.
Searching for, selecting, and changing multiple elements at once
Imagine working with a file with hundreds of different objects and shapes, such as small leaves on a tree illustration or multiple buttons and icons in a complex UI design. And then, you need to change the color of every other object in the file. Not all of them, but enough of them that selecting them by hand would be a real pain.
This is where the simple Find/Replace tab comes to the rescue! It may sound trivial, but this is an overlooked part of Inkscape with great potential.
Let’s give it a try now. The icons you created during Chapter 3, Modular Icon Set Design with the Power of Vector, will be great test subjects. Although there are only nine of them, you will be able to use the same method later for more objects.
For the sake of practice, let’s say that you need to change the turquoise color of the icons to orange. You could select all the turquoise parts manually one by one, then enter the groups they are part of and recolor them.
Some of them are strokes, so they need to be colored differently. But instead of this, you can be smart and use the Find/Replace method:
- To start, identify the objects you want to recolor. What is the common property of these objects? Their color, for example. Click on one of the objects and get the code of that common color – in this case, copy the code of the original turquoise, 2ac1b5, without the # symbol.
- Now, you need to press Ctrl + F to bring up the Find/Replace tab on the sidebar. Paste the color code you are looking for into the Find field as seen in Figure 8.4.
- Now, get the color code of the new color. In this case, we are looking for orange, with the ff9955 code. Copy and paste this code into the Replace field.
- As you can also see from Figure 8.4, there are quite a few settings and options on this tab. Most of the time, you will only need a few.
- Under the Search in label, select the Properties option. This will tell Inkscape that you are not searching for this string of characters in the text but in the properties of the objects.
- Under Scope select Search in selection. This is about fine-tuning your search criteria to only find and select the elements you mean to and to avoid randomly selecting and changing parts of the document. For this to work, select all the icons you want to change the colors of. The rest will be out of scope.
- And that is all! If you click Find at the bottom, all of the elements that have a property with the given value will be selected. Now you can recolor, move or even delete them as you need.
- Or you may select Replace all, and the original value will be overwritten with the new one. In this case, all the elements will be selected and given a new color value. For the task at hand, this is the better solution. It does not matter if the color was assigned as a stroke or a fill color since Inkscape now only searches for the value anywhere in the selected part of the XML.

Figure 8.4 – The elements selected using the Find/Replace tab
This simple trick can save a lot of time and work on recoloring multiple elements. The Find/Replace tab adds a great deal to the versatility of vector graphics with Inkscape.
Naming and organizing your objects with unique IDs
As mentioned previously, SVG files are built with XML, which means that they are readable for both programs and humans. There is no complex encoding but an easy-to-follow structure of nodes, IDs, and attributes.
You can also use this open structure to your advantage to organize your documents better.
Get any object, path, or group in Inkscape. Right-click the object and select Object Properties. Or press Shift + Ctrl + O and then select the object.
This will open the Object Properties tab, where you can set the ID for the selected object. Every object has to have a unique ID in the document; by default, Inkscape assigns one to them.
Just write the ID to your object or group, that is, icon001, btn002, character1_head, and so on. Finally, click Set, and the object is properly identified. Check out Figure 8.5 for example settings.
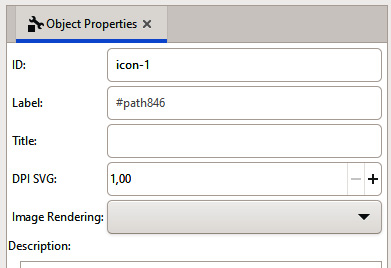
Figure 8.5 – Setting the ID of a single path in the Object Properties tab
So, how can this help you? Do you need to do this for every single object? Of course not, but changing the automatic IDs set by the program makes finding named objects easier. If you want to use the Find/Replace tab, you can also check the box next to the ID field, so Inkscape will then select all the icons or anything with a specific ID match.
If you are creating game art or working on a complex UI design or illustrations, naming parts of your vector graphic is a useful habit to pick up.
Giving unique IDs to your groups is also helpful when you need to select Batch export multiple images as well. This is not a new feature; even the older versions of Inkscape can export multiple selected objects at once (there is a Batch export checkbox in the Export dialogue in those older versions). There are a few methods for this, and there is a big difference between Inkscape 1.2 and the versions before and one thing in common.
Let’s check them out.
- If you are using an older version of Inkscape: To start, simply select multiple elements on your page, and check the Batch export X selected objects box on the Export PNG images tab (to open this tab, press Shift + Ctrl + E). This will export multiple PNG files in the defined folder.

Figure 8.6 – Batch export multiple objects before Inkscape 1.2
- If you are using Inkscape 1.2 or newer: Since Inkscape version 1.2 there is a dedicated Batch Export tab under the Export tab. Here you can export multiple files with different file formats. Not just PNG but SVG, PDF, and JPG are supported. This Batch Export tab gives you previews of the objects selected, where you can see exactly what will be exported and with what filename. This solution is much more convenient and helps with your workflow.

Figure 8.7 – Batch export multiple files in Inkscape 1.2
- Setting unique IDs: This is the common point between the two versions. If you did not set your own unique IDs to the objects to be exported, the program will automatically save them with automatic filenames created from the automatically assigned IDs in the SVG. You will have files named path4483.png, g5123.svg, and so on. Then, you should identify them and rename them manually, and for multiple files, that is very time-consuming.
For example, when you are exporting 50 icons at once, these generated names can be a real drawback since you have to check every single icon yourself and name them according to their content so they can be used later.
But if you did set the IDs in Inkscape for each of the objects or groups to be exported, then Inkscape will save those PNG files with the filenames specified as IDs before. To come back to the icon example, if you give your icons an ID as you go (setting each group a unique ID in the Object Properties tab) then Inkscape will assign those IDs as filenames. This will help identify and sort your images and files, later on, sparing you a lot of time in your workflow!
Consider using Inkscape vector more like XML
Even if you are not comfortable thinking about the code behind your graphics, please consider using Inkscape as an accessible editor for your SVG file.
Searching for values in the SVG script is very easy in Inkscape and can save a lot of time and effort. Setting IDs can also be an easy and useful method for you, shortening the time of finding, organizing, and exporting your graphical elements.
In this section, we learned about using IDs for searching and exporting vector elements in Inkscape. Both humans and machines can recognize and read your IDs and other properties in an SVG file. They are used by laser cutters, printing setups, or, as shown in the next section, by Inkscape extensions. Indeed, IDs and specific extensions can be one of the solutions for exporting your images in CMYK!
Overcoming the CMYK color barrier in Inkscape
CMYK has been mentioned before in this book, and users tend to talk about it online as well, but what is the issue here? Inkscape is working with SVG, and SVG is created for the web. It means it is natively running in the RGB color space used by screens and not in the CMYK color space for printing.
Although this issue is less and less important since most printers can do the converting for you if you provide the graphics in RGB, CMYK is still needed if you want to have absolute control over the printed colors. Some printers only accept CMYK formats, and specific files such as PDFs.
Solving the CMYK issue using other programs
In Chapter 7, Combine Inkscape and Other (Free) Programs in the Design Workflow, we learned about Scribus, which is open source publishing software. In the Scribus section, we mentioned one solution for the CMYK challenge: save the vector graphics as an SVG in Inkscape and import the SVG graphics into Scribus.
Then, set the color space and color settings there and export your document into any CMYK color mode and format you want. This way, you can easily generate proper vector graphic files ready to be printed.
You could also use another program mentioned in Chapter 7, Combine Inkscape and Other (Free) Programs in the Design Workflow: Krita. You can import the SVG as you did in that chapter and export it as a TIFF in CMYK format. A TIFF is a bitmap image, not a vector, but it uses lossless compression. That makes it perfect for printing.
Using the Inkporter extension for CMYK exports
The previous solutions work very well, but for some, it might be too much effort to use a third-party app every single time they need a CMYK vector document for printing.
This is where Inkporter comes into the picture. Inkporter is an Inkscape extension that can export parts of your SVG document into several formats! This extension came out before Inkscape 1.2, but it still has some advantages compared to that version.
The new multipage support and the Extension tab that was introduced in Inkscape 1.2 are great. But additionally, Inkporter can export multipage PDF documents and JPG and PDF files in CMYK format too!
I mentioned earlier that the IDs would be important later in this chapter. The extension method of Inkporter is ID based. It exports the files and the pages in the PDF booklets based on their IDs with a unique pattern. Let’s give it a try:
- To start, you need to install the Inkporter extension. Close Inkscape if it is currently running. You can download Inkporter from https://inkscape.org/ under the Extensions tab.
- Installing this extension is simple, just copy the downloaded files into the Extensions folder in your Inkscape installation. If you need help, you can follow the installation steps in the description on the download site.
- After Inkporter is installed, open a document with multiple groups or objects again. The nine icons from the icon set you created during Chapter 3, Modular Icon Set Design with the Power of Vector will be the perfect test subject again.
- As mentioned previously, Inkporter works based on IDs. It will identify the elements you mean to export based on their IDs. Press Shift + Ctrl + O to open the Object Properties tab and set a unique but repeating ID pattern, that is, icon-cloud, icon-settings, icon-load, and so on.
- Then head to Extensions | Export | Inkporter to open the Inkporter popup. Choose a file format; for the icons, SVG will work best. The ID pattern will be recognized if you type in icon-, Inkporter will export all the groups that have a unique ID starting with icon-.
- You only need to set an export folder and select Export, as shown in Figure 8.8, and you are done.
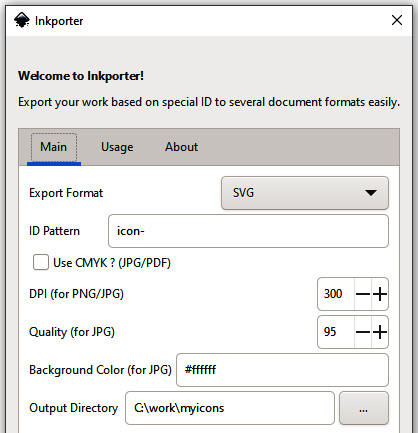
Figure 8.8 – The simple settings of Inkporter
ID patterns are only needed now because we are looking for an effective (lazy) solution by exporting all the icons at once. You could set unique IDs without any repeating pattern for each icon, but then you would have to set them manually for each export.
If you want to export PDF booklets, patterns are even more important since the groups with the patterned IDs will be stitched together into one PDF document.
As you can see, the CMYK issue is still present but is solved by third-party apps such as Krita and Scribus and by the smart Inkporter extension. I really hope that a native CMYK solution will be added to Inkscape in future updates, but until then, these are some working methods to jump over the CMYK color barrier.
The next section is a simple way to make your vector life easier: you will learn how to use and create templates for your Inkscape workflow.
Working faster with custom templates
If you use Inkscape regularly, after a while, repeating the same tasks over and over again is inevitable. You might create one business card after the other or draw icons of the same size every day. This is why, when you create a new document, Inkscape offers to create it from a template to ease your work. There are a number of default templates, including standard paper sizes, the mentioned business card size, and even templates to create seamless pattern designs.
And apart from these, you can create your own custom templates for tasks that you work with regularly. If you know that one task is repeated frequently, and you know you will keep on repeating it in the future, it might be worth creating a template for it. A template will save you time and energy, and it will become an important part of your workflow in no time.
Creating your own custom template
A template file is very simple to design. It is nothing else, just an Inkscape SVG file that is placed in the Inkscape Template folder. You might create a general template file; for example, if you create the same size horizontal banners for all websites, create a blank SVG with the page size needed. Or you can create a more specific template for a task you create for a particular client over and over again.
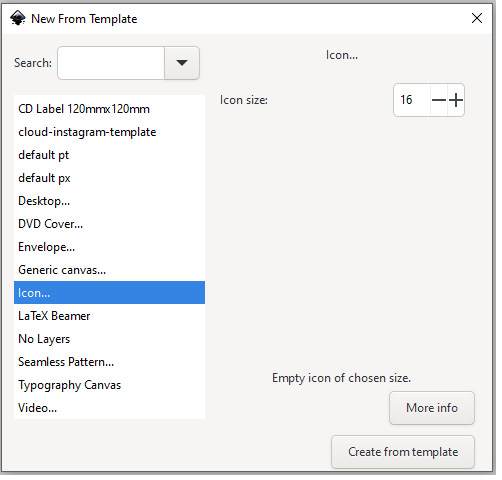
Figure 8.9 – The New From Template popup
To practice, you will create a very specific template: you will design an Instagram post template to use for our practice brand, CloudUsers. Instagram is built around images, but brands and influencers like to post text and quotes in an image format to capture the attention of users.
These posts are all the same size, with a background color, some sample text, and minimal branding. If you have used Canva for Instagram posts, Inkscape might be a more creative and unique solution.
Here is how you can create your own Instagram-ready vector templates:
- To start, create a new document, and draw a 1080 px X 1080 px square. This is the standard Instagram post size. This will be the basis of our template.
- Select the square, and press Shift + Ctrl + R to resize the page to the selected content. Or use the Page tool and resize the page with the resize icon on the Tool menu.
- Now, to the branding and colors. If you created the different versions of the CloudUsers logo in Chapter 2, Design a Clever Tech Logo with Inkscape, you should have a white version of it. That version was placed on the gradient we used in the logo. Copy the white logo and the background element with the gradient into your Instagram template.
- This same linear gradient will be the color of your background; now apply it to the square.
- As you see, templates can really contain everything a normal SVG file can: shapes, colors, gradients, and even text and guides. To add the guides, draw another square, this time 1000 px X 1000 px. Position it in the center of your page, in the center of the square background.
- Select this second square and select Object | Object to Guides in the top menu. This will turn it into four guidelines, each 100 px away from the edge of your background square. These will help later every time you use this template.
- Now add some title text using the bold Montserrat font to the background. Under that, add smaller sample text, as shown in Figure 8.10.
- Under the text, place the white CloudUsers logo. That’s it, you’re finished with the design!

Figure 8.10 – A simple Instagram post template design
- To turn this into a template, simply copy it into the Inkscape Template folder at Share/Inkscape/Templates. It is in your Inkscape installation folder.
- If you close and restart Inkscape now, you will see your own Instagram template among the templates offered at the start!
Templates are all about reusing and shaping vector elements. Forget recreating the same things again and again. Build your own template library and make custom templates part of your workflow! In this section, you learned to use templates to start your work faster. In the next section, you will learn about dealing with Inkscape crashes like a pro.
What to do if Inkscape crashes
This part of the chapter could be written about any graphic design program, or about any program really. Nothing is perfect, accidents happen, and programs crash. And sometimes, you just lose the results of hours of hard work.
Inkscape is an open source program, with different versions able to run on various operating systems. People use Inkscape on Windows, macOS, and GNU/Linux, working on computers with very different capabilities.
Inkscape is constantly developed, and new features mean new design possibilities, but they might also cause bugs. And sometimes things are too much to handle, and Inkscape crashes. In the following sections, you will learn what to do on these rare occasions.
Prevention
Your first defense against accidental crashes is to prevent them. Here are a few tips to remember every time you work with Inkscape. Most are useful tips for other design programs as well.
Save your work and save it often
The first thing you should always do right after you draw the first shape is to save your work as an Inkscape SVG file in the project directory. And after that, save your work every time you make a major change. Make this a habit; simply press Ctrl + S to quickly save your file. It seems trivial, but I’ve seen too much work being lost because someone was so deep into their design work that they forgot to save it.
Set up the Autosave timer
If you tend to forget to save, set up Autosave! Go to Edit | Preferences, and from the Input/Output drop-down menu, pick Autosave. Here, you can set up how often you wish your work to be saved. You will not notice this feature running, only when you lose your work and find out that Inkscape indeed saved it a few minutes ago. Such a relief!

Figure 8.11 – Enabling Autosave in Preferences
Don’t overload Inkscape; organize your work
You cannot overload Inkscape, actually, but you can cause it to collapse when you force it to handle too much, and that can overload your computer’s memory. When too many objects, too many effects, or too many imported bitmap images are starting to slow down your computer, then it is time to save, stop and clean up your document a bit.
Delete the parts and objects that are not needed anymore, link images instead of embedding them whenever possible, and save new versions of your documents after cleaning them up.
This last tip also helps organize your work, since it is easier to handle multiple smaller files than one huge one for each project. This book itself provides a good example of this method: when designing a whole visual identity, including a logo, an icon set, a website, and illustrations for one company.
It is natural that you copy and reuse elements between the different parts of the project. If you kept these elements in one file, it would be huge, slow, and complicated to find your way around, let alone work with it. This is a good reason to keep your content organized in separate files!
Recover your work
Using the aforementioned preventive tips will reduce the risk of crashing and losing your work. Plus, with every new version, Inkscape is getting more and more stable. But it can still happen that you get an error message and the software simply crashes. And in this case, you need to know how you can recover your graphics in Inkscape.
Emergency backup files
Whenever the program crashes, Inkscape tries to create an emergency file in the same project folder as your original file or in the User folder on your computer. It will add a timestamp to the name of the file to easily identify it and distinguish it from the original. Look for the file and check whether it has the correct vector data in it. If it works and has all the graphics you just thought to be lost, rename it to remove the timestamp – just to make things convenient later – and continue your work.
Autosaved backup files
If you have the Autosave feature enabled, as shown earlier in the Prevention section, then Inkscape creates backup versions of your document automatically. To find these backups, head to Preferences again, and in the Autosave settings check the path to the autosave directory, as shown in Figure 8.11.
Copy the directory location and navigate there, as this is where your backup files are located. Most of the time, they do not have a .svg extension, but you can still open them with Inkscape and save them as normal Inkscape vector files.
How to open corrupted files
Sometimes files are saved, but they simply cannot be opened. This might happen without a crash with any program; files just get corrupted.
If you cannot open an Inkscape SVG file, you might try opening it with another program to check whether it really is corrupted. You can try other vector graphical applications such as Illustrator, but if you have none of them installed, modern browsers can even open and display SVG files. Try opening your file in Chrome and see whether it shows the file is empty or damaged.
If the file displays properly, create a manual save with another filename, and try to open it in Inkscape again. You might lose some Inkscape-specific settings this way (such as losing guides), but you might save the bulk of your design and that is what matters.
When you try to open an Inkscape file that worked before, do so with a different version of Inkscape. Most of the time, installing the newest version of the program solves this issue. If not, try a downgrade, or look for an older version – most versions are still available from the official website.
And if a corrupted file cannot be opened with either method, try to look for autosaves and recover a previous version if possible.
Most importantly, remember to save often, enable Autosave, and organize your files because prevention is the best way to keep your work safe!
Summary
This chapter was built differently than the previous ones. In this chapter, you received various tips and tricks that are based on a decade of daily Inkscape usage. First, there was a short reminder about the basic tools and methods and how important it is to know them before digging deeper. Then we learned about LPEs and through a few examples, saw how effective they really are. LPEs provide some of the best automation for vector graphics.
Then we moved even deeper, checking behind the curtain of SVG files and learning about the benefits of using just a bit of XML. The Find/Replace function is invaluable when you are working with multiple objects, and object IDs can be used in more than one way too!
CMYK support was always a question for XML, but thanks to the Inkporter extension and other apps, now you know more than one way to solve this problem.
Next, you learned about custom SVG templates and how easy it is to create them in Inkscape. And finally, you prepared yourself and now know what to do when Inkscape crashes and when SVG files get corrupted. Remember: make saving a habit!
The next chapter is the last one of this book, where we will take a look at all you have learned about Inkscape.