
Here are the steps to follow to run the GUI version of Check Disk:
In Windows Explorer, right-click the drive you want to check and then select Properties.
On the drive’s property sheet, select the Tools tab.
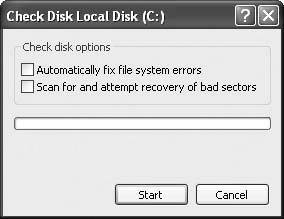
Click the Check Now button. The Check Disk window appears, as shown in Figure 12-1.
You have two options:
Automatically Fix File System Errors. If you select this check box, Check Disk will automatically repair any file system errors that it finds. If you leave this option cleared, Check Disk just reports any errors it finds.
Scan For And Attempt Recovery Of Bad Sectors. If you select this check box, Check Disk performs a sector-by-sector surface check of the hard disk surface. If Check Disk finds a bad sector, it automatically attempts to recover any information stored in the sector and marks the sector as defective so no information can be stored there in the future.
Click Start.
If you selected the Automatically Fix File System Errors check box and are checking a partition that has open system files, Check Disk will tell you that it can’t continue because it requires exclusive access to the disk, and it will ask if you want to schedule the scan to occur the next time you boot the computer. Click Yes to schedule the disk check.
When the scan is complete, Check Disk displays both a message letting you know that it has finished and a report on the errors it found, if any.
Insider Secret
If you click Yes when Check Disk asks if you want to schedule the scan for the next boot, the program adds the AUTOCHK utility to the following registry setting:
HKLMSYSTEMCurrentControlSetControlSession Manager
BootExecute
This setting specifies the programs that Windows XP should run at boot time when the Session Manager is loading. AUTOCHK is the automatic version of Check Disk that runs at system startup. When AUTOCHK is scheduled, you see the following the next time you restart the computer:
A disk check has been scheduled.
To skip disk checking, press any key within 10 second(s).
You can bypass the check by pressing a key before the timeout expires. Note that you can change the timeout value by creating a DWORD value named AutoChkTimeOut in the following registry key:
HKLMSYSTEMCurrentControlSetControlSession Manager
BootExecute
Set this to the number of seconds you want to use for the timeout. Another way to do this is to use the CHKNTFS /T:[ time] command, where time is the number of seconds to use for the timeout. (If you exclude time, CHKNTFS returns the current timeout setting.) For example, the following command sets the timeout to 60 seconds:
CHKNTFS /T:60
Here’s the syntax for Check Disk’s command-line version:
CHKDSK [ volume [ filename]] [/F] [/V] [/R] [/X] [/I] [/C] [/L:[ size]]
| The drive letter (followed by a colon) or volume name. |
| On FAT16 and FAT32 disks, the name of the file to check for fragmentation. Include the path if the file isn’t in the current folder. |
| Tells Check Disk to automatically fix errors. This is the same as running the Check Disk GUI with the Automatically Fix File System Errors option selected. |
Runs Check Disk in verbose mode. On FAT16 and FAT32 drives, Check Disk displays the path and name of every file on the disk; on NTFS drives, it displays cleanup messages, if any. | |
| Tells Check Disk to scan the disk surface for bad sectors and recover data from the bad sectors, if possible. This is the same as running the Check Disk GUI with the Scan For And Attempt Recovery Of Bad Sectors option selected. |
| On NTFS non-system disks that have open files, forces the volume to dismount, invalidates the open file handles, and then runs the scan (the /F switch is implied). |
| On NTFS disks, tells Check Disk to check only the file system’s index entries. |
| On NTFS disks, tells Check Disk to skip the checking of cycles within the folder structure. A cycle is a corruption in the file system whereby a subfolder’s parent folder is listed as the subfolder itself. (For example, a folder named C:Data should have C: as its parent; if C:Data is a cycle, then C:Data—the same folder—is listed as the parent, instead.) This creates a kind of loop in the file system that can cause the cycled folder to "disappear." This is a rare error, so using /C to skip the cycle check can speed up the disk check. |
| On NTFS disks, tells Check Disk to set the size of its log file to the specified number of kilobytes. The default size is 65,536, which is plenty big enough for most systems, so you should never need to change the size. Note that if you include this switch without the size parameter, CHKDSK tells you the current size of the log file. |