


Linux for z Systems (SUSE)
This chapter covers installing SLES 11 Service Pack 3 and SLES 12. Later distributions (such as SLES 12 Service Pack 1) will probably have a similar installation process to SLES 12. There is no need for you to install both distributions. Both distributions are featured to show minor changes and to illustrate the general processes involved in both instances.
This chapter includes the following sections:
3.1 Installing SLES 11 service pack 3
For this example, the distribution, a single file named SLES-11-SP3-DVD-s390x-GM-DVD1.iso, was placed in a subdirectory in the base Linux home directory named DVD. The path name was /home/ibmsys1/DVD.
The distribution iso file was mounted on a mount point created in the home directory named ISO:
# mount -o loop /home/ibmsys1/DVD/SLES-11-SP3-DVD-s390x-GM-DVD1.iso ISO
mount: /dev/loop0 is write protected, mounting read-only
$ ls ISO
The loop function in the mount command takes the single .iso file (as input) and explodes it into all the component files at the mount point. The ls command displayed 29 file or directory names, starting with ARCHIVES.gz. This output verifies that the iso file and the mount function worked correctly.
An example devmap was created in the base Linux home directory named devSLES11:
[system]
memory 3000m
processors 3 #hash symbols indicate comments
[manager]
name awsckd 22
device 02A0 3390 3990 /z/SLES11A #This volume is about 8.5 GB usable space
device 02A1 3390 3990 /z/SLES11B #These are smaller volumes
device 02A2 3390 3990 /z/SLES11C
[manager] #this creates your first LAN
name awsosa 33 --path=a0 --pathtype=OSD --tunnel_intf=y
device 0400 osa osa
device 0401 osa osa
device 0402 osa osa
[manager] #this creates your second LAN
name awsosa 33 --path=f1
device 0404 osa osa #use different addresses from
device 0405 osa osa #what was used for the first LAN
device 0406 osa osa
This devmap assumes that you have created the three 3390 volumes earlier using alcckd commands. Your path name in the OSA definitions might differ, and you can skip defining the second LAN shown here. The 3390 file names (such as /z/SLES11A) are arbitrary and are not visible to Linux for z after it is running.
The initial installation process can be divided into three parts:
1. IPL (“boot”) the installer and installation kernel.
2. Use VNC to communicate with YAST for the primary Linux configuration and installation.
3. IPL the system again to allow the installation processes to complete.
Each of these steps is described in detail in the following text.
3.1.1 Booting the installer and installation kernel
You can use these steps to boot the installer and installation kernel:
1. Start zPDT with your devmap and boot the installation process by using a special zPDT command:
$ awsstart devSLES11
(The usual startup messages appear)
$ ipl_dvd ISO/suse.ins (note the underscore in the command)
AWSMID020I Comment from .ins file: 'SUSE Linux for zSeries.....
AWSMID021I Enter 'Y' to continue or 'N' to cancel the installation
Y (you enter Y at this point)
Several screens of messages (and some pauses during the messages) are displayed before the first option menu is displayed:
Main Menu
1) Start Installation
2) Settings
3) Expert
4) Exit or Reboot
2. Normal messages to be sent to the emulated z Systems from a base Linux command window use the oprmsg command. For example, use oprmsg 1 to send a “1” to the z Systems program. However, issuing many oprmsg commands is laborious and leads to errors. You can use the Linux command alias +=oprmsg to provide a shorter sequence, and you can then use + 1 to send the “1” character. Note the space after the plus sign. The following text is the script from the initial Linux for z Systems installation. Note that ibmsys1@linux-4f4a:~ is the prompt for user ibmsys1 in the base Linux system.
A listing of the first part of the installation is included here:
|
Attention: In the interest of readability, some of the lines in the following text are truncated or shortened.
You will experience multi-second pauses at various points in the startup. Be patient.
|
ibmsys1@linux-4f4a:~ alias +=oprmsg < create alias
ibmsys1@linux-4f4a:~> awsstart devSLES11 < start zPDT
IBM z Systems Personal Development Tool (zPDT)
Licensed Materials - Property of IBM
5799-ADE
(C) Copyright IBM Corp. 2007,2013 All Rights Reserved.
z1090, version 1-6.49.13, build date - 05/29/15 for Linux on SuSE 64bit
AWSSTA014I Map file name specified: devmapz
AWSSTA204I zPDT started in directory '/home/ibmsys1'.
AWSSTA146I Starting independent 1090 instance 'ibmsys1'
OSA code level = 0x4301
AWSDSA010I AWSOSA is ready for chpid: 0xA0 device: 0x400
AWSDSA010I AWSOSA is ready for chpid: 0xA0 device: 0x401
AWSDSA010I AWSOSA is ready for chpid: 0xA0 device: 0x402
AWSEMI314I CPU 0 zPDTA License Obtained
AWSSTA059I System initialization complete
AWSSTA012I All configured subsystems started
ibmsys1@linux-4f4a:~> ipl_dvd ISO/suse.ins
AWSMID022I The installation directory is ISO
AWSMID020I Comment from INS file: '* SuSE Linux for zSeries Installation/Rescue System’
AWSMID021I Enter 'Y' to continue or 'N' to cancel the installation
y <no + prefix needed here
Memory loaded, 0x8A6E00 Bytes at address 0x0
Memory loaded, 0x4 Bytes at address 0x1040C
Memory loaded, 0x4 Bytes at address 0x10414
Memory loaded, 0xF95AB9 Bytes at address 0x1000000
Memory loaded, 0x47 Bytes at address 0x10480
ibmsys1@linux-4f4a:~> OPRMSG: Initializing cgroup subsys cpuset
OPRMSG: Initializing cgroup subsys cpu
OPRMSG: Linux version 3.0.76-0.11-default (geeko@buildhost) (gcc version 4.3.
(multiple Linux initialization lines omitted)
OPRMSG: >>> SUSE Linux Enterprise Server 11 installation program v3.3.91 (c) 1996-2010 SUSE Linux Products GmbH <<<
(more lines omitted)
OPRMSG: >>> Linuxrc v3.3.91 (Kernel 3.0.76-0.11-default) <<<
OPRMSG: Main Menu
OPRMSG: 1) Start Installation
OPRMSG: 2) Settings
OPRMSG: 3) Expert
OPRMSG: 4) Exit or Reboot
+ 1 <select option 1
ibmsys1@linux-4f4a:~> OPRMSG: 1
OPRMSG: Start Installation
OPRMSG:
OPRMSG: 1) Start Installation or Update
OPRMSG: 2) Boot Installed System
OPRMSG: 3) Start Rescue System
+ 1 <select option 1
ibmsys1@linux-4f4a:~> OPRMSG: 1
OPRMSG: Choose the source medium.
OPRMSG:
OPRMSG: 1) DVD / CD-ROM
OPRMSG: 2) Network
+ 2 <select option 2
ibmsys1@linux-4f4a:~> OPRMSG: 2
OPRMSG: Choose the network protocol.
OPRMSG: 1) FTP
OPRMSG: 2) HTTP
OPRMSG: 3) HTTPS
OPRMSG: 4) NFS
OPRMSG: 5) SMB / CIFS (Windows Share)
OPRMSG: 6) TFTP
+ 1 <select option 1
ibmsys1@linux-4f4a:~> OPRMSG: 1
OPRMSG: Detecting and loading network drivers
OPRMSG: Choose the network device.
OPRMSG: 1) IBM OSA Express Network card (0.0.0400)
OPRMSG: 2) IBM OSA Express Network card (0.0.0401)
OPRMSG: 3) IBM OSA Express Network card (0.0.0402)
+ 1 <select option 1
ibmsys1@linux-4f4a:~> OPRMSG: 1
OPRMSG: Please choose the physical medium.
OPRMSG: 1) Ethernet
OPRMSG: 2) Token Ring
+ 1 <select option 1
(For the example configuration (and devmap) you want to use the
tunnel for TCP/IP with the read channel at address 0.0.0400,
the write channel at 0.0.0401, and data channel 0.0.0402.
No port number is used.)
ibmsys1@linux-4f4a:~> OPRMSG: 1
OPRMSG: Enter the relative port number
+ <a null entry
ibmsys1@linux-4f4a:~> OPRMSG:
OPRMSG: Device address for read channel
OPRMSG: 0.0.0400!>
+ <a null entry
ibmsys1@linux-4f4a:~> OPRMSG:
OPRMSG: Device address for write channel
OPRMSG: 0.0.0401!>
+ <a null entry
ibmsys1@linux-4f4a:~> OPRMSG:
OPRMSG: Device address for data channel
OPRMSG: 0.0.0402!>
+ <a null entry
ibmsys1@linux-4f4a:~> OPRMSG:
OPRMSG: Portname to use
+ <a null entry
ibmsys1@linux-4f4a:~> OPRMSG:
OPRMSG: Enable OSI Layer 2 support?
OPRMSG: 1) Yes
OPRMSG: 2) No
+ 2 <no layer 2
ibmsys1@linux-4f4a:~> OPRMSG: 2
OPRMSG: (Port 0)
OPRMSG: qeth.2c6def: register layer 3 discipline
OPRMSG: qdio: 0.0.0402 OSA on SC 4 using AI:1 QEBSM:0 PCI:1 TDD:1 SIGA: W AP
OPRMSG: qeth.736dae: 0.0.0400: Device is a OSD Express card (level: 4301)
OPRMSG: with link type OSD_1000 (portname: )
OPRMSG: qeth.47953b: 0.0.0400: Hardware IP fragmentation not supported on eth
OPRMSG: qeth.d7fdb4: 0.0.0400: VLAN enabled
OPRMSG: qeth.e90c78: 0.0.0400: Multicast enabled
OPRMSG: qeth.5a9d02: 0.0.0400: IPV6 enabled
OPRMSG: qeth.184d8a: 0.0.0400: Broadcast enabled
OPRMSG: qeth.9c4c89: 0.0.0400: Outbound TSO not supported on eth0
OPRMSG: Automatic configuration via DHCP?
OPRMSG: 1) Yes
OPRMSG: 2) No
+ 2 <no DHCP here
ibmsys1@linux-4f4a:~> OPRMSG: 2
OPRMSG: Enter your IPv4 address.
OPRMSG: Example: 192.168.5.77/24
+ 10.1.1.2 <address for new Linux for z
ibmsys1@linux-4f4a:~> OPRMSG: 10.1.1.2
OPRMSG: Enter your netmask. For a normal class C network, this is usually
OPRMSG: 255.255.255.0
OPRMSG: 255.255.255.0!>
+ <null entry
ibmsys1@linux-4f4a:~> OPRMSG:
OPRMSG: Enter the IP address of the gateway. Leave empty if you don't need on
+ <null entry
ibmsys1@linux-4f4a:~> OPRMSG:
OPRMSG: Enter your search domains, separated by a space:
+ <null entry, long pause
ibmsys1@linux-4f4a:~> OPRMSG:
OPRMSG: Enter the IP address of your name server. Leave empty or enter "+++" if you don't need one
+ <null entry
ibmsys1@linux-4f4a:~> OPRMSG:
OPRMSG: Enter the IP address of the FTP server
OPRMSG: >
+ 10.1.1.1 <base Linux tunnel
ibmsys1@linux-4f4a:~> OPRMSG: 10.1.1.1
OPRMSG: Enter the directory on the server
+ ISO <your copy of iso DVD
ibmsys1@linux-4f4a:~> OPRMSG: /mnt/disk
OPRMSG: Do you need a username and password to access the FTP server?
OPRMSG: 1) Yes
OPRMSG: 2) No
+ 1 <for use on base Linux
ibmsys1@linux-4f4a:~> OPRMSG: 1
OPRMSG: Enter the user name with which to access the FTP server
+ ibmsys1 <userid for ftp on base Linux
ibmsys1@linux-4f4a:~> OPRMSG: ibmsys1
OPRMSG: Enter the password for the FTP server
+ xxxxxx <password for ibmsys1 on base Linux
ibmsys1@linux-4f4a:~> OPRMSG:
OPRMSG: Use a HTTP proxy?
OPRMSG: 1) Yes
OPRMSG: 2) No
+ 2 <no proxy needed
ibmsys1@linux-4f4a:~> OPRMSG: 2
OPRMSG: Loading Installation System (1/6) (24640 kB) - 0%
(lines omitted)
OPRMSG: Select the display type.
OPRMSG: 1) X11
OPRMSG: 2) VNC
OPRMSG: 3) SSH
OPRMSG: 4) ASCII Console
+ 2 <use VNC
ibmsys1@linux-4f4a:~> OPRMSG: 2
OPRMSG: Enter your VNC password
+ xxxxxxxx <must be minimum 8 characters
ibmsys1@linux-4f4a:~> OPRMSG:
OPRMSG: starting hald...
OPRMSG: ok
OPRMSG: starting syslogd (logging to /dev/tty4)...
OPRMSG: ok
OPRMSG: starting klogd... ok
OPRMSG: starting slpd to announce VNC...
OPRMSG: starting yast...
OPRMSG:
OPRMSG: starting VNC server...
OPRMSG: A log file will be written to: /var/log/YaST2/vncserver.log ...
OPRMSG: ***
OPRMSG: *** You can connect to <host>, display :1 now with vncviewer
OPRMSG: *** Or use a Java capable browser on http://<host>:5801/
OPRMSG: ***
OPRMSG: (When YaST2 is finished, close your VNC viewer and return to this window.)
OPRMSG: Active interfaces:
OPRMSG: eth0 Link encap:Ethernet HWaddr 02:A0:A0:A0:A0:A0
OPRMSG: inet addr:10.1.1.2 Bcast:10.1.1.255 Mask:255.255.255.0
OPRMSG: --
OPRMSG: lo Link encap:Local Loopback
OPRMSG: inet addr:127.0.0.1 Mask:255.0.0.0
OPRMSG:
OPRMSG: *** Starting YaST2 ***
3.1.2 Using VNC to work with YaST2
You can use steps like these to use VNC to work with YaST2:
1. Move to another command window in your base Linux system. Leave the command window with the initial text (as shown above) open.
2. In the new command window, enter the following command1:
$ vncviewer 10.1.1.2:1
$ password: xxxxxxxx (VNC password you assigned earlier)
This example assumes that you assigned 10.1.1.2 as the IP address of your target Linux for z Systems installation. Remember that the 10.1.1.1 is the default IP address of the tunnel on your base Linux.
3. This command should result in a graphics window opening on your base Linux desktop, with the target system YaST2 running in a semi-text manner. This section does not include all of the screens involved. Instead, it presents a condensed version of your interactions for this portion of the installation. You might make different choices at various points.
4. Some of the update operations are slow. Wait a second or two when the VNC window is updating to be certain you are seeing the complete update. A busy indicator is displayed while processing that looks like the example shown in Figure 3-1.

Figure 3-1 System busy icon (in VNC window)
The output similar to the following will be displayed:
Lanuage: English (US)
Keyboard Layout: English (US)
Agree to License terms
<next>
Select Configure DASD Disks
DASD Disk Management
(select first disk with cursor (0.0.02A0) and double click)
Perform Action: Activate
Not Formatted: Format Now. <Continue>
(Formatting takes some time. Generally, do not format several disks in parallel. The progress bar displayed is confusing.)
(Use the same steps to format additional DASD volumes you may have defined.)
<next> (Some transitions are slow. Be patient.)
<next>
System Probing
Select New Installation
<next>
Set time zone.
<next>
Installation Settings
Possibly select (click) Partitioning (optional)
(use the whole 02A0 disk volume for Linux and do not partition it. This default results in: (based on your initial 9 GB 3390 volume)
/dev/dasda1 2 GB swap
/dev/dasda2 about 6 GB GB ext3
New users might want to practice installing Linux for z Systems several times; if so, initially use the default partition arrangement on one volume.)
Possibly select (click) Software (optional)
(accept the defaults.)
<install>
Confirm licenses <I agree>
Confirm Installation <install>
(The example installation took about 30 minutes.)
Finishing Basic Installation
System will reboot now.
5. However, the system does not reboot. Instead, it loads a disabled wait, as seen in the initial command window where zPDT was started. You must reboot manually, as described in 3.1.3, “Completing the installation” on page 25. The VNC window closes automatically.
3.1.3 Completing the installation
Linux for z Systems is now bootable, but has not completed all of the installation processes. For reasons that were not clear, you sometimes need to stop and restart zPDT to finish the installation. To do so, you can use steps like these:
1. Enter the following commands:
$ awsstop
(wait for “Shutdown Complete” message)
$ a wsstart devSLES11
2. Your first boot (IPL) of the new system requires special care, as shown in the following text. Go to your first command window on the base Linux and enter the following zPDT command:
$ ipl 02A0
This should result in the following interaction:
ibmsys1@linux-4f4a:~> OPRMSG: zIPL v1.15.0-0.136.13 interactive boot menu
OPRMSG: 0. default (SLES11_SP3)
OPRMSG: 1. SLES11_SP3
OPRMSG: 2. Failsafe_1
OPRMSG: 3. ipl
OPRMSG: Please choose (default will boot in 10 seconds):
+ 3 <do this quickly
(Do not let this default to option 0. You must select option 3 within 10 seconds.)
OPRMSG: Booting ipl...
(A long series of startup messages omitted here,
including some long pauses.)
OPRMSG: ***
OPRMSG: *** Please return to your X-Server screen to finish installation
OPRMSG: ***
OPRMSG: starting VNC server...
OPRMSG: A log file will be written to: /var/log/YaST2/vncserver.log ...
OPRMSG: ***
OPRMSG: *** You can connect to <host>, display :1 now with vncviewer
OPRMSG: *** Or use a Java capable browser on http://<host>:5801/
OPRMSG: ***
OPRMSG: (When YaST2 is finished, close your VNC viewer and return to this window.)
3. Open another command window of your base Linux system and start a VNC viewer again:
$ vncviewer 10.1.1.2:1
4. Perform the following actions in the YaST2 displayed by VNC:
Set and confirm a password for the root user
<next>
Set a host and domain name. (use “SLES11” and “site” and do not allow DHCP to change the name.)
<next> (long pause while setting network configuration)
disable the firewall for your initial tests.
<next>
skip the network test.
<next> (followed by several screen updates. Be patient.)
<next> (creating a certificate and more pauses)
User authentication method: Local
New local user: define ibmsys1 as a new local user to receive system mail.
(You should select your own name. The example uses ibmsys1 as the primary
user on both the base Linux and Linux for z Systems. This could be
confusing to some people.)
<next>
Writing the system configuration
Release notes
<next>
Hardware Configuration
<next>
Installation Completed.
uncheck the Clone This System For AutoYaST option.
<Finish>
This process caused the VNC window to close, and some shutdown and startup messages to appear in the zPDT command window followed by a login prompt.
5. Start the vncviewer in a base Linux command window:
$ vncviewer 10.1.1.2:1
This command (after a pause) creates a fully graphic Linux window.
6. Log in, start YaST, and define a new user. You can connect by using ssh (to 10.1.1.2) but not with Telnet. You can use an ASCII mode login from the base console window that you used to start zPDT, but this requires entering oprmsg (or the “+” shortcut used in the example) for every line and is not practical. The example used a df -h command to observe that Linux for z Systems used 3.2 GB disk space (all in the root directory in the example configuration).
7. Do not attempt to start YaST from the base console window you used to start zPDT. The z Systems console functions that it provides are basic. When it detects a test interface, YaST attempts to use a full-screen mode that does not work in this case. Instead, make an ssh connection and use the text-mode YaST through it.
8. Using YaST through a VNC window, shutdown Linux for z Systems. Doing so displays a Power Manger Still Running message.
9. Enter Shutdown Anyway. This action produced the followign output in the zPDT window:
INIT: Switching to runlevel: 0
(more shutdown messages)
The system will be halted immediately.
10. Stop zPDT with the awsstop command in the base Linux command window. Then start zPDT again with a awsstart devSLES11 command. The startup menu appeared again:
OPRMSG: 0. default (SLES11_SP3)
OPRMSG:
OPRMSG: 1. SLES11_SP3
OPRMSG: 2. Failsafe_1
OPRMSG: 3. ipl
OPRMSG:
OPRMSG: Please choose (default will boot in 10 seconds):
11. This time allow it to default to option 0. After several startup messages, you receive a login prompt in the zPDT starting window.
12. Start a VNC viewer and perform any additional system setup through this interface.
3.1.4 Additional work
Many postinstallation jobs need to be completed. This book only addresses topics that are related to use with zPDT. For information about the jobs not detailed in the following sections, see The Virtualization Cookbook for IBM z/VM 6.3, RHEL 6.4, and SLES 11 SP3, SG24-8147.
3.1.5 Stopping the system
Typically, you use the VNC desktop to stop Linux for z Systems. Wait for the The System will be halted immediately message in the base Linux window, then enter awsstop to stop zPDT. It is sometimes necessary to stop and restart zPDT when you want to restart Linux for z Systems.
If you inadvertently closed the base system Linux window that was used to start zPDT, you will not see the The System will be halted immediately message. In this case, wait about a minute before entering the awsstop command in another base Linux window.
3.1.6 FTP
You can use these steps to allow an FTP link:
1. Use YaST to install vsftp. The system remembers the FTP link to 10.1.1.1 and installed it from the .iso files mounted there.
2. Configure vsftp, again through YaST. Elect it to have it start through xinetd.
3. The default mode is anonymous only. The YaST windows for FTP allow you to select anonymous users, authenticated users, or both.
4. By default, uploading is disabled. This can be enabled in the same window.
5. The Expert Settings window allows enabling of SSL, with several options.
If the installation process described in this chapter was followed, you should be able to make the following connections:
(from Linux for z Systems): $ ftp 10.1.1.1 (connect to base Linux)
and
(from the base Linux) : $ ftp 10.1.1.2 (connect to Linux for z)
3.1.7 More DASD
Almost all users require more disk space than what was created during the installation described above. Complete steps like these to add more space:
1. Decide on the number and size of 3390 volumes involved. You can create a single very large 3390 volume and create multiple partitions. However, Linux for z Systems DASD are limited to three partitions. At the other extreme, you can generate many small 3390 volumes with a single Linux partition on each one.
There is no general recommendation about your disk requirements. As a starting point, consider several moderate-size 3390 volumes, perhaps 10-20 GB each, with one or two partitions per volume. Your first Linux for z Systems installations will be like a trial, making it a good time to experiment with disk layouts.
2. Create the 3390 volumes with the zPDT command alcckd:
$ alcckd /z/MyNextLinuxVolume -d3390-5 (this command on your base Linux)
This command creates a single Linux file (on the base Linux) with 5*1113 = 5565 cylinders. This configuration provides about 732K usable bytes/cylinder, or roughly 4 GB total space. The space is in raw 3390 format and is not yet usable by Linux for z Systems. Creating emulated volumes (with alcckd) is best done when zPDT is not running.
3. Add the new volumes to your zPDT devmap:
...
[manager]
name awsckd 22
device 02B0 3390 3990 /z/SLES11A #this will be the boot drive
device 02B1 3390 3990 /z/SLES11B
device 02BA 3390 3990 /z/MyNextLinuxVolume #use of z directory is arbitrary
....
As mentioned earlier, the device number or “address” such as 02BA for a new drive in this example is arbitrary. It has more meaning on a “real” z Systems mainframe, but this is not relevant to zPDT systems running Linux for z Systems. The addresses need not be sequential, but it is common practice to make them sequential (or almost sequential).
4. After restarting zPDT and IPLing Linux for z Systems, use the YaST DASD option. The newly added device should be visible as channel 0.0.02BA (based on the devmap example). Select the device and Perform Action → Activate. This should offer to format the volume. Select Continue to do so. As a result of formatting, the device should now have a name, such as /dev/dasdd. Select <next> to exit from the DASD Management function. This can take several seconds.
5. Decide on mount points in Linux for z Systems for the new volumes or partitions. For new users, generally use mount points that are not part of the root file system. The following mount points are created in the example home directory:
$ cd ~ (go to home directory)
$ mkdir mountpoint1 (not very clever names, but you get
$ mkdir mountpoint2 the general idea)
6. Find the Partitioner function in YaST; select Yes to continue. Double-click the new device name (/dev/dasdd in this example). A screen is displayed to Add, Edit, Move, Resize, and otherwise manipulate partitions. The example involves adding two partitions, each 250 MB, and selecting Ext3 file systems and appropriate mount points. After you select <Finish>, the partitions are created and added to the mount table (if you selected this option).
More disks can be added without using YaST. This process involves the chccwdev, fdasd, and mke2fs commands, and then editing /etc/fstab. As a new user on this platform, use the YaST interface.
3.1.8 Network expansion
The initial installation had only the “tunnel” network connection between Linux for z Systems and the base Linux. This connection was sufficient for running a VNC viewer on the base Linux. The next step is to connect to the external Internet. This connection can be done using the same PC LAN adapter that is used by the base Linux, as shown in Figure 3-2.
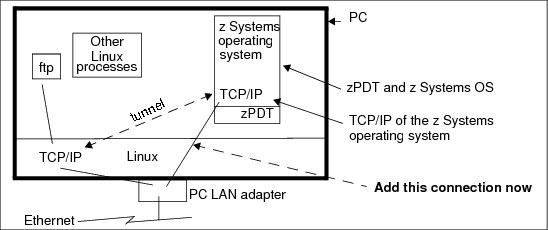
Figure 3-2 External Ethernet connection
In the example, the base Linux has the address 192.168.1.107, which was assigned by DHCP on a local router. The static address 192.167.1.110 was arbitrarily used for Linux for z Systems.
If you have not already defined a second LAN
The first step is to add another network interface to the devmap. Remember that z Systems need three OSA addresses for a TCP/IP connection. The 400 address range is arbitrary, but generally use three consecutive addresses for each definition. A separate device manager definition is required:
....
[manager] #this creates your tunnel LAN
name awsosa 33 --path=a0 --pathtype=OSD --tunnel_intf=y
device 0400 osa osa
device 0401 osa osa
device 0402 osa osa
[manager] #this is for a real LAN
name awsosa 44 --path=F1 --pathtype=OSD #this pathtype is required
device 0404 osa osa
device 0405 osa osa
device 0406 osa osa
As before, the 44 number is arbitrary but different than any other device manager number. The path (CHPID) number, F1 in this example, might need to be adjusted. On the base Linux, enter a find_io command. The following results are shown:
$ find_io
Path Interface State MAC address IPV4 IPV6
---- --------- ---------------- ------------- ---------- --------
F0 enp0s25 UP, NOT RUNNING f0:de:f1:a6:0e:17 * *
F1 wlp3s0 UP, RUNNING 00:24:d7:7f:e1:00 192.167.1.107 ........
A0 tap0 UP, RUNNING 3a:d0:f9:6a:05:0a 10.1.1.1 ........
A1 tap1 DOWN etc
On the example, the wlp3s0 interface is the wireless interface that was connected to the local router. The enp0s25 is an Ethernet wired interface that is not currently being used. To use the same wireless interface for Linux for z Systems, use the F1 path in the devmap. pathtype=OSD is required in the devmap.
Configuring and activating
You can use the following steps to configure and activate the system:
1. Update the devmap.
2. Restart zPDT.
3. IPL Linux for z Systems.
4. Connect with VNC.
5. Using YaST, select Network Settings. This window initially displayed the OSA Express Network cards (0.0.0404 - 0.0.0406) as not configured.
6. Select the first address in this range (0404) and select Edit.
7. For Port Name, enter a name of your choice.
8. Leave the Port Number blank.
9. Enter the Read Channel as 0.0.0404, the Write Channel as 0.0.405, and the Control Channel as 0.0.406.
10. On the next window, enter 192.168.1.110 as a static address.
11. After exiting from Network Settings and YaST, an /sbin/ifconfig command showed both the tunnel (10.1.1.2, assigned the eth0 name) and the new link (192.167.1.110, assigned the eth1 name).
12. Connect to Linux for z Systems with a vncviewer command on a Microsoft Windows system on the same local network to verify operation.
There are many options for network setup, and this book does not cover anything more complex than the simple operation already outlined.
Remember two important facts about networking with zPDT and Linux for z Systems:
•You cannot communicate between the base Linux and Linux for z Systems by using the same network adapter on the PC. A tunnel is required for this communication.
•IP addresses outside a local network are complex topics. Do not attempt to use an address outside the 10.x.x.x or 192.168.x.x range unless you clearly understand those issues.
3.2 SLES 12
You can use the following example steps to install SLES 12:
1. Create a subdirectory in the base Linux home directory named DVD. The path name in the example is /home/ibmsys1/DVD.
2. Place the distribution (which is a single file) named SLE-12-Server-DVD-s390x-GM-DVD1.iso in this directory.
3. Make a mount point in your home directory named ISO.2
4. Mount the distribution iso file on this mount point3:
# mount -o loop /home/ibmsys1/DVD/SLE-12-Server-DVD-s390x-GM-DVD1.iso ISO
mount: /dev/loop0 is write protected, mounting read-only
$ ls ISO
5. The ls command displayed various file and directory names, starting with ARCHIVES.gz. This command verifies that the iso file and the mount function work correctly.
6. Create a devmap in your base Linux home directory named devSLES12:
[system]
memory 3000m
processors 3 #hash symbols indicate comments
[manager]
name awsckd 22
device 02B0 3390 3990 /z/SLES12A
device 02B1 3390 3990 /z/SLES12B
device 02B2 3390 3990 /z/SLES12C
[manager] #this creates your first LAN
name awsosa 33 --path=a0 --pathtype=OSD --tunnel_intf=y
device 0400 osa osa
device 0401 osa osa
device 0402 osa osa
[manager] #this creates your second LAN
name awsosa 33 --path=f1
device 0404 osa osa #use different addresses from
device 0405 osa osa #what was used for the first LAN
device 0406 osa osa
This devmap assumes that you have created the three 3390 volumes earlier using alcckd commands. Your path name in the OSA definitions might differ, as described earlier, and you can skip defining the second LAN shown here.
The initial installation can be divided into three parts:
1. IPLing (“booting”) the installer and installation kernel.
2. Using VNC to communicate with YAST for the primary Linux configuration and installation.
3. IPLing again to allow the installation processes to complete.
Each of these steps is described in detail in the following sections.
3.2.1 Booting the installer and installation kernel
Complete these steps to boot the installer and installation kernel:
1. Start zPDT with your devmap.
2. Boot the installation process using a special zPDT command:
$ awsstart devSLES12
(The usual startup messages appear)
$ ipl_dvd ISO/suse.ins (note the underscore in the command)
AWSMID020I Comment from .ins file: 'SUSE Linux for zSeries.....
AWSMID021I Enter 'Y' to continue or 'N' to cancel the installation
Y (you enter Y at this point)
Several screens of messages (and some pauses during the messages) are displayed before the first option menu:
Main Menu
1) Start Installation
2) Settings
3) Expert
4) Exit or Reboot
3. Normal messages to be sent to the emulated z Systems machine from a base Linux command window using the oprmsg command. For example, enter oprmsg 1 to send a “1” to the z Systems program. However, entering oprmsg many times is laborious and leads to errors. You can use the Linux command alias +=oprmsg to provide a shorter sequence, and then use + 1 to send the “1” character. Note the space after the plus sign. The following text is the script from the initial Linux for z Systems installation. Note that ibmsys1@linux-4f4a:~ is the prompt for user ibmsys1 in the example base Linux system.
A listing of the first part of the installation is included here. Some lines have been omitted to shorten the listing.
ibmsys1@linux-4f4a:~> alias +=oprmsg
ibmsys1@linux-4f4a:~> awsstart devSLES12
IBM z Systems Personal Development Tool (zPDT)
Licensed Materials - Property of IBM
5799-ADE
(C) Copyright IBM Corp. 2007,2013 All Rights Reserved.
z1090, version 1-6.49.13, build date - 05/29/15 for Linux on SuSE 64bit
AWSSTA014I Map file name specified: devSLES12
AWSRAS181I 0 Snapdump incident(s), RAS trace and RAS log files occupy 0 bytes in /home/ibmsys1/z1090/logs
AWSRAS182I Associated files, logs and core files occupy 0 bytes in /home/ibmsys1/z1090/logs
AWSSTA023I DEVMAP contains warnings, please use "awsckmap" for more information.
AWSSTA204I zPDT started in directory '/home/ibmsys1'.
AWSSTA146I Starting independent 1090 instance 'ibmsys1'
OSA code level = 0x4301
AWSDCK005E Could not open file '/z/SLES12C' on device 02B2, ERRNO=2
AWSDSA010I AWSOSA is ready for chpid: 0xA0 device: 0x400
AWSDSA010I AWSOSA is ready for chpid: 0xA0 device: 0x401
AWSDSA010I AWSOSA is ready for chpid: 0xA0 device: 0x402
AWSDSA010I AWSOSA is ready for chpid: 0xF1 device: 0x404
AWSEMI314I CPU 0 zPDTA License Obtained
AWSDSA010I AWSOSA is ready for chpid: 0xF1 device: 0x405
AWSDSA010I AWSOSA is ready for chpid: 0xF1 device: 0x406
AWSEMI314I CPU 1 zPDTA License Obtained
AWSSTA059I System initialization complete
AWSSTA012I All configured subsystems started
ibmsys1@linux-4f4a:~> AWSEMI314I CPU 2 zPDTA License Obtained
ibmsys1@linux-4f4a:~> ipl_dvd ISO/suse.ins
AWSMID022I
The installation directory is ISO/
AWSMID020I Comment from INS file: '* SuSE Linux for zSeries Installation/....
AWSMID021I Enter 'Y' to continue or 'N' to cancel the installation
y
Memory loaded, 0xA45800 Bytes at address 0x0
Memory loaded, 0x4 Bytes at address 0x1040C
Memory loaded, 0x4 Bytes at address 0x10414
Memory loaded, 0x19D8940 Bytes at address 0x1000000
Memory loaded, 0x14 Bytes at address 0x10480
ibmsys1@linux-4f4a:~> OPRMSG: Initializing cgroup subsys cpuset
(omit many lines here)
OPRMSG: >>> linuxrc 5.0.26 (Kernel 3.12.28-4-default) <<<
OPRMSG: Main Menu
OPRMSG: 0) <-- Back <--
OPRMSG: 1) Start Installation
OPRMSG: 2) Settings
OPRMSG: 3) Expert
OPRMSG: 4) Exit or Reboot
+ 1 (select option 1)
OPRMSG: Start Installation
OPRMSG: 0) <-- Back <--
OPRMSG: 1) Installation
OPRMSG: 2) Upgrade
OPRMSG: 3) Rescue System
OPRMSG: 4) Boot Installed System
OPRMSG: 5) Network Setup
+ 1 (select option 1)
OPRMSG: Choose the source medium.
OPRMSG: 0) <-- Back <--
OPRMSG: 1) DVD / CD-ROM
OPRMSG: 2) Network
OPRMSG: 3) Hard Disk
+ 2 (select option 2)
OPRMSG: Choose the network protocol.
OOPRMSG: 0) <-- Back <--
OPRMSG: 1) FTP
OPRMSG: 2) HTTP
OPRMSG: 3) HTTPS
OPRMSG: 4) NFS
OPRMSG: 5) SMB / CIFS (Windows Share)
OPRMSG: 6) TFTP
+ 1 (select option 1)
OPRMSG: Choose the network device.
OPRMSG: 0) <-- Back <--
OPRMSG: 1) IBM OSA Express Network card (0.0.0400)
OPRMSG: 2) IBM OSA Express Network card (0.0.0401)
OPRMSG: 3) IBM OSA Express Network card (0.0.0402)
OPRMSG: 4) IBM OSA Express Network card (0.0.0404)
OPRMSG: 5) IBM OSA Express Network card (0.0.0405)
OPRMSG: 6) IBM OSA Express Network card (0.0.0406)
+ 1 (select option 1)
OPRMSG: Enter the relative port number. (Enter '+++' to abort).
+ (enter a null line)
OPRMSG: Device address for read channel. (Enter '+++' to abort).
OPRMSG: 0.0.0400!>
+ (enter a null line)
OPRMSG: Device address for write channel. (Enter '+++' to abort).
OPRMSG: 0.0.0401!>
+ (enter a null line)
OPRMSG: Device address for data channel. (Enter '+++' to abort).
OPRMSG: 0.0.0402!>
+ (enter a null line)
OPRMSG: Portname to use. (Enter '+++' to abort).
+ (enter a null line)
OPRMSG: Enable OSI Layer 2 support?
OPRMSG: 0) <-- Back <--
OPRMSG: 1) Yes
OPRMSG: 2) No
+ 2 (select option 2)
OPRMSG: Examples: 192.168.5.77/24 2001:db8:75:fff::3/64.
+ 10.1.1.2/24 (IP for target system)
OPRMSG: Enter your gateway IP address.
+ 10.1.1.1 (could also be null)
OPRMSG: Enter your name server IP address.
+ (use a null line)
OPRMSG: Enter your search domains, separated by a space. (Enter '+++' to
+ (use a null line)
OPRMSG: Enter the name of the FTP server. (Enter '+++' to abort).
+ 10.1.1.1 (IP of base Linux)
OPRMSG: Enter the directory on the server. (Enter '+++' to abort).
+ ISO (mount point on base Linux)
OPRMSG: Do you need a username and password to access the FTP server?
OPRMSG: 0) <-- Back <--
OPRMSG: 1) Yes
OPRMSG: 2) No
+ 1 (you need a username/pw)
OPRMSG: Enter the user name with which to access the FTP server.
+ ibmsys1 (your userid on base Linux)
OPRMSG: Enter the password for the FTP server. (Enter '+++' to abort).
+ xxxxxx (password for ibmsys1 on base)
OPRMSG: Use a HTTP proxy?
OPRMSG: 0) <-- Back <--
OPRMSG: 1) Yes
OPRMSG: 2) No
+ 2 (no proxy)
OPRMSG: Loading Installation System (1/5) - 0%
(many messages not shown)
OPRMSG: Select the display type.
OPRMSG: 0) <-- Back <--
OPRMSG: 1) X11
OPRMSG: 2) VNC
OPRMSG: 3) SSH
OPRMSG: 4) ASCII Console
+ 2 (select VNC)
OPRMSG: Enter your VNC password. (Enter '+++' to abort).
+ xxxxxxxx (minimum 8 characters!)
.......
OPRMSG: starting VNC server...
OPRMSG: *** You can connect to <host>, display :1 now with vncviewer
OPRMSG: *** Or use a Java capable browser on http://<host>:5801/
OPRMSG: (When YaST2 is finished, close VNC viewer,return to this window.)
OPRMSG: eth0 Link encap:Ethernet HWaddr 02:A0:A0:A0:A0:A0
OPRMSG: inet addr:10.1.1.2 Bcast:10.1.1.255 Mask:255.255.255.0
OOPRMSG: lo Link encap:Local Loopback
OPRMSG: inet addr:127.0.0.1 Mask:255.0.0.0
4. Open a second command window on the base Linux and enter the command vncviewer 10.1.1.2:1. This command opens a graphic window in your base Linux system and prompts you through the next phase of the installation. This type of operation should be familiar to experienced PC Linux users, so the steps are just summarized here:
5. Agree to the license terms.
6. Configure DASD.
7. If your DASD volumes have not been previously formatted for Linux,4 click Select All, Perform Action, Activate, and then Continue.
8. Register your system so that you can obtain online updates.
9. Install any add-on products.
10. Partition using the Expert partitioner or a similar tool. The following are the example partition results:
– /dev/dasda1 200 MB /boot/zipl
– /dev/dasdz2 980 MB swap
– /dev/dasda3 6.5 GB /
– /dev/dasdb1 1.6 GB /diskb (an arbitrary mount point
– (The third drive was not partitioned)
11. Disable firewall and blacklist, and open an ssh port.
12. Select install.
The example installation took about 30 minutes. When it completed, it automatically closed the VNC window and entered a wait state:
AWSEMI307I Warning! Disabled Wait CPU 0 = 00020001 80000000 00000000 00116A9E
13. IPL (boot) your new system:
$ ipl 2b0 (this command on the base console)
The example hung with the message unlabeled traffic allowed by default. For unclear reasons, the base Linux needed to be rebooted to resolve the problem. If necessary, start zPDT again:
$ awsstart devSLES12
$ ipl 2b0
14. This example skips grub2, as offered in the SLES 12 startup options. At this point you could start a vncviewer again. If, like the example, you are unable to start an ssh session, open another window on the base Linux and enter the command vncviewer 10.1.1.2:1.
The vncviewer provides a fully graphic screen, but operation was very slow in the test environment. This slowness was probably due to the default use of gnome 3, which uses complex graphics. The test zPDT setup (emulation, VNC, and so forth) did not provide the hardware acceleration needed for gnome 3. Nevertheless, this VNC window was used to complete additional installation steps.
Additional installation steps
You can use YaST (in the VNC window) to complete the following additional steps:
1. Select the DASD option and verified that your third volume (dasdc) is present. Partition this volume and assign a mount point.
2. Enable vsftpd.
3. Configure the second LAN interface using static IP address 192.168.1.112. You can use any address that is appropriate for your configuration.
4. Disable the firewall to allow ssh to connect. You might handle this step differently. In the test environment, the firewall disable option that was selected during installation did not carry over to the final system.
In addition to the VNC interface, you can log in by using ssh and run all the normal Linux commands.
1 As before, “$” indicates the command line for a non-root user on the base Linux. You might have a different name for your VNC client program.
2 This same mount point was used for installing all four Linux distributions described in this book, mounting one at a time.
3 The -o loop option of the mount command explodes the iso file into its component files. This process avoids any need to restore the iso distribution file to a DVD.
4 Creating the volumes with the zPDT alcckd command does not format them for Linux use. You need to format new volumes manually.
..................Content has been hidden....................
You can't read the all page of ebook, please click here login for view all page.