
This section is aimed at setting up a lab environment for practising penetration testing in general. Skills that you can practise with this type of lab are as follows:
- Essential skills
- Discovery techniques
- Enumeration techniques
- Scanning techniques
- Network vulnerability exploitation
- Privilege escalation
- Password and hash attacks
- Additional skills
- Modifying and testing exploits
- Tunneling
- Fuzzing
- Vulnerability research
- Documenting the penetration testing process
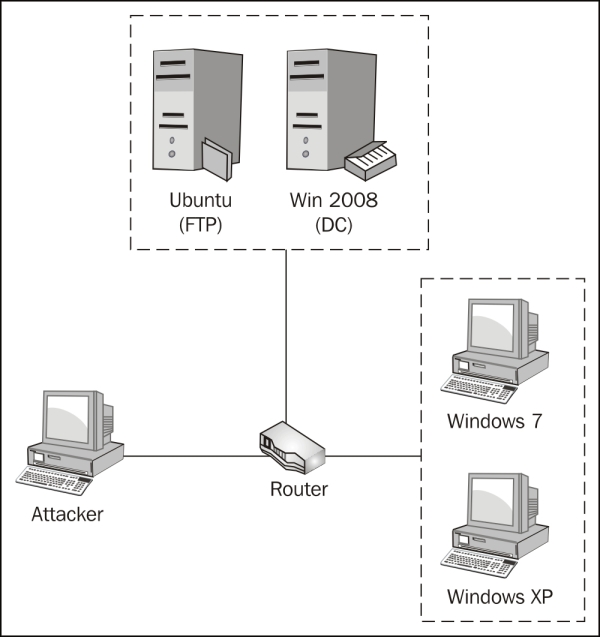
Prior to setting up the network security lab environment, let's do some preparation. We need to clearly understand our lab network topology for this task. It will differ from the topology given in the Planning the lab environment (Should know) recipe, because of tweaking for the current lab needs. In this recipe, the other components are necessary:
- Router
- Domain controller (Windows 2008)
- FTP server (Ubuntu)
- Two workstations (Windows 7 Pro and Windows XP Pro)
- Attacker workstation
You can see the current task network topology in the following diagram:
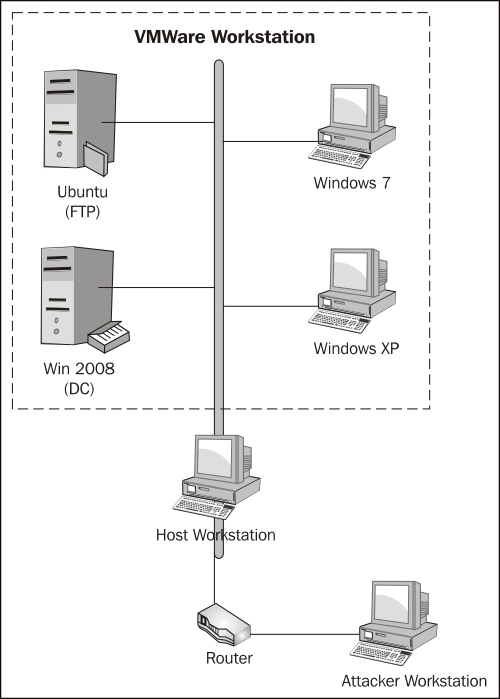
Since we decided to use virtual machines, we need to clearly understand the current lab environment architecture (physical and logical). One physical PC will be used as a host workstation for virtual machines. It could be the same PC, which will be used as an attacker workstation. One more physical component is the router; all other components will be virtual machines, bridged to the router via a host workstation network interface. The described network security lab architecture is provided in the following diagram:
Before we proceed with setting up the lab, you should prepare the router and distributions of the following software:
- VMware Workstation 8 (installer)
- Microsoft Windows Server 2008 (
.isoinstaller disk image) - Ubuntu server 12 (
.isoinstaller disk image) - Windows 7 (
.isoinstaller disk image) - Windows XP (
.isoinstaller disk image)
Except VMware Workstation, software versions without service packs are preferable, because they contain more publicly announced vulnerabilities, which you can exploit to practise your skills in the lab.
We need to configure our router in the first step. For my example, I used ASUS WL-520GC, but the difference between home routers is not significant:
- Plug in the power supply and Internet connection cable to the router. The Internet connection cable should be plugged in the WAN port.
- Now, connect the LAN adapter of the computer, which will host the virtual machines (host workstation) to any of the router LAN ports with the network cable.
- The power indicator, WAN port indicator, and one of LAN port indicators in the router front panel must shine with green lights.
- Open the browser on the host workstation, go to the address
192.168.1.1, and input the username and password for the router. By default, it isadmin:admin. - In the left panel, click on the IP config link and input your WAN settings (taken from your ISP) to the corresponding fields. Leave the LAN IP settings as default (IP:
192.168.1.1, Subnet Mask:255.255.255.0). Click on Apply. - In the DHCP Server page, enable Integrated DHCP server and change the setup of the IP pool from
192.168.1.2to192.168.1.15. Click on Apply. - Go to the Internet firewall section, enable Internet firewall and disable Web access from WAN. All other settings are left by default. Click on Finish and then Save & Restart.
- The router will reboot, which indicates that it is ready for us to work with it.
Now, we need to install our virtualization software; in my case, it is VMware Workstation 8 (the installation process is similar for older versions):
- Start the setup process by executing the distribution file.
- Choose the custom setup type and click on Next to view the setup options:
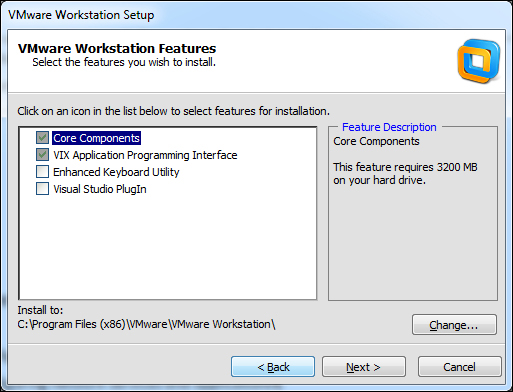
- I used the default settings, which are enough for our task, but you can change them if you need more VMware features enabled or want to install it into another directory. After selecting your settings, click on Next.
- Select the Check for product updates on startup checkbox on the next screen and click on Next.
- Select the Help improve VMware Workstation checkbox on the next screen if you want to let the VMware Workstation software send the debugging information to VMware company servers for further analysis. Click on Next.
- Select the location where you want to put shortcuts for VMware Workstation, and click on Next.
- Click on Continue to start the installation process. It can take a while to install the program and its components.
- Enter your license key when prompted for it, and finish the installation.
Now, we need to update the VMware Workstation software to the latest version:
- Run VMware Workstation.
- In the drop-down menu Help, click on Software Updates.
- In the opened Software Updates windows, click on the Check for Updates button.
- Install the available updates by choosing them and click on Next.
Now, the VMware workstation is ready for work and we can proceed with the other lab components.
First, we should install the servers. Let us start from Windows Server 2008 which will be our DC.
- Select New virtual machine… in the drop-down menu File of VMware Workstation or press Ctrl + N.
- In the opened wizard, select the typical configuration for the new virtual machine and click on Next.
- In the next window, select Installer disk image file (iso), and browse through the path to the installer image of Windows Server 2008, and click on Next:

- In the next window, type in a product key if you have one or skip it, select the Windows Server 2008 Enterprise version, type in the user name (I use
labhere), and click on Next:
If you did not provide a product key, a new dialog window will appear and ask for your confirmation in order to proceed without a product key. Click on Yes.
- In the next window, type in the name for this virtual machine (I used the default one). Choose the file location for the virtual machine path and click on Next:

- Set the system volume disk size for the virtual machine (it is better to set no less than 40 gigabytes) in the next window and select Split virtual disk into multiple files, then click on Next.
- Click on the Customize hardware button in the next window to manually set virtual machine hardware parameters.
- In the new window, set no less than 1 GB of memory, but it's better to set 2 GB or more. Set the essential parameters to the following values:
Parameter
Value
Memory
2 GB
Processors
1
Network adapter
Bridged (without physical network connection state replication)
USB controller
None
Display
Use host settings for monitors
- Click on Close.
- Select Power on this virtual machine after creation and click on Finish.
- Now, your virtual machine is ready for installing the OS. This process will start automatically after turning the virtual machine on and will last for a while.
- The VMware workstation will automatically start installing the VMware tools after the installation of the Windows 2008 server; wait until this process ends.
- Reboot the guest system and log in. You must see the initial configuration dialog box.
- Click on the Set time zone link and set your time, date, and time zone.
- Provide a computer description and the name using the link in the initial configuration window.
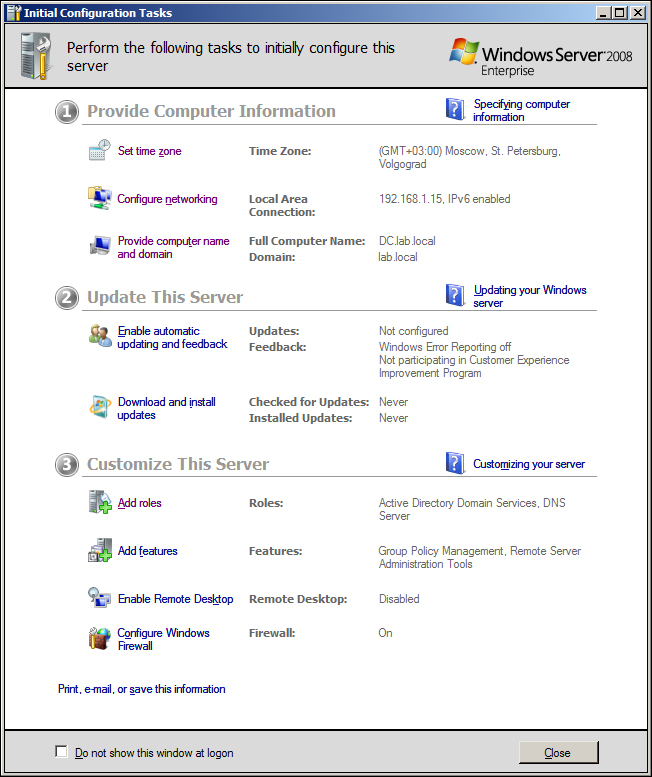
- Open the Local area connection properties window using the following sequence: Configure networking | Local area connection | Properties. Leave all properties to the default setting except TCP/IPv4. Set the values for the TCP/IPv4 properties as shown in the following screenshot:

Now, you should have an initial configuration window similar to the following screenshot:
- Now, we need to assign a Domain Controller role to our server. In the initial configuration window, click on the Add roles link and then Next to open the Server Roles assigning dialog window. Select the Active Directory Domain Services checkbox and start the role installation by clicking on the Next and Install buttons:

- When the role installation will be finished, open the Start menu and type in
dcpromoin the Search field. Launch dcpromo:
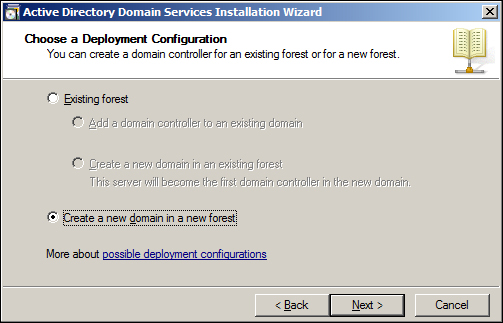
- Continue clicking on Next in the opened dialog window until you get to the Choosing deployment configuration dialog box, select Create a new domain in a new forest, and click on Next:
- Type in your lab domain name (FQDN), for example
lab.local,and click on Next: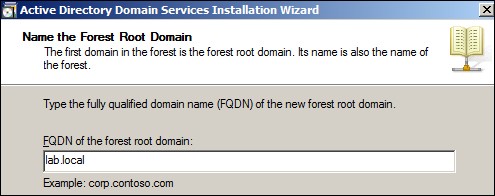
- Now, we need to choose the functional level for the domain forest. Choose the latest version in your system (for mine, it is Windows Server 2008) and click on Next:

- In the next screen, we must enable a DNS server role for our domain controller in order for it to work correctly:

- When the wizard prompts you about the integration with an existing DNS infrastructure, click on Yes.
- In the next dialog box, leave the
Database,Log, andSYSVOLfolders as default and click on Next. - Set the directory service restore mode administrator account password and click on Next.
- Check the summary info, click on Next, wait while the wizard is installing active directory domain services, and restart the system.
- Take a snapshot of the domain controller virtual machine after its successful installation and initial configuration. To take a snapshot, select the Take Snapshot menu item, type in a snapshot name and comments in the dialog window, and click on the Take Snapshot button:

After creating a domain controller, continue with installing Ubuntu Server:
- In VMware Workstation press Ctrl + N and follow the on-screen instructions to create a new Ubuntu virtual machine. This process is similar to creating a Windows Server 2008 virtual machine, so you should not have any trouble. Make sure you do not forget the root password that you enter during this process and set the network connection as bridged.
- Ubuntu installation will start automatically after finishing with virtual machine creation. It will also automatically install VMware tools. It will take several minutes depending on your computer's performance and virtual machine properties.
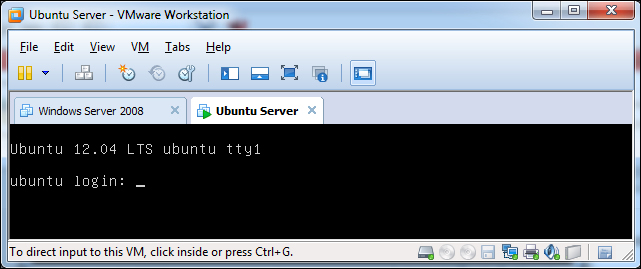
- After the installation, you should be able to see a standard Ubuntu Server console with a login invitation:
- Log in and type the
ifconfigcommand without arguments to find the name of your network interface. In my case it iseth0. - Now, configure your network interface by executing the following command:
sudo ifconfig eth0 192.168.1.14 netmask 255.255.255.0 broadcast 192.168.1.255
You will have to type in the root password to execute the command. After this, check if network interface settings are set as per our requirements, by typing the
ifconfigcommand again but without any argument:
- Now, we need to add a route through a default gateway in order to let our server access the Internet. Do it by executing the following command:
sudo route add default gateway 192.168.1.1
- Now, execute the
routecommand without any arguments and tryping www.google.com:
- Let us install the FTP server now. I have chosen
vsftpdas the solution for an easy way to install and setup. Type in the following command:sudo apt-get –yu install vsftpd
The installation will be done in automated mode.
- To configure the
vsftpdaemon, open the/etc/vsftpd.conffile with the Nano editor by executing the following command:sudo nano /etc/vsftpd.conf
- Uncomment the following lines in the
vsftpd.conffile:local_enable=YES write_enable=YES
- Then, press Ctrl + X to exit. Answer
Yto the question about saving your changes and choose the same file for saving/etc/vsftpd.conf. - Now, we need to create at least one user who will have FTP access to his home directory. The easiest way to do it is to use the
addusercommand, which will prompt you with all the needed data and automatically create the user's home directory:
- Restart the FTP daemon by executing the following command:
sudo /etc/init.d/vsftpd restart
- Take a snapshot of your new virtual Ubuntu server.
Now, we need to install and set up virtual Windows workstations. Let's start from Windows XP:
- In VMware Workstation, press Ctrl + N and follow the on-screen instructions to create a new virtual machine with customized parameters. Do not forget to set up the network interface for the virtual machine as
bridged. The Windows XP installation process starts automatically right after creating a virtual machine. - You will be prompted to enter the Windows product key if you have not done it in the previous step. Enter the valid product key (you can find a lot of trial keys on the Internet). Windows XP with SP3 lets you skip the product key entering step during installation.
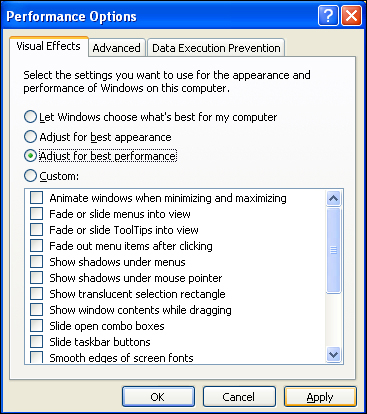
- As long as we use virtual machines for our lab, performance is important for us. We can improve the performance of Windows XP in the following ways:
- Open Control Panel from the Start menu and switch to the classic view.
- Double-click on the System icon.
- Go to the Advanced tab and click on the Settings button in the Performance section.
- Select the Adjust to best performance option and click on Apply and OK:
- As this workstation will be used to practice penetration testing skills, it should have some vulnerabilities. This is why we need to turn off automatic updates — go to the Automatic Updates tab, select Turn Off Automatic updates, and click on Apply and then OK.
- The network connection for the Windows XP workstation is configured to acquire the dynamic IP address by default, so it must be already set. But, you need to manually set the domain controller IP as the primary DNS server address:
- Open Control Panel and double-click on the Network connections icon.
- Open Local Area Connection and its properties.
- Select Internet Protocol (TCP/IP) and click on the Properties button.
- Set the following properties and return to Control Panel:

- Now, we need to join the Windows XP workstation to our lab domain:
- Make sure that the domain controller is turned on.
- Double-click on the System icon.
- Go to the Computer Name tab in the System Properties dialog window.
- Click on the Change… button.
- Set the computer name as
WinXP. - In the Member of section, select the Domain radio button and type in the lab domain name in the text field below it. In my case, it is
lab.local, and click on OK:
- You will be prompted for domain credentials. Enter the domain administrator's credentials and you should see the welcome window.
- Restart the Windows XP virtual machine and take a snapshot of it.
The last lab component is Windows 7:
- In VMware Workstation, press Ctrl + N and follow the on-screen instructions to create a new virtual machine with customized parameters. Do not forget to set up the network interface for the virtual machine as
bridged. The Windows 7 installation process starts automatically right after creating a virtual machine. - Windows 7 starts automatically after its installation.
- Log in and set up the performance setting to Adjust for best performance in the System Properties dialog window; it can be found at Control Panel | All Control Panel Items | System | Advanced System Settings.
- Turn to the Computer Name tab and join this workstation to the lab domain in the same way as we did for Windows XP.
- Reboot the system and take a snapshot.
Finally, we are done with the installation and configuration tasks and can check some components to see if they work ok:
- By joining the Windows workstation to the domain, we have already checked if the lab domain works.
- Now, check the FTP server in the following way:
- In the Windows XP Start menu, find the Run command and enter
cmd. - In the command line, type
ftpand press Enter. - Type the command
open 192.168.1.14and press Enter. - You should see something similar to the following code if the FTP server works:
Connected to 192.168.1.14. 220 (vsFTPd 2.3.5) User (192.168.1.14:(none)): - Enter the username and password.
- After logging in, enter the
lscommand and theftpuser directory listing should be executed if everything works fine.
- In the Windows XP Start menu, find the Run command and enter
- Try to ping all the hosts from every host.
Let's explore the essential steps that we just went over.
During the router configuration process, we need to restrict Internet users from rooting our lab router, so we should disable web access to the router from the external network (WAN) and activate the firewall.
When you start the VMware Workstation software, it will indicate if there are any updates available, and will ask if you want to install them. Some updates need to uninstall VMware Workstation first to install the new version. It will be done automatically if you click on Yes. Software updates for VMware Workstation are strongly recommended to be installed, because it is a way to fix known bugs and security flaws in VMware software.
But, we do not need any software updates for our virtual systems because we need them to have vulnerabilities with which we can practice penetration testing skills. This is the reason why I recommend you to turn off the automatic updates on all virtual systems.
We use bridged network interfaces in our virtual machines in order to let them communicate with the router, as they were physical hosts. If we set up NAT, then our systems will use VMware Workstation as a software DHCP server and will work in another subnet than the router.
I intentionally did not type in the Windows product key, because I use it only for demonstration purposes less than 30 days. But if you want to use it longer, then I recommend you to buy licenses.
The domain controller as well as DNS server; should have a static IP address in order to operate well. So, let it be 192.168.1.15. It is also a good practice to give static IPs to servers; that is why our Ubuntu server also has a static IP.
A domain infrastructure needs a DNS server that is why we used dcpromo to install a DNS server role to the domain controller for maintaining the active directory.
During the domain controller configuration process, I set only two roles (Domain Services and DNS Server), but you can add or remove other roles for any training purposes and at any time later.
By default, vsftpd is configured to only allow an anonymous download. During the installation, an FTP user is created with a home directory /home/ftp. This is the default FTP directory. But we want to practise password guessing techniques with the FTP server, so we need to create different FTP users. I have shown you how to create an FTP user and now you can easily create as many users as you want.
Being a professional penetration tester means always going further find out more information than was given and constantly improving your knowledge. This is common for both a professional penetration tester and a real hacker, and this is also the reason to check the next paragraphs.
You have to understand that the described way of building a network security lab is not the only one or the right one – there could be plenty of variations and different solutions starting from small personal labs to corporate virtualization clusters.
Let me give you some options:
- If you are going to research vulnerabilities and modify or write your own exploits, it might be useful to set up VMware Workstation with the Visual Studio plugin for debugging purposes. It provides an interface between virtual machines and Microsoft Visual Studio.
- You may need to add other hosts and install other additional network services in order to practise specific skills. This is not difficult, and you can always find appropriate manuals on the Internet.
- You can also replace some or all of the virtual machines with old unused physical computers and connect them into a network with a router or switch.
- If you do not want to manually install and configure all virtual systems, you can find virtual machines with already installed OSs on the Internet. You can also use specially-crafted vulnerable virtual machines. For example, one of the best vulnerable machines for lab purposes is Metasploitable.
Here, I would like to tell you about some more useful things:
- After setting up the lab and taking snapshots of all the virtual machines, you will start performing different kinds of techniques and attacks against them. When you finish with the basic discovery and enumeration attacks, you would probably want to improve your skills to the next level and test yourself against different security solutions. In that case, install and set up integrated host antivirus, firewall, and intrusion preventing systems (HIPS) on the target virtual machines and take new snapshots. This will let you practise different firewall rules enumeration techniques, which is called firewalking, and different IDS evasion techniques. You can always revert your systems from any state to any of your snapshots in order to compare the results of using different techniques performed on different system states.
- One of the most useful techniques that I usually use during penetration testing projects is tunneling. It is a technique for passing your traffic through hosts, already controlled by you (successfully attacked). This means that you can reach non-routable hosts and networks. That is why I strongly recommend you to learn and practise it in your lab if you want to leverage your penetration testing skills robustly.
- Always try new techniques and software in your lab to understand them well.
- Try different penetration testing distributions such as BackTrack, and choose which fits you the best.
- I always take snapshots of my virtual systems. A snapshot is a saved state of a virtual machine that lets you return to any point you have previously saved. This means that you have a great opportunity to do whatever you want with your virtual machines, without being afraid of totally misconfiguring or losing them. So, do not forget to take snapshots.
To get additional info, you can check the following resources: