
![]()
Tweeting with REST API 1.1
This chapter explains the procedure involved in posting messages using Twitter with REST API 1.1 and OAuth authentication directly from Intel Galileo boards, thereby enabling you to avoid intermediary web services. This chapter also explains how to integrate Linux scripts with sketch, the advantages of using Linux to post on Twitter, including the commands involved and the hardware required. It also explains why the examples provided by Intel Galileo IDE 1.5.3 do not work with Arduino boards.
Project Details
If you tried to post on Twitter using the code in Examples->Ethernet->TwitterClient, which is offered by IDE 1.5.3, you probably became frustrated. These examples don’t work with Intel Galileo or on any board compatible with Arduino APIs.
The main reason for the failure is related to the new REST API 1.1. Twitter now requires a new authentication method and the messages have a new format as well. The old functions based on API 1.0 do not work anymore, which means thousands of applications around the world, including the examples in the Arduino IDE, don’t work anymore either.
The authentication is based in OAuth, so the procedure involves processing the sha1 algorithm. There are secret and token codes, encoded in base64, which is special format required by the API that forces string manipulations. The board must be able to provide timestamps according to the current real world time, which is independent of time zones or daylight savings time.
Some developers created web services that bridge between the Arduino boards and the Twitter servers. These web services compute the sha1, the encodes, and all the string manipulation, but require the developers to host the service in some server and have a public IP available. This complication increases the cost of your project and might affect its performance and stability.
The idea here is to explore the power offered by Linux OS and integrate with sketches, thereby avoiding a massive quantity of code. This will make the project efficient and simple.
- Computes the sha1 (secure hash algorithm based on a 160-bit hash value) and encodes to different bases using openssl.
- Manipulates the strings using sed and other tools.
- Posts messages using proper authorization, headers, and message using curl.
In the sketch, the code will interact with the script. It will show, in a few lines, its ability to post to a Twitter account.
Using the Linux capabilities offered by Intel Galileo, in few lines of code and scripting, you will be able to communicate with the Twitter server. You can therefore avoid a massive quantity of code and be free of licensing issues, huge code development, and debugging.
However, you must be able to create a Twitter account, get the secret code and token, understand how the software works, and understand the hardware requirements to make this project functional.
This chapter describes how to make posts, but if you understand how the software was created and the concept of Twitter APIs, you can change this software to accommodate the best API for your project.
Material List
Although you can do everything in this project using just the Ethernet interface already present on your board, it is recommended that you have the coin battery plugged into the board to persist the hardware clock (this is explained in more detail later in this chapter).
You can make the connection using the Ethernet, a WiFi, a modem, or any other kind of interface that gives you access to the Internet. The code and script involved does not require any special kind of client. This project uses the WiFi listed in Table 6-1.
Table 6-1. Optional Material
|
Quantity |
Components |
|---|---|
|
1 |
Intel Centrino Wireless-N 135 |
|
2 |
Dual band antennas 350mm cable 2118060-1 TE connectivity |
|
1 1 2 |
3V coin battery Coin battery holder case Wires jumper 10cm long 1/4w female-male |
Maybe you are wondering why I am discussing the system and hardware clock if all you have to do is simply post on Twitter? One of the key elements for computing the string base and getting authorization to post on Twitter is a timestamp.
This timestamp must be in sync with the rest of world, in other words, your board must have a valid and actual time and date. If you type date in the terminal shell as soon you log in, you will see something like this:
clanton login: root
root@clanton:~# date
Mon Jan  1 00:19:31 UTC 2001
This date represents the system time in UTC maintained by the kernel software. To check the hardware clock, use the hwclock command:
root@clanton:~# hwclock
Mon Jan  1 00:19:56 2001  0.000000 seconds
If you try to get the timestamp based on one of these dates, Twitter will not authorize because they are not synchronized with the real time.
There are several ways to fix the date and time according to the busybox help manual:
date
date [OPTIONS] [+FMT] [TIME]
Display time (using +FMT), or set time
Options:
        [-s] TIME       Set time to TIME
        -u              Work in UTC (don't convert to local time)
        -R              Output RFC-822 compliant date string
        -I[SPEC]        Output ISO-8601 compliant date string
                        SPEC='date' (default) for date only,
                        'hours', 'minutes', or 'seconds' for date and
                        time to the indicated precision
        -r FILE         Display last modification time of FILE
        -d TIME         Display TIME, not 'now'
        -D FMT          Use FMT for -d TIME conversion
Recognized TIME formats:
        hh:mm[:ss]
        [YYYY.]MM.DD-hh:mm[:ss]
        YYYY-MM-DD hh:mm[:ss]
        [[[[[YY]YY]MM]DD]hh]mm[.ss]
One format not documented here is MMDDhhmmYYYY. Change the date and clock using your preferable format. The following command uses YYYY-MM-DD hh:mm[:ss]:
root@clanton:~# date 2014.01.08-11:14:20
Wed Jan  8 11:14:20 UTC 2014
To synchronize the hardware clock, you can use the following command:
root@clanton:~# hwclock -w
Check the hardware and system clock again:
root@clanton:~# hwclock
Wed Jan  8 11:19:38 2014  0.000000 seconds
root@clanton:~# date
Wed Jan  8 11:19:42 UTC 2014
Updating the time clock might be irrelevant because if you decide do not use a coin battery attached to the BATT pins on Intel Galileo and if your system reboots, the clock will be reset and you will have the wrong date and clock again (Mon Jan 1 UTC 2001). This will cause an error if your sketches try to post messages again when they’re restarted.
Several factors might force you to reboot your system, such as high temperatures if your board is not cooling properly, some instability in the firmware, some new driver or native application installed, and so on. Thus, it is recommended that you include the coin battery in your project if you want to run for several hours.
If you are interested in adding a coin battery to your system, read the next section. Otherwise, jump to the section entitled “Workaround with 1.5V Batteries” later in the chapter.
Assembling the Coin Battery
Connect two female connectors of the jumper wires to the BATT terminal on the Intel Galileo board, as shown in Figure 6-1.
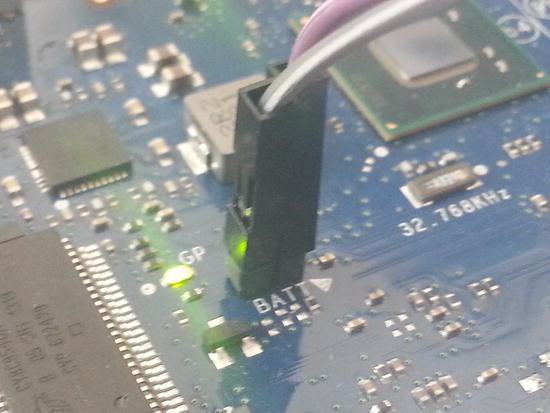
Figure 6-1. Battery terminals location
Then weld the other end of jumper cable to the battery holder terminals according to the polarity provided by your case, as shown in Figure 6-2. Strip the end of the wires and then weld directly to the battery case’s terminals.
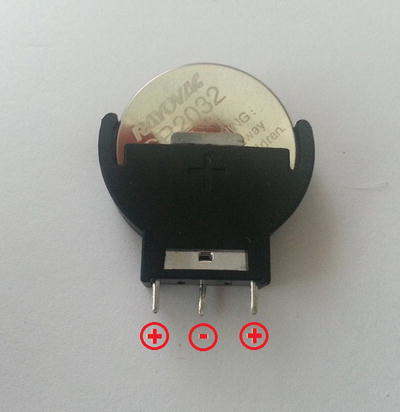
Figure 6-2. Coin battery 2032 in the case and the polarity
Note that there are different coin battery cases and the polarity in the terminal varies depending on the model. Insert the coin battery in the case and use a voltmeter to check the right polarity before you weld the wires.
With the battery in the case and the case properly connected to the BATT terminals, Intel Galileo will be able to keep the date and time even when the system reboots.
Workaround with 1.5V Batteries
If you want test your project and preserve the hardware clock after the boot but you do not have a coin battery, it is possible to make a simple workaround using two AA or AAA batteries connected in a series. These are the same batteries you find in your TV remote control. Keep in mind that this is a temporary and dirty workaround. Table 6-2 lists the materials you need.
Table 6-2. Materials for Temporary Battery Workaround
|
Quantity |
Components |
|---|---|
|
2 |
AA or AAA 1.5 batteries |
|
1 |
Tape |
|
1 1 2 |
Wire plier or equivalent to strip wires Voltmeter Wires jumper 10cm long 1/4w female-male |
Connect two 1.5 batteries in a series and tape them, strongly pushing one battery against the other. Using a voltmeter, make sure you have 3V in the battery terminals.
Then connect the two wire jumpers (female connectors) to the BATT terminals, as shown in Figure 6-1.
You should have something very ugly but temporarily functional, as shown in Figure 6-3.
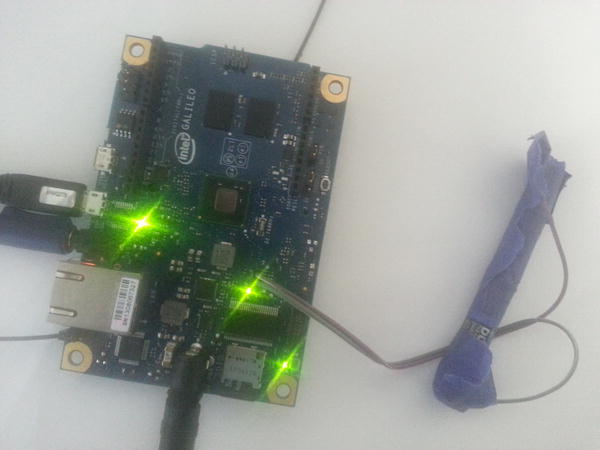
Figure 6-3. Temporary workaround to keep hardware clock
Creating a Twitter Application Account
The new Twitter API requires some elements like secret code and tokens. Such elements are automatically generated when you create an application account. You’ll see how to do that in the next two sections.
The next steps describe how to create your account and how to avoid a potential bug in the Twitter server present as of the writing of this chapter.
Step 1: Creating Your Twitter Account
The first thing you need to have is an email. You can create an email account using the provider of your preference, including Gmail, Yahoo, or any other.
If you already have a Twitter account and you want to use it for your tests, you can skip to Step 2.
Otherwise, access the https://twitter.com/signup link (see Figure 6-4).
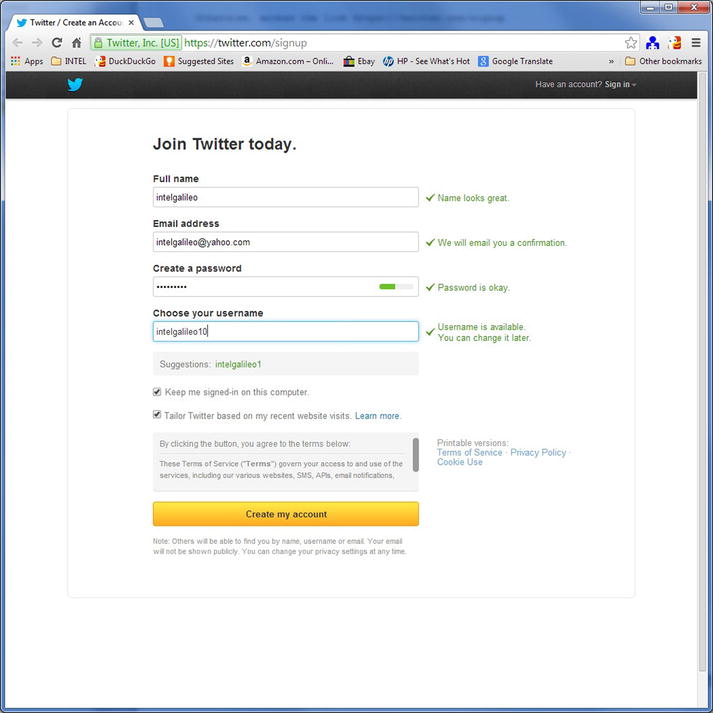
Figure 6-4. Creating a Twitter account
![]() Tip This step looks simple but you need to know a very important tip. After you create your Twitter account, you will be able to log in and use Twitter normally. However, in parallel you will receive a confirmation email. If you do not confirm it, in the next step, the Twitter application will fail.
Tip This step looks simple but you need to know a very important tip. After you create your Twitter account, you will be able to log in and use Twitter normally. However, in parallel you will receive a confirmation email. If you do not confirm it, in the next step, the Twitter application will fail.
You might feel lost because in fact you have a Twitter account, but you received a warning that it’s not valid. As soon you create your Twitter account, check your email and confirm it. If you did not receive the confirmation email, you will be able to click the Resend Confirmation button at the top of screen as soon you log in, as indicated by the arrow in Figure 6-5.
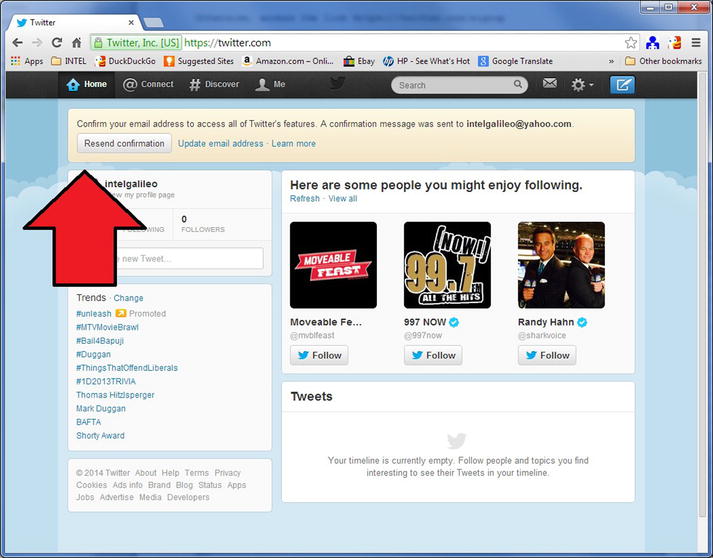
Figure 6-5. The Resend Confirmation button after you log in
The next step is to create your Twitter application.
Step 2: Creating the Twitter Application
From this application you will receive the secret code and authentication token that you need to incorporate your C++ code.
Access the https://dev.twitter.com/apps/new link and using your confirmed Twitter account to log in (see Figure 6-6).
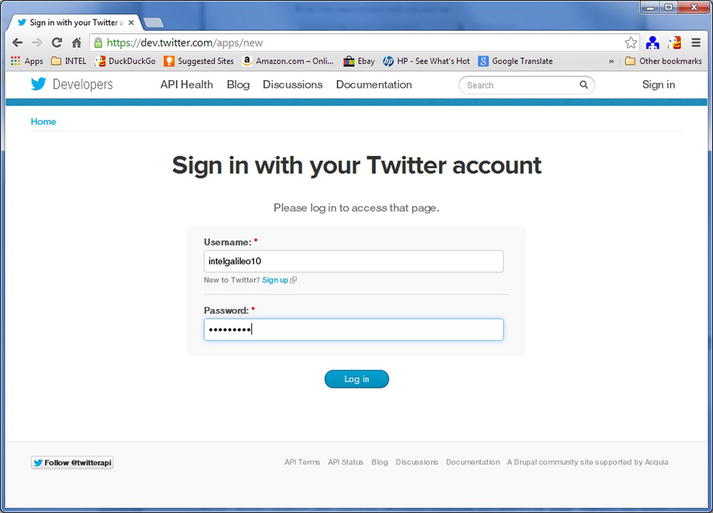
Figure 6-6. Signing in to create the Twitter application
The next screen will ask for some data related to your application. One of mandatory details is a website, as shown in Figure 6-7. Because you will not use it, feel free to add any website, like http://www.intel.com.
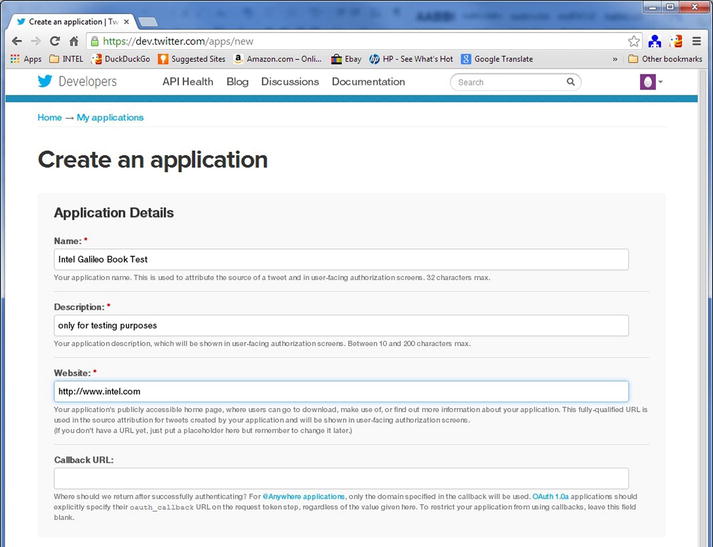
Figure 6-7. Creating an application on Twitter
After you fill all the required data, you will be able to see a screen with the data you entered. This screen also includes the OAuth settings data such as the consumer secret string and URL token access. See Figure 6-8.
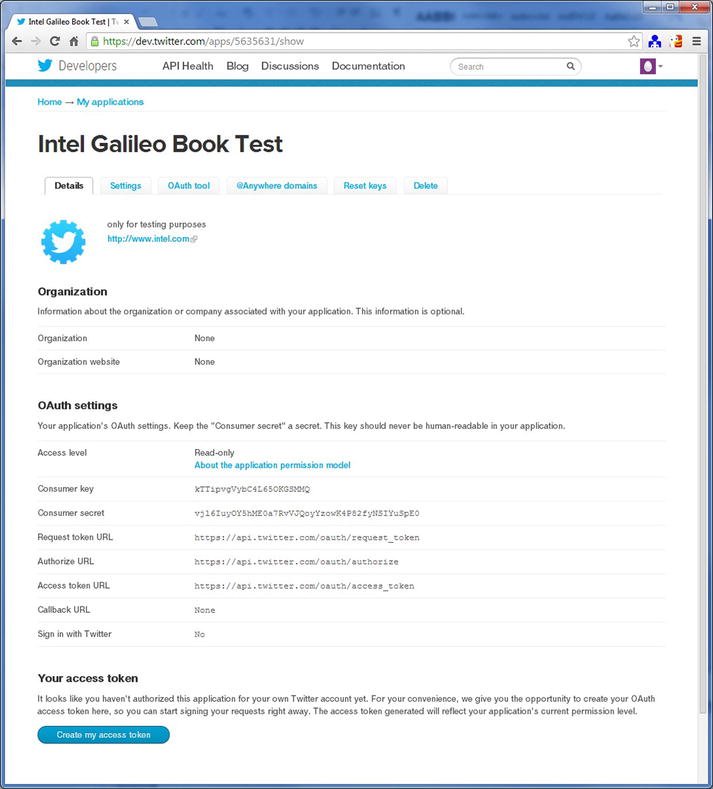
Figure 6-8. The Twitter application details page
At the bottom of this page is a button called Create My Access Token. You will need access tokens in order to make the software work; however, do not click on this button! You still need to change the access level.
Check on this same page the Access Level in the OAuth settings. Initially, it is Read-Only but considering you will post messages on Twitter, you need to change this access level in order to support write operations.
As of January, 2014, Twitter has a bug that’s initiated when you create tokens by clicking the Create My Access Token button. If you create the tokens with read-only access, even if you change the access to read/write access and reset the tokens, your tokens still will have read-only access.
It took me several hours to figure out why the GET operations were working but the POST operations were not, even with proper access levels and new access tokens.
As soon you enter the Twitter application details page shown in Figure 6-9, click in the Settings tab and select the Read, Write, and Access Direct Messages or the Read and Write option.
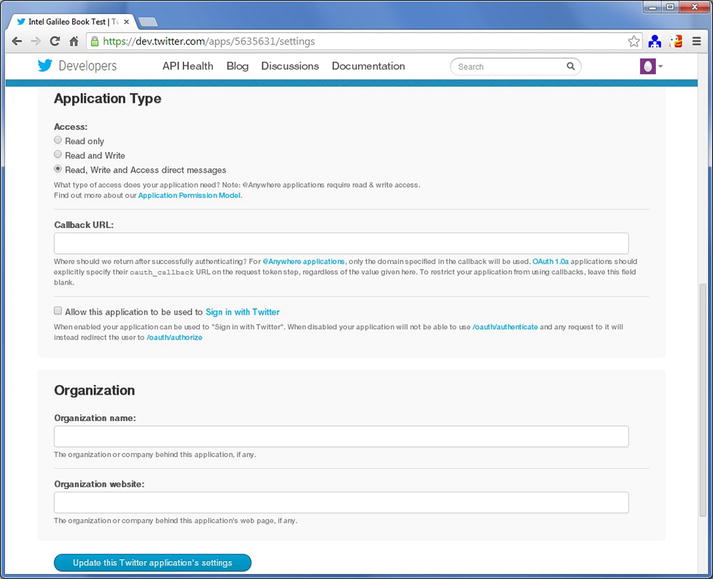
Figure 6-9. Changing the Twitter access level
You can choose “Read and Write” or “Read, Write and Access direct messages”. Then click in the Update this Twitter Application’s Settings button on the bottom of the page.
Click again in the Details tab and wait a few seconds. Then reload the page by pressing F5. You will see that the access level was properly changed and you can click in the Create My Access Token button.
Wait a few seconds and then press the F5 key again. You will be able to see your access token, secret token, consumer key, and secret consumer key, as shown in Figure 6-10.
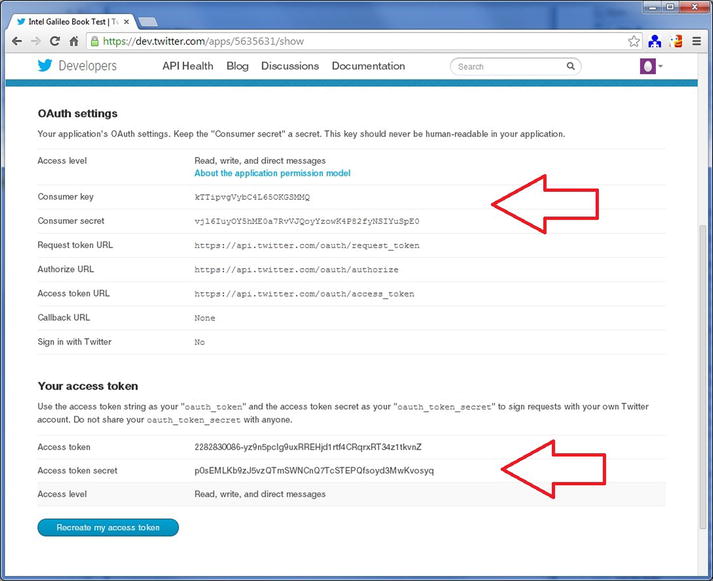
Figure 6-10. Token and consumer keys have been created
Creating a Script to Post Messages on Twitter
Once you have created a Twitter account and the application’s tokens, you can initiate a creation of your software. The method in this chapter was used to POST messages on Twitter but you can create a different one if you understand the process. That means you can create a method to get data, create other types of POST methods, and any other functions provided by the Twitter API.
First of all, you must identify the structure of the POST API. To do so, follow the steps:
- Open the developer console and access https://dev.twitter.com/console.
- For the service, select https://api.twitter.com/1.1.
- For the authentication, select OAuth1. When you’re selecting this option, the Twitter console will ask you if you authorize the console to access your application. Only accept by clicking the Sign In with Twitter option. Your account will pop up in the Authentication field.
- For the Select an API method option, select the API Tweet -> POST -> /statuses/update.json. This is the method used in this chapter. It allows you to post messages to your Twitter account.
- In the Status field, you can write a message if you want.
If you set up everything correctly, Figure 6-11 shows what you should see in your browser.
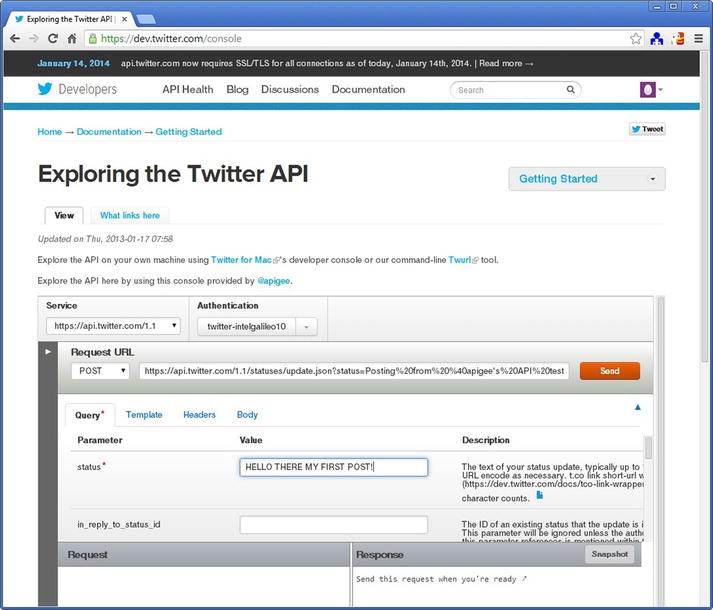
Figure 6-11. Using the developer console to POST messages
- Click the Send button and you should have your status posted in your Twitter page. You should see the server response HTTP/1.1 200 OK. See Figure 6-12.
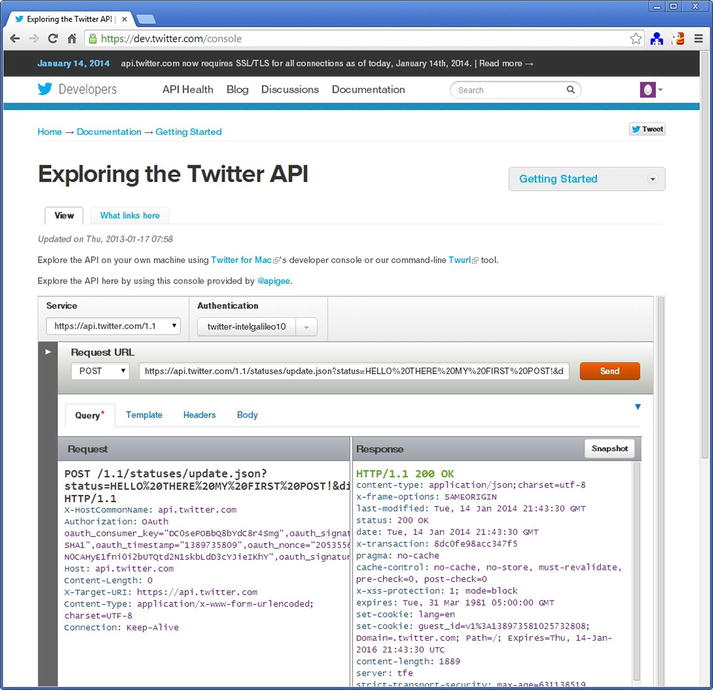
Figure 6-12. POST response with success
- After you send your post, copy the string generated in your POST to the clipboard. For example:
Step 2: Generating the OAuth Signature with the OAuth Tool
Access your Twitter application again, as shown in Figure 6-8. You will see a tab called OAuth Tool.
On this tab there is a section called Request Settings. Based on the string captured previously, you should be able to fill these fields properly.
Suppose the string you captured is as follows:
You need to set the following settings:
- For the request type, choose POST.
- For the request URL, you need to split the string you captured and include it only until the name API. For example, based on the string captured in this chapter, the Request URL field is:
- For the API, copy the rest of string after & and post it in this field. For example, in this example the request query is:
status=HELLO%20THERE%20MY%20FIRST%20POST&display_coordinates=falseFigure 6-13 graphically shows the steps mentioned.
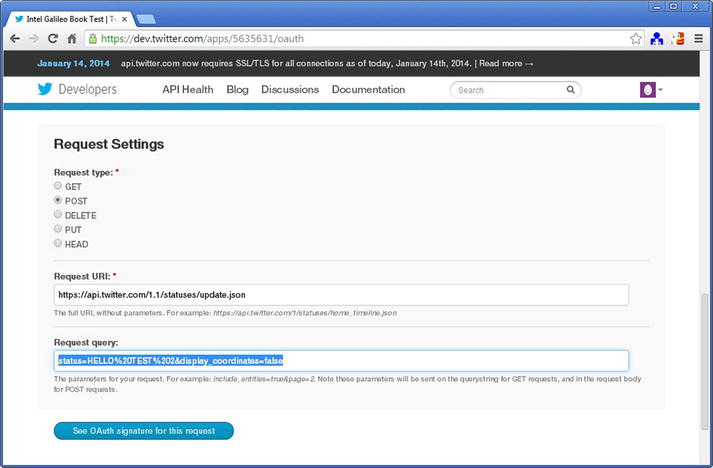
Figure 6-13. The input data session
- Click the See OAuth Signature for this Request button.
If everything was okay, you will be able to see the OAuth signing result in the same tab. Data such as the signature base string and authorization header help you program your script and keep the curl command informed to test using the terminal. Figure 6-14 shows the OAuth signing for your reference.
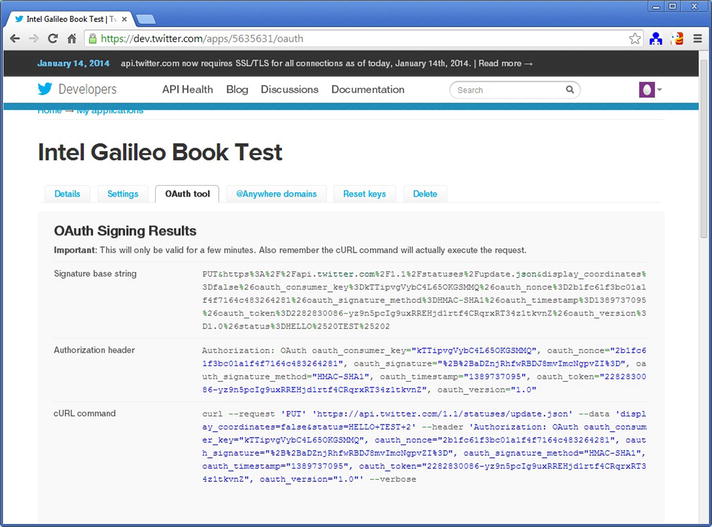
Figure 6-14. OAuth signing results
Ensure that there a curl command is generated. If you are using Linux or Mac, or if you have Windows with a Cygwin terminal, try to copy and paste this curl command into a Terminal shell. You will be able to tweet using this command if you get a HTTP 200OK response.
mcramon@ubuntu:~$ curl --request 'POST' 'https://api.twitter.com/1.1/statuses/update.json' --data 'display_coordinates=false&status=%22HELLO+TEST+2%22' --header 'Authorization: OAuth oauth_consumer_key="kTTipvgVybC4L65OKGSMMQ", oauth_nonce="690331247b06d8c8de6b39be9b415580", oauth_signature="XBBsrxFJq%2Bzx67RyOZn9NibKHdU%3D", oauth_signature_method="HMAC-SHA1", oauth_timestamp="1390173936", oauth_token="2282830086-yz9n5pcIg9uxRREHjd1rtf4CRqrxRT34z1tkvnZ", oauth_version="1.0"' --verbose
* About to connect() to api.twitter.com port 443 (#0)
*   Trying 199.59.148.20... connected
* Connected to api.twitter.com (199.59.148.20) port 443 (#0)
* successfully set certificate verify locations:
*   CAfile: none
  CApath: /etc/ssl/certs
* SSLv3, TLS handshake, Client hello (1):
* SSLv3, TLS handshake, Server hello (2):
* SSLv3, TLS handshake, CERT (11):
* SSLv3, TLS handshake, Server finished (14):
* SSLv3, TLS handshake, Client key exchange (16):
* SSLv3, TLS change cipher, Client hello (1):
* SSLv3, TLS handshake, Finished (20):
* SSLv3, TLS change cipher, Client hello (1):
* SSLv3, TLS handshake, Finished (20):
* SSL connection using RC4-SHA
* Server certificate:
*        subject: C=US; ST=California; L=San Francisco; O=Twitter, Inc.; OU=Twitter Security; CN=api.twitter.com
*        start date: 2013-10-10 00:00:00 GMT
*        expire date: 2014-10-10 23:59:59 GMT
*        subjectAltName: api.twitter.com matched
*        issuer: C=US; O=VeriSign, Inc.; OU=VeriSign Trust Network; OU=Terms of use at https://www.verisign.com/rpa (c)10; CN=VeriSign Class 3 Secure Server CA - G3
*        SSL certificate verify ok.
> POST /1.1/statuses/update.json HTTP/1.1
> User-Agent: curl/7.19.7 (i486-pc-Linux-gnu) libcurl/7.19.7 OpenSSL/0.9.8k zlib/1.2.3.3 libidn/1.15
> Host: api.twitter.com
> Accept: */*
> Authorization: OAuth oauth_consumer_key="kTTipvgVybC4L65OKGSMMQ", oauth_nonce="690331247b06d8c8de6b39be9b415580", oauth_signature="XBBsrxFJq%2Bzx67RyOZn9NibKHdU%3D", oauth_signature_method="HMAC-SHA1", oauth_timestamp="1390173936", oauth_token="2282830086-yz9n5pcIg9uxRREHjd1rtf4CRqrxRT34z1tkvnZ", oauth_version="1.0"
> Content-Length: 51
> Content-Type: application/x-www-form-urlencoded
>
< HTTP/1.1 200 OK
< cache-control: no-cache, no-store, must-revalidate, pre-check=0, post-check=0
< content-length: 1866
< content-type: application/json;charset=utf-8
< date: Sun, 19 Jan 2014 23:26:57 GMT
< expires: Tue, 31 Mar 1981 05:00:00 GMT
< last-modified: Sun, 19 Jan 2014 23:26:57 GMT
< pragma: no-cache
< server: tfe
< set-cookie: lang=en
< set-cookie: guest_id=v1%3A139017401726629941; Domain=.twitter.com; Path=/; Expires=Tue, 19-Jan-2016 23:26:57 UTC
< status: 200 OK
< strict-transport-security: max-age=631138519
< x-access-level: read-write-directmessages
< x-frame-options: SAMEORIGIN
< x-transaction: 093eea24eede2302
< x-xss-protection: 1; mode=block
<
{"created_at":"Sun Jan 19 23:26:57 +0000 2014","id":425046751838355456,"id_str":"425046751838355456","text":""HELLO TEST 2"","source":"u003ca href="http://www.intel.com" rel="nofollow"u003eIntel Galileo Book Testu003c/au003e","truncated":false,"in_reply_to_status_id":null,"in_reply_to_status_id_str":null,"in_reply_to_user_id":null,"in_reply_to_user_id_str":null,"in_reply_to_screen_name":null,"user":{"id":2282830086,"id_str":"2282830086","name":"intelgalileo","screen_name":"intelgalileo10","location":"","description":"","url":null,"entities":{"description":{"urls":[]}},"protected":false,"followers_count":0,"friends_count":0,"listed_count":0,"created_at":"Thu Jan 09 01:05:45 +0000 2014","favourites_count":0,"utc_offset":null,"time_zone":null,"geo_enabled":false,"verified":false,"statuses_count":2,"lang":"en","contributors_enabled":false,"is_translator":false,"profile_background_color":"C0DEED","profile_background_image_url":"http://abs.twimg.com/images/themes/theme1/bg.png","profile_backgroun* Connection #0 to host api.twitter.com left intact
* Closing connection #0
* SSLv3, TLS alert, Client hello (1):
d_image_url_https":"https://abs.twimg.com/images/themes/theme1/bg.png","profile_background_tile":false,"profile_image_url":"http://abs.twimg.com/sticky/default_profile_images/default_profile_5_normal.png","profile_image_url_https":"https://abs.twimg.com/sticky/default_profile_images/default_profile_5_normal.png","profile_link_color":"0084B4","profile_sidebar_border_color":"C0DEED","profile_sidebar_fill_color":"DDEEF6","profile_text_color":"333333","profile_use_background_image":true,"default_profile":true,"default_profile_image":true,"following":false,"follow_request_sent":false,"notifications":false},"geo":null,"coordinates":null,"place":null,"contributors":null,"retweet_count":0,"favorite_count":0,"entities":{"hashtags":[],"symbols":[],"urls":[],"user_mentions":[]},"favorited":false,"retweeted":false,"lang":"en"}mcramon@ubuntu:~$
You might be thinking that you should do the same using your Intel Galileo terminal shell. If you posted the curl command using your desktop terminal, be sure to change the text message. Otherwise, Twitter might respond with "duplicate status".
You will see the following error:
* About to connect() to api.twitter.com port 443 (#0)
*   Trying 199.59.149.199...
* Connected to api.twitter.com (199.59.149.199) port 443 (#0)
* error reading ca cert file /etc/ssl/certs/ca-certificates.crt (Error while reading file.)
* Closing connection 0
curl: (77) Problem with the SSL CA cert (path? access rights?)
There is no CA certification installed on your Intel Galileo. Twitter requires your code to trust in G2 and G3 root certificated provided by VeriSign. For more information, check out https://dev.twitter.com/docs/security/using-ssl.
To follow all the procedures to have the certificates in your Intel Galileo board, you instead must include the -k option in the curl command generated by the OAuth tool. This makes the curl command process insecure SSL connections, thereby allowing you to execute curl and avoid any certificates.
After you install the certificates or use -k in the curl command, you’ll be able to tweet directly from your Intel Galileo terminal shell.
Step 3: Creating a Script to Post on Twitter with Intel Galileo
If you read the “Important” information provided after you compute the OAuth signing results as shown in Figure 6-14, you will see the following phrase: "This is only valid for few minutes...".
It means the curl commands generated by this tool will not work indefinitely because they are based on the timestamp provided. In few minutes, the Twitter server will consider the command generated with "time out of bounds". This is the same error message presented when Intel Galileo uses the wrong time and date.
Therefore, before you run the scripts, make sure you have the date and time of your Intel Galileo board properly set, as explained in the section entitled “System and Hardware Clock”.
Once you have a Twitter account and the application’s tokens created, you can initiate a creation of your software. The method used in this chapter posted messages on Twitter, but you can create different methods if you understand the process.
Each step presented in the sequence might seem a little “hacking,” but they work and were developed after reading the documentation on https://dev.twitter.com/docs and participating in some of the Twitter discussions.
In order to understand the details, take a look Listing 6-1.
Listing 6-1. twitter.sh
#!/bin/bash
#
# POST MESSAGES ON TWITTER
#
# part of this code was based in the discussion:
# https://dev.twitter.com/discussions/14460, info provided by
# https://dev.twitter.com/docs and small hacking observing
# the OAuth Signing Results provied by OAuth tool.
#

debug=1 # set 1 to debug messages

internet_ok=0
# checking for all internet connection except the loopback (lo)
for interface in $(ls /sys/class/net/ | grep -vi lo);
do
  #if there is any, the carrier must be "1"
  if [[ $(cat /sys/class/net/$interface/carrier 2>/dev/null) = 1 ]]; then
      internet_ok=1;
      break;
  fi
done

if [ $internet_ok = 0 ]; then
      echo "ERROR: No internet connection"
      exit 1
fi

consumer_key=$1
consumer_secret=$2
oauth_token=$3
oauth_secret=$4

message=$(echo -n $5|sed -e "s: :+:g"| sed -e s':!:%21:g')
message_special_space_cases=$(echo -n $5|sed -e "s: :%2520:g"|sed -e "s:!:%2521:g")

#nonce evaluation
timestamp=`date +%s`
nonce=`date +%s%T555555555 | openssl base64 | sed -e s'/[+=/]//g'`

#POST regular format
signature_base_string="POST&https%3A%2F%2Fapi.twitter.com%2F1.1%2Fstatuses%2Fupdate.json&display_coordinates%3Dfalse%26oauth_consumer_key%3D${consumer_key}%26oauth_nonce%3D${nonce}%26oauth_signature_method%3DHMAC-SHA1%26oauth_timestamp%3D${timestamp}%26oauth_token%3D${oauth_token}%26oauth_version%3D1.0%26status%3D${message_special_space_cases}"

#only add both
signature_key="${consumer_secret}&${oauth_secret}"

#oauth_signature
oauth_signature=`echo -n ${signature_base_string} | openssl dgst -sha1 -binary -hmac ${signature_key} | openssl base64 | sed -e s':+:%2B:' -e s':/:%2F:' -e s':=:%3D:'`

#the message header
header="Authorization: OAuth oauth_consumer_key="${consumer_key}", oauth_nonce="${nonce}", oauth_signature="${oauth_signature}", oauth_signature_method="HMAC-SHA1", oauth_timestamp="${timestamp}", oauth_token="${oauth_token}", oauth_version="1.0""

if [ $debug = 1 ] ; then

  echo -e "
message:"$message
  echo -e "
message spaces:"$message_special_space_cases
  echo -e "
once:"$nonce
  echo -e "
signature_base_string:"$signature_base_string
  echo -e "
oauth_signature:"$oauth_signature

fi

curl --request "POST" "https://api.twitter.com/1.1/statuses/update.json" --data "display_coordinates=false&status=${message}" --header "${header}" -k
The first part of the script checks if there is an Internet connection available. This chapter is using a WiFi mPCIe module, but the system could use any other interface like Ethernet.
Thus, it is necessary to check if there is an Internet connection present, independent of interface used. The following snippet of bash code is responsible for this task:
internet_ok=0
# checking for all internet connection except the loopback (lo)
for interface in $(ls /sys/class/net/ | grep -vi lo);
do
  #if there is any, the carrier must be "1"
  if [[ $(cat /sys/class/net/$interface/carrier 2>/dev/null) = 1 ]]; then
      internet_ok=1;
      break;
  fi
done

if [ $internet_ok = 0 ]; then
      echo "ERROR: No internet connection"
      exit 1
fi
So basically, this code searches all the interface drivers, looking if at least one interface has a connection available (it checks for the number 1 in the carrier file). Note the loopback interface lo is not considered. It is eliminated from the search by grep -vi lo because it is the only loopback interface for the 127.0.0.1 address.
Depending on the kernel version used, when the cat command is used to check the carrier file, it might return an error like cat: read error: Invalid argument if the interface is down. In order to make the code reusable in a different Linux kernel version and patches, if the interface is down and cat returns an error during the reading, the stdout redirects this error to a null device (/dev/null).
The next part formats the timestamp according to the Twitter server, evaluates the nonce, changes some specific characters in the text message, assembles the signature base and signature key, assembles the header, and finally sends the request to the Twitter server.
The consumer key, consumer secret, OAuth token, and OAuth secret code are passed as arguments to the script:
consumer_key=$1
consumer_secret=$2
oauth_token=$3
oauth_secret=$4
Some characters used in the text message must be converted. The signature base string and the messages used in the curl command receive different conversions. Two variables were created to hold each of them—message and message_special_space_cases.
message=$(echo -n $5|sed -e "s: :+:g"| sed -e s':!:%21:g')
message_special_space_cases=$(echo -n $5|sed -e "s: :%2520:g"|sed -e "s:!:%2521:g")
If you tweet text messages with space characters, these must be replaced by the + character in the curl command and by %2520 in the signature base string. Other characters must be considered as well. For example, the character ! must be replaced by %21 in the curl command and by %2521 in the signature base string. The character : must be replaced by %3A and %253A.
You might wonder where you get these conversions. The simple answer is using the OAuth tool! You can see how each character used in the text messages was replaced in the signature base string and curl command in Figure 6-14. This script supported alphabetic characters, spaces, !, and :, covering most common characters used to tweet simple text messages. However, if you need special characters, you need to change the script as explained.
To determine how characters are converted, use the OAuth tool and observe how each character was replaced by comparing the new string to your original text message.
The timestamp must be the number of seconds since 00:00:00 1970-01-01 UTC and to do this, the command date with the %s argument is used. The OAuth nonce is the timestamp with hours, minutes, seconds, and nanoseconds. However, in base64 the +, =, and / characters are removed from the string.
timestamp=`date +%s`
nonce=`date +%s%T555555555 | openssl base64 | sed -e s'/[+=/]//g'`
The signature base string is only a copy of string generated by the OAuth tool.
The next step is the generation of signature_key. This is only a junction of the consumer secret code with the OAuth secret code. However, this variable is used to generate the OAuth signature using sha1 algorithm, converting to base64, and replacing some characters like + with %2B, with %2F, and = with %3D.
signature_key="${consumer_secret}&${oauth_secret}"

#oauth_signature
oauth_signature=`echo -n ${signature_base_string} | openssl dgst -sha1 -binary -hmac ${signature_key} | openssl base64 | sed -e s':+:%2B:' -e s':/:%2F:' -e s':=:%3D:'`
At this point you have all the elements you need to assemble the message header and to assemble the curl command. Note that the curl command used in the script removed the option called --verbose and added -k so that Intel Galileo didn’t need the CA certificate to be installed.
#the message header
header="Authorization: OAuth oauth_consumer_key="${consumer_key}", oauth_nonce="${nonce}", oauth_signature="${oauth_signature}", oauth_signature_method="HMAC-SHA1", oauth_timestamp="${timestamp}", oauth_token="${oauth_token}", oauth_version="1.0""

curl --request "POST" "https://api.twitter.com/1.1/statuses/update.json" --data "display_coordinates=false&status=${message}" --header "${header}" -k
If you have the certificates installed in your board and you want to connect to Twitter securely, remove the -k option of the curl command from the script.
Step 4: Creating a Sketch that Tweets
Finally, you need to create a sketch that interacts with the script. Take a look Listing 6-2.
Listing 6-2. twitter_sketch.ino
#include <unistd.h>
#include <stdio.h>
#include <stdlib.h>
#include <sys/wait.h>

char cmd_rsp[256];

/* Add your consumer and OAuth string codes here */
String consumer_key="";
String consumer_secret="";
String oauth_token="";
String oauth_secret="";

/* this is the name of the script in the target
   you need to push this script to the target before you run this software */
String script_name = ". /home/root/twitter.sh ";

/* prototype */
boolean post(String message);

void setup() {

  Serial.begin(115200);

  delay(3000);  // just a delay to allow you to see the serial monitor messages
               // you can remove this delay

  String message="TWEETING!!!";
  post(message);

}

void loop() {
  delay(100);
}

boolean post(String message)
{

  boolean result = true;

  String command = script_name;

  command += consumer_key;
  command += " ";

  command += consumer_secret;
  command += " ";

  command += oauth_token;
  command += " ";

  command += oauth_secret;
  command += " ";

  command += "'";
  command += message;
  command += "'";

   // buffer to be used with popen
   char cmd_char[1024];

   // clear message buffer
   memset((void *)cmd_char, sizeof(cmd_char), 0);

   // convert the message to char array
   command.toCharArray(cmd_char, sizeof(cmd_char), 0);

   Serial.println(cmd_char);

   FILE *fpipe;

   if ( !(fpipe = (FILE*)popen((char *)cmd_char,"r")) )
      {  // If fpipe is NULL
      Serial.println("Problems with pipe");
      result = false;

   }
   else
   {

     while ( fgets( cmd_rsp, sizeof(cmd_rsp), fpipe)) {}

     pclose(fpipe);

     // checking for errors
     if ((strstr(cmd_rsp, "{"errors":[{"message"") != NULL) ||
         (strstr(cmd_rsp, "ERROR: No internet connection") != NULL))
     {
        Serial.println("OPS!!! ERROR!!");
        Serial.println(cmd_rsp);
        result = false;
     }
     else
     {
        Serial.println("POSTED WITH SUCCESS!");
        Serial.println(cmd_rsp);
     }
   }

   return result;
}
The code is pretty simple. You just need to define your consumer key, consumer secret, OAuth token, and OAuth secret, represented in Figure 6-10, and include them at the beginning of the code:
/* Add your consumer and OAuth string codes here */
String consumer_key="";
String consumer_secret="";
String oauth_token="";
String oauth_secret="";
Define your text message and call the post() function. Note that the post() function calls the script using popen(), which is responsible for calling the scripts passing the consumer, OAuth string codes, and the text message. It opens a pipe between the sketch and the script, therefore allowing you to read the curl command string responses using fgets().
The fact curl command returns a string or explains why the system() function was not called once this system() function returns only integers.
If you want to see the command response as the command executed by the sketch, you can open the serial console (Ctrl+Shift+M) because you have some debug messages in the sketch, as shown in Figure 6-15.
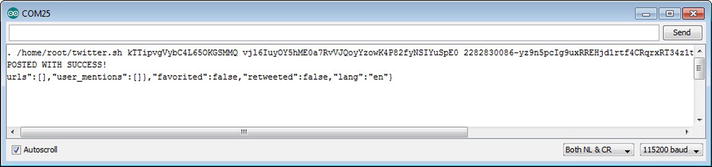
Figure 6-15. Debug messages from the serial console after a tweet
Ideas for Improving the Project
This chapter described how to post messages on Twitter and also explained how to create your Twitter application and successfully communicate with the Twitter server.
The next sections explains how to improve the code presented and include some ideas for how to integrate this code into other projects.
Flowers and Plants Communicating with You on a Social Network
One example is to integrate this chapter’s code with the code used in Chapter 8. The idea is, if each sensor corresponds to a plant and the sensor detects when the plants need water, each plant can tweet messages asking for water.
You can find the example by searching for soil_moisture_with_twitter.ino.
The integration is very simple. There is a function called should_post_today() that determines, using regular C functions, whether the day has changed. If the day has changed, that means the system must tweet for each sensor if the plants need water.
boolean should_post_today(int * day)
{

  boolean mustTweet = false;
  time_t rawtime;
  struct tm *timeinfo;

  time ( &rawtime );
  timeinfo = localtime ( &rawtime );

  if (old_day[current_sensor] == 0) old_day[current_sensor] = timeinfo->tm_mday;

  if (old_day[current_sensor] != timeinfo->tm_mday)
  {
     old_day[current_sensor] = timeinfo->tm_mday;
     mustTweet = true;
  }

  if (day != NULL) *day = timeinfo->tm_mday;

  return mustTweet;
}
The code changes required in the loop() function are also very simple, as you can see in Listing 6-3.
Listing 6-3. soil_moisture_with_twitter.ino
void loop() {

  int day;

  // reading the button state
  checkButtonState();

  if( button_state != lastButtonState)
   {
      // button pressed
      current_sensor++;
      if (current_sensor > 1) current_sensor = 0;
  }

  // reading the sensor
  switch (current_sensor)
  {
      case 0:
          sensor_value = analogRead(ANALOG_MOISTURE_SENSOR_1);

          // first sensor - one LED ON
          digitalWrite(PIN_RIGHT_EYE, HIGH);
          digitalWrite(PIN_LEFT_EYE, LOW);

      break;

      case 1:
          sensor_value = analogRead(ANALOG_MOISTURE_SENSOR_2);

          // second sensor - two LEDs ON
          digitalWrite(PIN_RIGHT_EYE, HIGH);
          digitalWrite(PIN_LEFT_EYE, HIGH);

      break;
  }

  switch (current_sensor)
  {
    case 0: plant_name = "orquidea";
    break;

    case 1: plant_name = "sunflower";
    break;

    default:
        Serial.println("There is an error in your logic!");
    break;

  }

  if (DEBUG)
  {
      Serial.print("current_sensor:");
      Serial.println(current_sensor);

      Serial.print("   sensor_value:");
      Serial.println(sensor_value);
  }

  if (sensor_value >=SOIL_IS_GOOD)
  {
     drawMatrix(array_happy_face);
     if (should_post_today(&day))
     {
        char strDay[2];
        sprintf(strDay, "%d", day);

        message = "This is ";
        message += plant_name;
        message += " I am ok thanks! Day:";
        message += strDay;
        post(message);
     }
  }
  else
  {
     drawMatrix(array_sad_face);
     if (should_post_today(&day))
     {
        char strDay[2];
        sprintf(strDay, "%d", day);

        message = "This is ";
        message += plant_name;
        message += " HEY! I NEED WATER! Day:";
        message += strDay;
        post(message);
     }

  }

}
Summary
This chapter walked step-by-step through how to create a Twitter application and how to integrate with Intel Galileo in order to tweet messages using simple sketches.
It also discussed the integration of bash scripts and how to use the popen instructions to parse string responses from the web, along with how to avoid using simple and poor system call instructions. You also read about how RTC (Real Time Clock) works, how to set up the time, and how to connect a battery coin to your Intel Galileo boards.